
Ree Drummond's Blog, page 69
September 2, 2011
Pam's Pie Tutorial!
 The following tutorial is from the wonderful Pam Regentin who graced the Lodge with her presence a couple of weekends ago for a pie workshop. Pam inspired everyone in attendance with her pie talents and has now compiled her best instruction and tips for the perfect pie crust. Follow her directions below…and you'll be a pie making queen in no time! (Or king, if that suits you better.)
Thank you, Pam!
PIE TUTORIAL
Pie, that icon of American desserts, is a mystery to many people. What makes pie crust flaky? How can the dough be rolled and formed without sticking or tearing? It's a shame that pie crust, something with only a few simple ingredients, can cause such fear and trembling in the home baker.
Two crust pie used to be ubiquitous on family tables. Whether sweet or savory, pie was a traditional food easily found and universally enjoyed. Why is it becoming so hard these days to find delicious, well-made two crust pie? Our all-American pastry pie has become a victim in our modern times with the focus on convenience foods and the exodus of home cooks out of the kitchen. Carefully hand-crafted pies have been replaced by factory processed imitations. Fewer and fewer pie makers, the keepers of the pie crafting secrets, are around to pass on the tradition of creating two crust pie. I hope to see a revival of this craft and want to share what I know to further that end.
Traditional two crust pie is so much more than a recipe. Pie making is a method. Flour, fat and water must be blended in a just-right combination, using particular techniques to achieve a flaky, tender crust that can encase a myriad of different fillings. Though it sounds mysterious, it truly is not. Once the structure of a good pie dough is understood, the making of it becomes much simpler.
Pastry dough should be sturdy enough to hold a filling but tender enough when baked to melt on the tongue with delicate flakes of crust. This is achieved when the flour and fat are in the right ratio with each other. The ratio I use is 2.5 parts flour to 1 part fat. An addition of salt and sugar for flavor and water to form structural gluten with the flour and you have the building blocks of a good pie crust. It is important for the flour and the fat to be incorporated together in a way that when the dough is rolled out, the bits of fat become stretched out between layers of glutenous flour. When the fat melts during baking, it leaves the spaces between the flour structures…voila! Flakiness!
FATS
 So let's consider fats. Any kind of fat, solid or liquid, can and has been used to make pie crust. They each have their pros and cons. For the sake of brevity I will tell you what I use and why I use them.
Lard
Lard has always been considered the premier fat for producing the best pastries. These days lard has an undeserved bad reputation. The fact is, it is a natural fat that has been eaten in many cultures, all over the world since the beginning of time. Lard is mostly monounsaturated fat and also has 10% polyunsaturated fatty acids. It is also a rich source of vitamin D. Leaf lard is a premium lard, harvested from the kidneys of the pig and has a mild flavor. Chefs everywhere recognize the virtues of lard for baking and cooking.
Unfortunately most lard available in grocery stores has been altered by hydrogenization and adulterated with preservatives. The only health building lard is produced by artisan farmers who make pure lard that must be refrigerated or frozen for storage. It is well worth the effort to seek out sources for this valuable cooking fat.
Butter
Butter is also a natural fat, rich in fat-soluble vitamins A, D, E and K as well as important trace minerals. It also has an undeserved reputation as being unhealthy when the reality is that it is a healthy, natural fat. There are many articles available that bear this up. Recent studies have shown that saturated fats like butter have no link to increased risk of heart disease. Good quality butter will give a pastry crust a rich flavor unparalleled by any other fat. It is not as flaky and tender as lard so if I want a really tender crust I will substitute lard for some of the butter in the recipe.
It is for these reasons that I choose butter and leaf lard for all my pastry crusts. I no longer use any man-made fats because they are all hydrogenated and processed with chemicals that are both unhealthy for me and my family and will leave unsavory flavors in my finished pie. Our pie fats taste test helped us see how the natural flavors of butter and leaf lard were superior to the laboratory produced, artificial flavors of man-made fats.

My Recipe for the Perfect Pie Crust
This is the recipe I use. I didn't invent it. It can be found in many places and is as old as the hills. Keep in mind that the fat in the recipe can be any kind. Butter or a butter/lard combination can be substituted in any recipe that calls for shortening or other manufactured fat.
This is my go-to recipe for a flaky, beautiful two crust pie. Any time that I want a more sturdy crust, like when making a slab pie or a tart, I will use all butter for a total of one cup per recipe.
For a nine inch, two crust pie:
2 ½ cups all purpose or pastry flour
1 teaspoon salt
1 teaspoon to 1 tablespoon sugar (for a fruit pie. Omit sugar for a savory pie.)
¾ cup cold butter, cut into chunks
¼ cup cold leaf lard, cut into chunks
¼ cup cold water
 Mix the 2 cups of the flour, salt and sugar together lightly in a mixing bowl or in the bowl of a food processor.
 Add the butter and lard chunks and cut into the flour using a pastry cutter or by pulsing the food processor. The mixture should look like large crumbs and begin to cling together in clumps. Add the remaining ½ cup of flour and mix lightly or pulse the processor two or three times.
 Do not over mix this flour. It should coat the clumps.
 Sprinkle the water over the dough and with hands or a wooden spoon mix in until dough holds together.
 Shape the dough into two discs.
Rolling Technique
A traditional method of rolling dough is to flour the rolling surface, the rolling pin and the dough itself. As soon as the dough begins to get sticky, more flour is liberally rained on the surfaces, continually, until the pie circle is complete. The problem with this method, especially for beginners, is that it is very easy to cause too much flour to be absorbed into the dough, upsetting the delicate balance of flour and fat. When too much flour has been added, the dough becomes dry and difficult to handle. The final baked crust will also be tough and dry. This is what causes so many to give up on pie crust!
 The parchment paper technique is what changed my pie making from hair pulling sessions of frustration to successful pie crafting. I have taught this technique to men, women and children with continued success. It is a great joy for me to see someone who has never made a pie or has had limited success with creating pie achieve their goal of a beautiful pie by using this simple method. Using two pieces of parchment paper (or wax paper in a pinch) the dough can be rolled without sticking and transferred to the pie dish without tearing. Because the ratio of flour and fat has been maintained, the baked crust is tender and delicious!
Magic Happens
Using two sheets of parchment paper that is at least twelve inches square each, place a disc of dough between them. (If the dough is sticky for any reason, don't worry. Just sprinkle some flour on the parchment to get started. You shouldn't have to add much and it will stop sticking.) Starting at the center roll the pin out to the edge. Turn the dough and parchment as necessary and continue rolling, always from the center to the outer edge. The goal is to have a circle shape that will be just slightly larger than the pie dish. After a couple rolls, lift the parchment paper away from the dough to loosen and replace the parchment. Flip the whole thing and loosen the other paper sheet. Continue rolling until the dough is about eleven inches in diameter for a nine inch pie dish.
 When the dough circle is the desired size (hover the pie pan over the dough to check if the dough circle is large enough) loosen both sheets of parchment by lifting them away and then replacing them on the dough. Keep one sheet of paper on the dough and use it to lift the dough and flip it into the pie dish. Take care to center the dough in the dish. Remove the paper.
 Carefully lift the edges of the dough and scoot the dough into the bottom corners of the dish. Try not to trap any air under the bottom crust.
This pie lined dish can go into the refrigerator while the top crust is rolled out in the same fashion with the parchment paper. Prepare the pie filling.
Assembling the Pie
 Even with pie filling, it is good to think in terms of method rather than recipe so that the baker can be flexible, using what is on hand and being creative. Fruits can be mixed (peaches and raspberries, apples and pears), sugar, thickener and spices can be adjusted as necessary. It is good to try to develop a baker's intuition. Pie making can be experimental while following basic guidelines.
For a fresh fruit filling of any type it is usually not necessary to use more than about ¾ cup of sugar and two rounded tablespoons of thickener for a nine inch pie. I prefer tapioca flour for thickener for its mild flavor but corn starch or white flour can also be used. The thickener can be decreased or increased according to the juiciness of the fruit, berries need more, apples may need less. Use enough fruit to fill the pie dish; six cups is usually enough.
 Mix the fruit, sugar and thickener together and put into the dough-lined pie dish.
 Dot the top with chunks of butter. I use lots, about four or five tablespoons. This adds a delicious richness to the pie juices. I also like to squeeze the juice of half a lemon over the pie filling to add sparkle to the flavor.
Roll out the top crust in the same way as the bottom crust between the parchment sheets. Loosen both sheets, remove one and use the other to transfer the dough onto the pie. Remove the parchment and gently press the dough onto the pie. Press the edges together lightly. Trim off excess dough on the edges so that there is about one inch extending around the pie. Pressing the two crusts together, roll them under and inside the rim of the pie dish.
 Flute the edges by pinching with fingers into a fancy pattern or simply use a fork like my grandmother always did. The idea is to seal the edges so the juices stay inside the pie while baking.
 Cut some slits in the pie with a knife to allow steam to escape. This helps prevent volcanic eruptions of bubbling juices. At this point I like to brush the top of the pie with an egg wash (one egg beaten with one tablespoon of water). This gives the pie a nice shiny glaze. Heavy cream brushed on also makes a nice brown crust.
Place your beautiful creation on a baking sheet and bake in a hot oven, 425 degrees, until the pie starts to brown, about 30 minutes. Cover the pie with foil to hinder more browning, turn the oven down to 375 and continue baking until the juices in the pie begin bubbling. Depending on the fruit used this could take twenty to forty minutes more. Be patient. As long as the pie crust is covered to prevent over-browning, the pie can continue to bake.
 When the pie is bubbly and golden brown, remove from the oven to cool. Do a little jig. Go ahead and make it the Happy Dance. You just made a gorgeous, flavorful pie that your grandma would be proud of.


August 31, 2011
Bananas Foster
 Those of you who've read my site for any length of time likely know that I hate, abhor, loathe, and recoil at the sight of bananas. I've disliked them my entire life, even when I was a baby. And I happen to believe that this is some sort of genetic aversion, as both my dad and one of my brothers share it, too. In my entire forty-two years on this earth, I've never eaten a whole banana. I've had accidental bites here and there, half of which were promptly spit out into a napkin. And while I did gobble down three pieces of some banana bread my mom made at my house a few years ago, I'm certain it was because I had just finished a no-carb diet and had a skewed sense of taste. It had never happened before, and it hasn't happened since.
Speaking of my mom's banana bread, it is the only recipe on my entire website that contains bananas. The only one. If someone has a bunch of bananas they need to do something with, they won't find a hundred different ideas here. There's no banana pudding, banana cake, banana cream pie, or banana muffins. I am unabashedly anti-banana. I wear it like a badge. It's part of my identity, along with being a redhead and someone who's never watched The Princess Bride or Groundhog Day.
But yesterday, I decided to step outside of my comfort zone, display a small measure of open-mindedness, and add another banana dish to my website. I want this to be a place where folks can find what they're looking for, and the cold, hard truth is that there are just a lot of folks out there that like bananas. That the dish contained butter, sugar, cream, and booze helped soften the blow a little bit. But all I knew was this: I was doing it for you guys, for the kind people who stop by and read The Pioneer Woman Cooks from time to time. I certainly wasn't doing it for myself. And by golly, the stuff wasn't going to touch my lips. This was a purely altruistic move.
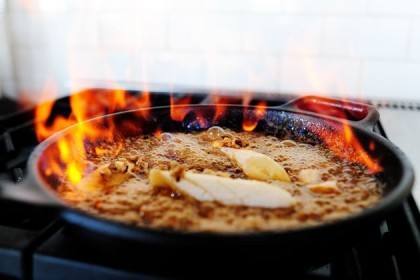
 Get this stuff and put it by the stove. Run and got the rum. Dark rum, not light. Slice the banana inside the peel so you won't have to touch it with your hands. The evil might melt your fingertips!
 Melt a stick of butter in a heavy skillet.
 Throw in a cup of dark brown sugar.
 Stir it around and cook it over medium heat until it bubbles.
 Pour in heavy cream. 1/2 to 3/4 cup is fine!
 Let it bubble and cook, and by the way: you could stop here and have a really simple, really quick caramel sauce for ice cream or apple pie. It's not a true caramel in the strict sense of the word, but…butter? Brown sugar? Cream? It's sorta divine.
 YUCK! Okay, sorry. Next, carefully peel back the banana peel and allow the (diagonal) slices to fall into the pan. You can do smaller/thinner slices, but that would mean that there'd be more little pieces of banana floating around the finished product, which might make me need to sit down and put my head between my knees.
 I seriously can't believe I'm doing this. What's happening to me?
 Next, throw in the chopped walnuts or pecans.
 These were straight out of the bag, and they were just fine.
 And now. This all moved very quickly; I'm sorry about the lack of pictorial steps. Carefully pour in the rum, shake the pan around just a bit, then–standing back a bit–pull the skillet toward you, then carefully tip it (only slightly) toward the burner so that the flame of the burner meets the fumes of the alcohol. This should cause it to ignite. You could also use a wand lighter if you don't want to tip the skillet. Just be careful, please.
 Let this flame for 30 seconds or so; it should go out on its own, but you can shake the pan gently to hasten this if you need to.
 After the flame goes out, turn off the burner…and look at this masterpiece. I don't care that there are demonic bananas in there! It's a gorgeous, bubbly pan of butter and sugar. Gorgeous!
 Sprinkle in a little cinnamon at the end and stir it to combine.
 Immediately serve it over vanilla ice cream. It helps to have the ice cream already dished up ahead of time so you don't have to stop and mess with it. (Just dish it up, then keep the bowls in the freezer until you need them.)
 Now, at this point, I was still doing this all for you. I had to dish it up, getting chunks of banana in there, so I could photograph the final dish and show that this was, indeed, Bananas Foster. But then it was going in the trash.
 Or, alternatively, I might–just might–stick the very tip of my pinkie in the sauce and take a small taste. And then, if I didn't detect any banana flavor, I might–just might–spoon a little of the sauce (but absolutely none of the banana) over a little ice cream.
But I wasn't making any promises.
 By the time I snapped the final photo, though, my ravenous appetite for sweets–particularly sweets involving a caramely sauce–took over. I decided to just taste the dessert straight from this bowl, for simplicity's sake. Surely I could avoid the big chunks of banana, right?
Here's what happened in a nutshell:
1. I took a bite of ice cream, making sure to get a bunch of sauce on the spoon. It was divine.
2. I repeated this step fourteen times.
3. Feeling strong, no doubt because the sudden volume of sugar that was pumping through my veins, I looked at one of the banana chunks in the bowl.
4. I remembered all the nightmares I'd had about bananas. In one of them, a large banana is chasing me with a machete.
5. I decided to take a bite anyway. I have no idea what got into me. It was this sudden urge to try something adventurous, something new.
6. I used my spoon to cut a small bite of a banana, making sure to get a lot of ice cream and sauce along with it.
7. I ate it.
8. I didn't die.
I have to say, it wasn't bad. There was so much other stuff going on, and the banana had cooked enough, that the flavor was actually very mild…and the texture wasn't as heinous as I imagined it would be. I tried a second bite, and it still wasn't that bad. Then I quit while I was ahead, removing the banana chunks from the bowl and scarfing down the rest of the ice cream and sauce, which was just too divine for words.
The verdict on the dessert: delicious. Note that you could use different fruits here: apples, peaches, etc. Note also that if you're uncomfortable lighting a pan on fire in your kitchen, you could easily just add the rum and cook the sauce for a couple of minutes without the flames. It would still be delicious! And you can serve the sauce over French toast, crepes, etc.–whatever floats your boat.
Enjoy this, guys. And to my fellow lifelong banana haters: don't worry. I'm still in your camp. But I'm glad I decided to take those two bites. It was a character building exercise.
Love,
P-Dub
Recipe: Bananas Foster
Prep Time: 1Minute
|
Cook Time: 5 Minutes
|
Difficulty: Easy
|
Servings: 6
Print Recipe
3"x5" Cards
4"x6" Cards
Full Page
Ingredients
1 stick Butter (salted)1 cup Packed Dark Brown Sugar1/2 cup (to 3/4 Cup) Heavy Cream1/2 cup Dark Rum2 whole Bananas, Sliced Diagonally Into Thick Slices1/2 cup Chopped Walnuts Or PecansDash Of Cinnamon Preparation Instructions
*Be careful with the open flame*
In a heavy skillet, melt butter over medium-high heat. Add brown sugar and stir together. Add cream and continue cooking, then stir in bananas and chopped walnuts. Mixture should be bubbly. (The steps so far should take less than 2 minutes; this is quick!)
Pour in rum and stir to combine. Carefully tip the skillet slightly toward the open flame of the burner to ignite the alcohol in the pan, then let the mixture flame for 30 seconds or so (it should go out on its own.) You can shake the pan a bit to get it to calm down. Remove from heat and stir in cinnamon.
Serve sauce immediately over vanilla ice cream or French toast. (Sauce does keep in the fridge, though. Delicious!)
* Note: You can omit the flame step altogether if you prefer. Just let the sauce cook for a minute or two--still utterly delicious!
Posted by Ree on August 31 2011

August 29, 2011
Uses for Pesto
 I'm on a pesto kick, no doubt because I sense that the day is drawing nearer when fresh basil won't be a daily thing for me. It's such a magical substance, that beautiful pesto stuff. It's one of the things that makes life worth living.
Here's how I make it:
 Add about a cup of basil leaves to a food processor or blender. Throw in grated Parmesan, pine nuts, garlic, salt, and pepper. Turn on the food processor and drizzle in enough olive oil to get it to the consistency you want.
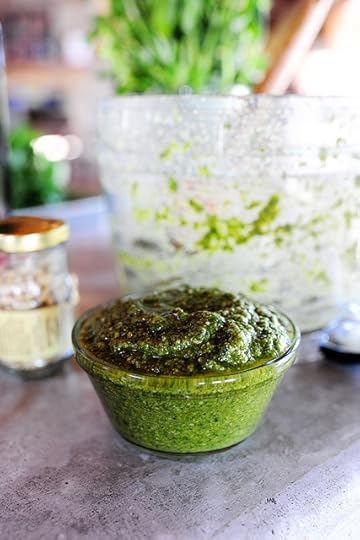 Done!
Done!
 Here's what I've done with pesto this summer:
* Used it as a pizza sauce: just spread it on the pizza crust as you would regular pizza sauce. Especially perfect with veggie pizza or chicken pizza. Yum.
* Stirred it into quiche filling. The quiche was filled with leeks, mushrooms, and Swiss cheese…a generous tablespoon of pesto completely transformed it.
* Mixed it with heavy cream and poured it over pasta a fresh tomatoes. A triumph.
* Stirred it into a chicken pasta salad: bowtie pasta, chicken chunks, lima beans, peas, carrots, corn, with a mayo/sour cream/half-and-half dressing. A generous addition of basil made it over-the-top irresistible.
* Mixed it with mayonnaise for a perfect panini spread. Grilled chicken. Tomato slices. Chopped olives. Pesto mayonnaise. And the girl was so, so happy.
* Added a generous amount to the sauce for my chicken parmigiana last night. A tablespoon wasn't enough. Two tablespoons wasn't enough. I think I wound up adding about 1/3 cup before it was all over…and the sauce was better than ever. I closed my eyes and gave thanks for basil.
That's all I've done this summer. So far.
Feel free to shout out your basil ideas, everyone! I'm making a bunch more this week.
Love,
P-Dub

August 26, 2011
The Orange Floral Mixer (Winners Announced)
The winners of the orange floral mixers are:
#337 Antoinette: "Tying down everything that could move and riding out the storm… intermingled with praying it passes quickly out to sea!"
#9895 Lindsay C. "No huge plans, meeting up with the parents and in-laws for some family time!"
Congrats, winners! Contact prizes@thepioneerwoman.com to claim your beautiful mixer.
 Many of you might remember this mixer?
 Yes, I watch too much American Chopper. Who wants to know?
 And I love the orange.
 I repeat: I watch too much American Chopper.
 I loved this scalloped edge. Lovely!
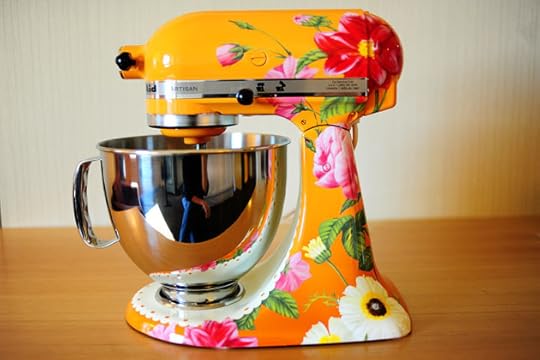 It's enough to make Paul Sr. and Paul Jr. sing praises of joy.
If you don't know who Paul Sr. and Jr. are…it's best if I don't explain it. I don't want you to get hooked, too. (The new season starts Monday! I have something new to live for.)
Today, because my husband's milking a wild cow tonight, because my cooking show starts tomorrow, and because I love ya, I'm giving away two (2) of these floral, bursting-with-color "PW Edition" KitchenAid mixers.
Yes, I watch too much American Chopper. Who wants to know?
TO ENTER
To enter this extra special giveaway, just answer the following question in the Comments section of this post:
"What are your weekend plans?"
Are you battening down the hatches for the coming storm? Going to the beach and reading a book? Cleaning out your kitchen junk drawers? Watching your husband milk a wild cow? Whatever your plans, just leave 'em in the Comments section of this post and you're automatically entered to win one of the special-edition mixers.
THE RULES
One entry per person, please.
No entries after noon Saturday.
Winners will be selected at random and announced Sunday night.
Good luck!
___________________________
Giveaway sponsored by Pioneer Woman. Beautiful, custom mixer designed by Nicole at Un Amore.

August 25, 2011
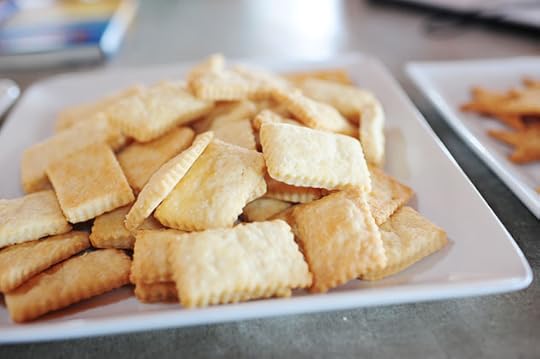
Pie Fats Revealed!
Many of you got these right! Here are the answers to the pie fat mystery post from yesterday.
FYI: Pam is writing up a tutorial about making the perfect crust. I'll post it here as soon as it's all ready. Thank you, Pam!
I'm keeping my original notes about each shape below, then will post the "answers" below each one.
 Star. Less-than-remarkable flavor and texture. A little bit of an unpleasant aftertaste. It was not a star.
STOREBOUGHT CRUST: It wasn't at all difficult to tell that this was the storebought crust; the texture, appearance, etc.
Rectangle. Almost cookie-like in texture; firm but nice and tender. Really good, yummy flavor. Loved this one.
BUTTER: Mmm. This sample was probably the yummiest, and once Pam revealed that it was made with all-butter, I understood why.
 Round. More of a fall-apart texture than previous two samples. But the flavor fell a little short. It wasn't bad, but didn't have that "Mmmmm" quality.
BUTTER-FLAVORED SHORTENING: The texture of this was really nice. It's just that after the butter sample, it just didn't quite measure up.
 Heart. Not a bad texture; it was on the flaky side. Flavor/aftertaste was blech, though. Definitely not as good as the rectangle or the round.
SHORTENING: I was surprised that this turned out to be the shortening sample, as I use a great pie crust recipe with all shortening and have always loved it. But compared to the crusts that had the butter flavor, I could definitely tell a difference. The texture was nice, though.
 Teardrop. Very pleasant flavor, but as you can see, extremely fine texture. It wasn't flaky; it was crumbly and fall-apart, almost like a fine sugar cookie. I didn't see how it could hold up as an entire pie crust.
LEAF LARD: Quite the product this leaf lard is! The samples really were delightful, but look at how crumbly the crust is. So light and tender and delicate!
WHAT DID PAM USE?
I'll let Pam explain in her post next week all the pros and cons of the different fats, and exactly when she uses what, but generally speaking, she chooses…
The all-butter option! Sometimes she does a mix of butter and leaf-lard, but it seems that all-butter is her go-to crust.
This has made me really dig deep within myself and reconsider everything I've ever understood about pie crust.
I love a friend that makes me think.

August 24, 2011
Pie Fats: A Comparison
 Pam, the teacher of last weekend's pie workshop, employed an interesting and effective method for demonstrating the use of different fats in pie crusts: she baked up a bunch of different crusts in different shapes, then had everyone taste each shape, write down their reaction to each shape, and try to guess which shape went with which fat.
See if you can figure out which is which!
THE FATS
Here were the fats Pam used:
* Butter
* Shortening
* Butter-flavored shortening
* Leaf lard (this is a specific kind of lard made from the kidneys of pigs)
* And finally: A storebought pie crust to throw everyone off (this was the easiest one to identify)
THE SAMPLES
Here were the samples, along with my own reaction to each one.
Star. Less-than-remarkable flavor and texture. A little bit of an unpleasant aftertaste. It was not a star.
Rectangle. Almost cookie-like in texture; firm but nice and tender. Really good, yummy flavor. Loved this one.
Round. More of a fall-apart texture than previous two samples. But the flavor fell a little short. It wasn't bad, but didn't have that "Mmmmm" quality.
Heart. Not a bad texture; it was on the flaky side. Flavor/aftertaste was blech, though. Definitely not as good as the rectangle or the round.
Teardrop. Very pleasant flavor, but as you can see, extremely fine texture. It wasn't flaky; it was crumbly and fall-apart, almost like a fine sugar cookie. I didn't see how it could hold up as an entire pie crust.
Which shape do you think goes with which fat?
I'll post answers here Thursday.

August 22, 2011
Pork Chops with Apples & Creamy Bacon Cheese Grits
 In a word: Yum. And that pretty much sums it up.
Honestly. I was trying to figure out what to say at the beginning of this recipe (which is actually two recipes in one) but there's just too much to cover. The grits alone will send you both into orbit and to confession.
And that's when you know something's really good.
Oh, and I was going to do a play on Peter Brady and call this Pork Chops and Apple Sauce (not applesauce; Apple Sauce) but I didn't want to feel that horrible feeling I've been feeling lately whenever I make a pop culture reference from the late sixties/early seventies and I'm met with crickets because the people around me are too young with dewy skin to know what I'm talking about. I've noticed it's happening more and more lately.
Whew. It's a good thing I didn't make the Peter Brady reference, isn't it?
Anyway, back to the dish: It was perfectly delicious in mid-August, it'll be even more so this fall. Flavorful, hearty, and oh, so satisfying. Let's make it together!
THE GRITS
 First, we'll make the unbelievably ridiculous grits, where ridiculous means miraculous. Chop up an onion.
 Cut several slices of regular bacon into 1/2-inch pieces.
 Saute the bacon for a couple of minutes to render some of the fat…
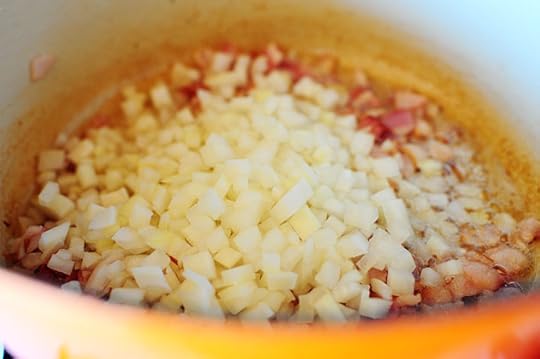 Then throw in the onions.
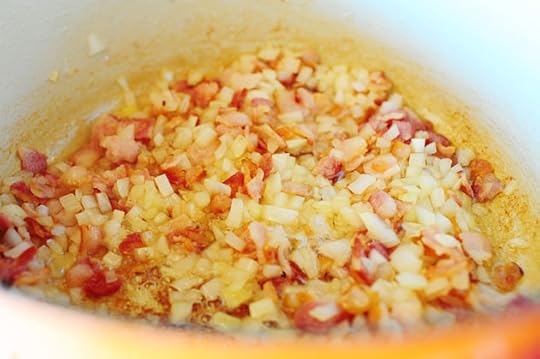 Stir this around and cook it for a few minutes over medium heat, until the onions are soft and the bacon is chewy but not crisp.
Your kitchen smells really good right now. This is normal.
 Now. I want you to look at these beautiful stone-ground grits. Helene brought them to me from Charleston on her recent trip to the Lodge for her macaron workshop, and I think they might be the most beautiful grits I've ever seen in my life.
They certainly make the cardboard cylinder of quick grits in my pantry feel a little silly right about now.
 Charleston grits. Find them. Cook them. Savor them. Soon.
And don't get me wrong, I love all grits. People in Charleston might disown me when I say this, but I'll eat quick grits any day of the week and eight times on Sunday.
But if I had these grits in front of me, I'd choose them first every time.
 To two cups of dry grits, add four cups of low sodium chicken broth and two cups of water.
 Bring it to a boil, then reduce to a simmer and cook, covered, for about 30 to 35 minutes, stirring to keep any from sticking to the bottom of the pot.
 WARNING: What you are about to see may shock you.
It certainly shocked me, and I'm the one that poured it in.
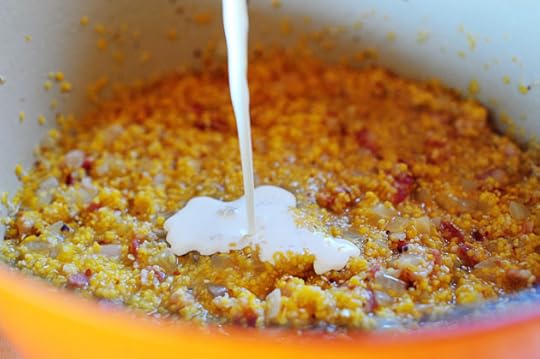 Add in a little heavy cream.
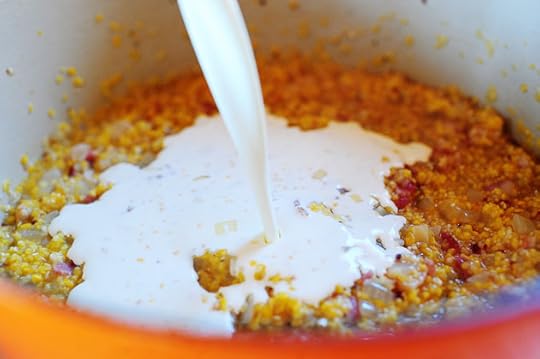 I mean a lot of heavy cream.
A Lot = Two Cups
 So basically, I'm out of control. But in a really good way! Now just cover the pot again and simmer on very low heat for 20 minutes, stirring occasionally. And watch during the cooking process to make sure the liquid level is okay; if the grits start to get low on liquid, just add in a little warm broth.
You simply won't believe how good these are going to be.
 Okay. We're getting close. Grits are slightly firm, but definitely ready.
The flavor. It's beyond imagining.
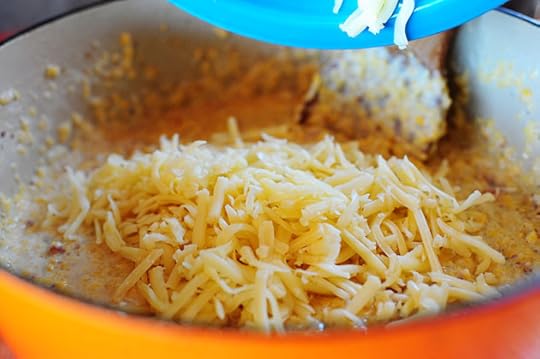 And that's when it's time to dump in the grated cheese. Monterey Jack, farmer's cheese…any creamy cheese will do.
 The good news is, these grits have bacon, cream, and cheese in them. The bad news is…these grits have bacon, cream and cheese in them.
But a little goes a long way!
Okay, stick the lid on the grits and just keep them warm. It's time to make the pork chops.
(A note about the grits: you really have to try them. They turn out just right. The stone ground grits are substantial enough to hold together and really keep their texture, even with all the cream and cheese.)
THE PORK CHOPS
 Start by chopping two apples: cut around the core…
 Then cut the pieces into strips and dice 'em up.
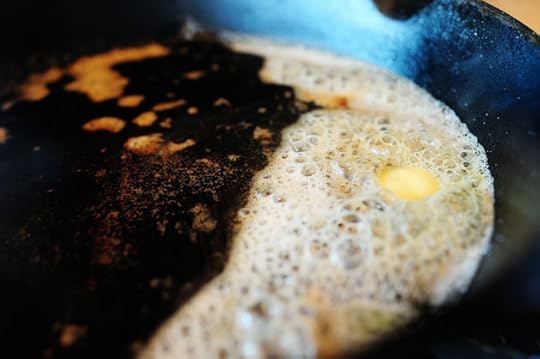
 Heat up a heavy skillet and melt a little butter with some olive oil.
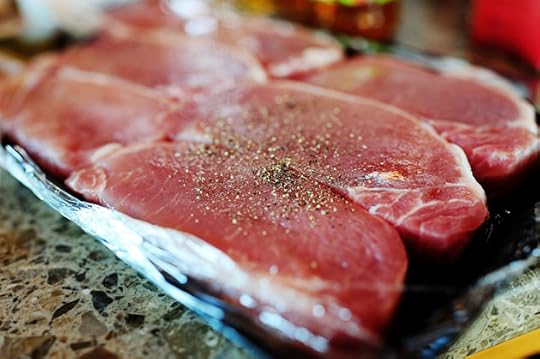 Salt and pepper some boneless pork chops. Not too thick, not too thin. Right in the middle.
 Place them into the hot butter/oil.
 Saute them until golden brown on both sides.
 This'll take about 2 minutes per side, then you just need to remove them from the pan and set 'em on a plate.
Then–this is very, very important–you need to go eat four spoonfuls of grits.
Go ahead. You have time.
 When you return from the grit-fest, throw the diced apples into the skillet.
 Stir 'em around for a minute and start the cooking process…
 Then pour in some white wine…
 And some red wine vinegar.
 Let it bubble and cook for a couple of minutes, allowing the liquid to reduce by about half.
While this is happening, give the grits another taste to make sure they're not poisonous.
You owe it to your loved ones.
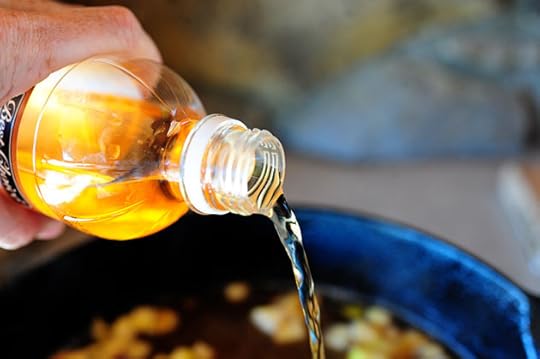
 Next, reduce the heat a bit and pour in some real maple syrup.
 Mmmm. Immediately smells divine.
 Let this bubble up and cook for a minute or two. Add a dash of salt.
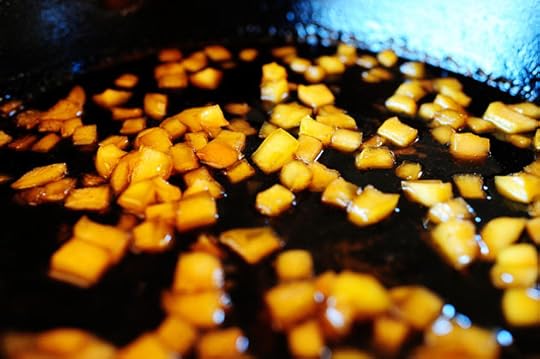 Then turn down the heat…
 And slide in the pork chops, making sure to get all the juices from the plate.
Never leave the juices on the plate.
Never, ever, EVER!
 Work the apples around the chops a bit, getting them as "submerged" in the cooking liquid as possible. Then just cover the skillet and let this simmer for another 10-20 minutes.
Now, obviously, you can overlap the cooking of the grits and the cooking of the pork chops. I showed the two recipes separately to make it simpler, but I was overlapping the heck out of them.
TO SERVE
 To serve up this luscious ridiculousness (ridiculous lusciousness? I'm starting to lose track), grab a big spoonful of grits.
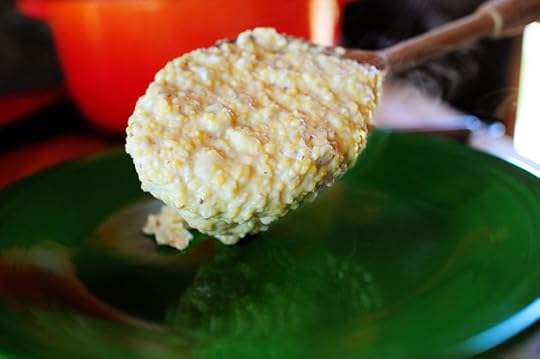 (Look at that beautiful texture. Cain't get that with quick grits. Remind me I said that next time I break out the cardboard cylinder, okay?)
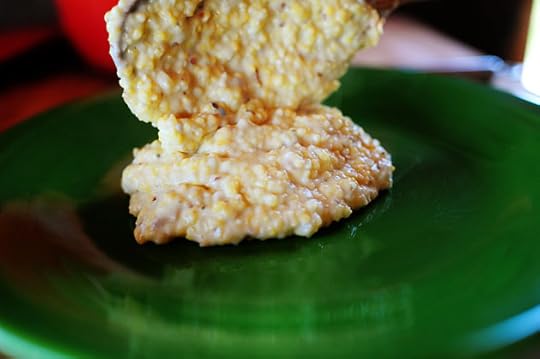 Spoon the grits onto a plate…
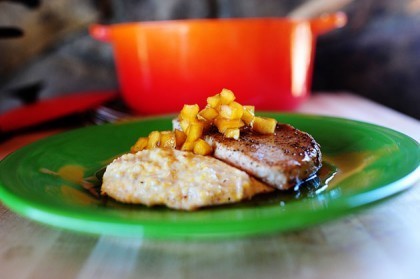
 Then lay a pork chop onto the grits and spoon plenty of apples onto the plate, along with some of the sauce.
 Look at that. Beautiful. And so flavorful and special and satisfying. And the pork chops and apple-maple sauce would be delicious on mashed potatoes or buttered egg noodles, of course. But with these grits?
These grits.
THESE…GRITS!
Make this meal soon, my friends. You'll absolutely love it.
Recipe: Pork Chops with Apples and Creamy Bacon Cheese Grits
Prep Time: 5 Minutes
|
Cook Time: 25 Minutes
|
Difficulty: Easy
|
Servings: 6
Print Recipe
3"x5" Cards
4"x6" Cards
Full Page
Ingredients
6 whole Boneless Pork Chops, About 1/2-inch Thick2 Tablespoons Olive Oil2 Tablespoons Butter2 whole Gala Apples, Diced1/2 cup Dry White Wine2 teaspoons Apple Cider Vinegar3/4 cups Pure Maple SyrupDash Of SaltFreshly Ground Black PepperCreamy Bacon-Cheese Grits (separate Tasty Kitchen Recipe) Preparation Instructions
Heat a large, heavy skillet over medium-high heat. Add olive oil and butter and heat until butter in melted.
Salt and pepper both sides of pork chops. Brown them on both sides until nice and golden. Remove pork chops from the skillet and set on a separate plate.
Reduce heat to medium. Add apples and stir to combine. Pour in wine and vinegar, then whisk along the bottom of the pan to deglaze. Cook until liquid is reduced by half, about 5 minutes. Pour in maple syrup, then add a dash of salt and pepper. Stir, then return pork chops to the pan. Cover and simmer on low for 20 minutes.
Serve pork chop on a generous helping of Creamy Cheese Grits (mashed potatoes are good, too) and spoon the apple-maple sauce over the top, allowing the liquid to drip over the grits.
Posted by Ree on August 21 2011

August 19, 2011
Pot Giveaway (Winners Announced)
(Note: The original giveaway was for one pot, but because of the response, I'm selecting an additional winner.)
The winners of the kiwi Le Creuset pot are:
#37949 Andrea R.: "Domestic triage, there is always laundry, and Sunday Brunch with a couple of girlfriends. I live for the weekends, and fantasize hourly about winning the lottery so every day can be Saturday."
#33497 Mary C. "Our weekend will involve staying inside with the air conditioning. This Texas heat is relentless."
Congratulations, winners! Contact prizes@thepioneerwoman.com to claim your pots.
Thank you for sharing your weekend plans, everyone!
*******************
Today…
Because it's Friday…
Because Charlie's asleep on the sofa next to me and he's sawing some serious logs…
Because a blessed thunderstorm is headed our way…
And because I love ya…
 I'm giving away this 7 1/4 Quart Round French Oven in this lovely "Kiwi" color.
I love this color.
But I really, really love this pot.
TO ENTER
To enter the contest, just answer the following question in the Comments section of this post:
What are your weekend plans?
Summer is starting to wind down, and kids are gearing up for school. What are your plans this weekend? Are you headed to the beach? Doing some house cleaning? Going to see a movie? Crawling under your covers and sleeping? Just shout out your weekend plans and you're automatically entered to win one of the pretty (but more importantly, awesomely functional) Le Creusets.
THE RULES
One entry per person, please. Strictly enforced with a wooden spoon, a whisk, and can opener.
No entries after noon Saturday.
Winners will be chosen randomly and announced Saturday evening.
Good luck!
____________________________________
Giveaway is like, totally sponsored by Pioneer Woman, with cooperation from CHEFS Catalog. Le Creuset has never heard of me. I could take a long walk off a short pier tomorrow and Le Creuset would ever know. I just love their pots, man. Over and out.

Pot Giveaway
Today…
Because it's Friday…
Because Charlie's asleep on the sofa next to me and he's sawing some serious logs…
Because a blessed thunderstorm is headed our way…
And because I love ya…
I'm giving away this 7 1/4 Quart Round French Oven in this lovely "Kiwi" color.
I love this color.
But I really, really love this pot.
TO ENTER
To enter the contest, just answer the following question in the Comments section of this post:
What are your weekend plans?
Summer is starting to wind down, and kids are gearing up for school. What are your plans this weekend? Are you headed to the beach? Doing some house cleaning? Going to see a movie? Crawling under your covers and sleeping? Just shout out your weekend plans and you're automatically entered to win one of the pretty (but more importantly, awesomely functional) Le Creusets.
THE RULES
One entry per person, please. Strictly enforced with a wooden spoon, a whisk, and can opener.
No entries after noon Saturday.
Winners will be chosen randomly and announced Saturday evening.
Good luck!
____________________________________
Giveaway is like, totally sponsored by Pioneer Woman, with cooperation from CHEFS Catalog. Le Creuset has never heard of me. I could take a long walk off a short pier tomorrow and Le Creuset would ever know. I just love their pots, man. Over and out.
August 18, 2011
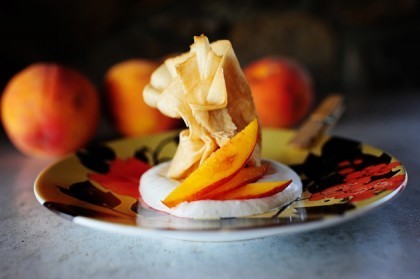
Quick-and-Easy Peach Parcels
 These are really fun. Fancy. And they take ten minutes to make.
 Warning: I used storebought crepes! If you're a crepe person, you can make your own and they'd probably be even better. But to keep this dessert in the throw-together category of your life, you must use storebought ones. Melissa will really appreciate it.
Who is Melissa, anyway? Is she friends with Sara Lee? Is she related to Ann Taylor?
These are the questions that keep me up at night.
 Halve a peach.
By the way, you might notice that I'm on a bit of a peach kick. If so, your observation is correct. I'm on a peach kick. But there's a really, really good reason for that:
I love peaches.
 Cut each peach into 6 to 8 slices, then cut each slice in half to create chunks.
 Throw a little softened butter into a bowl…
 Then throw in some brown sugar.
Brown sugar. Good.
(Okay, I have to say it. I discovered The Hulk on Twitter, and I'm enjoying it a little too much. He shouts a lot.)
BROWN SUGAR! GOOD!
I keep forwarding Hulk tweets to my kid sister Betsy and she's not really that amused.
But I am.
 Then add a little bit of vanilla…and a little peach schnaaps, but only if you want to! Then stir it up until it's nice and smooth.
 Next, grab a crepe. They dry out very, very quickly, so just remove them from the package one at a time. And don't, like, take a phone break or anything. Drop on a chunk of peach, then a big drop of the buttery/sugary/vanilla mixture.
 Gather up the sides of the crepe so that it creates a little parcel…or bundle…or purse. Then just clip it together with a clothespin!
I tell you what–the world's just gone crazy. All this high-tech equipment!
 Place them on a baking sheet–one with water spots would be preferred so I'll feel better about myself. Then just bake the little cuties for (Hulk alert. Brace yourself.) ONLY FOR ABOUT 3 TO 5 MINUTES, MAXIMUM. Seriously–I've burned these at 6 minutes, as the crepes are so delicate. And we're not concerned with the butter/sugar/peach caramelizing or baking or anything; it's just about warming up and melting.
 To serve to your guests, who will think you've slaved over something very complicated, just plop some freshly whipped (and a little lumpy) whipped cream in the middle of a plate.
 Use the handle of the clothespin to place the parcel right in the middle of the whipped cream, then remove the clothespin!
 I think clipping the clothespin on the plate is cute. And hokey. And cute. And hokey.
 Then just lay some thin little slivers of peach on the side in the fanciest pattern you can come up with, just to hide the crinkle the clothespin made. And you can even drizzle on a little storebought caramel sauce, just to finish it off. Yum.
And this took ten minutes. Ten. Goldarn. Minutes.
And it's good! Warm buttery, peach…crisp, flavorful crepe. Cute presentation. A cinch to throw together.
Even The Hulk would like it.
Enjoy!
Recipe: Quick-and-Easy Peach Parcels
Prep Time: 5 Minutes
|
Cook Time: 3 Minutes
|
Difficulty: Easy
|
Servings: 8
Print Recipe
3"x5" Cards
4"x6" Cards
Full Page
Ingredients
8 whole Storebought Crepes (I Used Melissa's Brand)1 whole Ripe Peach, Pitted And Cut Into Chunks3 Tablespoons Butter, Softened1/4 cup Brown Sugar1 teaspoon Vanilla Extract1 teaspoon Peach Schnaaps (optional)Freshly Whipped CreamSpecial Equipment: Clothespins Preparation Instructions
Preheat oven to 350 degrees.
In a bowl, mix together softened butter, brown sugar, vanilla, and peach schnaaps, if using.
Working one at a time, lay a crepe on a flat surface and place a couple of peach chunks in the middle. Spoon a little bit of the butter mixture on top of the peach chunks, then quickly gather the crepe into a "parcel." Secure with a clothespin.
Repeat with remaining crepes. Keep in mind that the crepes dry out very quickly, so just work with them one at a time. Don't worry if you experience a little crack or tear; they'll still be yummy.
Bake at 350 degrees for only 3 to 5 minutes, watching to make sure they don't burn. (Crepes burn very easily; keep an eye out!)
To serve, spoon whipped cream onto a plate. Set warm peach parcel in the middle of the whipped cream and garnish with little peach slices.
Very pretty/fancy...very little effort!
Posted by Ree on August 18 2011

Ree Drummond's Blog

- Ree Drummond's profile
- 2032 followers

