
Ree Drummond's Blog, page 70
August 15, 2011
Peach-Whiskey Barbecue Chicken
 Boy, oh boy. This was one good Sunday dinner.
In my next cookbook–the one I've been working on and am almost finished with and can no longer button my jeans because of–I have a delightful barbecue chicken recipe that's chock full of fresh peaches. It's divine. But it also takes a little longer to make. You have to halve the peaches. Remove the pits. Slice the peaches. Risk laceration injury. Who knew peaches could be so dangerous?
This is a much, much easier version—just chop, brown, and pour.
Oh, and stir.
Add add.
And cook in the oven.
But other than that, it's a cinch! And most importantly: you'll absolutely love it.
 Start with a bunch of chicken thighs. They're my life.
They're a goldarn miracle.
 Heat some olive oil and butter in a big ol' pot.
 Then, four at a time, put the chicken thighs in the pot skin side down.
 Brown them until golden, then flip 'em over and brown the other side.
 Remove them to a separate plate, then repeat with the rest of the chicken.
 After you pull out the last piece of chicken, pout off half the grease.
I'm all about making healthy choices, as you know.
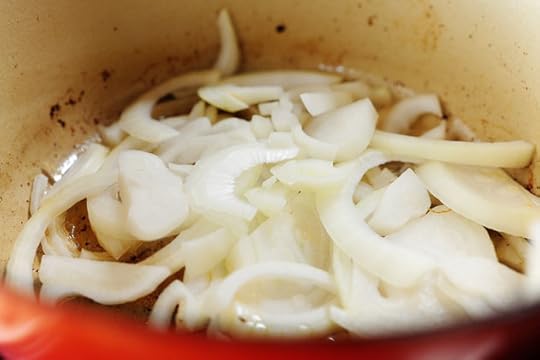
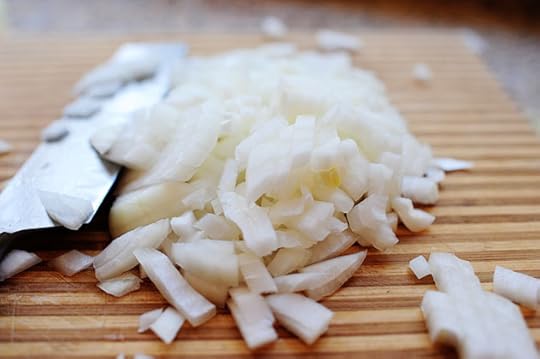 Chop up a whole onion…
 And throw it into the pot.
 Stir the onions around and cook them for a couple of minutes.
 And when they're golden brown and lovely, grab the Jack Daniels (or any other whiskey) from your bedside table.
 Pour in a bunch.
 Smells like booze! Stir this around and cook it for a couple of minutes, allowing it to bubble and reduce just a little bit.
 Next, pour in a bottle of your favorite barbecue sauce.
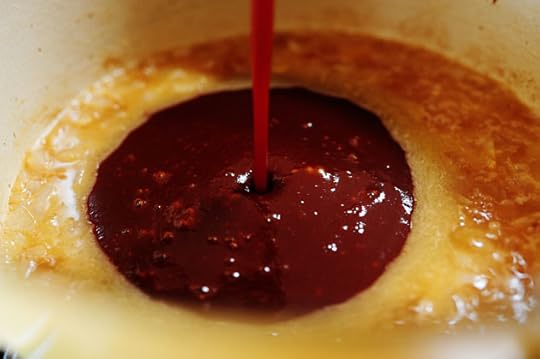 Art. Pure art.
 Next, grab some peach preserves.
 And *glug-glug-PLOP* Throw in the whole jar.
 Then fill the jar about halfway full with water.
 Shake it up to loosen all the leftover bits stuck in the jar.
And by the way, do you have any idea how difficult it is to hold a camera in your right hand and take a photo of yourself shaking something in your left hand? It's actually next to impossible, from a brain synapse standpoint. You know that whole rub-your-tummy-scratch-your-head thing? Exactly like that, only more humiliating because you're taking a photo of it happening.
 Then pour in the water. And really, it's not necessary to shake the water in the jar. Just a little tip if you don't like to waste.
 Next, throw in some Worcestershire…
 Oh! And throw in some garlic cloves. It just…it just feels right.
Pruny fingers + missing diamond in the wedding band = Welcome to the forties. I've lived a long, hard life.
Next up: the CHAAAAAANGE!
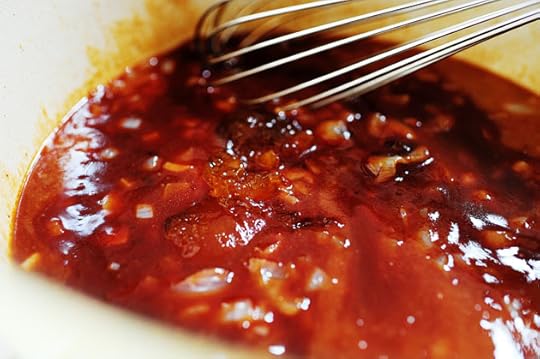 Then whisk it all together.
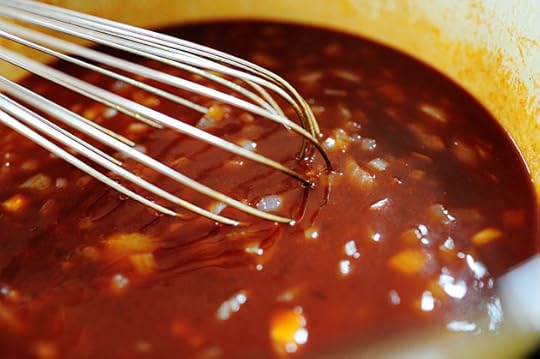
 Give the sauce another stir, then put the chicken back into the pot.
 And pour in the juice from the plate where the chicken was resting.
 Not time to eat it yet, though. First you have to stick it in the oven for a good hour and a half. The chicken will finish cooking, the sauce will become magical, and the meat will eventually fall off the bone.
And meat falling off the bone is good for your health.
And your attitude.
And your religion.
Moving on…
 Cook the chicken in the oven for 1 1/2 to 2 hours, then remove it from the oven and keep it warm until you serve it.
 Look at this! It a little bite of chicken, sent from Heaven to fall off the bone during the cooking process so that when I lifted the lid off the pot, I would retrieve it with my fork and gobble it down without apology.
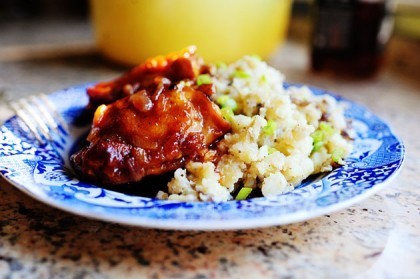
 Serve the chicken with a big plate of warm, creamy mashed potatoes and sprinkle the whole lovely mess with sliced green onions.
 But then do this. The sauce is just out of this world.
 So basically, here's what happens: you stick your fork anywhere remotely close to the chicken and pieces of gorgeous meat just fall all over the place. So delicious and tender. But then when you take a bite of your smashed potatoes, you get some of that whiskey-and-peach-laden flavor, too.
Divine, divine, divine. You'll love this.
Here's the handy printable!
Recipe: Peach-Whiskey Barbecue Chicken
Prep Time: 5 Minutes
|
Cook Time: 2 Hours
|
Difficulty: Easy
|
Servings: 6
Print Recipe
3"x5" Cards
4"x6" Cards
Full Page
Ingredients
12 whole Chicken Thighs, Bone-in, Skin-on2 Tablespoons Olive Oil2 Tablespoons Butter1 whole Yellow Onion, Diced1-1/2 cup Whiskey12 ounces, fluid Barbecue Sauce1 jar Peach Preserves1/2 cup Water2 Tablespoons Worcestershire Sauce4 cloves Garlic, Peeled3 whole Green Onions, Sliced Thin Preparation Instructions
Preheat oven to 300 degrees.
Heat oil and butter in a heavy pot over medium-high heat. Place chicken thighs, four at a time, in the pot, skin side down. Brown both sides, then remove to a plate and repeat until all chicken is browned.
Pour off half the grease, then return pan to stove. Add onions to pan and stir, cooking for 2 minutes. Pour whiskey into the pot, being very careful if you're using an open flame. Stir and scrape the bottom of the pan, allowing whiskey to reduce for a minute or two. Pour in barbecue sauce, peach preserves, water, and Worcestershire sauce. Throw in garlic cloves. Stir until combined, then return chicken to the pot, skin side up. Cover and put pot in oven.
Cook for 1 1/2 hours, then remove from oven.
Serve pieces of chicken over a big pile of smashed potatoes. Sprinkle sliced green onions over the top.
Posted by Ree on August 14 2011


August 11, 2011
Pie Workshop at the Lodge! (Winners Announced)
Here are the winners of Pam's Pie Weekend at the Lodge:
#567 Lindsay: I am a huge fan of Pumpkin Pie! It reminds me of fall, cooler weather and Thanksgiving.
#1196 Susan Lamb: Lemon, Apple, French Silk, Pecan and Pumpkin.
#2388 Lucy: Like my grandfather, I only like two kinds of pie: hot pie and cold pie!
#4234 Jennifer from Kansas: Coconut creme by far!
#5107 Blake: Apple Pie!
#5698 Tina: Homemade Key Lime Pie! Fresh squeezed key limes, pastry crust, and meringue topping. A little different than the traditional key lime pie recipe but, oh, so very, very, good!
Winners, contact prizes@thepioneerwoman.com for details–where, when, etc. You're each welcome to bring a guest to the workshop.
Thank you, everyone, for entering. I wish you could all come, but I'll definitely be offering more Saturday workshops this fall/next spring! And I'll definitely be documenting every second of Pam's pie workshop–I don't want you to miss a thing.
Love,
Ree
________________
I have an online friend I've known for quite some time. She lives in Oregon, her name is Pam, and I admire her a lot. Pam's been married for thirty years, has seven children…and has been homeschooling for twenty years. And she still has nine to go! Thank goodness for women like Pam who show relative rookies like me that it can be done.
 Let me tell you something else about Pam: she makes pies. Hoo, boy…does she ever make pies. She's won pie contests: her apple pie beat 52 others in the first pie contest she ever entered. She judges pie contests. She knows pies, man!
My Oregonian buddy has taught pie-making classes for about five years now. Her students have been men, women and children, and every single one of them has left her class home with a gorgeous hand-made pie that they accomplished themselves…without shedding a single tear or needing counseling!
 Pam has a baking business, Fleur Cakes, and she regularly makes pie to serve a hundred or more guests at weddings and events. She makes regular pies, mini pies, teeny tiny tarts, and slab pies with her easy, stress-free parchment paper method of rolling pie crust. By Pam's own admission, she's made a lotta bad pie–torn, dry, stale crusts as well as gooey, under-baked ones, and through much trial and tribulation, she's figured out how to keep these mistakes from recurring. Her goal is to help to keep homemade pie-making traditions alive.

PIE WORKSHOP AT THE LODGE
The wonderful Pam will be on the ranch next weekend for one reason and one reason only: She's teaching an all-day, incredibly fabulous PIE WORKSHOP! I absolutely, positively can not wait.
Today and tomorrow, I'm giving away twelve spots (six winners, one guest each) for the all-day pie workshop, which will be held next Saturday, August 20 here on the ol' ranch in Oklahoma. If you live within driving distance of northeastern Oklahoma and would like to spend all day next Saturday learning to master pies (and having fun with a bunch of new buddies), drop your hat in the ring!

THE AGENDA
Here's the general focus of the class:
This class will have a focus on pie crusts and methods for making a traditional two crust pie, the most difficult version of the iconic American dessert. Once mastery of the dough is learned, we'll try applications of its uses: pie, quiches, appetizers, turnovers, hand pies, etc.
1. General discussion of pie and its place in American food culture.
2. What makes a good pie crust? A few simple ingredients are combined to make a dough with complexities. Discussion of what makes a pie crust tender and flaky and what errors cause tough, dry pie dough that is difficult to handle.
3. Blind taste testing of crusts made with different types of fats.
4. Demonstration of methods for rolling a crust without tearing or swearing or using the rolling pin for anger management.
5. Demonstration of constructing an old fashioned, two-crust pie.
6. Students/guests make their own two-crust pie.
7. Discussion and demonstration of single crust pies, blind baking
8. Discussion and demonstration of pan-less pie dough applications: hand pies and turnovers
9. Eating pie!
(We'll also touch on savory pies. Yum!)
THE GIVEAWAY
The giveaway includes an all-day pie workshop, a gift bag with pie-making supplies, and treats to take home. I'll be cooking lunch and dinner to sustain us in between the pies…and Charlie will likely dine at our table. Well, on the floor under the table.
TO ENTER
If you are available to drive to the ranch for the day next Saturday, August 20 (9:00 am to 7:00 pm) just answer the following question in the Comments section of this post:
What is your favorite kind of pie?
Do you prefer cherry? French Silk? Banana Creme? Pecan? Just list your favorite kind of pie in the Comments section of this post, and you're automatically entered to win a spot at next Saturday's all-day pie workshop.
THE RULES
One entry per person, please.
No entries after midnight Friday.
Six winners will be selected and contacted; in the event any winner is not able to attend, a replacement will be selected.
Each winner may bring one guest.
**Please only enter if you're able to travel to and from the ranch next Saturday, August 20. Thank ya kindly.**
Winners will be announced Saturday morning.
Yay for pies!


Pie Workshop at the Lodge!
I have an online friend I've known for quite some time. She lives in Oregon, her name is Pam, and I admire her a lot. Pam's been married for twenty-nine years, has seven children…and has been homeschooling for twenty years. And she still has nine to go! Thank goodness for women like Pam who show relative rookies like me that it can be done.
Let me tell you something else about Pam: she makes pies. Hoo, boy…does she ever make pies. She's won pie contests: her apple pie beat 52 others in the first pie contest she ever entered. She judges pie contests. She is the pie expert to end all pie experts.
My Oregonian buddy has taught pie-making classes for about five years now. Her students have been men, women and children, and every single one of them has left her class home with a gorgeous hand-made pie that they accomplished themselves…without shedding a single tear or needing counseling!
Pam has a baking business, Fleur Cakes, and she regularly makes pie to serve a hundred or more guests at weddings and events. She makes regular pies, mini pies, teeny tiny tarts, and slab pies with her easy, stress-free parchment paper method of rolling pie crust. By Pam's own admission, she's made a lotta bad pie–torn, dry, stale crusts as well as gooey, under-baked ones, and through much trial and tribulation, she's figured out how to keep these mistakes from recurring. Her goal is to help to keep homemade pie-making traditions alive.

PIE WORKSHOP AT THE LODGE
The wonderful Pam will be on the ranch next weekend for one reason and one reason only: She's teaching an all-day, incredibly fabulous PIE WORKSHOP! I absolutely, positively can not wait.
Today and tomorrow, I'm giving away twelve spots (six winners, one guest each) for the all-day pie workshop, which will be held next Saturday, August 20 here on the ol' ranch in Oklahoma. If you live within driving distance of northeastern Oklahoma and would like to spend all day next Saturday learning to master pies (and having fun with a bunch of new buddies), drop your hat in the ring!
THE AGENDA
Here's the general focus of the class:
This class will have a focus on pie crusts and methods for making a traditional two crust pie, the most difficult version of the iconic American dessert. Once mastery of the dough is learned, we'll try applications of its uses: pie, quiches, appetizers, turnovers, hand pies, etc.
1. General discussion of pie and its place in American food culture.
2. What makes a good pie crust? A few simple ingredients are combined to make a dough with complexities. Discussion of what makes a pie crust tender and flaky and what errors cause tough, dry pie dough that is difficult to handle.
3. Blind taste testing of crusts made with different types of fats.
4. Demonstration of methods for rolling a crust without tearing or swearing or using the rolling pin for anger management.
5. Demonstration of constructing an old fashioned, two-crust pie.
6. Students/guests make their own two-crust pie.
7. Discussion and demonstration of single crust pies, blind baking
8. Discussion and demonstration of pan-less pie dough applications: hand pies and turnovers
9. Eating pie!
(We'll also touch on savory pies. Yum!)
THE GIVEAWAY
The giveaway includes an all-day pie workshop, a gift bag with pie-making supplies, and treats to take home. I'll be cooking lunch and dinner to sustain us in between the pies…and Charlie will likely dine at our table. Well, on the floor under the table.
TO ENTER
If you are available to drive to the ranch for the day next Saturday, August 20 (9:00 am to 7:00 pm) just answer the following question in the Comments section of this post:
What is your favorite kind of pie?
Do you prefer cherry? French Silk? Banana Creme? Pecan? Just list your favorite kind of pie in the Comments section of this post, and you're automatically entered to win a spot at next Saturday's all-day pie workshop.
THE RULES
One entry per person, please.
No entries after midnight Friday.
Six winners will be selected and contacted; in the event any winner is not able to attend, a replacement will be selected.
Each winner may bring one guest.
**Please only enter if you're able to travel to and from the ranch next Saturday, August 20. Thank ya kindly.**
Winners will be announced Saturday morning.
Yay for pies!
August 10, 2011
Cherry Sherbet
 I have so many things to say today. Please brace yourself.
First of all, what is sherbet, and how is sherbet different from sorbet? It's easy to confuse the two. In a nutshell, though, sorbet is a fruit-only frozen concoction. Sherbet is a frozen fruit concoction, too, but with the addition of a dairy component.
Sorbet = fruit only.
Sherbet = fruit and dairy.
Coffee ice cream with chunks of candy bar and caramel sauce drizzled over the top = my favorite breakfast.
Sorry. Got carried away there.
The second thing I'd like to say is this: it's sher-bet...not sher-bert. Not that I have any moral high ground here, as I second-guess myself every time I utter the word.
Hey! Let's hold an informal poll!
How Do You Pronounce "Sherbet?"
Go ahead–come clean! You're among friends here.
Here's a classic cherry sherbet, not to be confused with cherry sorbet. I used succulent fresh, pitted cherries for this, but frozen ones work just fine. And I left my mixture a little bit on the pulpy side because I like the texture…and I wound up adjusting the final recipe below to include a tiny splash of cream for richness. This is interesting, though: in order to truly be considered sherbet in American, the mixture has to have a relatively low milkfat percentage. After a certain level of milkfat, it's considered ice cream. So while I don't think my splash of cream is going to catapult it into ice cream land (it wouldn't have any egg component, either, so I'm definitely safe) I didn't wind up adding as much as my id originally told me to add.
My id is very naughty. Especially when it comes to cream.
(Wait. Can one's id be blamed for fat cravings? Someone get Freud on the phone.)
 You can use these. They're widely available.
 Or you can use these. Pitted, sweet, fresh cherries. And the girl was so, so happy.
 Throw the cherries into a saucepan.
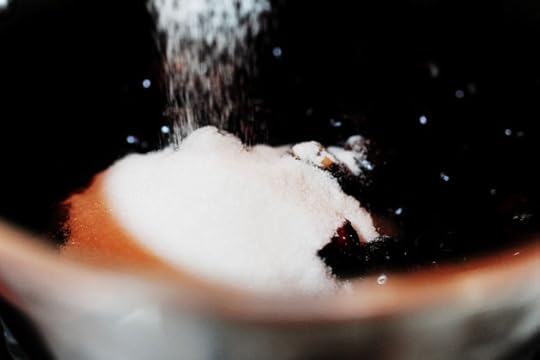 Throw in a buncha sugar.
Nice photo, Ree! Awesome exposure you have going on there.
Not.
 Bring the cherries to a gentle boil…
 And cook them for about 15 to 20 minutes, or until the cherries are soft and the liquid is syrupy. Resist the urge to spoon this over vanilla ice cream. Goodness gracious.
 Let the cherries cool until lukewarm, then pour them (and all the luscious juice) into a blender or a food processor.
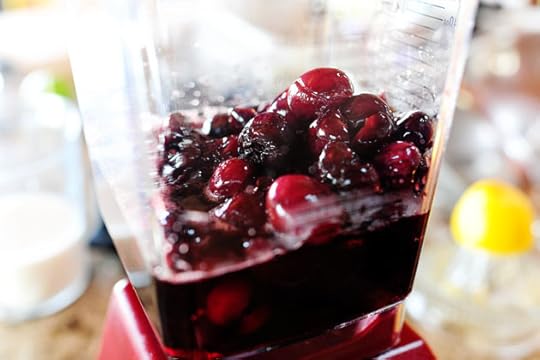
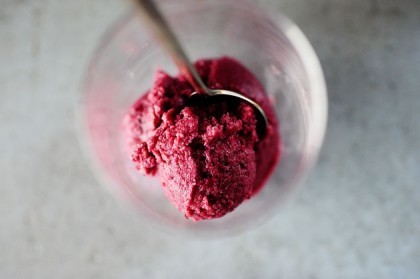
 Blend the cherries until they're nice and smooth…but if you like a little pulpy texture (and I like a little pulpy texture), stop just short of totally liquefying it.
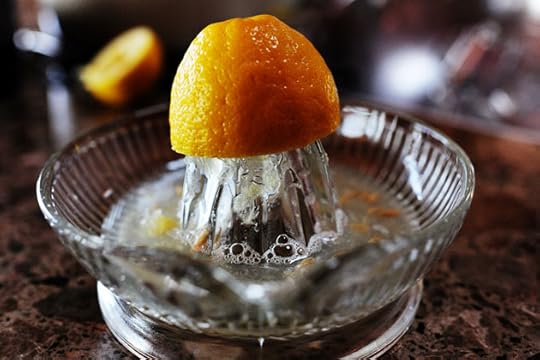 Next, juice a lemon…
 And pour it into the blender.
 Then add a little booze if you're into that sort of thing. And I'm into that sort of thing.
Kirsch, a classic cherry brandy-type booze, is the standard choice, but I don't keep any of that specialized stuff around this joint. So I just added plain rum instead.
 And finally, the milk, which sets sherbet apart from sorbet. I used whole milk in this batch, but was left at the end with wanting just a slight uptick in the creaminess. So in the printable recipe below, I add a little bit of cream. Believe me, it's delicious without it. It's great. But adding just a little cream might give it just the amount of richness I was looking for.
 Blend it one last time, then pour it into your ice cream maker. (I finally upgraded from my wooden/rock salt version. I'll share it with you here sometime soon. It has changed my whole frozen dessert existence.)
 Turn it on, then go live your life!
But only until the ice cream maker's done.
 When it's frozen, transfer the sherbet to an airtight freezer container, then freeze it for at least 24 hours. You want it to be nice and solid.
And cold, man.
 How pretty is THIS?
 It's even prettier in a stemless wine glass.
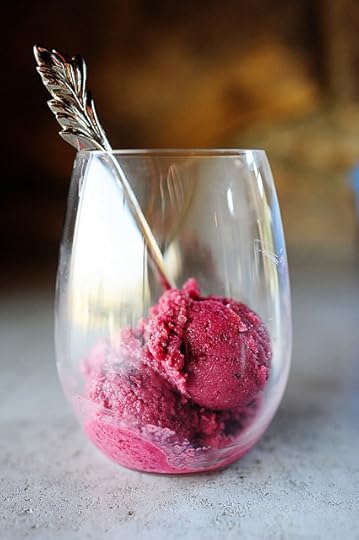 Gosh.
Gosh.
 A regular bowl works fine, too. And let me tell you what I did, then you can decide if you ever want to talk to me again or not. I shot this photo late the other day after a day of cookbook cooking at the Lodge, and just after I'd poured myself a glass of cold white wine to both reward myself after the cooking I'd done and console myself after the mess I'd made. So after I snapped this photo, I looked at the sherbet…then I looked at the wine.
Then I poured some of my wine over the sherbet that I'd scooped into the stemless wine glass. Then I stirred it up until it reached a milkshake consistency.
Then I drank it. And as bizarre as that sounds…it was absolutely heavenly. A wine and sherbet milkshake!
Enjoy, guys.
Recipe: Cherry Sherbet
Prep Time: 2 Hours
|
Cook Time:
|
Difficulty: Easy
|
Servings: 6
Print Recipe
3"x5" Cards
4"x6" Cards
Full Page
Ingredients
3 cups Fresh Or Frozen Cherries, Pitted.1 cup Sugar1-1/2 cup Whole Milk1 Tablespoon Heavy Cream1 Tablespoon Cherry Booze (such As Kirsch) Or Clear RumJuice Of 1 Lemon Preparation Instructions
Add cherries to a saucepan with sugar. Bring to a slow boil and cook until cherries are soft and liquid is syrupy. Cool to room temperature.
Add cherries and juice to a blender or food processor. Blend until smoooth, stopping short of totally liquefying it if you'd like a little pulp. Add milk, cream, booze, and lemon juice and blend briefly.
Freeze according to your ice cream maker's instructions, then transfer to an airtight freezer container and freeze for at least 24 hours before serving.
Scoop into a pretty glass and serve. If you're feeling dangerous, mix with a little cold white wine for a delicious "milkshake." Just don't tell anyone I told you to do that.
Posted by Ree on August 9 2011

August 8, 2011
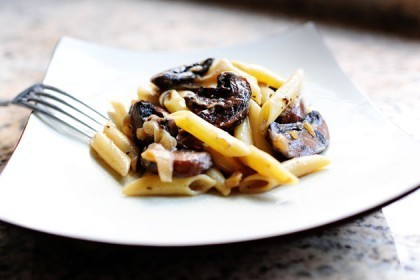
Pasta with Whiskey, Wine, and Mushrooms
 You'll have to bear with me as I share this recipe, which started out as a chicken recipe with wine and pasta and ended as a pasta recipe with whiskey and wine. Long story. But I had to follow my heart.
Just know this: no matter how I got to the end, it was worth it.
 They had these lovely little numbers at our local grocery store yesterday. Big, thick slices of baby portobello mushrooms. And the world was a gentle, kind place again.
Don't listen to me. I make no sense.
 I decided to roast the little darlings for reason I'll explain later. Drizzle with olive oil…
 Sprinkle with salt and pepper.
 Roast 'em in a 375 degree oven until they're nice and dark golden brown, then just set 'em over to the side.
 Heat a couple tablespoons of olive oil and an equal amount of butter in a heavy pot, then go to the fridge to retrieve the chicken thighs you're positive you bought after church, because you thought about making this dish sometime during the sermon and you knew the only chicken you'd want to use were thighs.
Then–this step is important if you want to be exactly like me–realize to your horror that you did not buy chicken thighs at the store. You forgot them. Cry. Cuss, but only internally. Then figure out Plan B.
 Plan B. Blah. Boneless, skinless breasts. Not what I had in mind, but they'll have to do!
 Salt and pepper the breasts, then brown them on both sides…
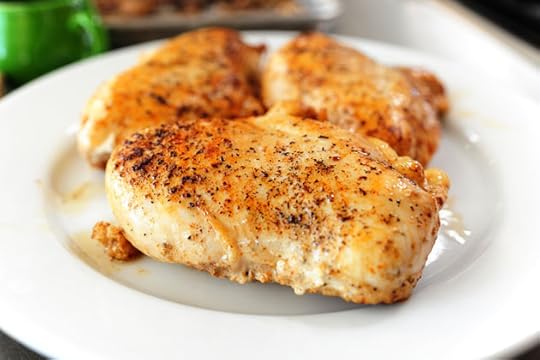 And remove them to a plate.
I don't have anything against boneless, chicken breasts. They're wonderful in many settings–flattened, shredded, grilled, sliced. But for what I wanted to do with this, they just wouldn't be my choice.
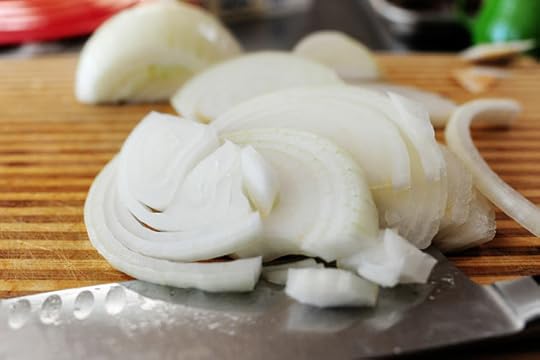 Slice up a couple of onions.
 Throw 'em in the pot.
 Stir 'em around and cook 'em over medium heat for a couple of minutes, or until they start to turn translucent.
 Next, pour in some dry white wine…
 …And let it bubble and simmer and reduce for a couple of minutes.
 Then pour in a good amount of cream. Yummy for my tummy.
 Bad for my bottom.
 Then throw in the roasted mushrooms. I roasted them because I wanted them to be that nice, dark golden brown color. A nice contrast to the creamy sauce.
 Stir 'em around, add a little salt and pepper, and let the sauce bubble and thicken.
 I put the chicken back into the pot…
 Along with the juice from the plate.
And I stuck it in the oven to bubble up and cook for 20 to 25 minutes or so.
Then I removed it from the oven and decided that I didn't want the chicken anymore. So I removed it from the pot, wrapped it in foil, and decided to save it for another use. I'll cube it up or shred it up or slice it up and use it in the next couple of days.
 Then I did a bad thing. I splashed in some Jack Daniels. I splashed in some Jack Daniels because the sauce needed more juice and more booze flavor, and I had no wine left. So then I remembered the bottle of Jack I had in my bedside table! So I ran into my bedroom and got it, then splashed it into the pot.
Ideally, I would have added this back when I added the wine. I've adjusted the printable recipe below to reflect this.
I've also adjusted the recipe to omit the chicken and the oven step.
I've also adjusted the recipe so that the dish has zero calories!
I've also decided not to mention my bedside table in the printable recipe.
 Bubble…bubble…toil and trouble.
Trouble = Utter Deliciousness.
 So after all the ins and outs and ups and downs, here's my verdict: forget the chicken. Just make it a flavorful, creamy, miraculous meatless pasta that's absolutely wonderful on its own. Try serving this with a big juicy steak if you need some protein in your life. How divine would that be?
I hope you've enjoyed my chicken pasta dish that didn't wind up having chicken in it! There's likely more where that came from.
Love,
Pioneer Woman
Recipe: Pasta with Whiskey, Wine, and Mushrooms
Prep Time: 5 Minutes
|
Cook Time: 30 Minutes
|
Difficulty: Easy
|
Servings: 8
Print Recipe
3"x5" Cards
4"x6" Cards
Full Page
Ingredients
24 ounces, weight Thickly Sliced Mushrooms (baby Portobellos Are Best)2 Tablespoons Olive OilKosher SaltBlack Pepper2 Tablespoons Olive Oil2 Tablespoons Butter1 whole Large Onion, Peeled And Sliced1 cup Dry White Wine3/4 cups Whiskey (Jack Daniels Is Good)1/2 cup Chicken Broth1 cup Heavy CreamSalt And Pepper, to taste12 ounces, weight Mostaciolli, Cooked Al Dente Preparation Instructions
Preheat oven to 375 degrees. Drizzle mushrooms with a little olive oil, then sprinkle with salt and pepper. Roast for 20 to 25 minutes, or until golden brown. Set aside.
In a large pot, heat additional olive oil along with the butter over medium heat. Throw in the sliced onions and saute for a couple of minutes, or until beginning to turn translucent. Pour in wine and whiskey and allow to bubble for a minute or two. Pour in broth and allow the liquid to reduce for a couple of minutes. Stir in cream and reduce heat to low. Add mushrooms, salt, and pepper, and simmer until sauce thickens.
Toss in cooked pasta, using a little hot pasta water if sauce needs a little thinning. Taste for seasonings and add immediately.
Posted by Ree on August 7 2011

August 4, 2011
Spicy Beans
 My name is Pioneer Woman and I love beans.
Hi, Pioneer Woman.
Sorry. It's true, though. A big pot of brown beans simmering on the stove is one of life's most basic, simple joys. Beans can be served with cornbread, piled on top of nachos or tacos, mashed and turned into refried beans. They're cheap, they're full of protein and fiber, and they're a cinch to throw on the stove and forget about for several hours.
Beans are good.
A big pot of beans don't necessarily need a bunch of fuss. A ham hock (or pieces of bacon or ham) and salt and pepper are often all they need. And here's my favorite way to eat the suckers:
1. Get a big piece of cornbread.
2. Split it in half and lay both pieces cut side up on a plate.
3. Ladle beans and plenty of juice over the cornbread.
4. Go to town. Figuratively speaking.
Here's a nice, spicy variation made delicious with bell pepper and jalapenos. I made them a few weeks ago and we chowed down on them in one form or another for a few days. Major yum.
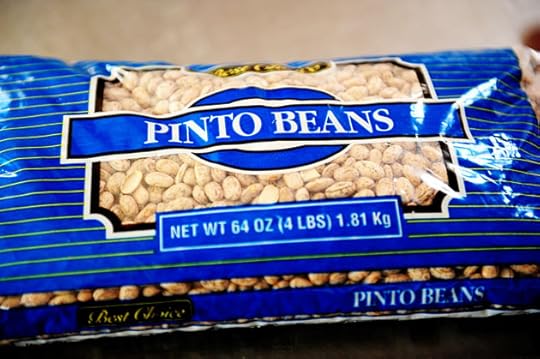 Start with pinto beans.
 Rinse them in a colander under cold water.
 Pick through the beans and remove any pebbles or other debris that doesn't belong.
 Throw 'em into a pot and cover with water by about two inches.
 Grab a ham hock and throw it in with the beans. You can also do diced ham, diced bacon–any fatty/salty pork product with some fat for flavor.
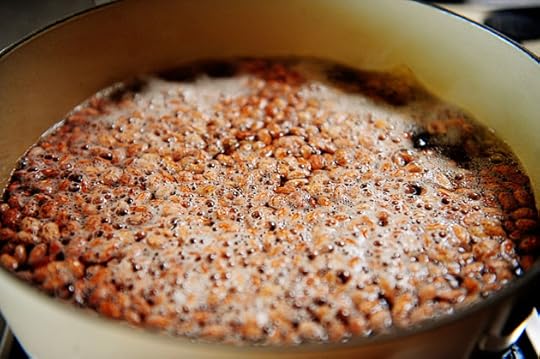 Bring 'em to a boil…
 …Then reduce the heat to a simmer.
 Cover and simmer for a couple of hours. I did cover the pot tightly, but I wanted to let a little steam out for this photo because I love photographing steam. It's a weird, twisted hobby of mine.
UPDATE: A note about soaking: I never soak my pinto beans. The reason for this is that I am not a planner. I want to have the idea to make beans, then just make beans without a bunch of waiting. But if you are a soaker, you can go about it two ways:
1. Cover the beans with water, then cover and allow to sit for four to six hours. Then pour off the water, refill with fresh water, and proceed with the cooking instructions.
2. Bring beans to a boil, the turn off the heat. Cover and allow to sit for an hour or two. Then pour off the water, refill with fresh water, and proceed with the cooking instructions.
But that's too much work for me.
 While the beans are simmering, dice up a big, fat onion.
 Do the same with a couple of red bell peppers.
 Slice up a couple of jalapenos, too. Leave in the seeds if you can handle the heat!
 After the beans have simmered for a couple of hours, throw in the onions and peppers.
 Stir them in, then cover and continue to simmer for an hour or two. You'll want to watch the beans as they cook. If the water level gets too low, add in more…but not too much! You want to have a nice, thick bean gravy when it's all said and done.
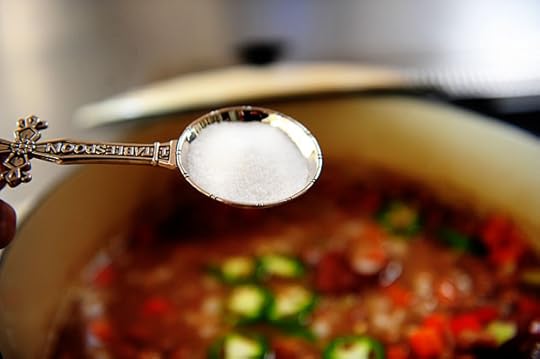 Oh! And be sure to add salt…
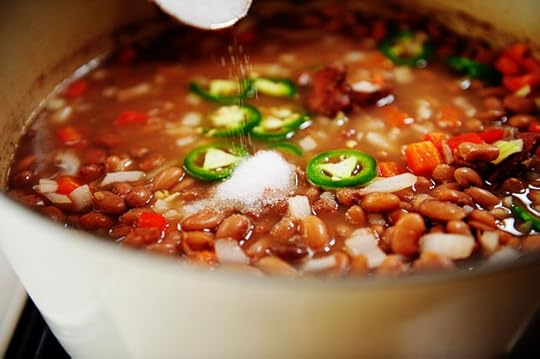
 And plenty–plenty, plenty, plenty–of black pepper.
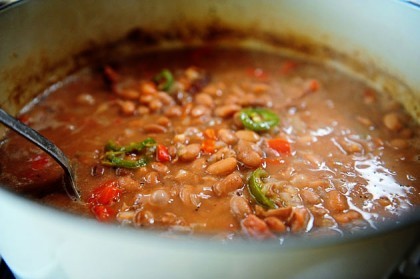
 Mmmm. This is awhile later. It's looking thick and rich and delicious, and the juice/gravy is just right.
Score. A direct hit.
If you're not a bean person, make a pot this weekend! You'll be amazed at how versatile they are.
If you are a bean person, whip up this spicy batch next time. It'll clear your sinuses, and add a nice kick to your Mexican dishes.
Enjoy!
Recipe: Spicy Beans
Prep Time: 5 Minutes
|
Cook Time: 4 Hours
|
Difficulty: Easy
|
Servings: 12
Print Recipe
3"x5" Cards
4"x6" Cards
Full Page
Ingredients
4 cups Dry Pinto Beans1 whole Ham Hock4 cloves Garlic, Minced1 whole Onion, Diced2 whole Red Bell Peppers, Diced2 whole Jalapenos, Sliced2 teaspoons Salt, More To Taste2 teaspoons Black Pepper, More To Taste2 teaspoons Chili Powder (optional) Preparation Instructions
Rinse beans under cold water, sorting out any rocks/particles.
Place beans in a pot with the ham hock and cover with water by 2 inches. Bring to a boil, then reduce to a simmer. Cover the pot and simmer for 2 hours, checking occasionally to make sure the water level is fine. Add more water as needed.
Throw in diced onion, red bell pepper, and jalapeno. Cover and continue cooking for another hour, remembering to check the water level.
Add salt and pepper, then cover and cook for another 20 to 30 minutes, or until beans are lovely and tender. Serve with cornbread as a meal, or spoon on top of nachos, tacos, etc.
Posted by Ree on August 4 2011

August 3, 2011
David's Duck Risotto
 A couple of weeks ago, I recreated the menu that David Leite served when he had me and a couple of friends over to his place for dinner in May. The food at that Ethel-Merman-song-peppered dinner was such a treat, and while I happily slurped down every last bite of David's gazpacho (I featured it here last week), it was his risotto dish that pretty much catapulted the whole evening into one of the most memorable meals ever.
Duck is my life, by the way. On a trip to Portland about eighteen months ago, I fell in love with it and haven't looked back. It's so moist and tender and flavorful without being overly gamey. And this dish is packed with it. And we don't even have to talk about how much I love risotto. The starchy pasta-like ricey loveliness. Yum.
But what I loved most about this dish was the orange flavor David added to the risotto; he used both juice and zest, and the flavor was unmistakably orange. But it complemented the duck and all the other ingredients so perfectly. I loved every single bite.
This isn't necessarily an everyday dish, but if you have the opportunity to pick up some duck legs and breasts sometime, it's a winner of a recipe. (I'll let David decide definitively whether chicken breasts and thighs would be suitable substitutes; I happen to believe they'd be lovely, though you'd want to adjust the baking time in the oven to allow for the breasts to cook all the way through.)
 Add some oil to a heavy dutch oven or skillet. Please pardon my fingernails. It's the best I can do in this life I've been given.
 Salt and pepper the duck legs on both sides…
 Then place them in the pot, skin side down. Sear them for about five minutes per side, then drain the duck fat from the pan.
 Pour in enough chicken stock/broth to cover the duck legs. Reduce the heat and simmer these for about 1 to 1 1/2 hours.
(Not shown because I'm a dork.) In a separate skillet, heat a little of the reserved duck fat over medium-high heat and saute the diced sausage (I used chorizo) until the fat is rendered, about five minutes. Remove the sausage from the pan and drain on a couple of paper towels. Wipe the skillet clean and set aside.
 After they finish cooking, transfer the duck legs to a plate…
 And shred the meat with two forks. Set the meat aside for a bit, and please try your darnedest not to eat it all before the risotto is ready.
 Next come the beautiful, glorious duck breasts. Look at that luscious skin and, underneath it, the beautiful fat.
At this time, I will refrain from raising the question of why skin and fat aren't described as luscious and beautiful on forty-two-year-old women.
I sure am glad I didn't raise the question! For a minute, I thought I was going to.
 I was busy thinking about Donnie Darko or Toni Collette or something and hurriedly threw the duck breasts on the skillet to sear them before remembering that I needed to score the skin. So I removed them from the pan and did it real quick. Here, you can see that I'm cutting through the skin/fat all the way through, but am avoiding cutting into the meat. If you'll look closely, you'll see that there's a little membrane separating the skin/fat from the meat, so if you're careful, you can stop short of cutting through the membrane.
I like to pretend I'm a surgeon sometimes. My name is Dr. Breedlove.
I have no idea where that came from.
 Cut the skin into a crosshatch pattern, then go ahead and throw it into the skillet, skin-side down. Cook it for 10 or 15 minutes over medium-low heat so that the skin cooks slowly and becomes crisp.
Crispy duck skin? It's the stuff that dreams were made of.
After the skin is crisp, flip 'em over and sear the other side for a couple of minutes.
Because David says so, that's why.
 When they're seared on both sides, remove the breasts from the skillet…
 Then place them onto a baking sheet and stick 'em in a very low (160 degree) oven to keep warm.
 Next, drain the skillet you just used to sear the duck breasts, leaving a little bit of the precious, sacred duck fat. Throw in some chopped onion…
 And cook 'em until they're softened, about five minutes or so.
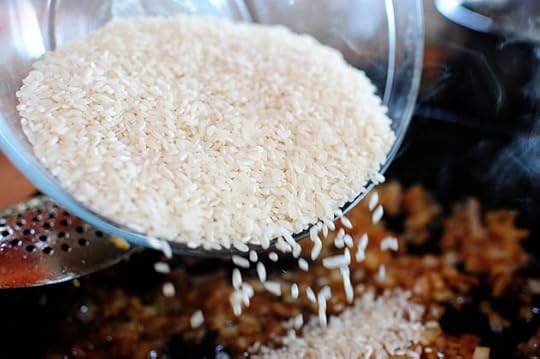 Add the arborio rice…
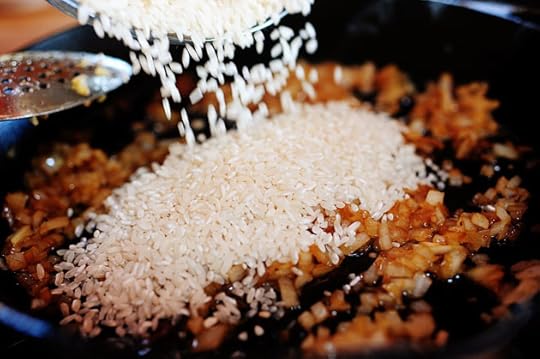
 Then stir it in with the onions and cook for about two minutes over medium heat.
 Add white wine, then stir and cook for a couple of minutes until it's absorbed. And then–this is very, very important–close your eyes. Inhale. Breathe in the miracle that's occurring right in front of you: Duck fat. Onions. Wine.
Then give thanks for all the blessings of this life.
 Next, it's all about cooking the risotto: just add ladles of warm chicken broth in increments, stirring and allowing each addition to absorb before adding the next one.
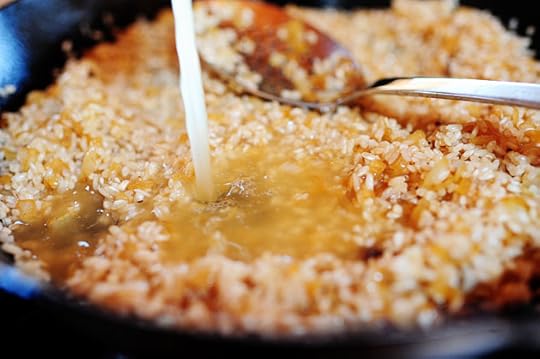 Add broth…
 Then stir and absorb. Keep going until the risotto is cooked, but still has a nice bite to it.
 When the risotto is done, chop up some ham. I just had this thinly sliced prosciutto-type ham, but if you have a thicker piece you can cut it into small cubes like David says.
 To the risotto, add the ham along with the cooked sausage…
 Then add orange juice and zest. This is what sends the dish over the top, guys!
 Finally, as if the risotto isn't already at the height of decadence, stir in the shredded meat from the duck legs…
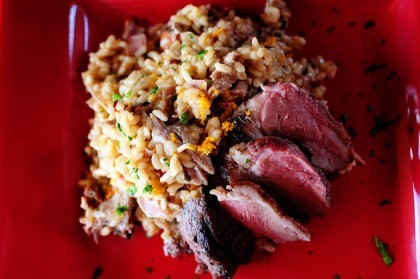
 Then remove the duck breasts from the oven. Slice 'em up…
 Then rest the slices on a generous helping of risotto. Sprinkle the whole thing with finely minced parsley…then stand back and take a good, long look.
Then remember that whole "give thanks for the blessings of this life" thing above? Do that one more time.
And finally, at long last: dig in!
You've more than earned this.
 You can find this recipe in David's gorgeous cookbook, The New Portuguese Table, which happens to be one of my mom's very favorite cookbooks. It's one of my faves, too.
Thank you, sweet David, for letting me recreate the gorgeous dinner you prepared in May. It was such a memorable meal, and I love ya more'n my luggage.
Here's the printable recipe, guys
Recipe: Duck Risotto with Ham and Sausage
Prep Time: 30 Minutes
|
Cook Time: 2 Hours
|
Difficulty: Easy
|
Servings: 4
Print Recipe
3"x5" Cards
4"x6" Cards
Full Page
Ingredients
1 Tablespoon Olive Oil2 whole Duck Legs (about 1 1/4 Pounds) Trimmed Of Excess FatKosher Salt And Freshly Ground Black Pepper8 cups Chicken Stock Or Low-sodium Chicken Broth1 whole Boneless Duck Breast Half (about 12 Ounces)3 ounces, weight Smoked Spanish Sausage (I Used Chorizo) Cut Into 1/4 Inch Cubes1 whole Small Yellow Onion, Minced2 cups Arborio Rice1/2 cup Dry White Wine1/4 cup Serrano Ham Or Prosciutto, Cubed2 Tablespoons Fresh Orange Juice1 Tablespoon Unsalted ButterMinched Flat-leaf Parsley Leaves, For Garnish2 Tablespoons Grated Orange Zest Preparation Instructions
1. Heat the oil in a large skillet over medium-high heat. Season the duck legs well with salt and pepper. When the skillet is hot, add the duck pieces, skin-side down and sear until lightly browned, about 5 minutes per side. Drain the fat. Transfer the legs to a medium pot and add enough of the stock to cover, and then simmer, covered, over low heat, until the meat is tender, 1 to 1 1/2 hours.
2. Meanwhile, drain the duck fat from the skillet, add the sausage, and sauté the over medium heat until the fat is rendered, about 5 minutes. Remove with a slotted spoon to paper towels to drain and wipe out the skillet.
3. Transfer the duck legs to a plate. When cool enough to handle, remove the skin, pull the meat from the bones, and shred into bite-size pieces. Set aside. Spoon the fat from the top of the stock and add the remaining stock into the pot. Bring to a simmer over medium-low heat.
4. Heat the oven to 160°F and slip in a cooling rack set on a baking sheet.
5. With a razor-sharp knife, score the skin of the breast in a crosshatch pattern, being mindful not to cut into the flesh. Pat dry and season with salt and pepper. Heat a large dry skillet over medium-low heat, add the breast, skin-side down, and sear until crisp, allowing the fat to render slowly, 10 to 15 minutes. Don't rush this. The last thing you want is a mouthful of chewy fat. Flip and sear the other side for 3 to 4 minutes. Transfer the duck to the rack in the oven to keep warm.
6. Drain all but 3 tablespoons of fat from the skillet and heat over medium heat. Add the onion and cook, stirring occasionally, until softened, about 5 minutes. Stir in the rice to coat, and cook until translucent around the edges, about 2 minutes. Splash in the wine and continue cooking until absorbed. Add a ladleful of hot stock and cook, stirring continuously, until the liquid has almost burbled away. Keep up this rhythm of adding stock, stirring, and cooking for 15 minutes.
7. Stir in the ham, sausage, and the shredded pieces of duck into the risotto and resume ladling, stirring, and cooking until the rice moves wave-like when mounded and is tender but offers just the slightest bit of resistance in the middle, 5 to 10 minutes more. Stir in the orange juice and butter and season with salt and pepper to taste.
8. Cut the breast crosswise into thin slices. To serve, divide the risotto among shallow bowls and arrange the slices on top. Sprinkle with the parsley and orange zest. Rush to the table.
Posted by Ree on July 24 2011

August 1, 2011
Chipotle Steak Salad
 I have a problem with steak salads: I love them, which isn't actually a problem at all, unless you call a complete inability to stop eating something until not a trace remains a problem. Which I do, and which I have. But I already said that.
Could you repeat that, Ree?
Sorry. Talking to myself.
Again.
This isn't my first rodeo with steak salads. I made this Ginger Steak Salad two or three years ago. Angels sang. And I made this Big Steak Salad a year or so ago. Same result, and that time they may have even sung John Denver. That's when you know something wonderful has just occurred.
And last week, this beautiful plateful of wonder.
Try it this week. It's a cinch to throw together, and the dressing is so spectacularly simple, you'll want to make extra so you can use it as a veggie dip in the days and weeks to come. It's really tasty.
Let's make the salad! The angels are waiting in the wings…warming up their vocal cords.
 First, we need to make the marinade for the flank steak: drizzle some olive oil into a bowl.
 Then add some Worcestershire. And I'd like to take this opportunity to point out the hard water spots on my bowl before someone else does.
Thank you for allowing me to be heard.
 Crack open a can of chipotle peppers, which I'm pretty much obsessed with these days. Would you all do me a big favor and go eat a whole chipotle pepper today? You need to make friends with them so I can keep using them in my recipes. Not really! Don't do that. If you ate a whole chipotle pepper today, tomorrow you would come egg my house. And as hot as it is outside, that egg would probably fry the second it hit my thirty-year-old cedar siding.
Wood plank fried eggs! Sounds divine.
What I'm saying, guys, is that:
Chipotle peppers are natural
Chipotle peppers are good
Not everybody does it
But everybody should
And that's all I'm saying.
Oh, and hang on to the rest of that can of chipotles. We'll need 'em in a second.
 To the marinade, add some ground cumin…
 And some oregano.
 Grab a beautiful, flavorful flank steak. Skirt steak would work, too, speaking of things I'm obsessed with lately.
Skirt steak? Fugghetaboutit.
 Pour the marinade over the steak, turning it over to coat the other side. Then cover the steak (or throw it in a ziploc) and refrigerate/marinate it for a couple of hours.
 Next, make the chipotle dressing. It's a very, very, very complicated multi-step process, so really hunker down and concentrate. You won't want to miss a step of this!
STEP 1: Throw a big jar of mayonnaise into a blender or food processor.
 STEP B: Dump in the rest of the can of chipotles.
 I used a big jar of mayonnaise and a big can of chipotle, because I like to have leftover dressing to use as dip, a base for pasta salad, and other yummy things. But you could easily cut this in half and it'd be more than enough.
 STEP TRES: Mix it up until it's totally combined.
And that, my friends, Romans, and countrymen, is one delicious dressing. Transfer it to a container and stick it in the fridge until you need it.
 After the flank steak has marinated a couple of hours, pull it out of the fridge and grill it over a hot flame. You want to keep it in the rare/medium-rare range, so it really only needs about a minute-and-a-half to two minutes per side.
 Remove it from the heat and let it rest for about ten minutes.
 Meantime, slice up some tomato, cucumber, and red onion.
 Then slice the meat into really thin shingles–cut on the extreme diagonal to get as thin a slice as possible.
 Gosh. Garsh. Garshk. This looks so good. I love a good pile of thinly sliced flank steak.
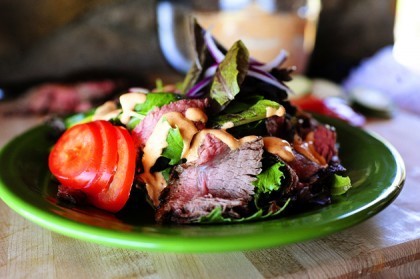
 To serve each salad, mound lots of greens on a plate. Drape slices of warm steak down the sides like cascading mountain streams of…meat.
Meat streams.
Beef falls.
Never mind.
 Arrange some cucumbers and tomatoes around the side…then put some pretty red onion slices on top.
 Then grab a big, whopping spoonful of chipotle dressing…
 And drizzle it all around the salad.
 Goodness gracious. You can't know. You just…you can't know.
 Here's what happens: the warm meat hits the cool greens, and the dressing just sort of makes it all a big pile of harmonious paradise. The crisp and cool tomatoes, cucumbers, and onions give the whole thing some color and crunch.
You will absolutely love this.
Enjoy!
Here's the handy dandy printable:
Recipe: Chipotle Steak Salad
Prep Time: 2 Hours
|
Cook Time: 5 Minutes
|
Difficulty: Easy
|
Servings: 4
Print Recipe
3"x5" Cards
4"x6" Cards
Full Page
Ingredients
30 ounces, weight Mayonnaise11 ounces, weight Chipotle Peppers In Adobo Sauce, Reserve 2 Tablespoons Adobo1 whole Flank Steak3 Tablespoons Olive Oil1 Tablespoon Worcestershire Sauce1/2 teaspoon Ground Cumin1 teaspoon Oregano1 Tablespoon Honey24 ounces, weight Salad Greens (spring Mix)4 whole Roma Tomatoes, Sliced1 whole Cucumber, Sliced1 whole Red Onion, Halved And Sliced Preparation Instructions
Dressing: In a food processor or blender, combine mayonnaise with canned chipotles. Blend until totally combined. Transfer to a separate container and store in the fridge.
Marinade: In a separate bowl, mix olive oil, Worcestershire sauce, cumin, oregano, honey, and reserved adobo sauce. Whisk to combine.
Pour marinade over flank steak, coating both sides. Cover and marinate in refrigerator for at least two hours.
Remove flank steak from fridge. Grill over high heat, only about 1 1/2 to 2 minutes per side until rare/medium rare. Remove from heat and allow meat to rest a few minutes. Slice very thin shingles of meat on an extreme diagonal.
Mound salad greens on a each plate. Drape strips of warm steak over the sides of the greens so that they're cascading downward. Lay tomato and cucumber slices on one side of the plate, and place red onion slices on top.
Drizzle the whole salad with chipotle dressing. The warm meat on the cool salad, combined with the flavorful and spicy dressing, is out of this world.
Posted by Ree on July 31 2011

July 29, 2011
In the Meantime
 I've worked myself into a little bit of a wedge this week: I've been cooking non-stop, taking photos, and getting new recipes ready for both my next cookbook and this section of my website. But because we've been shipping cattle, getting up at who knows what time, getting little sleep, and losing our lucidity more and more with each passing day, I've had no time to edit and upload recipe photos, transfer the photos to a post, and…well…write the post.
Oh! And I started this little entertainment section here on Pioneer Woman. Had to write about Daniel Day-Lewis and Real Housewives a little so I could get on with my life.
After a long day of cooking today, this weekend will about recuperation and recovery, and I'll have a scrumptious and not non-fattening new recipe to share with you first thing Monday morning.
In the meantime, I want to share a link that was emailed to me this morning. Feast your eyes on They Draw & Cook, a website featuring illustrated recipes from contributors around the world.
If you haven't yet seen this…you will love it.
Have fun browsing around–it's such a fun way to read a recipe!
They Draw and Cook
(Thank you, Becky, for sharing!)

July 26, 2011
Grilled Vegetable Pizza
 I've been on a pizza jag, and am including no fewer than five new pizza recipes in my next cookbook. As a matter of fact, one day a couple of weeks ago, I made all five pizzas over a period of four hours. The kitchen at the Lodge looked like a war zone.
But I sure did eat well that night.
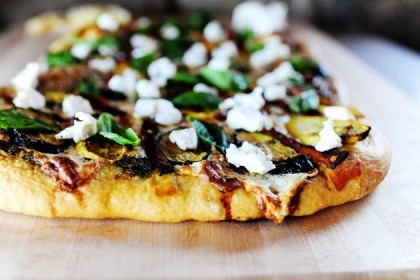
Here's a little pizza I whipped up on the side that day–glorious grilled vegetables with a scrumptious pesto sauce. It's one of my favorite pizzas in the universe; I wait until the pizza comes out of the oven to dot the whole thing with goat cheese, and that always winds up being one of the best things about it.
Gorgeous grilled vegetables. Soft, warm goat cheese: the stuff that dreams were made of.
 Start by making pesto. You can certainly use storebought pesto if you have access to some that's good and fresh and green. If not, just make your own! You can save the extra in the fridge and use it for something else in a few days. (Pssst: I dropped a big tablespoon into a quiche I made the following Saturday. Unbelievable flavor.)
Note: You can see my step-by-step pesto photos in this post.
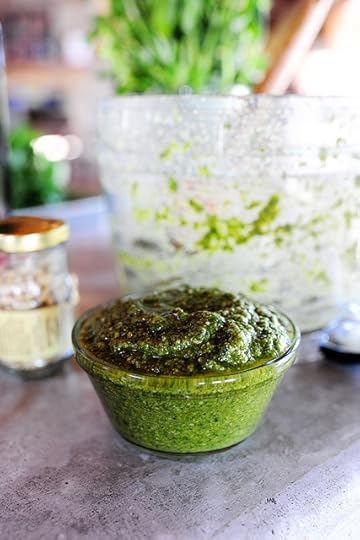 If there's something on earth that's more glorious than a batch of fresh pesto, I haven't yet found it.
 Set the pesto aside for awhile while you grill the veggies. I had too many things going that day and forgot to take photos of the zucchini and yellow squash on the grill, but I did manage to capture the peppers! (Ignore that there skirt steak. That's for something else.)
Blacken a red and yellow bell pepper on the grill, then immediately seal them inside a large ziploc bag. Let the peppers sit for 20 to 30 minutes (long enough for the skin to steam) then remove the blackened skin from the peppers. Deseed the peppers, then slice them into strips.
Then–and this is really, really important: eat a strip of red pepper. Then eat a strip of yellow pepper.
Good job. Now you can move onto the next step.
 When you're ready to make the pizza, roll out the pizza dough (recipe below) as thin as you can and transfer it to a baking sheet drizzled with olive oil. Then spread a generous layer of pesto all over the surface of the dough.
 Slice up some fresh mozzarella and lay the pieces all over the pesto…
 Then arrange the zucchini and squash all over the pizza in an alternating pattern. I also didn't show the slicing of the squash because I'm a multitasking nincompoop; basically, you want to cut slices on an extreme diagonal so they'll lay flat on the grill…and on the pizza.
 Then arrange strips of peppers in between the squash.
 Help me, my dear, sweet, precious Rhonda. This looks absolutely, positively delicious.
Notice that I really pack on the fillings. I like a lot going on with my pizzas.
 Bake the pizza in a 475 degree oven with the rack toward the bottom so the cheese won't become overly brown before the crust bakes.
 As soon as you pull out the pizza, crumble a bunch of goat cheese all over the top, then decorate the whole things with several whole basil leaves. (Oh, and throw on a bunch of shaved Parmesan, too. It'll float your boat in a major way.)
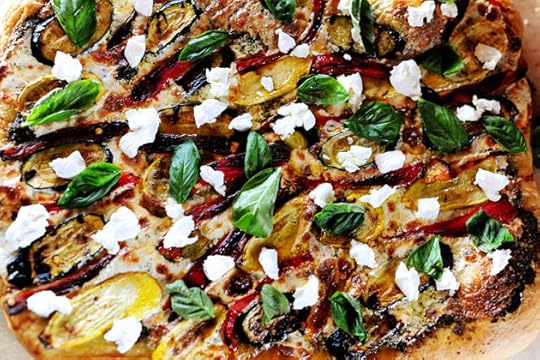 It's purty. It's colorful.
But more than that, it's beyond yummy. Flavor to the max.
Like, totally.
Here's the handy dandy printable!
Recipe: Grilled Veggie Pizza
Prep Time: 2 Hours
|
Cook Time: 25 Minutes
|
Difficulty: Easy
|
Servings: 8
Print Recipe
3"x5" Cards
4"x6" Cards
Full Page
Ingredients
Pizza Crust1/2 teaspoon Active Dry Yeast3/4 cups Warm Water2 cups All-purpose Flour1/2 teaspoon Kosher Salt3 Tablespoons Olive OilPesto3/4 cups Fresh Basil Leaves1/2 cup Grated Parmesan Cheese2 Tablespoons Pine Nuts2 cloves Garlic, PeeledSalt And Pepper, to taste1/3 cup Extra Virgin Olive OilTOPPINGS:2 whole Zucchini, Cut In Diagonal Slices2 whole Summer Squash, Cut In Diagonal SlicesOlive Oil For Brushing1 whole Yellow Bell Pepper1 whole Red Bell Pepper12 ounces, weight Fresh Mozzarella, Sliced4 ounces, weight Goat CheeseExtra Basil Leaves, For GarnishGrated Or Shaved Parmesan Cheese, For Sprinkling Preparation Instructions
To make the crust: Sprinkle yeast over 3/4 cups warm (not lukewarm) water. Let stand for a few minutes.
In a mixer, combine flour and salt. With the mixer running on low speed (with paddle attachment), drizzle in olive oil until combined with flour. Next, pour in yeast/water mixture and mix until just combined, and the dough comes together in a sticky mass.
Coat a separate mixing bowl with a light drizzle of olive oil, and form the dough into a ball. Toss to coat dough in olive oil, then cover the bowl tightly with plastic wrap and set it aside for 1 to 2 hours, or store in the fridge until you need it.
To make the pesto: Add basil leaves, 1/2 cup Parmesan, pine nuts, and salt and pepper to a food processor or blender. Turn machine on, then drizzle in olive oil while it mixes. Continue blending until combined, adding additional olive oil if needed. Set aside.
To make the toppings: Brush zucchini and summer squash slices with olive oil. Sprinkle with salt and pepper. Grill over medium heat until vegetables are tender and have nice grill marks. Set aside.
Place whole peppers on grill and allow to blacken. Remove from grill and immediately place in a large ziploc bag. Allow to sit for 20 minutes or so, then remove peppers from bag and peel off blackened skin. Deseed peppers, then slice into strips. Set aside.
Preheat oven to 475 degrees. Arrange a rack toward the bottom of the oven.
To assemble the pizza: Roll out pizza dough on a floured surface; get it as thin as you can. spread a generous layer of pesto all over the surface of the crust. (You might have a little left over; if you do, store in the fridge.)
Lay slices of mozzarella all over the pesto. Arrange grilled zucchini, squash, and peppers in a pretty pattern on top of the mozzarella. Bake for 15 to 18 minutes, or until crust is golden brown and cheese is bubble (watch to make sure cheese doesn't get too brown.)
Remove from oven and crumble goat cheese all over the top of the pizza. Lay basil leaves on top, sprinkle with Parmesan, and serve immediately.
Posted by Ree on July 26 2011

Ree Drummond's Blog

- Ree Drummond's profile
- 2032 followers

