Stuart Ellis-Gorman's Blog, page 15
October 17, 2022
Battles of Westeros: a BattleLore Game, A Personal Retrospective
When it was released Battles of Westeros came with the tagline “a BattleLore Game”, a subtitle that probably does not mean very much to many people, and I don’t think it particularly did at the time either, but which I think is a fascinating insight into its creation - and possibly it’s ultimate failure. BattleLore is a game designed by Richard Borg and was sort of a medieval history entry in his ongoing Command and Colorrs series of games. This was a series of fairly light wargames that combine dice, hexes, and either blocks or miniatures in a tactical level game about (usually) historical battles. Battles of Westeros represents an interesting off-shoot from the core series, but to fully explain why I think it is so interesting - and why despite that I no longer own a copy - we should consider the history of the series it came from in a little more detail.
In 2000 Avalon Hill Games, the classic American wargame company which was owned by Hasbro since 1998, published a game called Battle Cry designed by Richard Borg. Battle Cry was a tactical level game about the battles of the American Civil War, and it had several interesting features that would underpin the series of games that would largely define Borg’s career as a designer. Battle Cry was played on a board with a hex grid that was subdivided into three columns. Units were represented by simple plastic miniatures and terrain was cardboard tiles that were placed over the relevant hexes on the board. Players activated units by playing a card from their hand which would tell them what of the three board sections they could activate units in and how many units they could activate there. It was an easy game for players to learn but contained significant strategic depth, and it had ample replayability thanks to the many battle scenarios that came with the game.
In 2004, the publisher Days of Wonder released Memoir ’44, a Richard Borg design in the vein of Battle Cry but now about World War II. Days of Wonder are famous for their lavish games and Memoir ’44 was a gorgeous production, with little plastic soldiers, tanks, and artillery to populate its battles. Memoir ’44 is still one of the all-time wargaming classics, a quick to play, simple to learn, but immensely fun little tactical wargame. This brought the system pioneered in Battle Cry to a much larger audience and spawned a whole stream of (mostly) excellent expansions. It is probably still the most popular game in the series.
Following on from the success of Memoir ’44, Days of Wonder released BattleLore in 2006. BattleLore deviated a bit from its predecessors. It was a medieval fantasy game, where scenarios about the Anglo-Scottish wars would see dwarves fighting on the side of the Scots, or where the French might bring Goblins with them to fight in the Hundred Years War. It included a mix of historic and fictional battle scenarios, a giant spider, and a magic system and deck of spell cards. There were a lot of moving parts to BattleLore and it never quite seemed to find its audience. Perhaps it was too historical for fantasy gamers or too fantasy for history enthusiasts. I enjoyed the time I spent playing BattleLore but I found it to be more complicated than I wanted. If I’m honest, it was the magic cards and Command Camp systems that I found the most frustrating. The Hundred Years War expansion included rules to exclude most of the magic rules but went out of print quickly and was nearly impossible to find even when the game was still being published. I do still own my original BattleLore box but it’s in storage and I haven’t played it in years.
2006 also saw the release of Command and Colors: Ancients, the first to bear the name by which the whole series is now known, by GMT games which was a straight historical take on ancient Roman warfare and remains one of the most popular games in the series. While Ancients is now considered a classic and an all time bestseller for GMT, BattleLore did not receive the same glowing reception.
BattleLore plugged along over the years, receiving a slew of expansions – many of which are devilishly hard to find – before the publishing rights to the game were bought by Fantasy Flight Games. FFG would continue to release expansions for BattleLore, and in 2010 they released Battles of Westeros – a game very much inspired by BattleLore but designed by Robert Kouba instead of Richard Borg and with several interesting deviations from the traditional Command and Colors mould. Battles of Westeros is a game that I absolutely adore. It is also a game that I no longer own. I have complicated feelings about it, basically. Let’s start with what I like about it, then we can move on to why I eventually traded it away.
Battles of Westeros is one of the most interesting games about medieval warfare I’ve ever played. It completely discarded the traditional Command & Colors division of the board into three sections. Instead, if you wanted to activate units with a card you chose one of your commanders and played the card on them. They could only activate units within their Command Range, usually any space within two hexes and they could only have so many cards played on them in a round. Each round you also were given a random assortment of chits you could spend to activate individual units which gave you some options beyond just the card play. The cards were also pulled from separate factional decks rather than a single shared one.
BoW also had more complexity as most units had at least one special ability, and many units were unique to their respective faction, creating much greater level of asymmetry than seen in previous Command and Color games. On top of that it completely threw out the usual turn structure of Command and Colors. Instead of players simply taking turns playing cards until someone won, Battles of Westeros was divided into turns and rounds. On each turn players would either play a card or use a token to activate a unit - with the complicating factor that each unit can only be activated once per round. Well, sort of. There was also a Rally mechanic where you could spend a flag token to reduce your morale (there’s a morale track that sometimes can be an instant-win but sometimes not) to Rally a unit which then lets you activate that unit again that turn. This is also all without getting into the Engagement rules and Flanking Attacks, both of which are, again, very cool but also one more thing to track! It all makes for great decisions and interesting interaction, but it’s also a lot to keep track of in what was traditionally a fairly simple system.
I also really liked that the dice in Battles of Westeros were d8s. I could justify this by how I think it better represented differences in the quality of armour between units, and that is true, but really I just really prefer rolling d8s to d6s.
Looking back on it now, it is clear to me that Battles of Westeros owed as much to classic hex and counter game design as it did to Richard Borg’s earlier games. Elements like the command auras, the activation system, and the more freeform shape of the battles are much more reminiscent of my experiences with Men of Iron than with Memoir ’44. That said, the legacy of BattleLore is still there – particularly in how combat is resolved. There are no combat tables in Battles of Westeros - instead units come in one of three types - light, medium, or heavy - each of which has its own colour. When you attack you roll a number of dice determined by the attacking unit and for every symbol you roll that matches the enemy unit’s type you deliver a hit. The three types are not evenly distributed on the dice, though, so heavily armoured red units are far harder to hit than lightly armoured green units.
If I find it so fascinating, why don’t I own it anymore? The simplest reason is that Battles of Westeros, as many of you will have guessed, is set in the world of George R. R. Martin’s A Song of Ice and Fire series (FFG had the book license at the time, so it is very much based on those and not the series Game of Thrones, a subtle distinction). Here’s the thing: I don’t like A Song of Ice and Fire. It has been too long since I last read a book in the series (I read the first two) and little would be gained by me trying to explain why it does not appeal to me. Suffice to say, there are things to like about it but overall, I am not a fan. This means that while I find the moment-to-moment gameplay of Battles of Westeros really engaging, I don’t get invested at all in the battles like I would if they were real historical events. When playing Battles of Westeros, I kept wishing I was using these rules to recreate the Battle of Benevento or Crécy.
The other reason I gave it away is that it just was not getting played. Over the many years I owned the game I only played it a handful of times. This partly reflected my greater interest in miniatures wargaming during that same time, but it was also the result of the niche the game sat in. Battles of Westeros presents itself as if it is a game in the Command and Colors line, but it is a significant deviation in rules from those series and on top of that is chock full of chrome and little complexities that make it a much harder game to teach. It is also a long game, with many games decided by reaching a certain number of rounds rather than eliminating X number of enemy units. While you can easily play a game of Memoir ’44 in thirty to forty minutes, getting a game of Battles of Westeros in under 90 minutes was a struggle and the big battles could run for hours. That is not on its own a problem, but it is a misalignment between the expectation of what the game should be like and the reality and that can make it harder to pitch it to someone who you are hoping to play it with. Dedicated fans will find time to play it, but I just found other Command and Colors games easier to get to the table, particularly because neither myself or any of my friends were particularly enthusiastic about the subject matter.
Battles of Westeros is long out of print and copies can go for shockingly high prices – especially for some of the expansions. I wouldn’t say that it is necessarily worth buying a copy, but if you find yourself at a convention or a friend’s house and you have the opportunity to play it, I absolutely encourage you to do so. It’s a fascinating piece of game design, and I would love to see someone pick up some of its idiosyncrasies and apply the to a game with a setting that interests me more. Some elements of its design were later used in BattleLore Second Edition, this time a fully fantasy game with no history whatsoever, but that game is also out of print – and importantly didn’t have d8s.


October 10, 2022
First Impressions: Arquebus – Cerignola 1503
Coming right off the heels of playing my first game of Blood and Roses I arranged to play fellow member of Team Crossboys Russ Wetli in a game of Arquebus that same day. I had a hurried skim of the rulebook to try and pull-out what elements were different from previous Men of Iron titles, which was thankfully a relatively painless process even without the volume specific rules highlights I was accustomed to from the Tri-Pack. There’s a lot to be said for playing games in a system. It makes it much easier to pick up the next game in the series since you already know about 80% of the rules, but on the other hand it also becomes increasingly easy to mess up that last 20% the more games you learn! This was Russ’s first experience playing Men of Iron and I wanted to be sure I got as much right as possible, and for the most part I think I succeeded. We picked the Battle of Cerignola to play because it was by far the shortest and simplest scenario in the box and neither of us was up for an epic multi-hour clash that evening. I also ensured that he had the full Men of Iron experience by having him play the side that lost the battle historically. Nobody ever promised that Men of Iron would be fair.

Opening deployment - the Imperial forces are behind both a ditch and a rampart. Special rules limit the ability of the French to attack over this barrier until they succeed in breaching it by crossing the barricade.
The battles in Arquebus are all drawn from the Italian Wars, a series of conflicts in mostly Northern Italy between various Kings of France and the Holy Roman Empire. This is a topic I knew nothing about just 4 years ago but I’ve recently become increasingly interested in. I have since learned a lot about the logistics of the period and how armies were formed but I’m honestly a little hazy on some of the specifics of the main battles. I have a few books on my shelf that should help with that but it’s been difficult to make time to read them when there are so many other books vying for my attention. This is something I’m hoping to rectify later this year, but I also feel like I say that about all sorts of topics!
One interesting aspect of the conflict and something I really felt while playing Cerignola was how it pulled from all over Europe. My army was composed of Spaniards and German Landsknechts and against me were French soldiers alongside Swiss Mercenaries – the latter of which were more than happy to abandon the cause if they found that they had not been paid in a timely manner, which was a great bit of chrome that conjured up the period and the nature of Swiss mercenaries in particular. In reality the use of mercenaries was widespread and payment often shortcoming, but the Swiss reputation for being expensive and willing to leave a fight if they were not adequately compensated stood above all others.

The initial French advance into Imperial arquebus fire, plush a push across the ditch at the bottom of the map. They succeed in vacating the corner at the top of the ditch, leaving open the potential for an initial breach of the line. (I also forgot to clear the movement lines, apologies in advance as it gets messy later)
Arquebus clearly shares a lot of its DNA with Blood and Roses but where that game was just introducing gunpowder Arquebus has fully embraced it. It also includes several new additions to the rules that were first introduced in Blood and Roses. The one I’m most interested in trying is the Army Activation where you can move your whole army as long as they are near your Overall Commander, but you can’t attack or even move too close to the enemy during that activation. A method for tactically repositioning your whole force seems like an excellent addition to the rules set, particularly given my previous complaints about how some Battles felt like they got left behind in a given scenario. Unfortunately, in the First Battle of St Albans the forces were so small there was no point in trying out this new rule while Cerignola was basically a knife fight in a phone booth so there was no time to be shifting lines around - we both had to attack as much as possible. However, I’m looking forward to trying it in a future, larger, battle. My fear with Army Activation is that while it could fix one of my problems with Men of Iron as a system it could also dramatically slow play, particularly in the larger scenarios. Given that I mostly play solitaire, though, this may be less of an issue!

The initial French attack is repulsed under fire from the arquebuses. However, efforts to seal the breaches at the top of the line doesn’t go as well as one would have hoped. Also the gunpowder supply detonates at the bottom of the line, Disordering four units.
When I said Cerignola was the shortest scenario available, but it was probably still about a 90 minute game. Most Men of Iron games only have one or at most two scenarios that are 3+ hours. In Arquebus only Cerignola seems to be shorter than that! I’m honestly pretty excited to try some of these epic battles and I think the role artillery and shorter range gunpowder play in the game has the potential to make them very exciting, but I would also probably warn off most people from starting with Arquebus unless they’re already seasoned hands at hex and counter. This game is definitely bigger and more complicated than the games in the Tri-Pack and I was glad I already had that familiarity from the previous games in the system. That said, this was Russ’s entry into the series so I don’t think it’s impossible to start here. Russ is really interested in the Italian Wars and the golden rule of wargaming still holds true: enthusiasm for the subject will carry you far and overcome most forms of complexity.

The French close to melee, crossing the barrier at the top which allows them to now attack over the ditch more easily. Unfortunately, one of the Swiss units hasn’t been paid and decides to pack up and go home.
The increased role of missile weapons was probably the most striking thing about playing Arquebus. This is the beginning of the Pike and Shot era of European warfare and many units have both the capacity to shoot and to engage in melee combat. This seemingly minor difference does a lot to change how the game plays. Being able to shoot and shock in one activation is very powerful. At the same time, the melee units with ranged capacity are pretty poor at shooting and only very effective at point blank range. You won’t be sniping enemy units from a distance with your pikemen. More traditional ranged troops are better at longer range but are very vulnerable in melee, to a much greater degree than in previous titles. One of Russ’s sword and buckler units attacking my dismounted crossbowmen had +7 to his roll! This creates an interesting dynamic around balancing how you use your vulnerable longer ranged troops with your more versatile close ranged melee units.

Aftermath of the French attack, both lines are full of holes and feeling the pressure of the battle. The French have suffered more casualties but the number of Retired Imperial forces is mounting.
There wasn’t very much artillery at Cerignola and they only entered the game very late in our play but I could see how they can radically change your experience of the game. Unlike in Blood and Roses artillery now comes in many different types and nearly all of them have very long ranges. At those long ranges they suffer significant penalties to their attacks so it is not like they will be routinely obliterating units from five hexes away but given the relatively short movement ranges available to most melee units in this game they could have multiple chances to disrupt or even kill opposing soldiers before being threatened in melee. Of course, they also run the risk of exploding and should enemy units manage to close the distance artillery is very susceptible to being eliminated in close quarters. They’re a very interesting addition to the system that doesn’t introduce too much in the ways of new rules or complexity.

The Imperial artillery comes forward and some infantry cross the line - pushing the French back. Casualties are mounting for both sides!
There is also a significant reduction in the variety of melee troop types in Arquebus, which makes sense as we are beginning to reach the point when firearms will dominate European warfare. You can see this very easily on the combat tables where there are far more rows of units that might be attacked in melee than there are columns of unit types that might be doing the attacking. These melee units are still central to the fighting, though, and this is made readily apparent in the flight points used in Arquebus. Losing a unit of pikemen in Arquebus is the same number of Flight Points as losing a king was in original Men of Iron. This really forces you to think about when you are going to push your attack and march into melee because things can turn against you very quickly if pikemen start getting isolated and killed. Arquebus also makes missile weapons far less effective beyond point blank range so you will still need to close at some point once your enemy is disrupted - if you can turn a flank or make a hole in their lines the melee troops can clean up pretty quickly. Soften your opponent up at range and then close for the kill!

The French counterattack comes - both sides are looking a bit bedraggled and by this stage we were both within 8 of our Flight Point, which meant it was feasible for both of us to lose the scenario at this stage. We both survived to fight another day.
Not that we did that in our game. Russ and I were content to smash our lines together and see what happens, which is probably the purest Men of Iron experience. This was only my second time playing Men of Iron against a human opponent (you can actually watch my first time on the Homo Ludens YouTube channel by clicking here). In a previous blog post I mentioned that I wasn’t sure if I would be interested in playing Men of Iron two player rather than solitaire but after my two games I have to revise that stance. There are definitely battles, especially in the original Men of Iron, that I don’t think I would enjoy playing multiplayer but overall, I really enjoyed playing against human opponents. Unexpectedly, it actually diminished my frustration with the dice. I think it’s because when I’m playing solitaire every bad roll is a bad roll for me as I’m both sides. In a two player game the bad results are distributed between two players and when my opponent rolls badly it’s like the best thing that’s ever happened to me. The solitaire experience is all bummers when bad results happen, but with two player it’s a mix of joy and sorrow, which I think I prefer. I also didn’t feel like there was too much downtime and both of the scenarios I played (Poitiers and Cerignola) felt like they had something to offer both players. Now, Russ may disagree since he had the losing side of Cerignola and may have felt like he had little hope of victory. Certainly if I were to play Cerignola again I would try some of the variants that make it a little more balanced.

I activated my standard to Rally my large number of Retired units and that ended up being the final straw - Russ rolled a 7 for his Flight check and that was exactly enough to put him over the line. The French fled the field but it was a hard fought battle!
I’m really looking forward to playing more Arquebus but after the Mad Month of Men of Iron I’ve just had I think I’m going to pack my counters back up for a little while and play some other things. I’ll definitely be cracking the box open sooner than I did last time (and I have the C3i with the Battle of Wakefield coming in the post…) but I also have other games that demand my attention! I’m also about to move house and should soon have access to a much larger gaming space, which will finally make the huge battles in Infidel and Arquebus feasible to play. I’m very excited for that!
I just want to give a short shout out to reader Hamilburg who gave a really generous donation to my Ko-Fi and commented on how much he liked my Men of Iron posts. This encouraged me to bite the bullet and actually buy a copy of Arquebus which lead to me writing this post you were reading now.* If you too would like to sway my game purchasing decisions buying me a coffee and telling me you like it when I write about X is super effective. If that sounds like something that would interest you, you can find my Ko-Fi at https://ko-fi.com/stuartellisgorman
*I know technically I played this game on Vassal, but the module doesn’t have the combat tables, so I did play use the physical rules I bought!
October 3, 2022
First Impressions: Blood and Roses – First Battle of St Albans 1455
I’m very interested in pretty much all things medieval warfare but I have to admit that within that category the Wars of the Roses would rank near the bottom. I am not totally uninterested in the subject, but an assortment of miserable nobles all killing each other to see who gets to be King of England isn’t my preferred topic. It has some interesting moments, and I find Edward IV to be an interesting monarch, but overall it doesn’t fill me with excitement. This meant that while Blood and Roses promised to be a very interesting entry in the Men of Iron series, I haven’t been rushing to get it to the table. However, with the whole Men of Iron series having been chosen for this month’s Club de Jeu on the Homo Ludens Discord I decided to take a plunge and try and play a battle from every (published) entry in the series, which meant finally trying Blood and Roses. I picked the First Battle of St Albans as my entry point in part because it was a small battle that plays in under an hour and in part because the idea of more urbanised combat in a Men of Iron game was really appealing. I’m glad I did because I think First St Albans (as we’ll call it from now) is a great entry point into the Men of Iron series and a fun little battle in its own right!

The opening of the battle from the Yorkist position. In the far back of the Lancastrian lines is King Henry VI. He can’t move and if York can reach him they win the battle automatically, but first there’s Lancastrian infantry and a big ol’ ditch.
First, a confession: I don’t really pay much attention when wargames tell me what scale the game is. I don’t know how many individuals each counter is supposed to represent, and I don’t particularly care. I’m interested in the general idea of the scale (i.e. is it grand strategic or operational) but beyond that I’m not checking in the rules or the back of the box to track the size of each formation. That having been said, I quickly noticed that Blood and Roses is on a slightly different scale than the rest of Men of Iron and this carried some interesting gameplay implications with it. The Wars of the Roses was populated more by skirmishes than major battles. The smaller size of the armies isn’t too surprising since both sides were effectively pulling from the same population to form their armies. First St Albans was the start of the conflict, although nobody knew it at the time, and it was essentially an accidental battle - an escalation of hostilities that neither party was necessarily prepared for. This meant that these weren’t proper armies formed for battle but more like the forces you would see on a raid or a policing action. This made for a much smaller engagement than something like Crécy. As a result, it’s not surprising that Blood and Roses might choose to zoom in a bit and look at the conflict at a different scale.

This was probably my first mistake - using the same tactics in Blood and Roses as I did in other games. I should have used York’s longbows to soften up Lancaster more before closing. Fighting over that ditch is hard going.
The small counter count was an obvious indicator that First St Albans was a small battle but there were two other elements that had an impact on my experience of Blood and Roses. The first was what drew me to this battle in the first place: the urban setting. While in previous battles I played a town might only be a few hexes, at the small scale of First St Albans the town of St Albans has clear buildings and roads you have to navigate. Only certain units are able to pass through the buildings (and at a high movement cost) which gives this scenario a feeling I associate more with World War II skirmish games than medieval battles. That said, the buildings only factor into the battle very briefly because if the Yorkists have reached the edge of the town the battle must be near its conclusion. The movement choices felt different than in other Men of Iron games, which was great because I think having interesting movement choices is probably what I like most in hex and counter games. This makes me very excited to try the Second Battle of St Albans which was a larger engagement and uses the same game map so it could potentially provide even more interesting choices!

The Yorkists achieve an initial breakthrough in the middle, including a big Continuous Attack, but most of Salisbury’s Battle are disordered in the process.
Obviously, we eventually have to talk about archery and in Blood and Roses archery is very different from Infidel or Men of Iron. The smaller scale really struck me when looking at the tables relating to missile weapons. In Men of Iron and Infidel no missile shoots further than three hexes, whereas in Blood and Roses longbows can shoot far beyond that. This isn’t because the missiles were better during this period, the bows were pretty much the same, but rather that we’re looking at the conflict at a smaller scale. The bonuses for shorter range are also much less than in Men of Iron and the penalties for long range are pretty extreme both of which change how the game plays. The lethality of longbows at point blank range is gone, to my joy, and even with bad odds the possibility of shooting enemies from 4-5 hexes away is exciting. In my game I didn’t really grasp the potential of this change and still played it very much like it was classic Men of Iron. Going forward I am excited to see how it affects my playstyle and experience of the game. Longer range harassing fire from missile weapons encouraging you to close the distance and try to fight it out in close quarters is a dynamic of medieval warfare I find really interesting. My first instinct is that this version of archery aligns much closer to my understanding of how it worked based on my research and I’m excited to see how Blood and Roses handles it in the larger battles.

A truly heroic counter attack, including two Continuous Attacks, drives Salisbury back and eliminates most of his Battle but on the other flank things are collapsing for the Lancastrians and these York troops are still fresh. Also the road to the King is looking pretty insecure.
Blood and Roses also seems to have a slightly narrower pool of units, at least for melee. Dismounted men-at-arms and infantry were the only melee troops in First St Albans and from looking at the counters there doesn’t seem to be many more types than those two. Certainly it doesn’t have quite the same variety as Infidel. This reduced number of melee troops does make room for more missile troops, including handgunners, and the addition of artillery which didn’t show up at First St Albans but I’m looking forward to trying the new gunpowder units in the future. I think to some extent this reflects the increasing professionalism of medieval armies over the course of the fourteenth and fifteenth centuries. The English in particular created a much more systemic method of recruiting and equipping armies during the fourteenth century and while the political situation was in total chaos during the Wars of the Roses the effects of this process would still have been visible. It also reflects that this was a civil war and the two sides were pretty symmetrical in terms of the types of troops they could recruit.

Salisbury makes a run on the King but meanwhile on the right flank Lancaster leads a powerful counter attack.

The Lancastrian counter attack eliminates York himself and drives the Yorkist line back across the ditch. But can they stop Salisbury from getting to the King?
The reduction in melee types could also be the result of the more widespread use of the technology that actually would change warfare forever: gunpowder. While guns first appeared in Europe in the early fourteenth century, it took at least a century for both guns and gunpowder to become staples of the battlefield - first dominating siege warfare in the mid-fifteenth century and later taking over the battlefield in the mid-sixteenth century. The Wars of the Roses sits somewhere between the two. Late medieval and early modern gunpowder offered a much more lethal ranged weapon than what was previously available but at greater monetary cost, slower reload time, and reduced reliability and accuracy. A long list of downsides that are made up for by the ability to routinely penetrate plate armour. I’m sure I’ll have plenty of thoughts about how Men of Iron tackles these weapons, but in the meantime I suspect I’ll be encountering them first in my play of Arquebus, the most recent volume in the series and one not included in the Tri-Pack.

York stalls out in the face of the lone Man-At-Arms defending the King and Clifford circles around and attacks Salisbury from behind, eliminating his unit and securing victory!

Lancaster manages to seize victory by the narrowest of margins (in this battle the random die roll isn’t added to Flight Points, instead you must reach the target number)
Overall Blood and Roses felt noticeably different from the previous two games in the series. I felt like I could tell that this was a later entry in the series, it felt slightly more refined and polished, but it’s too soon for me to say anything definitive, I’ve only played one tiny battle, but I was a little surprised at how simple it was to learn. I think having played all three games in the Men of Iron Tri-Pack now I would say that Infidel is probably the most complicated while the other two are comparably complex. Blood and Roses features slightly more rules than the other two games but the fact that both sides are fairly symmetrical - this is a civil war after all - makes playing it easier than Infidel with it’s drastic asymmetry between sides.
I also think that First St Albans may be the best battle to learn Men of Iron on as a system. It is relatively low in number of counters but includes most of the key concepts you’ll need to know to play the rest of the battles. Really only mounted units are missing. It also emphasises how important terrain is to the system. However, I think what matters most is that I really enjoyed First St Albans and would happily play it several more times experimenting with some of the optional rules. There are several battles in the base Men of Iron box that potentially make a better learning experience in terms of teaching you all the mechanisms of the system but that I don’t think are as much fun. Falkirk, for example, is a great battle to learn the full rules of Men of Iron in and is very solitaire friendly but I also didn’t enjoy it as much as I enjoyed First St Albans. If you own the Tri-Pack but haven’t been able to get it to the table yet, maybe try St Albans!
September 29, 2022
England, France and Aquitaine: From Victory to Defeat in the Hundred Years War by Richard Ballard
I have lamented before about how there aren’t enough histories of the end of the Hundred Years War (in English anyway). That was why I was particularly excited to discover Richard Ballard’s history focusing on just Aquitaine over the Hundred Years War. Aquitaine was one of the main theatres of the Hundred Years War and most relevant was the location of its dramatic conclusion in 1453. This is not the first book to cover this subject but Malcolm Vale’s classic English Gascony, 1399-1453: A Study of War, Government and Politics During the Later Stages of the Hundred Years' War is both 50 years old and decidedly out of print so I was hoping for a newer volume covering similar ground. I have to confess, though, that I had an altogether uneven experience with Ballard’s book. It covers an interesting period and is well researched, but I would have reservations in recommending it to anyone but the most diehard of Hundred Years War enthusiasts.
Overall, the book comes across as reasonably well researched. Ballard reads both French and English and shows an impressive familiarity with the key archives relevant to a study of this subject. He has also clearly read the historiography deeply. He refers to older works quite often which can sometimes be a worrying flag, but with a subject as sparsely treaded as the end of the Hundred Years War it’s not uncommon to have older historiography still be relevant. While I would quibble with interpretations in some places, on the whole information contained within the book is good. It is mostly a narrative history, which is fine but doesn’t make me particularly excited, but there are moments where Ballard ventures into more thematic history and these parts are among the book’s best in my opinion.
Ballard chooses a somewhat unusual framing for the book which works for and against it. From the title one would expect it to chart Aquitaine from the at least the 1340s, with particular emphasis on the Poitiers campaign, through to Battle of Castillon and fall of Bordeaux in 1453. While Ballard does cover the early history of English Aquitaine including the first half of the Hundred Years War, much of the focus is on the campaigns in the 15th century. In fact, the narrative continues well beyond 1453 and includes the start of the Wars of the Roses and the campaigns of Edward IV up until the Treaty of Picquigny in 1475.
On the one hand this framing is a really interesting choice. While traditionally 1453 has been treated as the de facto end of the Hundred Years War, hostilities between the English and French continued for centuries. The outbreak of the Wars of the Roses was caused by the events of the Hundred Years War, and it is impossible to avoid the fact that Edward IV’s resumption of hostilities with the French is inextricably tied to the politics of the early 1400s. The boundaries of the Hundred Years War are the creation of historians, and it is interesting to see someone explore an alternative framing. That said, it is something of a double-edged sword in this particular work. The Yorkist campaigns were confined entirely to Normandy and the area around Calais – they have very little to do with Aquitaine. This makes for a rather strange inclusion in a history of Aquitaine. It’s not that they had no impact on politics in the southwest or that nobody thought about trying to launch another invasion through Bordeaux, but it’s far from the centre of the narrative. This happens in a few places throughout the book where the narrative ventures far from Aquitaine which somewhat undercuts the framing of the rest of the work and makes for a confusing and meandering read.
That brings me to my final, and most significant, problem with this book: Ballard’s writing can be a real chore. Individual sentences are fine but there is no clear thread that links them together into a coherent whole. The narrative frequently swings wildly between disparate topics and geography, and it just does not make for a very pleasant reading experience. This made me kind of dread picking the book up each day and it took me much longer to finish it than its thin size would suggest. I’m also not sure how someone who is not already familiar with the events of the Hundred Years War would fair. I was able to navigate the sudden leaps in discussion because I knew the big picture already, but if you were trying to learn it from this book, I think you would probably struggle.
While the content of the book was interesting and covered a much-neglected topic, the quality of the writing and the book’s habit of meandering into topics beyond Aquitaine means that I cannot recommend it to anyone but Hundred Years War completionists.
September 26, 2022
Infidel – Antioch 1098
For my second game of Infidel, I decided I should pick something a little more straightforward than Arsuf, much as I enjoyed it, and Antioch looked like it would fit the bill. It also helped that I’ve found the Siege of Antioch fascinating since literally my first year as an undergraduate in college. It’s also a bit of a weird battle so I was curious to see how designer Richard Berg adapted the Men of Iron rules to fit the fragile alliances and unusual deployment process that defined the climactic battle of the two sieges of Antioch.

Opening deployment for Antioch - the Crusaders march single file from the city while a handful of leaderless Turksih light archers are nearby the harass them (or to die, depending on your dice).
Antioch was a major city in the Holy Land and the site of several important moments in the development of early Christianity. It was also, along with Jerusalem, Constantinople, and Rome, the seat of one of the four Christian patriarchs. When the Crusaders arrived outside its walls in 1097 it also presented a daunting challenge for an exhausted army with only limited siege equipment. The Crusaders laid siege to it for months, enduring a harsh winter outside its walls, before finally taking it in June 1098 thanks to a traitor within the city letting in a small force of Crusaders who opened the gates to everyone else. Only a few days after they took the city Kerbogha, the Atabeg of Mosul, arrived outside the city with possibly the largest army the First Crusade faced and after an initial failed attempt to take it by force set about laying siege to the city. Having just endured months of siege warfare there was little within Antioch’s walls to sustain the crusaders, so the Crusaders decided to ride out and meet the Turkish army in the field, risking everything in one possibly final display of glory. Miraculously, they won. Despite having the larger army and presumably being more rested and with better morale, Kerbogha’s army crumbled in the face of the crusader’s charge.
I’m interested in many aspects of historical wargaming but one topic I am particularly drawn to is siege warfare. Sieges, which are often defined by their length, their grinding attrition, and highly asymmetric decisions don’t seem as natural a fit for gamifying as battles do. However, these factors also offer excellent opportunities for creating unusual and memorable gaming experiences. I bring this up because Antioch is perhaps more famous for being a siege than for the battle that ended it, although that battle is an important part of its history. The scenario in Infidel does not attempt to tackle the siege itself, instead focusing entirely upon the final battle, but the battle map includes some lovely nods to the preceding siege - including a section of Crusader Camp tiles representing the position that they had held mere days before when they were stuck outside the walls trying desperately to get into the city they were now trying to defend.

First contact is made with..underwhelming results for the Christians. Kerbogha’s army begins to appear in the distance.
The thing I love most about Antioch the scenario is how it captures one of the weirdest elements of the battle. At Antioch the crusaders had to march their entire army out from just one gate and form it into battle lines before charging Kerbogha’s army. For some reason Kerbogha allowed them to do this instead of attacking them when they were only partially deployed. It is not exactly known why he allowed this – hubris is the most common suggestion, but any number of factors could have decided it. Richard Berg has gone for the best solution from a gameplay perspective which is that both players need to deploy most of their armies from reinforcements – very few troops exist on the map at the start. The Crusader player is given a lot more flexibility in terms of when they want to deploy new troops but they must deploy their Battles in a fixed order and through a narrow corridor that must be clear for a new Battle to advance through it.

Most of the Crusaders have now advanced out from Antioch and the main host of Kerbogha’s army has appeared. Several Crusader troops are facing South because there is the potential for a force of Muslims to come from that direction and few things are worse in Men of Iron than being attacked from behind.
In contrast, the Muslim player has a huge space to deploy Battles from and can choose the order but cannot move forward to attack the Crusaders until at least three of their Battles have entered the field. They also must make rolls against Kerbogha’s leadership to check if the new troosp can even enter play. This means they must focus on bringing new Battles in until a critical mass of their army is ready, which also gives the Crusaders time to plan a strategy, and potentially deal with the troop of leaderless light cavalry that begin on the map. This is a great way to capture some of the tempo of Antioch without too many rules or making it boring. One thing that was missing from my game was that I defaulted to the Crusaders taking the defensive and resisting Muslim charges whereas my understanding of the battle is that they took the offensive – but this could just be my Men of Iron training taking over and maybe next time I should try a more offensive posture for the Crusaders.

Having cleared most of the initial light cavalry expedition, the Crusaders attempt to form a defensive position in preparation for the inevitable Muslim attack. It’s possible that I should have been a bit more aggressive here, especially with the Crusaders rather sparse numbers of archers.
While the exact reasons for the Crusader’s victory at Antioch are widely discussed and debated, most scholarship currently places central emphasis on the fragile nature of Kerbogha’s alliances. While Kerbogha was able to amass an enormous army to march against the Crusaders, many of the Muslim leaders and their followers that composed the core of the army were less than keen on Kerbogha. There seems to have been a substantial element that were happier to see Kerbogha get knocked down a peg or two than they were reclaiming a city they had no stake in from an enemy they saw very little to fear from. The argument is that essentially once the initial Crusader charge was more effective than expected many Muslim commanders decided to pack up and go home, and once that exodus began there was no stopping it, leaving Kerbogha with just the troops who were totally loyal to him – his advantage in numbers absolutely erased and his army’s morale shattered.

The Muslim charge is devastating. Initial harassing arrows from the light cavalry clears a path for a charge by the cavalry which punches a hole through Hugh of Vermandois’ Battle.
The Antioch scenario doesn’t exactly replicate this, and I can’t fault it for that. To capture this exact dynamic would probably be very complicated and create an unpleasant play experience for whoever was controlling Kerbogha. In a more strategic game covering the whole campaign you might try to capture the fragility of Kerbogha’s alliances in all their messiness, but for something tactical like this I don’t think it’s strictly necessary. Instead, Richard Berg has done two main things. The first is that there is a Kerbogha counter representing his overall command and it is used for determining how new Battles are brought on to the map – representing his role as overall commander and also his struggle in motivating everyone to show up (in my game he succeeded very well at his rolls, but statistically he will fail a given roll more often than succeed).
Second is that the Muslim’s have no Standard, any result of Retired is treated as Eliminated. This does a simple job of capturing how Muslim commanders quickly left the battle once things turned against them and Kerbogha’s inability to stop them. Separate to its role as a historical model, I kind of prefer this way of playing. I understand the role of Standards and the Retire result in Men of Iron, but it is definitely far from my favourite mechanic. A lot of the time when I’m Rallying a Standard it feels like I’m just postponing an inevitable defeat by several more turns rather than amassing forces for a counter charge that could change the result of the battle. I like the simplicity of not having a Retire option.

The Muslim charge was effective but left many of their cavalry Disordered. The Crusaders pivot to try stem the attack while the Muslim’s try to encircle what is left of Hugh’s Dismounted Men-at-Arms to eliminate them before they can be rescued.
One aspect of the Battle of Antioch that I cannot fault Richard Berg for not including but would love to see someone tackle is the role of the miraculous. One of the climactic moments of the second part of the siege (the part where the Crusaders were in the city with Muslims outside) was the discovery by the monk and mystic Peter Bartholomew of the Holy Lance which pierced the side of Christ while he was on the cross. The discovery of such a holy relic restored Crusader morale and they bore it as a standard when they rode out to face Kerbogha’s army. The Lance would go on to be a topic of significant controversy, splitting the Crusaders between those who recognised it as the authentic Holy Lance and those who challenged it as a fake. Peter Bartholomew would die in the wake of a trial by fire that was supposed to assert the validity of his claims, but even that would not entirely erase the debate and factionalism that had sprung up. The incident of the Holy Lance is a major moment in the First Crusade and while it has only a tangential bearing on the battle itself, I would love to see a game try to meld the more spiritual factors with the military and political.
The Holy Lance is hardly the only miracle to be reported at the battle. The eyewitness chronicler Raymond of Aguilers reported seeing saints and the spirits of deceased knights joining the Crusader charge and driving the Muslims from the field. While hardly something to be taken literally, similar to the case of the Holy Lance it would be interesting to see a game tackle the more subjective perception of battle and the cause of victory.

The Crusaders manage to reform their line but make little progress pushing the Muslims back.
This is only my second game of Infidel but so far, I think it’s both a bit more interesting and noticeably more complex than the base Men of Iron game. Many of the Men of Iron battles feature one side taking up a largely defensive position while the other attacks them in waves. These battles are not without tactical decisions for both sides and Richard Berg has done an excellent job making them feel different, but at the same time they are not exactly what I would call dynamic experiences. Both games of Infidel I played have featured a lot more maneouvering with positions being much more fluid than in base Men of Iron. This kind of thing happens in original Men of Iron but is usually a mid to late-game experience, once casualties have happened and the lines are beginning to be broken up. Infidel skips that early stage and gets right to the chaos, which I really like.

The Muslim’s punch a few more holes in the Crusader lines but at some cost - many disordered troops are looking ripe for a Crusader counterattack. Both sides have suffered heavy casualties by this stage, though, and both are at risk of fleeing the field.
That said, Infidel also brings quite a bit more complexity to the table. In terms of rules, it is not that much more complex than base Men of Iron, especially if like me you are playing with the rules from the Men of Iron Tri-Pack which brings the three included games’ rules into closer alignment. What makes Infidel more complex is the kind of units available and the greater asymmetry on offer. Muslim light archers and Christian Knights on their own don’t have many more rules than were present in Men of Iron but I found that together they add just enough to make Infidel more of a brain burner than Men of Iron is. I don’t want to suggest that Infidel is supremely complicated or anything, it’s just a bit more complex than Men of Iron original. You could definitely learn the system with Infidel, especially if the Crusades is a topic that interests you more. I am finding it more mentally challenging to play, but I am also enjoying that challenge!

In the end it is the Crusaders who flee first when we check for flight. A reversal of the rolls would see a Muslim defeat - very close battle!
In that regard Antioch was a better experience for bridging the gap between Men of Iron and Infidel than Arsuf was. Due to the nature of the history, the Christians had far fewer mounted troops by the time they were fighting outside of Antioch – mostly due to loss of horses rather than loss of knights to ride them – and that’s reflected in the scenario. You have only a handful of knights to keep track of and the Muslim forces are a mixture of foot soldiers, medium and heavy cavalry, and horse archers. This makes Antioch feel a bit more like a halfway point between Infidel and Men of Iron and that was definitely something I appreciated about it.
To sum up: overall I really enjoyed the Antioch scenario and I’m looking forward to exploring Infidel more, but first I’ve decided to finally try Blood and Roses!

The final game state - the Crusader position has crumbled a bit but there are plenty of fresh troops and the Muslim cavalry are mostly Disordered. If it had lasted one more turn it could have had a very different result!
While overall Antioch had a great balance of activating multiple Battles throughout the game, you can see in the distance that not all of Kerbogha’s forces ended up contributing (there is even one further Battle, the one that can enter from the South, that never showed up).
September 19, 2022
Men of Iron – Bannockburn 1314
Bannockburn is an interesting battle. Many historians have argued that it was a turning point in medieval warfare, the division between the High and Late Middle Ages, but you could just as easily argue that it was a symptom of broader trends, just one event of many in a slow process of change. It’s narratively fascinating and historiographically intriguing, and that’s before we get to the nationalism. It’s not very surprising that it has an enduring legacy in popular culture and in historical writing – it’s too good a story to ignore and many historians have tried to fit it into their pet theories about how the fourteenth century forever changed medieval warfare. And lest you think I am without sin I have done this very thing in the past, even as I have since become significantly more sceptical of such arguments in recent years.
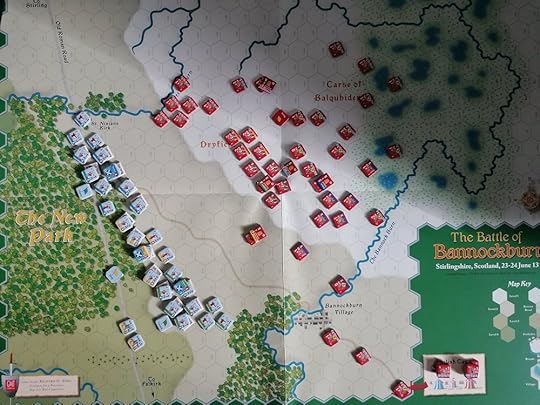
Before the armies clash - the Scots have a well ordered battle line while the English are scattered across the marshy terrain. Who goes first is actually determined by a random role, to reflect a lack of certainty about who really took the offensive back in 1314.
The first essay I wrote as an undergraduate that was on a topic of my own choosing (i.e. not from a list provided by the lecturer), I remember putting forward the argument (which was not very original in a historiographical sense, but it was new to me at the time) that the English victories of Crécy and Agincourt could trace their roots back to the Scottish wars and in particular the English defeat at Bannockburn. My argument was rooted in the broader historiographical tradition of the infantry revolution of the fourteenth century. This was essentially an attempt by historians to explain the fact that fourteenth and fifteenth century Western European armies mostly fought on foot, with mounted troops dismounting before combat. The arguments around the infantry revolution come in various extremes, with some arguing that cavalry essentially disappeared while more moderate voices point to the evidence that they still contributed to conflicts throughout the period albeit in a differnt role than before, but that’s a discussion for another time. What we know is that at battles like Crécy, Poitiers, and Agincourt the English and (from at least 1356) the French mostly fought on foot. The question was: why did Europe’s military elite who had previously preferred to fight on horseback decide suddenly to get off their horses and join the lower classes in fighting on foot?

Edward’s Battle begins to reform and reinforcements are brought from the camp while the Scottish axe men break rank and advance to attack and disrupt some of the English knights.
One popular theory looks to the Scots as the originators – except for them it wasn’t really a new tactic but rather how things had pretty much always been done. Scotland didn’t have as many of the large horses that were required to carry a fully armoured man-at-arms into battle and so they had a more established tradition of the nobility fighting on foot with the other soldiers. This really came to the fore at Bannockburn where an army of dismounted Scots, led by Robert the Bruce, delivered a resounding defeat to King Edward II’s mounted knights.
The theory goes that the English, so utterly shamed by their defeat learned to copy those Scottish tactics and deployed them to great effect on the fields of France - the French seemingly entirely unaware of these tactics despite being the Scots closest allies. To add insult to injury the English would defeat the Scots at Neville’s Cross in 1346 with the tactic and some historians even refer to it as the “English way of fighting” ignoring its supposed roots in Scotland.
We don’t have time for me to unpack that entire argument, but here’s the thing – Bannockburn is fascinating but it’s not unique. At Courtrai in 1302 the Flemings, without cavalry, crushed the flower of French Chivalry. Even then that alone wasn’t enough to win them their independence and within 4 years they were back under French control. One battle is not decisive, and a single victory does not a universal tactical shift make. Each battle is unique, its circumstances unlike any other battle in a myriad of ways, many of which we can never know. To my view, all these battles fall into broader patterns of changing tactics and methods of warfare that extend far beyond the individuals involved in them. There’s more to war than just the military. Population demographics, technological developments, and even shifts in political and religious structures all contribute to determining how war is waged.

The English charge into the Scottish line for remarkably underwhelming results while the aggressive position of the axe men blunts some of the charge potential.
Bannockburn was an important event. There’s no disputing its central role in changing Anglo-Scottish relations. It is not a military revolution on its own. However, that still doesn’t answer the most important question and the reason you all are here reading this, which is: what do I think of the Bannockburn scenario in Men of Iron? Honestly, I thought it was pretty rad!
One of my issues with the original Men of Iron box is how static one of the players often must be. Battles like Falkirk and Courtrai have one defending side sitting in formation waiting to be attacked by the other player. This is not entirely the fault of the game since it is really just representing how battles were fought at the time. Short of picking different battles (and there are a few I would maybe have preferred to be included) there’s not much to be done about that. In the end, though, I can’t dispute that Richard Berg had the right to pick what he wanted included in his game and the ones he chose often had this dynamic. At the same time, I don’t have to find that fun!

The English knights are quickly pushed back by the Scottish pikemen and the Scots begin to advance. Robert the Bruce is getting his hands dirty and pushing forward himself.
I bring this up because Bannockburn could have been another battle with one static side facing off against an attack from the other side, but I found it to be a lot more dynamic than other scenarios. I think the scattered nature of the English deployment helps with this a lot. The Scots have a strong defensive position and could choose to just hold that – forcing the English to attack them or risk the clock running out. However, since the English line isn’t fully formed, they are potentially vulnerable to attack at the start of the battle. As the Scots is it really the best plan to wait, or should you push the offensive now and never give the English a chance to properly organise themselves? It’s a viable option for the Scots to break ranks and attack – or even to reposition and set up a new line somewhere else. It made for a much more dynamic and exciting experience than I’ve had in many other Men of Iron battles.

The English lines have begun consolidating and the Scots are looking a bit stretched, but the momentum is still with them. Will the English be able to counter attack successfully?
This was also the first time that I really felt like I was missing something by not bothering with the Seizure Counters. I’ve been playing these all solitaire, I haven’t been using them because it didn’t feel like they would add very much to my experience. For the most part I haven’t seen many situations where I’d want to add an extra thing to keep track of during my games. However, during Bannockburn there were several moments where I thought “I would have used a Seizure Counter there”. I think a big part of this is that there are more options of commanders with good command ratings. Most obviously, the Scots have two commanders at 4 and Bruce is at 5 and gives -1 to the other commander’s rolls. A roughly 50% chance to activate a second Battle is very strong, and a 40% on the third is amazing. Interrupting that momentum at a crucial moment could pivot the game in a big way. This means using a Seizure counter to attempt to interrupt the Scots’ activation is very tempting, much more so than in scenarios where the chances of your opponent making their Continuation Roll seems lower than my chances of succeeding with a Seizure Counter.

Scottish momentum continues but the English have rallied their Routed troops and are forming a defensive line. Still, casualties have been high and chances aren’t looking good for them. (This photo is from the next day, hence the return of daylight)
The English are less good, but you have an interesting balance where Edward II is terrible but he has a huge Battle so you kind of want to activate him first and then try and get another commander with a Continuity Roll. The two cavalry Battles each have command ratings of 4 which isn’t bad odds of getting them to do something, and the archers are on 3s. There are options, and you should be able to activate two Battles reasonably often. However, this also runs the risk of you leaving yourself exposed as it takes several turns to reassemble Edward’s Battle into fighting order. If you’re relying on Continuity Roles to activate other Battles nearer the Scottish lines you run the risk of the Scots seizing initiative again and as we’ve seen, they can get a lot done in one turn.
I really felt this push pull and I can see how the battle could develop very differently with Seizure counters in play. Similarly, I never felt like Bannockburn fell into the trap that annoys me in Men of Iron where you just keep activating one Battle repeatedly to try and push its advantage as much as possible. I activated every Battle on both sides and often in different orders each turn. This gave it an extra layer of decisions that I thought was missing in some of the other scenarios.

The Scots went berserk for a dramatic finale - Robert Bruce and two others going on a rampage of Continuous Attacks. I don’t think I’ve ever seen them go this well in any of my games so far! Final game state is a solid Scottish victory.
In terms of the history, I really liked that it felt different from Poitiers, Crécy, and Courtrai. As I said at the start I feel like when historians take a big picture view of these battles, they can fall into a trap of assuming that they were all pretty much the same and a clear through line can be drawn between the tactics at each of them. While Men of Iron does show their similarities, they are also distinct, and it helps to show that just because two events share some similarities it does not make them the same event. Bannockburn is a distinct battle and an important one, but it is not a turning point in military history. It is also more than just a single data point in a longer series of battles. It is a distinct event worthy of its own study in addition to considering its place in greater history, and I think Men of Iron does a decent job of capturing that. Also, respect to Berg for giving the Scots longbowmen that are as good as the English, you love to see it.
September 12, 2022
Consim Game Jam 2022 – An After-Action Report
I have no urge to design a Eurogame or to write roleplaying game rules no matter how much I enjoy both of those kinds of gaming. When it comes to wargames, though, I feel this itch to try and craft my own take on historical events that I am fascinated by. I think it’s because at their core so many wargames are historical models and, in my other guise, I’m a public military history. I cannot help but think about how I might be able to use game mechanics to communicate an idea about one of my favourite subjects. I suppose it’s no great leap from being prepared to commit several years of my life to writing a book for public consumption to spending a similar amount of time designing a game to achieve something similar. At least in terms of the impetus in my part that is. In terms of execution, the two are quite different!

My most advanced design is a little card game about the Battle of Benevento in 1266, trying to focus more on the archers than the cavalry.
Over the past year I have dabbled in a couple of design projects but only one has advanced as far as having a physical prototype and I’ve only played it a handful of times. That was a big part of what made the Consim Game Jam (http://consimgamejam.com/) so appealing. The challenge to design a game in 72 hours could help me focus and get a game further along the design process in three days than I have with any of the projects I’ve had in the tank for months. I needed to rip the bandage off and prepare myself for failing often and failing fast. It also helped that this promised to be a team event. Having a few comrades in arms to brainstorm solutions for the problems we all caused helps take the sting out of making those mistakes in the first place. We’re all in this together, it’s nobody’s fault!
I sought out my teammates in advance on the Discord server of supports of the YouTube channel Homo Ludens (shameless plug, you can see me play Pax Viking on the channel by clicking here or listen to a podcast where I chat a bit about the game Warriors of God here) and together Russ, Pierre, and myself formed Team Crossboys. Of the three of us only Pierre had any real game design experience, Russ and myself both being of the blogging persuasion (you can, and should, read Russ’s work at https://cardboardconflicts.com/). What we lacked in experience we made up for in enthusiasm and in the week leading up to the Jam all three of us were brainstorming ideas about what we would like to work on for our design. The organisers had dropped some hints about the theme (which would only be revealed at the start of the Jam) and we know it would probably involve some form of card driven element. With that to work on we decided to pick a few topics we thought were interesting that would make interesting Card Driven Games (CDGs). We knew that when the final theme was announced some of them might not be suitable, but we deliberately picked very flexible topics and were reasonably confident at least one would work. The three topics we eventually settled on were:
The invasion of the Songhai Empire by the Saadian Dynasty of Morocco in 1591
The Jacquerie of 1358
The last stand of the Swiss Guard during the Sack of Rome in 1527
As the Jam approached, I think we were mostly leaning towards the first topic. It was a conflict that would be unfamiliar to a lot of gamers and that had a lot of potential in terms of ways we could approach its design.

I’ll probably still attempt to design a game on the Jacquerie at some point, though. It’s too interesting a topic to leave alone!
The Jam’s theme was to design a CDG (no surprise) but you couldn’t use any map and were limited to 54 card and 54 other components total. This somewhat scuppered some early work we had done planning out a rough point to point map of West Africa but in the end, I think it was probably for the best – the game is much more interesting without a map.
The announcement was made on Thursday night European time and Pierre and I both went to sleep after only a few hours of brainstorming. Meanwhile Russ, who is in Eastern US Time, basically solved how to do the geography with only cards. Instead of a map players would have cards representing somewhat abstracted locations placed in a tableau in front of them. Players would then be able to move armies, represented by counters, between cards but to move onto your opponents cards you would first have to use cards from your hand that would represent traversing the often-difficult terrain of the Niger River and its surrounding environs. If you successfully made it to one of your opponent’s cards and could take control of it, you would lift it from their tableau and add it to your own. It needed a little refining, but the core idea was there, and we were off to the races.

Russ also did up basic graphics to explain his idea. The final product changed from this but it did a lot to convince us of how this might work with a tableau rather than a map!
Friday and Saturday were spent in intense brainstorming and in playtests that were very fast and loose – changing rules mid-playtest, either because we didn’t like a rule or, more frequently, because we realised the rule didn’t make any damn sense. This was a really fun process and the fact that we were a team really helped - realising you don’t know how a rule works when you’re showing your game to a friend is embarrassing but collectively realising that none of you know how it works is funny.
By Saturday evening our game, then titled Al-Mansur’s Gambit after the Moroccan Sultan who ordered the start of the invasion, had begun to really take shape. We had built a basic but fast combat system and incorporated systems for representing support (or lack thereof) for the Askia, the leaders of the Songhai, and the Sultan’s approval of the progress of his generals. We refined it a little more over the Sunday morning but most of that day was devoted to polishing. Things like proofreading rules, updating the TTs Module (all Russ’s work), adding art (all Pierre), and making sure we had all the elements we needed for our submission to meet the requirements of the Jam.

The submitted product. I can take no credit for the Tabletop Simulator mod or the graphics as I contributed nothing to them!
Overall, it was a great experience and I’m happy with the game we managed to design in just 72 hours. I came out of the experience with a reasonably long list of fixes that I wanted to make now that we would have more time but given the time constraints, I think we did a good job. The restrictions definitely limited our design decisions but we never felt so constrained that we couldn’t execute our broader vision. In some ways the restrictions helped to focus our design and spurred some ideas we would not have come up without the restrictions. Left to my own devices I definitely would have used a point-to-point map for this game, and there probably is a great game on this subject that could be made using one, but I’m very happy with the tableau system we ended up using instead. I’m looking forward to continuing to work on it and expanding the design while keeping some of the restraints from the Jam if they fit the design!
I can’t exactly claim to be any kind of expert in game design after this experience, but I do think that it gave me a much better understanding of the processes involved and it will serve me well going forward as I attempt future designs. For the sake of posterity, and as a source of future shame when I inevitably forget one of them, I thought I’d share the main game design takeaways I have after the Game Jam.
Get a prototype together as soon as possible. It doesn’t matter if you haven’t solved every design question you have or if parts of it don’t work. Take the systems you already have and just start playing around with them. This will help you identify if they work and if they are giving the kind of experience that you want from the game.
Following on from above: try to have a high level vision for what you want the game to be and generally how you want it to function. This shouldn’t be specific mechanics but instead a set of broader principles. For example, in our game we didn’t want to emphasise combat and instead focused more on political support and the physical geography of the conflict. This meant that we wanted a system for resolving combats quickly to get the game back to its main focus. We didn’t want a six step multi-layered combat system, no matter how clever it might be, as that would go against what we wanted the game to emphasise.
Few things are more valuable than people who are willing to play your broken ass game. We were lucky because there were three of us but if you have a friend who is also interested in design (or just very patient) you should rope them in to playing your prototype with you. Having someone to bounce ideas off of while you try and tweak mechanics on the fly is a huge advantage.
Don’t be afraid to change mechanics mid-game! You don’t need to go away for a week to come up with an amazing alternative, if something doesn’t work change it immediately and see if it works better (or worse)! It took at least a day of testing before any of us actually played our game to completion and that’s fine! If you have a clever idea later you can always try it then, but if you have someone willing to test with you now you should make the most of it!
A little art goes a long way. I am not blessed with artistic talent, but there are plenty of images freely available on Wikimedia or in museum collections (the Met in NYC and the National Gallery in Washington, DC have pretty generous copyright rules) and you should feel free to liberally steal them. A prototype with no art is easier to change, but once you start adding even some basic images it will make the whole thing feel more real. Don’t go too far, though, and obsess over how the game looks early in the process. Just slap some pictures and borders on things and move on - functional not final!
Made a shitty prototype? Hey guess what, you’re a designer now! There’s no membership rules to being a game designer, you don’t need to be published, if you’ve made something then that counts! Go out and make something terrible and then, slowly, make it better! Try to resist the creep of imposter syndrome or the feeling that you could never make an interesting game. If you want to design something then do it, and if you’re too busy then maybe sign up for the next Game Jam and get yourself the full experience in just a few days!
If you’re interested in trying Al-Mansur’s Gambit for yourself, you can access the Tabletop Simulator Module via this link: https://steamcommunity.com/sharedfiles/filedetails/?id=2851542614. It includes a copy of the rules and play aids in the module so everything you need to play is there. If you do try it, I’d love to know what you think!
Lest you think that our game was the only one designed, there were many fascinating submissions during the Game Jam that I still have yet to play. However, once the results are announced many of them should be available to play via the Consim Game Jam website. You can find the games from the previous Game Jam here: http://consimgamejam.com/edition-1-submissions/.
September 4, 2022
First Impressions: Sekigahara by Matt Calkins
I’ve wanted to play Sekigahara for years. The first time I saw the stacks of blocks and the glorious art of the board I knew I had to play it. Sadly, it was far beyond my meagre budget, and I wasn’t sure if anyone would play it with me even if I managed to buy it, so for many years I gazed forlornly at it from a distance. That is until last month, when I finally got a chance to play it thanks to my newfound competence playing games online using Vassal (and a helpful nudge from the Homo Ludens’ Discord Club de Jeu). That made it much easier to find someone who would play it with me, and since they also owned a physical copy of the game, I didn’t have to feel bad about not buying my own! I am not the same person I was back when I first saw Sekigahara, though. I have aged several years and played many games since. Will I still be as entranced by it as I was when I first saw it?
Let’s let the tension out of the room by saying that no game could live up to my imagination of many years ago, but I did really enjoy playing Sekigahara so while it may not be the game of my dreams it’s still a very good game. For those who may not be familiar with it, Sekigahara is a block game about the end of the Sengoku Jidai, an extended period of civil war in Japan that saw the toppling of the previous Shogun and, eventually, the rise of the Tokugawa family who would rule the country for the next two and a half centuries. In Sekigahara one player controls Tokugawa and their allies while the other player plays the supporters of Hideyoshi Toyotomi, a former ally of Tokugawa who had united Japan under his rule before dying and leaving it to his young son who Tokugawa is scheming to overthrow. The titular Sekigahara was a single major battle in 1600 that largely decided the conflict, but the game takes more of an operational view of the broader campaign between the two factions instead of just the climactic battle.
Each player has a mountain of blocks, which in the physical game are very satisfyingly stacked on top of each other to form towering armies, and a hand of cards. Players first discard a card to bid for initiative, which Tokugawa wins more often than not, and then take it in turns to decide how many cards to discard for moves. You can make one move for free, or discard a card for three moves, or discard two cards to move all your forces. How many cards you discarded also determines how you take Muster actions, which let you bring more blocks into play. Movement is very slow and the larger your army the slower it moves, but you can discard a card to forced march one extra space allowing you an extra burst of speed.
So, there are lots of things you can do by discarding cards but here’s the problem: you need cards to win fights. Each card has a symbol on it relating to one of the clans that is allied to your cause. In combat you must play a card of the matching symbol to deploy a block to the fight, if you don’t deploy them, they don’t contribute. Blocks also give bonuses when a block of the same clan is played into a fight, so you are incentivised to keep multiple cards with the same clan symbol but doing so will also limit your ability to succeed in other fights if none of that clan are present. Its quite a thorny puzzle that’s very satisfying when you get it right and very stressful when you get it wrong (or when your opponent gets it right).
Make no mistake, you will be getting into fights. They are essential to victory, of course, but Sekigahara also does a lot to reward aggressive play. After a fight you will draw cards equal to the number you played into the fight – so you don’t have to worry about using up all your resources in one big battle and not having anything to do after. The loser will even draw more cards based on their losses, a simple method of helping them catch up a bit after their defeat. These systems do a lot to nudge you towards more aggressive play, which is also the more fun way to play the game.
As clever as this system is I do have a few problems with it. First, and most obviously, you are very much subject to the whims of your deck. In my game neither of us drew any cards relating to the clans in the North of Japan for the first half of the game and so no actions were taken in that section of the board until very late in the game. It can also feel sometimes like you weren’t strictly out played, but rather your opponent drew better cards at a crucial moment. There is a system for recycling your hand, but it comes at the cost of losing a whole turn and there’s no guarantee you’ll get good cards out of it. In a game with so few turns and with such a range of possible actions – you could pass to refill your hand while your opponent moves literally every piece they have on the board – it’s not an enjoyable experience. This doesn’t ruin the game, but in a game that’s as long as Sekigahara is it’s a bit of a downer.
Combat is also very unknowable. You don’t know what cards your opponent has in their hand, and you probably don’t know what blocks they have. Much of the initial set up is predetermined so you could in theory memorise the starting position of each of the armies and track their movement, making estimates of which blocks moved where, but only if you’re a robot. For most of us tracking all the blocks, particularly after a few turns and once new blocks have been added, you can only guess that blocks in a region are more likely to be from a clan in that region, probably. This isn’t necessarily a bad thing, a little bit of ignorance can be great for a game, but it does make it a lot harder to make good plays. I did a lot of bold and risky play in my game, and I was rewarded for it thanks to having better cards than my opponent, but I could have done the same thing and been utterly destroyed with minimal change in my own decisions. That might appeal to you, it might not, but either way it is something to be aware of.
I’m also not particularly impressed with Sekigahara as a depiction of history. Now, I’m no expert in Sengoku Jidai era Japan so take this with a grain of salt but I didn’t feel very drawn into the conflict when playing Sekigahara. The art is really doing a lot of the heavy lifting in terms of theme. The combat feels more like something you’d find in a Euro game. It’s fun (I like Euro games) but I’m not sure how it exactly it captures the feel of Samurai warfare. Sekigahara isn’t trying to be a detailed simulation so it would be unfair to criticise it for not being one, but I would have liked it if I felt more like the gameplay and the history aligned a little better.
I have a few other nit picks like how the game feels a little too long and the victory conditions are a little boring, but that’s really getting into the weeds. Overall, there’s a lot to like about Sekigahara. The combat is unlike anything else I’ve ever played before and is really engaging. The aesthetics are amazing, even if the game board sacrifices some usability in favour of appearance, and I imagine pushing the blocks around in real life is really satisfying (it’s a lot less exciting on Vassal). It’s not a very complicated game either, you could teach this to basically anyone. I think it is a little too fiddly for me to say it’s a perfect entry game, I think the Columbia block games (see my write up of several of them here: https://www.stuartellisgorman.com/blog/columbia-block-wargames-review) are a better general introduction because they’re shorter and don’t have quite as much of a mental load when you’re playing them. That said, if Sekigahara appeals to you it is absolutely a perfectly fine place to start with card drive and/or block games. The best entry game has always been and remains the one that interests you the most.
For me, I won’t be rushing out to play Sekigahara again, but I probably wouldn’t turn down a game of it if someone else really wanted to play it. It has also made me more excited to take Granada: Last Stand of the Moors, a game using the same core system, down from my shelf and finally get that played.
September 1, 2022
The Hundred Years War by Desmond Seward
It may be damning with faint praise, but I expected Desmond Seward’s The Hundred Years War to be worse. Don’t misunderstand me, I didn’t think it would be terrible, but it was first published in 1978 which is a long time ago given how much has been written on the Hundred Years War since. On the whole I weas pleasantly surprised by my experience with Seward’s history. I probably still wouldn’t recommend it to most people, it has some glaring problems mostly derived from its age, but on the whole, it was a lot better than I expected!
The Hundred Years War is a classic narrative history of Anglo-French conflict from 1337 to 1453. It is clearly an antecedent to more recent books like Jonathan Sumption’s Trial by Battle as well as its sequels and Juliet Barker’s Conquest. I am a little surprised to say that I think I prefer Seward’s history to both of those books. While the latter examples include more up to date research and a finer grain of detail, Seward does in about 270 pages what Sumption does in 1800 (and counting). Seward also has none of Barker’s stark English nationalism. In fact, Seward’s account is impressively even handed for the most part. He is critical of Henry V, happy to highlight his flaws along with his triumphs, and praises Charles V’s competence (a rarity in English language popular histories). He is arguably a bit harsh on Joan of Arc and Charles VII but in the case of the former he seems to be pushing back against a prevailing view that Joan was indispensable to French victory and in the latter while harsh, it largely mirrors the portrayal in Shakespeare that has long been the popular image of the French king.
Seward’s writing is very readable and engaging, I breezed through the book and didn’t feel like I was bogged down in unnecessary detail or bizarre asides. He even spends a reasonable amount of time on the fall of Normandy and Gascony in the 1450s, a novelty in books like this. I can see how Seward’s history would have been a big deal upon release and why it has remained popular over the decades since.
That having been said, it is definitely showing its age. In areas of military history Seward is far out of step with modern historiography. At Agincourt he gives the French as having 40,000+ soldiers to approximately 8,000 English. Anne Curry’s research has made a very strong case for the position that the English were only slightly outnumbered, and even proponents of a larger French army wouldn’t consider figures as large as those Seward quotes. Seward includes pretty much no references, either, so unless he mentions a source in the text it is largely impossible to determine what he is using as a basis for figures like this. Agincourt is probably the most egregious example, but throughout the book it is easy to see how it is rooted in a much older military historiography. That is not Seward’s fault, he worked with what he had at the time of writing, but it is reason to be wary of reading his book uncritically in 2022. I am also made a little wary by the fact that if I can see glaring errors in my specialty there is a likelihood that other errors exist that didn’t jump out at me because I am not as familiar with the historiography. While I didn’t notice anything as problematic as his accounts of Crécy and Agincourt (the account of Poitiers was less troubling), especially in comparison to more recent histories I have read, I am still not an expert in all things Hundred Years War and could have missed other flaws.
For this reason, I wouldn’t recommend you seek out a copy of Seward to read. If you desperately have to have a narrative history of the Hundred Years War and no alternative to narrative will do then Seward is still a reasonably good option. However, I would strongly recommend reading something like David Green’s The Hundred Years War: A People’s History – it will give you plenty of narrative in addition to a lot more contextual information on the period and is based in much more recent historiography. However, if what is on your shelf or in your local library is Seward, you could do worse than reading him as an introduction to the topic.
August 29, 2022
[Malta Month Bonus] Malta Besieged: 1940-1942 by Steve Carey
The States of Siege games from Victory Point Games are some of the most widely recommended solitaire only wargames. Unfortunately for people like me who have recently taken up wargaming they can be quite hard to find since Victory Point Games shut down. All is not lost, though, as Worthington Publishing has recently taken to publishing deluxe editions of some of these classic games, and I thought now was a good time to finally try one. Malta Besieged is about the other famous siege of Malta, the attempt by the Axis to seize it during World War II. I have to admit I’m not much of a WWII buff and I wasn’t very familiar with the history for this one, but I thought since I’m doing a month of games about Malta why not try something a little more modern to mix things up?
In Malta Besieged you have to manage the defence of the island of Malta and a stretch of North Africa from a range of threats, represented by tracks on the board. The game is divided into three different eras, each represented by its own deck of cards. On your turn you flip the top card of the deck and do what it tells you. Usually it advances some enemy units on their tracks, tells you if you gain/lose any resources, lists what dice role modifiers (DRMs) you have on the various actions available to you on your turn, and most importantly tells you how many actions you get to take this turn. Sometimes he card will also indicate that a relief convoy is on its way to you with supplies and you have to resolve the Axis attempts to sink it – at the start of you turn you determine how many hits it suffers and then only at the end do you determine whether those hits damaged the convoy or not.

The stage is set, let the siege begin! This is my third game where I decided to play with the cards in historic order to see if it made me feel the history that bit more.
On your turn you have a wide selection of actions available to you. You can attack any of the various forces marching slowly towards you on their various tracks. You do this by rolling a d6 and if you roll greater than the number printed on the chit representing that army you push it back one space. Alternatively, you can increase one of your resources, this is resolved the same way but if you succeed you push the resource up the track. Military and Morale give you a bonus if they are at their maximum point on the track or a penalty if they’re at their lowest while Supply can allow you to take extra actions but punishes you if you run out of it. From the second era on you can conduct Raids which make it easier to attack Rommel and his Afrika Corps. There are a few other actions, such as activating ULTRA or constructing Forts, but those are the main ones you’ll be doing most of the game.
I want to take a moment to mention that the rulebook for Malta Besieged is terrible. This is not a very complicated game, but it manages to make it seem substantially more confusing than it is. I had a miserable time learning to play Malta Besieged, so be aware of that if you decide it sounds interesting to you. The best advice I received was to just read about the actions and then start trying to play. The sequence of play is printed on the board, start drawing cards and only look up rules as you encounter them.

Dearing the end of the first phase of the war (represented by the first of three decks of event cards) and things are going okay. Supply is down but Malta isn’t in any great danger..yet.
Once I got through the misery of the rulebook and started playing Malta Besieged, I could immediately see the appeal of this series. It’s a very light game, perfect for passing the time on a quiet evening, but it also manages to keep you engaged throughout. The decisions you make on your turn are all very similar but the ever-shifting landscape of the game, the new enemy positions and DRMs, helps to keep it from feeling repetitive. I really like how the card flips at the start of your turn, presenting you with a set of challenges you have to react to. You need to balance trying to undo the immediate effects of this latest card with the need to maintain an overall strategy for how to achieve victory. It’s not enough to just triage, you have to actively push your enemies back. This was a much more enjoyable system to me than other solitaire games I’d played where you pick an action and then a random element, dice roll or card draw, determines what the game’s response to that action is. Those felt random and like I lacked control, sort of like the game was playing me, whereas this meant I had plenty to do every round and I was trying to solve the latest puzzle the game through at me.

I pushed the North African front as far back as I could in preparation for Rommel’s arrival, but I have somewhat neglected the Luftwaffe who are now breathing down my neck right next to Malta.
Overall, I really enjoyed my first experience with the States of Siege series, but there are a few reasons why I probably won’t be keeping Malta Besieged long term. My issues with the system are few, but I do have some. I found tracking all the DRM modifiers a little too fiddly. On rounds when there were only 2-3 DRMs to track it was fine, but there would be rounds where I had 4-5 DRMs and only two actions and it felt like I spent more time putting out counters than I did taking actions. This isn’t a major flaw, but it was something I found a little exhausting. I would prefer to see a smaller number of DRMs each round.

The U-Boats have arrived and honestly I’m already on the ropes a bit. The Luftwaffe have been pushed back but Rommel bypassed Tobruk and is threatening Alexandria while the Italian air force is attempting to bomb Malta.
Another issue I had was that assuming you make it to the end, you see every card in the game every game. Sure, the order is different, but you can eventually learn the deck pretty well and eventually plays begin to feel a little same-y. This could be the result of me playing it several times in rapid succession, if I let it rest on my shelf only getting it once over other month or so I suspect this wouldn’t be much of a problem.
My real issue with the game, and the reason I won’t be keeping it, is in the theme and how it captures the history. As I said at the start, I’m not a big WWII buff and so I didn’t know anything about the defense of Malta before I played this. After having played it several times I don’t feel like I know all that much more than I did. Each card represents an event during the conflict and even includes a little bit of historical text, but if I’m honest I basically never read them. There was enough book-keeping to be done every round without reading the tiny text on every card. This game already takes a couple of hours to play, I didn’t feel any strong desire to lengthen it by reading short summaries of the events of 1940-1942 out of their historical order.

I want to make something very clear - I pushed Rommel back to before Tobruk and he bypassed Tobruk for a second time! It’s the end of the second deck and things are looking dire for Malta and North Africa in general.
The way Malta Besieged represented history felt like it was targeted mostly at people who already knew the history and wanted to experience it through a game. If you already recognise these major events, I bet it’s exciting when you draw one from the deck, and the randomised order of events probably makes for an interesting “What If” experience. I am not one of those people, though, so for me while I did get a little bit of the historical flavour – I may not be very up on my WWII history, but I did recognise the various military units that were attacking me – it didn’t really capture me enough that I can imagine myself playing this game more than a handful of times.

I made it maybe a quarter of the way through the final deck. I just about managed to keep Malta but the North African campaign has been decisively lost, triggering an automatic defeat for me - my first loss playing the game.
I enjoyed my time with Malta Besieged and if the WWII defense of Malta is more your speed than the 1565 siege you should check it out. For me, I think I’m going to see if another States of Siege game on a different topic might appeal to me more.