Stuart Ellis-Gorman's Blog, page 12
April 20, 2023
Henry VI by David Grummitt
Henry VI often comes across a as almost a secondary character in his own life, which has made him a challenging figure for biographers to approach. He ruled disastrously during a particularly pivotal moment in medieval English history, a time that has been famously captured in some of Shakespeare’s more boringly titled plays - yet another element that has bolstered his name recognition while pushing the real person further away. David Grummitt's very approachable biography of the king does not overcome this challenge, in fact it does almost the exact opposite and embraces a perspective of Henry VI that largely holds the person at arms length to examine the systems and culture that shaped him. This makes for an engaging account of not only the life of Henry VI but also of the broader Lancastrian era of the English monarchy: its goals and its failings, and how they shaped and were shaped by the dynasty’s longest ruling monarch.
Grummitt proposes to frame his biography of Henry VI within a discussion of what it was to be a Lancastrian king, with the notion that this broader cultural framework will be informative in terms of understanding and judging the kingship of Henry VI specifically. If I were to boil down the impetus for this biography to one idea, I would say that Grummitt was seeking to answer the question of how a king who was so obviously unfit for the job still commanded such loyalty that he survived several attempts to remove him from power and was even once restored to the throne. Henry was even venerated as a saint after he died, a not unprecedented but still remarkable event for so unpopular a deposed king. Grummitt’s answer is this idea of Lancastrian kingship; essentially a set of principles that created an environment in which Henry’s kingship was perceived by contemporaries.
To do this effectively Grummitt begins far before Henry VI, even before when his grandfather Henry IV seized the throne in 1399, to look at the earldom, later duchy, of Lancaster and the descendants of Edmund, younger brother of King Edward I. A key figure is Thomas of Lancaster, Edmund’s son who was executed in 1322 as part of a baronial revolt against Edward II. This long look at the history of one noble institution is fascinating and I think probably the best part of the book. It is a ready reminder that medieval people were not ignorant of their own history and, in many cases, the Lancastrians were acting within a framework laid out decades before that they were consciously embracing. Grummitt also includes one of the more detailed and interesting discussions of Henry IV’s 1399 coup and the political unrest that followed that I’ve read. In attempting to place Henry VI within a broader framework of Lancastrian kingship I think Grummitt easily succeeds.
In approaching the individual of Henry VI himself, I think Grummitt is less successful. The king is not absent from this biography and he is not presented as entirely at the whims of a wider political culture, but at the same time this is not a detailed character study. During the period of Henry’s early reign, from 1422 until 1450, I found the book interesting and engaging. It dealt as much with the wider administration of the realm as with Henry’s own preferences, and I think Grummitt does a good job staking out his position on where he falls between seeing Henry VI as the source of all his eventual misfortune and Henry as a disengaged monarch swept along by the currents of his advisors. Grummitt embraces a more active portrayal of Henry VI but his Lancastrian framework helps to incorporate the council into more of the narrative without restricting himself to a dichotomy of just whether Henry made a decision or if his advisors did.
The narrative from 1450 on is where the book somewhat lost me. To be fair, this is not entirely the author’s fault. The end of the Hundred Years War and the outbreak of the Wars of the Roses, especially after Henry’s first bout of illness in 1453, renders the king very nearly a sideshow in the climax of his reign. Grummitt provides a lucid and coherent narrative of the beginnings and early stages of the Wars of the Roses, as well as Henry’s posthumous career as a figure of veneration, but the absence of Henry’s own will in this period made it a less engaging read for me. At times I could forget that the book was meant to be about Henry as he would only occasionally appear in the narrative. This was still well written, and it is a reasonable representation of what happened, I suppose I just found that my general lack of interest in the Wars of the Roses bled over into the final chapters and nothing in the book was sufficient to combat that.
Over all, this was an excellent and approachable biography of a king I’ve never found particularly fascinating. I don’t think I will be recommending it to everyone under the sun, but should you be looking for a biography of Henry VI or something on the Lancastrian kings more generally I would definitely recommend it.


April 17, 2023
We Intend to Move on Your Works - The Lost Cause in Games on the American Civil War: A Project
I am a scion of the Great Commonwealth of Virginia, the Old Dominion, and the son of an avowed Civil War buff so you can probably imagine that my childhood featured a lot of information about the American Civil War. In School I didn’t learn any history after 1865 until I was fourteen. The period between Jamestown and the end of the Civil War was the high point of Virginian hegemony and the school system was perfectly happy to dwell within that temporal space for as long as possible. During my childhood I was frequently taken to battlefields to play - I’ve been to Chancellorsville, the Wilderness, Gettysburg, and many smaller sites more times than I can count. I even have a favourite obscure American Civil War site (it’s the Confederate Breastworks in West Augusta County, Virginia - although more for its scenic views and lovely hiking trail than its historical importance). Few historical events loomed as large in my life as the American Civil War and this has given me a complicated relationship with it.
I was spared the worst of neo-Confederate Lost Cause mythmaking in part thanks to the fact that my father is from Washington, DC, and therefore a fairly die hard Unionist rather than a Confederate sympathiser, but this barrier was not absolute. The insidious tentacled reach of the Lost Cause penetrates deep into ones psyche no matter how strong your barriers against it, and I have had to unlearn several “facts” about the American Civil War over the years. I was even taught, and then thankfully un-taught, core Lost Cause myths in school. While I abhor the Lost Cause and everything it stands for, I am also fascinated by it. Arguably the greatest rebuttal to the idea of “history is written by the victors”, its impact on American history and contemporary society is immense. To really understand how America came to be where it is, and the horrors white Americans committed to bring us here, you have to understand the Lost Cause. In this series I hope to possibly unpick one potential avenue for the Lost Cause to perpetuate itself by on dipping my toes into the immense pool of wargames on the American Civil War and examining them through a lens of not just how fun they are as games but also what they can tell us about how we choose to remember the American Civil War. Before we get into the details of the project, though, I should probably define the Lost Cause and give a general outline of the kinds of things I’m looking for in these games.
I’m not going to give an exhaustive account of the Lost Cause here - an entire sub-field of research is devoted to this topic and they have produced a whole library’s worth of books on the subject. Instead I will provide a brief summary of the Lost Cause and the salient points most relevant to the overall scope of this project - more specific aspects will be brought up in the relevant blog posts as needed.
The Lost Cause is a pseudohistorical narrative that dramatically reframed the reasons behind and the narrative of the American Civil War with the purpose of absolving the Confederacy of its crimes and furthering its ideals of white supremacy in the post war period. The Lost Cause derives its name from two books written by Edward A. Pollard, The Lost Cause: A New Southern History of the War of the Confederates (published in 1866) and The Lost Cause Regained (published in 1868). Pollard was an avowed White Supremacist who had worked at the Richmond Examiner throughout the war. However, while Pollard gave the movement its name it is important to note that there was no singular author of the Lost Cause. Ex-Confederates made substantial contributions, sometimes through their memoirs or, in the case of Confederate General Jubal Early, through numerous speeches and contributions to newspapers and magazines. Organisations formed in the wake of the war to commemorate those who fought, such as the Sons of Confederate Veterans and the Daughters of the Confederacy, also made significant contributions to the Lost Cause. In some cases even academics contributed as the narrative became the dominant one in post-war America. That’s not to say there was no push back, the memoirs of Union generals and their allies, especially in the nineteenth century, usually pushed back against the Lost Cause narrative. However, the Lost Cause ultimately won the post war conflict over the war’s narrative, even convincing some Union generals to its side in the process. Until at least the 1960s the Lost Cause was the predominate, although not exclusive, story of the American Civil War and it persists in certain circles today.
So what was the story they were trying to tell? The Lost Cause is more of a loose network of White Supremacy and neo-Confederate sympathies than a singular canon but there are some principles that are shared across the vast majority of Lost Cause narratives. These are:
The American Civil War was Not About Slavery - Probably the most fundamental principle of the Lost Cause, this rejects the very obvious fact that the reason for the secession of the southern states and the entire reason for the war was the desire of the south to retain their “peculiar institution”. Ignoring the many times that secessionists stated their purpose for leaving the United States, the Lost Cause blames the war on Northern aggression or, more commonly, frames it as a dispute over “States Rights”.
The South Was Fighting For Its Freedom - Closely related to the above, particular the idea of the war being about States Rights, this has an extra layer of recasting the Confederacy as a noble fight against a larger, oppressive neighbour. A doomed last stand of the underdog standing up for traditional values against the brutality of an industrialised North, this sympathetic picture of the Confederacy has long endured in popular media and is perhaps the most literal reason for the name Lost Cause. This argument will sometimes go so far as to suggest that it was a good thing the South lost because it did bring about the end of slavery, but they will quickly add that slavery would have ended naturally within a few years (it wouldn’t have) and the cost of the war was far greater than leaving the South alone would have done.
Slavery Was Good Actually - This one largely predates the actual Civil War but retained significant vigor after the defeat of the Confederacy and in particular was a potent contributor to Jim Crow rule in the South. According to this argument, black people liked being slaves and the Antebellum South was a blissful time of happy cohabitation between the races who each had the decency to know their place. The new postwar order was chaos until Jim Crow was instated to restore some sort of order. Some readers may notice that elements of this argument may be in conflict with some of those above - don’t get too exercised about this, the Lost Cause has more in common with conspiracy theories than it does with actual history. Internal logic is not necessary to sustaining its myths.
The Cult of Lee - The Lost Cause has three individuals it holds up as its saintly pillars: Thomas “Stonewall” Jackson, Jefferson Davis, and, most importantly, Robert E. Lee. Jackson is the Cause’s martyr, dying a heroes death in the war during the high point of Confederate victories. Davis, in his role as die hard secessionist and first (and only) president of the Confederacy, represents the cause of secession as a whole. However, it is Robert E. Lee, the Confederacy’s most successful general, who has risen to truly saintly status. The Lost Cause instilled a genuine religious worship of Lee in the war’s aftermath, one that even infected non-Southerners. Lee is the Lost Cause’s God.
Those are four of the core principles for understanding the Lost Cause and its impact on American society. However, there are several more niche arguments, some of them derived from the above main principles, that are a little more likely to show up in wargames. Several of these will be discussed as they become relevant, but I thought I would highlight a few now as something to keep an eye out for.
The War Was Fought in Virginia - The sanctification of Lee and Jackson has gone hand in hand with emphasising the theater they fought in as they both served in the Army of Northern Virginia. The Lost Cause has reinforced the primacy of this theater while neglecting the Western Theater, where famous Union generals like Grant and Sherman cut their teeth and earned their reputations. In Lost Cause historiography the Virginia theater is what matters most and this allows them to emphasise how superior generals like Lee and Jackson were to Union rivals like McLellan, Hooker, and Burnside. Of course, at the same time, some Lost Cause narratives will describe Lee and Jackson as amazing generals who were ultimately let down by their fellow generals, like Johnson and Hood. There are many ways to peel a neo-Confederate onion.
The South Lost Because of Industry - A popular explanation for why the Confederacy lost, and part of the narrative of a doomed underdog, is that most of America’s industry was in the North. The Union simply had more men, more money, and more guns and the South never had any hope of victory no matter how superior their generals or their soldiers were. This of course ignores that the Union had by far the harder job: invading and occupying most of the South against sustained hostile opposition and in a thorny political climate. Make no mistake, the South could have won and it took a mix of talent and luck on the part of numerous Union generals and politicians to bring about the end of slavery in the United States. However, the notion that Union victory was inevitable persists and an overemphasis on resources and industry while ignoring the political challenges facing the United States is a potential pitfall for wargames.
So given all of that, what is it I’m proposing to do? Well, I have drafted in a few victim --I mean… “volunteers” to join me as we play through a range of wargames on the American Civil War. I will be selecting games from a range of designers at different scales and from different series trying to get a snapshot of the major battles and campaigns of the war. We will be playing the war in approximately chronological order - I say approximately because while we will be keeping within a given year (i.e. playing all of 1862 before moving on to 1863) we may jump around a bit to better fit series or related battles in individual theatres together. The plan is not to play every game on the American Civil War, or even near it, but rather to get a decent sample of the kinds of games that are out there with a bias towards games that are supposed to be good - we are still trying to have fun after all!
After we play each game we will be recording a podcast in association with the YouTube channel/podcast Homo Ludens where my opponent - game designer Pierre Vagneur-Jones - and I will chat with host Fred Serval about the game, what we liked, what we didn’t, etc. Pierre and Fred are also largely unfamiliar with the American Civil War so this will be a good opportunity to balance out my intense familiarity with the conflict with the opinions of two people who are kind of learning as we go. I will also be writing blog posts about the games - either impressions or reviews as merited - and I may also write about a couple of games that I play solitaire rather than with Pierre. Also, since any project like this requires substantial research, I’ll be reading histories of the American Civil War and the Lost Cause and posting reviews of them on the blog as well.
In addition to content about each game I will be attempting to draw together broader themes as we explore the games and I will publish my thoughts on this blog. These posts will probably only start to appear once we have a few games under our belt and I can start looking at the scope of games from a wider view. Don’t hold your breathe is what I’m saying, we’ll be at this a while!
So that’s the plan, for now at least. As we all know no plan completely survives contact with the enemy so I expect this will face revisions as we get deeper into it. We will also be announcing the next game at the end of each podcast, so if you want you can play along with us and let us know what you think about the games!
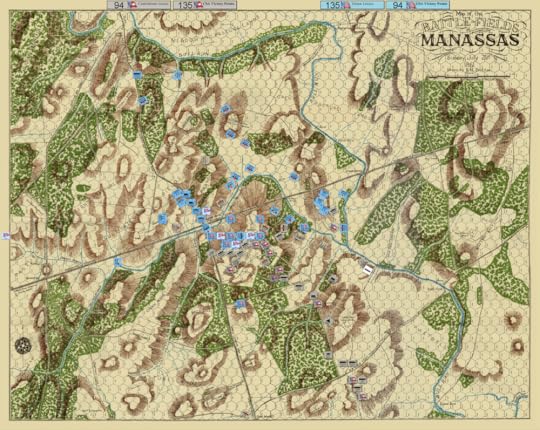
We decided to start the project with the war’s first major battle and a venerable classic, Manassas by Rick Britton, first published in 1980. It seemed only fitting to start the project with an old school hex and counter game about the war’s first major battle. I wrote a very long review of this masterpiece of a game, which I recommend you read. You can also listen to Pierre and I discuss the game with a surprise guest host!
First Impressions: Shenandoah: Jackson's Valley Campaign by Tom Dalgliesh and Gary Selkirk
I love block games. Someday I will maybe be able to fully articulate why the simple fog of war and tactile satisfaction of blocks make my brain so happy, but today isn’t that day. Let’s just start from a position that I love them. However, I do not love them all equally and there are even some block games that I don’t like very much. I have previously written about card driven Columbia block games, most of which I really enjoyed and continue to enjoy, but I had never played a game from Columbia that used any other activation system. I must confess that I didn’t even know how such a thing might work. When I set out to make a study of American Civil War games I knew I had to include a block game and I also wanted to play something on Jackson’s Valley Campaign, so Shenandoah seemed like a perfect fit for the project. It also served as an ideal palette cleanser for myself and Pierre after our lengthy game of Manassas - we loved that game, but playing something that could be finished in a couple of hours had a great attraction after that marathon of a game. I didn’t expect a whole lot from Shenandoah, I was just looking for something light and easy to play, but I was really impressed with the experience it offered. I think people have been sleeping on this one, this is a great little block game!
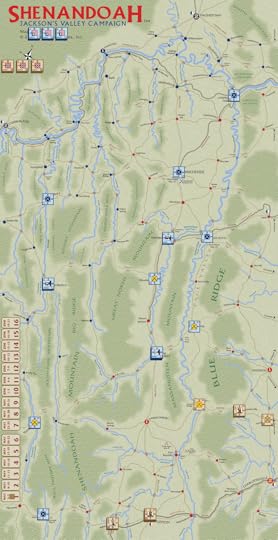
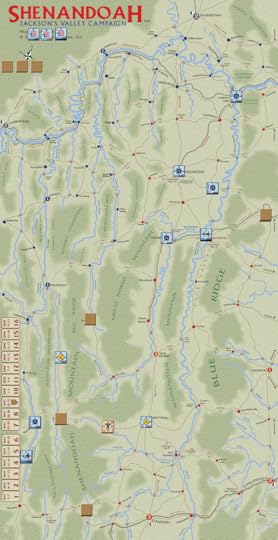
Initial set up for Shenandoah - a long map suited to the long valley we will be battling over

The Union (i.e. me) has taken an aggressive position, pushing south into the Valley, and has met with fierce resistance. These battles do not go particularly well for the poor Union unfortunately.
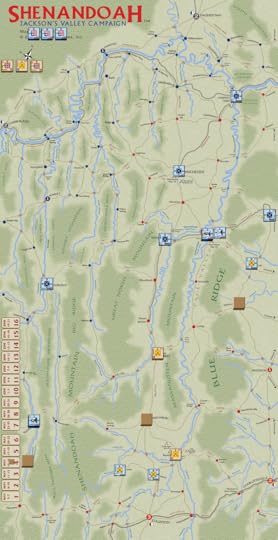
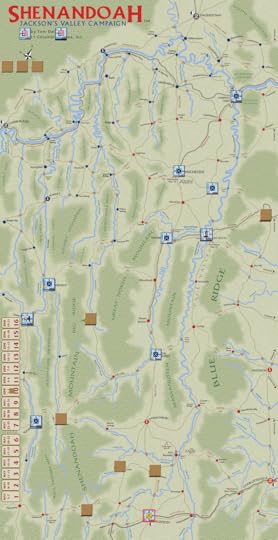
The Union has been pushed back from their initial aggressive position, but two cavalry units have gone behind Confederate lines and will proceed to spend much of the game being jerks and messing with Confederate supply.
Shenandoah is a game about Jackson’s famous 1862 Valley Campaign, where he won multiple battles against Union generals and successfully pulled resources away from McClellan and the Peninsula Campaign in eastern Virginia. The game centres Jackson’s superior capability over his Union rivals, and Confederate allies, which is something I have mixed feelings about but does make for an interesting game experience. Blessing Jackson with superior stats, and making the Confederate units - including the famous the Stonewall Brigade - far superior to their Union counterparts, felt like it was straying a bit into Lost Cause mythmaking. At the same time, this was Jackson’s triumph so an argument can be made that these design decisions aren’t unfounded in the history and I don’t think the game buys too deeply into the myth of Jackson.
The Confederates generally have better units, are less likely to suffer step losses when Forced Marching, and are more versatile thanks to Jackson’s ability to activate any unit, even those under other commanders, and from a greater distance than any other commander. However, they also have to go on the offensive in a game system that favours the defender and seize territory to drain Union resources. If the Union can play a holding game and keep the Confederates at bay with only minimal numbers of troops they can win – delay and harassment are their path to victory.

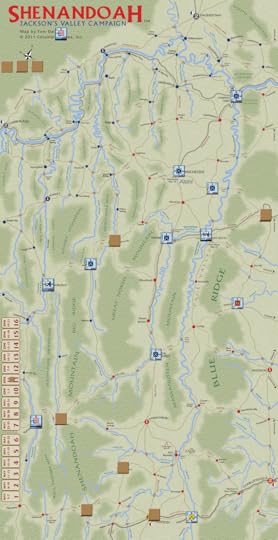
Jackson pushes the Cavalry out of the bottom of the valley but doesn’t eliminate them. Meanwhile, in an uncharacteristic move of competence, Fremont has eliminated Johnson - racking up a lot of VPs and reducing the Confederate options for counterattack.
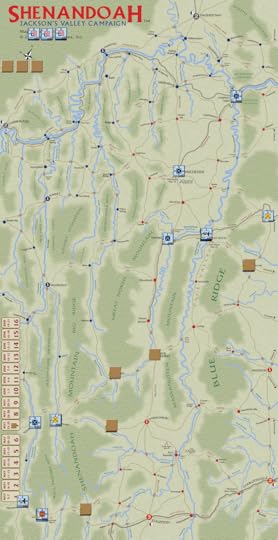
Shields marches off the map at Salem - each of his units adding a VP to the Union side so long as they stay off map for the rest of the game. Fremont’s offensive in the south continues while Jackson has pushed the harassing cavalry out of the valley and into the mountains to the west. Meanwhile Ewell is pushing up the eastern border but is faced with some less than ideal offensive options.
This is a fun dynamic, and one that is enhanced by the game’s relatively low block count and map. The small number of blocks makes the positioning of each unit vital and the map gives you an engaging suite of options to consider when placing them. The game uses a point to point map of the Shenandoah Valley with four different kinds of paths – Pikes, Roads, Trails, and Ferries. The most critical of these is the Trail, which passes through the many gaps in the mountain ranges that carve up the valley. Marching an army through a gap isn’t too much of a problem, the amount of blocks that can pass through a gap is the same as the stacking limit of most spaces on the board. However, only two blocks can attack across a gap, which creates a huge problem whenever you want to go on the offensive.
Gaps can also create bad supply, which doubles the cost of adding steps to any block so afflicted. This is crucial as activating a leader causes a step loss and if you have no steps left on your leaders - a common occurrence for the Union especially - you can’t issue commands. The map presents an amazing assortment of poor options for fighting once you leave the main north south pike, which means that it is very much in the interest of the Union to try and pull the fighting to those kinds of areas. The necessity of maintaining supply, especially in the late game, lends a real urgency to not letting enemy blocks sneak behind your lines.
Jackson pushes further west but has his supply restricted as a result - forcing him to draw supply through a vulnerable gap via New Market. Fremont has given up his southern offensive and pulled back to reform his troops. Ewell has made it further North but still struggling to launch an effective attack.
The game is quickly becoming Jackson’s Southern Valley Campaign as he drives off Union cavalry only to have to chase them to his supply base in Staunton or risk running out of supply completely.
Cavalry being the only unit able to retreat in the first round of combat makes them perfect for this work, as you can send them off on their own to cause mayhem – although once they’re out of command they can only move one space at a time and have to roll on the Forced March table which can cause them to slowly attrition down.
Shenandoah does a lot with a relatively simple set of rules. This is a classic Columbia eight page rulebook with minimal chrome but it still manages to create a lot of interesting asymmetry and evoke famous Valley Campaign. An easy example is the cavalry mentioned above, their ability to retreat in round one is a very small deviation from standard rules but one that makes their role in the game feel radically different.
Jackson retakes Staunton but every other major Confederate division has had its supply lines cut by Union forces. With Jackson at the bottom of the valley and few other options, the Confederate attack seems to be dead in the water.
Similarly, the fact that Union generals all start with only one step while the Confederates have several steps creates a situation at the beginning of the game where the Union desperately needs to be in supply and/or only activate a fraction of their forces because it takes all their supply to recover from activating all their generals in one turn. In contrast the Confederates can afford to be more aggressive early but their fewer supply points could cost them in the long run if they aren’t careful.
In our game the Valley Campaign was a decisive Union victory, and while it is far too early for me to comment on game balance it did make me think about how games should tackle something like the Valley Campaign. In 1862, Jackson greatly outmaneuvered and out outperformed his Union opponents in what has generally been regarded as one of the most impressive campaigns in American military history.
Should a game about this campaign give the player significant advantages to make it easier to replicate Jackson’s triumph, or should it require them to outplay their opponent as drastically as Jackson did in order to achieve similar results? I think Shenandoah picks a good middle path in that it gives Jackson advantages over his Union opponents but at the same time replicated the Confederate victory will take some doing. We shall see if this holds up over further plays, but I’m optimistic.

Jackson drives the cavalry east to Charlottesville - the base for Ewell’s supply. Ewell meanwhile manages to make an attack but Banks marches south and cuts off his supply again. Fremont meanwhile has somewhat stalled in the west.
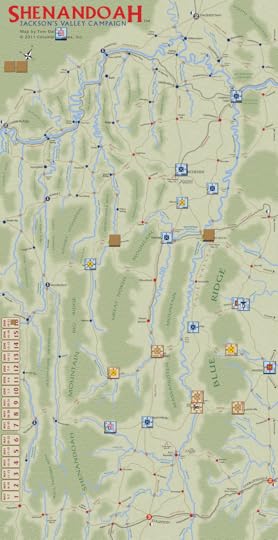
Game end state - Jackson managed to attack back up the valley but it was too little too late, especially with Fremont sneaking in behind him. The Confederate army may not have been eliminated but a decisive Union victory nonetheless.
Shenandoah’s individual elements combine to make a really engaging and relatively simple gaming experience. This isn’t Great Campaigns of the American Civil War, it’s not going to offer you the full depth of the Valley Campaign, but at the same time it does a lot with its simplicity. It also manages to just be a really enjoyable block game in its own right. I’ve played a decent few block games in my time now and I would rank Shenandoah near the top of the Columbia games I have played. I’ve only played it the one time so far so this is very much a tentative ranking, but I would be surprised if more games greatly change this opinion. This is a great little game and one that I think any fan of Columbia block games should try.
April 13, 2023
The Hundred Years War by Anne Curry
I want to say at the start that I think Anne Curry is one of, if not the, most important scholars working on the Hundred Years War. Her work on the prosopography of medieval soldiers is truly astonishing and she has collaborated with many excellent scholars to put out an amazing body of work. That all having been said, it is a black mark on her record that she has written two different books titled The Hundred Years War. I am of the opinion that authors should entirely cease titling their books The Hundred Years War, it is becoming impossible to find them among the sea of identically titled books, but to have one author write two such books is beyond the pale.
The first is the Osprey history of the conflict, a light introduction that is perfectly suited to its target market. I have nothing much to say on it, it is one of Osprey’s better books but still far from my go to recommendation for a history of the conflict. The book I am reviewing is her other book titled The Hundred Years War, this one published by Palgrave with a more academic audience in mind. Having read it now I have to say that I was really impressed, Curry does a lot with what is overall quite a short work and I think this, as much as it will annoy me to actually do it, will be one of my preferred recommendations for an introductory work on the subject. If you’re reading this for some reason Prof Curry, I want you to know that I blame you for all the times I will have to say “You should read Anne Curry’s The Hundred Years War, but not that book called The Hundred Years War, I mean the one published by Palgrave.”
Let’s start with the basics. This is very much a political history of the conflict, you won’t find deep dives into the cultural or linguistic aspects of the Hundred Years War. Instead, this is a detailed but brief study of the main political questions that dominated the conflict, including probably the most coherent explanation of the war’s origins, and the thorny question of why we lump these conflicts together into one “war” and not earlier or later ones, that I have ever read. Over the past year I have read at least half a dozen histories of the Hundred Years War, and many more histories about specific aspects of the conflict, and none have come close to explaining the context and ideas of the war as Curry does in this book. Sumption’s enormous history does a comparable job in terms of getting the details right, but in distilling it down to a fraction of the pages Curry makes it much easier to follow.
That having been said, this will not be dethroning David Green’s The Hundred Years War: A People’s History (thank god for a sub-title – it’s not hard people!) as my preferred recommendation for all audiences. I think Green’s book is a better history for most people as he covers a much wider swath of the war and culture of the period. You get a lot more with Green, and you should because his book is probably three times the length of Curry’s. However, Curry’s book is one of the best introductions for anyone who is interested in seriously studying The Hundred Years War. Don’t get me wrong, Curry is a great writer and anyone can read this book. It is not reserved for the ivory tower of academia. However, the types of questions it addresses, the way it engages with historiography, all of these things make this is a great on ramp for understanding the study of the Hundred Years War and the types of questions that have been widely debated by previous scholars.
While I wouldn’t say that this should be your first book on The Hundred Years War, although you could do much worse, I think that if you are planning to make a study of the Hundred Years War you absolutely should make it the second or third book that you read. Alternatively, if you are interested in historiography and thorny questions like “why do we call this period of Anglo-French warfare the Hundred Years War?” or “how series about becoming Kings of France were the English monarchs?” this is a great introductory text towards answering those questions.
March 20, 2023
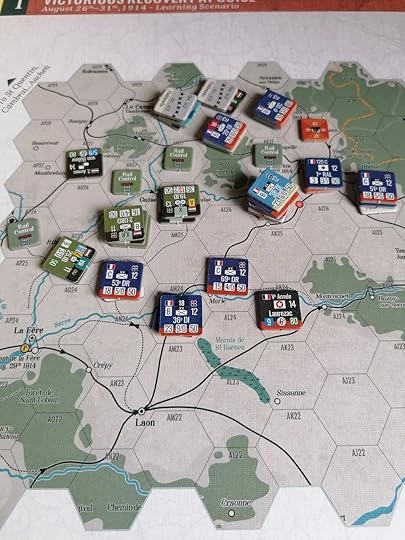
First Impressions - 1914: Nach Paris by Bertrand Munier
I have been admiring the games coming out of Vuca Simulations in Germany for some time. They have a striking aesthetic whose attention to detail and consistent feel across numerous games really stand out. Plus, they are among the best in the industry at box covers. However, their games are largely on World War II which is not a subject I have a burning desire to play games on, if I’m honest. I was still tempted because of their amazing aesthetic, but then I saw 1914 Nach Paris and I thought that this would be a great option for my first Vuca game. While I’m still more drawn to pre-twentieth century games, World War I does hold some interest and an operational look at the war’s opening weeks promised to be really interesting. At the same time, though, it looked like a daunting game in terms of complexity - a step beyond the games I have played so far. Still, I was excited to try it!
Vuca Simulations very kindly provided me with a review copy of 1914 Nach Paris.
1914 is a heavy game, of that there can be no doubt. While far from the heaviest wargame on the market - a competition where there are arguably no real winners - it is definitely on the heavier end of the scale and it is the heaviest game I have tried to learn. No one system in 1914 was necessarily completely overwhelming but the many systems that are in play as well as the healthy layer of chrome on top of it makes for a challenging game to learn. That said, Vuca have done an excellent job in teaching the game.

Each scenario comes with an order of battle for you to lay out all the units you will need. There is no set up per se, instead the first turn involves the deployment of troops from the order of battle onto the map - usually they can take some minor actions as well such as attempting to dig fieldworks.
The rulebook is very clear and full of examples to help walk you through the game’s systems. It is also very well laid out with many internal references to make it easy to look up a rule when you inevitably remember that some rule applies in this situation but cannot for the life of you remember how that rule works. I found reading the rulebook to be genuinely a nice time, something I cannot say for quite a few I have read, even for simpler games. It’s still a lot of game to take on board and after a handful of plays I’m not sure I’ve got it all in my head quite right, but I’m getting there. I will say that it’s not a game where I cannot think of what to do because the mechanisms are so complex I don’t know where to start. Instead it’s a game where I can mostly play it but there are lots of little rules that I’ll forget or need to double check exactly how they work.
The game does a lot of clever little things to help you learn the game. Probably my favourite is the approach to scenarios. While 1914 feels like it was designed with the enormous four map 27 hour long full campaign in mind, it does a lot to divide that experience up into more approachable portions. My favourite decision here is the inclusion of four double-sided A4 sheets with a map section on each. There are also order of battle sheets for each of the eight scenarios played on these small maps and each scenario can be played in under two hours. The expected playtime is often given as between one and two hours but I’ve found myself playing these scenarios in sometime as little as thirty minutes, very nice lunchtime game experience.
Several scenarios are labelled learning scenarios and they are a great way to approach the game one bite-sized portion at a time, easing you into the rules with manageable scenarios with clear objectives rather than just dumping you onto a map of northeast France and asking you to figure it out. I love this approach and I think it’s something that pretty much any publisher of hex and counter games could learn from. I know that including a smaller single map scenario in a larger game is hardly new, my Great Battles of the American Civil War game has one, but the number and variety of the scenarios provided in 1914 is far greater than I’ve ever seen before. Vuca have clearly put a lot of care into these scenarios, they are not an afterthought pushed out with minimal testing but a core part of the experience, and I think there is a lot to be learned from this approach to teaching a heavy game and making it more approachable!

The opening stages of the first scenario now that troops have started appearing on the battlefield. (Apologies for the lighting, I was playing the first turn at night and my set up wasn’t the best).
These small scenarios also make for an excellent solitaire experience. For most of them only one side will be on the offensive, so no solitaire system is really necessary. As someone who prefers multi-hand solitaire I have been enjoying my time playing through these small scenarios on my own. I don’t know if this solitaire-friendly experience will extend to the larger scenarios that use one or all of the map sheets, but there are certainly enough single sheet scenarios to keep me busy for a while!
The game is obviously gorgeous and I’m not sure anything I can say about it can do more to convey that than just looking at images of the game will. However, I do want to point out that I think the graphic design does a lot to keep the game manageable. The amount of information on each counter is intimidating, but after I read the rules I found the counters fairly easy to process and remember. I rarely find myself looking up what a piece of information on a counter corresponds to.

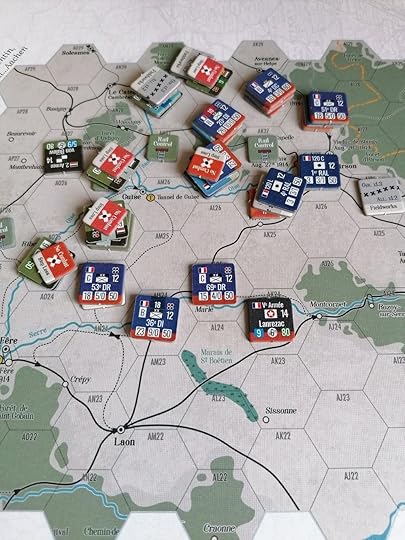
The French offensive pushes past the German left flank inflicting heavy losses - which I of course forgot to mark with the appropriate Step Loss tokens because I forgot. I also forgot to adjust the railroad token. Also the Fieldworks tokens should be on top of the stacks to show who is in them but that made it harder for me to see so I put them under for the moment.There’s a lot to keep track of!
I am generally not a fan of NATO symbols on counters, but I think the design of these ones, plus the density of information on them, makes the choice understandable and I didn’t mind it in this case. Similarly to Equatorial Conflict, the NATO symbols didn’t distract me from the game. The graphic design also extends across the player aids and every aspect of the production - something that might seem obvious, but I have played games that had lovely components but where the rules or other supplementary materials were lacking. The whole package of 1914 shows a loving care to the aesthetics and how it contributes to the play experience - but then I probably shouldn’t have expected any less given Vuca’s other output.
In the North the German’s dig in to fieldworks to attempt to resist further French assaults while they prepare to make their own attempt at turning the French left flank. They have a slight numerical advantage but the French are in fieldworks so will it be enough?
After my first few plays of 1914 I think the thing I enjoy most is the standard combat, i.e. how the system handles infantry and cavalry attacks on enemy positions. The combat strength numbers involved in a fight in 1914 are wildly beyond anything I’ve experienced before, with forces that have 70+ strength points routinely fighting each other, and the fact that it uses ratios makes the calculation of strengths a bit of a challenge. The manual recommends that you limit players’ ability to use a calculator to calculate odds before committing to an attack and I embraced that idea in full - attacking more on gut instinct than carefully calculated odds. For me this is probably what I like least about the combat, big numbers and ratios are not my strong suit. From here, however, it gets pretty great.
The ratio gives you a column on the combat results table (CRT) and then you roll a d20 - yes a d20. 1914 uses a d20 for its CRT and it actually works way better than I expected and I kind of love it. I would totally try more d20 CRTs, even if it can be a little hard to read if you’re trying to find the 12th row in a given column. Once you’ve rolled the dice you are far from finished though, things are just getting started. A number of modifiers are now applied to the result, including terrain modifiers, attacks from multiple hexes, flanking bonuses, and a penalty for having too fancy a uniform. Each modifier will add or subtract to the die roll rather than to the unit strength. If these modifiers are large enough they can trigger column shifts - favourable or not - and land you in a very different place than where you started. It honestly feels a little more reminiscent of Dungeons and Dragons than of any other wargame I’ve played, but also I really like Dungeons and Dragons and unlike D&D no matter what you roll something is going to happen.
End of the first scenario. The German flank attack hit a disastrous spell of bad luck while the center crumbled under French attack and the German right didn’t fair much better. I also remembered the Step Loss tokens this time, which is good as they’re a pretty critical part of the game! Still haven’t tidied up the railroad markers or the lone fieldworks on the right…
Once you know your row, now it’s time to determine the result. You may or may not inflict step losses on the attackers or defenders, but you will almost certainly trigger a Combat Ability (or CAB) test. This is maybe my favourite part of the combat. Each unit has a CAB stat and the combat result will probably apply a bonus or a penalty on that test. For each counter you must roll a d20, trying to roll under or equal to the unit’s modified CAB. I really like this as a way of distributing casualties after an attack. It adds an interesting tension to each attack and makes for a really elegant way of reflecting how both sides can suffer casualties even with one side having advantageous results. For example, a combat result might cause the defender to roll CAB at minus four while the attacker must roll it at plus two. This reflects how both sides will potentially take losses, but tilts the odds in favour of one side. While it can be a lot to test CAB for everyone involved in a huge combat, I love a bit of dice rolling so I didn’t really mind. It can also create interesting situations where if the attacker commits four or five units to an all out attack on an enemy position with just two units, they might get a favourable result on the CRT but they will probably have to test CAB on every one of their counters and could end up suffering more casualties than the defender. The game does let you not fully commit to an assault to avoid this, but then you won’t have as favourable a CRT column because partially committed forces don’t lend their full strength to the attack. There are lots of great decisions to be made here and plenty of tension in determining the results. One of the best combat systems I’ve encountered I think.
While I really enjoyed the standard combat, I am so far feeling a bit more mixed about the artillery combat. The core system is fairly straightforward, but there’s enough additional rules that I at times struggled to remember everything. This was particularly obvious when playing a scenario that involved capturing a fortified position. Remembering the differences between the two types of artillery, one for attacking units and one for attacking fortifications, as well as the rules for combining a fortified attack with an infantry assault on that position was a lot for my poor little brain. It was here that I really began to feel the weight of the game’s rules, and not in an entirely enjoyable way.
I think my frustration with this also partially came from the fact that I most like hex and counter as a system for managing unit maneuvers and positioning. The scenario where I had to take Liege felt like it lacked what I most enjoy about hex and counter and that combined with the headache I was having remembering the artillery rules made for a much less enjoyable game than the first scenario. Some of this is definitely the product of the small scenario I was playing - a larger game would include a balance of maneuvers and attacks on fortifications - but at the same time in a bigger scenario I might be more frustrated by trying to remember how to bombard a given fort as it distracts me from the part of the game I’d rather be playing. It’s too soon to render judgement on this part of the game as a whole, but my first instinct is that I don’t like it nearly as much as some of 1914’s other elements and I personally would probably have enjoyed it more if it were simpler.

The moment in scenario two where the Germans first broke into Liege - from here there was very little the Belgians could do to hold them off but resolving all the remaining attacks on forts was mentally a bit grueling for me.
My initial impression of 1914 Nach Paris is that it is a very carefully designed game that has been lovingly developed and graphically presented, but I’m not entirely sure if it is the game for me. I think for enthusiasts of World War I, particularly people who like heavier games, this will be a must play. The way it is so devoted to representing specifically 1914 will really help it to stand out when compared to other games about World War I, but it may be a little too simulationist for me to reliably come back to play it again and again. I would probably have more fun with a game that shed a bit more of the historical nuance in favour of simplicity.
That said, I am still playing scenario after scenario of 1914 Nach Paris and I’m interested in seeing how more plays will shape my thoughts, so look for a full review coming from me once I’ve had more time to play and digest this majestic beast of a game. It may not be destined for a permanent spot in my collection, but I am having a lot of fun with it and it may end up being one of my most played games this year.
March 6, 2023
Review - Manassas by Rick Britton
I grew up in central Virginia with a father who is something of a Civil War history enthusiast and a casual wargamer. This meant that my childhood was steeped in Civil War history and my house had a small but influential selection of American Civil War wargames. I never played these growing up, at least not beyond convincing my father to set them up and let me and my brother push counters around with only minimal regard for the rules. However, when I started getting into wargaming in early 2022 I asked my parents if there was any game they would be willing to send to me to try. My father picked Manassas by Rick Britton, a venerable classic first published in 1980. He had bought it directly from the designer, who lives in my hometown, in the early ‘90s on someone else’s recommendation but had never gotten around to playing it. I can see why, Manassas is a daunting game in terms of its scale. The game map is three feet by four feet, far too large for most tables and for that reason it took me most of a year to get it to the table. However, when I decided to do my project on American Civil War games I knew that this one had to be the first game my companion and I played. I’m so glad we did, this game is goddamn amazing.
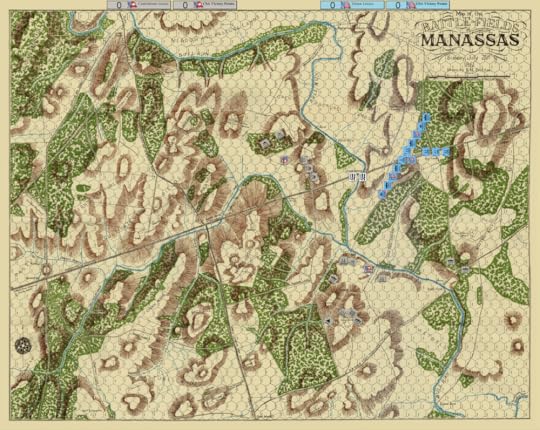
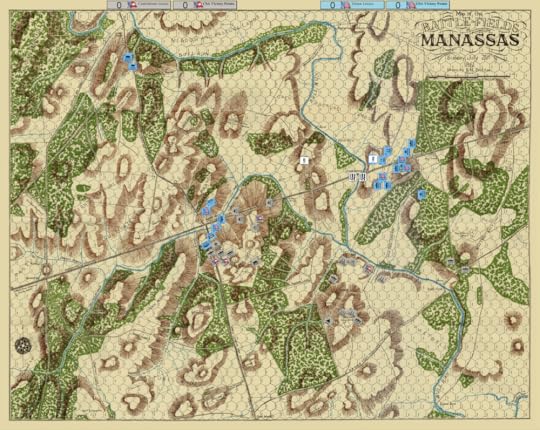
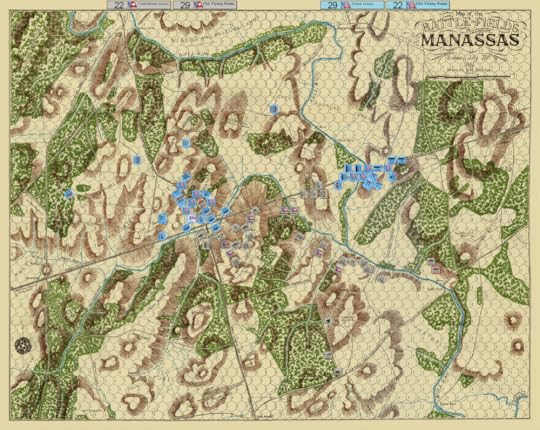
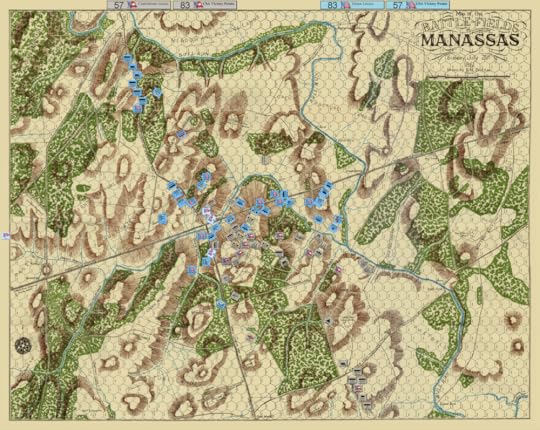
The initial deployment - Manassas allows free deployment of some units within given constraints. Only a very small number of counters start on the map and most of those are restricted in their position for the first third of the game. The remaining troops will arrive by the roads. I also want to note that experts will definitely note some errors in this game, we made mistakes, please don’t judge us for it!
Before I get into why Manassas is great, and why it’s a tragedy that it is out of print, I should provide some explanation of what it is. Manassas is a hex and counter grand tactical game covering the entirety of the First Battle of Bull Run. It is a brigade level game, i.e. each counter represents a single brigade, with a significant emphasis on maneuver and positioning. Each turn of the game represents fifteen minutes of real time in the battle and players take command from it’s very start on the morning of July 21st, 1861 until the early evening. Reinforcements will arrive for both sides over the course of the day and victory is determined by casualties inflicted on the enemy as well as control over the map’s geography at the end of the day. An interesting wrinkle the game includes is that unit strength is not printed on the counters and instead is tracked on a separate sheet so each player knows the strength of their own units but must try and remember which enemy brigades have been worn down and which are still at full strength. Morale also plays a central role in the game as disrupted and routed units will flee the front and must be rallied and brought back into the fight. It’s as much a game about how you approach the battle and where you draw your lines of attack and defense as it is about the individual combats. While it is relatively minimal in terms of counters it manages to feel immense.
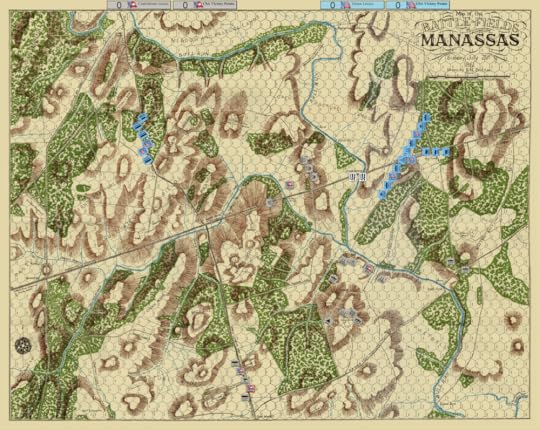
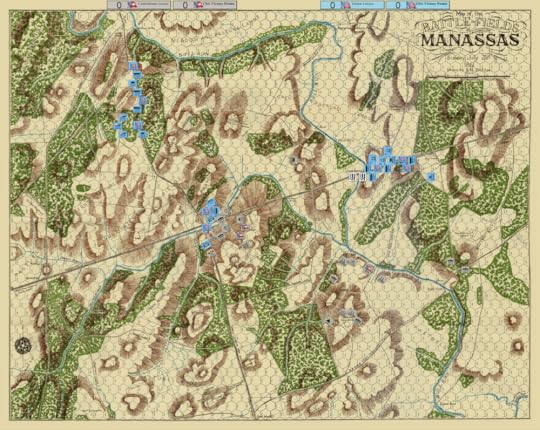
Reinforcements for both sides arrive, the initial combat will be between these divisions and not around Bull Run which for the time being is largely a staring contest.
At its core Manassas is not a very complicated game. Each turn you resolve rallying and fleeing units, artillery bombardment, movement, and then combat in that order. The core rules for these are all pretty simple. Each counter has a movement value printed on it and they move that many hexes by default. Some terrain will slow or prevent movement entirely and if units are in column formation (changing formation is easy, you just spend two movement points) they get bonus movement as long as they move along a road. Combat is a matter of summing up unit strength comparing it to enemy defense, adding any terrain bonuses, then finding the correct ratio column on the table and rolling on that. It is very minimal in terms of elements that can cause column shifts or DRM modifiers. So far so fairly light hex and counter.
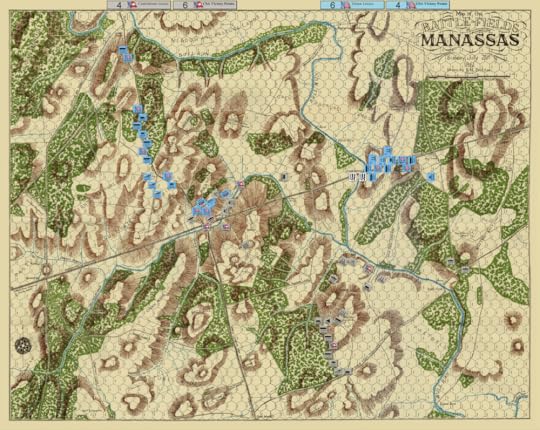
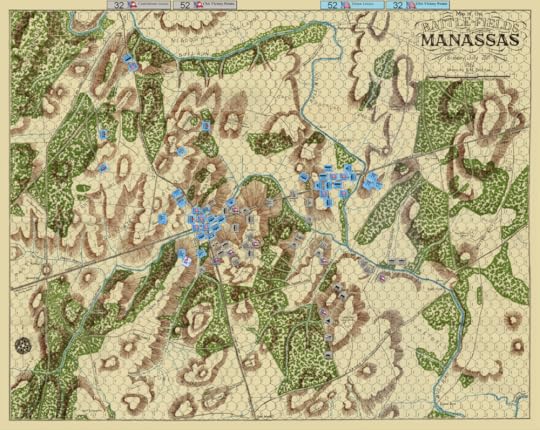
First contact! Much of the battle, like it was historically, will be fought around Henry House Hill here. No casualties have been suffered but one Union brigade has been disrupted, which is almost worse in this game. Two artillery divisions on the east are marked Engaged as they are stuck in an artillery duel.
Artillery bombardment is not much more complicated than movement or close combat. You total the number of guns you have shooting, which will give you a DRM for your roll, add any other relevant DRMs and then roll on a table based on the range you are shooting at. Each distance has two results, one for rifled and one for smoothbore guns. That’s about it. In play you can take risky shots at enemies from long range or you can wait until enemy troops close for more deadly short range firing. The reason you might want to wait is that you only have a limited pool of ammunition and over the course of a very long game you will want that ammunition. Ammunition is tracked on a separate sheet and thus hidden from your opponent, so they might be trying to remember if you shot five shots or six and do they feel lucky before they launch that next assault.
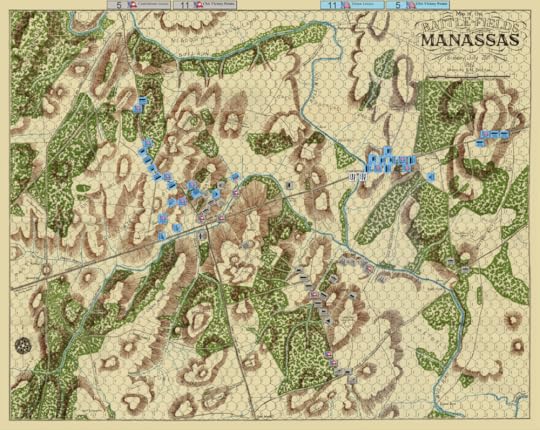
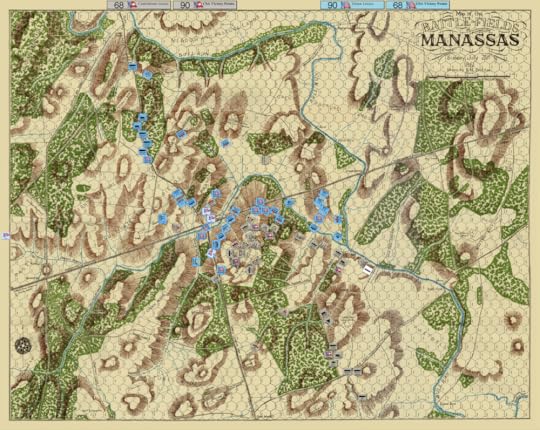
The Confederacy stakes its claim to Henry House Hill but McDowell and a large Union force are coming down the road. No casualties yet but the Morale effects are mounting on both sides. In the East Tyler is approaching Stone’s Bridge but can’t cross until the Union player succeeds at the Tyler Seizes Initiative check.
Tracking all of this hidden information is relatively straightforward - especially in the surprisingly robust Vassal module - but I did struggle a bit with all the different unit names. The artillery in particular could take me a surprisingly long time to grasp which line on the reference chart referred to which counter on the map. If you’re an expert in the structure of Union and Confederate armies in c.1861 this may not be as much of a barrier, but to a neophyte to these finer points like myself it was a challenge. Still, I liked it as a mechanism - it reminded me a bit of Napoleon 1806 - and I think with a little more polish to make it easier for ignorant types like me to use and it could be nearly perfect.
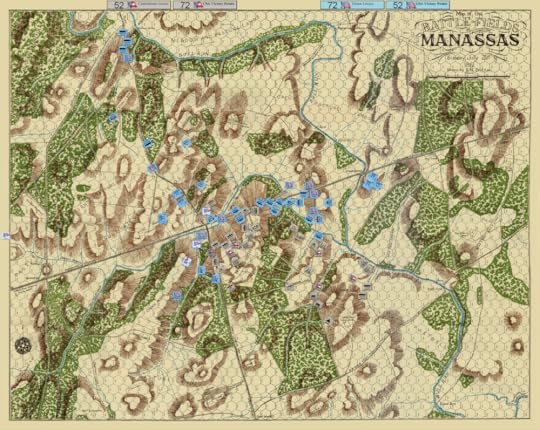
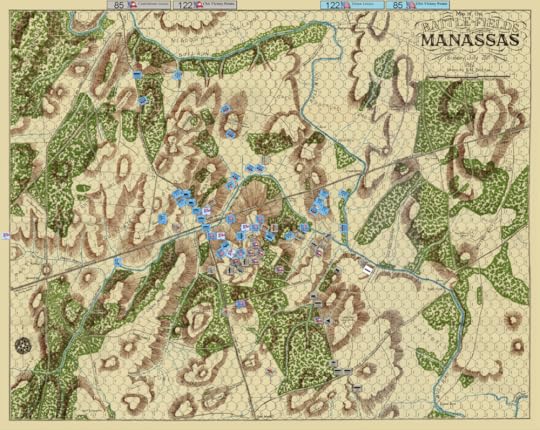
First blood! Both sides have suffered casualties - each Loss is a victory point for your opponent so you can see the current count along the top of the map but not which units have actual taken the hits which are tracked in secret. The Confederates continue to push the Union back but with a new wave of blue soldiers nearly there and their own still in the distance have they been too aggressive?
So far the game might seem relatively light, at least for the type of game it is, but Manassas adds many layers of chrome on top of this simple structure to make for a more complex experience. This chrome includes things like rules governing the different command structures of the Union and Confederate armies, including who can influence Command Control over which brigades and who can attempt to Rally which units. There are rules governing when General Tyler finally seizes the initiative and attempts to cross Bull Run and when General Cocke can abandon his position at the river fords to support the other positions. There are also rules for bayonet attacks, cavalry charges, avoiding combat, killing generals and promoting their replacements, and the capturing of artillery.
The Union has arrived in force and the casualties are beginning to accumulate but the Confederacy has decided to try and hold this hill for as long as they can.
I don’t think any of this is unwarranted - although I personally would have put capturing artillery under the Optional Rules - but it does make Manassas a fairly complicated game. I think overall this is a good use of the game’s complexity budget, though. By keeping the core of Manassas relatively simple it allows for all of this nuance and detail to be built on top of it without making it unwieldy. You’re never at a complete loss as to what you can do in Manassas but, especially on your first play, you will often find little rules that you forgot as you play. It is just a lot to keep in your mind, especially if you aren’t familiar with the American Civil War and this battle in particular. I will say that there are a few ways the game could have made this a little easier to track. The manual could be a little easier to reference and there is probably room in the graphic design of the counters and terrain tables to simplify things and provide useful reminders for key rules. This is of course hardly unique to Manassas and I could be describing any number of wargames with this critique!

McDowell and the main Union force push the Confederates off their hill and across Young’s Branch river, but Thomas Jackson (not yet “Stonewall”) has taken up a defensive position on Henry House Hill for the forward forces to fall back to.
Meanwhile in the East Tyler succeeds at seizing initiative earlier than his historical counterpart and begins the slow process of clearing the abatis and crossing Bull Run
The description above may sound interesting, but it probably doesn’t sound amazing and I’ve promised you amazing. What makes Manassas amazing isn’t some innovative mechanic or twist on a familiar formula that fundamentally changes the play experience. Instead, Manassas excels by being far more than the sum of its parts. I’m going to try my best to explain how these elements come together to make one of the best gaming experiences I have ever had playing a hex and counter game. I will also cover some of the downsides, because while it is an amazing game it is not perfect and it is definitely not for everyone.
McDowell and Tyler’s attacks begin in earnest but to mixed results - one of Schenck’s units in the east is routed by artillery fire while in the west the Union is slowed by crossing Young’s Branch. There are also already several routed Union units scattering through the wilderness.
Let’s start with Manassas’ most indulgent but potentially best feature: its stupidly big map. The map is two sheets that when combined span three feet by four feet (or approximately 90cmx120cm for those more metric inclined types). It’s insanely big and when I first started playing I thought it was a little absurd, even if the map is gorgeous. However, after only a few turns I really began to appreciate all of the thought that went into the map and all of the possibilities it entailed. You probably won’t use every part of the map every game, but you will use a lot of it and over several games you absolutely could use basically every one of these hexes. Movement and control of the geography of the battle are the beating heart of Manassas and this map brings all of that to life with minimal effort. The actual rules for terrain are relatively light but the network of roads, forests, and hills, plus the two main rivers, together create more than enough decisions to keep you busy and, perhaps more importantly, to constantly make you wonder about the road less traveled.
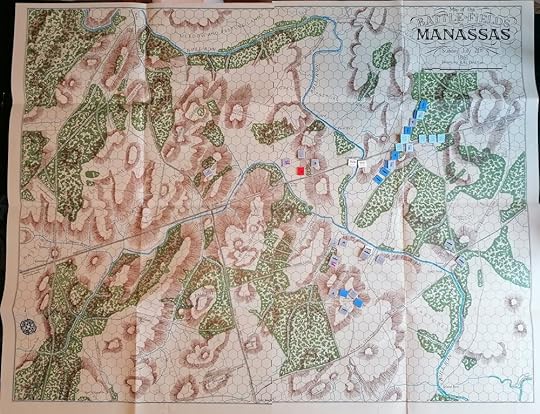
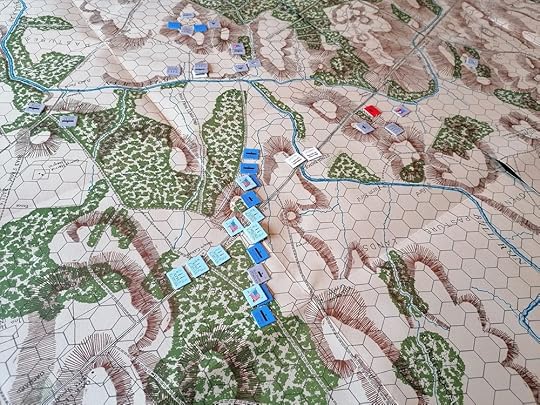
I had to show off the gorgeous physical map for this one. This is what the actual game looks like set up - sadly my opponent and I live in different countries so we will have to wait a while before we can play with the physical game.
Did it make sense to move those troops down the shortest road to attack the enemy position? What if you had tried flanking on another road? Sure it would have taken longer, but then maybe you could have avoided this goddamn hill you keep trying to attack up. It’s hard to explain just how much the map affects your decisions in Manassas but after months of playing hex and counter games with fairly minimal terrain on maps that might as well be blank I am completely in love with the approach on offer here. One thing that I will probably say about Manasssas several times is that it’s not a game that could be about any other battle - it is ground up built to be about First Bull Run. A major part of that is the design of the map and how closely integrated it is with every other decision in the game. Moving this system to a different battle would require rebuilding pretty much the whole game from scratch starting with the map. It is no exaggeration to say that I cannot wait to get this map out again and try something different with its expansive network of roads and hills.

Tyler has crushed the easternmost position of Confederates north of Young’s Branch, putting the whole southern position behind the river.
Meanwhile, to the west a lone Confederate attack is threatening McDowell’s position, forcing a roll on the ever scare leader casualty table!
I feel like I’m becoming a parody of myself, but we need to talk about this game’s combat results table (CRT). I’ll get the downside out of the way first: it uses ratios. I don’t like calculating ratios, summing up each sides’ strength and defense and then figuring out if it’s 1-1 or 3-2 or 2-1. It’s not for me. I’m bad at math at the best of times and in the midst of a game is not me at my best. However, this is hardly unique to Manassas and I can’t complain too much about it.
McDowell is killed outright! The overall Union leader is dead, forcing a series of field promotions and a reorganisation of Union command, plus giving the Confederates a hefty 10 victory points.
That was the Bad, let’s talk about the Good and the Weird. The thing I like most about the CRT is that it uses 2d6 rather than the more common d10. I like 2d6 because it produces a very different distribution of results, tending to cluster around 6, 7, and 8, rather than every result having an equal probability. This creates some really interesting design options around how you lay out your CRT. Which brings us to The Weird - the results on the CRT are absolutely insane. On several instances we would roll a result, say a 9, and realise discover that it was a terrible result for us but if the odds had been one column worse for our side the result would actually be better! Usually by the middle of a game you have an idea when you’ve rolled well and when you’ve rolled badly, but in Manassas we never knew if the result was good for us until we checked the CRT. It created truly wild amounts of chaos in our game and I could easily see it being one of the most controversial elements of the design. But me? I love it.
The death of the Union commander can hardly be cause to stop the attack, though, and the Union is now coming at Henry House Hill from two directions. Attacking up hill is punishing in this game, but the Union brigades are strong and many of them fresh. More reinforcements will be coming for the Confederacy but will they last that long?
I would love to see someone do a statistical model of the distribution of results on the CRT and the probability of rolling them, I’m genuinely curious. Chaos aside, I would not accuse the game of being overly random. In general, being in a more favourable combat position will yield more favourable results. What the CRT adds is a sufficient dose of anarchy - remember you are fighting with barely trained soldiers who have never seen combat before - to keep you on your toes all the time. Despite the CRT’s chaotic nature overall I never felt like my successes or failures on a grand scale were beyond my control to mitigate or that I was not at least partially to blame for the setbacks that I faced. The game is played more in positions and strategic movement than it is in any one combat so the CRT can hurt you but it is not the sole cause of your failure.

Slowly the Union makes progress on the eastern edge of Henry House hill but the western side doesn’t look so good. However, the last wave of fresh troops is coming down the road from the North - will they be enough to break the Confederate position?
I’m increasingly aware of the fact that I love games about maneuver and deciding where to fight and when to give or take ground. Manassas is a king among these games. The core of the game is fighting for key terrain. Beyond that, though, you will spend lots of the game bringing in new reinforcements as the battle escalates and both sides commit ever larger portions of their armies to the fight. In this regard the game is almost more about the approach to battle than it is the battle itself. Picking where to move your reinforcements, and the pressure of whether they will arrive in time, is so stressful. That agonising feeling of wondering if your front line will hold for long enough for fresh troops to reach it. Should you just rush these new soldiers to the front as fast as possible or would that just be throwing more troops into the meat grinder? What about attempting a flanking maneuver or setting up a fall back position? For artillery you need to pick where to position them for the best coverage over the following turns since artillery cannot fire and move on the same turn. You also have to balance smaller decisions around when to switch formations as units in column formation are more vulnerable to attack, especially by artillery, but if you switch too early you’re just wasting movement points that could be used better next turn. There’s a lot of decisions to be made every turn and the stakes always feel high.

The Union continues to push up the hill and is even beginning to reach the top of it in places, allowing them to negate the defensive bonus the Confederates have been relying upon until now. There are still more troops coming down the road for both sides and some fresh Confederate troops are coming to shore up their line on the hill.
The movement and combat elements of Manassas combine to deliver on one of Manassas’ greatest elements: how it captures the ebb and flow of battle. Positions are assaulted, taken, attacks repulsed, and flanks crumbled by truly horrible results on that maniac of a CRT. With only a minimal element of prescriptivism in terms of unit movement and deployment Manassas manages to capture the feel of a battle from this era. You also experience the anxieties of a commander as you seize strong positions only to see your units crumble, forcing you to either fall back or take them again. We played at least six turns where each one felt like it could be the last turn of the game but both sides tenuously held on through them all. One Union attack on Henry House Hill felt like it would be the end for my Confederates but their aggressive position put them in point blank range of my guns and the subsequent artillery barrage routed huge swaths of the Union line completely changing the state of the field. This kind of thing didn’t just happen once, it happened almost every turn!
A fairly disastrous turn for the Confederacy sees their lines crumble in the north east, but for the moment they’re still holding it together. Further east Sherman’s troops are routinely failing to cross Young’s Branch and Tyler has completely crossed Bull Run.
Manassas really threads the needle in terms of nudging players towards historical strategies and outcomes but without being prescriptivist. In my game at a critical moment Thomas Jackson and his brigades had to hold Henry House Hill against a Union attack from two directions until Jubal Early could bring up reinforcements to secure the position. This very neatly emulated the historical battle, which gave Jackson his “Stonewall” nickname, but no rules explicitly pushed me into this. Manassas also eschews giving units special abilities to, for example, help ensure that Jackson’s units hold when another one might not and thus more reliably recreate history. There are no special rules for the famous “Stonewall” or Irish Brigades even though both are present here. Instead all units and commanders are the same, excepting only difference in unit size and strength, and this makes Manassas feel highly organic. Like an enormous sandbox for you to play in but one that teaches you without you even noticing because it’s so subtle. It’s really quite brilliant.

The Union pushes all the way onto Henry House Hill on the north (here showing the various movement tracks) and is making a major push in the west. They have also positioned Tyler’s guns on a hill in the east, while to the South Jubal Early has arrived with a small number of fresh troops.
Let’s talk aesthetics for a moment. It would be an understatement to describe elements of Manassas’ appearance as “old school”. The game was published in 1980 and I would guess that no part of its aesthetics ever touched a computer. This is all hand drawn components. The map, as already discussed, is gorgeous. The counters are a little simple but they include some really nice touches. The greatest of which is definitely that the width of the bar representing each corps aligns approximately with the unit’s starting strength - but only approximately. It’s enough to give you the gist of what you’re up against but you can’t rely solely upon it, especially once casualties start accumulating. It’s a lovely little bit of fog of war, offering a tantalising taste of information which will have you sweating bullets as you plan your attacks. It’s great. I think the artillery counters area little busy, particularly with regard to the names, and it would be great if the counters had some kind of indicator to remind you of divisional structures, but overall they’re very functional and add a lot to the game.
Things looked bleak for the Confederacy going into their turn, but a wave of withering point blank artillery fire has driven the Union back and routed several strong brigades. Once again the Confederate lines have been shored up and the Union must attack them. This moment really captured the ebb and flow of the game and its constant tension!
One interesting decision that Rick Britton made, and which is made more impactful using an optional rule I haven’t tried yet, is to use the actual historical colours of the brigade’s uniforms for the counter colours. This might not seem like a dramatic decision, but you have to understand that in 1861 the two sides had yet to settle into their archetypical blue for Union and grey for Confederate. Some Union troops wore grey, some Confederates wore blue, and some from both sides wore the distinctive red of the Zouaves. The Vassal module we played on removed these colour distinctions (with a small exception, when you click on your own units it changes to the colour if it is different from the default) which was mostly good for the sake of simplification but I think it actually went a little too far. The Union also has a group of Federal Regulars, practically the only trained soldiers present, which are distinguishable because their counters are a lighter shade of blue - except the module removes that as well so you have to track them by knowing which units they are. I don’t think this had a significant impact on our game, but since I was playing the Confederates and couldn’t easily see where the Union regulars were I couldn’t regularly remind my opponent of their special rules, which mostly involved ignoring Command Control limits and not being disrupted if a routing unit runs through them. The multi-coloured counters is an interesting decision and I like that it reflects history, but both the original vision and the Vassal amendment seem a little messy.
Here is the physical game showing the range of counter colours. You can see the light blue Federal regulars and dark blue troops who have been untested in combat. Sherman has one brigade in grey while across the river are Confederate Zuaves in Evan’s division and some dark blue Confederate artillery.
I’ve heaped a lot of praise on this game, let me lay out some negatives. Let’s do them as bullets!
At times the Chrome is a bit much and there are a few rules I probably would have shunted to Optional rather than keeping them in the core rules. For example, capturing guns is a lot of bookkeeping, I would have had spiking them be default and capturing be an optional extra for people who already know the game pretty well. There are also some rules that could use additional clarity. Retreating in particular seemed to cause us regular consternation as we hit weird edge cases we weren’t entirely sure how to untangle.
Manassas is super long, do not trust the estimated playtime of four hours given on Boardgamegeek. We played for around a dozen hours for just one game. Now, that was over multiple sessions so we had to do a fair bit of relearning and Vassal is often a little slower than in person play, but still. I would believe that Rick Britton could play this in four hours when he was designing it, but for most people this is going to be an all day game.

Once again the Union troops push against the Confederate lines and push them back, taking ground on the hill. However, the Union has now suffered over 100 losses which means their morale is very low and they can no longer Rally any units, especially with McDowell dead. That means any result of Disrupted or Routed from this point will be permanent. The Confederacy may be losing its position but the Union army is on the brink of collapse.
I really like the chaos of the CRT but its unorthodox distribution of results and the difficulty in knowing how best to optimise your combat results could really irritate some players.
Sometimes you just need to be prepared to embrace a more Vibes based approach to playing the game. On the map terrain types often bleed into neighbouring hexes and you could probably spend hours arguing over the specific of drawing line of sight in some parts of it. You need to be willing to agree a ruling with your opponent and keep the game moving, this is not the kind of game to play with someone who needs to have every single possible situation addressed within the game’s rules. This didn’t really bother me and I think it’s true of quite a few wargames, but if you’re a hardcore simulationist it may not be for you.
On the whole, these are all very mild criticisms but I do think I need to raise them because for some people they will matter more than they do to me. Not every game is for everyone, and that’s fine.
Fresh Union reinforcements push the Confederates further back off Henry House Hill, but to claim the Hill for victory points they have to get them into the woods and across the nearby creek and roads, a tall order for them. Meanwhile in the East the Confederates are crossing Youngs Branch for the first time in many turns.
With my heaping praise on long out of print obscure hex and counter game The Flowers of the Forest last year I really feel like I’m running the risk of being the guy who recommends out of print games from decades ago and I don’t want that. A lot of older games are not that great and are out of print for good reason - don’t let people tell you that you need to go back and play all the “classics” from prior generations. Play the stuff that’s good now. That said, there are some genuine gems hidden amidst the mass of mediocre cardboard and it is borderline criminal that they are not more available. Manassas is one of those gems - this game has a deeply old school feel but at the same time except for it’s obviously 1970s aesthetic it feels like it could have come out a few years ago, the design is that fresh and engaging. This is a phenomenal game.
The Union claims the north of Henry House Hill but the Confederacy manages to put together a surprisingly solid line on the southern end of the hill and is even beginning to threaten turning the Union flank. Meanwhile one of Cocke’s brigades is attacking the Union artillery on the hill in the east.
The good news is that Compass Games has signed on to do a reprint of it and I really hope they give it the love it deserves. I think with a little bit of polishing in a few places this game could be an all time classic. That said, I’ll be keeping my original copy - it’s signed by Rick himself and it’s a gift from my father, who sadly never got to play it and isn’t really in a position to play it now. I hope one day at a convention to find the time and space to get it out and play it properly with the physical components instead of just on Vassal. I’m not willing to commit to saying that Manassas is the best game I’ll play all year, but I will say that I would be shocked if it isn’t on my best of the year round up in December 2023. This is a great fucking game.

The final game state - after twelve hours over eight sessions we agreed to call it here with a few turns still to go. The Union weren’t going to full take Henry House Hill in those turns but neither would the Confederates retake any lost ground. We removed the Routed units that could no longer be rallied, adding their losses to the VP total, and the result was a Tactical Confederate Victory - significant VP margin but they had lost control of the Warrenton Turnpike. Reasonably comparable to the historical outcome.
I hope you enjoyed this review, it took a long time and a lot of work to put together. If you enjoyed this, or any other content on this blog, I would really appreciate it if you would consider buying me a coffee (or a pint if you prefer) on https://ko-fi.com/stuartellisgorman. Any funds raised will go into the maintenance of this website and the creation of further content for it. Many thanks!
February 27, 2023
Review - Nevsky by Volko Ruhnke
I must confess to feeling some trepidation when I wrote in my review of Almoravid that while I liked Levy and Campaign’s Iberian excursion, for me the original Baltic flavour was superior. You see, at time of writing I had just wrapped up several months of playing Almoravid and I hadn’t so much as opened Nevsky in weeks let alone played it. I couldn’t help but wonder if I was viewing my experiences with rose tinted glasses. After all, I’d only played a few games of Nevsky, all of them solitaire, and hadn’t even written a review of the game. I was thus very excited when news came out that Rally the Troops would be adding Nevsky as the site’s next game. Now I could finally give it the thorough exploration it warranted and determine with certainty whether the sentiments I felt so keenly after playing Almoravid were still true months later. I’m happy to report that they are! While I do have some quibbles with Nevsky, which we’ll get to, I’ve fallen in love with it all over again and found new depths to its design that I hadn’t appreciated before.
The release of Nevsky on the thoroughly excellent free online tabletop gaming platform Rally the Troops, now with revised second edition rules, was the perfect opportunity to revisit the game and finally log some serious playtime against real human opponents. If you take nothing else away from this review please remember this: the implementation on Rally the Troops is amazing! Nevsky, and Levy and Campaign games more generally, pose a challenge to playability in terms of both table space and length of game and having an excellent digital implementation like this makes it much easier to play this excellent game. You can even play on your phone, although I’m not sure I’d recommend it. The interface is a little worse on mobile, but the real problem is that it represents a grave potential risk to every other aspect of your life should you find yourself playing four games of Nevsky simultaneously while trying to cook dinner. To choose an example entirely at random.
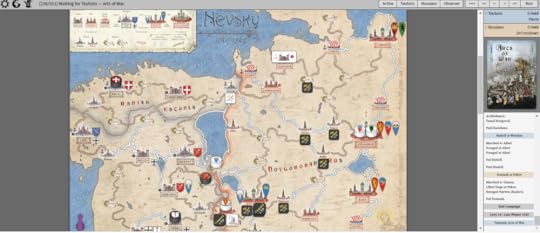
The implementation loses none of Nevsky’s beauty and offers an excellent player experience, including enforcement of the game’s rules. No better way to learn!
If you are not familiar with Levy and Campaign games at all, I will do my best to summarise. They are operational level games of medieval warfare designed (so far at least) by Volko Ruhnke and published by GMT Games. They emphasise the more mundane elements of medieval war such as the limits imposed by military service from vassalage, feudal relationships, and the logistics of feeding and paying an army as it marches through both friendly and enemy territory. In this review I won’t be going over the basics of how Nevsky actually works, if you are interested in that I recommend reading one of my previous articles on the system or, if reading about how games work isn’t your thing, I personally recommend this video. In this review I will be focusing on the elements of the game I think are interesting or worth writing about rather than covering literally every aspect of the game.
What I Love About Nevsky:
A game of Nevsky is a logistical nightmare and that misery makes my heart sing. An excessive assortment of transport including Carts, Boats, Ships, and Sleds spread across three seasons each of which comes with its own limitations makes for a very challenging puzzle that is constantly shifting as you play. I love having to balance my transport and the requirements of feeding my army across multiple turns. I must balance the needs of the present season with ensuring that my lords are adequately positioned and provisioned for when the weather changes. Winter lets you use just sleds to take any path you want, so you can invest heavily in them, but come spring the rasputitsa renders all those sleds (now carts) worthless and restricts you to just waterways should you plan on bringing any food with you. Suddenly you’ll wish you invested in some boats or ships. All these transport options make the game’s Levy phase feel tense as you have more things you could use than you can reasonably add with your limited Lordship values. You want more vassals but more vassals means more demand for Provender which means you need more Transport but you really wanted to get some Capabilities to improve your other options. It’s frustrating in the best way - which may be the best summary of Nevsky overall.
When I first played Nevsky I wasn’t entirely impressed with its map. Sure it was gorgeous, of that there is no doubt, but I worried that the limited crossing points between the Rus and Teutonic regions could cause the early stages of each game to feel repetitive. With only a few potential opening gambits the first few turns of the campaign could grow stale. As I’ve played it more I’ve really come to appreciate how complex the map is. In particular the distribution of roads and waterways creates some very thorny problems, especially in the rasputitsa when it is impossible to transport food by roads. More than once I’ve had an army get stranded with nowhere to go because the river I thought they were safe on actually dead-ends on a crossroads and I’ll starve if I try and march down the subsequent roads. In my first games I’d also focused too much on how the map handles movement from east to west and hadn’t fully appreciated the complexity of north to south movement. Sure in the very first turn of the larger campaign game the Teutons will need to push east and seize territory via one of only a few available paths, but once that is over it very quickly opens into an array of thorny problems about what to do next. The range of options it creates and the complexities that come from it are much greater than I had initially thought. Also it is still very pretty.
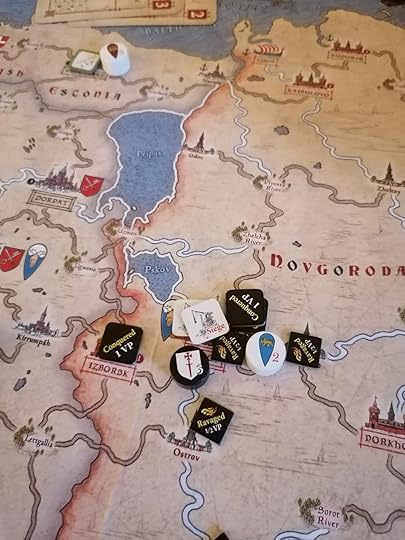
The game is absolutely gorgeous, the map especially but also all the other pieces. Just a joy of a physical object.
In Nevsky you have to feed your lords and keep them supplied because if you don’t they’ll pack up and go home - maybe forever. This has always been the part about Levy and Campaign that excites me the most: it models feudal relationships and limited military service. That’s some dorky stuff I know but it’s one of the fundamental elements you have to know about to have any understanding of medieval warfare and it’s great to see a game finally dig into that. In my review of Almoravid I said I wanted lords to go home more often and having returned to Nevsky I’m actually very happy with the frequency with which Lord’s move between game map and calendar, particularly during the grand campaign. You never have enough command cards in a given turn to use every Lord in your roster but if you ever have no Lords on the map you automatically lose so there’s a careful balancing act around how long to keep each Lord on the map. Can you afford to send them home now? What if things take a turn for the worse next season? You also have to weigh the risk and advantage of Event cards that can shift when Lords can be available again, so maybe you’re sending that Lord home now but you know he’ll be back pretty soon. Of course at the same time, what if your opponent draws an Event that sends a Lord home early? Do you have contingencies in place to manage that? You can use Coin to extend service and, especially in longer scenarios, it is possible for the Rus to build up quite the war chest, but it never felt like there was so much Coin that either player could totally ignore the service limits and need to feed their armies.
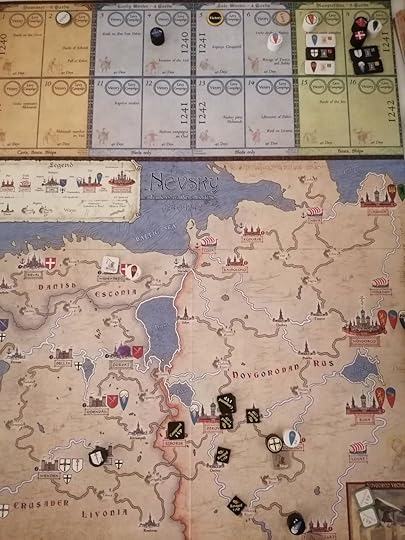
The combination of game map and calendar is such a clever solution for how to model time limited service. It makes what could have been a very confusing concept visually clear and easy to parse at a glance.
I really appreciate Nevsky’s somewhat understated asymmetry. There are plenty of obvious differences between the Teutons and the Rus: each Lord has unique stats, the sides have different events and capabilities, and the Call to Arms is different for both. That’s great but the way things shake out is actually less dramatic than in Almoravid. The Teutons by and large pack a bigger punch - they get more units and better ones and their fortresses are harder to take. However, if the Rus fully mobilise, especially if/when Aleksander Nevsky himself shows up, they can be a force to reckon with. Add to that there are times when the Teutons really want to go fast and lean, not bringing their full army with its hungry stomachs, and you create a situation where in general the Teutons have an advantage but if the Rus pick their moment right they can crush Teuton lords one by one. Nevsky strikes a good balance for me in that it feels different to play the Rus and the Teutons but at the same time I don’t feel like either faction entirely dictates how I have to play the game. If I want to focus on fast raids with small armies I can do that with either side or if I want to summon vast hosts and crush my enemies in the field I can do that too.
We should probably talk about combat - for many people I suspect this would go down as a negative but while combat is far from my favourite aspect of Nevsky I really appreciate how it affects the gameplay. The thing about combat in Nevsky is that it’s highly random - you can tilt the odds in your favour as much as possible but in the end it all comes down to the dice and they can deliver some surprise upsets now and again. I think this is brilliant. Medieval warfare was unpredictable and battles were always a significant risk to both sides. Just like in the game, medieval commanders could prepare all they wanted before a battle but at some stage they had to cross their fingers and hope things worked out for them. The high risk of combat, and its punishing potential negative consequences should you lose a key fight, discourages players from getting into too many fights, just like how they would behave were they a real medieval commander. You have to carefully pick and choose your battles and balance aggression with pragmatism. The battles are random and not the most fun, but the point of the game is to not get into too many of them! I think it’s really quite clever.
I also really like how small the garrisons in the fortresses are. Small Rus cities are easily stormed and will swap sides frequently but the larger cities, and the Teuton ones, present an interesting challenge. They’re that little bit harder to take, but you could still storm them if you get lucky! The garrisons in Almoravid are (in accordance with history I might add) just way bigger and storming in that game almost always felt like a mistake. In Nevsky Storming is often the right call and it makes sieges a balancing act of should you wait a bit longer or just throw men at the walls and hope to get lucky.
Sadly Rally the Troops doesn’t have the Advanced Vassals rule implemented on the site. Understandably this is because it would be too much work, but it means that I haven’t had a chance to experiment more with it. Rally the Troops does have the Hidden Mats variant, though, and I took this opportunity to try that a few more times. I was pleasantly surprised with the experience!
In the Hidden Mats variant you know what Lords your opponent has on the map but not what troops, transport, or capabilities they have for those Lords. I hadn’t been too impressed with this variant when playing Almoravid, it was fine but didn’t seem worth the effort. Having tried it in Nevsky I have a much more positive attitude about the variant and I would definitely use it again.
I think the crux of why I like it more in Nevsky is that most Lords in Nevsky come with only a relatively small army initially but with vassals and capabilities (and events) can become extremely threatening. This allows almost any Lord to threaten any other so that lack of information is always tense. I found in Almoravid that quite a few Muslim Lords were never really going to pose a serious threat to some of the Christians if those Christians prepared for a proper battle. Similarly, the titular Almoravids always come with the same enormous terrifying army while the Nevsky brothers arrive with only a moderately sized army but can become terrifying if they start Levying the rest of their forces. I think this makes potential for surprise much higher in Nevsky and thus makes the experience of playing Hidden Mats more tense. In Almoravid I basically never attacked as the Muslims unless it was with the Almoravids, so it didn’t really matter if I knew exactly how big the Christian army was. In Nevsky not knowing could make a huge difference to my plans and create moments of genuine shock as a Lord I thought was travelling light actually has a massive host and is ready to fight.
I still don’t think I’ll play with Hidden Mats in every game. For the long campaign it’s a little too tense and stressful. I think I’ll just use it now and again when playing the mid-length scenarios. I think between four and six turns of hidden mats is the sweet spot for me.
The Bits I Don’t Like As Much:
There’s nothing in Nevsky I would say is outright bad - I am in love with this game. If there is one grievance I have with Nevsky it is the Events. I quite like the idea of the Arts of War cards being both Event and Capability but I have some reservations about how it fits within the broader game. It feels like too involved a system to be such a peripheral element of the game. You could spend days puzzling over strategies for how to Levy the best Capabilities to seed your Event deck for the optimal output - and I suspect someone has because that is the most logical explanation for the inclusion of the No Event cards. The No Event cards are kind of a bummer when you draw them. It’s an underwhelming play experience that feels like it is necessary only to fix an uncontrolled outgrowth of the decision to use the double functionality on the cards. I can’t help but wonder if a better solution could have been worked out if Events and Capabilities were separate decks. I like the double purpose Arts of War cards as an idea, but I’m not entirely convinced it’s the best idea for this game.
I think the main drawback of these multi-purpose cards is that you can’t really remove Events from the game once they trigger, every Event has the potential to always be in play. This creates two potential problems, one is in the narrative the game tells and the other is in the game experience itself. In the first case you get situations like the game I played where I drew the event Valdemar three times in one relatively short game. The Valdemar event represents the Danish king dying and the Danish lords Knud & Abel shift their service and can’t Levy or be Levied that turn. As Events go it’s not too bad, but from a narrative experience it is really weird that three Danish kings died in this one year alone. It kind of felt like maybe Knud & Abel weren’t very interested in joining the Crusade and couldn’t think up a better excuse than repeatedly claiming they had to attend a monarch’s funeral.
Those wacky Valdemars, always dying off and forcing all their lords to come home for a big funeral.
That kind of incident is silly but doesn’t greatly hurt my experience of the game much. What was more frustrating was the campaign game where I was Rus and my opponent drew one of the Events that shifted Alexandr’s cylinder further down the turn calendar three times over the game’s second half. This was extremely frustrating not because it was hurt me tactically, I honestly didn’t need Aleksandr that badly, but rather because it felt like it was removing part of the game experience. One of Nevsky’s most interesting decisions as the Rus is deciding when to bring Aleksandr and/or his brother onto the map to fight for you. If you refuse to bring them you receive Victory Points but on the other hand they are your most powerful lords. Finding the perfect balance point between pushing them back for VPs or bringing one (or both) of them on to deal with the Teutonic threat is a core part of the game, especially in the big Campaign game. The event that pushed them away on its own wasn’t terrible, but the fact that it triggered so many times meant that for basically the entire second half of the game I didn’t have that decision and except for adding one Coin to my Veche box I basically didn’t get to do the Call to Arms phase at all. Further, it was almost entirely due to blind luck of the draw on my opponent’s part and not the result of some grand strategy he had concocted which made it all the more annoying. A system where events like that are removed from play to limit their potential impact in one game could potentially be better, but that isn’t really possible with the dual purpose Arts of War cards.
Honestly, that’s basically my only significant criticism and it’s a pretty halfhearted one - I like the idea of the dual use Arts of War cards but I don’t think it’s quite there in either Nevsky or Almoravid. I am certainly open to a future entry in the series proving me wrong, and it is entirely possible that they will. Part of the problem I see in these dual purpose cards is that it is hard to tweak them to get them exactly right in a game where there is so much else that needs to be managed as part of the design and development. As Levy and Campaign advances as a series, the core mechanisms will need less tweaking and that could leave more room for refining the Arts of War decks into potentially being one of the series’ greatest strengths. We shall see.
An even milder critique would be that in the full campaign game, and even in the longer scenarios, it can be clear that the game is over for one side well before it actually reaches its conclusion. There is an auto-victory trigger if one side ever has no Lords on the map but that’s pretty rare as it is fairly easy to keep at least one Lord on map if you play conservatively. This can mean that there could be hours of game left well after the results are written on the wall. This is a very mild critique because you can just concede when it becomes clear that you can’t win anymore but I do enjoy it when games include a victory mechanism that prevents them from lasting past the point where they become largely unwinnable for one player. I don’t know what that would look like in Nevsky and I don’t think it’s a substantial flaw in the game, but it is something I would potentially be interested in seeing in future entries in the series.
In Conclusion
I adore Nevsky and the implementation on Rally the Troops makes it so easy to just keep playing more and more of it. I’m finally playing the full Campaign and while that feels like the game’s main meal, and I would recommend people tackle it as soon as they can - right after playing the Quickstart scenario if you can. Rally the Troops removes the barrier of it taking too long to easily be done in one session, since you can now just play it as you are available with no set up, and I think experiencing Nevsky as a slow burn is phenomenal. I’ve begun dabbling in some of the other scenarios and I really enjoy the ones I have played but I think they are in many ways best suited to players who have a better idea of what they are doing. It’s not that you can’t play them, but I think you will get more out of fumbling your way through the full campaign and you will have a better appreciation for the tactical situations of the shorter scenarios once you’ve messed up a few games of your own.
That all having been said, I do feel like I should put in a disclaimer here that Nevsky is absolutely not a game for everyone. I’m a medieval military historian, obsessing over medieval logistics is one of my primary pastimes, but it might not be yours! It is also a game with its fair share of luck and dice rolling and it can be punishing in the extreme if you make a critical error. That all said, it’s free to try on Rally the Troops and if you’ve read this far and you think this sounds like an interesting game you should just try it. Levy and Campaign is an experience unlike anything else currently on offer in the wargaming scene!
February 20, 2023
First Impressions - 1212 Las Navas de Tolosa by Pablo Sanz
1212 Las Navas de Tolosa is immediately visually arresting with a fabulous aesthetic inspired by medieval manuscript art. This aesthetic alone was enough to make me look twice but what really got my attention is how the game is powered by a deck of only nine cards. I love games with small decks - I’m a huge fan of the ever popular Japanese microgame Love Letter - and I was really interested to see how the principles of a small deck could be applied to a fairly abstract wargame. I’m also always on the lookout for short games, especially ones I can either carry around with me. Don’t get me wrong, I love an all day gaming session but these days I rarely have the time or energy for that. Great aesthetics, interesting mechanism, and a short playtime was a trifecta I just knew I had to get to the table. Despite it’s short playtime it took me a while to get it to the table as real life got in the way of in person gaming, but I finally played it and I had a really great time. As usual, I have a few thoughts.
Publisher Draco Ideas provided me with a complimentary review copy of this game.

1212 Las Navas de Tolosa all set up before the first turn. Units are all of equal strength but symbols indicate if they are regular troops, archers, or cavalry - the latter two have special actions available only to locations where they are present. The positioning of the deck and various card piles is also fairly essential to play.
1212 Las Navas de Tolosa (1212 from here on out) is a relatively simple game about a famous battle in Iberia where the Christian kings of Navarre, Aragon, and Castile allied together to attack the Muslim Almohads who ruled much of southern half of the peninsula. The decisive Christian victory broke Almohad power, and while it would take almost another three hundred years before Christians conquered the rest of Iberia it did represent a significant shift in the politics of the region. The representation of the battle in 1212 is quite abstract but it does capture some of this historical flavour as well as emphasising the dramatic charges that were central to Christian strategy at the time.
The game is played on a three by six grid which is split into two three by three halves - one each for the Christians and Muslims. Each round players each draw three cards and then use one to bid for initiative - keeping the other two for their actions. Each card has two values, one for the Muslims and one for the Christians. You use the value that aligns with the side you are playing, and on your turn you use that value to take actions such as moving units, rallying, or making one of three types of attacks: standard, archery, and charge. Each action has a cost and there are some general restrictions on what units can take certain actions. Players are also restricted in the number and type of attacks they can make each turn. Tracking these nuances is easier than it may sound and they tend to only come into play on the rare turns when you can play your six value card - with only three or four action points you won’t have the luxury of being hindered by these restrictions!
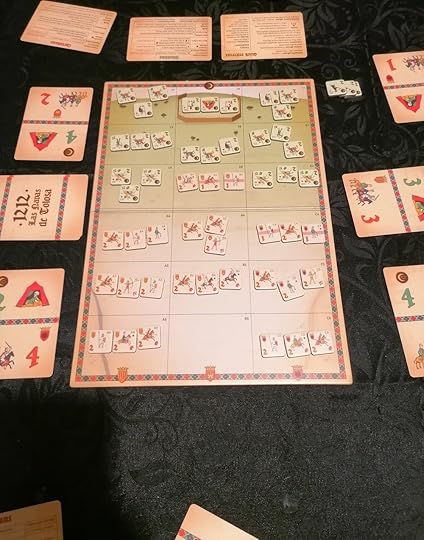
I won initiative and chose to charge down the middle - a respectable combat card saw me wipe out the units in front of me which for the Christians (when cavalry charging) causes the entire column to shift up one space.
The game is highly asymmetric though with lots of little tweaks to distinguish the sides. For example, Christians can only move up and down in their respective columns, each of which is aligned with one of the three kings, while Muslims can move (and attack) in any direction. Christian archery costs fewer action points but does less damage. To make up for that, Christians have greater bonuses on their melee attacks, with the Muslims even suffering a penalty to their Standard Attack action. Muslims can counterpunch the Christians quite brutally if they get over-eager on their charges, though, which makes being too aggressive risky. For a game that’s quite simple and plays very quickly there is a large amount of decision space and you could definitely get lost in its systems if you allow yourself to.

A few turns later and my attacks have been repulsed with significant casualties on both sides. Victory is determined by control of spaces on the board and it costs the Christians more movement points to enter the Muslim side - unless you can do so via dramatic charge like I did on the first turn.
Let’s talk about melee combat, probably the best thing in the whole game. In melee combat you pick a location to attack an adjacent location from. You then total the strength of the units in both locations and add any modifiers to the attacker based on the type of attack. All units have the same strength value, initially two but as they take damage they can be flipped to their reduced side which is strength one. This default symmetry of strength means that combat tends to favour the attacker as, excluding Muslim Standard Attack, they will get a benefit to the result. Once you’ve calculated the initial strength difference things get interesting - the attacker flips the top card of the deck and adds the values on that card to the respective strengths of both sides. This can have no impact on the result as some cards have equal values but it can also result in a difference of five strength, which is quite a lot when the maximum strength that can be in any location is only six.
Where things get really interesting is when you factor in how small the deck is. Remember, there are only nine cards in the deck. At the start of the round six of those cards were dealt to the players, so only three cards remain in the combat deck. At the start of the round the first player knows what four of those cards are - the two in their hand and the two initiative cards. This gives you some information on what might be in the combat deck, but it is far from complete.
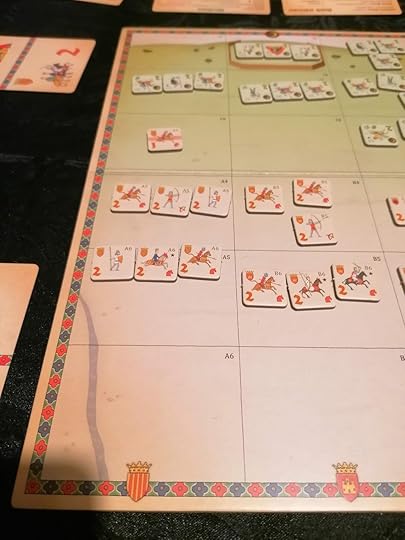
A successful charge on the left flank eliminates one block of units only for a Muslim counterattack to nearly eliminate the charging knights!
Here’s where things can get extra interesting though! You can make at most two attacks per turn and you will each play two turns before reshuffling the cards and dealing new hands (except your Initiative card which returns to your hand). That could potentially be eight combats if you both do nothing but attack and there are only three cards in the deck. As you play cards they are added to the discard and if the combat deck is empty and you need to resolve a fight, you flip the deck over without shuffling it and draw from it again. This means that if you’re having a particularly violent round, by the second turn you could know the order of the combat deck - and how does that affect the decisions you make? You can’t look through the discard at any point so you better have remembered it correctly before you hinge your strategy on that card order. This is also something you need to think about when you choose your cards. Maybe don’t play that card with a high value for your opponent first because you don’t want it to end up in the combat deck.
You could get completely lost in this system, particularly if you’re not very good at remembering cards (like me), but in our game we largely played it with our gut and had a blast. We recognised the danger in trying to count cards too much and just played the best we could without getting too lost in our own minds. In particular, because you’re alternating play and the deck is shared you can’t totally control the outcome so placing all your faith in a strategy around cycling the deck can be very risky. I may eventually figure this mechanic out sufficiently that it loses some of its charm, but for the moment I am enthralled by it and I cannot wait to get 1212 out and obsess over this tiny handful of cards again.
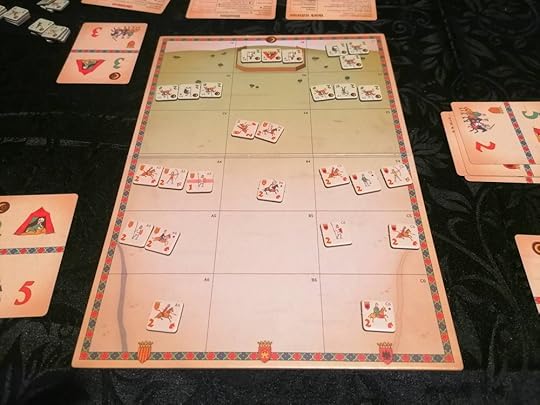
Final game state - a Christian victory. I won by spreading my troops out to claim more territory on the board, which felt a little game-y and a bit anticlimactic. That said, it also helped the game come to an end at a reasonable time without dragging things out longer than necessary.
Beyond its mechanisms the aesthetics of 1212 are also deeply appealing. I love the medieval style art and I appreciate that there are a variety of unit types depicted on the counters even if most of them are functionally interchangeable. Its nice when publishers make the extra effort to evoke the flavour of the period even if it’s not strictly mechanically necessary. There are also some very nice little aesthetic touches that help with the flow of play. For example, each of the cards is associated with a specific Christian king and the Christians get a +1 combat modifier if they play a card to initiate a combat in the column matching that King’s symbol. The artist has very helpfully aligned the king’s symbol with their column on the card, so the king in the left-most column has his symbol on the left side of the cards, the one in the center has his symbol in the center, etc. It’s a nice touch that shows that playability was a factor in the art direction as well as aesthetic appeal. I also adore the tiny box it comes in - one of my greatest pet peeves is boxes that are too big for the games they contain and it fills me with delight that 1212’s box is the perfect size for the game it contains.
After only one play of 1212 I’m not confident drawing any conclusions about how long I’ll want to play it. There is an advanced variant that adds some extra cards that can be used for one time special powers which might extend the game’s shelf life, but I won’t be using them any time soon. For the moment I really enjoyed my first play of 1212 and I cannot wait to get it back on the table. This is a great little gem and I’m so glad I have it in my collection.
February 16, 2023
Review - Battle Cry of Freedom by James McPherson
The historiography of the American Civil War is challenging, to put it lightly. A major event like a civil war, especially one on this scale, is almost always a recipe for a complex and controversial historical memory as the violent reckoning echoes through subsequent generations. The history of the American Civil War is even more fraught than most and perhaps the single greatest rebuttal to the notion “History is Written by the Victors”. For a century after the war’s conclusion in 1865 the history of the war was primarily written by the losers - ex-Confederates and their sympathisers crafted a narrative known as The Lost Cause that largely shaped the public understanding of the conflict. Flying in the face of basic fact this narrative discarded vast amounts of evidence in favour of a story that made the Confederacy sympathetic, a nation suffering for its freedoms against an oppressive industrialist neighbour. The Lost Cause had counternarratives that pushed back against it but it really took until the mid-20th century for its status to start cracking. Even still, though, it is still hanging on with surprising tenacity. Attending school in central Virginia in the early 2000s I was taught Lost Cause myths as history, although thankfully a better teacher later undid that work.
Battle Cry of Freedom is not about the Lost Cause but its very existence is in many ways a blow to that narrative. First published in 1988 and recipient of the Pulitzer Prize the following year, this single volume history of the American Civil War remains one of, of not the, best histories of the conflict as a whole. That it clocks in at over 850 pages of text, not counting index or bibliography, should tell you what a gargantuan task this is. I grew up in a culture steeped in the stories and myths of the American Civil War but while I could name a dozen generals and battles I had never really gotten a full sequence of the war straight in my head. That was what I wanted out of Battle Cry of Freedom, help in putting my jumbled knowledge of the American Civil War into a coherent whole. I got that and more - so much more.
The most apt word to describe Battle Cry of Freedom is impressive. Primarily a narrative history, McPherson takes you from the 1830s through 1865 providing all the essential context you need for why the war came about, the backgrounds to many of its major characters (but not all, as there are so so many), and then following the war through its completion. Chapters generally alternate between pure military history, describing the major campaigns of the war, and discussion of the political, economic, and logistical challenges each side faced at the same time as the campaigns. This is one of the book’s greatest strengths. While at times I found myself just wanting to get back to the exciting war bits (I’m terrible I know), I have to admit that the book would be much worse without the politics and economics. Military campaigns didn’t come out of nowhere, there were very often important political and economic considerations that underpinned the strategic decisions that commanders had to make - and there was often an tension between political leaders and generals about what to do at key points in the war. McPherson does an excellent job at presenting the complexity of the war in very easy understand terms.
Okay, well, maybe not so easy to understand? I have to confess I’m completely unable to judge just how approachable a book Battle Cry of Freedom is. Having read it I feel like it’s a great introductory history to the American Civil War, one that almost anyone (or anyone prepared to read over 800 pages of military history) could pick up and get a relatively robust understanding of the war from. However, as I’ve confessed several times now I grew up on this stuff. I knew who almost all the generals mentioned in the book were before I picked it up ( although some recognition must be given to States Rights Gist, who caught me totally by surprise. That’s his real name folks, look it up). This means that while My instinct is that Battle Cry of Freedom is a great history for anyone interested enough in the subject to tackle it’s length, and I can definitely recognise that McPherson is an excellent writer whose prose is top notch, I must acknowledge my own limitations when it comes to this subject. I don’t know enough about what a normal person knows about the Civil War to be confident in my judgement!
Overall, I would highly recommend Battle Cry of Freedom to any military history enthusiast. I’ve mentioned its length several times and that’s because I do think it is the only significant drawback to recommending it. It’s not that the length is undeserved, honestly McPherson does an admirable job fitting so much history into the pages he has, but at the same time it took me a long time to read and I was kind of exhausted by the time I was finished. I am so glad I read it and I wouldn’t be surprised if it makes my list of favourite books I read this year, but also I’m in no rush to read it again.
February 13, 2023
First Impressions - Sherwood by Buxeria
Sherwood is the latest entry in the venerable Cry Havoc system - a man to man hex and counter game of medieval warfare released by French publisher Historic-One with a legacy stretching back to the early 1980s. The system has undergone several revisions over the past decade, modernising the design and making it more approachable for new players. I’ve had my eye on it for a while since I’m always interested in anything medieval but never quite pulled the trigger on any of the recent releases. However, when I saw Sherwood I decided that this might be the perfect time to take the plunge. Sherwood aims to be an introductory volume to the series, with simplified rules to introduce the system’s core concepts but without the same detail. The core rules have been reduced to just five pages and there is even a single page “basic rules” option for playing with children.
Historic-One kindly provided me with a free review copy of Sherwood.
Alan a Dale is performing in the tavern but the Sheriff’s men are not to keen on what he’s been saying about the current administration. But will the people let them arrest him?
I wasn’t only attracted to Sherwood because of its promised simplicity. A man to man hex and counter game about Robin Hood is an amazing idea and that helped to push me over one of the barriers that had held me back from trying Cry Havoc. For those who may not know, a man to man game is one where each piece (counters in this case) represents just one person. In a system like Men of Iron each counter instead represents hundred of men. Man to man scale has felt strange got me for a medieval game. For a twentieth century conflict zooming a game down to be at the level of individual squads can create a really interesting experience while still representing the warfare accurately.
Alan leapt from the upstairs Tavern window, landing safely, and many of the guards have been bogged down at the foot of the stairs or at the Tavern entrance. However, two guards are attempting to flank him from both directions.
However, in medieval warfare where large scale battles generally featured static formations of hundreds of men, you can’t really do that. Now, medieval warfare had raids and border wars at a much smaller scale but I wasn’t sure how Cry Havoc would represent these and as a result I kind of held the system at arms length. None of that really applies to Sherwood, though, because the stories of Robin Hood and his Merry Men are the perfect choice - the scale at which Robin operates is perfectly aligned with the Cry Havoc system. So Sherwood really killed two birds with one stone - it addressed my general concerns about how well a man to man scale could work for medieval warfare while also offering a simplified system that is easier to learn.
At time of writing I have played the first three scenarios in Sherwood. In the first one a group of the sheriff’s men are trying to arrest Alan a Dale and in the second the Merry Men are trying to interrupt a wedding to so that Alan a Dale can marry his love instead of the man who has (presumably) kidnapped her. This latter scenario is lifted from the works of Howard Pyle and I like that the rulebook flags this, telling you which version of Robin Hood was the inspiration for the scenario. Not every scenario is literally drawn from a specific work of fiction but flagging those that were is a nice touch. Both of these scenarios used just one map and they were a fun way to learn the game but Sherwood really benefits from being played at a grander scale. Characters can move and shoot quite far in Sherwood and the cramped space of a single small map doesn’t feel like it makes the most out of these mechanics. That’s not to say I didn’t have fun, but it felt a little more like a tutorial than the full experience. When I finally got to sit down and play the third scenario, which covers three maps and uses a much greater number and variety of characters, that was when the game really began to sing for me. I was also playing against a human opponent for the first time and the game conjured such an exciting narrative in only about 90 minutes of playtime. I wouldn’t say the scenario itself was particularly exciting but when we let ourselves get invested in the game the experience as a whole more than made up for it. I’m in no particular rush to replay the first two scenarios but the third one I would absolutely revisit, but probably only after playing the rest of the scenarios that come in the box.
Alan opts for the protection of being near his friends while the tougher members of the community, in particular Much and Tuck, begin to make short work of the isolated guards. In this scenario characters flee when they’re wounded rather than fighting to the death.
The core rules of Sherwood are quite simple and easy for anyone familiar with hex and counter games to pick up. Each counter has an attack value, a defense value, and a movement value. They also have a little code in their bottom right corner that tells you what faction they are aligned to and what kind of unit they are - the only really important thing to note is whether they are archers or not, but there’s no real detail in this that the art doesn’t convey already. Mounted characters are in double wide counters and have restrictions on the direction of their movement, but otherwise units can move pretty much anywhere they want. Each character comes with two counters which represent their four possible statuses: healthy, stunned, wounded, or dead. Players take it in turns to first shoot with any of their archers, then move all their characters, then resolve combat, and then any of their characters who were stunned on their opponent’s turn recover. It’s a light system and one that is particularly well suited to a casual sort of play. If you encounter an edge case situation or aren’t sure how exactly to rule on something, such as does the balcony block an archers line of site to a target half a map away, you’re better off just agreeing something with your opponent and moving on rather than getting lost in the weeds. I think the rules are clear enough that this isn’t an issue, but I do think it’s also a system best suited to a mindset where you’re looking for a bit of light fun in an evening and not a competitive tournament experience.
The final guard meets a rather gruesome end at the hands of a powerful gang of local villagers and peasants. Alan a Dale is safe, but I suspect the Sheriff won’t forget this slight from him or his friends.
I quite like the sort of Victorian romantic art style used for the characters and the old school D&D vibe of the buildings and terrain. It’s old fashioned but in a very endearing way, to me at least.
Obligatory comment on the rules for crossbows: Well the game has rules for crossbows, so bonus points for that already. I’ve only played one scenario with archers in it and the scenario itself wasn’t very well suited to extended missile fighting so I haven’t really dug into the rules in practice. However, on paper I really like the subtle distinction between bows and crossbows. Crossbows can shoot further and receive a bonus to their damage rolls but if a crossbowman shoots during the missile phase they can’t move that turn. This helps to make the two unit types feel distinct while also reflecting the potentially greater power and slower reload time of the crossbows. This information shouldn’t affect whether you play Sherwood or not, but I can’t help but talk about this kind of stuff!
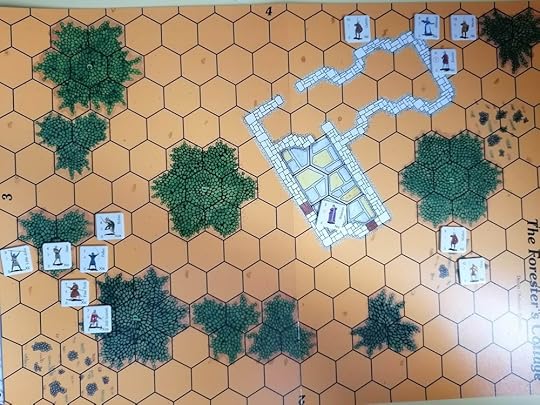
Opening of Sherwood’s second scenario - this time the Merry Men must interrupt an illicit marriage to rescue the bride to be so she can marry Alan. How hard could it be?
Combat is pretty straightforward. Attacking characters subtract their targets defense value from their attack value and then consult the CRT to see which column corresponds to that figure. There are two separate CRTs depending on whether the target is mounted or not, based entirely upon the target rather than the attacker. Attackers can gang up to combine their attack values and to get a bonus column shift one way in their favour. The attacker then rolls a d10 and checks the relevant column to see what happens. It’s pretty simple and moves things along quickly. There are relatively few modifiers to count when making melee attacks beyond just pure strength, which I really appreciate. I enjoy Men of Iron but the element that I like least is definitely the adding up the many potential modifiers before I make each roll. At it’s best it rewards good play without getting in the way, but at its worse it is a lot of effort for occasionally minimal gain. I prefer the simpler system in Sherwood even if it lacks some of the nuance of Men of Iron.
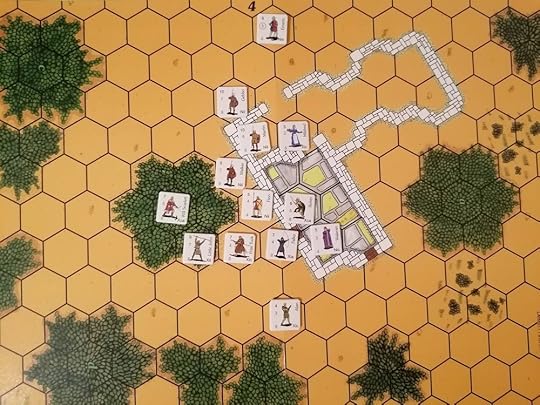
Robin recklessly leaps through the chapel window to prevent any ceremony from being concluded while the rest of the Merry Man engage guards outside. Was this perhaps a little too reckless?
On top of the above there are the usual rules you’d expect, like movement costs for different terrain, a table for resolving missile fire, and a few combat modifiers governing things like cover and different elevation between attacker and defender. The game also has some nice little bits of chrome, such as rules for climbing trees and, best of all, rules for jumping out of those trees or out of the windows of the tavern. There’s also rules for leading animals by their bridle, such as if your mounted fighter gets off his horse or if you need to pull a cart through a small clearing. Lastly, there are rules for ambushes which looked very interesting but I haven’t yet tried them.
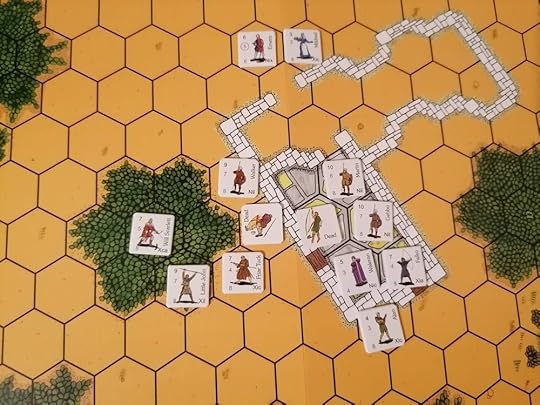
Answer: yes it was too reckless. Robin Hood is dead (!) as is one of the guards. Meanwhile another Merry Man has jumped in the church to assist his deceased leader but things are getting ugly all around.
One thing that became immediately apparent as I was learning Sherwood was that it comes from a slightly different tradition of wargaming than the other hex and counter games I’ve played. In particular, Sherwood, and potentially Cry Havoc as a whole, feels much more connected to the roleplaying side of the hobby. This isn’t a total surprise - Dungeons and Dragons famously has its origins in the miniatures wargaming rules Chain Mail. However, the links between wargaming and roleplaying extend far beyond a set of miniatures rules. Roleplaying games drew heavily from boxed wargames as well as games like Diplomacy and professional wargames like the kriegspiel. This link between RPGs and wargames is not always apparent in the contemporary scenes that exist around the two hobbies, but in Sherwood you can really see the shared DNA between the two. As such, Sherwood really feels like it benefits from the players getting into the roles of their assigned factions. This is honestly a pretty key part of any wargaming experience in my opinion, but it is doubly true for a game where you might be fleeing attack by leaping out a window or you might jump from a tree onto your horse. For maximum enjoyment, you should probably get invested in inhabiting your role and prepare to attempt exciting and ridiculous things rather than necessarily aiming for clean optimal play.
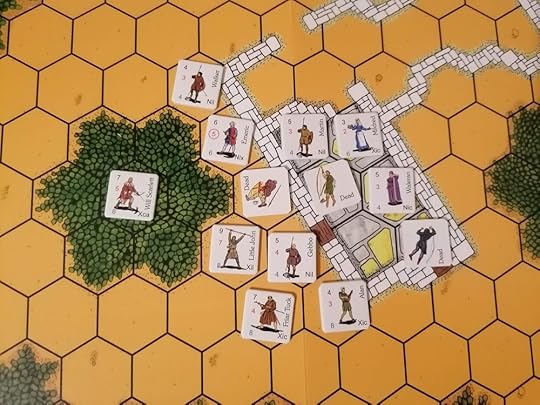
The bodies are starting to pile up and many of those that aren’t dead are wounded. Things aren’t looking good for the Merry Men, though!
This roleplaying element made playing Sherwood solitaire an interesting experience which I’m not entirely sure how I feel about. On the one hand the system works fine as a solitaire experience - at least if you’re not playing a scenario that uses the Ambush rules - but on the other hand I struggle to fully inhabit both roles and feel like I’m not getting the full experience. Many scenarios also use an element of free deployment as well, which is another mechanic that I find a bit trickier for solitaire play. I much preferred my one game against a human opponent over my two solitaire games, but also for that game I was playing a more exciting scenario with a lot more moving parts so it is hard to evaluate exactly how much more I enjoyed the two player experience versus how much more I enjoyed the scenario. I will probably continue to dabble with Sherwood as a solitaire experience but for me I think I rank it closer to a game like Great Heathen Army, where solitaire is fine but the best experience is two player, rather than Men of Iron, which I slightly prefer as a solitaire game.
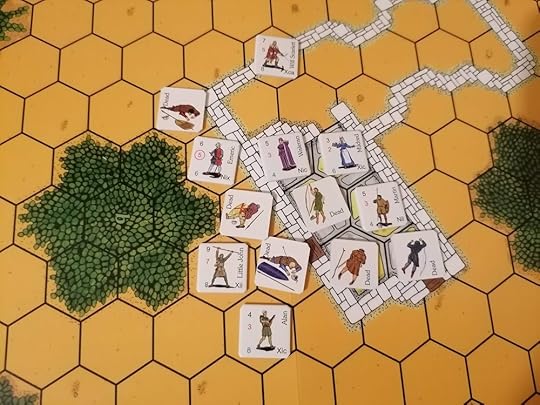
A win for the vile Sheriff’s men as Martin successfully weds his unwilling bride…in a chapel with two dead bodies. Look, I don’t care how you look at it, this wedding was a disaster for all involved. This is why you shouldn’t kidnap people!
I still feel like I’ve only scraped the surface of the Sherwood experience but I’m really enjoying what I’ve found so far. The Robin Hood stories are a great use of this system and at the same time this system is a great way to evoke the narrative of a Robin Hood adventure. The system even comes with some basic rules for making your own scenarios which means you can start adapting some of the wider legendarium yourself. Scenarios based on Disney’s classic movie, anyone? I think Sherwood has the potential for not just being a great introduction to Cry Havoc but to hex and counter gaming generally, especially with its child friendly starter rules.