Stuart Ellis-Gorman's Blog, page 19
April 28, 2022
Men of Iron – Falkirk, 1297
I was in a bit of a Scottish wars mood after playing the Braveheart: Solitaire book game so I decided to try out how Richard Berg modelled Falkirk in Men of Iron as an interesting counterpoint. As I somewhat hinted at in that review – I’ve got a bit of a chip on my shoulder when it comes to William Wallace. I feel he’s a bit overrated as a historical figure, basically entirely because of Braveheart – a movie I strongly dislike. Lest you think I’m a boring historian who hates fun, my favourite medieval movie is A Knight’s Tale, my hatred of Braveheart stretches beyond mere historical inaccuracy. I’ve born a slight grudge about living in a post-Braveheart world where William Wallace has overshadowed the far more interesting Robert Bruce. My opinions on this have mellowed with time – and I think it helps that Bruce seems to be getting more popular culture recognition as well (including his own movies, which I have not seen, making me part of the problem).
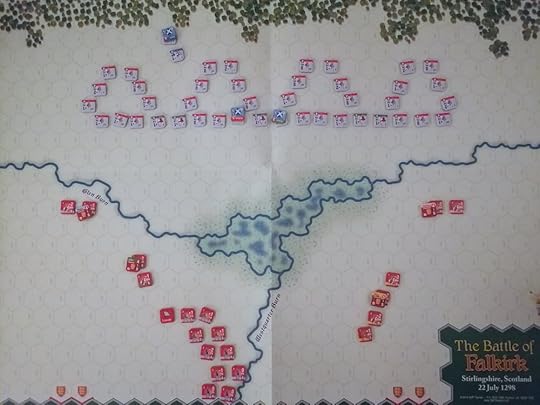
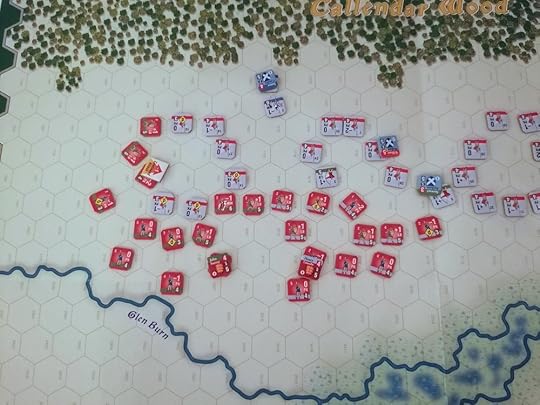
The calm before the storm - Wallace has taken up his defensive position but much of the English army still has yet to arrive.
I was immediately interested to see that the Falkirk scenario comes with a sort of solo mode as default. With the basic rules the Scottish player basically sits in schiltron and the English player has to crack their defences. I was intrigued by only having to really think about one side and abandoned my plans to try playing this scenario with modified chit pull rules for activations. I have to confess I was a little disappointed by my experience. The scenario is timed, and while my understanding is that the timer only advances if the non-timed side passes, I moved it forward after every English turn because that felt like the only challenge to the scenario – could I defeat the Scots within 15 turns? The answer was a pretty definitive yes.
A series of amazing continuation rolls brings the whole English army to the field very early. Little did I know that this would set the tone for what my dice rolls would be this game: consistently low.
Falkirk is a battle that I simultaneously find both interesting and extremely boring. The logistics of Falkirk and how it came to take place are absolutely fascinating. The army that Edward I brought with him to Falkirk numbered nearly 30,000 soldiers and was probably the largest army assembled by the English in the whole of the Middle Ages. It also represents something of a turning point in military recruitment. Edward I still primarily used traditional levies for his army but there are numerous reports describing how this system was breaking down at the time. One of the most common issues was that often levels of service had been set in the Domesday Book back in the 1080s, but in the intervening almost two centuries the fortunes of noble families had grown or shrunk dramatically. This meant that some nobles might be struggling to provide the service their ancestors had agreed to while others would be providing far less than their means would have allowed. There are also some absurd stories of levies turning up with only the explicit minimum they had to – things like turning up with a bow but just one arrow. Not all later reports of this latter kind of shenanigans should be taken at face value, but the essential point that the traditional means of levying troops was seen as no longer suitable motivated significant change in how English armies were recruited. This was a slow process and wouldn’t really be complete until the fifteenth century, but the army that Henry V brought to Agincourt has its origins in the Falkirk campaign.

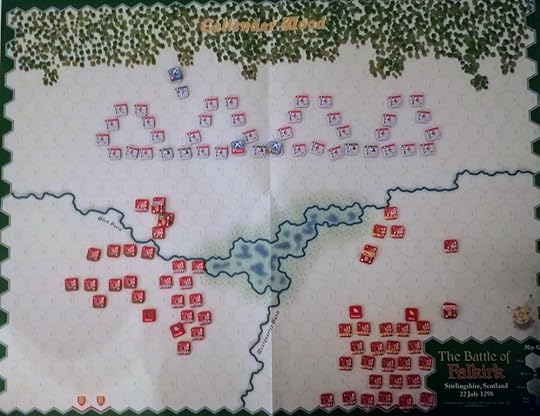
The battle lines collide with more of a whimper than a roar as the English archers fail to have much impact on the Scots. The English mounted men-at-arms manage to reach the archers unscathed and proceed to also have minimal impact.
All that having been said, the battle of Falkirk itself never particularly interested me. Essentially, Wallace foolishly agreed to fight the English on open ground and while he had a made a great effort at deploying his schiltrons to blunt the English charge – Edward I had brought a much much bigger army and was more than able to overpower the Scottish forces on a battlefield where he could bring his numerical superiority to bear. It’s a fairly one-sided conflict with the English crushing Wallace beneath their boot heel. It’s not without tactical interest, but I was never particularly fascinated by the tactics of Falkirk – more confused about why Wallace, who clearly new about minimising enemy strength from his victory at Stirling Bridge, allowed this to happen.
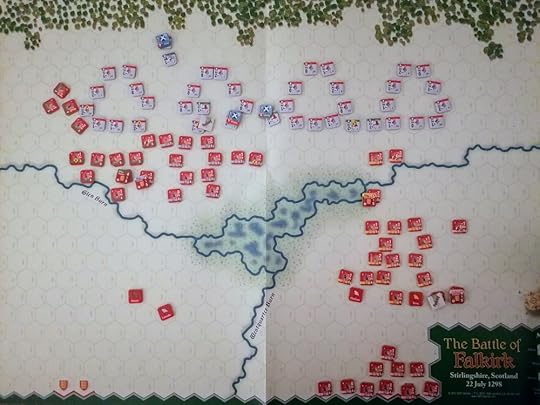
The attack on the left heats up - the Scottish archers are cleared out of their position but the English archers continue to have minimal impact on the Scots. The lone men-at-arms in the east is Retired.
Of course, Wallace would have done a lot better if Edward had rolled like I did when I was playing. I consistently couldn’t roll above a five, which meant that I was pretty reliably making continuation rolls but also meant that my archers might as well have been throwing their arrows at the Scots. This was the first time I ever became very frustrated by the luck involved in Men of Iron, and it really soured my time with Falkirk. This is certainly a matter of taste, but I’m not wild about the system of rolling a single d10 and consulting the table to see the result. I prefer more ways to mitigate my luck, or at the very least a die roll that averages out faster – like rolling multiple d6s. I know that in the aggregate the d10 will move towards the average result, but in practice I find rolling a single die – particularly one with 10 results – kind of frustrating.
After more turns than I care to admit, the English finally begin breaking apart Wallace’s schiltrons. I will confess that I completely forgot about the Scottish cavalry for basically the whole game so don’t expect any dramatic cavalry rescue!
I know you’re meant to mitigate this with good positioning and by trying to build up a long list of positive modifiers to increase the value of your roll, and thus better increase your odds of a good result. However, I just find this more frustrating – I spent all this time positioning for the optimal attack and then I rolled a 1. Sure, all my planning means that I didn’t suffer the worst result, but I just climbed my way up to “no result” on the table and feel like I wasted the last two minutes of my life. For the most part this hasn’t really spoiled my time with Men of Iron, but I had such a consistently bad run of luck while playing Falkirk that it did really begin to irritate me.
Usually this is the point where I’d complain again about how archers in Men of Iron are too powerful – and they are – but at Falkirk it bothers me less. Plate armour wasn’t yet common when Falkirk took place and Edward used his archers to break up the Scottish schiltrons, which was essential to his victory. I do wish it was slightly easier/tactically better to combine archers with melee attacks – using the archers to disorder the enemy and then attacking with your pikemen. In my experience massed archery on its own was just better without bothering to bring melee troops in unless absolutely necessary. The melee troops primary job was trying to kill the enemy archers – usually with mixed results. I still think archers should be reigned in a bit, but it bothered me less at Falkirk than it did at Poitiers, if that makes sense.
The left Scottish schiltrons are now well and truly broken while Edward I finally brings the bulk of his Battle forward on the right.
I also found myself once again activating the same Battles over and over again rather than using the full range of troops available at my command. This was exacerbated at Falkirk because the Scots all activated together – so attacking on two fronts seemed like a needless risk. It was far better to push relentlessly on one side of the Scottish formation rather than giving them more targets by trying a full encirclement. In the end I did bring Edward’s archers to bear on the right flank, but only because of a good run of continuation rolls – it was hardly a tactical priority. I think this is a shame because the game would be more interesting if I was forced to jump around more in my activations – possibly something that could be fixed with a chit pull system instead.

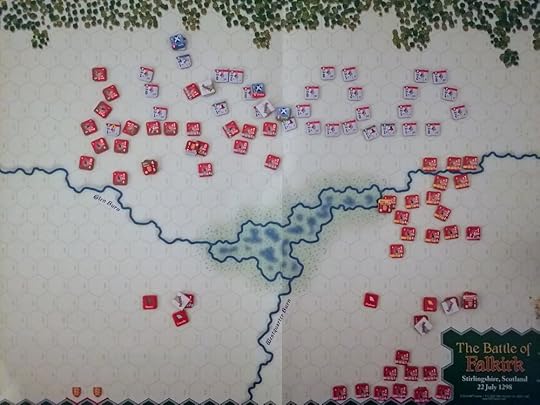
The end of the battle - the late arrival of the Scottish cavalry was far too little far too late and the Scots are routed as Edward’s Battle manages to get involved in the action just in time for it to end.
Overall, I wasn’t wild about my time with Falkirk, but it was also one of the quickest battles I’ve played, and I wouldn’t quite say I had a bad time. I think Falkirk has good potential as a learning battle for the system since only one side does very much and it includes a lot of the core mechanics: schiltrons function as shield wall, the English have to bring reinforcements onto the battle, the map has rivers and some marshy terrain to navigate, and both sides have a good range of unit types. That said, with the very static Scottish side and the one-sided nature of the battle I don’t think it offers very much if you’re already familiar with the system. I suppose that’s why it’s the first battle in the book! My recommendation is that if you’re new to Men of Iron give it a shot, but if you’ve already got a few battles under your belt don’t feel bad if you skip it.
Recommended Reading:
A Great and Terrible King by Marc Morris
The Three Edwards by Michael Prestwich
Robert Bruce and the Community of the Realm of Scotland by G.W.S. Barrow
If you enjoyed this post, maybe consider reading some of my other writings on the Men of Iron series:
First Impressions Men of Iron: Agincourt - https://www.stuartellisgorman.com/blog/men-of-iron-agincourt-1415
Men of Iron Round 2: Courtrai - https://www.stuartellisgorman.com/blog/men-of-iron-courtrai-1302
Men of Iron pt. 3: Poitiers - https://www.stuartellisgorman.com/blog/men-of-iron-battle-of-poitiers
If you’ve enjoyed this or any of my other blog posts maybe consider buying me a coffee via Ko-Fi at https://ko-fi.com/stuartellisgorman. Let’s be honest, instead of buying an actual cup of coffee I’ll probably spend the money on books and wargames and you’ll see the results here!


April 25, 2022
Review - Braveheart: Solitaire by Worthington Publishing
I’ll tell you right now that I do not like Braveheart, and I haven’t liked it for some time. It’s not just that it’s egregiously historically inaccurate, even looking past that I don’t like it on its own merits. Like why did they put in that romance between William Wallace and Isabella – wasn’t the whole reason this rebellion kicked off due in part to the tragic death of Wallace’s wife? Kind of harsh to fridge your wife and then in only a few years you’re off shagging French princesses – who while not the literal child that she would have been historically does seem a little young for Mel Gibson. Sorry, I got distracted there by my loathing for ‘classic’ film Braveheart – I’m supposed to be talking about the new book game from Worthington Publishing! I’ll try to stay focused; I promised my family that I wouldn’t rant about Braveheart anymore.
This was my first time playing one of Worthington’s book games and I had a reasonably good time with it, but I’m not sure I’ll be picking up any others – a least not immediately. The premise of the book game is that you have a scenario on a single open fold out of the book – two approximately A4 size pages. One side shows the layout of the battle, while the other has the tables and results you need to resolve the actions taken by the English at the battle. On your turn you pick a Scottish formation to activate and an action – usually an attack on a specific enemy formation – then you roll a die to determine what action the English take, resolve the English side’s action, and then all going well complete your action. All rolls are a single d6 with fairly minimal modifiers, which makes calculating the odds relatively straightforward. You can’t activate the same formation twice in a row and formations only have a certain number of activations total in the game. This causes you to leap between sections of the battle juggling different goals simultaneously while also working against the clock.
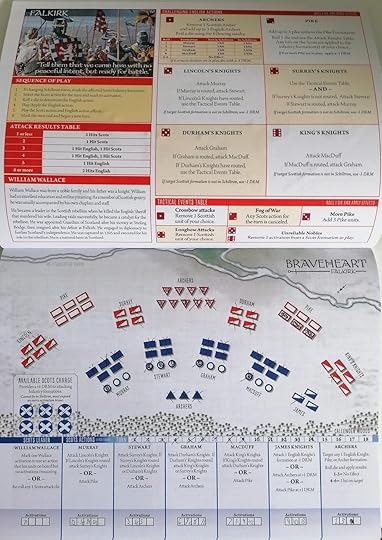
One of my successful Scottish defenses at Falkirk. Stewart and Graham were wiped out, but in exchange for Lincoln, Surrey and Durham. This game featured a lot of English archers, which makes things much harder for the Scots but whether they show up and do anything is pretty random.
There is also a table of Bad Stuff (not what it’s called) that you sometimes have to roll on that can dump a little more misfortune on the Scots. For the most part these are fine. One just kills a Scottish unit, which isn’t very inspired but is fine. I really like the one where you have to mark off an activation on one of your formations – making you decide who is a lower priority for you this game. I really dislike the one where you action just fails to happen, every time I rolled that it was just miserable. I would have much preferred something that just imposed a penalty on my next roll, even if that would probably be a worse result for me since you can lose your own units on an attack it would still feel better than losing a whole activation for no effect.
The inability to activate units twice in a row is probably my favourite element of the game. It forces me to think strategically and plan a few turns down the road, but also remain flexible because those English actions could throw a real wrench in my plans. It also makes me invested in the outcome of each action because if this one fails it will be at least two turns before I can take another – if I still have actions to take on this formation! It’s enjoyable, but it more closely resembles a puzzle than a wargame which may bother some. I actually kind of wish they’d found a way to print it in a smaller book, more like a puzzle book. If it were smaller, I might carry it around in a bag and play it on the train.
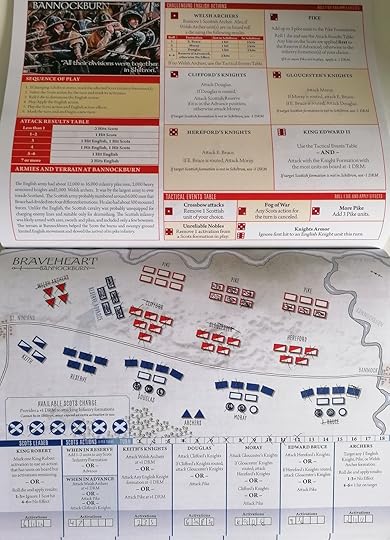
My lone Scottish victory at Bannockburn. This is also the one time I committed the Reserve to the battle instead of using them to resupply other units - I think my good dice rolls made more of a difference to the result than they did, though.
That said, for a puzzle it is both a bit too random and somewhat lacking in variety. The book contains two battles – we’ll talk more about that later – and each battle comes in two different difficulties. You get six pages for each difficulty, for 24 total battles in the book. I can’t really see myself playing each difficulty level of each battle six times. At the end of my second play of Falkirk on the standard difficulty I thought I had kind of seen most of what it had to offer. My later play of the more challenging Falkirk scenario did little to mix up the experience, and thanks to some good rolls I won it on my first attempt. The scenarios aren’t particularly challenging, so if you’re someone who likes your solitaire games extremely difficult I would definitely steer clear - I’ve lost games of Braveheart: Solitaire but I’ve won most of my games, which I don’t mind but I know is not to everyone’s taste.
The game also has bit more luck than I would like. I don’t think it’s imbalanced, all of my games were very close – so much so that I would say it was actually remarkably balanced for a game where enemy actions are determined purely by d6 rolls. It’s more that I don’t find myself particularly interested in trying out new strategies because my strategy is mostly reacting to what the game throws at me. For some people this might be enough to keep them going through 24 scenarios, but I would have liked to have seen more variety and mechanics at play across the variations on the battles. Even the more advanced battles just seem to tilt the luck a little more against the Scots rather than adding new mechanics or complexity.
The battles themselves also strike me as odd. I should say that since it’s mostly a puzzle the experience playing it is very abstract. Nothing about the game really evoked the battles of Falkirk or Bannockburn, and they could really have been about just about anything. Which makes it even more odd to me that the two battles are Falkirk and Bannockburn. Falkirk makes sense, that’s one of William Wallace’s famous battles, but why Bannockburn? Wallace was well dead before Bannockburn happened. Bannockburn is also the second battle in the book and in my experience the slightly harder one. It’s hard to say because it could have just been the luck I had, but I pretty routinely lost Bannockburn as the Scots while I have yet to lose at Falkirk. That this is so dramatically the opposite of the historical outcomes really hammered home how abstract this game is. It also just feels like a really weird choice. Surely the logical choice would have been to make the first battle Stirling Bridge – Wallace’s famous victory, notoriously depicted sans bridge in the movie – and then make Wallace’s disastrous defeat at Falkirk the more challenging second battle. I am very confused by this choice.
Overall, I’ve had a fun time with Braveheart: Solitaire. It only takes 20-30 minutes to play a battle and I enjoyed the time I spent with it. That said, I won’t be playing all 24 battles in this book. I had kind of seen enough of it at around my fifth or six play of the game. Instead of finishing the book I’ll be sharing it around with some friends and collectively we’ll probably play all the battles eventually. Since this game is so abstract, I don’t particularly see a need to play other games in the series, I feel like I’ve seen just about all this has to offer and it isn’t quite enough to keep me playing. Others may disagree, though, and I hope that fans of this series continue to enjoy them.
April 21, 2022
King Arthur: The Making of a Legend by Nicholas J. Higham (Yale University Press, 2018).
We can often feel a strong desire for mythical and legendary figures to be based on some kind of historical reality – while we know that obviously not every aspect of the story can be true it would be so much nicer if a good story was at least be worthy of the dubious“Based on a True Story” tag used for so many Hollywood movies. In his book King Arthur: The Making of a Legend, Nicholas Higham systematically tears apart the myth of the historical Arthur piece by piece. It is impressive in its thoroughness and remarkably readable despite its complexity. This is not a book that sets out to convince academics, who are largely already on the same page as Higham, but rather one for general Dark Ages enthusiasts. As Higham notes, while it is all well and good for the idea of the historic Arthur to be largely ignored within academia, it still holds significant sway in popular imagination and histories and so he took it upon himself to show why there can be no historic Arthur. Higham is making good on the notion that instead of secluding themselves from the myths of public imagination, historians must be out in the trenches fighting them.
I will say right out the gate that if you want a book about how aspects of the story of Arthur, including the Knights of the Round Table, were introduced into the mythical canon this is not the book for you. Higham doesn’t completely ignore the French romance tradition, for example he does have interesting asides about the origins of Camelot and the Holy Grail within the Arthurian story but examining how each individual element built upon Arthur’s story is not the purpose of this book. This is a book concerned with King Arthur first, other characters like Guinevere or Lancelot only enter the narrative when their paths intersect with the question of Arthur’s origins. This means that Higham focuses more on the British Arthurian traditions rather than the continental ones.
However, if you ever wondered whether King Arthur had a historical basis, or if you’re just interested in the origins of the story of King Arthur specifically, then Higham’s book is the one for you. The book is broadly divided into two sections. The first concerns arguments that place Arthur’s origins outside of Britain. The most popular of these theories argues that Arthur was a member of the Roman military who served for a time in Britain. Other theories Higham dismantles include arguments that the Arthurian myths have their origins in oral traditions of the Caucasus or astronomical myths of ancient Greece, these having merely been adapted to a British setting by later writers. In setting about tearing these arguments down Higham provides plenty of fascinating information about Imperial Roman history and oral and written folklore and mythology of the eastern Mediterranean. You’ll find yourself learning about a lot more than just Arthur in this book.
The second section of the book focuses on the British origins of the Arthurian story, picking apart what we know about fifth century Britain – in particular what the author Gildas does and, more importantly, does not say about this period. Higham then moves through various literary and historical works from the early and central Middle Ages that mention, or could be interpreted as mentioning if one reads them generously, Arthur in a historical context. These all lead up to Geoffrey of Monmouth’s History of the Kings of Britain which played a central role in popularising the story of King Arthur but also has little to no basis in actual historical fact. Parts of these sections can be a bit hard to follow, particularly if you aren’t used to tackling complex matters of medieval writing and authorship, but Higham does a good job at not overloading the reader and in repeating information periodically so if you didn’t quite catch it the first time you have another chance later. I would say that I think Higham is a little too dismissive of the length of time an oral tradition can be kept alive. I don’t think he’s wrong in this particular circumstance, but I do think he overstates the general point when a more specific argument about the possibility of lost Arthurian oral traditions would have made a stronger case.
If I were to quibble with Higham’s book it would be that I think the structure can be a tad hard to follow in places. The task of structuring a book like this is immense and Higham mostly does a good job, but there are places where it jumps between points a bit abruptly and I found myself having to backtrack and re-read a few pages to catch my bearings. It’s hardly a significant flaw, but it was one area where I struggled a bit.
If you’ll permit me a slight aside, there’s another book I read some years ago that pretty significantly altered my thoughts on the idea of searching for a historical original for a mythic or fantastical figure of myth and legend. That book was Crusoe’s Island by Andrew Lambert. This was a history of Robinson Crusoe Island, an island in the Juan Fernández Islands off the coast of Chile. The Scottish sailor Alexander Selkirk was marooned on the then uninhabited island from 1704-1709. His story of isolation and survival was an inspiration for Daniel Defoe’s Robinson Crusoe, and the association between the two is so strong that the island Selkirk was stranded on was renamed after the famous fictional character in the 1960s. The thing is, in the story Robinson Crusoe was stranded on an island off the coast of Venezuala, near Trinidad, and Crusoe famously wasn’t alone – there is his companion Friday as well as the cannibals that he fights on multiple occasions. The story of Robinson Crusoe contains very little overlap with that of Alexander Selkirk, but that has not stopped people from viewing Selkirk as the ‘historical’ Robinson Crusoe - so much so that they renamed an island after his fictional ‘counterpart.’ My point here is that the story of the fictional character shares only the most superficial elements with the real figure that inspired Defoe to write his work, and I wonder what value there even is in viewing Selkirk as a ‘real’ Robinson Crusoe. I think it is worth questioning what we mean when we say that someone was the inspiration for a character in a work of fiction - particularly when we’re trying to identify someone in a historical record who could be that ‘real’ version. If we ignore Selkirk surely any shipwrecked sailor who survived on an island could be the ‘historic’ Robinson Crusoe.
Overall, King Arthur: The Making of a Legend is a fascinating read and if you are interested in the origins of the story of Arthur it is well worth a read – just bear in mind that it is only concerned with the origins of Arthur’s story and is very light on details about what followed once he became a household name in medieval Europe.
April 18, 2022
Columbia Games’ Card-Driven Block Wargames – An Almost Comprehensive Review
Columbia has been famous for their block wargames since the 1970s, but in recent memory none of have loomed quite as large as the series of four games card driven games starting with Hammer of the Scots in 2002, and including Crusader Rex, Julius Caesar, and Richard III. I played my first game from this line a little while ago, and you can read my first impressions here (https://www.stuartellisgorman.com/blog/first-impressions-richard-iii-by-columbia-games). In the intervening period, and with many thanks to the amazing digital implementations of these games on the website Rally the troops (https://rally-the-troops.com/), I have been able to play all four of these games and I have put my thoughts down on each of them below. Hopefully this will be interesting or enlightening, but at the very least you can tell me why I’m wrong and how your favourite is really the best one.
Before we get on to the games themselves, an overview of the features shared across these games is in order. They are all block wargames – meaning that the player’s pieces are wooden blocks with unit information only on the side which faces their controller. This creates a simple but effective fog of war where my opponent can tell how many units I have and where they are on the map but doesn’t know which specific units those are – and crucially doesn’t know their strength. Play is determined by playing action cards – there are generally two kinds of cards, those with action points and those with special events. Action points allow the movement of armies across the board while events usually allow for a limited action that breaks the game rules, such as moving units further than normally allowed or allowing units to recover strength.
Combat occurs when both players’ blocks are in the same location and is resolved in the same way across all games in this series. Units have a combat rating in the form of a letter and a number, e.g. A2 or B3. They also have a strength, which simultaneously functions as their health value. Combat is resolved in alphabetical order, all As then all Bs and so on, with the defender going first. The active player’s units roll dice equal to their current strength, and hit if they roll lower than the number in their combat rating – so if they are combat rating 2 they hit on 1s and 2s. Hits are applied to the enemy block with the highest strength, and are resolved by rotating the block 90 degrees for each hit. It’s simple yet elegant, and one of the defining features of this system.
There is also generally a special Winter round or phase after all the cards have been played in which blocks must either return home or be dismissed if they exceed local supply limits. Blocks then recover some strength before a new hand of cards is dealt and another round begins. These traits are shared across all of the games discussed below, but there are also significant differences which makes each one a unique experience. Read on to hear my thoughts on each of these games after a minimum of two (and in some cases a good bit more!) plays with each.
Hammer of the Scots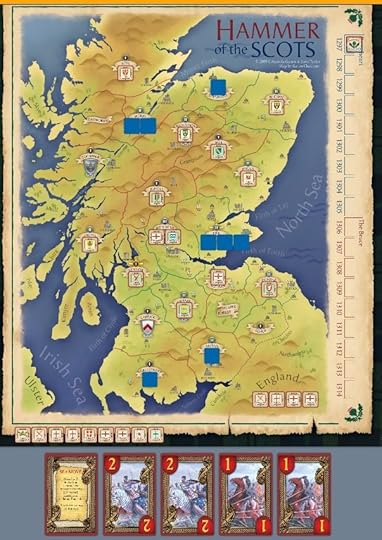
Scotland is inconveniently narrow, I would like to request that geology implement a patch to fix that. On a more serious note, the art on Hammer of the Scots cards is excellent.
I’ve heard from quite a few people that Hammer of the Scots is their favourite of this series, and I can see why. Hammer of the Scots is a great game, and I’ve enjoyed my time with it, but there are enough little nagging issues with it that I can’t quite say that it’s my favourite. Before I get all nit-picky about it, let’s start with the good!
Hammer of the Scots does a good job of bridging together the wars of Edward I, most notably his fights with William Wallace, with the later conflict between Edward II and Robert the Bruce into a single game. With one set of mechanics, it reasonably effectively evokes both settings, including an interesting attempt to model the challenges for the Scots with picking a king late in the war. Historically, after declaring himself king Robert Bruce somewhat notoriously stabbed one of his main rivals to death in a church, an act for which he was excommunicated for the rest of his life. He followed this up with a campaign of fairly heinous ravaging and mass murder in the lands of Galloway to punish his enemies. That is to say that the selection of a new Scottish king, particularly when current king John Balliol was alive but in exile, was a decision that was quite contentious at the time. Hammer of the Scots does an interesting job of trying to model this, by making the Scottish king an amazingly powerful piece but selecting any of the three potential candidates for king will cause defections from the Scottish side. My only real fault with this as system is that in my experience with the game it doesn’t really come up very often. This may be the bias in the games I played, but rarely did my games that started with Wallace last long enough to see a new king crowned, while the later scenarios start with a new king already on the throne.
Speaking of factional splintering, I love how Scottish nobles immediately defect if defeated in battle. They show up as one strength on the other player’s side – unlikely to contribute to the fight but still a problem to be managed. Since the goal of the game is to control nobles, whenever you send nobles into battle you are risking VPs and once a battle turns against you things can snowball very quickly. I think this really captures the fickle nature of medieval alliances, and in particular how easily kings and lords would forgive someone for fighting against them in the past as long as they’ll fight alongside them now. Similarly, I love that if during the winter the block returns home to find enemy soldiers waiting for them than they immediately defect again – those fickle Scottish nobles!
The combat in Hammer of the Scots is interesting because it is very attrition focused. You can heal your blocks some during the Winter phase, which happens every 5 turns, and also potentially recruit new blocks but at only one health. This means that you have to be very careful in picking your fights, and most rounds will only see one or two really big fights. There are potentially a lot of rounds in Hammer of the Scots and that makes sense given how cautious you need to be to play effectively. It also adds a lot of tension to the fog of war inherent to this kind of block game – you really want to know if those blocks are at full strength or if they’re still hurting from last season’s campaign, but you can’t quite remember!
That’s the good, let’s move on to the less good. While I think the mechanics of Hammer of the Scots work well in capturing warfare during the Edward I and Edward II phases of the war, I don’t think the transition between them is particularly elegant. There was seven years between the death of Edward I and Edward II’s disastrous invasion of Scotland that resulted in his defeat at Bannockburn. During that seven years there was basically a fully blown civil war between the Bruce faction and their enemies. I think in theory Hammer of the Scots has the potential to replicate this, but in practice I don’t think it does a very good job. Now, this is being kind of nit-picky, Hammer of the Scots is a fairly simple wargame, not an attempt at simulation. However, I think there is more potential there in the systems that Hammer of the Scots has established, and I just wish the game was split into three phases – with a Scottish civil war bridging the two – instead of just the two.
The thing I don’t really like about Hammer of the Scots is the map. There are parts of it I really like –it’s quite pretty – but there’s very little room to manoeuvre and games can get a bit bogged down if one side establishes a large presence around Menteith and the other player has to find a way to leverage them out. That on its own wouldn’t be too bad, but because Hammer of the Scots is so attrition focused, it can result in one player doing a big attack, failing, and then spending the rest of the round playing very conservatively so that they can heal up over the winter before trying again. I think more naval movement options that made it easier to move between the upper and lower halves of the board would have opened it up and made for a more interesting game. As it is there’s one event card that allows naval movement and there’s no guarantee it will even show up in a given round so you can’t really plan around it. It’s not a huge deal, and I’m sure some people like the map, but it was probably the part of the game that I disliked the most.
I have mixed feelings about how Hammer of the Scots models the Scottish rulers. William Wallace and the Scottish King are both A3 blocks in a game without a lot of A blocks. This means that they have the potential of killing an isolated block before they even have a chance of attacking. This is very powerful and means that effective use of Wallace/King is essential to winning the game. This is interesting, especially in the later scenario when losing your King can cause you to lose the game. I enjoy the juxtaposition between having a piece that you want to keep no matter what but also have to risk in battle to win. That said, sometimes it feels like the Scottish strategy can hinge a little too much on these blocks and I would have liked to see more alternative strategies – although maybe that’s just my limited experience with the game.
Overall, I like Hammer of the Scots, it’s a spectacular game that does a lot with a little and if the theme of Anglo-Scottish war really interests you then you absolutely should play it.
Crusader Rex
The layout of Crusader Rex’s map is very interesting and it does a good job of replicating how intertwined the Crusader Stats and their Muslim neighbors were in terms of their position. Attacks could come from anywhere.
My first game of Crusader Rex was probably the worst experience I had with this series of games in my plays so far. I feel a little bad saying that, because my opponent was very friendly and happy to offer my advice since I was new to the game, but he was much more experienced, and my absolute obliteration was not particularly enjoyable. My consolation prize is that my Crusaders did about as well as their historical counterparts – we finished the game with Antioch, Tripoli, and Acre still in Christian hands and that was about it.
I had really expected that Crusader Rex would be my favourite in the series because the Crusades I by far the period in history covered by these games that I am most interested in – and it has siege warfare! I’m always interested in how games model siege warfare. It was such a major component of medieval warfare and one that is often very hard to make entertaining. Unfortunately, my love for this game was not to be. My experience with my second game was much more positive and I can see why for some people this their favourite is, but for me there’s enough that bothers me about Crusader Rex that I can’t say I truly love it.
Let’s start with the good. I really like how Crusader Rex models the arriving of the participants of the Third Crusade. You randomly draw reinforcements from a face down pile and while Crusader lords can be placed directly onto the board, the French, German, and English crusaders must all be placed into boxes for their kingdom along the side of the board. Each kingdom has three boxes, and only when you have filled these boxes can you begin to move the blocks onto the board via the sea ports (or in the case of the Germans via the roads along the top of the board). This is a great little system that builds tension in the game, and also easily represents how Saladin knew that crusading kings were coming but could not predict how long it would take them to arrive. It’s a lovely bit of randomness and I was hugely impressed with it.
The design of the map also has a lot going for it. The Crusader States were spread over a relatively thin line of coast and were potentially easily isolated from each other by the loss of just a few essential fortifications. The map of Crusader Rex does a great job of making you never quite feel safe and allowing for elaborate flanking attacks or bluffs where you make it look like you’re heading one way only to pivot elsewhere. It makes it very hard to predict your opponents strategy which, when combined with the inherent fog of war of block games, makes for a really interesting positioning game with a lot of strategic depth. I think this aspect of Crusader Rex gives it the greatest potential depth of any of the games I’m discussing here.
While I initially struggled with the game, as I got a better hold on the strategy, and I started to have a better time. That, and once the members of the Third Crusade started showing up, I gained access to better troops and was able to actually execute a few semi-competent campaigns. This is probably the game in the series with the most tactical depth, and as a result the one that most severely punishes misplays. If I sat down and played this game four or five times and began to grasp the strategy better I would probably enjoy it a lot more – or maybe if I just played against people on the same skill level as myself – however, there are other games in this series I enjoy more already so I’m not sure about giving Crusader Rex much more of my time in the hopes of liking it more.
My issues with Crusader Rex are not particularly complex. I’m going to (try and) lightning round through a few of them, and then talk about why I don’t like how it models sieges – not because that’s my biggest gripe with the game (it is not) but because I have the most interesting stuff to say about it. So, with that aside, my top 4 things I didn’t particularly like about Crusader Rex:
1. I found it to be a bit too fiddly. Blocks defending in sieges can take half its – rotating 45 degrees – which is something I kept forgetting and also feels like it undermines the elegance of the rotating blocks to track damage a bit. Both sides have special rules, Crusader knights can Charge, and Muslim cavalry can Harry, which is another two combat options to track. The last round of the game is the Winter Round and no battles can happen in this round unless you play the Winter Campaign card. One of the things I love about this series is its simplicity and Crusader Rex feels like it adds a bit more complexity than I want without a clear advantage – in my opinion anyway.
2. The game calls the Muslims ‘Saracens’. Please do not do this in your games. I know medieval authors did it – but when has that ever been a reason to do something? It’s a term with a long and problematic history, and we have strictly better alternatives. Crusader Rex is hardly unique in this offence, but that does not make me less annoyed by it. Particularly since his game is modelling specifically the opposition of Saladin to the Third Crusade, why not just call the Muslim side the Ayyubid player? There are plenty of good options that don’t use a problematic term for a group of people who are often misrepresented in western media.
3. I hate the point-to-point road movement. Having the blocks on the cities made it harder to remember where they were – and I’m already intimately familiar with the Holy Land c.1187, I can’t imagine trying to locate cities if you’ve never looked at a map of this region before. The difference between solid line roads and the hashed line roads caught me out on several occasions, my poor eyesight foiling my strategy. I can appreciate there are some game differences between point to point and area movement, but from the perspective ease of parsing the state of the game I much prefer the area movement with clear coloured borders of Hammer of the Scots and Richard III.
4. Winter is very punishing in Crusader Rex – much more so than in Hammer of the Scots. This feels very weird to me, because winter campaigning was way more common in the Holy Land than in Scotland. In particular, the game doesn’t seem to allow you to maintain a siege over the winter round despite this being very common in Crusader warfare – the Siege of Acre which is directly within the scope of Crusader Rex’s setting lasted two whole years. Before that, the Siege of Antioch during the First Crusade famously lasted over a winter. I also don’t particularly like how it divides territories between Muslims and Crusaders and supply works differently between the two. I get that this probably works better for gameplay, but it paints a picture of two very divided populations when in practice the people living in Crusader lands were very similar to those living in Muslim ruled lands - only the ruling class really differed.
My annoyance with siege warfare is relatively minor compared to those outlined above, but I do think it largely fails as a model of Crusade era siege warfare. Storming castles is commonplace and in general it seems to favour the attacker. Sure, the defenders get the benefit of taking half hits (which, as mentioned, I don’t love) but the attackers barely seem to struggle finding able bodies to persecute the siege and swapping injured attacking units out for fresh bodies is relatively straightforward. Sieges were massive, complicated affairs that were far more likely to go badly than they were to go well. In Crusader Rex the defending blocks all have to roll for siege attrition – but why not the attackers? Dysentery ravaged besieging armies in the Middle Ages while a well-stocked and fortified position could happily hold out for months without a bother.
It also seems to reverse the relative power of larger citadels. Historically, a bigger city was harder to take, whereas in Crusader Rex it seems to be the opposite. Since you can only storm a fortification with a number of units equal to the number that it can hold – so for a small castle 1 block, while for a large city like Acre you could use 3 blocks – what you actually get is a situation where if the defender hasn’t put a full garrison of 3 blocks in their city you can outnumber them as the attacker. In reality, undertaking a major siege of a city like Acre would have been much harder than attacking a small castle. Castle and city walls were force multipliers – a smaller garrison had a significant advantage holding out against a larger army. The decisions in Crusader Rex make sense from a playability perspective, but I do think it inverts the historical reality of the challenges in medieval sieges.
Sieges were slow and tedious, which is why historically Saladin successfully took so many Crusader fortresses by offering generous terms of surrender to anyone inside – basically if Saladin’s huge army showed up outside your castle, you could fight to the death, or you could just pack your things and walk away. Many Crusaders chose the latter. This caused problems down the line, though, as Saladin’s attack on Tyre may have failed in part because the city had been reinforced by all the fleeing Christian soldiers. A mechanic that let you cede the ground and return of a friendly city would better reflect this – instead of forcing you to fight to the death.
I appreciate that siege warfare is hard to model in an engaging way – it was slow, horrible, and often not very eventful. I’m just not particularly impressed with how Crusader Rex handles it. I think it just makes it a slightly fiddly form of field combat instead of something distinctly its own.
That all having been said, I do think Crusader Rex is a fascinating game and my historical nit-picks need not be taken as gospel. Games are not simulations, at best they are models, but they only really succeed if they are fun to play. I think my knowledge of warfare of this specific period undermines my enjoyment of the game – if you took the rules of Crusader Rex but transplanted them to a different period of medieval warfare, I think I would like it more.
I would recommend against playing Crusader Rex as your first game in the series. It brings more complexity and a more punishing style of gameplay to the system. However, if you’ve already had a lot of fun with other games in the series than maybe give Crusader Rex a try – you might find its tactical depths and slight quirks far more endearing than I have! I suspect I haven’t seen the last of Crusader Rex either, I’ve probably got a few more games of it in me because there is a lot there that is interesting, even if it’s not exactly a brilliant representation of crusading warfare.
Julius Caesar
Julius Caesar’s map of the Mediterranean. This is probably my least favourite of the maps, but I do think it’s quite pretty. On the cards, the number in the top left is how many moves you get, and the number of circles on the banner is how many levies. It’s a great use of graphic design I think.
I was the least excited about playing Julius Caesar because I’m not particularly interested in classical era warfare, and even within that period I’m really not interested in the campaigns of Julius Casear. That said, for completeness’ sake and because I’m interested in the series as a whole, I decided I should play it at least twice. I’m not sure if you could exactly call my first experience with it a full game – I lost pretty decisively as Caesar in less than two rounds as I was unable to push Pompey back from his starting position and if you don’t get a strong aggressive start as Caesar, you pretty much immediately lose the game. I don’t particularly like this feature, especially as the Roman armies are much more ponderous than in other games in the series with attacks having to come form adjacent locations and many more blocks being C or D rated for combat. That said, familiarity with the game would certainly remove some of these difficulties and I can see why people would like it. My second game I played as Pompey, and I saw what a good Caesar strategy looks like – also losing decisively pretty early on in the game. Let’s start with the great and move on to the less good.
The thing I love most about Julius Caesar is that the cards are dual purpose – they have a number of movement points and a number of Levy points on them. I kind of wish more games in the series had done this or something similar. This allows cards to be much more variable – for example you can have a card that only lets you move one army but lets you levy 4 times, while another might let you move lots of armies but gets you relatively few new units. This makes for more interesting choices when picking which card to play. In Hammer of the Scots especially I would find myself dealt a hand of just numbered cards and while there is still a lot of choice there, it could feel a little underwhelming if 4 of my 5 cards were 2’s. Every card in my hand in Julius Caesar was interesting and each round I thought about which one to play.
I also really liked how you are dealt one extra card at the start of the round and discard down to your hand size, giving you just a little bit more control over your actions that round. I can appreciate that how troops were levied varied across time so the Roman recruitment represented by the levy actions on the cards may not transport well to medieval Scotland, but I’m tempted to play all my games in this series with the deal one extra card and discard down rule. The combination of the extra capacity of the cards and the small role I had in selecting my cards also sometimes had me kicking myself late in a round because I kept an event when I really wanted that extra movement instead.
Now for what I didn’t like. Julius Caesar has the same movement along roads between cities that Crusader Rex had, and I like it even less here because controlling cities is how you get Victory Points. When your blocks are directly covering the victory point markers you need to track to win, that’s not great graphic design. I appreciate that Rally the Troops tracks the VP for me, but I frequently had to click the interface button to remove the blocks from the board to see which locations even gave VPs in the first place. So much of this game relies on the positioning around these cities and tracking control of them, which makes not knowing which cities are worth what a major problem. I appreciate that if you’ve played this game a dozen times this won’t matter at all since, you’ll know the board by heart, but for a new player it was very difficult. At least Rally the Troops lets me switch the block interface off – playing in person if I asked my opponent to move their blocks so I could see the city it would kind of telegraph my plans a bit.
I feel like Julius Caesar has something of a mismatch in terms of how sudden its win conditions are versus how ponderous the gameplay is. Victory can come quickly for one side as they sweep in and secure several key cities, but at the same time it feels like armies are slow and that the mechanics encourage a slow building of armies before engaging in crushing battles. It felt to me like the levy system and fact that you can only attack from one spot away encouraged a form of gameplay more like Hammer of the Scots - careful and brutal attrition until one side emerges victorious. However, the actual win condition is holding territory, more like Crusader Rex, and effective strategies seem to make effective use of naval movement and event cards to sweep in and grab unprotected territory before your opponent can build up their forces and stop you. Neither of my games lasted very long and in both cases I felt like I’d been out-positioned and we did very little actual fighting. This may not be a problem for some, and it could just be a mismatch between what I thought the game was versus what it actually is, but I think I’d prefer this game if it took the more attrition-heavy focus. I wanted to watch Roman legions punch each other up and instead I just found myself floundering in a game that was more about movement than battle.
That all having been said, Julius Caesar is definitely an interesting game, and I can understand why some people love it – especially if you prefer ancient Rome to the Middle Ages. My lack of interest in the wars of the Julius Caesar means that I’m not particularly interested in playing this game more. If I’m going to dig deep into a game in this series that I’ve struggled with, it’s going to be Crusader Rex and not Julius Caesar.
Richard III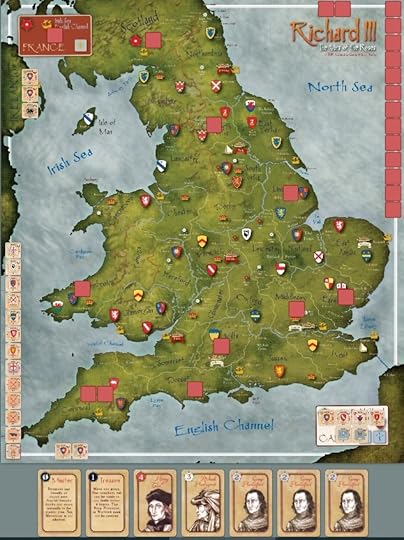
I am in love with this map, but I have to admit I find the card art a little uninspired.
I’ve kept Richard III for last because it’s my favourite of the series – and that fact kind of shocks me because besides Julius Caesar the War of the Roses is the subject covered by these games that interests me the least. Now, don’t get me wrong, I like the War of the Roses alright, but I find the general obsession with Richard III (the king not the game) to be weird. Few monarchs bore me more than Richard III and that initially put me off the idea of this game. That changed when I realised that you start at the beginning of the War of the Roses and Richard may never show up. A game where I can play Edward IV? Now I’m interested. I feel like by now we’ve really dug through the specifics of how these games work so let’s just cut to what I like about Richard III and to what I don’t think totally works!
The good stuff first, of course! I love Richard III’s map – it’s a full map of England and Wales and it leaves open tons of room for manoeuvring your armies and engaging in elaborate positioning wars with your opponent. You don’t feel funnelled into a few points like in Hammer of the Scots and the amphibious movements are a lot simpler than Julius Caesar which leaves open tons of options for sudden and exciting repositions.
I love how Richard III handles recruitment. You can spend an action point to muster a full-strength lord in their holdings across the board – assuming its not enemy controlled. This makes it really easy to place strong armies all over the board – but then you need to spend action points dragging all of them together into a coherent army. Then, in between Campaigns everyone goes home, and you have to do it again! I love this push and pull of trying to get your army together and also trying to pounce on isolated enemy lords to kill them off – since having more lords in England is the win condition between Campaigns any enemy lord you can kill is a plus. This also gives you more of a choice of how to spend your action points – in general in the other games they just let you move, but in Richard III you have to decide between consolidating/moving your armies or adding more blocks to the board.
I also really enjoy how much resets between Campaigns in Richard III. I appreciate this won’t be to everyone’s taste, but I feel more comfortable engaging in risky plays – especially late in a round – since so much will go back to normal once it’s all done. I also think this neatly captures history since there were generally many years between phases in the War of the Roses, so while lords were killed at an astonishing rate by the next time things started the deceased’s son would be grown up and fighting (in most cases anyway).
Now for the less good. After a few more plays I’m still not wildly impressed by the Treachery mechanic. I have used it successfully a few times now and it is powerful when it happens, but I much prefer the simplicity of Hammer of the Scots system where defeated lords betray you. I think if Richard III adapted that system to the handful of treacherous nobles it would be a more interesting game.
I also wish the game offered a few more systems for making it harder for the Yorkists to retain the throne if they take it – it feels a little too hard as Lancaster to retake the throne should you lose it in the First or Second Campaign. I think a few more elements like the Rebel that switch sides to the Pretender regardless of faction would have been interesting, and possibly make the game better able to replicate the reality of the house of Lancaster losing the throne but eventually winning it back in dramatic fashion. For example, Henry Tudor’s block feels a bit weak, making him more powerful would give Lancaster a strong late game push potential. I also think there should be a mechanism whereby the Kingmaker could potentially defect to Lancaster if the Yorkists take the throne, after all that is what he did, and it was the Yorkists who killed him in battle not the Lancastrians.
ConclusionTo a certain extent all of the above is basically nit picking. This is a great series of games and, with the possible exception of Julius Caesar, if you had any of these games set up and asked me for a game I’d almost certainly say yes. I also think it’s a real testament to the series that they manage to achieve a remarkable differences in how each game plays while still ensuring that if you know how to play one of them you can basically play any of them. It’s a very impressive feat hardly seen in wargaming, and my hat is off to the designers, Tom Dalgliesh, Jerry Taylor, Grant Dalgliesh, and Justin Thompson. Making a series of very similar games where people can still argue about which one is their favourite/the best is a stunning achievement and they all deserve immense kudos for it.
The legacy of these designs extends well beyond just these games, and even beyond just Columbia Games. I have two games currently sitting on my shelf that took direct inspiration from these titles. One of these is Worthington Publishing’s Robin Hood, a game that adapts the core idea of the Columbia block wargames to medieval highway robbery. The other is This War Without an Enemy, a game about the English Civil War which adds new layers of complexity to the Columbia system while still keeping its core elements recognisable. I have yet to play either of these games, but I am very much looking forward to trying out both of them!

Currently sitting at the top of my pile for when I can next get some games in with a real life opponent.
I’ve been sucked down something of a block wargame rabbit hole and I’m now fairly obsessed with this system, and very excited to try other variations on games that use the same block-based fog of war in new and exciting ways. The only real problem I’ve had with these games is that block wargames are not particularly suitable for solo play – since so much of the game is in that fog of war and the manoeuvring of armies you lose a lot when playing both sides. Some people don’t mind this, so your mileage may vary, but for me I have not been particularly tempted to try it out. Because of this Rally the Troops has been an excellent resource for playing games that otherwise I’d be lucky to get to the table a few times a year. I’d still prefer to be playing them in person, pushing blocks across the table myself, but this excellent digital implementation is far superior to not playing the games at all!
April 14, 2022
The Battle of Poitiers 1356 by David Green (Tempus Publishing, 2002)
While hardly unknown or obscure, I’ve generally been of the opinion that the Battle of Poitiers is unfairly overshadowed by Crécy and Agincourt. While Crécy is noteworthy for being the great early English victory that reinvigorated a too expensive war, Poitiers and its aftermath really set the foundation for what would come next in the Hundred Years War. Still, there are far fewer books dedicated to Poitiers than to either Crécy or Agincourt, which is why I was interested to see that David Green had written one. David Green wrote what is probably my favourite general history of the Hundred Years War but before that he was best known as a scholar of Edward, the Black Prince, which makes it only logical that he would have written a short history of the prince’s most famous victory. The Battle of Poitiers 1356 is an excellent overview of the battle and its most famous participant, fitting quite a lot of information into a relatively short book.
David Green’s expertise in the history of the Black Prince really shines through in The Battle of Poitiers. He centres the events of the battle within Edward’s overall military career, from his participation at Crécy while still only a teenager to his premature death from disease. Poitiers was the prince’s crowning achievement and Green does an excellent job placing it within that context. The downside of this approach is that we get less of an impression of how Poitiers fit into the military careers of its other famous participants, most notably King Jean II of France, whose capture was the battle’s most impactful outcome. Jean II and the Dauphin, later Charles V, are not absent from the book but it is very much a story from the perspective of Edward with the French figures as minor players. It would have been nice to see a greater deconstruction of the impact the battle had on the lives of those two French royals since it so defined the end of Jean II’s reign and the beginning of Charles V’s.
The book is a very easy to read, Green is a great writer, but it is also written with the assumption that the reader has some knowledge of the Hundred Years War. That’s not an unreasonable assumption, I doubt many people who have never heard of the war are buying books on Poitiers, but it is just something to be aware of. I would advise you to read a general history of the war, or at a minimum the Edwardian section of the war, before picking up a copy of The Battle of Poitiers. That is really the only background you require, though, as Green’s writing is clear, and he does a good job of conveying all the important information. The book includes extensive background of the events leading up to the battle as well as an important discussion of its aftermath up to the Treaty of Brétigny and beyond.
The only real flaw with the book is that it was written twenty years ago, which means that it is based on slightly older scholarship. This is probably me being a little avant garde but I could definitely nit pick at some of the conceptions of late medieval warfare on display in The Battle of Poitiers, most significantly in how it represents the effectiveness of the crossbow and longbow. It’s not like Green is wildly off base on any of this, and the book generally reflects what the dominant opinion was at the time, but since it’s my area of specialty it really stood out to me! This probably won’t bother most readers.
An interesting way in which the book seems a little ahead of its time is in providing biographies of all the key players in the battle in an appendix at the end. While this is focused on the nobility rather than the common soldiers, it is a bit reminiscent of how more recent prosopography projects have put the lives of the soldiers more front and centre in military histories of this period. This section, along with another appendix dedicated to wargaming the battle, and the several battle maps included, makes The Battle of Poitiers particularly useful for any tabletop gaming enthusiasts interested in replicating the battle with miniatures. It stops short of having a full wargaming scenario with rules, but it would be a very valuable resource to those interested in modelling history on the tabletop.
With the main narrative of the battle totalling up at just over eighty pages, and the appendices adding about another forty to the total length, The Battle of Poitiers is hardly a long book. There is probably room for a more detailed and in depth history of the battle, but as an introduction to one of the Hundred Years War’s most impactful battles this is an excellent place to start.
April 11, 2022
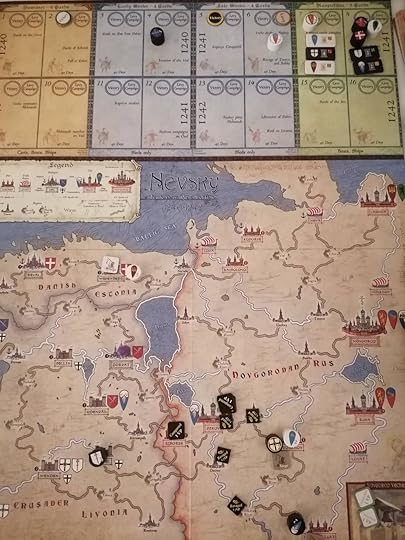
First Impressions: Nevsky by GMT Games
Cards on the table, I have played Nevsky twice as of writing this piece. Normally my First Impressions are literally that, reactions to having played the game once. I played the first scenario in Nevsky and afterward wasn’t sure what exactly to say about the experience, so after a few days I set up the second scenario and started playing. It’s not that Nevsky isn’t a fascinating game – it is, and we’ll get to that – it was just that it has taken me longer to digest it. Part of this delay is probably due to Nevsky particular design decisions, but part of it is definitely down to me and my own obsessions.
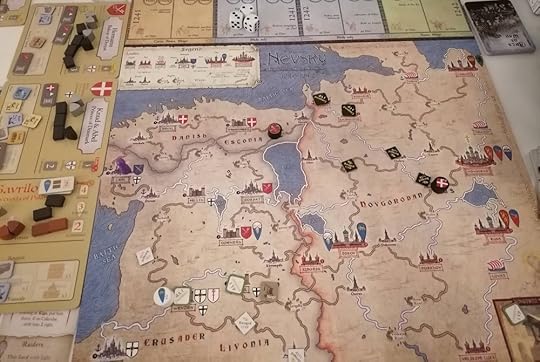
The end state of my first game of Nevsky. At the end of the summer campaigning season the Rus managed to just eke out a victory as both sides rampaged each others territory largely unopposed.
As should be apparent to anyone who has been following my posts up to now – I’m completely obsessed with the Middle Ages, and I’m also pretty obsessed with wargames. Unfortunately for me, medieval history is not the most popular topic in wargaming. While I’ve been enjoying my time with the Men of Iron series, hex and counter recreations of medieval battles isn’t really my main area of interest. I’m not really a ‘battles guy’. I’m interested in medieval battles because I’m interested in almost everything medieval, but I’m far more interested in how the battle came to be than I am in which flank did what first. Basically, I’m more interested in strategic and operational level tactics. That’s where Nevsky comes in – it helps to fill the really quite large void in operational medieval wargames. Nevsky, and the Levy and Campaign system generally, is exactly the kind of game I’ve been waiting for, and I think that’s part of what has made it so challenging to get my thoughts in order after having played it for the first time.
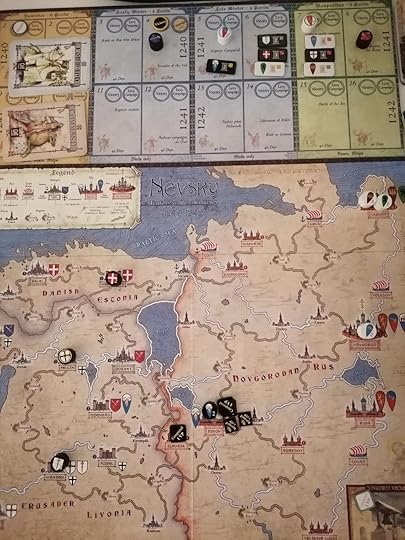
Game 2: The end of the first Levy phase. The Teutonic Knights begin with control of Pskov and the Rus must fight to reclaim their lost territory.
A lucky event draw for the Rus - chaos in Denmark causes Knud & Abel to leave the board, leaving Danish Estonia unguarded.
Before I go on to talk about the experience of playing Nevsky, I want to give due credit to Jean Michel Grosjeu, who’s excellent YouTube videos taught me how to play. If you’re at all interested, you should definitely watch them, they’re excellent. You can view the first one by clicking here. I read the rulebook after watching the videos. Nevsky’s rulebook is well put together and easy to reference but having the experience of watching two full rounds played with Jean Michel Grosjeu explaining everything to me as it happened made it all click much faster than it normally would have.
Nevsky is the first title in designer Volko Ruhnke’s new Levy and Campaign series and, as the name suggests, each round of Nevsky is split into two phases: Levy and Campaign. In the Levy phase you summon new lords to fight, and equip previously recruited lords with new troops, transport, and/or special abilities. Once the Levy phase is complete it’s time to campaign and discover how badly you messed up your Levy phase. You see, Nevsky is a game primarily about logistics. If your army moves or fights you have to feed them, if you can’t feed them, they lose their motivation to stay on the board and may just leave. Even if you can feed them, your commanders have only agreed to be on campaign for a certain number of turns before they just pick up all their stuff and go home. You can pay them to stick around longer – but did you remember to collect taxes before invading the other sides territory? If you didn’t you could always take an enemy city, or maybe acquire some loot by raiding, except that taking enemy cities can be a long and arduous process, and loot makes it harder to move across the board which means you’ll need more food to get where you want to go.
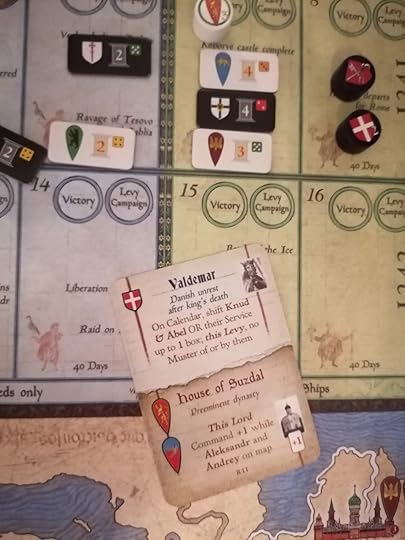
At the end of Winter and Gavrilo is besieged by the the Teuton Andreas while Valdemar makes an incursion into Danish Estonia. Meanwhile the traitor Yaroslav is making progress south of Novgorod.
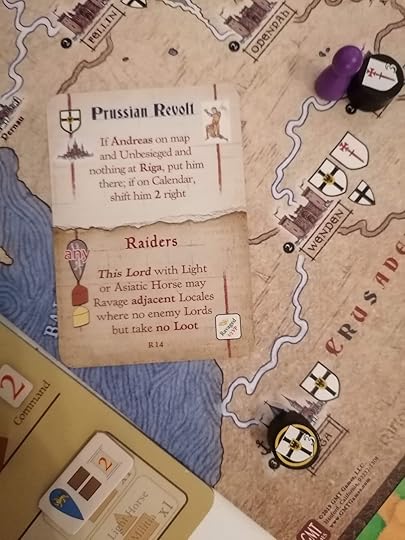
A revolt in Prussia sends Andreas back to Riga, bringing a premature end to his siege!
Don’t get me wrong, there is fighting in Nevsky, but there’s a lot of hurdles to jump through before you can even get your armies in a position to be fighting each other. If you lose a fight your army might just pack up and go home, but even if you win a fight if can’t feed your victorious troops, they might do the same. Sometimes it may even be worth losing a battle because your opponent has no food, and thus is in no position to fight. If you just show up and run away in the first round that could be enough! The calculations surrounding combat in Nevsky are really unlike anything I’ve played before.
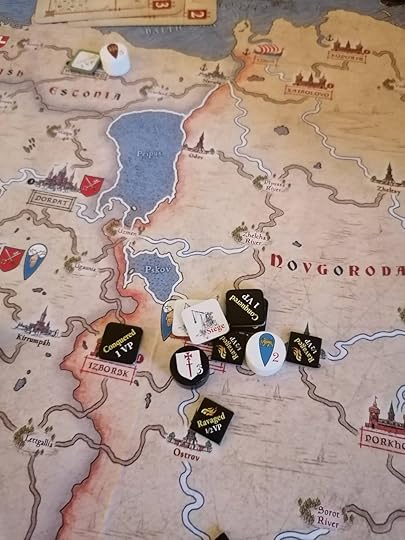
With Andreas out of the way Gavrilo moves on Pskov. After Gavrilo begins his siege, the Rudolf van Kessel intercepts and a battle takes place outside the city’s gates. (I later realised that one of these siege markers was illegal and had to backpedal on it, but it had no effect on the game’s eventual result). Meanwhile Valdemar continues to make progress in Estonia - successfully taking his first city.
Because of all of these logistical challenges, I would recommend learning the game with the second scenario in the book rather than the first. You see, the types of transport you need vary by season in Nevsky – in summer you have ships, boats, and carts, while in the winter you only have sleds, and in the muddy spring ‘rasputista’ you can only transport food by water. The default starting point is in the summer, which immediately drops you into a game where you have to balance three different modes of transport. However, the second scenario starts with a winter campaign, where rivers and roads are interchangeable, ships are unusable, and all you need are sleds. It’s a little bit less to juggle as you try and grasp the game’s basics. The campaign then carries on into the spring so you can learn about ships and boats once you’ve played a few rounds already.
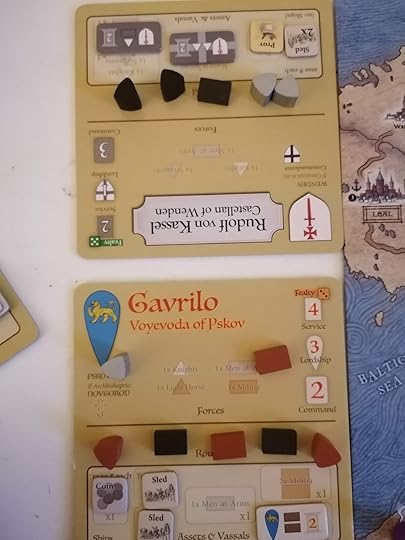
Despite the superior quality of Rudolf’s troops Gavrilo manages to emerge from the battle victorious thanks to a great string of luck. Unfortunately his forces were significantly diminished in victory, making it impossible for him to storm Pskov.
There are also fewer activations in winter. In the campaign round you get a number of activations based on the season – who you activate when is determined by a deck of cards you assemble before the campaign begins, locking you in to a certain order of play. In winter it’s only 4 cards, so again you have less to do and a little less to worry about. It’s also a shorter amount of time, so once you realise how badly you’ve messed everything up you won’t have to live with those mistakes for quite as long!
I think Nevsky does an admirable job of capturing the nightmarish logistics of medieval campaigning while also embracing the unique elements of Baltic warfare – particularly in its use of winter campaigns and the rasputista. I really look forward to playing it competently someday. So far, I’m doing well if I successfully finish a campaign turn with all my armies fed and located approximately where I intended to put them. There is clearly plenty of depth to this game, and I look forward to exploring it!
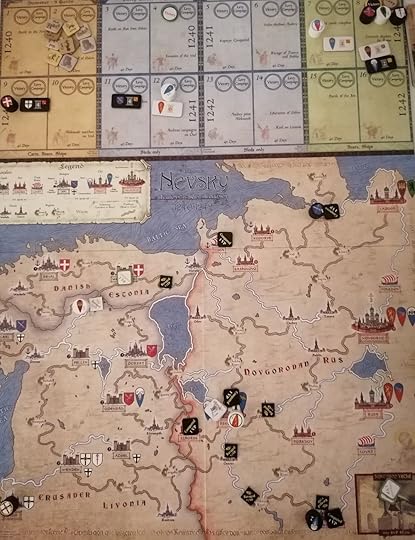
The titular Alexander Nevsky enters the game and rushes to Pskov to help, but Gavrilo leaves after the first storm attempt and Alexander is no more successful despite his superior forces. Meanwhile, Valdemar's service is almost over stalling his invasion. Heinrich sails along the north coast taking ports as he goes and Yaroslav has seized another Rus city. In the end Aelxander’s arrival is too little too late and the Rus are defeated.
Recommended Reading:
The Northern Crusades by Eric Christiansen
The Teutonic Knights by William Urban
If you’ve enjoyed this or any of my other blog posts maybe consider buying me a coffee via Ko-Fi at https://ko-fi.com/stuartellisgorman. Let’s be honest, instead of buying an actual cup of coffee I’ll probably spend the money on books and wargames and you’ll see the results here!
April 7, 2022
The Hundred Years War by Christopher Allmand (Cambridge University Press, 1988)
Christopher Allmand’s history of the Hundred Years War is the classic college textbook on the subject. The book is (very slightly) older than me and a venerable institution in the study of this somewhat misnamed conflict. I have to confess that up until now I had never actually read it. You see, I came to the Hundred Years War by a slightly weird route. Since my background was in studying weaponry, I didn’t read many grand sweeping political histories of the conflicts where crossbows were used, instead I jumped straight into the nitty gritty of the detail. This is something I have decided to rectify and Christopher Allmand seemed like the best place to start.
It's not often appreciated how difficult writing a succinct history of a massive topic is. Christopher Allmand’s book clocks in at just over 170 pages and in that he has to cover over a hundred years of complex political, cultural, financial, and military history. It is quite the challenge, and he rises to the occasion admirably. While the book can at times be a little dense and a little dry, the amount of information packed in is nothing short of stunning. After finishing the book you will be filled with new knowledge about Anglo-French warfare in the fourteenth and fifteenth centuries. I particularly enjoyed the chapter on the Hundred Years War in contemporary literature, discussing how writers and literary figures of the day reacted to what must have seemed like a war without end that was happening around them. That chapter is emblematic of how Allmand doesn’t let the fact that this is a history of a war bog him down in making it just a military history - the history of warfare is so much bigger than just logistics, politics, and battles.
That all having been said – this book is over thirty years old and plenty of new scholarship covering the period of the Hundred Years War has come along since that obviously isn’t reflected in it. For instance, Allmand dismisses out of hand the idea that the English were seeking battle with their chevauchees and instead argues that they were trying to avoid it. In contrast, Clifford Rogers has made extensive arguments detailing how Edward III was actively pursuing a battle-seeking strategy in the Hundred Years War. Now, you might not agree with Clifford Rogers, there are a good few scholars who do not, but it is a major element of modern historiography that is entirely missing from Allmand’s book because it happened after he wrote it.
This is the peril in reading older works of history. I generally try and dissuade people I know who might only read one book on a subject from reading a ‘classic’ in the field. This is not to say Christopher Allmand’s book is bad – it’s still an excellent book – but there is a lot you will miss if this is the only book on the Hundred Years War that you read. In its place I would probably recommend David Green’s The Hundred Years War: A People’s History. David Green’s book is very similar to Allmand’s – both give a high-level overview of the military history of the war at the very start of the book before moving on to more cultural and political themes that underpinned the war. I think Green’s book also has a slightly cleverer structure where he uses case studies from the war for each chapter, but those case studies are laid out chronologically, so not only do you get an overview at the start of the book the it also carries you through the war in a mostly chronological fashion. It just makes it much easier to parse whereas Allmand can be a bit dense and sometimes feels like he’s jumping around a bit as he tries to fit all the information into the book.
If you’re obsessed with the Hundred Years War and you haven’t read Allmand’s book then you should, it’s a classic for a reason and it is worth getting his perspective, but if you’re just looking for one book to read then David Green’s The Hundred Years War: A People’s History is the book you want.
April 4, 2022
Review: The Shores of Tripoli by Fort Circle Games
I first became aware of the Barbary War when I was around fourteen years old. I was in my hometown’s Barnes and Noble and saw a book that covered the career of William Eaton, focusing on his role in the Barbary War and eventual conflicts with Thomas Jefferson. It had been granted a prominent place in the bookshop since it involved TJ – our local hometown hero, of sorts, and yes, we do call him TJ – and while I didn’t buy it at the time it stuck with me. Later I convinced my parents to buy a copy of the audiobook on CD and after one failed attempt, eventually listened to it with my father on a road trip somewhere. It is perhaps not the most ringing of endorsements that I remember almost nothing from that book, not even its title. I tried looking it up, but it turns out that several books on the Barbary War were published in the mid-00’s. Still, while my first encounter with the Barbary War was not the most engaging it has sat in the back of my head all these years as one of the more interesting, and forgotten, American wars.
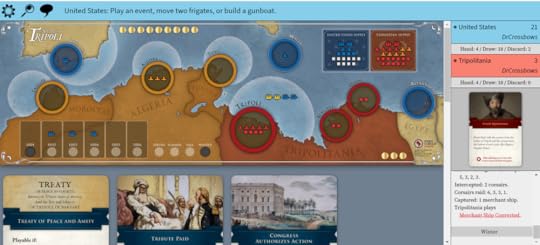
The Shores of Tripoli is a two-player card driven wargame about the First Barbary War. One player plays the Tripolitan pirates and their allies, while the other plays the Americans and theirs. The game is quick, you could easily play a full game in 25-30 minutes. I’ve been playing all my games on the digital implementation on Rally the Troops and while some games drag on a bit as real life gets in the way, for the most part they have been quick and engaging the whole way through.
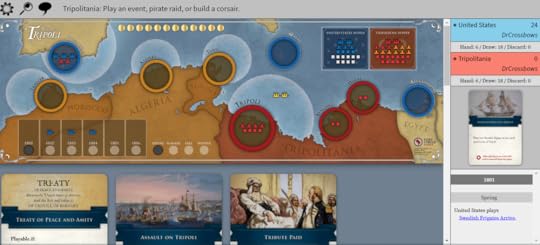
The display for The Shores of Tripoli on Rally the Troops. This is from the US perspective at the start of the game - we have summoned Swedish help to Tripoli, which is useful in the early game but comes at a cost later in the game.
In a game of Shores of Tripoli each player draws from their own small faction deck. You can, and slowly will, memorize this deck. Knowing what cards, you’ve played and what are still to come is essential to the more complex strategies of the game. To begin with, though, you don’t need any of that and your first playthrough will have exciting twists and turns as cards named for historical events crop up and cause chaos with your plans. That is, of course, what the historical actors would often have found when living through the war so in many ways it is the most authentic experience. With that in mind, for your first game I would recommend not flicking through the decks – let them be a series of chaotic discoveries! It won’t make for a very competitive game, but it’s a very memorable experience.
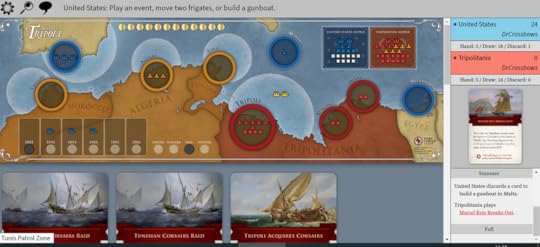
A few turns later. The Algerians, marked in orange, have joined the fight, while the US has built a gunboat in Malta and the Tripolitan corsairs in Gibraltar have broken out and returned to Tripoli. I didn’t actually think to screen cap one of my real games, so these are all examples from me playing myself!
There is a considerable amount of luck in The Shores of Tripoli, both in terms of when cards come up and in the large numbers of dice you’ll be rolling throughout the game. I still feel like I’m only beginning to explore the strategic depths of the game – even after six games I still barely know what I’m doing – but my impression is that in general the player with the better strategy will win Shores of Tripoli more often, but only in the aggregate. There are going to be games where the dice or cards just punch you right in the gut, and you must be prepared for that. That said, the game is only 30 minutes long (and possibly shorter if things are going really badly for you!) so you won’t be in misery for long if that happens. I’ve had games that I’ve won and lost based on luck, but for the most part it has been the luck nudging me to winning a game that I was narrowly losing strategically or vice versa. For something as easy and quick to play as this I don’t mind that at all, but pure strategists who hate luck in all its forms should beware.
The US has committed Frigates to the waters around Tripoli and successfully intercepted several Tripolitan corsairs during their raid. However they were unable to stop the North Africans from capturing three ships and securing their first three gold of the game!
In my games so far, it looks like the Tripolitan player is favoured initially – playing the American side involves a much better knowledge of your resources and careful planning to achieve success. However, a well-executed American strategy can be a formidable thing to face, and I suspect over time the two factions will have a close to equal win rate. One interesting strategic consideration is that each player has two possible win conditions – one more likely to succeed and one less so. The Tripolitan player can either successfully pirate 12 gold or they can destroy 4 American Frigates, the former is fairly achievable but the latter, while possible, is not particularly likely. Still, having two paths to success is really interesting. The options for the American player are even more interesting. They can either follow the historic option of capturing Derne, ensuring the Tripolitan player’s allies are subdued, and destroying any Tripolitan Frigates that were on the board. Then if they play the Treaty card, they win the game. However, they can as an alternative assault Tripoli itself – this card is a do or die play, if the American player fails, they lose instantly, but if they win than they can do what the actual American navy was unable to. I think this is kind of brilliant, it’s so tempting in a wargame to want to see your opponent totally crushed, and some of the real-life individuals involved would have agreed that total submission should have been the goal, but in general the more reliable play is to go for the Treaty win. It’s a great implementation of multiple paths to victory and one a lot of designers could probably learn something from.
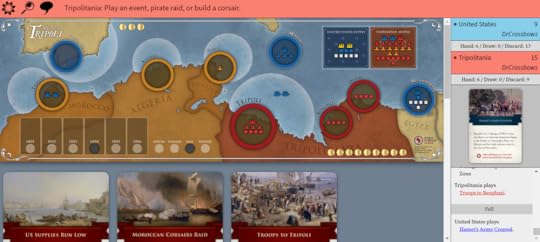
The late game. Tunisia has almost won on gold and is looking strong by having already captured a Frigate even before the US captures Derne. Still, the US ground forces have been assembled and Tunisia doesn’t have too many corsairs left so it could still be anyone’s game!
Shores of Tripoli is easy to pick up and play, the rulebook isn’t very long, and the systems are not particularly complex. The board only has a couple spaces on it, and most of the action is further limited to only a few of those. Despite this small scale, there is impressive strategic depth to be found in it. I can’t think of very many games that are this narrow in scale and that play this quickly while managing similar levels of strategy. I’m not sure Shores of Tripoli is a game for everyone, as I said you will lose games to bad luck and that might rub pure strategists the long way, but if you love chucking handfuls of dice but also want some serious strategy to your game then you should check out the Shores of Tripoli.
As the opening of this review has implied – I am not very well read on the First Barbary War, but after my time with Shores of Tripoli you can be sure that I’ll be looking up the game’s bibliography and doing some further reading on the subject! If you have a favourite book on the subject please let me know what it is and why you like it!
If you’ve enjoyed this (or my other) blog posts maybe consider buying me a coffee via Ko-Fi at https://ko-fi.com/stuartellisgorman. Let’s be honest, instead of buying an actual cup of coffee I’ll probably spend the money on books and wargames and you’ll see the results here!
March 31, 2022
We the People by Mark Herman: A Personal Retrospective
It seems more than a little absurd given the trajectory my life has taken, but when I was twelve years old I was really struggling to find anything to enjoy about studying history. My teacher at the time was the tragically named Ms. Aufil, and while she wasn’t quite awful, she certainly wasn’t inspiring, and I was having a hard time studying Virginia colonial history for what must have been the fifth time. A quirk of the Charlottesville public school curriculum of the time was that we spent the first six years of school only studying the period from the settling of Jamestown to the American Civil War – otherwise known as the period in United States history when Virginia was Kind Of A Big Deal. I was nearly fourteen years old before I learned anything from the twentieth century in a classroom setting. It was during this difficult period in my childhood that Mark Herman’s seminal game We the People entered my life.
My original copy of We The People - the box is a little worse for the wear over the years but it’s still holding together!
My memory of receiving We the People is both very strong and utterly lacking in detail. I don’t know what day it was, nor month, not even the season. I knew I was still in school, so it can’t have been the summer, but beyond that I’m not sure. My parents bought it for me and gave it to me with little ceremony. This might seem like a perfectly ordinary experience, but some context is useful. My hobbies increasingly tended towards the obscure as I got older and my parents often struggled to find gifts that suited my interests – this could make birthdays and Christmas a little fraught at times. Despite these general troubles, when they purchased that copy of We the People for me they reached the highest achievement you can when giving a gift: they gave me something I absolutely loved, but never would have even known that I wanted. To this day We the People is one of my most treasured gifts I’ve ever been given.
The insides of the box of We The People - including tokens, two decks, an assortment of standees, and the rulebooks.
My father had a history with classic Avalon Hill Games dating back a good few years, so he was destined to be my opponent once I cracked the box open. I read the rules and taught the game to both of us – taking command of the British in my first game. I was feeling a bit contrary about my endlessly American focused education I suspect and wanted to work out some of my frustration with constantly being taught about Famous Virginians by crushing a few of them beneath General Howe’s polished boots. I can happily report that in those early games the British were reasonably successful in this operation.
My board has developed this weird ridge along the fold - tragically making my hometown almost impossible to place tokens on. Still working out how best to fix that.
For those not familiar, We the People is a game designed by Mark Herman and published by Avalon Hill Games in 1993. It is generally credited with being the first Card Driven Game (CDG), a highly influential and popular genre of wargame. In a CDG players have a hand of cards that have a combination of action points (often called Ops) and/or historical events that have a specific effect on the game. On a player’s turn, they can play a card for its special event or for the action points. Action points can then be spent on a range of actions, such as moving armies or recruiting units. To give an example, Benedict Arnold begins the game as an American general but in the deck is a card that when played causes him to betray the Americans and leave play no matter what he is currently doing. As the American player, you can use Benedict Arnold as one of your generals, and he’s quite useful, but you have to know that somewhere in the deck is the potential that he will betray you at the worst possible moment. Players draw from a shared deck, so the American player might end up with Benedict Arnold Treason! in their hand, which lets them control when he betrays them to some degree, but also means they have to give up a turn playing an opposition event. The thing about We the People, though, is that you won’t play every card in a game - so maybe Arnold never betrays you, or maybe he betrays you on the second turn of the game!
Some sample Strategy Cards from the deck. This game is how I learned about Baron von Steuben, who has gone on to be one of my favourite figures of the American Revolution.
Victory in We the People is achieved primarily through area control – by seizing territory on the map of the Thirteen Colonies – rather than by destroying enemy armies. That said, it’s still a wargame so the Continental and British armies inevitably must clash from time to time. Combat was handled by a separate deck of combat cards. In a fight the two players drew a hand of cards based on the competence of their generals involved in the fight and then played a relatively simple card game to determine the victor – an interesting but very time consuming system that was cut from the implementation of We the People, GMT Games’ Washington’s War. I have very fond memories of this combat system, and I understand similar systems were implemented in later CDGs so it hasn’t entirely disappeared from the wargaming scene, but I can also appreciate that it took a lot longer to resolve than rolling a few dice and consulting some tables!
The Battle Deck and some sample cards - I wish I could say these brought back vivid memories of how the combat played but honestly I all it stirred was vague memories of really liking the Double Envelopment card…
I knew nothing about We the People’s illustrious legacy when I first learned to play it and I wouldn’t play another CDG for at least a decade. All I knew is that I liked playing We the People with my father. We would set it up on the dining room table and play it over several nights. I don’t know how many times we played it but I definitely became a little obsessed with it. I spent evenings flicking through the deck of combat cards, learning the odds of certain hands, and developing the rudimentary card counting skills necessary to optimise my strategy. My father did not show the same devotion to the game’s combat, which tilted things in my favour and only encouraged me to do it more. I even started designing my own cards – adding little bits of American Revolutionary history to the game as I saw fit - often with little to no regard for petty matters like game balance or rules coherence.
[image error]We The People even inspired my first documented attempts at game design. Mark Herman is more than welcome to incorporate any of these cards into the next printing of Washington’s War should he wish to do so.
I stopped playing We the People sometime during high school – I was too busy studying and trying to maintain some kind of social life for multi-hour-long wargames. I left it behind when I went to college – I travelled across the Atlantic for my university education and complex wargames were hardly top of the packing list. Still, years later when my mother was clearing out some old games and asked me if there was anything I wanted to keep I didn’t hesitate to tell her she could give away anything she wanted – so long as it wasn’t We the People. I was a little disheartened on my next trip home when despite my warning to keep it, I couldn’t find my copy anywhere. I had no memory of where I’d last put it, and things often got misplaced in the house over the years. I’ll admit I was a little despondent.
This past Christmas I visited my parents for the first time in nearly three years, the pandemic having caused a much longer than desired interruption. Imagine my joy when I saw the beaten-up box of We the People sitting atop a pile of old games in the spare room my family was taking over for the trip. I immediately knew that bag weight limits be damned I was going to bring it back home with me – I wasn’t prepared to risk letting it get out of my sight again!
I would love to say that over Christmas I cracked open We the People again and my father and I played a game for old time’s sake - hashing out the American Revolution over several evenings while trying to prevent my toddler from disturbing the board during the day. Unfortunately, my father was diagnosed with Alzheimer’s in 2020 and his capacity for things like complex wargames is nowhere near what it once was. This has cast something of a pall over my personal rediscovery of historical wargaming – I had always imagined that in his retirement we would find time to play these kinds of games together again during my intermittent visits home (I live a continent away, so it was hard enough traveling back to Virginia even before the global pandemic). Realistically, that will never happen now and instead I’ll have to look for games that we can play jointly rather than against each other – keeping track of lots of small rules and edge-cases is just beyond his memory now. While I may not be playing We the People anytime soon, and even though the game was later retooled as Washington’s War and published by GMT Games in a nice new package, I’ll be keeping my box ready. Hopefully in a decade’s time I’ll be able to coax my daughter into learning a little bit about both American and wargaming history.
March 28, 2022
First Impressions: Infidel – Arsuf 1191
I was finally able to secure the big table for an evening late one night and I took the opportunity to unpack one of the really quite large maps that come with Infidel – the Men at Iron game focused on the Crusades. I’ve long been fascinated by the history of the Crusades, so I was very excited to try Infidel, but it was already getting late by the time I started setting up, so I picked my scenario in a rush. The scenario options in Infidel are intriguing – some of them are battles I expected, but there are some absences and inclusions that surprised me. Dorylaeum, Montgisard, and Arsuf all make total sense. I was very surprised to not see Hattin, Saladin’s most famous victory, and I have to confess I didn’t immediately recognise the Battle of Harran. Still, one of the fun things about playing these games is seeing what aspects of history someone else thought were the most interesting to include. I also have to say that the bibliography at the back of the scenario book was pretty impressive – multiple books by John France and not even one mention of Runciman! You love to see it.
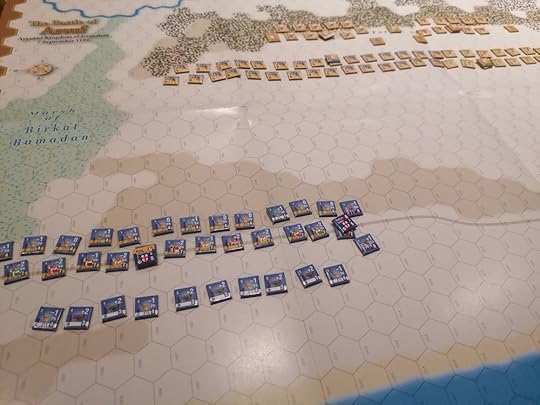
The Crusader army enters the plains of Arsuf to find Saladin’s army arrayed for battle. Apologies in advance, the lighting in this room was not very conducive to good photography so there will be some glare, and some weird angles as I try and avoid too much glare!
In the end I settled on Arsuf – it had an interesting looking deployment and it’s both a battle I think is quite interesting and one I know a fair bit about. I then set about setting up the game – a bit of an involved process given the scale of the map but one that was pretty satisfying all the same. It was only after I’d laid out the armies that I noticed the note in the booklet that told me that Arsuf was quite a complicated battle with several important rules amendments and new rules involved to make the Men of Iron rules system fit the historical battle. Reading those rules and having played it now, I don’t think the new rules were as intimidating as I’d initially expected. That said, I definitely got a few rules wrong as it was both my play of Infidel, and I was playing the most complicated scenario! It was a lot to juggle!
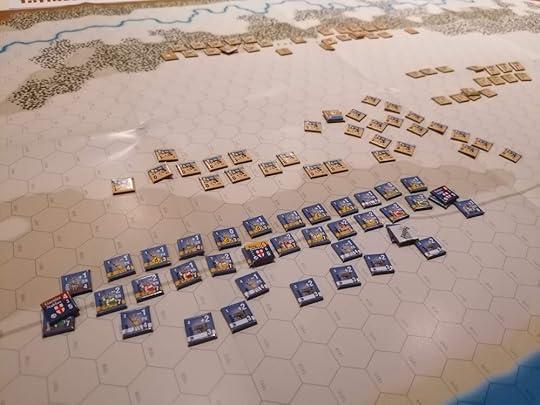
The horse archers have closed in to harry the Crusader army with missile fire, one crusader is Retired but the rest have held their formation so far. In the distance another section of Saladin’s army has moved forward to try and cut them off further down the road.
Arsuf was for a long time seen as the zenith of Richard I’s tactical brilliance – a sophisticated fighting march that successfully navigated enemy terrain and saw off an attack by Saladin himself. Soon after the victory at the Siege of Acre, Richard I (and Guy de Lusignan, former King of Jerusalem, who is often overlooked) set off with a much-reduced army on the long march south along the coast towards the city of Jaffa. Jaffa was the nearest major port to Jerusalem, so any attempt to retake the Holy City had to start there. The Crusader army moved extremely slowly while most of its supplies were on ships sailing down the coast in parallel. This is because a fighting march is an extremely slow way to move – the entire army had to be combat ready the whole time and there could be no spreading out of the line, everyone had to move at the same speed. A gap in the formation could be deadly as Ayyubid cavalry were harassing them pretty much the whole way. Steve Tibble, who wrote an excellent study on Crusader tactics, noted that the crossbow was particularly important as it allowed the Crusaders to force the mobile horse archers of the Turkish and Ayyubid armies from effectively harassing them. For this reason, a significant proportion of the army would have had missile weapons. The fighting was constant as Richard and the rest of the army made their way down the coast, but on the plains right before the ruined city of Arsuf Saladin’s main army attacked and the largest engagement of the march took place.

The crusaders break formation early to charge into Saladin’s horse archers. Several knights get a little over-eager in their attack.
There has been much debate as to whether Richard intended to fight Saladin outside Arsuf. The strongest evidence suggests that he did not. Instead, he wanted to march through the Ayyubid attack and set up a defensive camp around Arsuf – from there he could drive off any attacks as necessary. However, the rear guard of Hospitallers – the military orders often took positions at the front and back of the column since they were better disciplined to keep the necessary pace – grew tired of constant harassment and charged into the Muslim lines. Once one part of his army had committed, Richard and the other commanders had to join in, or everyone would be annihilated. In the chaos of the battle Richard successfully drove off Saladin’s army and was able to carry on to Jaffa which he quickly captured as its walls had been pulled down a few years previous.
I should probably briefly address the elephant in the room - I’ve labelled this post a First Impressions, but I’ve already played Men of Iron three times, so how can it be a First Impression? I know it’s a little arbitrary, but Infidel was originally its own game in the Men of Iron series and it offers some significant deviations from the original Men of Iron in rules and, more importantly, in the style of battles it models. It’s all fairly arbitrary, but even though I got the first three Men of Iron games in one big box I still decided to treat each one as its own game - so while this may be my fourth game with the Men of Iron system it is my first with Infidel specifically.
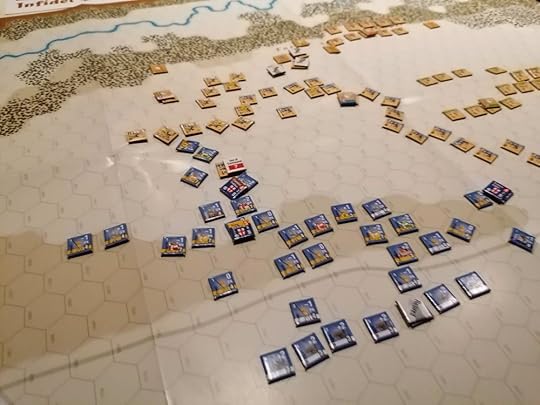
Saladin calls his cavalry back, restoring order to their formation and leaving the Crusader line somewhat overextended. Saladin’s heavy cavalry also begins to move forward to engage.
To capture the distinct elements of the fighting march, the scenario for Arsuf required some fairly significant modifications to the standard rules of the Men of Iron system. The two most relevant are that the Crusaders can activate their whole army at once, but only to March 3 hexes without taking any missile shots. The second was that the main Battle that Richard commanded could be partially activated – foot soldiers or knights – by the Hospitallers or Templars when their (tiny) Battles activated. The same applied to the Battle of the Kingdom of Jerusalem, which has no leader. I think these changes work really well – it makes it possible to keep the whole Christian army moving forward like they would have historically and makes for some interesting and dynamic play decisions. I was playing this scenario quite late at night, though, and the extra complexity – including the other new rules around how the Retired status affected Crusaders and various rules about formation and retreats – were not immediately welcome sights to my already tired eyes.
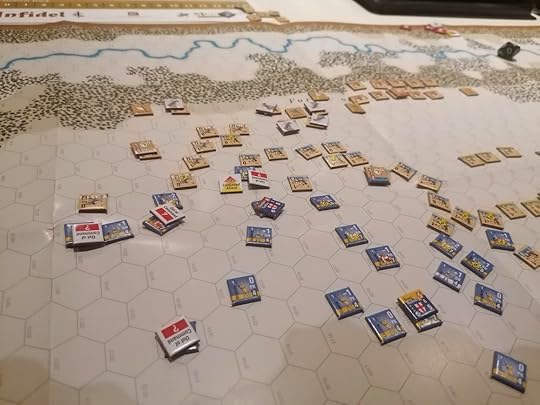
The Crusaders push on their attack, but many elements of the army end up out of formation as a result. Meanwhile the Ayyubid heavy cavalry get entangled in the fight, but with underwhelming results.
I did have some issues around how the rule rewarding the Crusader player for moving off the map worked. There’s a secondary win condition for Richard if he can move enough of his army off the map at Arsuf. I have two issues with this. While I said that Richard was trying to move through the main combat and not engage, that was to set up a defensive camp that could drive off enemy attacks. Moving units off the board makes his position weaker in the scenario, since he has fewer troops, but historically it would have made him stronger. He should be trying to run to a better defensive position where he’ll be more difficult to attack, not reducing his power by failing to commit to the fight. The other issue I have is that, to my mind at least, this encourages the Saladin player to put his army in between Richard and the far end of the map – this means that more often than not the Templars in the vanguard will be more likely to engage first, while historically it was the rear guard who engaged first. This is a smaller issue – games don’t need to replicate history – but I love it when games naturally nudge you towards something like the historical result without forcing your hand, and I wish the scenario had done more of that – not that I know how to fix it, mind!

Richard I gets into the thick of things for himself, while the Crusader army tries to put its formation back together in the face of the Ayyubid counter attack. However, while they effectively inflict chaos on the Crusaders, the Ayyubids have little success actually killing or retiring Crusader troops.
Overall, the wider map space at Arsuf and the abundance of mounted units on both sides made for a far more dynamic game than my previous experience with the grindier battles of Men of Iron. There was lots of positioning to factor in and once the lines got intertwined, I had knights engaging in continuous attacks all over the place and ending up out of formation, while Muslim horse archers ran all over the place. It was really interesting and lead for some great moments and interesting problems for me to pick apart.
Some of my problems with the game still persisted, though. Archery still seems way too powerful. The almost 50% chance of disordering a charging Knights seems too high, for example, although I do like how shooting at Knights runs the risk of being charged with probably very unpleasant results. I like the idea of the moving and shooting of Seljuk horse archers, but with so many on the board it was a bit repetitive to move each one, shoot, move again. It was fun the first turn I did it, but it felt like the optimal strategy was probably to play very conservative with them and that felt like it would get very boring over several turns – although arguably that would also just be replicating historical reality.
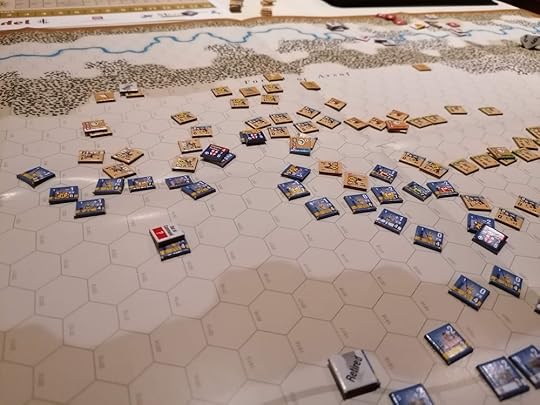
The Ayyubid attack falters as the Crusaders reform their lines - but Richard I gets a little too eager and charges deep into Ayyubid lines.
My biggest problem is nothing to do with the game, but instead my paralysis over how to optimise activations of the Ayyubid army. With the Crusader army being so small it was easy to know who to activate, but with the Ayyubid’s it was a real struggle to pick whether to keep activating the horse archers over and over again or if I should try and bring other troops in. I think my enjoyment of the game could be improved with some kind of chit-pull system for determining which Battle should be the first to activate that turn, and then letting me decide from there. The decision space is just so large it kind of overwhelms me. This would not be as much of a problem were I playing against a human opponent and thus only looking after one side, and is very much a me problem, but it was something I really noticed in this battle. It has also come to my attention that Francisco Gradaille has designed a chit pull system for the Men of Iron series, available on the Players Aid blog (https://theplayersaid.com/2020/09/24/men-of-iron-series-from-gmt-games-variant-chit-pull-system-from-francisco-gradaille/), so I may have to try that out as well.
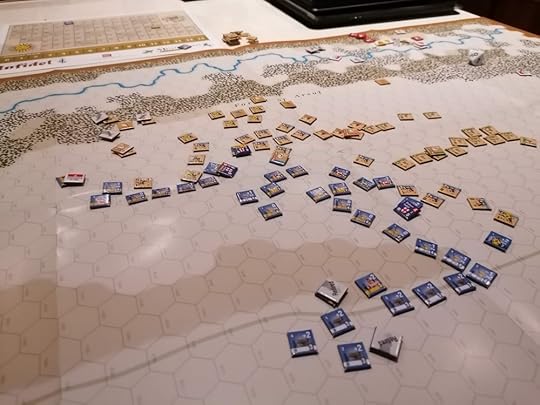
Richard I is victorious - he drives Saladin from the field and can continue his march to Jaffa - once he gets his army back into formation that is!
Overall, I really enjoyed my time with Infidel and Arsuf. The Ayyubids were at a disadvantage in the scenario, and a double disadvantage in that Richard I’s army kind of played like what I was used to from Men of Iron but controlling the Ayyubids was brand new, so I was not good at it. I also definitely got some rules wrong, missed some things across the many units on the board, and just generally had a bit of a sloppy game. That said, this is the first scenario in this box that having played solo once I am still interested in maybe playing solo a second time. While I’ve enjoyed my previous games, after they were done, I felt like I saw all the battle had to offer with me in command of both sides. With Arsuf I can think of things I would do differently or alternative strategies that would be interesting to try – particularly if I implement a chit pull system to mix up unit activations. I don’t know when I’ll next play it – I have a lot of battles still to play and very limited access to a table big enough for the map – but I am interested in getting it to the table a second time!
Recommended Reading:
Thomas Asbridge, The Crusades: The War for the Holy Land
Steve Tibble, The Crusader Armies, 1099-1187
John France, Western Warfare in the Age of the Crusades, 1000-1300