Stuart Ellis-Gorman's Blog, page 18
May 26, 2022
Knights and Peasants: The Hundred Years War in the French Countryside by Nicholas Wright (Boydell Press, 1998)
Military history often has the bad habit of overemphasising the generals and commanders that lead armies to glorious victory or disastrous defeat in climactic battles or sieges. While these stories are interesting and often significant, telling them can come at the cost of neglecting the impact that these campaigns had on the people who happened to have the misfortune of living between the army and its goals. That’s not to say that the existence of the common people is entirely ignored in the study of military history, few modern histories would go that far, but they rarely receive an equal level of attention and what they do receive can often be overly simplistic. Nicholas Wright’s book on the effects of the Hundred Years War on the peasantry and communities in rural France does an excellent job of balancing this narrative, leaving aside the battles and putting the people front and centre.
One of the primary goals of Wright’s book is to challenge the overly simplistic portrayal of the French peasant that has dominated narratives of medieval warfare since the Middle Ages. This book could be seen as something of a rebuttal to the influential works of the nineteenth century French scholar Jules Michelet, who saw in the Hundred Years War the development of a French national identity driven by the peasantry and culminating in the rise of Joan of Arc as the ideal embodiment of the French people. Many medieval clerical writers, and many modern historians such as Michelet, saw in the French peasant an individual who was egregiously exploited, constantly persecuted, and always in a state of great suffering due to the misbehaviour and violence of the military elite of medieval society.
Wright does not deny the violence of medieval society – in fact he devotes significant attention to how medieval soldiers often behaved like persecuting warlords. The description of suffering inflicted upon the common population pulls no punches. Probably the most horrifying section describes the raiding of villages and communities and then forcing the peasants to pay ransoms – when they could not the youngest would be conscripted into military service, often acting as almost slave soldiers having surrendered their freedom in exchange for their lives. These poor souls would then end up continuing the cycles of violence that had led to their situation in the first place.
However, Wright’s book is not solely devoted to descriptions of violence and suffering, and it is in that where the differences between this and many other histories that cover the same subject arise. Wright is also quick to point out the many ways that French peasants had to oppose or resist the violence of social elites. This starts with the most famous method – the peasant revolts that became all too common in the fourteenth and fifteenth centuries – before moving on to more interesting discussions of how peasants were driven to lives as brigands and the methods of communal defence the peasants could use to endure raids and attacks as well as the controversy those defences could cause.
I saw that these latter two are more interesting because I found the accounts of medieval rebellions to be a little underwhelming. I believe this is primarily due to the book’s age. It is over twenty years old and plenty of new research on French peasant revolts has come about in those intervening years. In particular, Justine Firnhaber-Baker’s history of the Jacquerie provides a much deeper analysis of this phenomenon than can be found in Wright’s book. Of course, Firnhaber-Baker was writing nearly two decades later and devoted an entire book to something that is covered in less than 40 pages in this one, so its superiority should be no surprise. In the areas of brigandage and communal defence I think this book really shines, as well as the discussion in the conclusion of the dichotomy of peasant as victim and peasant as independent actor able to fight and survive on their own terms.
My only real fault with Wright’s book is that the writing can be quite dense and often lacks a clear throughline to help the reader follow the argument. The arguments themselves are well made, but the structure of the book on a page-to-page level leaves a bit to be desired. It just makes this book a harder read than I would like, it has very academic writing, which I don’t mean as a compliment. There isn’t much in the way of complex jargon, instead it’s more how the writing comes together that makes this book less accessible than it could have been. If you’re used to reading dense academic text, then this may not bother you.
Overall, this was an interesting read and I’m glad I read it even if it took me longer than I expected for a book that’s less than a 150 pages long. I wouldn’t recommend it to everyone, it definitely requires existing familiarity with the history of the Hundred Years War and the deep dives into historiography, especially the discussions of Michelet’s writings, would not appeal to most readers. Still, for scholars and enthusiasts of the period there’s a lot here that’s worth exploring.


May 25, 2022
Cutting Room Floor: The Calais Garrison
The Cutting Room Floor is a new series where I will be sharing work that I did for my new book, The Medieval Crossbow: A Weapon Fit to Kill a King, that did not make it into the final text. My book was very near to its maximum word count, so some sections had to be pulled or cut down severely in order to make room for more important sections. This was one such section. While I find the use of the crossbow by the English garrison in Calais fascinating, it didn’t quite fit anywhere within the broader arguments or structure of the book and so in the end I decided to cut it. I am now presenting that original section below, with some minor edits to make it read more cleanly since it is now divorced from the original context of the chapter it was written for.
The Calais GarrisonIn the immediate aftermath of his famous victory at the Battle of Crécy in 1346, King Edward III laid siege to the city of Calais in Northern France. The siege was long and lasted through the winter, but in the end the city could not hold out and there was no sign of a relief army coming from the French king. In the subsequent decades Calais would provide a valuable foothold for the English on the European continent as well as granting them greater control over the English Channel. By the late fifteenth century the Pale of Calais, which consisted of the city of Calais and several nearby fortresses, was the last area in France still held by the English monarchy after King Charles VII’s reconquests of Normandy and Gascony. Defending Calais was a high priority, even during the upheaval of the War of the Roses. The soldiers defending Calais represented as close to a standing army as England had in the Middle Ages, and the information contained in the detailed records left by the garrison and its treasurers provide insight into the extent of crossbow use by the English during the era of the longbow.[i]
As one might expect, archers played a significant role in the defence of Calais. The garrison included large numbers of both archers and crossbowmen but the former generally outnumbered the latter. For example, Edmund Beaufort received wages for 40 crossbowmen, 30 mounted archers, two-hundred men-at-arms, and two-hundred foot archers. This is just one sample of hundreds of retinues hired over two centuries, but it is representative of the overall trend that crossbowmen were a valued minority of the garrison.[ii]
William Ross Master of the King's Ordinance and Controller of the Ordnance for Edward IV's invasion of France in 1475, bought over a hundred crossbows between the years 1473 and 1483. He bought both wood and steel crossbows, showing the longevity of the simple wooden crossbow, which was still seen as militarily viable. The two kinds of crossbow even had comparable costs. In 1476 there were 121 steel crossbows and forty wooden crossbows in the wardrobe in Calais, along with 1,076 longbows. By 1481 the number of crossbows had increased to two hundred. In addition, there was a garrison of forty crossbowmen not assigned to any specific retinue and paid at the higher rate than the rest of the garrison. Further evidence of a valued minority of crossbowmen defending the city.[iii]
The large numbers of crossbowmen and archers went largely unchanged after the introduction of gunpowder weapons. The number of arquebuses in Calais increased steadily over the early sixteenth century, but no drop off is evident for crossbows or longbows until the middle of the sixteenth century. For example, in a 1539 inventory of the armouries of the Calais and Guines, one of the other castles in the Pale, there were 184 new handguns, 416 older guns, 3,360 longbows, and 53 crossbows.[iv]
Crossbowmen seem to have generally been paid more than foot archers, receiving at least 8d. a day to the foot archers’ 6d. Mounted archers were generally paid the same wage as a crossbowmen, reflecting the higher cost of maintaining their horse. These are just average pay figures, though, and in practice they could vary. For example, in 1451 Edmund Beaufort received wages for 40 crossbowmen, eighteen of whom were paid 10d. a day and the rest 8d. a day. Crossbowmen were also generally given all their equipment out of the Calais armoury while archers were sometimes given their weapons but could also be required to provide their own bows. This was likely due to the greater costs involved in equipping a medieval crossbowman. It is worth mentioning that during certain periods in the history of Calais treasurers and other accountants had a habit of using the military description of a certain soldier to instead mean their level of pay. As an example, a record might describe a retinue as ‘foot archers’, but they might be equipped with spears rather than bows. If both foot archers and spearmen received a daily wage of 6d. a day, from an accounting perspective this was no problem, and it simplified the number of individual record types to lump them together. It is possible, then, that there were more crossbowmen hiding in the records under the guise of other military roles and many so-called ‘archers’ may not have used bows, but even still it is likely that there were more longbows than crossbows in the Pale. It should also be stressed that this was not a universal practice, and only reflects the careers of certain treasurers and covering certain periods in the history of the Calais garrison – other record keepers were more meticulous.[v]
The Calais garrison was not entirely defensive. In the wake of the failed Burgundian siege of 1436 many members of the garrison joined the English relief army in raiding the neighbouring Low Countries, which were ruled by the Dukes of Burgundy at that time. After the conclusion of the Hundred Years war, once the relationship between Burgundy and England had healed some, many members of the garrison found service as mercenaries in the dukes’ many wars – several even participating in the disastrous Battle of Nancy in 1477 where the last Valois Duke of Burgundy was killed by the Swiss. On a smaller scale, there were frequent skirmishes between the soldiers in the Pale of Calais and its French neighbours. David Grummitt has noticed that the Pale was still receiving shipments of pavises even after the rest of France had been lost. This could indicate that the crossbowmen in the Pale were expected fight battles outside of the city’s walls. The English have a long history of using the pavise with longbowmen as well, though, and so it is possible they were intended for equipping a field army including traditional archers pending a future invasion.[vi]
A common stereotype is that the English completely abandoned the crossbow sometime during the thirteenth century and adopted the longbow as their exclusive missile weapon. The evidence from the Calais shows how easily this can be disproved. While the garrison included a majority of longbow, it also included a highly paid elite of crossbowmen – sometimes receiving a daily wage of nearly double that of a longbow archer. They key takeaway is that crossbows and longbows were not necessarily technologies in competition and within medieval warfare there was plenty of room for both of them, even in a kingdom as obsessed with bows as England.
If you liked this, maybe consider buying the book which includes a lot more like it! You can see where to purchase it depending on your location at: https://www.stuartellisgorman.com/books.
Notes:
[i] Paul L. Holmer, 'The Military Crossbow in Yorkist England', Journal of the Society of Archer-Antiquaries, 22 (1979). pp. 11-16.
[ii] David Grummitt, The Calais Garrison: War and Military Service 1436-1558, (Woodbridge, 2008). pp. 45-52; 120-1
[iii] David Grummitt, The Calais Garrison, pp. 120-1; Paul L. Holmer, 'The Military Crossbow in Yorkist England', 11-14
[iv] David Grummitt, The Calais Garrison, pp. 45-50; 120-3
[v] David Grummitt, The Calais Garrison, pp. 45-52; 120-1
[vi] David Grummitt, The Calais Garrison, pp. 120-1; Kelly DeVries, “The Introduction and Use of The Pavise in The Hundred Years War”, Arms and Armour, 4;2 (2007). Pp. 93-100.
May 23, 2022
First Impressions: Warriors of God
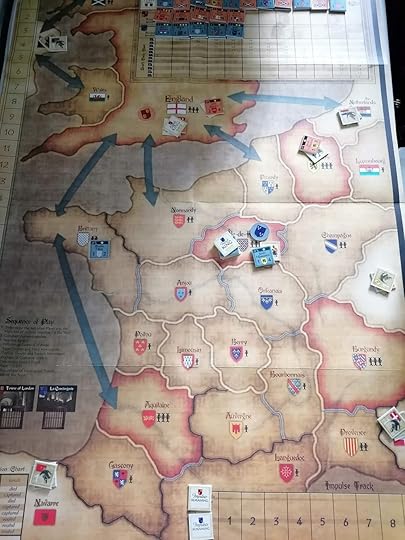
This game is amazing, I think I’m in love. It’s also total chaos, wildly messy, and definitely not for everyone. It’s a fascinating representation of the Hundred Years War that manages to capture certain aspects of the conflict while throwing vast portions of its history into the wind. It’s a game that feels like it has been built around one specific mechanic which I’ve never encountered anywhere else, and the rest of the design has spiralled out from that decision. It’s got area control, dice chucking, unit recruitment, and, most importantly, lots and lots of leader death. I am super enamoured with this design, and I think every wargamer should play it at least once – it’s an experience you cannot get anywhere else. Let’s talk about it.
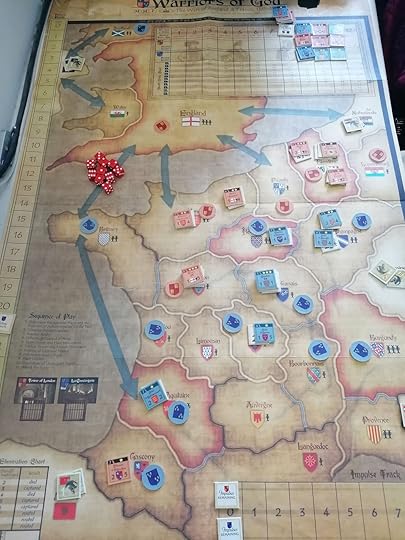
The stage is set - let the game begin!
Warriors of God was designed by Nakajima Makoto and published in English by Multi-Man Publishing. At first glance it’s a reasonably standard area control wargame. Players will have a number of leaders and under each leader is a number of units, limited by that leader’s rank. Armies are moved en masse from a single area to a neighbouring region – with limits on number based on the type of border between the two areas. The goal is to seize territory, you score victory points based on how many regions you control at the end of a turn. Battles ensue where both players have pieces. There are two kinds of battles: field battles and sieges. Sieges can only take place in the defender’s friendly territory and are resolved with a single roll of one d6 adjusted by various modifiers. Battles, in contrast, can be lengthy affairs with plenty of dice chucking. In a battle you roll dice equal to your total units in that area up to a cap determined by the Battle Rating of your most senior commander in that area – this can be as high as eight or as low as one. You hit on sixes by default but depending on the respective Bravery stats of the two lead commanders one side may get a bonus to their rolls. The bravery stats really make a leader far more than their Battle Rating, rolling fewer dice but hitting two or three times as often is often much better. The choice of when to choose siege or battle is really interesting – a single bad siege roll will cost you everything but if the odds are favourable, it may still be worth it over risking a series of battle rolls.
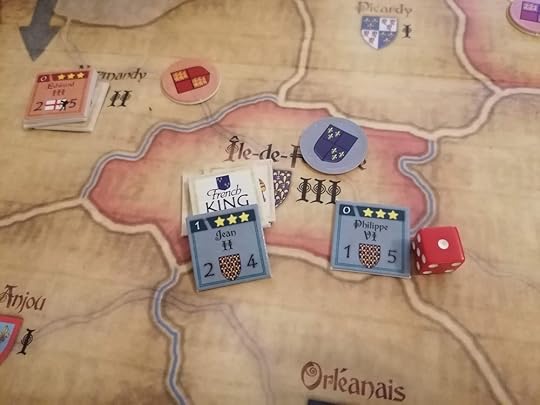
The game opened as it intended to continue - with King Philip VI dying at the end of the very first turn.
None of these features are bad, but none would make Warriors of God stand out if it weren’t for the best mechanic in the game: the Leader death table! At the end of every round a new group of six leaders enters the game, but before they arrive you roll for each leader you have on the map to see if they have died. Leaders can die at the end of the turn they first arrived on – meaning you got one round of actions with them and now they’re gone. That can only happen on a roll of a 1, but in my game Edward III, The Black Prince, King Philip VI, King Charles V, and Henry V all rolled 1s at the end of their first round and were eliminated. Of the various royals in the game, only Charles VI (who lasted a meagre 2 rounds) and Henry IV (made it to the premature end of the game where his side lost) were spared this fate. This phase is done after you recruit new troops, but before you place new leaders, and it injects pure chaos into the game. You just recruited a big army for that lord? Well, he’s dead, too bad! Even worse, your leader could die and be replaced by an enemy leader, who is now leading the troops that were previously on your side!
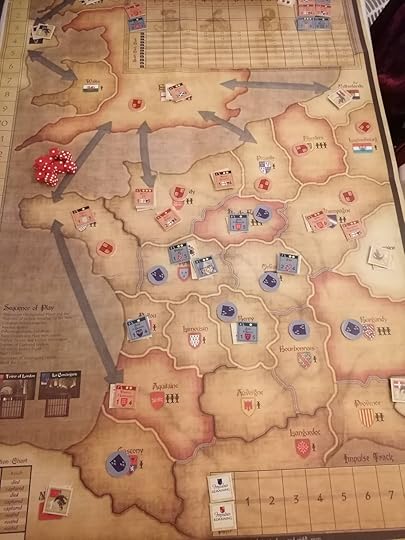
Some good rolls early on give the French control of quite a lot of regions early while the English struggle to establish a foothold. This turn neither side had a king due to staggering mortality among the royal lines. This was also the first round that saw quite a few impulses, which promised more excitement.
Warriors of God has something of an irreverent tone and the Leader death table embraces that concept fully. It’s absolutely hilarious and interacts in amazing ways with the game’s other systems. I already mentioned the problem of recruitment, but let’s also discuss captured leaders. Any leader on the losing side of a siege and many that lose a battle (depending on a roll on the Elimination Table) are captured by your opponent. At the end of the round, you first swap lords, assuming both sides have prisoners, which is not optional. If at the end of this process one player still has captured lords his opponent can choose to ransom them by removing control markers from the board – a high price to pay. Alternatively, you can leave them to rot in prison, but at the end of the round your opponent will receive a Victory Point for any captured lords they still have – if they’re still alive that is! You can gamble that the captured lord is pretty old, maybe they’ll just die and spare you the VP loss. On the other hand, maybe you just ransomed that valuable lord and right after that they just up and die, leaving you short a control marker and a lord! Some people will find this level of chaotic luck infuriating, but for me it was hilarious.

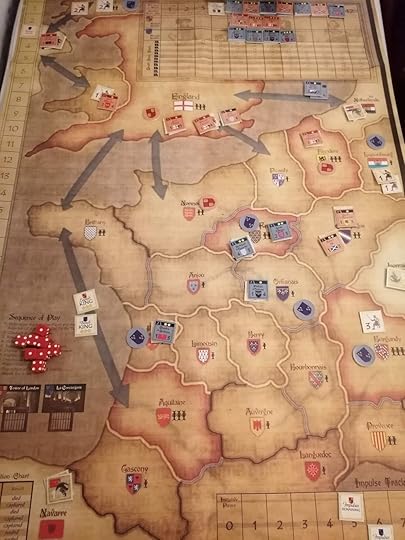
Two turns ago neither side had a king, last turn England did and France didn’t, this turn France does and England doesn’t. France has also successfully established control over much of the south while squaring up for a fight in the north.
As a simulation of the Hundred Years War, Warriors of God is hardly high in fidelity. Armies didn’t really switch sides if their lord died but a new one from the other side just showed up at the right moment, and the battles and politics are highly abstracted. In the same box is a separate campaign recreating the Anglo-French wars of the 11th and 12th centuries, a radically different period of warfare, which should give some indication of the extent to which this game simulates late medieval warfare. However, it does get a few elements right in ways I find fascinating.
Bertrand du Guesclin arrives on the scene with his amazing Bravery stat and the number of English commanders in prison expands rapidly. Charles VI also becomes the first French king to actually survive the round he arrived on.
The first is the aforementioned death tables. Many games would attempt to replicate the historic lives and deaths of their figures, crafting a model that grants Edward III a long life but cuts Henry V’s brutally short. Warriors of God instead engages with the concept of what if the random cruelty of medieval life was applied equally across the entire war? Henry V did die young, but Edward III could have just as easily – fate is a fickle creature. By leaning into this concept, the notion that disease could carry off a noble warrior at any stage, Warriors of God replicates much of the uncertainty of medieval conflict. Arguably it heightens these elements, deaths come quick, and they come fast, but that can be forgiven because it is after all a game first and a simulation second. It is a great engine for generating counterfactuals while still maintaining the broad structure of the conflict as new lords are steadily arriving and the same key players will feature no matter what.

Bertrand du Guesclin lasted longer than most but he was struck down in whatever plague effectively cleared the board this round. Charles VI and Henry IV were proving remarkably long lived at this stage - at least compared to their ancestors.
I also like how Warriors of God captures shifting alliances within the war. Two of the six leaders that enter every round are neutral and can be loyal to either side. Starting with the player who went second that round, players will pick one of these to be loyal to their side (possibly along with other neutral lords who are already in play but have been routed in combat). One of the interesting parts of the Hundred Years War is the broader political landscape it took place under, with many shifting alliances, civil wars, and battles for legitimacy of rulership in neighbouring kingdoms. This system allows for the recreation of rebellions and civil wars without introducing a mountain of extra rules. It’s not the perfect replication of the full political scope of the war, but within Warriors of God’s general framework it’s an amazing bit of extra spice that helps the game shine.
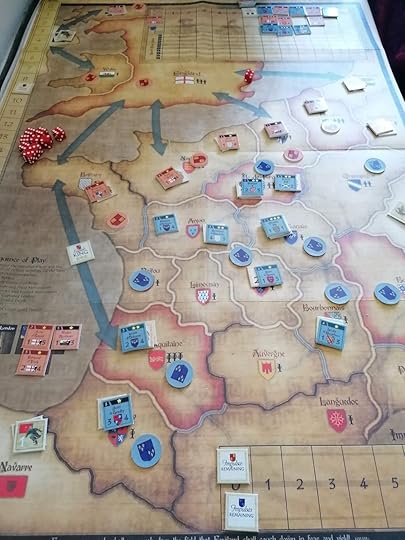
With the plague having removed a large number of French commanders, the English begin to make a comeback. Henry V has turned up, so things must be looking up. Minutes after taking this photo Henry V died of plague.
If there’s an aspect of Warriors of God, I’m not entirely enamoured with it’s the unit recruitment system. Don’t get me wrong, I broadly like it – and I really like what it’s trying to achieve – but I did find it a little bit fiddly. Each round after movement, battles, and area control are resolved each area generates units equal to its value (areas are valued between one and three), and units can be recruited along continuous lines of control, so unit scan turn up several spaces away if all intervening areas are friendly. This is fine in general, but I found that I had so many units each turn that I wasn’t really sure what to do with them much of the time and it could drag the game to a crawl as I tried to guess at optimal placement for them. I think this was exacerbated by the fact that kings and royal heirs had a bad habit of dying very suddenly in my game so I rarely had commanders who could lead large armies available, which meant I had a surplus of units and a lack of commanders for them. Different Leader Death table rolls could drastically change this experience. What I did like about this system is that you have to do all of this before you place new leaders or, more importantly, see if your existing leaders have died. This makes the decision of where to place the units harder, but also creates comedic situations where you placed an army somewhere planning for a new leader to take them – but actually the king just died, and the new king needs to take over his old army or Paris will be exposed. I just wish there was a slightly faster way to resolve this round. I don’t have a solution, and it didn’t really hinder my enjoyment of the game, but it was the only blemish on my time with the game and could easily have just been a product of the circumstances of my first play.
In the end the English rally was too little too late. Despite France being once again kingless - Charles VI finally passed away, followed quickly by Charles VII - but the arrival of Joan of Arc was enough to hold off the English long enough to clinch an early victory.
There’s not a lot of games about the Hundred Years War, so Warriors of God isn’t in a very competitive field when it comes to being the best game on the subject. However, I think no matter how many other games there were, Warriors of God would always be one of the most interesting. I had an absolute blast playing it and I cannot wait to get it on the table again. Rarely do games make this strong of an impression on me the first time I play them, but this really is something special.
Recommended Reading:
For my money, the best introductory history of the Hundred Years War is David Green’s The Hundred Years War: A People’s History.
I have also reviewed several books on the Hundred Years War on this blog, including Poitiers, 1356, also by David Green (https://www.stuartellisgorman.com/blo...), The Hundred Years War by Christopher Allmand (https://www.stuartellisgorman.com/blo...), and The Agincourt War by A.H. Burne (https://www.stuartellisgorman.com/blo...).
May 19, 2022
The Agincourt War by A.H. Burne
Lt. Col. Alfred H. Burne served in the Royal Artillery of Great Britain from 1906 through 1945, serving active duty in France during World War I and as a training officer in Britain during World War II. In his retirement in the late 1940s and 1950s he wrote several very influential works on military history, particularly medieval military history. The Agincourt War, first published in 1956, is the second book in his history of the Hundred Years War. The first The Crecy War, covers the conflict from its origins until the 1390s, where The Agincourt War picks up and continues the war to its conclusion. It is always useful to understand the background and potential biases of any historian, but for a historian like Burne it is particularly vital because his background bleeds through into his work on almost every page. This is not to say that reading Burne’s work is without merit, nor to undersell his influence on the field of medieval military history, but more to note that tackling an author like Burne and his work is a complex matter and not one to be taken lightly.
The Agincourt War briefly covers the career of the marshal Bertrand du Guesclin in its opening in one of the least flattering portrayals this famous French commander has ever received. Burne describes his campaigns as being largely without military interest since they consist primarily of raids and sieges with no major battle. The Frenchman even has the indecency to have been captured in both of the major battles he fought in. Burne even takes a moment to comment on how ugly du Guesclin apparently was, along with a jibe about him having “common” origins. Burne is not entirely without praise for du Guesclin – he recognises that for someone of his status to be buried amidst the French monarchs must mean something, but his acknowledgements of du Guesclin’s successes are at best backhanded compliments and at worst outright insults. He even manages to work in another jibe about how ugly du Guesclin was when discussing another Breton commander, Arthur de Richemont, later in the book.
I bring this up because it really gets to the heart of what the tone of Burne’s work is as well as his major interests. Burne is primarily interested in field battles: major engagements between armies. In this way his interest in military history is very much rooted in a modern understanding of conflict. Extensive discussion is devoted to the manoeuvring of armies, army sizes, the disposition of troops before battle, and course of the battles themselves. Parallels are frequently drawn to Burne’s own experience on World War I – particularly during the Normandy campaigns as they overlap geographically with his own service – as well as World War II and, occasionally, Napoleonic warfare. Burne acknowledges in places that siege warfare was the dominant kind in the Middle Ages, and there are descriptions of famous or important sieges, but these still focus primarily upon the commanders, rather than a description of how siege warfare actually worked at the time. If you want an explanation of late medieval artillery or the process involved in undermining city walls you will not find them here. This is very much military history as grand strategy; logistics are considered only when absolutely necessary. This is why the campaigns of Bertrand du Guesclin feature little of interest to Burne, whereas the wars of Henry V are full of the grand manoeuvres, major battles, and the clash of strong personalities that interest him most.
Another feature present in Burne’s dismissal of du Guesclin is his significant pro-English bias. This history is clearly very personal to Burne and he was very invested in the successes and failures of the English. He is full of praise for Henry V and John Talbot, and more reserved but still positive toward the Duke of Bedford. On the other hand, he has scathing things to say about Charles VII and is generally unimpressed with most of the other French commanders. He frequently criticises French commanders for failing to seek battle, labelling them cowards and weaklings, even if by his own description it was probably not tactically in their best interest to fight. Only Joan of Arc, and to a lesser extent Jean Bureau, escape his disapproval. Joan being the only French commander he is full of praise for and is possibly the only figure in the book to rise to near the heights of Henry V.
Burne was also a firm believer in the possibility that the English could have succeeded – that Henry V and his descendants could have been Kings of France. He even continued to believe in the possibility of English success after the 1435 Treaty of Arras, where the Burgundians switched their alliance to France. Arras is generally considered by most historians to be the beginning of the end for English rule in France. Without Burgundian support it was untenable for the English to hold on to Normandy – and given the state of English finances and the chaos of the Henry VI administration, Gascony was unlikely to hold out for long after. Burne doesn’t see it this way, and instead in his narrative turns against English fortune almost always come out of some unexpected twist in the events of the war rather than coming from limitations in English capacity to fight the war. Joan of Arc is the pinnacle of this theory – an unexpected force arising from seemingly nowhere to revitalize French morale and force the English back. This is not to say that Burne is above putting blame on individual English commanders or to criticise what he views as their errors – but he never considers that the war was unwinnable or that England may have stretched itself too far. Where a more modern historian might argue that the Siege of Orleans was unlikely to ever succeed – the English army being too small and overstretched as is – Burne argues it was winnable right up until Joan of Arc arrived outside its walls.
It is worth considering Burne’s most famous introduction to the study of military history – his concept of “Inherent Military Probability” or IMP. This was Burne’s solution to the problem of medieval sources, or the lack thereof. When presented with a lack of information about how a conflict unfolded, Burne would use his best judgement as a military officer of substantial experience to determine what the most logical course of action would have been – and then to assume that the medieval commander did that. To be generous to this concept, Burne acknowledges something often neglected by earlier historians of medieval military history: medieval commanders were as smart as their modern equivalents. These were not superstitious rubes relying on their faith in God to bring them victory. They made intelligent tactical and strategic decisions based on their own expertise when faced with the inevitable challenges of campaigning and waging war. The inherent flaw in IMP is that Burne was an artillery officer in a modern army with experience in modern warfare – no matter how hard he might try he could not place himself in the shoes of a medieval commander and the very different form of war they waged.
This is most apparent in Burne’s mild obsession with the idea that if the English could just take the enemy capitol, they might successfully win the war – an extremely modern concept. Burne criticises the English commanders for failing to march on Baugé, where Charles VII had his headquarters, after the signing of the Treaty of Troyes in 1420 disinherited Charles and made Henry V the heir to the French throne. Burne seemingly thought that had they taken the city then the cause of the (then) Dauphin Charles would have crumbled and with it French resistance to English rule. This doesn’t really seem to follow, after all the English already held Charles’ actual capitol of Paris and there was plenty of territory in southern France for Charles to move on to. Besides, even if they took the city could the English really hold it? They would be far outside their usual territory and the army could only stay in the field for a short while. In a similar vein Burne argues that in the campaigns of the early 1440s the English should have tried to take Paris – seeming to believe that similarly this would resolve the conflict in England’s favour. This all seems too rooted in the World Wars and the idea of taking Berlin to defeat the Germans rather than reflecting actual medieval reality.
It probably sounds like I’m being a bit harsh on Alfred Burne, and I want to stress that this book is a piece of serious scholarship by a very talented scholar – it is just also a dated work whose flaws are more apparent with the advantage of hindsight. There is a lot to be impressed with when reading Burne, and I genuinely enjoyed my time with his book. For one thing, there are very few books that cover the final stages of the Hundred Years War in any detail. While books on Agincourt are plentiful, Burne’s book carries on past that famous victory through the disastrous end of the war in the late 1440s and early 1450s. Most English language histories are content to end around 1435, if they even get that far, and provide only a cursory summary of the very end. While Burne does spend more time on Agincourt and Henry V’s conquest of Normandy than he does on Charles VII’s reconquest of Normandy and Gascony he still provides more detail on those latter campaigns than many histories I have read. Only Juliet Barker’s Conquest really covers the same period in detail in English, and that still wraps up around 1450 – before the reconquest of Gascony.
The thing I love most about Burne’s book is the Appendices that he places at the end of each chapter. In these sections Burne discusses things like how he derived estimates for the sizes of armies, or his thoughts on the available evidence, but most importantly he discusses his sources in detail. He mentions what medieval chronicles and sources cover this period of the war, and where to find a published version of the text (usually an early modern or nineteenth century edition). One of the most relatable things I have read in years was a passage where Burne complained about how hard it was to get access to a certain source for a campaign because it wasn’t published in an accessible volume. Burne also provides references to what was at the time the most up to date scholarship, showing his mastery of both French and English nineteenth and early twentieth century historiography. Burne also shows impressive knowledge of the geography of the areas he discusses – he has clearly visited most if not all the major battlefields of this period and describes in detail his efforts to locate the exact sites of the battle. While we may quibble with his conclusions, his knowledge of French geography cannot be denied.
If you’re interested in a book on the Hundred Years War, A.H. Burne’s The Agincourt War would not be my first recommendation. It is a work of its time and as a study of medieval military conflict its flaws outweigh its merits. However, if you’re doing a deep dive into the Hundred Years War, or late medieval warfare more generally, at some stage you will have to reckon with Burne and his legacy in the field. For good or ill, Burne’s fascination with medieval battles lasted long past his lifetime and still hangs over the study of medieval warfare. There is still far more written about the famous battles of the Middle Ages than the sieges. If you are taking a historiographical deep dive into this subject, you owe it to yourself to experience Burne and his writing directly – don’t just take a summary of it from someone else. At the very least it makes for some interesting reading, and his ability to point you to the most relevant chronicles for any individual campaign is still valuable even 60+ years later. However, if what you want is a general history of the Hundred Years War, read David Green’s The Hundred Years War: A People’s History instead. It’s a much more up to date work and covers a much wider range of topics than Burne’s hyper focused military study.
May 16, 2022
Learning COIN: Andean Abyss
This is the second part in a series, if you haven’t read it check out the first part, where I learn to play Pendragon: The Fall of Roman Britain, here: https://www.stuartellisgorman.com/blog/learning-pendragon, and my First Impressions after finishing a game of it here: https://www.stuartellisgorman.com/blog/first-impressions-pendragon.
Holy God this game is a lot easier to learn than Pendragon was. Part of that is certainly the familiarity with the system I developed over my two solo plays of Pendragon, but also there’s just a lot less going on and a lot less to keep track of! Don’t get me wrong, it’s not like Andean Abyss is a simple game, it’s more that I now see just how deep the water was where I first jumped in, and I understand why most people pick somewhere else. I know a lot of people learn with Cuba Libre, but for some reason the Cuban Revolution just doesn’t really appeal to me, so I decided that I should take a trip to South America instead. My knowledge of Colombian history is pretty limited, probably on par with a lot of Americans who are vaguely aware of the War on Drugs and its effects in Colombia but not much beyond that. I do know they have way too many hippos thanks to Pablo Escobar, but I’m not sure that will help me learn this game.
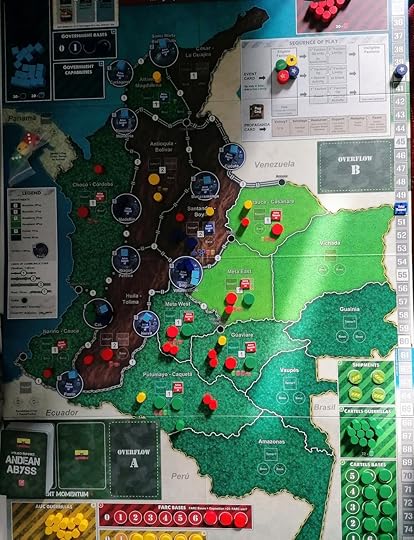
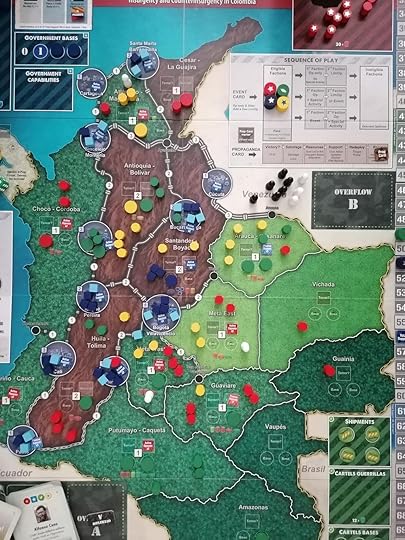
The game at set up. I’m somewhat embarrassed to admit that I was annoyed the manual didn’t come with a picture of the game at set-up and only later noticed that set up is literally printed on the board.
Andean Abyss was initially extremely intimidating with its many counters and wooden pieces, but now that I know what they all do it doesn’t feel much more complicated in terms of moving parts than your standard heavy Eurogame. Strategically is another matter – see my rant about indecision below – but the complexity of Andean Abyss really does lie in how everything fits together rather than in the rules themselves. It helps that the three insurgent factions share most of their actions, with a few minor tweaks, so the number of actions you have to learn are significantly fewer than they first appear. Only the Government faction significantly differs from the others, and definitely presents the most challenging aspect of the game to learn.
For my learning game I set up the full deck, per the Playbook’s instructions, but I only played through two- and a-bit Propaganda Cards. The Playbook walked me through the first one, and I played through about 15 more cards after that, with a Propaganda Round triggered about midway through those cards. After that I felt comfortable with the process of play and the core actions in the game. I even had an idea about how to execute reasonably effective strategies as the three insurgent factions, which is more than I can say for the end of my learning game with Pendragon. I’m still really struggling to get my head around how to play as the Government, though. I understand all the individual actions and special abilities, and I understand what I need to do to win the game, but the steps in between are where I get lost. I can kind of make a short-term plan, and I know my long-term goal, but the mid-term planning is doing my head in.
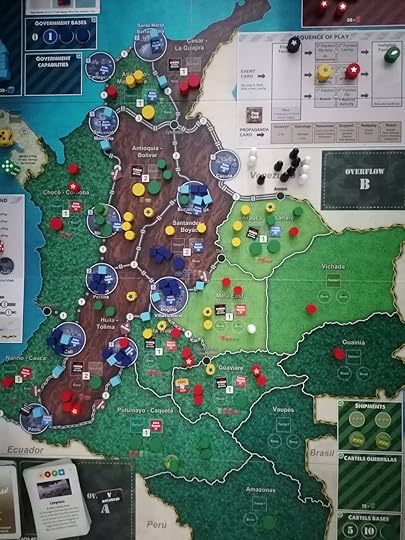
Game state at the end of the first Propaganda Card - the Playbook would only hold my hand for one more turn - after that I was cast off on my own to sink or swim!
In a COIN game you really need to plan a minimum of a turn ahead of where you are now because you can only do one type of thing on each turn. So, if I want to build a base somewhere as an insurgent, I first need to get some of my guerrillas there so I can turn them into a base, which means I probably need to put more guerrilla pieces on the board and then move them to where I want before cashing them in for a base. That’s probably three turns worth of actions – although good use of events and clever play might speed that up. For the Government, though, I’m struggling to understand what steps I need to take now to get myself into the position I need to be in a few turns down the line. My play is still very reactive to what the insurgents were doing rather than executing a strategy of my own.
Part of this was also the challenge in playing this game four handed solitaire. Because as the insurgents I knew that the Government player had no idea what he was doing, I could kind of ignore myself and just fight the other insurgents who were obviously the greater threat. This meant that the insurgents weren’t posing an immediate threat I had to react to as the Government, which was the only thing, I knew how to deal with which compounded my inability to plan effectively. This is all very much my own problem, and I think the result of me letting my indecision as the Government player spiral a bit. I think what it really needs is a game reset and, ideally, some real human opponents to spare me from my omniscient incompetence.
The next Propaganda card came pretty quickly, so I didn’t actually change the game state very much in between them. I played for a few more turns before packing things up, feeling like I had a decent grasp on how to play.
I think that last part is important. I really enjoyed playing Pendragon solo even without the bots – just me making all the decisions. For Andean Abyss I enjoyed that a little less. I think I’m phrasing that a little wrong. A better way to frame it was that I missed having people to play it with more than I did with Pendragon. All of Pendragon’s complexity, as well as its extra doses of randomness thanks to more dice rolls, made it more engaging for me to puzzle through it myself. For Andean Abyss I really wanted the additional chaos of someone else making decisions. After learning Andean Abyss, I can see why people prefer playing COIN games with four players. This is a game that feels like it will shine when played with friends. For that reason, and because it’s much easier to teach, I’m planning to make Andean Abyss the first COIN game I play with my friends – and I’ve already started lining up a date when I can do that. Stay tuned to hear the results of my efforts!
May 12, 2022
Hokusai: A Graphic Biography
More years ago than I care to reflect upon, I was recommended a graphic novel called Logicomix which examined the developments and debates in mathematics and logic that dominated the early twentieth century through the lens of the life of famous philosopher Bertrand Russell. Logicomix narrative was multi-layered, intermixing the story of the writing of the book itself with the life of Russell and his contemporaries, and even tying in ancient Greek tragedy in a rather unexpected way. It really convinced me that graphic novels could not only be entertaining but also highly informative and great pieces of scholarship in their own right. Logicomix does a better job explaining Gödel’s contribution to logic than many books I’ve read.
My past experience with Logicomix meant that I was intrigued when I was given a copy of Hokusai: A Graphic Biography by Giuseppe Latanza and Francesco Matteuzzi for my birthday. I’m a big fan of Hokusai’s work – seeing some of his original prints on my trip to Japan in 2019 was a highlight even if we were unable to make time to visit the Hokusai Museum in Tokyo. I also had an idea that his life was a bit…eccentric to put it mildly, so this promised to be an interesting read. It also brought to mind the anime film Miss Hokusai which adapted vignettes from a manga about the life and artistic career of Hokusai’s most famous daughter, Katsushika Ōi. Unlike Miss Hokusai, Hokusai: A Graphic Biography is a western production intended for a European and North American audience rather than a Japanese one. This is made very clear by the choice to intersperse the story of Hokusai and his life with pages of text explaining Edo era Japan for the uninitiated.
Like the film adaptation of Miss Hokusai, Hokusai: A Graphic Biography is more a series of vignettes and short anecdotes about Hokusai’s life rather than a straightforward biography. It is broadly chronological and covers the main phases in Hokusai’s artistic career but focuses more on moments of change or significant achievements rather than looking at his day-to-day existence. It also largely ignores his personal life; we get a brief mention of the death of his first wife, but his subsequent marriages are entirely unmentioned. One of his (in the story nameless) daughters plays a role in a scene later in his life, but the artistic career of his daughter Ōi, including her time apprenticing with him, along with the lives of any of his numerous other children are absent from the narrative. Arguably these aspects are not central to the book’s focus of exploring the artistic career of Hokusai. This would hardly be the first work to focus primarily on Hokusai’s art over his personal life, but I would have preferred to learn more about Hokusai the person as well as the artist.
Hokusai: A Graphic Biography went up several steps in my opinion based on the quality of its Afterword, which is not something I can usually say. In those two pages the authors explain how difficult it was to piece together the life of Hokusai. While the artist was an ardent self-promoter and left significant autobiographical information behind, he was also a deeply unreliable narrator of his own life and many of his stories are fantastical and lack corroboration from other sources. This makes it very difficult to piece together a “true” history of Hokusai – and this is possibly why so many accounts prefer to just focus on the art and his career and leave aside the thornier issues of interpreting his life outside of his work. I do wish this was somewhere in the main text instead of relegated to an Afterword. It was far more interesting than the straightforward account of Japanese history that separated the chapters about Hokusai.
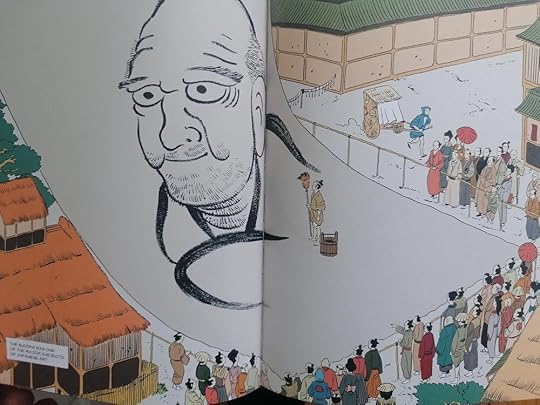
Hokusai: A Graphic Biography focuses quite a bit on some of Hokusai’s more extravagant artistic displays, such as this event where he painted a giant portrait of Bodhidharma using a broom as his brush.
The pages describing Edo era Japan are largely fine – nothing revelatory or historiographically ground-breaking, but then you wouldn’t really expect that in a graphic novel for general readers. I saw a few popular myths/exaggerations about Edo era Japan scattered throughout the text but nothing particularly egregious. For the most part these are fine, they didn’t wow me but for people who aren’t already familiar with the subject they will be a useful introduction.
The place where Hokusai: A Graphic Biography really shines is in the art. Giuseppe Latanza’s artwork is phenomenal. It draws inspiration from Hokusai’s work but is also distinctly its own thing. As you would want from a graphic novel biography, the visual element is vital to the story told in the book. Perhaps this is why I didn’t like the historical explainers as much – they were often largely devoid of art. I was a little disappointed to see that some of the art is reused in a few places, but I can also appreciate that drawing something like this must have been very time consuming and a little light re-use cannot be entirely condemned. I would have just preferred more art, as should be clear by this stage. The only other fault I could find is that I would have liked it if they tried to include more dramatic compositions – the framing of the characters can be a bit too straightforward. I really like a panel late in the book that intersperses modern era Tokyo with classic Edo, and I wish the art took a little more effort to push the limits of what is possible in the medium. That said, that is personal preference and I’m sure a weirder artistic take would put some people off as well!
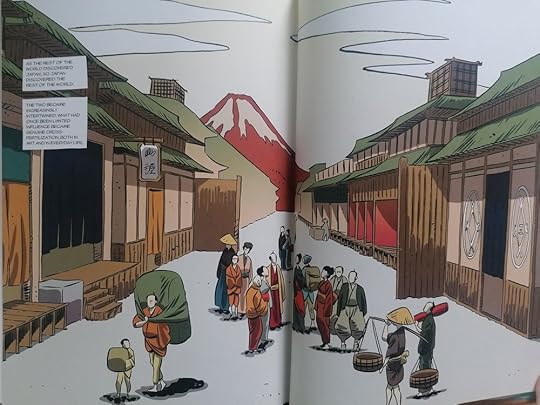
Art is obviously subjective, but I really like this aesthetic - particularly the image of Fuji in the background taking direct inspiration from Hokusai’s work.
Overall, I liked Hokusai: A Graphic Biography even if it didn’t wow me the same way Logicomix did. I will still continue to periodically check out how graphic novels are helping us to understand history, because I think it is a method that has great potential and is often underutilised. Arguably there is no better way to tell the story of the life and career of a famous artist than through a visual medium, and in that regard Hokusai: A Graphic Biography is a great little read.
May 9, 2022
First Impressions: Red Flag Over Paris from GMT Games
I can’t shake the feeling that I’m joining a chorus of wargame commentator by saying that I knew basically nothing about the Paris Commune before playing Red Flag Over Paris, the second game in the Final Crisis Series published by GMT Games. I did actually learn a bit about the Franco-Prussian War in school, but we focused more on Otto Von Bismarck and the theory of Realpolitik and basically ignored anything happening in France. French politics between 1815 and 1914 were not a focus of my teenage education. I must confess that I haven’t taken very many steps to fix that – unless reading The Count of Monte Cristo counts – so I can’t blame my ignorance exclusively on the Virginia public school system. If, like me, you are largely ignorant of this period of history then Red Flag Over Paris may be a great place to start. If you were already a rabid fan of Paris Commune, then I presume you’ve already bought the game and are just wondering if I liked it. The answer is that yes, my initial experiences with it were very positive, read on to find out more!
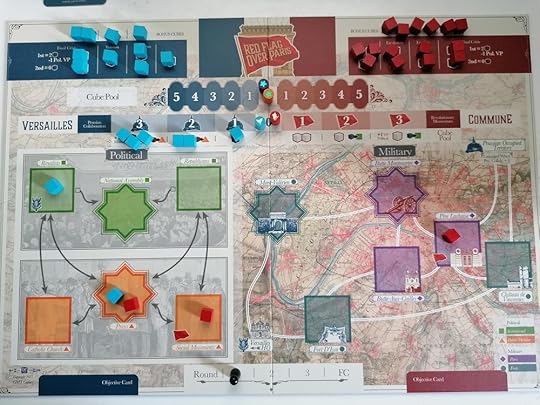
The game board at set up before anything too chaotic has happened. I don’t think I need to point out that it’s a very pretty board.
As I said, Red Flag Over Paris is the second game in the Final Crisis Series – and really the game that makes it a series at all. The first game was Fort Sumter, designed by Mark Herman and published in 2018. Fort Sumter was about the build up to the American Civil War, ending with the Confederate siege of Fort Sumter in Charleston harbour. The game was a relatively simple card drive game (CDG) where players placed cubes on a mix of mostly abstracted spaces on the board with the goal of controlling a majority of the spaces. Each round players were dealt four cards and played three of them, keeping the last one for the Final Crisis which made up the last round – usually the fourth although there were ways it could trigger earlier. It was a relatively simple game but reasonably enjoyable. I’ve played it a few times thanks to the great little digital implementation on the app designed by Playdek – I bought it for like €2 on my phone and it’s a fun way to pass the time, check it out if the system sounds interesting.

End of Round 1 of my first game - not very much has happened but the Commune are off to a decent start.
Red Flag Over Paris does a lot to add greater depth to Fort Sumter’s core system. In Red Flag Over Paris there are two main types of region to fight over: politics and military. Each of these is then subdivided into two sections, for a total of four areas with three spaces each. Like Fort Sumter there is one pivotal space in each section which gives the controlling player access to special actions before scoring at the end of each round. So far so similar, but Red Flag offers a few significant changes to Fort Sumter’s systems.
The first major change is that there are now rules for adjacency between areas. Fort Sumter’s map was very abstract, and players could place cubes pretty much anywhere unless restricted by a card’s event. Red Flag imposes significant limits on where and how you can place or remove cubes across its two sections – and players can only play in either Politics or Military in a given turn. This adds a lot of complexity to the decision making required for good play without requiring too much new rules overhead. The map helpfully makes it clear which spaces are adjacent to others, and which adjacency paths are only one-way.

End of Round 2, the Commune have seized control of central Paris and are making a push on the National Assembly.
Probably my favourite change is that in Red Flag the cards you keep for the Final Crisis played for their event. In Fort Sumter each card was assigned an area, such as Politics, and in the Final Crisis only this aspect of the card was used to resolve actions unique to that round. In contrast, in Red Flag you have to play the event on the card – and if it is an event that helps your opponent that doesn’t matter. This is both simpler rules wise since you don’t need to learn a whole new set of rules for the Final Crisis phase, and a lot more interesting. Do you want to keep that really useful event for the final round, or should you play it now for an immediate advantage? Scoring happens after every round so keeping it might not be worth it. It also forces you to play cards with your opponents’ events on them, which is important because your opponent can discard a card of matching value to use that event on their turn. There is the potential that you could discard one card in the Final Crisis without playing it, so sometimes you can “bury” a card this way – but if you choose a card you want to bury in the first round you will inevitably come across an even worse card in a subsequent round and wish you’d buried it instead!

End of the game - the scores are low but the Commune manage to squeeze out a victory
Red Flag Over Paris also has a really interesting victory system. Points are zero sum, meaning that if the Versailles player gains a point, they take it from the Commune player and vice versa. There are also two-point tracks – one for the Political and one for the Military sides of the board. The win conditions are slightly asymmetric in such a way as to nudge the Versailles player towards Military points and the Commune player towards Political, but you can’t neglect the other area as victory requires some balance in point totals. I’m kind of a sucker for zero sum points systems in wargames, so this really appealed to me.

Game 2, end of Round 1: Factions have clearly gotten confused as Commune seizes Paris while Versailles focuses on the political.
I also have to confess that I feel a little bad only talking about the mechanics of the game, because I’m so unfamiliar with the theme that I can’t really dig deeper into it. The rise (and eventual fall) of the Paris Commune is a fascinating topic for a game. I really enjoyed that it was set in a time period I vaguely knew something about – I’m at least familiar with the broad strokes of the Franco-Prussian War – but introduced me to something I’d never heard of. I even recognise several of the characters on the cards but had no idea they were even tangentially involved in something like this. It’s a great example of using wargaming to bring an interesting but somewhat obscure moment in history to a wider audience. Also, given Paris’ long history of rioting and rising up against the ruling party it’s about time we got some wargames that depicted it in greater detail. Hopefully Red Flag Over Paris kicks off a trend, and the next big thing is a game about the Jacquerie.

By Round 3 things are looking a lot worse for the Commune - they still hold central Paris but not much else.
So far, I’ve only played Red Flag two handed solitaire, but I enjoyed both of my games even without a real human opponent. It helps that I struggle to remember what cards I had in the other hand when I’m playing as either side so the illusion of a real opponent remains intact. Red Flag comes with solo bots for both the Versailles and Commune players but I’m something of a bot novice and struggled to wrap my head around it the first time I tried using one. In the end I decided that I preferred playing both sides, but I intend to revisit the bots in the future because I’ll be damned if I’m letting a flow chart defeat me. I’m also very much hoping to get a game in with a human opponent in the near future because I think that’s where the game will really shine.
Game 2 ends in a decisive Versailles victory
Red Flag Over Paris is basically the ideal sequel for a series, adding a dose of extra complexity to create an ocean of new depth in the system. I’ve only really dipped a toe into the game and I’m excited to try it more. Each game only uses a small fraction of the available strategy cards, so there’s a lot more to explore – and a lot to the game I haven’t discussed such as how few cubes players have available which constantly stretches your limits in how strongly you can contest regions and how annoying it is when the Versailles player removes your cubes as the Commune player. It’s a really interesting game is what I’m getting at.
I also must note with my humblest apology that at time of writing it looks like Red Flag Over Paris seems to be pretty much completely sold out. My timing leaves a bit to be desired, and I apologise if I’ve piqued your interest in a game you cannot actually play. Hopefully there will be a reprint in the near future. If there isn’t, I think we all know what to do – take to the streets and start building barricades!
May 5, 2022
John Talbot and the War in France by A.J. Pollard
There is a dearth of scholarship in English covering the end of the Hundred Years War. If you want to know what happened in France after the Treaty of Arras in 1435, you’re going to have a hard time. That was partly why I was so excited to get my hands on A.J. Pollard’s book about John Talbot. Talbot was a legendary English military figure; the bulk of whose career was career was spent in France between the years 1435 and 1450 – with a brief but disastrous return in 1452-3. Talbot is probably most widely known to medieval history enthusiasts for his dramatic death at Castillon in 1453, the final battle of the war where French commander Jean Bureau’s artillery obliterated the English charge – often seen as a turning point in European warfare. John Talbot was more than just the man who died in an arguably reckless charge in southwest France and A.J. Pollard’s account of his extensive military career both fleshes out the man and fills in a large historiographical gap in our understanding of the Hundred Years War.
I should mention now that this book is far from new. A.J. Pollard originally wrote it in the early 1980s and it is in part based on work he did for his PhD thesis in the late 1960s. I read a 2005 reprint of the book, which includes probably the single best introduction to a second printing of any book I’ve ever read. In it, Pollard outlines not only the history of the book itself, but the historiography of what has come since its first publication, helpfully putting the book in its updated context. It is interesting that no other book fills the exact niche of John Talbot and the War in France and despite the fact that in some places it is based on 50+ year old research. It remains a vital source of information on a much-neglected period of Anglo-French warfare.
Many histories of the Hundred Years War are more than happy to skip directly from the end of the Anglo-Burgundian alliance at the Congress of Arras in 1435 pretty much directly to Charles VII’s reconquest of Normandy and Gascony from 1449-1453, if the even cover the latter in any detail at all. What Pollard does is really dig into the period between the 1435 Congress and the 1444 Treaty of Tours, which ceased hostilities until the English foolishly restarted the war in 1449. Pollard also gives valuable background on who Talbot was, his rise to prominence, and his limited military career in the early fifteenth century but it’s really these disastrous years that are the focus of the book. Pollard shows how Talbot, as well as several other commanders, were able to achieve remarkable success with limited resources during a chaotic administration. Not quite winning the war but doing enough that when peace negotiations happened in 1444 England was in the strongest position it could be. During these years they also weren’t facing the full brunt of Charles VII’s attention, and Pollard is always clear that the war was somewhat doomed – Talbot was fighting a losing engagement but he was fighting with remarkable tenacity and effectiveness.
Don’t believe that Pollard is here to lionise Talbot. While he is definitely impressed with Talbot’s successes against the odds, he is quick to point out that during Talbot’s infrequent stays in England during this time, and particularly after his capture and release in 1450, he was a source of constant chaos. Frequently in dispute with neighbours over his various holdings across England, he was not above kidnapping someone he was actively engaged in a court case with to win leverage over them. Pollard’s picture of Talbot is of precisely the kind of warrior you wanted abroad causing problems for someone else. In that way more than most he fits a classic picture of the knightly class. Pollard also comments on how none of this should be seen as lacking in chivalry, Talbot was perfectly chivalric in all its good and bad implications.
Pollard also includes an interesting section examining the captains and retinues of men who served under Talbot in France. This has echoes of Anne Curry’s work in the early fifteenth century, and with good reason because Pollard was Curry’s PhD supervisor. The sections lack the depth seen in more modern studies of this kind of material, which is understandable since Pollard didn’t have access to tools like the medieval soldier database or the library of scholarship that has been produced in the last few decades. Still, even with these limitations it is impressive the level of detail he achieves and well worth a read for those of a more prosopographical mind.
John Talbot and the War in France is an impressive piece of scholarship from a major figure in medieval English history and I really enjoyed it. My only complaint is that I wish it was longer and went into more detail in places – the Castillon campaign features of course but is not examined in detail. This is probably because this is more of a biography of a man and his career than an in-depth exploration of the campaigns and battles fought during the waning of the Hundred Years War, but I would have loved if it was both!
May 2, 2022
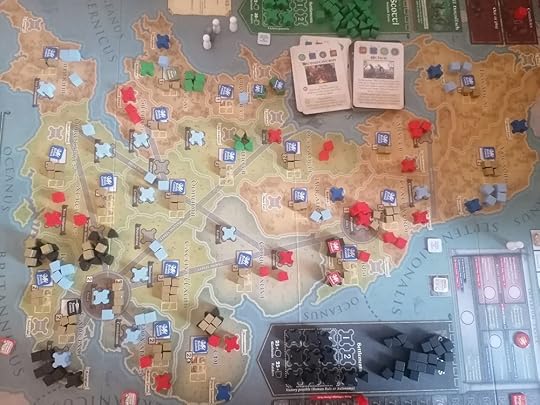
First Impressions: Pendragon by GMT Games
I have technically played Pendragon before when I sat down to learn the game (which you can read about here: https://www.stuartellisgorman.com/blog/learning-pendragon), but the first half of that game was with the aid of the playbook guiding all my actions and the second half was a fairly chaotic mess of indecision. I have since sat down and played the game for myself and I’m much more comfortable with playing it, but still feel a little out of my depth strategically. It is a real testament to the quality of the Pendragon playbook that I was able to complete my playthrough of the game without having read the rulebook. Sure, I referenced the rulebook fairly regularly – looking up specific rules and double checking how actions worked in specific situations – but I was able to play two entire Epochs without having to read the rules cover to cover. That’s impressive no matter what the game is, but doubly so with something as complicated as Pendragon. I intend to read the rules before tackling a full-length six Epoch game as there are definitely elements I still don’t fully understand, such as specifics of how the degradation of Roman rule functions, and over a long game those will probably come up more. I will also need to know the rules a lot better before tackling the enormous task of teaching Pendragon to other people, especially if they are relative COIN novices like myself. That all having been said, my experience playing a game of Pendragon was fascinating and I can’t wait to set it up again.
This time I situated the board so I wasn’t trying to constantly read it upside down, which helped a lot when I had to locate provinces for certain event effects. I am also slowly learning the names of the Roman regions.
I played four handed solitaire, meaning I played all four factions without the solo-play bots that come with the game. The bots add a whole extra layer of complexity and challenge that I didn’t need when I’m still coming to terms with the basics of how to play. When I finished my learning game, I felt relatively comfortable taking actions as the Scotti and Saxons but not comfortable implementing a winning strategy with anyone. Now having finished my first full game I think I have a better idea how to win those two factions, including the subtle differences in their respective goals – the Saxons want to actually settle in Britain while the Scotti mostly just want to plunder – but I’m still a bit adrift when it comes to the Civitates and Dux.
A lucky event early in the game gives the Saxons a foothold in the south-east of England, while a similar event for the Scotti gives them control of part of Wales. The barbarians have landed.
I have a much better idea how to stop the Civitates and Dux from winning – which is a very important part of the game. The Dux player begins the very first turn already winning the game and the Civitates aren’t far off winning themselves, if they can just switch to Civilian rule at the first Epoch they would win. However, both sides have to maintain that control through at least 9 rounds of play – assuming the Epoch is very early – and it is up to the other factions to find ways to tear them down. My learning game saw the Dux claim victory even though I had no idea how to effectively execute a strategy with the Dux – and I’m still not sure I could do that now – just based entirely on the strength of their opening position. This game I managed to effectively tear the Dux position to shreds but undermining the Civitates proved to be more troublesome.
Some amazing Saxon rolls put down a huge number of raiders…

…who promptly destroy two Civitates’ towns - greatly reducing their numbers but enriching them to capacity.
At the start of the game the Dux win if the total wealth on Britain plus their individual prestige is high enough. They start with no prestige and can only reliably gain it through glorious battle with the barbarians, but the island is plenty wealthy. Eroding this wealth is pretty straightforward, as the Saxons and Scotti will be launching raids and bringing their plunder home to boost their own renown. Thus, if you can effectively execute a decent raiding strategy with those two factions bringing the Dux low, at least initially, isn’t too hard. When Rome begins to crumble and the victory thresholds shift, things can get a little more complicated, but I haven’t gotten there yet. The Civitates on the other hand win if they rule a large enough population. This can be eroded in two main ways early in the game – founding rival settlements as Scotti or Saxons, or if the Saxons ravage regions and reduce their population.

The first Epoch card arrives - nobody has secured victory so play continues.
The challenge with the Civitates isn’t that in the long term you don’t want to undermine their rule. Instead, it’s in the balance between playing for a long strategy and ensuring that they can’t win in the short term. Early on the Dux are motivated away from attacking the Civitates so it’s really up to the two barbarian players to bring them low. However, the temptation exists to just raid early on and collect renown, and not really trying to set down permanent settlements that the Dux could attack. However, if they neglect settling – or at least destroying Civitates settlements – too much then they run the risk of not doing enough to prevent the Civitates from winning. In my game I did a tolerable job at undercutting Civitates rule, but in the end, they were still able to eek out a win on the end game scoring with a massive score of 5 points.
The dice for generating Saxon raiders were absolutely on fire this game - they once again established a huge presence in the southeast.
What I find fascinating about Pendragon is how it balances this need to undercut your enemies’ chance of winning with the desire to pursue your own goals. This is hardly the first game to require players to police their rivals victory conditions, but often other games that do this can get a bit petty and miserable. Towards the end of a round players sometimes find themselves discussing openly how to kneecap whoever is closest to winning. Now, I’m playing solo so obviously I’m not having those conversations anyway, but while I could see players discussing who is winning in Pendragon the random play of events and the limitations on how many actions you can take makes it much harder for everyone to construct a clear plan for an alliance all against one player.
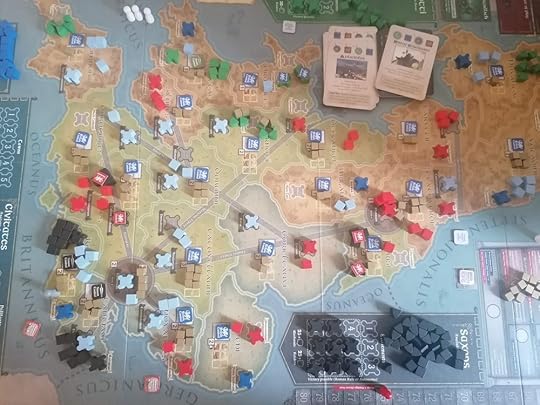
The Saxons successfully settle an alarmingly high number of raiders, giving them control of their second region and fulfilling their victory condition for this scenario. The Dux are amassing at the border to deal with this problem. Meanwhile the Scotti have built a second settlement in the northwest.
Also, the victory conditions can turn on a dime, so any such alliance will barely last more than a turn or two. In my game the Saxons had a strong lead for almost the whole game, establishing an early foothold in the southeast thanks to a lucky event and then expanding rapidly with amazing rolls for numbers of raiders. They seemed unstoppable, but a strong alliance of Civitates and Dux crushed them near the end of the second Epoch. However, that alliance had caused them to neglect the Scotti who probably would have won – except that an early second Epoch card prevented them from fulfilling their strategy. Actions like kingmaking or ganging up on players seem like they can only last a few turns before the shifting state of the game throws up new challenges that everyone tries to turn to their advantage.
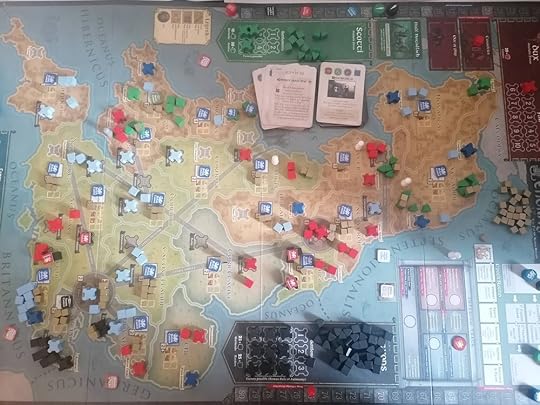
The second Epoch arrives, but not before the Civitates and Dux manage to crush one of the Saxon settlements. The Scotti were just about to return their raiders and very likely build a third settlement in the north possibly clinching a victory. As it is, no faction achieved its victory on their own merits but the Civitates achieve a final score of 5, just edging out the Scotti’s score of 2.
I’ve still only played the game as far as the second epoch from an early game start, so I have yet to even begin to really explore Pendragon’s most fascinating and noteworthy mechanic: how it models the decline and eventual collapse of Roman rule in Britain. For my next game I think I might try one of the scenarios that starts a bit later to see what a more fragmented Britain plays like, but to get the full experience I suspect I’ll need to somehow find the time to play a much longer game. The two epochs I played took me at least three hours, time I secured by being off work with my daughter in daycare. As I learn the game I’ll play faster, but I still expect it will be a while before I have the time to play a full six epoch game of Pendragon. In the meantime, I will keep chipping away at its strategic depths, and maybe by the time I play the full game I’ll finally understand how the hell to play the Dux.
Recommended Reading:
This area isn’t really my specialty, so I don’t have a list of recommendations, but I did recently review King Arthur: The Making of the Legend by Nicholas J. Higham which includes a lot of interesting detail about this period of British history while exploring the myth of a historic King Arthur. You can read my full review of it here: https://www.stuartellisgorman.com/blog/king-arthur-the-making-of-a-legend
April 28, 2022
Men of Iron – Falkirk, 1298
I was in a bit of a Scottish wars mood after playing the Braveheart: Solitaire book game so I decided to try out how Richard Berg modelled Falkirk in Men of Iron as an interesting counterpoint. As I somewhat hinted at in that review – I’ve got a bit of a chip on my shoulder when it comes to William Wallace. I feel he’s a bit overrated as a historical figure, basically entirely because of Braveheart – a movie I strongly dislike. Lest you think I’m a boring historian who hates fun, my favourite medieval movie is A Knight’s Tale, my hatred of Braveheart stretches beyond mere historical inaccuracy. I’ve born a slight grudge about living in a post-Braveheart world where William Wallace has overshadowed the far more interesting Robert Bruce. My opinions on this have mellowed with time – and I think it helps that Bruce seems to be getting more popular culture recognition as well (including his own movies, which I have not seen, making me part of the problem).
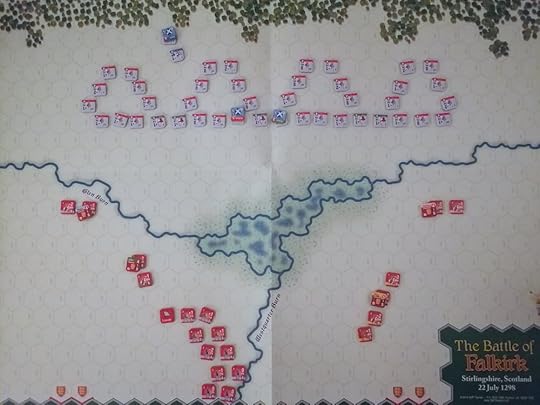
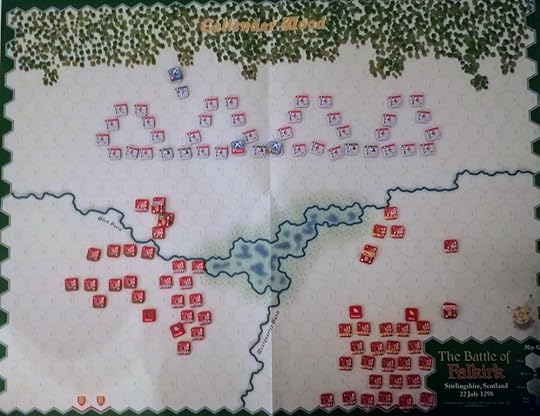
The calm before the storm - Wallace has taken up his defensive position but much of the English army still has yet to arrive.
I was immediately interested to see that the Falkirk scenario comes with a sort of solo mode as default. With the basic rules the Scottish player basically sits in schiltron and the English player has to crack their defences. I was intrigued by only having to really think about one side and abandoned my plans to try playing this scenario with modified chit pull rules for activations. I have to confess I was a little disappointed by my experience. The scenario is timed, and while my understanding is that the timer only advances if the non-timed side passes, I moved it forward after every English turn because that felt like the only challenge to the scenario – could I defeat the Scots within 15 turns? The answer was a pretty definitive yes.
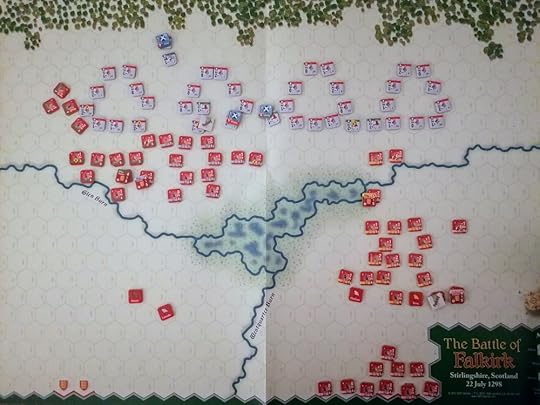
A series of amazing continuation rolls brings the whole English army to the field very early. Little did I know that this would set the tone for what my dice rolls would be this game: consistently low.
Falkirk is a battle that I simultaneously find both interesting and extremely boring. The logistics of Falkirk and how it came to take place are absolutely fascinating. The army that Edward I brought with him to Falkirk numbered nearly 30,000 soldiers and was probably the largest army assembled by the English in the whole of the Middle Ages. It also represents something of a turning point in military recruitment. Edward I still primarily used traditional levies for his army but there are numerous reports describing how this system was breaking down at the time. One of the most common issues was that often levels of service had been set in the Domesday Book back in the 1080s, but in the intervening almost two centuries the fortunes of noble families had grown or shrunk dramatically. This meant that some nobles might be struggling to provide the service their ancestors had agreed to while others would be providing far less than their means would have allowed. There are also some absurd stories of levies turning up with only the explicit minimum they had to – things like turning up with a bow but just one arrow. Not all later reports of this latter kind of shenanigans should be taken at face value, but the essential point that the traditional means of levying troops was seen as no longer suitable motivated significant change in how English armies were recruited. This was a slow process and wouldn’t really be complete until the fifteenth century, but the army that Henry V brought to Agincourt has its origins in the Falkirk campaign.

The battle lines collide with more of a whimper than a roar as the English archers fail to have much impact on the Scots. The English mounted men-at-arms manage to reach the archers unscathed and proceed to also have minimal impact.
All that having been said, the battle of Falkirk itself never particularly interested me. Essentially, Wallace foolishly agreed to fight the English on open ground and while he had a made a great effort at deploying his schiltrons to blunt the English charge – Edward I had brought a much much bigger army and was more than able to overpower the Scottish forces on a battlefield where he could bring his numerical superiority to bear. It’s a fairly one-sided conflict with the English crushing Wallace beneath their boot heel. It’s not without tactical interest, but I was never particularly fascinated by the tactics of Falkirk – more confused about why Wallace, who clearly new about minimising enemy strength from his victory at Stirling Bridge, allowed this to happen.
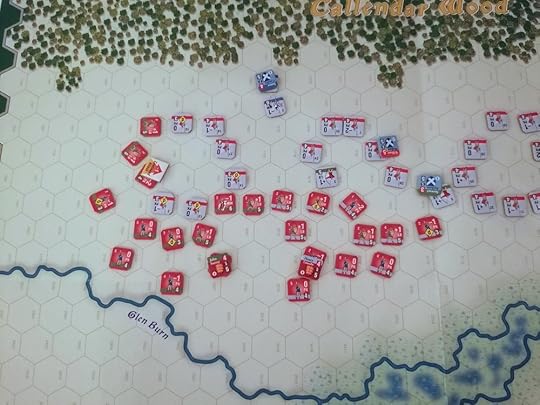
The attack on the left heats up - the Scottish archers are cleared out of their position but the English archers continue to have minimal impact on the Scots. The lone men-at-arms in the east is Retired.
Of course, Wallace would have done a lot better if Edward had rolled like I did when I was playing. I consistently couldn’t roll above a five, which meant that I was pretty reliably making continuation rolls but also meant that my archers might as well have been throwing their arrows at the Scots. This was the first time I ever became very frustrated by the luck involved in Men of Iron, and it really soured my time with Falkirk. This is certainly a matter of taste, but I’m not wild about the system of rolling a single d10 and consulting the table to see the result. I prefer more ways to mitigate my luck, or at the very least a die roll that averages out faster – like rolling multiple d6s. I know that in the aggregate the d10 will move towards the average result, but in practice I find rolling a single die – particularly one with 10 results – kind of frustrating.
After more turns than I care to admit, the English finally begin breaking apart Wallace’s schiltrons. I will confess that I completely forgot about the Scottish cavalry for basically the whole game so don’t expect any dramatic cavalry rescue!
I know you’re meant to mitigate this with good positioning and by trying to build up a long list of positive modifiers to increase the value of your roll, and thus better increase your odds of a good result. However, I just find this more frustrating – I spent all this time positioning for the optimal attack and then I rolled a 1. Sure, all my planning means that I didn’t suffer the worst result, but I just climbed my way up to “no result” on the table and feel like I wasted the last two minutes of my life. For the most part this hasn’t really spoiled my time with Men of Iron, but I had such a consistently bad run of luck while playing Falkirk that it did really begin to irritate me.
Usually this is the point where I’d complain again about how archers in Men of Iron are too powerful – and they are – but at Falkirk it bothers me less. Plate armour wasn’t yet common when Falkirk took place and Edward used his archers to break up the Scottish schiltrons, which was essential to his victory. I do wish it was slightly easier/tactically better to combine archers with melee attacks – using the archers to disorder the enemy and then attacking with your pikemen. In my experience massed archery on its own was just better without bothering to bring melee troops in unless absolutely necessary. The melee troops primary job was trying to kill the enemy archers – usually with mixed results. I still think archers should be reigned in a bit, but it bothered me less at Falkirk than it did at Poitiers, if that makes sense.
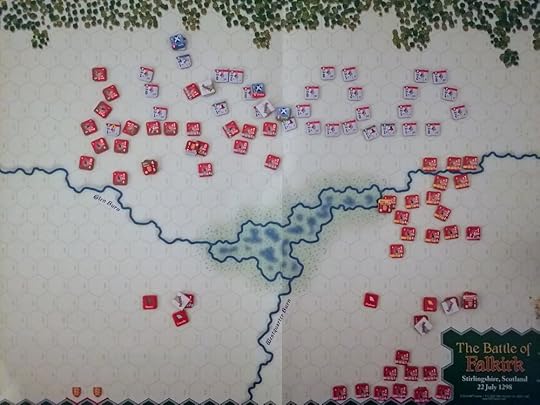
The left Scottish schiltrons are now well and truly broken while Edward I finally brings the bulk of his Battle forward on the right.
I also found myself once again activating the same Battles over and over again rather than using the full range of troops available at my command. This was exacerbated at Falkirk because the Scots all activated together – so attacking on two fronts seemed like a needless risk. It was far better to push relentlessly on one side of the Scottish formation rather than giving them more targets by trying a full encirclement. In the end I did bring Edward’s archers to bear on the right flank, but only because of a good run of continuation rolls – it was hardly a tactical priority. I think this is a shame because the game would be more interesting if I was forced to jump around more in my activations – possibly something that could be fixed with a chit pull system instead.

The end of the battle - the late arrival of the Scottish cavalry was far too little far too late and the Scots are routed as Edward’s Battle manages to get involved in the action just in time for it to end.
Overall, I wasn’t wild about my time with Falkirk, but it was also one of the quickest battles I’ve played, and I wouldn’t quite say I had a bad time. I think Falkirk has good potential as a learning battle for the system since only one side does very much and it includes a lot of the core mechanics: schiltrons function as shield wall, the English have to bring reinforcements onto the battle, the map has rivers and some marshy terrain to navigate, and both sides have a good range of unit types. That said, with the very static Scottish side and the one-sided nature of the battle I don’t think it offers very much if you’re already familiar with the system. I suppose that’s why it’s the first battle in the book! My recommendation is that if you’re new to Men of Iron give it a shot, but if you’ve already got a few battles under your belt don’t feel bad if you skip it.
Recommended Reading:
A Great and Terrible King by Marc Morris
The Three Edwards by Michael Prestwich
Robert Bruce and the Community of the Realm of Scotland by G.W.S. Barrow
If you enjoyed this post, maybe consider reading some of my other writings on the Men of Iron series:
First Impressions Men of Iron: Agincourt - https://www.stuartellisgorman.com/blog/men-of-iron-agincourt-1415
Men of Iron Round 2: Courtrai - https://www.stuartellisgorman.com/blog/men-of-iron-courtrai-1302
Men of Iron pt. 3: Poitiers - https://www.stuartellisgorman.com/blog/men-of-iron-battle-of-poitiers
If you’ve enjoyed this or any of my other blog posts maybe consider buying me a coffee via Ko-Fi at https://ko-fi.com/stuartellisgorman. Let’s be honest, instead of buying an actual cup of coffee I’ll probably spend the money on books and wargames and you’ll see the results here!