Stuart Ellis-Gorman's Blog, page 16
August 23, 2022
[Malta Month] Playing the Siege of Malta
Having now played multiple games on the 1565 Siege of Malta I wanted to take a minute to think about what I’m looking for in a game about the siege and to reflect a bit on how each of the games I played portrays this historical event. I’ve tried to outline several of the key elements or events of the historical siege that I want a game to incorporate in some form. I will discuss why I think they’re important and how each game approaches them. This is not meant to be a critique of the games – if you want my opinions on playing them you should check out the individual posts on each game (easily found via this linke: https://www.stuartellisgorman.com/blog/category/Malta+Month) –instead it is more of a (highly subjective) study of how the siege is portrayed in wargaming.
I should also put as a disclaimer here that there is one game about the Siege of Malta that I haven’t played: Knights of Justice a magazine game published in Wargamer Magazine #50 in 1986. Copies of this are hard to come by so I wasn’t able to play it this month. However, I have found someone who can share their copy with me, but not until they have access to their storage in a few months’ time. When I do get a chance to play it, I’ll write up some general thoughts for a much belated Malta Month post and I may revisit this post then to incorporate the final Malta game.
With the context all settled, let’s jump into the history of the siege and what elements I think are important to capture in a game about it. If you haven’t already, I would definitely recommend reading my summary of the events of the siege I posted at the start of the month. It will provide valuable context and can be read here: https://www.stuartellisgorman.com/blog/cutting-room-floor-malta
Ottoman LeadershipThroughout the Siege of Malta the Ottoman leadership was seriously fragmented. Mustapha Pasha was commander of the ground forces while Piali Pasha commanded the navy – in theory anyway. Mustapha had been placed in overall command by Suleiman, but Piali had married into the Sultan’s family and had a more powerful position in the Ottoman court, making for an awkward balance of power from the start. At the same time, they had both been instructed to listen to what Turgut, the lord of Tripoli and an effective Barbary pirate with a notorious reputation, had to say in all matters. Turgut was also in direct command of the Barbary corsairs, since they would only listen to him, and had the most experience and prestige, making him a third potential commander. The disputes between the three commanders, two after Turgut was killed by a misfired cannon, created plenty of tension during the campaign.
The first, and to my mind most important, point of contention was how to start the siege. Piali Pasha proposed the plan that was eventually implemented, which was to take Fort St Elmo first and then attack Birgu and Senglea. This was because Piali wanted to moor his fleet in the bay north of Mount Scibberas which wasn’t possible as long as Fort St. Elmo still stood. Mustapha wanted to secure the small island of Gozo and then the capitol city of Mdina before turning on the Hospitaller positions around the Grand Harbour. Turgut preferred Mustapha’s plan but was too late to support his argument, Piali’s plan having already been implemented by the time Turgut arrived.
Mustapha’s plan may have succeeded where Piali’s failed so one of the things I’m interested in is how a game can model the counterfactual of what if the Ottomans had chosen a different course of action.
1565 St Elmo’s Pay doesn’t include this at all – there is no option for battling over Mdina so the only plan to enact is Piali’s.
1565 Siege of Malta kind of forces you into a hybrid plan through its action menu. As the Ottoman player you’ll be attacking both Mdina and St Elmo pretty regularly. The mechanics do push you a little towards focusing on one of those two first before going for the harder to capture Senglea and Birgu, but in general you’re forced to spread your actions so wide that it never quite captures the specific focus of the main Ottoman army on one position at a time.
Waning Crescent, Shattered Cross has the most robust version of this challenge with its small deck of Ottoman strategy cards – definitely my favourite solution to this challenge.
None of the games include Gozo as a playable space, so the control of the smaller island is entirely ignored.
The second aspect of Ottoman leadership is the conflict between the main leaders throughout the siege. None of the games really capture this clash of personalities, but it would also be hard to do it without making the Ottoman side more than one player. It’s very hard to force a single player into debating with themself what to do next. St Elmo’s Pay does make the decision to single out Mustapha as the clear leader since he is the permanent leader whose death causes the Ottoman player to lose while Piali is just a card in the deck. I think this works against the history of the siege a bit; I think I would have preferred if instead the Ottomans had two Leader cards they had to juggle somehow. This bothers me less as something missing from the games, though, since many games have to abstract away conflicts in leadership and present a more unified front than was historically the case for ease of play.
Valette’s Resource ManagementThe Hospitallers and their allies were desperately outnumbered in the siege and relied upon their superior defensive position to resist the might of the Ottoman army. They also had to spread their forces over four main locations: Fort St Elmo, Birgu, Senglea, and Mdina. This created a significant strategic challenge in terms of deciding how to distribute their forces. In particular, during the siege of Fort St Elmo Valette had to decide how many soldiers he could afford to send over to the fort knowing that most if not all of them would not return. As the siege dragged on and became more desperate the need to retain control for as long as possible had to be weighed against the limited supply of troops that had to last for the whole siege. This is something I desperately want to see portrayed in any game where I control the Hospitallers – to my mind it is one of the essential decisions facing the defenders of Malta.
To a degree all three games include this decision. Waning Crescent, Shattered Cross as the most complex game unsurprisingly includes the most elaborate and robust version of troop positioning and movement between the locations. 1565 Siege of Malta includes movement of troops between locations as one of the Hospitaller actions but with the relatively low difficulty of playing as the Christians I didn’t feel like I was under pressure to use it all that often.
St Elmo’s Pay has a system for moving units between the three locations, but it doesn’t capture that feeling of being outnumbered as the Christians and having to spread limited resources between the locations. The Ottomans are slightly better at putting out more cards, but with the limit of three cards per a frontier and the generally greater strength of the Christian cards you don’t feel like you’re outnumbered two to one. The fact that strength values at all three Frontiers are resolved simultaneously every round makes it harder to ask the Christian player to prioritise one Frontier the other two. It’s understandable, but again it feels like a legacy of the fact that the system was originally designed for a battle not a siege. In a battle all three wings would fight simultaneously while at a siege like Malta the Ottomans had to prioritise where they were putting their main attack.
The Weight of Time
The Siege of Malta had a massive clock hanging over it the entire time. Unlike with the earlier Siege of Rhodes the Ottomans couldn’t realistically spend the winter in Malta – resupplying by sea would be too difficult and there was nowhere near enough food on the island. They would also be much more exposed, and in the spring a Christian relief force could easily arrive from Sicily well before any reinforcements could come from Constantinople. That meant that they had to take the island before the weather turned and prevented a return voyage to Constantinople. This gave a realistic end date to the siege as sometime in September. Every delay and each setback created more tension for the Ottoman commanders – they may have had more resources, but they didn’t have more time.
The second ticking clock was the Christian relief force. An army was slowly mustering in Sicily throughout 1565. Don Garcia, the commander appointed by Spanish King Philip II, refused to sail for Malta until he had a large enough force to present overwhelming opposition to the Ottomans. He needed a large enough fleet to guarantee that he could break through the Ottoman blockade and then once he landed, he needed a large enough army that it could drive the Ottoman’s off the island. Landing a small force ran the risk of it being entirely wiped out, providing supplies and a morale boost to the Ottomans instead of helping the besieged Christians. Don Garcia also had to weigh the fears Philip II had of an Ottoman or Barbary attack elsewhere in the Mediterranean – if he committed his army to Malta would he expose himself to attack somewhere else? What if he lost is fleet trying to relieve Malta, crippling his kingdoms defences for no gain?
This relief force was a clock for both sides – the Christians were desperate for it to muster and sail while the Ottomans needed it to hit as many delays as possible and to keep up their strength to oppose it should it land. Historically Don Garcia didn’t recruit an army equal in size to the Ottoman’s but by the time he arrived at the start of autumn the Ottomans were so tired and demoralised, and had lost many of their best soldiers, that his smaller but well rested army was more than up to the task of driving them off.
St Elmo’s Pay doesn’t really include any of the temporal elements. There’s no separate tracking of the Sicilian relief force and no clock ticking away forcing the Ottomans to be more aggressive.
1565 Siege of Malta does quite a good job at both of these clocks. The Sicilian Relief arguably arrives a little too quickly – or at least potentially can since it’s based on random card draws – but it certainly includes a system for the slow mustering and then eventual arrival of the relief. One of the things I liked most about 1565 Siege of Malta was how the event deck was used to track victory, the Ottomans lose if it runs out while the Christians win, making the experience of playing the Ottomans a race against the deck while the Christians just want to survive until the last card is done.
Unsurprisingly, Waning Crescent, Shattered Cross has the most complex systems for modelling both of these. It includes 20 individual weeks, and near the end the Ottomans must roll to see if they leave the island. Similarly, there are rules for the eventual arrival of the Sicilian relief force (although I did not get far enough in my game to play with them), and the game can end in a Final Battle phase where both players see if the relief was enough or if the Ottoman’s can emerge victorious despite the strain of the siege. This is by far the most elaborate representation of the clock, and I love it, but it of course comes a the cost of many more rules and a much longer game.
Dramatic Events
The final element I think is essential to capturing the Siege of Malta is some way to incorporate the dramatic events that marked certain points in the siege. To me there are four specific moments and three more generic, recurring events that should be included in some form in the game.
The four specific events are:
1. The dragging of Ottoman ships over Mount Scibberas to launch a combined assault on Birgu and Senglea – and then the dramatic defence against the odds in the face of the combined assault.
2. The death of Turgut and the threat to the lives of the other leaders
3. The piccolo soccorso, or “small relief”, the force of approximately six hundred soldiers who snuck across Malta in the wake of the Ottoman capture of St Elmo and were ferried into Birgu in the nick of time.
4. The cavalry raid out of Mdina into the Ottoman camp during one of the last dramatic assaults on Birgu and Senglea, which was mistaken for the arrival of the main relief force and caused the collapse of the Ottoman attack just when it might finally have succeeded.
In addition to the four above I would like for the game to capture the attempts to undermine the walls, particularly Birgu and Senglea, the endless barrages of the Christians by Ottoman artillery, and the many dramatic last stands where Christian forces who should have been wiped out somehow survived to fight another day.
1565 Siege of Malta has most of the above elements, although I did complain in my review that it felt like the big one-off events (specifically boats over Mt Scibberas and cavalry raid out of Mdina) happened far too often. It doesn’t really have leader death, it’s not that granular in its representation of the two sides, and there’s no piccolo soccorso. It does have bombardment and dramatic attacks on the Christian positions, but not really any system for mining.
St Elmo’s Pay doesn’t do this particularly well. It has artillery cards which represent the bombardment in an interesting way, but you aren’t guaranteed that they’ll show up and play a major role in your game. Same thing with cards for miners. Lots of cards represent characters who can die, but Turgut may never show up (he hasn’t in my games) so his death can hardly be a major event in the siege in most games. It does have the auto-loss if Mustapha or Valette die but that’s kind of the opposite of what I want since it ends the game. I want to see the fallout of that death and have to cope with it. Things like the dragging of the boats, Mdina cavalry attack, and piccolo soccorso don’t fit into the games structure. There are cards for Mdina cavalry and Ottoman ships, but they persist until killed, not as one dramatic attack.
As the most complex and granular game, it’s no surprise that Waning Crescent, Shattered Cross has the most detail for all of these. There are rules for the piccolo soccorso and event cards can cause the dragging ships over Mt Scibberas and the cavalry attack from Mdina. All of the leaders run the risk of death, although interestingly only through Christian card play. Christian events can be used to try and kill all the Muslim leaders, but Valette can only be killed by dramatically coming to the defence against an Ottoman attack, a choice the Christian player makes. Bombardment and dramatic pitched fights play a major role in the game and there are rules for mining, although they are quite simple, and they didn’t come up in my short demo game.
ConclusionThis post isn’t intended to be a review, I already wrote what I thought about each of the individual games. Instead, it is an exploration of the historic siege and what I, in my humble opinion, think are the most important and interesting elements to convey in a game about the siege. These opinions are what have led me to preferring Waning Crescent, Shattered Cross to the other two, but obviously the designers of 1565 Siege of Malta and St Elmo’s Pay have different ideas of what is important when portraying the siege. Which is fine! Hopefully this has been at least an interesting exploration of the topic. If you have different opinions about what you want to see of the siege represented in games, then hopefully it has also provided you some guidance in picking a game for you.


Playing the Siege of Malta
Having now played multiple games on the 1565 Siege of Malta I wanted to take a minute to think about what I’m looking for in a game about the siege and to reflect a bit on how each of the games I played portrays this historical event. I’ve tried to outline several of the key elements or events of the historical siege that I want a game to incorporate in some form. I will discuss why I think they’re important and how each game approaches them. This is not meant to be a critique of the games – if you want my opinions on playing them you should check out the individual posts on each game (easily found via this linke: https://www.stuartellisgorman.com/blog/category/Malta+Month) –instead it is more of a (highly subjective) study of how the siege is portrayed in wargaming.
I should also put as a disclaimer here that there is one game about the Siege of Malta that I haven’t played: Knights of Justice a magazine game published in Wargamer Magazine #50 in 1986. Copies of this are hard to come by so I wasn’t able to play it this month. However, I have found someone who can share their copy with me, but not until they have access to their storage in a few months’ time. When I do get a chance to play it, I’ll write up some general thoughts for a much belated Malta Month post and I may revisit this post then to incorporate the final Malta game.
With the context all settled, let’s jump into the history of the siege and what elements I think are important to capture in a game about it. If you haven’t already, I would definitely recommend reading my summary of the events of the siege I posted at the start of the month. It will provide valuable context and can be read here: https://www.stuartellisgorman.com/blog/cutting-room-floor-malta
Ottoman LeadershipThroughout the Siege of Malta the Ottoman leadership was seriously fragmented. Mustapha Pasha was commander of the ground forces while Piali Pasha commanded the navy – in theory anyway. Mustapha had been placed in overall command by Suleiman, but Piali had married into the Sultan’s family and had a more powerful position in the Ottoman court, making for an awkward balance of power from the start. At the same time, they had both been instructed to listen to what Turgut, the lord of Tripoli and an effective Barbary pirate with a notorious reputation, had to say in all matters. Turgut was also in direct command of the Barbary corsairs, since they would only listen to him, and had the most experience and prestige, making him a third potential commander. The disputes between the three commanders, two after Turgut was killed by a misfired cannon, created plenty of tension during the campaign.
The first, and to my mind most important, point of contention was how to start the siege. Piali Pasha proposed the plan that was eventually implemented, which was to take Fort St Elmo first and then attack Birgu and Senglea. This was because Piali wanted to moor his fleet in the bay north of Mount Scibberas which wasn’t possible as long as Fort St. Elmo still stood. Mustapha wanted to secure the small island of Gozo and then the capitol city of Mdina before turning on the Hospitaller positions around the Grand Harbour. Turgut preferred Mustapha’s plan but was too late to support his argument, Piali’s plan having already been implemented by the time Turgut arrived.
Mustapha’s plan may have succeeded where Piali’s failed so one of the things I’m interested in is how a game can model the counterfactual of what if the Ottomans had chosen a different course of action.
1565 St Elmo’s Pay doesn’t include this at all – there is no option for battling over Mdina so the only plan to enact is Piali’s.
1565 Siege of Malta kind of forces you into a hybrid plan through its action menu. As the Ottoman player you’ll be attacking both Mdina and St Elmo pretty regularly. The mechanics do push you a little towards focusing on one of those two first before going for the harder to capture Senglea and Birgu, but in general you’re forced to spread your actions so wide that it never quite captures the specific focus of the main Ottoman army on one position at a time.
Waning Crescent, Shattered Cross has the most robust version of this challenge with its small deck of Ottoman strategy cards – definitely my favourite solution to this challenge.
None of the games include Gozo as a playable space, so the control of the smaller island is entirely ignored.
The second aspect of Ottoman leadership is the conflict between the main leaders throughout the siege. None of the games really capture this clash of personalities, but it would also be hard to do it without making the Ottoman side more than one player. It’s very hard to force a single player into debating with themself what to do next. St Elmo’s Pay does make the decision to single out Mustapha as the clear leader since he is the permanent leader whose death causes the Ottoman player to lose while Piali is just a card in the deck. I think this works against the history of the siege a bit; I think I would have preferred if instead the Ottomans had two Leader cards they had to juggle somehow. This bothers me less as something missing from the games, though, since many games have to abstract away conflicts in leadership and present a more unified front than was historically the case for ease of play.
Valette’s Resource ManagementThe Hospitallers and their allies were desperately outnumbered in the siege and relied upon their superior defensive position to resist the might of the Ottoman army. They also had to spread their forces over four main locations: Fort St Elmo, Birgu, Senglea, and Mdina. This created a significant strategic challenge in terms of deciding how to distribute their forces. In particular, during the siege of Fort St Elmo Valette had to decide how many soldiers he could afford to send over to the fort knowing that most if not all of them would not return. As the siege dragged on and became more desperate the need to retain control for as long as possible had to be weighed against the limited supply of troops that had to last for the whole siege. This is something I desperately want to see portrayed in any game where I control the Hospitallers – to my mind it is one of the essential decisions facing the defenders of Malta.
To a degree all three games include this decision. Waning Crescent, Shattered Cross as the most complex game unsurprisingly includes the most elaborate and robust version of troop positioning and movement between the locations. 1565 Siege of Malta includes movement of troops between locations as one of the Hospitaller actions but with the relatively low difficulty of playing as the Christians I didn’t feel like I was under pressure to use it all that often.
St Elmo’s Pay has a system for moving units between the three locations, but it doesn’t capture that feeling of being outnumbered as the Christians and having to spread limited resources between the locations. The Ottomans are slightly better at putting out more cards, but with the limit of three cards per a frontier and the generally greater strength of the Christian cards you don’t feel like you’re outnumbered two to one. The fact that strength values at all three Frontiers are resolved simultaneously every round makes it harder to ask the Christian player to prioritise one Frontier the other two. It’s understandable, but again it feels like a legacy of the fact that the system was originally designed for a battle not a siege. In a battle all three wings would fight simultaneously while at a siege like Malta the Ottomans had to prioritise where they were putting their main attack.
The Weight of Time
The Siege of Malta had a massive clock hanging over it the entire time. Unlike with the earlier Siege of Rhodes the Ottomans couldn’t realistically spend the winter in Malta – resupplying by sea would be too difficult and there was nowhere near enough food on the island. They would also be much more exposed, and in the spring a Christian relief force could easily arrive from Sicily well before any reinforcements could come from Constantinople. That meant that they had to take the island before the weather turned and prevented a return voyage to Constantinople. This gave a realistic end date to the siege as sometime in September. Every delay and each setback created more tension for the Ottoman commanders – they may have had more resources, but they didn’t have more time.
The second ticking clock was the Christian relief force. An army was slowly mustering in Sicily throughout 1565. Don Garcia, the commander appointed by Spanish King Philip II, refused to sail for Malta until he had a large enough force to present overwhelming opposition to the Ottomans. He needed a large enough fleet to guarantee that he could break through the Ottoman blockade and then once he landed, he needed a large enough army that it could drive the Ottoman’s off the island. Landing a small force ran the risk of it being entirely wiped out, providing supplies and a morale boost to the Ottomans instead of helping the besieged Christians. Don Garcia also had to weigh the fears Philip II had of an Ottoman or Barbary attack elsewhere in the Mediterranean – if he committed his army to Malta would he expose himself to attack somewhere else? What if he lost is fleet trying to relieve Malta, crippling his kingdoms defences for no gain?
This relief force was a clock for both sides – the Christians were desperate for it to muster and sail while the Ottomans needed it to hit as many delays as possible and to keep up their strength to oppose it should it land. Historically Don Garcia didn’t recruit an army equal in size to the Ottoman’s but by the time he arrived at the start of autumn the Ottomans were so tired and demoralised, and had lost many of their best soldiers, that his smaller but well rested army was more than up to the task of driving them off.
St Elmo’s Pay doesn’t really include any of the temporal elements. There’s no separate tracking of the Sicilian relief force and no clock ticking away forcing the Ottomans to be more aggressive.
1565 Siege of Malta does quite a good job at both of these clocks. The Sicilian Relief arguably arrives a little too quickly – or at least potentially can since it’s based on random card draws – but it certainly includes a system for the slow mustering and then eventual arrival of the relief. One of the things I liked most about 1565 Siege of Malta was how the event deck was used to track victory, the Ottomans lose if it runs out while the Christians win, making the experience of playing the Ottomans a race against the deck while the Christians just want to survive until the last card is done.
Unsurprisingly, Waning Crescent, Shattered Cross has the most complex systems for modelling both of these. It includes 20 individual weeks, and near the end the Ottomans must roll to see if they leave the island. Similarly, there are rules for the eventual arrival of the Sicilian relief force (although I did not get far enough in my game to play with them), and the game can end in a Final Battle phase where both players see if the relief was enough or if the Ottoman’s can emerge victorious despite the strain of the siege. This is by far the most elaborate representation of the clock, and I love it, but it of course comes a the cost of many more rules and a much longer game.
Dramatic Events
The final element I think is essential to capturing the Siege of Malta is some way to incorporate the dramatic events that marked certain points in the siege. To me there are four specific moments and three more generic, recurring events that should be included in some form in the game.
The four specific events are:
1. The dragging of Ottoman ships over Mount Scibberas to launch a combined assault on Birgu and Senglea – and then the dramatic defence against the odds in the face of the combined assault.
2. The death of Turgut and the threat to the lives of the other leaders
3. The piccolo soccorso, or “small relief”, the force of approximately six hundred soldiers who snuck across Malta in the wake of the Ottoman capture of St Elmo and were ferried into Birgu in the nick of time.
4. The cavalry raid out of Mdina into the Ottoman camp during one of the last dramatic assaults on Birgu and Senglea, which was mistaken for the arrival of the main relief force and caused the collapse of the Ottoman attack just when it might finally have succeeded.
In addition to the four above I would like for the game to capture the attempts to undermine the walls, particularly Birgu and Senglea, the endless barrages of the Christians by Ottoman artillery, and the many dramatic last stands where Christian forces who should have been wiped out somehow survived to fight another day.
1565 Siege of Malta has most of the above elements, although I did complain in my review that it felt like the big one-off events (specifically boats over Mt Scibberas and cavalry raid out of Mdina) happened far too often. It doesn’t really have leader death, it’s not that granular in its representation of the two sides, and there’s no piccolo soccorso. It does have bombardment and dramatic attacks on the Christian positions, but not really any system for mining.
St Elmo’s Pay doesn’t do this particularly well. It has artillery cards which represent the bombardment in an interesting way, but you aren’t guaranteed that they’ll show up and play a major role in your game. Same thing with cards for miners. Lots of cards represent characters who can die, but Turgut may never show up (he hasn’t in my games) so his death can hardly be a major event in the siege in most games. It does have the auto-loss if Mustapha or Valette die but that’s kind of the opposite of what I want since it ends the game. I want to see the fallout of that death and have to cope with it. Things like the dragging of the boats, Mdina cavalry attack, and piccolo soccorso don’t fit into the games structure. There are cards for Mdina cavalry and Ottoman ships, but they persist until killed, not as one dramatic attack.
As the most complex and granular game, it’s no surprise that Waning Crescent, Shattered Cross has the most detail for all of these. There are rules for the piccolo soccorso and event cards can cause the dragging ships over Mt Scibberas and the cavalry attack from Mdina. All of the leaders run the risk of death, although interestingly only through Christian card play. Christian events can be used to try and kill all the Muslim leaders, but Valette can only be killed by dramatically coming to the defence against an Ottoman attack, a choice the Christian player makes. Bombardment and dramatic pitched fights play a major role in the game and there are rules for mining, although they are quite simple, and they didn’t come up in my short demo game.
ConclusionThis post isn’t intended to be a review, I already wrote what I thought about each of the individual games. Instead, it is an exploration of the historic siege and what I, in my humble opinion, think are the most important and interesting elements to convey in a game about the siege. These opinions are what have led me to preferring Waning Crescent, Shattered Cross to the other two, but obviously the designers of 1565 Siege of Malta and St Elmo’s Pay have different ideas of what is important when portraying the siege. Which is fine! Hopefully this has been at least an interesting exploration of the topic. If you have different opinions about what you want to see of the siege represented in games, then hopefully it has also provided you some guidance in picking a game for you.
August 18, 2022
Conquest by Juliet Barker
There aren’t a lot of books in English that focus on the end of the Hundred Years War. I suppose there has generally been little interest in revisiting the collapse of English rule in France when there are more glorious times to focus on. Most histories tend to skip forward abruptly after the arrival of Joan of Arc directly to the end of the war, skipping over many important developments in the process. Thankfully there are a few historians that have decided to make a closer study of the period from 1417-1453. Conquest by Juliet Barker focuses just on the war in Normandy, covering the period from Henry V’s conquests starting in 1417 until the collapse of English rule in the Duchy and it’s total reconquest by the French monarchy in 1450. It is well researched and is a much-needed study of this period, but I have mixed feelings on the book as a whole.
Let’s start with the good stuff. Conquest is very thoroughly researched. Barker has made an extensive study of the period and provides an in-depth and detailed narrative of both the major and minor events across over three decades of Anglo-French history. If you wanted a thorough breakdown of what happened – how did the English take control of Normandy and several of its neighbouring counties and then lose it all – Conquest absolutely delivers on that. It was very useful in helping me clarify the timeline on several key events and in identifying some of the less famous figures involved in both conquests of Normandy.
It's also well written – the narrative is clear and easy to follow. While I’m not new to this subject and therefore not necessarily the best judge, I still think that most people could pick up this book and follow it without needing much background in the Hundred Years War as a whole. Having that background is always better and I wouldn’t recommend this as a first book on the subject, but if you already have a copy, you could read it without having that broader context. Writing narrative history is challenging, especially narratives with as many moving parts as the Hundred Years War, so Barker must be praised for how well she manages it. The narrower focus on Normandy helps, there’s no effort to include events in Gascony, which reduces the cognitive load in terms of participants and events.
All that having been said, I would have some reservations about recommending Conquest to general readers. The first and, to me personally anyway, most frustrating issue with the book is the very English nationalist perspective that runs throughout the narrative. This may be the most nationalist history of the Hundred Years War I’ve yet read. What’s particularly odd is that the book is still thoroughly researched and many of the core facts are presented in an even-handed manner, it’s just the interpretation that has a strong English bias. This can create odd moments of cognitive dissonance where the interpretation seems to be strongly at odds with the evidence presented by the same book. Let me use an example.
One of Barker’s more interesting points is the way she shows how the Treaty of Troyes, far from securing a long-term peace actually undermined any effort to resolve the Hundred Years War in its later years. For those who may not know, the Treaty of Troyes was signed in 1420 and in it the future Charles VII, then Dauphin or crown prince of France, was disinherited and Henry V was made King Charles VI’s heir in his place. The treaty also cemented the alliance between the Duke of Burgundy and the English and outlined several principles restricting peace negotiations with the disinherited Dauphin. Famously, Henry V died before Charles VI and passed the claim to the inheritance of the French throne to his son Henry VI. What Barker does an excellent job of showing is how the terms of the Treaty of Troyes, along with the later crowning of Henry VI as King of France in Paris – an act orchestrated by Henry’s brother the Duke of Bedford in his capacity as regent but largely in line with Henry’s original wishes – completely undermined any attempt to make peace in the 1430s and 1440s. The English regency, and then later Henry VI when he came of age, couldn’t make peace without conceding that the terms of the Treaty of Troyes were illegitimate. These acts had locked in their claim to the title of King of France and that claim had been used to justify all the conquest and war that had followed – to make peace with the Dauphin would be to declare all those actions illegal and immoral. This created significant stumbling blocks in peace negotiations and created an environment where the only real option was war, a war the English eventually lost.
All of that analysis is fascinating and provides a great perspective on what is often seen as Henry V’s greatest diplomatic triumph. However, Barker also doesn’t take the logical next step and question whether Troyes really was all that good of a treaty. Was it a diplomatic coup achieved by Henry V in his prime or was it an ill-conceived power grab that burdened his kingdom and his son and would eventually lead to social collapse and Civil War? Much of the evidence in the book seems to argue the latter but Barker cannot help but argue an aggressively pro-Henry V line in which he can have done no wrong. The failures are all in how the successors failed to overcome the flaws in the Treaty of Troyes, not in Henry’s original plan.
A similar problem can be seen in how Barker wants to blame both sides for the breaking of the Truce of Tours and the resumption of the war in 1449. The evidence as documented in the book is damning for the English and shows a French monarchy presented with the perfect opportunity to win the war and choosing to take it. The need to paint the English in a good light at times results in criticising the French for making sound decisions that benefit them because they don’t fit the author’s seemingly arbitrary concept of what was or was not chivalrous. This serves to undercut the book and made it a frustrating read.
Conquest also suffers from many of the issues that I have with narrative history more generally. Narrative history can be very engaging and it’s a useful type of history to have, but it can also be done in a fashion that is far too narrow. I found Conquest to be long in narrative and short in broader analysis. It did a lot to tell me what happened but didn’t do nearly enough to tell me why it happened. This to me is the flaw in narrow narrative history. Answering the why is an important part of historical analysis and I just didn’t feel there was enough of it in Conquest. I could have done with a little less in terms of detailed descriptions of minor border skirmishes and instead some explanation of what these border skirmishes meant and what they tell us more broadly about Anglo-French conflict during this period.
My other criticisms are much more minor. I appreciate that Barker is just focusing on Normandy and that the book is long enough as is, but it really would have benefited from providing some context for what was going on in Gascony as well. French campaigns in Gascony only appear in the narrative very rarely, and the end of the book pretty strongly implies that the war ended in 1450 with the fall of Cherbourg – completely ignoring the fact that fighting in Gascony continued until 1453. It’s not a damning flaw, but it is somewhat misleading particularly if you’re not already familiar with the subject.
I also have mixed feelings about her analysis of the financing of the war. This is more an issue of presentation rather than research. Barker has clearly done a lot of work researching how much the various campaigns cost and presents very detailed information on it throughout the book. What I think is missing is context and, in a few places, analysis. I couldn’t help but contrast this with Jonathan Sumption’s Trial by Battle (see my review here: https://www.stuartellisgorman.com/blog/trial-by-battle-by-jonathan-sumption). I think Sumption did a much better job at contextualising the immense financial burden of the campaigns of the 1340s. Barker presents you with the evidence showing how expensive campaigning was and the increasing difficulties the English faced in meeting those demands but she never seems to take a moment to explain that these costs were unsustainable. I think this feeds back a bit into the nationalist perspective of the book – to admit that the English couldn’t afford to wage the war would be to admit that the war was unwinnable, something she cannot bring herself to do. As a result, it feels like a layer of analysis is missing from the book. The research has been done and readers can draw their own conclusion, but it would have benefited from a more explicit exploration of the topic.
Overall, while Juliet Barker’s Conquest is a very valuable history covering an important part of the Hundred Years War that doesn’t receive enough attention, I’m not sure if I would recommend it to most readers. Only die hard Hundred Years War enthusiasts or those with a special interest in the war during the fifteenth century should really read it. For most readers I would recommend A.J. Pollard’s John Talbot and the War in France instead (my review here: https://www.stuartellisgorman.com/blog/john-talbot-and-the-war-in-france-by-aj-pollard).
August 15, 2022
[Malta Month] Preview: Waning Crescent, Shattered Cross by Andy Loakes
Waning Crescent, Shattered Cross (WCSC) is by far the most complex game about the Siege of Malta that I’ve played. This is not a light game to be played in less than an hour. Instead, it is nothing less than the full siege in all its violent glory to be re-enacted over hours of gameplay. WCSC is still in development and Legion Wargames helpfully put me in touch with designer Andy Loakes. Andy kindly shared the draft rules and Cyberboard module being used for playtesting and was even more generous by spending four hours across two weekends to walk me through the game. In that time, we played approximately three weeks of the siege. A full game can last for twenty. That should give some indication of the scale of this experience. I have to say, though, that I had a blast and was engaged the entire time. This is a fascinating game, and I can’t wait to see how it turns out in its final published form.
WCSC is very much a game of geography. The main board of WCSC is a point-to-point map of the Grand Harbour including Senglea, Birgu and St Elmo. In the top right corner is a pile of tracks for things like morale, honour, and Ottoman supply. There are also two inset boxes for Mdina and Fort St Angelo. At first read I found the rules for the map quite intimidating. The points are in a variety of colours each with their own rules. Upon playing it, however, I found it quite intuitive. The red points at the edges of the map are where the Ottoman armies can enter play, grey points on top of fortifications obviously represent fortified positions, etc. A few have some specific special rules, for example a series of light blue points along Mt Scibberas are important for establishing whether the Ottomans are screening the harbour preventing the reinforcement of St Elmo, but those only need to come in to play in certain circumstances.
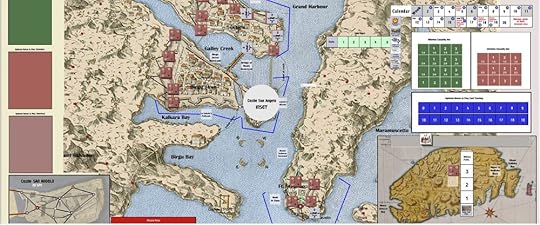
I couldn’t fit the entire board into one image on Cyberboard on my monitor, but here’s the main parts - the three forts and the insets of Mdina and Fort St Angelo. I should also stress that these are all playtest graphics - none of this is is final art!
That really is my impression of the game as a whole: it looked very intimidating at first but was much less complicated than I expected. Don’t get me wrong, this is still by far the most complex game I played this month, but I would say that it’s probably medium complexity for a wargame. There are still a lot of elements to keep track of, such as multiple unit types and the aforementioned tracks, and I expect when playing the final version I will want the rulebook by my side for referencing, but the core gameplay loop is relatively straightforward. On your turn you either play cards for their events or you discard them to take one of a number of actions – usually moving stacks of troops, bombarding walls, making missile attacks on enemy troops, or initiating melee combat. It’s not what I would call simple, but if you’ve played a card driven wargame before a lot of it will be familiar. Even the length, while still impressive, is probably not as bad as my initial play would indicate. Obviously, I was still learning the game and the difficulty of using Cyberboard, a play by email platform, to live play definitely slowed us down a bit, but also the game will probably speed up as you play for reasons I’ll get into later.
But enough of the more generic wargame-y elements of WCSC, let’s get to the good stuff! How does this game model the Siege of Malta specifically? The short version is amazing well, the long version is coming up, so I hope you’re ready!
The Ottomans are tasked with attacking Fort St Elmo first and so deploy two stacks of troops onto the peninsula. Your opponent can only see what is on top of the stack, which creates a subtle fog of war that reveals itself as you fight.
One of the challenges I had long thought would be difficult for a game about the Siege of Malta was how to represent the divisions within the Ottoman strategy. Piali and Mustapha disagreed on the best approach of how to take Malta. Piali’s plan eventually won out despite arguably being the worse option, and history has shown it to have been ultimately unsuccessful. When designing an epic game about the siege how do you account for this? If Piali’s strategy is worse, do you still force the player to execute it or do you design a game where Mustapha’s plan is more viable but risk players never choosing the historic option? The solution in WCSC is so simple I almost feel stupid for how long I’ve been thinking about this question. The Ottoman player is secretly dealt a card from a deck of six which outlines the plan that has been chosen. This deck is weighted in favour of the historic plan but includes two alternatives. The plan takes the form of instructions on the order certain parts of the island must be taken in, e.g. the historic plan requires the taking of St Elmo before assaulting anywhere else. However, the player is not obliged to follow this plan, they can do whatever they want but if they fail to fulfil its requirements, they will lose honour at the end of the game and honour is worth victory points. Players can then choose – if you don’t like the strategy do you discard it in favour of an alternative and just hope that your new plan is effective enough to make up for those lost points? This kind of careful thinking really underpins a lot of the game and it’s what makes it such an interesting representation of the siege.
For our game we played the historic strategy, partly because it is the classic scenario and in part because it largely ignores Mdina. This latter point is important because the rules for sieging Mdina, which are much more abstracted than the other locations, are being significantly revised and tested and it was simpler for our demo game if we just left it alone. I am very much looking forward to seeing how they develop in the final game, though.
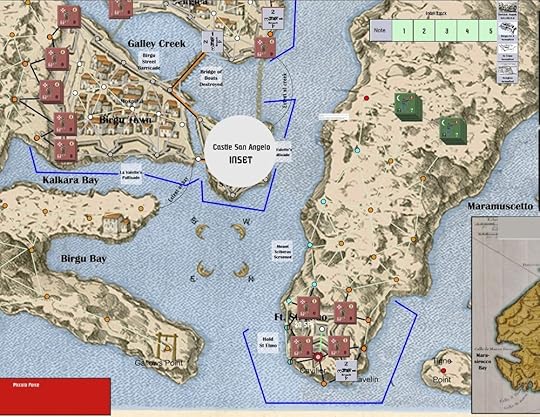
The Ottoman attack begins - this may look quick but it took me three cards to move this far as I could only move one point each turn. However, I placed Ottoman control markers behind me which means that any troops that follow my path can move across those spaces for free - I’ve secured ground making it easier to bring more troops forward.
I found the core gameplay of each turn really engaging and as the Ottoman player I thought Andy did a great job of capturing the feeling of not having enough time to prosecute the siege. Starting with the Ottoman player, players take it in turns to first draw as many cards as they want and then to play as many cards as they want to take actions. Once a player has run out of cards or passes then their opponent repeats the process. There are two very important wrinkles that make this system work. The first is that you can’t draw any more after you start playing cards, so you can’t draw a card, play it, draw another, etc. The second is the End of Week cards.

Bringing the second set of Ottoman troops forward was much faster. I then entrenched both forces - a necessary stage before I could begin bombarding the walls with my basilisk and my cannon. The Ottomans have a limited amount of artillery to bring to bear, and if they are captured by a Christian counter attack I could lose them forever so I don’t want to risk exposing them any more than necessary. Walls can be Breached on a level between 1 and 8 - you need to create a very large breach to attack between and until they are nearly totally destroyed the Christians can try and repair them.
If the Ottoman player draws an End of Week card, then an End of Week phase must be resolved, including both players discarding down to 4 cards in hand and shuffling the discard back into the deck. More importantly, though, is that the tracker representing the progress of the siege moves forward one week – bringing it slowly closer to its conclusion. This creates an element of push your luck as the Ottoman Player obviously wants a lot of cards in hand to have a big turn but must avoid those End of Week cards. Some cards are removed from the deck permanently through play over the course of the game, so as the game progresses the deck will become thinner, and those End of Week cards are likely to come up more often. This gives the game the potential to accelerate towards its conclusion in the later weeks.
The Christian player also wants to avoid End of Week cards to some extent – only End of Week cards marked with a Maltese cross affect them, so the chances of triggering an End of Week are lower for them. Still, because the Ottoman player always go first drawing End of Week causes both players to potentially discard cards and then play switches back to the Ottomans. The Christian End of Week also doesn’t progress the week tracker, though, so the Christian player can’t just keep drawing cards to try and accelerate the end of the game.
In addition to pushing the temporal element of the siege to the front and centre in the gameplay, the End of Week cards also represent an interesting element of the historic siege. Some weeks not very much seems to have happened. Successfully prosecuting a siege is a logistical nightmare and some weeks the Ottomans just got bogged down and didn’t get very much done This mechanic creates some great tension in planning your strategy and captures that ebb and flow of a massive siege like Malta.

End of the First Week, some serious bombardment has happened but it still feels like I didn’t do enough given how few weeks it feels like I have. I also managed to increase Ottoman intelligence (track above Mt Scibberas approach) due to the Christians resupplying Fort St Elmo - this is one of two necessary elements to allowing me to screen the harbour and prevent any future reinforcement of the fort.
Combat is also utterly lethal in ways I found very interesting. Ranged combat seems to be more of a mixed bag, taking pot shots with arquebuses keeps your troops relatively safe but may not inflict much harm - particularly for the Ottomans shooting at the more heavily armoured Christians. The real meat of the fighting is in melee – storming walls if you’re the Ottomans or pushing attackers back out of breaches if you’re the Christians. Combat resolution is done via a relatively straightforward Combat Results Tables (CRT) with column shifts based on a number of factors. I’m honestly not much of a fan of CRTs. I like the immediacy of being able to determine results just from the dice, but it’s impossible to get the same level of detail out of a dice only system. I appreciate that the CRTs for WCSC are relatively light on modifiers – you won’t find yourself having to calculate six different elements all of which slightly impact the roll. Instead you work out the rough ratio of troops and then check a few modifiers that cause column shifts. Once you’ve determined the relevant column both players roll using the Attacker and Defender results within that column.

The Ottoman assault on Fort St Elmo begins…kind of. I actually used an Event to displace the Christian troops on that wall section and just marched into the breach - but technically I did start the assault. Now if I fail to take the fort within 5 weeks I will risk losing Morale - this was supposed to be a cakewalk. I’m also limited in how many troops can occupy a Breach so only a fraction of my stack has moved forward.
What I really appreciate is how dangerous combat is for everyone involved. Even on the most unbalanced CRT column, a 5:1 ratio in favour of the attacker, the defender will still inflict casualties 50% of the time. I also really like the system for determining the size of a combat. You calculate the size of the smaller force in terms of overall strength points, i.e. how many troops are present, and that determines how many dice are rolled in combat for both sides. This means that the bigger the fight the more casualties on both sides. I haven’t played enough games to know if this is fairly standard in more complex games with CRTs but it was new to me and I think does a great job of capturing the carnage of combat during the Siege of Malta. In our first combat in a breach my Ottomans were decisively driven back, suffering twice as many casualties as I inflicted – but at the same time I had twice as many troops to lose and I removed one Strength Point worth of Hospitallers (representing approximately 50 knights) to the Walking Wounded chart. These units are in short supply on the Christian side so I probably came out ahead despite my higher losses. This moment felt like the siege to me, throwing away troops I didn’t care about (no Janissaries were included in this assault, I risk losing honour should they retreat from an attack) to grind down the Christians much more limited supply of men.
The Christian counter attack eliminates my initial attack, but we take some of them with us and troops are more precious to them. You can see on the right where losses are tracked - some losses will return to the battle later as they recover but it is a slow process.
Waning Crescent, Shattered Cross really felt like the ideal distillation of the Siege of Malta. It’s not entirely without its drawbacks. As a complex game that probably takes most of a day to play it’s not something I’d likely get to the table very often, but I don’t think I’d need to. For many people this game will be too big and too long and they will have a much better time with one of the other games I reviewed this month – but for me and what I want out of replaying the 1565 siege this seems like the ideal game and I cannot wait for its eventual release.
August 11, 2022
White Mythic Space: Racism, The First World War, and Battlefield 1 by Stefan Aguirre Quiroga
I think some people might see the title of this book and think it does not have any relevance to them or their interests and that’s too bad because White Mythic Space offers a valuable framework for countless situations beyond just those explored within its pages. This is the kind of book that, if there is any justice, will be referenced for decades to come. It’s a fascinating, well written, and approachable work that expanded my understanding of more subjects than I can readily count. I’m going to try, though, because if I just continue sing it vague praises that do it an injustice and wouldn’t make for a very interesting review.
I want to start with the core theme of the book, and the one that I think will be of use to most people: the idea of the White Mythic Space. Stefan Aguirre Quiroga proposes the concept of subjects which white culture believes to be the unique and exclusive property of a homogenous white identity. Essentially, these are topics, be they fantasy or real history, that large proportions of (primarily white) society believes to only include white people. The topic which is explored for much of the book is the First World War and the erroneous belief that only (or nearly only) white Europeans fought in the trenches of the Western Front. However, this concept is hardly limited to this one historical event. Indeed, elsewhere the author has written about the popular backlash to the inclusion of non-white characters in the animated movie Frozen 2 and non-white actors in the recent Amazon series set in Tolkien’s fictional Middle Earth.
Part of what makes the White Mythic Space particularly interesting, and troubling, is that its beliefs persist even in the face of obvious contrary evidence. The presence of non-white soldiers in Europe during the First World War is well documented and (you would think) indisputable and yet there are thousands of people who are unwilling or unable to accept this reality when presented with it in the form of the video game Battlefield 1’s inclusion of non-white soldiers.
As someone who specialises in medieval history, I can immediately see the applicability of the concept of White Mythic Space beyond modern warfare. Arguably few areas are as much a White Mythic Space as medieval Europe. The degree to which the Middle Ages is seen as a White Mythic Space is so strong that it bleeds into pure fiction – nearly all works of fantasy that happen to include elements of medieval Europe in their world building are also automatically White Mythic Spaces. We see this in objections to casting of non-white actors in worlds created by Tolkien or, as Stefan explores in his book, the casting of Marvel’s Thor movies – movies where the (fictional) Norse gods are aliens from another world and not in fact Scandinavian at all. The concept of White Mythic Space provides a valuable framework for analysing the public backlashes to the inclusion of non-white people in these spaces, or more generally to the denial that non-white people were ever present in medieval Europe, and make no mistake, there were non-white people in medieval Europe. Even in my weird narrow field I have found a Peter the Saracen and Benedict the Moor working as crossbow makers in early 13th century England. While we don’t exactly have photos of these men it is hardly a stretch to suggest that they may not have been white.
White Mythic Space contains more than just the conceptual framework of the White Mythic Space. It also contains a thorough exploration of how it applies to the game Battlefield 1 and the backlash it faced for including non-white soldiers among its cast of characters. The book’s structure deftly interweaves criticism of the game itself – noting that its single player campaign is, despite its promotion, distinctly lacking in non-white stories – with analysis of the intense backlash it faced across multiple internet forums. It expands upon previous work analysing the historical accuracy of videogames to introduce a more specific and much needed discussion of how race factors into understandings of historicity and audience expectations when engaging with historical representation in media.
Stefan also sets Battlefield 1 within two broader contexts. The first is the general representation of WW1 in popular media from the immediate aftermath up to a few years after Battlefield 1’s release. The second is within the more specific context of the centenary celebrations of the war, which aligned with Battlefield 1’s release, and how the game fits within the broader re-evaluation of the conflict that this event spurred. I really appreciated how this contextual information helped enhance my understanding of popular representations of WW1 generally and how they specifically related to the game Battlefield 1 (which, for the record, I have played and found reasonably enjoyable).
There’s just so much to like about this book. I’m far from a specialist on any topic covered in its pages but I was easily able to follow it thanks to the clear writing style and intuitive structure. About the only critique I could level against it is that as an academic book published by an academic press it’s very expensive. That’s barely a critique, but it is what would stop me from saying that you need to go out and buy this book right now. Instead, you should try and convince your nearest library to buy it for you, and then borrow it from them!
August 8, 2022
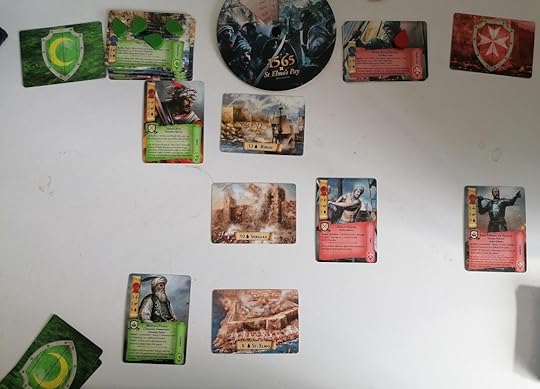
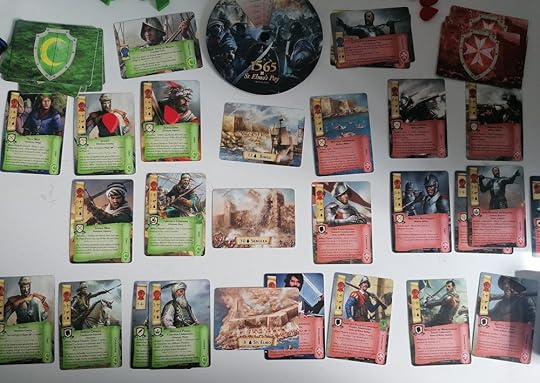
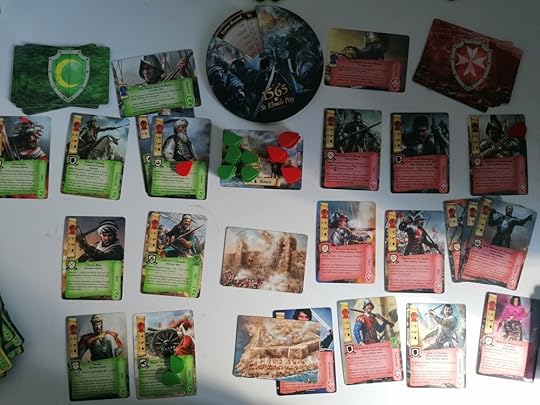
[Malta Month] 1565: St Elmo’s Pay by Tristan Hall
1565: St Elmo’s Pay is the second game in Hall or Nothing Production’s Historic Epic Battle System. The first game was 1066: Tears to Many Mothers, a game about the Battle of Hastings. Both games are relatively quick playing, 30-40 minutes, card games for 1-2 players. While I haven’t played 1066 there are certainly ways in which this system feels like it originated as a model for a battle rather than a large scale siege like Malta. Capturing the epic scope of the Siege of Malta in just a few decks of cards is a daunting task, but despite its limitations I think St Elmo’s Pay does an admirable (if not exactly perfect) job at representing the siege. Before we get to deep into my thoughts about how well it models the siege, let’s talk about the game some.

The initial set up for the solitaire scenario playing as the Ottomans. I have decided that despite Mustapha’s historic preferences I’ve assigned him to take St Elmo first.
In a game of St Elmo’s Pay each player starts by taking their side’s respective decks which include cards representing characters, generic units, events, and tactics used during the siege. Cards are played into one of three rows, each associated with one of the Hospitaller fortresses on Malta: Birgu, Senglea, and St Elmo. Initially players will be trying to resolve objectives in their separate objective decks. These represent key events that occurred during the build up to the siege. Once both players have completed their objective decks the siege begins in earnest. Only at this point do players begin comparing the combat stats in each row. Each unit has two combat stats: Might and Zeal. The player with the higher Might value adds the difference in damage markers to the location in that row, while the player with more Zeal adds just one damage marker. Each of the three fortresses in the middle has a health value and the first player to reach that number wins the location. First player to win two locations wins the game. Players can also win by killing the other player’s leader or if their opponent’s deck runs out. For what it’s worth, while I’ve seen some leaders take significant damage, I’ve never seen much more than half the deck be used over the course of the game. Winning two of the three locations was by far the most consistent victory condition.
I got an early opportunity to kill Francisco Balbi di Correggio and I took it, because without his one Resource the Christians won’t be able to do very much for the first few turns.
The core gameplay is pretty straightforward if you’ve played card games before. Cards have a cost you must pay to play them. You can generate resources to purchase cards by discarding cards from your hand at a one-to-one exchange. Some cards when in play can also be used to generate resources at the cost of not making any other contribution that round. The gameplay of discarding most of your hand to take just a few actions is a great decision space. I liked it back when I played Race for the Galaxy in college, and I like it now. It’s even more intense in St Elmo’s Pay because you won’t ever shuffle your discard into your deck, so any card you use for resources won’t be coming back later. Some cards come in multiple copies, so discarding a card you want won’t necessarily mean that option is gone forever but it’s possible you’ll never see the other copy of that card in your game.
St Elmo’s Pay also comes with a very good solitaire mode. The rules for solitaire play are easy to interpret and play very smoothly – which is not often the case in my experience. A dial is used to track the AI bot’s resources. The slow ticking up of enemy resources gives the game an increasing intensity as the solitaire bot plays better and better cards as the game progresses. Unlike a normal opponent the AI cycles its deck regularly looking for cards to play with its available resources. It makes the game feel a bit more like a race than carefully planned duel of two equal powers, but it’s still a fun experience and plays relatively quickly. I rarely found myself having to check the rulebook for what decision the AI would make, which is always good to see in a solitaire system.

Siege preparations are now very much underway, we’re clearing objectives and filling out our respective forces.
But how does St Elmo’s Pay do at replicating the siege? St Elmo’s Pay takes a very different approach to 1565 Siege of Malta, which I covered last week (link: https://www.stuartellisgorman.com/blog/1565-siege-of-malta-by-maurice-suckling). Instead of a zoomed out strategic view of the siege, St Elmo’s Pay is focused on the characters of the siege and makes it more of a clash of personalities than a game of grand strategy. This has benefits and drawbacks in terms of depicting an event like the Siege of Malta.
St Elmo’s Pay does manage to evoke one strategic element well: the emphasis initially on the taking of St Elmo. St Elmo is by far the weakest of the frontiers in the game, and since all frontiers are equal when it comes to victory it naturally encourages players to prioritise it. Do you try and grab St Elmo quickly to get a leg up on overall victory, or do you sacrifice it to try and win the other two even if they’re more challenging overall? It manages to capture some of the strategic push and pull with very little rules overhead. That said, it is far from perfect. There is no representation of Mdina in the game, so the game has no capacity to portray the alternative Ottoman strategy of taking Mdina first before focusing on the Grand Harbour.
The Ottoman’s reach the Great Siege objective which allows me to start engaging in Zeal combat and slowly chipping away at the locations for a turn or two before battle begins in earnest. Might combat only begins when both sides reach the Siege objective. This is interesting in terms of gameplay, but doesn’t feel like it makes much sense as an abstraction of the siege..
What St Elmo’s Pay does well is capture the characters of the siege. The Great Siege of Malta was brimming with larger-than-life individuals and in St Elmo’s Pay they are evocatively portrayed in portraits on their respective cards. Valette and Mustapha face off the entire game, while a rotating cast of characters comes in to support them. Cards can also eliminate characters almost as quickly as they are brought to the fight, which normally I find frustrating but here it captures the extreme violence and luck of the siege. After all, the historic Turgut was killed by the random misfortune of a misfiring gun, so why not capture some of that chaos? It also makes more room for new cards to come into play. I do kind of wish there wasn’t an automatic victory for killing the enemy leader, though. That feels more fitting to a clash of potential monarchs like Hastings than to the Siege of Malta. If either Mustapha or Valette had died their side still would have fought on, it just would have done so without an essential leadership figure to manage them. I think loss of the leader should be a significant disadvantage but not necessarily an instant loss. It also fails to capture the divided command of the Ottoman side - Mustapha is clearly the important leader and it’s very possible that Piali and Turgut will never appear in your game.

The siege begins in earnest! I’m badly losing in Senglea, but the other two are going much better (I foolishly stacked the tokens at St Elmo so it’s hard to see how many there are). The Christian arquebuses are hurting me in Birgu, though, which may limit my ability to hold out there. The choice of red and green for the damage tokens isn’t very color blind friendly.
I like how St Elmo’s Pay captures the build up to the siege. The opening rounds are carefully planning your strategy before the lines clash, and the objectives are snapshots of what happened between the fall of Rhodes and the siege. The one critique I would have is that this feels like it takes up too large a proportion of the game – once the siege itself begins things can move very quickly and the game can be over in a matter of turns. This feels more appropriate to a game about a battle like Hastings, where months of campaign preparation can be decided in a matter of hours. For an event like the Siege of Malta it feels like the siege part should take longer. It also means the temporal stress of the siege, where the Ottomans were worried about running out of time and the Christians just had to hold out until reinforcements came, is completely absent from the game which is a pity because it is such an important part of the story of the Siege of Malta.

I won in St Elmo but lost at Senglea (I should have tracked that with tokens, I should also have done something about that sun glare on the lower right). Some lucky card draws let me relocate Mustapha to the front by swapping him for some already damaged artillery. Can he help me get it over the line?
The story of the siege as shown in St Elmo’s Pay is very abstracted. There are no chronological or plausibility restrictions on when and where cards can be played. As the Hospitallers you could play a unit from the Spanish Relief Force on the first turn, no matter how absurd that is from a historical perspective. The individual spaces are also conceptually confusing. The Ottomans can play ships into the Frontiers, but what exactly does that represent, and more importantly what does it mean if my cavalry are behind my ships and why would that give them a bonus? When playing the game this doesn’t exactly bother me as long as I’m engaged in my individual decisions, but if I zoom out and try to reconstruct the story I’m telling it’s very odd. Similarly, while the event cards reference specific moments in the story of the siege they don’t do very much to conjure the extreme drama or excitement of some of the siege’s turning points. They can go off just about whenever as long as you have enough resources regardless of plausibility.
The game is chronologically and narratively kind of a mess, which makes sense given how the decks are shuffled and randomised every game. The game’s mechanics can create an interesting narrative as each player builds their forces, suffers losses, and clash for control of the central frontiers, but this feels abstracted from the historical narrative the game is about. The cards you play are an essential part of this narrative, but the characters portrayed on those cards don’t line up with their historic roles well at all. This has the effect of making the character and event cards feel more like cameos – a fun historic easter egg to recognise if you already know the history – rather than a means of conveying the greater history of the siege.
A last Ottoman push lets me just barely squeeze out a victory at Birgu thanks to my greater Zeal. My initial impression is that the Ottoman’s might be slightly easier to win with, but even at Normal difficultly my solitaire games have all been pretty close.
I don’t want to sound too negative. St. Elmo’s Pay does a lot with being a card game that is played in 30-40 minutes. It’s not a detailed simulation and it doesn’t attempt to be and there are certainly mechanics in the game that evoke some of the siege’s dynamics. The asymmetry in how the two factions play is also really interesting and provides a lot of potential strategic depth to be explored through multiple plays. On the whole I’m reasonably fond of St. Elmo’s Pay. It does a good job scratching the card gamer itch I’ve been trying to ignore since I stopped playing Magic the Gathering as a teenager. It’s not my favourite game, and I don’t know if it will stay in my collection for years to come (especially given the size of its box), but I’ve had fun playing it and it’s definitely a game I can see myself periodically coaxing a friend into playing with me.
August 4, 2022
[Malta Month] The Great Siege of Malta by Bruce Ware Allen
I am enthralled by the Great Siege of Malta. It is one of the most engaging historical narratives I’ve ever come across, the kind of story that feels too exciting to be even remotely true. Too long to really work as a movie, it feels perfectly suited to a high drama HBO series – except probably lacking in sufficient opportunities for gratuitous female nudity. It is a story full of sudden dramatic changes in fortune, deaths, betrayals, desperation, and dramatic last stands against all odds. An underdog story of resistance against an unstoppable foe that somehow also manages to show how much that massive foe is struggling against their own difficulties. It is easy to see why it captured imaginations at the time and within months of its conclusion some commentators described it as the greatest siege that ever was.
It is perhaps a little surprising, then, that there aren’t very many books on the siege. For a long time Ernle Bradford’s history, first published in 1961, has been the definitive history. I was therefore pleased to find that Bruce Ware Allen’s The Great Siege of Malta provides a much-needed update to Bradford’s foundational work. While the overall narrative of the siege in Ware Allen’s account doesn’t differ greatly from Bradford’s, the inclusion of a wider range of sources, particularly more Turkish evidence, gives Ware Allen’s version a more well-rounded perspective than was present in Bradford. This is an excellent history of The Great Siege and if you have any interest in the subject, or just enjoy an engaging and exciting historical narrative, this is the first thing you should read!
As is fairly standard with accounts of the Great Siege, Ware Allen begins with Suleiman the Magnificent’s rise to the Ottoman throne and his plan to drive the Knights Hospitaller from their fortress in Rhodes. This successful siege sets the stage for the great conflict many decades later, near the end of the Sultan’s life. Ware Allen also does a good job of bridging the years in between, providing a detailed history of the Knights’ search for a new home, their eventual settlement in Malta, and the struggles they faced in their new home. He also charts the careers of the Barbary pirates, particularly the Barbarossa Brothers, whose disciples would play a key role in the siege and broader Ottoman conflict and diplomacy with major European powers.
This is a traditional narrative history. It is well sourced and very readable, and with the Great Siege there is a ton of narrative to cover so it works well. That said, I’ve now read multiple narrative accounts of the Siege and while I’m engaged every time, I now yearn for some more thematic histories. I want to know how the Siege and its failure fits into broader Ottoman politics, what it tells us about Christian alliances at the time, and the role that groups like the Hospitallers played in the Catholic Church during the Reformation that was raging around these events. Sometimes these ideas manage to peak into Ware Allen’s account, but they are always peripheral to the core story.
This is not a critique of this book, but more a comment of what I hope to see going forward. I think this account of the Siege provides a great narrative basis and could remain the core narrative/political history of the subject for many years to come. I sincerely hope it encourages scholars to start tackling other aspects of The Great Siege in more detail. An event of this magnitude has the potential to teach us about so many aspects of sixteenth-century society.
I also really appreciate how Ware Allen is able to highlight the individuals involved in the siege. While it can at times be a little overwhelming to track all these characters, the writing is good at reminding you of where an individual appeared before and doesn’t just assume that you remember every single name. I also really liked how it highlighted the multi-cultural nature of both forces. It can be too easy to fall into a clash of cultures style account, placing Hospitallers against Turks which misses that the Hospitallers were supported by a multi-national array of mercenaries and Maltese natives while the Ottoman empire was multi-ethnic with many key figures originally of European origin. Ware Allen does a good job of highlighting the various origins of the narrative’s key players which captures some of the messy allegiances present in these conflicts. Great stuff.
The only substantial critique I would offer of Ware Allen’s book is that sometimes when it journeys further afield from the sixteenth century it can make some assertions that I wouldn’t particularly agree with. There is one comment that attempts to draw a parallel between the tactics of the Knights and the Ottomans and those of the ancient Greeks and Persians which feels particularly strained. There are only a handful of cases where this happens and I suspect most people won’t even notice them, so I’m largely nit picking here.
Overall, I really enjoyed Bruce Ware Allen’s The Great Siege of Malta. The Great Siege is a fascinating historic story whose narrative excitement probably overstates its actual impact, but what a great story it is.
August 1, 2022
[Malta Month] 1565 Siege of Malta by Maurice Suckling
Making a game about a siege is challenging. Sieges are often by their very nature filled with long stretches of time where one side has little to do but endure. A siege like the Great Siege of Malta, which lasted most of a year, can be a long, slow, tortuous, and brutal event that doesn’t lend itself immediately to being turned into a game. Capturing the scale of a siege while also giving players plenty of choices and things to do to keep them engaged is a challenge. Even when you do find an element to gamify, if the game is multiplayer, you will need something for both sides to do. It’s not very exciting if one player is taking lots of actions and the other player just has to wait until something happens. You can design the best system ever for the attacker to try and topple his opponent’s walls, but if the defender has nothing to do you haven’t made much of a game. This may be why many wargames about sieges seem to be solitaire games. When you only have to create a game for one side and can entirely abstract the other it simplifies the challenge of making a game from the history.
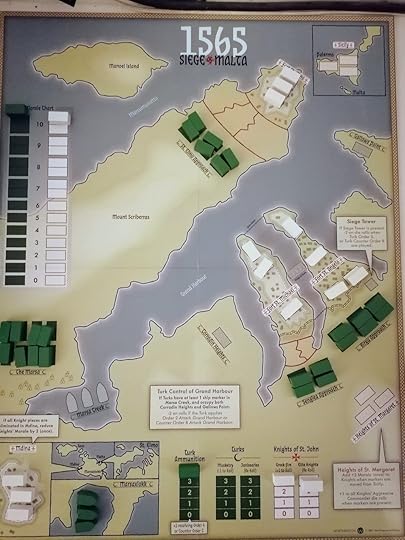
Opening set up for the Hospitaller player - I did forget to put the bridge between Senglea and Birgu because I’m an idiot. In my defense, it didn’t really come up in my game.
1565 Siege of Malta is a solitaire game, but it doesn’t entirely benefit from this simplification because players can choose to play either side of the siege. This means that its systems need to work for both the attacking Ottomans and the defending Knights. I like this decision because the siege is fascinating from both perspectives, and it has the potential to let you view a single event through very different lenses. Too often solitaire games can make the opposing faction feel faceless, a series of mechanics without empathy, and I think this a good way to minimise that. That said, it also puts a significant strain on the game since it needs to be interesting to play both sides and with a game as simple as this one there isn’t much room for added complexity to adapt the specific circumstances that either side faced.

The Ottoman attack is not going well and they are burning through ammunition very quickly.
Probably my favourite part of the game, and the place where I think it best succeeds at adapting a shared mechanic to both sides, is in how the event deck affects victory conditions. The deck acts as a clock, roughly approximating how the siege could not be maintained over the winter and victory was as much about time as it was about supplies and resources. The Hospitallers automatically win if the deck runs out, whereas the Ottomans automatically lose in that same event. This is really elegant and at a high level I think does a good job of creating different kinds of pressure for the two sides. It takes one mechanic that is functionally identical no matter what side you play but makes your relationship to it very different in a way that is thematic to the circumstances of the siege. I generally have mixed feelings about event decks as a mechanic, and I have my issues with this one, but this overall idea is great.
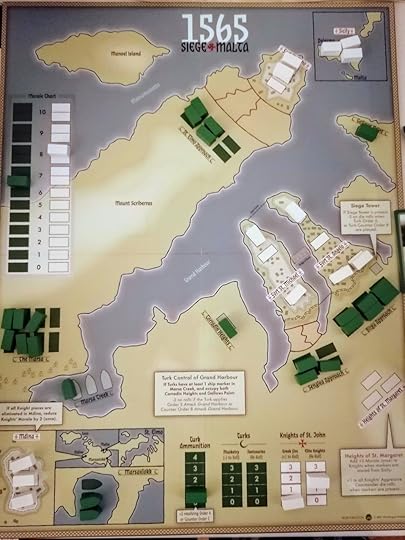
Reinforcements are ready in Sicily. They have suffered some casualties but the Ottoman’s are still fairing worse.
That all having been said, I’m not particularly enamoured with this game system. In theory I like games where you have a pool of actions, but every time you take an action you cannot take it again until you meet a requirement that allows you to refresh your available actions. One of my favourite games is Concordia, a relatively simple trading in the Roman Mediterranean Eurogame where you have a hand of cards, and each turn you plan one card from your hand. However, you can only pick your cards back up by playing a card that lets you do that, and only that, on your turn. You need to balance when exactly you want to reset your strategy and when you should push on with what you have – it’s simple but it’s good.
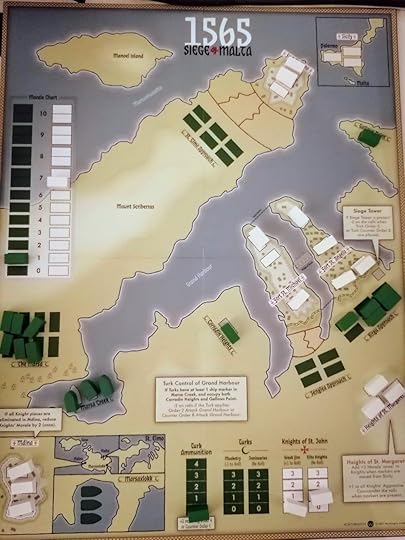
The Ottomans manage to bring all their ships into the Grand Harbour, but the attacks on St. Elmo and Senglea have collapsed despite their favourable position.
However, this same mechanism doesn’t really work for me in 1565 Siege of Malta. In Malta you have a menu of actions, and you can only pick each one once until you’ve used all of them or you play one of your limited Aggressive Commander or Inspirational Speech cards alongside another action. As a mechanic I don’t hate it, but it doesn’t feel like it fits the theme of the Siege of Malta very well. As the Ottomans you can’t repeatedly smash your troops against St. Elmo, instead for every time you attack there you must also attack each of the other Hospitaller strongholds before you can attack St. Elmo again. It doesn’t feel like it captures the brutal grind as the Ottoman army turned its attention on one aspect of the siege to prosecute it with extreme prejudice - ignoring other elements as much as possible until this victory was achieved.

The Ottoman command sheet including results tables and the cards used to denote which orders have been used
It is this that really underpins my problem with this game – it doesn’t feel to me like it really evokes the Great Siege of Malta. There’s no need, in terms of satisfying a victory condition, for the Ottomans to take St. Elmo. As the Ottoman player the goal is to eradicate Hospitallers wherever you can find them and to slowly erode their morale. To this end, an attack on one Hospitaller fortification is much the same as an attack on any other. Seizing territory contributes very little to victory – which is sort of good because taking a fort is very hard, especially since you may only be able to attack St. Elmo 3 or 4 times over the course of a game.
While historically the Ottomans did succeed at degrading Hospitaller morale, and morale was a crucial element of the conflict, they lost in the end because they failed to take control of the island. There are plenty of other nit-picks I have, such as Mdina being too difficult to take – historically it was not prepared to endure an Ottoman bombardment had they turned their full attention to it – but the core issue I have is with how it models an Ottoman victory. The Ottomans should need to seize fortresses to win, it is not enough to simply kill Hospitallers. The historical Ottomans killed plenty of Hospitallers and Maltese defenders, and in the process degraded their morale to near rock bottom, and they still lost.
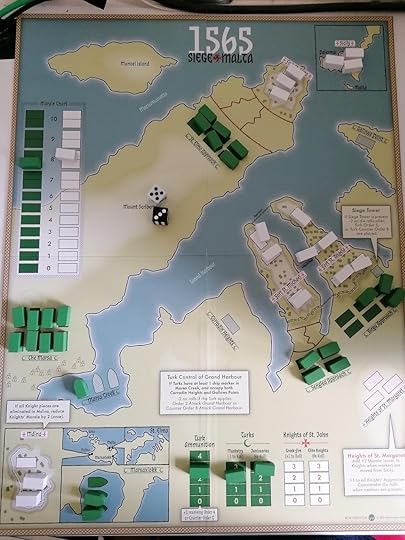
I won my first game as the Ottomans, but most of my games looked like this - total disasters with very poor rolls (high is bad)
I also don’t particularly like how what historically were major one-time events are gamified such that they can just keep happening over and over again. I don’t mind the fact that the Ottomans can repeatedly build and lose their siege tower, that’s okay if a little strange. Siege equipment could be rebuilt even if the game does engage in some remarkable temporal flexibility when it comes to how long it would take to do so. I’m thinking more of things like the cavalry raid on the Ottoman Camp out of Mdina or the dragging of Ottoman ships over Mount Scibberas to launch a naval attack on Senglea. Both of these were very consequential events, but they also only happened once. It kind of ruined my sense of narrative that they can happen at least as often as an attack on St. Elmo over the course of a single game.
My problem with this isn’t that the game is not totally historically accurate. No game is, and levels of abstraction in gaming are expected. My problem is that when I play a historical wargame, on at least some level I want to feel like I’m living the story of that historical event. I want to be sweating over the fight in St. Elmo, the constant carnage and desperation of that battle causing me distress and anxiety. As La Valette I want to be weighing the cost and benefits of sending yet more soldiers into the carnage at St. Elmo – if it can hold out a bit longer that could save me, but I only have so many troops to spare! I didn’t feel the story of the Siege of Malta while playing this game, I felt like I was playing an entertaining if a bit too random boardgame. I appreciate that this won’t bother other people as much – if you like the gameplay and are not nearly as obsessed with the Great Siege as I am then it probably doesn’t matter to you if playing the game doesn’t exactly conjure the specific events you’ve read and written about. For me, though, if I’m playing a game about the Siege of the Century, I really want to feel like I’m playing that siege and 1565 Siege of Malta doesn’t give me that.
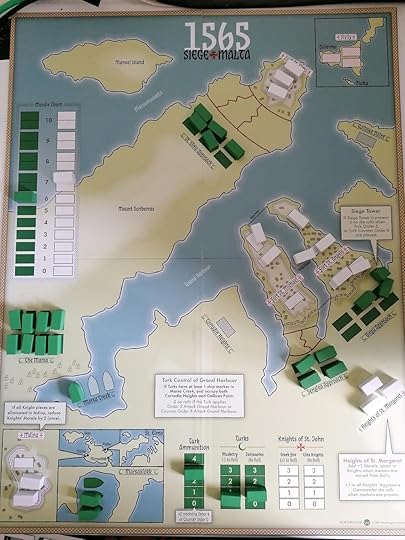
Unlike historically, the Sicilian reinforcements had a habit of showing up very early on during my games as the Ottomans.
I think the game is more fun playing as the Ottomans than as the Hospitallers. The Hospitaller actions are a little underwhelming. I frequently found myself needing to take the Move Troops action to refresh my pool but I wasn’t actually missing any troops so I had no spaces to move anyone into, which leads to another issue: playing as the Hospitallers is kind of easy. I didn’t play them as many times, but the Hospitallers didn’t seem to face very much of a challenge. Certainly, I didn’t feel harried to the point of despair like I would have expected. There is a challenge in modelling historical events where you have to decide how important is it for the game to accurately repeat history. As a model that generates the historical result, a Hospitaller victory, this works very well. However, historically it was a close-run thing and the Hospitaller victory felt a bit like a miracle, and the game difficulty doesn’t really conjure that feeling. In contrast, winning as the Ottomans is much more challenging and I found myself much more engaged in trying to work out an optimal strategy to succeed at reversing the historic outcome.
I also don’t love the choice of terminology for the factions. The game uses Turks to refer to the Ottomans, and while the ruling elite of the Ottoman Empire were largely Turkish the actual army was a diverse collection of people who were subjects of the vast empire. Many soldiers, and even some commanders, at the 1565 siege would not have been Turkish and I think using this term erases some of that diversity. I also think the Hospitaller descriptions don’t give enough credit to the Maltese and various (mostly Spanish) mercenaries, who vastly outnumbered the Hospitallers were instrumental in the defence of the island. In total there were only a few hundred Hospitallers in the siege, a minority of the defenders by far.
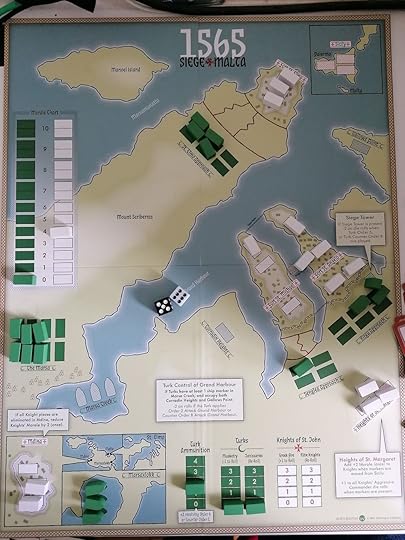
My final game as the Ottomans ends in total disaster - like most of my Ottoman games did.
The production was a bit much for my taste, but that is a highly subjective statement (as is pretty much all of this post if we’re honest). I think I would have preferred this game more if it was a small box with cubes, cards, and a smaller board. As a light €20 game I could fit in my bag I might have kept it in my collection, but as a big box experience taking up precious shelf space I think I’ll see if I can find a new home for it with someone who will appreciate it for what it is instead of wishing it was something different, like I so clearly do.
In the end I don’t think I would play 1565 Siege of Malta again, which is a little disappointing. I am fascinated by the Great Siege, and this just didn’t evoke the history for me. I also don’t think I’m a huge fan of this series and its mechanics, so it probably wasn’t the game for me regardless. I might have enjoyed it more as a two-player game, but I’m not sure. Not every game is for every person, and this clearly just wasn’t a game for me. Luckily, it’s not the only game about the 1565 Siege of Malta, so stay tuned to see how I got on with some of the other attempts to model The Siege of the Century. Hopefully one of them is exactly what I’m looking for!
[Malta Month] Cutting Room Floor - The Great Siege of Malta
This Cutting Room Floor is a little different from the others. A section about the Great Siege of Malta did make it into the final text of my book. However, my original draft was much, much longer than what I could eventually fit into the book. What I am presenting below is a (lightly edited) original cut of the text about the Siege of Malta.
This also serves as an introduction to Malta Month! This August I’m playing games about The Great Siege of Malta and giving you my thoughts. Since I’m going to be spending so long talking about it I thought it best to kick things off with a little historical context! I hope you enjoy!
.
The Great Siege of Malta in 1565 was not the first time that the Knight’s Hospitaller clashed with the Ottoman Empire, nor even the first time they had fought against the sultan Suleiman I, The Magnificent. Forty years earlier in the winter of 1522-3, at the very start of the sultan’s reign, he had driven the knights from their previous home on the island of Rhodes. The 1522 Siege of Rhodes is just one in a series of famous Ottoman sieges, starting with the Siege of Constantinople in 1453, then the less talked about 1480 Siege of Rhodes during which the Hospitallers drove off the forces of Suleiman’s father, and the later Siege of Malta in 1565. Suleiman opened his reign by driving the hated Knights Hospitaller, a military order with its roots in the eleventh century and which had participated in nearly every major crusading conflict, from the eastern Mediterranean and opened the sea for future Turkish expansion.
The Siege of Rhodes dragged on for months, lasting into the winter, and finally ended when the Sultan Suleiman I agreed terms of surrender with the surviving Knights Hospitaller. The Knights would be permitted to take their possessions and leave the island in peace so long as they surrendered Rhodes to the sultan. These generous terms reflected the difficulty that Suleiman had experienced in besieging the Hospitaller fortress, as well as the length of time the siege had lasted. The knights accepted and left what had been their only home for centuries in search of a new one.
They remained homeless for seven years, from the fall of Rhodes in 1523 until 1530, when Emperor Charles V, the Holy Roman Emperor and King of Spain, offered them the island of Malta as their new home. Malta was no Rhodes, it lacked the impressive fortifications built up over centuries and the abundance of natural wealth, but it had two excellent natural harbours and, most importantly, nobody was offering the Hospitallers anything else. Charles V required from them only a single hunting falcon, to be paid to the Viceroy of Sicily on Charles’ behalf, as payment along with a guarantee that the Hospitallers would never make war on his kingdom. Charles V also burdened them with the city of Tripoli in modern day Libya, an exposed bastion of his empire that they would struggle to hold at great cost. Tripoli was taken by a combined force of Ottomans and Barbary corsairs, including the famous Turgut who would participate in the Great Siege, in 1551.
The Hospitallers needed to reinforce Malta and make it a new home from which they could conduct their ongoing war against Muslims generally and the Ottomans specifically – but building fortifications is expensive and their funds were limited so progress was slow. While the Hospitallers had once been famous for their fortresses in the Holy Land, they were now more famous for their naval engagements. Their detractors saw little difference between the order and common pirates. Befitting their naval activities they set up their base of operations in the town of Birgu in Malta’s Grand Harbour. The main city on the island, and it’s technical capitol, Mdina was largely left to the Maltese.
The Hospitallers had taken several centuries to build up their impressive defensive fortifications in Rhodes, but they had neither the time nor the finances to achieve similar results before the next expected Ottoman attack. They also had limited resources, while Malta had immense supplies of stone readily available to be mined it was less abundant in earth and wood – two other materials necessary for fortress building. It was also not particularly abundant in foodstuffs, lacking the soil to grow grain in large quantities. It imported much of its basic food from neighbouring Sicily with funds made by exporting figs, melons, and other fruits. It also had few sources of natural water, with only a handful of springs located on Malta. However, this lack of abundance did offer one advantage to the Hospitallers: Malta was a difficult place to sustain a long-term campaign, like a siege, as any invading force would need to bring all its own supplies with it and could not rely on resupplying from the island. The island’s rocky foundations also made mining, a common siege practice of digging underneath enemy walls to collapse them, extremely difficult.
In the end the Hospitallers constructed three main fortified positions around Malta’s Grand Harbour. The first was the town of Birgu, built on a peninsula that emerged into the harbour perpendicular to the harbour’s entrance. Birgu had been a relatively small fishing village which the order expanded into a respectably sized town with walls and, on the peninsula’s point, the fortress of Fort St. Angelo. On a parallel peninsula located slightly further into the harbour they built the town of Senglea, a less impressive fortified town than Birgu with the fort of St. Michael located on the landward end of the peninsula. Between these two peninsulas a chain was hung that could be pulled up to block off access to the water that lay in between. On the opposite shore from these two peninsulas was Mount Sciberras, a large peninsula that formed the north-western side of the Grand Harbour, with the smaller harbour of Marsamuscetto lying on its opposite side. Mount Scibberas represented a point of significant threat, as artillery mounted on the mountain could threaten both Birgu and Senglea. The Hospitallers constructed another fort at the very tip of this peninsula, Fort St. Elmo, which could command a position overlooking the entrances to both the Grand Harbour and Marsamuscetto, while contesting control of mount Sciberras as well. In addition to enhancing their fortifications, the Hospitallers expanded the system of watch towers and signal fires across both Malta and Gozo, the second largest island in the archipelago, so that they would be notified immediately of any approaching enemy fleets.
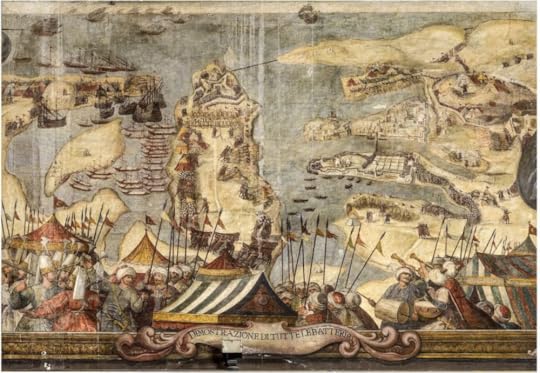
An early modern map of The Grand Harbour and its environs during the Great Siege. Mount Scibberas juts out in the center, the Ottoman fleet anchored on its left, while the twin peninsulas and the Grand Harbour lie to the right.
None of these fortifications were without their flaws. Limited funds and resources, which sometimes had to be shipped over from Sicily, as well as the challenges of building a fort on the end of a mountainous peninsula meant that the Hospitallers were forced to compromise on the quality of their defences. Fort St. Elmo may have overlooked the harbours, but Mount Scibberas looked down on it, meaning that an attacking force could fire into the fort from a higher position if they took the mountain. St. Elmo had also been built without adequate protections on its north-western side, something that was partially fixed with the addition of a projecting fortified position called a ravelin. Birgu was the best fortified of the Hospitaller communities, while Senglea was reasonably well fortified on its landward ends but had gaps in its water defences.
Despite their lack of finances, the Knights Hospitaller were a notable thorn in the side of the Ottoman Sultan when operating out of their new home, continuously raiding his shipping lanes, and causing grief to the sultan and his followers. Malta itself also presented a problem for the Ottomans if they ever wished to control the Mediterranean and be able to threaten Western Europe will asserting control over North Africa. Malta sits almost in the middle of the Mediterranean and any vessel wishing to travel from the Eastern Mediterranean to the Western, or vice versa, must pass very close to the island. This made it a constant threat to Ottoman ships trying to raid in the Western Mediterranean. It also meant that Malta was the natural first steppingstone for any plans to launch an invasion into Western Europe, particularly Sicily which had been a Muslim holding centuries before. The annihilation of the Knights Hospitaller was also some unfinished business for Suleiman I, who in 1565 still ruled the Ottoman Empire at the ripe age of seventy.
Unlike at Rhodes, Suleiman did not decide to lead the invasion of Malta in person. Instead, he chose as his general Mustapha Pasha. Mustapha was a veteran of the siege of Rhodes, having fought under Suleiman as a young man, and Suleiman placed great trust in him. Commanding along with Mustapha was the admiral Piali Pasha. Piali was only in his thirties and married to the daughter of Suleiman’s son, and future sultan, Selim. The third commander of this expedition was one of the most feared men in the Mediterranean, Turgut (sometimes known as Dragut), a notorious North African corsair and, since taking it from the Hospitallers, governor of Tripoli. Although Mustapha was given overall command, in practice these three men had to share in all the decision making. Suleiman sent to Malta a truly staggering invasion force, estimated to be at least 30,000 soldiers, not including the sailors, slaves, and other non-combatants that travelled with them. This included over six thousand Janissaries, the elite of the Ottoman armies.
Standing against the Ottoman invasion force were the Knights Hospitaller and their grand master Jean "Parisot" de la Valette, usually known just as La Valette. La Valette had also served at Rhodes as a young member of the order and had risen through the ranks over the intervening forty years to reach its very top. He had filled numerous commands as a Hospitaller, and even spent some time as an Ottoman prisoner. Under La Valette the order had at most seven hundred knights who were able to travel to Malta before the Ottoman fleet arrived – that being out of a total of probably not much more than a thousand Hospitallers. This force was supplemented by between two and three thousand Maltese irregulars and at least that many mercenaries and Spanish soldiers supplied by King Philip II, son of the Charles V who had given the island to the knights. The Hospitallers also had approximately 1,500 slaves – a mixture of captured Muslims and Christians serving sentences of imprisonment – to use as an involuntary labour force to reinforce defences and do other onerous and thankless tasks. In total, the forces tasked with defending Malta probably number between eight and nine thousand soldiers, less than a third of what the Ottomans were bringing.
The Ottoman fleet arrived at Malta on the 18th of May. After initially appearing to sail north toward Gozo they eventually settled into the harbour of Marsasirocco on the south-east end of the island. On the 19th of May they began to land their massive invasion force. La Valette had ordered all the available food and livestock to be moved into the defendable settlements and distributed his forces – although some reports suggest that they were not entirely successful in this. Most of his troops were stationed in Birgu and Senglea. The cavalry he placed in Mdina, from which he hoped they would be able to harass the Ottoman position. He placed smaller garrisons in St. Elmo and the citadel on Gozo. The Ottoman and Hospitaller armies first clashed on the 21st of May, when a small force sortied forth from Senglea and Birgu to attack the Ottomans who were positioning themselves outside the cities. The two forces battled for six hours, with casualties on both sides, before La Valette ordered the Christian forces to return behind their fortified walls.
From then on, the Hospitallers would fight an almost exclusively defensive war – buying time in hopes of a relief force to come to them from Sicily, only fifty miles north of Malta. There the Viceroy of Sicily, Don Garcia de Toledo, was amassing a relief army to drive off the Ottoman invasion – or at least that was the theory. In practice, Garcia was attempting to amass that army with what limited resources he could get from the Spanish king, Philip II, and struggling to put together sufficient forces, in terms of both ships and soldiers, so that he could safely take on the risky endeavour of launching an amphibious invasion of Malta from the north. The Spanish king was very worried about risking his fleet, he had only just replaced it after an earlier disastrous battle and fleets were not cheap. They also could not afford to land a small army on Malta and have it be isolated and crushed by the Ottomans, any relief force must be overwhelming in strength. The Hospitallers and their allies would have to wait a long time for relief to come.
In the meantime, the Ottoman’s decided on their battle plans, although it was not a unanimous agreement. Mustapha wanted to first capture Gozo, then move on to Mdina, and once they had completely isolated the Hospitaller main force begin the siege of the Grand Harbour. Admiral Piali did not agree, he did not feel safe with his ships in their current harbour and wanted access to the bay north of Mount Scibberas to protect him from the risk of any unseasonable winds. Securing that safe harbour would mean taking Fort St. Elmo first. In the end, Piali won the day, and the Ottoman forces began positioning artillery on Mount Scibberas to begin the bombardment and eventual assault on Fort St. Elmo. Turgut was late to the siege, so while he eventually would agree with Mustapha’s assessment, he was not present to influence the initial debates and by the time he did arrive it was too late change. The Ottoman chief engineer estimated that the fort would not last more than five days. On the 24th of May, after painstakingly hauling guns into place and building defensive positions with dirt that also had to be moved up the mountain, Mustapha ordered the start of the Turkish bombardment of St. Elmo.
The garrison of St. Elmo numbered only a few hundred, a mixture of Knights Hospitaller, mercenaries, and Maltese, who were faced with the full might of the Ottoman army. Mustapha ordered near constant bombardment of the fort, the Ottoman artillery slowly wearing away its defences and reducing it to a ruined husk. Over the subsequent days the Ottoman forces would mount multiple assaults on the fort, only to be repulsed after hours of fighting at the cost of massive casualties. La Valette kept St. Elmo supplied with a slow stream of new soldiers to replace the Christian losses but balancing the needs of the fort with those of his own fortresses, as well as managing morale in St. Elmo, was a significant challenge. La Valette likely knew that most if not all the soldiers he sent over to St. Elmo would die there, but he also needed them to hold that position for as long as possible. Each new week was predicted to be St. Elmo’s last, with both sides doubting that it could hold out much longer, but somehow the Christian defenders endured. Even after Ottoman forces captured the ravelin and the Knights were forced to burn the bridge that connected it to the rest of St. Elmo the garrison held out.
Finally, on the 23rd of June St. Elmo fell to the Ottoman attack. The Ottomans killed every Knight they could. Nine knights were reportedly taken prisoner, but little evidence survives of what happened to them, while a handful of Maltese soldiers jumped into the Grand Harbour and successfully swam to Birgu, bringing with them the story of the final hours of the fort. St. Elmo, a fort that the Ottoman engineers had predicted would fall in five days, had lasted for a whole month. In the process of taking, it the Ottoman army has been estimated to have lost upwards of eight thousand soldiers, with significant casualties having come as recently as the 21st of June when a failed attack had reportedly cost them the lives of two thousand soldiers. These casualties were high, but the Knights had also suffered significant losses. It is estimated that the Christians lost 1,500 soldiers in the defence of St. Elmo, a significantly smaller figure than the Ottomans but also one the Knights and their allies were less able to afford. It had also cost the Ottomans significant resources in terms of gunpowder and ammunition, although the Turkish army had brought ample supplies of both for the invasion.
The greatest cost to the Ottomans was in time. They had expected to be finished with St. Elmo in a week, but it was now near the end of June. The passage of time presented two major risks to the Ottoman army. The first was that each passing week increased the likelihood that Don Garcia could organise his relief force and come to the Knights’ aid. Garcia had already told La Valette to expect him on the 20th of June, a deadline he would not make, but a sign of the risk to the Ottomans.
The greater risk, however, was the end of the campaigning season. Malta was not like Rhodes, where the Ottoman army had been only a few miles from the Turkish mainland. This force was halfway across the Mediterranean in unfriendly waters on an island with little food. They could not winter there for the siege, they could not even risk staying late in the Autumn lest they be unable to safely sail home in the more tempestuous autumn Mediterranean. The Ottoman army needed to conquer Malta before autumn and with St. Elmo only just captured it was already almost mid-summer. With the clock ticking and casualties mounting – dysentery having now also reared its ugly head in the Ottoman camps – Mustapha turned his attention to the joint siege of Birgu and Senglea.
It took several days to reposition all the guns from Mount Scibberas, as well as to dig trenches and build a fortified camp outside of Birgu and Senglea, and the bombardment of them both only began in earnest with the coming of July. During the process of relocating the Turkish army a small relief force numbering approximately seven hundred men, mostly Spanish infantry but including a few more Hospitallers and soldiers of fortune, landed on the north of the island near Gozo. On the night of the 29th of June, this force, known as the Piccolo Soccorso, snuck around the Turkish camp and were ferried in to Birgu, providing much needed support to the beleaguered forces and in a single night replacing half of those lost in St. Elmo. These reinforcements may well have decided the overall siege, as when all the dust would settle at the end of the summer the number of Hospitallers still fit to fight would only number approximately six hundred.
For his first attack on Birgu and Senglea Mustapha had something special planned. The Ottoman army dragged several ships over the narrow gap where Mount Scibbers joins the rest of Malta and put them in to the bay on the western end of Senglea – a position where the Hospitallers had not expected an attack. In response the Hospitallers did their best to reinforce the exposed side of Senglea against naval attack with a wooden palisade and chains while the Ottoman’s did their best to stop them. The Maltese swimmers proved their worth, playing an instrumental role in constructing the palisade and defending it from Ottoman attempts to tear it down.
On the morning of the 15th of July, the Ottoman’s launched a joint attack by both land and sea against both Birgu and Senglea. The fighting was fierce and bloody, but the attack ultimately stagnated. Mustapha’s second wave of Janissaries, intended to encircle the already engaged forces on Senglea and land on an empty bit of shore further north, ran into unexpected trouble. The Ottomans had missed that there was a very low gun port on Ft St Angelo, and he entire second wave sailed directly into its sights. The Hospitaller in charge waited until the perfect moment before unleashing a barrage, sinking most of the ships and sending the rest fleeing for shore.
In the end the Ottoman attack, which included attacks on the landward walls of Senglea and Birgu, was repulsed with heavy losses suffered by the attacker. This was to be a theme for the coming weeks. The Ottoman artillery kept up a near constant barrage of the fortifications while Egyptian siege engineers attempted to undermine the walls. Occasionally Mustapha would order an all-out assault on the Hospitallers which, often through the vagaries of fate and to the surprise of both sides, would be driven back with significant Ottoman casualties.
The attack on the 2nd of August seemed to nearly be a complete victory when alarms that the Ottoman camp was on fire and fears of a Sicilian relief force having arrived unannounced forced Mustapha to call it off. In the end, it turned out to have been a raid by the cavalry that were operating out of Mdina – one with devastating results but that likely would not have been enough to save Birgu and Senglea had it not been mistaken for Diego’s rumoured relief force. Another attack, this time launched in conjunction with the detonation of a mine dug under the bastion of Senglea, was repulsed when La Valette himself led a counter charge into the breach caused by the detonation and, while rallying all available soldiers to him, pushed the Ottoman forces back off the peninsula. La Valette suffered a wound to his leg in the process and would be unable to lead troops with the same vigour for the rest of the siege. The continuous bombardment and attacks were slowly wearing the Christian forces down, but Mustapha and Piali still could not successfully take either peninsula and time was running out.
By the end of August, the defenders of Birgu and Senglea were exhausted. They had endured countless hours of cannon fire, the buildings were in ruins, bodies lined the streets as there was not enough time or people to bury them. They had endured numerous Ottoman attacks, many of them employing a variety of siege weapons, each one different from the last.
On the of 29th of August, it began to rain. The heavy rain stopped the Ottoman attack on that day and hindered both sides’ ability to use their guns. It was also an ill omen for the Ottoman’s, since rain suggested that the inclement weather of the Mediterranean autumn was already coming. The Hospitallers were obviously hopeful that the weather would convince the Ottomans to leave rather than risk wintering on the island, but they were also prepared for this eventuality. Inside their armoury was an ample supply of crossbows, a weapon whose performance was not at all diminished by the rain despite the claims of some fourteenth century chroniclers. The crossbows, according to the eyewitness Francisco Balbi, were given out to the men defending the most dangerous positions and significantly outperformed the Ottoman bows which their opponents were forced to use – so much so according to Balbi that the Turkish soldiers feared the Hospitaller crossbows. The Hospitallers used their crossbows against subsequent Ottoman attacks, which came steadily as the bad weather motivated Mustapha to try and seize the fortresses as soon as possible. Ottoman morale was so low at this stage that Mustapha was even forced to lead some of these attacks personally.
While the end of August is the first time that crossbows were explicitly mentioned by Francisco Balbi, it is very likely that they were used earlier in the siege. Back in April of 1565 a small assortment of arms was issued from the Hospitaller’s armoury to the city of Mdina which included 41 arquebuses and one crossbow. Given Mdina’s lack of a central role in the siege it is possible that this particular crossbow was never used, but nevertheless it shows that the Hospitallers were considering the crossbow a viable option for the coming battles, even if they obviously preferred the more modern arquebus. The historian Stephen Spiteri has argued that crossbows were distributed to the Maltese irregulars along with guns, possibly indicating again that the Hospitallers preferred their guns as they distributed the crossbows to soldiers outside the order, but it is also highly suggestive of the possibility that crossbows were used more extensively throughout the siege.
It would follow that the late August rains were an instance when the crossbow really showed its value and stood out to Balbi, but that it was not the only time it was used. While the evidence suggests that the crossbows may have mostly been used by untrained militias, it is worth noting that as recently as 1562 the crossbow was still standard issue on Hospitaller galleys and that knights were expected to practice shooting the crossbow to ensure their familiarity with it. This means that nearly every Hospitaller at the Siege of Malta would likely have some experience with the crossbow and some of them may have used that during the siege. The Hospitaller armoury certainly seems to have had many crossbows in it, and even still does today. The Palace Armoury in Malta still possesses a large collection of early sixteenth century crossbows in the Spanish style, exactly what one would expect the Knights Hospitaller to have used at the time of the Great Siege given that they were partially Spanish subjects thanks to the gift of Malta from Charles V.
On the 7th of September the relief force finally landed on Malta. It had first departed some days before but been blown off course and delayed by inclement weather. The exact size of the relief army has been debated but is generally estimated to have been between 8,000 and 12,000 soldiers, nowhere near enough to drive off the Ottoman army when it first landed but probably enough to face the exhausted, diseased, and depressed soldiers that occupied the island at the end of the summer. With the impending arrival of autumn and the news of fresh troops landing on the island, Mustapha decided it was time to cut his losses and withdraw. After one final battle on the 8th of September, where Mustapha’s exhausted army was easily routed by the fresh and enthusiastic Spanish soldiers who made up most of the relief force, the Ottoman army retreated to Constantinople, leaving Malta devastated but still in the hands of the Hospitallers.
While they had won the siege things were not immediately so secure for the Hospitallers. Their fortresses had been destroyed and the Ottoman fleet had sailed off intact. The chance that Suleiman could send a new army with the spring loomed large, but in the end the Sultan decided to campaign closer to home and his death in 1566 put an end to the immediate threat. The Ottoman’s remained a potent force in the Mediterranean, the major naval battle of Lepanto in 1571 saw the Ottoman fleet destroyed by a grand Christian alliance but even with those losses a new fleet was quickly constructed. The Ottomans would not attempt a full invasion of Malta again and the island would remain under Hospitaller control until the order was expelled by Napoleon at the end of the eighteenth century.
Recommended Reading:
Bruce Ware Allen, The Great Siege of Malta
Roger Crowley, Empires of the Sea
Ernle Bradford, The Great Siege of Malta 1565
Francisco Balbi di Correggio, The Siege of Malta 1565 trans. Ernle Bradford
Stephen C. Spiteri, Armoury of the Knights,
Guy Francis Laking, A catalogue of the armour and arms in the Armoury of the Knights of St. John of Jerusalem, now in the Palace, Valletta, Malta,
July 25, 2022
First Impressions: Gettysburg by Mark Herman
I’m not sure how many times I’ve visited Gettysburg. Enough to have the entrance to the town’s Holiday Inn burned into my memory, as well as the layout of several family friendly restaurants. I can close my eyes and picture Little Round Top as if it was in my back yard. Growing up every summer my family would drive for 15 hours from central Virginia to upstate New York to spend a couple of weeks by a lake in the Adirondacks. When I was young, we didn’t drive those 15 hours in one go, instead we would stop over at Gettysburg for a night and then usually spend a second night somewhere far less remarkable near the New York border. My father is a huge American Civil War buff and I think he really enjoyed sharing that with us at Gettysburg – we mostly enjoyed climbing on cannons and on the rocks by Devil’s Den. Still, of all the many, many battlefields he took us to (most of them in Virginia) I always enjoyed Gettysburg the most. Maybe it was because we were on vacation, but I always preferred it over Chancellorsville.
Buford’s cavalry spot the Confederate army and battle is joined. Most troops are off the board - two Union regiments enter at the southern edge of the board, but on the bottom left we can see the stacks of units that will be arriving in subsequent turns.
Not that I would have publicly declared that very often. I grew up in a very weird place when it comes to discussing the American Civil War. This history wasn’t dead and buried in Virginia – it was (and still is) hotly debated. Asking someone about their favourite Civil War battle was considered normal small talk and picking Gettysburg over Chancellorsville was considered suspect. You see, Chancellorsville was a great Confederate victory and, equally importantly, was in Virginia. Gettysburg was a great Union victory and, equally bad, was in the North. My father grew up in Washington, DC so I was spared some of the more hard-line Neo-Confederacy that lurked in local discussions of Civil War history, but he had still been raised on popular history that was steeped in the Lost Cause (a major historiographical movement that deliberately tried to rehabilitate the South and deny the war’s real causes and horrors).
On Turn 2 the battle is joined. One Confederate regiment manages to make it into Gettysburg but is quickly encircled, meanwhile the other regiments will battle for control of the high ground further west.
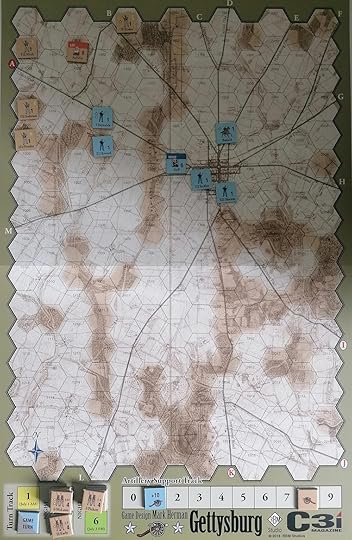
Combat goes the Union’s way - no Confederate regiments are eliminated but on the west they are forced to retreat and in Gettysburg the Regiment is blown and will have to return on the next day.
This is all a preface to explain why I have a very strong interest in the American Civil War, but I also have a lot of reservations about how it is handled, particularly in popular culture and wargaming. Despite my interest in the conflict, I have been slow to pick up ACW games. However, when I decided to take a plunge and buy my first copy of C3i to explore my newfound fascination with wargame magazines (something I somehow hadn’t known about before), I decided to pick the one with Mark Herman’s Gettysburg.
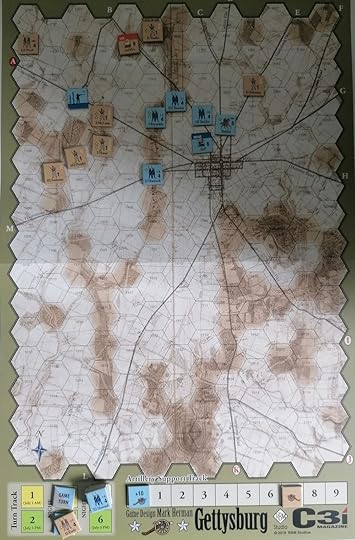
The Confederate attack on Turn 3 pushes the Union back toward Gettysburg, they take up positions on the nearby hills. The Sharpshooters are isolated, but as a guerilla unit they will reform closer to the Union lines next turn.
I’ve rambled on long enough already, so let’s get right to the point: I really liked this game. I played it solitaire, which wasn’t ideal because it meant I missed out on some of the fun of the blind bidding rules for artillery support, but overall, I think it works just fine as a solitaire experience. Some people have even come up with rules for automating artillery, which I looked into, but they seemed more complicated than I wanted out of a first play.
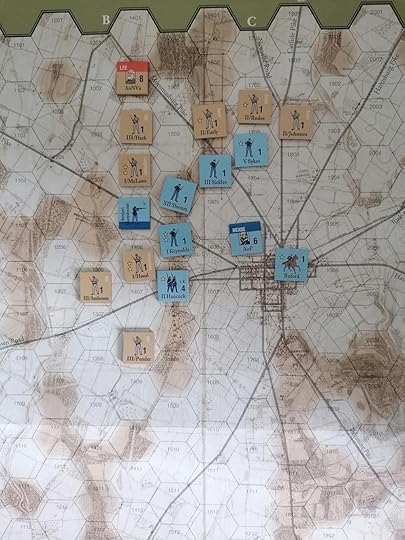
Turn 4 is when things are going to start getting bloody. This is the positioning before the shooting starts, the Union has the high ground but will it be enough?
I’ve come to realise that I really love games with interesting movement and positioning to play with. Lots of dynamic movement does a lot for me, and that is something that Gettysburg offers in spades. There is no strict limit on how many moves either player can take during the Movement Phase, but as each unit enters the enemy’s Zone of Control they slowly get locked down and can’t move anymore. So, you have this dwindling number of movement opportunities. There’s a real push and pull around when to lock down an enemy unit while securing the most advantageous position for yourself. I also really appreciate the random element where when one player passes the other player rolls a d6 to determine their remaining moves. It’s a welcome bit of unpredictability that can encourage an early pass because your opponent may end up with insufficient moves to complete their plan – but at the same time they could roll high and it could all be for naught.
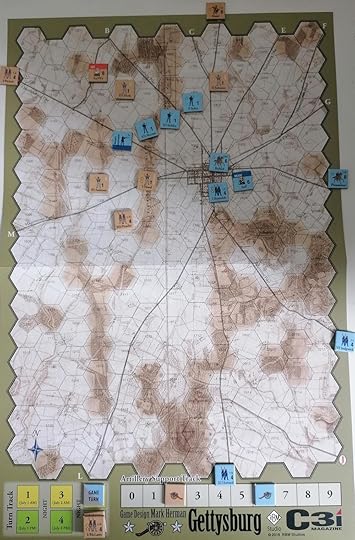
The Confederates managed to get a toe hold on the ridge near Gettysburg but at great cost - large numbers of troops are blown and won’t be back until the final turn and Confederate artillery is running out!
What really makes the movement element sing, in my opinion anyway, is how it’s completely divorced from the attacking. The movement phase is resolved in its entirety before you move on to resolving attacks. Back when I played miniature wargames games with this kind of division weren’t really to my taste, but in Gettysburg it really works. It means that the movement phase never slowed down so I could resolve attacks. Then, during the attack phase, it makes the retreats feel impactful because that player can’t just take another action to move forward one hex and attack again. I was able to fully focus on just the decisions of each respective phase as I played them. Sure, I had to plan for the next phase in the current one, but that phase never interrupted the fun I was having now. It never felt like the game had to slow down while I resolved something or made a series of boring plays because they were strategically optimal – I was fully engaged with the experience the whole way through.
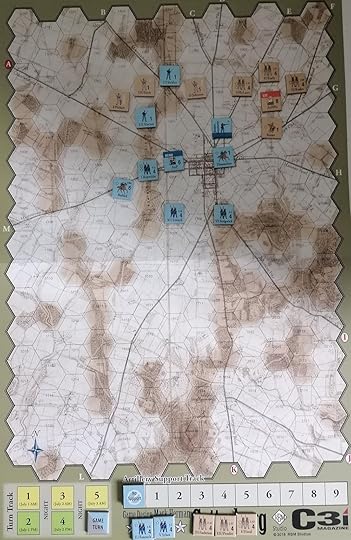
Opening of the final turn. The Confederate’s have brought back on their blown regiments and both sides are out of artillery, but the Confederates are currently losing with 3 lost regiments to just 2 eliminated Union ones. Can they pull out an unlikely victory?
Gettysburg is a very light game, in wargaming terms anyway. There aren’t a lot of counters, combat is a dice off with only a few modifiers, but it does a lot with a little. I wasn’t buried in the rulebook while playing it and I still felt like I was playing Gettysburg. Now, it doesn’t exactly capture every moment of the battle – if you’re looking for a detailed simulation that will return historic results this probably isn’t the game – but I think it strikes a good balance between evoking the history of the battle and being an enjoyable game that is fun to play. I had a lot of fun with Gettysburg and I’m looking forward to coaxing someone into playing it with me sometime in the future.
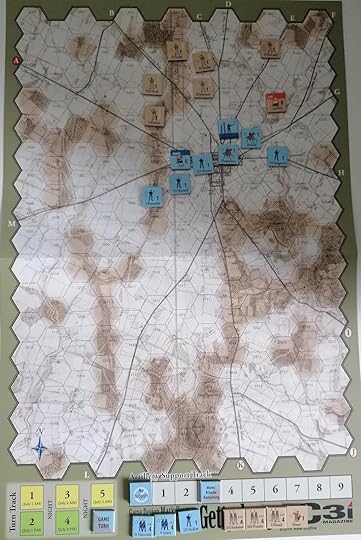
The Confederacy’s final attack has been defeated, the Union controls Gettysburg and has suffered fewer casualties, winning the day if not the war (yet).