Stuart Ellis-Gorman's Blog, page 10
August 28, 2023
Discussing the Lost Cause with Beyond Solitaire
I was lucky enough to be invited to appear on Dr. Liz “Beyond Solitaire” Davidson’s podcast a few weeks back. We discussed my ongoing project on the Lost Cause in historical wargaming as well as a range of subjects, including why we are drawn to difficult subjects and why we might want to play and write about games we know that we won’t actually enjoy playing. It was a great discussion and I think provides some excellent context to the We Intend to Move on Your Works project. You can listen to the podcast via all main podcast distributors or you can watch it on YouTube below:


August 22, 2023
Review - Longstreet Attacks by Hermann Luttmann
Few names loom larger in the, for lack of a better word, wargame-ology of current American Civil War games than Hermann Luttmann. A Most Fearful Sacrifice, his enormous game on the full battle of Gettysburg, has won countless awards and is easily among the most talked about games of 2022. Before that he was widely known for his Blind Swords system, which includes several battles from the Franco-Prussian War but is dominated by American Civil War games. Seeing as I am currently undertaking a tour of ACW designs it was inevitable that I would play a few Luttmann designs. As my entry point into the ludography of Luttmann I selected Longstreet Attacks. This wasn’t because I thought it to be the best entry into the system, many people have said it is not, but rather a choice based on the game’s subject. I wanted to play something Gettysburg to mark the 160th anniversary back in July and I thought playing a game about the second day on the 2nd of July would be appropriate. I managed to approximately time the beginning of my game with the timing of the famous attack, but the actual playing of the game took a fair bit longer than Longstreet’s disastrous assault did. I also think the figure of Longstreet and his position in the Lost Cause myth is an interesting one, and something that is very germane to my project.
Blind SwordsFor those who may not know, Blind Swords is a chit pull, regimental level tactical hex and counter game system of I would say medium complexity. Lighter than Great Battles of the American Civil War, but by not without its chrome and complexity. The core is pretty easy to grasp, but there’s enough little nuance in the rules that you may find yourself having completely forgotten some small element until after you finish playing a game – I certainly did. To my mind, there are three things that stand out in Blind Swords and that I found utterly gripping, and please bear with me, they are: the chit pull, the combat results table, and the orders system. Wargaming baby, I’m nothing if not consistent in my love of the seemingly mundane at least!
I wouldn’t say I have a ton of experience with chit pull, but I’ve certainly played other systems that use it. I’ve played a few Great Battles of the American Civil War games, with its very complex chit pull, and I’ve dabbled in some lighter games where you just dump everybody in the cup and resolve to see what order each unit activates in. I mention this because I think the chit pull in Blind Swords is the most interesting version I’ve encountered so far by a mile. It’s relatively simple (although the Vassal mods implementation of it is a bit fiddly) but also really engaging. This is due to both how it handles events and how each activation is resolved.
I’ll start with the latter first. Unlike in something like GBACW where if you pull a division, you activate every unit in that division, in Blind Swords you first have to roll a die to determine if you activate fully or have to take a limited activation and then you only pick one brigade under that commander to activate. Then you mark that brigade as having been activated and if you have brigades under that commander that still need to activate you put the chit back in the cup to draw again in the future. I really like this, it makes the back and forth much faster as you’re usually only activated between two and five units on each chit pull, not entire wings of your army. It also makes for a more interesting flow to the battle, as you never know when another brigade in that division will activate or even if they will fully activate – so how risky do you want to play? A big aggressive move earlier could see that brigade stranded without support as your opponent plans their counterattack. It keeps the tension high on each chit pull and is overall a really satisfying experience.
The events also add a lot of excellent spice to the gameplay. Each turn you will place a number of events from your side into the cup, usually some you get to pick while others are added at random from the available pool. When you pull events, some will trigger immediately while others can be held and played later. This adds a lot more variety to what can happen in each round and for the most part the events are interesting without being game breaking. What I liked even more, though, was the Fog of War event that always goes into the cup. When this is drawn you roll on a table and an event triggers for one of the players. The best of these by far is the one that lets you move an enemy unit one space. Few things are more satisfying than taking control of an enemy piece. It is not only satisfying, though, it is also a great example of the chaos of battle and how sub-optimal decisions can be made in the heat of the moment. Game systems can struggle to capture one leader making a poor decision or an error that the commander, with their wider perspective, never would but by handing control to your opponent for one move you can create that sensation of a subordinate completely screwing up. If I had to distill Blind Swords down to one inspired rule, it would be this – I love it.
I am less certain that I am in love with the combat results table, but I am certainly intrigued by it. After calculating your attack strength you roll a d66, meaning you roll two d6 one of which represents a tens and the other a ones digit, so you get a number between 11 and 66. You then consult that row of the CRT against the column for your strength and look for the cohesion rating of your target – if you hit it will be in a colored band that will tell you what table you’re opponent has to roll on to see how their unit responds to being shot at. This could have no effect, or it could be utterly disastrous. I’m honestly not convinced by the first table; I think it works but I don’t love it. My issue is less with the table and more with how central the Cohesion Rating is to many of the game’s systems and the mixed feelings I have about it – but I’ll talk more about that later in the review.
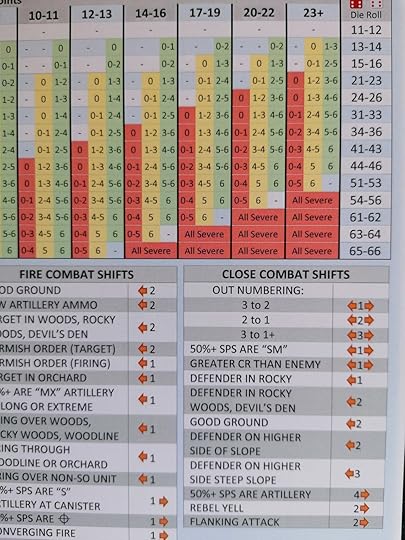
An excerpt from the first of the two CRTs. You can see the dice results on the righthand column, the columns for attack strength, and the colored boxes for target CR values. You can also see here the many, many column shifts you factor in each combat, which can be a little overwhelming at times.
The second table, though, I think I love that. The defender must now also roll two d6s, one of which will determine whether his units are Battleworn (flipped over to a weaker side) and the other (brilliantly known as the Skedaddle Table) determines whether they retreat and if so, how far. Splitting these two outcomes and having them be randomly determined separately is great, I love it. It can create interesting situations where units take a ton of punishment but refuse to give up their position, or where completely healthy units break and run but are perfectly healthy and able to be sent back into the fight. It generates a valuable diversity of outcomes to combat with only a minimum amount of rules overhead – the best of both worlds.
The table that defenders will be rolling on - this one is for ranged combat, close combat has a separate one. I love the use of Skedaddle here. If I had a critique it is with the choice to use a D for Depletion as the result that inflicts a Battleworn status. We spent most of our game saying Disordered or Disrupted instead of Battleworn because of this.
Now, let’s talk orders. I think orders in wargames are really interesting. Last year I picked The Flowers of the Forest as my favorite game I played that year, and that’s a game entirely about giving orders and then regretting them utterly. Blind Swords is not that, and in fact is quite forgiving in how it handles orders but still manages to be interesting. When you activate a brigade, you pick an order from the four options: Attack, Defend, Maneuver, or Regroup. What order you pick will determine what they can do with their activation, with no order allowing you to do everything you want. The key factors you have to balance are how far you can move, what kinds of attacks you can make, and what options you have for rallying and rebuilding injured units. While Attack and Maneuver will be by far the most frequently used in any game, the situational usefulness of the other two cannot be denied and they certainly gave me food for thought as I was planning my strategy. This system isn’t the greatest thing in wargaming, but it does strike just the right balance between complexity and generating interesting decisions and I think that is worth praising.
Before we get on to my main critique of Longstreet Attacks, I wanted to do a quick bullet list of my nitpicks with Blind Swords. These are not irredeemable flaws, but they are things that annoyed me enough that they provided a mild detriment to my truly loving what is otherwise an excellent system. My complaints are thus:
I hate calculating strength ratios. When I saw the initial combat system for Blind Swords, I was excited that it used unit strength, and then I saw that you have to calculate strength ratios to determine column shifts in close combat. I hate this.
Cohesion Rating is a cool stat, but it feels a bit too critical. CR 4 and 5 units are so much better than CR 2 ones. CR not only determines how likely you are to be hit in combat, it also can trigger column shifts in close combat and having a CR of 2 or less makes you susceptible to Panic results triggered by neighboring combats. It just feels a little too critical of a stat and that makes the variability present in some units a bit frustrating, which is something I’ll go into more below, but it was a frequent source of frustration for me.
The leader death rules are pretty underwhelming. Given the high rate of wounding and death for officers in the ACW this is now something I look for in the games I play. Leader death is a possibility from drawing the Fog of War chit, with a separate table to see who, if anyone, died. It doesn’t happen all that often, and in my game the only leader who died was replaced by a leader with the exact same activation stat. This was pretty underwhelming and basically had no impact on the game, which was disappointing. I’d like to see it trigger more often.
The games are too long. The grand campaign of Longstreet Attacks took me over a dozen hours and from what I can see this seems to be pretty standard for the system as a whole. If my opponent and I had played in person in one sitting, as opposed to over Vassal across a number of evenings, it would have gone faster but I have yet to see a Blind Swords ACW game with a full battle playable in under four hours and that’s a bit of a bummer. Don’t get me wrong, I love a long game some of the time but it’s not an every week kind of gaming experience and long games have to be really amazing to warrant me returning to them again and again.
Those are my main nit-picks. The core system is good but we’re not here to just talk about Blind Swords in the abstract. This is a review of Longstreet Attacks specifically, so what did I think of that game specifically? The short version is that while I really like Blind Swords as a system and I’m sure there is a Blind Swords game out there for me, I’m sure that that game is not Longstreet Attacks. The long version is below.
Longstreet AttacksI want to open with the fact that I think Longstreet Attacks is a fine game. I enjoyed my time playing it. If I hadn’t, I wouldn’t have played it for nearly as long as I did. I found the Little Round Top scenario a little tedious, but it was also a learning scenario so that’s kind of understandable. The main campaign battle was definitely more interesting, but I also found it at times very frustrating. This was the kind of frustration where I wanted to love this game, but there were elements of it that prevented me from doing so and that drove my frustration with it. It’s a very specific kind of frustration, maybe the worst kind, and I want to try and explain why. I’m going to open with a few minor critiques of things that just didn’t work for me, but I can understand may be the result of my own personal preferences, before getting to the real meat of my problem with Longstreet Attacks: the narrative of the battle that its systems create.
While I think it seems natural to pick Little Round Top as an intro scenario with its small counter density, the terrain proved incredibly frustrating while I was playing the game and in both games (this and the grand battle) the Confederates barely launched a sustained assault due to be bogged down in the rocky terrain.
In terms of pure mechanics, the element of Longstreet Attacks that frustrated me the most was its victory conditions. Across the map are scattered various victory point hexes for one side or the other, or both, that grant VPs at the end of each turn. There are also three hexes that if the Confederacy can take them will generate an automatic victory. I’m generally not a fan of victory points in wargames and I’m really not a fan of wargames that generate points every turn for controlling a space. I need a solid justification for why controlling this hex is so important to overall victory and if it’s going to be for a number of turns, I really need to understand why controlling this hex for 20 minutes (the in-game turn length in Longstreet Attacks) matters as much as who controls it at the end of the game. Victory conditions are something I have a mild obsession with, and I don’t like ones that are too game-y. I want the terms of victory to convey something about the historical objectives of the two sides.
This gets to my other problem with Longstreet Attacks’ victory conditions, and one that I accept is derived from my own opinions on what I want to see in a historical game. The victory point hexes are scattered in a way that nudges players towards control of areas that were central to the historic battle. To put it another way, the victory conditions are set to direct players towards recreating the historical course of the assault. This means that hexes that objectively would be worthless to control in terms of overall strategic value to the battle can be worth quite a lot of points because historically that was a point of fierce fighting. This feels too artificial to me. I want the game to have victory conditions that make me understand the strategic goals of the battle, not ones that try to move me along on rails to recreate what the historical commanders did. I know for other people this won’t be as big of a problem, but this is my review and so I get to say I don’t like it.
I haven’t really brought it up in the review because I think its already widely covered elsewhere, but the game does come with this very nice Rich Barber map. If I had to be a slight heretic I would say that I found the terrain around the Round Tops to be a bit too busy and hard to read at times, but there’s no denying the map’s overall aesthetic appeal.
The victory conditions frustrated me because they felt more tedious and less interesting than I wanted, but they were not my greatest issue with Longstreet Attacks. My objection to Longstreet Attacks could arguably be oversimplified into the idea that the Union units Cohesion Ratings are too low, and the Confederates’ ratings are too high, but it’s more than that. Explaining it, however, is going to take a bit of time so I ask you please for your indulgence.
I want to talk about the narrative of Longstreet Attacks, and in examining that narrative I am only considering the emergent story that comes through via the game’s mechanisms. Not the framing that might be in the rulebook or with the scenario description, nor any designer notes. Instead, I just want to consider what version of Longstreet’s attack on the 2nd of July this game told me when I spent many hours of my life playing it. To understand why I care so much about this we need to talk a little bit about Longstreet as a man and his unusual position within the historiography of the American Civil War.
Longstreet was a general who spent almost the entire war serving under Robert E Lee. Lee affectionately called Longstreet his “Old War Horse” and he was one of the few generals who was able to complain to Lee about his strategies and openly disagree with the general. They were very close, especially after the death of “Stonewall” Jackson in May of 1863, and so you would expect Longstreet to hold a similarly hallowed position within the halls of Confederate memory as Lee and Jackson do. You would be wrong, and to understand why you need to know what Longstreet did after the war. To cut a very long story very short, Longstreet moved to Louisiana, joined the Republican party, and argued in support of other ex-Confederates joining the party and accepting Reconstruction – not out of the pure goodness of his heart, mind, he believed it necessary to dilute black involvement in politics, but still a radical approach for a man of his legacy. This put him in direct conflict with Redeemers like the KKK, the White League, and other organizations that sought to violently restore a white supremacist order to the southern United States. This came to a dramatic head in 1874 at the Battle of Liberty Place, when an armed group of white supremacists attempted to storm the Louisiana capital and depose the Reconstruction era government there. Longstreet, as an officer in the state militia, led a force of mixed-race militiamen to oppose them. Over a hundred men died, Longstreet was captured trying to negotiate with the White League, and President Grant eventually sent in Federal troops to quell the unrest. An ex-Confederate hero leading black troops against his fellow white southerners was an unforgivable sin. Former comrades in arms, including notorious Lost Cause promoter Jubal Early, denounced Longstreet and set about rewriting the annals of history to make him a scapegoat for the failures of the Confederacy. Most prominent among these was the great defeat at Gettysburg, now placed solidly at the feet of one General Longstreet.
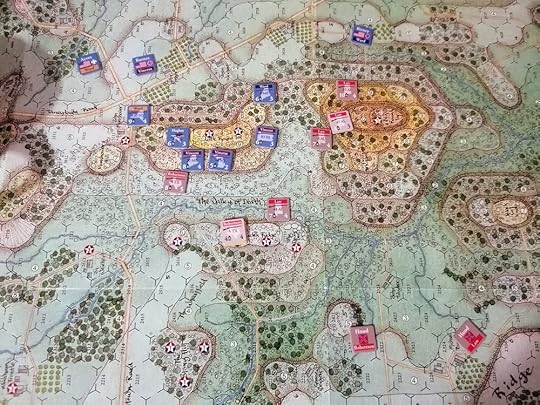
The beginning of McLaws attack in our game. Hood has stalled out trying to take the Round Tops and Devil’s Den (he eventually took the latter but it was a very long time coming). McLaws would prove far more successful against the Union center. It may look like he is outnumbered but those Union counters don’t stand much of a chance against his attack.
The reason this is relevant for Longstreet Attacks is that there are kind of two conflicting possible narratives for what this attack means. Longstreet famously (or infamously, depending on your perspective) did not like the plan of attack on the 2nd of July 1863. He thought it risky and unlikely to work and argued strenuously with Lee for a different plan – ideally a movement of the whole army towards the Union rear to cut off their access to Washington and force them to attack the new Confederate position instead. Lee refused to consider this idea, and Longstreet was forced to go ahead with his assault. The assault ultimately failed, securing no significant ground and causing the death and wounding of hundreds of soldiers the Confederacy couldn’t afford to lose. Yes, the Union suffered casualties too, but not enough to seriously endanger the Army of the Potomac. This narrative is one where Longstreet’s attack is a doomed assault, well executed but ill-conceived from the start. Not quite so disastrous as Pickett’s Charge, but still a flawed strategy that came at enormous cost.
The alternative narrative accuses Longstreet of dragging his feet, launching his attack too late in the day and failing to really put his heart into the attack. It was doomed not because it was tactically unsound but because its commander did not believe in it and botched the operation. No surprise this was the narrative pushed by Early and other architects of the Lost Cause, and for a long time it was the dominant narrative, but it was built on a foundation of lies (often literally, such as a fictional order that Longstreet was to launch his attack at dawn. He was to ready his troops at dawn, not attack). My problem with Longstreet Attacks the game is that in many ways it feels more in line with this narrative than with the actual history, an experience that was exacerbated by my choice to read Stephen Sears’ massive history of Gettysburg at the same time I was playing Longstreet.
In Longstreet Attacks the Confederate units are just better than the Union ones. They often have higher strength, and they always have a higher cohesion rating. Unless they suffer morale penalties from combat most of the units are immune to a Panic result in combat. The smell of the notorious Confederate sentiment “one southerner could whip any ten Yankees” comes off the game in waves. One cannot deny that the Confederate generals gave the attack their all and that many units withstood stunning amounts of punishment to attack Union positions, but the defenders were no callow bunch of cowards breaking at the first sign of attack. The battle on the Union left was chaotic because General Sickles had left his position and stretched his lines too thin. Arguably the low cohesion ratings could reflect this poor position and chaotic command, except that even the units that were outside of Sickle’s Corp often have this same poor cohesion rating – it is a trait of the Union army not just those units that were in chaos. And surely that chaos could be reflected in the game’s use of Disruption morale penalties rather than baked in stats. It seems a bit egregious that often Confederate units on their reduced Battleworn side are still superior to many Union regiments – especially when cohesion rating is so crucial to determining when a hit is inflicted in combat.
My somewhat crude illustration showing the distribution of Cohesion Ratings between the two sides. The far left are units with CR 5 while the far right are those with a CR of 2. It can be hard to fully grasp the significance of this without knowing from experience how much better a CR of 4 is over a CR of 2. It also doesn’t show the strength distribution, where many of the higher CR Union units are either very low strength and/or sharpshooters, who only have a single step of strength. This is only infantry counters, artillery are mostly CR 3 on both sides.
To avoid getting too lost in the weeds let me try and distill the matter. Playing as the Union in Longstreet Attacks I did not feel like I was a general trying to fix a mistake made by my inferior officer, i.e., Sickles. I felt like a man tasked with taking green troops into combat and repeatedly frustrated by their failure to perform while my opponents stormtroopers ran roughshod over my positions. My only saving grace being the terrain and a desperate prayer for night to come soon and bring an end to the attack.
I made little progress in stemming the Confederate attack – for all its strengths Blind Swords seems like a system poorly suited to highly attrition conflict. Battleworn status can be recovered more easily if your CR is higher, like for nearly all Confederate units, and there is no permanent loss that cannot be restored in time. Confederates could push my lines back so far that the handful of units I forced to be Battleworn could end up being far enough from the front line to rebuild the next turn, undoing all my hard work. This may be a slightly more fundamental issue with Blind Swords, at least as it is in this early entry. It’s not built for sustained attrition and may not be suited to horrifically bloody engagements like the second day of Gettysburg. Perhaps it is for that reason that there are no Blind Swords games on other particularly violent engagements like Shiloh, Antietam, or the many battles of the Overland Campaign. Not every system can do everything and this may be a limitation of Blind Swords.

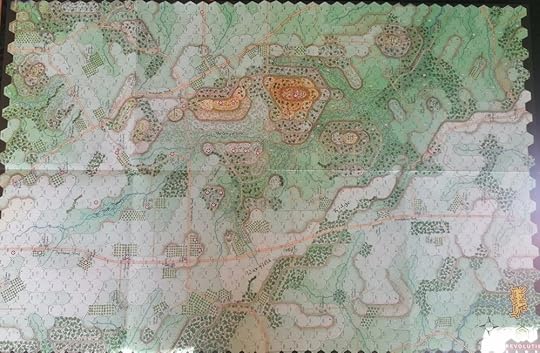
Near the end of our game of Longstreet Attacks. McLaws has successfully pushed back the Union center - many of those units are broken and useless in combat. Anderson is having a harder time on the Union right, while Hood’s attack on Little Round Top never really came to anything and now Law is engaging in a wildly ahistorical flanking maneuver that has placed him awkwardly in the middle of the Union activation chits. While the position is bad, this a strong Union victory as the attack went too slow to secure the VPs it needed to win.
I also saw no sign of fatigue in the Confederates as the game progressed, no indication that their losses were adding up, no indication that the assault was running out of steam and that it was asking more of its men that they could deliver. Instead, it seemed as if the only way to stop the Confederate attack was for night to come, suggesting that maybe had Longstreet attacked earlier he would have been victorious. I got no sense that maybe Longstreet would see that his attack had failed, his forces were stalling, and he had no reserves to commit, and order a withdrawal of his units. No, given infinite time these Rebels would nearly always overrun the Union army, and to me that reeks of the story of Jubal Early and his cohort discarding history to settle a personal vendetta. And it saps my ability to enjoy the game.
ConclusionIn my final assessment I did really enjoy Blind Swords as a system, but I found the emergent narrative of Longstreet Attacks somewhat poisoned my ability to love it. I was frustrated, and not in a fun way. Blind Swords is a system that really embraces the chaos of warfare and historical simulation, and that is something I love dearly. I think historical games need chaos because history is not predictable. However, I also think historical games need to be honest about what they are saying, and I think the romanticism of the Confederate attack presented in Longstreet Attacks pushes aside the actual history and muddles the game as a whole. Playing it while reading a very thorough history of the battle at the same time made its flaws that much more apparent and made me less inclined to forgive them. Longstreet Attacks is not a failure of a game, and I am glad I played it, but I also know I will not play it again. However, I am very excited to try more Blind Swords games. I have a copy of A Greater Havoc sitting on my shelf waiting for me to find some time to try it. I believe that there is at least one Blind Swords game out there for me, but I know that Longstreet Attacks is not that game.
Longstreet Attacks by Hermann Luttmann
Few names loom larger in the, for lack of a better word, wargame-ology of current American Civil War games than Hermann Luttmann. A Most Fearful Sacrifice, his enormous game on the full battle of Gettysburg, has won countless awards and is easily among the most talked about games of 2022. Before that he was widely known for his Blind Swords system, which includes several battles from the Franco-Prussian War but is dominated by American Civil War games. Seeing as I am currently undertaking a tour of ACW designs it was inevitable that I would play a few Luttmann designs. As my entry point into the ludography of Luttmann I selected Longstreet Attacks. This wasn’t because I thought it to be the best entry into the system, many people have said it is not, but rather a choice based on the game’s subject. I wanted to play something Gettysburg to mark the 160th anniversary back in July and I thought playing a game about the second day on the 2nd of July would be appropriate. I managed to approximately time the beginning of my game with the timing of the famous attack, but the actual playing of the game took a fair bit longer than Longstreet’s disastrous assault did. I also think the figure of Longstreet and his position in the Lost Cause myth is an interesting one, and something that is very germane to my project.
Blind SwordsFor those who may not know, Blind Swords is a chit pull, regimental level tactical hex and counter game system of I would say medium complexity. Lighter than Great Battles of the American Civil War, but by not without its chrome and complexity. The core is pretty easy to grasp, but there’s enough little nuance in the rules that you may find yourself having completely forgotten some small element until after you finish playing a game – I certainly did. To my mind, there are three things that stand out in Blind Swords and that I found utterly gripping, and please bear with me, they are: the chit pull, the combat results table, and the orders system. Wargaming baby, I’m nothing if not consistent in my love of the seemingly mundane at least!
I wouldn’t say I have a ton of experience with chit pull, but I’ve certainly played other systems that use it. I’ve played a few Great Battles of the American Civil War games, with its very complex chit pull, and I’ve dabbled in some lighter games where you just dump everybody in the cup and resolve to see what order each unit activates in. I mention this because I think the chit pull in Blind Swords is the most interesting version I’ve encountered so far by a mile. It’s relatively simple (although the Vassal mods implementation of it is a bit fiddly) but also really engaging. This is due to both how it handles events and how each activation is resolved.
I’ll start with the latter first. Unlike in something like GBACW where if you pull a division, you activate every unit in that division, in Blind Swords you first have to roll a die to determine if you activate fully or have to take a limited activation and then you only pick one brigade under that commander to activate. Then you mark that brigade as having been activated and if you have brigades under that commander that still need to activate you put the chit back in the cup to draw again in the future. I really like this, it makes the back and forth much faster as you’re usually only activated between two and five units on each chit pull, not entire wings of your army. It also makes for a more interesting flow to the battle, as you never know when another brigade in that division will activate or even if they will fully activate – so how risky do you want to play? A big aggressive move earlier could see that brigade stranded without support as your opponent plans their counterattack. It keeps the tension high on each chit pull and is overall a really satisfying experience.
The events also add a lot of excellent spice to the gameplay. Each turn you will place a number of events from your side into the cup, usually some you get to pick while others are added at random from the available pool. When you pull events, some will trigger immediately while others can be held and played later. This adds a lot more variety to what can happen in each round and for the most part the events are interesting without being game breaking. What I liked even more, though, was the Fog of War event that always goes into the cup. When this is drawn you roll on a table and an event triggers for one of the players. The best of these by far is the one that lets you move an enemy unit one space. Few things are more satisfying than taking control of an enemy piece. It is not only satisfying, though, it is also a great example of the chaos of battle and how sub-optimal decisions can be made in the heat of the moment. Game systems can struggle to capture one leader making a poor decision or an error that the commander, with their wider perspective, never would but by handing control to your opponent for one move you can create that sensation of a subordinate completely screwing up. If I had to distill Blind Swords down to one inspired rule, it would be this – I love it.
I am less certain that I am in love with the combat results table, but I am certainly intrigued by it. After calculating your attack strength you roll a d66, meaning you roll two d6 one of which represents a tens and the other a ones digit, so you get a number between 11 and 66. You then consult that row of the CRT against the column for your strength and look for the cohesion rating of your target – if you hit it will be in a colored band that will tell you what table you’re opponent has to roll on to see how their unit responds to being shot at. This could have no effect, or it could be utterly disastrous. I’m honestly not convinced by the first table; I think it works but I don’t love it. My issue is less with the table and more with how central the Cohesion Rating is to many of the game’s systems and the mixed feelings I have about it – but I’ll talk more about that later in the review.
An excerpt from the first of the two CRTs. You can see the dice results on the righthand column, the columns for attack strength, and the colored boxes for target CR values. You can also see here the many, many column shifts you factor in each combat, which can be a little overwhelming at times.
The second table, though, I think I love that. The defender must now also roll two d6s, one of which will determine whether his units are Battleworn (flipped over to a weaker side) and the other (brilliantly known as the Skedaddle Table) determines whether they retreat and if so, how far. Splitting these two outcomes and having them be randomly determined separately is great, I love it. It can create interesting situations where units take a ton of punishment but refuse to give up their position, or where completely healthy units break and run but are perfectly healthy and able to be sent back into the fight. It generates a valuable diversity of outcomes to combat with only a minimum amount of rules overhead – the best of both worlds.
The table that defenders will be rolling on - this one is for ranged combat, close combat has a separate one. I love the use of Skedaddle here. If I had a critique it is with the choice to use a D for Depletion as the result that inflicts a Battleworn status. We spent most of our game saying Disordered or Disrupted instead of Battleworn because of this.
Now, let’s talk orders. I think orders in wargames are really interesting. Last year I picked The Flowers of the Forest as my favorite game I played that year, and that’s a game entirely about giving orders and then regretting them utterly. Blind Swords is not that, and in fact is quite forgiving in how it handles orders but still manages to be interesting. When you activate a brigade, you pick an order from the four options: Attack, Defend, Maneuver, or Regroup. What order you pick will determine what they can do with their activation, with no order allowing you to do everything you want. The key factors you have to balance are how far you can move, what kinds of attacks you can make, and what options you have for rallying and rebuilding injured units. While Attack and Maneuver will be by far the most frequently used in any game, the situational usefulness of the other two cannot be denied and they certainly gave me food for thought as I was planning my strategy. This system isn’t the greatest thing in wargaming, but it does strike just the right balance between complexity and generating interesting decisions and I think that is worth praising.
Before we get on to my main critique of Longstreet Attacks, I wanted to do a quick bullet list of my nitpicks with Blind Swords. These are not irredeemable flaws, but they are things that annoyed me enough that they provided a mild detriment to my truly loving what is otherwise an excellent system. My complaints are thus:
I hate calculating strength ratios. When I saw the initial combat system for Blind Swords, I was excited that it used unit strength, and then I saw that you have to calculate strength ratios to determine column shifts in close combat. I hate this.
Cohesion Rating is a cool stat, but it feels a bit too critical. CR 4 and 5 units are so much better than CR 2 ones. CR not only determines how likely you are to be hit in combat, it also can trigger column shifts in close combat and having a CR of 2 or less makes you susceptible to Panic results triggered by neighboring combats. It just feels a little too critical of a stat and that makes the variability present in some units a bit frustrating, which is something I’ll go into more below, but it was a frequent source of frustration for me.
The leader death rules are pretty underwhelming. Given the high rate of wounding and death for officers in the ACW this is now something I look for in the games I play. Leader death is a possibility from drawing the Fog of War chit, with a separate table to see who, if anyone, died. It doesn’t happen all that often, and in my game the only leader who died was replaced by a leader with the exact same activation stat. This was pretty underwhelming and basically had no impact on the game, which was disappointing. I’d like to see it trigger more often.
The games are too long. The grand campaign of Longstreet Attacks took me over a dozen hours and from what I can see this seems to be pretty standard for the system as a whole. If my opponent and I had played in person in one sitting, as opposed to over Vassal across a number of evenings, it would have gone faster but I have yet to see a Blind Swords ACW game with a full battle playable in under four hours and that’s a bit of a bummer. Don’t get me wrong, I love a long game some of the time but it’s not an every week kind of gaming experience and long games have to be really amazing to warrant me returning to them again and again.
Those are my main nit-picks. The core system is good but we’re not here to just talk about Blind Swords in the abstract. This is a review of Longstreet Attacks specifically, so what did I think of that game specifically? The short version is that while I really like Blind Swords as a system and I’m sure there is a Blind Swords game out there for me, I’m sure that that game is not Longstreet Attacks. The long version is below.
Longstreet AttacksI want to open with the fact that I think Longstreet Attacks is a fine game. I enjoyed my time playing it. If I hadn’t, I wouldn’t have played it for nearly as long as I did. I found the Little Round Top scenario a little tedious, but it was also a learning scenario so that’s kind of understandable. The main campaign battle was definitely more interesting, but I also found it at times very frustrating. This was the kind of frustration where I wanted to love this game, but there were elements of it that prevented me from doing so and that drove my frustration with it. It’s a very specific kind of frustration, maybe the worst kind, and I want to try and explain why. I’m going to open with a few minor critiques of things that just didn’t work for me, but I can understand may be the result of my own personal preferences, before getting to the real meat of my problem with Longstreet Attacks: the narrative of the battle that its systems create.
While I think it seems natural to pick Little Round Top as an intro scenario with its small counter density, the terrain proved incredibly frustrating while I was playing the game and in both games (this and the grand battle) the Confederates barely launched a sustained assault due to be bogged down in the rocky terrain.
In terms of pure mechanics, the element of Longstreet Attacks that frustrated me the most was its victory conditions. Across the map are scattered various victory point hexes for one side or the other, or both, that grant VPs at the end of each turn. There are also three hexes that if the Confederacy can take them will generate an automatic victory. I’m generally not a fan of victory points in wargames and I’m really not a fan of wargames that generate points every turn for controlling a space. I need a solid justification for why controlling this hex is so important to overall victory and if it’s going to be for a number of turns, I really need to understand why controlling this hex for 20 minutes (the in-game turn length in Longstreet Attacks) matters as much as who controls it at the end of the game. Victory conditions are something I have a mild obsession with, and I don’t like ones that are too game-y. I want the terms of victory to convey something about the historical objectives of the two sides.
This gets to my other problem with Longstreet Attacks’ victory conditions, and one that I accept is derived from my own opinions on what I want to see in a historical game. The victory point hexes are scattered in a way that nudges players towards control of areas that were central to the historic battle. To put it another way, the victory conditions are set to direct players towards recreating the historical course of the assault. This means that hexes that objectively would be worthless to control in terms of overall strategic value to the battle can be worth quite a lot of points because historically that was a point of fierce fighting. This feels too artificial to me. I want the game to have victory conditions that make me understand the strategic goals of the battle, not ones that try to move me along on rails to recreate what the historical commanders did. I know for other people this won’t be as big of a problem, but this is my review and so I get to say I don’t like it.
I haven’t really brought it up in the review because I think its already widely covered elsewhere, but the game does come with this very nice Rich Barber map. If I had to be a slight heretic I would say that I found the terrain around the Round Tops to be a bit too busy and hard to read at times, but there’s no denying the map’s overall aesthetic appeal.
The victory conditions frustrated me because they felt more tedious and less interesting than I wanted, but they were not my greatest issue with Longstreet Attacks. My objection to Longstreet Attacks could arguably be oversimplified into the idea that the Union units Cohesion Ratings are too low, and the Confederates’ ratings are too high, but it’s more than that. Explaining it, however, is going to take a bit of time so I ask you please for your indulgence.
I want to talk about the narrative of Longstreet Attacks, and in examining that narrative I am only considering the emergent story that comes through via the game’s mechanisms. Not the framing that might be in the rulebook or with the scenario description, nor any designer notes. Instead, I just want to consider what version of Longstreet’s attack on the 2nd of July this game told me when I spent many hours of my life playing it. To understand why I care so much about this we need to talk a little bit about Longstreet as a man and his unusual position within the historiography of the American Civil War.
Longstreet was a general who spent almost the entire war serving under Robert E Lee. Lee affectionately called Longstreet his “Old War Horse” and he was one of the few generals who was able to complain to Lee about his strategies and openly disagree with the general. They were very close, especially after the death of “Stonewall” Jackson in May of 1863, and so you would expect Longstreet to hold a similarly hallowed position within the halls of Confederate memory as Lee and Jackson do. You would be wrong, and to understand why you need to know what Longstreet did after the war. To cut a very long story very short, Longstreet moved to Louisiana, joined the Republican party, and argued in support of other ex-Confederates joining the party and accepting Reconstruction – not out of the pure goodness of his heart, mind, he believed it necessary to dilute black involvement in politics, but still a radical approach for a man of his legacy. This put him in direct conflict with Redeemers like the KKK, the White League, and other organizations that sought to violently restore a white supremacist order to the southern United States. This came to a dramatic head in 1874 at the Battle of Liberty Place, when an armed group of white supremacists attempted to storm the Louisiana capital and depose the Reconstruction era government there. Longstreet, as an officer in the state militia, led a force of mixed-race militiamen to oppose them. Over a hundred men died, Longstreet was captured trying to negotiate with the White League, and President Grant eventually sent in Federal troops to quell the unrest. An ex-Confederate hero leading black troops against his fellow white southerners was an unforgivable sin. Former comrades in arms, including notorious Lost Cause promoter Jubal Early, denounced Longstreet and set about rewriting the annals of history to make him a scapegoat for the failures of the Confederacy. Most prominent among these was the great defeat at Gettysburg, now placed solidly at the feet of one General Longstreet.
The beginning of McLaws attack in our game. Hood has stalled out trying to take the Round Tops and Devil’s Den (he eventually took the latter but it was a very long time coming). McLaws would prove far more successful against the Union center. It may look like he is outnumbered but those Union counters don’t stand much of a chance against his attack.
The reason this is relevant for Longstreet Attacks is that there are kind of two conflicting possible narratives for what this attack means. Longstreet famously (or infamously, depending on your perspective) did not like the plan of attack on the 2nd of July 1863. He thought it risky and unlikely to work and argued strenuously with Lee for a different plan – ideally a movement of the whole army towards the Union rear to cut off their access to Washington and force them to attack the new Confederate position instead. Lee refused to consider this idea, and Longstreet was forced to go ahead with his assault. The assault ultimately failed, securing no significant ground and causing the death and wounding of hundreds of soldiers the Confederacy couldn’t afford to lose. Yes, the Union suffered casualties too, but not enough to seriously endanger the Army of the Potomac. This narrative is one where Longstreet’s attack is a doomed assault, well executed but ill-conceived from the start. Not quite so disastrous as Pickett’s Charge, but still a flawed strategy that came at enormous cost.
The alternative narrative accuses Longstreet of dragging his feet, launching his attack too late in the day and failing to really put his heart into the attack. It was doomed not because it was tactically unsound but because its commander did not believe in it and botched the operation. No surprise this was the narrative pushed by Early and other architects of the Lost Cause, and for a long time it was the dominant narrative, but it was built on a foundation of lies (often literally, such as a fictional order that Longstreet was to launch his attack at dawn. He was to ready his troops at dawn, not attack). My problem with Longstreet Attacks the game is that in many ways it feels more in line with this narrative than with the actual history, an experience that was exacerbated by my choice to read Stephen Sears’ massive history of Gettysburg at the same time I was playing Longstreet.
In Longstreet Attacks the Confederate units are just better than the Union ones. They often have higher strength, and they always have a higher cohesion rating. Unless they suffer morale penalties from combat most of the units are immune to a Panic result in combat. The smell of the notorious Confederate sentiment “one southerner could whip any ten Yankees” comes off the game in waves. One cannot deny that the Confederate generals gave the attack their all and that many units withstood stunning amounts of punishment to attack Union positions, but the defenders were no callow bunch of cowards breaking at the first sign of attack. The battle on the Union left was chaotic because General Sickles had left his position and stretched his lines too thin. Arguably the low cohesion ratings could reflect this poor position and chaotic command, except that even the units that were outside of Sickle’s Corp often have this same poor cohesion rating – it is a trait of the Union army not just those units that were in chaos. And surely that chaos could be reflected in the game’s use of Disruption morale penalties rather than baked in stats. It seems a bit egregious that often Confederate units on their reduced Battleworn side are still superior to many Union regiments – especially when cohesion rating is so crucial to determining when a hit is inflicted in combat.
My somewhat crude illustration showing the distribution of Cohesion Ratings between the two sides. The far left are units with CR 5 while the far right are those with a CR of 2. It can be hard to fully grasp the significance of this without knowing from experience how much better a CR of 4 is over a CR of 2. It also doesn’t show the strength distribution, where many of the higher CR Union units are either very low strength and/or sharpshooters, who only have a single step of strength. This is only infantry counters, artillery are mostly CR 3 on both sides.
To avoid getting too lost in the weeds let me try and distill the matter. Playing as the Union in Longstreet Attacks I did not feel like I was a general trying to fix a mistake made by my inferior officer, i.e., Sickles. I felt like a man tasked with taking green troops into combat and repeatedly frustrated by their failure to perform while my opponents stormtroopers ran roughshod over my positions. My only saving grace being the terrain and a desperate prayer for night to come soon and bring an end to the attack.
I made little progress in stemming the Confederate attack – for all its strengths Blind Swords seems like a system poorly suited to highly attrition conflict. Battleworn status can be recovered more easily if your CR is higher, like for nearly all Confederate units, and there is no permanent loss that cannot be restored in time. Confederates could push my lines back so far that the handful of units I forced to be Battleworn could end up being far enough from the front line to rebuild the next turn, undoing all my hard work. This may be a slightly more fundamental issue with Blind Swords, at least as it is in this early entry. It’s not built for sustained attrition and may not be suited to horrifically bloody engagements like the second day of Gettysburg. Perhaps it is for that reason that there are no Blind Swords games on other particularly violent engagements like Shiloh, Antietam, or the many battles of the Overland Campaign. Not every system can do everything and this may be a limitation of Blind Swords.
Near the end of our game of Longstreet Attacks. McLaws has successfully pushed back the Union center - many of those units are broken and useless in combat. Anderson is having a harder time on the Union right, while Hood’s attack on Little Round Top never really came to anything and now Law is engaging in a wildly ahistorical flanking maneuver that has placed him awkwardly in the middle of the Union activation chits. While the position is bad, this a strong Union victory as the attack went too slow to secure the VPs it needed to win.
I also saw no sign of fatigue in the Confederates as the game progressed, no indication that their losses were adding up, no indication that the assault was running out of steam and that it was asking more of its men that they could deliver. Instead, it seemed as if the only way to stop the Confederate attack was for night to come, suggesting that maybe had Longstreet attacked earlier he would have been victorious. I got no sense that maybe Longstreet would see that his attack had failed, his forces were stalling, and he had no reserves to commit, and order a withdrawal of his units. No, given infinite time these Rebels would nearly always overrun the Union army, and to me that reeks of the story of Jubal Early and his cohort discarding history to settle a personal vendetta. And it saps my ability to enjoy the game.
ConclusionIn my final assessment I did really enjoy Blind Swords as a system, but I found the emergent narrative of Longstreet Attacks somewhat poisoned my ability to love it. I was frustrated, and not in a fun way. Blind Swords is a system that really embraces the chaos of warfare and historical simulation, and that is something I love dearly. I think historical games need chaos because history is not predictable. However, I also think historical games need to be honest about what they are saying, and I think the romanticism of the Confederate attack presented in Longstreet Attacks pushes aside the actual history and muddles the game as a whole. Playing it while reading a very thorough history of the battle at the same time made its flaws that much more apparent and made me less inclined to forgive them. Longstreet Attacks is not a failure of a game, and I am glad I played it, but I also know I will not play it again. However, I am very excited to try more Blind Swords games. I have a copy of A Greater Havoc sitting on my shelf waiting for me to find some time to try it. I believe that there is at least one Blind Swords game out there for me, but I know that Longstreet Attacks is not that game.
August 15, 2023
Review - Men of Iron by Richard Berg
I have written and thought more about Richard Berg’s Men of Iron than I have any other wargame I’ve ever played. The Men of Iron tri-pack was the game that brought me fully into wargaming. It was my first hex and counter game. While not my most played game if individual plays are measured, in terms of hours invested it almost certainly is. I have a relationship with this game series is what I’m saying. When I first bought that tri-pack I didn’t have any plans to write a review of the games therein. I’ve documented many of my individual plays of certain battles and that was my plan to continue going forward – not writing up literally every play but certainly every scenario that I thought I had something to say about. However, as I play more Men of Iron, I keep thinking about what I love about the system and what frustrates me about it, and I’m increasingly tempted towards making my own version of Men of Iron. That has nudged my thoughts more in the direction of what I think is the appeal of the system and what its failings are, and at a certain point that’s basically just a review so I thought I’d put that down on a page, and once I’ve done that I might as well share them with the world.
At this outset I do want to emphasize that this is far from my final thoughts on Men of Iron. I’ve played over a dozen games, so these are far from first impressions, but I also have no plans to stop playing and many more scenarios to try, so these are more like my thoughts midway through my journey. I believe them to be sufficiently robust that they won’t change much as I play more, but if they do then I suppose I’ll have to write a new review after thirty or forty plays. With that disclaimer, let’s get this thing under way!
What is Men of Iron?For those of you who may be new here, Men of Iron is a tactical hex and counter system for medieval battles designed by legendary (and divisive) designer Richard Berg. A battle is playable in between one and four hours with most battles being in the one-to-two-hour area. It’s relatively low counter density, with no stacking, and I would say approximately mid-weight in terms of complexity. Definitely not heavy, but fiddly enough to not quite qualify as light either. There are currently four entries in the series (more on that below) with a fifth on the way from a different designer since Berg passed away a few years ago. While Men of Iron may share some qualities with other Richard Berg systems, it is also very much its own thing. Just because you like other Berg designs doesn’t mean you will like Men of Iron, and vice versa (I for one am no fan of Great Battles of the American Civil War and have not been very tempted by Great Battles of History, two flagship Berg designs). It was my entry into hex and counter wargaming, so I certainly think its suitable for that purpose, but I also wouldn’t say it is the best introduction to this side of the hobby. It’s great if medieval battles are your thing, less so if they’re not.
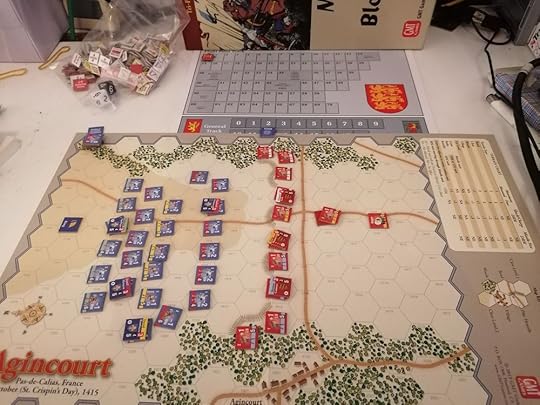
My first ever time playing the system, this takes me back. The little Agincourt scenario may not be my favorite, but it was a great way to learn the system.
What’s good about it?Lots! But there’s also just a lot to the system, Berg was not a man to do something halfway, and I don’t want to dedicate hundreds of words to each and every little mechanic in Men of Iron. For me, the strength of Men of Irons is greater than the sum of its parts, so I’m going to highlight a few specific elements that stand out to me as distinctly Men of Iron and particularly good. After that I will move on to the reason I think Men of Iron is great, and the reason I keep opening up its box and setting up one more scenario.
The weapon’s matrixThis is a simple chart that you consult every time one of your units attacks an enemy unit in close combat. You find which column the attacking unit is in, then trace your way down to the row with the defender, and there you will find a dice roll modifier. It’s super simple and allows for a very quick calculation of the initial parameters for every combat. You then consult the armor value printed on the target counter and you’re most of the way towards resolving your close combat. It’s really intuitive and as I’ve played more hex and counter wargames, I’ve found few systems that I like as much as this. It helps keep the counters from getting too cluttered while also allowing for an interesting diversity of units in the battles. It’s great.
Victory ConditionsI am obsessed with victory conditions from a narrative perspective, i.e., what does victory mean? I often care more about the story of victory than I do the balance. By my metric, Men of Iron’s victory condition is near perfection. When units are eliminated or retired their controlling player will incur Flight Points, which are tracked on a sheet separate to the game map. At the start of each player’s activations, you both roll a d10 and (temporarily) add it to your current Flight Point total. If the result is greater than your flight threshold for that battle, you lose. If it is less, you ignore the die roll entirely and keep playing. I love this because it combines an easy to track victory condition with an element of randomness that means you’re never sure when you’ll lose, only that you’re close to it. I also love it because it captures what the key condition to winning a medieval battle was: not being the side that ran away. The moment an army breaks and runs, it is over, and they have lost. Many factors can contribute to why they would retreat, but fundamentally the point of the battle is to make your enemy run away and Men of Iron brings that to the fore. It’s excellent.
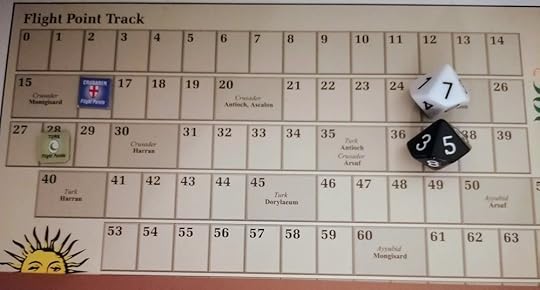
The Infidel flight track, you can see the relative position of the two markers. This was for Antioch, and the roll has put the Crusaders over their threshold of 20 but kept the Turks below their threshold of 35, yielding a Turkish victory.
Continuous Attack!When you eliminate an enemy unit in close combat, most of the time you’re going to generate a Continue Attack result. This means that the unit in question must attack again at the end of this close combat phase, and with a penalty. This is not optional. When combined with the fact that you must advance into a vacated space in close combat, this can result in your units being way out of formation after an offensive. It can also allow for decisive and crushing attacks where one unit goes on a rampage and cleans up a series of disordered enemy archers or infantry. It can create thrills and anxiety in equal measure and it’s so far outside of your control that it can sometimes feel like rather than playing Men of Iron you’re just trying to desperately hold on while the game takes you on a rollercoaster of chaos. Some people may hate the sound of that, but to me it’s both extremely entertaining and really captures the limits on control that defined much of medieval warfare. These were not drilled and disciplined professional soldiers, and they didn’t act like it.

Robert the Bruce goes berserk, racking up a Continued Attack -2 as he carves his way through the center of the English lines at Bannockburn.
The NarrativeThis is the big one, the thing that always drags me back to Men of Iron. Men of Iron tells great stories. The combat results table is punishingly random – I’ve set up so many careful attacks only to roll a zero and disorder my own King’s unit, but I’ve also seen Robert the Bruce cut through three English units in one turn. Men of Iron is full of interesting decisions around where to position units, how to structure your attacks, what order to move units in, but once you’ve done all that the game dumps a massive helping of chaos into those plans and throws them back at you. You then have a chance, via the Continuation system, to activate another group of units but that is again dictated by the dice. This level of randomness will absolutely rub people the wrong way, but for me chaos is essential to historical wargaming. History is a fickle beast and there’s no way for one person to entirely predict or control its flow. Men of Iron is a game that asks you to make the best strategy you can and then slaps you with results and asks you to just deal with it. This can be incredibly frustrating at times, but at the end of each game I feel like I experienced something. This game tells stories and while that story might be one of disastrous failure it is still incredibly memorable.
And that’s just the core system! Each battle throws a new twist at you. New circumstances, special rules, optional rules to examine hypotheticals or alternative historical interpretations, and new units and leaders. All of these elements ensure that each time you set up Men of Iron you’re going to be telling another story and experiencing a different kind of history. While not every scenario is created equal, I’ve found all of them to at least be interesting and the truly great ones to be utterly compelling. I think it’s hard to convey how I can get so excited about pushing cardboard chits around a map and then screaming at a couple of d10s, but it really works for me. I’m totally engaged and invested in what happens in a game of Men of Iron and that is down to an amazing alchemy that the system has.
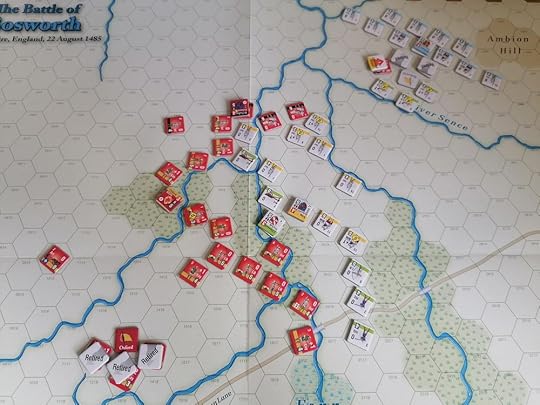
The concluding position of my most recent game of Bosworth. Henry VII made an amazing series of Continuation rolls and was able to seize the initiative and launch a very effective flanking movement, collapsing the Yorkist position and threatening their rallying position.
I’ve been trying to unpick exactly what that alchemy is, and I think it comes down to the game’s flow. Men of Iron doesn’t have strict turns, instead players will intermittently alternate activations. Your first activation, either of the game or when play passes back to you, is called a Free Activation and it lets you pick one Battle (the medieval term for what in other games would be a brigade or corps of troops under one leader) and activate it. They move and, if they are archers, conduct missile fire and then, once all movement is finished, you conduct melee combat. Once that is resolved, you can attempt to activate another Battle by rolling under that Battle’s leader’s continuation value. If you succeed, you repeat that process with that Battle, if you fail play passes to your opponent. There’s a little more to it than that, but that’s the gist. What’s great is that this can create a really uneven tempo to the game, where maybe on one turn you just activate one Battle but on another you activate three. It’s impossible to know how many activations you’ll get before your opponent can go and this creates an interesting thought process as you decide what to prioritize and what can be ignored for now. It also naturally allows the system to create big Moments, where you get a key activation you needed, or your opponent fails to capitalize on a successful round of close combats. It’s that interplay of total control (picking a free activation, deciding where to move) with total chaos (continuation, combat results) that makes Men of Iron’s magic work. It does mean that the system is somewhat susceptible to failure – a run of bad luck can spoil it – but given how many dice rolls you’ll make in a single game it will generally balance out in the aggregate.
What’s not so good?Lots, if I’m honest, but not enough to make me feel anything less than love for Men of Iron. I have many nitpicks with the system, things that hold it back from being truly amazing. I want to reemphasize that none of these complaints are enough to override what I like about Men of Iron, or to stop it from being one of my all-time favorite hex and counter systems, but they are absolutely problems with the game. My nitpicks are, ranked in approximate order of annoyance:
There are too many damn DRMs. My description of the combat matrix left out that once you’ve done those two steps there’s like a dozen more potential DRMs. A modifier for if you’re shooting into the flank of a horse unit, Richard? Really? The frustration of setting up a big attack only to roll a zero is significantly amplified if you just spent two minutes counting up DRMs on that combat. It’s too much, it should be simpler.
The rule for attacking when your unit is outnumbered is needlessly confusing. A unit is supposed to make every eligible attack they can, but also each enemy unit can only be targeted by one melee attack per combat round. In a one-on-one situation, this is fine, it makes sense. But when the defenders outnumber the attackers, things get very confusing very quickly and even after many plays, I’m still not sure I entirely understand it. I can see why Shields and Swords just went with each unit makes one attack in combat, it’s much easier to parse.
The rally mechanic kind of only serves to drag the game out without necessarily making it more exciting. When a unit suffers the Retire result, they are placed next to a standard, either for their Battle or for their overall side depending on scenario, and as a Free Activation you can rally all the Retired units. While they are Retired, they each count one point towards your side’s Flight total. The problem is that bringing Retired units back into the fight is so slow – they are all Disordered and usually far from the front lines plus you’ve spent an entire activation just un-Retiring them. In my experience using the Rally action rarely changes the outcome of a battle but it absolutely can make the game longer, and that’s a real bummer. Nobody wants a game to overstay it’s welcome and the Rally mechanic risks causing a game to overstay its welcome.
Archery is too damn powerful. I’ve written about this extensively in other pieces, so I won’t repeat myself here, but archery is just too strong and as a guy who wrote a whole book on the crossbow this annoys me.
Terrain is often secondary in the scenarios. This isn’t true of every battle, but in many of them the terrain is confined to the borders of where the action will take place, or there’s only a handful of terrain hexes to consider. Woods and hills weren’t invented in the modern era and medieval battles were not just fought on flat, open plains. I want to see more terrain in my battles.

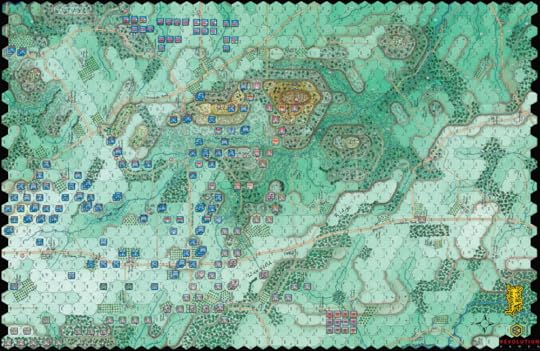
The Antioch scenario has some lovely art on the map, but that camp is completely inaccessible and the entire battle is pretty much completely fought in the open plain.
Continuation just doesn’t quite work. When Continuation fires it’s amazing, but, in most battles, it is just too unlikely. I had a game where my opponent and I swapped about a dozen activations without either of us making a single Continuation roll. This becomes a big problem in battles where you have a lot of Battles (how’s that for a sentence). Often it makes more sense to keep activating one or, at most, two Battles over and over again than it does to risk activating a Battle near the rear of your lines and hope for a Continuation to allow you to push the offensive elsewhere. I think that Continuation would have benefited from being more likely in the first instance and then suffering a much steeper decline in likelihood (by default most leaders have a Continuation rating of 2-4 and each successful Continuation inflicts a cumulative -1 penalty on all subsequent ones). While I like that Men of Iron embraces randomness, I think the balance on Continuation is kind of off and it can create some very weird game experiences as some Battles just sit in the rear and never move because it’s not worth it to risk activating them first and you never succeed on a Continuation with them. In a scenario where you only have 2-3 Battles per side this is usually less of a problem, but in the huge scenarios with 4+ Battles you can end up just not activating units for the entire game and producing these really wonky looking formations and weird narratives. I do want to reiterate that I like the Continuation system, I just think that it could use a little more development to help it truly sing.
What’s the best one?Well hypothetical straw-man version of myself, what a loaded question. They’re obviously all great, but I know that when you have a system with four published games there is a need to rank them. I won’t be doing that. However, I will meet you halfway, fictional self, and provide a brief rundown of my thoughts on each volume (so far).
Men of IronThe original flavor covers battles from the late-13th through the 14th and into the early-15th century (if you have the tri-pack, which includes the Agincourt scenario originally published in C3i Magazine). Of the topics covered by Men of Iron games, this is the one closest to my heart. That’s why it pains me to say that this is probably the worst entry in the series. The battles lean towards one side holding a static formation while the other player attacks them, which largely reflects the historical combat of the period but can get a bit boring by the third or fourth time you experience it. Archery is also at its most overpowered in this entry and the scenario design as a whole is just not great. It’s not bad, but it’s also not great. There are a few standout battles, like Bannockburn, that are truly phenomenal but there are also battles like Falkirk that are a bit boring. Overall, a mixed bag.
InfidelThe second entry in the series covers the battles of the Crusades. There are more large-scale battles, with maps that cover twice as much space as those in Men of Iron original flavor. The big change here is the abundance of horse archers and the extreme asymmetry they bring to the two sides. Archery has also been toned down some, which is nice. Overall, I think Infidel is a better game than original Men of Iron, but I’m also not sure if I like it more. The scenario design is more interesting, but I find the many, many horse archers to be a bit tedious at times. Riding in wave after wave of mounted troops, shooting, and then running away is just really annoying – both as the person on the receiving end and as the one resolving it. To be fair, this tactic was incredibly irritating on purpose and so in that way the game kind of reflects history – it was in part intended to provoke a break in the Crusader’s ranks. That said, I don’t know how much I enjoy doing it as a player of a game. I think my fondness for the fourteenth-century battles of original Men of Iron means that I slightly prefer that entry even if Infidel is a better game.
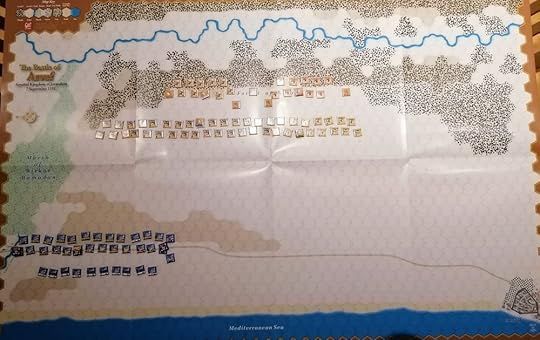
The enormous Arsuf scenario from Infidel (apologies for the glare, my lighting set up wasn’t great here). Infidel has several scenarios of this scale, which allows for the greater mobility of the Muslim horse archers to shine (and annoy).
Blood & RosesMen of Iron does the Wars of the Roses! I’m honestly not very interested in the Wars of the Roses; they just don’t do anything for me. I’m not sure why. This is too bad because Blood & Roses is a clear improvement to the system. It introduces Army Activations, that let you move but not fight with your whole army and thus help to fix the problem of totally neglecting some of your Battles for an entire scenario. It also has an improved CRT that introduces a Disorder or Retreat result – something that makes close formations less punishing (in previous entries being forced to Retreat could instantly eliminate a unit and so you had to unrealistically spread out your units) and allows players a bit more choice in how to respond to a combat result. Also, the archery table is great – longbows shoot super far but are way less effective. Mechanically this is the best entry in the tri-pack, but my ambivalence towards the Wars of the Roses makes it harder for me to get very excited about any of the battles no matter how well designed they may be.
ArquebusArquebus brings Men of Iron to the Italian Wars of the late-15th and early-16th centuries and is the only entry (so far) not in the tri-pack. This expands upon the developments of Blood & Roses and adds systems for units being trapped in melee engagements. It also introduces combined melee/ranged units with the early development of pike and shot tactics. I think this might be my favorite entry in Men of Iron. I’m fascinated by the Italian Wars and the gradual change in tactics that happened over the decades the conflict lasted. So already it’s a bump up above Blood & Roses there. It also has some truly excellent scenario design, particularly Fornovo, which is probably the single best scenario I’ve played. I can really see the refinement that went into the system for its fourth entry. I do have some reservations, though. So far, I’ve mostly only played the small and medium sized scenarios. I think Men of Iron struggles with larger battles, for the reasons I outlined above, and Arquebus has the biggest battles of any entry. Until I’ve played all these huge battles I won’t know if my fears are justified, but it is a small reservation I have.

Look at that river! Who wouldn’t want to desperately try and march an army across it? This is such a great scenario!
ConclusionMen of Iron is a system that is defined by an agony of choice. You always have more you want to do than you can reasonably expect to achieve. You want to activate every Battle in your army, but you almost certainly won’t be able to, so who do you prioritize? When picking enemy targets, who do you go for first? Should you push more aggressively or try and make some space so some of your units can recover from being Disordered? Each moment is filled with tension, and I find every play of Men of Iron to be an exciting and engaging narrative. It also has an addictive gambling quality, because of that one time you will successfully make all those Continuation rolls and achieve all your hopes, but that will be such a rare event you’ll continue chasing it like an addict at a slot machine. For all of its Berg-ian excess and systems that just don’t quite work, I love it to pieces, and I will continue to play it for years to come. Do I recommend it? I don’t know honestly – I love it, but you may not. Decide for yourself, I’ve got another scenario to set up.
July 26, 2023
Review - Jeff Davis by Ben Madison
Cards on the table: I went into Jeff Davis already disliking the subject but still hoping to experience an interesting design within a distasteful shell. What I ultimately found was a universally terrible experience. Jeff Davis a game with what seems to me to contain no redeeming value. It is filled with bad history and an underwhelming and boring play experience. I want to put this up front to make this clear – I do not like Jeff Davis, both the person and the game. That does not mean that you have to dislike it, although I struggle to see how someone could find a positive in this mess, but if you read on any further I expect that you do so because you are interested in why I hold these views and what I see in Jeff Davis that I find so repulsive. Please do not read this with the hope of seeking validation for your own positive opinions of the game nor to simply make a bullet list of all the ways you think I am wrong. Save us both some time and go do something else with your day.
I played Jeff Davis multiple times, pulling levers and trying various strategies to see what the game contained. This is not an opinion arrived at simply by looking at the game’s concept (objectionable as it is), but rather an informed opinion based on spending far too many hours with this mediocre trash of a game. For the record, not that it matters, I did manage to “win” the game once.
The GameBefore we get to the subject matter and how I think Jeff Davis falls short in portraying the American Civil War while still supposedly attempting to tackle historical hard truths, I thought it would be worthwhile to consider the game itself.
Jeff Davis is a variant of the States of Siege game system, first designed by Darin Leviloff and published by Victory Point Games. These games vary in their topics, but all share a few core mechanisms. The game map is split across several tracks converging on one central point. Enemy forces advance along these tracks and the player must hold them off until the game ends. Each turn starts with the drawing of a card or chit that tells you which tracks advance and then if any events or other special rules come into play this turn. The player is then usually given a chance to respond to these events by rolling dice to try and push back enemy units or to manage a variety of resource or political tracks. For a review of a more traditional example of the form, I would point you to my coverage of Worthington’s reprint of Malta Besieged.
Ben Madison, the designer of Jeff Davis, has made something of a reputation for taking the bones of States of Siege and modifying them in a few crucial ways to develop a different but the same sort of game experience. Jeff Davis’ greatest difference is probably in how it handles player actions. In most States of Siege games, the card you draw will tell you how many actions you can take this turn. Instead, Jeff Davis builds an elaborate economy where no action is free – if the player wishes to do something they must pay for it somehow. This certainly increases the complexity, but for me also sucks much of the fun out of the game. I will go into the historicity of this economy later, but just in terms of play it nudged me more towards not playing the game. There were several turns where after resolving all of the events for that turn, I would simply not take any actions because it made more sense to conserve resources for later. This is certainly a choice, but in a game with so much to resolve before I can even begin taking actions it felt a lot like I wasn’t really playing the game. My experience playing Jeff Davis felt like it was 75% automation, 25% choice, and that’s a shitty ratio in my book. Maybe if this was an app on my phone that would be fine, but as an activity I do over several hours it was goddamn boring.
The Sequence of Play is not promising - the section dedicated to player actions is pretty thoroughly overwhelmed by everything else. This also shows off many of the special rules and other elements that you will frequently be looking up in the rulebook.
Jeff Davis is also a game very dependent upon luck. There is obviously the dice rolling, to push an enemy army back you must roll higher than its value on a d6. That’s very standard States of Siege and I don’t mind it – it’s part of the fun. Jeff Davis adds quite a few more layers of random in terms of the Foreign Intervention track, roll more d6s to advance France and England, as well as the very crucial randomness of when you draw US Frigates and Anaconda Plan counters from the counter cup. These counters will cripple your economy, which you need to take actions, and if you have the bad luck to draw them too early you will have lost the game before it even got started. Now, I am often an advocate for randomness in historical games. I think a historical game needs randomness to function, and I look askance at games without an element of luck in them. However, for a highly random game like Jeff Davis, I need it to also be short, and that is something that this game decidedly is not. To be both random and long is a sin I can only rarely forgive.
Besides just being plain boring to play, my other major gripe with Jeff Davis as a game experience is that the narrative is dreadful. Narrative is a large part of what draws me to historical wargaming. I want to see the arc of history, nudge it, and see where it goes. I love systems like Men of Iron not because they are the perfect example of their genre, but because they tell phenomenal stories. Jeff Davis is a game that feels both too on the rails and simultaneously insufficiently structured to tell a meaningful story.
Each turn you draw chits from a cup, instead of the decks of cards used in the classic States of Siege titles, which in theory I don’t mind. The Blue Panther thick wooden chits give the pulling of individual pieces from a cup a satisfying tactile feel and the random mix of the cup is slightly more satisfying than the ordered chaos of a shuffled deck of cards. One critique of event decks I’ve seen, and felt myself on occasion, is that your chances of victory could be set before you even begin playing if the deck shuffle is particularly bad for you. You’ve lost, you just don’t know it yet. With a counter mix in a mug that isn’t true. However, the problem with the counters is obvious when you think of it – there’s far less space on each counter than there is on a card! That means that Jeff Davis must fill each counter with symbols and has no room for any context or storytelling. A card can say what offensive is being launched, what event these numbers are meant to represent. This is a thin narrative, but it is still a narrative. The chits all feel meaningless, and the innate abstractness of States of Siege comes even more to the fore, making for a rather drab experience. I used to doubt the value that simple names and a line of flavor text could bring to historical narrative, but after my experience with Jeff Davis I doubt no longer.
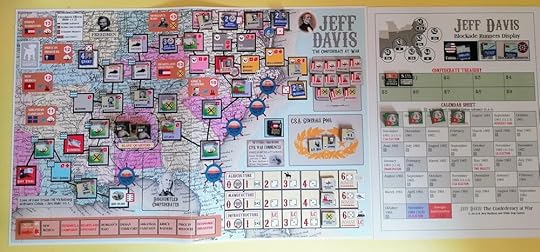
The game is also spectacularly ugly. Please, publishers, hire graphic designers and artists to do your games, don’t just use whatever the designer has put together. Staring at this is not a great way to spend an afternoon.
At the same time, Jeff Davis includes a variety of set events. The Campaigns events, triggered by a certain symbol on a chit, always happen in the same order every game but could happen all in the first year of the war, all at the end, or any time in between regardless of what else is happening in the game. Other events, like Kentucky’s neutrality being tested or the Emancipation Proclamation, all happen to a fixed schedule. The fact that most of the campaigns are ludicrously abstract, only the Peninsula Campaign even happens on the map, limits the potential impact any of this could have on the game’s narrative. At no point playing Jeff Davis did I feel like I was watching the American Civil War unfold – I saw only symbols and tracks and the fickle randomness of the dice. However, at the same time I could never not be aware of the fact that the game was about the Confederacy and that I was trying to defend slavery. The lack of another narrative to hang my experience on simply reinforced the grossness of the game’s topic and the bizarre decisions Madison made in his representation of it.
The Problem with the EconomyI really don’t want to get lost in the weeds when discussing how Jeff Davis represents history. There are a lot of strange decisions on display in this game and I’m not sure all of them are bad. Many of them are, but maybe not all of them. The inclusion of the failed experiment that was the C.S.S. Hunley submarine while the much more important ironclads are relegated to an optional rule is an odd choice but not particularly objectionable – it’s a designer’s prerogative to include the weird in their design if they so wish. I do want to single out the choices around the Confederate economy because they have such a large impact on how the game plays. Since you need to pay for each of your actions, how you acquire money and use other resources is going to be a core part of the game experience.
The core mechanism to earn money for the Confederacy is via blockade running, much like it was at the war. At the start of each turn, you will assign your blockade runners to various routes and then roll dice and consult a table to see where the available USA Frigates blockade, preventing and potentially eliminating your ships. You total the value of each ship that makes it through the blockade based on the value of their routes and then subtract the number of Anaconda Plan counters that have been drawn from the cup and placed on various ports on the map.
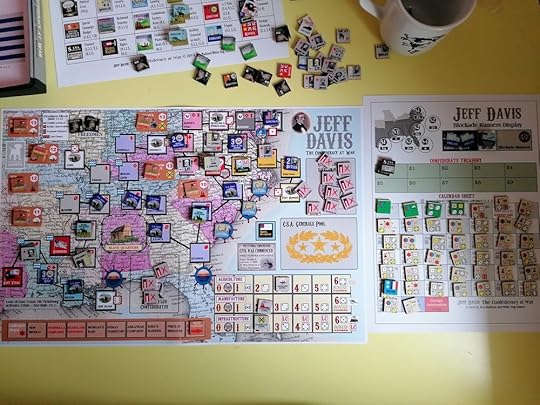
The end of my one “victory”, where I was out of resources but still held everything together. Early British intervention (based purely on luck of the draw and roll) held off an effective blockade for most of the game. Honestly, losing all my Blockade Runners was a relief as it meant one fewer step for me to resolve each turn.
This version of the southern economy includes all the key elements, but kind of jumbles them up as to make them almost unrecognizable. The Anaconda Plan was initiated in 1861 by General Winfield Scott to try and choke off the Confederate economy. The southern United States was an export economy before the war, they produced goods with slave labor which they exported either to the north or abroad. With the outbreak of war, they needed to export goods abroad to make any money to sustain the war effort. They didn’t even have much in the way of processing to turn raw cotton into usable material. The way that the south got goods abroad was on blockade runners, small ships that ran fast and tried to weave their way between the Union ships hanging outside their harbors as part of Scott’s plan.
What doesn’t really make sense in Jeff Davis is that the effectiveness of this plan is totally random. I once spent more than half of a game with only a single Union Frigate trying to block me, the rest being in the chit cup along with all of the Anaconda Plan counters. This makes no damn sense – if there is no blockade why would I even be using blockade runners in the first place? Blockade runners are only necessary once a blockade is happening! Surely a blockade like this should escalate naturally as the game progresses, not be left entirely to random chance. Especially since a blockade that comes in too early will completely scupper your victory. In many ways, it felt like how the blockade developed determined my chances of success.
Also, as far as a gaming experience goes, the blockade runner minigame is fundamentally uninteresting. The decision on which routes to use for your blockade runners should in theory be interesting but it is pretty much entirely dictated by the number of US Frigates in play. With only one Frigate in play there is a pretty clear optimal placement that never seems to be worth altering – certainly not worth pondering for any length of time. Two frigates and one or two Anaconda Plan markers can be potentially interesting, but in practice I still found a fairly consistent placement that I didn’t change often. Once three frigates appear, or more than two Anaconda Plan markers, the minigame pretty quickly becomes pointless and not worth the effort. By the late game you probably won’t even be using it at all. This is both incredibly uninteresting as a design experience and isn’t particularly informative about the actual history. Yes, the tightening of the blockade would make blockade running harder, but blockade running was always essential to the Confederate economy. You wouldn’t just give up on blockade running in 1863 and try to pivot to an alternative economy. There was no alternative!
This may seem like a very small critique, but I think it is representative of the game’s approach to history. Madison has many of the details right (or, at least, mostly right) but he shows little to no understanding of (or possibly interest in) how they fit together. It’s like having the history explained to you by a reasonably well read drunk – he knows the facts, but his train of thought is a mess and the version he’s telling you makes no damn sense.
SlaveryThere’s no way around it, we have to talk about slavery and how Jeff Davis handles it. One of this game’s sole merits is that it is the first American Civil War game I’ve played that actually committed to including slavery. That said, I’m not prepared to give it too many marks simply based on the failures of others. That this game includes slavery is a positive, but it would be utterly damning if it did not and how Madison has chosen to include it is deeply flawed.
Slaves are a resource. The player starts with a number of counters representing slaves which can be spent like money but with the added downside that spending them decreases the foreign intervention tracks and there is no way to replace them. I have several minor objections to how slavery is framed in the game – the barbed wire surrounded box that holds your slave counters is not a great choice no matter what Madison seems to think and it doesn’t really make any sense that the French and British only object to your use of slavery some of the time – but my core objection to the depiction of slavery in Jeff Davis is that Madison makes the use of slavery a choice by the player, one you can choose to not do if you so desire.
What does it mean when you use up slavery tokens? Are you working slaves to death? Are they running away because only now has your treatment turned to be objectionable? The entire southern economy and war engine was sustained on the backs of slave labor for the entire war. This is not something that just comes up when you need it in a pinch. The Confederacy wasn’t forced to use slaves when they ran out of money because the Union had finally cut off their foreign trade, they were using them the whole time, that was the whole point. In an attempt to game-ify slavery Madison has fundamentally missed the point and created a poor and troubling representation of slavery in America in the 1860s.
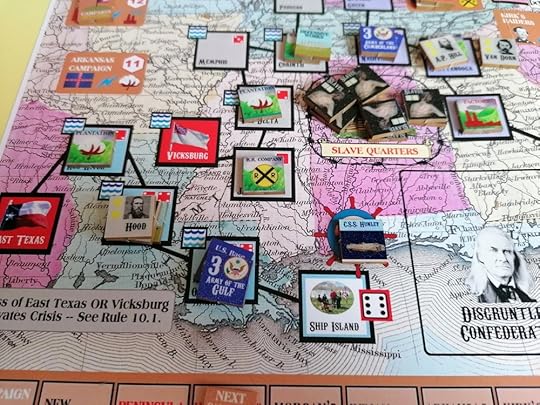
I can’t tell if the choice a famous photograph of the aftermath of the physical abuse of slavery on the slave counters is a bold choice or exploitative. What I can say is that the choice of using cotton for plantations and not, y’know, slaves is pretty gross.
Let’s consider how this works in practice in the game. Assuming your game is developing reasonably well, in the early game you should be able to fund your war effort from blockade runners. Only from the mid-game when the Union ships start strangling your exports should you be forced to turn to other resources, such as spending your slave tokens and tapping key Confederate figures to try and bolster your economy. As a game arc this is coherent, but as history it makes no sense. The money raised from blockade running and the slaves on plantations were not two separate but equally valuable resources. The merchandise that the blockade runners were carrying was goods and material made and harvested by slave labor. The slaves produce what the ships carry! These are two parts of the same system – no slaves meant no goods to sell. Unless General Jackson proposes that his men start eating slaves, you can’t use slaves to sustain the soldiers without the other parts of the economy functioning! By splitting these elements in twain, Madison confuses the history and presents a jumbled and troubling version of Confederate history.
In Jeff Davis you can try and win the game without “using” your slaves, and if you get very luck you might succeed. At the final scoring during the 1864 US Election you get points for each “unused” slave you have still on the board. This nudges you towards a strategy where you don’t use slaves to fuel the Confederacy when using slaves the fuel their economy and war was the entire point of the Confederacy. Jeff Davis claims proudly that it confronts its players with the truth of slavery, and then the design suggests that to win you maybe don’t even have to “use” those slaves – whatever that is actually meant to represent.
This is made even more troubling by Madison’s statement during one of his design notes that Jefferson Davis “treated his slaves well”. I wish I was shocked that this needs stating, but no, Jefferson Davis did not treat his slaves well. No slave was treated well in America, Confederate or otherwise. There were varying levels of cruelty, but none of it was nice and it was universally horrible for the enslaved. That Madison can write in one line that Davis treated his slaves well and then in that same line note that more than a hundred fled from his plantation for freedom in the Union army shows a shocking lack of self-awareness and a troubling failure to understand slavery in the United States.
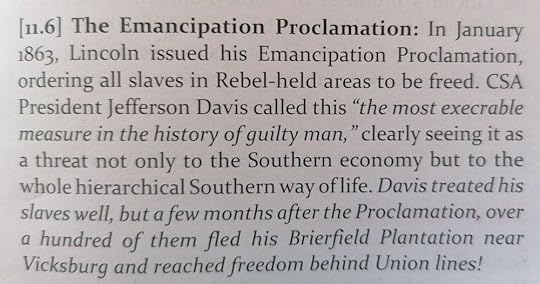
The relevant passage from the Jeff Davis rulebook
The Lost Cause without the Lost CauseAt the start of the rulebook for Jeff DAvis Ben Madison proclaims that this game will include none of the Lost Cause mythmaking that is present in so much American Civil War history. To some degree he is correct. He clearly lays out that the reason for the American Civil war was slavery and slavery alone – flatly rejecting the core tenet of the Lost Cause, that the Civil War was about “States Rights” or some similar alternative explanation to avoid the actual truth. Leaving aside that Madison also expresses his support for the Confederacy even while clearly being aware that it was all about slavery, a stance that certainly implies that Ben Madison is pro-slavery, this would be a more convincing statement if the rest of the game didn’t lean so hard into the Lost Cause.
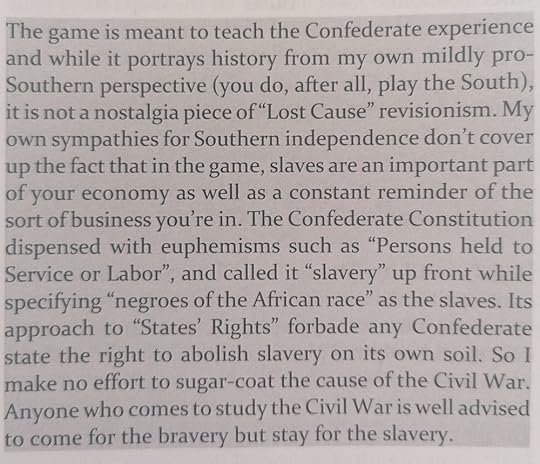
I’m genuinely not sure how else this can be interpreted besides Ben Madison declaring that he knows the Confederacy was for slavery and that he has still chosen to support it.
The thing is, while Madison rejects the revised justification for the war, this is a game about playing a lost cause that tries to avoid being the Lost Cause. While as Davis you are struggling to hold your coalition together against the inexorable march of the Union (or are meant to anyway, if I’m honest the mechanisms for disunion among the CSA felt half baked), no attention is given to political struggles within the Union itself. If you get very lucky, you could potentially try and attack Washington and give them a bit of a fright, that’s as far as things will go. The Union is an unstoppable war machine that has you outnumbered and is better supplied than you will ever be. Their armies march forward on virtually every turn no matter how effective you are at driving them back. This conception of a noble south being slowly crushed by a more powerful industrial north is a key principle of many Lost Cause narratives after the war.
Similarly, we see a superior Confederate generalship in old favorites Lee and Jackson. While Grant is given his due, being the scariest Union general on the map, Madison cannot shake the worship of Jackson and Lee. The two Virginians, along with Stuart should he enter play, get a bonus when fighting in Virginia (and happen to be restricted to that theater anyway). They also have multiple counters that you can have in play, which allows them to make two to three times as many attempts to drive off a Union attack as any other Confederate general. These are the backbone of your military effort, and their superior character is clearly on display. And wouldn’t you know it that worshipping at the altars of Lee, Jackson, and (what a surprise) Jefferson Davis are core elements in many Lost Cause narratives.
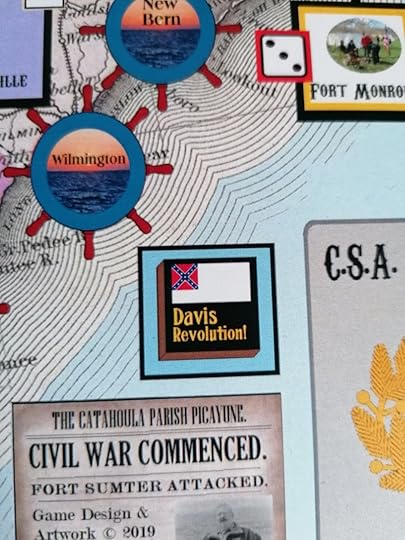
The choice to name the reforms undertaken by the Confederacy in 1862 “The Davis Revolution” screams gross hero worship. The other counters that go in this box are called States Rights and The Lost Cause. I’m genuinely not sure what to do with this information as, like much of the game, it just seems like a confused jumble of gross ideas.
Madison declares his rejection of the lie that sits at the heart of the Lost Cause in Jeff Davis, but he removes none of the other structures, which are fully capable of standing on their own as neo-Confederate propaganda. And even when he denounces the lie, he lets it quietly in the back door with his declaration that Davis was kind to his slaves – a horrific lie that hints at an even more extremist pro-Confederate stance: the idea that the slaves were happy in their bondage.
ConclusionThe kindest thing I can offer Madison is that maybe he does not understand the full implications of what he says and what he has done with this design. That he has made a boring and troubling game out of a form of ignorance. That is a bare excuse, a topic like this deserves far better, but the alternative is far more troubling: that Madison believes the cause of the Confederacy was noble and that, at least in the Nineteenth Century, black Americans were better off enslaved. We want to insist that no one in this year could hold this belief but given recent developments in Florida’s school curriculum it seems that this kind of racist historical denialism remains alive even as progress has been made in tearing down monuments to the Confederacy elsewhere in the country. I sincerely hope that Madison has simply not thought through what Jeff Davis the game is saying, but I can only judge it by the evidence I have before me and that is not promising.
As a game Jeff Davis is a poor entry in the States of Siege system, a fiddly, overcomplicated mess of a design that long overstays its welcome and whose appeal I genuinely cannot understand. As history, it claims to offer hard truths and an unwavering look at a dark time in American history but while it is prepared to (partially) admit one truth it sustains so many other lies as to be barely better than neo-Confederate propaganda like Gods and Generals.
I expected to find troubling history when I opened Jeff Davis, and I in fact looked forward to it because I find engaging with odd historical viewpoints to be genuinely interesting and worthwhile. What I didn’t expect was to find a game that was so boring. Jeff Davis isn’t even bad enough to be interesting, it’s just bad.
July 13, 2023
Gettysburg by Stephen W. Sears
I don’t read all that many battle histories (a small irony as I’m currently writing one) but it’s not because I don’t think they’re interesting, they absolutely are, but rather I tend to be a bit more of a bigger picture guy, only digging into the details now and then. I read battle histories, but usually only after I’ve read at least one or two books on the wider context. Since I’m reading more about the American Civil War it was inevitable that I eventually read a book on the war’s most famous battle. I have visited the Gettysburg more times than I can count, but despite that my knowledge of the specifics has always been a little hazy. I thought since it was recently the 160th anniversary that I should finally fix that. Stephen Sears’ book came highly recommended and was available from my local library, so I decided it was a great place to start!
This is a pretty hefty book, of that there can be no doubt. The main text, excluding bibliography, references, etc., comes in at over five hundred pages. This is a very thorough overview of the battle and more. It begins very soon after the Union defeat at Chancellorsville in May, 1863 and goes into great detail explaining the reasoning behind Lee’s decision to invade Pennsylvania. This includes a thorough account of the debate around whether it would be better to focus on opposing General Grant’s ongoing siege of Vicksburg or letting Lee pursue his own strategy. It also covers the intrigues around the eventual firing of General Hooker and the promotion of General Meade to command the Army of the Potomac mere days before the battle. All of this stuff was fascinating, especially since, as I’ve already established, I’m a wider context kind of guy!
I definitely finished Sears’ book knowing a lot more about Gettysburg than I had before. It is a very thorough account, but maybe a little too thorough - for me at least. I’m glad I read it, but it felt like it took me forever. Sears digs deep into the details, especially when discussing the casualties individual regiments suffered on the three days of Gettysburg. Each little movement of individual brigades, or even regiments, is covered in quite minute detail and honestly even as someone with a basic understanding of the battle before I started reading this stuff lost me quite a bit. This level of analysis can be interesting, but it was a lot and there were definitely times when I wished for slightly less detail. For some people this will be a part of the appeal of the book, and there are definitely subjects where I would want it, but I also don’t always want that level of detail. In this case I think for my own personal taste and sanity I would have preferred a slightly higher level examination of the battle that only dipped into very specific detail from time to time.
I particularly enjoyed how Sears analyzed the generalship of Meade and Lee. A combination of very popular myths tends to place all the blame for Confederate failures on Lee’s subordinates while also giving Meade no credit for his victory. Sears does an excellent job covering the roles each individual general, both the supreme commanders and their subordinates, played in the battle and I found his analysis very insightful, fair, and thought provoking.
The book is maybe too detailed is hardly a criticism though, and the wider context that Sears gives to the lead up to and immediate aftermath of Gettysburg really helps to present an excellent overall picture of the battle. It can be too easy to view Gettysburg as just the three most violent days but it is much more than that, and that is crucial to understanding how it happened and what it meant. I particularly enjoyed Sears coverage of the 4th of July and the tension about whether Meade would launch a counteroffensive, as well as his coverage of Lee’s eventual flight from Pennsylvania and the complications that both sides faced in the wake of the bloodiest battle on American soil. I’m very glad I read Sears’ book, but I also don’t intend on reading many more books this long on individual American Civil War battles - I simply haven’t the time or the energy! However, if you are either indefatigable or have an insatiable demand for very detailed American Civil War I can highly recommend Sears book - although in the latter case you’ve almost certainly already read it!
July 7, 2023
Teach and Play of Antietam 1862 by Grant Wylie
Hot on the heels of my initial review of The Seven Days Battles, I joined Fred Serval on his YouTube channel Homo Ludens to play an introductory game of Antietam 1862 - the first game in the same series. We played a quick game of the Bloody Lane scenario, a very small and quick playing introductory experience. We also chatted about our thoughts on the series as well as a variety of other games. You can watch the video below:
July 4, 2023
Initial Impressions - Seven Days Battles by Grant Wylie
While arguably one of the most important battles of the American Civil War, the Seven Days Battles have not really ingrained themselves into our popular consciousness the same way battles like Chancellorsville or Gettysburg have. There are no doubt many factors that explain this, but I would hazard that one of them is that the Seven Days sits in an awkward middle between being more than one battle but not quite a full campaign. From a game perspective it also presents an interesting challenge to design for. The Seven Days, as the name suggests, was a series of battles covering a week of combat. During the Seven Days, Robert E. Lee, recently appointed to command of the Army of Northern Virginia, lead a series of aggressive attacks on the Union army of George McClellan which was stationed just outside of Richmond. Lee’s army suffered horrific casualties, but, thanks in part to McClellan’s own fears about Confederate military strength, it was able to drive the Union army back to the coast of Virginia. My initial expectation was that the battle would work best at an operational scale, which lead to me playing The Late Unpleasantness, which I found… underwhelming. Now I’m taking my second shot at the Seven Days Battles but this time as a hex and counter tactical game thanks to the latest entry in Worthington’s Civil War Brigade Battle Series.

The initial Union starting position, guarding Beaver Dam Creek. Every unit the Confederacy can get across this Creek will be worth victory points at the end of the game, but crossing it is easier said than done!
For more of my thoughts on the challenges of gaming the Seven Days and the Peninsula Campaign more broadly, I recommend listening to the episode of We Intend to Move on Your Works on The Late Unpleasantness:
Worthington Publishing provided me with a complimentary review copy of The Seven Days Battles
The Civil War Brigade Battle Series is a simple hex and counter game with only eight pages of rules, none of which are very complicated. Its titles cover several battles, including Antietam, Shiloh, Cedar Mountain, and the Seven Days, of course. Each game includes a few adjustments to the rules to fit the battle. The Seven Days notably includes rules covering Thomas “Stonewall” Jackson’s habit of falling asleep during the battles as well as instructions to ignore rules around building breastworks as well as a few other niche rules.
I have a history of being very annoyed by games that use a separate series and individual game rulebook. I dislike learning a bunch of rules that may not be relevant to the game I’m about to play. I also find it very frustrating to have two places to look up rules, especially if there is a chance that looking up a given rule in one book will give me a wrong answer because it has been significantly amended in the other. While I’m not going to say that Seven Days Battles made me see the error of my ways, I will say that it is on the more harmless end of the spectrum as far as these things go. For the most part the individual game rules just add a few more elements to consider, not more than one or two rules, and tell me to ignore one phase in the sequence of play. It’s small enough that I can easily keep it in my head, and if I do need to reference it the rules are largely confined to just one page of the scenario booklet.
The Confederates arrive! AP Hill attempts a flanking maneuver to the north while the rest of the army masses to the south to try and punch through the stretched Union lines. Slocum in the far east can only come to their support once the Confederates start crossing the river.
Enough about the rulebooks, though, let’s talk system! This is a system first and foremost built for attrition. Each turn you will feel like you are feeding soldiers into a meat grinder. Almost every CRT result will cause at least one step loss and units can have upward of thirty or more steps. While attrition is high, the elimination of units is comparatively rare – as mentioned they can have a lot of steps so while you will consistently be dealing damage there is also a lot of capacity to absorb that damage. Each step loss is also a victory point, so this attrition is in many ways the path to victory. One thing I really like about this system is that the CRT is effectively one sided, meaning that you will never experience a negative result when attacking. The worst that you can suffer is a “no result”. This is compensated for by the fact that in the combat phase the defender, i.e. the non-phasing player, gets to resolve an entire round of combat first, making every attack they can, before the attacker goes. So, you must face a withering barrage of enemy fire before launching your own attacks.
This enemy barrage is made significantly more worrying thanks to the game’s morale rules. Any time your opponent rolls a morale result on the CRT or, more frequently, any time a unit suffers a step loss you must test for morale. This is a relatively simple process, you roll a d10 and compare it to the unit’s morale status. Units can have morale values of 5, 7, or 9 and a friendly general can boost that morale by one to a maximum of 9 – a roll of a 10 is always a failure. A routed unit retreats three hexes and forces any friendly unit it passes over to make their own morale check, potentially causing a cascade effect. The morale values are high enough that most units will not flee when attacked, but when combat frequently inflicts step losses it is also likely that most units will rout at least once in a game. Thankfully rallying them is easy – at the end of your turn each routed unit makes another morale test and if they pass you remove the routed marker, and they can act normally next turn. This is relatively forgiving but also injects a much-needed element of chaos into the game. The board state is ever shifting and from turn to turn it is challenging to predict exactly what the map will look like.
The first Confederate assault meets with mixed results - several units are routed and the Union is attempting something of a flanking maneuver of their own. Up north AP Hill is getting bogged down in the woods.
One thing that really impressed me in my first two games of Seven Days Battles was how such a simple set of rules managed to evoke the broader narrative of these battles. To me this is the gold standard goal for any wargame: to conjure up the historical events with only a minimum of rules acting as guidance. In both of my games the Confederacy launched large, costly assaults on the Union position. Slowly, they gained ground, the Union falling back inch by inch as they were overwhelmed, but the Confederacy suffering far greater losses in the process. This roughly mirrored how these battles went – they were very costly for the Confederacy but thanks in part to their aggression and Union General McClellan’s own paranoia the Army of the Potomac slowly fell back to the Virginia coast, ending the Peninsula Campaign. While I only played the first two battle scenarios, I really felt this narrative in my games.
While the games unfolded in a manner very evocative of the Seven Days, I’m less certain about the overall win conditions. The first scenario, Beaver Dam Creek, was excellent. It was very close, only a few VPs separating the two sides. Had the Confederacy been able to get just a few more units across the creek before nightfall they would have won. The second battle, Gaines Mill, felt a little off to me, at least to my initial impression. The VPs available to the Confederacy for taking ground were not numerous and required them to overrun the Union position nearly completely. I still think the narrative of the game experience was very enjoyable, but that the game ended in a decisive Union victory while their position as in such terrible shape felt a little off. It may just be a result of the scale the game is at – the Confederacy winning a pyrrhic victory would make more sense as a defeat in a broader narrative including multiple battles than as just a single snapshot that I was playing. For this reason, I’m very curious to try the scenario that combines the two battles using the two boards the game comes with. I even wonder if it is possible to link all the scenarios together into an enormous four-day battle – Seven Days comes with two double sided boards so there is plenty of potential there. I’m not sure I could subject someone else to playing through that with me, but so far all of my games have been solitaire and I think it’s a good system for solitaire play. The chaos of the dice keeps things unpredictable and there is no hidden information.

The next Confederate assault achieved better results and they have secured a toe hold across the creek. General “slow-come” is living up to his nickname and while on the move likely won’t arrive in time to make a difference. The Confederates are lagging on attrition but making progress now, will it be enough?
It should be noted that this is not a particularly short game. I would estimate that the single board scenarios each take a couple of hours and the larger two map battles could easily take you an entire afternoon to finish. With a system this simple and games that long you can expect a certain level of repetition. Each turn sees a lot of combats and while they are thankfully quick to resolve some players may not enjoy all this dice rolling. I really enjoyed watching how the battles unfolded over the course of days, I just left the game set up and played a turn now and then when I had some free time, but I could see some people growing impatient with it after a couple of turns. This is a light system, but these are not quick scenarios, don’t expect a quick playing lunchtime game!
I must confess I’m also not entirely convinced by the “Stonewall” Jackson special rules. Jackson performed notoriously poorly during the Seven Days, frequently failing to attack, including on at least one occasion falling asleep instead of leading an attack. This is represented in the game with a simple die roll at the start of the turn that determines whether Jackson and his subordinates can move. His units can still engage in combat, assuming they are within range, but must remain in their current positions. This is simple, which I like, but also the entirely random element of die rolling makes it feel like it could really swing the outcome of a battle. In my play of Gaines Mill, Jackson spent most of the battle doing basically nothing, and it feels like that was probably the greatest contributing factor to the Union victory. I don’t mind things like this in a relatively short game, but if I’m playing for a few hours, I don’t quite like this level of total randomness. I would probably slightly prefer a more fixed randomness, such as a deck of cards, but I have also only played with it once (Jackson had not yet arrived for the events of the first scenario I played) so my opinion may change as I explore it more.
The final game state - the Confederates have managed to push several units across the Creek but it was not enough to overcome their staggering losses and they lose by only a handful of victory points. A very tight finish to an exciting game!
At its core this is a light system with a lot of dice rolling and a high potential for chaos. These are all things that I enjoy in my games but are very much not to everyone’s taste. I think I would like a little more complexity – not much but just a smidge – but as it is I have had plenty of fun with the Seven Days Battles and I intend to explore it more. I’m not sure if it will have a permanent spot on my shelf, and I am certain that I probably don’t need every game in the series, but I am already looking forward to getting it back to the table (as well as trying Antietam and Shiloh in the same series) so that’s a positive sign!
Initial Impressions: Seven Days Battles by Grant Wylie
While arguably one of the most important battles of the American Civil War, the Seven Days Battles have not really ingrained themselves into our popular consciousness the same way battles like Chancellorsville or Gettysburg have. There are no doubt many factors that explain this, but I would hazard that one of them is that the Seven Days sits in an awkward middle between being more than one battle but not quite a full campaign. From a game perspective it also presents an interesting challenge to design for. The Seven Days, as the name suggests, was a series of battles covering a week of combat. During the Seven Days, Robert E. Lee, recently appointed to command of the Army of Northern Virginia, lead a series of aggressive attacks on the Union army of George McClellan which was stationed just outside of Richmond. Lee’s army suffered horrific casualties, but, thanks in part to McClellan’s own fears about Confederate military strength, it was able to drive the Union army back to the coast of Virginia. My initial expectation was that the battle would work best at an operational scale, which lead to me playing The Late Unpleasantness, which I found… underwhelming. Now I’m taking my second shot at the Seven Days Battles but this time as a hex and counter tactical game thanks to the latest entry in Worthington’s Civil War Brigade Battle Series.
The initial Union starting position, guarding Beaver Dam Creek. Every unit the Confederacy can get across this Creek will be worth victory points at the end of the game, but crossing it is easier said than done!
For more of my thoughts on the challenges of gaming the Seven Days and the Peninsula Campaign more broadly, I recommend listening to the episode of We Intend to Move on Your Works on The Late Unpleasantness:
Worthington Publishing provided me with a complimentary review copy of The Seven Days Battles
The Civil War Brigade Battle Series is a simple hex and counter game with only eight pages of rules, none of which are very complicated. Its titles cover several battles, including Antietam, Shiloh, Cedar Mountain, and the Seven Days, of course. Each game includes a few adjustments to the rules to fit the battle. The Seven Days notably includes rules covering Thomas “Stonewall” Jackson’s habit of falling asleep during the battles as well as instructions to ignore rules around building breastworks as well as a few other niche rules.
I have a history of being very annoyed by games that use a separate series and individual game rulebook. I dislike learning a bunch of rules that may not be relevant to the game I’m about to play. I also find it very frustrating to have two places to look up rules, especially if there is a chance that looking up a given rule in one book will give me a wrong answer because it has been significantly amended in the other. While I’m not going to say that Seven Days Battles made me see the error of my ways, I will say that it is on the more harmless end of the spectrum as far as these things go. For the most part the individual game rules just add a few more elements to consider, not more than one or two rules, and tell me to ignore one phase in the sequence of play. It’s small enough that I can easily keep it in my head, and if I do need to reference it the rules are largely confined to just one page of the scenario booklet.
The Confederates arrive! AP Hill attempts a flanking maneuver to the north while the rest of the army masses to the south to try and punch through the stretched Union lines. Slocum in the far east can only come to their support once the Confederates start crossing the river.
Enough about the rulebooks, though, let’s talk system! This is a system first and foremost built for attrition. Each turn you will feel like you are feeding soldiers into a meat grinder. Almost every CRT result will cause at least one step loss and units can have upward of thirty or more steps. While attrition is high, the elimination of units is comparatively rare – as mentioned they can have a lot of steps so while you will consistently be dealing damage there is also a lot of capacity to absorb that damage. Each step loss is also a victory point, so this attrition is in many ways the path to victory. One thing I really like about this system is that the CRT is effectively one sided, meaning that you will never experience a negative result when attacking. The worst that you can suffer is a “no result”. This is compensated for by the fact that in the combat phase the defender, i.e. the non-phasing player, gets to resolve an entire round of combat first, making every attack they can, before the attacker goes. So, you must face a withering barrage of enemy fire before launching your own attacks.
This enemy barrage is made significantly more worrying thanks to the game’s morale rules. Any time your opponent rolls a morale result on the CRT or, more frequently, any time a unit suffers a step loss you must test for morale. This is a relatively simple process, you roll a d10 and compare it to the unit’s morale status. Units can have morale values of 5, 7, or 9 and a friendly general can boost that morale by one to a maximum of 9 – a roll of a 10 is always a failure. A routed unit retreats three hexes and forces any friendly unit it passes over to make their own morale check, potentially causing a cascade effect. The morale values are high enough that most units will not flee when attacked, but when combat frequently inflicts step losses it is also likely that most units will rout at least once in a game. Thankfully rallying them is easy – at the end of your turn each routed unit makes another morale test and if they pass you remove the routed marker, and they can act normally next turn. This is relatively forgiving but also injects a much-needed element of chaos into the game. The board state is ever shifting and from turn to turn it is challenging to predict exactly what the map will look like.
The first Confederate assault meets with mixed results - several units are routed and the Union is attempting something of a flanking maneuver of their own. Up north AP Hill is getting bogged down in the woods.
One thing that really impressed me in my first two games of Seven Days Battles was how such a simple set of rules managed to evoke the broader narrative of these battles. To me this is the gold standard goal for any wargame: to conjure up the historical events with only a minimum of rules acting as guidance. In both of my games the Confederacy launched large, costly assaults on the Union position. Slowly, they gained ground, the Union falling back inch by inch as they were overwhelmed, but the Confederacy suffering far greater losses in the process. This roughly mirrored how these battles went – they were very costly for the Confederacy but thanks in part to their aggression and Union General McClellan’s own paranoia the Army of the Potomac slowly fell back to the Virginia coast, ending the Peninsula Campaign. While I only played the first two battle scenarios, I really felt this narrative in my games.
While the games unfolded in a manner very evocative of the Seven Days, I’m less certain about the overall win conditions. The first scenario, Beaver Dam Creek, was excellent. It was very close, only a few VPs separating the two sides. Had the Confederacy been able to get just a few more units across the creek before nightfall they would have won. The second battle, Gaines Mill, felt a little off to me, at least to my initial impression. The VPs available to the Confederacy for taking ground were not numerous and required them to overrun the Union position nearly completely. I still think the narrative of the game experience was very enjoyable, but that the game ended in a decisive Union victory while their position as in such terrible shape felt a little off. It may just be a result of the scale the game is at – the Confederacy winning a pyrrhic victory would make more sense as a defeat in a broader narrative including multiple battles than as just a single snapshot that I was playing. For this reason, I’m very curious to try the scenario that combines the two battles using the two boards the game comes with. I even wonder if it is possible to link all the scenarios together into an enormous four-day battle – Seven Days comes with two double sided boards so there is plenty of potential there. I’m not sure I could subject someone else to playing through that with me, but so far all of my games have been solitaire and I think it’s a good system for solitaire play. The chaos of the dice keeps things unpredictable and there is no hidden information.
The next Confederate assault achieved better results and they have secured a toe hold across the creek. General “slow-come” is living up to his nickname and while on the move likely won’t arrive in time to make a difference. The Confederates are lagging on attrition but making progress now, will it be enough?
It should be noted that this is not a particularly short game. I would estimate that the single board scenarios each take a couple of hours and the larger two map battles could easily take you an entire afternoon to finish. With a system this simple and games that long you can expect a certain level of repetition. Each turn sees a lot of combats and while they are thankfully quick to resolve some players may not enjoy all this dice rolling. I really enjoyed watching how the battles unfolded over the course of days, I just left the game set up and played a turn now and then when I had some free time, but I could see some people growing impatient with it after a couple of turns. This is a light system, but these are not quick scenarios, don’t expect a quick playing lunchtime game!
I must confess I’m also not entirely convinced by the “Stonewall” Jackson special rules. Jackson performed notoriously poorly during the Seven Days, frequently failing to attack, including on at least one occasion falling asleep instead of leading an attack. This is represented in the game with a simple die roll at the start of the turn that determines whether Jackson and his subordinates can move. His units can still engage in combat, assuming they are within range, but must remain in their current positions. This is simple, which I like, but also the entirely random element of die rolling makes it feel like it could really swing the outcome of a battle. In my play of Gaines Mill, Jackson spent most of the battle doing basically nothing, and it feels like that was probably the greatest contributing factor to the Union victory. I don’t mind things like this in a relatively short game, but if I’m playing for a few hours, I don’t quite like this level of total randomness. I would probably slightly prefer a more fixed randomness, such as a deck of cards, but I have also only played with it once (Jackson had not yet arrived for the events of the first scenario I played) so my opinion may change as I explore it more.
The final game state - the Confederates have managed to push several units across the Creek but it was not enough to overcome their staggering losses and they lose by only a handful of victory points. A very tight finish to an exciting game!
At its core this is a light system with a lot of dice rolling and a high potential for chaos. These are all things that I enjoy in my games but are very much not to everyone’s taste. I think I would like a little more complexity – not much but just a smidge – but as it is I have had plenty of fun with the Seven Days Battles and I intend to explore it more. I’m not sure if it will have a permanent spot on my shelf, and I am certain that I probably don’t need every game in the series, but I am already looking forward to getting it back to the table (as well as trying Antietam and Shiloh in the same series) so that’s a positive sign!
June 29, 2023
Podcast: Seven Pines; or, Fair Oaks by Amabel Holland
For episode four of ongoing podcast series We Intend to Move on Your Works, I am once again joined by Alexandre and Pierre as we discuss Amabel Holland’s interesting hex and counter take on the battle alternatively known as Seven Pines or Fair Oaks Station. This was a great discussion and well worth your time!