
Emily Henderson's Blog, page 52
May 21, 2024
Our New Favorite Place To Put Tile In A Kitchen…Can You Guess Where It Is??

It’s pretty exciting to get not only one but TWO incredible reveals from EHD favorite, Kirsten Blazek. The woman just can’t miss in our eyes. So in case you missed this moody office/bathroom trust me and go look at it now. If you’ve already had the pleasure of pouring over those photos then you know this kitchen both lives in the same style world (MCM, organic, modern) but is the lighter brighter version. Ready to get into the details? Let’s start with maybe our favorite:

Do you see those green tiles under the custom banquette?? What a simple yet impactful detail that I feel could be relatively DIYable if you or someone you know is a little handy.
Also what a stunning shot. Kirsten created a truly airy yet richly textured space. But then again that’s kinda what she does best.


Those tiles add dimension so that your eye has a little break from all of the wood in the space and they also bounce the light around. I love that she chose a green patterned fabric (peep those mini buttons!). Cohesive but not even a little boring:)

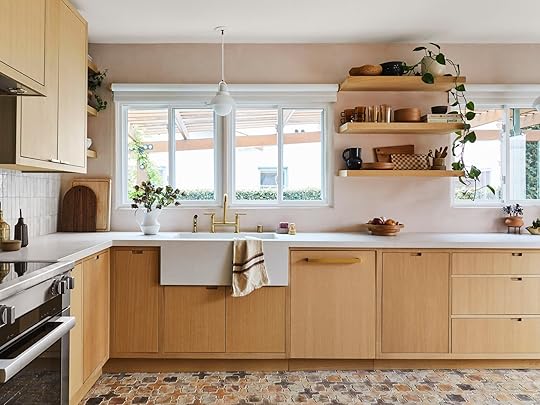
Now let’s talk about the lighting choices. Typically we recommend switching up light fixture shapes if you have more than one area that requires lighting in one space. But since there are only these two spots, I LOVE how she chose different pendants in the same shape but in two different materials and sizes – both in an MCM style. So beautiful and a great contrast to all of the straight lines.
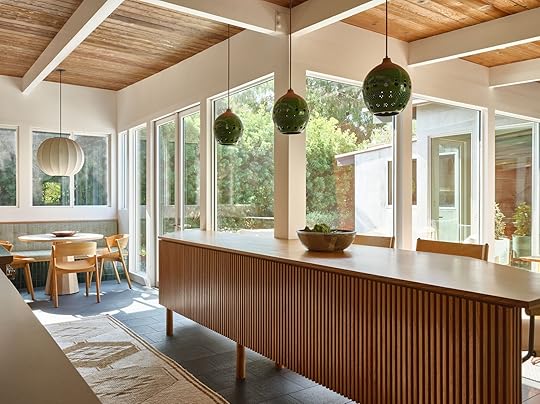
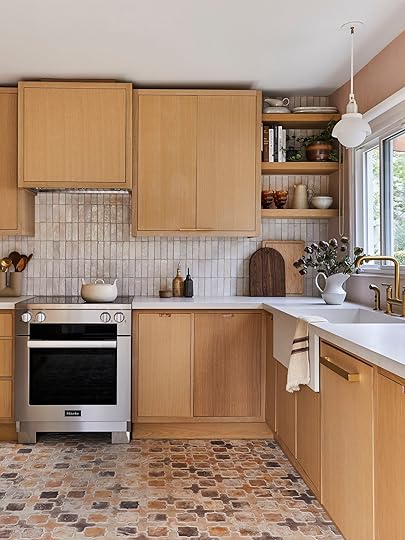
Speaking of straight lines, we need to talk about this island immediately.


First off, modern slat detailing is something I have loved for a long time…when it’s done right, and this is absolutely done right. And the way that this island wraps around that corner post creating more counter space makes it look so intentional and like it’s always been there.
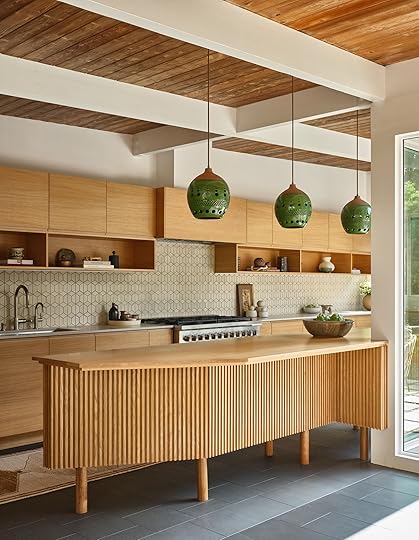
But what really feels special is that it’s footed like a piece of moveable furniture. Now this isn’t a new idea and is very popular with the more traditional modern style, farmhouse vibe (like Emily’s vintage island), and especially the eclectic English style. But when it comes to more modern spaces, like this one, it’s less common and that should clearly change! Look at how amazing this looks and makes the whole space feel lighter.
And in a very “tell me you’re in you’re in your 30s without telling me you’re in your 30s “…the ease at which you could vacuum under that island does things to me. Unprompted, my cousin had the same reaction:)

Oh, another stunning view! This side really highlights not only the really pretty mix of old and new wood between the ceiling and the cabinetry/island but also the mix of wood grain orientation. The grain on the cabinets is going horizontal while the slats on the island are vertical. That’s what I call “secret visual interest”. It’s also why you hire a designer:)
Oh, and notice the dark floor tiles. I love how the ceiling wood and the floors are darker and anchor the space, letting the rest of the lighter elements really shine.

Let’s now talk about this backsplash tile. Kirsten has used this style of tile before in this incredible renovation and I can see why she wanted to use it again. It’s a stunning ceramic tile with a lot of visual dimension in an MCM pattern. But since it’s in a more neutral color, it doesn’t feel overwhelming. Also, the thinner countertop is so sleek and that midtone color goes beautifully with the backsplash tile.


Lastly, let’s chat about those display boxes. First of all, I love them. The homeowner might use them for actual dishware or glassware but there seems to be a good amount of storage between the lowers and island (I assume the wall of cabinets is the fridge/freezer and pantry storage). I think having at least half of them be used for pretty decor creates some visual versatility. Also, I love that the decor is on those lower boxes versus on top of the cabinets. While the “above the cabinet” space, and how to address it is controversial, I love that it’s left unstyled intentionally. There is so much light with all of those windows that leaving negative space helps make everything feel light and airy.
Thank you, Kirsten, for sharing another space with us, GO BUY her wonderful new book, A 1000 X Better: A Rebel by Design, and if any of you decide to tile the base for your banquette, let us know!
Love you, mean it.
*Design by A 1000x Better
**Photos by Michael P.H. Clifford
The post Our New Favorite Place To Put Tile In A Kitchen…Can You Guess Where It Is?? appeared first on Emily Henderson.


May 20, 2024
My Favorite Color In The River House – The Case For The Medium-Toned Green/Gray And Why It Works So Well
Every single time I walk into this room I say loudly or under my breath “Oh my gosh, I love this color“. It’s more of a compulsion than a commentary. It’s just so perfect. Which of course begs the question of what color is it? And furthermore, why is it “so perfect”? But first, you must know some facts that make a difference (and might affect this exact same color in your home).
Where Are WE? The Family/TV Room
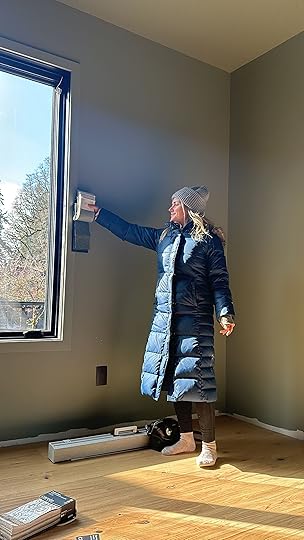
This room is meant to be a cozy family/media room, but unlike ours, it’s flooded with natural light. So we didn’t want to go too dark, but the window frames are black in here so we wanted to help them feel a little less stark.
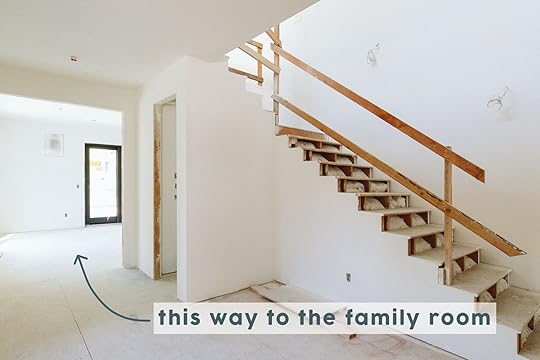 The Family/TV Room With Drywall (Pre-Paint)
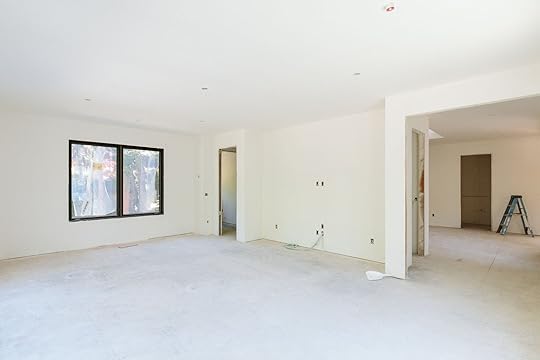
As you can see, here it is with fresh primer after being drywalled.
The flooring is going to be Stuga in Shell (a light white oak) and there will be benches along that window wall.

Those doors face east so at night it gets blasted by the sun (when it’s sunny), although some of it is dappled by the trees.

 But What Color???
While, of course, I’m heavily involved in designing this house, I was really focused on the rooms that had a lot of partnerships and mostly just helping Ken/Katie out in these rooms as their sister. So we didn’t have this super dialed-in design plan – no furniture had been picked out yet. We just knew that it would have a huge sectional, a cozy rug a table for crafting/homework, and a big old TV. But the color palette was totally up in the air.
While I hate choosing paint colors without knowing what else is happening in a room, in this case, we had to because they needed to paint soon. So the options are to keep white, then paint once they fully moved in and chosen all furniture, OR choose an awesome come and hope that it’s the right color for any future design plans.

Max and I went room by room and he really pushed us to not wait on the color – to just choose one and make it work. His confidence was high, so I was like, “ok let’s try it”.
What IS This Paint Color??

Well, it’s none other than Evergreen Fog by Sherwin-Williams (the color of the year in 2021). I’ve seen it used a million times but never experienced it myself, IRL. So I knew it was a great color or people wouldn’t love it so much, but it’s also one of those in-between colors that changes a lot depending on your space.

In this room, it’s just so stunning, soothing, and calm but full of pigment. Sometimes it’s green, sometimes gray, sometimes really warm. But because it’s an in-between color it is going to be nice and cozy at night to watch TV once the shades are pulled, and yet still light and happy during the day when flooded with natural light.
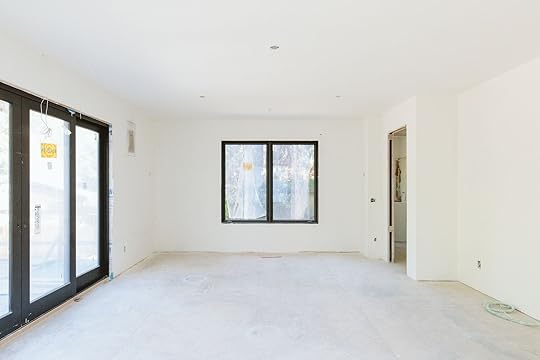
Ah see those benches?!

 Choosing Window Treatments
This room is getting blackout shades and curtains via Decorview. We chose the fabric a long time ago – a really dark green that pulls the black from the doors/windows but also adds depth to this green tone.
Painting The Built-in Cabinetry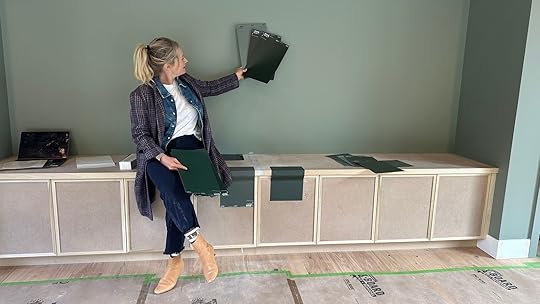
We recently designed and installed this built-in credenza under the TV for storage. So then we had to choose the color we were going to paint it. We are doing with a bit of a color drench vibe in here (the sofa is not green, so it’s not going to be totally tonal). So for the cabinets, we wanted a darker green but not an accent color.

We ended up choosing Foxhall Green by Sherwin-Williams, which is a really dark but not almost black green to balance out the window treatments and ground the TV wall.

I know it doesn’t look too exciting right now, but being in this room is wonderful and I’m so excited about the furniture and rugs we’ve selected. It’s already such a warm, happy, and yet soothing vibe. Would this color look as good in a room with less light? I don’t know. But if you have a lot of light as we do, then I think it’s a viable option for that perfect medium-toned color.

I hope to have finished but empty photos for you soon so you can see how it looks with the white oak bench and the flooring.
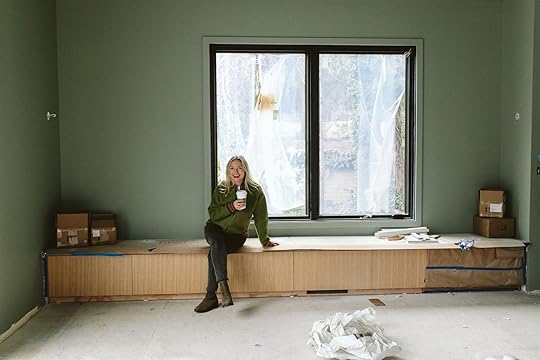
For now, we are loving how this room is turning out and I’m so happy to have another go-to color in my arsenal that I KNOW I love. Evergreen Fog and Foxhall Green FTW (both Sherwin-Williams). And yes, we partnered with Sherwin-Williams on this house but this post is not sponsored – my enthusiasm for this color was too great to keep inside. Enough with the river house gatekeeping. More to come very soon. 
Architect: Annie Usher
Interior Designers: Emily Henderson and Max Humphrey
Contractor: JP Macy of Sierra Custom Construction
Pretty Photos by Kaitlin Green
The post My Favorite Color In The River House – The Case For The Medium-Toned Green/Gray And Why It Works So Well appeared first on Emily Henderson.
May 19, 2024
The Link Up: Em’s $15 Sunglasses, The Running Shoes Mal Lives In, And A Truly Great Mascara
Hola from Mexico! Just kidding we’re back home (well, aside from Jess who decided to extend an extra day:)). We are so grateful to have had that time together, in a beautiful country, to connect! Like Emily said last week, we are going to recap the whole thing but just as a warning, you are going to want to pack those bags and head to Todo Santos ASAP. Ok, now back to our regular programming…LINKS!
This week’s house tour is a Zoe Feldman special y’all! But this time it’s an even more modern (90s and early 00s) and eclectic space with some very cool design standouts…we’re talking a neon yellow range and hood. It’s colorful and cool while still feeling like a home where people really live (and enjoy). Go check it out here!
From Emily: The sun came OUT hard and I was cruising around in the now totally viral Target dress (currently on sale for $28) and not only did I get compliments on it, but also these $15 aviators that are pretty cool. I’m not saying they are the best sunglasses ever but if you are like me and need many that are affordable (in case you are also like me and lose and/or scratch/break them) then I think these are solid contenders that aren’t dorky.
From Mallory: I’ve been getting into running for the last few months and when I was first starting out I posted asking if anyone had tried Hoka running shoes before and you guys gave me the BEST insight. A collective wave of comments told me to immediately go to Road Runner and have them analyze my feet before willy-nilly buying running shoes and you guys were so right. I went in and it was awesome (they do this service for free and if you’re not by a Road Runner I think there are other running stores that do this). I ended up getting custom insoles from them and then they ultimately recommended the Hoka Bondi 8 (I got them in white but they almost have a blue tint to them which I love) and I have literally worn them every single day because they’re SO comfortable. Anyway thought I’d say a big thanks and if you’re thinking about getting into running or just want some very comfortable shoes go to Road Runner!!
From Gretchen: I was running low on my go-to foundation, IT Cosmetics CC+ Cream, and magically (more like scarily) somehow Amazon knew because when I opened the app, a newer version of the same was recommended to me. This one is the “Nude Glow” formula. I already loved the OG version but I LOVE how this one delivers exactly what it says–that nude, my-skin-but-better glow–I think because it’s slightly less coverage? For me, foundation is more about giving my pale face some kind of color than it is about coverage anyway. My shade is Light and it blends into my skin so well! It’s lightweight, moisturizing, has a decent amount of SPF, and is oh so glowy. I think I found a new favorite!
From Caitlin: I’ve shared this before, but I can’t get enough of the 2 Black Girls, 1 Rose podcast. I’ve been a fan for years and it’s been so fun to see them expand beyond The Bachelor franchise – I’m OBSESSED with their recent episodes on Sex and the City, Love is Blind Sweden (so good, if you haven’t watched it) and I can’t wait for some of the coverage they have planned this summer!
From Arlyn: It’s here: Sweat-through-your-makeup season. One of my oldest foes of summer makeup was smeared mascara thanks to my greasy upper cheeks. But it’s been a few years since I even really had to worry, since switching to this Thrive Liquid Lash mascara. It’s a tube mascara, which means it coats each lash in a, well, tube of mascara that dries and doesn’t budge until you wet it. I’ve used other tube mascaras that don’t smudge but also don’t give me long and full lashes, so this one is definitely tops for me and a staple of my makeup drawer forever and ever.
From Jess: New hair mask alert! As to not disrupt my hair care schedule, I bought an Oribe Mini Gold Lust Transformative mask. It was a bit of a splurge for the price but what better excuse when you need a mini-sized mask bottle, right? Well, I decided to give it a whirl a week before the trip (I was too curious), and as I suspected it’s incredible and smells amazing…like all of Oribe’s products. My hair looked and felt amazing after so now I might need to get the full size when I run out of my current one:)
Thanks for stopping by and being understanding about the altered schedule this past week:) See ya tomorrow! xx
Opening Image Credits: Photo by Mike Kelley | From: The Fig House Lounge | Before & After
The post The Link Up: Em’s $15 Sunglasses, The Running Shoes Mal Lives In, And A Truly Great Mascara appeared first on Emily Henderson.
May 18, 2024
Summer Outfit Inspo: Fun, Throw-On-And-Go Outfits On 5 Different Bodies

WE ARE BACK. The EHD team had a retreat in Mexico this recent week and it was so wonderful in a million ways (which I can’t wait to share with you). For today we decided to take a photo or two of some of our lewks that made us feel cute, comfortable, and just super summer (if that were an adjective). It was 75 during the day (a bit chilly at night). Head to stories to see these clothes more in action


Dress | Head Bandana (unavailable) | Shoes
I shall call this the dress I thought I liked a LOT and now realize I LOVE. The pattern and colors are so good, the fabric is super drapey and the boxiness of it gives it style. Is it flattering? Not in the typical way, but after wearing a suit all day and, of course, eating lots of delicious food, this was the only dress that I wanted to wear. Dress it up or down – heels or flip-flops. And while my bandana is vintage I think this is going to be my headdress move all summer. Also, those $15 sunglasses are wonderful.
Gretchen

Top | Swimsuit Top (Not Available) | Pants | Sunglasses
Another linen set from Old Navy? Yes please! This is an easy, breezy and BRIGHT two piece-er that makes me feel tanner than I am and ready for vacation! The swimsuit top is old, but the gauzy top and flowy, pull-on pants are two awesome new additions to my linen line-up. I love how saturated the color is and the texture just feels beachy. Easy enough to slip on over a swimsuit and run to lunch, but so comfy you might find yourself falling asleep wearing them—not that I’m speaking from experience or anything. Also these sunglasses are an exact replica to a pair I bought (and broke) while visiting Toronto. I loved them so much and was devastated when they snapped, so I tried my luck finding the same pair on Amazon (thank you google lens) and scored them for a whopping $17, just in time for the team trip!
Mallory

Guys, I’m OBSESSED with this look and will be rocking it all summer long. I saw it at J. Crew and decided to try it on and it was an immediate “hell yes”. The skirt has 3 buttons so it’s adjustable around the waist and it’s elastic so it’s really comfy but it’s more of a cover-up kind of skirt since the slit is very large (can be safety pinned or sewn shut so the slit is less intense). It’s also super lightweight so it’s perfect for the warmer months. I can’t wait to pair the top with some light blue denim and rock a different look too!! I was surprised to find out it wasn’t very expensive for J. Crew — plus this purse went so well with it and it’s on sale for $26 right now!
Jess

Going into & Other Stories is always a gamble for me. Sometimes a huge success and other times well…not and the limited sizing is the issue. Luckily, this time was a big success as shown through this yellow dress It’s a large which is their biggest size (GET IT TOGETHER & OTHER STORIES! WHAT?!). So aside from that I really loved the color, the subtle floral pattern and the length. On the website they call it a midi dress but at 5’4″ it’s a maxi on me:) It also comes in a solid red which I’m highly considering too. It’s just easy to dress up or down and awesome for summer.


If you love the look and feel of linen but you’re not crazy about the price tag, you need to RUN to Target IMMEDIATELY. This set was $35 and it feels incredible – soft, breathable, and comfortable (you know a gal loves an elastic waistband!). I have a long torso and found that the tank would flash just the right amount of skin – I’m not comfortable in “crop tops” and I normally wouldn’t gravitate to this draped cut with my 36F boobs, but I was SO surprised by how at ease I felt in this combo. I’m usually a 12/14 and grabbed a large in both pieces – they really feel like a nice way to dip my toes into the world of matching sets in a way that doesn’t feel like I’m trying to dress like a teen! (PS. The rest of the A New Day collection is unreal – I grabbed this linen-blend dress and these pants and the quality is UNREAL for the price. You’ll love it, I swear!)
Hope these got you excited for the warmer months! See ya tomorrow. xx
*Photos by Kaitlin Green
The post Summer Outfit Inspo: Fun, Throw-On-And-Go Outfits On 5 Different Bodies appeared first on Emily Henderson.
May 17, 2024
Fix It Friday: 4 Ways To Tackle The Tricky Empty Corner (+ Real Reader Homes!)
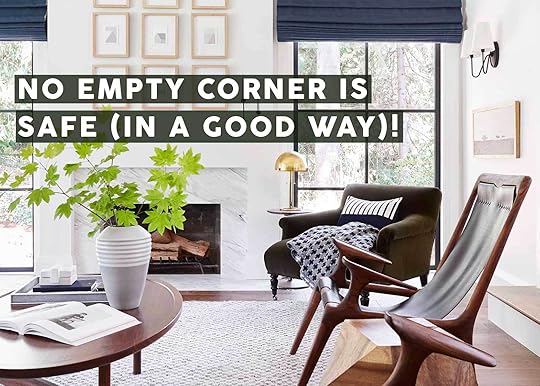
Fix It Friday Friends! I’m back with another installment. You’re either here because you have a similar issue you need help with, or (like me) you love having a peek into other people’s homes. I blame my parents for raising me basically *inside* model homes in builder communities across the greater Orlando area (but for real, it was one of our favorite pastimes). Anyhow, today, we’re tackling the thorn in the side of every room/space: the empty (or troublesome) corner.
Coincidently, while I was working on this piece, EHD alum Brady posted a reel on Instagram about how to fill an empty corner. His formula? Pretty armchair, sculptural side table, table lamp, art. As is usually true with Brady’s design suggestions, he’s definitely not wrong. This is a SOLID recipe for filling a corner. It works in a bedroom, in a living room, and in an office.
 design by emily henderson design | photo by sara ligorria-tramp | from: a budget and rental-friendly living and dining room (with 80% thrifted finds)
Another failsafe combination? A small piece of storage furniture, such as a tall or short bookcase, a small cabinet or console table.

 left: design by arlyn hernandez | photo by sara ligorria-tramp | from: arlyn’s bright & happy rental living room makeover | right: design by brady tolbert | photo by sara ligorria-tramp | from: brady’s living room refresh with the citizenry
Or a plant. A plant almost always works.
 designed by velinda hellen for ehd | photo by sara ligorria-tramp | from: sara’s living room & dining room reveal
But today, I’m tackling four readers’ corners with a few more customized solutions, because not every empty corner is created equal. In some, I offer straightforward advice (tree! console!). In others, I see a chance to spin around some furniture orientation to open up more room to work with, turning a corner into a whole-room opportunity. Let’s dive in.
Coffee Corner ConundrumFrom the reader: “We recently bought a new house and from the first time I saw this spot, I envisioned a lovely little ‘morning coffee corner’ with a round table and big cozy chairs; except now that we live here, I’m having a terrible time with scale and room layout in general. I suppose a dining-height table isn’t the right size for this corner, but I just love the look of an oak pedestal. My style is very vibrant, and vintage, with a touch of English cottage / low-key coastal. As for budget, we’re flexible.”

The second I read “coffee corner,” I knew I needed to help this reader figure it out. How fun is that? I agree that the scale is not right for this big, open space, but I can help her remedy that while still keeping her beloved pedestal table. In the extended version of the reader’s message, she mentioned all the existing furniture was left over from a recent move, and they will be taking their time to fully furnish their home. Let’s look at a wider shot of this room, so you can get a better sense of what we’re working with:

In the floorplan she also sent (#prepared!), I saw that there was a formal dining room/dining area if you went straight past the fireplace (opposite the coffee corner), so we didn’t need anything overly spacious here. I immediately knew what I wanted to do here: a corner banquette. I thought it would fill the space nicely, offer her that cozy English cottage vibe she said she loves, and also offer another moment to bring in some quirky style. She also mentioned the windows to me, but figuring out this corner would require me to figure out the rest of the room, and that’s not really why we’re here today. (But for the record, a pretty Roman shade or bamboo roller shade on this window and the other large ones would be nice and charming.)

Banquette | Sconce | Bolster Pillow | Existing Table (similar)
I found this beautiful block print corner banquette at Ballard Designs. It’s a bit pricey at almost $2,800, but I think it would be well worth the investment to make this part of the room feel really locked in and permanent. They offer different sizes and pieces, so she could get the lengths she needs depending on the measurements in there. The green plays well with the red tones of her wood table but also pulls from the existing sofa. She can very well throw some pretty pillows in the mix, but a formal velvet bolster is such an ice, clean look (and the velvet also references the sofa, too). Oh, and I also suggested a long arm sconce to add even more drama and interest. This one is plug-in, which won’t require adding any junction boxes, and can easily be plugged into the outlet that I believe I’m seeing under the smaller window. Hang it in the empty space to the right of the small window.
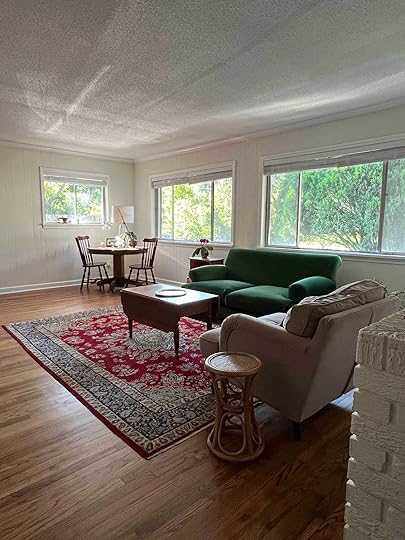
A Sofa SwitcherooFrom the reader: “I have been struggling with what to do with this space for years! I’d love to add some storage to this area. I have a large cabinet to the left of the fireplace, so not sure if I should do something similar or change it up. My style is Anthropologie-like. I love fun pops of color, but yet again struggle to use it. I’d love nothing more than to complete this space and keep the budget under $1,500. I’d love this space to feel more cozy and fun!”

I thought long and hard about this room, wondering what the right answer for it was, and then it came to me: the sofa is in the wrong spot. Anything you put in that corner is going to be blocked by the sofa where it is, and if not blocked, very tight (at the very least). I 100% understand why they put it where they did, but I want to suggest something different: Spin the sofa 90 degrees, so the back that’s on the bottom right is actually on the left (near the dining room). This will open up the space under the windows and create access to the nook. Plus, “closing off” the dining area would make this space feel more like its own and cozy as the reader wanted.
From there, I’d move the fabric wall hanging and plant into the space between the windows, add floating shelves top to bottom in the nook to create storage and even some pretty styling moments, and add a show-stopping lounge chair in a great, dramatic color.
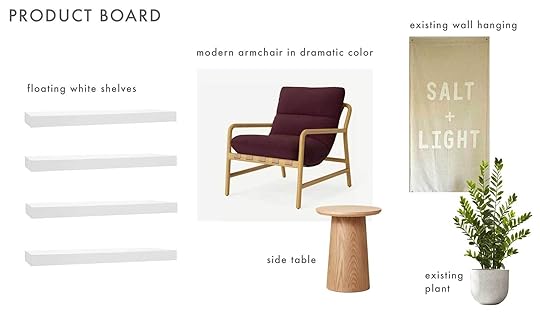
Floating Shelves | Armchair | Side Table
These shelves are from Rejuvenation and are available in a ton of widths. I wasn’t sure what the width here was, but guessing about 36 inches. Four shelves should do the trick. There’s always the option of getting a custom built-in solution, with some closed storage below if needed, but that is, of course, far more expensive. If that space happens to be closer to the 43-inch mark, they could save some serious money with the Lack shelves from IKEA. The bulk of the budget goes to that beautiful chair from Anthropologie. The bordeaux color gives the reader that jolt of color she mentioned loving, but it’s deep enough that it’s not shocking to the senses. It also seems to go well with the rug that has some muted red tones in it, I think. A pretty, stately table (from Target!) could either go on the side of the sofa after it spins or to the side of the chair to create a true little reading corner.
From Empty Hallway To Decor HallmarkFrom the reader: “Longtime listener, first-time caller. There’s a nook at the beginning of our hallway that just feels like it’s asking for some sort of moment. It’s 36 inches wide. Around the corner, there’s a gallery wall of family pictures, but otherwise, the hallway is just a hallway. I’m still trying to figure out this space after three years in our home. And there’s also a nook in our hallway that just feels empty.”
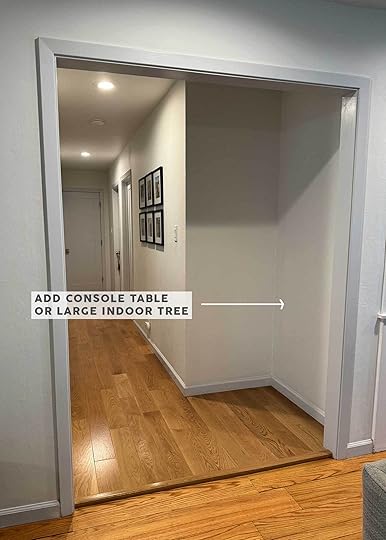
Haven’t we all had a hallway nook just like this at some point that we didn’t know what to do? I had one EXACTLY like this in a hallway twice this length in my old apartment. The nook was the halfway point of the hallway and I never was in love with what I ended up doing—I placed a small side table with a vase and flowers, and hung some art above it). It was totally fine, but it wasn’t special and basically just became a spot that collected dust. I don’t want that for this reader!
Before settling on what to do here, I reviewed some other photos of the space nearby the reader sent to get a sense of style and color. It reads a little vintage, a little mid-century, a little quiet modern.

Back to the hallway corner nook…
I’m of two worlds here. They could either keep things simple and add a tall, dramatic leafy tree which would add so much life to what is otherwise just a transient space. Or go more decorative with some furniture, decor, and art. It’s hard to tell how much light makes it in there, but my guess is…very little. A low-light tree would be important, or she can always go faux (which is never my first option).
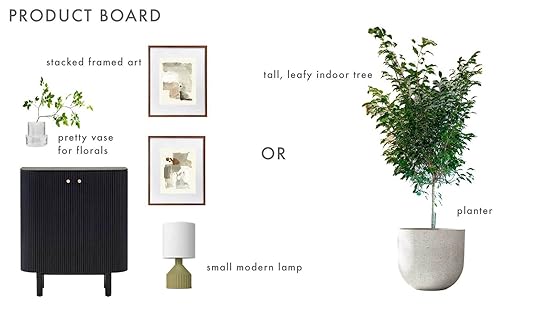
Combo on the Left: Console Cabinet | Glass Vase | Frame | Top Art Print | Bottom Art Print | Lamp
Combo on the Right: Indoor Tree | Concrete Planter
For my first option, I’m suggesting this pretty, warm modern console cabinet that leaves a few inches on each side of the nook so that it’s not a tight fit. Plus, more storage is never a bad idea in a home, right? A petite lamp in a cool color (like this olive one) would add some ambiance to the hallway. I’d pair it with a glass vase for visual lightness. She can add flowers or dramatic branches to it. To fill the verticle space, how about two pretty abstract prints in walnut wood-toned frames (this matches some of the wood tones in the living and dining spaces)?
And in option two, I love the bushy-ness of a Benjamina Ficus. It does require indirect light, so it may or may not work here. It’s also not pet-friendly (but the reader didn’t mention having pets). There is also a Dracaena Marginata which can tolerate medium to low-light situations but is also toxic to cats and dogs. A simple concrete planter would pair well with either of those tree varieties.
Opening Up A New PerspectiveFrom the reader: “While we love so many aspects of our modern city home (floor-to-ceiling windows! waterfall counter! roof deck! etc), there’s one area of our main floor that’s really confusing/hard to optimize and that is our dining room. We are looking for a storage cabinet/bookshelf/ tall console to help stow linens, drink, and barware, and display family photos or cookbooks in a way that feels light and airy and not too cluttered. This room also, and annoyingly, serves as our mudroom, so while we want to add something, we also want to be mindful that the room already works overtime as a landing zone for stuff. We are hoping to find something that’s closed on the bottom (toddler), and likely tall to help fill the space. We lean towards a minimal, modern style and have aspirations of our home feeling like a modern rustic house in the city – are we nailing it, not sure, but that’s our goal and we have no idea what to do here. Our budget is $3,000 to $3,500.”
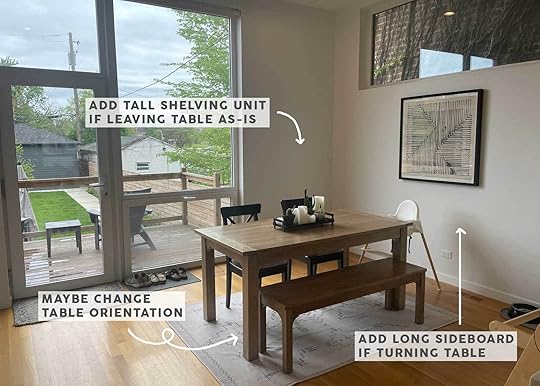
Remember two readers ago, when I suggested spinning the sofa to open up more usable space? Well…guess what? I’m back at it. I think we have a missed opportunity here to use the full expanse of the long wall with the art on it. Also, to me, adding a tall storage piece to the small piece of wall next to the windows might feel a little off-balance. It would certainly work from a functional standpoint, but to me, it’s option B.
Option A? Turn that table and rug so that it’s parallel to the high horizontal window (and in line with the island for a better visual flow). I’m not sure of the table size, so there is a chance it wouldn’t fit comfortably that way. Perhaps that’s the whole reason the table is oriented the way that it is, BUT, if they haven’t thought of it, I want them to.
Here’s another angle of the room plus the rest of the first floor, which is one big open-concept space:

To me, that big wall is begging for a moment. I know the reader mentioned this being both a mudroom and dining area, and while it’s a little out of the path of travel, a long open surface on a 90-100″ credenza might be super useful.
Here are some of the product boards I came up with, one in case they *can* turn the table, and another in case they can’t:

Combo on the Left: Sideboard | Lamp | Candle | Tray | Match Striker
Combo on the Right: Bookcase | Lamp | Tray | Plant
Okay, so the left combo has a sideboard that’s 96 inches. The reader mentioned her room is 123.5 inches by 163.5 inches, but I’m not certain which length is for which direction. Either way, those 96 inches are large enough to provide ample storage and surface area without devouring the space. They can leave the art where it is, and maybe flank it with two matching lamps (or not). I just love accent lighting in dining spaces to make them feel so romantic and magical after sunset. These are from Wayfair and under $90 including the shade which, sadly, is a great price these days for lamps. I rounded it out with a long, narrow tray, a candle, and a match striker, but honestly, they could just stack cookbooks in a few piles and it would look just as nice.
For the right combo, I found a tall bookshelf with closed storage that would fit within the 56.5 inches of space to the right of the windows. The wood tones match some of the other furnishings in their home, it’s clean and modern but a touch rustic due to the organic grain. A mini lamp never hurt anyone, a catchall tray also never hurt anyone, and a trailing plant—you guessed it–never hurt anyone (I don’t think…).
That’s it for this Friday post. Corner conundrums turned corner conquests! If any of the readers who submitted their homes and made it into this piece make any changes, keep us updated! The same goes for any other recipient of Fix It Friday advice. Update us all, pretty please! Also, if you have a Fix It Friday topic you’re hoping we tackle, drop those in the comments (remember, they should be easy, tangible, small areas of the home that need a designer’s perspective). Some we’ve already done: bedding, foyers, windows, color palettes, mantels, and outdoor spaces.
Until next time.
Your friend in fixable design, Arlyn
Opening image credits: Design by Emily Henderson Design | Photo by Sara Ligorria-Tramp | From: Portland Project: The Living Room Reveal
The post Fix It Friday: 4 Ways To Tackle The Tricky Empty Corner (+ Real Reader Homes!) appeared first on Emily Henderson.
May 14, 2024
EHD is OOO!!! A Fun And Much Needed Retreat + Here’s The Plan For The Week

I closed down the LA office in July of 2020. Obviously, we all went remote at that point and Brian and I weren’t locked into Portland yet, but pretty close. I was SO relieved to not have that $5k a month overhead. But being 100% remote can be hard! All the research shows that hybrid work is the healthiest and most productive, especially for a job that requires a lot of creativity. But with our team in two different states that’s obviously not possible. Jess, Mal, and Caitlin are 100% remote, working from home in LA, with a handful of in-person lunches or dinners to connect. Then up in Portland, we have Gretchen and myself, of course, and our wonderful photographer/friend, Kaitlin who is freelance but we shoot together weekly so she’s adopted as a team member for our retreats. Gretch and I work from home most Mondays and Fridays, then prep and shoot together Tuesday – Thursday. It all works because my LA team has been with me for so long so we have a real rhythm and routine, not to mention so much consistent communication and extreme trust. They are real pros and need no hand-holding. But after a few months without seeing each other outside of Zoom calls it’s like any long-distance relationship – you just really need to connect in person. We try to see each other once a quarter at least, – whether it’s up here for a retreat, in LA, or more of a destination (Like Nevada City/Grass Valley two years ago, Long Beach, Round Top, the mountain house, etc).
So Where Are We On This EHD Retreat???MEXICO!!! We all arrived in Todo Santos, Mexico, last night for a three-night hang session (and they are staying after without “mom” :)) We usually prep out blog posts and schedule them so you don’t miss any content days when we are out of the office together (you guys don’t even realize we are OOT). But trying to keep up with daily content and prepping for the upcoming weeks while also trying to be present and connect, is soooo HARD. Jess ends up staying up late to make sure we are dialed in or we end up phoning it in because we are writing with cocktails. Then after we are back, everyone suffers trying to catch up on emails AND prepping the next few weeks’ posts (while likely being depleted from traveling). As the business expands outside of the blog, I love that our team remains this lean. But if we don’t take some time off here and there from the daily content we won’t have time to think creatively, and we can’t create space for new ideas. That’s all to say that for the first time in EHD history, there will be no blog posts this week until FRIDAY (so taking off today – Thursday). But what we are doing this time is real-time social stories of our trip (not banking it to align with a blog post – which we will, of course, publish after we are back).
So if you want to watch the 6 of us connect, hug, laugh, ride horses, drink margaritas, and “boat brainstorm” in Mexico, then head over to the IG account this week and show us some “likes” if you are into it. We are staying at a beautiful Airbnb built and designed by the owner of deKor, one of our favorite design stores in LA (and Ojai). We’ll of course tour the whole thing for you. The goal of the next three nights is just to connect, laugh a lot, and probably tell inappropriate stories that any HR team would be appalled by. Hell maybe we’ll even come up with some great content ideas or a way to reinvent the holiday gift guide (LOL), but for me, I will be taking off my boss hat and hoping to connect with these wonderful friends who work so hard for EHD and show them a percentage of appreciation they deserve. Come back Friday for a great design post, head to stories to see what our Airbnb looks like, and see me gallop on a horse like Jessica from The Man from Snowy River.
Opening Image Credit: Photo by Kaitlin Green | From: Farmhouse Front Porch Reveal
The post EHD is OOO!!! A Fun And Much Needed Retreat + Here’s The Plan For The Week appeared first on Emily Henderson.
May 13, 2024
Forget the Focal Wall – Enter the Focal Room (How To Manage A Multispace Eyeline Within Your Design) + A Colorful Bathroom!
January marked our team’s (“Velinda Hellen Design”) fourth year, with over 300 projects under our belt. The majority of these are return clients or referrals, a testament to your trust and support, especially during our start-up days amidst the pandemic. Your collaboration and confidence have been our anchor, propelling us forward. We can’t help but reminisce about the many faces that have crossed our path over the years. It’s a sentiment echoed among our team: we have the best clients, hands down! And a significant portion of that gratitude goes to EHD.
Amid the many gifts from our collaboration with EHD, top-notch clients stand out. When clients mention discovering us through EHD, it’s an instant reassurance that we’re aligned with kindred spirits. While there might be statistical correlations between informed blog readers and creatively-minded, generous clients who would be an asset to any dinner party, I avoided any/all statistics classes in school. Instead, here are results from my amateur field research, having worked now with several of you readers over the last four years:
You all:
· You embrace color fearlessly.
· Love a clean, contemporary line, but don’t fully abandon eras gone by.
· Bring informed perspectives to the table, and push boundaries.
· Break the mold!… I’ve heard rumors that many designers look to leave residential design because clients can be too “exhausting”. Our EHD reader-clients are REFRESHING.
Take today’s reveal’s clients, the most delightful EHD-reading couple. Their Spanish bungalow in West Hollywood was a canvas awaiting the perfect balance of Mediterranean charm and modern allure. With multiple shared eyelines, the challenge was guiding the eye seamlessly through each distinct space. Our solution? “Forget the accent wall”. To avoid confusing the eye amid this much information, “It’s time to whip out the accent room!”

Now, choosing bold elements isn’t without its balancing act. Thankfully, I’m supported by a team of design tightrope walkers, like Julie Rose and Grace DeAsis. For this project, Julie was the lead designer and my collaborator on each careful step taken to avoid “wobbling”.
But let’s back up…To 2022 when we finished this project. Before blooming, this Spanish beauty looked like this:


Unlike our clients, the home lacked warmth and personality. Functionality was lackluster, though the original hardwood floors had already been impressively redone, pulled back to a natural white oak tone our clients loved (as did we!).
The layout of the kitchen unnecessarily divided a nice-sized kitchen nearly in half. And unlike the rest of the house, which had an open flow and entryways with lovely, historic arch detail, this room had a standard, narrow passageway that cut off potential natural light to the dining area and inevitably exiled a host from the hub of future gatherings. This would not do.

With a need to expand the passageway to mimic the other two and the acknowledgment the dining room would now be a visual extension of every main living space, we had uncovered our currently-shy, but soon-to-be anchoring all-star. An ugly duckling ready to become a swan.
But unlike every 90s movie, we couldn’t simply straighten frizz, remove eyewear, and expect a shallow love-interest to suddenly take notice. We needed to establish a palette that was stand-alone-exciting enough to pull the eye first within the design (as any good, anchoring “accent” will do), but gracious enough to complement or share elements well with other rooms. Our palette and overall aesthetic direction started here:
The original concept was to bring in some vintage elements and a wallpaper that blended the colors of all adjoining spaces.
And without further ado, here she is…

To maximize entertainment potential in a consolidated footprint, a round extendable dining table became the central piece. This avoided interrupting the flow of this usual pass-through room unless extra guests demanded it. HOT TIP: A dining table in a similar tone as the floors will help keep the large piece from feeling overwhelming, especially helpful in a smaller space. Duo corner cabinets were brought in to provide both open and closed storage as well as a place for appetizers and cocktail setups to land when entertaining.

While adjacent spaces would be lighter and brighter, this one would carry the most visual weight through chunky black chairs, lots of natural texture, and a bold blue and green patterned wallpaper. This central space had “oomph” (an incredibly technical design term). To keep it from leaning too heavy, wood tones and the oversized natural rug (for when the table is at its max capacity) all played off of the gorgeous white oak tones of the floor.

Here’s just a small peek into the office nook, where we repeat elements from other spaces you still have in store: floor tiles and custom cabinets match the kitchen while the color pop teases what’s to come in the bathroom.

To successfully play off this established aesthetic, the adjacent rooms needed to be related without matching; “sisters” but not “twins” to this not-to-be-forgotten middle child. Beyond implementing similar finishes and complementary color palettes, they also needed to maximize function and balance the home’s historic heart with the client’s contemporary cravings. And what better place to curb a craving than in a kitchen:
Want to guarantee colors will pair well? Take a leap across the color wheel. Opposites attract! Our design color anchors were blues and greens; our leap landed us in the pink world, which happens to be a simplistic yet contemporary nod to traditional Spanish designs.

The soft Portola Roman Clay added a bit of texture and warmth to the walls and an extra layer of depth to the space, but little was needed thanks to the gorgeous variations of the concrete floor tiles, which our client reports is easy to keep clean since it was properly sealed despite the porousness. The flooring was kept heavily mosaic influenced; a clear “old world’ statement since the more contemporary, white oak tones were again repeated in this room through the custom cabinetry, remember we are going for “sisters” not “twins”. The integrated pulls in lieu of traditional hardware further “modernized” the look in a subtle way.

To keep things feeling open and airy, we opted for floating shelves instead of traditional uppers along this run as well as white minimal light fixtures and window treatments.
Continuing the streamlined theme, a seamless counter to an apron front sink was installed in a more natural quartz material that brought in some of the rustic earthy-ness aesthetic our clients were drawn to from their inspiration of the space.

Topping things off with a zellige backsplash in a similar color to the stone laid out in a modern leaning pattern, vertically stacked.

An adjusted cabinet layout allowed the original square footage to multiply in functionality and now frame the walk out to the gorgeous patio, bringing the outdoors in. The space not only feels/looks more spacious, it has uninterrupted flow from the dining room to the courtyard, meaning nobody ends up exiled…this is now wholly a hub.

Never mind the fact you’re technically standing in the laundry room too. Who would notice, given the streamlined carpentry (with louvered doors for ventilation), integrated/hidden appliances, and a narrow but mighty utility storage?

This pretty “sister” shows a softer side, overall, complementing the anchoring room without competing. She doesn’t mind that the louder, bolder “middle child” demands attention first. Her own, subtler demands are satisfied.
But she’s not alone in having to “share a room”. On the other side of our dining room lives the brightest sibling. And when we met her, she looked like this:


Great bones and historical character! Look at that barrel ceiling and original fireplace. We didn’t want to lose an ounce of it, but wanted it to shine brighter. And that same zellige tile that shone in the kitchen helped:

A simple refinish for stunning sophistication. But you’re looking at this space’s biggest challenge. Designers in the 1920s were completely careless when it came to placement for TVs. Every last one of ‘em. Bizarre. We didn’t want to lose the overall shape of this original fireplace by pulling away the mantle, but the layout of the room combined with the height of this one just wasn’t going to work. Our savior: the Frame TV stationed on an easel-style TV stand.
As you all know by now a trick to add more visual height to any room is high and wide window treatments, we went with a dark olive tone for some added color and depth. The thicker velvet fabric is great for blocking out any TV glare.

The rest of this room was simple furnishing and lighting fixture swaps, which were kept wall-mounted (true to the era of the home) but modernized. Lighting is a great place to “play” or even follow trends as they are easy to swap over time. And boy did we love the playful, nimble double-arm sconce in this room.

Sophisticated and bright, vintage-leaning rugs with the help of our friend, Sheba, who owns Blue Parakeet Rugs and a slipcovered sofa (leaning once again old world) are balanced by a contemporary, chunky chair and pops of black (more subtly repeating the black pops in the dining room). Then, further proving to be fearless and fun, our clients encouraged a colorful reface of the front door for a fully-swoon-worthy-yet simple first impression.
A formerly “dead” space was reimagined to serve as an entry drop zone. Including storage for shoes, hooks for jackets, and incorporating the existing black bar cabinet which holds all the party essentials.
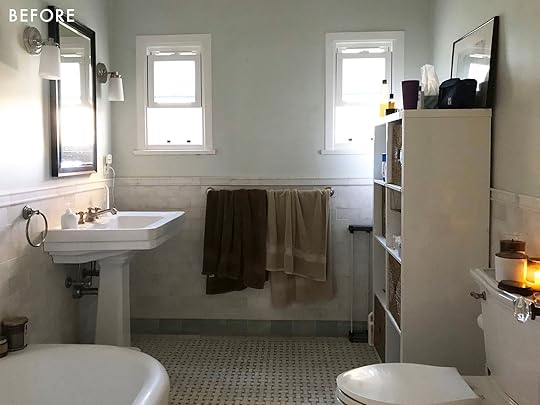
Speaking of needing to make an impact; there is only one bathroom in this house. So, the single commode quarters needed to be as exciting as a guest’s powder room yet as soothing as a spa, all while being fully functional for everyday use. At first, she fell short of fully hitting any of these marks:
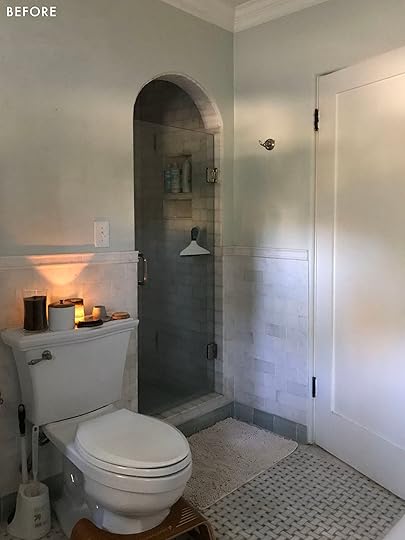
But after a buff, came a beauty (WHOA! It’s like she took her glasses off??!):
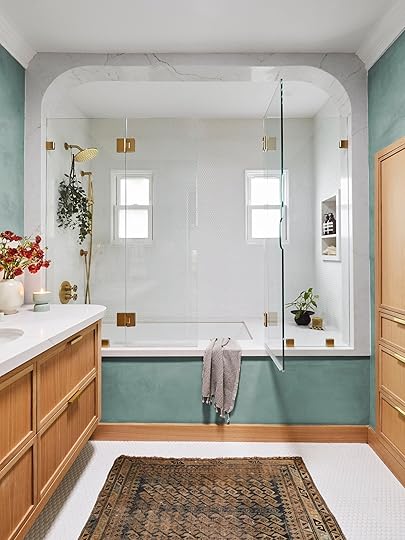
While the footprint and even windows were kept, the space was reimagined. A large shower and tub plus maximizing storage were two things on the top of our client’s list.

The former shower became a separate water closet “nook” to maximize the space allotted to this older bathroom’s wash zones and add a bit of privacy to the toilet area, which was oddly in the forefront before. Adjusting the placement of the plumbing gave way to the opportunity to integrate a built-in cabinet for additional storage, further maximizing both flow and functionality.

Adding to the visual “openness” is this floating vanity moment. It’s a custom design with rounded edges and a mirror integrated into the stone of the backsplash. Paired with classic-leaning lighting for an overall timeless touch.
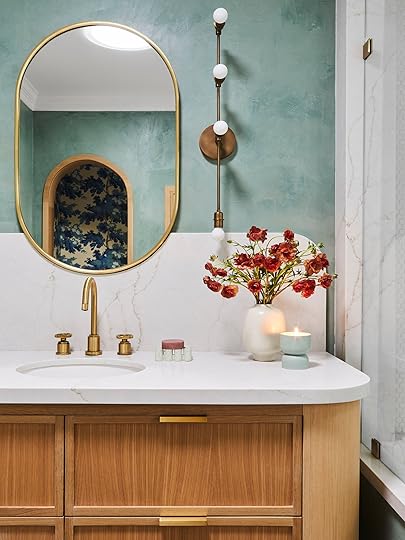
Here’s that color the office built-in “sneak peek” teased, applied here in a Roman Clay finish which speaks to the subtle movement/wall material of the pink hue in the kitchen.

Inspired by arched elements often found in Spanish-style homes (and the barrel ceiling present in this one), curves became a repeated element in this space. Rounded elements repeat through the arched stone shower opening, the curved glass cutouts on the shower doors, and the singular oval sink (we, of course, asked our clients’ preference for two sinks vs one with more counter space and they chose the latter).

Further adding to the traditional vibes, penny tiles were used for the floor and shower surround for more of that modern spa-like look. The water closet nook was dressed in a wallpaper that stayed true to the palette established in the nearby dining room and was chosen in a traditional pattern. A vintage rug, again from Blue Parakeet, was used as a bath mat for some additional charm within the now fully-new design.
And thus, the Spanish sisters burgeoned into beauties. Given the great bones and personality already at the core plus the easy-going nature of our savvy clients, the only real challenge faced on this project was avoiding a fight for attention from each craving sister space. But it ended harmoniously.
Speaking of harmony. I started writing for EHD in 2018 and at that point, I casually used “friends” to address you readers. Now, many of you have become just that “IRL”. From casually addressing you in 2018 to now, it’s been an incredible journey of collaborating with both teams and clients who deserve that valued term.
We hope to work with more of you! Currently immersed in thrilling full-service projects, our virtual services are a tad limited. But fear not, if you’re eager to join forces, simply drop “EHD” on your intake form, and we’ll fast-track you onto our client list. Planning a major renovation? Let’s chat—we’re already lining up projects through 2025 and we’re happy to extend a complimentary call. Thank you, FRIENDS!

*Design by: Velinda Hellen Design
**VHD DESIGN LEAD: Julie Rose
***Photographer: Sara Ligorria-Tramp
****Stylist: Emily Edith Bowser
The post Forget the Focal Wall – Enter the Focal Room (How To Manage A Multispace Eyeline Within Your Design) + A Colorful Bathroom! appeared first on Emily Henderson.
May 12, 2024
The Link Up: Em’s Feel-Good Book Of The Summer, Jess’ Dream Blouse, And Our Most Effective Deodorant

From Emily: Happy Mother’s Day, friends. May we treat all women like the queens that we all are, whether we’ve given birth to children and/or likely cared hard for everyone around us with motherly love. My advice? Keep your expectations low, plan your own fun day, and love on everyone around you because having anyone to take care of means that you are appreciated. To all my fellow ladies, being a woman means being part of a sisterhood and I feel the influence of so many of you in how I parent (talking to you Dr. Becky). Happy Mother’s Day, to all!…. well, except for all the dudes, this is NOT your day – as Brian very well knows I take my coffee black, my mimosa filled to the top with fresh oj on the side and I prefer a medium to firm foot massage and not the phone it in kind. And Happy Mother’s Day to my mom (mother of six!), my MIL (mom of two boys!), and all my wonderful friends out there raising kids with me – you all taught and continue to teach me so much about how to do this role with the least amount of damage but mostly about love and connection (I HOPE). And listen, we are all going to screw our kids up in one way or another so let’s give ourselves a break today from overanalyzing how our mistakes will affect our kids and instead recognize that we love them so hard, so endlessly and that’s 99.9% of being a “good mom”. Now go take a bath, read a romance novel, or watch The Idea of You while drinking something fancy in bed. xx
This week’s house tour is the home of songwriter, Benny Blanco. The majority of the home is classic and beautifully traditional home but has a lot of fun, youthful decor. We’re talking Squashmallows on the primary bed:) But his home theatre is pretty incredible and bold. Honestly, you just have to go see it. Go check it all out here!
Also From Emily: I’m calling it, the feel-good book of the summer is Emily Henry’s, Funny Story. The other Em Hen is sweeping all the ladies that are into books with easy wit, charming characters, and feel-good everything. I’m not breaking the story here, if you like romcoms you know that every one of her books is awesome (start with Beach Read). Add in Sarah Adler and Carley Fortune’s new books out soon (I’m sure more) and ladies we have a summer of beach reads ahead of us. Also, follow Beach Reads & Bubbly on Instagram for more if you are into this genre (there are days that I fantasize about having an account just like this – just reading and reviewing romance novels and thrillers all day long!! While no job is as easy or fun as it looks, my goodness I would enjoy that).

Left: Dress + Bag (similar and the one I reeeallly want) + Slides | Right: Hat + Blouse + Shorts + Slides
Also Also From Emily: I headed to Anthro for the last stop to find some pieces for Mexico and boy did I get some good ones. I love this dress. It’s fun but so incredibly easy to wear. I will be wearing this all spring and summer long. Then you know I’m a sucker for a romantic flowy blouse and this one is so pretty and lightweight/breathable. Another piece that I will easily wear all summer. Then finally those yellow shorts are so cute. I do have a special 20% off code in case you also want to try these out or anything else Anthro has (which is a lot of great stuff). Just use code: EMILY20
From Caitlin: ICYMI: Last year, EHD fav favorite Rajiv Surendra launched his own YouTube channel and it is HANDS DOWN the most inspiring and inspirational place on the internet. Rajiv has sparked a newfound love and appreciation of craftsmanship in me (I’ve picked up some very amateur woodworking and sewing skills, inspired by his adventures!), I’ve learned a ton (who knew I’d be enthralled by a 23-minute video on keeping your whites bright?), and I honestly just think Rajiv is a great role model for living a beautiful, intentional, conscientious life on any budget. He describes it better than I can in this channel description: “I really believe that the key to living a rich and fulfilling life is much simpler than we assume; that every day can be filled with tasks, activities and simple pleasures that leave us with a sense of real, lasting accomplishment.” AGREED, RAJIV. (This video, filmed in a custom upholstery shop, is SO GOOD. You’ll be hooked, trust me.)
From Arlyn: Considering I suggested Stasher bags last week, it’s clear by this week’s recommendation that I’m heavily focused on my food storage needs lately. For the longest time, I really struggled with storing broth, soup, and sauces in the freezer. I’d mostly use disposable freezer bags and then freeze them flat as best I could. The problem with that was I rarely had room in my freezer to do that, so they’d end up crumpled. That, or I’d freeze too large of a batch and defrosting was a pain, especially if I just wanted a single serving size. Enter: 1-cup silicone freezing tray with lids! I recently made a large batch of bone broth, let it cool, ladled a cup into each compartment, popped them in the freezer (they’re sturdy!), and boom! Now I have small batches of bone broth to use as I please. I plan on using this for tomato sauce this summer, soups year-round, and anything else that makes sense.
From Jess: I finally found my ideal big-collar white blouse and I LOVE her. It’s romantic but shows just enough cleavage to look a little sexy and I love all of the detailing. Plus it’s roomy which I very much appreciate. Throw it on with jeans or shorts and you’ll immediately feel put together and comfortable.
From Gretchen: I finally found the perfect cargo pants, and it was truly a Goldilocks moment. The first pair was way too baggy (and kinda looked like scrubs), the second pair too long (though I did order a tall…), and the third made my already flat butt look absolutely concave. For me, the perfect cargo pant has depth, with just the right amount of pockets to add strategic bulk. Well, Abercrombie made it happen! These cargo pants (among many they offer) are my big winner! The slouch, the color, the POCKETS (and helllllo that zipper detail). I love everything about them. Heads up they are on clearance so they may go fast!
From Mallory: I used to have 2 major flaws that I cannot believe I’m gonna share on the internet but why the heck not: I used to be smelly and my lips were always chronically chapped. I’ve shared the deodorant that literally changed my life on here before (yes, it’s expensive for deodorant but it’s the only thing that has ever worked on me), but I realized I didn’t share my cure for chapped lips. Feast your eyes on my favorite lip balm that I buy in bulk every few months so I can keep them in my car and every bag I own!! If you’re also a smelly girl with chapped lips: I feel you. try these. It will get better.
Again, happy Mother’s Day to those who are celebrating, and see y’all tomorrow. xx
Opening Image Credits: Photo by Kaitlin Green | From: Our Custom Farmhouse Dining Nook Reveal (And What Makes It So Incredibly Durable…And Pretty:))
The post The Link Up: Em’s Feel-Good Book Of The Summer, Jess’ Dream Blouse, And Our Most Effective Deodorant appeared first on Emily Henderson.
May 11, 2024
My Current Favorite Lightweight Trousers On My Body

Here we are – the transitional months where our bodies are so confused about what to wear to be comfortable all day long. It’s warm during the day but not hot, but could be hot if you are in the sun in the middle of the day, but probably too cold to leave the house in tiny shorts or skirts. And nobody but me has any color on our legs yet (obviously, mine is from a bottle) so people just aren’t ready for that level of exposure. So I shopped and tried on a bunch of lightweight comfortable trousers and found a few that I feel really good about recommending.
Very Comfortable Old Navy Linen Pants
Hat | Sweater | Linen Pant | Shoes
On my recent “Oh wait, Old Navy is so awesome” discovery, these linen pants were a big winner. With the right casual but elevated top and shoes, you can take these crazy comfortable pants and make them look/feel like you really care about your appearance.

Hat | Sweater | Linen Pant | Shoes
I bought this sweater at Free People because it’s that perfect slouchy, heavy knit that is roomy and boxy. It lands at the right place for me, is a good color, and feels high quality. It’s perfect for over a t-shirt at night in the summer (it’s a breezy knit so it has weight but it’s not hot if you know what I mean) and it doesn’t cling anywhere. It feels very throw-on-able.
Old Navy Trousers

Linen Trench | T-Shirt | Bandana (similar) | Trousers | Slides
I found these trousers at Old Navy which again, look so much more expensive than they are. They are your basic cool, straight-legged, boy-cut with a cuff situation which I like to dress down, but could easily be worn with a cute blazer for an office job. The white linen trench is from Target and is awesome, a white T-shirt from Madewell, a very old Madewell bandana, and Kelsi Dagger slides.
Lightweight Parachute Pants
Sweatshirt | Scarf (similar) | Pants | Sandals
This style of pant is having quite the moment, but most of them I found way too baggy for me. But since these are cropped I liked them more. I still like a slimmer fit for pants on my figure (LET’S HEAR IT FOR THE RETURN OF CAPRIS WHICH IS ACTUALLY HAPPENING RIGHT NOW!!!). But for those of you who like a wider fit, these are great and cool.


Sweatshirt | Scarf (similar) | Pants | Sandals
The sweatshirt though is awesome and I want it in more colors (from Free People and I find that I wear it most days because it’s so cozy, flattering, and easy to layer without being fitted or tight anywhere). Scarf by Clare V

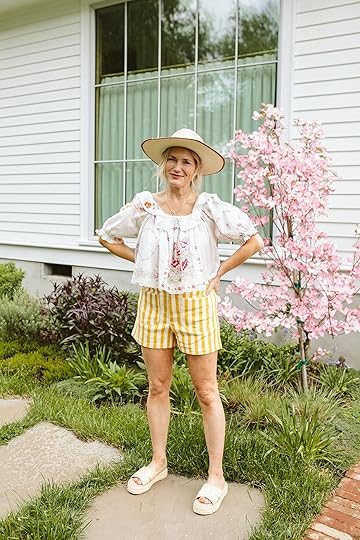
Hat | Blouse | Cargo Pants | Sandals
These pants are SOLID. They are Target, y’all, and look way more high-end. They are thicker than some of the others (so less “lightweight” and more medium weight) and the pockets are really flattering (I find that front-seamed square pockets like this are very slimming and make your tummy look flatter if you are into that). I rolled them up so that they were more cropped, which I felt better in. Blouse from Anthro, hat is Brixton and of course, those are my Birks!


Hat | Blouse | Cargo Pants | Sandals
I thought this was a super cute and appropriate spring outfit (comfortable in every way, and yet looks like I still care).
The Really Good Spulrge
Linen Trench | Striped Tank | Scarf (similar) | Purse (similar) | Trousers | Shoes
She’s really going for it with that smile!! I have no idea what I was laughing about – so awkward. But the outfit is a solidly cute spring assemble that I could totally wear to run errands or go to meetings.


Linen Trench | Striped Tank | Scarf (similar) | Purse (similar) | Trousers | Shoes
These pants are Frank & Eileen so they are far more splurgy. Are they great? YEP. And if you have the budget you’ll wear them forever. They wash well, the cut is so good (lower waisted though, which is my preferred cut) and the hem is unfinished so it gives it a bit of youth.

Linen Trench | Striped Tank | Scarf (similar) | Purse (similar) | Trousers | Shoes
My favorite, as far as what I’d wear the most often, is the linen stripe pant from Old Navy and these from Frank & Eileen. Both are so breathable and light, comfortable and cute plus check all the “lightweight trousers” boxes.
*Photos by Kaitlin Green
The post My Current Favorite Lightweight Trousers On My Body appeared first on Emily Henderson.
May 10, 2024
The Really Good Home Decor Stuff At Target Right Now (Including Stools I’m Considering For The River House)

The other day we popped into Target and once again we were so impressed with their home stuff. I don’t really need anything right now (and I suggest if you don’t need, don’t go) but found so many things I wanted. We were there shopping for clothes for our team Mexico trip (next week!) but of course snapped a few photos of just solidly excellent affordable home stuff (and no, I’m 100% not sponsored by Target anymore, but my love runs deep and our relationship remains so lovely).

Accent Chair | Round Pillow | Square Ottoman
Y’all that green pillow is the perfect punch of “I’m on trend” while also being soft and cute. 10/10. The chair is a great scale – larger than a lot of affordable chairs you usually find for this price point.

Tall Plastic Ribbed Tumbler | Short Plastic Ribbed Tumbler
I’ve entered my acrylic cup era because now that we have a pool (mini or not, you can’t have glass near it) and these are SO GOOD. They look like glass, but are not (and I find that colorful acrylic/lucite glasses look better longer whereas clear can start to look scratched and kinda icky after a few seasons).

I was trying to find a place for this piece of art as it looks so real and vintage-y in person. I don’t need but really loved.

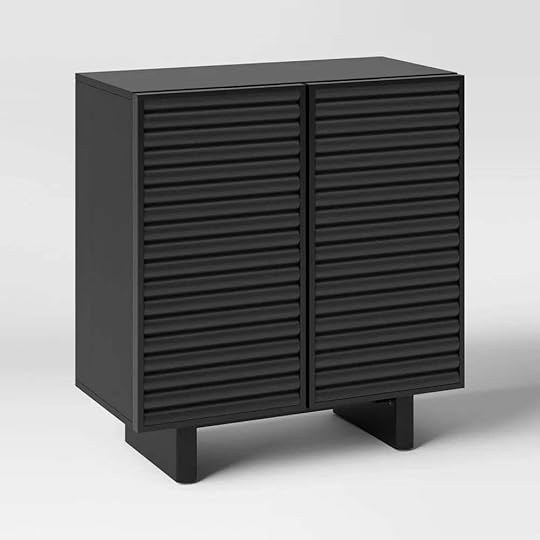
Withania Cabinet | Fluted Accent Cabinet
Two really good cabinets that have so much design detail that there is no way that these could be as affordable as they are. Mixed materials always say more work went into a design (and thus tend to be more expensive). These are awesome.


Woven Upholstered Arm Accent Chair | Rounded Swivel Accent Chair
OOF. That mustard chair is SO GOOD. I might need it!! The rounded swivel chair looks definitely like it could be sold at CB2 for $800, but it’s not


Square Woven Pouf Ottoman | Storage Bench
That’s a great green pouf – they are really nailing these colors and fabrics.


Faux Marble Accent Table | Nesting Accent Table | Castalia Coffee Table
For all you post-modern lovers, that marble table is GOOD.


Upholstered Barrel Boucle Counter Height Barstool | Ceylon Woven Counter Height Barstool
I’m shopping for the River House counter stools right now and y’all, I did not expect to find two at Target that are real contenders. SO GOOD!!!! I want to see that black one in person to see if it can work!


15oz Goblet | Wooden Mini Round Serve Board with Handle
For those wanting more tabletop love, a good big water (or margarita, duh) goblet in a thicker glass like this brings the Mexican summer vibes.


Kessler Bed | 2 Drawer Nightstand
What a lovely wing-back bed at such an affordable price! I appreciate that they bring the headboard down to the base, something that often is skipped in cheaper beds and there is a gap that I hate. Those nightstands are awesome. Storage, but not boring.


Modern Geo Woven Dec Pillow | Boho Velvet Contrast Fringe Dec Pillow Square
As you know we are getting into really decorative fabric details over here lately and BOY, is that velvet one looking cool and lush.
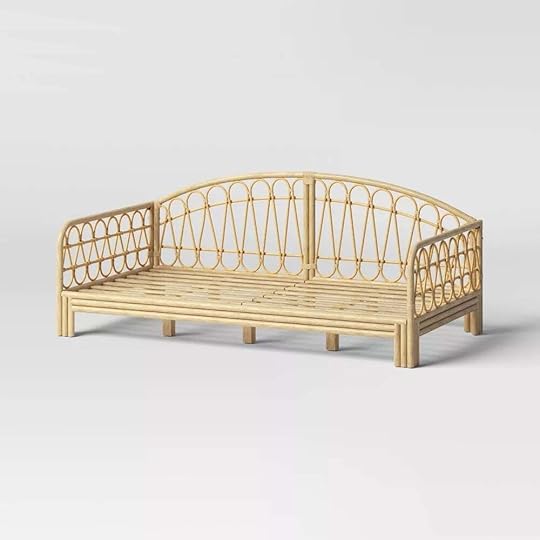

Rattan Kids’ Daybed | Velvet Kids’ Floor Pillow
A good daybed is one of the more underrated/hard-to-find pieces of furniture, especially for kids’ beds. You tend to want kids’ beds to be against the wall (to free up space to play) but shoving a twin bed in a corner looks dumb. This daybed is soooo good (and can obviously transition into other rooms should you want to move it around). The floor pillow has this dope stripe on the edge and contrast piping – GREAT JOB DESIGNERS!!


Slat Metal Outdoor Patio Dining Chairs (Set of 2) | Portable Indoor/Outdoor LED Tabletop Lamp
These slatted chairs are the outdoor chairs of the summer (the style doesn’t work as well at the farm, but for a more contemporary vibe it’s a YES). And you know I love mood lighting and that, of course, goes for these outdoors too! Target is NAILING these outdoor portable lights. The details are so good.
Great job, Target. I will continue to go back over and over to see what they have while chanting psychotically to myself “No, you DON’T need that – SO GOOD, no you DON’T need that – SO GOOD”. If you see me at Washington Square or BHH Targets (my two Targets within 10 minutes) please stop me, even if I’m talking to myself
*Photos of Emily by Kaitlin Green
The post The Really Good Home Decor Stuff At Target Right Now (Including Stools I’m Considering For The River House) appeared first on Emily Henderson.
Emily Henderson's Blog

- Emily Henderson's profile
- 10 followers

