
Emily Henderson's Blog, page 204
August 11, 2020
The 5 Tiny (And Affordable) Hardware Hacks You Probably Forgot About But Shouldn’t Have

Decorating your house is like baking a cake. (I only like ice cream cake and have no baking knowledge, so y’all are gonna have to truck through this metaphor with me, ok?)
Your furniture is your fresh, unfrosted canvas. Maybe you’re a vanilla cake and your home is Scandi and soothing; maybe you’re a chocolate cake and your home is rich and comforting; or maybe you’re a Funfetti cake and your home is bright and chaotic (I think this would be my house). Either way, you’ve got a nice base going on. (Please tell me what kind of cake your home is in the comments.)
Your accessories are your frosting. Your rugs, plants, art, your blankets, your trays, your curtains — all the things that make your home definitively yours. (Maybe you’re a minimalist maximalist, like me, and you’d be a Funfetti cake with unfrosted sides, like a Milkbar cake! This analogy is getting away from me but I swear that I’m almost to my point.)
But this whole comparison got me thinking: if your furniture is your base and your accessories are your frosting, then WHAT THE HECK ARE YOUR SPRINKLES? I think they’d be your hardware — the little pops that bring hits of personality to your design. And then I got to thinking — pulls and knobs are great, but what about the other finishing touches? What about the tiny, affordable tweaks that can make your house design look super considered and styled?
I got to poking around our archives and realized there are a couple pieces that just make your house seem done. Installed thoughtfully, these things can elevate a room without breaking the bank, which is a TOTAL DREAM. Let’s jump into it with something that’ll make a great first impression…
 photos by sara ligorria-tramp | from: make your home fall ready with 7 simple tricks (using all target)
1. Cast Iron Door Knocker | 2. Vintage Brass Door Knocker | 3. Parallel Door Knocker | 4. Modern Shapes Door Knocker | 5. Lion Door Knocker | 6. Beekman Door Knocker | 7. Arts & Crafts Door Knocker | 8. Swinging Hare Door Knocker | 9. Pineapple Door Knocker
DOOR KNOCKERS. WOW. There’s so much potential here to signal your style from the moment you set foot on the threshold to your home — are you whimsy and fun, like #8, or is your place simple and clean, like #3 or #6?
I’m personally in love with both #1 and #7, which are design chameleons. Both could work on a traditional craftsman home, but both could also work as a great, geometric hit of black in a more modern space. #2 is a vintage classic for traditional homes, and #5 is timeless and stately (it also comes in a whole bunch of finishes, in case you want a shinier lion, which would be SO FUN).

1. Mid-Century Star Doorbell Button | 2. Beaded Round Bell Push Button | 3. Diamondback Iron Doorbell Cover | 4. Please Ring Doorbell Button | 5. Nellie Doorbell Cover | 6. Tall Doorbell Button
BUT WAIT, don’t just let your door have all the fun! I know that there are a ton of doorbell advancements over the past couple years — Rings, Arlos, other virtual options, etc. — but if you’re like me and still just chilling with your basic, manual doorbell, swapping your standard plastic surround with a designed front button can make a huge difference in the feeling of your entry space.
My personal favorite here is #3. I love how graphic and simple it is! But I can imagine feeling super welcomed by someone with #5, super entertained by someone with #4, and super impressed by someone with #1, which just seems to be one of those pieces that quietly says “I have my life together.”

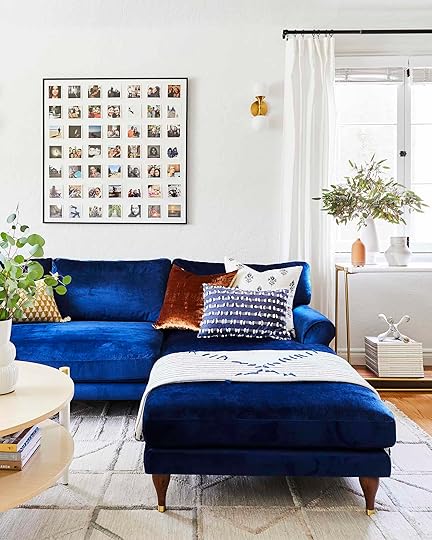 photos by sara ligorria-tramp | left from: jess’ long awaited (small space) living room reveal, right from: arlyn’s moody dining room reveal
1. Brushed Brass Curtain Clips | 2. Smooth Drapery Curtain Ring | 3. Matte Black Clip Rings | 4. Martha Stewart Living Bundle | 5. Cafe Pinch Ring | 6. Pewter Round Rings
OK. We’re inside now. We’re looking at our windows. And we’re looking at our beautiful curtains. But y’all, what do you have holding up those lovely window treatments?!
This may not be an issue if you’re rocking grommets or drapery with rod pockets, but for the rest of us, there’s curtain rings and curtain clips! The matte black clip rings in #3 are sturdy, simple, and unobtrusive. #1 is great for those who want to go a little more glam and bold, and I love the formality of #5 (she also comes in 6 different finishes, so there’s definitely one that can complement your home).

 photo by jess isaac and monica wang | from: a floral glam nursery reveal
 design by designstiles | photo by amy bartlam
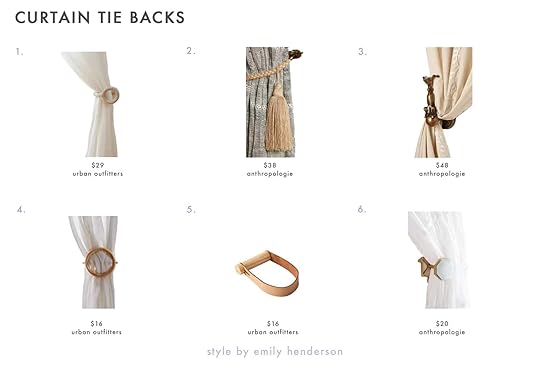
1. Sofia Curtain Tieback | 2. Makira Tassel Tieback | 3. Watchdog Tieback | 4. Rattan Curtain Tieback | 5. Leather Curtain Tieback | 6. Rylee Tieback
Tiebacks are a vintage-inspired trend that I am VERY bullish on right now, folks. I love the shape, lines, and ceramic texture of #1 — it’s very 2020 — and the graphic rattan circle of #4. I’m also obsessed with the charm of #3, because, like, WHY NOT have a sweet dog holding your curtains back and helping show off your view? (Truly, dogs really ARE a man’s best friend.)
#5 would bring an awesome hit of texture to any window treatment. Velvet + leather? Cool. Sheers + leather? Cool. Linen + leather? Cool. Buuuuut — and maybe I shouldn’t say this — it also does seem pretty DIY-able. If you have an old belt around the house and a round wood dowel, I’m sure you could pull together the same look for less. (Please show me if you do this!)
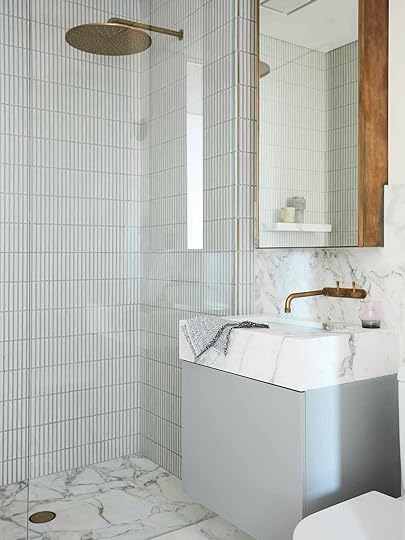
 photo by tessa neustadt | from: scott’s bathroom makeover with parachute
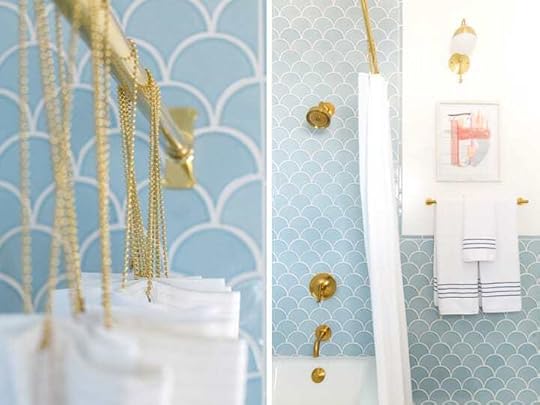 photos by jess isaac | from: master bathroom reveal
1. Decorative Shower Curtain Rings | 2. Modern Shower Curtain Rings | 3. Shower Curtain Rings | 4. Chrome Ball Hook Curtain Rings | 5. Dual Sided Hooks | 6. Quiet Town Shower Curtain Rings | 7. Ball Shower Hooks | 8. Tassel Shower Curtain Hooks | 9. Lucite Shower Rings
And y’all KNOW I couldn’t leave out the most important hooks of all: OUR SHOWER CURTAIN RINGS. These get so much use (you know, assuming you’re bathing at least kind of frequently) and I’m sure you’re seeing them at least a few times a day when you step into the bathroom, so why not make them a little special?
First off, I’m here to preach the gospel of the dual-sided hook. #1 is admittedly cuter, but I’ve tried #5 and it was a GAME CHANGER. It’s nice to have a bit of separation at the top of your liner and your shower curtain as it encourages some more circulation. (But I also went 28 years without a dual-sided hanger and I’m still alive, so I’d like to happily endorse a few more favorites.)
#2 is SO CHARMING. The squiggle shape is considered and graphic without being too much. And I have a huge soft spot for #9 — chunky lucite works with so many different styles and it’s super trend-forward, but it also doesn’t feel overpowering or tacky. And for my fans of a timeless classic bathroom out there — #3 is highly rated, simple, and it’ll work with anything you bring into the space.
OK WE’RE DONE. But y’all, are there any other tiny things that make a huge difference in your own homes? Have you made any swaps that have helped your place feel more finished? And maybe more importantly, WHAT KIND OF CAKE WOULD YOUR HOUSE BE?
Opening Image Credit: Photo by Jess Isaac and Monica Wang | From: A Floral Glam Nursery Reveal
The post The 5 Tiny (And Affordable) Hardware Hacks You Probably Forgot About But Shouldn’t Have appeared first on Emily Henderson.


Need A Big Design Change On Tight Budget? These 6 DIY Paint Ideas Will Get You There

Everyone on the EHD team (and from the comments, a lot of you) have been itching to do something bold in our homes and there’s this courageous, awesome, “screw it, what’s the worst that could happen?” attitude happening. Sara even wrote about her thoughts and feeling on the topic in this post. This collective deep need is likely due to the perfect storm of long-time white-washed design content, the lack of visual stimulation from the outside world (thanks, COVID), and the daily staring contest we have with our walls (another big shoutout to COVID). So we thought that we all needed this post and for it to serve as a pep talk for us to take that chance and give our home a bold moment we are craving. And one that doesn’t require all of our money. Some of these ideas are VERY easy, while others may require you to bring out your Hilma af Klint and use all of that creative talent you’ve been storing inside. There is something for everyone, I promise. So let’s grab our brushes and get to it because your eyes are about to be filled up with a lot of design joy.
Let’s start with a trend because trends are fun:)
The Handpainted Scallops (Especially Pink Ones:))
 design by katie sarokhanian, photos by kelly christine, from: “the kitchen coronavirus built”: a jaw-dropping, diy kitchen that truly proves the sky’s the limit
This has been the real surprise star of 2020. I guess if there is ever a time to go for with scallops it’s now! While they may not be for everyone, in the right space they add a heck of a lot of magic and whimsey.
Above, you might recognize that incredible DIY kitchen when we featured it a couple of weeks ago. Katie (the creator of that incredible DIY kitchen) started out using a stencil but then got bored so decided to freehand. She (and we) love that it has a touch of an organic feel.

 left: photo and design by aileen grodzinsky | right: design and photo by bre bertolini
But if you are someone like me who tends to need things to be exact, then feast your eyes on the two awesome rooms above. Playing with scale is something that you definitely want to consider when “scalloping”. The larger scale that Aileen Grodzinsky chose for her parlor room, is the perfect medium size so that it worked with both wallpapers. Then for Bre Bertolini’s little girl’s room, the sweet small delicate size gives it more of a traditional feel that perfectly pairs with the modern traditional style of the room. Here is a stencil you can purchase to help:)
 design and photo by emma på långagärdet
But are you in the mood to get even crazier? Then mixing up the scallop sizes is also a great option. Who wouldn’t want to have that room as a kid…or let’s be honest, an adult who wants to feel like a kid? What, just me?
Ok, now let’s get into the next 2020 DIY wall paint star…
The Handpainted “Wallpaper”
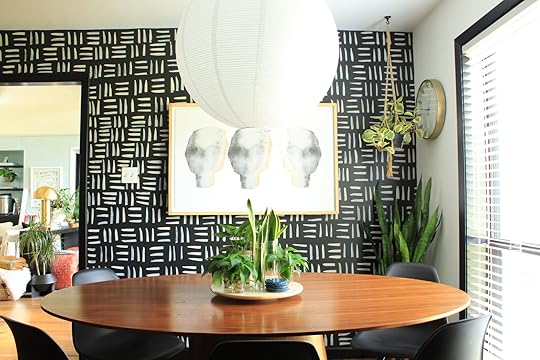 design and photo by carmeon hamilton
 I believe it was Domino who recently posted a headline that said something about the freedom of painting a custom design on your walls. I couldn’t find the article again but I’m 99% it was them. Despite not bookmarking the article (ugh!) it really struck a chord with me. In a year when basically everything and everyone feels completely restricted, finding moments to breakthrough creatively is so important and liberating. So why not try to paint your own pattern on your wall? If you mess up then you can just paint over it! Sure it’s time consuming but a lot of us have more time than ever to let our inner artist free. Consider it a budget-friendly therapy session. So let’s talk about these awesome examples…
First off, if you aren’t already following Carmeon Hamilton WHAT ARE YOU DOING? This woman has awesome, bold design coming out of her pores. The dining room above and the hallway below both are testaments to this fact. If you want to see her whole process in action, here is an Instagram highlight outlining everything on how she came up with the design for the dining room. For the hallway, Carmeon really loved this Kelly Wearstler wallpaper but said it was too expensive to purchase. So instead, she did her own version with her paintbrush (always giving credit to her inspiration, of course). Y’all, you can do this too. I believe in you!
 design and photo by carmeon hamilton
 But if freehand custom patterns are too much for you to tackle then let painter’s tape be your friend.

 design by sarah sherman samuel
Above, Sarah Sherman Samuel gave her little girl a temporary nursery while their home was being renovated. Yes, this was the temporary one! When using painter’s tape to create stripes, the one very hard thing to avoid is the inevitable rough edges. BEWARE. Especially if you don’t have a smooth wall to work with. If that’s going to drive you nuts then I have another option for you…
 design and photo by tanieka harris
Deja vu?! You are correct…kinda. Tanieka Harris was so inspired by Sarah’s DIY that she did her own version. But guess what? She used white gaffer’s tape instead of paint! That’s right I’m changing the rules just for a second. So instead of worrying if her lines were going to be rough, she decided it would be much easier, and just as awesome, to paint the wall tan and then add the white tape on top. Genius.
Side note: Look how effortlessly these stripes work in two completely differently styled rooms?? They both look incredible!
 design and photo by tanieka harris
And can we take a minute to ooh and aah over her camouflaged striped dresser idea?! For this one, since the dresser was already white, she did use painter’s tape and a similar tan paint to create those stripes. But since the dresser had such a smooth surface, rough edges were of no concern. To see the whole room process check out her Instagram highlight
August 10, 2020
An Office Reveal That Happens To Be A Full-On EHD Alum Family Affair…


Hi EHD world, it’s me Mel of Melanie Burstin Design. Remember me? A few years ago I was designing with Emily and ever since have popped in and out of the blog to show you some cute stuff (here is a tour of my home). Well, the time has arrived for more cute stuff! Today’s reveal is a project near and dear to my heart because it’s a space I designed for one of my best friends and amazingly enough, it’s a friend I wouldn’t have without Emily (more on that shortly). The project I’m about to share is… an office. Do you remember office spaces? I can’t deny this is a strange time to share when most of us are working from home or have lost work, but I hope this tour is enjoyable and perhaps the only time in our lives we’ll actually want to see an office and fantasize about working there. I hope you’re all safe, and man I cannot wait for this pandemic to end! I digress…
Before I show you the amazing photos and the cute vignettes you can translate into your own homes, I’d love to share my ‘meet cute’ with the aforementioned bestie/client/boss-CEO who hired me for this space. This is a story I tell often, it’s how Remi (founder and CEO of Freck Beauty) and I became best friends. The story usually starts over a drink at a bar (also remember those?) and I start by saying, ‘we were both interviewing for the same job, and they couldn’t decide between us, so they hired us both!’ Perhaps you’d think this would spawn a rivalry instead of a friendship, but EHD is an awesome place to work and this ended up being the perfect solution for everyone. While interviewing both Remi and I mentioned wanting to work slightly under full time as we had our own side hustles; I wanted to maintain having personal clients and Remi was building a mega beauty brand. (Both kinda turned out super well huh?). We also had pretty different skill sets and Remi worked more with Emily and I spent most of my time with Ginny (another EHD alum I looove). Pretty soon, we were all really good friends and apparently I could go on and on about the amazing people I met at my time at EHD but I’ll just say one more… guess who shot these photos? My dear friend Tessa Neustadt! This project really was an EHD alumni family affair and I can’t wait to share it with you…

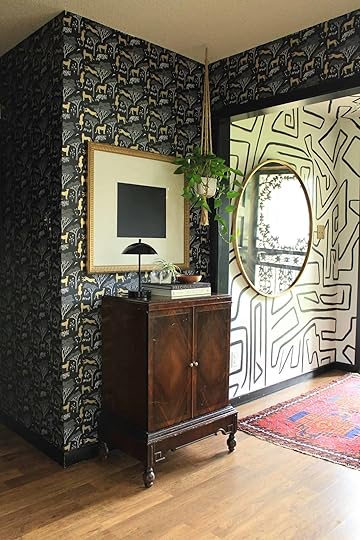
Ladies and Gentlemen, here we have the main working area, or the ‘bullpen’ so to speak. We began with an empty commercial building in the LA neighborhood of Atwater Village with a lot of light but not enough storage. Freck’s headquarters needed to have desk space for their super cool staff but also needed to be able to store a fair amount of product and supplies, so more storage was at the top of Remi’s wish list. We discussed all of our options from building new walls, to storage systems, to putting up a curtain on a rod. I’d say this storage solution is the ‘curtain on a rod’s older, cooler, and more sophisticated sister’. Freck considers their brand “an attitude” for anyone who cares about the process but not about the rules- so it was really important for the space to reflect those qualities. I wanted the design to feel chic and cool, while also inviting, and comfortable. This DIY curtain I designed and Remi built with her own hands embodies all of these qualities.

As you can tell the space is super open and airy and as a boss lady of the 21st century, Remi’s next request was a space where she could have a little privacy to focus but that wouldn’t separate her too much from her team. So here’s Remi’s office nook:

We grounded the area with a vintage desk and a pair of chairs that could easily be pulled up for a quick chat. I also had my friend Zilah of Plants and Spaces install incredible greenery for me throughout the office. I’ve really come to rely on Zilah for all my projects. I used to think I could go into florals if design didn’t work out, but then I realized I don’t really have the greenest of thumbs. So now, I get to collaborate and it’s the best. I send Zilah inspiration images (almost always sparse trees from Japanese interior design magazines), she shops her insider nurseries, installs the plants, and then explains to my clients how to keep everything alive. I think we’ve got a foolproof system down at this point. I guess one theme of this office is young boss women helping young boss women and I love it.

In Remi’s office space you’ll also see one of my favorite pieces of art of all time. The piece is by Misato Suzuki and in it she uses pencil and coffee grounds to achieve the most serene piece of art I’ve ever seen. I understand this is a lot of hyperbole but I really do love her work. I found her through Uprise Art which is one of my go-to online art galleries for when I’m curating and sourcing for my projects. They have a lot of work that’s accessible and affordable. I live in both camps of being a lover of prints and a lover of hanging original art, and Uprise has both.

The next area I want to discuss is the lounge. I’m personally a work-from-the-sofa kind of girl so a place for Freck’s employees to have a more casual area felt necessary. One of the first things we did to the space was install massive Noguchi pendants to add some visual interest since the ceilings are amazingly lofty. And of course, next came more art. This painting was commissioned from another dear friend of mine Wyatt Carroll who is an amazing graphic designer and illustrator. We were down to the wire, and needed a massive piece of art so Remi and I were considering DIY-ing one ourselves. Thankfully I had a stroke of genius and realized an illustrator would DIY something much better than we would. So I showed Wyatt an inspiration deck of paintings I liked, paintings I didn’t like, what I felt was derivative and then our design mockups so he could know the color pallet. One week later he provided 6 digital renderings, we chose our favorite and then he painted! I think he’s considering selling those Wyatt Carroll x Freck prints so I’ll nudge him to see if we can make it happen. He really captured the essence we were after; something unique, something vaguely spacey (Freck has an incredible space-themed eyeshadow pallet so aliens are on aesthetic), and something neutral and yet bold. His ability to capture so many contradictory ideas is pretty impressive!


To make this lounge as cozy as possible we layered more plants, a simple rug, vintage coffee table, and of course, we scoured Article for the perfect sofa. The space was a little tight and time was of the essence but luckily Article had the gaba modular sofa in stock; a sofa that’s contemporary, chic, and fit our spatial needs. One of my favorite things about Article is that they are reliable. I’ve been encountering so many delays lately so it was amazing that Article actually had the sofa ready to ship and it arrived and was unboxed easily and on time. It’s also super comfortable!

Let’s move on to the bathroom. One of my favorite things about Remi is that she’s really game for anything. This bathroom is filled with DIYs and I think that’s what makes it so special. I’m more of a ‘hire an expert kind of girl’ but we pulled up our bootstraps and really made it all happen. How cool is this vanity situation? It all started with a table I found for under $200 on Offer Up, and a sink and faucet from Wayfair. With the help of my handyman, we turned the desk into a vanity all while keeping the side drawers functional for storing some of those necessary bathroom accessories. We fell in love with this light from Schoolhouse Electric, a vase from my friend Blake Beaudette, and this super minimal yet fabulous towel rack to tie it all together.

I would be remiss to talk about the design of this bathroom without mentioning the incredible walls that serve as the backdrop. One of my favorite design tricks to make a space cozier and more inviting is to limewash paint the walls. My favorite limewash brand is by far Portola Paints as it’s a toss-up of whether the customer service or the product is better (because both are amazing). Their paints are made locally in LA and though it takes a little technique to apply, anyone can do it, and anyone can improve their space twenty fold just by doing so. FYI, I almost always end up using the same color, it’s Eastwood. I can’t help it if it’s perfect! All it takes is a primer and a crosshatch brush stroke (there are tons of youtube videos) and suddenly any room can have depth and texture. I highly recommend it.

Look at how cute some of Freck’s products look in front of the limewash! I personally use So Jelly eye cream and Cactus Water every morning. No one has asked but here I am sharing! I also love the Lid Lick in green for a night on the town but I have not been social in months so that’s sadly not in use right now though I’m sure it would look great for a Zoom call.
Okay, Let’s go upstairs shall we? This is Remi’s favorite photo from the shoot, which I find hilarious, but it is a really beautiful shot and Tessa is very talented. The stairs and second floor were covered in a black carpet that Remi ripped up herself, she then sanded the floors and painted it all. She got a little tired and ended up having some help but she definitely took on more than I ever would. Perhaps the photo means even more to her because of all her hard work?

On the second floor, we have the kitchenette area and the conference room.


I’ve really been into an aesthetic lately that I can only call Japanese Industrial? Or Japanese Camping Chic? I love the idea of a space that feels really simple, has a vaguely vintage feel, and yet is still warm and inviting. I thought a workbench would be the perfect kitchen surface since we didn’t need to go full kitchen and were not adding a sink nor any major appliances. I fell in love with a really affordable one from Home Depot that friends of mine have, but unfortunately California law (I think the preventative cancer ones? which is obviously important) prohibited it from being delivered. So we found someone on Craigslist to make a similar version for almost as cheap.

Next up is what Remi and I have privately (and now publicly) coined the “bucktooth curtain”. We needed a way to hide the less aesthetically beautiful, but super necessary kitchen tools so I thought a romantic under counter skirt would be the answer. I found an Etsy shop called Erin Langland Decor who has the prettiest linen cupboard curtains and ordered away. We installed them and perhaps it was that we had been working for 10 hours that day, or perhaps we are just insane people, but something wasn’t right. The curtains Erin sells are really beautiful and perfectly hemmed, so we decided on a gut instinct to ruin them! We did a raw hem and were surprisingly pleased with the outcome. Now our buck-tooth curtains provide some concealing of mess and are also soft without being too romantic for this exact project.

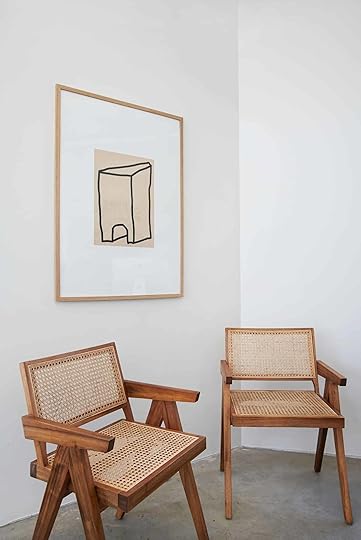
The conference room is maybe my favorite area of the whole office and definitely plays on the Japanese Industrial Camping aesthetic I mentioned earlier. We added a window to gain some more light and insisted on a thin wood frame. The dining table and chairs are some of my favorite pieces and I honestly struggle to not suggest them again for every project I’m working on. The Aldus table is from Skagerak. This company has so much cute stuff. I purchased a planter from them a few years ago and pretty much want everything on their site.

The chairs are from one of my favorite stores Finnish Design Shop. They carry so many amazing brands and designers and it’s always really easy to ship with them whereas otherwise receiving goods from Europe can be a pain. I source stuff from them for every project. The pendant is from a Brooklyn based studio called In Common With that has such beautiful lamps.

Remi and her business partner Des, do a lot of conference calls, social media takeovers and so many other on-camera experiences that I knew I needed to create a cute backdrop area for them. The conference room already had a soffit that felt like a platform so I styled more product, more plants, and of course more art! This poster is from Poster Club Official, another one of my go-to sources for art. We used a lot of their posters throughout the office; they’re so chic and affordable.
How amazing is this print in Remi’s office nook! The chairs are from France and Sons.

We also put this cool one I think looks like a whale by the entrance. The floating cabinet is from Bludot.

This poster (also from Poster Club) lives over a bay of desks. We went really budget on the chairs and desks so we could have lots of fun accessories. The chairs are really comfortable and look great in person but the desks can get a bit wonky. If you’re okay tightening them every few months they’re totally worth avoiding a splurge. To create a minimalist desk look, the desk accessories included pencil cup holders from Blake Beaduette and then other fun neutral-toned bits from Etsy that are either vintage or no longer available, unfortunately. But Etsy is amazing and there’s always more to be found.

And lastly, the framed photo is actually the only thing Remi already owned that she brought into the office. She purchased it off the wall at a Monster Children photography show and it’s always had sentimental meaning because Freck was the first realistic temporary freckle makeup in the game! The first time I tried out their Freck OG product I sent photos to my other friend and they immediately asked me to bring it the next time I saw them so they could try it. So yeah, Freck started out with Freckles, hence the name!
Thank you so much for joining me on this project reveal that is near and dear to my heart. I hope you enjoyed it! And I hope you found some ideas to introduce into your own WFH setups. I know there are some warnings against working with friends, but for me, I can definitely say it was a dream. Thank you Remi for being a dream client and pretty much saying ‘Ok’ to every crazy idea I had, and thank you Emily for having me on the blog today and for introducing me to so many of my favorite people! I hope you all stay safe out there and comment below, and message me and follow along on Instagram if you have more questions or want to see some pictures I couldn’t fit on this enormous blog post. XOXO-Mel
Design by Melanie Burstin Design | Photos by Tessa Neustadt
The post An Office Reveal That Happens To Be A Full-On EHD Alum Family Affair… appeared first on Emily Henderson.
August 9, 2020
The Link Up: Emily’s Affordable Vintage Daybed Replacement, Ryann’s Favorite Cast Iron Skillet, and The Face Masks We’re All Ordering

Welcome welcome welcome to this week’s link up, we’re your hosts, the EHD staffers. If you listen to Armchair Expert then I hope you read that line in Dax Shepard’s voice. If you don’t listen, give it a go because we can’t stop talking about it around here…still. It’s another lovely Sunday and we’ve got some lovely little links for you guys, so as per usual let’s dive right in…
This week’s home tour is the home of a celebrity you most definitely know, but between the (literal) glowing entry, an insane bathtub, and a neon sign of …well you’ll find out…you HAVE to check this one out. Leave your thoughts in the comments below, we’d love to hear
August 8, 2020
My 5 Part Scientific Formula For Buying Cute And Comfortable Summer Blouses (Especially For Us Ladies With Larger Breasts)


The search for a good blouse preceded the pandemic, and it has certainly waned with my lack of desire to curate the perfect outfit to hang out with my 4 and 6-year-old and maybe a neighbor or two. It’s not that I’ve given up completely on looking pulled together, it’s that I’ve reprioritized my entire wardrobe to fit into our seemingly endless lifestyle at home. I want to be comfortable, feel cute, low-maintenance, practical, and timeless. So, when I do add something to my now tiny wardrobe (girlfriend has been PURGING) I need to KNOW that it’s going to work on my body, for a long, long time without having to return it (which is virtually impossible up here). So, I have developed a formula that deserves sharing – especially for those of you with larger breasts that might struggle with tops (I used to before I developed my formula). Ahem.
There are five things I look for in “the perfect comfy but cute summer blouse”. Now, not all five boxes HAVE to be checked, but when they are …. oh girl … it’s worth every penny (and some can be lots of pennies, but I’ve worn them for YEARS).
 photo by veronica crawford | from: my “casual, comfortable, cool” spring weekend wardrobe
A voluminous sleeve detail (or at least roomy shoulders). This could be princess, ruffle, or flutter. Why? This gives the illusion of a smaller waist (hello shoulder pads) if you are into that, and draw attention away from your ladies. The sleeve becomes the statement, whereas otherwise, the boobs tend to garner the attention. Don’t get me wrong, I want to get them the attention they are due at times, but right now, for the occasional bbq with neighbors or nighttime walks with Brian, I like wearing something that I feel cute and attractive in but is more subtle. Boxy but not too thick or heavy (for summer, at least). I’m not talking crazy wide and boxy, and I know that doesn’t work for everyone, but in the blouse department, I’m not interested in something super fitted along my rib cage and down to my waist. That sounds like a lot of clinging and maintenance for me. I will not “work” to wear a shirt anymore. I mean, I tried to wear my 1 1/2″ Rachel Comey sandals that I’ve literally worn months on end in previous summers, but this year I felt like a toddler, needing to hold on to the coffee table in order to get around it. Will we ever go back to the way it was???Some sort of plunging neckline that breaks up the amount of fabric across your chest. This gives a peek of the secrets you hold under there but doesn’t feel crazy revealing or low-cut (not that anything is wrong with that, but just for summer with my immediate family I like it to be easier to wear – plus I’m not wearing real bras so I don’t want to reveal that secret). This neckline could be a slit with a little tie (my personal favorite) or just your basic button-up that you unbutton 4 down. V-necks also welcome. This is the Ulla Johnson formula – the princess or ruffle sleeve, with the secret, peek at what’s underneath. It’s the formula that I LIVE FOR and the reason why I’ve always splurged on her shirts. I wear them for YEARS, guys. YEARS. Easy to tuck and/or easy to drape (likely a thin fabric like silk or cotton). If you are lucky, a shirt will hit perfectly where it needs to – not be too long or too short (good luck, thus the front tuck). I’m short torso/long legged so most blouses are a bit long on me which is fine if they are easy to tuck in. Here is where you want something that doesn’t cling to the areas you might not want it to, and drapes really nicely. A small busy pattern. I have a ton of white blouses, too, but most days I opt for something colorful, busy or bright to A. give me a burst of color/pattern which makes me feel happy and almost like I’ve tried, B. Pattern makes it low maintenance when it comes to dirt/kids (I’m still working on my “white blouse” abilities), and C. The colors and pattern themselves draw attention from other things you might want to not have to think about – bra straplines, the beautiful shape of a two kid tummy, etc.
By writing this I’ve absolutely sold myself. This formula WORKS. If you are super petite and smaller up top these blouses might overwhelm your frame, but I am not, even though you might think I am (I actually have lovely, but fairly large and muscular arms in addition to boobs). When I see the “perfect tank top” roundup I don’t click because I know I likely won’t find one that I actually want to wear, so if you are like me and want the perfect cute blouse? HERE YOU GO.
 photo by sara ligorria-tramp | from: 4th of july fashion
1. Ruffled Sleeve Blouse | 2. Women’s Plus Size Long Sleeve V-Neck Blouse | 3. Pleated Popover Top | 4. Lace Blouse | 5. UO Dylan Embroidered Boho Top | 6. Puffed Shoulder Blouse | 7. Cora Embroidered Blouse Top | 8. Ruffle-Neck Keyhole Top in Stripe | 9. Women’s 3/4 Sleeve Prairie Shirt

1. Eyelet Blouse | 2. Moon River Ruched Sleeve Top | 3. Jacquard Frill Blouse | 4. Cotton Balloon Sleeve Blouse | 5. Scotch & Soda Shirt | 6. Saylor Mildred Blouse | 7. Rolla’s Stephanie Cost Floral | 8. Lourdes Blouse | 9. Free People Blouse | 10. & Other Storie Frill Blouse | 11. Tularosa Mae Top | 12. 1.STATE Trendy Blouse
 see?! i can’t get enough.
1. Greg Puff Blouse | 2. Jaslyn Embroidered Lace Blouse | 3. Marrakesh Coal Blouse | 4. Joie Pollo Ruffle Long Sleeve | 5. The Great Shepard Stripe Cotton | 6. Wilfred Playa Blouse | 7. Daphne Peasant Blouse | 8. Sonnet Blouse | 9. Keepsake Ardour Top | 10. Antik Batik Nikki Blouse | 11. The Great Mare Plaid Top | 12. Stephanie Embroidered Blouse

1. Ulla Johnson Medine Ruffled Floral Shirt | 2. Doen Blush Etta Blouse | 3. Tikuri Blouse | 4. The Great The Lace Prim Top | 5. Ulla Johnson Liana Ruffle Blouse | 6. Hickory Top | 7. Rouge High Neck Draped Silk Blouse | 8. Colette Blouse | 9. Button-Up Bell Sleeve Top
There you have it. But in case you need a visual reminder of this very scientific formula, we made a super helpful graphic for you to use at your shopping leisure. I hope you found your perfect summer blouse and if you have more recommendations drop them below. Happy Saturday and happy shopping, folks. xx

Opener Image Credit: Photo by Veronica Crawford | From: A Fashion Review: New Clothing on My Body and How I Like Them (Or Not)
The post My 5 Part Scientific Formula For Buying Cute And Comfortable Summer Blouses (Especially For Us Ladies With Larger Breasts) appeared first on Emily Henderson.
August 7, 2020
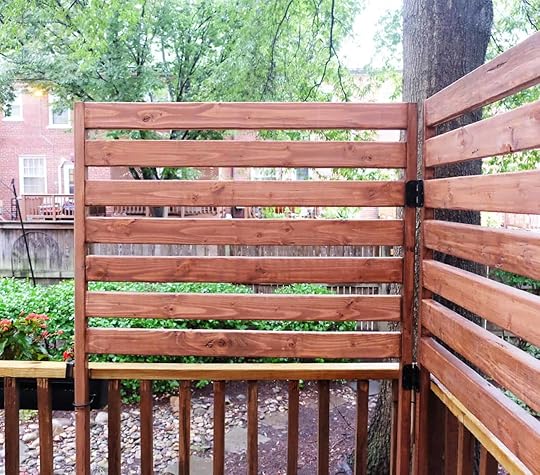
The Outdoor DIY That’s 100% Still Worth Doing This Summer… Malcolm’s Mobile Privacy Wall

The creative process is a funny thing. This is usually how it pans out for me:
This thing is a great idea! Let’s make it happen!Ok, this might be a bit harder than I thought…WHY DID I THINK THIS WOULD WORK?!Alright, now we’re getting somewhere…This thing was a great idea! I made it happen!
The process behind this DIY privacy wall for my deck was certainly no exception to the rule! You should definitely read all about the overall plans for my deck makeover, but stay here for the full story about how the privacy wall came to be and a tutorial if you are in the DIY privacy wall market.
Let’s start by reviewing my general expectations for this project:
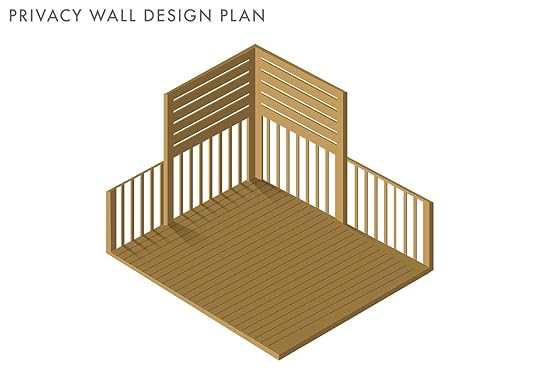
This was my initial schematic for the privacy wall, which was based on nothing but my desired outcome and purely aspirational. Backward design is a powerful and widely-applicable thing, folks!
PRIVACY
Since my backyard is shared with about a dozen other units, my personal deck is in very close proximity with my neighbors’. Generally, that doesn’t bother me very much, but some slight privacy every now and then is welcome! My goals were to create something that provided a little bit of separation from my immediate neighbors without completely blocking view of the yard, and to make the deck feel more like a “room” and a true extension of my dining room and kitchen.
LIGHTING
There isn’t enough lighting on the deck for nighttime chilling (a necessity!), so additional lighting is a must. The verticality of the privacy wall will give me plenty of options for draping string lights around the perimeter in a way that feels natural to the environment.
MOBILITY
I decided that I wanted to try to make the overall privacy structure a mobile aspect of the deck for a few reasons: in case I want to reposition it, in case I want to remove it from the deck entirely (during very windy/inclement weather, for example), and so that I can easily carry it and store it away whenever necessary. This became the biggest and most interesting challenge of the project, but I figured out a good solution, I think! More on that in the tutorial below! I’m so excited about this! So much exclamation!
Step One: Measure the space to determine the specifications for the wall.

I promptly hopped into Adobe Illustrator to plan out the exact specifications for the various pieces of wood that I would need. I decided that I wanted my wall to be six feet tall and about 2 feet wide on each side. That way, it would be tall enough to meet my privacy needs, but not so wide that it would impede views of the backyard.
Step Two: Gather the things!

Once I determined how much wood I would need, I set off on a masked trip to my vacation home (Home Depot) to gather my supplies. I settled on standard 2x4s for the horizontal slats and 2x2s for the vertical leg components. I don’t own the necessary equipment to cut wood at home (yet!), so I always rely on Home Depot to cut pieces of wood for me.

At this point, I started to think hard about stability and mobility. I was SO HAPPY when I thought about using door hinges to keep the two pieces together, for so many reasons! Primarily, the hinges would keep the two panels perfectly perpendicular for additional stability. The hinges would also allow me to fold the wall in like a door, which would allow for easy mobility and storage. Crossover appeal! However, I still felt as though I needed some additional stability to support the wall and keep it securely in place.

Whenever I’m stumped on an idea, I peruse Home Depot or Lowe’s to find inspiration. The staff surely thinks that I have too much time on my hands (I don’t) and/or that I live next door (I don’t). I stumbled across these u-bolts, which come in a plethora of sizes, and are made exactly for this type of project! And they’re cheap! All they needed was some black spray paint to match the matte black door hinges.
Step Three: Assemble the aforementioned things!
I’ve done enough belaboring at this point… so here’s a cheeky little diagram to show you how everything came together. Am I IKEA?

I used deck screws to attach the horizontal slats to the vertical posts (four screws per slat, two on each side), and subsequently installed the three door hinges to attach the two panels together.

Which led us here!
Step Four: Apply stain, if your heart desires.
I honestly think the structure would look perfectly fine without stain, but regardless, it’s probably a good idea to finish it off with some sort of deck sealant to protect it from the elements. Personally, I opted to stain it a darker color to make it more consistent with the rest of the deck. It isn’t a perfect match, but I’m planning to stain the entire deck down the road, so I’m not too particular about it at this point. I chose Behr chocolate semi-transparent deck stain, which is one of three deck stain colors that my HOA allows.
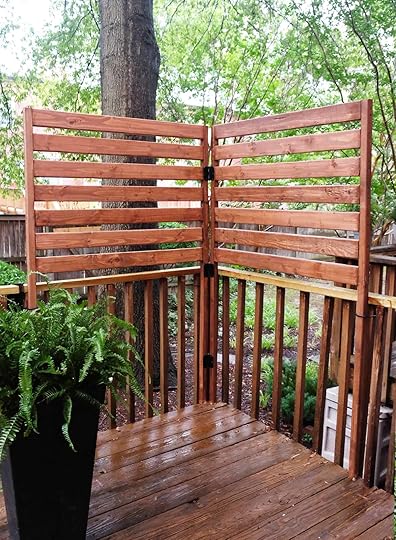
See how she moves!

For those of you curious about the cost breakdown, this is where I landed.
Deck screws: $102x2s (four 8′ pieces trimmed to 6′ each): $82x4s (seven 8′ pieces cut down to 14 3.5′ pieces): $33Door hinges: $11U-bolts: $4Deck stain: $38
Grand total: $102
The priciest item was the deck stain, but it was still a reasonably priced project for a pretty big statement!
And there we have it! What do you think? I’m super excited to see this project come to life. Next steps: furnishing, styling, and ENJOYING. I’ll be back for the final reveal soon. Stay tuned!
The post The Outdoor DIY That’s 100% Still Worth Doing This Summer… Malcolm’s Mobile Privacy Wall appeared first on Emily Henderson.
Office Rugs You Can Roll Your Chair Over


How is your new work from home/homeschool office looking? If you answered, “Not great, thanks for bringing it up” I understand and I am with you. Of course, I am grateful I have a job (and one that allows me to work from home no less) but I would be lying if I told you it was in my plan to pull together a home office this year. This is only something 2020 would throw at us. Luckily, last week Jess graced us with tons of desk and chair combos but if you feel something is still missing in your office, do not underestimate the power of a rug. Rugs can instantly give a room a facelift and add color, pattern, whimsy, and general happiness. I think that is what we all need during these trying times, especially in our WFH spaces.
But in true EHD fashion, I am not here to simply talk about cute rugs you can purchase. Around here we love a good combination of style AND function and when it comes to rugs in the office we have THOUGHTS. First and foremost, nothing is worse than struggling to roll your office chair around a rug. That is a great way to lose your sanity on day one. A perfect office rug absolutely must be office chair friendly. These chairs and rugs must get along and in fact, we want them to be BFFs.
Best Types of Office Rugs
Flatweave/Low-pile – Any rug with a flat and tight weave is less likely to snag and get caught underneath your office chair wheels. Indoor/Outdoor – Indoor/outdoor rugs are great for a high traffic area such as an office. They can withstand dirt, are waterproof and they tend to be smoother in texture so a chair can easily slide around.Jute – Jute rugs, similar to indoor/outdoor rugs, are durable and generally easy to clean. Just make sure to choose one that has a tight weave which will allow for your chair to glide seamlessly across it.
Rugs To Avoid
High-Pile – This term equals thick rug which means your rug and office chair are going to be in a constant fight. Stay away!Sheepskin – Thick sheepskin rugs, though so comfy and inviting, are not a great match for rolling office chairs. Stay away from these and opt for a thin patterned rug instead. Tufted – A tufted rug that has a raised woven pattern is likely to cause serious frustration. Avoid the office chair roadblock and go for a flat weave rug instead.
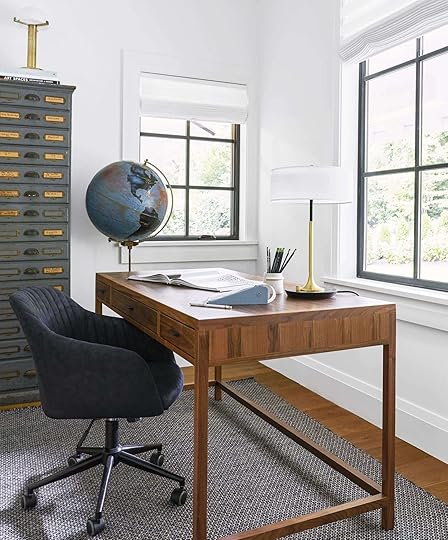 photo by sara ligorria-tramp | from: portland reveal: a light and bright home office
Remember this office from the Portland Project? It is one of my favorite offices EHD has done and if you take a close look you’ll notice the rug (by Annie Selke) is flat weave and VERY office chair friendly. No wheels are getting stuck here, folks.
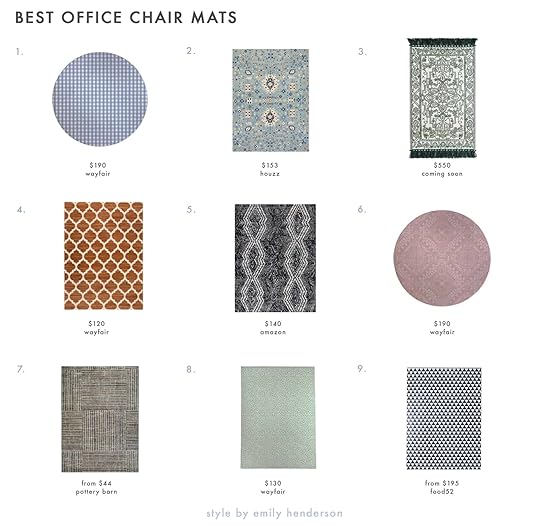
Now for the fun part (SHOPPING!). If office rugs had Olympics these would the top contenders:

1. Natural Woven Jute and Cotton Reversible Rug | 2. Layers Blue Rug | 3. Maya Rug | 4. Lines Rug Dusk | 5. Mikka Jute Rug | 6. Plus Rug | 7. Echo Rug | 8. Round Cotton & Jute Rug | 9. Outdoor Adde Black Rug | 10. Jute Wave Rug | 11. Damali Black & White Rug | 12. Cooke Rug | 13. Denim Rag Diamond Rug | 14. Square Tobacco Rug | 15. Zareen Oxblood Red Rug | 16. Jugol Rug | 17. Blue + Gold Pattern Rug | 18. Woven Cable Stripe Indoor/Outdoor Rug | 19. Diamond Lattice Rug | 20. Blue Awning Indoor/Outdoor Rug | 21. Byron Handmade Stripe Gray/ White Area Rug | 22. Harper Denim Rug | 23. Outdoor Offset Stripe Navy Rug | 24. Spectrum Fiesta Rug| 25. Delphina Delft Blue Rug | 26. Jute Rug | 27. Shoa Rug
If you are homeschooling kids this year (bless you) you will probably require a durable and easy to clean rug so you can spend less time worrying about stains and more time looking forward to happy hour. Outdoor rugs such as #9 and #20 can take a beating and are able to withstand treacherous conditions so some spilled marinara will be no problem. They are also often tightly woven polyester so they have a flatter surface. Similarly, a jute rug is easy to maintain, and with a low-pile, perfect for a rolling chair.
Speaking of easy to clean, machine washable rugs are an ideal office space rug. Ruggable has so many styles and options and many are perfect for an office space (peep #9, #11, and #25 for example). The removable top carpet is easy to clean and easy to slide your chair around. Win-win, my friends.
Now if you are looking for something a bit more practical but still want to add some style to your WFH space, allow me to introduce you to chair mats…
1. Straight Round Chair Mat | 2. Tabrix Blue and Beige Rug’d Chairmat | 3. Magic Carpet| 4.
Straight Rectangular Chair Mat | 5. Anji Mountain Chair Mat Rug’d Collection | 6. Okeelanta Straight Round Chair Mat | 7. Elis Waterproof Mat | 8. Straight Rectangular Chair Mat | 9. Flat Woven Vinyl Mat
Chair mats have smooth vinyl surfaces and are guaranteed to compliment your office chair. These guys are specifically made for the office and are a great addition to a small work space or kids room. I love the subtle floral pattern on #8 and can see it working perfectly in a teenager’s room. #3, however, is by far my favorite. It is eco friendly, biodegradable, and also just really cool. I can see it working nicely in a kitchen as well.. wait do I need it for mine?? I digress.
Of course, we all know it’s never a good time when the corners of a rug refuse to stay flat and in place (especially those flatweaves), so it is good practice to keep some rug adhesives on hand.
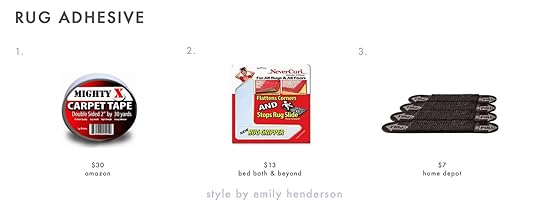
1. Mighty”X” Indoor Rug/Carpet Tape Double Sided | 2. NeverCurl 4-Piece Anti-Curl Rug Corners with Gripper | 3. Rug Anchors (4-Pack)
Okay guys and gals, we made it. I hope you feel confident about the future of your home office and PLEASE let me know if you purchase any of these or if you have others to recommend. Let’s chat. xx
Opener Image Credit: Photo by Zeke Ruelas | From: Moody Mid Century Home Office + Shop The Look
The post Office Rugs You Can Roll Your Chair Over appeared first on Emily Henderson.
August 6, 2020
REVEAL: Our Boy/Girl, 2-Twin Bed Shared Kids Room… With A HEAVY Dose Of Mama Drama

IT’S BEEN A REAL JOURNEY. It was less “cobbler’s kids with no shoes” because that sounds kinda quaint and cute. No, more like “dentist’s kids with only 3 teeth”, eliminating the option of dentures. After 4 years of working on this room, today I’m revealing the “final” (ha) version of the kids shared bedroom and even I’m surprised that I like it this much – not because it’s the best kids room ever but because like most of you I was VERY WORRIED that it wasn’t going to turn out well. The truth is my doubts were there, but it still made my heart beat (in a good way, not a heart attack like another commenter feared). So I knew I could make it work. Turns out we all love it – it’s exciting and interesting and playful and has a nod to the eclectic traditional vibe that this house wants, but in a way that is still very ME. And by “ME” I mean, of course, “them” – the two children who might inhabit this room. In this weird world, they haven’t even seen it yet as we are still up in the mountains, so I snuck down to LA without them because in shocking news trying to style out and shoot a kids room with kids in the room is like trying to catch frogs with your elbows. I’m not exactly sure when/if they will ever sleep in this room again, but it’s ready for them when they do and from seeing the photos they love it, too.
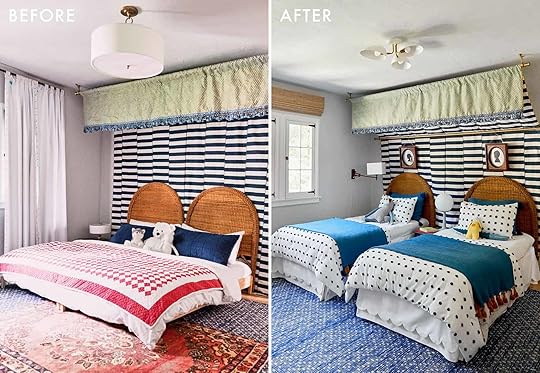
It’s been a long time coming …


Let’s revisit ghosts of bedroom past. When we bought this house I think it was considered the Primary bedroom (formerly known as master, learn more about that language shift here) even though it didn’t have a bathroom and had a tiny closet. The year was 1921 and people shared full-sized beds, had 5 outfits in total, and burned their garbage in a pit in the backyard (true story). So we added a bathroom for the kids and made room for a proper closet.

Three and a half years ago we finished the first iteration of this room and shot it for Real Simple, as just Charlie’s room. It was cute, but I didn’t love it. Honestly, I didn’t know it was going to be shot until a couple of weeks before so I scrambled to pull it together. It just felt a bit dated and nothing really too special about it.

Then over a year and a half ago the kids moved in together, by choice (so cute), and I STRUGGLED to design it mostly due to it being small-ish for two beds and the fact that we all preferred a big king bed over two twins. Bunk beds were a big NO for us as we tried one for 11 days and nights of horror. They got up 6 times a night “scared” and while I was out of town Brian took it apart and put the mattresses on the ground, where they stayed for months.
ANYWAY, it’s been 3 different colors, has had cheap beadboard on it and I tried 3 different bed arrangements to get here. Of course, the pandemic made it harder to source pieces and there might be some things that I would add that were unavailable or we couldn’t get our hands on. But it felt ready to show you and frankly I myself was desperate to style something and have a pretty show and tell for you all.
HERE WE GO.
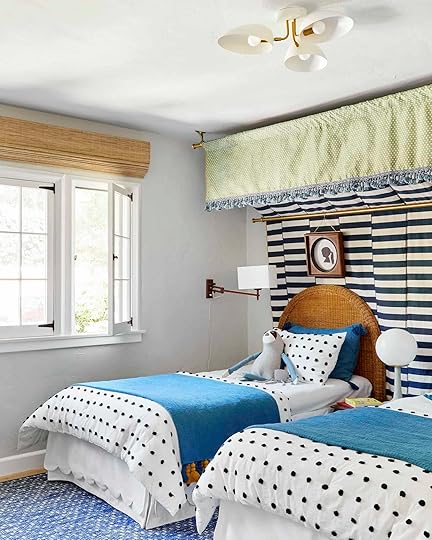
Paint Color | Window Treatment | Rug | Ceiling Light | Stripe Fabric | Green Fabric | Brass Curtain Rod | Brass Endcap Finials | Plug-in Sconce (vintage) | Wicker Twin Bed (similar) | Vintage Wicker Bed (similar) | Table Lamp | Scallop Bedskirt | Dotted Duvet Set | Blue Bed Throw | White Sheet Set | Stuffed Sloth Animal | Stuffed Octopus Animal
It’s whimsical, original, exciting, but with a pretty cohesive color palette of blues and greens (with hits of mustard and red) so it doesn’t feel cuckoo anymore. Last time you saw this we all voted/agreed to separate the beds (we can push together for a while if they want), raise them on higher frames, and lower the brass bar of the canopy. Once we did those three things I knew that I could style it out to be cute. The proportions were originally off, making the canopy feel SO overwhelming. But once they were right, it was just a matter of styling and fun.
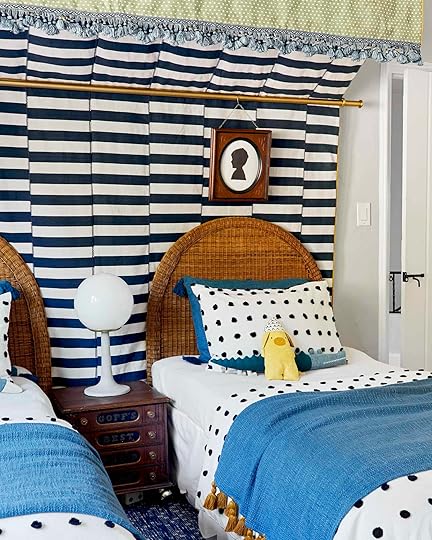
THE DRAMATIC CANOPY

So let’s talk details of this canopy. The canopy was the problem child a few months ago. It dominated the room, eliciting fear, worry, and even “vertigo” from one reader/commenter. Every time Brian walked in he would say, “it’s just… a LOT“. I thought I would have to take it down and scrap it all together despite the heavy investment, but I kept telling myself to just work with it as far as you can, push through the finish line and if I couldn’t make it work we’d admit defeat and revise. It was a bold commitment/risk as it was all custom and I KNEW that this room didn’t have an obvious focal wall that it should live on (thus trying to create one). But now that it’s all styled out, it not only WORKS but it’s AWESOME.
The broken stripe fabric is Zak + Fox and if you look closely there are hand stitching throughout, making it far more special than it might initially appear. Its all hand-sewn and super thick (plus we backed it). I know that it’s a lot for some of you, but in the room, now that the headboards are higher, I love it – it feels like a modern/playful take on the traditional canopy. And like a child theater actor, this lady adds a heavy dose of drama and personality, letting the rest of the room be “the company” – full of character and whimsy but taking a back seat.
The green fabric is from Maresca Textiles, is a bit darker in person, and adds some contrast in both color and pattern. Both of those fabric companies are from smaller designers creating patterns that I LOVE, with many of them supporting artisans or made in the states. Please check them out. Obviously I couldn’t just leave it there, and insisted on the fringe on the front and mustard piping on the sides. I love both.
Now, what I learned is that we need something stiffer in the green fabric flap to keep it taut – almost like one of those cardboard things that are in your collar when you buy it from Macy’s. The wrinkles do kinda bum me out, but not enough to spend more time/energy/money on it.

I LOVE what this does in the room, but if I were to do it again I might have done a more affordable version of it mostly because it added up to a lot (12 yards of fabric (gifted) + accent trim + sewing $1500, plus a $200 install, then lowering, another $100). But pre-pandemic-no-spare-time-always-overwhelmed-Emily had different priorities than I do now and outsourcing was all I could muster (more on that later). It was constructed and installed in March when I wanted to create something aspirational and fantastical, instead of my new direction of more approachable and still inspirational (although I’m currently project-less). And to be fair to past-Emily, I was ready to invest here because I was frankly desperate to prove to myself (and sure, perhaps you) that I could make this room awesome, special, editorial, rivaling both kids rooms in our last house which I nailed – design-wise (see Charlie’s and Birdie’s). I was embarrassed by this room for years, making a million excuses/disclaimers when friends – or worse – acquaintances – came over and wanted to “poke around”. And now I can’t wait to show people this room (if we ever have people over). It absolutely gave the room the statement that I wanted and yes, I am proud of it (THANK GOD).
The Headboards

The headboards are vintage, bought off of Chairish – these are normally pretty easy to find at vintage stores and relatively affordable (I paid $400 but I’ve seen them for like $50 before). There are actually a few sets left online. I know that a lot of you voted for either headboards OR canopy – not BOTH – but I stand by this layering choice. Here’s why – you have a simple, warm, solid, wicker oval shape against the busier rectangular graphic softer, fabric pattern. These shapes ground the wall in a way that the wild canopy couldn’t have ever. In fact, if you need a far-fetched metaphor you could say that I’m the canopy and Brian is the headboard. I also love that when pushed together into a king bed these headboards still look AWESOME, so I’ll be able to use them in the future in a different project.

HOT TIP: Like in most of my rooms, I like a combo of square and round – I think that subtle contrast makes a really interesting and eclectic and creates tensions in a good way. So we have the blocks/stripes of the canopy with the rounded headboard (as opposed to a squared-off one). Then the rectangle shade on the sconce and the round ball lamp. You get it, but now that I’ve told you you’ll see this everywhere in this room and in all of my projects.
Also how cute are all those stuffies? I bought them all from a new-to-me brand Goodee which sells far more than just large sloth stuffed animals – check them out.
Stuffed Sloth | Stuffed Pig Animal | Stuffed Crocodile Animal
THE BEDDING
The room really woke up once I layered the bedding, and balanced out the wall and yet calmed her down. The black and white polka dot comforter set is from Pottery Barn and the teal blanket and shams are from Justina Blakeney’s new line and it’s REALLY GOOD. The blankets have contrasting fringe and the pillows are a really thick weave that feels very high quality (comes in a bunch of different colors, too).
Scallop Bedskirt | Dotted Duvet Set | Blue Bed Throw | White Sheet Set
Please note my inclusion of scallops in this room – the bed skirt, which I think we can go ahead and call it what it is – A DUST RUFFLE. I restrained myself here, almost doing a plaid or something CRAZY ruffly, but when I found these from Ballard Designs (first time ordering from there, ha!). I realized the white helped separate the bed from the rug and the scallop said “playful and whimsy” without taking me into the over-decorated ’80s territory that frankly, this room was threatening to enter.


Before we leave this side of the room I wanted to show off the DIY silhouettes that the kids and I made. I bought the antique frames off Etsy and hung them on a simple change and jump ring from the brass curtain rod. This “moment” makes me VERY happy. If you look closely you can see them write their name and age in pencil and Birdie couldn’t help herself but add a ton of hearts on hers when I wasn’t looking.
The Light and Blackout Shades

Let’s not forget about the other side of the room. But first, we switched out the larger fixture for this one that is more modern and playful (and strangely affordable). It competes less with the canopy and recedes in a good way.
We worked with Decorview once again for the custom shade. The canopy + curtain situation drowned the room in the fabric so we had to change to shades. I wanted something that popped off more than white, but I didn’t want yet another fabric in here. So I customized theses natural woven shades that picked up on the wicker and wood tones in the room. We chose to do just ONE across the windows, hung high up to reduce”light leak”. We still have plans to sew magnets into the sides (and glue to the window frame) to reduce the light leak on the sides even more. I know that custom window treatments are a splurge, but these older windows made getting something ready-made very hard, and once you enter the custom route you want to make sure that they are done right and installed perfectly. We installed them just a few inches from the ceiling to make the ceiling look taller and they reach the bottom of the sill.

The “Bookstore” Nook

Paint Color | Window Treatment | Green Bookcase | Paper Ship | Red Table Lamp | Vintage Children’s Desk | Rug
This corner was such a challenge. I thought about actually walling it off to make the room more square, or doing a cute faux wall with a big circle in it to create a fort. When Brian nixed those ideas I thought about hanging a big oval wicker chair, which would have looked cute and engaged the space nicely. But we needed a bookshelf and Charlie was begging for a desk to do “homework”. I decided to just make it as functional for my family as possible, so I scrapped the swing that I knew they would likely fight over and would just be a hanging sculpture for me to enjoy looking at (there was no room for them to even “swing” much). I found this vintage desk on Craigslist in our neighborhood. I had plans to paint the base but, well, didn’t and that’s ok.
The bookshelf is kinda perfect for this. I love the dark green color and know that it could transition to any room when they are older (or literally any room – even a family room). It’s super simple, with great book storage and a big drawer at the bottom. I thought about putting it where the trunk is (to be able to put the swing in the corner) but it made the room feel much smaller and was too close to the dresser (square case good near square case good felt a little claustrophobic).

I’d like to introduce you to my new favorite accessories in this room – the red lamp and the ship kite. I bought the lamp for the living room but it was a bit too bright and jarring. Once we put it here it really awoke that corner and added more playfulness. The bookshelf corner still felt dark but once I got that white kite hung it really pulled your eye over there and brightened it.
The Rug and The Trunk

Paint Color | Rug | Dresser | Table Lamp | Dotted Duvet Set | Blue Bed Throw | Round Mirror
The rug and the trunk were the two areas that I might have changed had we not been in a pandemic. I could have shopped in person and spent a bit more time and money obsessing. But at a certain point, I just wanted to call it on this room (especially since we aren’t even living here). So I know that this rug isn’t perfect because it’s too big. And I still wanted to layer a playful rug over it (I chose this one, but it was on backorder). But listen, this rug is great in the space and my mindset has shifted a bit in general. I didn’t want to waste this rug and purchase another one just because it was technically too big, especially during our quarantine. It was a case of “good enough”
August 5, 2020
Is Buying A House Right Now A Good Idea? (Plus A Step-By-Step Guide For First-Time Buyers)

Cat’s outta the bag: I’m house hunting. I’ve been renting in LA for 8 years, I love it here, and mortgage rates are so low that I figured I’d just look and see what’s out there. (Also, I became very obsessed with the @cheapoldhomes Instagram, which has fed into my frenzy and my lifelong dream of renovating something to live in. Those people are doing the lord’s work.) But AHHH. Y’all, being a first-time homebuyer is confusing. Even being a person considering buying a home for the first time is confusing. There’s a whole new vocabulary to pick up, ducks to get in a row, and a lot of my googling was fruitless (you know, seeing as we’re living in an unprecedented time and the real estate rules have changed a little bit from when most advice was written).
Basically, I spent the last couple of months totally lost. Can I even afford a house? Is now a good time to buy? Where is the checklist for beginners?! How many questions can I text my mom before she blocks my number?! I needed a one-stop internet post that clarified all the terms and timelines — a step-by-step guide for buying real estate, explained by a normal person who didn’t have a vested interest in selling me a property or mortgage or moving service. I couldn’t find one (or, at least, I couldn’t find a centralized one that didn’t end with me opening an exponential number of tabs and overheating my laptop), so I decided to harangue my loan officer, Andy Green, and my Realtor, Francine Biton, with hours of questions on everything first-time buyers need to know. (If you’re like, “hey, but Caitlin, I don’t have a loan officer or agent to help me,” DON’T WORRY. I will also share how you, too, can find nice and generous people to harangue with your own questions!)
So if you’re also sitting at home wondering “hey, should I do this?” my answer is this: “uhh…maybe! It depends on your situation. But hopefully, I can help clarify!” (Sorry if you’ve come here from Google in the hopes that at least one person can validate your home search.) Before we jump in, I just can’t overstate enough that nobody knows what’s going to happen in the market moving forward and that yes, we are living in unprecedented times…but if you’re curious about exploring ownership right now, here’s a regular person’s guide to how things are currently going down in the time of COVID and how to figure out if now is the right time for you to take the plunge.
 i, too, hope i get the opportunity to fix up a place like emily’s glendale home
Step 1: Check Your Credit Score
Unless you’re planning to stroll in and buy a home in cash, you’re going to need to take out a mortgage. (If you are planning to stroll in and buy a home in cash, dang, please come write a guest post about that because I admire your financial acumen.)
Simply put for my beginners: a mortgage is an IOU between you and a lender (AKA a bank with a lot of money). They’ll come in, buy your house on your behalf, and you’ll have the privilege of spending 15-30 years paying them back (with a little extra added on top every month, because hey, they did loan you a ton of money).
So, how does your lender decide that you’re someone worth trusting? How do they know that you’re not the kind of person who will just borrow a bunch of money and never pay them back? They’ll look at your whole background, like your work history and your bank statements, but they’ll take special note of your credit score. You can check your score with sites like Credit Karma, Nerd Wallet, or Mint, but your bank or credit card provider may also be able to tell you. (I can find my FICO score in my Bank of America app, my Citi App, and my Amex app.)
If your score is high — usually anywhere above a 720 is a great place to be — your lender will say, “oh, heck yeah, that person will definitely pay me back,” and you’ll be eligible for the lowest rates. That means that you’ll have to pay a little less every month (and if you’re buying something as big as a house, “a little less” every month can add up to thousands of dollars over the life of your loan). If your score is above a 620, you should still be able to secure a “conventional” mortgage, just with a higher rate (read: you’ll pay more every month). But if you have a lower credit score, around 580, don’t despair! There’s still hope for you. Now it’s time to…
Step 2: Learn Your Loans
OKAY. I know. I just dropped the term “conventional loan,” and WHAT EVEN IS THAT?! So let’s take a sec to clarify the main types of loans you can take out — get used to these words cause you’re gonna see them a lot on your search.
Conventional Loan: This just means that the loan is issued by a financial institution and not insured by the government. (The rest of the loans below are insured by the government, which means that a bank or credit union will buy your house, but the government will provide a guarantee to your lender in case you stop paying.) Normally, folks in this category have a fairly strong credit score and they’ll put down around 10-20%, but you can go as low as 3% in some situations. If you’re paying less than 20% for your downpayment, you’ll pay a monthly fee called private mortgage insurance until you hit certain thresholds (this is all super dependent on your market and the house you buy.) In COVID times, these are hands down the most attractive types of loans. WHY? Well, next up is… FHA Loan: This type of loan can be easier for first-timers to qualify for, since they only require a credit score of 580 and a minimum downpayment of 3.5%. While this can offer you some financial flexibility and breathing room, some agents may encourage their sellers not to accept offers made with FHA loans. Basically, FHA loans have SUPER stringent safety rules. While you may be okay with redoing weak floors or fixing peeling paint, this loan’s requirements says that the seller has to make all these changes before FHA will sign off on you buying the house. Since this may be annoying for a seller who just wants to get out and move on ASAP, offers from those with conventional loans will often win out over their FHA equivalent. (Not to get too in the weeds, but even 203k renovation loans — like what Bowser got, where FHA will bundle in a loan for repairs with your mortgage — require that the home is safe…so drywall’s gotta be up, no visible wires waiting to shock ya, no peeling paint for your kid to pull off and eat, you get it.)VA Loans or USDA Loan: These are two more types of government-insured loans that let you buy a home with zero downpayment. VA loans are for eligible veterans or active-duty military personnel; USDA loans are for low-income rural or suburban buyers. Since I’m not a veteran or a rural buyer, I’m not a true expert on either — just note that these may be options for you, too! Here’s a page with more info on each.
It’s important to know which type of loan makes sense for you early in the process for two reasons: some properties are extremely specific in what they’re willing to accept (“No FHA” is a super common phrase in listings), and having an idea of what sort of loan you’re shooting for will give you a better idea of how much of a downpayment you’ll need to pony up. That’ll come in handy when you start to…
 we have to do all the responsible financial stuff first so i can live my dream of DIY tiling a kitchen like orlando’s
Step 3: Look At Your Budget
It’s time to take a look at your finances. (Bleh, I know, but also…important.) At the beginning of this process, I was under the impression that I just needed to have enough saved for a downpayment (and obviously a cushion for emergencies) but BOY, that was NOT CORRECT. Let’s jump into some of the standard questions, yeah?
“How much house can I afford?”
OK, the basic rule here is that you can — generally, with good credit — afford a home that’s about 3 – 5 times more than you make per year. If you live in a high cost of living area, like LA, you may be approved for more. (In my case, I have been given the green light by my loan officer to look at houses up to 6.25x my annual income. That’s higher than I’m willing to spend because I don’t want to feel overwhelmed by a mortgage that’s significantly more than my rent is now, but it’s nice to have that parameter.)
The other thing you’ll need to consider is your debt-to-income ratio. Basically, you’ve got to think about what recurring payments you have set up. What are your minimum credit card payments? (“Debt,” in this case, isn’t referring to the whole amount you’re paying off, just the required monthly payment.) Are you paying off student loans? Do you have a car payment or lease? Did you buy something with a service like Affirm or Afterpay with a long financing time frame? (Guilty as charged on that last one — I didn’t realize that those small monthly payments would be on my credit report, but THEY WERE.) And in this case, your income isn’t determined by your take-home pay. Lenders only care about your gross income, AKA what you make before taxes.
Plug everything into a calculator like this one. You’re going to want a debt-to-income ratio under 36%. Lenders may approve you if it’s higher — everything is on a case-by-case basis — but this is just a good number to have on hand. You can also play around with the tool to test out potential mortgage payments to see what monthly number makes sense for your budget. For a lot of lenders, 43% is a limit. I’ve heard anecdotal cases of people going up to 50%, and I’m not your financial advisor, but uhhhhhh…maybe try to avoid signing up for more debt if you can avoid it.
“Am I a viable candidate for a loan?”
When there’s not a pandemic, unemployment isn’t a deal-breaker — lenders would issue loans for those who experienced unemployment as a “typical part of their industry.” The go-to example in LA is production crews, who work on set for 8 months and experience stints of unemployment between gigs. But since there is a pandemic, lenders have gotten really nervous and they’ve tightened their belts. It’s still a case-by-case basis (like, if you’re just sitting on a pile of funds or if you’re earning interest on dividends or something, you’ll have a better shot), but it’ll be significantly more challenging to get approved.
“Where are my funds coming from?”
If your potential downpayment funds are in a normal bank account, great! If not, do you have a plan to get these funds into your account? In my case, the money I have saved for a downpayment is in a brokerage account. That’s great for returns, but less great for accessing funds quickly. I’ll have to work with a banker to figure out a plan to withdraw my money so I don’t get slammed with capital gains taxes, which I hadn’t fully considered. If you have something similar in place, it’s worth just thinking about now as your future taxes may cut into the amount you think you have saved.
There are also rules for gifted funds — how long they have to be in your account, verification from your gift-er that you don’t need to repay them, and more — but I did forget to ask my loan officer Andy about the specifics. I’M SORRY. I can report back if any of you have a generous family member who’d like to send me a gift
August 4, 2020
The Difference Grout Color Can Make To Your Tiles
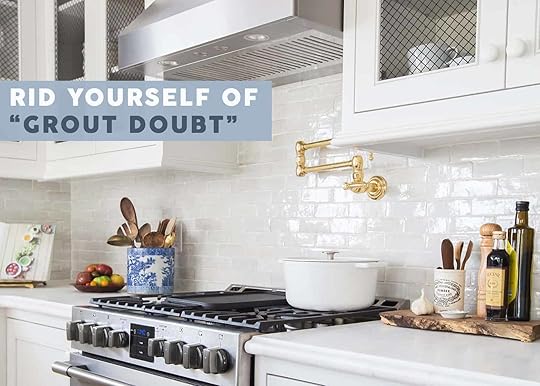
This post has been one of our top Pinterest posts for the past couple of years. We were shocked at first too, but then we realized that grout is not something most people spend time thinking about until they are about to renovate their beautiful new kitchen or bathroom with their beautiful new tile. Then it’s a mad dash to Pinterest (or StyleByEmilyHenderson.com;)) to find the inspiration they need. So just in case you might have missed this one and are in the tiling stage of your renovation we hope it helps. O and if you are looking for some out of the box grout ideas check out this post!
Tile is hard to choose, grout should be easy. But sometimes it’s not. Welcome to another “Drafts We Never Published” all about grout color. The reason that we didn’t publish it originally is because I felt that just saying, “black grout looks busier but more dramatic than white grout” isn’t enough of a lesson. Ultimately I would want to give more specifics like, “when using white tile you should use ________ color from ______ brand,” and I’d give you real takeaway instead of just “choose the right grout.” Anyway, I didn’t feel like there was enough value in this post. I can’t give you specifics, because your grout color is dependent almost completely on your tile and your kitchen or bath design. That being said, considering what different colors of grout can do to your room is a very good thing.
Let’s break it down and show you some examples of what different grouts do for different tiles so you understand what I am talking about:
White Tile…
White Grout
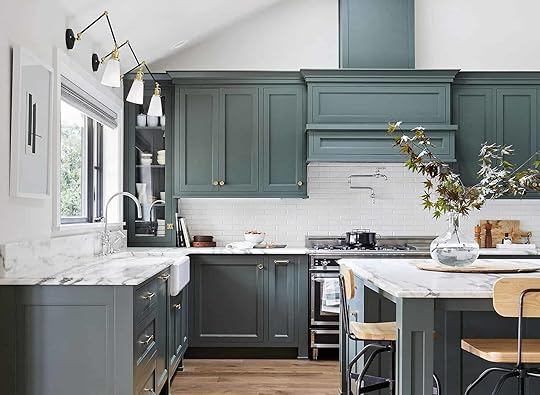 photo by sara ligorria-tramp | from: all the what’s, why’s & how much’s of the portland kitchen (+ big reveal)
White Tile with White Grout: The ever-popular combo that may seem boring when we type it out, but in reality is classic, timeless and gives any room a clean updated look. Among the most popular options in the white tile category we have the subway tile. This has been the go-to tile for DIY home renovations (and Starbucks locations) for quite some time and for a good reason. It is classic, very affordable, and is something that will never go out of style. As you can see, white with white looks great here, and gives the kitchen a clean and simple look.
 photo by sara ligorria-tramp | from: velinda’s tiny kitchen makeover takeover (with tons of smart storage hacks)
Light Gray Grout
 design by zga studio| photo by tatjana plitt | via remodelista
The grout in the photos, above and below, look slightly darker – more like a really light gray which is a good idea if you don’t think you can handle it when your white grout gets dirty. Because it will. But a light color is a great option for those of you with smaller kitchens or bathrooms as it will make them appear visually larger, even if they aren’t. Just make sure that you keep your scrub brush handy to keep the grout clean and fresh looking. Conclusion – lighter grout makes the room feel bigger.
 design by tahma smith | photo by prue ruscoe | via est living
Black Grout
 design by angela medlin | photo courtesy of schoolhouse electric | via remodelista
But what happens when we mix it up and put some black grout in between those simple tiles? This kitchen above went with the traditional subway tile, but paired it with a black grout. Which to be honest I am usually not a fan of unless it is done very well (like this version) and the rest of the space stays pretty neutral. Doing this to your tile will accentuate the grout which in turn makes the entire kitchen appear busier and less calming, but it does give it that vintage industrial look if that is what you are going for. The bathroom below is another prime example of that.
 design by ali cayne | photo by brittany ambridge | via domino
Brown Grout
Now what happens when we pair a white tile with a brown grout? This one was a little more tricky to find, but we wanted to illustrate it none the less. And who did it in a way that’s effortlessly cool?? Kelly Wearstler of course. She used it in the coolest modern way possible in this bathroom below.
 design by kelly wearstler
If brown is your jam then go ahead with the brown grout. Again, it is a very specific look which makes it a little less timeless than the other two, but when done well it can work and brings a graphic element to the space. I’ve never done it and I’m scared to do it, but it’s something to think about… especially after seeing this beaut.
Black Tile…
Black Grout
And just when you thought we were done playing tile matchmaker, let’s talk about black tile. It was huge in the ’90s and in the right modern space has always been classic, but different versions of it in various finishes are starting to come back and we are into it.
 design by jette creative | photo by nicole franzen
This bathroom went with a black on black scheme on the walls and it really works. They complimented it (and lightened it up) with a white and light wood vanity which helps both tiles and patterns work well together as the grout is not competing with the tile, but just adding texture and depth to it.
White Grout
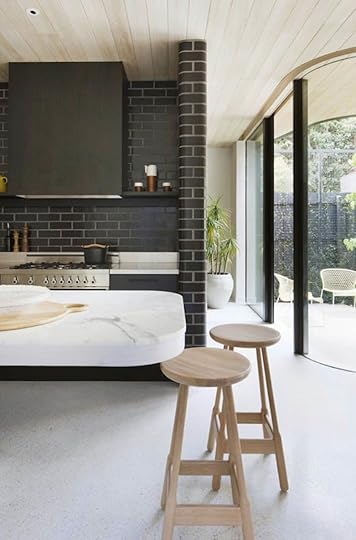
 design by clare cousins architects | photo by shannon mcgrath
Now when you go with a black tile and a white grout you are going to see that visually (like with white tile and black grout) things start looking a bit busier and you do make out the shapes of the tiles more so than you would if it was all tonal. Still, a very pretty look which we love.
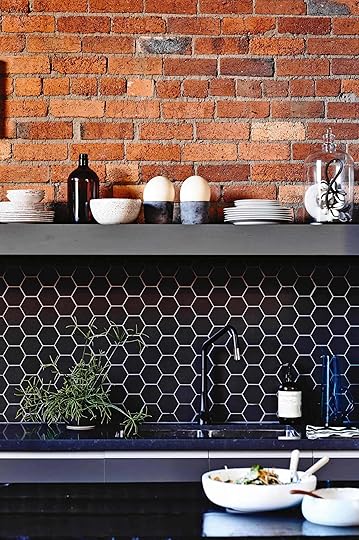 design by brett murray, stuart mckenzie, and simon carver | via inside out
Brown Grout
Last but not least, black with brown, this is not an easy combo to find but if you look at the awesome kitchen below, it’s a pretty great one. The perfect medium between black and white grout that’s a bit softer than both.
 design by christina economous and barun chatterjee | photo by caitlin mills | via the design files
So, what is your favorite combo? Do you love the monochromatic of the white on white and black on black or do you think you could get behind mixing in some brown grout with your black or white tiles? In case you still aren’t sure we created these little cheat sheets to help you next time you have to make some serious grout decisions.

Pure White Grout | Cream Grout | Brown Grout | Black Grout | White Subway Tile | Black Subway Tile
And also pulled this one together with penny tiles, which is another popular contender and very affordable when it comes to renovating:
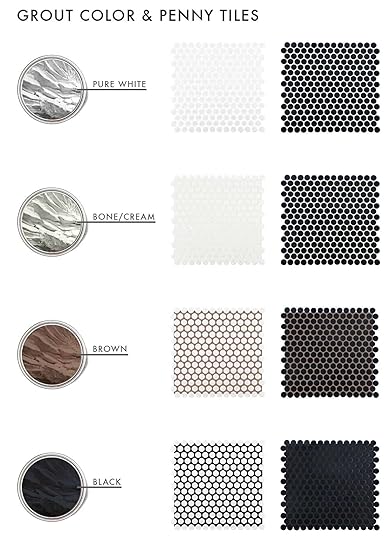
Pure White Grout | Cream Grout | Brown Grout | Black Grout | White Penny Tile | Black Penny Tile
Let us know if you have any questions below, and if you have found any inspiration photos that exemplify these different combos that we may have not seen be sure to leave the link to them below in the comments.
And if you like this whole ‘Post We Never Published’ thing, check out our first one – Mixing Pattern & Textures in Fashion (And Home)
Opening Photo Credits: Photo by Tessa Neustadt | From: My Kitchen Design A Year Later: Lots To Love & Some Regrets
The post The Difference Grout Color Can Make To Your Tiles appeared first on Emily Henderson.
Emily Henderson's Blog

- Emily Henderson's profile
- 10 followers

