
Emily Henderson's Blog, page 205
August 4, 2020
A DIY Kitchen Renovation In Two Parts (Plus A Reno Pep Talk)


Emily has loved following along with Jess and Tyler Marés, of Renovate 108, on Instagram as they renovate their 1500 sq ft home in Los Angeles. And their kitchen is truly a crown jewel. And since I’m about to embark on my own kitchen renovation journey (so far it’s terrifying), I caught up with Jess over email to pick her brain about all things kitchen renovation. Especially since they did so much of the renovation THEMSELVES. Talk about inspiration.
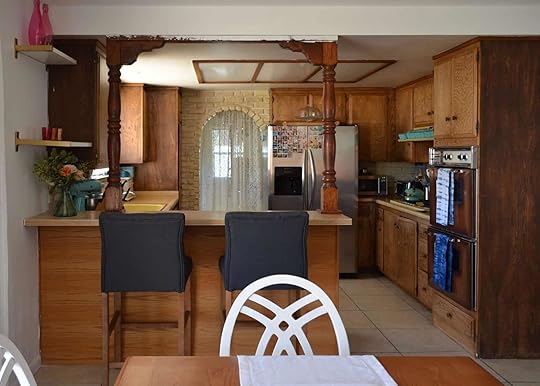
 the untouched kitchen, as it was when they bough the home
The couple bought the home back in 2015, and did a first round kitchen “update” in 2017. But they finally gave the kitchen the full renovation of her dreams in 2019, and it’s giving me serious kitchen inspiration/hope. Let’s dive in . . .
First of all, how long did you live with your “intermediate” kitchen and why did you decide to do an “in-between” design? I feel like a lot of people slowly fix up spaces, but to make a concerted PHASE ONE effort seems like a big financial decision, versus just saving for one big renovation.

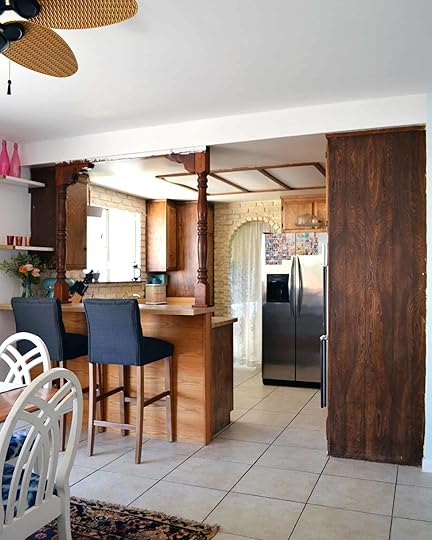
 before on the left, update on the right
When we first moved in (Summer 2015), I didn’t want to spend an extra penny on anything that was “not permanent”. This was mostly because we had just come off of a couple of strict years of low-spending and high saving in order to get out of debt and save up our (very small) down payment. I look back now and see that reaction as a mix of naïveté, exhaustion, and not knowing where to start (I knew I wanted to change everything about the kitchen, so it was a bit overwhelming!). Hence, it took me a year and a half (Feb 2017) to get to the point where I had a vision and the energy to give the original kitchen a facelift.

We had just finished the living room and I realized just how much better I felt in that room, and I knew I could have that too in the kitchen with a little paint and some new hardware. I did originally intend to also get a new sink and faucet (the very ones we’d use in our future kitchen, so that we wouldn’t be wasting those items) and do a concrete finish on the counters, but my dad and Tyler talked me out of it (I still wish I did it though!)

 the original stovetop on the left, the updated version on the right
How much did your kitchen “update” cost you, and was it worth it?
I only spent about $200 total! It was two gallons of Benjamin Moore Advance Paint, new hardware (I got them for $1 a piece from eBay – unused vintage hardware!), a can of high heat black spray paint, and two samples of rubber straps to hide the seam in our little faux beam that we did to wrap the ceiling. We had the plywood and the beadboard leftover from other projects, but it probably wasn’t even $40 worth of product for those items. Our Rejuvenation light was about $150 but I don’t include it in this makeover, since we use it now in our pantry and I don’t consider it a loss between the original kitchen and our renovation.
If you tap forward to a bit over halfway into this Instagram highlight, you can see where I walk you through all that we did and what we spent!


My verdict is that IT WAS SOOOOO WORTH IT, and I do wish I had done it sooner. The house had a sort of sad energy when we moved in, the rooms/walls everything just felt sad and depressing. I am very affected by my environment and, I think if I had been open to repainting the kitchen right away, it would have been just the burst of energy the house needed. To be fair, we had just exhausted ourselves financially to make it happen, but the update cost so little in the end. I think I would look a lot more fondly on moving in if I had a better attitude about working with what it was from the beginning. It really felt cute and like it reflected “us” in its last moments.
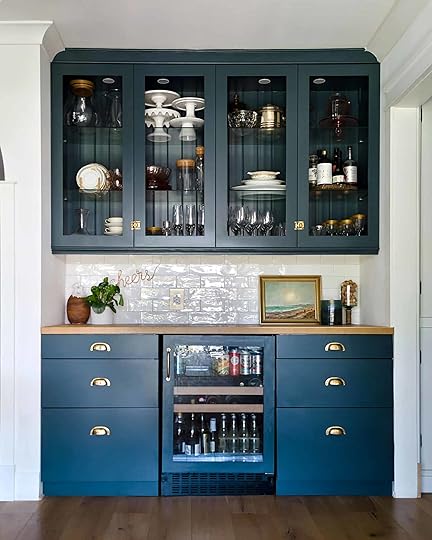
 the final kitchen renovation – all grown up!
Now when it came time to your actual kitchen reno, where did you start? The idea of renovating my kitchen has been brutally overwhelming. Physically exhausting. Emotionally draining. Where did you get the energy to even begin, and what was your jumping point in the design that you were able to build/design out from?
I’ve always loved the opportunity to make a space my own since I was very very young. I would re-design every room I walked into to bring out the full potential of a space in my head (like I can see lines coming down and walls and windows being moved around in moments, the same way they illustrate that on HGTV haha). And visiting job sites with my dad showed me that I could, in fact, make those changes! So my energy for this has yet to reach an endpoint. The only thing that holds me back is usually time and money (*YAAWWNNN*). I suppose I am an odd bird in that respect.

I have been pulling specific ideas for what I want in MY kitchen since I joined Pinterest in Feb 2011. I officially decided on Carrara marble counters in 2012. Other inspirations come from ideas I gathered as a child; I’d see something and say “I want that in my house when I grow up”. This is where the brass Schluter comes into my flooring. I remember seeing brass inlay in Tomorrowland (at Disneyland) and municipal buildings growing up in LA, especially being worked in with terrazzo, and knowing I loved that detail and I wanted it in my house. The tumbling blocks in my pantry is because of a visit to the Getty Villa on a 6th-grade field trip.
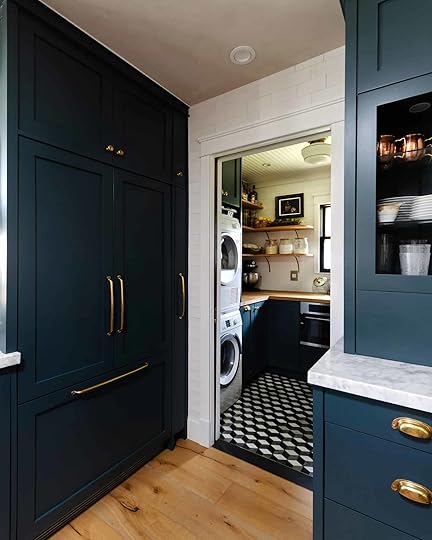 peek those tumbling blocks on the pantry floor
At some point between 2010-2014 Semihandmade came out, and I thought FINALLY. Paintable fronts for IKEA kitchens was the product I needed to make a DIY kitchen work for me. I LOVE IKEA kitchens, but I also knew I needed to be able to paint my kitchen cabinets – I want to choose the color of my cabinets, I want to be able to touch up paint, I want to be able to replace things when something gets irreparably damaged, and I want to be able to CHANGE the color in 10 years if I so desire!
I already knew that the only way I was going to be able to afford and create the kitchen I wanted would be if I were able to get creative and build it myself. (Unless I wanted to wait another 10 years, but all this energy was already so bound up I couldn’t bear to wait that long.) And, I knew I needed creative control and to not have to rush through problem-solving. This is why both Tyler and I prefer to do the finish work in our house ourselves, probably even if we could afford to hire out the job. We play off of each other’s energy and come up with fun ideas that we would not have if we worked alone. So we knew we needed an affordable, “hackable”, semi-customizable, install-yourself kitchen – and really, the only answer to that was Semihandmade and IKEA.

I made the first designs for the kitchen when we were in escrow on the house in June 2015! Actual IKEA plans, where I was discovering which cabinets would go where and such. Later, in a fit of despair and depression, after our main sewer pipe collapsed 6 months after we moved in, I went on a cleaning strike, taught myself SketchUp in a day, and then spent a month designing our house in 3D. I was able to finally put all that I had been gathering over the years together and see it come together in full dimension. It was totally a life-changing experience for me. No longer did I have to rely on flat drawings, inspiration photos, and wild gesturing to explain to the hapless people in my life what my plans were for my kitchen. I can just SHOW them my future kitchen in exquisite detail.

So all of this has been brewing for me for years. If I was going to give a suggestion for someone who has indeed not been dreaming about her future kitchen since she was 6, I would say “close your eyes and imagine how you want your new kitchen to feel; What makes you want to cook? What restaurants or coffee shops have you been in that make you know that the food is going to be good, that the conversation will flow, the atmosphere that can make even the most mediocre of wines taste delicious? How can you distill those elements into an everyday kitchen?” Okay, so maybe I’m not good at making this simple or less intimidating . . . Let’s just say that if you want a lovely kitchen that fits into a modest home, it’s best to focus on beautiful utility.
I’m currently trying to teach myself SketchUp, and it is HARD. So kudos to you. Now, where did you go for inspiration, and what were some of your biggest influences?
For this kitchen, my biggest direct influence on the cabinetry is DeVol Kitchens, specifically their shaker style. It is what led to my choice of mixing slab drawers with shaker doors, and the end panel design.
*AUDIBLE GASP* DeVol Kitchens is a huge inspiration for me too!
After that, I would say Jessica Helgerson and touches of Amber Lewis here and there, also Jean Stoffer. I wanted a kitchen that had less of a “timestamp” on it (although, in hindsight, that is almost always unavoidable, and not something I think we should be overly concerned with). And I was an early adopter of Pinterest so I usually go there for specific inspiration (like Double L kitchen layouts—which is an uncommon kitchen shape).

I also kept my romantic idea of how I wanted to use my kitchen at the forefront of my mind. I routinely imagined summer evening get-togethers with friends and family, being barefoot in long skirts with kids running around, sipping wine, string lights abound with Fleetwood Mac blaring, and my kitchen as the backdrop for all of this. I think mostly because that’s exactly how I grew up! But still, even local things were an influence. The pantry evokes Main Street Disneyland to me. Because, why not? I love Disneyland, and their store displays are the perfect sort of backdrop for a walk-in pantry.
Organizationally, I would say Marie Kondo is a huge influence, as well as just going into IKEA and looking in all the drawers of their display kitchens. That was a big help!


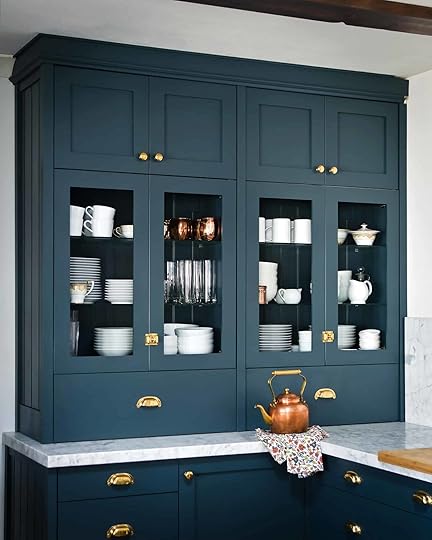
How did you decide to go dark on the cabinets? Did you ever consider a light color? I was originally going to go dark, then bounce to light, and now have landed somewhere in the middle.
I always knew I wanted dark, so it was a question of whether we would go black or navy! Originally, I had planned for two-toned, white uppers and dark lowers as I did in the kitchen update. Very similar to Emily’s kitchen in the Glendale house! I do particularly like dark lowers and light uppers, especially when the uppers are painted the same color as the ceiling, as the dark lowers are grounding and the light uppers are lifting, creating the illusion of a taller space.
Ultimately, however, I decided to go with one color, after realizing I was going to have to make some awkward paint choices when it came to my integrated fridge; there were no defined lines on where to start and stop each color. And I ended up nixing black, and chose a dark color that still had enough contrast with my stove to look like it was deliberately a different color. I also chose a color that was still a color, but also could read very neutral. I specifically wanted the color that you see in landscapes where it is still a saturated hue, but it’s right before it fades into a gray or a black in a body of water or a mountain or a cloud.
However, I INTENTIONALLY designed my kitchen to go “light” very easily. A couple of coats of paint on the cabinets and it would be a white kitchen.

I truly do not understand cabinets. How do you make them fit perfectly in a kitchen and decide what each drawer is going to do? It’s a giant puzzle.
Indeed, it is a giant puzzle! I am also very concerned about symmetry in my kitchen designs, so that adds another layer of complication to cabinetry layout. This means that I won’t just put a bunch of differently sized drawers, doors and cabinets along a wall just because they fit — does that make sense? A sense of balance is needed in order to have the finished space feel comfortable and less chaotic. This becomes more of an issue the larger a space gets, but typically there are options for symmetry even in small kitchens to give it a nice sense of presence.

To understand what you have to work with as far as cabinetry symmetry goes, you need to establish where the main appliances of the kitchen are going; fridge, stove, sink, and, usually, dishwasher. I particularly like to go with a custom paneled dishwasher especially, because it gives you more options to play with when it comes to cabinetry, and also I personally am not a fan of a giant slab of stainless steel in the middle of my beautiful cabinetry. Some people love the industrial look of that and that’s just fine, but I think its good to remember that the option to integrate the dishwasher into your cabinetry to help balance the room is an option. I also think that a trash & recycling drawer is something not to be overlooked. Indeed, it is my favorite feature of my kitchen! It’s great not having to put our trash or recycling in whatever standing space we can find. I also love our spice drawer… which leads us to how to decide what goes in what drawers.

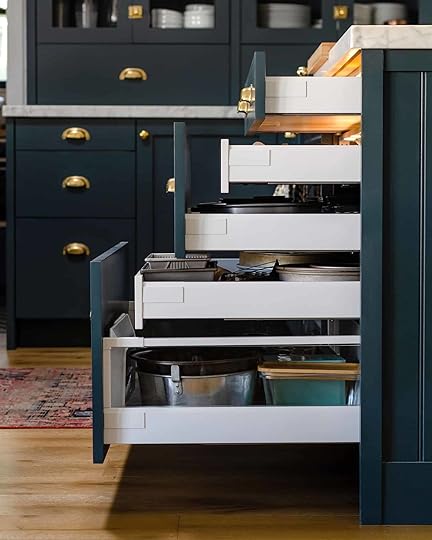
After deciding on the main placement of each major appliance, I considered the items that we wanted to store. For instance, you know you need a place for eating utensils and serving utensils, pots and pans, etc. Tyler and I made an exhaustive list of items that we needed to store in our kitchen, labeled them out on paper, and assigned them letters. Then, we printed out the cabinet layout I had settled on, and labeled each cabinet with the letter corresponding to the contents we wanted to put in that cabinet. When we discovered that we didn’t have a good place for something we could re-arrange accordingly. We also realized we wanted an uneven amount of shallow drawers. This led to us deciding to do utilize my favorite kitchen cabinet secret; the hidden drawer. The result of this was that I settled on the slim 5″ upper drawer, 10″ middle drawer, and 15″ lower drawer on ALL of my cabinets with drawers. But then behind some of those medium and large drawers I have a shallow hidden drawer behind it. In fact, two of my cabinet boxes LOOK like 3 drawers, but are in fact FIVE! 


August 3, 2020
The Practical, Functional, Everyday Things That Make Our Lives SO MUCH Better

Back in March, Em wrote about her favorite household basics. EHD’s go-to flatware, glasses, bed pillows, duvet inserts — it’s all in there. But on a recent call, we started talking about the less glamorous basics. You know, the sponges and drying racks and vacuums and brooms that keep us, and our homes, functioning.
These things — the lids and straws and cloths — are practical, tiny, and often affordable, but we never talk about them, even though they can make such a HUGE difference in our quality of life. I know this for a fact, because I’m about to tell you about the broom that has literally made me a cleaner person. (Like, yes, it made my space cleaner, but also, it shifted my behavior!!!)
I slipped my first disc in 2008, at the ripe old age of 17. (Thanks, sports!) I’ve had trouble with my back ever since — including a recent repeat injury earlier this year (Team EHD got to witness me wearing overalls for about a week straight so I could strap a heating pad to my back. I could only travel 3 feet from my desk while remaining plugged in. These are the things I miss now that we work from home.) Anyway, my bad back has always made me hate cleaning my floors since it’s a long process with a ton of bending and replugging and picking up and…you get it.
But when I moved into my apartment last June, I got a lobby broom. Yup — it’s one of those brooms that stands up, like the ones you’d see in a movie theater. I remember my mom laughing at me when I picked it out — “are you sure you want that one?” — but I was dead-set on getting this standing broom. After a year, the verdict is in: I LOVE IT. You guys. I use my broom EVERY DAY NOW. And it’s snowballed: since my floors are cleaner, I keep my surfaces cleaner. I’ve carved out time in my schedule every day to tidy.
You have to know that this was a pretty big shift for me. I was formerly a “do one big clean” type and I’d feel overwhelmed by the number of tasks in front of me, so then I’d procrastinate and it’d just be worse. NO MORE. All because of this little stinking broom!!!
So with all that said, sometimes it’s just about finding the RIGHT basics that make sense for you and your lifestyle. To that end, it turns out we all have a few things we feel passionately about in this department — things that have just made us happier in our homes. Let’s jump in, yeah?
 photo by veronica crawford | from: velinda’s under-$20,000 diy kitchen (& laundry room) gut reno
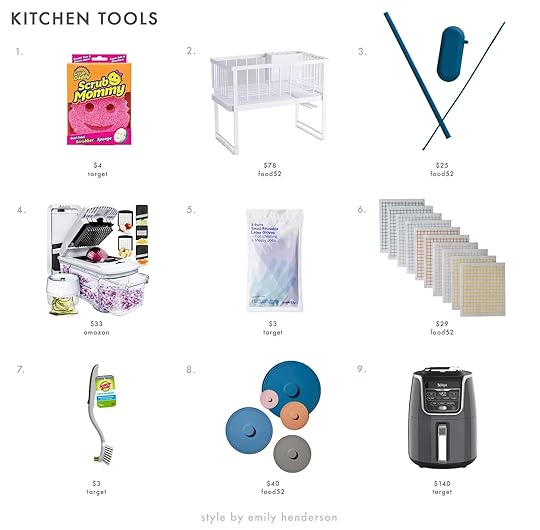
1. Scrub Mommy: I know all the hype is for the Scrub Daddy, but I’m here to say that the Scrub MOMMY is the superior tool. I’ve been dishwasher-less since 2015 and this is my all-time favorite sponge/scrubber. It’s textured on one side and a classic sponge on the back, so it does double duty, and it somehow always rinses clean despite pulling up a ton of gunk from my pots and pans every time I break it out.
2. Double Decker Dish Rack: If you’re the type of person who lets dishes stack in the sink (no judgement) and then gets overwhelmed by the sheer amount of work ahead of you, a double decker rack is a game-changer. This one offers up a TON of space, adjustable hooks, a flatware compartment, and a movable spout that drains straight into the sink. It’s compact, stable, and pretty enough to leave on your counter 24/7.
3. Silicone Straws: 10 straws. 4 cases. (And 4 squeegees, so your straws ACTUALLY get clean…but they’re also dishwasher-safe if you’re lucky enough to have one.) These silicone straws are unbreakable and temperature-safe, so you won’t have to worry about shards or about them getting too hot to touch. Most importantly: there is no aftertaste!!! (This was so exciting for me after coming over from the world of metal straws.)
4. Multi-Functional Vegetable Chopper: This little guy can spiralize, dice, julienne, grate, AND catch it all for you in a safe little compartment. I asked Jess about it and she said, “I have been making some changes to my diet and by that I mean I am finally putting nutrients into my body. This vegetable slicer has been one of the best and most affordable purchases I’ve made. It’s so easy to use and slices my veggies nice and small (which is the only way I like them). FIVE STARS.” High praise!!!
5. Cleaning Gloves: I have 3 pairs of these — one for doing dishes, one for deep-cleaning my kitchen surfaces, and one for cleaning my bathroom — and I don’t think I can go back to a glove-less life. They change my mental state (I feel a lot more competent when I’m dressed for the task) and they just make me a lot more willing to get into grime or to stick my fingers down my shower drain. I rinse them off, let them dry, and store them inside out so they’re ready to grab for the next time something gets gross.
6. Compostable Sponge Cloths: These come in sets of 10 and one cloth can replace 17 rolls of paper towels. They’re SO absorbent and perfect for doing the dishes or soaking up spills. When you’re done, just rinse, wring out, and let them dry! You can put them in the dishwasher, throw them in the laundry, or microwave them (!!!) to clean. I still haven’t hit the point where I’m ready to retire any of mine, but you can just toss in the compost when you are. Y’all, these were a LIFESAVER when all my local grocery stores ran out of paper towels earlier this year and now I’ll never go back.
7. Pot & Pan Brush: It’s nice to have one scrubbing brush in the house for pots and pans and this one is great…but I actually use it cleaning around on the floor near my toe kick. It’s firm enough to remove any gunk or accidental splatter but soft enough that I’m not worried about screwing up the paint on my billion-year-old cabinets. (Plus, the tiny green edge is PERFECT for getting out tiny litter particles that somehow get wedged in the cracks between my flooring and my cabinet. It’s the tiny, satisfying things!)
8. Silicone Lids: Plastic wrap no more! Full disclosure: I did not anticipate falling in love with these, but I DID. They’re air-tight and good for everything. They’ve subbed in for my missing Tupperware lids (where do those go???), they’ve prevented leftovers from splattering all over my microwave, and they’re good for keeping my mac & cheese warm while I decide if I’m going to eat the whole pot (I always do, and it’s nice that it’s still gooey after I’ve debated!). They nest and fit perfectly in a drawer. A TRUE DREAM.
9. Ninja Air Fryer: Oh jeez, there are a whole lot of air fryers out there and it’s kind of hard to discern which is best, especially when you’re a cooking novice. I bought this one per Arlyn’s recommendation — the lady knows her way around a kitchen — and it’s awesome.
 photo by tessa neustadt | from: how our new laundry room came together
1. Dyson Cord-Free Vacuum: We link this puppy up EVERY TIME it goes on sale because it’s a staff favorite. This is the vacuum that Em uses up at the Mountain House and her kids actually love using it. It’s lightweight, it can do double duty as a handheld vac, and not having to un-plug and re-plug in every room makes cleaning and touch-ups go by so much quicker.
2. Upholstery & Carpet Cleaner: Jess’ dad is actually the guy behind this recommendation. A self-proclaimed neat freak, he says this is the perfect everyday wet vac to clean up after spills and messes on those non-washing machine-friendly pieces.
3. Chom Chom Roller: Bowser first introduced us to the Chom Chom Roller in a Link Up about a year ago and our pet-owning lives were forever changed. This is the official pet hair-collecting tool of EHD. It is the best. If you think you’re destined to a life of fur on every surface, think again!!! You know how we get our houses looking all spic and span before we shoot our MOTOs? THIS ROLLER.
4. Standing Broom & Dustpan: AH, the broom that launched this whole post. I have since convinced Ryann to purchase one. Let me reiterate: buying a standing broom was the best thing I ever did for my hard-floored home. It’s easy to transport, there’s no bending required (so I actually sweep regularly, since it’s such a painless process), and the teeth on the top portion help pull out any hair that’s trapped between the bristles. I will never use a different type of broom.
5. Miele Vacuum: OH BOY. This is the heavy-duty, keep-forever, official adult vacuum. Em has this down in LA and Jess owned one for EIGHT YEARS but had to leave it behind when she moved to Australia. A truly heartbreaking story. She thinks about it more than anyone would think about a vacuum (her words!) — it’s the real deal for deep cleaning.
6. Long Lint Roller: “Why do I need such an enormous lint roller?” – me, 5 years ago, when my mom gave me one of these. “EVERYONE NEEDS THIS,” – me, today. My mom is always right!!! This is such a delight if you have a bad back (guilty!) and need to roll a pet bed, or honestly, if you need to roll your own bed. In addition to being great for mobility, it’s so big that you can cover WAY more surface area WAY faster. I can usually hit all the seating surfaces in my apartment with one sheet before pals come over (LOL remember friends visiting?) without having to tear off and throw out a million tinier roller sheets.
 photo by sara ligorria-tramp | from: our soft yet secretly sultry downstairs guest bed + bath
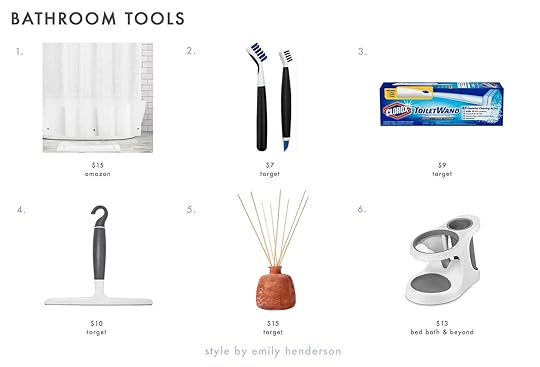
1. Weighted Shower Liner: There are magnets attached to the bottom so you will no longer experience the terrifying ghostly embrace of a billowing liner mid-shower.
2. Deep Clean Brush Set: WHAT A MAGNIFICENT DUO. The thumb grip on the larger brush makes it a dream for heavy-duty scrubbing in the shower or on your stovetop. The small brush is a dream for getting into grout but is especially handy for polishing up around your drains! They’re firm enough to remove grime and buildup but soft enough to prevent scratching. If you’re in the “I just use a sponge or a microbe cloth or a Lysol wipe to clean everything” camp (I definitely was!!!), you are going to be BLOWN AWAY by what a difference these and a little elbow grease will make to your home.
3. Toilet Wand: If y’all are not on the Clorox Toilet Wand train yet, IT IS TIME. This is the first thing I purchase ANY TIME I move into a new home. (Do I own a plunger? No! But is my toilet clean? Yes!) It takes so much of the ‘ick’ out of the toilet brush process.
4. Bladed Squeegee: Use this on anything glass: your shower, your window, your mirror, a glass-topped end table…no more streaking. It’s a tiny thing that makes such a huge difference.
5. Harmony Oil Diffuser: We love an oil diffuser here at EHD — they’re beautiful and you’ll never that “oh crap, did I blow that out before I left home?” moment that you get with candles. Target recently dropped a new line of oil diffusers in 3 different scents, but Harmony (woody and spicy) is our favorite — you can read Julie’s full review here. If that’s not your go-to smell, you can also try out Tranquility (floral and sweet) or Serenity (crisp and earthy).
6. Style & Store Caddy: My mom bought me this caddy about 4 years ago during one of her visits and it changed my life. It’s made from silicone and it can withstand high heat, which means that I actually put my hair tools away after using them instead of leaving them on the vanity all day to “cool.” (You can actually spot mine in action in this post, so you know I really mean it!)
 photo by tessa neustadt | from: laundry closet makeover
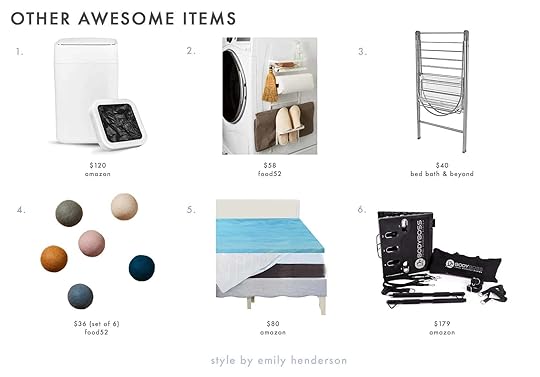
1. Self-Changing Trash Can: Welcome to the future where even trash cans are smart!!! At 4 gallons, the TowNew is ideal for smaller spaces or for under-the-sink usage (just measure first!), but the real kicker is this: this trashcan replaces and seals the bag for you. No more touching garbage! No more bending into the can and banging around to get your new bag ready to go! It’s a beautiful solution for those who struggle with mobility or for those who are just a little squeamish about touching garbage. (I use this near my cat’s litterbox and it is a DREAM. And the bags are biodegradable!)
2. Magnetic Laundry Organizing Rack: Small space dwellers, rejoice! This thing is strong and can hold your detergent pods, stain remover, dryer sheets, a spare roll of paper towels, or any other extra cleaning supplies.
3. Drying Rack: Jess loves this guy. It’s sturdy, pretty lightweight and can hold a bunch of drying clothes (which she has tons of). Also, the net at the bottom is perfect for flat dry items. Then when she’s done it folds up like a dream and lives in her closet for no one to ever have to see.
4. Wool Dryer Balls: I am a dutiful patron of my local laundromat (when I’m not trying to wash my clothes in my own tub) and these have changed my drying game. I use 3 per load and my laundry not only dries faster (costing me less quarters!) but also comes out fluffier, softer, and with fewer wrinkles. You can spritz these with your favorite essential oils, too, if you want to add a scent boost. Anyway, these are 10/10 and I will never buy dryer sheets again!!!
5. Gel Mattress Topper: This one was recently tested when Jess was house/dog sitting for her cousin. She immediately asked her it was a Tempur-Pedic mattress. Nope! Just an incredible mattress topper. It’s the perfect depth to relieve pressure points and the gel construction helps keep it cool so you can sleeper more comfortably.
6. Body Boss: Exercise is finally on Jess’ priority list and after getting this set up recommended to her by her brother’s fitness-loving fiancé, she decided to give it a try. To her surprise she loves it! This little foldable gym hits anywhere you want to work on and there are a ton of videos online so if you are a SUPER beginner like Jess, there is no need to stress out because you don’t know where to start.
OK WAIT. So we’ve shared our household essentials, but now we gotta know — what say you??? What are the basics that keep your home running or that make your life a little brighter? Did we miss anything? LET’S CHAT
August 2, 2020
The Link Up: Emily’s New Favorite Decor Piece, Jess’ Body Changing “Hammock” and The Best Bath Towels
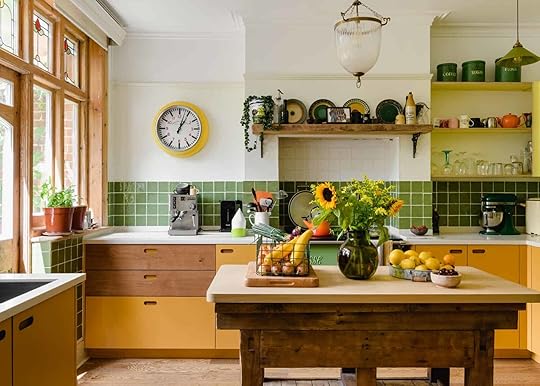
The fact that we have made it to August feels a bit mindblowing. But we also made it to Sunday (YES!) and that is cause for a little celebration. We hope that you can find at least a few moments where you do something that is purely for you. And if that is only the chance to read this link up then please know that we are honored! Let’s get right to it then.
We don’t know about you but this kitchen (and home) looks like what a Sunday afternoon should feel like. Sophia and Simon Cook so effortlessly mixed modern elements like the tile and cabinetry with vintage decor and architecture. And just wait until you see the bedrooms. This is clearly a home full of joy.
From Emily: A VERY exciting reveal is coming at you this week and this Sailing Ship Kite may be involved:) Ok, it is involved and I love it because it’s sculptural, playful, and has such a visual impact without being super loud. Anyone else excited/terrified for this reveal???
From Sara: I got a mask from this Etsy store and it’s amazing. It comes with a pocket filter, AND filters, has a really nice design, and comes in a lot of cute fabric options.
From Caitlin: Cousin Greg from Succession just put out a charity single called Antibodies (Do You Have The) through Atlantic Records and it’s SO CATCHY. It was produced by my old roommate, Colin, and a portion of proceeds go to Cope and Partners in Health. (Also can we talk about how Roman, Tom, and Greg the Egg all nabbed Emmy nominations this week for best-supporting actor?! Out of the 3, who do you think has the best shot at winning? I thiiiiink Tom is the strongest contender but UGH. Roman is my favorite!!)
Also From Caitlin: SOS. Which is your favorite real estate app/site? I’m noticing that each of the ones I’ve downloaded have different info on what’s contingent, what’s pending, and sometimes even what’s actually sold. Which one do you trust the most?
From Julie: This year especially I’ve been trying to prioritize my health and be more conscious of what I put into my body. So I’ve started to regularly include a superfood powder into my morning routine. It has made me feel so much better on a day to day basis and it’s just nice to know that I’ve checked that box on getting the right nutrients I need first thing.
From Ryann: I am never not buying jeans. Even when it is 100 degrees outside, I will convince myself that yes, I do in fact need another pair of vintage Levi’s. Recently, wanting to reduce the amount of clothes I buy, I started using Rent The Runway again. I really love it and the best thing I have ordered so far is these jeans. They are SO flattering and I’ve worn them 5 days straight. They are rigid though so I had to size up about 2 sizes. 10/10 recommend!!
From Jess: I honestly can’t remember where I saw the ad but it got me good because now I own a Neck Hammock. I know we all love hammocks over here but this is on a new level and doesn’t require and outdoor space. It was designed by a licensed physical therapist and according to the site, it helps to improve neck, head or shoulder pain, tension headaches, poor posture, poor sleep due to anxiety and restless thinking before bed to name a few. I want to improve ALL OF THAT. Definitely check the site to make sure it’s a good fit for you but next time we talk I plan on being a whole new human.
From Mallory: I never realized how much joy new towels could spark until I bought new towels myself. These bad boys are so cute, comfy, and come with a little tie that makes it SUPER easy to hang them on a hook…genius! There’s nothing quite like the feeling of getting out of the shower and wrapping myself in one of these. Truly a 10/10 towel rec.
That’s it for today! Have a wonderful rest of your Sunday and we hope some kind of hammock is involved:) See you tomorrow!
Opening Photo Credits: Design by Sophia and Simon Cook | via The Modern House
The post The Link Up: Emily’s New Favorite Decor Piece, Jess’ Body Changing “Hammock” and The Best Bath Towels appeared first on Emily Henderson.
August 1, 2020
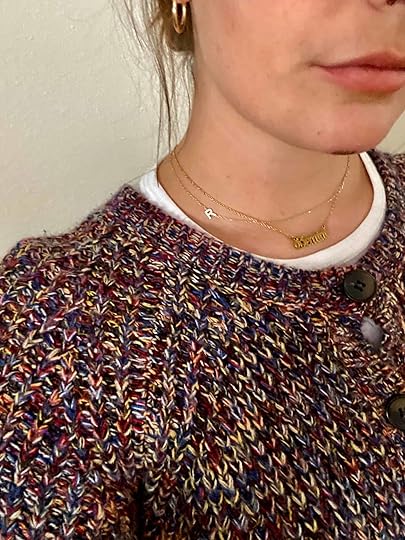
The One Accessory We ALL Love and Wear 24/7: Delicate Gold Jewelry


Acquiring good everyday jewelry has become a beloved hobby of mine. A gal can never have too much in my opinion and it should come as no surprise that EHD is no stranger to a delicate necklace or tiny gold hoop. With the exception of an occasional statement earring (usually inspired by the one and only Veronica Crawford), we frequently don delicate gold pairings because some cute yet subtle gold jewelry always levels up an outfit — even if it’s a t-shirt and jeans. A few delicate pieces can effortlessly make an outfit look more pulled together and that is peak efficiency. So since we are all quite passionate about these gems on our bodies, today we are FINALLY sharing our everyday favorites along with the ones we have our eyes on right now.
Emily’s Favorites
Gorjana Bali Antique Locket Necklace: I bought this for a fashion shoot and am so surprised by how much I love it. Also, Birdie says every day “but mama, when are you going to put a picture of me and Charlie in there?” SOON. It’s just pretty (and $65 is pretty affordable for special sentimental jewelry).
A while back Brain bought me a customizable necklace that says ‘Bird and Bear’ on it (for Birdie and Charlie Bear) and it’s just so sweet and dainty and special to me. I think we all know this, that personalized gifts are kinda the best, so thank you, Brian.
Love Knot Ring: This was an anniversary gift from Brain a few years ago and it’s another piece that is so special to me. I love it and still wear it every day.
Sara’s Favorites:


Chain Necklace: Gold paperclip chains are very trendy right now, and I’m not immune to their charms. So in an attempt to see how I could manage three necklaces at a time (I usually wear a nameplate necklace, and my “M” initial necklace), I ordered this sweet little chain. So far all three are playing very nicely together.
Initial Necklace: This was an anniversary gift from Mac 4 years ago, and I still wear every. Single. Day. I asked for it (demand probably isn’t too strong a word), because I wanted something I could wear every day and think of him. I truly enjoy and cherish it 24/7, and it hasn’t rusted, faded, bent, or broken in all that time. I never take it off, including the pool, ocean, and shower.
Initial Earrings: I love an initial piece. I wear the “M” initial necklace from Maya Brenner every day (“M” for Macauley). But I felt like I needed something that represented me – so I searched “initial earring” and this is the one that called to me. Now I’ve got a little “S” always on my left ear.
Hoop Earrings: These were an investigative purchase, to see if huggie hoops were the right hoop for me (I’ve traditionally worn endless hoops, which I love, but are much more difficult to take off and sometimes I just want to sleep without my hoops). Guess what, they are! I love the ease of being able to pop them on and off, and I like the chunky-ness they have. So now I feel ready to invest in a 14k gold pair from here.
Double-Sided Earring: Targeted ads are a thing, and they work very well on me! If I’m remembering correctly, this little friend was a “sponsored” recommendation, and I instantly fell in love. My one concern was how secure it would be without a backing, but I’ve been wearing it 24/7 on my right ear for the past two months now and it hasn’t budged.
Solar Ring: I was getting Mac a ring for his birthday, and spied this daintier version and caved. It’s simple and understated, but still somehow manages to elevate an outfit.
Jess’s Favorites:


The Sun Necklace: This was a piece I bought in Barcelona last year and I fell for it as soon as I saw it. It’s both simple and unique which gives a little oomph to whatever I’m wearing. It has tarnished a little because I literally don’t take it off (the shower is the real problem). But anytime I look in the mirror and see it, I smile (something that’s actually priceless).
Initial Charm: My newest edition! I plan to eventually get it its own chain but I love the modern vintage look it adds to my collection. It feels unique to me (the fact it has my initial might have something to do with that). It’s perfectly delicate and a little fancy which really helps me feel more put together when leggings and t-shirts are my current uniform.
Ryann’s Favorites:

Gold Hoop Earrings: A classic gold hoop is essential and these ones are the perfect size in my opinion. They are my everyday hoop earring but I like to wear these chunky ones for a fancier look.
Zodiac Necklace: This has been my favorite necklace for years. Even when I lose it or accidentally break it (which has regrettably happened twice) I buy a new one. It says Gemini in Old English font and it layers really well with any other gold necklace.
Initial Necklace: Apparently everyone needs an initial necklace. This one is very subtle and it’s also very cute to layer with.
Not pictured: This bracelet that my boyfriend gave me for my birthday that I also wear daily. I love the bolo-tie clasp and it’s simple enough to wear all the time so I rarely take it off.

Earrings: I’ve been working on moving my “delicate gold earrings” towards “kinda delicate but more interesting than just regular gold hoop” earrings. Does that even make sense? Hopefully. But anyway, these are fun bc they’ve got FRINGE.
Rings: I lose my rings constantly and it’s definitely a problem, but these are the ones that made it out. I love an opal so here’s a link to a similar opal ring to the one I wear every day and the other stackable rings are really old Madewell so here are some more similar ones!
Necklace: I LOVE a layered necklace but if you read my jewelry storage post, you would know that they always get tangled and I still need to order my storage solution.
Thanks, gals! Like I said, you can never have too much gold jewelry so here are some more we have our eyes on:

1. Dainty Oval Necklace | 2. Jules Chain | 3. Circle Bar Necklace|4. Signature Initial Rectangle Necklace| 5. Open Circle Necklace | 6. Gold Figaro Chain Necklace | 7. The Ojo Necklace| 8. Crystal Gold Necklace | 9. Bar Necklace | 10. Celine Necklace | 11. Kelli Necklace|12. The Empowered Necklace

1. Abstract Ring | 2. Dainty Oval Ring | 3. Dainty Black Gold Ring | 4. Twisted Stacking Ring | 5. Personalized Ring | 6. Yellow Gold Vermeil Thin Love Knot Ring | 7. Personalized Initial Ring | 8. Adjustable Gold Ring | 9. Thin Beam Ring | 10. Baguette Gold Ring | 11. Minimalist Gold Ring | 12. Minimalist Pearl Ring

1. Chloe Mini Stud Earrings | 2. Chunky Small Hoop Earrings | 3. The Brenda Hoop | 4. Flower Pin Earrings | 5. Square Hoop Earrings | 6. Door Knocker Stud Earrings | 7. Chevron Earrings | 8. Three of Swords Gold Earrings | 9. Argento Vivo Bar Stud Earrings

1. Reyna Bracelet | 2. Create Your Own Pull Chain Clasp Bracelet | 3. Tubular Bracelet | 4. Cuban Link Bracelet | 5. Box Chain Bracelet | 6. Modern Box Bracelet | 7. Bespoke Plate Adjustable Bracelet | 8. Curb Link Bracelet | 9. Delicate Collection Demi-Fine Opal Chain Bracelet
Now you know our favorites and because we can’t get enough of dainty gold jewelry we would love to hear yours. Drop your favorite jewelry pieces/brands below and let’s chat. xx
Opener Image Credit: Photo by Veronica Crawford | From: My 6 Favorite (And Mostly Affordable) Fashion Accessories That I Wear All. The. Time.
The post The One Accessory We ALL Love and Wear 24/7: Delicate Gold Jewelry appeared first on Emily Henderson.
July 31, 2020
The NO-FAIL, EHD Approved Bar Cart Styling Formula… Just In Time For The Weekend
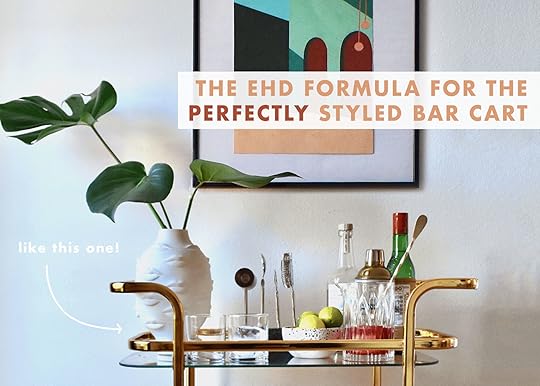
Hey hey, party people welcome to FRIYAY! I have been assigned to tackle (yet another) post about alcohol (the last was my easy cocktail making formula for beginners, don’t forget to read it if you haven’t already). Today’s post, however, isn’t about mixing drinks, it’s about creating and styling out the station that houses all the goods to do so. That’s right, we’re talking about…anyone? Anyone? Bueller? THE BAR CART. I know that suspense was killing you, so I won’t make you wait a second more. Let’s get down and dirty on the rocks.
I purchased a bar cart beauty from the one and only Sara so I’m excited to say that it’s being passed down from EHD generation to generation. It’s kind of like your Grandma’s family heirlooms getting passed down except for your Grandma has impeccable style and is only 29. Anyway, Sara was selling this beauty and I pounced on the deal very quickly. Here’s my new bar cart in action (from Sara’s perfectly styled house reveal):
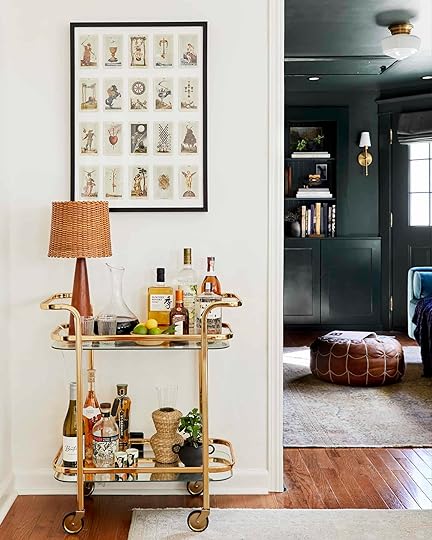 photo by sara liggoria-tramp |from: sara’s living room and dining room reveal
Ain’t she cute?? Now here she is in my empty pile o bricks apartment:

A lil different without the cute styling, professional photography and good lighting…but I’d say this bar cart is still a looker. I saw its potential very early on (well at Sara’s shoot to be exact) and since then I wanted to make it look as good as possible, BUT HOW? I needed some inspiration, so I dug into the EHD archives and pulled some cute styled bar carts from back when Ginny and Brady did their MOTOs. Let’s take a peek:

 left to right: photo by zeke ruelas, from: at home with ginny for christmas | photo by zeke ruelas, from: brady’s living room reveal
 There’s no denying these bar carts are swoon-worthy…so let’s dissect what makes them SO GREAT. I studied and I fought and I killed for a bar cart formula we now get to build…(is Hamilton suck in your heads too since it came out on Disney plus???). Also, I had some expert help from Julie too:) Anyway here’s the magical EHD no-fail bar cart styling formula:
OUR FOOL-PROOF BAR CART STYLING FORMULA
TOP SHELF:
On one Side: Something tall and sculptural (a vase with greenery is a great option)
In the Middle: Bar tools to actually make your drink (shaker, mixing glass, cocktail spoon, jigger, muddler, etc), everyday glasses and citrus bowl
On the Other Side (because we want to create levels): Most used liquor bottles (either decanted or not, YOU CHOOSE)
BOTTOM SHELF:
On one Side: Tall extra/specialty liquor bottles
In the Middle: Tray (the rug of the bar cart) with extra glassware on top with something small like a candle
On the Other Side: A fun, tall sculptural decor piece (again levels are your design eye’s friend)
So that’s how it’s done. But clearly, I’ve talked the talk but now it’s time to walk the walk… so here it is you guys. My bar cart styling formula in action (with photography by me so please don’t judge):
 vase | rocks glass | bar tools | terrazzo citrus bowl | stir spoon | cocktail mixing Glass | marble tray (similar) | martini glasses | peace sign hand (similar) | casamigos candle (similar) | art piece
I told you my photography skills are not quite professional, but look how cute this lil cart looks! Compared to that first photo where it’s empty, I’d say I’m pretty proud of how she turned out. Also, yes I put a decent helping of Casamigos on it bc it’s my favorite and no this is #notsponsored. If you guys want to see me build it check em’s Instagram this afternoon for a styling IGTV!
Now let’s be real. It wouldn’t be a bar cart post if I didn’t round up a bunch of awesome bar cart accessories (P.S. these might look similar if you shopped my how to make a cocktail for beginners post). If you didn’t read that post and still haven’t clicked on it even though I linked it twice then these will look very fresh cute and new to you (but still read the cocktail post and enjoy the best at-home drinks of your life). Please enjoy these goodies!

1. Cocktail Kingdom Set | 2. Gold Cocktail Tool Set + Gold Cocktail Shaker | 3. 12 Piece Cocktail Set | 4. Gunmetal Cocktail Set | 5. Rose Gold Cocktail Set | 6. Black Marble Bar Tool Set + Champagne Gold Cocktail Shaker
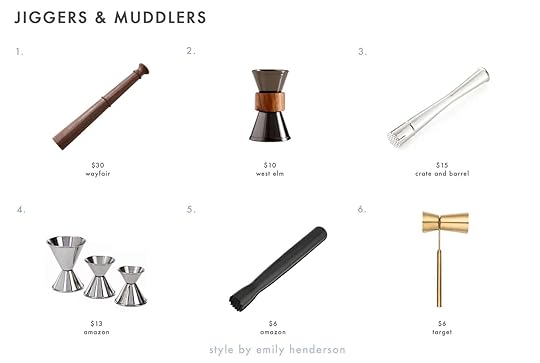
1. Walnut Wood Muddler | 2. West Elm Thatcher Jigger | 3. Hammered Metal Muddler | 4. Stainless Steel Jiggers (Various Measurements) | 5. Winco Netted Head Muddler | 6. Gold Jigger with Handle

1. Nugget Ice Maker | 2. Peak Extra-Large Ice Cube Tray | 3. Silicone Round Ice Tray | 4. Short Tumbler (set of 4) | 5. Mexican Recycled Luster Highball Glasses (set of 4) | 6. Blush Pink Coupe Glass (set of 6)
Thoughts? Comments? Questions? Concerns? Hope this was a fun post to round out your week –– happy bar cart styling everyone!
The post The NO-FAIL, EHD Approved Bar Cart Styling Formula… Just In Time For The Weekend appeared first on Emily Henderson.
Ask The Audience: Help Julie Design A Quick And Colorful Rental Bathroom Refresh
Hi all, and welcome back into my teeny tiny bathroom for one! A little over a month ago a few of us on the team walked you through our rental bathrooms and shared our hopes/dreams of how to spruce them up for the better. Unbeknown to us (Ryann, Caitlin, & myself), Jess decided to announce in the post that she wanted to challenge all of us to get them done in 2 months. I gladly accepted this deadline cause I personally work better under pressure. Let’s just say I perfected pulling an all-nighter in design school. So ladies, how are yours coming along? I know that Caitlin has wallpaper on the way and Jess shared a very beautiful custom piece with us on our Zoom call yesterday. All I can say is that it involves more of that beautiful wood incorporated in the rest of her apartment and it’s a real good hack that I think many of you have agonized over in your own rentals. I’ve had a few items arrive like a huge half-circle vintage mirror, a vintage french towel rack and a hanging planter but there are some last-minute but big design decisions to be made and I am soooo torn. Here is where you all come into the equation, today I am hoping you’ll weigh in and just tell this Libra which direction to move forward in.
July 30, 2020
What Do You Do With Bad Decor Gifts??
I don’t talk about this much, but I have a great aunt named Katherine who lives in Amish Country right on the outskirts of Lancaster, PA. I see her once or twice a year tops — only for the holidays — and in true millennial fashion, I normally spend the entire trip complaining. My time at her house is usually spent up on a ladder, reattaching the gutters, cleaning the 9 basement litterboxes for the hordes of feral barn cats she’s welcomed into her home, or carrying around bails of hay. Y’all, there is a reason I moved to a big city 11 years ago and it’s because this LTE-less farm life is NOT my thing.
But every time I’m at Katherine’s, right when it’s time to head back to my regular life, she hits me with a present. Sometimes they’re holiday-related, sometimes they’re a belated birthday gift, sometimes it’s an “I saw this and thought of you” pick. They’re almost always thoughtful and timely — snowmen at Christmas, fake flowers for an upcoming spring, pumpkins to celebrate the fall, an embroidered pillow — but they’re so not my style that I dread getting them every time.
AHH. Does this happen to you, too? What do you do with decor gifts that are just not right for you, especially if there’s love behind the giving process?
We ended up talking about this on a recent EHD Zoom and EVERYONE from the team had examples. There were bookends from a loving nana, depression-era goblets from a great grandmother, tiny figurines from a sentimental mom, quilts from a thoughtful sister…and collectively, we are stumped. If this is a universal struggle, how do you handle it in your home?
Katherine can’t travel (and she doesn’t have the internet, which is why I feel a little better about airing my grievances so publicly), so all of my gifts from her currently sit in a closet in my living room. Y’all, it looks like a Magnolia outpost in there. I HAVE SO MANY THINGS MADE OUT OF WOOD. It’s truly like a secret Narnia farmhouse, which sits in stark contrast to my 80s black and white striped sofa and leopard print Jaymar chair. I know the etiquette is that I’d have to style these things like they always take up real estate in my home if she were ever to visit, but since that’s not an option, they just sit untouched until I will inevitably re-pack them up and schlep them to my next home.
My favorite gift I’ve ever gotten from Katherine was a sponge holder, like this, which my mom forced her to get me for my 25th or 26th birthday. My mom says she protested — “this isn’t nice!!! It’s not good enough!!! It’s only $6!!!” — but it’s the only gift I’ve ever actually used (and loved! I highly recommend a sponge holder like that!). But it’s been a couple years, and we’re back on the painted barn wood gift train — even my mom’s nudging that maybe I’d prefer something a bit more practical didn’t sink in long-term.
So if you can’t necessarily hint at the things you’d like (and you have enough social awareness to know that telling your 80-something year old great aunt that you dislike her taste would be AWFUL) and you have to accept these gifts, where do you go from here? Is donating ever an option?
For the past couple years, it’s been cool to have less, but the world has shifted a bit. (LOL. A BIT.) Like, do my unnamed coworker’s (you know I wouldn’t put anyone on blast!) old goblets spark joy? No. Do they work with her decor? NO. Buuuut, would they be kind of nice to have now that she’s home all the time and dishwasher-less? Maybe! I think I struggle with my decor because it can’t serve this functional purpose — my hanging wooden Halloween ghost is off-brand (for me) and it’s just taking up space. But can I donate it without guilt? I’m not sure! (Right now, though, it’s a firm no! She’s old and spent her limited income on getting something for me, so I have to keep it forever, right? SOS! Someone, tell me if it’s weird or not to be having a moral crisis over this! I want a closet back!)
And it just gets more complicated when you jump into the family heirloom space. What happens when you’re not dealing with just decor — what if it’s a bigger piece, like a vintage chaise or an antique hutch? How do you tell your family that you’re just not interested in bringing something with history and sentimental ties into your home, knowing that it’ll cause hurt feelings? Do you think you’ll ever regret not having your grandmother’s extremely ornate bedroom set? Is it worth it just to store it somewhere, or do you just cut your losses and send it to Goodwill? The whole thing is just DICEY, y’all.
So please, I’m curious if you’re having the same dilemmas: do you also have a spot for that gifted decor that’s just not right for your house? Do you suck it up and present it anyway, because you love the history and gift-giver? Have you donated a gift? Do you lay things out when your relatives come over, only to return them to their more permanent home in your closet or basement? Have you donated something and then regretted it? Are you not sentimental at all and do you think I’m a goof for writing this whole post? LET’S CHAT ABOUT IT.
Opening Photo Credits: Photo by Bethany Nauert | From: Lisa’s House: Living Room
The post What Do You Do With Bad Decor Gifts?? appeared first on Emily Henderson.
It’s Back to School… Well Back To Homeschool: 54 Desk and Chair Combos For Every Age And Budget

I want to start this post by saying that the dining table is a perfectly great and sometimes the only option for a SFH (schooling from home) space. However, if you are a parent facing the harsh reality (as many parents are) that normal school will not be in session in the next month (and you do have a little extra space to spare), you may be thinking about a more permanent school workspace. One that will make your home feel a bit more in control (remember control? haha wasn’t the past fun??) and the dining table reserved just for meals. Now I am not a parent but after watching and consoling my friends and family who are, I wanted to round up some solid desk/chair option for kids of all ages. It was the actual least I could do. Summer is almost over so let’s get right to it. Alright, little ones are up first.
 from: our kid’s attic playroom – update (and mini-reveal) + the five parenting fails/mistakes i made
If you are like Emily, your kids are in school but their studies are less about good grades and more about exercising their little brains to prepare them for the big leagues… elementary school. Sure there are cute workbooks and flashcards to go over but arts and crafts are still A BIG part of the curriculum. So instead of opting for a desk, think about getting a play table. Extra points if it has storage!

1. Jorden Lift-top Storage 3-Piece Ready to Finish Child’s Table Set | 2. Children’s Table & Children’s Stool | 3. Forest Table and Chairs | 4. Emilio Kids 3 Piece Arts and Crafts Table and Chair Set | 5. 2 Piece Table and Bench with Paper Roll | 6. Lemonade Playset | 7. 3pc Modern Table and Chair Set White | 8. Large Charcoal Adjustable Kids Table + Kids Chair | 9. Kids Table And Chairs | 10. Aghacully Kids 3 Piece Table and Chair Set | 11. Maxxi Mini Table Natural + Oriente Stool Natural | 12. Nicklas Kids 3 Piece Windsor Writing Table and Chair Set | 13. White and Maple 3-Piece Easel Kids Table and Chair Set | 14. Child’s Table with 2 Benches | 15. Kids’ Riviera Play Table & Kids’ Riviera Chair| 16. Kids’ California Dining Table + Kids’ Sunwashed Riviera Chair| 17. Melissa & Doug Wooden Table & Chairs | 18. Crescent Table & Crescent Chair Pair
I just think it’s worth a mention how chic children’s furniture has gotten. I mean #10 and #15 (hello mini wishbone chairs!) are too much for my heart. But when it comes it’s cuteness #3 and #14 are so sweet. However, being a parent makes you put practicality as the main priority, so if you don’t already have a ton of storage #1, #2, #3, #4, #10 and #11 are your top contenders.
Now let’s get serious because the kids are bigger and the math is harder…
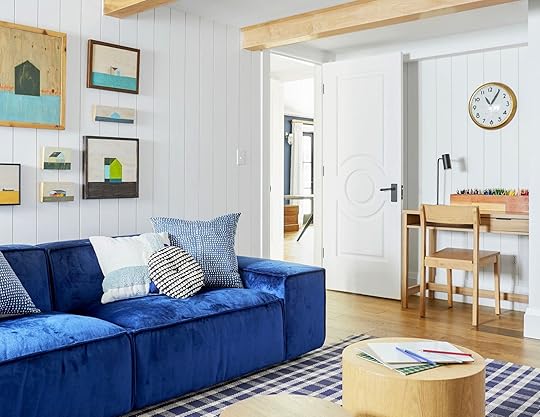 photo by sara ligorria-tramp | from: portland reveal: the 5 design elements every awesome “big kid” playroom needs
This next roundup is for kids that are still not ready for the actual “big kid desk” but are in need of a more proper desk. The grind starts early people! And while I am clearly no expert, I feel that creating a work desk for your “not super little” little, is a good way for them to practice sitting at a desk like they would in a regular school setting. This is not me shaming any parent that doesn’t have a desk for their kid. Because let’s be honest, what is best for you sanity is best for you child:)

1. Black and Wood Kids Table with Drawer and Chair | 2. Architect Table Pink + Little Architect Chair | 3. Blue Kids Table + Galento Paris Kids Desk Chair | 4. 2 Piece Arts and Crafts Table and Chair Set | 5. Bohème Desk + Adjustable Weaning Chair | 6. Study Furniture Set | 7. Règine Desk + Kids Chair Suzie | 8. STUVA + Metal Children’s Chair | 9. Kids at Home Desk & Stool | 10. Kids’ Desk + Kids’ Chair | 11. Growing Chair and a Multifunctional Table | 12. Adjustable Mobile School Standing Desk + Industrial Activity Chairs (Set of 2)
And yet another classic “Jess can’t choose a favorite because she is annoying and can’t make a decision to save her life.” But really. LOOK at how cute these all are. I will say that the price of #1 is incredible and would blend with almost any style of home decor (10 points for that). #5 is a very sophisticated and CUTE setup and I would happily put that combo on display in my home. Plus the chair height is adjustable. And speaking of adjustable furniture, the desks for #9 and #12 also can grow and your kiddo gets a little taller. Pretty great AND practical.
Alright, it’s big kid time. That ranges from middle school to well I guess college with the quarantine still fully in place. The great thing about this category is that eventually, these pieces can be yours if you want! So HOT TIP: Choose with your kid (and you) in mind.

 left: photo by david tsay, from: tween bedroom makeover |right: photo by tessa neustadt, from: sylvia’s surprise makeover: the living room
Also, the sweet room/desk setup on the left belongs to a now very grown 16-year old Grace that just this past year got a full room makeover and Sara and Julie are shooting this week! Stay tuned and hopefully, you are more patient than me because I CANNOT WAIT to see the photos. Until then here are the combos for your kids (and you)

1. Hampshire Olive Green Kids Desk + Adelai Office Chair | 2. LILLÅSEN + LÅNGFJÄLL | 3. Oslari Wood Writing Desk + Furlicious Faux-Fur Airgo Swivel Desk Chair | 4. Meredith Desk + Lourdes Task Chair | 5. Ada Glass and Wood Writing Desk + Upholstered Rolling Desk Chair | 6. Emily Henderson.
July 29, 2020
Does Your Home And Pup Want Cuter But Practical Accessories? We’ve Got You Covered
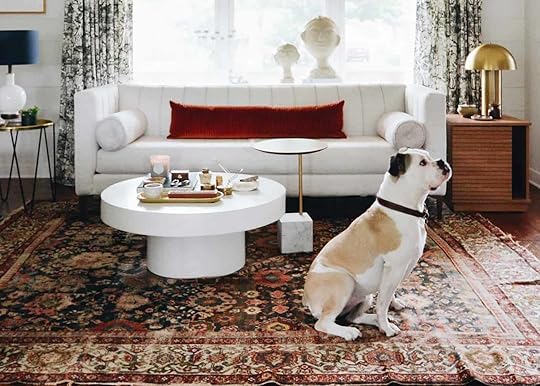
I think all dog owners can agree that once they become a part of your home and life, your world is forever changed. Not just because they are human’s best friend but because they will absolutely take over your home if you let them. I’m not the strictest dog parent so needless to say my dog has won this battle. It’s fine, I surrender. However, so long as I have a 60 lb lap dog in my life, on my sofa, and in my bed, I will be damned if I don’t at least attempt to save the decor and design of my home. This means searching for the most design-friendly dog accessories out there, so I can perhaps maintain a tiny bit of control.
I’ve put off purchasing a lot of the dog accouterments but as the design of my home comes further and further along, I needed to find what’s best for my dog, my home, and my sanity. Here we go…

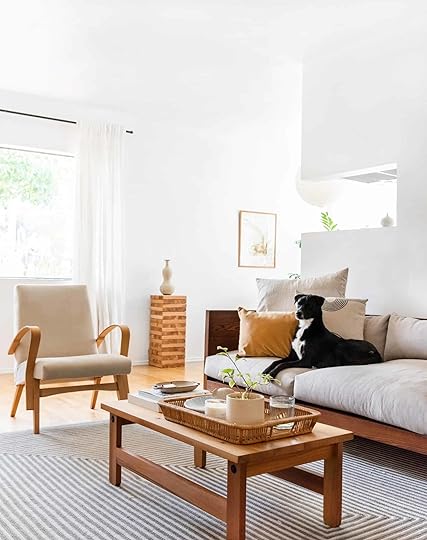
1. Forest Dog Bed | 2. Contempo Lounge Pet Bed | 3. The Wolf Nest Linen Dog Bed | 4. Riviera Dog Bed | 5. Moderno Pet Bed | 6. Animal Print Memory Foam Dog Bed | 7. Quilted Orthopedic Bolster Cat & Dog Bed | 8. Modern Mud Cloth Natural Dog Bed | 9. Wild One Bed | 10. Indigo Mud Cloth Dog Bed | 11. Isla Dog Sofa | 12. Fringe Studio Textile Lines Pillow Pet Bed
I have to admit that I love a floor pillow in place of a traditional dog bed. They are subtle and great for small spaces as you can layer them on top of a rug so it doesn’t take up a significant amount of floor space. Something like #6 would be very cute layered over a cowhide rug and people won’t even realize it’s secretly a dog bed. Personally, my pup will lay/sleep on basically anything but over the years I’ve noticed he prefers the beds that have a ridge so he can lay his head on it like a pillow, so #7 and #9 would be his preference I’m sure. But as I mentioned before here, a great trick is to have throw blankets (that you aren’t super attached to) layered on rugs and on the floor for them to snuggle up on. This is a great way to keep them off furniture as much as possible.

1. Dove Marine Rope Dog Leash & Charcoal Stripe Dog Collar | 2. Found My Animal Classic Hemp Dog Leash & Making Shapes Collar | 3. Emerald Velvet Rope Leash & Hunter Green Rope Dog Collar | 4. Coral Dog Collar & Coral Dog Leash | 5. Navy + Brass Recycled Materials Dog Collar & Royal Navy Rope Dog Leash | 6. Chambray Dog Collar & Grey Cotton Rope Dog Leash | 7. Custom Leather Dog Collar & Black Leather Dog Leash | 8. Wild One Collar & Wild One Leash | 9. Sage Box Lounge Leash
This roundup was very timely for me as I have not upgraded Gus’s collar and leash combo since we adopted him. It’s something I’ve been wanting to do for a while but never felt like a big enough priority to spend money on. BUT NOW, after seeing the options out there I think it is time. He would look so handsome in #5 and #7 but I also love the look of #9. Has anyone had experiences with any of these brands or products?? If so, you know I love a real customer review so let me know.
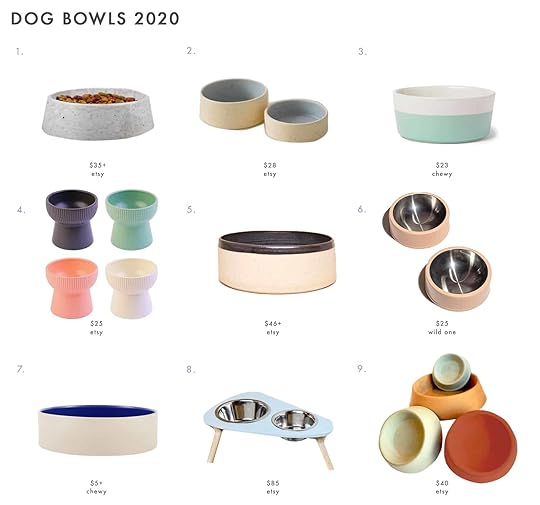
1. Concrete Pet Bowl | 2. Ceramic Peet Bowl | 3. Waggo Dipper Dog & Cat Bowl | 4. Handcrafted Ceramic Raised Dog Cat Pet Bowl | 5. Dog Bowl for Small & Large Dogs | 6. Wild One Bowl | 7. Ethical Pet Stoneware Crock Pet Dish | 8. Raised Dog Bowl | 9. Concrete Dog Bowl
The difference that purchasing these dog bowls made in my kitchen is pretty unbelievable. Before, I was using tin salad bowls in place of actual dog bowls and let’s just say it was not cute and very messy. Now that we have these proper ones I feel so much better and I feel happy for Gus even though he doesn’t know the difference, I like the idea of spoiling him a bit (he’s my baby!!).
 design by mel burstin | photo by tessa nuestadt | from: house tour: mel’s new place makes us want to declutter immediately
1. Vanilla Veg Tanned Leather Tug Toy | 2. Modern Mud Cloth Natural Dog Squeaky Toy | 3. Cotton Dog Rope Toy | 4. Frisco Plush and Rope Bundle Dog Toy, 6-Pack | 5. Triangle Tug | 6. Medium Rope Tug | 7. Organic Cotton Rope Dog Toy | 8. Bolt Bite | 9. Sheepskin Bone Squeaky Plush Dog Toy | 10. HuggleHide Bone Dog Toy | 11. Leaps & Bounds Playful by Nature Toss | 12. Jax and Bones Anchor Rope Dog Toy
My dog is a pretty big boy so his favorite toys are stuffed animals he can rip apart in two seconds. He also loves a squeaky toy (like the animals in #4) but they annoy me so much so for him, I try to stick with bones and things he can chew on. However, his favorite ball ever is this so if you don’t mind the squeaky sound, it’s a good and cheap option. #5 and #8 are very chic for dog toys and a rope toy is a classic because who doesn’t love tug of war??

1. Jar With Lid | 2. 3 Piece Canister Set | 3. Waggo Gloss Dog & Cat Treat Jar | 4. Waggo Dipper Dog & Cat Treat Jar | 5. Colori Canister | 6. Large Ceramic Canister | 7. Niko Large Blue Ceramic Canister with Wood Lid | 8. Textured Stoneware Kitchen Canisters | 9. Airscape Ceramic Storage Container
The great thing about treat containers is you can use just about any kitchen food container out there. If you don’t have a ton of cabinet space and will be leaving the treats out on a counter all of these options are stylish options that could easily fit in with normal kitchen decor. I love #5 and #8 and you can’t go wrong with a classic glass jar.

1. Set of Rainbow Baskets | 2. Culla Bench | 3. Garissa Basket | 4. Woven Basket | 5. Revistero Basket | 6. Mid-Century Cabinet | 7. Jay Tufted Upholstered Storage Bench | 8. Mid-Century Toy Chest | 9. Rope Basket with Lid
Storage is always top of mind for me (hello tiny apartment) so I had to include some options here. Now that you have dog leashes, collars, and toys you’ll need somewhere to store them. If your space permits, I think an entry storage bench is a perfect solution. You can keep the leash and toys close by the door plus the bench can be multifunctional.
If a storage bench is not a viable option, baskets are a great alternative. I love the ease of simply throwing my things in a basket and closing the lid. Voila! Just like that, I am the best organizer ever.
 did you think I would end this post without showing off my sweet boy, gus at least once??
That’s all I have for pups but I’d love to know what other pet roundups would you like to see from us. We know many of you are dying for some cat content (which I am sure Caitlin or Sara could certainly oblige) but if you have other suggestions drop them in the comments. See you there. xx
Opener Image Credit: Design by Lea Johnson | From: Tour a Stylist’s Mid-Century-Meets-Traditional “Farmhouse” Full of Thrifted Treasures
The post Does Your Home And Pup Want Cuter But Practical Accessories? We’ve Got You Covered appeared first on Emily Henderson.
Design Agonies BE GONE… 5 VERY Universal Problems, Solved Via The EHD Insider Design Agony Group Chat

Our design agony posts are extremely near and dear to us. We LOVE getting to have a more personal connection to you all, getting to answer your exact questions, and helping you tackle your most troubling design issues. I mean room layouts are tricky, knowing what to do with a blank wall can feel like a graduate-level algebra question, and sometimes a second opinion can put you at total ease. We know that last one to be VERY true because y’all you have been just as much as a support to us in helping make some very important design decisions as hopefully, we have been to you. SO it was a top priority for when we created the EHD Insider Community that a “Design Agony” section was included so any member could upload a photo and ask the community for help. And let’s just say it might be the best part. Everyone has such great and insightful advice and knowing there is a place to ask, “Hey, is this rug a good fit for my living room” or “Any suggestions for my fireplace reno mishap” or “What is missing from making this room look awesome??” is pretty freaking great. But to be fair we may be partial:)
So with their permission, we wanted to take a handful of the agonies our Insiders posted that are pretty darn universal. Let’s jump right in…
I want to start with my old friend, Martha. Ok, so sadly we don’t “formally” know each other and hang out with wine, chatting design into the wee hours of the morning. That’s what normal friends do, right? BUT if you head to our ShowEmYourDIY: Kitchen Edition you will see her wonderful kitchen remodel where a light facelift made a HUGE difference. This time though she was inspired by our headboard sconce trend post and DIY’ed one herself. It looks awesome!
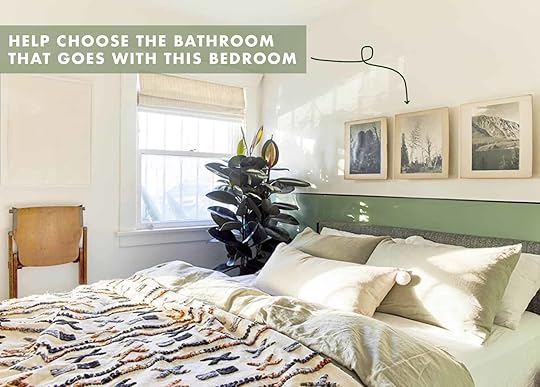
But she is now stuck with the ever baffling question of “What do I put above my bed??” This is actually a question we get all. the. time. so if you need some examples here and here. But let’s talk about Martha specifically. Here is here bedroom and question:

How wonderful is this?! Now in terms of the art question, one Insider was curious about the depth of the ledge which Martha replied was only one inch…so not an ideal depth for an art ledge. Another reader thought that something like the MQuan beaded wall piece that Em has used in the past would look great (and it for sure could) BUT Martha wants something a little calmer in texture so here is what Julie (and then seconded by Bowser) recommend:

The point Julie made about balancing out the “grid” look of the headboard with a single large scale is a winning match. One reader recommended this awesome print that we love and could be a perfect pick. However, Martha wants something that’s unique to her… so vintage is on her mind. We think that’s a great idea since buying vintage is for most of us, our design love language. I also personally think a large scale horizontal textile (vintage or not) could look awesome and also cozy:)
Next up is a window treatment dissatisfaction…

Buying window treatments can be intimating and when you aren’t in love with what you bought is SUCH a letdown. But despite Emilie feeling blah about her relaxed roman shades, we think that they are totally great. The Insiders had a ton of great ideas. Some of which included trying normal curtains, faux panels, a patterned roman shade, rotating the bed to be in front of the windows, etc. But we think her lackluster feelings are coming from a lack of texture and decor in general. By adding in a furniture set up like the one below (one of my all-time favorite EHD rooms) between the middle and far-right window, Emilie would bring in a ton of visual interest which would take that pressure off of the shades to fill that visual hole.
 photo by tessa neustadt | from: eclectic traditional bedroom reveal
Or simply hanging some large framed art pieces or a large wall hanging would also bring in that dimension without the need for more furniture. Lastly, we agree with another Insiders suggestion to try the bench at the foot of the bed
Emily Henderson's Blog

- Emily Henderson's profile
- 10 followers

