
Emily Henderson's Blog, page 201
September 1, 2020
Happy 10 Year Anniversary, Brian (Plus a 20 Year First Date Anniversary Update…Yes Our First Date Was On My Birthday:))

***UPDATE. Today is my 41st birthday which isn’t very monumental obviously, but you know what is? That fact that it’s ALSO the 20th anniversary of Brian and my first date. Technically it was a group of my friends, but we had met the night before, hit it off obviously and I invited him out the next night for my 21st birthday. Four years ago I wrote this post documenting our now 20-year relationship and the ups and downs of our marriage, which a lot of you related to. I’m happy to say that while we work through the same challenges as I wrote about in this post (isn’t it funny how your issues are your issues… forever?) we are in such a great place as a family and in a better place than we’ve ever been. So while technically it’s my birthday, today we celebrate 20 years with Brian Henderson – we are dangerously close to loving each other over HALF OF OUR LIVES. xx
Brian and I are celebrating our 10th anniversary today. TEN YEARS. It’s actually 16 years together in total. He’s truly my soulmate, best friend, and generally my most favorite person in the world. And folks, I’m happy to say that after some rockier years we are more solid than we have ever been because of some recent changes that we’ve made. You might be dying to know what those changes are, but first a quick bio of our relationship. No one loves a love story like I do, so while this may not be everyone’s version of a good post, if you are into shows that involve, say, Chris Harrison or Felicity and Ben then you, too, might be into this post. It only took me 14 hours to write/edit but it’s something I want our kids to eventually read, it’s something that many of you might relate to, and it’s a story that is so fun to relive. Here we go.

Brian and I met our senior year of college at the University of Oregon, in the year 2000. He was acting, shirtless, and in a play where I was in the audience, falling in love with his surprisingly ample chest hair. My friend was the stage manager and I begged him for an intro. It was all very immediate. That night we talked until 4 am about our mutual love of The Coen Brothers and Chuck Palahniuk novels, my love of Dido and his lack of Felicity knowledge, etc. He played with my hair until I fell asleep. No kiss. Nothing… The next day as he drove me home we listened to the radio and both started singing the chorus of the same cheesy pop song at the exact same time and I remember thinking, I am going to marry this man. He felt like home, instantly and I was immediately in love.
He didn’t call for 5 days. I didn’t have his number and it was before social media. I was so hurt and confused, but assertive, so I finally tracked it down and he gave me a “Shoot, can’t talk now, I have friends over” excuse. Of course I’m no idiot, I knew what had happened. There was somebody else. He called back and asked if he could come over and talk. I said, sure and the second he sat down I called him out on it. He said he had been trying to get out of the friend zone for a year with this girl and that they had just gotten together a week before we met. He was super confused and couldn’t stop thinking about me, but he felt like he had to give it a try with her. Blah, Blah. We went out that night and had so much fun. Too much fun. Nothing happened, except that I felt confirmed that we should be together because we were the same person. The way we communicated, our sense of humor, how much we had in common, how much we made each other laugh was absolutely unmistakable. He dropped me off. I went inside and cried. And two days later I called him and asked him to coffee.
I told him that we needed to be together. That it wasn’t up to us, that clearly the universe thought that we should be together. It wasn’t just our chemistry, it was like our personalities met and they melted into each other instantly. He looked at me with a smirk and said, “I know. I broke up with her last night.”
We were inseparable for months. We listened to David Gray and Coldplay, went to pretentious art house movies, and bought vintage t-shirts at thrift stores. As I fell deeper and deeper in love with him I realized that it wasn’t being reciprocated as much, WHICH SUCKED. He started disengaging so instead of me waiting until my heart was demolished, I broke up with him. He told me that he didn’t really know who he was and was unable to go there. I must have had the confidence to know that we would get back together because I wasn’t that heartbroken. Of course weeks later when I saw him on campus at 9 am with a girl, looking all disheveled, my heart felt like it was full of warm acid and my stomach felt like the outer lining was made of cement. Then I was heartbroken.
A month later he called and begged to get back together and while I tried to resist, I took him back. Gladly. I hadn’t stopped loving him and missed his everything. But we took it slow. Clearly this guy wasn’t ready for this.

Over the next couple of years we graduated, I went to Europe for 2 months with my best friend, then Brian and I moved to Sacramento and lived with his parents to save money for a move to New York.

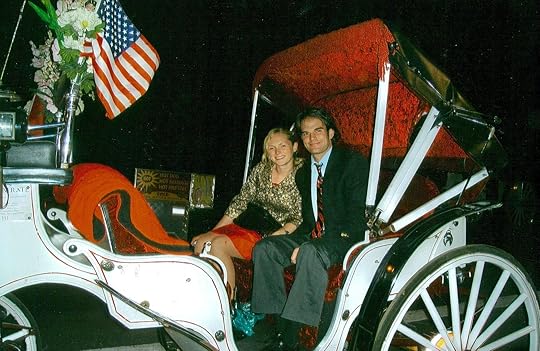
We landed with $3k and 22-year-old dreams of adulthood. That pic above is the day we road tripped from Sacramento to New York. We wanted to bring our west coast version of cool to the east coast which apparently meant flavor savers and Teenage Mutant Ninja Turtle t-shirts. Dear God. We found a 350 square foot studio in the East Village for $1200 and proudly called it home. He went to grad school at NYU for theater while I walked dogs and bartended, and we slowly grew into our adult selves. But he still wasn’t ready (and neither was I to be honest). Trying to find yourself in New York while tied to someone from college felt strangely constricting and after realizing that we weren’t connecting, and that he simply wasn’t ready to really BE together, we broke up.
I cried every morning for hours for a month, then one day woke up feeling better. A therapist that was a regular at my bar told me to “exercise my sadness” which meant to wake up, face the sadness, and let yourself cry. Before that I was literally crying while taking drink orders – I was so incredibly heartbroken and not coping well. But it worked, you guys.

We took 6 months of space, and when you are 22 and a bartender in New York that meant a lot happened (for both of us). Hilariously we have never ever, ever spoken about that time – even now! It wouldn’t be that painful, it was 13 years ago!!! But still – he doesn’t know what I did or didn’t do, and likewise (P.S. He thinks it’s sooooooo much worse which I’m letting him believe). When he came back he begged and begged, saying that he had grown up, that he was ready, that I was his #1 priority, etc. I believed him. Sure, I made him work for it, but I believed him.

He moved in with me, we lived our 20’s lives in New York together. We were so happy. We worked on our careers, we went out a lot, we made amazing friends, and lived a ridiculously fun 20’s life. We adopted some cats and as soon as he graduated from grad school, he booked his first big off-broadway show and got an agent. He felt like he was ready. He proposed to me when we were 26. Which now of course sounds so insanely young. It was in central park, with candles and his friends playing our song on the acoustic guitar. It was shocking and amazing and romantic and impulsive and yet totally right. We were so young, but at the time we had already been together for basically 5 years and it felt like it was the right time.
We got married a year later. Our budget was $7k. I bought a $60 dress off eBay, a ring at an antique store, and we had a taco truck WAY BEFORE THEY WERE COOL to cater it. It was the best, laid back, low key, wonderful night of my life – before Pinterest, blogs, pressure, or options. It was perfect for us. He was, and is, the best man I’ve ever met and I knew how lucky I was to be locking him down so young.
On our honeymoon in Montreal, we made a list of promises to each other, one of which was that we would prioritize our own personal happiness over the happiness of each other or our kids. Oh, how naive (and yet so wise) that was. We were so happy at the time that we didn’t know the cause or result of personal or collective unhappiness. I had no idea how much his happiness (or lack thereof) would affect my own so much. We lived for another year in New York until he became restless and unhappy and, while I couldn’t have been happier in New York, I agreed that following his heart (and the Hollywood gold rush) was the right move.
The move to LA was the beginning of our more challenging years – but maybe it was also because we were in our late 20’s, which tends to be a pivotable time in many people’s lives. We moved to Santa Monica 6 days before the writer’s strike which shut down Hollywood for years and it has never recovered. We had no friends, no jobs, and were in this extremely alienating city that made you feel old every time you went out to dinner. After months of crying and drinking too much, we looked at each other and knew we had to change our situation. We left for Vietnam the following Monday and stayed there ’til the strike ended. It was what we needed and after we came back we moved to the east side and restarted our LA life. I auditioned for DesignStar, Brian got a new agent, booked a couple plays and it was looking on the up and up.

But then I won DesignStar, started shooting Secrets From A Stylist and while he was wildly supportive, LA wasn’t as friendly to him as it was to me. Without ripping Hollywood apart too much, it’s fair to say that talent is valued far below most things and my resentment towards this industry was only matched by Brian’s disillusionment towards it. Acting was his passion, and I don’t use that word lightly. He went to a 3-year conservatory in New York that is so intense and basically sets you up for success (or so they were told). He had really dedicated his life to it as an artist, not for fame but as a performer, as his sole creative outlet. To not succeed was devastating to him. As I was shooting 60 hours a week and getting so much attention, he was falling deeper and deeper into situational depression.
We grew apart. After a while, we realized we were in a really not so good place. We both knew that we were meant to be together, but we didn’t know how to get it back. We didn’t fight, and we were still being romantic (at times), but his depression and my absence deeply affected our relationship.

He made a shift and decided to assistant direct an indie film in Nicaragua for 6 weeks. He left and due to the lack of cell service and the time difference we only spoke twice in six weeks. It was almost like a trial separation that we didn’t label. Neither of us missed each other. After 10 years of an extremely strong loving, border-line perfect relationship, 10 years of being emotionally and physically so connected to each other, neither of us missed each other for six weeks. Once I realized that fact, I was devastated. The night he got back we cried about how much we didn’t miss each other and decided to enact Extreme Marriage Makeover, 2012. We would go on new dates, together, without our friends (crutches). We would avoid our easy local date joints and instead push ourselves into having real experiences and adventures again together.

Things got better. Then he decided to quit auditioning. Not necessarily quit “acting, ” but he no longer wanted to do the “soul-stealing, driving-to-santa-monica-to-audition-to-be-a-dead-person-in-NCIS-but-then-not-get-it-and-be-super-depressed” auditioning. Unless you’ve been an actor, or have closely known one, you can’t understand how soul-destroying that career can be.
Things got even better. So much better. He felt liberated and free, and I stopped shooting the show and had more time for him and us. He was still performing and doing improv and during the day was doing real estate. We moved, got pregnant, miscarried, got pregnant again, bought our house, and had a baby. We were happy. Pretty happy.
 high rollers on a yacht – he shaved a goatee for the costume.
The year after Charlie was born we were really happy. He was, and still is, the best dad that I’ve ever known. He is caring, patient, attentive, responsible, hardworking, sacrificing, full of compromise, and intelligent conversation with both me and our kids. We’re on the same page and we created this extremely loving, happy family and home. The first year of Charlie’s life I was so smitten by him. Being a good dad is endlessly attractive and I spent hours staring at him thinking thank God I married this guy.

But then … the stress of parenthood brings its own challenges as many of you know.
When Charlie was about a year old, Brian realized how unfulfilled he was with his career and he missed being creative. He started definitely not liking the real estate gig (I should have guessed when he said “ugh, I hate going inside strangers’ houses”) and he slipped back into situational depression.

But then, he found a therapist that has changed his life, and ours. SO MUCH. It’s a particular style called Narrative Therapy and it’s amazing and something that he would like you all to know about, so we felt compelled to share.
Narrative Therapy is less about psychoanalysis or analyzing the past/parents/childhood and instead, helping people realize that they are in charge of their own story and how they tell it to themselves and others. I’ve only sat in on a couple sessions, but it’s really about listening and helping understand how they can open up the perception of their life and what steps they need to do to change it. Brian, like many people I know, felt totally paralyzed. He was so devastated from not acting, something he thought he would do forever. He was full of “cannot’s, ” and “no’s, ” and reasons why he couldn’t move forward or succeed despite being one of the best, smartest, most capable, intelligent, funny, and wonderful people in the world.
It helped so much. He felt better after a couple of months and the changes I saw in him were insane. He was happier, lighter, and full of optimism, motivation, and humor. It wasn’t instant, but it was noticeable.
Then we had another baby, our little Ellie-Bird.

The last year has been full of so much love and stress, and we did the dance that only two parents with two kids under three do. Some days were great, and ultimately we have been in a really good place, but there was this underlying exhaustion and stress with trying to keep up with life. To cope with how hard we both felt that we were working, we started secretly competing, parenting-wise. Not competing for their love, but tallying our individual sacrifice and work. We just felt so overworked individually that we were unable to see how much the other person was doing. He invited me to his therapy session to talk about it and I said, weeping, how I just didn’t feel acknowledged. I didn’t need a parade every day, but I really felt that he wasn’t seeing how hard I was working to support us, and how good of a mom I was being all the while. He felt so bad, so terrible, and yet, he felt the same way. He was trying so hard to start his now successful video production company and was still so attentive and exhaustingly loving towards our now two kids, but I didn’t really give him the recognition he felt he deserved either.
Acknowledgment of hard work is highly underused in our society. Appreciation of it is even more rare. Sure, we say thank you for the big stuff – thanks for letting me go out with my girlfriends, or letting me sleep in on Saturday morning, but the daily hard work goes often unnoticed. And after years of feeling unnoticed, unacknowledged, and unappreciated, even the strongest of marriages can breed resentment. Despite how honest, communicative, respectful, faithful, and fun you are with your partner, resentment is a small but powerful poison that without its antidote can kill or weaken even the healthiest of marriages – something I talked about in my anniversary post last year. Our problems weren’t that we didn’t get along, or that we were fundamentally different people, or even bigger, unfaithful, disrespectful, unsupportive. No, our problem was that we were both too busy and exhausted to look at what the other person was sacrificing and compromising on a daily basis and say, thank you so much.
This one thing has made us so much happier and has made us fall so much deeper in love. When I go on business trips he now knows how appreciative I am that he is the kind of dad that can handle two kids all night for three nights on his own. And I feel, finally, that he knows that those business trips aren’t a vacation for me and that they are indeed work, work that will never replace the happiness I feel when I’m with my family. It’s gotten infectious and reciprocal – where I know that we both genuinely really, really see and appreciate how much and how hard we are both working as people and parents.

I know that we aren’t the only ones that had this problem, which is why I’m writing about it. I know this because every single person in my life feels this way – both man and woman. NO ONE feels as appreciated as they feel they deserve to be, which begs the question – WHY DON’T WE ALL TRY TO APPRECIATE EACH OTHER MORE?????
Additionally, we now give each other a night off GUILT-FREE. Doing bedtime by yourself with 2 kids under 3 isn’t easy, but it’s doable. So now we each know that we can take one night to go out with friends, get a massage, go shopping, or watch a movie without the other saying anything but, “have so much fun.” It’s been amazing. Some weeks I don’t even take mine, but knowing that I have it feels so good. You guys, DO THIS.
Meanwhile, now that we are learning how to handle two kids he is going to get back into acting – doing theater, more improv, taking some creative classes so that he feels like he is using that muscle that he spent years developing – something that I get nervous about, but super supportive because I know he needs it.
To be able to say that 16 years in we are happier than ever is something I don’t take for granted. The longer you are married, the more lessons you learn, right? One big one that we have learned is while you should put family first, you can’t neglect your own happiness or it can destroy the family you are working so hard to protect. Individual happiness is one of the true keys to a good marriage, and with us both being happy, we are in such a good place with each other. But we have many more lessons to learn, I’m sure.

If I had to give one piece of advice to someone before getting married it would be to truly like the person you are marrying. It’s so easy to love someone, but it’s harder to really like them. Marry your best friend. Marry the person you have the most fun with and who you want to hang out with. I think you can get through any marital problem if you are best friends and I’m so happy to say that this man is truly my best friend, forever, and I love him more than I ever thought I could.

So that’s our love story. 16 years. Meeting your person when you are 21 is tricky, but we helped raise each other, we’ve been there for each other through everything, and we’ve gotten stronger, happier, and fallen even more in love every day. I know we are very, very lucky.
Brian, ours is a love story – not grand or fancy, but still epic. If I didn’t know you and you were in the middle of a room of strangers, I would choose you immediately, I know it. I would be drawn to your face, shoulders, the kindness in your hazel eyes, and your loving, protective soul. And your sense of humor. And your still-ample chest hair. No one is as good as you are, and no one loves anybody as much as I love you. Happy Anniversary, my love.
To quote the end of our marriage vows 10 years ago, Grow old with me … the best is yet to be.
Here’s to 50 more years. I love you.

Thanks for reading – and thanks, Brian for being all I’ve ever wanted in a partner, co-parent and friend. xx
**Pushing publish on this gives me anxiety even though Brian, Brady, Sara, and Becca all read through it and helped me edit so the tone was neither “we have problems” nor “we are perfect” nor “I know everything about everything”. Someone, somewhere will find something negative to say, but ultimately my goal is that by telling our love story and how we handle average marital issues, readers can relate and feel inspired or confidant in their own relationship. We are just two human beings in love, working through life, careers, marriage, depression, and parenthood in the best most positive way possible, like everyone else. Thanks for reading (and commenting).
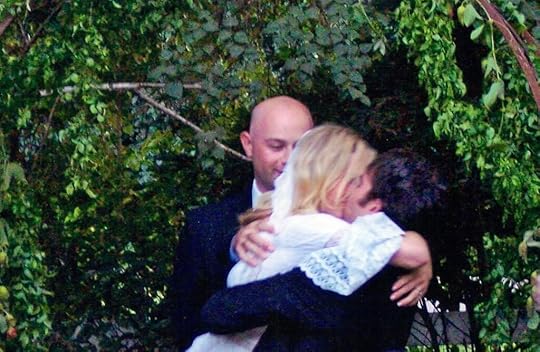
2020 update: So that was 4 years and many of you might have also caught how he surprised me that year by flying up our best friends that weren’t at our very young wedding to Sacramento, bringing my dress, and recreated the whole thing including a newly edited video that made us all BAWL. If you want to see that post – head here.
The post Happy 10 Year Anniversary, Brian (Plus a 20 Year First Date Anniversary Update…Yes Our First Date Was On My Birthday:)) appeared first on Emily Henderson.


August 31, 2020
Two More Hendersons Kids… Because We Weren’t Done With The Big Life Decisions :)

At the beginning of the pandemic, Brian started looking for a dog. Notice that I didn’t say “Brian and I” or “we”. We were not on the same page regarding this situation because A. He was ready and I wasn’t and B. He specifically wanted some sort of “oodle” to avoid shedding, be kid-friendly, trauma-free and I wanted a rescue. He was scared of the unpredictability of a rescue dog and I was set on rescuing. I was literally a dog walker in New York when I was 23 because I loved dogs so much. But I was pretty afraid of adding chaos to our life and while I love animals, I don’t want every animal as a pet in my house, under my responsibility and obligation to love, and getting the wrong dog just for the sake of having a pet sounded very stressful to me.
So I did the obvious and texted Kristen Bell. I had met her and her rescue pups last year and as we were chatting about the idea of rescuing she said “When you are ready, text me. I know where to do go and how to pick the right one for your family”. So on a random Saturday morning during quarantine, I did. She seemed genuinely excited and gave me a ton of good advice (yes, she is extremely lovely and just as generous as she seems – and yes, she reads this blog).
She emailed her favorite rescue organizations, helped introduce us, and asked me a ton of questions about size, demeanor, age, expectations, etc. and followed up with advice. I took her advice and we started looking. But we weren’t the only people looking for rescues during the pandemic as you’ve probably heard. Like most people, Brian’s argument was that since we never left the house we actually had the time to put into training one right now (HAHAHA) and I couldn’t argue with that. We live in the country with a ton of space. We both work from home. The kids are almost 5 and 7. He’s currently working way less (video production has shut down and no theater work) so he said he would do the bulk of the annoying stuff. He promised. I also knew that he really needed the pick me up that dogs can give humans. Ok. I’d just look.
Now the rescue organizations that Kristen recommended (Mutt Match LA, Wagmor, and The Dog Cafe) had so few dogs, but by looking at their faces online Brian fell in love with the idea of a rescue pup. Not to shame anyone who adopts a bred dog, AT ALL, I just felt that it was what our family should do. I grew up with rescue dogs that we literally found on the side of the road on a road trip. And one of the things that changed Brian’s mind re rescues was that Kristen said with a rescue dog (versus new puppy) is you actually DO know more what type of dog you are going to get, rather than a puppy whose personality you can’t even see yet.
So he started shopping every. single. day and they were getting adopted so fast we kept missing them. We went to an adoption fair (drove 2 hours back to LA near LAX) only to be told that they were all spoken for despite having an appointment. The kids were devastated and confused, obviously, but it was a good lesson for them, too. Those kids need more rejection in their life anyway. The other fair was similar – none left that were good for kids (by the nature of being rescued a lot of them need rehabilitation and training and yes, could still be traumatized and be aggressive).
We were pretty open about breed, size, and age. Our main requirements weren’t small though – we wanted calm, affectionate, not jumpy, not loud and barky, happy energy, and most importantly for the kids, not aggressive. It took months…
So we found a couple of shepherd mixes still available at a rescue in San Bernardino and took the kids down to check them out. It was a situation out of the movies. We saw these two dogs on our way in, but we weren’t there to see them and were guided to keep walking while looking back. As we walked past the rest of the dogs, they were all barking and jumping at the site of people, but those first two… they were chilling.

The guy led us into the meeting area and brought the first shepherd mix over and while super sweet even the guy that worked at the rescue was like, “oh no, he’s not for your kids” as he jumped all over them and knocked them down. We asked about the other dog and he said, “no, he’s even bigger and can’t stop jumping”. The kids were disappointed but, like the feel-good family movie that we were apparently acting in, Brian and I looked at each other and said “What about those two?” The man replied, “Oh those? Yah, they came from a litter of 7 puppies that were bred for Christmas money but were born too late. They are the last two left”. I didn’t know that was a thing which is sad on many levels, obviously. He said this happens every year:( Christmas puppy rejects? Born too late? Or maybe born exactly when they should have been?? Perhaps this is more a hallmark holiday movie than Disney movie and by golly will we have a happy ending??????


So they brought the rejected “Christmas” pups over and it was like a DISNEY and HALLMARK “meet cute” moment. They didn’t jump but were so excited and happy and sweet. It was a big sweet love fest and the kids were so excited. They were brother and sister of the same litter (twins!). They had been there for a while (I have no idea how they were still available) and we obviously couldn’t just adopt one and leave the sibling. They were 8 months old (Kristen told me to not get under a year, sorry KB) and the rescue said they were full-grown (not true). We don’t know what they are but they said “husky poodle mix”. We immediately said we would foster and see if they were the right fit for our family (thus staying quiet for a bit). I was still nervous about making sure that these pups were right for us and wanted to live with them for a bit. People give back rescue dogs frequently when they aren’t the right fit (especially with kids involved) so I was nervous and didn’t want to tell the world until we KNEW.

Well, the dogs out the bag, and I can solidly tell you that these two pups are indeed HOME. And not because they have the same hair color as their human siblings and match the wood flooring in our home (it’s actually ridiculous). No, it’s because they are so sweet, so affectionate and cuddly, they love the kids, love each other, are obsessed with Brian (and me) and have indeed added so much joy to our lives in the short time they’ve been with us. They have the exact right chemistry of energy for us – enough to want to play with the kids, but then they come inside and nap and chill. Or maybe dogs just match the energy needed by their parents. They are achingly cute. The fact that they were the last two left of the 7 pup litter begs the question – If these were the rejects, what did the other 5 look like??? We’ll never know and I don’t care. These are OUR PUPS!!!!!!!!

So, world, I’d love to introduce you to Oscar and Buttercup Henderson – named by the kids, obviously. Oscar has the black tips on his ears and Butter looks like a stick of butter. We have thought about renaming him Ralph because he throws up every time he gets in a car. And she came to us with two large ticks (the rescue isn’t one that I’d recommend if you know what I mean – more of a pound). We are still training them to walk on a leash and to not treat our home like a two-story litter box. But all in all, they are actually such great dogs. I don’t know how it happened. But maybe it’s like having kids – once you are in love, once they are part of you, every parent looks at their kid and thinks, “I can’t believe how special you are and how much I love you”. That’s what love does to you, and thank god because the 5 am barking to go out and the pile of dog shit on top of the pile of clean clothes ON TOP of the guest bed can only be tolerated once in love. We took them on a hike the other day in the car and I prepped my lap with two towels. As Oscar ralphed multiple times in the 15-minute drive I just quietly kept scooping it up, and making him more comfortable by blasting the AC.

Listen, “not pukey” wasn’t on my requirement list and you can’t have everything. Is it strange that I can handle lap puke so much more than a dog that barks all the time? We all have our things.

So get prepared to get to know them and see them on social and here now and again. And if you are on the fence about rescuing or adopting, just give rescuing a whirl first – it can work out! If you have your heart set on a purebred or a designer mixed dog there are a ton of rescue agencies that take the “rejects” and find them homes. So with a bit of research, you might be able to rescue a pup that is actually the best fit for you and your family.
We did. 
August 30, 2020
The Link Up: Emily’s Target Studio McGee Line Picks, Our Favorite Yoga Mat and Sara’s Very Important (and Personal) Charity

This past week left us speechless… yet again. While beautiful reveals help to create moments of escape, we have to continue keep our eyes wide open and actively fight against injustice. So before we get into another small dose of escapism, if you can donate to Jacob Blake’s GoFundMe and if anyone has information about how to help the victims of the Kenosha protest please put that info in the comments. Okay, let’s get to the link up…
Today’s home tour comes to us from The Design Files (duh!). This home is a masterclass in pops of color. Homeowner, interior decorator Phoebe Rolleston and architect Lucy Bowen really created something beautiful.
From Emily: The new Studio McGee collection for Target is better than imagined. I need nothing right now which pains me because I want this table, this pouf (in blue), and this console so bad. Yay to my friend Shea for such a great collaboration with my other friend, Target.
August 29, 2020
The Long-Awaited EHD Approved Overalls Roundup


It is no secret that Emily (and the rest of EHD) love a single garment no-fuss outfit option. Jumpsuits are the unofficial EHD uniform and we are all big fans of comfortable, flowy dresses. But there is another cousin to these easy to throw on pieces that have not had their time to shine. That’s right, it is high time we give proper tribute to the overall.
Why do we love them? Well, they are great for being on set because they are comfortable and easy to move around in, plus they are ideal to wear while moving around furniture and shlepping props because they can withstand some wear and tear. They are versatile (we wear them all year long) and work with boots, mules, Birkenstocks, sneakers, you name it–and yes it is totally possible to wear them without feeling like a farmer (though that’s never a bad thing IMO). If you need more convincing than that, allow me to introduce you to the ones we have our eyes on right now:

1. Lizzie Culotte Overalls | 2. Denim Dungaree | 3. Lacey Dungarees In Black | 4. Women’s High-Rise Cropped Raw Hem Overalls | 5. Denim Overall | 6. Boyish Kenny Overall |7. Rosalie Overalls | 8. RJ Overalls | 9. Levi Vintage Overall | 10. Citizens of Humanity Christie Wide-Leg Denim Overalls | 11. EDWIN Sadie Utility Denim Overalls | 12. Denim Overalls | 13. High-Rise Cropped Raw Hem Overalls | 14. Brooklyn Denim Dungarees | 15. Straight Leg Overalls
I love an oversized overall with a wide or straight leg such as #1, #6, and #12 because I am a comfort gal at heart. In fact, I’ve been coveting these for over a year–ever since I saw Emily wearing similar ones in this post. Our resident overall champion, Julie, has these and loves them for styling days and shoot days so you can bet they are comfortable and durable.
Now let’s move on to shortalls as the weather is not getting any cooler anytime soon.
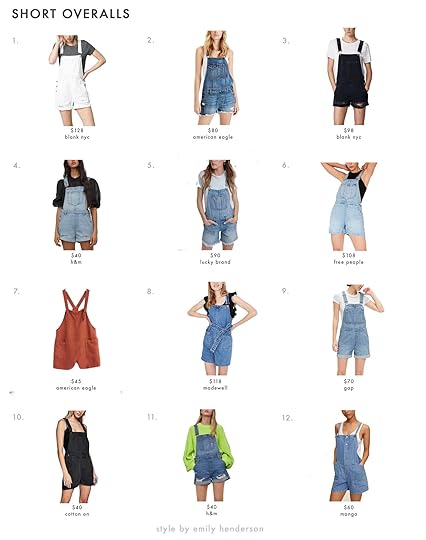
1. Eyes On You Shortall | 2. AE Denim Tomgirl Short Overall | 3. Mercury Rising Shortall | 4. Denim Overall Short | 5. Lucky Brand Shortalls | 6. Lee Relaxed Short Overalls | 7. Aerie Twill Knot Shortall | 8. Denim Tie-Waist Patch Pocket Short Overalls | 9. Denim Shortalls With Raw Hem | 10. Denim Shortall | 11. Denim Overall Shorts | 12. Denim Button Dungarees
I am very into these classic ones from Gap (honestly pretty sure my mom owned this exact style in the ’90s) and these super cute distressed ones are very similar to the ones Emily wore here. For less casual but still comfortable look, sign me up for #7 and #12.
So, are you team overall? Or what is your favorite no-fuss outfit? Please, do tell. xx
Opening Image Credit: Photo by Sara Ligorria-Tramp | From: My Summer Wardrobe
The post The Long-Awaited EHD Approved Overalls Roundup appeared first on Emily Henderson.
August 28, 2020
What We Have Our Eyeballs On From The Nordstrom Anniversary Sale

The Nordstrom Anniversary Sale is happening right now and while I’d usually be taking this time to stock up on some new fall sweaters and boots, I felt a little bit lost this year. Am I still living in sweats? Will I ever go outside again? What do I actually need? What’s actually worth buying now as we head into what is going weirdest holiday season of our lives?
LUCKY FOR ME, I have a team who was ready, willing and able to share their picks from the sale with me (and now with you!). As a whole, we’re eyeballing some skincare, some athleisure, some comfy sweaters that make sense for both home AND the grocery store, some boots for kickin’ Ms. Rona to the curb. I even ended up finding some cute home stuff (honestly, I didn’t even know Nordstrom *carried* home goods…a whole new page to stalk!). So without further ado, here is a totally #notsponsored look at what our team ACTUALLY put in our carts from the Nordstrom Anniversary sale…
From Emily – Fall Refresh Essentials

This year, I’m just adding a few classic basics to my cart – jeans, boots, plain t-shirts, and workout clothes that will last me a long time. They’re comfy enough to wear at home all day with the kids, but I can still go out in public while wearing them and feel good and put together.
Aspe Bootie: I have last year’s version of these boots by this brand and I LOVE THEM. The ones that I have are very light and I’m not sure if these are, but I can vouch for the brand and comfort (two of my friends bought these and love them).
Waterproof Rain Boot: This gray and orange combo is SO CUTE and takes what is super classic (who doesn’t love Sperry) and makes it fashionable. We are all going to be going on more walks and hikes this fall and winter (I’ve never been a hiker before and now I’m SUPER into it). I have enough rain boots, but the move to Portland might require another pair at some point.
High Waist Cigarette Jeans: I like the cut and lack of holes, and having a new non-blue wash is never a bad thing. I don’t know the fit of this brand though, so if any of you can vouch for it let us know.
Cotton Blend T-Shirt: I have this shirt in three colors. Def size down, it’s super oversized which I know is the style, but it’s like THAT oversized, so size down.
Track Jacket: I have this in blue (I bought it during the last Nordstrom sale) and work out in it ALL THE TIME. There are cute little thumb/finger holes that make me feel like an athlete for whatever reason.
Slim Fit Boyfriend Jeans: I love the Dre cut of these jeans (I’ve had two pairs for over two years that I still wear often), so I’m curious if this cropped one has the same really good fit…. The normal Dre jeans fit low and slouchy in the crotch, but then more fitted in legs – not full drop crotch, but just a really good cut.
From Sara – Mix and Match Basics

The main thing I want this fall – MIX AND MATCH BASICS. I want timeless pieces that I can wear over and over again, that don’t feel trendy, and that will transition between multiple outfits.
Combat Boot: These boots are a classic warm leather that can work with loose flowy dresses, with tights and cute skirt, or with any type of jean. Its heel makes it just a little elevated, but its unadorned leather keeps it basic and timeless.
Racerback Bodysuit: I’ve been really into bodysuits recently. They don’t bunch like tucked in shirts when worn with jeans or shorts, they give a smooth silhouette when worn with skirts, and they’re perfect for layering under sweaters. I HATE wearing camisoles or tank tops, but I’ve realized that’s just because I’m a bodysuit person! It’s probably all those years doing ballet…
High Waisted Jeans: Wide-legged pants have really found their way back in my outfit repertoire recently, and these look an ideal pair. Casual for with a cozy sweater and sneakers for a dressed-down look, or paired with those high heel boots from above, that black bodysuit from above, a leather jacket, and some winged eyeliner for the perfect fall evening lewk.
From Ryann – Skincare

I know we were all supposed to figure out our skincare routines month 1 of quarantine but I’ve always been a bit of a procrastinator. But, I think now’s the time I get the ball rolling so here are some products I am itching to try out…
Supergoop! Defense Refresh: I can’t tell you how many times I have applied makeup only to realize I forgot the most important step: SUNSCREEN. Up until now, I assumed there was no way to remedy this amateur move until I found out Supergoop Defense Mist exists. You simply spray it over your makeup for full SPF 40 coverage. GENIUS.
FAB & Flawless Kit: I have dry as the desert skin so I require really strong and effective moisturizer. I’ve used First Aid Beauty in the past and it hydrates my skin like no other. This package is perfect for me and it’s only $50!! Needless to say, I purchased it within seconds.
Clean Facial Cleansing Device: I’ll admit I am really bad with my skincare routine because, well, I don’t have one. I don’t have a favorite cleanser and end up just trying a new one any time one runs out. This device won’t fix that fact BUT I hope it will motivate me to get serious about my skin.
From Jess – Cute But Comfortable Tops

As proven in my month 5 quarantine wardrobe, comfort is still very much king. It’s likely part loving to be comfortable and part putting on those super fun quaran-pounds, making my normal clothes less than comfortable. But I don’t want to sit in my apartment, feeling frumpy because it’s just not good for my mental health or self-esteem. So I want to invest in some tops that are cute comfortable and are the kind that look good give or take those 10 lbs:) You know the ones. That way I am buying tops that have longevity which is important to me, the environment, and my wallet.
Tie Neck Peasant Top: This top follows a lot of Em’s blouse formula. I love the happy but neutral color (great for most seasons), the flowy body (wonderfully forgiving), detail of the neckline and of course the tie at the top to make it a little sexy if need be! PLUS it’s under $30. Done.
V-Neck Nep Wool Blend Sweater: Ok so this isn’t a blouse but with fall coming up quick, I want some pretty but slouchy sweaters. They are my kryptonite. I LOVE the light blue color and honestly, it just looks really comfortable. It seems great a warm winter (like we get in Southern California) or with some added layers perfect for a cold, snowy winter.
Catch Me If You Can Top: I’m surprised how much I love this top because the pattern is VERY busy but maybe that’s why I love it?? I prefer the darker color combo and with a cute pair of jeans, this shirt looks like it feels like a vacation. Plus it’s flowy and the cuff ties are super cute.
From Caitlin – Fall Decor Accents

I’ve cooled it on my fashion purchases seeing as I have devoted myself to a lifetime of joggers, tank tops, grocery delivery, and only leaving my apartment to meet with my realtor. (Wearing a mask — or, even better, a mask/sunglass/hat combo — makes me SO BRAZEN when it comes to being a scrub in public! I dress like a college student headed to the gym! Will I ever be able to actually put on regular clothes again???). Anyway, I’m late to the party because I had no idea that Nordstrom carried home goods so I had a fun time falling down the rabbit hole and bookmarking some favorites!!
Throw Blanket: It’s a confetti print in a more muted, toned down, fall-appropriate pallet. (I know what it looks like from the image, I promise that zooming in will clarify). There’s some nice olive, mustard, and navy in there so it’s colorful without being jarring or super saturated. I LOVE IT.
Toaster: Does anyone already own this? The reviews are good, but is it ludicrous to spend this much on a toaster? For what it’s worth, a core staple of my quarantine diet has been English muffins, so my toaster gets daily (if not twice daily) use…and it kinda would be nice to look at something that’s cute and rose gold, instead of a black box I picked up 6 years ago. Is this a good upgrade???? (Because if so…I’d obviously buy it on sale).
Votive Candle Set: OMG Y’ALL. These candles in these sizes are SO HARD to find. (They’re usually $55 for the full-priced versions). I’m normally a fan of clean or citrus-y scents (like cotton/linen or Capri Blue) buuuuuut I make an exception in the fall for these. I know what the descriptions say and I would NEVER normally gravitate to any of these scents just based on their names, but woooow they just smell warm and crisp and spicy and woodsy. Since fall is so short in LA and the burn time on these small versions is great, the votives are the best size to get me through a few weeks before I head straight into Christmas candle territory
A Happy “See You Soon” Send-Off To Our Sara After 6 Incredible Years At EHD

Today is Sara’s last day as an official EHD team member and after almost 6 years she is getting a proper goodbye in the form of unbridled sentimentality by yours truly. In case you missed why she is leaving here’s a quick recap: She is ready and excited to become a full-time freelance photographer, and I seriously couldn’t be happier for her. The rest of the world now gets to hire her and experience the wonderfulness that is my friend, Sara. She is taking her favorite part of her job and making it full time, expanding her client list from just me (what? are you sick of my face?) and working for herself. I’m so proud of her. It’s kinda all you want for your friends after so much hard work.

I remember her interview 6 years ago, clear as day. She came to me entry-level, almost right out of school, with one internship under her belt, I was impressed with how her resume looked and how willing she was to work and learn. She was quiet at first, but when she spoke she said important things and had this confidence and lack of fear that made me feel safe and comfortable as a boss – both in her as an employee and as a friend. I just knew I could trust her. I remember saying in our reviews, “I just want to clone you” because she was willing to do anything, had so many skills, worked so hard, and had so much integrity – owning her mistakes, and was so honest. She worked more than she was asked to which I personally think is the smartest thing to do while building your career – you simply will get where you want to go, faster. She is a GREAT testament to that (honestly so many of my former and current team members are). She also was willing to teach herself anything, like photography – it’s actually super inspiring and we should all learn something from this. By watching a billion videos, taking online classes, and obviously a ton of experience shooting with me, she became a professional photographer with a lot of clients lined up, teaching herself over 3 years. As I write that I’m wondering if I should teach myself how to shoot.
August 27, 2020
Introducing Our New Mentorship Program (And Basically Our “Design Blog School”)

Well, I’m super excited to get this going – giddy even because after almost 11 years of blogging and content creation we have learned a thing or twelve thousand. Welcome to our “Design Blogger” mentorship program – it’s blog graduate school, really – where the entire EHD team will help coach a beginner or up and coming design blogger through every part of this weird and exciting job. And it is a job, trust me… Heck, it can even be a career, if you are up for it
Budget Basement Bathroom – The One Where We Tried To Not Spend Money… (And Now You Know Why)

Sure, we started designing the bathroom years ago (like 2) but it shifted down and down the priority list and I was willing to spend less and less on it even before we decided to move and sell the house. When the pandemic hit I was like, “Let’s just do it. We’ll make it cute for cheap and besides, eventually we’ll need to…. for resale”. Brian and I found ourselves saying “….for resale” more often than we thought (which tipped us off to the idea that maybe we were ready to move). Regardless it had been demo’d out for months and it was time to finish this sucker off. Here’s the full story if you missed it.

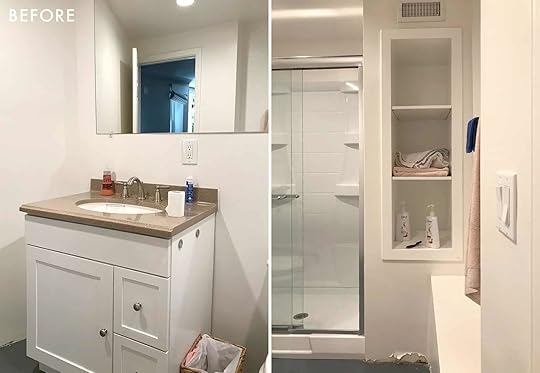
We needed to change out the vanity, lay flooring, paint, and then just see what some good old fashioned decorating could do (with stuff I already had). And hopefully all without spending too much money.

We put down the new Cali Bamboo waterproof flooring (same as the bedroom/office), waterproof baseboard, painted the walls in a warm denim-y blue (Good Jeans by Clare Paint), took off the glass door, switched out the faucets and replaced the vanity. I guess that is more than I thought, but the point is no tile installed, we didn’t TOUCH the vinyl shower surround but its white and TOTALLY FINE. We also didn’t do anything with the recessed cubbies and then just decorated it all cute. And yes, we used the same toilet. It’s ok guys, this is the basement bathroom… it just wasn’t worth the $400 to us because even before we decided to sell, it was just Brian using this space if that. That guy doesn’t give a crap about toilets if you know what I mean.
For all of you who are wondering, the vanity sits on top of the motor for the sump pump that you can access through the cabinet although my handyman who installed it didn’t totally understand that we wanted him to cut out the bottom so that still needs to be done.
The vanity is pretty great for how inexpensive it is ($260 including the countertop). Now I never saw the paint color or the vanity in-person before they were totally done (covid designing!) and I might have gone with the white vanity had I seen them together, but everybody thinks I’m crazy.
It actually looks great here!!! That’s a better representation of the wall color, but when the light is on its brighter.

The great thing about Clare paint is that they send you large stickers of paint swatches that you can stick on your wall instead of tiny paint samples that you have to paint (DUH … SO SMART, NICOLE!). The vintage art and mirror are coming with me and yes, you bet that I should have switched out the outlet cover for a black or bronze one – OH WELL. PANDEMIC STYLING AND PHOTOSHOPPING. Sure, we left the outlet, but that little lamp on mister’s head is a clip light that yes, has a cord but it didn’t work anyway so we photoshopped it out because I really just wanted that in there to add quirk. Thank you for understanding why I cheat sometimes:) Technically there could be an outlet behind the piece of art so I’ll stick with that story.

Like I said that vintage mirror is coming with me. The faucet (sink and shower) were both super affordable and pretty great for the price.
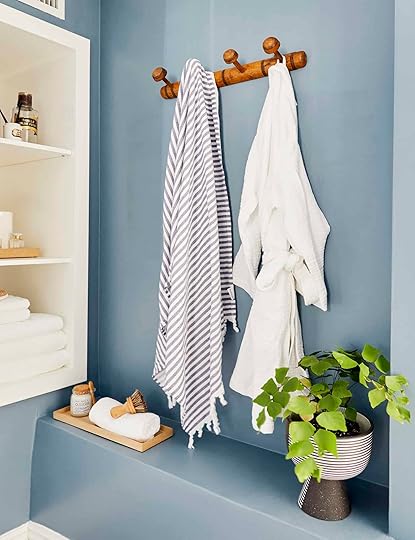
I bought that vintage towel hook on Etsy, and already had everything else (the footed pot is from Jonathan Adler, I believe).
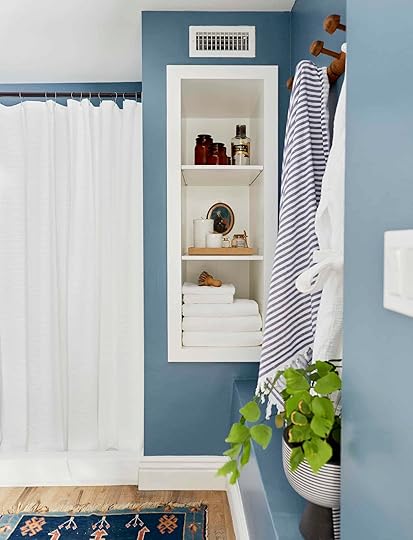
NOW. The one thing that was supposed to happen that didn’t was the baseboard and the cubbies were supposed to be painted the blue to keep it more tonal and modern. My guy didn’t get that note and we showed up the night before to style and shoot. Brian disagreed and said it should stay white and I wasn’t in the mood to push back, and I was ready to shoot it.

So I thought it would be fun to show you what it would look like IF the whole room was painted the Good Jeans blue that I had wanted. Again, not a big deal and not worth changing, but I just want you guys to know the intent
August 26, 2020
Styling To Sell: How We Staged Our Dining Room And Kitchen (With The Changes I Should Have Done Years Ago!)


I’ve said it before and I’ll say it again – a “super fun” and “easy” game is to pretend that you are selling your house and then spend weeks if not months making all the little changes you meant to for years then NOT MOVE, just so you’ll be happier living in your home. I think this is the premise to Love it Or List it, right? Not shockingly, this is Brian Henderson’s, least favorite game so it’s one I mostly play by myself (happily). Don’t be confused, we are still selling/moving, but I like some of these spaces SO MUCH MORE after I made a couple of changes to be more “sellable”. It took our realtor coming in to say, “hmm do you have a smaller entry table?” and “maybe add more color” for me to make some changes that I wish I had made years ago but just didn’t prioritize or had looked at it with the same eyes, therefore losing objectivity. The dining room is the subject of today’s styling to sell post. We actually only really made two major changes…
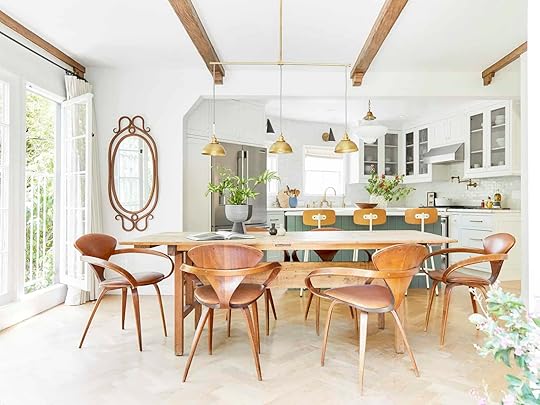
But first, this is likely my favorite room in the house. The two walls of vintage charming windows and french doors (all of which open) overlook the prettiest patio in the world (IMHO) and the backyard. So if you sit at the dining table (and say write a blog and drink coffee) you are flooded with soft light and you can literally hear birds chirping and see hummingbirds floating around. Obviously having it be open to the kitchen made life easy for our family and, I don’t know, it’s just light and airy and warm all at the same time. So I wasn’t unhappy with it at all, but by making a couple of changes I love it even more.
But first, let’s take a look back…
 from: our new home!
The photos of the kitchen are deceptively “big” (shot with a wide-angle lens), it was tiny, if not totally adorable.
 photo by tessa neustadt | from: emily’s kitchen and dining room reveal
 from: our new home!
 photo by tessa neustadt | from: emily’s kitchen and dining room reveal
When we shot it for Real Simple (the first reveal 3 years ago) we had those pretty upholstered dining chairs and a larger light fixture (no longer available). I liked it a lot, but couldn’t handle the fabric armed chairs with my double toddler situation, and then when I found my dream vintage Cherner chairs at the flea market I dropped those blue chairs off at my friend’s (she still has them) – I sit in them often and I’m jealous of how comfortable they are compared to mine.
A couple of years ago I got that Target glass cabinet that acted as a storage bar and held glassware and wine (and cocktail makings). I love it, but it always kinda bugged me that the grid on the face of the cabinet mimicked the grid of the windows on the left and right. It reflected the light nicely but I wished it had been either solid or at least a color so that it had more contrast. But the function and scale of it were perfect and as a piece it was great. Last year I was like, “I wish this room had more color” but I didn’t know where to bring it in. I thought about reupholstering the Cherner chairs in a colored fabric, but thought that long term these would simply be prettier and more timeless in a caramel leather that matched the wood of the chair (this is debatable, maybe a navy blue would have been equally awesome but I’m sticking with that story). We upholstered them in Crypton leather, Seville in Caramel from Goose & Miles (doesn’t get oil stains, so pretty) and BuildLane reupholstered them. I do love them very very much, and no the chairs never stopped creaking. I actually had to put mittens on the bottom of the legs so they slid around easier because the legs were too narrow to nail in a little slider thing (and felt didn’t stay on). Putting $1 Amazon brown mittens on your important vintage Cherner chairs is both offensive and hilarious, but well, that’s what we did (sorry, not pictured).

This is where we are now and I love it the most. I got that light fixture for $350 (now $450) and it’s GREAT. I love that it’s minimal, feels antique-y but engages the length of the table.
Back to bringing in color. I thought about replacing the curtains in a color or pattern, but they were custom and expensive. I have to say they faded a lot. They were originally a green and cream pinstripe and now are just like a beige and cream pinstripe. Still pretty and they just recede which is good to show off the windows, but I didn’t notice till I was styling them that on the inner folds they are green and I had forgotten!!!

Art. Yes, that’s how you bring in color. So I found these two pieces by Angie Dickerson-Lee of Bonita Interiors at the Pasadena Antique Mall. I actually thought they were vintage, but they are contemporary (check out her work). I love them. I hung them vertically on the far wall and loved seeing them from the view from the living room through the arch.

So when Howard (our realtor) was like, “maybe more color?” I thought, “tree?” but that would take up space and we loved how open and big the dining room is and didn’t want to obstruct the view to the backyard. I had forgotten about this demilune that I bought on Craigslist years ago for $60 and painted it that pretty blue. So I plugged it in the corner, hung the paintings above it, and put the vintage Thonet mirror (thrifted from the mountains for $60 I think, maybe $80) on the other side.

Y’ALL. It’s so much better!!! Of course, I have less storage so maybe I would need to find a different solution for our wine and glassware had we actually lived like this but having that burst of blue over there in a lighter/leggier piece of furniture is just so happy and pretty. It makes the room bigger and really pulls you into the room.

I made us take this shot (that I love) to show how you can cook WHILE seeing the kids play in the backyard. You have full castle vision while souping!

HOT TIP: Pieces with more visual weight to them can actually make your room feel bigger because it draws your eye to the corner telling your brain “this is a BIG room”.
Those were the only major changes. The rest was just styling for the shoot and for walkthroughs with potential buyers. We employed my “footed bowl, open book” TM formula that works for photos (but less so for real-life unless you like to read the same page over and over and over).
I brought in a couple of potted plants, including what I sadly learned is called a “shrimp” plant (the red on the island) that is AWESOME but c’mon! Don’t call a plant a shrimp plant! It’s like how we used the paint color “elephant’s breath” or “dead salmon”. Branding, folks. Branding. I still love it, but will refer to it here on out as “wild orchid table bush”.
I will ALWAYS miss this room – the light from all sides, the openness to the backyard, patio, living room, and family room. It’s quintessential indoor/outdoor living in a really charming and sweet way. And the simple changes – adding in more saturated color and vintage pieces made it feel more modern, fresh, quirky, and just more “us”. I will hoard these photos forever, thank you Sara for indulging my obsession with this house before we leave it. xx
P.S. If you are interested or you know a serious buyer contact Howard Lorey at Nourmand & Associates, HLorey@Nourmand.com DRE # 01263717.
**Photos by Sara Ligorria-Tramp
The post Styling To Sell: How We Staged Our Dining Room And Kitchen (With The Changes I Should Have Done Years Ago!) appeared first on Emily Henderson.
August 25, 2020
Choosing Curtains For a Small Space: Ryann Has 3 Different Style Options And Needs Your Help


Welcome to another episode of “Ryann can’t seem to make a design decision without writing a whole post about it”. This week’s dilemma is all about window treatments so you can expect a rollercoaster of emotions and of course a healthy dose of fear and anxiety over making the wrong choice. THE FUN AWAITS.
The last time we chatted about my living/ dining area I was so young and naive, thinking that deciding on a paint color was going to be our biggest hurdle. Ha. ha. ha. Cut to now, I’ve spent weeks agonizing over curtains and wish it were as easy. My problem is I have a small space and two windows (well, technically 3) within 8 ft of each other that require window treatments. Also, surprise! We finally painted and we love it. So once again, here’s the layout:
 pardon the mess but please note my design assistant Gus:)

As you can see we have a fairly wide window behind the TV and two corner windows where my beautiful new desk is (from Sunbeam Vintage). The windows have been undressed and exposed for over a year now because I have been putting off this part of the design process for as long as possible. Curtain shopping is terrifyingly difficult but after months of searching I’ve narrowed down my choices (for now). Here we go:
OPTION 1: MOODY ECLECTIC

I know someone will hate that these are not blackout curtains but let me explain why. We get a fairly good amount of natural light in this room which I love, and I worry blackout curtains will darken the room way too much. This area is also where I work so the last thing I want is for it to feel like a movie theatre in here. Yes, it makes it hard to watch TV during the day but cutting down our TV consumption is never a bad thing. That said, in the corner where my desk lives is where the most sunlight comes through and at certain times of the day it is blinding. So, I’d prefer thicker curtains there so I can finally work without sunglasses on (true story) while leaving the living area brighter.
Now, I can’t wait to talk about the knotted curtains. I am in love with the shape and the elegant drape of them. I’ve never called curtains dreamy, but these totally are. I really love the look of them paired with these diamond patterned ones that have a really special delicate design. My only worry is how they will look paired with our current living room rug. The rug is multicolored and does have some hints of purple so it could work well or it could very well clash with the busyness… should I take the risk?
OPTION 2: ELEGANT MONOCHROME

This option might be my favorite (though it’s my boyfriend Rocky’s least favorite of course). Here we have my favorite dreamy curtains this time in this beautiful muted green color paired with simple olive green linen curtains. Going monochrome with all the green seems pretty cool and calming for a workspace, plus it would give us so much freedom to play around with art and decor.
OPTION 3: BRIGHT & BOLD TRADITIONAL

When I wrote about my living and dining room, I was contemplating between these velvet mustard curtains or these matte velvet ones. Clearly things have changed since then but what hasn’t changed is my attraction to these crushed velvet curtains and how I imagine they would look against the paint color. I think they’d really brighten up the space and complement our old-world art and decor very well. The living room curtains are simple enough but still have some really special detail with the tassels and subtle design that I love. This is Rocky’s top choice so if it’s your favorite too I wouldn’t blame you because he has really great taste.
In the spirit of designing for real life as the ever-wise Arlyn urges us to do, I want to assure you that I did consider roman shades for the corner windows for the sake of practicality. I was told it might be annoying to have long curtains where my desk is, but after much contemplation, I came to the conclusion that it will be manageable because I just really love the look of curtains. The desk is very light and easy to move and there is enough space there that it does not need to be flush with the wall. With some tie backs, I can easily pull them aside to let some sunlight in when need be.
Emily Henderson's Blog

- Emily Henderson's profile
- 10 followers

