
Emily Henderson's Blog, page 202
August 25, 2020
We Should Design Like We Should Dance: Like Nobody’s Watching (At Least That’s What Arlyn’s Trying to Do In Her Latest MOTO)

What’s up EHD world?! It’s Arlyn (ex-Editorial Director, forever friend of the blog) and I’m happy to report that I’m baaaack. No, not in a full-time capacity, but when Jess and Emily reached out to ask if I wanted to contribute the occasional post, how could I say no? So here I am, and here I’ll stay; a few times a month you’ll see my byline pop up and I hope you read and engage because I’ve missed you. Today, I’m sharing my take on what I can only imagine will be a bit of an “unpopular opinion” though I mean it more as a thought-starter for us all. Let’s get to it.
I feel an interesting wave catching on in the design world and it’s one I want to ride into the sunset. It’s not a tsunami of a trend yet necessarily; maybe it never will be, but that might make it even better, actually. Let me explain…
Earlier this month, my editor friend Taryn Williford over at Apartment Therapy launched a new series called Comfort Decorating. “Comfort Decorating is like comfort food: It’s familiar, sensory, nostalgic, and maybe a little bit impractical—but it will always hit the spot.” Such goes the introduction to the package of 20 stories from real people divulging about the “comfort” items—an old crocheted tablecloth, nostalgic fridge magnets—that, albeit “ugly”, at least by traditional Pinterest standards, nourish their owner’s souls.
Try not to feel all emo while reading that.
Soon after, I stumbled upon Domino’s newer podcast, Design Time, in which they “explore spaces with meaning,” followed shortly by my discovery of designer Megan Hopp’s initiative she’s sharing over on her Instagram: #goodenough—exactly what it sounds like…#goodenough design tips for #goodenough rooms. I’M INTO IT.
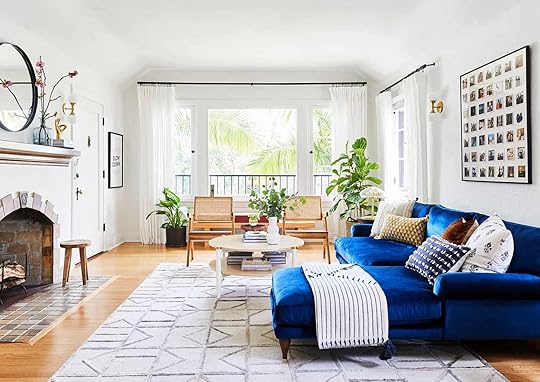 there she is. don’t get me wrong, i love my living room, but more and more i think it’s too stiff, too “camera-ready” and lacking a little bit of that x-factor funk that comes with time.
 I write all of this, of course, from a literally picture-perfect living room (well…in its best form, certainly not in its current state with packages leaning against the hearth and deep butt-shaped indentations in the sofa that’s gone unfluffed for too long). While I’m really quite happy with the spaces you all have seen around this neck of the woods, I can step back and say out loud, honestly, that I think the rooms are…too perfect, too designed.
 crispy…perhaps *too* crispy.
 My living and dining rooms are likely not the kind of spaces my future children will conjure back up in a spiral of nostalgia one day. It’s hard to imagine them smiling as they think back to the Anthropologie coffee table or the somewhat generic art dotting the gallery wall in the same way I do remembering the chartreuse and silver (yes, silver) striped wall I helped my mom paint in the family room of my childhood home. There was always something changing, some kooky idea she had that she just went for, long before any photos would ever be snapped for the Internet judging panel. It makes me wonder if my sponge-painted moon and star bedroom motif from my teenage years, with all its flaws—and the large overstuffed cow in the corner I loved well past the age someone should love such a thing—would have been more pristine, tamer, if someone was “watching.”
This wasn’t “good design” by any means. It was just my mom,
myself, having some fun in the spaces we lived in every day, LITERALLY not caring
what anyone thought. Easy to say when NO ONE WAS LOOKING, I know.
I’m possibly going a bit too deep here—look, I’ve been locked
inside for 5 months so I’m giving myself the space to do that, I make no
apologies—but I’ve been wondering lately if I’ve done myself and my future family
a disservice by being overly manicured with my design. I want to create a home
with legacy, with quirk. I no longer aim to decorate with the hope that people
seeing it “get it,” or can even recreate it. The best, most meaningful abodes can
belong solely to the people that cooked them up, imperfections, “comfort design”
and all.
“She didn’t plan her gallery wall…it just grew into the epic showcase, using the design secret weapon that is time.”
Please don’t take what I’m writing here today and misconstrue it as not appreciating a well-designed and decorated home, however. I LOVE A WELL-DESIGNED AND DECORATED HOME. I’ve literally made a living around it. But something happens to me, viscerally, when I see a not-perfect space that has come together over years, maybe even decades. No styled “shelfie” in sight. Just a bunch of well-loved books stacked on top of each other in haphazard piles. Maybe a worn-in skirted armchair in a toile fabric I’d NEVER pick for myself. Family photos in whatever frames they originally came in filling wall-to-wall, ceiling-to-floor of a hallway like they do in my grandmother’s house in Puerto Rico. She didn’t plan her gallery wall…it just grew into the epic showcase of my memories, using the design secret weapon that is time.
 a room in the english home of amanda c. brooks, featured in architectural digest. the fringed lampshades, the mismatched throw pillows, the scattered books all say “comfort” and character to me, which I’m craving right now. photo by oberto gili
To me, at least right now at this moment, the goal of a finished space is far less enticing than a home that’s maybe never actually done. Never “ready for its close up.” At times, I envy those who are creating their homes for *just* themselves, outfitting rooms that will never grace the pages of Architectural Digest or the crevices of Instagram virality. After all, I think “comfort design” comes together at a pace no one would be interested in following on the ‘gram.
Here’s the big question though: How does one bridge the gap between loving highly curated spaces, “comfort decorating” and a hodge-podge mess of a room with no basis in design? It’s one thing to say I’m looking for some fluidity as I design my own spaces, and another to feel like nothing is ever concrete, always in (messy) flux. I’m afraid I don’t quite yet have the answer to this, but you’ll be the first to know when I do.
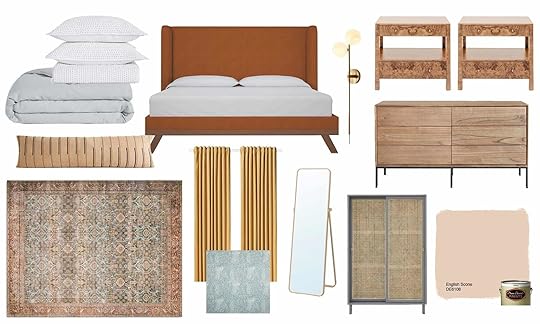 a working moodboard of my bedroom redesign. read more about it here.
 If you follow my blog, Arlyn Says, you’ll know I’m currently in the process of redecorating my sad, design-lacking bedroom. I’m in the “moodboarding to death” phase that makes me excited but incredibly frustrated at the same time because I really don’t want to land in the same “picture perfect” spot I got to with my living and dining rooms. I’m trying to reference other rooms far less while I work on this space, and just do what feels right to my eye. Fewer rules, more gut. Less inspiration, more do-whatever-I-want. But I recognize the oxymoron that is writing about a bedroom design on my own blog at the same time as I write an article on another blog about how I want to create a space no one wants to blog about. It is complicated and a bit nonsensical. I’m not entirely sure you even followed that sentence because it was that chaotic.
So perhaps this piece is just a catharsis for me; a place to explore my need for side-stepping perfection during a time where everything feels anything but. I’ll likely go back to bookmarking magazine-worthy rooms and Photoshopping version 3, 4 and 5 (6, 7, 8) of my bedroom—which I’ll be revealing right here on this blog in the coming months so STAY TUNED—knowing deep down that while it will feel good and nice and “complete-ish” when it’s ready to be photographed by the amazing Sara Ligorria-Tramp (miss you!), I’ll look forward to the years to come where the space gets a layer of LIFE mixed into it. There is, after all, room for both comfortable, non-design-y rooms and professionally presented spaces. The admiration for each does not need to be mutually exclusive, I’m finding. Let’s honor them both for what they bring to our lives, knowing that each “hits the spot” in their own ways, regardless of who’s watching.
Reveal Photo Credits: Photos by Sara Ligorria-Tramp | From: Arlyn’s Bright & Happy Rental Living Room Makeover and Arlyn’s Moody Dining Room Reveal Is All About the Insane Power of Paint
The post We Should Design Like We Should Dance: Like Nobody’s Watching (At Least That’s What Arlyn’s Trying to Do In Her Latest MOTO) appeared first on Emily Henderson.


August 24, 2020
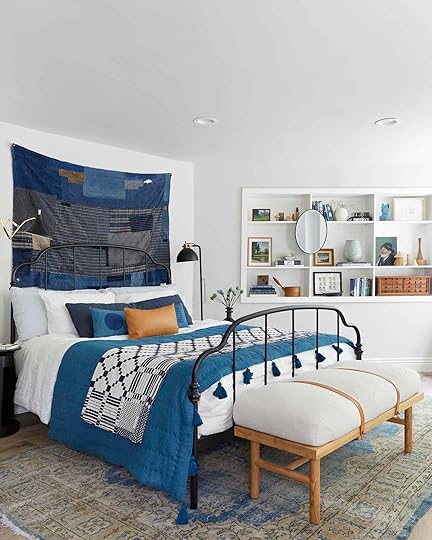
Styled To Sell: Elliot’s “Bedroom” That No One Has Actually Slept In, But It’s Still Pretty Darn Dreamy…

Despite its dreaminess, amazing light and wall of windows, after Birdie moved into Charlie’s room this room was an embarrassing storage collection for over a year. We moved a desk in here while we fixed the basement and had a dresser full of I don’t know what. It sucked. I truly didn’t know its purpose for a while so I couldn’t really design it. Was it a guest room? An office? My writing room for the book? Would Birdie actually want to move back in soon as they are 4 and 6? So I left it pretty much empty. But first, here is what it looked like when we moved in and then 3 years ago when it was her nursery, shot for Real Simple …. so cute.

 photo by tessa neustadt | from: elliot’s nursery reveal
I still LOVE that wallpaper (tree murals forever) and yes we put it over the plaster, ill-advised by everyone and it looks GREAT. Don’t put something graphic like a stripe over plaster (the texture beneath can make it look wonky) but something more fluid and organic like this actually looks GREAT.
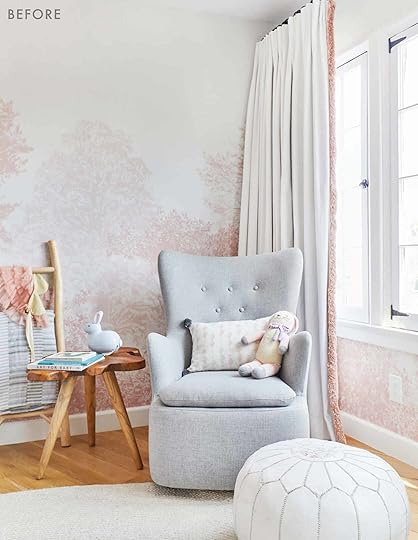 photo by tessa neustadt | from: elliot’s nursery reveal
We originally put up a custom double rod curtain – one for blackout and one for sheers (for one the sun blasts in). Now about a year in the plaster wall simply couldn’t support the weight (it was a LOT) and the rods came out of the wall. So if we were to stay here (and advise to the new owner) they need individual shades on the window frames – I would do something minimal OR a track on the ceiling that can hold the weight. We were going to do one of those two options but the room was not being actually used so it wasn’t a priority. It never gets blasted by the sun (southern light – yay!) so Brian and I could write in there just fine.
 photo by tessa neustadt | from: a baby girl’s blush and green nursery
So to sell it, I wanted to show people you could put a twin (or even a full) bed in here in a way that still made it feel really big and bright. I had always wished I hadn’t sold Birdies vintage wicker bed from her first tree-muraled nursery (above), so instead I bought this $500 new replacement from World Market that is pretty darn GREAT. A daybed in front of those windows is just so pretty, although you could have it come into the room on the side or in front of the windows and it would be fine, but just make the room feel a bit smaller.


Available Bedding: Quilt | Lumbar Pillow | Round Pink Velvet Pillow


We kept it pretty simple after that… round rug, layered with sheepskin (holding strong), and a bookshelf (and cute lamp) on the opposite side. We shot it with a dollhouse and rocking horse but for the real estate photos took those away to make it look more open and bigger (I truly don’t know what is the right way to style to sell, I personally like more personality but we tried to stick to the “more space and light” idea for any future buyers).
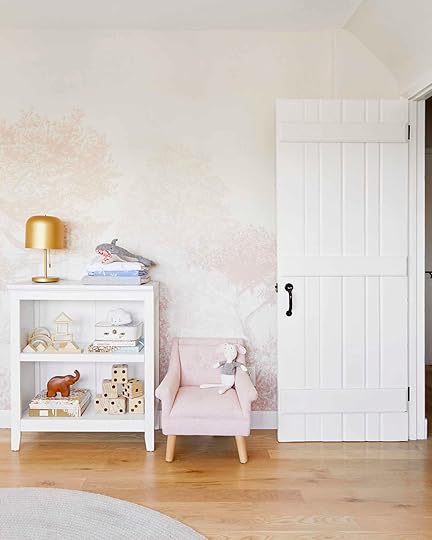
So that’s how it ended up. It’s so simple and pretty. You could obviously put another piece of furniture in here (dresser or toy storage) but we left it simpler. Also taking down this wallpaper is $400 and having this room be all white would be DREAMY, too.
In case you missed any of the other reveals so far check them out: The Living Room | The Kid’s Shared Bedroom | The Basement Guestroom/Office
**Photography by Sara Ligorria-Tramp
The post Styled To Sell: Elliot’s “Bedroom” That No One Has Actually Slept In, But It’s Still Pretty Darn Dreamy… appeared first on Emily Henderson.
August 23, 2020
The Link Up: The T-Shirt Emily Bought This Week, Mallory’s Go-To Wallpaper, and The Shopping Resource We Wish We Found Sooner

Hey happy Sunday! Welcome back to another edition of the EHD Link Up. We sure are glad to have you here. Lil recap on this week: you may have heard our favorite team leader, Emily Henderson had some big news, so here’s the link to that post in case you missed it (we are so excited for her and the fam’s next chapter!!) Now that you’re all caught up, let’s get to links and things:
This week’s home tour is brought to you by Clever. While this beautiful living room is neutral, the rest of Bia Daidone‘s family home is full of color and wonderful family artifacts.
Our hearts go out to all those in the Midwest that were impacted by the derecho storm. Here are all the ways we can help whether or not you’re located near Iowa.
From Emily: I’ve been on the hunt for a couple of voter T-shirts to well, loudly repeat the message that WE HAVE TO VOTE. I found two that I like so far. This one is only $30 and looks pretty cute (I ordered it but haven’t tried it on yet) and this one my friend gave me and its splurgy (but $50 goes towards I’m a Voter, which is a non-partisan voting initiative). And yes, it’s awesome on – the boxy vintage cut that we all love.
From Julie: I’ve been using my hand-me-down blender from my mom for the past year but is now on its last leg. This is when you come in, I need all of your help to tell me which blender I should invest in. I am looking at both the Vitamix for the quality, my sister has used hers daily for the past 10 years and it’s still going strong. And also the Ninja for its multifunctional uses, Sara has one and swears by it. Weigh in and help me decide. Thank you in advance!
From Ryann: My boyfriend Rocky is reading this book for school and being the nosey gal that I am, I picked it up one day and starting reading and I could not put it down. It is written by a therapist who highlights all the problems faced by adolescent girls and man oh man did it resonate with me and my experiences as a teenager. It is such a fascinating, at times heartbreaking, and extremely important read that I would recommend to anyone, but especially to parents of girls.
From Jess: SHE’S BACK! I was so sad when it seemed like Phoebe Robinson’s Sooo Many White Guys podcast wasn’t coming back. (P.S. If you haven’t listened in yet it’s awesome and you should). But now Phoebe has a new podcast, produced by her and her boyfriend, called Black Frasier. It’s an interview/advice podcast, great guests (like Tracee Ellis Ross, Whitney Cummings, and Hasan Minhaj), completely non-sponsored and at the end of each episode, she promotes a black-owned business she loves. Just listen because it’s wonderful, helpful and of course funny.
From Sara: I want this cookbook called Jubilee! I can’t wait until I have a kitchen again to justify ordering it
Also From Emily: THANK YOU ETSY. If you are doing any shopping (home, fashion, beauty) this weekend and want to support more small Black-owned businesses, Etsy created a curated list of some of their vendors making it VERY easy to not only support small businesses but also Black-owned business and designers. Let’s start shopping.
From Mallory: I just finished my latest design project (which was revealed on the blog this last week if you missed it!!) so now I’m FULL STEAM AHEAD on my apartment design. I’ve been eyeing pretty much all of the wallpaper at this company, which is a female-founded brand that I recently found (probably via Instagram). I’m VERY into the sediment collection but literally every single one in their shop is so good that I can’t stop ordering samples & trying everything.
From Caitlin: Unlike most of the team, I still haven’t really graduated from the “comfy clothes only” part of quarantine, so I’m currently stocking up on some of my favorite relaxed t-shirts which are now on sale for only $11!!! (Thank you, Nordstrom Anniversary Sale!) I’m also planning on grabbing this fleece pullover because I have seen Em and Sara wearing ones from the same brand an also because I am trying to stock up and prepare for yet another freezing fall/winter in my apartment. (Is it 97 degrees in here this week? Yes! Will it be in the 50s as soon as the weather shifts? You bet! Do my windows/walls work at all? Absolutely not!)
So that’s what we have for ya this week, folks. See you tomorrow!
Opening Image Credit: Design by Bia Daidone and Mandarina Arquitetura | Photo by Fran Parente | via Clever
The post The Link Up: The T-Shirt Emily Bought This Week, Mallory’s Go-To Wallpaper, and The Shopping Resource We Wish We Found Sooner appeared first on Emily Henderson.
August 22, 2020
Our Guest Room/Office Basement Suite Reveal … + How To Make A Basement (Office) Feel Warm, Happy And Functional

This post could also be titled “How Brian Came to Finally Realize That My Habit of Hoarding Beautiful Things Actually Comes in Handy After 20 Years of Being in a Relationship”. I don’t think I bought like anything for this room (maybe 2 things) decor-wise, and simply pulled it all from my admittedly robust prop “inventory” (the garage). Finally, the basement suite reveal is here, after four quick years. It’s like finding the wedding dress the day you get home from your honeymoon. I’m bummed that we didn’t prioritize this room, but proud that we invested enough to make it awesome without putting too much into it, unable to recoup cost in resale (I was going to do Scottish inspired plaid wallpaper – for my “eccentric Scottish grandpa” theme for one Brian Henderson – which might have been a harder sell). So here we are. I don’t think I have before photos because I’m new at blogging and don’t know how to document projects properly. When we bought the house it was not dissimilar to this state, except cement floor and probably a less good gray paint color but the potential was great. Same windows. Same built-ins. Two less support beams.
Here’s how it all went down. After we finished the mountain house I was like this is crazy, it’s time to actually work on this room and use it. Julie came up with a plan for the bathroom but once we got a quote for it we realized it would be like $15k – $20k. I really just wanted it to be “cute” and even “habitable” but this wasn’t where we should invest real money. A couple of months after the pandemic hit I realized that this was a good time to do it (on even more of a budget – life felt precarious). We needed to put down waterproof flooring, paint, and make the bathroom “cute”. So three weeks ago it was ready for me to style and shoot, which I tried to do without buying anything or where I did buy it was affordable (the bed).


The biggest and best change we did was put down this vinyl “wood” flooring that was super affordable, looks GREAT and is totally waterproof which is great for a basement that has an exterior door up two steps. It’s from Cali Bamboo, and is the Seaboard Oak color. Velinda used it in her basement kitchen and loved it, so I copied her:) It absolutely warmed up the space and has fooled many people who didn’t know (if you look closely you can tell it’s not real wood, but if you are just checking out the space it looks GREAT). I’m VERY happy with it and HIGHLY recommend.
As you can see in the “before” photo above, there is this cabinet on the wall that would have been super off-center to the bed. I wanted to get rid of it completely and drywall over, but Brian was like “you want to get rid of storage in a basement office?” which was a good point/question. Thank god I had been hoarding this amazing vintage Japanese indigo tapestry that I bought on Etsy last year. We hung it up, it fit perfectly both over the cabinet and behind the bed and created a focal point for the room. YES. Permission to keep hoarding awesome stuff, accepted.
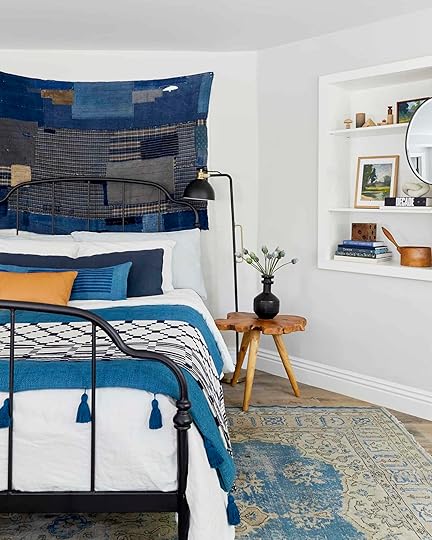
I bought the rug years ago from Rejuvenation’s vintage site, the bench is Katy Skelton (from my Glendale days at the foot of my bed, and was at our piano but now lives here), the bed is Target (coming soon!), the black standing lamp is Target (no longer available), and the bedding is almost all what I’ve already had except the teal blanket by Justina Blakeney that is new (and awesome – so heavyweight and such a pretty thick weave). Lumbar pillow by Block Shop, leather pillow from Target (old), patterned blanket from Schoolhouse Electric (one of my all-time favs).


I have to pat myself on the back for making color and pattern totally wake this room up without making it feel small and busy or cluttered. It’s actually a really great space. Light, but cozy and I’m not just saying that because we are selling it. It has enough light to not feel like you are in a basement (windows on two sides) but where it’s located on the house just feels like a cozy studio, a little escape. Brian worked here for a couple of years and loved it. Also, the paint color is one of my absolute favorites (we have it in our bedroom, too) and pretty much captures “light yet cozy” well. It’s Ammonite by Farrow & Ball. Also, if you want more gray paint colors we love head here.


The built-ins were already there, but we took out the third shelf which allowed for us to lean larger pieces of art. All of those pieces are things that I love and will likely always hoard. I was so happy to give them a place in our house, even for just a few months. I think the only things still available is the teal sculpture from artist B. Zippy and the quiet painting by Addie Juell (that I purchased from the Portland project). I styled the bench out with a couple of pillows (Target) and throw (West Elm and similar). We always had plans of making a big custom cushion, but, well… we never did. The vintage “sconce” (which can also be a table lamp) I bought from Amsterdam Modern years ago.
On the other side of the room, we have the “office”.

Admittedly I’m VERY impressed with how this turned out from what we had on hand. I’ve been hoarding that desk for 3 years (remember the Parisian bedroom reveal??) and it’s a big desk to hoard (from Ava home). But it was too pretty to get rid of and I knew it would come in handy, three years later. Indeed it did.

The wingback is from Target (still so good and still available) and is such a good scale for the desk and adds so much warmth here. The lamp was a score from the flea market ($15) but I had to get it repaired ($15) and then my guy at Practical Props in the valley (Ian) threw in the shade because it was “damaged” and I was like, “aren’t we all, Ian? Aren’t we all?“. It’s probably from the ’90s and yes has some scratches and maybe a dent but for free that shape in black is so awesome on that lamp and you honestly don’t notice. (This is why I can’t have real paying residential clients … I’m a perfectionist in a billion ways – I tweaked that vignette to camera for 45 minutes – but will absolutely let things like that slide).

The painting is also from the flea market, the round sculpture is CB2, pillow from Target (old), and the blanket I’ve had forever from Rebecca Atwood.
I had that leftover wall hook from the mountain house (kinda wish I had hung it up here, actually … maybe I will after we sell) – from Lawson Fenning. I threw a Parker Clay bag, some yardage of vintage plaid (I had to bring the “Scottish” in somehow) and then I had bought this beautiful necklace from 54kibo.
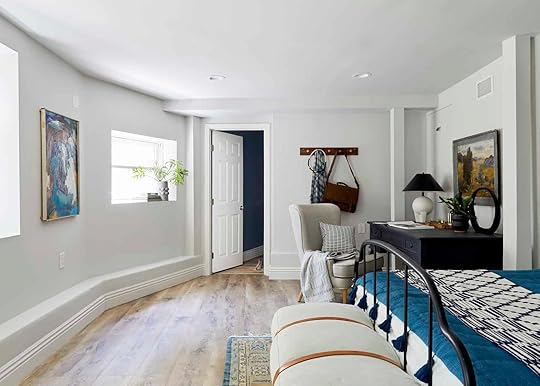
Here you can see the full space on the other side of the room leading into the bathroom which I’ll show you very soon. The corner where the desk is was always awkward so I’m just so happy that the desk really engages that space and you don’t really notice the columns that float in the room. The foundation ran along the side of the wall (I think the previous owners dug down to make it tall enough to create a room) and I was like, “what the heck do I do with this ledge?”. I joked about lining it with candles. I even tried leaning art. I put a tray with “keys” and no matter what I did it looked junky, cluttered, and drew attention to the oddness. I ended up putting a plant, and stack of books on the window and called it a day.

All in all I’m honestly so happy with it. It came alive, while maintaining its bare-bones function (bed for guests, desk for office), feels warm, and exciting without feeling cluttered at all. And it goes to show that with a neutral foundation (walls, floor) you can add a lot of eclectic styles within a color palette (blues and wood). It’s an EHD formula that works for those of you who are into it. Although to be fair it did take years of collecting all of those things… I’d WFH here in a heartbeat… YOU?
** Photos by Sara Ligorria-Tramp
The post Our Guest Room/Office Basement Suite Reveal … + How To Make A Basement (Office) Feel Warm, Happy And Functional appeared first on Emily Henderson.
August 21, 2020
We Are Moving!!! But To Where???

They say you shouldn’t make permanent decisions in a temporary situation, but here we go. The pandemic has both slowed life down and yet sped things up, right? I know so many people who are fast-tracking their life, and making more huge decisions than ever before. These last 6 months have given us some perspective – time to think and reprioritize the long term life decisions that are so easy to put off when you are busy. We know how unbelievably lucky we are to be able to do that. I know that many people were/are even busier, juggling so much MORE. But for us – with production, design work, and theater at a stand-still – Brian and I had time to ask ourselves (and answer) some big questions. Now that we practically live up in the mountains full-time and love the access to nature, did we want to go back to living in LA? Do we really want to raise our kids in a big city? Do we really need to be in LA “for work”?
The answer is “no”. After 8 years in New York and 12 years in LA, truly appreciating two of the most exciting cities in the world, we are ready to move back to Oregon to raise our kids amongst our family and extremely close childhood friends, surrounded by more nature and trees (not sure you guys caught that I’m super into trees). We have been talking about it for 5 years (even looked at houses after Birdie was born), and seriously thinking about it for 3 years. We always knew that we would end up there, but with the business and Brian’s theater career it was so easy to think we HAD to be in LA. The pandemic has proved that we don’t, and while we have seriously considered raising our kids up in the mountains long term, ultimately we want to be closer to our family. We are SO EXCITED. Nervous, yes, but SO EXCITED. A lot to talk about, I know. So I figured I’d answer the questions in the order that I get them. Because I’ve been getting them …
Wait. WHY ARE YOU LEAVING?
More than anything we really want to be closer to family. Not to mention, there are some patterns you fall into living in a city. I was on a hamster wheel, addicted to being busy while being happy in so many ways and enjoying the hell out of my job every single day. But, I over-scheduled myself because that’s just what you do when you live in a big fast-paced city. Living up here out of LA slowed me down enough to get a foot off of the wheel. Once I was off, I realized that it was an addiction I needed to give up – hopefully permanently – to be more healthy. No. I’m not retiring. With Oregon being more affordable I’ll be able to make a larger impact. I want to focus on helping more underserved families in a bigger way than any individual Feel Good makeover. More to come once we get settled up there (but we do have our first pandemic Feel Good makeover in November, FINALLY, yay).
 photo by tessa neustadt | from: the finished patio (with the tile!)
Are you selling your house in LA?
Yes. It’s not listed yet, but we will be selling it. Hopefully to someone who will love it just as much as we have. After living there for 5 years, it’s really the main emotional pull that has kept us here. We moved here when Birdie was 1 and Charlie was 3, and it has been THE PERFECT home for young kids. The way the house is laid out, the year-round indoor/outdoor flow, is just so wonderful to live in. The flat, enclosed backyard with no bodies of water or access to cars means the kids have some freedom. It’s fully fenced, with lots of pockets of shade and intrigue, and you can see the backyard from the kitchen so I left them unattended while I cooked, even when they were tiny. I know that is boring to most of you, but to moms of small kids, that is HUGE. Our bedrooms are all near each other so we felt close and safe, and the house is walking distance to the local public elementary school on the east side (Ivanhoe, which we LOVED).
But we can’t hang onto it and move to Oregon. Pre-pandemic, before this decision, I started finishing some rooms that I was excited about (like the living room, shared kids room). But as it became clear that we weren’t going to return to LA, I started tackling the other rooms that would need to be fixed in the event that we needed to sell (like the basement studio and Elliot’s old room). If you are a serious buyer looking for a magical family home, with a separate studio (and bath) and a shady backyard in Los Feliz (Ivanhoe school district) see the info at the end of the post.
 photo by tessa neustadt | from: our feature in real simple magazine!!
Are you selling your furniture in the house?
Nope. Maybe a few pieces if I can easily replace them. But I have really come to curate pieces that we love and we aren’t starting over this time. I want almost every single thing forever.
Are you selling the mountain house?
No. As of now, I can’t imagine selling this house and we picture coming down here in summer and winters to see our friends and get away from the rain. We might rent it out, give it away to friends or auction it off for charity fundraiser weekends in between.
So, where in Oregon ???
Well, I’m nervous to talk about it without jinxing it too much. It’s a very long story, but it’s a place that we have a relationship with and the opportunity came up recently, and quickly. The property is outside Portland and if it works out we feel is the next (and likely forever) Henderson home. Obviously as soon as things are finalized I’ll be sharing the project with you because TRUST ME, it’s going to be fun to document and watch. But until it’s 100% finalized, I’m not gonna say anymore. BUT WE ARE DRIPPING WITH EXCITEMENT.

When are you moving???
It’s still TBD as we aren’t in escrow yet on a house. After much thought, we plan on living in Lake Arrowhead until we make the official move. We know we’re going to make the move, but the details are still a little up in the air. So we are homeschooling from the mountains, while I can still commute down for shoots when needed. We aren’t trying to rush it. We are going to take it slow, not put more pressure on ourselves than we already feel homeschooling the kids (maybe distance learning, still figuring it out) and just try to keep our foot off the temptation of the hamster wheel (although I do need to write that book…).
What will happen with the business?
It’s going to be GREAT, as we’ve already made a lot of changes, working remotely for months. Turns out we don’t all need to be physically together to run a blog (even though we love being together for so many other reasons). So luckily me leaving the state doesn’t affect my team, whose jobs are mostly online. I don’t plan on hiring in Portland, because my team here in LA is amazing and work so hard. They’re really the ones who have made this remote work thing work. Sure, there will be some shifts (new faces via contributors, familiar faces coming back, more freelancers when needed) and the future is always unpredictable when you are running a small online media business (in general, not mention during a pandemic). But my team has been killing it on this blog and we have a lot of fun things planned. I’m dying to start blogging about the new house, but until then there are a lot of reveals from how each room in our LA house was styled and some design projects/MOTOs in LA that we are wrapping up.
You might have also caught on stories last week that Sara, after almost 6 WONDERFUL YEARS, has decided to pursue a full-time freelance photography career. Neither my moving or her going freelance had anything to do with one another, they just happened to line up (like I said, lots of people making big decisions). But I couldn’t be more excited for her, and if you are in LA and need an interiors photographer please reach out to her directly. She’s joining a beloved group of EHD alum, all who have really helped shaped the company you know and love today.
Are we sad to leave?
YES. Of course I’m sad to leave our friends, but we’ve stayed pretty connected to them through the pandemic (thank you, Portal). I tell them all the time that they were literally the only thing keeping us here for YEARS because we loved them so much. But we’ll always stay connected. I’m not worried about that.
What Will You Miss About LA?
I’ll miss the light. The flea markets. The amazing produce (wait, Portland has amazing food) and the weather. Did you know that most Instagram influencers move to LA for the year-round amazing light? I’ve literally met so many content creators that moved here sure, for the opportunity, but also because it’s so much easier to take good photos in LA. Fun – and true – fact. Looks like I’ll need some new skills…

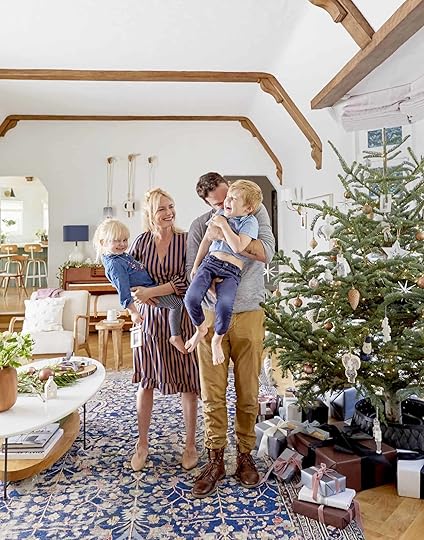 photo by sara ligorria-tramp | from: how we decked our halls for christmas
The Truth:
I’m VERY sad to leave our home, neighborhood, friends, and community. Like I gushed about earlier, it is a magical, happy home full of natural light, charm and now four years of incredibly happy memories. We transformed it into our dream home with so much hard work and even more love. The energy is just so good here and so yes, I cry thinking that we may have made our last memory together here. I’m scared that by leaving, I’ll forget things, that distance will make the memories fade. Last year Charlie and I walked to kindergarten and held hands 1/2 the way. Birdie started cooking soup with me at night and put on impromptu ballet shows in the living room. We’ve danced to Moana on the patio for weeks and the kids have had so much fun in the bath that we had to eventually give them an hour curfew. We could walk as a family to the school fundraising street fair and get drinks at Hyperion Public. Heck, even our church was walking distance – Silverlake Presbyterian (I’m letting out all my secrets now. And when it opens back up I can’t recommend it enough for those looking for a nonjudgemental progressive community).
 photo by tessa neustadt | from: the finished patio (with the tile!)
And as you know, we lived NEXT DOOR to one of my best friends in the whole world, a sister really, with whom we shared a hole in the fence that our kids climbed through, back and forth all weekend. Who gives that up???????? Imagine how that conversation went – cut to the three hours of us bawling, with as many glasses of wine. To say I’ll cherish those years is the understatement of the century. I got to live near my best friends, school, church, and work in LA for four amazing years. But at a certain point, your priorities just become so clear. If you always know in your gut that this is how it will end, why wait?? Why put off the next phase in your life, one that you know will make your family happier, just because it seems crazy?
Here’s just a little quick trip down memory lane (don’t worry there will be more).

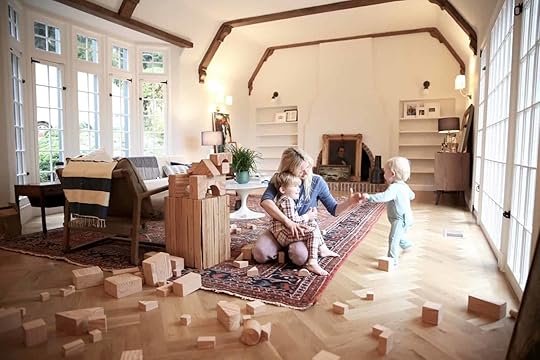
 photo by sara ligorria-tramp | from: living room update – again
 photo by tessa neustadt | left from: our modern english country kitchen, right from: our classic modern master bathroom reveal
It’s been 4 years exactly since we bought that house. It’s been 20 years, almost exactly to the month since we left Oregon. I suppose it’s all full circle and while everyone is shocked, I think no one is really surprised.
 photo by veronica crawford | from: our first ever reader event at the mountain house—a recap
As blog readers hopefully this will be a new adventure for you, too. Can one go home again? How will our kids adjust? What property could be so “us” that it drew us up there after 20 years of living a city life? I promise that you’ll understand once you see it.
I’d love to hear what, if any, large life changes you’ve made during the pandemic. I heard a quote somewhere that said, “the pressure and stress of the pandemic has opened up the cracks in our lives, and the light has come blasting through, shining the light on what we couldn’t see before (for good and bad).” My cracks showed me that I was on a hamster wheel, addicted to staying busy, and insisting on living in a city that I would never truly feel at home in. It also showed me the contentment I can feel in living a slower life, and the total joy I get strictly from my husband and kids.
BUT AGAIN WHAT ABOUT YOU????? What changes are you thinking about making or have you made since COVID???
P.S. The house isn’t on the market yet, but should be in the next couple of days – I wanted to give you guys a heads up first so you didn’t hear it second hand. If you are interested or you know a serious buyer have your realtor contact Howard Lorey at Nourmand & Associates, HLorey@Nourmand.com DRE # 01263717. I’m so sad that we can’t have an open house like we did last time so more of you can come and see up close all the crazy renovations and updates you’ve watched online the past four years. But I do have a lot of fun updates to show you here, coming soon…
P.P.S. While the real estate photos aren’t out yet, if you are interested and want to see what this house looks like here you go: living room, kitchen/dining, powder bath, patio, backyard, primary bed, primary bath, kids room, Elliot’s room, jack and jill bath).
Opening Photo Credit: Photo by Jason Frank Rothenberg for Rachael Ray Every Day. Additional styling by Scott Horne
The post We Are Moving!!! But To Where??? appeared first on Emily Henderson.
August 20, 2020
What Is Your Ideal Bed Size? Ryann And The Team Have Thoughts

“What’s your ideal bed size?” is a loaded question. Like all great controversial debates, it is one that is dependent upon circumstance and individual preference thus making it a passionate topic. It’s especially a hot topic around here, and when Jess posed the question a few days ago in Slack it stirred up some feelings:

It is my understanding that bed size is dependent upon the following: the number of people sharing said bed, presence of kids or pets that find their way in in the middle of the night, room size, budget, and finally, sleepabilty (a very scientific word that I just made it up). Sleepability, for those of you who can’t read my mind, refers to how well you are able to sleep. Are you a light sleeper? Does it take a long time for you to fall asleep? Do you require no one to be touching you in order to sleep? (ME). All of these questions must be weighed when considering bed size. Personally, I have poor sleep hygiene and am a horribly light sleeper. I also share a bed with my boyfriend Rocky and despite his protests, our dog Gus. We currently have a queen bed and it’s tolerable. Mind you, my dog is 60 lbs and takes up a third of the bed and loves to kick me in the back when he’s dreaming about what could only be a very intense race against other dogs. So in order to make our current bed size work, I require everyone to be in specific sleeping positions. Rocky, who sleeps like a rock (HA) needs to stay on his side of the bed, while I try and maneuver our dog to sleep at the foot of the bed which works about half of the time. Most often the evening ends with Gus in between us leaving me with about 3 ft of space. It’s not ideal but we make it work.
This has been our situation for about 2 years now, and I didn’t know how much it could be improved by acquiring a king bed until my parents replaced the queen bed in their guest room with a king. When the three of us spend the night there it is bliss. There is so much room!!! I can barely even reach Rocky all the way over on his side of the bed. It’s truly divine. However, and here is where the plot thickens, when I spend the night there by myself it’s disorienting and uncomfortable to have all that space. Talk about ~high maintenance~.
Now herein lies our dilemma. Clearly a king-size bed is ideal for our sleepability but it is not ideal for our bedroom size. With our queen bed, the bedroom already feels tight so a king will certainly exacerbate this fact but part of me thinks who cares?? We don’t spend much time in the room anyway plus I think it would make our room feel uber cozy. Upgrading won’t happen for a while, so I have time to agonize over the pros and cons. In the meantime, I have to know what your ideal bed size is and all of the factors that contribute to your preference. Do you sacrifice room space for bed size?? Tell me everything. xx
Opener Image Credit: Photo by Sara Ligorria-Tramp | From: Mountain House Reveal: Our Calm Scandinavian Master Bedroom
The post What Is Your Ideal Bed Size? Ryann And The Team Have Thoughts appeared first on Emily Henderson.
How To Build A Backyard Lounge From Scratch For Less Than $1,000

Do you have a dream that an area in your home can be better than it is right now? 3 months ago, I had that dream and it all started with a trampoline and some dog poop. Here’s what I’m talking about…

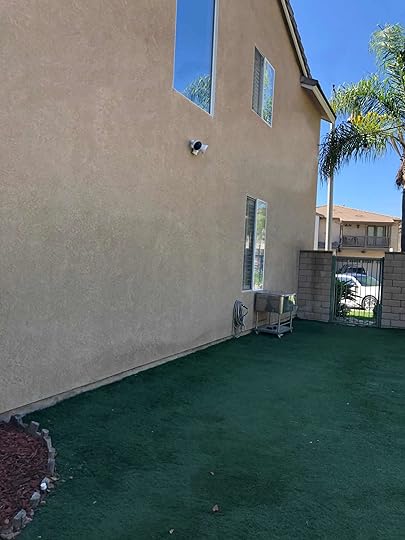
You may have already been following along in this journey, so let me just give you a brief recap. This is my boyfriend, Chase’s parent’s neglected side yard (wow that was a mouthful). Well, this is what it used to look like at least. 3 months ago (wait I mean 6 months??) we were fortunate enough to set up shop at their house during the initial COVID stay-at-home order. You guys will get this for sure: being stuck in one house for a few months really gets the wheels going on what “could be” design-wise, am I right or am I right??? Well, I saw the potential in this space and knew that one day she would be a beautiful (budget) outdoor lounge.
My plan rolled into action one (almost) summer night, when we were out on a walk and stumbled into an outdoor sectional on the side of the street. She was small and old, but charming nonetheless and I knew this could be the beginning of something good. What happened next? We did what any normal person would do. Grabbed the Toyota Camry and shoved the sectional into the car as much as possible (no the doors did not even come close to being closed), then we drove through the neighborhood (no major streets thank god) and dumped it straight into the backyard. She was missing some cushions to be honest, but it really sparked something for this space. Here’s what it looked like:
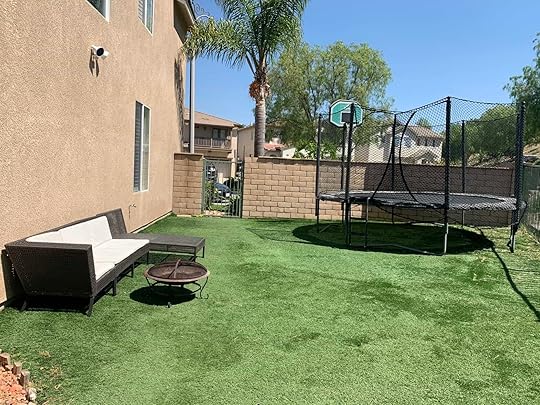
Dreamy, no? In all seriousness, we had huge hopes and dreams of making this sectional work (and I still fully believe we could have if we had just gotten a few more chairs to round out the space and then fixed the missing cushion situation). But what happened shortly after we picked this up felt like fate: I posted this photo on the blog in this post with a dream of one day turning it into the outdoor lounge we all desperately wanted. Little did I know that blog post would REALLY get the ball rolling on this budget-friendly lounge plan.
We chatted about the outdoor set situation back in this post, but basically what happened was an amazing and lovely reader (and talented designer) was about to list an outdoor sectional on craigslist, but saw my backyard plans and sent me an email to see if I wanted it. To say we were STOKED would be an understatement. But you really should know that while getting used furniture can be life-changing and incredibly helpful to the budget, it almost always comes with a catch. This one came with two. 1. It was in Santa Barbara (a 3 hour drive each direction) and 2. The cushions had some major issues, which you can read more about here. We weighed out the pros and cons and decided to take a chance on this outdoor set regardless of what could’ve happened (it could’ve been bad you guys). Luckily, we figured out a solution for the cushions (which you can watch more about that in the video below) and got the ball rolling YET AGAIN.
Once we got the sofa situation locked in –– maybe you remember, maybe you don’t but we had 3 different design plans for our new (well, used) beloved sectional. Here they are to jog your memory:
DESIGN PLANS
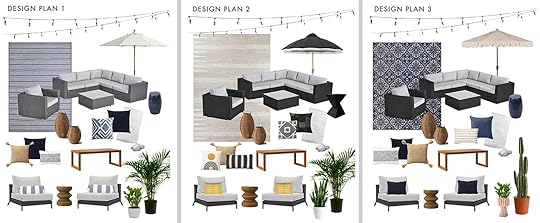
So which design plan did we end up going with?? DRUM ROLL PLEASE…
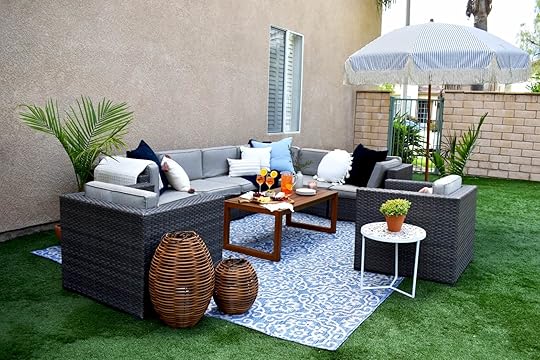
Coffee Table | Terrazzo Side Table | Blue Outdoor Rug | 7′ Umbrella | Big Woven Lantern | Small Woven Lantern | White Throw | Navy Sunbrella Pillow (similar) | Pink Square Pillow | Striped Lumbar | White Textured Pillow | Navy Throw | Oversized Circle Pillow | Palm Leaf Plant | Vase |Tea Towel | Cheese Platter | Wine Glasses | Pitcher | Candle
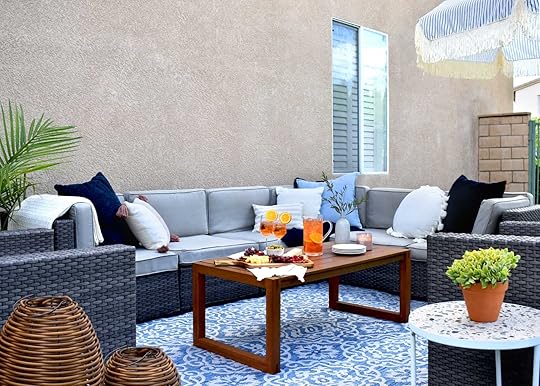
None of them! Jokes on me because little did I know putting highly requested affordable outdoor accessories on the blog means that they will most certainly sell out (besides all outdoor stuff is FLYING off the shelves as is). So I ended up creating an entirely new design plan: I wanted to lean toward the spanish style in option 3, but ended up going with the color palette of option 1. So we landed somewhere in the middle, which is kinda fun. You know what else is fun? Another before and after, so here it is:
BEFORE AND AFTER

We built this entire thing from the ground up FOR LESS THAN $1,000. I’m screaming with joy and pride after seeing these photos because there were moments when I just thought there was no way. But no, there is always a way!! There were 3 main things that I learned, so if you’re wanting to create an outdoor space on a budget, here’s what you should know (plus a video where I’m chattin all about it!! Just wait a few seconds for the ad to play:))
CREATE A FLOOR AND A CEILING

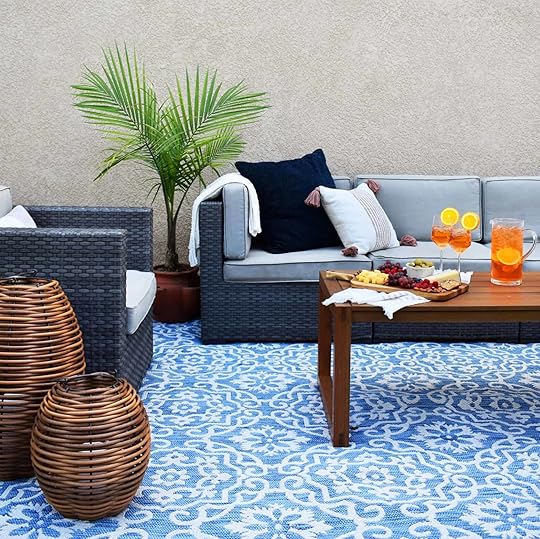
Coffee Table| Blue Outdoor Rug | Big Woven Lantern | Small Woven Lantern | White Throw | Navy Sunbrella Pillow (similar) | Pink Square Pillow | Palm Leaf Plant | Vase |Tea Towel | Cheese Platter | Wine Glasses | Pitcher | Candle
This is the best tip I’ve learned from Emily Henderson herself: Treat your outdoor space like a room and make sure you have “a floor” and “a ceiling.” There are MANY ways to go about doing this, but not all of them are cost-effective. For example, a non cost-effective way is to build a deck or a pergola as your floor/ceiling. A cost-effective way to do this is to use a rug as your “floor” and string lights/an umbrella as your ceiling. We (obviously) went with the cheaper option and I could not be happier with how it turned out.
USE YOUR RESOURCES
Coffee Table | Blue Outdoor Rug | Big Woven Lantern | Small Woven Lantern | Pink Tasseled Lumbar | White Throw | Navy Sunbrella Pillow (similar)| Pink Square Pillow | Tea Towel | Cheese Platter | Wine Glasses | Pitcher | Candle
The planters and some of the pillows we had already had lying around the house, so we repurposed those items to be part of our new lounge. We already had the big navy pillows that weren’t getting any use, so we figured let’s just use them as outdoor pillows since at least they’ll get used. Also, it gets pretty dusty out here since it’s next to a hill, so we’re planning to keep all of the pillows inside most of the time (which is why you’ll notice not all of these pillows are outdoor pillows) but I purposefully chose pillows that seemed more durable than your average indoor pillow, so they’ll definitely hold up if we accidentally leave them out for a night or two.
I know you’ve heard the sectional saga, but I must reiterate that finding used furniture is ESSENTIAL in keeping to a small budget. Facebook Marketplace, Craigslist, and literally THE CURB are your best friends. We were incredibly fortunate to know of someone that was getting rid of their sofa, but even if that didn’t happen we definitely could’ve made our original curb sofa work. We only would’ve needed a few more seating options across from it (which we also would’ve tried to find used). Furniture is THE BIGGEST expense when building a space (and most outdoor furniture is $$$), so if you can use your resources, keep your eyes peeled on the street and look online, you can definitely find some gems out there.
Oh and where is that curb sofa now? We split it into two chairs and now it’s functioning as an extra seating area across from the lounge (pictured on the left below):

Coffee Table | Blue Outdoor Rug | Big Woven Lantern | Small Woven Lantern | Pink Tasseled Lumbar | White Throw | Navy Sunbrella Pillow (similar)| Pink Square Pillow | Vase |Tea Towel | Cheese Platter | Wine Glasses | Pitcher | Candle | Blue Lumbar Pillows | Stump Side Table
The Aperol spritzes and cheese plate were just out here for the shoot, but now I’m wondering how I can keep them here all the time cause man they make the space look good. Now for the last tip:
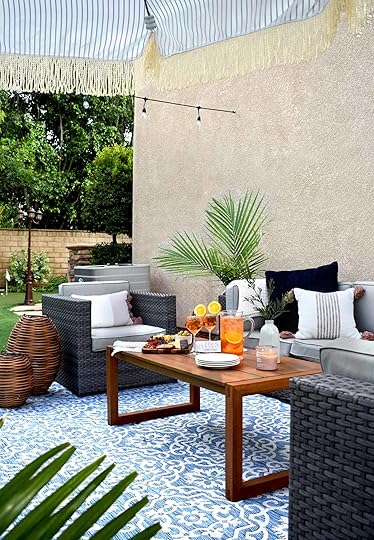
STICK TO A COLOR PALETTE

Coffee Table | Terrazzo Side Table | Blue Outdoor Rug | 7′ Umbrella | Big Woven Lantern | Small Woven Lantern | White Throw | Navy Sunbrella Pillow (similar) | Pink Square Pillow | Striped Lumbar | White Textured Pillow | Navy Throw | Oversized Circle Pillow | Palm Leaf Plant | Vase |Tea Towel | Cheese Platter | Wine Glasses | Pitcher | Candle
When throwing used stuff into the mix (like this free sofa and pillows we already had) it’s even more important to stick to only a few colors to make it look cohesive. I picked up a bunch of random stuff off of the side of the road (as I always do), but just throwing random free stuff together can make it look jumbled and messy. Pick a jumping-off point then stick to a few colors (I started choosing a color palette once I found this super affordable 9×12 rug from Target and it set the scene for the whole space.)
Now if you don’t mind, I’m going to enjoy my spritz with all of the friends I’m seeing during this quarantine (aka no one, so here’re photos of me leisurely enjoying the spritz solo).


Thanks everyone for tuning in and let me know your thoughts in the comments!! BYE!!! Xx
Opening Image Credit: Photography by Mallory Wackerman| Design by Mallory Wackerman | Styling by Mallory Wackerman (post-covid shoots are way different, guys)
The post How To Build A Backyard Lounge From Scratch For Less Than $1,000 appeared first on Emily Henderson.
August 19, 2020
Caitlin Found A House In The Hills For $299K And This Is What Happened

A couple of weeks ago, I called my loan officer Andy and made him answer about 40 straight minutes of questions so I could pull together this post on how to buy a house. Most of my questions were about securing a mortgage, but then I asked one that really opened a can of worms: “Is it possible to get a loan to buy land and then build on it?” Andy said that yes, those loans do exist. He then said that because of COVID, lenders have gotten anxious and that those loans are few and far between (if they’re issued at all).
Now, when I was growing up, my grandma always used to accuse my grandpa of having “selective hearing.” And I think that trait may be genetic, because what transpired over the subsequent two weeks was a result of me only hearing the “yes” and ignoring the serious, adult part. I set myself up for a REALLY stressful situation, but I learned A LOT and it may (or may not???) have been worth it.
P.S. Yes, there is a video walkthrough of this home buried in this post if you can find it 
Caitlin Found a House in The Hills for $299K and This is What Happened
A couple of weeks ago, I called my loan officer Andy and made him answer about 40 straight minutes of questions so I could pull together this post on how to buy a house. Most of my questions were about securing a mortgage, but then I asked one that really opened a can of worms: “Is it possible to get a loan to buy land and then build on it?” Andy said that yes, those loans do exist. He then said that because of COVID, lenders have gotten anxious and that those loans are few and far between (if they’re issued at all).
Now, when I was growing up, my grandma always used to accuse my grandpa of having “selective hearing.” And I think that trait may be genetic, because what transpired over the subsequent two weeks was a result of me only hearing the “yes” and ignoring the serious, adult part. I set myself up for a REALLY stressful situation, but I learned A LOT and it may (or may not???) have been worth it.
P.S. Yes, there is a video walkthrough of this home buried in this post if you can find it
August 18, 2020
Desk Styling 101: How To Make Your Desk Cute AND Practical For Everyday Working (Plus A Bunch Of Affordable Accessories)

I read the craziest statistic the other day. It was “the average office worker spends 15 hours a day at a desk” which is truly baffling considering the fact that there are only 24 hours in a day and at least 8 of those should be spent sleeping. For many of us, our permanent work or school desk just relocated into our homes and now is in need of a major glow up. So today I’m here to do what I do best –– look through our past EHD archives to create an easy peasy formula for how you can decorate your desk so it’s stylish like you BUT IS ALSO PRACTICAL (cause if it wasn’t functional who even cares).
Quick sidebar before anyone gets VERY worried about storage (seriously, we don’t want that), this post is strictly telling you how to make the TOP OF YOUR DESK a stylish and practical space. So we’re not chatting filing cabinets or any other important document storage that happens under your desk (although that’s an important conversation for another day). We can only tackle so much at a time, so if you’re looking for something more specific check out our recent posts: affordable desk combos (this one has actual furniture shopping options for your desk set up), rugs you can roll your office chair on, kids homeschool desks, or check out what Emily’s hilarious work from home situation looks like (update: it still hasn’t changed). Okay, now let’s get on with the desk accessories and styling (the fun part!)
The Basic Formula:
Alright, everyone. For the simple and practical everyday desk styling, you only need 5 ITEMS OR LESS. You heard this right. That’s IT and we have some real solid affordable options here, so you can a desk set up that won’t force you to work more hours to pay for it. Here’s what you gotta do:

Step One
Grab a lamp (or a sconce). Having an extra light on or above your desk makes your life better and will look nice. It helps in the mornings and at night when it’s a little dark over there, but you still want to be able to see ya know? Function and fashion…desk lamps are a double win. We’d also recommend that you grab one that’s taller to give your desk styling some height (and so it can cast a light overhead versus straight into your eyeballs).
Step Two
Art people!! Now you have creative freedom here, so maybe you want to do a full gallery wall or one big piece of art. Do whatever the heck makes you happy, but I guarantee adding something framed above or on your desk will give it the personal touch you need to keep motivated for 15 hours straight. HOT TIP: This is a great place to add in a family photo if you so please! Check out the post I wrote last week on how to frame your family photos in a cool designer approved way if you need some inspo…
Step Three
A cute plant! This is perhaps one of the less “functional” or “practical” things when compared to a light or mousepad or whatever, but a lil plant friend will add so much life and character to your space that it really will become a necessity. You’ll see. You want the place you spend the most time to feel cozy and warm, yes?? Grab yourself that lil plant baby and pop her in a fun planter and VOILA! Instant happiness.
Step Four
Pencil/Pen Holder/Organizer:) Easy access to a pen and paper is crucial, so you need a place for all your favorite #2 pencils, pens, highlighters, sharpies, and whatnots. Essential and SO useful.
Step Five
Last but not least. We fully believe in the power of a mouse or desk pad. It’s hard to find a good, affordable one (unless you scroll down below and see our roundup), but let me tell you, once you do it’s awesome.
Now that you know the basic steps, you can actually add as many or as few of these items as you want. If you read that last mousepad section and you were like, “No way, I don’t want a mousepad,” here’s the fun thing…don’t get one!! This is the basic gist you can go off of, but if you’re a minimalist, it’s your desk and your house so just do what feels right to you. Here are some inspiration photos for your desk styling pleasures:
 photo by tessa neustadt | from sara’s office reveal
Someone recently asked us in our DM’s how we would style a gaming desk…I’ll be honest, gaming desks have way more lights, keyboards, monitors, gadgets and gizmos, so I’d say to style it similar to this one above & try to keep as few items off the desk as possible. That means get creative with you walls by adding art/sconces/etc
Emily Henderson's Blog

- Emily Henderson's profile
- 10 followers

