
Emily Henderson's Blog, page 208
July 6, 2020
Our Go-To Cabinet Hardware Placement + 60 Of Our Shoppable Favorites
Imagine this, you’ve just spent the last year or so working on your home renovation, putting in countless hours and (more importantly) money into the project. You’re in the final stages of the project which should be the easy part. Just needing to complete the finishing touches like installing your light fixtures, figuring out furniture placement, and placing your cabinetry hardware. Then you go to actually install said hardware and you think, but wait where should it go?? Emily always refers to hardware as the “jewelry” of the home, like the cherry on top of an ice cream sundae. Basically it should be fun, not stress-inducing. But this simple task can even make a pro stop and question themselves. So today we are here to give you all the rules on where to place your cabinet hardware, let you in on some tips and tricks, and tell when to throw all those rules out your kitchen window (and of course a roundup of all our go-to favorites).
For all you renters, or those who are just looking to update your kitchen without having to go into full-on demo mode, one of the easiest, cheapest, and most rewarding hacks is to simply swap out that dated hardware for something shiny and new (aka not from the 90s). Choosing the right style of hardware can truly transform the space. However is you are in a full-on reno, you have to ALSO think about things like placement because if it isn’t quite right something will inevitably feel a bit off.
There are some overall general rules to help get you started and avoid that “off feeling”. What are they you ask? It’s pretty simple, put knobs on your cabinet doors and pulls on your drawers. Done! Post over, you are all dismissed. But really, every kitchen and bathroom vanity is different so sometimes you need to set the rules aside and learn when and where to break them which I’ll show you plenty of past project examples below. An easy example is if you have a drawer with a smaller face (the width of the drawer front) then opt for a knob instead of a drawer pull so it doesn’t take up the entire width making it look crowded.
In the end, the following are just guidelines to make the process as stress-free as possible but if you have an idea you love it’s your kitchen/bathroom after all, so do what makes you happy!
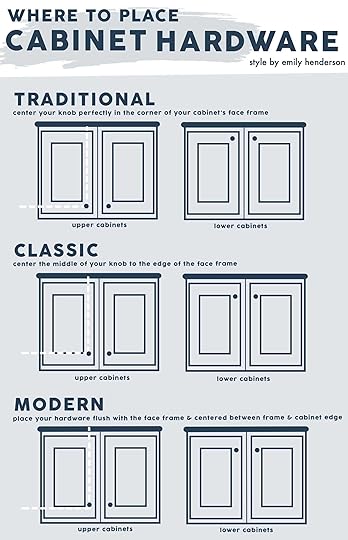
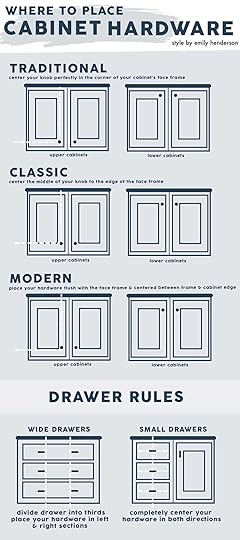
The 3 Most Common Styles of Placement for Your Knobs
Traditional Placement
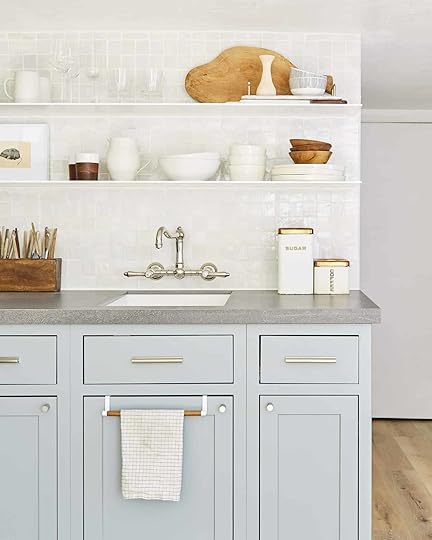 photo by sara ligorria-tramp | from: velinda’s tiny kitchen makeover takeover (with tons of smart storage hacks)
First up, the ‘Traditional Placement” which is actually one that EHD hasn’t really implemented a ton in past projects. BUT luckily Velinda showed us a great example of it in her tiny kitchen makeover. The trick is to completely center your knob vertically and horizontally to the face frame of your shaker style cabinet. This placement is great to use in a house that leans very traditional. However, as you can see by pairing this placement with a cleaner more modern micro knob like Velinda did it instantly makes the combo more modern. Very clever!
Hot Tip
Consider the diameter for your parameter: If you have a shaker style cabinet door, make sure to measure the width of the face frame (the vertical piece that sticks out from the rest of the door) to pick out the right diameter knob. Ideally, the knob's diameter is small enough so that you can see some of the frame on either side so the knob.
 photo by sara ligorria-tramp | from: portland reveal: how the bathroom i was most nervous about turned out to be my favorite
Now although this example above may not technically fall within the “traditional placement guidelines,” it shows the same idea if your face frame is much more narrow in its width. Placing them approximately 1″ inward and down from the frame will give more of a traditional feel.
Classic Placement
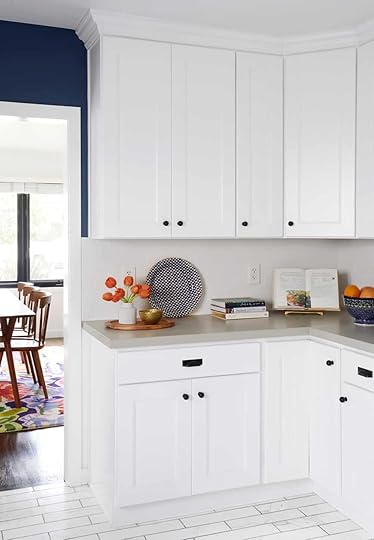 photo by zeke ruelas | from: traditional eclectic kitchen: the big reveal
The more “Classic Placement” is to center the middle of the knob to the edge of the face frame. If you choose to have your kitchen cabinet doors be a partial or full overlay like the example above rather than inset into the cabinet frame (see Velinda’s cabinets above) than this is a great choice since the hardware will be lower on the door face giving your eye some breathing room.
 photo by ryan liebe | from: my powder room reveal
In Emily’s powder bath they choose a pendant drop pull (yes, yes technically not a knob) which if it was placed centered horizontally as well would’ve lined up awkwardly. So instead, she used the classic placement which looks great and speaks to the metal grate on the door face. Perfect!
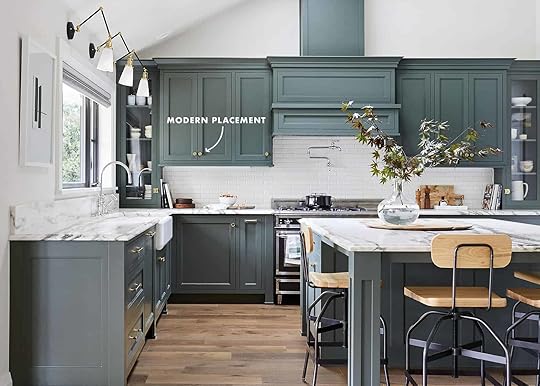
Modern Placement
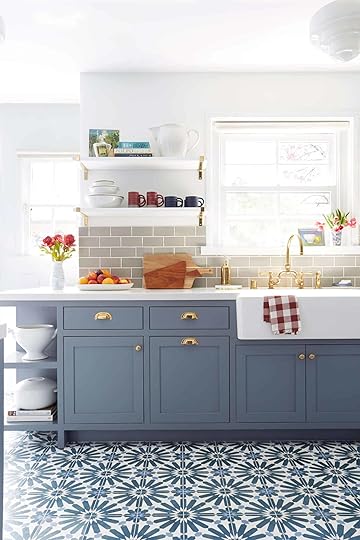 photo by zeke ruelas | from: modern deco kitchen reveal
Last up, The “Modern Placement” which has been heavily used throughout our EHD projects. With this, you align the bottom (on upper cabinets) or the top (on base cabinets) to the edge of the face frame. This is one that you will want to measure more than twice before drilling a hole through your probably expensive cabinet door since the exact placement will be determined by your knob diameter instead of measuring (read: eyeballing) it on the face frame. A foolproof solution is to either make a cardboard template or you can get a cheap standard template since the hole is determined by your knob diameter. I also love this full tutorial by our friends over at Young House Love.
 photo by sara ligorria-tramp | from: portland reveal: creating the dreamiest of master bathrooms
Looking back to the master bath in the Portland House, I think that since the knobs were small in size it could’ve also looked great in the Traditional style as well but then again I wasn’t there when they were deciding on the placement so maybe it visually felt too far away from the pulls. This is why it’s a good idea to employ a friend to hold your hardware in different locations so you can step back and see how it looks overall. Just remember to buy them a drink after or they have to be a really good friend.
And if you still don’t see the subtle difference between the three, here is a full infographic to give you more of a visual aid and maybe save it for later a date (ahem, Pinterest, ahem)…
You might be thinking by now (or earlier) these rules all sound great but what if I don’t have shaker cabinets and instead just a flat panel, what then?? Well, in the Mountain House Kitchen we decided to place them about 1.5″ from the top of the door and 1″ inward. This is a bit closer than the 2-3″ standard recommendation because we took a few things into consideration. The knobs that we choose were micro which was more modern with a lower profile. Also, the cabinets were inset meaning the door faces were a bit lower than average so you could visually get away with them being a 1/2″ higher up.
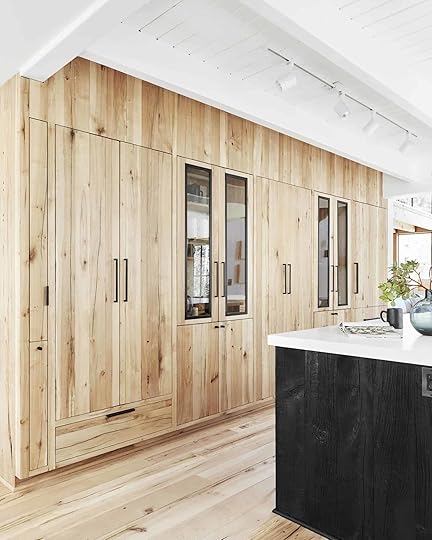 photo by sara ligorria-tramp | from: it’s finally here: the reveal of the mountain house kitchen
While we are already on the subject another design dilemma that we ran into in the was where to align hardware of different sizes on the same wall. As you can see above there are 2 different size handles on our cabinets so we started with the pulls on the glass cabinets which were placed 8″ from the bottom of the door to the bottom of the hardware. Then we aligned the rest and centered the larger fridge appliance pull since it was a couple of inches longer.
 photo by sara ligorria-tramp | from: all the what’s, why’s & how much’s of the portland kitchen (+ big reveal)
Latches are like the cousin to the knob. You may not see them often but when you do then the whole family is back together again. For the Portland kitchen, we decided to place them 4 – 5″ from the bottom of the face frame, there is some wiggle room with these as they work better higher up than a knob.
Now Where to Place Your Drawer Pulls
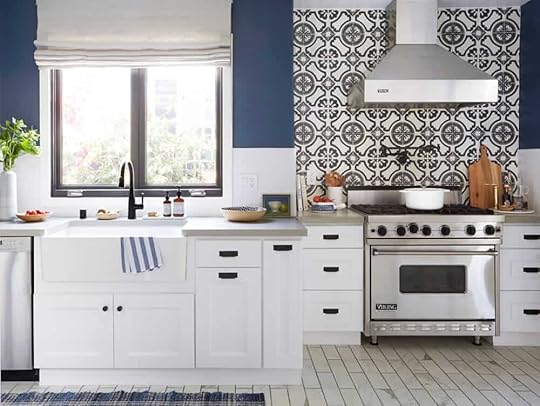 photo by zeke ruelas | from: traditional eclectic kitchen: the big reveal
The placement of your drawer pull all really depends on the style of the pull itself. There are many options to choose from but the most popular are: bar pulls, bin pulls, finger pulls, ring or drop-handle pulls & recessed pulls. The example above used bin or sometimes referred to as cup pulls, typically you will want to center them vertically and horizontally to a drawer face.
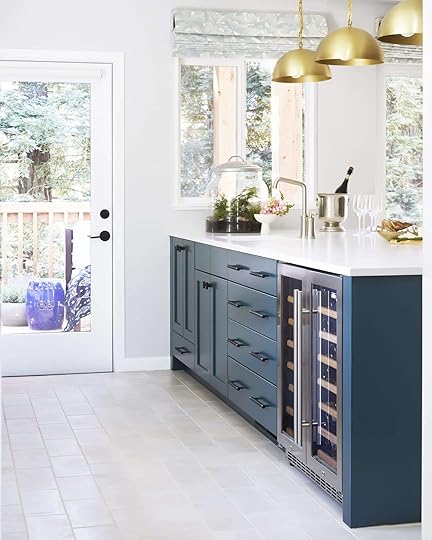 photo by zeke ruelas | from: the casa soria kitchen reveal (+ 5 things i would have done differently if it were my kitchen)
If you have a drawer that is 24″ or wider you can split the drawer into thirds and double up on your hardware centering them in the left and right portions of the drawer. Orlando has a great example of this in his parent’s kitchen renovation, he already had a few styles of hardware mixed throughout so instead of adding another size he kept it streamlined and doubled up on the wider drawers.
 photo by sara ligorria-tramp | from: all the what’s, why’s & how much’s of the portland kitchen (+ big reveal)
Although, this more traditional approach can mean that you are now spending twice the amount of your hardware budget. For a more modern and hopefully budget-friendly approach you can find wider pulls like the ones we used in the Portland Kitchen.
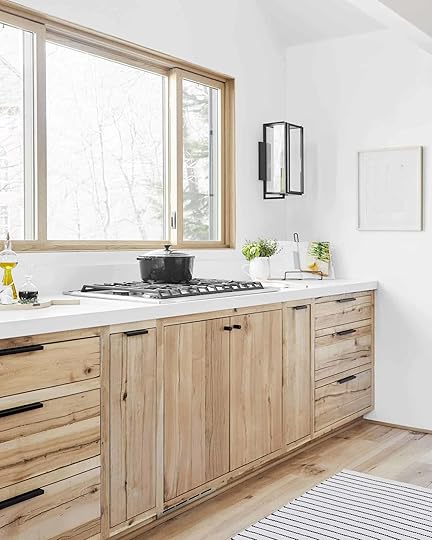 photo by sara ligorria-tramp | from: it’s finally here: the reveal of the mountain house kitchen
Or use a longer finger pull instead and center it along the top of your drawer. Do note that sometimes with finger pulls you may need to have your contractor make a divot along the top so the drawer sits flush to your hardware like we did above. Otherwise, your drawer won’t shut:) Thanks again to our patient GC, Jeff Malcolm.
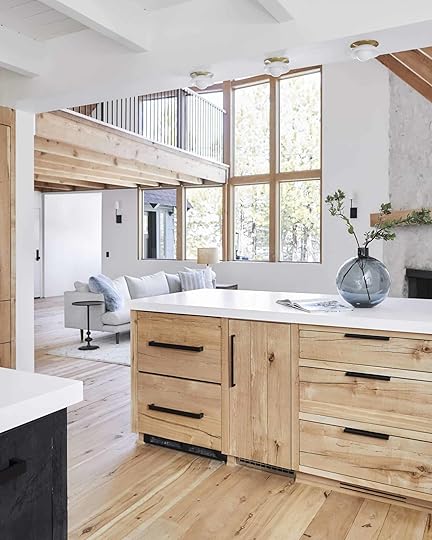 photo by sara ligorria-tramp | from: it’s finally here: the reveal of the mountain house kitchen
When it comes to integrated (panel-ready) appliances don’t forget about the all-important appliance pulls. You could probably get away with a regular pull on some appliances like we did with the ice machine but ones that are heavier like the fridge drawers require hardware that is very strong and made to last.
If you are one to skip over all my jibber jabber (I don’t blame you) to get on with your morning and just want the spark notes version of the post then we have all the info below, enjoy!
Some Rule Exceptions
I have to admit that I love when designers take a risk and break all the rules like the kitchen below and it just WORKS.
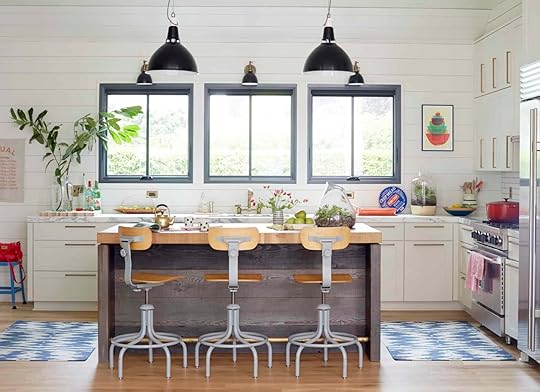 photo by david tsay | from: styled: secrets for arranging rooms, from tabletops to bookshelves
It seems so simple to use the same exact style and size hardware throughout but this had to have taken some forethought to make sure it would not only work functionally but visually as well for each cabinet. Bravo! To be fair this is the kitchen of Schoolhouse Electric owner, Brian Faherty so he knows what he’s doing:)
Other Exceptions (Bathroom Edition)
 photo by sara ligorria-tramp | from: moto reveal: emily bowser’s 32-square-foot bathroom is packed with small space hacks
I think you can generally follow the rules above when it comes to bathroom vanities but sometimes they just need to be adjusted and end up looking really good. Or you might buy a vanity that has pre-drilled holes for your hardware so the decision will be made for you. Above, Emily B. opted for two knobs instead of pulls which was the right call in her tiny main bath, saving on space and a little money.
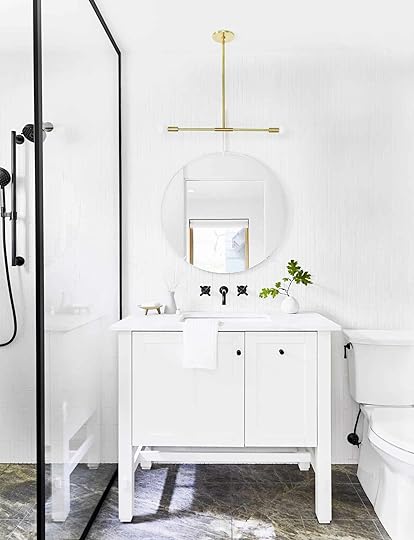 photo by sara ligorria-tramp | from: mountain house reveal: the upstairs guest bath that used to be a closet
In the upstairs guest bath of the Mountain house we decided that two micro knobs was the right choice instead of mixing up styles. But as you can see neither are in their “correct” location. Why? Well, it would’ve looked a bit strange had we not aligned them to one another since they are on the same unit.
 photo by sara ligorria-tramp | from: mountain house reveal: the riskiest bathroom i designed—with a “how i’m feeling now” update
For the kid’s bath in the Mountain House, the wood hardware was such a contrast to the white and those square knobs would’ve looked too crowded higher up so instead we again opted to align them to the drawer pulls.
Ok now that we have ALL of that covered, let’s shop a little huh?
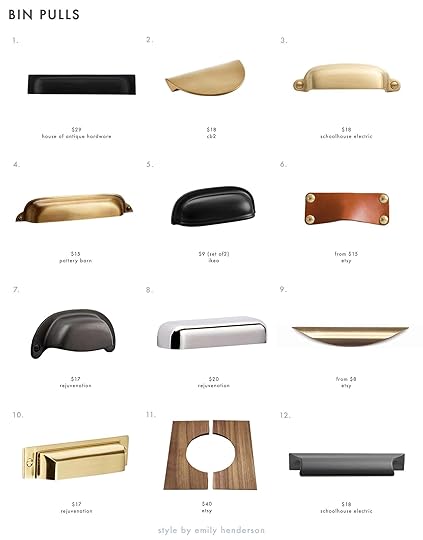
1. Rectangular Cast Brass | 2. Brushed Brass | 3. Brunswick | 4. Classic Hardware 6″ | 5. ENERYDA | 6. The “Morrison” | 7. Massey | 8. Larkin | 9. Luna | 10. Mission | 11. Wood Drawer | 12. Card File
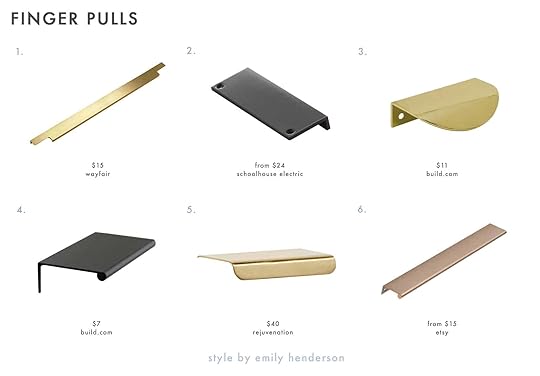
1. Brass Center to Center Finger Pull | 2. Ledge | 3. Center to Center Finger Cabinet Pull | 4. Bravo | 5. Large Drawer Edge Pull | 6. Dina

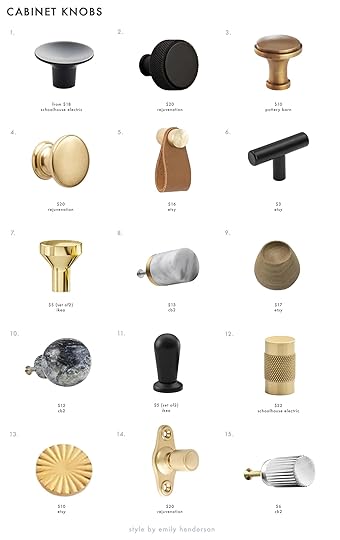
1. BAGGANÄS | 2. Knurled | 3. Link | 4. BORGHAMN | 5. Black Beech | 6. Elroy | 7. Deep Gold | 8. Mission | 9. Modern Solid Brass Gold | 10. NYDALA | 11. Brass Backplate | 12. Beckett | 13. Walnut Beech/Brass | 14. Mills Pull | 15. Large Massey
1. Dish | 2. Trask | 3. Boulevard | 4. Vernon Mushroom | 5. Cassidy | 6. T-Bar | 7. Brass BAGGANÄS | 8. White Marble Notched Cylinder | 9. Mid-century Modern Cabinet Wood | 10. Bark Aster Marble Ball | 11. Black BAGGANÄS | 12. Knurled | 13. Solid Brass Round | 14. Tolson | 15. Sprocket

1. Pacific | 2. Kennaston| 3. Serene | 4. Knurled | 5. Bremen | 6. Brass Mackinaw | 7. West Slope | 8. Kane | 9. Brixton | 10. Wood Mackinaw |11. Edgecliff | 12. Victoria Falls
If you still have questions about where to place your hardware in your own home that is completely understandable. This is meant to act as a guide but not the end all be all rule. Do what you think will work best visually (and functionally). If you are still stumped then come on over and join our EHD Insider Community and share your own space, there are plenty of people (including the EHD team) that will be more than happy to give our two cents about your conundrum. See you over there or I’ll talk all things hardware with you in the comments below!
Opening Photo Credits: Photo by Sara Ligorria-Tramp | From: All the What’s, Why’s & How Much’s of the Portland Kitchen (+ Big Reveal)
The post Our Go-To Cabinet Hardware Placement + 60 Of Our Shoppable Favorites appeared first on Emily Henderson.


July 5, 2020
The Link Up: Emily’s Kid’s Favorite New Show, A Sara-Approved Flan Recipe, & An Article By A Beloved EHD Alum
 design by black lacquer design | home of nicole byer | photo by nate cook | via lonny
 Happy Sunday ladies and gents. Hope you are staying cool and safe. Today we have a short and sweet link up for you so let’s get right to it, shall we?
First up, today’s home tour is home of the hilarious comedian Nicole Byer and as you can see her style is as vibrant and wonderful as she is. If you don’t know Nicole you should. You can watch some of her stand up on Comedians of the world, listen to her podcast, Why Won’t You Date Me, OR watch her as the host on Nailed It! (a Henderson household TV staple).
From Emily: My kids LOVE The Big Flower Fight. Charlie was particularly obsessed and we went through it in a week!
From Sara: I’ve found a new favorite food blog and I’m obsessed with this flan recipe. I love flan. I’m a flan fan you could say. But I’d never made it myself. This was my first attempt and it came out PERFECT. It was thick, creamy, and perfectly custard-y (oh and it was super easy).
Have you seen Carmeon Hamilton’s new home office space? It’s a coworking dream and the light fixture is INCREDIBLE.
Speaking of Carmeon (and Shavonda because she also spoke on this topic), she wanted to point out that while the outpouring of support of small Black-owned businesses is great… it also has the potential to be very harmful. Why? Well since so many businesses have sold out of their stock, they are having to temporarily shut down for restocking. While that might not sound like a bad thing, it’s not great for business. Gradual growth is always more sustainable. So this has the potential to do more harm with customers being frustrated due to long ship times and stock availability. This entire issue is yet another product of racial systemic injustice. SO what can we do to support for the long haul?? Here three easy tips she and Shavonda recommended:
Turn on Instagram notifications for your favorite brand to get alerts for new stock and info. Who doesn’t love getting the inside scoop first??Sign up for brand newslettersBuy a gift certificate if available
From Mallory: This AMAZING artist has some gorgeous prints and is doing 15% off with code BLM15. I bought this one and it’s arriving tomorrow…I can’t wait to see it!!
From Julie: The other day as I was doing my daily Instagram scroll my thumb suddenly stopped on @reno_notebook’s post, it was of @raven_smith‘s bedroom where he had painted 3 different colors to test out for the space. But I honestly loved how it looks as is and am very tempted to try it out in a space of my own for the future. Check out the post cause it’s swoon-worthy!
In case you missed our shout out on Emily’s instastory, Arlyn wrote a beautiful piece on what it was like to decide to change jobs, have a quickie wedding (of a 5-year engagement), and move across the country in a matter of six weeks (and how she feels about it now).
From Jess: I’m not usually one for cooking shows BUT I started to watching Crazy Delicious and was pretty amazed. It’s magical, a bit corny but so visually inspiring. I also decided to try The Big Flower Fight (a floral design competitive show). Again, INSANE creations and really gets those creative juices flowing. And boy o boy am I excited to happy cry this weekend watching Say I Do. See? I’m using my time suuuper wisely.
Also from Jess: Henry is an awesome subscription mask company that is Black-owned, the masks are made in LA and with every mask purchased one is donated to frontline workers or people in need. They also have kid-sized masks! Basically this a no brainer since WE ALL NEED TO WEAR MASKS and having enough is important.
From Ryann: One of the best Netflix original series I’ve seen in a long time is #blackAF. My boyfriend started watching it this week while I was in the other room and once I heard him laughing out loud multiple times I knew it was going to be GOOD. I saw a tweet describing it as “Blackish meets Curb Your Enthusiasm” which is 100% accurate. If you’ve been looking for a new show to binge, look no further!!
In case you are wanting a more product-focused post head to our July 4th sale roundup for all of the deals:)
Also, if you think we are done talking about the EHD Insider Community you would be wrong. It has truly been SO FUN and amazing to have all the members be so involved. The advice has been insanely good! If you haven’t checked it out yet, you really should. Why not? It’s free for the first two weeks:)
Again, hope you all had a nice weekend and stayed safe:) See you tomorrow xx
Opener Image Credit: Design by Black Lacquer Design | Home of Nicole Byer | Photo by Nate Cook | Via Lonny
The post The Link Up: Emily’s Kid’s Favorite New Show, A Sara-Approved Flan Recipe, & An Article By A Beloved EHD Alum appeared first on Emily Henderson.
July 4, 2020
EHD’s Favorite Comfortable Everyday Sneakers That Are Also Really Cute

Every day I take my dog on three walks. One in the morning, one in the afternoon, and one right before bed. Before Covid-19 times, the only other frequent walkers in the neighborhood were fellow dog owners. This makes sense because before I rescued my dog, Gus, I rarely took a stroll around the neighborhood just because. BUT THAT WAS BEFORE. Now, I rarely step outside without seeing at least 10 people out and about. There’s usually a couple walking around, a family of 5 either taking a stroll, riding bikes, or simply hanging out outside. It’s actually wonderful and makes me feel more apart of my community than ever before. I suddenly have this shared experience with everyone around me and even though we might be strangers, we have this knowledge that we are going through the same exact thing. It’s quite heartwarming in the most morbid way. Whew, 2020 is bizarre/scary.
I think people are walking more and generally just trying to get out of the house, so cute but comfy sneakers are a hot commodity. I’ve been a fan of the comfortable/practical but stylish sneakers for a while now and it is actually quite hard for me to wear any other shoe other than my Nike Cortez’s or Daybreaks (I’ll put it this way, my boots and mules have not seen the light of day in months). So, I rounded up the EHD team and asked them to share their go-to sneakers. I hope if you’ve been searching for a post like this that you will finally find the sneakers for you. I also hope you will share your favorites below so I can expand my collection:) But first, here are the ones we love:

From Emily: Slip-on Vans: Obviously these are classic, but make any boring outfit look intentionally casual and cool (not ANY, but you get the idea). I throw these on 3 times a day and the more they are worn they better they are.
From Emily: Vince Sneakers: Now if I want to get “fancier” with a bit of a lift, these Vince are still awesome and not heavy, but I guess I just like how they edge up the basics. They are kinda splurgy though and I’m sure there are good, more affordable options out there.
From Emily: Nike Wildhorse 6: I LOVE these. We do far more hiking and running along trails than I ever thought I would do. So it felt time to invest in some that have great grip but are lightweight (not hiking boots). I love these colors and feel like a real athlete when I wear them. Brian has them in black, too.
From Ryann: Nike Classic Cortez Sneakers: I never knew I was a sneaker person until these entered my life. My boyfriend Rocky insisted they would be a great addition to my wardrobe but I sort of didn’t believe him (which was silly, because he has great taste). Shortly after I got them I started wearing them almost every day and now they are a huge staple in my wardrobe. I love wearing these with vintage Levi’s and a plain white tee with dainty gold jewelry. Oh, and they are really comfortable and have great arch support.
From Ryann: Nike Daybreak Sneakers: These are my favorite shoes that I own. I love the colors (I have the yellow, tan suede, and red combo) and they go with so many outfits. They are way more versatile than you’d think and unbelievably comfortable. The rubber outsole gives a little bounce so whenever I am wearing them I am tempted to just start running around. I truly cannot recommend them enough.
From Mallory: Charlton Sneaker: So Nordstrom has been having some hot sales the last few months, so I bought a pair of these Topshop sneakers back in February (the exact ones I got are out of stock) and I’ve been wearing them ALL THE TIME. I’ve been eyeballing these for a few weeks now too and I think they’re super cute, fashionable, and go with everything so I’m planning to order. Plus they’re trendy but aren’t as big and clunky as dad shoes (TBT to the ones I wore in this post)…10/10 recommend. The Topshop shoes, not the dad shoes:)
From Mallory: Platform Trace: I bought these sneakers a few years ago and they were stolen out of the trunk of my car. They were probably stolen because they were THAT GOOD you guys. I originally had them in like a suede pink and then replaced them with this suede green. The moral of the story is 1. Lock your car 2. Platform suede tennies are the jam (and clearly everyone thinks so) and 3. These are $30 but were originally $90 so hit that hot deal!!
From Sara: Slip on Platform: These are my favorite sneakers! The platform makes them look just a little edgy and cool, but they’re just as comfortable and easy to wear as the originals. I wear them with literally everything.
So those are our tried and trues but here are some more that we really love the look of.

1. Veja Suede Olive Black Rust Sole | 2. Stan Smith Shoes | 3. UA Vans Classic Slip-On | 4. Mark Cox Tennis Sneakers | 5. Gradient Sneakers | 6. V-10 Sneaker | 7. Air Force 1 | 8. Attica Trainer | 9. Gills Platform Slip-On Sneaker | 10. Reese Printed Sneakers | 11. Leather Nautico Sneakers | 12. Black Solid Sneaker | 13. Old Skool Sneaker | 14. The Court Sneaker | 15. Nike Cortez ’72 Shoedog Q (Swoosh)
Okay, that is all from us. Have you been opting for cute but comfortable shoes lately? And if so, what are your favorites?? Tell me everything. xx
The post EHD’s Favorite Comfortable Everyday Sneakers That Are Also Really Cute appeared first on Emily Henderson.
July 3, 2020
45 July 4th Sales We Are Planning to Shop (Or At Least Heavily Window Shop) THIS WEEKEND

HI EVERYONE! Happy weekend. When I normally think about July 4th, I think about fireworks. (I also think about drinking AC Slaters — is that just a Delaware thing? — at the Grotto’s down in Rehoboth Beach, but that’s a discussion for a different post.) This July 4th is different though, because y’all, for the first time in my life, I just want a break from fireworks.
Is this happening in your town, too? Who is lighting them off at all hours of the day and night?! (Is it you?!) If it’s not happening in your city, it’s probably because my neighbors have hoarded the entire United States stockpile. Come on over for a nightly show! (Maybe I can wave at you from my window and we can watch together!
LA has also just rolled back some openings and banned gatherings of people who don’t live together, so we’re fully back in quarantine limbo over here. I’ll be spending this long weekend alone, in my apartment, forcing members of the EHD Community to help me with my design agonies, and online window shopping (my favorite hobby!). To that end, to aid you in your online sleuthing, I’ve pulled together a list of the best sales going down across the internet for July 4th.
It’s admittedly a weird time to be thinking about shopping, but these are the best deals we’re going to see until Labor Day…so if you need something, this is the weekend to grab it. Finish that outdoor space (or start, if you’re a procrastinator), nab a pair of house shoes (unfortunately, the Birks that commenters raved about are not on sale), or just spend an hour filling up a dream cart at Madewell and laughing when you see how much money everything would actually cost (this is my actual hobby and it’s fun, if not a little depressing). ANYWAY, let’s get to it…
HOME & DECOR
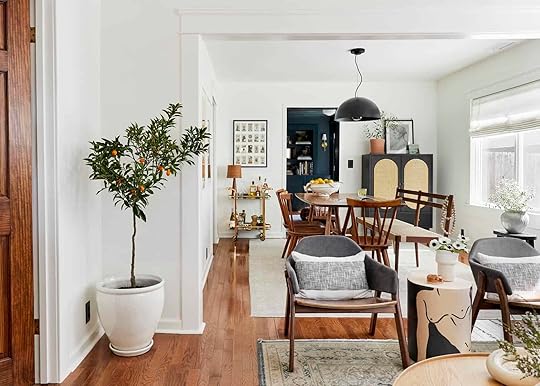 photo by sara ligorria-tramp | from: sara’s living room & dining room reveal
A quick pitstop first! So many products from our recent roundups are on sale and there’s not enough room to link all the things we love in this post.
If you’re in the market for boring things Em loves, sconces, ceiling fans, outdoor furniture, outdoor decor and accessories, coffee tables, bar stools, storage pieces, or — you guessed it — even more practical things that Em loves, click through to see all the EHD-recommended options before checking the rest of this post out. There’s a good chance your favorite may be on sale this weekend! OK, NOW WE CAN START.
AllModern
Dates: Through Saturday, 7/4
Deal: Take an extra 15% off select items
Code: GOFORIT
Our Picks: This dusty pink and purple geometric rug (under $300 for a 9′ x 12′ before discount!), these faux-leather stools, this elegant and bold end table
Apt2B
Dates: Through Tuesday, 7/7
Deal: 15% off storewide, 20% off orders over $1,999, 25% off orders over $2,999, 30% off orders over $3,999. Free delivery on every order.
Our Picks: This perfect apartment-sized sofa, this English-roll arm sofa
Article
Dates: Through Saturday, 7/4
Deal: Up to 40% off over 200 items
Our Picks: This low, modern coffee table, this soft coral bench with cool legs (that we’re currently eyeing for an EHD project!)
Bed, Bath & Beyond
Dates: Through Saturday, 7/4
Deal: Up to 50% off select furniture, kitchen, decor, and outdoor
Our Picks: This iconic Kitchenaid mixer, this Dyson stick vacuum with a 5-star rating, and scroll through the Le Creuset page for all their sale picks
Boll & Branch
Dates: Through Saturday, 7/4
Deal: Free beach towel with $150 order
Code: CELEBRATE4
Our Picks: This quiet but textured and graphic duvet cover set, this waffle blanket that’s EHD-tested and approved
 photo by veronica crawford | from: our bedroom update (also how I feel about having a tv in the bedroom)
Brooklinen
Dates: Through Wednesday 7/8
Deal: 15% off with free US shipping
Our Picks: This new summer linen collection in green, this go-to duvet insert (Em’s favorite), this weighted comforter (I bought this full price and have never slept better)
CB2
Dates: Through Monday, 7/6
Deal: Up to 30% off outdoor accessories, up to 40% off outdoor furniture, up to 30% off guest room/office essentials and sofas/sectionals
Our Picks: This coffee table that could honestly also work indoors, this under $300 minimalist sun lounge chair, this long and simple gray outdoor sofa
Crate & Barrel
Dates: Through Monday, 7/6
Deal: Up to 30% off select items, with up to 40% off select outdoor planters, pillows, furniture, and entertaining essentials
Our Picks: This under-$60 runner perfect for entryways, this timeliness linen double-drum pendant light
The Container Store
Dates: Through Sunday, 8/16
Deal: Up to 30% off customer favorites
Our Picks: This set of 40 blush velvet hangers for $25 (other neutrals are available if pink’s not your thing), this fridge organizer starter kit, the Poppin desk collection (for keeping that WFH space organized, bright, and modern)
Design Within Reach
Dates: Through Tuesday, 7/7
Deal: Up to 60% off on select items, plus free shipping
Our Picks: These modern house numbers to update your curb appeal, this vertically stacked bookcase
Hay
Dates: Through Wednesday, 7/15
Deal: Up to 60% off on select items, plus free shipping
Our Picks: These reusable glass straws, this eclectic pleated lamp we used in our Small/Cool project, this happy and portable end table
Industry West
Dates: Through Sunday, 7/12
Deal: 25% off site-wide
Code: JULY4
Our Picks: This kidney-shaped boucle ottoman, this bright and adjustable bar stool, this classic, minimalist, Scandi coffee table
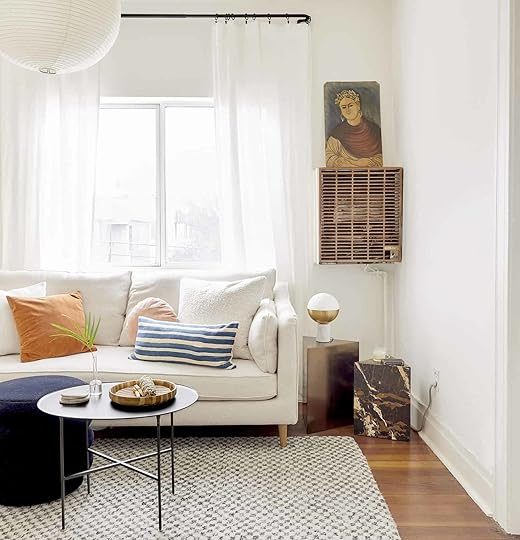 photo by sara ligorria-tramp | from: jess’ small space makeover takeover
Jayson Home
Dates: Through Sunday, 8/2
Deal: Up to 75% off select items
Our Picks: This mint vintage rug (if this is sold out, it’s because I bought it after linking it up! It’s so good), this woven leather and teak loveseat, this scalloped and ceramic pendant
Lulu and Georgia
Dates: Through Sunday, 7/5
Deal: 20% off site-wide
Code: SUMMERTIME
Our Picks: Obviously Ginny Macdonald’s collection, this light wood end table, this rust rug by Sarah Sherman Samuel
McGee & Co.
Dates: Through Saturday, 7/4
Deal: Take 20% off select lighting
Code: SHINEBRIGHT
Our Picks: This timeless and classic sconce, this industrial-cool pendant, this traditional lantern
Our Place
Dates: Through Sunday, 7/5
Deal: Take $30 off the Always Pan
Code: HOMECOOKING
Our Picks: Obviously, this pan (we’re all getting them per Sara’s recommendation — current color breakdown on team EHD is 4 sage, 1 char, 2 spice)
Overstock
Dates: Through Saturday, 7/4
Deal: Up to 70% off select items plus free shipping
Our Picks: This jute rug that’s perfect for layering, these 6′ cordless outdoor blinds
Pom Pom at Home
Dates: Through Saturday, 7/4
Deal: 20% off site-wide plus free shipping for orders over $49
Code: FIREWORKS20
Our Picks: This hand-woven baby blue striped rug, this body pillow that doubles as a lumbar (and is Em’s favorite!)
Pottery Barn
Dates: Through Monday, 7/6
Deal: 10% off orders over $100, 15% off orders over $250, 20% off orders over $500, and 25% off orders over $1,500
Code: SAVEMORE
Our Picks: This breezy linen throw blanket, this 16-piece black stoneware dinnerware set, this concrete umbrella base (it’s in the details, folks)
 photo by sara ligorria-tramp | from: all the what’s, why’s, and how much’s of the portland kitchen
Rejuvenation
Dates: Through Sunday, 7/5
Deal: 20% off site-wide
Code: FREESHIP
Our Picks: This oil-rubbed bronze cabinet finger pull (and all the rest of the cabinet hardware), this minimal ceiling fan, EHD’s go-to mantel mirror
Rugs USA
Dates: Through Saturday, 7/4
Deal: Up to 75% off in-house rugs
Our Picks: This wool-braided area rug, this tile-striped rug in a classic EHD blue
Saatchi Art
Dates: Through Saturday, 7/4
Deal: 10% off all originals, 15% off originals over $1,500
Code: REDWHITEBLUE10 and REDWHITEBLUE15, respectively
Our Picks: You can’t really recommend art, but you can get a well-priced original painting here (although if anyone would like to Venmo me twelve thousand dollars, I could probably use this in my MOTO)
Schoolhouse
Dates: Through Saturday, 7/4
Deal: 15% off all fans and hardware
Our Picks: This solid brass non-telescoping curtain rod and hardware setup, this sleek and minimalist ceiling fan, this modern globe doorknob
Serena & Lily
Dates: Through Tuesday 7/7
Deal: Special pricing (as marked) on all outdoor
Our Picks: This outdoor daybed (remind anyone else of Birdie’s nursery?), this indoor/outdoor rug, this charming and glamorous striped and scalloped umbrella
St. Frank
Dates: Through Monday, 7/6
Deal: 25% off printed pillows, plus free shipping for orders over $100
Code: BIGSOFTIE
Our Picks: This blush Kuba cloth lumbar pillow, this overstuffed indigo pillow
Sur La Table
Dates: Through Sunday, 7/6
Deal: Up to 60% off select items
Our Picks: This Staub all-day pan with a perfect rating, these $15 popsicle molds shaped like sea creatures (what kid doesn’t want to eat a homemade popsicle shaped like a whale? I’m an adult who wants the arctic-themed set)
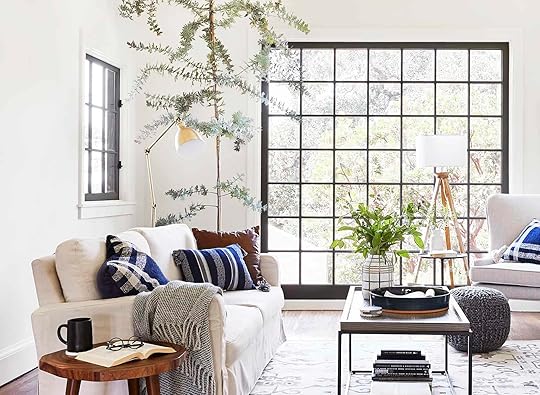 photo by sara ligorria-tramp | from: how target’s fall threshold collection nails the “updated classic” trend
Target
Dates: Through Sunday, 7/5
Deal: Save up to 25% off furniture, plus an extra 15% off indoor furniture
Code: SAVE15
Our Picks: This timeless set of 2 windsor dining chairs, this cute and compact blue end table, here’s all the umbrellas on sale (we hear your calls for shade!)
Tuft & Needle
Dates: Through Tuesday, 7/7
Deal: Spend $800, save $150; spend $1200, save $250
Our Picks: Team EHD is split between The Mint and The Hybrid
Wayfair
Dates: Through Saturday, 7/4
Deal: Up to 70% off select items
Our Picks: This highly-rated $300 daybed that looks high-end, this Kelly Clarkson (!) office chair that works for your old-man library vibe, this thin entry console table
West Elm
Dates: Through Sunday, 7/5
Deal: 20% off furniture, 25% off everything else
Our Picks: This modern round hanging mirror, this sustainably-sourced, organic-shaped, full-length mirror, this on-trend, and beautiful velvet chair
Williams Sonoma
Dates: Through Sunday, 7/5
Deal: Up to 65% off select items, plus free shipping for orders over $49
Code: SHIP4FREE
Our Picks: This ice cream maker (because if you’re stuck at home this summer, why not pick up a new skill?), this classic chef’s knife, this $99 air fryer
World Market
Dates: Through Monday, 7/27
Deal: Up to 50% off site-wide
Our Picks: This happy sloth doormat (it’s fun :)), this indoor/outdoor rug, this $7 jade bath towel that looks way more expensive than it is
FASHION & BEAUTY
 photo by veronica crawford | from: my favorite affordable spring dresses (all with pockets)
Alo Yoga
Dates: Through Tuesday, 7/7
Deal: Up to 50% off select items
Our Picks: This classic high-waisted black moto legging, this dusted plum funnel-necked pullover (great for burrowing inside!) with cute mesh detailing
COS
Dates: Through Sunday, 7/5
Deal: 20% off orders over $200
Our Picks: This simple and modest sleeveless color-blocked dress, this keep-forever striped t-shirt dress, this comfortable wide-leg cotton jumpsuit
Farm Rio
Dates: Through Sunday, 7/5
Deal: 15% off plus free shipping
Code: SUMMER15
J. Crew
Dates: Through Tuesday, 7/7
Deal: 50% off full-priced styles, plus extra 70% off 3+ sale styles
Code: GOFOURTH
Our Picks: This lobster-print sweater (classic J. Crew!), these linen-blend shorts that won’t ride up, this pleated midi-skirt
 photo by veronica crawford | from: this one pair of shorts worked on all of our bodies (+ all the other options we reviewed & loved)
Lou & Grey
Dates: Through Sunday, 7/5
Deal: Take 30% off select items, plus an extra 50% off sale
Our Picks: These lightweight joggers, these wide-legged comfy pants, this sweatpant/trouser hybrid
Madewell
Dates: Through Sunday, 7/5
Deal: Up to 40% off select styles
Our Picks: Our all-time favorite pull-on shorts, this classic striped t-shirt, these drapey paper-bag pants
Nike
Dates: Through Sunday, 7/5
Deal: Up to 40% off select items
Our Picks: These trail running shoes (as seen on Em!), these go-to running shorts, this one-piece sports bra (my 36Fs can vouch, and plus, no inserts come out in the wash!)
Nisolo
Dates: Through Monday, 7/6
Deal: Up to 40% off select items, but take an extra 20% off with our exclusive code
Code: JUNEEHD
Our Picks: This slide sandal, this open-toed mule (I own and love), this closed-toe mule (again, own and love), this D’orsay oxford (we all own a variant of this and love it)
 from: night to day lounge wear – our new wfh uniforms
Nordstrom
Dates: Through Sunday, 7/5
Deal: Up to 60% off select items
Our Picks: This printed workout legging (with pockets!), this high-impact graphic clutch with a removable strap, this simple and comfortable knit maxi dress
Parker Clay
Dates: Through Sunday, 7/5
Deal: 25% off site-wide
Our Picks: This signature tote, this leather backpack, this timeless carry-all
SkinStore
Dates: Through Sunday, 7/5
Deal: 25% off site-wide or a free gift with a $150 purchase
Our Picks: The whole PCA Skin collection, anything from The Ordinary, anything from Olaplex
Splendid
Dates: Through Sunday, 7/5
Deal: 40% off site-wide (excluding basics)
Code: SALEAWAY
Our Picks: This sleep set (15% of proceeds go to Girls Inc, Black Girl Ventures, and In Her Shoes)! And you thought you were gonna make it through quarantine without a tie-dye jumpsuit? Not if we have anything to say about it. This top, this bottom
Verishop
Dates: Through Sunday, 7/5
Deal: Take an extra 15% off select sale items
Code: SUMMER
Our Picks: This white blouse, these sweet-tea colored cropped pants, this swingy cropped jacket (all from an EHD favorite brand, The Great!)
WE MADE IT THROUGH ANOTHER SALE ROUNDUP, FOLKS. Thanks for sticking with me. And if you’re a small business owner, feel free to drop your own promotional details below. Have a safe weekend, okay?
Opening Photo Credits: Photo by Sara Ligorria-Tramp | From: Two Reveals, One Post: The Portland Outdoor Living Spaces and A Lot of Styling Tips
The post 45 July 4th Sales We Are Planning to Shop (Or At Least Heavily Window Shop) THIS WEEKEND appeared first on Emily Henderson.
July 2, 2020
Building A Built-In (And Making It Look Original)
Hey friends, today we’re diving a little deeper into my TV room. Why? Because that built-in bookcase and cabinet is my dream come true. It was one of the very first ideas I had when we started renovating the house, and seeing it come to fruition was WILD. But, while the idea was mine (and yes, it was genius), the actual bringing to life of this project was the result of the amazing design skills of Velinda Hellen and excellent construction by our contractor Ron.
So, I’m going to let Velinda take it from here . . .

Back in 2019 when Sara showed me her awkward corner she said, “so you can just… design something to stretch from one wall to the other that makes the shape of the room feel more balanced and purposeful. Something with decent storage that feel like it belongs with the rest of the house and hides this weird corner.” Oh, okay Sara. I’ll just do that.
She handed off the sketch of the rough concept she had in mind, which I hope she still has and inserts here:

Did that work? Is there a picture above now? GREAT. So now you can now see what I was working with. (It was actually very helpful. You don’t have to be Picasso to try to communicate with your designer). I measured her existing space, took into consideration future millwork that didn’t yet exist (door trim) and got to drawing.
This piece of the design took me about 7.5 hours from measuring to concept, through drawing and dimensioning. It then took me another hour of calls with the carpenter making sure the details were being executed just so.
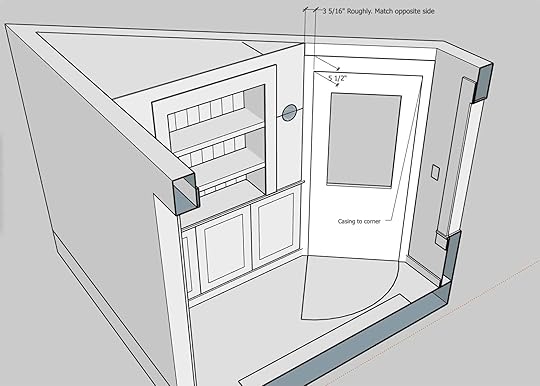 an overhead look at the design
So let’s look at those details. Due to the sharp angle of that wall, centering the lower storage (as Sara’s hunch had been) would have actually removed a great deal of what was usable about the space. The wall not housing the exterior door is flat and provides an area to make a full box, unlike the sloped wall, which doesn’t permit shelves to be deep enough to be useful right along the wall. Still, why lose that handy, full box on the opposite side?
 straight on details
By dedicating that normal-shaped box to stand on its own as a high-functioning lower (ie. inserting pull-out drawers), but combining the remaining awkward space into one cabinet so that there was flexibility to maneuver around that awkward shape, I attempted to give Sara and Mac the game-storage they needed.
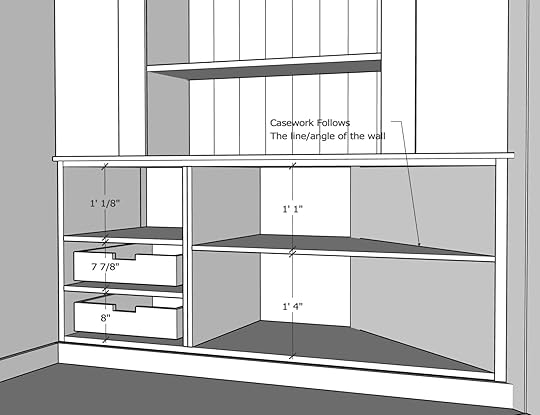 a look inside . . .
I also wanted to make sure electronics could be wired to hide in here since I knew the layout of the room wouldn’t allow for a legit media console. A shallow shelf was about the best we could get.
What I liked about this design too is the stretch of evenly-sized cabinet doors would almost feel like millwork in the room… and millwork plus built-ins are something craftsman homes traditionally have a lot of. So to leave that millwork-inspired feel, I made the door open via a push latch, so no hardware is necessary.
The rest was easy; center some open shelving, throw in some beadboard detailing, finish it off trim to match the rest of the room and push it off on someone else to do the hard part (the building).

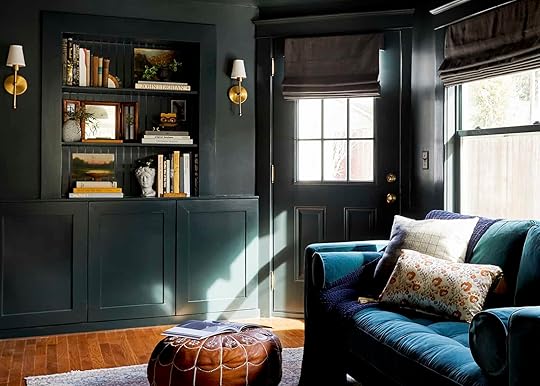
When it came to actually building the bookcase, they hired an awesome contractor named Ron. First he built the lower and upper sections separately off site, and assembled them on site. Then he added drywall and plastered over everything. Finally he spray painted the whole thing with a color-matched lacquer.

Here’s what it looked like once it all came together. You an see the angled wall in the bottom cabinets that allowed us to keep more depth, while we flattened out the top half.

Once it was all said and done, this is what Sara and Mac ended up with – a stunning built-in that not only looks original to the room, but works super functionally for their lives:

Finding the right lights was the hardest part of this whole ordeal. I knew right away that I wanted to flank the design with sconces for that library-feel, but we the swing of the door meant finding ones the had barely any projection (max 7”).

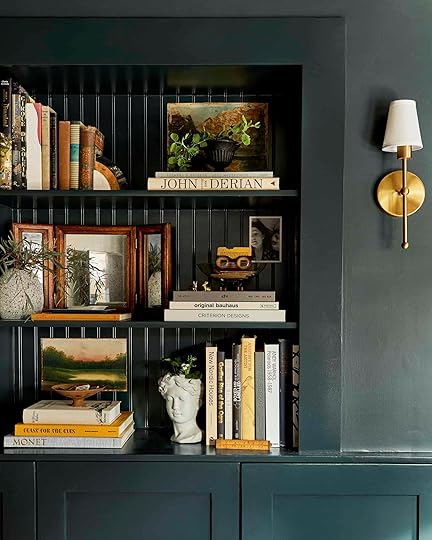
After a lot of hunting or “sourcing” (not included in the 8.5 hours I spent designing this whole thing), these became the perfect solution. The brass pops against that moody, deep green and the shades provide an ambient, diffuse glow adequate to allow overheads to be killed at night. I’ve witnessed, this room gets seeeexxxxy in the evening.
Ok! That’s it for me, I’m going to hand it back over to Sara who’s going to share just a little bit more about how it’s holding up, now that they’ve been living with and using this for several months.

I’m BACK! So . . . now that the photoshoot is over and we’re actually living in this room, how are we using it? Well, it’s mostly game storage. The top shelf houses Mac’s PS4, our router, and our modem. My dad and Mac spent about two days drilling and configuring all the wires so that they all hook up to the TV by running under the floor. Then the two pull out drawers are used for card games and video games.
“But if everything is neatly wired under the floors, then what is that white cord hanging out of the top shelf?” you may be wondering. Haha, that’s a little peek at reality. It’s an ethernet cable that runs from our modem all the way to the front bedroom and plugs into Mac’s desktop. Since we’re both working from home, Mac needs he’s intense work set up to run super fast, and that means a hardwire to the internet. It’s chill.

And here’s what we’re storing on the inside of those cabinets. GAMES. Listen, I wasn’t kidding when I said we were big game people. And these cabinets manage to barely store ALL of our games. Plus, please see our “normal life” styling on the shelves above. Not too different from the photoshoot styling, but definitely more pops of Mac in there 
Design 101: How High To Hang Your Sconce in Every Room + 48 of Our Favorite Picks

We thought it was high time to talk about the proper height for sconces. Why? Well, we have some secret intel that you all are buying up some sconces! Who would have guessed?? But we TOTALLY get it. Good lighting can make or break a room’s ambiance. Plus it’s such an easy way to add some serious style and make your home look more unique to you. Our favorite topic!
But let’s say you are in the middle of a renovation and you need to tell your contractor where to put the junction boxes. Or you are installing a plug-in sconce because well, a reno isn’t in your immediate future and you don’t know how high it should go?? That can be very stressful so we want to ease your design anxiety with this one-stop sconce shop and tell you what you need to know for each room inside your home. Because let me tell you, if you have to move a junction box after a wall has been closed up… your bank account will not be happy.
Living Room/Hallway
 photo by tessa neustadt | from: griffith park living room reveal
There are some things that you want to think about when you are planning for living room/hallway sconces. The usual goal is to evenly light a room. Well, at least that’s always our goal. To do this you want to keep the light source slightly above your direct eye line. This is so it won’t be too high, lighting mainly the ceiling, or too low, and lighting up the floor. So when you are deciding on your fixture, consider the style you want and adjust accordingly. Example: Say you have a sconce where the light source is closer to the bottom of the fixture like this one. You would want to adjust the junction box height to take that into account.
Let’s use Emily and this beautiful shaded sconce below as another example. Since the light source is on the higher side of the fixture, Emily chose to place the center of the junction box to be on the lower side of standard placement (60″). That way the actual light would be slightly above eye level, making it the ideal for even lighting throughout the space.
 photo by sara ligorria-tramp | from: portland project: the living room reveal
For living rooms, entryways and hallways these are the general rules:
They should be installed between 60”- 72” from the floor to the center of the junction box. For vaulted ceilings go for 66” – 72”. If you are going higher, just be sure to consider the window frame height. You don’t want them accidentally in line with each other. You won’t be happy with how it looks.
If you have more than one sconce in the same room, have at least 6’ of space in-between. But if your space is large go with 8′ – 10′.
Always make sure they are at least 6″ from door and window frames to the edge of the fixture’s canopy.
Ultimately you don’t want to see the top of your sconce or be looking directly into a bare bulb. Protect those pretty eyes.
Hot Tip
If you are renovating it really helps to pick out the fixtures BEFORE you place the junction box. This way you can more accurately decide the proper height and get exactly what you want. Otherwise, you will have to choose a sconce based on the placement of the box.
Kitchen
 photo by tessa neustadt | from: emily’s kitchen and dining room reveal
For a kitchen, we are big fans of the “above the window look with a task light fixture” (directional lighting, see above). However, it’s definitely not your only option.
Here are the rules you should know:
For above the window, we ideally stick to 6″ from the top of the frame to the bottom of your fixture’s canopy. That way it won’t look too crowded.
If you don’t want your fixture above a window or open shelf, then measure either 60” from floor or 24” from countertop to the bottom of your fixtures canopy.
Bedroom
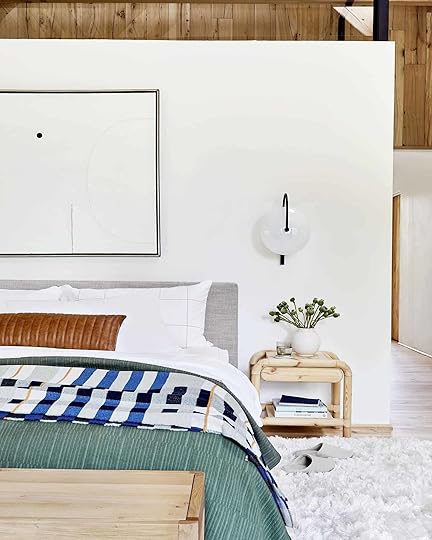 photo by sara ligorria-tramp | from: mountain house reveal: our calm scandinavian master bedroom
Bedside sconces are a great way to give yourself some extra nightstand real estate (and if you ask me, feel very fancy).
Here’s what you need to know:
We suggest, sitting up in your bed and measuring a few inches up from your shoulder, If you have a partner with a different height, split the difference:)
We like to center the scone to the bedside table. However, depending on the size of the sconce you can go a couple of inches either towards or away from your bed frame.
If you have a higher, traditional bed (25” bed height) then you can just measure 60” from the floor to the center of the junction box for standard placement.
Bathroom
 photo by sara ligorria-tramp | from: portland reveal: how the bathroom i was most nervous about turned out to be my favorite
 photo by sara ligorria-tramp | from: the first mountain house bathroom reveal: our “ouiet drama” powder bath
Bathrooms and sconces are like bread and butter, they just go together. But getting the right placement is key for lighting up that beautiful face the way you want it to.
Here are the general rules:
If you are wanting to flank your mirror (put a sconce on either side of it) then start with a 60” – 65” measurement from floor to the center of the junction box. The main goal is to install the light source around eye level so that your face is nicely lit for doing things like makeup (aka no face shadows). If your partner is a different height then split the difference or have them cave to your will:)
If you want to install above a mirror then that measurement is typically 75” – 80”. But honestly, it depends on the mirror. So using the same 6” from the top of the mirror to the bottom of the canopy is a good rule for this too (you know, to avoid it looking crowded.)
Ok, so those are the basic, standard measurements to start with. But of course, rules are meant to be broken if you want to shake it up. So if you can, test out your fixtures before any final calls are made to see how they feel to you. After all, it’s your house:)
Now that we know the rules, let’s get shopping (if you are looking). Lighting is my Kryptonite and stopping at only 48 options was SO HARD. But I can say with confidence that all of them are awesome. Let’s get into it…

1. Ballad Sconce | 2. Mantis Wall Sconce | 3. Kuppi | 4. The Nickel Pole Sconce | 5. Davis Sconce | 6. SKURUP | 7. Gio Wall Light | 8. Morgan Black Sconce | 9. Cylinder Task Wall Light | 10. Curvilinear Mid-Century 2-Light Long Sconce | 11. Odis Sconce | 12. Karl-Johan Wall Lamp | 13. Ribbed Glass Sconce | 14. Black Metal Accordion Adjustable Wall Sconce | 15. FLUGBO
Plug-in sconces are truly my jam (mainly since I am a renter) but also because there are so many options that are making my small space dreams come true. Now I love them all but #1 and #2 are real show stoppers for me. But I am VERY impressed with #15 with that $20 price tag.
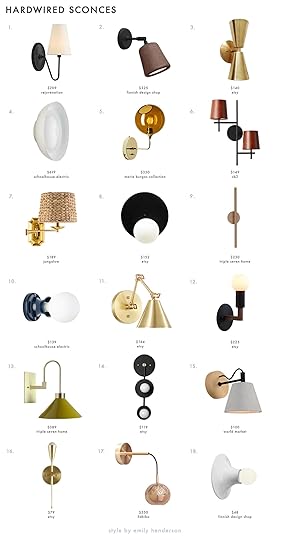
1. Berkshire Single Sconce with Linen Shades | 2. Material Wall Lamp | 3. Double Cone Brass Bowtie Wall Sconce | 4. Ray Sconce | 5. Ballroom Wall Light | 6. Reynold Matte Black Sconce | 7. Rattan + Gold Sconce 2 | 8. Modern Black Wall Sconce | 9. 24″ Ube Sconce | 10. Alabax Small Sconce | 11. Peak Sconce | 12. AP Wall Sconce | 13. Grant Sconce | 14. Gold Vanity Light | 15. Wood And Concrete Hayes Wall Sconce | 16. Mid Century Brass Wall Sconce Light | 17. Nur Wall Sconce | 18. Teti Wall Lamp
There are a lot more hardwired options which made it nearly impossible to cut it down. So 33 options it is! But out of the first 18, #2, #4, #15, and #18 are in the top ranking. I clearly have a thing for modern, natural, and neutral sconces.

19. Arc Mid-Century Sconce | 20. Emily Henderson.
July 1, 2020
Chandler’s MCM Living Room Update + All the Vintage Things We Are Looking For

Welcome to today’s Afternoon Snack (or as I lovingly refer to it as third breakfast) and hopefully this will satisfy any design cravings you may have been experiencing lately. We have another project update for you, the one that both Emily and myself have still not seen in person but things are still moving along with a reveal coming soon. *fingers crossed*
Last time, Emily gave you all the full rundown about Chandler’s living room and the debate of which KILZ® paint color we should use in this post here. Chandler is one of Emily’s best friend’s brother and also has been such a big help (mainly by answering my 1,462 texts) during this not so normal install but luckily he is a part of the “Friends & Family” program so he has been more than happy to lend a hand.
In case you all are in need of a bit of a refresher and since the courtyard of his apartment building is just too good not to show off again…

That’s right he may have to say close to home these days but if I were him I’d be spending that time lounging by the fountain of this historic building with a book and martini in hand, who’s with me?
Here is where we left off from last time with five paint swatches on the wall and four black leather wood armed chairs in the room. Well, it was unanimous: there are too many paint options and too many of the same type of chair. So today, we get to share with you all the official color for his MCM living room of his dreams, which was chosen by the client himself. But before we get to that, in a last-minute turn of events I found out the other week that Chandler actually didn’t realize that the new color would be for all four walls and not just the very dark accent wall which we luckily have plenty of their KILZ 3® Premium Primer to help us cover up or else I think it would take about 20 coats of paint to do the job. And suddenly he was very on board with a lighter color for the space instead of something more in the mid-tone range. So, he went back into the pile of color swatches I handmade for him (they are artisanal and yes, I am for hire for any of your paint swatch needs) and choose…

At first, I was a little shocked because all this time we had talked with him about adding more color into the space but I actually think this will be a very smart choice overall. The space itself doesn’t get much light since the only source of natural light comes from the far end french doors that open up into that courtyard from the beginning of the post. Courtyards are very pretty but can really block any direct sunlight and Chandler is frankly over living day in and day out in this cave-like living room. So Chalk Gray it is and moving on to designing the rest of the space!
Emily already went over some of the pieces that we will be keeping in the last post. But here is a quick recap, the Article credenza that used to be in Emily’s living room, the light gray rug from the Mountain House living room (not shown above) and that amazing vintage blue sofa she scored for about $200 on one of our random shopping/inspiration days. Side note: I can’t describe to you all how surreal it still is sometimes when Emily randomly calls me up during work and says, “Hey, would you want to go shopping today to get some design inspiration?” My fan-girl-TiVo(ing)-Secrets-From-a-Stylist-twenty-year-old-self can’t say, “YES!” quick enough sometimes.
In addition to some Emily hand-me-downs, using pieces that Chandler already owned, and supplementing some very affordable pieces for the room, vintage was next on the sourcing list. The fun part about finding that perfect vintage piece is searching high and low in a crowded, dusty shop. But since that isn’t currently an option I turned to our go-to online vintage favorite sources and of course consulted my personal wealth of LA vintage knowledge, Caitlin. It took some time but we found some amazing pieces. Unfortunately, a lot that wouldn’t really work in the space given the scale of that blue vintage sofa we really wanted to use, the seat height is only 14″ high, which is so low.
But we didn’t want all that time go to waste so here are some pieces that were just too good not to share. Disclaimer: Since these are vintage pieces some may already be sold out by the time this post goes live but that’s the name of the vintage game gotta get it quick when you find a deal! The good thing is these sellers have a ton of other incredible pieces
Boring Household Things I Never Thought I’d Be Into, But I Am Now (Domestic Practicality FTW)

As we all transform even more from who we were before to who we are now or will be in the future, we are realizing even more of the things that most families probably figured out earlier – we need practical things that make your life a little easier and (and simpler) while spending so much time at home, cooking, cleaning and trying to stay on top of the house. So recently I’ve been surprised (again) at how I want some things that I kinda thought were a little boring before – things that I didn’t think I would ever want or need. But I’m on the other side now, and maybe it’s because of my age, having two kids and doing hours of cooking and cleaning a day. Essentially there has been a style intervention by the growing need for daily domestic practicality, and I think we all know who is winning.
Daily Placemats
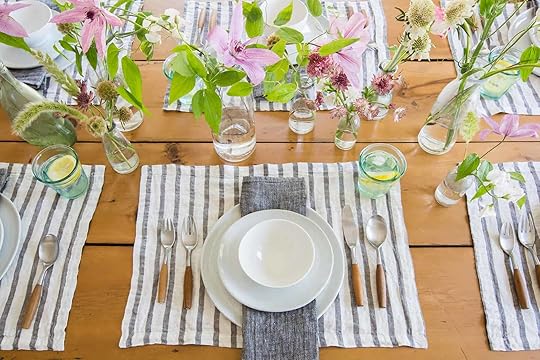 photo by tessa neustadt | from: setting the table with parachute’s new table linens
We’ve never had them before and I honestly didn’t get the appeal. Is it to protect your table? To feel fancy on a daily basis? To add more work and stuff to your life? This was the original debate and the entry into this whole conversation. Brian’s parents have always been confused why we don’t have placemats but it just seemed like another thing to buy, keep track of, clean and put away. I thought they were mostly for special occasions (in which I do like them). And then it all changed, likely because we are eating 3 meals a day at the table without the weekly cleaning help we had before. We realized the hard way that if you don’t clean up cheerios pretty quickly they will become a rock formation, stuck to your table semi-permanently. Same with oatmeal, melted ice cream, syrup, etc. I happen to have these faux leather round ones from Target that we were going to use for a shoot, in the garage, so I pulled them out and our life got easier. Now what I don’t fully understand is cloth placemats that you have to wash in the washer – at least not for every day, but maybe that’s for people who don’t have kids. For me, they need to be wipeable, easy to store, and not prone to wrinkles (I want then to look nice for as long as possible without washing). Here are six I’m into:

1. Faux Leather Charger | 2. Essential Placemats | 3. Einfache Placemats | 4. Leather Placemat | 5. Sand Polka Dot Placemat | 6. On the Table Brunch Placemat
Tablecloths
 photo by tessa neustadt | from: setting the table with parachute’s new table linens
As I brought up my secret placemat shame, Sara chimed in and said, “well, I have a tablecloth permanently on my dining table.” Perplexed we were, again by the same notion of something that we thought was for fancy occasions is now part of our daily lives. I know that a lot of you might be snickering that we’ve just discovered these things but I think it’s kinda generational and also just generally a style choice. We aren’t the generation that felt like we needed to fully protect our furniture, UNTIL NOW. Here are a handful of tablecloths that we think are great.

1. Linen Tablecloth | 2. Handmade Block-Print Patterned Cotton Tablecloth | 3. Aden Cotton Tablecloth | 4. Mustard Yellow Linen Tablecloth | 5. Cool Breeze Tablecloth | 6. Roxy Ocean Wave Tablecloth | 7. Vining Flowers Tablecloth | 8. Lina Table Cloth | 9. Natural Linen Table Cloth
“House Shoes”
Apparently, at a certain age you start to notice your lack of “arch support,” and walking around your own home feels strangely uncomfortable. The first thing I do every morning is put on my uggs – that was not something I predicted while secretly making fun of the ugg/short skirt trend of the aughts. But now that the weather is warmer – they are too hot, especially during the day. I find myself wishing I had shoes that are lightweight but with arch support, that are easy to put on and off, and that are soft and comfortable to wear during our epic 4-hour cleaning sessions or soup making (still at it, it’s a lifestyle, not a menu). We’ve entered the “house shoes” phase of life and I want some. (I’ve just been wearing my dedicated inside sneakers which are great, but less good for the on and off I tend to just wear them outside, which breaks the whole “dedicated” part). Here are some I’m looking at…

1. Haflinger AS Classic Slipper | 2. Sasawashi Room Shoes | 3. Stag Slipper Scuff | 4. Ayla Paige | 5. Suede Leather Clog Moccasin Slippers | 6. Shepherd of Sweden® Felted Wool Gitte Slippers
Makeup Mirror
 photo by sara ligorria-tramp | from: refreshing your bathroom with target’s project62 line
Why do I need one now? My eyesight isn’t worse. It could be that since I don’t have my lash extensions anymore (I have like 9 hanging on for dear life) I put on mascara now and I had forgotten how after five years of extensions that mascara is messy and generally SUCKS. I would love your favorites, by the way (waterproof, please – we are swimming a lot). ANYWAY, I want a pretty makeup mirror that I can put on my vanity or extend out from the wall. Here’s are some I’m thinking about.

1. Bath Vanity Mirror | 2. Modo Modern Vanity Mirror | 3. Duck Leg Makeup/Shaving Mirror | 4. Luxe Lacquer Vanity Mirror | 5. Rouen Round Metal Table Mirror | 6. Sedgley Dual Sided Halo Traditional Lighted Magnifying Makeup/Shaving Mirror | 7. Sensor Mirror 8” Wall Mount | 8. Mini Countertop Sensor Makeup Mirror | 9. Muse Black Marble Vanity Mirror
Tissue Box Covers
This was an immediate countertop transformation that made me so happy. I will NEVER understand why tissue box designers feel the need to make them look FUN and COOL. No. quite literally just make them white, maybe with a simple light gray stripe. Solid colors with no bells and whistles (I was approached once to collaborate and I was strangely excited but it fell through probably because I was like, “just make them a solid color and let it be.” So I bought this cover from CB2 and my counters went from feeling super cluttered to clean and chic. YES.

1. Lacquered Rectangular Tissue Box Cover | 2. Graf Lantz Tissue Box Cover | 3. Small Edge Leather Tissue Cover | 4. Rubber Coated Black Tissue Box Cover | 5. Tava Tissue Cover | 6. Camarillo Marble Boutique Tissue Box Cover | 7. Magee Bamboo Top Tissue Box Cover | 8. Linen Tissue Box | 9. Sedona Honey Square Tissue Box Cover
Shopping Notepad
We never had these before I think because we went to the store so frequently that we could always “run back out.” But now because of COVID and the fact that we really are more isolated up here when we forget something at the store, it’s VERY frustrating and maybe that has caused a few passive-aggressive, “but where is the celery seeds for my homemade coleslaw?” allegations. Then this genius realized that we can prevent these oversights by simply having a running list. I tried a notepad in the kitchen, but the kids kept stealing it and you might say “just use your phone” but I don’t really have my phone on me most of the day (fun fact: I’m NOT addicted to my phone, almost the opposite TBH). So I need a dedicated kitchen notepad. I bought this one because it’s just so pretty (haven’t gotten it yet) but here are a couple more that I love that are more affordable.

1. Desk Top Note Roll In Antique Brass Dispenser | 2. Hanging Note Pad | 3. Wall Hanging Note Roll
So there you have it. My continued journey into practical focused life. I have to say it feels pretty darn good. xx
So aside from your waterproof mascara recs, have any of you made these switches or any others? Or was I SO late to the game? AM I MISSING SOMETHING BIG? Let’s talk.
I also wanted to day that we are just as committed to the 15% pledge as the day we took it. Unfortunately, it has been difficult to achieve 15% with every design post, which we understand speaks to a larger issue of lacking equity and representation in the home decor market. Please know that we are not giving up or backing down. With every single roundup, we are being diligent in our research and learning of new vendors and makers we can include and support. And as always, please let us know of any wonderful BIPOC vendors, makers, or artists that you love.
The post Boring Household Things I Never Thought I’d Be Into, But I Am Now (Domestic Practicality FTW) appeared first on Emily Henderson.
June 30, 2020
How Ryann Is Mixing Styles In Her Living and Dining Room

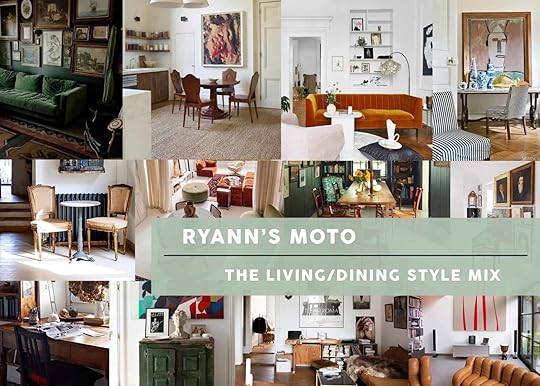
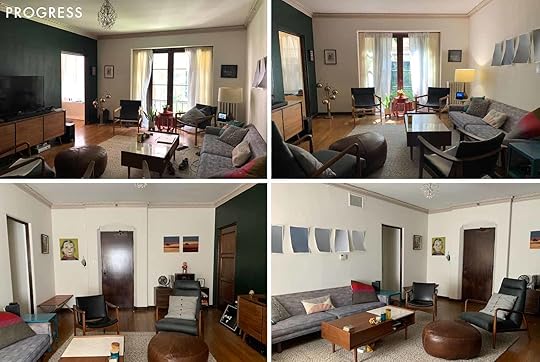
My boyfriend Rocky and I have lived in our apartment for a year and the design process has felt a lot like trying to run underwater. I can’t tell you how many photos I’ve pinned or the amount of hours I’ve spent scouring the internet for the right inspiration. After a while, my pinboard became a hodgepodge of styles ranging from minimalist farmhouse to borderline funhouse. To the amateur design hobbyist (aka me) this was disheartening and exhausting. Then last week when Emily #sharedthemic with Shavonda Gardner she said, “Cultivating and creating a home is a marathon, not a sprint.” This validated the slow-motion process I’ve been experiencing and at the same time inspired me to give in to my intuition. My all over the place pinboard started to make sense and our open concept living and dining room plan came together.
Naming my and Rocky’s collective style isn’t totally necessary, but it’s really fun. To make it brief, we are going for 70s-cowgirl-meets-eclectic-old-world-Italian-grandma. Coming over to our place will hopefully be like visiting your cool, eclectic grandma’s house but with Drake playing in the background (and Rocky waiting to queue up Jerry Vale). I am so excited to invite you into what our brains came up with but first I’ll show you what we are working with:


When you walk into our apartment, the dining room is straight ahead and to the right is the living room. It’s a small space and there is no separation between the two “rooms”. As you can see, we don’t live in a charming LA 1920s bungalow. She’s just an 800 sq ft apartment that has the architectural interest equivalent to that of a refrigerator. This made our initial design plan very daunting (bare bones and cream-colored walls will do that). But slowly this bleak architecture became a canvas to play with all types of styles. Here is where we are at now:

Since we last chatted, I purchased that vintage 1970s Azilal rug (!!!), the asymmetrical coffee table, & the blue Morrocan pouf. Once we procured these three items we were able to envision the potential of even more color, more patterns, shapes, and styles. This minimalist became a maximalist overnight. (@CAITLIN are you hearing this??)
Now, let’s travel into the dining room (don’t worry, it’s a short walk).


Here we are. Do you recognize that bar cabinet? I knew you would
Bowser’s Backyard Journey – An Unfinished EPIC Adventure

Today’s post is written by GOOD friend of the blog and EHD alum Emily Bowser. We hope you’ll all join us in giving her a warm welcome back : )
Back towards the start of the year I started sharing the saga of my back patio on Instagram, and the EHD team reached out and asked me to share it with all of you here on the blog. Of course I LIVE to talk on and on and on about renovation woes, so I quickly said yes.
Then, the tragic murder of Ahmaud Arbery happened in February, followed by Breonna Taylor’s murder by police in March. And everything was punctuated by the slow, calculated murder of George Floyd in broad daylight, by police, with people filming and crying out for them to stop. To say that a blog post about my patio felt unimportant is a massive understatement.
To be completely honest, the experience of the pandemic, combined with the current civil rights movement spearheaded by Black Lives Matter, months away from a very important (also understatement) election, has me re-evaluating every aspect of my life. I know I was asked to write a post about my patio, not social justice, but I simply can’t without first acknowledging the fact that what is happening in the world deserves our complete attention. I am white and have benefitted from systems that are founded in white supremacy, including buying, owning, and renovating a home. These systems include things like generational wealth, bank loans, and real estate practices. I chatted a lot about some of this in the comment section on my first post because a few readers felt that I was flippant in the way I spoke about homeownership (thank you to those who spoke up). Yes, I’ve worked hard, and despite a lot of other odds I was able to buy this house and do these expensive renovations. However, those facts do not negate the hard truth that had I been born with a different color skin, my odds of being a homeowner right now would diminish greatly.
So, before I go on to the rest of this post, I wanted it to be clear that all of this is on my mind (and hopefully on all of your minds too). I hope that my story of our small backyard renovation is helpful to those looking to renovate on a budget while enjoying the process. With all of that being said, let’s get into it . . .
WHERE WE STARTED
 this is a picture taken standing near the back unit, facing the back door of the front unit.
As a reminder, we own a “2-on-a-lot” (multi-family) property built by a single man in 1930. My husband and I live in and rent out the back house (680 sq feet). The whole lot is a little over 5000 square feet and when we bought it, the lot was all concrete, spare a few small openings for trees. There were 3 lemon trees, 2 apple trees, an orange tree, a clementine tree and a -still- unidentified tree (possibly guava) – where were they getting water with all that concrete??

 our mailboxes and the gate (chain link on right) that led to our backyard and the back unit | photo of the walkway from the front gate walking towards the back unit
I talked a bit about this before in my other posts, but it bears repeating – I am a very optimistic person. When I saw both houses on the property they were borderline in shambles. But all I could see was what could be versus the reality. The fact that the two houses were separated by a yard made them each feel a lot more private vs the upstairs/downstairs or side by side duplexes I had looked at. Not only were they separated but they each had their own outside space. I mean, it was nothing to look at, but the square footage was there and it was already mapped out to be a lot more private than any multi-unit property I had seen. I saw these outdoor spaces and I saw nothing but opportunity.
LOL. Reality is so annoying TBH.
You can read about the very overwhelming financial situation we were in here but the general thing to know is this: We had none monies. We didn’t even have the money to do the things that sort of had to be done in order to make the homes, you know, liveable or whatevs. The outdoor space quickly turned into a “one day later” thing as we put out reno fires for months then retreated into our somewhat-renovated but largely unfurnished home and licked our THIS-close-to-financial-ruin wounds.
 our backyard/renovation dumpster
Here were the few things we did do: We ripped up and replaced the sewage line that led from the back unit to the front. This meant pulling up some concrete and I specifically remember telling my contractor not to bother pouring new concrete over the new sewage line because “we will rip all this up soon.” We cut down the 2 apple trees and one lemon tree on a whim. And finally, we painted the exteriors of both houses. The space between the 2 homes became the dump for the renovation from October-January (as seen above).
THEN THE RAIN CAME . . .

All I remember about 2017 is a lot of rain, hustling but not having enough money, laughing with my friend Lauren instead of crying (mostly about the “quick and easy refinance” that was proving to be neither) and cuddling my cat Daffy. I noticed some pretty significant cracks in the walls of my bedroom and laundry room at some point in 2017 but tried to ignore them. The house was just settling, right?? RIGHT????
The cracks got progressively worse, and despite the fact that I still owed my contractor like $70,000 – I had him look at the foundation and turrrrrrrns out all that rain had washed its way down our concrete hill and landed right around those steps, soaking in, destroying the back wall of our foundation. Cue me laying in a fetal position and wondering (hoping?) if my bed would just fall into the abyss.
My contractor took pity on me, and agreed to do the work knowing I would find some way to pay him. If you want to talk about getting into a codependent relationship with a contractor we can chat more in the comments below.
 december 2017, getting down into the foundation
If my backyard is all concrete then what is that mass of green you ask?? OH, THAT’S A MONSTER TOMATO PLANT GROWING OUT OF A CRACK IN THE CONCRETE THAT I DID NOT PLANT OR WATER OR CARE FOR IN ANY WAY. Not only was it growing out of a crack, earlier in the year my mom had sprayed it with weed killer and STEPPED ON IT. Sorry if this is triggering to find out for anyone who is precious about their tomato plants. So there was something good about 2017 – I had more fresh tomatoes than any other person on the planet.
Anyways, we had fixed the foundation but how were we going to keep this from happening again? We learned that all the concrete poured over the years was likely an attempt to try to keep the water from doing what it did. Remember the sewage line? Well, ripping that up and not re-pouring the concrete had exasperated the problem. We realized the best option was to pour a sh*t ton more concrete to protect the foundation. So we agreed, but I was like, “yeahhhhhh . . . maybe, pour it into the shape of a patio tho??”
In retrospect, I’m an insane person. WHY would I add more to my debt when I was so far in? Probably because it seemed so counterintuitive to ADD more concrete without at least making it functional. Meanwhile, we were already paying to tear and remove some concrete in other parts of the yard, so the ‘ole “welllllll, as long as we’re here . . .” thing happened and we went ahead and removed all the concrete in our backyard (except of course for the new concrete patio we were going to pouring). When they brought over all the machinery to fix the patio, the chain-link fence gate in the front got damaged and I had the genius/insane idea of adding a stucco wall there as well. All in all, I added QUITE a bit to my already existing debt with my contractor (on top of the $2000 I paid to the subcontractor to remove all the concrete). Luckily my husband got a holiday bonus that year and we were able to give our contractor a $5000 check of goodwill.
NUMBER REALNESS
Speaking on money, let’s take a quick break to look at the numbers: We bought our home for $600,000, put down only $22,000, were able to pay our contractor $38,000 from a construction loan (that was added to our $600,000 mortgage), got a family loan (aka generational wealth) for $60,000, and scraped together the rest of the money ourselves ($40,000ish). By February 2017 we had paid our contractor $130,000 and still owed him around $70,000. Then the foundation problem happened, and $14,000 got added to the debt. It wouldn’t be until November of 2018 when we finally were able to get our house refinanced and pay him the $84,000 we owed him. I’ve talked about this before but it’s worth noting again – my contractor had quoted me $100,000 for the renovation, so it was 100% over what he said ($214,000 total), which is part of why he was understanding about the delay in payment.
Back to the patio . . .
THE FANTASY STARTS TO BECOME A REALITY
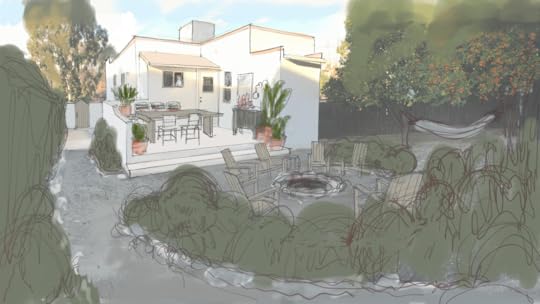
Remember William Hunter’s home? Well, he and his wife Amanda are friends of mine and he just whipped this beauty up for me. It was/is my north star. ALSO, CHECK DAFFY IN THE WINDOW. I came up with the layout of the patio by imagining what size the walkway needed to be to seem comfortable and extending the patio all the way up to that line so there wasn’t any wasted space. I gave myself around 2 feet of depth for planting a hedge against the fence and 4 feet for the walkway. The wall around the patio also created a natural nook for the trashcans to live on the other side without being an eyesore. William and Amanda actually convinced me that I would want one wide step for sitting on and they were SO right. It’s a weird concept, but sitting on the edge of a step is just something humans do I guess? I sit there ALL the time.
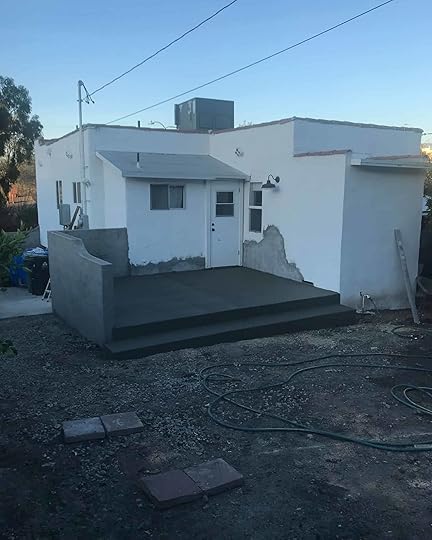
At this point the foundation was fixed, we had a structure, and all the concrete was gone from this area. There was just the teeny tiny problem of, once again, having absolutely no money but a very unfinished dirt yard. When this was going on, my friend Anne lived in the back unit and I believe she had shoes she would specifically wear to walk through the dirt/mud (because it was still rainy season!) and change shoes when she got to her car. I got to work as fast as possible creating a new walkway to at least fix that problem. Originally I was going to do a pebble path, but I had learned of too many people on hills having a hard time with them washing away with heavy rains.

 slowly digging a 4″ trench | checking the spacing of the pavers
I settled on large pavers and medium-sized stones surrounding them. I did a little (a lot) of googling and watched a ton of old men DIY youtube videos on how to make a path like this and here is what I learned: You have to dig a shallow ditch, the shape of the desired path, about 4 inches deep. Line the ditch with landscape weed barrier, use some kind of edging to keep the earth from falling back into the ditch (I used steel edging at first, replaced later by a stone edging), place pavers where desired and then fill in the rest with the smaller stones. Easy enough, right? FALSE. My dirt is made of clay and rocks, and digging that trench almost killed me. If you want a play by play, I have the whole saga saved in my story highlights (titled Yard Reno 3). It’s RIVETING.


We put the hedges in before the walkway so I knew I had enough room for the hedge to fit first. The hedges are Ficus Nitida and I got them from a local place called Planta Nursery. We bought 22 of them and planted them about 3 ft apart.

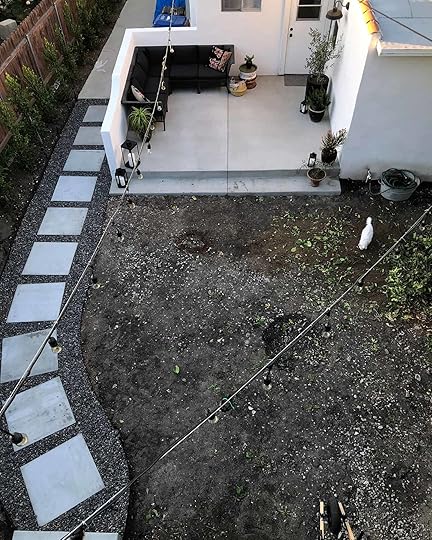 fin! walkway done, dirt yard still all dirt . . .
After I finished the hedges and walkway the yard stayed like this for the first half of 2018. We were, again, out of money and I had started working a lot more regularly for Emily, which kept me too busy daily to try any more intense DIYs. Personally, I also like to live with things unfinished for a while so I can figure out what I actually want. We put up lights, used outdoor furniture we had from our former apartment and honestly, despite the dirt yard (you didn’t notice that as much in the dark anyway) we really enjoyed the patio. We played Kubb (google it), sat around a fire pit with our back house tenants (and good friends) almost every night, and started letting our kitties out for supervised outside time (game changer).
VEGETATION AT LAST
A few months later we had saved enough to pull the trigger on having a landscaper put in a garden, mulch for under the fruit trees, river rocks for the walkway edging, irrigation, and grass. The total for that was about $7000, but we were able to pay in a couple of installments. A good chunk of that was the irrigation system (around $2000), grass (around $1500), and the install of everything ($2300). I can tell you right now, whatever they charged me for install was not enough. After that walkway and the hedges, I have a whole new respect for landscapers. Digging is. So. Hard.

During this install, I went to Maryland for a month in June to be with family after an unexpected passing of my aunt’s husband (she’s only a year older than me, it’s a long story, er, confusing story?). And as soon as I got back I jumped on a plane 24 hours later headed to Portland for a Target shoot Emily was doing there and that led right into the Portland Project. Every picture I have of the back yard during these early times of having a yard was of my cats because I would only be home for a day or 2 and then go back to Portland and clearly I missed my cats sooooooo much.

 tiny beebee plants | gah that sweet belly
I had planned on doing the gardening part myself but when it became clear that I wouldn’t be home for quite awhile, I went ahead and had the landscapers put plants in as well so they could establish themselves before cooler weather. The direction I gave was that I wanted it to feel very natural. I wanted herbs and lots of shades of greens with some dark purples. There’s rosemary, Kangaroo paws, lavender, olive bushes, black rose succulents, and more…
My hedges. I could write a love letter to them. They were inexpensive, they grew fast, and they just did their GD job. I always say they are the ONLY thing about this renovation that just all around WORKED. 22 of them + delivery = $350. I planted them myself, so that was free but honestly, I would have paid someone if I could have. 8 months after we planted them they needed to be staked because they were growing so fast and falling all over each other. My landscaper did it, the stakes and ties cost $195, the install was $75 (DEF glad I paid for that) so my total investment was $620 and LOOK AT THEM NOW:

I LOVE THEM SO MUCH.
They cover the not-so-pretty (because we were looking at the back of it) fence and add so much drama. That picture was taken in May, and since then they’ve actually gotten taller. I surmise these beauties are about 10 feet tall. You can kind of see where the fence is behind them, and that’s a 6-foot fence. Going from zero green, to the green grass and hedges has completely and totally changed this small outdoor space.
PAINTING THE PATIO – ONE STEP CLOSER TO DONE

We recently decided after living with the unfinished (read v dirty and stained) concrete patio that we left that way because we couldn’t afford tile for 2 years, to just go ahead and paint it. It was a pretty simple process. I bought an inexpensive power washer (the most exciting part. Fun fact: I like owning all the tools), washed the patio, filled in the cracks with concrete filler and painted it the same color as the house. If you go back to William’s sketch of the dream of the backyard, you will notice it is all white. At the time I was really into that look but figured it was not 100% a great choice as far as keeping it clean. Spoiler alert: It’s not. However, this is just for the short term and very fun nonetheless. You can use a Porch and Patio paint like this one. Then to make sure it would be easy to wash (knowing it would get so dirty) we finished it off with a wet look sealer which makes it way glossier and easier to clean. Probably could be slippery when wet though, just FYI.
BEFORE & AFTER (SO FAR)

SO, this is where we are now. Mind you, this is all our old furniture and look how sad that couch styling is! But we have BIG DIY plans for this space! Stay tuned, because I’ll be attempting a very large sectional, built with my own 2 hands featuring Ross Alan Reclaimed Wood. Stay at home orders have me itching to do some gardening. I’m going to be fixing up the garden that has grown in so much and needs some love and even more herbs so it becomes even more functional and not just pretty.
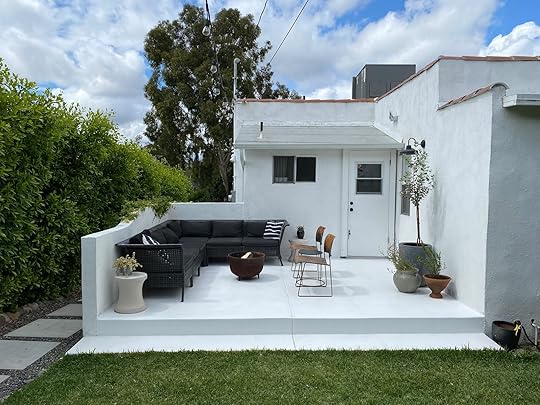 look at that hedge!
On the right side of the patio I’m going to attempt my first vegetable garden in a raised bed, and I’m going to make myself. Did anyone else watch Ron Finley’s masterclass??
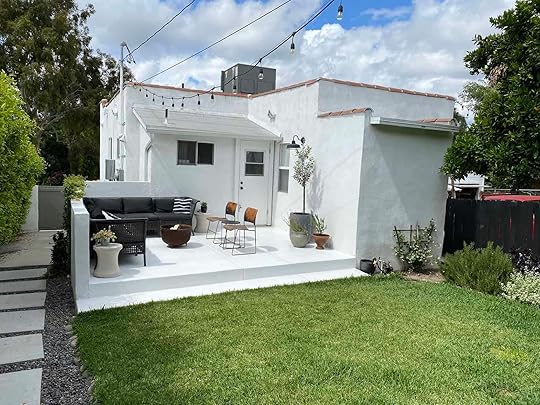

I’m sure I’ll be talking more about the process and selling things we no longer need (and I’m looking for a perfect table to put in this space!) over on the insider community! Please let’s talk in the comments, love hearing from all of you! Until next time xx
The post Bowser’s Backyard Journey – An Unfinished EPIC Adventure appeared first on Emily Henderson.
Emily Henderson's Blog

- Emily Henderson's profile
- 10 followers

