
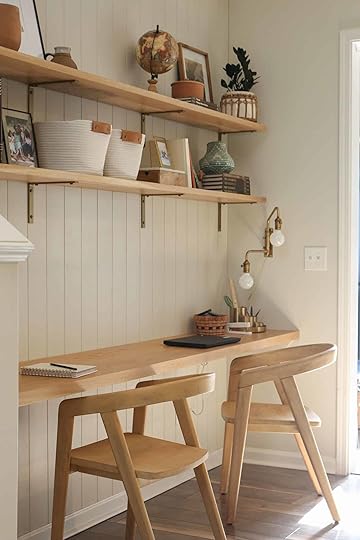
Have An Unused Nook Begging For Some Attention?? Make It A Beautiful At Home Office

We get the “what do I do with this awkward/unused space” question A LOT. And we totally get it because designing even a normal laid out space is hard enough. But today we have a GREAT solution that I think most of us in desperate need of. I am extremely excited to formally introduce blogger, DIYer, and designer, Tiffany of Pretty Real (check out her patio in yesterday’s post). When I came across her Instagram I was immediately taken with her joyful and approachable aesthetic. And then when I saw her One Room Challenge I knew that so many of you would both relate and be inspired by her warm but minimal (drumroll please)… office nook. I mean look at it! Tiffany is a mother of 3, with a husband who also works from home. So with everyone needing a place to work, she decided to give her dining room a break and really utilize an underused area.
I also wanted this reveal to be part getting to know Tiffany and part getting into the nitty-gritty of how she created this space. So grab a cup of coffee (or wine depending on the time of day…or not;)) and let’s have a blog chat.

“Mercer” Print | Frame | “Moth ii” Print | Frame | Rattan Pot | Brown Planter | Wonders of Man Book Set | Brackets | Coil Basket | Hanging file Holder (Spray Painted) | Folders | Pencil Sharpener | “Here With You” Print | Gold Desk Organizer | White + Brass Stapler | Chairs
What prompted you to start blogging and when did you start?
I started blogging over 10 years ago. Of course, it’s completely different today than it was then so please don’t look back at my old posts! A friend and I started it together- it was called Taste{FULL} and primarily focused on fashion, parties, and food- much different than my focus now. The blog was initially my friend’s idea, but I quickly came to see it as a creative outlet and a fun way to express myself. It continues to be that and combines my love of writing, photography, and inspiring others to celebrate their families and create a home they love.
How would you describe your style? (Sorry it’s such a hard question!)
This always stumps me. I’m a sucker for trends which does me no favors in figuring out what’s really my jam. I think at my core I’m vintage/modern which I know sounds like a rug category but I can literally start planning a room and before I know it I have one vintage-inspired design board, and another that’s completely mod. I try to mix the two (I love the tip that you should have something old in every room- wait, did I learn that here?- and find that I do that naturally) while also creating a cozy and comfortable vibe. I love clean lines and try as I might, I just don’t love pattern outside of geometric/ethnic varieties.
 anyone recognize that wall notepad from this post?
Emily has little ones, but your kids seem to be a bit older thus making actual school a non-negotiable. That must be a bit of a challenge (understatement??) under quarantine. Was this what prompted your ORC idea?
My kiddos are 10, 8, and 5 and yes, yes, yes. They were 100% the inspiration for the ORC project although somewhere along the way I realized that I too, need a workspace. It began with my daughter asking for a family computer for gaming (how am I even old enough to have a kid into gaming??) and we thought it would be a great idea to have a centrally located place for a computer- screen facing out if you know what I mean. And then Covid-19 happened and we realized it would also come in handy for remote learning. Unfortunately, we are slow with home projects, so we didn’t make the cut there, but we’ll be ready if remote learning is required come fall.
What was the biggest challenge of designing/installing the space?
Hands down it was budget (it’s always budget!) and sourcing the wood. We really wanted cabinetry but just couldn’t make the investment work so we decided to splurge on white oak and attempt a built-in look so that it would look substantial without cabinetry.
Speaking of budget, do you mind sharing yours?
Here’s a breakdown (estimate but close):
Wood: $500
Hardware: $160
Chairs: $200
Wall Treatment: $200
Paint: $20
Accessories/office supplies/decorative: $300
TOTAL: $1,380
 yikes that wood is stunning!
Any “fun” hiccups where you had to adjust the design?
I mentioned the wood- we must have gone to the lumber yard 10 times. It was difficult to find wood in the species and size we wanted. In the end, the shelves aren’t wall to wall nor floating- both part of the original plan- but I’m really happy with what we ended up with.
Where did you source the pretty wood you used? Was that a hard process?
A local lumber yard and yes. I don’t know if white oak is hard to find everywhere or just here (North Carolina) but it required lots of visits to the lumber yard (of course the first few don’t count when we were showing up at 2 pm and expecting the good stuff to still be there!). In the end, we settled for a narrower desk (even after joining two pieces together) and shelves that didn’t quite go wall to wall (we joined two pieces together for those too!). We also used brackets rather than float them since we were having a hard time finding 8/4 wood in the length we needed.
Jess here! I can attest to the wood finding process to be A PROCESS (and good wood isn’t cheap). Just be patient and keep an open mind.

Do you have a favorite detail?
The brass sconces are my favorite. I found one on clearance and then a couple months later another one appeared at the store. This was probably a year ago but I kept the faith and had been saving them for forever, waiting for the perfect place.
Hot Tip
If you love the exposed bulb look like Tiffany's beautiful sconces but want them at eye level then make sure to go for an opaque bulb like she did. This way it can have the exposed look without going blind. THE DREAM.

Any tips or tricks for installing a baseboard after you put up the paneling?
We reused the baseboard that was there. After carefully prying them off, we removed the nails, cleaned them up and repainted them before nailing them back on with a finish nailer. No adjustments were needed for the back wall. The side baseboards had to be cut shorter to account for the thickness of the paneling.
How did you adjust the outlets to account for the paneling on the back wall?
My husband used electrical box extenders (make sure to do this prior to attaching the paneling). We learned that the hard way for the shiplap in our kids’ bath.
Is the desk secured to the wood supports or is it sitting on top?
It sits on top but was also glued. The process is on the blog. My husband plans to attach small L brackets for extra support. But you’ve heard of the 90% club, right? Cause we’re in that. 


Emily Henderson's Blog

- Emily Henderson's profile
- 10 followers

