Kasey Bell's Blog, page 38
November 17, 2020
Blended Learning with Google (Part 2: Storytelling) – SULS089
The post Blended Learning with Google (Part 2: Storytelling) – SULS089 appeared first on Shake Up Learning.
More Blended Learning with Google!
 In part two of this podcast series, we will take a deep-dive into storytelling with Google tools and how we can use this strategy in any grade level or subject area.
Storytelling might be my very favorite strategy for teachers because it is so flexible, engaging, and creative!
And get a sneak peek of Kasey’s new book, Blended Learning with Google!
Did you miss part 1 in this 3-part series?
Listen to Part 1: Do This, Not That! here.
Access the entire series on this page: Blended Learning with Google Podcast Series.
#BlendedLearning with @GoogleforEdu! (Part 2: Storytelling!)
Click To Tweet
Listen to this article.


Shoutout
I’d like to send a shoutout to @PrincipalTeacherCo on Instagram for sharing her thoughts on the Shake Up Learning book!
Quick Tip of the Week (Master Slides)
In Google Slides, you can use the Master Slide to adjust the theme to your liking, add images, links, and other information that will appear of all of your slides. This is a HUGE time-saver for teachers.
Watch this short video to learn how!
Blended Learning with Google (Part 2)
In part 1 of this series, we shared the foundations for dynamic blended learning. This week, we are going deeper into strategies.
We are going to jump into one of the most prolific teaching strategies that you can have in your teacher toolbox, and that is storytelling.
Storytelling can be used in any subject area or grade level!
Students can retell events in their own words; students can change perspectives; students can invent and create stories told in brand new ways.
No matter the grade level or subject area we teach, we need to see our students as storytellers.
Kindergartners can create picture books or alphabet books.
Physical education students can explain health concepts, exercises, or rules of a sport.
History students can retell a historical event.
Language arts students can retell a story or novel from a different point of view.
Science students can explain the steps in their experiment.
Of course, any student can creatively write original stories, narratives, and autobiographical pieces.
Everyone has a story to tell, and with technology at our fingertips, there are hundreds of ways to tell these stories.
Storytelling with Google Tools
Google tools are a perfect companion to bring student’s stories to life.
Writing Stories with Google Docs
There are so many amazing digital tools that teachers can use to support writing in the classroom. As a former writing teacher, I can’t help but geek out a little at all the possibilities. But when it comes to Google, and Google Docs, in particular, there are some excellent tools to help teachers and students throughout the writing process.
Writing with technology matters! Students not only need to learn how to write, but they need to learn how to write with technology. Writing with technology will help prepare students for the future as well as allow them to do things that just aren’t possible on paper:
Digital collaboration
Digital workflow
See the revision history and process
Research
Give them student ownership of learning
Publish for a global audience
Increase engagement and motivation
Google Docs also gives us many tools to go BEYOND simple substitution with:
spelling and grammar check,
citing sources,
version history,
suggesting edits,
dictionary tool,
teacher comments and feedback, and
student comments and feedback.
Related: 9 Ways to Improve Writing with Google Docs
Storytelling with Google Slides
Y’all know I love Google Slides! It’s the perfect storytelling tool!
Try these storytelling strategies:
Create Interactive eBooks with Google Slides
Storytelling with Stop-Motion Animation in Google Slides (Taught in the Google Slides Master Class, and soon to be released Blended Learning with Google companion course.)
Storytelling with Comic Strips in Google Slides or Google Drawings
Storytelling through interactive timelines in Google Slides
Storytelling with Other Google Tools
Honestly, you could probably find a way to tell a story with many of Google creation tools. Here are a few more ideas:
Storytelling with Google Photos –create a collage, albums, gifs, videos, and more.
Storytelling with Google Earth–travel the globe!
and more!
Want more Blended Learning with Google?
Get Kasey’s book, Blended Learning with Google: Your Guide to Dynamic Teaching and Learning.
What are your favorite storytelling strategies? Share in the comments below.
Podcast Question of the Week
How can you use the storytelling strategy with your content area?
Post your answers in the Shake Up Learning community or on your favorite social platform.
Join our FREE Shake Up Learning Facebook group.
© Shake Up Learning 2020. Unauthorized use and/or duplication of this material without express and written permission from this blog’s author and/or owner is strictly prohibited. Excerpts and links may be used, provided that full and clear credit is given to Kasey Bell and Shake Up Learning with appropriate and specific direction to the original content on ShakeUpLearning.com. See: Copyright Policy.
The post Blended Learning with Google (Part 2: Storytelling) – SULS089 appeared first on Shake Up Learning.


November 10, 2020
Blended Learning with Google (Part 1: Do THIS, NOT That!) – SULS088
The post Blended Learning with Google (Part 1: Do THIS, NOT That!) – SULS088 appeared first on Shake Up Learning.
In part one of this podcast series, we will explore how Google tools can help us create Dynamic Blended 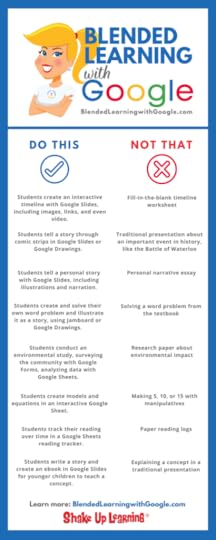 Learning experiences.
It’s not about Google, y’all! It’s about the learning.
We are going to take a deep-dive into practical ways we can use the Dynamic Learning Framework with our favorite Google tools.
As we all struggle to meet the demands of blended, online, and hybrid learning. Let’s look at some ways to engage students with the 4 C’s in our Post-COVID world.
And get a sneak peek of Kasey’s new book, Blended Learning with Google!
Shoutout
Thank you to Bowling Green Christian Academy for inviting me to virtually present!
Tip of the Week (Citations!)
There’s a new citation tool in Google Docs, and it pretty awesome!
Go to Tools>Citations to test it out. Add sources, parenthetical citations, and create a bibliography.
Watch this video to learn how! (coming soon)
Blended Learning with #GoogleEdu – Do THIS, NOT That!
Click To Tweet
Listen to the article.
Blended Learning with Google (Part 1)
What Is Blended Learning?
There are many different ways to define blended learning and several blended learning models. And as the technology and the world’s challenges and opportunities continue to shape the way we learn, these models continue to evolve and grow.
Blended learning is the combination of face-to-face instruction and online learning. This definition encompasses the concepts and ideas I have been teaching for many years. Clean and simple, but it leaves a lot on the table. That’s why I created a blended framework that would incorporate best practices and push the boundaries of traditional teaching practices.
Enter Dynamic Learning.
My definition of dynamic learning is continuing to evolve and grow, as best practices should. You’ll see that the definition below has been revised since the first Shake Up Learning book.
Dynamic Blended Learning:
Dynamic blended learning is characterized by constant change and activity, growing and evolving over time. This learning can take place anywhere, anytime, and it is personalized and differentiated. It is learner-centered, giving students choice and embedding communication, collaboration, critical thinking, and creativity skills where they align with the learning goals.
Dynamic blended learning also extends beyond the traditional bounds of the school day, schedule, and physical walls, and beyond the physical notion of hard and fast due dates. Digital tools are used for more than substitution, to do and create previously unconceived of things. Dynamic learning is boundless, with limitless opportunities.
Dynamic Learning is blended learning on steroids!
What is Static Learning?
Static learning is learning that lacks movement, action, or change. With this unengaging model of education, learning happens in short bursts and is often demonstrated through one-and-done activities, short-term assignments, or worksheets (even digital worksheets), which are confined within the traditional bounds of the school system, school day, and school walls.
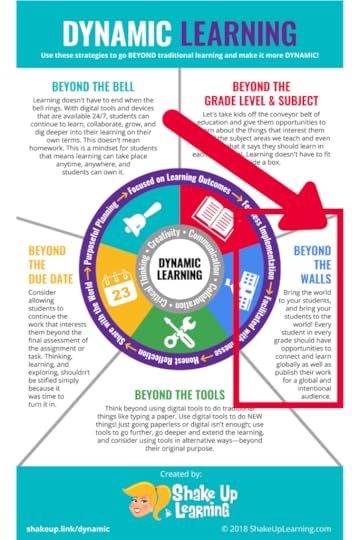
The Dynamic Learning Framework
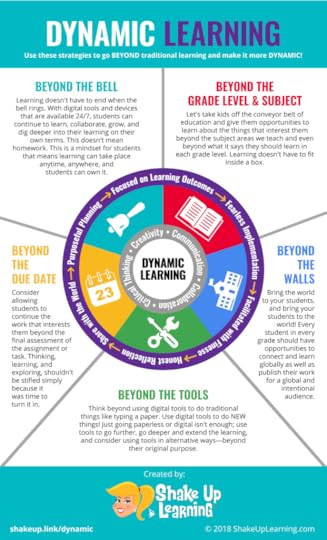
Dynamic Blended Learning with Google Tools
So how does Google come into play with the Dynamic Learning Framework, and all the components and characteristics we just covered? Well, Google for Education offers educators and students many tools that support the principles of Dynamic Learning.
Remember, Dynamic Learning is not about Google, and it certainly isn’t about getting distracted by shiny, techy tools.
The purpose of using technology in any form in the classroom is to support Dynamic, Blended Learning. Digital tools, such as Google for Education, present us with a unique opportunity to do things differently, to engage students in new ways, and to inspire them to explore and create!
Do THIS, Not That with Google Tools
Do This
Not That
Grade
Students create an interactive timeline with Google Slides, including images, links, and even video.
Fill-in-the-blank timeline worksheet
3–12
Students tell a story through comic strips in Google Slides or Google Drawings.
Traditional presentation about an important event in history, like the Battle of Waterloo
Students tell a personal story with Google Slides, including illustrations and narration.
Personal narrative essay
5–12
Students create and solve their own word problem and illustrate it as a story, using Jamboard or Google Drawings.
Solving a word problem from the textbook
3–12
Students conduct an environmental study, surveying the community with Google Forms, analyzing data with Google Sheets.
Research paper about environmental impact
6–12
Students create models and equations in an interactive Google Sheet.
Making 5, 10, or 15 with manipulatives
K–2
Students track their reading over time in a Google Sheets reading tracker.
Paper reading logs
3–12
Students write a story and create an ebook in Google Slides for younger children to teach a concept.
Explaining a concept in a traditional presentation
5–12
Related: Do This, Not That – Dynamic v. Static Learning
What strategy will you try?
Podcast Question of the Week
How can you use Google tools to better engage students in dynamic learning experiences?
Post your answers in the Shake Up Learning community or on your favorite social platform.
Join our FREE Shake Up Learning Facebook group.
© Shake Up Learning 2020. Unauthorized use and/or duplication of this material without express and written permission from this blog’s author and/or owner is strictly prohibited. Excerpts and links may be used, provided that full and clear credit is given to Kasey Bell and Shake Up Learning with appropriate and specific direction to the original content on ShakeUpLearning.com. See: Copyright Policy.
The post Blended Learning with Google (Part 1: Do THIS, NOT That!) – SULS088 appeared first on Shake Up Learning.
November 3, 2020
FREE Google Lesson Plans for Teachers and Students – SULS087
The post FREE Google Lesson Plans for Teachers and Students – SULS087 appeared first on Shake Up Learning.
Get FREE Google lesson plans for teachers and students from Google’s Applied Digital Skills resource  center.
These are super handy for teachers!
These are ready-to-go, asynchronous lessons that will help your students gain future-ready skills.
You will also find free teacher training, support for parents and guardians, free posters, and more!
Let’s dig into this amazing resource!
FREE #GoogleEdu Lesson Plans for Teachers and Students
Click To Tweet
Listen to the article.
Shoutout
I’d like to send a shoutout to Melissa Meverden on Twitter for sharing her sketchnote of e85 with Catlin Tucker. Thanks, Melissa!
Quick Tip (Clip a Video in Slides)
Google Slides gives us several options for formatting videos, like setting a start and end time (clipping a video), muting audio, and more.
Watch this short video to learn how!
FREE Google Lesson Plans for Teachers and Students
Many teachers don’t know that Google has an awesome online platform loaded with free training and lessons for students. It’s called Applied Digital Skills.
While the name isn’t super sexy, it offers a wealth of ready-to-go, project-based, asynchronous Google lesson plans that are free for anyone to use.
What is Applied Digital Skills?
Google defines this platform: “Applied Digital Skills is an online, project-based learning curriculum. Each lesson asks students to actively apply their learning of digital skills to help them solve real-world problems. Students watch videos that instruct them step-by-step how to build digital projects from scratch. Students who complete a lesson will have a project that demonstrates their academic learning, such as an infographic or an interactive story, or career readiness, such as a resume or a portfolio.”
Applied Digital Skills offers:
Free, flexible, and ready-to-use lessons: Adapt video-based lessons for remote or in-classroom teaching.
Project-based curriculum: Students leave with a useful project, like a presentation, a resume, or a research plan.
Skills for school, work, and life.
Teach the 4 C’s: communication, collaboration, creativity, and critical thinking.
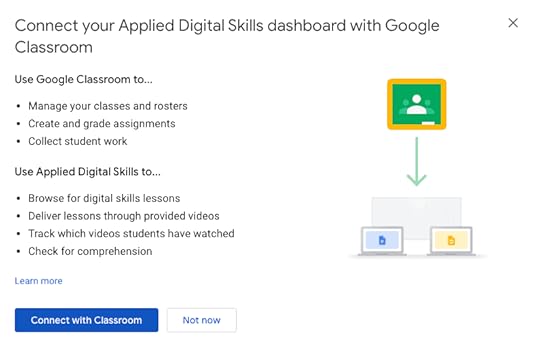
Connect with Google Classroom: Connect Applied Digital Skills with Google Classroom to import your roster and more.
What Grade Levels are appropriate for the Applied Digital Skills lessons?
In general, Google has designed these lessons for middle school and high school students, but I have seen these lessons used as young as second grade.
Victor Hicks believes students are never too young to start using this resource.
Related: FREE Google Templates
Explore the Lessons
Search and filter lessons to find lessons for your classroom.
Or explore the lessons by collections:
Back to School
Capstone Projects
Explore the World with Google Arts and Culture
Teach from Anywhere (for teachers)
Learn from Anywhere (for students)
and more!
Example Lesson Plan for If-Then Story Adventure
Related: Easy Lesson Plan Makeovers
Applied Digital Skills Resources
Get everything you need to teach digital skills from the resource page! View teacher guides, stories, example projects, and more!
Getting Started Guide for Teachers
Tips for Using Applied Digital Skills Remotely
Guardians Guide
Classroom Posters
How to Use with Google Classroom
Connect your Applied Digital Skills dashboard with Google Classroom to easily assign lessons.
Applied Digital Skills is a powerful resource for teachers and students. Check it out and share your experiences in the comments below!
© Shake Up Learning 2020. Unauthorized use and/or duplication of this material without express and written permission from this blog’s author and/or owner is strictly prohibited. Excerpts and links may be used, provided that full and clear credit is given to Kasey Bell and Shake Up Learning with appropriate and specific direction to the original content on ShakeUpLearning.com. See: Copyright Policy.
The post FREE Google Lesson Plans for Teachers and Students – SULS087 appeared first on Shake Up Learning.
October 27, 2020
Google Classroom Comments: All You Need to Know! – SULS086
The post Google Classroom Comments: All You Need to Know! – SULS086 appeared first on Shake Up Learning.
Feedback is a crucial part of the learning process, and with Google tools and Google Classroom, giving feedback on digital  assignments has never been easier. Today, I’m going to share with you everything you need to know about Google Classroom comments.
With Google tools and Google Classroom, giving feedback on digital assignments has never been easier.
The only question is, where?
We have several options for leaving comments and feedback, and it can be confusing.
Let’s explore all the ways you can use comments to enhance the learning in your classroom!
#GoogleClassroom Comments: All You Need to Know!
Click To Tweet
Listen to the article.
Shoutout
This week’s shoutout goes to Amber Harper, host of the Burned-In Teacher Podcast. Thank you to Amber for being a listener! Be sure to check Amber’s awesome podcast!
Quick Tip (Keyboard Shortcut to Insert Comments)
Use the keyboard shortcut Ctrl + Alt + M to insert a comment in doc, sheet, slides, drawings, etc.
Watch this video to learn how! (video will be posted soon)
Google Classroom Comments: All You Need to Know!
Susan M. Brookhart, author of How to Give Effective Feedback to Your Students, says, “Good feedback contains information a student can use. That means, first, that the student has to be able to hear and understand it. A student can’t hear something that’s beyond his comprehension, nor can a student hear something if she’s not listening or if she feels like it’s useless to listen.
The most useful feedback focuses on the qualities of student work or the processes or strategies used to do the work. Feedback that draws students’ attention to their self-regulation strategies or their abilities as learners is potent if students hear it in a way that makes them realize they will get results by expending effort and attention.”
Let that sink in for a moment.
Google Classroom has become a powerhouse for teachers and students!
Some teachers are beginning to wonder how they survived without it! As teachers, we need to help guide students on a flexible learning path that will help them reach learning goals. Using the commenting feature in Google Classroom is a no brainer.
We have several options for leaving feedback and each can serve its own purpose.
Let’s explore four ways to leave comments using Google Classroom.
Related: 4 Ways to Give Meaningful Feedback in Google Classroom
4 Ways to Comment in Google Classroom
Class Comments
Private Comments
Document Comments in the Grading Tool
Comment Bank in the Grading Tool
#1 Class Comments
Class comments are comments that every student and teacher in the class can view. Teachers can leave class comments to clarify instructions or leave a note on an assignment or announcement. But there is also a lot of power in allowing students to leave class comments.
For students to leave a class comment, you must enable this in your class settings. (You can choose to give students just commenting rights, or to post and comment. Posts would appear on the stream.)
Yes, I know many teachers fear what students will post, but keep in mind, just like any other classroom behavior, there can be consequences, including muting individual students who cause problems. The entire class shouldn’t miss out on a valuable communication tool, especially those doing distance learning, just because of one or two students who want to cause trouble.
Class comments offer students and teachers a way to communicate and collaborate in a way that the entire class can view. Class comments will appear in the stream and give students and teachers the option to reply in the stream.
This can be really useful for general feedback and questions. I use class comments to respond to frequently asked questions about assignments.
Do you keep hearing the same question from your students all day? Use the class comments feature to respond to questions, give general guidance on assignments, clarify any instructions, and increase communication in your class.
Encourage students to use this tool! Let them know it’s okay to use the class comments to ask questions, and that you will respond promptly. This can serve as an FAQ for your students, and the students who are reluctant to ask questions will have it to refer to.
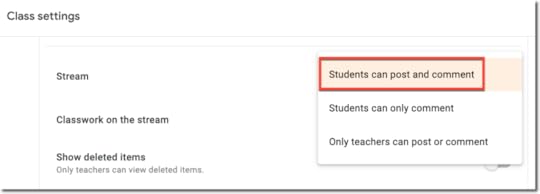
Enable Student Comments
You can decide how students can post and comment in Google Classroom. You can set permissions by class or by student. If you allow posting or commenting, students can’t edit their posts or comments, but they can delete them. Teachers can delete any post or comment.
Go to the settings for your class.
Under General, next to Stream, click the Down arrow and then choose permission.
Students can post and comment—This option is the default. Students can post on the class stream and comment on any item.
Students can only comment—Students can comment on an existing post, but can’t create a post.
Only teachers can post or comment—Students can’t post or comment. This option mutes all students.
Select comment permissions
In the top-right corner, click Save.
TIP: When discussing the use of student posts and comments with students, use this as a teachable moment to discuss online etiquette and digital citizenship skills.
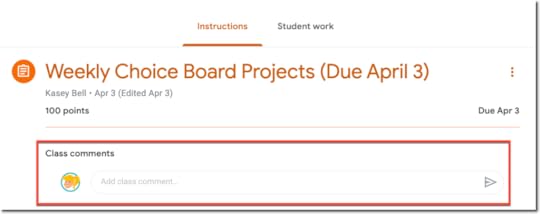
Add a Class Comment
In the stream, add the class comment in the space provided below the assignment, announcement, or discussion. Class comments look almost identical from the teacher and student views.
Tag Students in Class Comments
Did you know you can tag students in Google Classroom comments? Yes, if you allow class comments, you tag students, so they know you are responding to them. Simply type the plus sign (or @), followed by their email (+student@email.com).
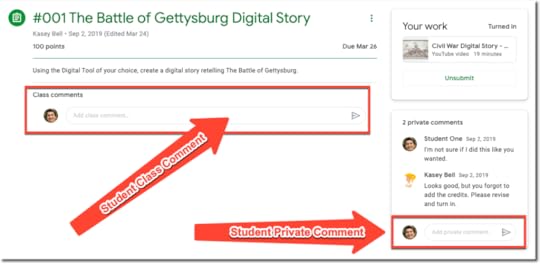
#2 Private Comments
Use private comments for individual student feedback and conversations.
I have seen a lot of teachers and students confused by the differences in class comments versus private comments. Private comments DO NOT appear in the stream. Private comments are just between the teacher and students.
Private comments are a powerful feature!
Use Private Comments in Google Classroom for Reflection
Some teachers take the private comments feature a step further and make it part of the assignment by requiring that students add a reflection as a private comment after submitting their assignment.
Sean Fahey suggests using an open-ended question or give students a prompt like, “What did you like most about the assignment?” or “What part challenged you the most?” Be sure to add this to your directions, so they don’t forget!
Add a Private Comment (Student View)
To leave a private comment, the student must “open” the assignment. Only the teacher can view the private comments left by students.
Get the Google Classroom Cheat Sheet for Students
View a Private Comment (Teacher View)
Finding private comments can be a little tricky for the teacher.
To view private comments,
Open the assignment.
Go to the “Student Work” tab.
From here you can see thumbnails of your students’ work. To the left, you will see your roster, and a snippet of the private comment if there is one.
Click on the student’s name to view the private comment.

Add Clickable Resource Links in Private Comments
When you leave feedback in private comments for students, don’t just tell students what to revise or edit; give them a resource link so they can review the skill!
A Note About Discussion Questions in Google Classroom
Discussion questions are an excellent way to engage students in online conversation, debate, and collaboration. I also love the way Google Classroom allows students to see and respond to each other, but first requires that they submit their own answers before they are allowed to view the rest of the students’ answers. This encourages original answers and deters cheating.
Comments are NOT Answers to Discussion Questions
This is a common misunderstanding that I have seen in using Google Classroom. My students don’t understand where to respond to a discussion question when class comments are enabled. I end up with answers in two different places: class comments and responses to the question. Be sure you instruct your students to open the assignment and respond where indicated below.

#3 Document Comments in the Grading Tool
Comments can also be added to other Google file types, like Docs, Sheets, Slides, and even non-Google file types that are uploaded into Google Drive.
When you assess student work through Google Classroom, you can leave document comments and private comments in the Google Classroom grading tool.
The Google Classroom Grading Tool gives teachers a workflow for evaluating student work, leaving feedback, grading, and returning student work.
To access the grading tool:
From the Classwork page, select the assignment and click on “View Assignment.“
Click on the student’s name in the left-hand roster.
Click on the file a student submitted and you should see the grading tool similar to what you see in the image below.

Here you can toggle through multiple student’s work, leave frequently used comments from your comment bank, as well as leave private comments.
#4 The Comment Bank
If you enter the same comment for many students, you can save the comment to use later.
It’s super easy to save your comments, feedback, and even resource links that can save you valuable time when assessing student work.
The comment bank is tied to your Google Account, so you can access it from any computer. To edit and delete comments in the comment bank, go to classroom.google.com/g/cm.
From the grading tool, click on the comment bank icon.
Click Add to comment bank and enter your
Comment.
Click Add.
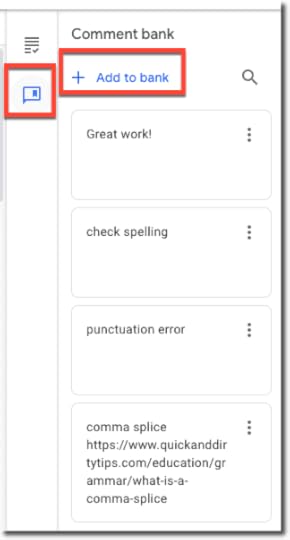
TIP: You can also add a resource link as I did with the common splice comment. Remember to include the “http://” portion, so it is clickable.
That wraps up our four ways to comment with Google Classroom. Please feel free to add your favorite tips in the comments below.
Join the Google Classroom Master Class!
 Learn all about the new updates to Google Classroom and take your skills to the next level. This course will give you everything you need to get started using Google Classroom and best practices to help you make the most of this tool.
Perfect for the beginner to intermediate skill levels! Consider this your video guide to Google Classroom!
NEW Bonuses just added on Google Meet integration and Remote Learning tips!
Click here to learn more and to ENROLL TODAY!
Learn All About the Course
Who Should Join the Google Classroom Master Class?
Beginners can learn everything they need to get started.
Intermediate level users can focus on learning more advanced features, tips and tricks, and best practices.
Go at your own pace.
Let’s dig in! This class is for all skill levels!
What’s Included in the Google Classroom Master Class?
Self-paced
Video-based lessons
6 BONUS Lessons
PDF Downloads
Supporting Resources
Best Practices and Tips
6 hours of professional learning credit
Purchase orders are accepted
Bulk license discounts
Get your whole team, campus, or district on board
Click here to learn more and to ENROLL TODAY!
© Shake Up Learning 2020. Unauthorized use and/or duplication of this material without express and written permission from this blog’s author and/or owner is strictly prohibited. Excerpts and links may be used, provided that full and clear credit is given to Kasey Bell and Shake Up Learning with appropriate and specific direction to the original content on ShakeUpLearning.com. See: Copyright Policy.
The post Google Classroom Comments: All You Need to Know! – SULS086 appeared first on Shake Up Learning.
October 20, 2020
Blended Learning Best Practices (with Catlin Tucker) – SULS085
The post Blended Learning Best Practices (with Catlin Tucker) – SULS085 appeared first on Shake Up Learning.
This week, I’m chatting about Blended Learning best practices with the blended learning guru, Dr. Catlin Tucker.
Catlin has written several books on the subject of Blended Learning, and she has been sharing many ideas to support teachers during this time of remote and hybrid learning.
In this inspiring interview, Catlin and I chat about blended learning strategies and models, and what’s working right now!
Don’t miss the amazing ideas that Catlin shares in this episode, including ideas that will help teachers and students survive concurrent teaching and learning.
Blended Learning Best Practices (with Catlin Tucker) – SULS085
Click To Tweet
Listen to this article.
Shoutout
Thank you to Jennifer Stadtmiller for sharing her experiences in the Google Certified Educator Academy!
“I first prepared for Level 1 using the Google Teacher Center. Using your class to prepare for Level 2 was so much more effective. You led us step-by-step through processes and gave us extra information during Lesson Checks. Thanks so much!!!”
Learn more about Google Certification and the online academies here: GetGoogleCertified.com
Quick Tip (Chrome – Pick Up Where You Left Off)
If you liked last week’s tip on Chrome Tab Groups, you might want to adjust your settings in Chrome so that these groups reload when you open Chrome. If you want to pick up where you left off when you closed Google Chrome, you need to adjust your settings. This will allow you to reload things like Chrome tab groups and pinned tabs.
Watch this Quick Video to Learn How!
Subscribe to Shake Up Learning on YouTube
Subscribe to Shake Up Learning on TikTok
Blended Learning Best Practices (with Catlin Tucker)
Catlin Tucker has been a go-to resource for all things blended learning. She is a bestselling author, international trainer, keynote speaker, blogger, and podcaster at CatlinTucker.com.
In this interview, we chat about challenges teachers are facing in the midst of the pandemic and what strategies teachers can use in a concurrent classroom learning environment.
Losing the Benefits of Online Learning
Even those teachers who are very experienced feel like brand new teachers this year. The challenge of designing learning experiences for a concurrent classroom, where there are students physically in the classroom and students who are joining the class online, is overwhelming and extremely frustrating.
Catlin says there are many benefits to face-to-face learning and online learning. The way in which schools are approaching online learning right now is actually stripping away the many benefits.
Online learning should give students more control and agency over their learning. Instead, many schools are enforcing screentime and synchronous learning that don’t give students or teachers the flexibility they need to succeed in this environment.
(Related: 5 Shifts Needed in Education Now)
Culture and Engagement in a Concurrent Classroom
The Community of Inquiry Framework brings together the ideas of a social, cognitive, and teaching presence.
“The Community of Inquiry theoretical framework represents a process of creating a deep and meaningful (collaborative-constructivist) learning experience through the development of three interdependent elements: social, cognitive and teaching presence.”
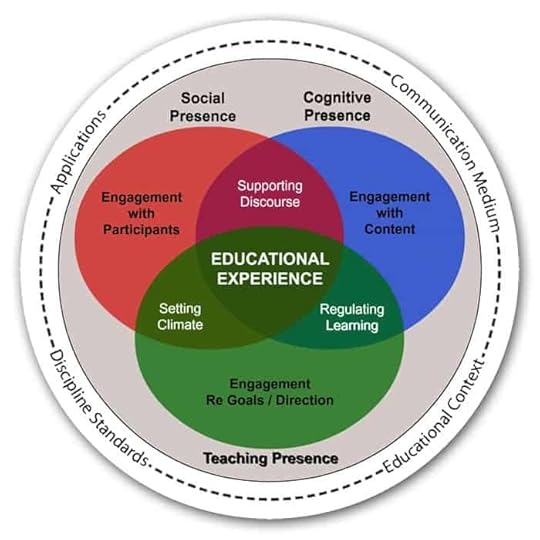
The Community of Inquiry Framework
Catlin says we need to cultivate that social presence. We also need to engage students to develop a cognitive presence online by positioning them as active agents in the learning process instead of reverting to old practices like long lectures.
For many teachers, school administrators’ mandates mean that much of these decisions are out of their control. Many schools require teachers and students to remain synchronously connected all day and complete synchronous, whole-class activities all day.
Leaders need to remember that research shows us that the more a human being enjoys autonomy and agency, the more likely they are to be motivated. That applies to teachers feeling that they have the professional latitude to make the decisions they think are right for their students and their subject area. And for students as well, giving them more voice and choice in their learning.
At a time when student engagement seems to be at an all-time low, a topic teachers and administrators should care about, we need to give students and teachers more agency to improve the quality of learning.
What’s Working Right Now
The teachers that have embraced the idea that less is more are having more success at this moment. It is impossible to take everything we used to do in a face-to-face classroom and dump it into a remote or hybrid classroom. Go deep, but don’t try to cover as much in terms of the breadth, and allow students to engage in the messy work that is learning. Give yourself permission to not cover it all.
(Related: Online Learning Tips for Teachers and Schools [interview with a teacher in China])
Divide student work by prioritizing your standards, the MUST DO assignments, and the CAN DO assignments.
Plan for shorter periods of time instead of monster units. Focus on two to three weeks at a time instead of six or nine weeks.
Engage students in active and creative ways, prioritizing collaboration and shared spaces like Jamboard or Google Slides, where kids can come together and learn from each other.
Teachers who are doing this are having the most success right now.
Another strategy to try is to create more touchpoints with your students.
Make time for one-on-one feedback with students and small groups.
Build student conferencing into your weekly schedule to make meaningful connections with students.
It may not be perfect, but it will be more meaningful.
Related: 35 Remote Learning Resources for Teachers
Blended Learning Models to Try Now
Catlin has shared many blended learning models in her books and blog posts. She suggests adapting the station rotation, flipped learning, and playlist models for the concurrent or hybrid classroom.
To ensure all students (online or in-person) get equitable access and help from the teacher, use ONE consistent method for students to ask for help. That could be using Remind, online chat, ClassroomQ, Google Classroom, or whatever platform works for you and your students.
Adapting the Station Rotation Model for the Concurrent Classroom
The station rotation model has been around for a long time. It’s a great way to differentiate and offer more flexible learning paths for students.
This model is NOT just for elementary! Even though stations have been more popular in the early grades. This is a strategy that can be used at any level.
Divide your students into three groups, and give your students a Teacher-led station, an online station, and an offline station. That way students do not have to rotate physically. The teacher still gets the opportunity to meet with small groups, differentiate instruction, and provide real-time feedback.
As kids are working on the online and offline activities, they can control their own pace. The kids who are online are not forced to stare into a classroom at a whole group activity.
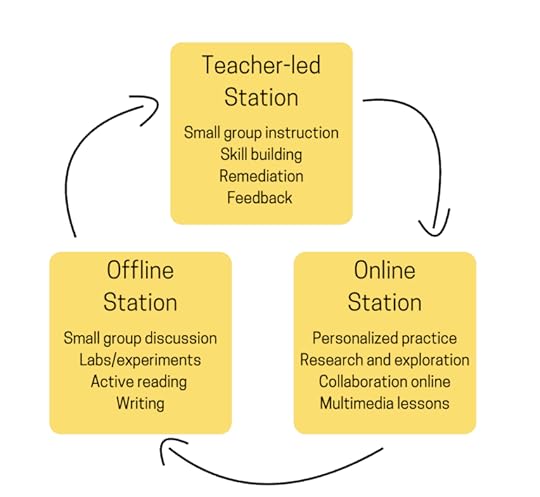
Catlin’s Station Rotation Model
Using Videos in Station Rotation
Break your video activities into three parts: pre-video activity, video, and post-video activity.
We can begin the class with an activity to brainstorm, make predictions, and activate prior knowledge.
Then we can transition into the video and give students a buffer to watch, pause, rewind, rewatch, take guided notes, and the teacher can check-in on students and give feedback.
As kids transition out of the video, they can complete individual or collaborative group practice to try to take what they learned and do something with it.
Try This
Take something you plan to present live and chunk it into smaller pieces, focusing on one big idea.
Then record it in a video, strive for six minutes or less.
Think about how to foster collaboration with your in-class students and your online students. You could have in-class students brainstorming on post-its and online students using Jamboard, and allow them to self-pace through that video. Maybe give them 20 minutes to watch and pace themselves through the video activity.
Then transition students into a discussion. Try a 3-2-1 strategy: what are 3 important facts, what are 2 connections we can make, what’s 1 question we have.
Remember, your videos do not have to be perfect! Keep it simple. Video frees you up to facilitate and help students, deliver small group instruction, and reteach struggling students. They can be watched, rewatched, and reused year after year. Use videos for instruction, directions, and modeling.
Related: Synchronous vs. Asynchronous Online Learning
Parting Wisdom from Catlin
Your work matters so much at this moment. You are appreciated. You are making a difference. Your students are lucky to have you. Embrace being a learner right now. Prioritize feedback from students to let them know you care.
Podcast Question of the Week
What blended learning strategy from this episode will you try?
Post your answers in the Shake Up Learning community or on your favorite social platform.
Join our FREE Shake Up Learning Facebook group.
 About Dr. Catlin Tucker
Dr. Catlin Tucker is a bestselling author, international trainer, and keynote speaker. She was named Teacher of the Year in 2010 in Sonoma County, where she taught for 16 years. Catlin earned her doctorate in learning technologies at Pepperdine University. Currently, Catlin is working as a blended learning coach and education consultant. Catlin has written a series of bestselling books on blended learning, which include Balance With Blended Learning, Blended Learning In Action, Power Up Blended Learning, and Blended Learning In Grades 4-12. She is active on Twitter @Catlin_Tucker and writes an internationally ranked blog at CatlinTucker.com.
Catlin’s Online Course: Getting Started with Blended & Online Learning
© Shake Up Learning 2020. Unauthorized use and/or duplication of this material without express and written permission from this blog’s author and/or owner is strictly prohibited. Excerpts and links may be used, provided that full and clear credit is given to Kasey Bell and Shake Up Learning with appropriate and specific direction to the original content on ShakeUpLearning.com. See: Copyright Policy.
The post Blended Learning Best Practices (with Catlin Tucker) – SULS085 appeared first on Shake Up Learning.
October 15, 2020
13+ Google Classroom Quick Tip Videos for Teachers
The post 13+ Google Classroom Quick Tip Videos for Teachers appeared first on Shake Up Learning.
In this post, I am going to give you 13+ Google Classroom Quick Tip Videos for Teachers!
Each week on The Shake Up Learning Show Podcast, I share a quick Google tip.
 The podcast is an audio format, so I started creating Quick Tip tutorial videos on YouTube each week. (You can access all of the Quick Tips here.)
Subscribe to Shake Up Learning on YouTube to access all of my tutorials and quick tips.
A large portion of these tips are for Google Classroom, so I have organized these into one playlist for easy access.
This playlist will continue to grow past the 13 videos at the time of this post.
I also started posting these quick tips on TikTok. (Follow @ShakeUpLearning on TikTok)
13+ #GoogleClassroom Quick Tip Videos for Teachers
Click To Tweet
Google Classroom Quick Tip Video (FULL Playlist)
The entire playlist is embedded below. (Click on the 3 lines in the top right corner of the video below to see all the videos.)
13 Google Classroom Quick Tip Videos for Teachers
The videos below are organized by podcast episode, with the newest on top. Not all of the tips for each episode are Google Classroom tips. Visit this page to see ALL the Google Quick Tips.
Episode 80: Invite a Co-Teacher
Episode 79: Invite Students with a Link
NEW FEATURE! You can now invite students to join your class in Google Classroom with a link!
Episode 78: Add Clickable Resource Links in Private Comments
When you leave feedback in private comments for students, don’t just tell students what to revise or edit; give them a resource link so they can review the skill!
<
h3>Episode 77: Tag Students in Class Comments
Did you know you can tag students in Google Classroom comments? Yes, if you allow class comments, you tag students, so they know you are responding to them. Simply type the plus sign (or @), followed by their email (+student@email.com).
Episode 76: Customize Google Classroom Notifications
Most teachers seem to have a love/hate relationship with Google Classroom notifications. Did you know you can customize what notifications you receive?
Episode 75: Post Assignments to Multiple Classes
Did you know you can distribute assignments in Google Classroom to multiple classes all at once? It’s super easy!
Episode 71: Create a Google Classroom Class Template
Are you tired of recreating Google Classroom classes and adding all your topics and organization? Create a reusable template to save yourself valuable time. (I’ve blogged about this in-depth here.)
Episode 67: Add Emojis to Google Classroom
Emojis are everywhere and are a great way to engage your students. Did you know that you can copy and paste emojis into Google Classroom and Google Drive? Yep! You can add them just about anywhere, including the titles of your Google files too!
Episode 66: Differentiate Assignments in Google Classroom
Did you know that you do not have to give every student the exact same assignment at the exact same time in Google Classroom? It’s super easy to differentiate, distribute modifications, assign group work, and more.
Click the drop-down arrow next to students on your Google Classroom assignment.
Uncheck “all students.”
Select the student or group of students you wish to give the assignment.
Episode 61: Customize the Google Classroom Stream
The Stream is your Google Classroom communication hub. This is where you post announcements and keep students informed.
By default, the Stream will also show notifications of new items posted on the classwork page. For some, this feels like duplication and can muddy up the Stream. (Ha! See what I did there.)
If you’re using the Classwork page, you can choose a collapsed or expanded view for Classwork notifications on the Stream page. You can also hide them entirely from the Stream page.
You can learn more about all of the Class settings here.
Episode 60: Use Private Comments in Google Classroom for Reflection
Private comments are a powerful feature!
Some teachers take the private comments feature a step further and make it part of the assignment by requiring that students add a reflection as a private comment after they submit their assignment. Sean Fahey suggests using an open-ended question or give students a prompt like, “What did you like most about the assignment?” or “What part challenged you the most?”
Be sure to add this to your directions, so they don’t forget!
Episode 59: Bookmark the Classwork page
Sometimes, navigation in Google Classroom can be frustrating and take a few too many clicks to get where you want to go. Since the majority of your time will be spent on the Classwork page, I recommend bookmarking it.
In Google Chrome, you can add it to your bookmarks bar for quick access.
Episode 58: Link Directly to an Assignment in Google Classroom
Did you know you can get a direct link to a specific assignment or topic in Google Classroom?
Yes! This Google Classroom tip is super handy when you need to refer students to something specific.
To get the link, go to the Classwork page and click on the 3 dots on the assignment. Then click on “copy link.”
Join the Google Classroom Master Class!
Learn all about the new updates to Google Classroom and take your skills to the next level. This course will give you everything you need to get started using Google Classroom and best practices to help you make the most of this tool.
Perfect for the beginner to intermediate skill levels! Consider this your video guide to Google Classroom!
NEW Bonuses just added on Google Meet integration and Remote Learning tips!
Click here to learn more and to ENROLL TODAY!
Learn All About the Course
Who Should Join the Google Classroom Master Class?
Beginners can learn everything they need to get started.
Intermediate level users can focus on learning more advanced features, tips and tricks, and best practices.
Go at your own pace.
Let’s dig in! This class is for all skill levels!
What’s Included in the Google Classroom Master Class?
Self-paced
Video-based lessons
6 BONUS Lessons
PDF Downloads
Supporting Resources
Best Practices and Tips
6 hours of professional learning credit
Purchase orders are accepted
Bulk license discounts
Get your whole team, campus, or district on board
Click here to learn more and to ENROLL TODAY!
© Shake Up Learning 2020. Unauthorized use and/or duplication of this material without express and written permission from this blog’s author and/or owner is strictly prohibited. Excerpts and links may be used, provided that full and clear credit is given to Kasey Bell and Shake Up Learning with appropriate and specific direction to the original content on ShakeUpLearning.com. See: Copyright Policy.
The post 13+ Google Classroom Quick Tip Videos for Teachers appeared first on Shake Up Learning.
October 13, 2020
Go Global: Online Publishing for All Students – SULS084
The post Go Global: Online Publishing for All Students – SULS084 appeared first on Shake Up Learning.
One critical characteristic of Dynamic Learning is going Beyond the Walls! Go global and consider online  publishing for all students.
Every student should have the opportunity to publish their work and learning for a global audience!
This will change the quality of their work and help them build a positive online presence.
This episode and blog post will explore ways to flatten the walls of your classroom and allow students to publish their work online.
Go Global: Online Publishing for All Students
Click To Tweet
Listen to this article.
Shoutout
Thank you to Susan Vincentz and Christian Academy Schools for inviting me to connect and present virtually!
Quick Tip (Chrome Tab Groups)
Google Chrome has a hidden feature that allows you to name, color-code, and group tabs!
Watch this quick video to learn how! (coming soon)
Go Global: Online Publishing for All Students
The Internet is becoming the town square for the global village of tomorrow. —Bill Gates
One of the essential components of Dynamic Learning is going BEYOND the walls of the classroom.
Every student in every grade should have opportunities to connect and learn globally as well as publish their work online for a global audience.
Technology is NOT a solution…it is an opportunity!–an opportunity to shake up learning, to do things differently, and to create more dynamic learning experiences for students.
An Important Shift
As a middle school teacher, I learned a very important lesson about giving students an audience for their work.
I had my pre-AP 8th-grade ELAR students publish their writing on a website that allowed for comments. As soon as they got their first comment, a shift had happened.
The hands went up, and my students asked, “Can I revise mine? I didn’t know anyone was going to read it besides you.”
WHOA! My pre-AP students, who were very much teacher pleasers, were admitting that they could give me better work if I could provide a better audience. Game-changer!
As much as we like to think our students want us to be their audience. If the only audience we ever give them is the teacher, we are missing a HUGE opportunity.
Publishing for Authentic Audiences
We now have the power to give students more authentic audiences for their work.
Are you taking advantage of this opportunity?
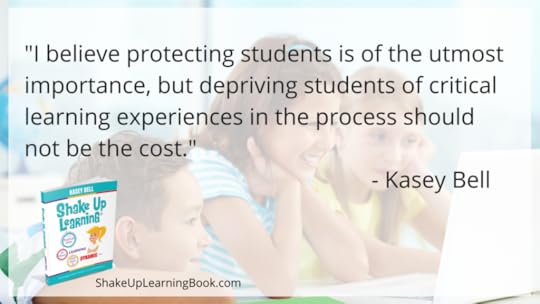
Protecting Students v. Depriving Students
I know many of you are already thinking…we can’t do this! This is too risky for students.
Well, think of it this way. We don’t have to share names, faces, or any personal information in order to give students an audience for their work.
I believe protecting students is of the utmost importance, but depriving students of critical learning experiences in the process should not be the cost.
Don’t Hide the Learning.
What’s the big secret?
Do we really need to hide the learning from the outside world?
This is depriving students of authentic learning experiences they need to be a part of the twenty-first-century workforce.
Why Limit the Learning Experience?
Why limit the experience of our students by limiting their audience?
If all they are exposed to is the opinions, comments, and feedback from their teacher and maybe their parents, they will never truly understand the twenty-first-century idea of sharing.
Let the learning light shine!
Protecting Students
You do not have to share names, pictures, or any personal information when sharing student work.
Consider pen names
Teaching students how to publish and share online without sharing personal information is a future-ready skill!
Who is the Audience?
Before you jump in, select a learning experience that is appropriate for sharing and getting feedback from others. Make publishing purposeful.
Baby steps! You don’t have to publish EVERYTHING for a worldwide audience. Select the appropriate audience, and gradually build toward bigger audiences.
Publish for an Intentional Audience
The intended audience should not have to search to find a student’s work. Simply making a Google Doc public doesn’t really cut it.
Reach out to authors, experts, and organizations.
Tag them on social media with links to student work.
Use specific hashtags for those audiences.
Try #comments4kids or #kidtweet
Give the Audience a Way to Leave Feedback
Feedback and comments will supercharge this experience, as illustrated in my own classroom story.
We must give the audience a way to leave comments, provide feedback, and interact with students in some way.
Levels of Publishing
STEP 1: Share outside the classroom
STEP 2: Share outside the school
STEP 3: Share with a global audience
STEP 4: Share with an INTENTIONAL global audience
Tools for Publishing Work Online
Google Sites
YouTube
FlipGrid
Blogs:
Blogger
Edublogs
SeeSaw
Podcasting:
Anchor app
Soundtrap
Podbean
Social Media (Use hashtags like #kidtweet, #comments4kids, or find or create your own)
Virtual Reality & 360 Video (Check out Cospaces)
The options are limitless!
What would you add to this list?
Share Your Student Work Examples
Fill out this form to help me build a database of student examples of work.
Podcast Question of the Week:
How can you give your students a more authentic audience for their work?
Post your answers in the Shake Up Learning Community or on your favorite social platform.
Join our FREE Shake Up Learning Facebook group.
Join the Waitlist to Learn About the New Books:
© Shake Up Learning 2020. Unauthorized use and/or duplication of this material without express and written permission from this blog’s author and/or owner is strictly prohibited. Excerpts and links may be used, provided that full and clear credit is given to Kasey Bell and Shake Up Learning with appropriate and specific direction to the original content on ShakeUpLearning.com. See: Copyright Policy.
The post Go Global: Online Publishing for All Students – SULS084 appeared first on Shake Up Learning.
October 12, 2020
Halloween Magnetic Poetry with Google Drawings!
The post Halloween Magnetic Poetry with Google Drawings! appeared first on Shake Up Learning.
Who’s ready for a little Halloween fun? Try Halloween Magnetic Poetry with Google Drawings!
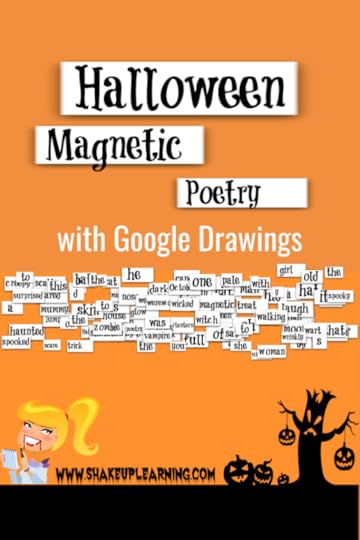
I’ve created a Halloween-themed magnetic poetry template with Google Drawings for you and your students.
There are nearly 100 words in this one, so adapt the words that are appropriate for your grade levels. You can use this as an independent activity, or take it a step further and make it a collaborative activity and see how the poetry evolves. You can use the “magnets” included, or even add your own text boxes to extend the activity.
(Note: The words I created are actually images and cannot be edited, but you can delete them. The images give you more of the “magnet” effect. You can add your own by creating a new text box and filling it with a white background, or right-click on the name box and copy it to use.)
To learn how to create your own, enroll in my free mini-course!
Halloween Magnetic Poetry with Google Drawings!
Click To Tweet
Get the Halloween Template
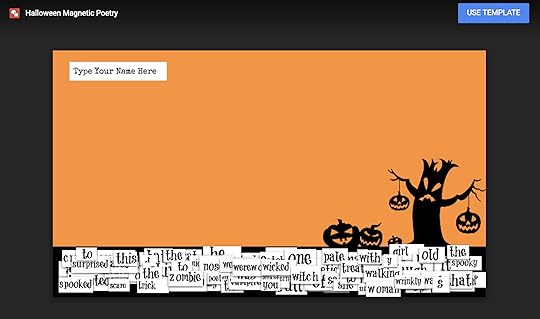
Click here to use the template | Click here to make a copy
Please make a copy of the template BEFORE assigning this to your students!
I repeat! Please make a copy of the template BEFORE assigning this to your students!
How to Assign Templates in Google Classroom
Please share your student creations with other teachers! I’ve set up a public folder where you can drop the file in your grade folder. This way we can see how this is used at different grade levels and give students a place to view other student work and leave comments and feedback! CLICK HERE TO ACCESS THE FOLDER.
Make sure you protect student privacy according to the policies by your school. When in doubt, first names only!
I also love to see pics of this in action on Twitter. Use the hashtag #ShakeUpLearning!
Or, share in the comments below this post!
Check out the other Magnetic Poetry posts:
Collaborative Magnetic Poetry with Google Drawings
Winter Magnetic Poetry with Google Slides
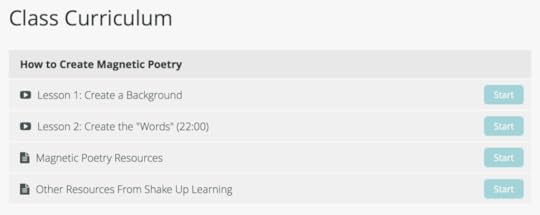
How to Create Magnetic Poetry Mini-Course
Want to learn how to make your own magnetic poetry and other types of interactive lessons?
Jump into my FREE mini-course, How to Create Magnetic Poetry with Google Slides and Drawings.
In this course, are two, quick, video-based lessons to show you how to create the background and create your own word images. All self-paced! Learn when and where you want! Easy peasy!
© Shake Up Learning 2020. Unauthorized use and/or duplication of this material without express and written permission from this blog’s author and/or owner is strictly prohibited. Excerpts and links may be used, provided that full and clear credit is given to Kasey Bell and Shake Up Learning with appropriate and specific direction to the original content on ShakeUpLearning.com. See: Copyright Policy.
The post Halloween Magnetic Poetry with Google Drawings! appeared first on Shake Up Learning.
October 6, 2020
Synchronous vs. Asynchronous Online Learning
The post Synchronous vs. Asynchronous Online Learning appeared first on Shake Up Learning.
It’s time to chat about Synchronous vs. Asynchronous Online Learning!
 With teachers learning so many new tools and strategies this year to facilitate remote learning, I thought it would be useful to discuss the idea of synchronous vs. asynchronous online learning.
I’ve seen a lot of confusion about what these words mean, and I think that defining these, along with strategies and tools, will help us better approach remote learning, hybrid learning, and yes, even face-to-face and blended learning.
Is that enough buzz words for ya? I promise these ideas and terms will help!
Synchronous vs. Asynchronous Online Learning – Strategies and tools to help teachers!
Click To Tweet
Listen to this article.
Shoutout
I’d like to send a huge shoutout to Daisy Marino of RaysofSunshineinc.org for inviting me to write a daily Christian devotional.
You can read it here: In Everything, Be Thankful!
Quick Tip (Publish to the Web in Slides)
Publishing your Google Slides lessons to the web gives you a unique link that anyone can view. It is a full window player, so you only see the slides one at a time. Use this unique link when sharing your screen in Zoom or Meet instead of clicking on “present.” This allows you to see more than one window at once.
video tutorial will be posted soon!
Synchronous vs. Asynchronous Online Learning
Many teachers who have only taught in face-to-face classroom settings have been learning new strategies and hearing new vocabulary like asynchronous learning. I think there is some confusion, so I want to help clarify.
In general, the terms synchronous learning and asynchronous learning have historically referred to online learning. As the lines between online, distance, remote, and blended learning get blurred, these definitions will continue to grow and evolve.
Definitions
Synchronous online activities are those that require students and instructors to be online at the same time. Instructions, lessons, discussions, and presentations occur at a specific time. All students must be online at that specific time in order to participate. (NOT FLEXIBLE)
Synchronous Examples
Zoom/Google Meet live classes, for example, every student must join a Zoom call at 9:00 for a live lesson.
Students collaborating in a Google Doc/Slide at the same time
Assigned work time during a live meeting (even if they turn their camera off), For example: Work on X assignment from 11:00-11:30.
Asynchronous online activities are just the opposite. Teachers provide materials, instructions, lessons, and assignments that can be accessed over an extended period of time. Students are given a timeframe and/or due dates to complete the work and watch lessons and videos. Interactions and discussions take place using asynchronous tools like discussion boards that do not require everyone to be connected at the same time. (FLEXIBLE)
Asynchronous activities require some student autonomy, ability to self-direct, and monitor progress.
NOTE: Asynchronous online learning does NOT mean independent work time while synchronously connected.
Asynchronous Examples
Zoom or Google Meet video recordings where the lesson video is posted online, and students can watch at different times.
Students are contributing to a collaborative Google Doc/Slide at different times.
For example, Give a week’s worth of assignments at the beginning of the week, and students take ownership to complete assignments within the time frame. (Flexible work time)
Blended Learning is a combination of face-to-face and online learning, so it combines any number of these strategies.
Strategies & Activities
Synchronous Strategies:
Direct instruction via live video
Small group instruction via live video
Live discussion
Guided practice
Facilitating live discussion
Facilitation live collaboration
Anything whole class and online at the same time (not usually independent)
Asynchronous strategies and activities: (independent, semi-independent, guided, self-paced)
Independent Reading
Exploring resources
Choice boards/Learning Menus
Project or problem-based learning
Personalized learning paths
Station rotation that is not live
Listening to podcasts or audiobooks independently
Watching videos independently
Research
Enrichment
The Tools
Many tools can be synchronous or asynchronous – depending on how you use them. However, there are several tools that lend themselves better to each strategy.
Synchronous tools:
Zoom live meeting
Google Meet live meeting
Microsoft Teams live meeting
Skype live meeting
Synchronous quizzes and games like Kahoot
Collaborative or cooperative work in Google Docs, Slides, Drawings, or Sheets (at the same time)
Anything that requires students to be in the same space at the same time, while doing the same task.
Instant message/chat
Live poll
Jamboard/Whiteboard collaboration at the same time
Asynchronous tools:
Flipgrid
Discussion boards like Google Groups or posting a question in Google Classroom
Any video or audio recording tool: Loom, Explain Everything, Screencastify
Contributing to a collaborative Google Docs, Slides, Drawings, or Sheets (at different times)
Edpuzzle
Padlet and Wakelet
Parlay
Survey or poll
any tool that students can use without a live instructor or facilitator
Unexpected Benefits of Online Learning
Students who would never speak up in class will suddenly have a voice.
Clone yourself! Post lessons, videos, and materials online so that you don’t have to keep answering the same questions and reteaching for those that missed the lesson.
Free yourself up to become a facilitator, work with small groups, and become more student-centered.
If students are sick or absent, all the information and activities are available online.
Podcast Question of the Week:
How can you use asynchronous online strategies with your students?
Post your answers in the Shake Up Learning Community or on your favorite social platform.
Join our FREE Shake Up Learning Facebook group.
© Shake Up Learning 2020. Unauthorized use and/or duplication of this material without express and written permission from this blog’s author and/or owner is strictly prohibited. Excerpts and links may be used, provided that full and clear credit is given to Kasey Bell and Shake Up Learning with appropriate and specific direction to the original content on ShakeUpLearning.com. See: Copyright Policy.
The post Synchronous vs. Asynchronous Online Learning appeared first on Shake Up Learning.
October 2, 2020
Collaborative Notes with Google Docs
The post Collaborative Notes with Google Docs appeared first on Shake Up Learning.
One of my favorite Dynamic Learning strategies is collaborative note-taking with Google Docs.
 Hands down, collaboration is one of the number one reasons to “Go Google!”
The beauty of G Suite lies in the collaborative features.
When students are able to take notes together, it allows them to learn from each other AND gives the teacher a way to check for understanding.
As a middle school teacher, it was difficult for me to teach note-taking skills and my students really struggled. They either tried to write down every word, got pieces and doodled on the sides. (By the way, doodling is OKAY!)
Honestly, I don’t think I really learned how to take notes myself until college. When I was in high school we weren’t allowed to share notes during class. (That was cheating!) If you missed something, you caught up with a friend in the hallway to copy their notes.
Collaborative Notes with #GoogleDocs
Click To Tweet
Collaborative Notes with Google Docs
Collaborative Note-Taking is a strategy for any age group that is old enough to take notes, usually 5th grade and up. There are many ways to make note-taking collaborative–small groups, partners, whole class, etc.
Four to five students are assigned different categories for the notes, for instance, new vocabulary. Then each student contributes to their assigned category in the notes. The student assigned to take notes on any new vocabulary listens to the lesson, or works through the activity and only adds to the collaborative notes when they encounter new vocabulary.
It is less overwhelming when you are responsible for taking notes on only one category or topic. It’s also a great way to model note-taking strategies.
Keep in mind, if you choose to do this whole class, every student doesn’t have to be assigned a category at the same time, but they become accountable.
If the student assigned to add new vocabulary misses something, any student can help them contribute–collaborative.
The beauty of taking notes together allows students to each contribute their own perspective. Something that one students takes away or understands may be different from the next students. But with collaborative notes, we have everyone’s thoughts, prior knowledge, and currently learning in one place.
This is particularly great for when students get distracted and miss something because another student will fill in the gap.
We are better together!
This is also a great strategy for professional learning, and I have used this idea in many of my workshops.
How to Introduce Collaborative Notes with Google Docs
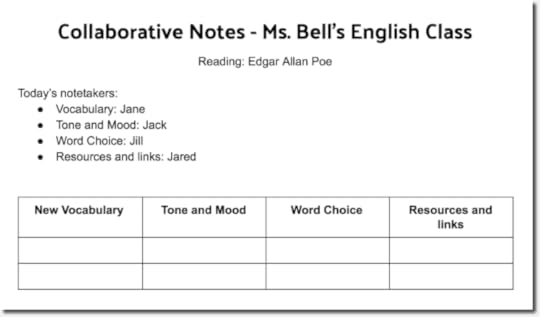
STEP 1: I create a Google Doc, and build a table inside the document. (See example below.) Tables give it some visual organizations, especially at first. It also keeps students from typing on top of each other. (Tip: If you choose to have more than 4 categories, change your page orientation to landscape to fit the table better.)
STEP 2: I assign each column to a different category. The categories will vary based on what you are teaching. I would break it into four or five categories.
Here are a few category examples to get your going:
vocabulary/spelling (all subjects),
important dates (social studies, ELAR, and other subjects),
important people (all subjects),
important events (social studies, ELAR, and other subjects),
formulas (math, science),
resource links (all subjects),
steps in a process (all subjects)
quotes (reading)
Use anything that you would want students to take notes on.
STEP 3: Then I assign one student to each category. I will often pre-populate the table with information I have already covered in my introduction–giving them a starting place and a model.
STEP 4: The rest of the class/group is encouraged to contribute, but those assigned to take notes have the official responsibility. The class will take turns as official note-takers, giving each participant an opportunity to contribute and learn a little more about Google Docs as we go.
If someone sees another category or idea needs to be added to the notes later, they can use the free space below the table.
Keep in mind, note-taking is not limited to text. Students can insert images, Google Drawings, links, emojis, and more.
What Students Learn from Collaborative Note-Taking
DON’T GET FANCY! The beauty of this learning experience is not just the notes and content learning, it’s seeing how student collaborate, check for understanding, model note-taking, AND learn how to use Google Docs.
In the image of my notes example above, I did very little formatting. In fact, I only left two empty rows in the table. That’s by design.
There is ALWAYS a student (or three) that want to format things and make them look pretty, changing fonts, colors, adding bullets, etc. They, in turn, will show the rest of the class how to format in Google Docs. If this gets out of hand, you can assign one student to format AFTER the notes are complete.
When students realize they don’t have enough space in the table, they will ask how to add another row or they will just figure it out! So students are learning valuable tech skills as they take notes.
Tip: The Google Docs chat feature can also be utilized as a backchannel for the class to discuss their notes.
Student Ownership of Learning
Gradually, I give more and more control of the notes over to the students–eventually no longer assigning note-takers. (Yay! Student ownership of learning!)
Eventually, you will not even create and share the guided notes, students will create and share with you!
The notes become what students need them to be, and are good as they want them to be.
Dynamic, Blended Learning with Google
 I talk a lot about making blending learning like this DYNAMIC! Applying my Dynamic Learning Framework, the collaborative note-taking strategy helps us tap into the four c’s–communication and collaboration. It also helps us go Beyond the Tool by using Google Docs to new, collaborative things. If you choose, the notes do not have to be limited to one activity, but could live and grow throughout the unit, semester, or school year, which allows us to think beyond one-and-done, hitting another DL characteristic, Beyond the Due Date.
The integration of Google Docs has endless possibilities for students and teachers. Collaboration allows us to be stronger and wiser together. Please feel free to share your ideas in the comments below.
Beyond Google Docs
Of course, there are many other applications that students can use to take collaborative notes. I like to start with Google Docs as a stepping stone before getting into other applications within G Suite or beyond.
The skills students learn, such as formatting, and general style of collaborative note-taking will carry over into any other applications you want to try.
Google Slides and Jamboard can allow for more abstract organization, and it’s easier to add images and allows students to embed video.
Give it a try, and let me know what you think!
New Book Coming Soon: Blended Learning with Google
If you like the idea in this post, you are going to love my new book, Blended Learning with Google!
In this book, I’m sharing my favorite strategies for using Google tools to create dynamic, blended learning experiences!
Use the form below to join the waitlist and be the first to know the release date, pre-order bonuses, and more!
© Shake Up Learning 2020. Unauthorized use and/or duplication of this material without express and written permission from this blog’s author and/or owner is strictly prohibited. Excerpts and links may be used, provided that full and clear credit is given to Kasey Bell and Shake Up Learning with appropriate and specific direction to the original content on ShakeUpLearning.com. See: Copyright Policy.
The post Collaborative Notes with Google Docs appeared first on Shake Up Learning.