Kasey Bell's Blog, page 33
April 20, 2021
Add Bullets and Formatting in Google Classroom!
The post Add Bullets and Formatting in Google Classroom! appeared first on Shake Up Learning.
Hooray! Google Classroom formatting is here!
 We can finally format our posts in Google Classroom with bullets, bold, italics, and underline!
Nothing glamorous here folks, but something we needed to emphasize certain words and steps in our Google Classroom assignment instructions.
Now, when you create a post in Google Classroom you should see a formatting toolbar for bold, italics, underline, bullets, and remove formatting.
This makes posts and instructions so much cleaner!
Call out important information and steps with bullets and formatting to help students better understand your Google Classroom posts.
Add Bullets and Formatting in #GoogleClassroom!
Click To Tweet Add Bullets and Formatting in Google Classroom!Access ALL the Google Quick Tips Here!Check out ALL the Google Classroom Resources Here!amzn_assoc_tracking_id = "shauplea-20";amzn_assoc_ad_mode = "manual";amzn_assoc_ad_type = "smart";amzn_assoc_marketplace = "amazon";amzn_assoc_region = "US";amzn_assoc_design = "enhanced_links";amzn_assoc_asins = "1735601829";amzn_assoc_placement = "adunit";amzn_assoc_linkid = "45e28ed74bb20171862e30ab5be2b0c3";
amzn_assoc_tracking_id = "shauplea-20";amzn_assoc_ad_mode = "manual";amzn_assoc_ad_type = "smart";amzn_assoc_marketplace = "amazon";amzn_assoc_region = "US";amzn_assoc_design = "enhanced_links";amzn_assoc_asins = "1735601802";amzn_assoc_placement = "adunit";amzn_assoc_linkid = "4c02c8cc44526bc9fbb710edf527215a";
© Shake Up Learning 2021. Unauthorized use and/or duplication of this material without express and written permission from this blog’s author and/or owner is strictly prohibited. Excerpts and links may be used, provided that full and clear credit is given to Kasey Bell and Shake Up Learning with appropriate and specific direction to the original content on ShakeUpLearning.com. See: Copyright Policy.
The post Add Bullets and Formatting in Google Classroom! appeared first on Shake Up Learning.


Must-Have Google Skills for Teachers (Part 4 – Google Docs & Slides) – SULS0106
The post Must-Have Google Skills for Teachers (Part 4 – Google Docs & Slides) – SULS0106 appeared first on Shake Up Learning.
In this episode, I am sharing some must-have Google skills for two of the most used Google  applications, Google Docs and Google Slides!
Better yet, most of these skills will transfer to other applications as well.
Learn how to make the most of Google, save time, and learn some best practices to help you thrive with Google!
This is Part 4 of a 4-part series on Must-Have Google Skills for Teachers.
You don’t want to miss Part 1, Part 2, or Part 3!
Must-Have Google Skills for Teachers (Part 4 – #GoogleDocs & #GoogleSlides)
Click To Tweet This episode is sponsored by Schoolytics.Schoolytics helps you measure, monitor, and manage student engagement and assignments. It also organizes all the student engagement data from Google Classroom in one easy-to-use dashboard. And my favorite part? Schoolytics is free for teachers!
Visit: schoolytics.io to sign up!
Listen to this article.


Thank you to Kelly Bell (no relation) for sharing her love of Blended Learning with Google on Instagram! Be sure to check out Kelly on e67 of the podcast!
Quick Tip of the Week (Google Classroom)Rich text formatting has finally arrived in Google Classroom–add bullets, bold, underline, and italics to your posts and assignments.
 Watch this quick video to learn how!
Subscribe to Shake Up Learning on YouTube
Must-Have Google Docs and Slides Skills for TeachersToday, I am sharing some MUST-HAVE skills for teachers that use Google Docs and Slides. But I also have to mention that most of these skills will transfer to other applications in the Google suite as well.
Google Docs and Google Slides are probably the two most-used applications, so they definitely needed to be included on my must-have skills list!
Once you learn how to do something in one Google application, it often transfers to other applications.
Create a New Google Doc or Slide DeckThere are many ways to create a new Google file.
One way is to go to the homepage for that application:
Docs Homepage: docs.google.comSlides Homepage: slides.google.comSheets Homepage: sheets.google.comForms Homepage: forms.google.comJamboard Homepage: jamboard.google.comSites Homepage: sites.google.comDo you see a pattern?
From the homepage, you can start with a blank doc or select one of the handy templates. (Note: Drawings doesn’t have a homepage. If you go to drawings.google.com, it will automatically create a new Google Drawing.
In Part 3, I mentioned how to create a new file from Google Drive, and I shared a quick URL trick that is worth repeating (see video below)!
Page Setup in Docs & SlidesPage setup is a must-have skill for Google Docs and Google Slides.
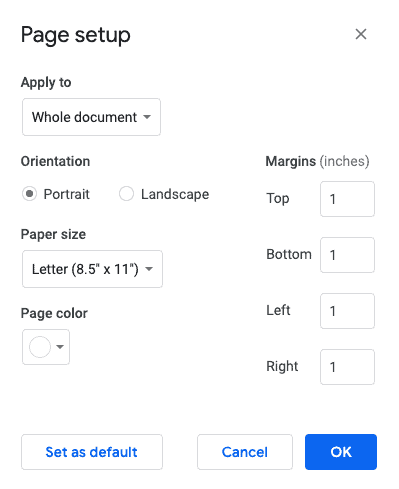
Google Docs Page SetupWhen you are creating a document in Google Docs, you need to be able to set up the page to work with your content or project. You may need to switch to landscape, change the margins, page color, or paper size.
In your Doc, go to File > Page Set Up.
Even though we don’t typically think of slides as “pages,” the steps are the same. You can customize the size of your slides into anything you want! Changing the size opens up many more possibilities for using Slides as a creation tool.
Related: 25 Things You Didn’t Know Google Slides Could Do!
Customize the Size of Your Slides
In your Slides, go to File > Page Set Up
From the dropdown, choose “Custom.”
Make the slides any size you want:
InchesCentimetersPointsPixels(Note: the size will apply to ALL slides.)
 amzn_assoc_tracking_id = "shauplea-20";amzn_assoc_ad_mode = "manual";amzn_assoc_ad_type = "smart";amzn_assoc_marketplace = "amazon";amzn_assoc_region = "US";amzn_assoc_design = "enhanced_links";amzn_assoc_asins = "1735601829";amzn_assoc_placement = "adunit";amzn_assoc_linkid = "45e28ed74bb20171862e30ab5be2b0c3";
Look for the “Share” button near the top right in Docs and Slides to share and collaborate in Docs and Slides.

Collaboration is the NUMBER ONE reason to use Google, and a MUST-HAVE skill for teachers and students.
From here, you can invite collaborators or make the file accessible with a link.
To learn more about sharing, watch the video below.
Make a CopyHands-down, one of the most important skills for ANY Google user is to know how to make a copy!
Most of the time, if you have the right to view a file, you have the option to make a copy and save it to your Drive. This way, you can edit the file and make it your own.
I shared how to make a copy from Google Drive in Part 3, but let’s look at it inside the application.
How to Make a Copy of Docs, Slides, Sheets, or Drawings,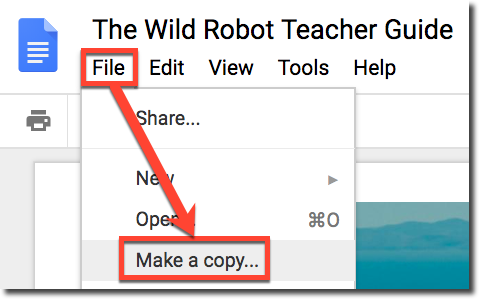 STEP 1: Open the file (Google Doc, Slide, Drawing, or Sheet) in your browser (Chrome is recommended).
STEP 2: Go to the FILE menu and select MAKE A COPY.
STEP 3: A small popup will prompt you to name your new copy and give you the option to organize it in one of your Google Drive folders. Click on the folder to select a different folder or create a new folder.
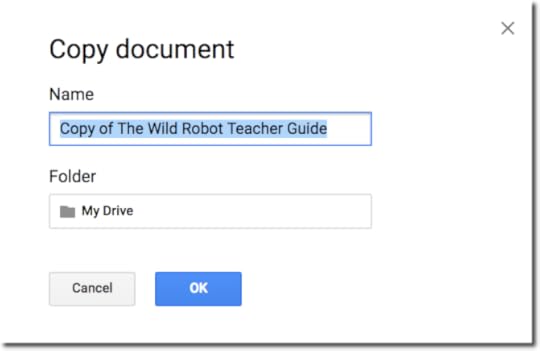
Note: If you are copying your own document, you will also see two checkboxes. (1) Share it with the same people, which will automatically share the new copy with the same people, and (2) Copy comments, which will automatically copy all of the comments from the original document to the new file.
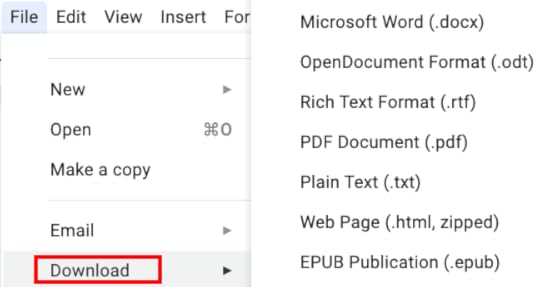
Click OK.Check out this blog post for more information about making a copy of Google files.Download FilesMost Google applications, including Docs and Slides, allow you to download as different file types. This is super handy!
Think of this as CONVERTING to a different file type.
Download in DocsIn Docs, the most common conversions are .docx and .pdf–the most universally accepted file format in the world.
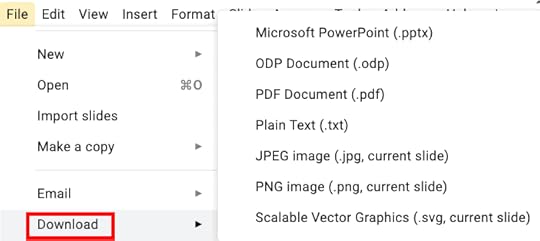
In Slides, the most common conversions are .pptx, .pdf, .jpeg, and .png. Those last two are image formats, meaning that you can convert a slide into an image and use it wherever you use images.
 amzn_assoc_tracking_id = "shauplea-20";amzn_assoc_ad_mode = "manual";amzn_assoc_ad_type = "smart";amzn_assoc_marketplace = "amazon";amzn_assoc_region = "US";amzn_assoc_design = "enhanced_links";amzn_assoc_asins = "1735601802";amzn_assoc_placement = "adunit";amzn_assoc_linkid = "4c02c8cc44526bc9fbb710edf527215a";
One particular skill that all teachers and students need to learn is how to insert and edit images in Docs and Slides.
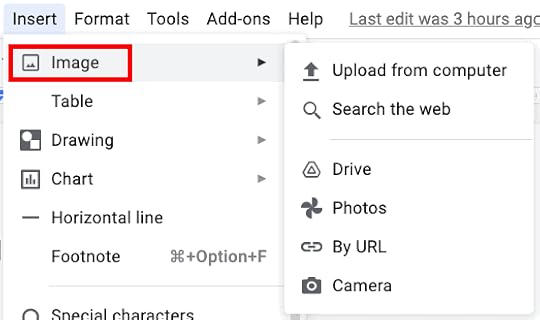
Insert Images in Docs and SlidesGo to Insert > Image, and you will see all the options for inserting images into Google Docs and Slides. Again, this skill transfers to other Google applications where you will see similar options for inserting images.
Upload an image that is saved on your computerSearch the web for images (This opens in a sidebar inside the application. Great for students!)Insert an image that is saved in your Google Drive.Insert an image from your Google Photos.Insert an image by URL–a unique image address that you can copy and paste.Or, use the webcam on your device to insert by camera.
Once you have inserted an image, you also have several image editing options.
Resizing Images
You can easily resize images by selecting the image and clicking and dragging the blue “handles” until you have the desired size.
To keep the proportion ratio, hold the SHIFT key as you click and drag. This will keep the image from looking out of proportion.

Cropping Images
Related: 10 Google Docs Tips Every Teacher Should Know
Masking ImagesInsert Video in Google SlidesOne feature that is ONLY available in Google Slides is the ability to insert a video from Google Drive or YouTube.
To insert a video in Slides, go to Insert > Video.
Then you can search YouTube for your video, copy and paste a link to a YouTube video, or bring in a video that is saved in your Google Drive.
Once you have inserted a video, you will have some video formatting options that pop up in a sidebar to the right.
To learn more about video formatting options, check out this post: 4 Video Formatting Options That Will Make Your Day. amzn_assoc_tracking_id = "shauplea-20";amzn_assoc_ad_mode = "manual";amzn_assoc_ad_type = "smart";amzn_assoc_marketplace = "amazon";amzn_assoc_region = "US";amzn_assoc_design = "enhanced_links";amzn_assoc_asins = "1946444693";amzn_assoc_placement = "adunit";amzn_assoc_linkid = "3567fefd26ae685b347909c6cb09d453";
The comment feature is available in most Google applications and is definitely a must-have skill for teachers in students.
Comments usually appear on the right side of the document or file.
Comments are great for teacher feedback, peer feedback, and other communication and collaboration.
There are several ways to insert a comment:
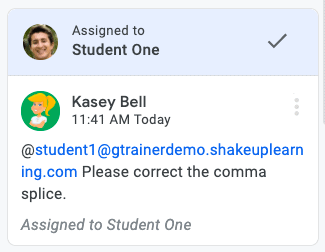
Inside the application (Docs, Slides, Sheets, Drawings), go to Insert > Comment.Click on the comment button near the top right (next to the share button), then click the plus sign to add a comment.In Docs, you can hover over the edge of the page, and you will see an icon to click to add a comment.Or, just use the keyboard shortcut (Control + Alt +M).Tag People (or Students) in CommentsNot only can you comment to leave feedback for students or collaborating with other educators, but you can also “tag” people in the comments, so it’s clear that the comment is meant for them.
To mention someone in a comment, type the “@” symbol and type their email address.
Once the user is found, you can check a box to assign that person a task.
If they have email enabled, they will get an email notification that they have been tagged in a comment.
Related: Tag Students in Comments in Google Classroom
Insert LinksAnother skill that will transfer across many Google applications is inserting a link.
To insert a link, highlight the text or object you wish to link. Then try one of the following methods:
Inside Docs, Sheets, Slides, Drawings, go to Insert > Link.Or, click on the link icon in the toolbar.Or, try the keyboard shortcut “Control + K.”By the way, that keyboard shortcut works in many other applications outside of Google. Super handy!
WHEW! That was a lot of info! Don’t miss the other parts in this series! Part 1: MUST-HAVE Chrome/Chromebook SkillsPart 2: MUST-HAVE Google Classroom SkillsPart 3: MUST-HAVE Google Drive Skillsamzn_assoc_tracking_id = "shauplea-20";amzn_assoc_ad_mode = "manual";amzn_assoc_ad_type = "smart";amzn_assoc_marketplace = "amazon";amzn_assoc_region = "US";amzn_assoc_design = "enhanced_links";amzn_assoc_asins = "1735601829";amzn_assoc_placement = "adunit";amzn_assoc_linkid = "45e28ed74bb20171862e30ab5be2b0c3";
© Shake Up Learning 2021. Unauthorized use and/or duplication of this material without express and written permission from this blog’s author and/or owner is strictly prohibited. Excerpts and links may be used, provided that full and clear credit is given to Kasey Bell and Shake Up Learning with appropriate and specific direction to the original content on ShakeUpLearning.com. See: Copyright Policy.
The post Must-Have Google Skills for Teachers (Part 4 – Google Docs & Slides) – SULS0106 appeared first on Shake Up Learning.
April 15, 2021
Use Custom Colors in Google Projects! (Docs, Slides, Sheets, Drawings)
The post Use Custom Colors in Google Projects! (Docs, Slides, Sheets, Drawings) appeared first on Shake Up Learning.
Do you ever get frustrated trying to find the exact color for your fonts, background, or other objects in your  Google projects?
Try the eyedropper Chrome extension to grab the exact color code and use it in your Google projects in Docs, Slides, Sheets, Drawings, and more!
Match the exact color of anything on the web!
I use the Eyedropper Chrome extension to copy the color code from images on the web.
Matching colors exactly will give your presentations, docs, and other Google projects a more professional look!
Use Custom Colors in Google Projects! (Docs, Slides, Sheets, Drawings) #GoogleEdu
Click To Tweet Use Custom Colors in Google Projects!Access ALL the Google Quick Tips Here!Check out all our Remote Learning Resources!amzn_assoc_tracking_id = "shauplea-20";amzn_assoc_ad_mode = "manual";amzn_assoc_ad_type = "smart";amzn_assoc_marketplace = "amazon";amzn_assoc_region = "US";amzn_assoc_design = "enhanced_links";amzn_assoc_asins = "1735601829";amzn_assoc_placement = "adunit";amzn_assoc_linkid = "45e28ed74bb20171862e30ab5be2b0c3";
amzn_assoc_tracking_id = "shauplea-20";amzn_assoc_ad_mode = "manual";amzn_assoc_ad_type = "smart";amzn_assoc_marketplace = "amazon";amzn_assoc_region = "US";amzn_assoc_design = "enhanced_links";amzn_assoc_asins = "1735601802";amzn_assoc_placement = "adunit";amzn_assoc_linkid = "4c02c8cc44526bc9fbb710edf527215a";
© Shake Up Learning 2021. Unauthorized use and/or duplication of this material without express and written permission from this blog’s author and/or owner is strictly prohibited. Excerpts and links may be used, provided that full and clear credit is given to Kasey Bell and Shake Up Learning with appropriate and specific direction to the original content on ShakeUpLearning.com. See: Copyright Policy.
The post Use Custom Colors in Google Projects! (Docs, Slides, Sheets, Drawings) appeared first on Shake Up Learning.
April 13, 2021
Must-Have Google Skills for Teachers (Part 3 – Google Drive) – SULS0105
The post Must-Have Google Skills for Teachers (Part 3 – Google Drive) – SULS0105 appeared first on Shake Up Learning.
In this episode, I’m sharing the must-have Google Drive skills for teachers.
 Google Drive is much more than just cloud storage.
And once you start using Google tools with your students, it’s imperative that you use and understand Google Drive.
Let’s take our Google Drive skills to the next level, and learn some tips and tricks along the way.
(This is Part 3 of a 4-part series on Must-Have Google Skills for Teachers.)
Must-Have #GoogleDrive Skills for Teachers!
Click To TweetListen to this article.
Thank you to @lessonplantoolbox on Instagram for recommending Shake Up Learning!
(Follow @ShakeUpLearning on Instagram.)
Quick Tip of the Week (Use Custom Colors in Google Projects)Do you ever get frustrated trying to find the exact color for your fonts, background, or other objects in your Google projects? Try the eyedropper Chrome extension to grab the exact color code and use it in your Google projects in Docs, Slides, Sheets, Drawings, and more!
Watch this quick video to learn how!
Subscribe to Shake Up Learning on YouTube
Must-Have Google Skills for TeachersWelcome to Part 3 of this 4-part series on Must-Have Google Skills for Teachers!
Even though this series is for teachers, these skills are necessary for just about any Google user–students, parents, ANYONE!
In this post, we will cover those must-have Google Drive skills and give you some handy tips and tricks along the way.
What is Google Drive?“Google Drive is a free, cloud-based storage service that enables users to store and access files online. The service syncs stored documents, both Google file types, including Docs and Slides, and other files across all of the user’s devices, including mobile devices, tablets, and personal computers.”
– Google from A to Z: The Google Glossary for Teachers by Kasey Bell amzn_assoc_tracking_id = "onamzshauplea-20";amzn_assoc_ad_mode = "manual";amzn_assoc_ad_type = "smart";amzn_assoc_marketplace = "amazon";amzn_assoc_region = "US";amzn_assoc_design = "enhanced_links";amzn_assoc_asins = "1735601802";amzn_assoc_placement = "adunit";amzn_assoc_linkid = "e0e95b9905443e87af51796b4858f159";
In order to understand Google Drive, Dropbox, Box, or any other cloud-based storage system, you need to understand what cloud computing is.
Cloud storage is like having a hard drive online. It allows you to save your data and files using third-party providers, like Google, and access it using an internet connection and browser.
Think of Google Drive as another hard drive on your computer, the storage for your files and data, but it’s accessible from any connected device.
Almost every other Google application you use as a teacher, Google Classroom, Google Docs, Google Slides, etc., are all connected to Google Drive.
What is My Drive?Google Drive is divided into different segments; the most prominent and most important is called “My Drive,” this is where YOUR Google stuff is stored.
You can create Google files, like Google Docs and Slides, that are stored in Drive. You can also upload other files and folders and store them in My Drive.
Changes to Google Drive StorageI mentioned this in Google Workspace for Education and Other Updates You Need to Know, but it bears repeating since we are talking about storage.
Unlimited storage is going away. The new storage model will provide schools and universities with a baseline of 100TB of pooled cloud storage shared across all of your users. This policy will go into effect across all Google Workspace for Education editions for existing customers in July 2022 and will be effective for new customers signing up in 2022.
Learn more about storage here.
Create from DriveClick the “New” button near the top-left to create new files like Docs, Sheets, Slides, Forms, Drawings, and more.
You can also create new folders to organize your files, upload files or folders from your computer, and even connect your favorite third-party apps like Nearpod.
It’s super easy to upload a file or entire folder of files into your Google Drive for easy access or backup.
On your computer, you can upload from drive.google.com or your desktop. You can upload files into private or shared folders.
On your computer, go to drive.google.com.At the top left, click New File Upload or Folder Upload.Choose the file or folder you want to upload.Drag files into Google DriveOn your computer, go to drive.google.com.Open or create a folder.To upload files and folders, drag them into the Google Drive folder.How to Share from Drive
Sharing is a MUST-HAVE skill when using Google! But it gets complicated. I’m sticking to the very basics in this post, but be sure you check out my FREE eBook: The Guide to Google Drive Sharing.
Step 1: Find the file you want to share
Share a single file
On a computer, go to Google Drive, Docs, Sheets, or Slides.Click the file you want to share.Click Share or .
.Step 2: Choose who to share with & how they can use your file
Share with specific people
If you use a Google Account through work or school, you might not be able to share files outside of your organization.
Select the file you want to share.Click Share or.Under “Share with people and groups,” enter the email address you want to share with.To change what people can do to your doc, on the right, click the Down arrow 
 Viewer, Commenter, or Editor.Choose to notify people.If you want to notify people that you shared a doc with them, check the box next to Notify people. If you notify people, each email address you enter will be included in the email.If you don’t want to notify people, uncheck the box.Click Share or Send.<span data-mce-type="bookmark" style="display: inline-block; width: 0px; overflow: hidden; line-height: 0;" class="mce_SELRES_start"></span> </p></p></p></p></p></p></p></p></p></p></p></p></p></p></p></p></p></p></p></p></p></p></p></p></p></p></p></p></p></p></p></p></p></p></p></p></p></p></p></p></p></p></p></p></p></p></p></p></p></p></p></p></p></p></p></p></p></p></p></p></p></p></p></p></p></p></p></p></p></p></p></p></p></p></p></p></p></p></p></p></p></p></p></p></p></p></p></p></p></p></p></p></p></p></p></p></p></p></p></p></p></p></p></p></p></p></p></p></p></p></p></p></p></p></p></p></p></p></p></p></p></p></p></p></p></p></p></p></p></p></p></p></p></p></p></p></p></p></p></p></p></p></p></p></p></p></p></p></p></p></p></p></p></p></p></p></p></p></p></p></p></p></p></p></p></p></p></p></p></p></p></p></p></p></p></p></p></p></p></p></p></p></p></p></p></p></p></p></p></p></p></p></p></p></p></p></p></p></p></p></p></p></p></p></p></p></p></p></p></p></p></p></p></p></p></p></p></p></p></p></p></p></p></p></p></p></p></p></p></p></p></p></p></p></p></p></p></p></p></p></p></p></p></p></p></p></p></p></p></p></p></p></p></p></p></p></p></p></p></p></p></p></p></p></p></p></p></p></p></p></p></p></p></p></p></p></p></p></p></p></p></p></p></p></p></p></p></p></p></p></p></p></p></p></p></p></p></p></p></p></p></p></p></p></p></p></p></p></p></p></p></p></p></p></p></p></p></p></p></p></p></p></p></p></p></p></p></p></p></p></p></p></p></p></p></p></p></p></p></p></p></p></p></p></p></p></p></p></p></p></p></p></p></p></p></p></p></p></p></p></p></p></p></p></p></p></p></p></p></p></p></p></p></p></p></p></p></p></p></p></p></p></p></p></p></p></p></p></p></p></p></p></p></p></p></p></p></p></p></p></p></p></p></p></p></p></p></p></p></p></p></p></p></p></p></p></p></p></p></p></p></p></p></p></p></p></p></p></p></p></p></p></p></p></p></p></p></p></p></p></p></p></p></p></p></p></p></p></p></p></p></p></p></p></p></p></p></p></p></p></p></p></p></p></p></p></p></p></p></p></p></p></p></p></p></p></p></p></p></p></p></p></p></p></p></p></p></p></p></p></p></p></p></p></p></p></p></p></p></p></p></p></p></p></p></p></p></p></p></p></p></p></p></div></p></p></p></p></p></p></p></p></p></p></p></p></p></p></p></p></p></p></p></p></p></p></p></p></p></p></p></p></p></p></p></p></p></p></p></p></p></p></p></p></p></p></p></p></p></p></p></p></p></p></p></p></p></p></p></p></p></p></p></p></p></p></p></p></p></p></p></p></p></p></p></p></p></p></p></p></p></p></p></p></p></p></p></p></p></p></p></p></p></p></p></p></p></p></p></p></p></p></p></p></p></p></p></p></p></p></p></p></p></p></p></p></p></p></p></p></p></p></p></p></p></p></p></p></p></p></p></p></p></p></p></p></p></p></p></p></p></p></p></p></p></p></p></p></p></p></p></p></p></p></p></p></p></p></p></p></p></p></p></p></p></p></p></p></p></p></p></p></p></p></p></p></p></p></p></p></p></p></p></p></p></p></p></p></p></p></p></p></p></p></p></p></p></p></p></p></p></p></p></p></p></p></p></p></p></p></p></p></p></p></p></p></p></p></p></p></p></p></p></p></p></p></p></p></p></p></p></p></p></p></p></p></p></p></p></p></p></p></p></p></p></p></p></p></p></p></p></p></p></p></p></p></p></p></p></p></p></p></p></p></p></p></p></p></p></p></p></p></p></p></p></p></p></p></p></p></p></p></p></p></p></p></p></p></p></p></p></p></p></p></p></p></p></p></p></p></p></p></p></p></p></p></p></p></p></p></p></p></p></p></p></p></p></p></p></p></p></p></p></p></p></p></p></p></p></p></p></p></p></p></p></p></p></p></p></p></p></p></p></p></p></p></p></p></p></p></p></p></p></p></p></p></p></p></p></p></p></p></p></p></p></p></p></p></p></p></p></p></p></p></p></p></p></p></p></p></p></p></p></p></p></p></p></p></p></p></p></p></p></p></p></p></p></p></p></p></p></p></p></p></p></p></p></p></p></p></p></p></p></p></p></p></p></p></p></p></p></p></p></p></p></p></p></p></p></p></p></p></p></p></p></p></p></p></p></p></p></p></p></p></p></p></p></p></p></p></p></p></p></p></p></p></p></p></p></p></p></p></p></p></p></p></p></p></p></p></p></p></p></p></p></p></p></p></p></p></p></p></p></p></p></p></p></p></p></p></p></p></p></p></p></p></p></p></p></p></p></p></p></p></p></p></p></p></p></p></p></p></p></p></p></p></p></p></p></p></p></p></p></p></p></p></p></p></p></p></p></p></p></p></p></p></p></p></p></p></p></p></p></p></p></p></p></p></p></p></p></p></p></p></p></p></p></p></p></p></p></p></p></p></p></p></p></p></p></p></p></p></p></p></p></p></p></p></p></p></p></p></p></p></p></p></p></p></p></p></p></p></p></p></p></p></p></p></p></p></p></p></p></p></p></p></p></p></p></p></p></p></p></p></p></p></p></p></p></p></p></p></p></p></p></p></p></p></p></p></p></p></p></p></p></p></p></p></p></p></p></p></p></p></p></p></p></p></p></p></p></p></p></p></p></p></p></p></p></p></p></p></p></p></p></p></p></p></p></p></p></p></p></p></p></p></p></p></p></p></p></p></p></p></p></p></p></p></p></p></p></p></p></p></p></p></p></p></p></p></p></p></p></p></p></p></p></p></p></p></p></p></p></p></p></p></p></p></p></p></p></p></p></p></p></p></p></p></p></p></p></p></p></p></p></p></p></p></p></p></p></p></p></p></p></p></p></p></p></p></p></p></p></p></p></p></p></p></p></p></p></p></p></p></p></p></p></p></p></p></p></p></p></p></p></p></p></p></p></p></p></p></p></p></p></p></p></p></p></p></p></p></p></p></p></p></p></p></p></p></p></p></p></p></p></p></p></p></p></p></p></p></p></p></p></p></p></p></p></p></p></p></p></p></p></p></p></p></p></p></p></p></p></p></p></p></p></p></p></p></p></p></p></p></p></p></p></p></p></p></p></p></p></p></p></p></p></p></p></p></p></p></p></p></p></p></p></p></p></p></p></p></p></p></p></p></p></p></p></p></p></p></p></p></p></p></p></p></p></p></p></p></p></p></p></p></p></p></p></p></p></p></p></p></p></p></p></p></p></p></p></p></p></p></p></p></p></p></p></p></p></p></p></p></p></p></p></p></p></p></p></p></p></p></p></p></p></p></p></p></p></p></p></p></p></p></p></p></p></p></p></p></p></p></p></p></p></p></p></p></p></p></p></p></p></p></p></p></p></p></p></p></p></p></p></p></p></p></p></p></p></p></p></p></p></p></p></p></p></p></p></p></p></p></p></p></p></p></p></p></p></p></p></p></p></p></p></p></p></p></p></p></p></p></p></p></p></p></p></p></p></p></p></p></p></p></p><h2>Organize Google Drive<br />Shared with me<br />Make a copy<br />How to Search Google Drive<br />Offline</h2></p></p></p></p></p></p></p></p></p></p></p></p></p></p></p></p></p></p></p></p></p></p></p></p></p></p></p></p></p></p></p></p></p></p></p></p></p></p></p></p></p></p></p></p></p></p></p></p></p></p></p></p></p></p></p></p></p></p></p></p></p></p></p></p></p></p></p></p></p></p></p></p></p></p></p></p></p></p></p></p></p></p></p></p></p></p></p></p></p></p></p></p></p></p></p></p></p></p></p></p></p></p></p></p></p></p></p></p></p></p></p></p></p></p></p></p></p></p></p></p></p></p></p></p></p></p></p></p></p></p></p></p></p></p></p></p></p></p></p></p></p></p></p></p></p></p></p></p></p></p></p></p></p></p></p></p></p></p></p></p></p></p></p></p></p></p></p></p></p></p></p></p></p></p></p></p></p></p></p></p></p></p></p></p></p></p></p></p></p></p></p></p></p></p></p></p></p></p></p></p></p></p></p></p></p></p></p></p></p></p></p></p></p></p></p></p></p></p></p></p></p></p></p></p></p></p></p></p></p></p></p></p></p></p></p></p></p></p></p></p></p></p></p></p></p></p></p></p></p></p></p></p></p></p></p></p></p></p></p></p></p></p></p></p></p></p></p></p></p></p></p></p></p></p></p></p></p></p></p></p></p></p></p></p></p></p></p></p></p></p></p></p></p></p></p></p></p></p></p></p></p></p></p></p></p></p></p></p></p></p></p></p></p></p></p></p></p></p></p></p></p></p></p></p></p></p></p></p></p></p></p></p></p></p></p></p></p></p></p></p></p></p></p></p></p></p></p></p></p></p></p></p></p></p></p></p></p></p></p></p></p></p></p></p></p></p></p></p></p></p></p></p></p></p></p></p></p></p></p></p></p></p></p></p></p></p></p></p></p></p></p></p></p></p></p></p></p></p></p></p></p></p></p></p></p></p></p></p></p></p></p></p></p></p></p></p></p></p></p></p></p></p></p></p></p></p></p></p></p></p></p></p></p></p></p></p></p></p></p></p></p></p></p></p></p></p></p></p></p></p></p></p></p></p></p></p></p></p></p></p></p></p></p></p></p></p></p></p></p></p></p></p></p></p></p></p></p></p></p></p></p></p></p></p></p></p></p></p></p></p></p></p></p></p></p></p></p></p></p></p></p></p></p></p></p></p></p></p></p></p></p></p><p>Organize Google Drive
We will touch on some of the basics of organization, but I highly recommend you check out this post for more organization tips: 13 Tips to Organize Your Google Drive.
Move Files into FoldersOnce you have files and folders created or uploaded, you will want to organize.
To move files into folders, you can click-and-drag files into folders. Click-and-drag is a MUST-HAVE skill for teachers AND students; pretty much everyone needs to practice and master this skill.
Similarly, you can right-click (or control + click) and select “Move” to move files into folders and subfolders.
Quick Tip: Add Files to Multiple FoldersYou can add the same file to multiple folders without having to make separate copies.
Color-Code Your FoldersAdding color to your folders can help you visually recognize files faster and give you additional ways to organize your Google Drive.
As you can see in the screenshot above and below, the folders are colored. Not only is this more visually appealing than plain old grey, but you can assign meaning to specific colors.
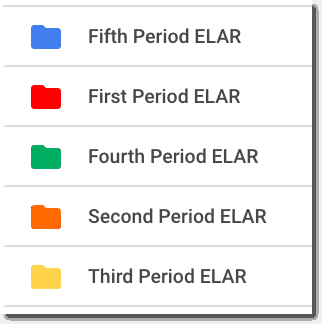
To change the color of the folder from Drive.
Right-click (or control-click) on the folderGo to “Change Color”Select the color from the paletteYou may really love color coding and color all of your folders, or you may be more like me and just add color to your most important folders, so they stand out. amzn_assoc_tracking_id = "shauplea-20";amzn_assoc_ad_mode = "manual";amzn_assoc_ad_type = "smart";amzn_assoc_marketplace = "amazon";amzn_assoc_region = "US";amzn_assoc_design = "enhanced_links";amzn_assoc_asins = "1735601829";amzn_assoc_placement = "adunit";amzn_assoc_linkid = "45e28ed74bb20171862e30ab5be2b0c3";
Shared with me doesn’t belong to YOU! Those are files that are owned by other people that have been shared with you.
DO NOT “CLEAN UP” OR DELETE FILES IN “SHARED WITH ME!”
Think of this like a filter that just shows you want files that have been shared with you.
Yes, you can add shortcuts and organize them into folders if you like. (That skill goes beyond our scope today, but I’ll be sharing a video soon!)
But teachers, please, resist the urge to clean this up. You could mess up your access and need that file later.
Shared with me files do NOT take up any of YOUR space in Google Drive.
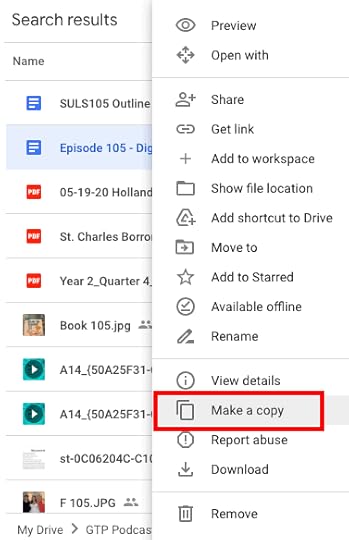
Make a CopyMake a copy is quite possibly one of the most important, MUST-HAVE skills for ANY Google user.
So important that you will hear me mention it in more than one episode in this series.
To make a copy from Drive:
Click once on the file to select it from your list.Then, right-click and select “Make a Copy”Drive will automatically make a copy and name it “Copy of…” with the original title.
More about making copies in Part 4 of this podcast series. amzn_assoc_tracking_id = "shauplea-20";amzn_assoc_ad_mode = "manual";amzn_assoc_ad_type = "smart";amzn_assoc_marketplace = "amazon";amzn_assoc_region = "US";amzn_assoc_design = "enhanced_links";amzn_assoc_asins = "1946444693";amzn_assoc_placement = "adunit";amzn_assoc_linkid = "3567fefd26ae685b347909c6cb09d453";
It is very important that you learn how to search Google Drive.
I have thousands of files in Google Drive and sometimes it just takes to long looking through all my folders, so I rely heavily on search.
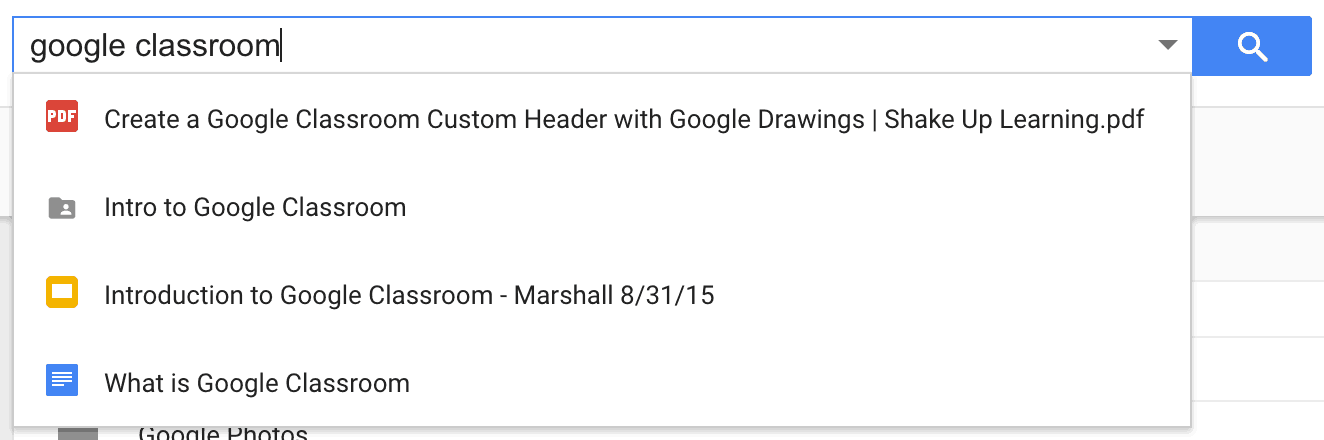
Search Google Drive by Keyword or NameJust type in your keyword terms in the search box to start your search. This search also has the auto-complete feature we are used to seeing in our Google searches. Remember the auto-complete is not showing a complete picture.
After you have typed in your keywords, hit Return/Enter to see the complete results.
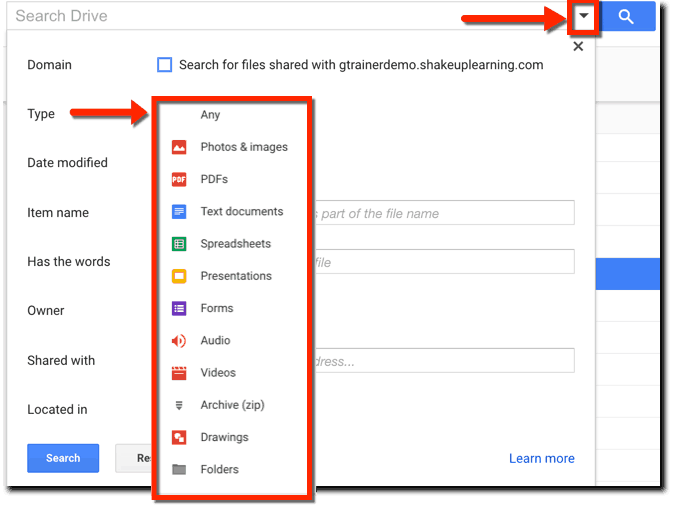
 2. Search Google Drive by File Type
When you click in the search box, a list of file types appears below the search box.
You can quickly filter your drive by file type to see a list of files by type.
You can also filter by file type with additional parameters using the advanced search tool.
Click on More Search Tools a the bottom of the search box,
OR click the drop-down arrow at the end of the search box and select the type of file you are looking for from the list.
Learn more search strategies: 8 Fantastic Ways to Find Anything in Google Drive.
Using Google Files OfflineSometimes we need to work on our Google Drive files when we don’t have an Internet connection. So I’m going to show you how to access files in Google Drive using the Google Docs offline extension.
How to Access Files Offline in Google DriveThis comes in handy when you are traveling.
It is also a great tool for students and teachers with limited or no Internet access at home.
This process varies by device.
I’ve got the step-by-step directions here: How to Access Google Drive Files Offline.
WHOA! We just covered a lot of ground! What must-have skill would you add to this list? Leave a comment below.© Shake Up Learning 2021. Unauthorized use and/or duplication of this material without express and written permission from this blog’s author and/or owner is strictly prohibited. Excerpts and links may be used, provided that full and clear credit is given to Kasey Bell and Shake Up Learning with appropriate and specific direction to the original content on ShakeUpLearning.com. See: Copyright Policy.
The post Must-Have Google Skills for Teachers (Part 3 – Google Drive) – SULS0105 appeared first on Shake Up Learning.
April 6, 2021
Must-Have Google Skills for Teachers (Part 2 – Google Classroom) – SULS0104
The post Must-Have Google Skills for Teachers (Part 2 – Google Classroom) – SULS0104 appeared first on Shake Up Learning.
In this episode, I’m sharing the must-have Google skills for teachers who use Google Classroom.
 Let’s learn how to make the most of Google Classroom–gain must-have skills, and a few tips and tricks to help you and your students thrive.
Google Classroom has evolved a lot over the years, and I have a lot of extra tips and resources for you in this blog post.
We are getting into the nitty-gritty of what teachers need to know and understand in Google Classroom.
This is Part 2 of a 4-part series on Must-Have Google Skills for Teachers.
Did you miss Part 1? You can access it here.
Access the entire MUST-HAVE Google Skills podcast series on this page.
Must-Have #GoogleClassroom Skills for Teachers!
Click To TweetListen to this article.
Thank you to all the educators in Washinton County Public Schools in Maryland participating in the Blended Learning with Google book study!
Quick Tip of the Week (Create a Custom Google Classroom Header)Many teachers want to customize the header image that appears on the Stream page in Google Classroom. I’ve got a quick tutorial in the video below.
Watch this quick video to learn how!
Subscribe to Shake Up Learning on YouTube
Must-Have Google Classroom Skills for TeachersGoogle Classroom is an assignment manager and communication hub for teachers and students. Over the years, it has become a much more robust Learning Management System that many relied on during the pandemic.
The Google Classroom Cheat SheetsIn case you missed it, I created a set of Google Classroom Cheat Sheets for Teachers AND Students. They are completely FREE. Fill out the form below to download.
Related: Google Classroom FAQ
If your school has a Google Workspace for Education account, you should use that email to create your classes. However, anyone over 13 years old can create a class using a personal Google Account.
Go to classroom.google.com.At the top of the Classes page, click Add [image error][image error]Create class.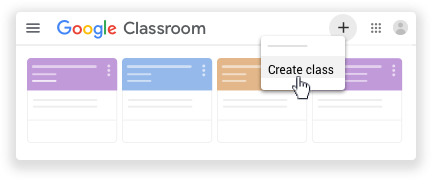
Note: If you don’t see Create class, your account only lets you join classes. Switch accounts or contact your Google Workspace administrator for help.Enter the class name. (Think very purposely about the naming conventions you wish to use.)
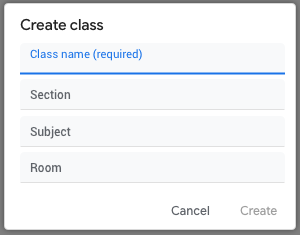 (Optional) To enter a short description, grade level, or class time, click Section and enter the details.(Optional) To add a subject, click Subject and enter a name or click one from the list that appears when you enter text.(Optional) To enter the location for the class, click Room and enter the details.Click Create.Create Topics to Organize Your Classwork
Using topics in Google Classroom, you can organize the Classwork page into categories. These categories will help your students locate their assignments and resources.
Create a TopicGo to classroom.google.com.Click the class[image error]Classwork.At the top, click Create[image error]Topic.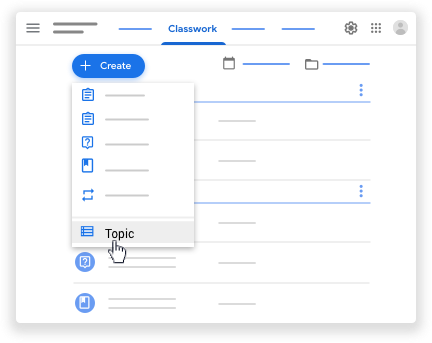 Enter the topic name and click Add.
Related: 10 Google Classroom Tips You Didn’t Know
Add a topic to assignments, quiz assignments, or questionsYou can add only one topic to an assignment, quiz assignment, or question. If an assignment is posted to several classes, editing the assignment in one class doesn’t update it in the other classes.
Go to classroom.google.com.Click the class[image error]Classwork.Next to the assignment, quiz assignment, or question, click More [image error][image error]Edit.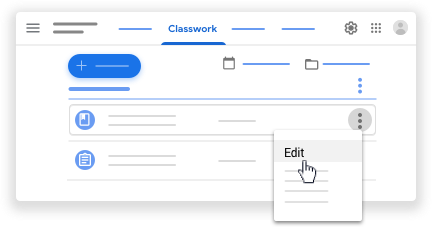 Next to No topic, click the Down arrow [image error] and choose an option:To create a topic, click Create topic and enter a topic name.To select a topic in the list, click the topic name.
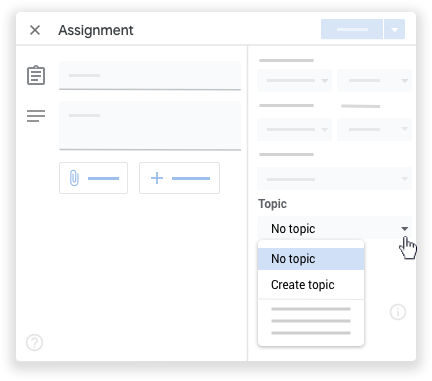 Click Save.
I have an entire post on How to Organize Google Classroom. Take time to explore this post if you want more direction and organizational ideas.
Here’s a quick overview of the most common ways to organize:
Organize by modules or unit of studyOrganize by weekOrganize by type of assignment (daily work, quizzes, tests, etc.)Organize by subject areas (best for elementary)Add a TODAY topic to the topOrganize by learning targetOf course, organization became even more important during remote learning. Check out these additional tips and strategies: 10 Google Classroom Tips for Remote Learning.
Related: Add Emojis to Your Topics and Assignments
Find the strategy that works best for you and your students.
Customize Your Stream SettingsInside your class, go to the settings icon near the top-right to adjust the settings for your class.
Adjust Student PermissionsThe default for Google Classroom allows students to post in the Stream, and comment on posts. During remote learning, you may find this feature helpful, or it may be causing issues. You decide what’s best for your students.
Posts are ideas, questions, or information that students share. Students can add files such as images, links, or YouTube videos to their posts.Comments are text-only responses to posts.Students can’t edit their posts or comments, but they can delete them. Teachers can delete any post or comment, and see deleted posts and comments.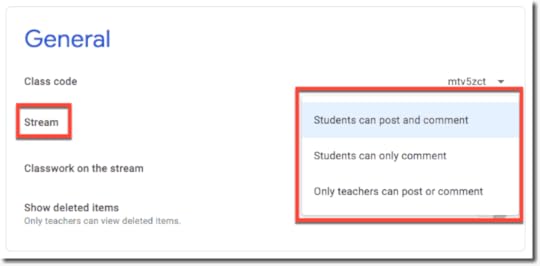 In the Class settings, under General, next to Stream, click “Students can post and comment” and then choose a permission:
This option is the default. Students
can post to the Stream page and
comment on any item.Students can only comment:
Students can comment on an
existing post, but can’t create a post.Only teachers can post or comment:
Students can’t post or comment on the Stream page. This option mutes all students.
TIP: When discussing the use of student posts and comments, use this as a teachable moment to discuss online etiquette and digital citizenship skills.
(See also page 9 in The Google Classroom Cheat Sheet for Teachers.)
Classwork on the Stream SettingMany teachers are annoyed with the Stream, where you can post announcements and see notifications of new items that have been added to the Classwork page.
Teachers can customize what appears on this page for each class. Inside your class, go the settings icon near the top-right and scroll down to the “General” Sections.
The Stream is your Google Classroom communication hub. This is where you post announcements and keep students informed.
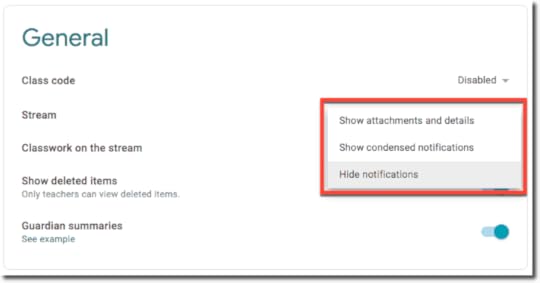 By default, the Stream will also show notifications of new items posted on the classwork page. For some, this feels like a duplication and can muddy up the stream. (Ha! See what I did there.)
If you’re using the Classwork page, you can choose a collapsed or expanded view for Classwork notifications on the Stream page. You can also hide them entirely from the Stream page.
Go to classroom.google.com.Click the class.On the Stream page, click Settings.Under General, next to Classwork on the stream, select an option:You can learn more about all of the Class settings here.
Related: How to Package Your Digital Assignments
Create AssignmentsGo to classroom.google.com.Click the class[image error]Classwork.At the top, click Create[image error]Assignment.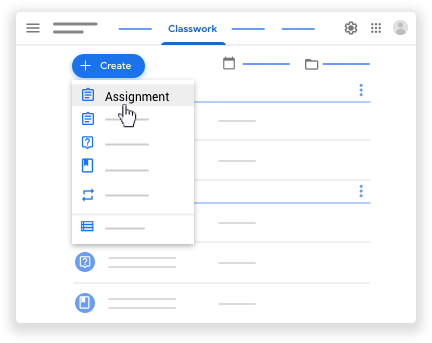 Enter the title and any instructions.
You can continue to edit and customize your assignment. Otherwise, if you’re ready, post, schedule, or save your assignment.
Related: 15 Google Classroom Tips for Teachers
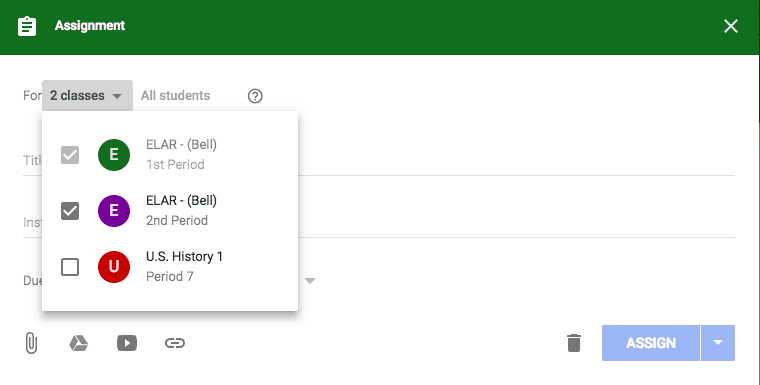
Post Assignment to Multiple ClassesFor those of you that teach the same subject across multiple class periods, you can create an assignment and distribute to multiple classes at once and save valuable time.
When you create a new assignment in Google Classroom,
1. Click the drop-down arrow next to the name of your class.
2. From here you can use the checkboxes to select each class that you would like to distribute the assignment.
Notes:
If you need to edit the assignment, you will have to edit each assignment in each class, individually.You can’t post to individual students across multiple classes. Posts to multiple classes are shared with all students in the classes.Schedule AssignmentsSometimes you need to create assignments ahead of time, so students don’t see it in their feed or get an alert until you are ready.
1. Create your assignment.
2. In the bottom right, click the drop-down arrow and choose, “schedule.”
3. Select the date and time you want the assignment to post.
4. Click, “schedule.”
Notes:
Posts can only be scheduled for one class at a time. So if you want to schedule for multiple classes, these steps will have to be followed for each class. You can, however, save as a draft for multiple classes at once by selecting the checkboxes for each class.Make Copies of Assignment AttachmentsYou can add attachments, links to outside resources and websites, YouTube videos, or Google Drive files to your assignment. When the file attachment is a Google Docs, Sheet, or Slide, you gain additional options for distribution and how students interact with the file.
After you select the Doc, Sheet, or Slide file, you will see a new drop-down menu option.
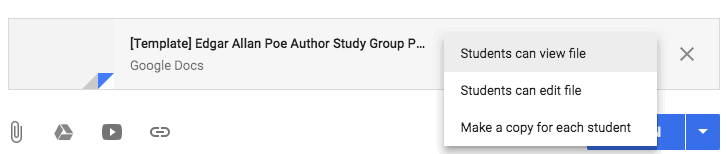
Students can view file—All students can read the file, but not edit it.
Students can edit file—All students share the same file and can make changes to it.
Make a copy for each student—(For Google Docs, Sheets, and Slides only) Students receive an individual copy of the file that they can edit. The student’s name is automatically added to the document title. When a student turns in the assignment, the teacher sees the file labeled with the student’s name.
Notes:
The above options are for Google Docs, Google Sheets, and Google Slides only.Once you click assign, you cannot edit these options. If you choose the wrong option, or simply change your mind, you will have to delete the assignment and start over.If you attach a Google Forms quiz, grades can be imported directly to the Student Work page if there is no other attachment on the assignment.Grade importing can’t be enabled if there is another attachment on the assignment.Invite StudentsThere are three ways for teachers to add students to your class.
1. Send an invite link—Students click the link to join.
Each class you create has an invite link. You can share the link with students so they can join your class.
Go to classroom.google.com.On the class card, click More [image error][image error]Copy invite link.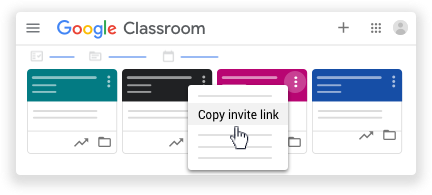 Paste the link into an email for your students. When students get your email, they click the link to join your class.Note: If you don’t see Copy invite link, make sure you have Invite codes enabled.
2. Send an email invite—Students can join from the email or in Classroom.
You can send an email invite to individual students or to a group of students. Students can accept the invite in the email or in Classroom.
Note: To invite a group of students, you can use the email alias for the Google Group. You don’t have to be a member or owner of the group, but you must be able to view group members and email addresses. If you can’t view this information, ask your administrator to change the permissions.
Go to classroom.google.com.Click the class you want to invite students to.At the top, click People[image error]Invite students [image error].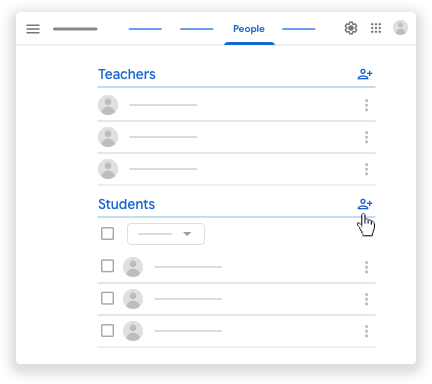 Enter the email address of a student or group.
As you enter text, an autocomplete list might appear under Search Results.(Optional) Under Search results, click a student or a group.(Optional) To invite more students or groups, repeat steps 4 and 5.Click Invite.
Note: If you have trouble adding an email address, it might be outside of your school’s domain.
After you send the invite:
Your class list updates to show the names of invited students.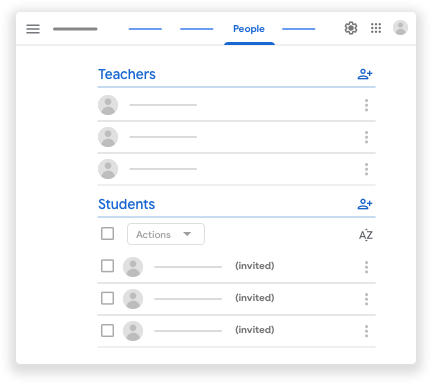 Your students can click Join in the email or on the class card.
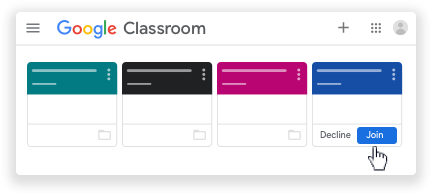
3. Share a class code—Students enter the code in Classroom.
Each class you create has a class code. You can share the code with students so they can join your class. To share the code, paste it into an email, display it with a projector, or write it on the board.
Go to classroom.google.com.Click the class[image error]Settings [image error]. (Optional) To copy the code so you can paste it into an email, under General, next to Class code, copy the code.
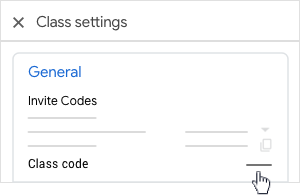 Along with the code, give the students these instructions:Go to classroom.google.com.On the Classes page, click Add [image error][image error]Join class.Enter the code and click Join.More Google Classroom ResourcesDon’t forget to check out the Google Classroom Resources page to get more tips, tricks, and ideas!If you need step-by-step instructions, get the Google Classroom Cheat Sheets for Teachers and Students.I also have a YouTube playlist with Google Classroom tips, and I am always adding more.Remember that the Google Support Center is a great place to find answers as well.Just getting started? Check these 6 Tips for Getting Started with Google Classroom.If you want more hands-on instruction, check out The Google Classroom Master Class.
© Shake Up Learning 2021. Unauthorized use and/or duplication of this material without express and written permission from this blog’s author and/or owner is strictly prohibited. Excerpts and links may be used, provided that full and clear credit is given to Kasey Bell and Shake Up Learning with appropriate and specific direction to the original content on ShakeUpLearning.com. See: Copyright Policy.
The post Must-Have Google Skills for Teachers (Part 2 – Google Classroom) – SULS0104 appeared first on Shake Up Learning.
April 5, 2021
Create a Google Classroom Custom Header with Google Drawings
The post Create a Google Classroom Custom Header with Google Drawings appeared first on Shake Up Learning.
 How to Create a Google Classroom Custom Banner
Google Classroom is a great application for Google using educators and students to manage assignments, communicate and collaborate, and go paperless!
Google has made great strides in updating this application based on the feedback submitted by educators like you.
Google Classroom is only going to get better!
So if you haven’t taken the time to learn this great application, now is the time.
In this post and video tutorial, I will show you how to create a custom header with Google Drawings, give you a FREE template, and show you how to upload it into Google Classroom!
Create a #GoogleClassroom Custom Header with Google Drawings
Click To Tweet How to Create a Google Classroom Custom Header with Google DrawingsOne feature of Google Classroom is the ability to customize the theme and header (see example below).
You can choose from ready-made themes and header images from Google’s gallery, or you can upload your own image to customize the look and feel of all of your classes.
Adding your own image usually requires more than just finding a picture stored on your drive.
Google Classroom is responsive, which means the size and shape of the header change with the size of your screen on your desktop, laptop, tablet, or phone.
For this reason, you will notice most of Google’s headers have a pattern that works well for this type of responsive application.
Faces and clipart can get distorted in the header, but I have found a way that works for me using Google Drawings to create the header image.
Google Drawings is the unsung hero of the Google Drive suite of applications.
It is a very powerful tool for creation.
See this infographic for more details: 10 Ways to Use Google Drawings in the Classroom.
Google Drawings allows you to create an image in any size that you want, so it was an easy option for creating a custom Google Classroom header.
Below are step-by-step directions to help you create a custom header for your Google Classroom classes.
Things to Know About the Header ImageThe header ONLY appears at the top of the stream in Google Classroom.
Since text appears on top of the image, there is a grey filter that will go over your image. Keep this in mind as you design your image.
In my example below, I used a white background and the filter turns it grey.
The other thing to remember is that Google Classroom is a responsive website that will resize based on the size of the screen. So, what looks good on the desktop, may look very different on mobile.

amzn_assoc_tracking_id = "shauplea-20";amzn_assoc_ad_mode = "manual";amzn_assoc_ad_type = "smart";amzn_assoc_marketplace = "amazon";amzn_assoc_region = "US";amzn_assoc_design = "enhanced_links";amzn_assoc_asins = "1735601829";amzn_assoc_placement = "adunit";amzn_assoc_linkid = "45e28ed74bb20171862e30ab5be2b0c3";
There are many tools that you can use to create a custom banner for Google Classroom.
My three favorites are Google Drawings, Google Slides, or Canva.com. For the purposes of this post, we are keeping things simple with Google Drawings. But you should definitely check out the super cool templates in Canva for Education.
FREE Blank Template
I recommend you learn how to create an image from scratch, but to save time, I’ve also created blank template. CLICK HERE to make a copy of the header image template.
1. Go to drawings.google.com to open a new drawing.
2. Click on the title (top left) and rename it.
3. Go to File>Page Setup
From the drop-down, select CustomChange inches to pixelsInput 1000 x 400 pixels and click Okay.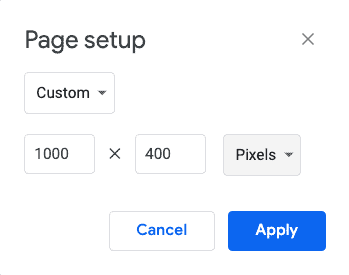
4. Here comes the fun part! Create your image!
Suggestion: right-click on the image and choose a background color to get started. (I chose a white background.)5. Now you can insert any images or text that you want, like your school logo, a Bitmoji, or other images that help define your class.
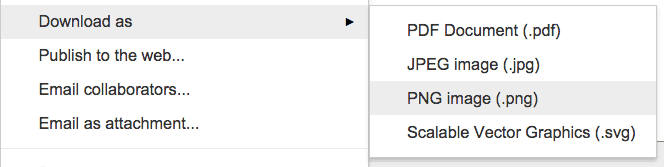
6. When you are done creating your image, go to File>Download as> choose .png or .jpeg to download the image to your computer. (Note: Jpeg is good if for real photographs, .png is good for clip art.)
7. Now, upload your new header into Google Classroom.
Go to Google Classroom and choose the class where you wish to update the header.On the Stream, near the bottom-right of the current image header, select “Upload photo.” Navigate to where you downloaded your new header, or drag and drop to upload.Move and crop the image if you like to get it exactly where you want it. Then click, “Select class theme” at the bottom of the window.Voila! You have a new customized header! (Note: the theme colors are not customizable, but Google Classroom tries to somewhat mimic the colors in your image. I’m hoping for the ability to choose custom colors in the future!)Tip: Choosing a different header, even just with minor changes will help you students see at a glance which class they are in and help keep them on track. Join the Google Classroom Master Class Online Course Learn all about the new updates to Google Classroom and take your skills to the next level. This course will give you everything you need to get started using Google Classroom and best practices to help you make the most of this tool.
Perfect for beginner to intermediate skill levels! Consider this your video guide to Google Classroom!
Click here to learn more and to ENROLL TODAY!
Check out all of my Google Classroom Resources here!amzn_assoc_tracking_id = "shauplea-20";amzn_assoc_ad_mode = "manual";amzn_assoc_ad_type = "smart";amzn_assoc_marketplace = "amazon";amzn_assoc_region = "US";amzn_assoc_design = "enhanced_links";amzn_assoc_asins = "1946444693";amzn_assoc_placement = "adunit";amzn_assoc_linkid = "3567fefd26ae685b347909c6cb09d453";

window.addEventListener('LPLeadboxesReady',function(){LPLeadboxes.addDelayedLeadbox('WiYjZELgxanonKPYYr35bY',{delay:'30s',views:0,dontShowFor:'0d',domain:'shakeuplearning.lpages.co'});});
© Shake Up Learning 2021. Unauthorized use and/or duplication of this material without express and written permission from this blog’s author and/or owner is strictly prohibited. Excerpts and links may be used, provided that full and clear credit is given to Kasey Bell and Shake Up Learning with appropriate and specific direction to the original content on ShakeUpLearning.com. See: Copyright Policy.
The post Create a Google Classroom Custom Header with Google Drawings appeared first on Shake Up Learning.
April 1, 2021
How to Access Version History in Jamboard
The post How to Access Version History in Jamboard appeared first on Shake Up Learning.
You can now access the version history in Jamboard and see exactly what your students contributed and  WHEN!
WHEN!
Jamboard is an interactive whiteboard application and a part of Google Workspace for Education.
It’s a great tool to get students collaborating and interacting in the classroom, online, and even during a Google Meet lesson.
Jamboard is quickly becoming one of my favorite tools for students.
Learn more about Google Jamboard here.
Related: How to Use Jamboard with Google Meet
How to Access Version History in Jamboard
Click To Tweet How to Access Version History in JamboardAccess ALL the Google Quick Tips Here!Check out all our Remote Learning Resources!amzn_assoc_tracking_id = "shauplea-20";amzn_assoc_ad_mode = "manual";amzn_assoc_ad_type = "smart";amzn_assoc_marketplace = "amazon";amzn_assoc_region = "US";amzn_assoc_design = "enhanced_links";amzn_assoc_asins = "1735601829";amzn_assoc_placement = "adunit";amzn_assoc_linkid = "45e28ed74bb20171862e30ab5be2b0c3";
amzn_assoc_tracking_id = "shauplea-20";amzn_assoc_ad_mode = "manual";amzn_assoc_ad_type = "smart";amzn_assoc_marketplace = "amazon";amzn_assoc_region = "US";amzn_assoc_design = "enhanced_links";amzn_assoc_asins = "1735601802";amzn_assoc_placement = "adunit";amzn_assoc_linkid = "4c02c8cc44526bc9fbb710edf527215a";
© Shake Up Learning 2021. Unauthorized use and/or duplication of this material without express and written permission from this blog’s author and/or owner is strictly prohibited. Excerpts and links may be used, provided that full and clear credit is given to Kasey Bell and Shake Up Learning with appropriate and specific direction to the original content on ShakeUpLearning.com. See: Copyright Policy.
The post How to Access Version History in Jamboard appeared first on Shake Up Learning.
March 30, 2021
Must-Have Google Skills for Teachers (Part 1 – Chrome) – SULS0103
The post Must-Have Google Skills for Teachers (Part 1 – Chrome) – SULS0103 appeared first on Shake Up Learning.
In this episode, I’m sharing the must-have Google skills for teachers who use the Google Chrome web  browser or Chromebooks.
If you are a Google-using teacher, you should be using Google Chrome on all of your devices.
Google works best with Google!
Google Chrome is the learning environment for all things Google and sets the stage for success.
(This is Part 1 of a 4-part series on Must-Have Google Skills for Teachers.)
There is SO MUCH in this episode. You will get even MORE tips if you listen to the episode instead of just reading this article.
Must-Have Google Skills for Teachers (Part 1 – Chrome) #chromebooks #googleedu
Click To TweetListen to this article.
Thank you to Kirsten Thompson on Instagram (@thompsonclassroom) for sharing the Shake Up Learning book! amzn_assoc_tracking_id = "shauplea-20";amzn_assoc_ad_mode = "manual";amzn_assoc_ad_type = "smart";amzn_assoc_marketplace = "amazon";amzn_assoc_region = "US";amzn_assoc_design = "enhanced_links";amzn_assoc_asins = "1735601829";amzn_assoc_placement = "adunit";amzn_assoc_linkid = "45e28ed74bb20171862e30ab5be2b0c3";
The coolest app on the block, Jamboard, now has version history!
Watch this quick video to learn how!
Subscribe to Shake Up Learning on YouTube
Must-Have Google Skills for Teachers (Part 1 – Chrome)Today, we are chatting about must-have Google skills for teachers, more specifically, Google Chrome skills!
There is a good reason that we are kicking-off this 4-part podcast series with Chrome.
The Chrome web browser is the learning environment for all things Google, whether you are on a Chromebook, PC, Mac, or mobile device.
Remember, Google works best with Google!
I’m sharing some of my best tips and settings.
These are the must-have Google skills so you can make the most of the learning environment.
If you are using a Chromebook, you are already using the Chrome web browser. If you are not on a Chromebook, be sure you install Chrome on ALL of your devices.
I use Chrome on ALL of my devices, including the app on my phone and tablet.
Installing Chrome (and logging in with your account) will allow you to sync everything across your devices, so you can seamlessly move from one device to the next.
Note: the directions referred to in this episode and post are based on the desktop version of Chrome, not the mobile app.
Sign-in & SyncWhen you sync, you can see and update your synced info on all your devices, such as bookmarks, history, passwords, and other settings.
You’ll sign in automatically to Gmail, YouTube, Search, and other Google services. If you were signed in before turning on sync, you’ll stay signed in.
If you change devices (for example, if you lose your phone or get a new laptop), you’ll get your synced info back.
On your computer, open Chrome.At the top right, click your Profile (usually your picture).Sign in to your Google Account.If you want to sync your info across all your devices, click turn on sync.Learn more about sign-in and sync.
Updating ChromeIf you are like me and not great at shutting down your computer every day, you may notice a little colored alert in the top-right letting you know there is an update available.
On the desktop, Chrome updates happen when you close and re-open the browser. (No downloading. no waiting!)
Updating the Chrome operating system on a Chromebook is a bit different. Learn more about it here.
Customize ChromeThe beauty of Chrome is the ability to customize it to fit your needs. Better yet, it allows us to customize the learning environment for our students!
Continue Where You Left Off
If you like Chrome to re-open the tabs you had open when you closed it, you can enable this feature in your settings.
Go to the 3 dots near the top right>Settings. Scroll down to the bottom. Then choose “Continue Where You Left Off.”
Bookmarks
Inside the Omnibox (the big search box where you type your search or URL), there is an outline of a star when you are on a website.
Simply click on the star to bookmark a website. Bookmarks can be saved and organized in multiple locations.
Bookmarks Bar
Besides saving bookmarks, you can add them to your bookmarks bar (the bar below the Omnibox).
If you don’t see a bar below your Omnibox, you can enable it by going to 3 dots>bookmarks>show bookmarks bar.
I keep all of my most frequently visited links in the bookmarks bar.
Then you can click-and-drag the lock next to the URL in the Omnibox to add the bookmark to your bar.
Right-click on the bookmark to edit the name or shorten it.
I like to bookmark the Classwork page for each of my classes in Google Classroom. It saves me tons of time!
amzn_assoc_tracking_id = "shauplea-20";amzn_assoc_ad_mode = "manual";amzn_assoc_ad_type = "smart";amzn_assoc_marketplace = "amazon";amzn_assoc_region = "US";amzn_assoc_design = "enhanced_links";amzn_assoc_asins = "1735601802";amzn_assoc_placement = "adunit";amzn_assoc_linkid = "4c02c8cc44526bc9fbb710edf527215a";
Related: 10 Google Tips for Remote Learning
Find and Install ExtensionsChrome extensions are like add-ons for the browser that gives you some additional features.
You can find and install extensions in the Chrome Web Store, like the app store for Chrome.
For example, I always share my two favorites, Tab Scissors (split the screen between two tabs) and Tab Glue (glue the tabs back together in one window). You want them both!

Explore the Chrome Web Store for extensions and themes that fit you and your students’ needs.
16:38
Tab ManagementMost web browsers use some kind of tabs. But as you are working, you may get frustrated with managing all of your tabs. (I’m kind of a tab hoarder, so this is a constant issue for me.)
You can click and drag your tabs to reorder as you need. You can also right-click to find even more features.
Pin Tabs
One feature that I love in Google Chrome is the ability is to pin a tab to the left of your window. They also shrink the size of the tab down to the favicon, the little icon for the site.
To pin a tab, just right-click and choose “pin.”
Tab Groups
Google has a newer feature that allows you to group tabs together, name them, and even color-code the group.
To create a tab group, right-click on your tab and select add tab to new group. Once you create your first group, you can add other tabs to the same group.
OneTab Chrome Extension
OneTab allows me to close all of my open tabs quickly and saves them in for me.
It also gives me an easy way to re-open all the tabs at once, open individually, or even share all the links as a webpage or QR code.
Perfect for saving a group of links for students!
So when I am in a hurry and need to close my computer, I just click on the OneTab extension to save all my tabs.
Password ManagementTo view the passwords you’ve saved, go to passwords.google.com. There, you’ll find a list of accounts with saved passwords.
To see a password, select Preview.
To delete a password, select Delete.
LastPass Chrome Extension
For passwords where I want an added layer of security, I use LastPass. LastPass, an award-winning password manager, saves your passwords and gives you secure access from every computer and mobile device.
Related: 5 Google Classroom Chrome Extensions
Keyboard ShortcutsThere are a TON of shortcuts for the Chrome web browser and Chromebooks!
Here’s a list of the Chrome shortcuts by device.
Here’s a list of the Chromebook shortcuts.
Re-Open Your Last Closed Tab
One keyboard shortcut that I use all the time is Control + Shift + T to re-open my last closed tab. Super handy when you accidentally close a tab!
Zoom In and OutYou can zoom in on your screen by using Control + (Command + on a Mac). Similarly, you can zoom out by using Control – (Command – on a Mac).
Related: 8 Reasons to Go Incognito in Chrome
Browsing HistoryYou can always see your browsing history by going to your 3 dots > history, and see all the recently visited websites on all of your devices.
Switch AccountsChances are that you are doing it wrong, and I’m going to show you a better way to manage and toggle between multiple Google accounts.
A lot of Google users have more than one Google account, often a school/work account and a personal account.
Logging in and out can be an absolute pain! But I am here to show you a better way!
There are so many ways that we can use Chrome to save time and help our students.
What are your favorite Google Chrome tips?
See ALL Google Chrome related resources amzn_assoc_tracking_id = "shauplea-20";amzn_assoc_ad_mode = "manual";amzn_assoc_ad_type = "smart";amzn_assoc_marketplace = "amazon";amzn_assoc_region = "US";amzn_assoc_design = "enhanced_links";amzn_assoc_asins = "1946444693";amzn_assoc_placement = "adunit";amzn_assoc_linkid = "3567fefd26ae685b347909c6cb09d453";
 Blended Learning with Google NOW AVAILABLE!
My new book, Blended Learning with Google is now available for educators across the globe.
In Blended Learning with Google, I will show you how to use Google tools to design and support dynamic blended learning experiences whether you’re teaching in-person, online classes, or both!
This book with practical ideas and meaningful strategies that you can implement right away.
In this three-part book, you will learn the Dynamic Blended Learning Framework, how to align Blended Learning classroom strategies with Google tools, and how to plan and implement Blended Learning with Google in your classroom.
Here is a peek at what you’ll find in Blended Learning with Google:
Lesson PlansGoogle TemplatesRemote Learning TipsGoogle Tips and Tricksand more!
 Purchase on Amazon (also available at many other retailers across the globe!)
© Shake Up Learning 2021. Unauthorized use and/or duplication of this material without express and written permission from this blog’s author and/or owner is strictly prohibited. Excerpts and links may be used, provided that full and clear credit is given to Kasey Bell and Shake Up Learning with appropriate and specific direction to the original content on ShakeUpLearning.com. See: Copyright Policy.
The post Must-Have Google Skills for Teachers (Part 1 – Chrome) – SULS0103 appeared first on Shake Up Learning.
March 25, 2021
How to Change the Font in a Google Slides Theme
The post How to Change the Font in a Google Slides Theme appeared first on Shake Up Learning.
Did you know that you can customize the font in your Google Slides theme, so you don’t have to change the font on every slide?
 Yes!
Yes!
You can customize your themes for your Google projects with your favorite fonts.
This is all about learning how to customize the master slide, and it is super easy!
Watch the video below to learn how.
How to Change the Font in a #GoogleSlides Theme
Click To Tweet How to Change the Font in a Google Slides ThemeRelated: How to Change the Link Color in Google Slides Themes
Access ALL the Google Quick Tips Here!Check out all our Remote Learning Resources!amzn_assoc_tracking_id = "shauplea-20";amzn_assoc_ad_mode = "manual";amzn_assoc_ad_type = "smart";amzn_assoc_marketplace = "amazon";amzn_assoc_region = "US";amzn_assoc_design = "enhanced_links";amzn_assoc_asins = "1735601829";amzn_assoc_placement = "adunit";amzn_assoc_linkid = "45e28ed74bb20171862e30ab5be2b0c3";
amzn_assoc_tracking_id = "shauplea-20";amzn_assoc_ad_mode = "manual";amzn_assoc_ad_type = "smart";amzn_assoc_marketplace = "amazon";amzn_assoc_region = "US";amzn_assoc_design = "enhanced_links";amzn_assoc_asins = "1735601802";amzn_assoc_placement = "adunit";amzn_assoc_linkid = "4c02c8cc44526bc9fbb710edf527215a";
© Shake Up Learning 2021. Unauthorized use and/or duplication of this material without express and written permission from this blog’s author and/or owner is strictly prohibited. Excerpts and links may be used, provided that full and clear credit is given to Kasey Bell and Shake Up Learning with appropriate and specific direction to the original content on ShakeUpLearning.com. See: Copyright Policy.
The post How to Change the Font in a Google Slides Theme appeared first on Shake Up Learning.
March 24, 2021
Get MORE Fonts for Your Google Projects! (Docs, Slides, Sheets, Drawings)
The post Get MORE Fonts for Your Google Projects! (Docs, Slides, Sheets, Drawings) appeared first on Shake Up Learning.
Yes, you can get MORE fonts for your Google projects!
 Do you get frustrated by the font selection in Google Docs, Sheets, Slides, Drawings, etc.?
At first, the list of fonts in most Google applications seems very limited.
If you are a font snob, this just doesn’t cut it.
But you may be missing a simple way to get more fonts.
Let me show you how!
Get MORE Fonts for Your Google Projects! (Docs, Slides, Sheets, Drawings)
Click To Tweet Get MORE Fonts for Your Google Projects! (Docs, Slides, Sheets, Drawings)Access ALL the Google Quick Tips Here!Check out all our Remote Learning Resources!amzn_assoc_tracking_id = "shauplea-20";amzn_assoc_ad_mode = "manual";amzn_assoc_ad_type = "smart";amzn_assoc_marketplace = "amazon";amzn_assoc_region = "US";amzn_assoc_design = "enhanced_links";amzn_assoc_asins = "1735601829";amzn_assoc_placement = "adunit";amzn_assoc_linkid = "45e28ed74bb20171862e30ab5be2b0c3";
amzn_assoc_tracking_id = "shauplea-20";amzn_assoc_ad_mode = "manual";amzn_assoc_ad_type = "smart";amzn_assoc_marketplace = "amazon";amzn_assoc_region = "US";amzn_assoc_design = "enhanced_links";amzn_assoc_asins = "1735601802";amzn_assoc_placement = "adunit";amzn_assoc_linkid = "4c02c8cc44526bc9fbb710edf527215a";
© Shake Up Learning 2021. Unauthorized use and/or duplication of this material without express and written permission from this blog’s author and/or owner is strictly prohibited. Excerpts and links may be used, provided that full and clear credit is given to Kasey Bell and Shake Up Learning with appropriate and specific direction to the original content on ShakeUpLearning.com. See: Copyright Policy.
The post Get MORE Fonts for Your Google Projects! (Docs, Slides, Sheets, Drawings) appeared first on Shake Up Learning.