
Kristina Seleshanko's Blog, page 5
January 31, 2024
January on the Homestead
 Harvesting Brussels sprouts.
This post may contain affiliate links. At no cost to you, I may earn from qualifying purchases made through some links. Please see FCC disclosure for full information. Thank you for supporting this site!
I haven't given monthly updates on our homestead happenings for quite a number of years, but this year, I'm picking it up again for one particular reason: I'll be tracking how much produce comes from my garden all year long. I'm doing this for a number of reasons. One is that I like to periodically track expenses and outputs on our homestead - a sort of financial "check up." This way, I can either say with certainty that homesteading makes financial sense or I can take steps to make it more efficient. (I can't think of a time when I've done this sort of tracking and determined a project wasn't financially worth it; but there have been plenty of times that I learned homesteading was saving us money. For example, when I tracked our expenses for egg laying chickens.)
When I announced this tracking project on this blog's Facebook page, some people's immediate reaction was to say that gardening isn't about money. While I agree there are lots of important reasons to grow your own food (better quality, truly organic produce with more nutrients and better flavor, being more self-reliant, getting outside more, etc.), the money aspect is an important to many people, including me. And I can't tell you how many times someone has given me the excuse that growing food costs "too much." It's true that getting your garden started can cost some money (although it's a mistake to think you have to spend a lot; no till methods, in particular, can be very inexpensive), I know from past experience that it still saves money at the grocery store.
In fact, in 2013, I tracked what I grew in my small suburban yard and learned that I conservatively saved $1,492 that year on produce and eggs. Today, I have a considerably larger garden, plus an orchard, plus grocery prices just keep going up...so I expect to save much more.
Here's how it's going to work: Every time I harvest produce from our homestead, I'll weigh it and log that figure. At the end of the month, I'll look at prices at my local Walmart (it's what we have here!) and figure out how much I'd have spent to buy that food. In 2013, I only looked at conventional produce prices, because even though the food I grew was organic, we certainly couldn't afford to buy organic. Even though that's still true, this year, just for curiosity's sake, I'll use both conventional and organic (if available) food prices.
I've also been asked to track how much time I spend gardening, which I will do. (Although I'll say upfront that I've always considered every dollar I save by gardening at least a dollar less I have to earn through money-paying work.) I don't expect to have much in the way of store-bought expenses going into the garden, but I'll also track what few I have.
At the end of the year, I'll add it all up and see how much money we saved. All in all, it ought to be interesting! See the bottom of this post for this month's totals.
In other news, January has mostly been a time of working on our house (an endless project, since we bought it unfinished), and organization. However, I also butchered chickens for the first time in many years.
 Harvesting collards and kale from the winter garden.
 When we replace an aging flock of chickens, normally we purchase sexed chicks locally or through the mail. But this fall, we decided to take a neighbor up on his offer of free fertilized eggs. His flock is very mixed, so the resulting chickens are "barnyard mix" (i.e. mutts). Well, of 15 chicks that hatched and survived, 11 were roosters. Ha! So we decided to butcher all but one of the roos. (Why? Because that may roosters will beat up each other - and over-mate the hens. Plus, we have chickens for eggs; we have no reason to feed chickens that don't lay.)
There was some confusion about how butchering day was going to work. I thought my hubby was going to butcher and I would assist, since that's how we did it over a decade ago. He thought I was going to do all the butchering (as I do with rabbits and quail) and that he'd assist. Ahem. In the end, he caught and dispatched the roosters and I did the rest. I wasn't terribly well prepared for that. Umpteen years ago, all I did was help remove the guts...and my hubby didn't have a strong recollection about how to butcher chickens. Thankfully, I'd watched a few butchering videos the morning of dispatch, but I would have done more research if I'd known I was relying on myself for all the butchering knowledge. Anyway, long story short, I got through 5 roosters before we ran out of time.
Previously, we'd decided to try skinning these birds. One reason for this was that we didn't have propane for our turkey cooker, which is where we scald birds. Another was that we HATE scalding birds; it's so nasty-smelling! We also aren't fans of plucking by hand or with the plucking attachment we have for an electric drill. (I understand an expensive plucking machine might make things easier, but remember, we rarely butcher chickens, so we've never purchased one.) Also, we aren't huge fans of eating chicken skin. Plus, we thought it might be easier and faster to skin rather than pluck.
 The bird on the right is my first try: Pathetic! On the left is the 5th bird: Much better!
(adsbygoogle = window.adsbygoogle || []).push({});
The first bird was a real struggle, I don't mind telling you, I thought whoever said skinning chickens was easier was a cruel prankster! But by bird #5, I had figured some things out and I do think I like skinning better than plucking. Was it faster? Eh...probably about the same - although once I have the skill down better, it might go more quickly.
A lot of folks on Facebook wondered why the meat was so reddish. This is not because I didn't drain the blood from them. There are actually several factors at play here:
One is the breed of chicken. Commercially-raised meat chickens, and even most meat chickens grown by homesteaders, have naturally pale meat. However, the chickens I butchered were not a meat breed. Another factor is feed. Birds given only commercial chicken feed tend to have pale meat compared to birds that forage for food like bugs. Finally, exercise is a factor. Commercially-raised chickens are abnormally heavy, plus they are confined, so they get little exercise. My chickens are not free-range (because they'd be eaten by predators instantaneously), but they have a large yard to run around in. For my tips on skinning chickens, see this Facebook post. 5 birds, resting before eating or preserving.
January Produce Totals:
At this time, we're mostly eating produce that I preserved last year. Even so, I do have a winter garden and we do eat fresh food from it during the cold months, as listed below.
Collards and Kale: 5 lbs.
------------> $29.60 organic or conventional (I was shocked they were the same price at our local Walmart!)
Brussels sprouts: 6 lb. .06 oz.
------------> $24.24 organic, $18.06 conventional
Snow peas: 10oz.
------------>$4.71 organic, $3.21 conventional
Saved in January:
$55.55 if purchased organic or $50.87 if purchased conventional. Not bad, considering I've spent ZERO time gardening since fall!


January 23, 2024
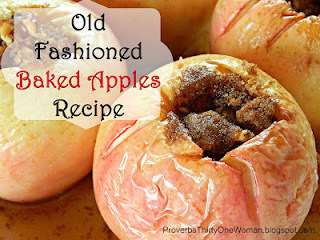
Old-Fashioned Applesauce Cake

This is one of those classic recipes that gets passed down from generation to generation. It's simple - even humble - but absolutely delicious. And like all the best cakes, it doesn't require a frosting. (Although you could mix powdered sugar and a bit of water or milk to drizzle over the top, if you like things really sweet.)
I got this recipe from a friend whose mother and grandmother had both used it as a staple dessert. As you can see below, in the recipe itself, I've made a couple of adjustments: I changed the fat, which my friend's family had noted as Crisco - an unhealthy, highly processed fat that is now made with GMO soybeans. The original recipe also called for "a box of raisins," but I've little doubt the amount of raisins found in a 1930s box was different from the amount found in a box of raisins today; so feel free to play with the quantity. If you're a raisin-hater, you could also omit the raisins - though they do add to the overall moistness of the cake.

1 cup coconut oil*
1 cup granulated sugar
1/2 teaspoon sea salt
3 teaspoons ground cinnamon
2 teaspoons ground nutmeg
1 teaspoon ground ginger
3 cups all-purpose flour
1 teaspoon baking soda
2 cups applesauce**
2 tablespoons dark molasses
raisins, to taste***

* The original recipe called for unhealthy Crisco; lard or butter would be healthier alternatives if you don't want to use coconut oil.
** I've used both unsweetened applesauce and my own homemade applesauce, which has a bit of sugar in it. Both work very well for this recipe.
*** I use about 10-12 oz. of raisins. I typically use the old-fashioned, dark kind, but for the photos, I used a mix of dark and golden raisins (because that's what I had in my pantry).
1. Preheat the oven to 350 degrees F. and grease two 8-in. cake tins. Set aside.
2. In the bowl of an electric mixer, beat together the oil and sugar until light and fluffy.
3. Add the salt, cinnamon, nutmeg, and ginger, mixing in well.
4. Add the flour and baking soda and beat until just mixed.
5. Beat in the applesauce and molasses.
6. Fold in the raisins by hand.
7. Divide the batter evenly between the two prepared pans and bake for about 30 minutes, or until a toothpick inserted into the center of the cake comes out clean. Cool on a wire rack.

(adsbygoogle = window.adsbygoogle || []).push({});
Related Posts:


(adsbygoogle = window.adsbygoogle || []).push({});
January 22, 2024
Cleanliness Is Next to Godliness?
 It seems there might be something to that old adage, "Cleanliness is next to Godliness." A new study indicates ethical behavior improves dramatically when people feel they are in a clean environment.In a way, this makes sense to me. I mean, doesn't a freshly cleaned house lift your spirits? Who wants to mess that feeling up by doing something bad?
(adsbygoogle = window.adsbygoogle || []).push({});
When I first read about this, my first thought was "How can I make this work for me as a parent?" My next thought was "I can't!" As much as I'd love a truly tidy, clean house, I seldom have one. The demands of modern life (and the fact that I don't have servants, as the original Proverbs 31 woman did) mean my house is often less than spotless.The good news is this, though: Just spritzing some Windex seems to have the same benefit.Just think, if you spray a little Windex around your house, your children might be better behaved! Ha, ha! Now that's worth trying!

January 18, 2024
The Basics of No-Till Gardening
 This post may contain affiliate links. At no cost to you, I may earn from qualifying purchases made through some links. Please see FCC disclosure for full information. Thank you for supporting this site!
I vividly recall my dad dragging out a heavy tiller and repeatedly tilling up the weedy soil to plant our vegetable garden each year...so when I got married and moved to a suburban house with a nice-sized backyard, I did the same. (And by "I," I mean my husband. Haha!) I sowed seeds and eagerly waited for them to come up. (Yes me; not he!) But the weeds came up first. Not too easily discouraged, I pulled them and waited for my desired veggies to emerge. They did - but so did more weeds.
I tried to keep up with those weeds - really, I did. But eventually, they got the better of me. Little did I know that tilling brings seeds that were too buried in the soil to naturally germinate up to the surface, where they happily begin growing.
Thankfully, my next try at a garden was a lot more successful - because by then, I'd been introduced to no-till, no-dig methods. ("No-dig" refers to the traditional method of double digging the soil before planting. Basically, it's the manual method of deep tilling. It does not mean the gardener can't dig into the soil to plant - or remove - something.)
I was attracted to no-till methods for the same reasons I still use them in my garden today:
1. It's a lot less work. It doesn't require any type of machine to prep for planting (nor fuel to run that machine), nor does it require difficult manual labor. Over time, it saves a tremendous amount of labor because the soil requires little to no prepping and so little weeding is necessary.
 My first no-till garden.
(adsbygoogle = window.adsbygoogle || []).push({});
2. It's better for the soil. In nature, most seeds and roots settle into soil that's largely undisturbed - certainly not deeply tilled or dug. This undisturbed soil is packed with beneficial microorganisms...all of which are disturbed or even killed by deep digging or tilling. Mycelium— the fungal network below ground that helps plants grow - is also damaged by digging and tilling. In addition, no till methods prevent erosion and compaction that makes it difficult for plants to take up nutrients and water. And unlike tilling, which destroys humus (and therefore requires plenty of soil amendments), no-till methods actually help create this important part of the soil.
3. Weeds are much less likely to germinate in undisturbed soil. Those weeds that do pop up are generally very easy to pull out by hand, due to the layers of organic matter on top of the soil. Or, if you don't want to bother with such pulling, you can merely smother out the weeds.
4. Less irrigation is necessary because there are organic layers covering the soil, retaining moisture.
 My current no-till garden.
(adsbygoogle = window.adsbygoogle || []).push({});
Now, none of this is to say that tilling might not be smart at times. For example, my garden area was originally packed with invasive blackberries. Before establishing the garden, my husband not only mowed everything down, he tilled certain areas so that the most pervasive weeds (and their roots) could be removed. However, once those areas were covered with layers of organic matter, tilling was no longer needed - or beneficial.
And before you start telling me no-till methods are just trendy and not worth trying, let me assure you that variations on the no-till method have been around since at least the 1940s book Ploughman's Folly, which quickly led to studies by Purdue University that came out in support of no-till methods. Other famous proponents of no-till methods include Ruth Stout (who published multiple books written in the 1950s-70s, including The Ruth Stout No-Work Garden Book), Patricia Lanza (who wrote Lasagna Gardening in the late 1990s), Paul Gautschi (of Back to Eden fame), and market gardener Charles Dowding (who's written multiple books, including Organic Gardening: The Natural, No-Dig Way). And then there's little ol' me, who's been using no-till methods for most of my gardening career.
The science is there to back up no till claims (you can start researching that here and here) - and the productivity and health of no-till gardens certainly shows that the method works.
 No-till methods produce big, beautiful produce.
(adsbygoogle = window.adsbygoogle || []).push({});
How to Get Started
The basic principle of all no-till methods are - obviously - to not till or double dig...but how does one achieve that? Various proponents use slightly differing methods. Ruth Stout put hay and sometimes leaves on top of her soil; Paul Cautschi uses wood chips; Charles Dowding uses compost. But truthfully, any organic matter can go on top of the soil to create a good no till garden (as Patricia Lanza hinted at with her layers of organic matter spread like lasagna filling on top of her soil).
But this organic matter laid on top of the garden isn't just a one time thing. You have to keep covering the soil, for two reasons:
#1, because the organic matter acts as a mulch to retain moisture in the soil and keep weeds down.
And #2, because the plants you grow are continually sucking nutrition out of the soil, so you need to add nutrients back into the earth.
In an established no-till garden, fertilizing is rarely, if ever, necessary. Instead, focus on feeding the soil by, once or twice a year, putting organic matter on top of it, to naturally decompose. This organic matter can be nearly anything you have on hand; you do not need to buy anything to have a successful no-till garden.
It's highly unlikely you don't have at least some useful organic matter in your own yard, but if perchance you don't, then you can round it up from your neighbors, your municipality, or from local businesses. Look for:
* Vegetable and fruit scraps from your kitchen. (You can compost these in a bin or pile, or you can simply bury them in the garden.)
* Dry leaves. When leaves fall in the autumn, gather them up and pile them onto the garden. It helps if you first run over them with a lawn mower so they decompose faster, but that's not absolutely necessary. You can also turn these leaves into leaf mold - but again, that little bit of extra work isn't required.
* Yard trimmings. Pulling leaves off your Brussels sprouts? Trimming a bush? Removing yellowed leaves from a broccoli plant? Need to get rid of the season's corn stalks? All these trimmings can be laid directly on top of your garden soil.
* Grass. When you mow, use the bagger, then spread the grass out thinly. Let it dry a little, so it isn't clumpy, then put it on top of your garden soil.
* Wood chips and sawdust. Local arborists often give wood chips away for free; so do mills and municipalities. Sometimes they even deliver!
* Compost. Make yours at home with kitchen scraps and yard trimmings. Use a bin, if you're concerned about pests getting into it or neighbor complaining. Can't afford a compost bin? Use a plastic garbage can with holes drilled all over it. Some municipalities also offer residents free compost made from grass and brush trimmings.
* Worm castings. Worm bins are cheap to create and cost nothing once you establish them.
 My no-till garden, early in the spring.
(adsbygoogle = window.adsbygoogle || []).push({});
* Newspapers. If you still get one that has only black and white ink, these can be laid down directly on the soil, then covered with more organic matter. Or, you can shred them and put them in your compost.
* Farm waste. Spent hay or straw from barns can often be had from local hobby farms for free. Just make sure the hay or straw is organic.
* Manure. Rabbit, sheep, and goat manure can be applied directly to the garden without composting it. Other livestock manure needs to compost a bit first. Again, manure can often be had for free from local hobby farms, but I also know gardeners who keep a rabbit or two as pets just so they can use their copious amounts of poop in their gardens.
* Cover crops. For just the cost of a seed packet, you can plant something that will prevent soil erosion during the winter, then can be cut down and laid directly onto the soil to feed it.
* Roots. Instead of pulling out the roots of plants when they are spent, leave them in tact. As they decay, all the good nutrients they pulled from the soil will go back into the earth. (If the roots are in the way of new plants you want to add to the garden, dig them out...then throw them in the compost pile.)
Some people claim it's just not possible to collect enough organic matter for a large garden. I say, keep asking around. Most people are delighted to give you their fall leaves or grass clippings, for example. I've even seen bags of dry leaves offered up for free on Facebook Marketplace.
In addition, there's no law that says you have to cover your entire garden with organic matter all at the same time. Instead, apply whatever you have on hand, and make a note of what parts of the garden didn't get covered. Next time you have organic matter on hand, lay it on the portions of the garden that were neglected last time.
 Planting out the garden in early spring.
(adsbygoogle = window.adsbygoogle || []).push({});
So, How Do I Plant?
A lot of people are confused about how to sow seeds or plant seedlings in no-till gardens....because they are taking the "no dig" name a little too literally.
To direct sow seeds, you can either insert your finger into the soil to create a hole for larger seeds that are more deeply sown, or you can use your finger to create a small furrow in the soil to plant smaller seeds into. In either case, once the seeds are at the correct depth, just use your hands (or a hoe) to cover them up with soil. (Be sure to tamp down the soil firmly, so the seeds have good contact with it.)
For plants, use a shovel, spade, or your hand to dig a hole of the appropriate size. You don't need to dig a large hole to "loosen the soil." Just dig it big enough that you can spread the roots out as needed. (Remember that over-digging actually harms the natural life in the soil.) Plop the plant in the hole, and push soil around it, making sure to to press down a bit so that any air pockets in the soil disappear.
Remember, the no-till, no-dig method is meant to minimize damage to the soil, but it doesn't mean you can't dig holes for planting.
How to Convert Your Garden to No Till
To convert your garden to this method, start by smothering the weeds. Mow or weed whack them low to the ground. If you have difficult-to-get-rid of weeds, dig them out or till lightly and pull them out, getting as much of their roots as possible. If this sounds like a lot of work...it can be. But remember that this is a one-time deal!
As long as the weeds or grass haven't gone to seed, there's no need to haul them off somewhere. Let them sit right where they fell. As they rot, they will feed the soil.
Now lay down something that will block light from the weeds and grass. I recommend corrugated cardboard, in double layers, overlapping. The cardboard should have no printing on it, or should have only black ink markings. Do not use cardboard that is slick, has colored ink, or is bleached any color, including white, because non-organic chemicals are used on such cardboard. If you prefer, you may also use multiple layers of newspapers instead of cardboard, but be sure to use black and white, non-slick pages only.
To find enough cardboard for your garden, look in local Facebook groups for people giving away moving boxes, or contact local businesses (especially appliance and furniture stores) to ask for whatever they have. You can also put an ISO ("in search of") post in local Facebook groups.
 Adding a new section to my garden by laying down cardboard.
(adsbygoogle = window.adsbygoogle || []).push({});
Some people are concerned that cardboard isn't organic because they've read that pesticides are sprayed on them (which has been debunked by multiple sources) or that the glue that's used to hold them together is not organic. There may be variations from country to country, but the USDA’s National Organic Programallows for the use of brown cardboard with black lettering on it. In addition, The ATTRA Sustainable AgricultureProgram has done research into the different chemicals used in makingcardboard, including those used for coatings, inks, and glue. They found thatbrown corrugated cardboard is the least processed and is benign in the garden. (Brown cardboard is simply recycled paper to which natural starch has been added, that is then pressed into shape.)
Assuming you're using upcycled cardboard, be sure to remove all labels and tape (which may contain plastic), as well as any staples, before you lay it down in the garden.
Once your smothering material is laid down and watered, cover it with more organic material. There are lots of ways to go about this. If you have the money, and you want an instantly great garden, you can buy good organic garden soil in bulk and lay it over the cardboard. Tada! All done.
 New garden beds made by laying down cardboard, mulch, and compost or soil.
(adsbygoogle = window.adsbygoogle || []).push({});
But you can also lay other organic matter on top, as long as it completely covers the cardboard with at least 4 inches. (The cardboard will decompose rather quickly, allowing plant roots through, if needed.) If you don't have enough homemade compost to lay on top of the cardboard, try lasagna gardening (also called "sheet mulching"). The trick here is to alternate layers of carbon-rich materials (or "browns," as they are often called in composting; these include dry leaves, straw, hay, and sawdust) with nitrogen-rich materials (or "greens," like grass clippings, produce scraps, garden trimmings, weeds, and manure). The brown layers should be about twice as thick as the green layers and the finished lasagna should be about two feet tall. (It will shrink down in just a couple of weeks.)
Now cover your pathways with cardboard and organic matter like wood chips or straw.
Your no till garden is now ready for planting!
To see how I created my current garden using these no till methods, click here.
 Later in the year...
(adsbygoogle = window.adsbygoogle || []).push({});
What if My Native Soil Is Lousy?
No-till methods are perfect for gardeners who have naturally lousy soil on their property. Our homestead has heavy red clay soil that almost nothing but weeds thrives in. But using no-till methods allows me to grow a highly productive garden.
It really doesn't matter if your soil is clay, sand, hard-packed, or full of rocks. With this method, you create new, better soil on top of whatever is native. (If you have large rocks in your soil, I'd remove them first, but if the rocks are smaller, just add lots of organic matter on top!)
Maintaining a No Till Garden
Very little maintained is required in a no-till garden, aside from continuing to layer organic matter on top of the soil once or twice a year. However, should some weeds pop up, you can either hand pull them (most will come up easily), or you can choose to re-smother them. To mother, simply lay more cardboard on top of them, then cover that with organic matter. The benefit of this latter method is that as the weeds die, they actually put fresh nutrients into the soil.
 No-till gardens are beautiful and require much less work!
Related Articles:


(adsbygoogle = window.adsbygoogle || []).push({});
January 16, 2024
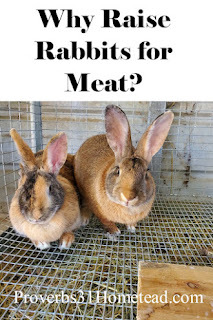
Caring for Rabbits in Cold Weather

This post may contain affiliate links. At no cost to you, I may earn from qualifying purchases made through some links. Please see FCC disclosure for full information. Thank you for supporting this site!
One of the reasons I love raising rabbits is that they are easy keepers. But as winter temperatures in the U.S. are plummeting, many people are wondering if they should be doing anything special to care for their rabbits. The answer? Maybe.
Good Housing is Vital
Thankfully, rabbits do well in very cold weather - but the difference between rabbits who sail through winter and those who develop frostbite or hypothermia is good housing. Wherever you house your rabbits must be dry and sheltered from the wind.
It's often tempting to simply drape tarps over your rabbit cages, but this is rarely adequate. For one thing, rabbits chew on tarps, leaving holes behind that expose them to the weather. For another, it's difficult to keep tarps tight against cages so your rabbits are truly protected from the elements. Also, you may think your tarps are well secured (and indeed, they may be well secured for years), only to discover one horrible morning that your tarps have blown away. (That happened to me this winter; thankfully, the affected cages were empty.)
While rabbits do have thick coats to insulate them against the cold, they are sensitive to drafts and can go into hypothermia if cool or cold water reaches their skin.Therefore, it's best to have a structure over your rabbit cages or colony setup. In addition to a roof with deep overhangs, it should have at least three walls and be large enough that none of the rabbits are unduly exposed to the weather.
Food and Water Concerns
 (adsbygoogle = window.adsbygoogle || []).push({});
Since rabbits dehydrate quickly, when temperatures plummet, it's also vital to keep your rabbits' water supply from freezing. If you use standard ball-type rabbit waterers, check their function every single day (at least once a day and maybe more frequently) by using your finger to extract water from the tip. In cold weather, the metal tube that rabbits drink from will freeze long before the plastic bottle part does.
One way to deal with this problem is to have multiple waterers on standby; keep them in a location where they won't freeze and simply switch out any frozen waterers with fresh ones, as often as needed. (Remember to switch out the entire waterer, not just the bottle, since the metal tubes are most sensitive to freezing.) I've also seen homesteaders wrap bottles in wool socks, a bit of bubble wrap, or bubble foil aluminum insulation. Some people choose to use heated bottles, but they require great caution around rabbits; if the animals chew the electrical wires, the bottles can become a fire hazard.
Another option is to switch to rubber bowls or water crocks. (Crocks with wide-mouthed bottles are slower to freeze.) Ideally, these crocks are kept off the floor so that rabbits don't step in them and get chilled. You will have to check the water several times a day as long as freezing temperatures persist.
Think about feed, as well. As temperatures drop, rabbits instinctively eat more because they are burning additional calories to stay warm. Therefore, winter is a good time to free-feed your rabbits, or at least increase their daily ration.
Bedding
 (adsbygoogle = window.adsbygoogle || []).push({});
If temperatures drop to 15 degrees F. or less, I recommend giving each rabbits a wood or cardboard box filled with straw. Some people prefer plastic boxes, but since rabbits tend to chew on everything and since I can't imagine that ingesting plastic is healthy, I recommend avoiding this. Wood or cardboard is warmer, anyway.
Some people are tempted to use other types of bedding, such as hay, shredded paper, or wood shavings, but these are less insulating than straw. Whatever you choose, however, be sure to check the box daily; if the box or the bedding becomes wet, it must be removed and replaced right away. If your rabbits defecate in the box, you'll need to clean up after that, too.
Pet rabbit folks will tell you that temperatures this low require bringing rabbits inside, but the truth is that if proper housing and bedding are supplied, rabbits do just fine in very cold temperatures. However, if you choose to bring your rabbits inside during cold weather, it's vital to make sure the temperature change they experience isn't radical. Even a 15 or 20-degree change in temperature can put rabbits into physical distress, with death a very real possibility.
One thing both farmers and pet rabbit experts agree on, however: never use a heating pad or heat lamp. Not only are both unnecessary, but they often cause horrific burn injuries to rabbits and can even lead to overheating and death.
Rabbit Kits

(adsbygoogle = window.adsbygoogle || []).push({});
Some homesteaders ask if they should avoid mating rabbits in winter, for fear the kits won't survive. But as long as mother rabbits prepare good nests, in most cases, cold weather shouldn't be an issue. I've talked with homesteaders who regularly have -15 degree F. weather in the winter, and all their rabbits - including kits - do just fine outside.One important thing to note, however, is that while you may prefer metal nesting boxes because they are easier to clean and don't get chewed on, if temperatures are cold, you should use wood nesting boxes - or even cardboard boxes - which are considerably warmer than metal.
Give the mother rabbit plenty of fresh straw (not hay) to build her nest and consider putting a layer or two of cardboard in the bottom of the box for extra insulation. As long as the mother pulls plenty of her own fur for the nest and the babies aren't born outside the nesting box, the kits will not be too cold. If you get surprised with suddenly low temperatures, you may wish to bring the kits and their mother into a warmer building. Just be sure that they don't experience big temperature swings, because just like adult rabbits, kits don't quickly adjust to temperature swings.

Related Posts:


December 14, 2023
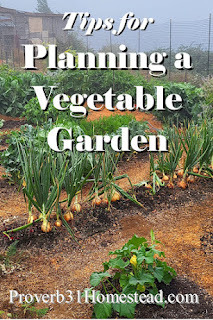
Tips for Planning a Vegetable Garden
 There are few things I enjoy more than snuggling up next to the woodstove with a cup of (decaff) coffee, my favorite seed catalogs, and my garden planning notebook. Winter is the best time to plan out the vegetable garden! If you're like me and struggle a bit when it comes to organizing, that's okay. You can still plan a great garden; just follow these seven tips. By the time the spring sun is shining and you're itching to get into the garden, you'll have a well thought out plan to ensure your next garden is the best you've had yet. So grab a notebook and pencil, and let's get started!
 Tip #1: Assess
I'm sure I'll take flak for quoting Bill Gates, but at least in this one thing, he is correct: "It's fine to celebrate success, but it is more important to heed the lessons of failure." In gardening, we must grab onto those glorious successes - like the cucumbers that produced like mad and the Brussels sprouts that were spared aphid infestation. But we should also carefully consider how we can learn from failures - like the cabbage heads that never grew bigger than a baseball. So begin the process of planning next year's garden by asking yourself: What did well the last growing season...and what did not?
Here are some examples of the sort of thing I recommend asking yourself:
* Did you fail to grow enough tomatoes to stock up your pantry for winter? Then now is the time to think about how many more tomato plants you'll need to plant next year.
* Did a certain variety of carrot not get very big? Next year, try a different variety that might grow better in your area.
* Did the spinach bolt (go to seed) early in the season? Try it in a shadier spot next year and look for a variety known for being bolt-resistant. (Weather that fluctuates from cool to warmer tends to cause plants to bolt, so think about your spring and fall weather. Weather-wise, if your fall tends to be more stable than your spring, for example, try growing veggies that tend to bolt in your fall garden. Read up on proper fall garden timing here.)
* Did the vine borers get your squash? Perhaps next year, you could try growing a variety that produces early, before the pests can destroy your plants.
 What do you actually eat? Do you need to grow more or less of it this year?
(adsbygoogle = window.adsbygoogle || []).push({});
Tip #2: Select Seeds
This is the fun part, right? But if you just ogle seed catalogs and buy without a plan, you're setting yourself up for a less than great garden. Instead, consider:
* What veggies do you regularly eat? This is what you should grow!
* How many plants of each type do you want to have?
* Do you already have plenty of seeds for the things you want to grow? (Don't rely on your memory; take a peek at your actual seed supply. Is it sufficient?)
If you decide you need to buy seeds, make a specific list of what you want...then hit the seed catalogs. These days, most seed supply companies have online catalogs, which is terrific if you're in the midst of planning your garden but the seed catalogs aren't out yet. Read the seed descriptions carefully, looking for plants that will thrive in your location. For example, I live where it's temperate and generally not very hot. I grow a lot of things that do well in Alaska, Russia, and Great Britain. If I select seeds that are better suited to the hot, humid south, I won't have a productive garden.
Also pay attention to how long it takes each variety to mature. I tend to choose seeds that have the shortest growing time I can find because they ensure I get the most from my garden. If I grow a lot of things that take months to mature, the harvest is naturally smaller.
Like many gardeners, I do like to try one or two new varieties each year, just in case I can find something better than my old standbys, but DANGER ALERT! Reign yourself in! You only have so much gardening space. Sure, some things are just plain fun to grow, but if being more self-sufficient is your aim, you'll want to ensure most of your garden space, time, and money go into staples.
Another important consideration is whether or not your seeds are hybrid or heirloom. If seed saving is your aim, buy only (or mostly) heirlooms. (Also, don't fall into the trap of thinking that hybrids and GMOs are the same thing. They are not. Thankfully, there are no GMO seeds available to consumers...although Baker Creek Seed claims that when testing corn seed, they've found seed crossed with GMO corn. Therefore, you may want to buy your corn from them, since they are the only seed supplier I'm aware of that tests their seeds this way. Learn more about GMOs and garden seeds here.)
 Kohlrabi is fun to grow and yummy to eat, but I grow little of it, because we just don't use it much.
Tip #3: Consider Your Garden Spot
Now's the time to get in touch with your inner critic and get really persnickety about your garden location. What specific problems did you encounter last growing season and how can you address them next year? If, for example, the soil didn't drain well, perhaps you should put in raised beds this year. Or if the garden bed wasn't sunny enough, now's a good time to trim some trees or relocate the garden. If pests have been an issue, plan now for what you can do to deter them. Maybe this should be the year you put up deer fencing, for example.
If you were pleased with your garden location last growing season, consider whether or not you should expand in the coming year. By how much? And what will you put in the expanded area?If you need a new garden location, watch potential spots carefully. Winter can be a good time to assess soil drainage and whether or not the garden spot is in a cold or warm micro-climate, but remember that the sun's location will be higher in the sky during the warmer months.
And while you're thinking about your garden spot, don't forget that a traditional garden bed isn't required for growing food. I've grown food in window boxes, mow strips, old bathtubs, culvert pipes, flower beds, buckets, and of course, flower pots. Others have used old gutters, tires, potato sacks, and chests of drawers. Use your imagination!
 Cabbages growing in a front window planter.
(adsbygoogle = window.adsbygoogle || []).push({});
Tip #4: Amend
The key to a prolific, healthy garden is organic matter...and lots of it. Winter can be a good time to add organic matter to the garden (as long as there isn't lots of snow). Consider adding leaves, organic straw, grass clippings, compost, manure...(Read this post for important information on using manure in the garden.)
Also, if you didn't test your soil in the fall, definitely do that now, weather permitting. (Learn how here.) Certain soil amendments take months to really do their job, so applying them in winter is better than applying them in spring.
 To get great veggies, you have to feed your soil organic matter.
Tip #5: Map it Out
Even if you aren't artistic, it's important to sketch out your proposed garden. (Or, if you prefer, use an electronic program to make a fancy garden map.) Consider: Will you have room to grow everything you have in mind? (Check seed packets or descriptions for how close together plants should be.) Will the corn and sunflowers block sun from the tomatoes? (If so, perhaps plant things like lettuce and spinach, which don't mind shade, in that spot...or move the tall plants to a location where they won't shade anything.)
While you're doing this, bear in mind where you planted things last year. To reduce pests and disease, crop rotation is very helpful. This means you don't put plants from the same family in the same location as last year. (Ideally, your crop rotation cycle should last four years, since that's how long it takes for most soil-borne diseases and pests to reduce to harmless levels.)
 Map out your garden, even if your method is very simple.
(adsbygoogle = window.adsbygoogle || []).push({});
Tip #6: Prepping
As many of us learned during the shutdowns a few years ago, gardening supplies can run out quickly. Even before a pandemic was declared, I sometimes had difficulties finding certain gardening supplies in stock at local stores once spring arrived. While I try to avoid buying any products for my garden, when I do need to make purchases, I buy them as soon as I can find them in stores - which is usually late winter or early spring. Make a list now of the sort of things to keep your eye out for. For example, snail bait, lime, or bird netting.
In addition, if you upcycle any items to use in your gardening pursuits, start gathering them now. For instance, gallon jugs or milk cartons for seed starting, newspaper and cardboard for mulching, and so on.
 Gonna need bird netting? Buy it as soon as it appears in stores.
Tip #7: Make a List and Check it Twice
Have you ever had grand gardening plans only to suddenly realize spring has sprung and you haven't planted anything? You can easily avoid this problem by making a list of everything you want to plant and noting by what date you must start the seeds and put the seedlings into the garden. If you prefer, use a calendar to note these important dates.
This is also a good time to consider whether you want to plant everything at once - ending up with large harvests all at one time - or use succession planting. With the latter, you plant a little bit of, say, green beans, then a week later, plant a few more, then a week later plant a few more. Succession planting is great if you want just enough food on hand to eat fresh, or if you want to preserve in small batches.
And that's it! May your future gardens be bountiful!
Related Posts:

(adsbygoogle = window.adsbygoogle || []).push({});
November 20, 2023
Beanless Chili Recipe (Plus Keto Cornbread!) Grain Free, Keto, Low Carb

This post may contain affiliate links. All opinions are my own. Please see FCC disclosure for full information. Thank you for supporting this site!
Before I switched to a keto diet (which not only took my out of control blood sugar and made it normal without medication - you can read more about how I totally reversed my diabetes here - but also put my hidradenitis suppurativa in remission), I had never heard of - let alone eaten - beanless chili. Now it's the only chili I make! This stuff is YUMMY and easy (my favorite combo). And while I don't love a super spicy chili, you can easily make this recipe spicier by following the notes below. If you want to add some low carb, no grain "corn"bread, check out the recipe that follows the chili recipe. Even my carbivore family thinks it tastes just like the real thing!
 Beanless Chili Recipe
 2 lbs. ground beef
1 bell pepper, chopped
1 jalapeno or Serrano pepper, chopped*
2 garlic cloves, minced
1 quart jar (about 32 oz.) stewed tomatoes
1 pint jar (about 15 oz.) tomato sauce
32 oz. beef broth
7 oz. tomato paste
2 tablespoons chili powder**
1 teaspoon dried oregano
1 teaspoon cumin
1 teaspoon garlic powder
sea salt and pepper
* For chili that isn't very spicy, use a jalapeno and remove all the seeds. For more heat, keep some or all of the seeds. For hotter chili, use a Serrano pepper; again, the more seeds you leave in, the hotter the chili will be. I recommend wearing gloves when chopping chilies.
** If you like spicy chili, this amount of chili powder is a starting point. After the chili has simmered 10 minutes or so, taste it; add more chili powder, if desired.
 Delicious, easy bean-free chili.
1. In a skillet, thoroughly cook the ground beef. Drain off the fat.
2. In a large pot, combine all the ingredients. Cover and bring to a simmer. If you're in a hurry, don't use a lid and simmer for about a half hour, but the flavors will be better if you simmer the chili for several hours. Keep the lid on if you want more liquid in the chili, and remove the lid if you want to cook off some of the liquid/thicken the chili.
3. When you think the chili is done, taste it. If you want more spiciness, see the asterisk notes above. Or if you just want stronger overall flavor, add a bit more salt. If desired, serve with sour cream and grated cheese.
NUTRITIONAL INFO. It's always more accurate to calculate nutritional ingredients based on the exact products you are using; however, according to NutritionValue.org, this recipe (12 servings) has 269 calories, 17 g. fat, and 14 carbohydrates, and 181 g. protein per serving. If you add more chilies, more chili powder, or sour cream and cheese, all these values will increase.
(adsbygoogle = window.adsbygoogle || []).push({});
 Keto "corn"bread is grain-free and yummy!
 Keto "Corn"bread Recipe
1 tablespoon butter
3/4 cup coconut flour (I use this.)
1/2 cup almond flour or meal (I use this.)
1/4 cup erythritol
1/2 teaspoon xanthan gum
1/2 teaspoon sea salt
6 large eggs
1/2 cup melted butter, cooled
1/4 to 1/2 cup water
1. Preheat the oven to 375 degrees F. Place 1 tablespoon of butter in a 10-inch cast iron skillet (or other overproof skillet). Place the skillet in the oven to preheat.
2. In a large bowl, mix together the coconut flour, almond flour, erythritol, baking powder, xanthan gum, and salt.
3. Stir in 1/4 cup of water. If the batter is dry or overly thick, add additional water - just a very small amount at a time.
4. Pour the batter into the pre-heated skillet, using a fork or the back of a spoon to even it out. Bake 20 to 25 minutes, or until the edges are golden brown. Remove from the oven and place on a cooling rack. Wait until the "corn"bread is cool before slicing.
NUTRITIONAL INFO. It's always more accurate to calculate nutritional ingredients based on the exact products you are using; however, according to NutritionValue.org, this recipe (12 servings) has157 calories, 13 g, fat, 5.7 carbohydrates, and 5.6 g. protein per serving.
(adsbygoogle = window.adsbygoogle || []).push({});
Related Posts:


November 13, 2023
Fall on the Homestead
 The last harvest of the season.
This post may contain affiliate links. At no cost to you, I may earn from qualifying purchases made through some links. Please see FCC disclosure for full information. Thank you for supporting this site!
"Let us not become weary in doing good, for at the proper time we will reap a harvest if we do not give up. Therefore, as we have opportunity, let us do good to all people, especially to those who belong to the family of believers."
______________
It's been a crazy-busy fall! Some of this is due to the usual homestead push to finish harvesting and preserving what I grew this year, but I also had an extra-curricular activity this summer and fall: I was rehearsing for, and then performing, the role of Mary Poppins in a local theater production. (Yes, I do have a life outside of homesteading!) Once upon a time, I was a professional musical theater performer; now I just do a show now and then for fun. This was a particularly challenging musical, and it ended with me getting the "C" virus for the first time, but gosh it was fun! Even more delightful was that I got to perform with my daughter, who'd never been in a musical before. Special times!
On the homestead front, the garden produced quite abundantly this year, so I spent a lot of time preserving this fall. The only disappointment was my winter squash. I'd planted most of it in newly purchased soil, and, as it turned out, it was still pretty "hot" (decomposing). This lead to extremely slow initial growth. I should have just fertilized the winter squash as soon as I noticed the slow growth rate and yellow leaves (signs of a nitrogen deficiency), but I don't typically fertilize anything, and I just kept putting it off. The end result was that I got few fully mature winter squash. But hey, some winter squash (which I love because it requires zero preserving in order to last many months in storage) is better than none! We eat the less mature squash just like summer squash, too - so nothing really goes to waste.
The garden is now ready for winter: All the tender crops are harvested, and I left most of the summer plants in the soil. This helps prevent erosion during winter, and as the plants die, all the nutrients built up in the roots release into the soil. I've also covered the top of the soil with rabbit manure. (Don't have manure? Add whatever organic matter you have on hand, like dried leaves, dried grass clippings, leaves from healthy plants, roots from previous crops, compost,wood chips...laid on top of the soil, not dug or tilled in, if you're following the abundant and easy no till, no dig method I use.)
 Playing Mary Poppins.
(adsbygoogle = window.adsbygoogle || []).push({});
Overwintering in the garden are Brussels sprouts, carrots, cabbage, kale, and collards. I do nothing special to these winter crops; they quite easily survive the small amount of snow we might get. There are also still snow peas growing and producing. (Want to learn more about growing food in winter? Click here.)
 Brussels sprouts overwintering in my garden.
  An abundance of summer squash led to lots of zucchini bread, fried squash, and zoodles.
 Nutrient-rich organic soil grows the biggest and best veggies!
The orchard didn't do a ton this year. There were no plums or ripe figs (due to spring weather conditions) and the pears were diseased, but we had plenty of apples. In fact, it was the perfect harvest for a busy season, since we had plenty, but not so many I was overwhelmed!
(adsbygoogle = window.adsbygoogle || []).push({});
 I can, freeze, dehydrate, and freeze dry many foods, including apples. Freeze dried is on the left; dehydrated is on the right.
 Zucchini bread jam from The All New Ball Book of Canning and Preserving.
 Canning pickled beets.
 My Walla Walla onions were HUGE this year! Just 2 of them, chopped, weighed 5.5 lbs and filled my freeze dryer.
(adsbygoogle = window.adsbygoogle || []).push({});
On the livestock front, we replaced our aging hens with chicks we hatched. Now pullets, it's interesting to see them grow, since they are a "barnyard mix" - something we've never raised before. We'll see how they stack up to our usual favorite breed: Australorps. We are taking a break from quail currently, but continue to raise rabbits, who are doing quite well, indeed.
 Our new hens aren't laying yet, so I'm thankful I have home freeze dried eggs in the pantry!
RELATED POSTS:
Kristina's "Famous" Zucchini Bread recipe
Freeze Dried vs. Dehydrated. What's the Difference?


(adsbygoogle = window.adsbygoogle || []).push({});
September 22, 2023
What to Do with Green Tomatoes (Ripening, Cooking, Baking, and Canning!)
 This post may contain affiliate links. At no cost to you, I may earn from qualifying purchases made through some links. Please see FCC disclosure for full information. Thank you for supporting this site!
Hopefully, you got lots of vine-ripened tomatoes over the summer, but now as cooler weather comes in, perhaps your tomato plants have little more than solid green fruit. If lots of rain is coming (and with it splitting and disease) or if frost is predicted, you can still make excellent use of all those green, unripe 'maters! Here's how.
Ripening Green Tomatoes Indoors
Did you know that you can easily ripen green tomatoes indoors? Just harvest them off the plant, then lay them in a single layer in a dark location. (It is temperature, not sunlight that causes tomatoes to ripen.)
I put them inside cupboards or in shallow boxes (the type canning jars come in are ideal) in a dark room or closet. Slowly, the tomatoes will ripen. In fact, you may be even have fresh, ripe tomatoes for Christmas! These tomatoes won't taste as wonderful as vine-ripened tomatoes, but they are still much better than store bought.
Cooking and Baking with Green Tomatoes
There are also many recipes that will use up a glut of unripe green tomatoes. Here are just a handful of green tomato recipes I think are worth trying. You can find many more by visiting your favorite recipe websites:
* Green Tomato Pie (which tastes just like apple pie!)
* Oven or Air Fried Green Tomatoes (or traditional Fried Green Tomatoes)
(adsbygoogle = window.adsbygoogle || []).push({});
 Green tomatoes ripening in a single layer.
Canning Green Tomatoes
You might be surprised to learn that there are some excellent tested safe canning recipes for unripe green tomatoes. Here are some you can find online:
* Pickled Sweet Green Tomatoes
* Kosher Style Dilled Green Tomatoes
* Green Tomato Relish (Also Fall Garden Relish and Rummage Relish)
 Green tomatoes, fresh from harvesting.
(adsbygoogle = window.adsbygoogle || []).push({});
In addition, The All New Ball Book of Canning and Preserving has a recipe for Thai Green Tomatoes and Green Tomato and Hot Pepper Pickles, while The Ball Complete Book of Home Preserving has recipes for several green tomato relishes, several green tomato pickles, green chili sauce, green tomato chutney, and salsa verde.
According to the University of Wisconsin extension office, it's also safe to substitute green tomatoes for tomatillos in tested safe canning recipes.
While millions of people have eaten green tomatoes without negative side effects, and while neither the USDA nor the Extension offices have expressed concern about canning or eating green tomatoes, Ball points out that unripe green tomatoes can contain something called solanine, which, if eaten in large quantities, can be toxic. If you want to be extra careful, Ball recommends only eating darker green tomatoes, saving pale green ones (which, they say, are higher in solanine) for off-the-vine ripening.
Finally, while not all the Extension offices tout this idea, the University of Wisconsin Extension office tells us to avoid canning tomatoes ripened off the vine because "the proper acidity may not develop."
 Large and small quantities of unripe green tomatoes make wonderful food!
(adsbygoogle = window.adsbygoogle || []).push({});
Related Articles:
August 31, 2023
What to Look for in an Automatic Coop Door

This post may contain affiliate links. At no cost to you, I may earn from qualifying purchases made through some links. Please see FCC disclosure for full information. Thank you for supporting this site!
A couple of years ago, I read The Wartime Kitchen and Garden by Jennifer Davies (a book I highly recommend; the tv series is great, too), and had to laugh out loud. In it, the author briefly notes that during "double summertime" (what we call Daylight Savings Time), one college girl remembered "finding her best friend, who was on the College's poultry course, sitting on the stairs weeping bitterly." Why? She hadn't just lost her home to a bombing - nor had she lost a loved one to the horrors of war. She was weeping "because the hens would not go to bed."
Oh yes! I've spent many summer evenings - exhausted from a long day on the homestead - desperately wanting to go to bed, but stuck staying up because the hens were not yet in their coop, safely locked away from predators. (If you've ever raised chickens, you know they don't head to bed until the sun begins setting...and that trying to herd chickens into a coop is not an activity to attempt when you are exhausted.) This is why I've always wanted an automatic chicken coop door - literally, a door that opens by itself in the morning, letting the flock out, and shuts itself securely at night, locking them up securely.
I did a lot of research over the years to determine what exactly I wanted in an auto coop door opener, and finally, after Chickcozy recently sent me their model, I now have hands-on experience, too. If you're considering buying an automatic coop door, here are some things I believe are important to consider:
1. How is it powered?
Many auto coop doors are battery operated, but some plug in to an outlet, and others are solar powered All of these power sources have their pros and cons. For example, batteries need replacing regularly - and in the case of an auto door, they must be replaced before they actually run out of "juice." (Doors that give a low battery light, like the Chickcozy does, are a boon!) In addition, batteries don't always do well in cold weather, so you'll want to be sure you can use lithium disposable batteries (we recommend Energizer Ultimate lithium batts). (Bonus: Lithium batteries, unlike alkaline batteries, do not leak - and a leaking battery will instantly ruin any electronics in your door.)
Doors that plug in obviously require the coop be near an electrical outlet. But also consider that livestock may unplug the device, making it useless. Chickens will also peck at wiring, so the cord must be completely covered to prevent them from de-powering the door - or possibly causing an electrical fire.
Solar panels require sun year round, which you may or may not have. And if your coop is in shade, solar might not work at all.
If possible, search for an automatic coop door that offers at least two of these powering options; this way, you'll have a backup should the first system fail.
 A chicken coop with a solar powered automatic door. Courtesy of Stephan Ridgway.
(adsbygoogle = window.adsbygoogle || []).push({});
2. How Adjustable Is It?
One thing I love about the Chickcozy automatic coop door is that it's highly adjustable. You can use it with only a daylight sensor - or you can use a timer, set to open/close at a specific time of day. For the light sensor mode, you can add delay time to the opening and closing to ensure the door doesn't close too early in the evening or too early in the morning.
Note that bright headlights from vehicles, house lights, and security lights may confuse the light sensor on auto coop doors, which could mean the door opens and exposes your chickens to predators in the middle of the night. Light sensors may also fail to open the coop door if it's a dark winter day.
If your hen house is in the shade, as ours is, a light sensor may pose different issues. Our auto door, had some problems with closing too early - before the chickens had gone to bed. Thankfully the Chickcozy allowed us to adjust the close light level, making the door less sensitive to the evening light change, thereby solving the problem.
3. How Does the Door Open?
Does the door open by sliding from one side of the coop to the other or does it go up toward the roof? Does your chicken coop have room for whatever type of mechanism your chosen door has?
It's also good to note if the door uses mere gravity to shut, or if it uses a motor for this function. A motor offers a safer option for birds who might happen to be in the doorway as the door is shutting - assuming the door has a safety sensor that prevents the closure if a chicken is in the way.
Also pay attention to the size of the door; if you have a larger breed of bird, will they easily fit through?
Testing our Chickcozy door's safety sensor.
(adsbygoogle = window.adsbygoogle || []).push({});
4. How Difficult is the Installation?
Some auto chicken coop doors install very easily: You just screw the door frame into the opening of your chicken coop. (Of course, that opening has to be the right size for your door, so it's possible a little carpentry to make that happen will be necessary.) Other door installations might be more complex, even requiring some wiring skill. Before you buy, ensure you're comfortable with the level of expertise needed to install the door. Most manufactures allow you to download the door's manual online, so you can see exactly what installation is required.
5. Is it Weather Proof?
Not only can cold weather affect the performance of auto door openers (see #1, above), but all electronics must be weather proof. If the manufacturer doesn't state that the control panel, for instance, is weather proof, it's best to find a different product.
You may also wish to note whether or not the door's plastic is UV stable. If it's not, your door will likely need replacing a few years down the road - but this may be acceptable to you, depending on the upfront cost of the door.
 Our new flock, adjusting to the Chickcozy automatic door.
(adsbygoogle = window.adsbygoogle || []).push({});
A Few Other Tips:
It will take time for your flock to adjust to an automatic door. For instance, when we first installed ours, instead of running out the door as soon as it was opened (our flock's usual behavior), our chickens took several minutes to come outside each morning. With time, the flock grew used to the door, and soon they were rushing outside again, just like they used to.
You should also expect that it will take some time to adjust the settings on your door and get them just right. It took us about a week to ensure our door was closing only after all our chickens were in the coop. (During that time, some chickens were getting locked out; expect to go check on your flock every night until you get the settings right.)
Finally, be aware that no matter the model you choose, the groove along the floor of the door will probably require daily cleaning in order for the door to function properly. We find that just giving the groove a swipe or two when we go out to feed and water our flock is quick, easy, and effective.
We've had our Chickcozy automatic coop door for over a month now, and so far, we couldn't be more pleased with it. If you think you might like a Chickcozy door for your flock, use this COUPON CODE at checkout for a 5% discount: kristinaseleshanko. Click here to order the door or learn more about it.
RELATED POSTS:


 * Cover image courtesy of The U.S. Department of Agriculture.


