
Michael Linenberger's Blog, page 10
March 12, 2019
Which is the Real Outlook Archive folder?
There are multiple ways to archive mail in Outlook. Each can lead to a folder or folder group on the left side of your Outlook window with the word Archive on it. As a result, you might have an Archive folder, and/or a group of folders labeled Archive, and/or something labeled either Online Archive or In-Place Archive. Each of these Archives are a different thing, however, and so that can lead to confusion.
In this article I want to show how each of these looks in Outlook’s folder pane on the left, clarify the differences, and revisit why you might want to use each type.
Archive Folder
Let’s start with the Archive folder (and button). It will look like this in your folder pane in Outlook:
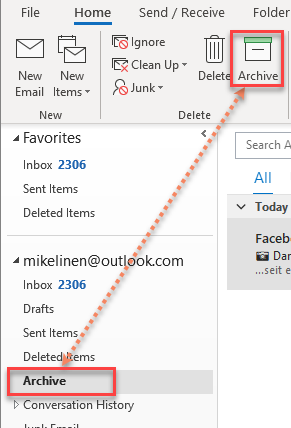
You’ll see these in newer editions of desktop Outlook (Outlook 2016, 2019, and Outlook in Office 365 business subscriptions). And you will see these whether you use these clients with Exchange or with Outlook.com. That Archive folder is available whether you are using Outlook desktop, Outlook Online, or an Outlook smartphone app. These days this is the most common archive approach in Outlook.
If you have it, the Archive folder is simply another folder stored on your central mail server with your other server folders. It is created for you automatically by Microsoft when you establish the mailbox in Outlook.com or in a newer version of Exchange Server. It’s not that much different from, say, your Inbox, or even from folders that you manually create on the server.
The main difference is that all newer versions of Outlook client have a button that automatically moves selected mail into that folder, shown in the figure above. That button is an advantage because it is so easy to use and since it has such a simple keyboard shortcut: Backspace. The button is present on Outlook desktop, Outlook Online, Outlook.com, and on the Outlook smartphone apps. Its universal presence can be quite helpful.
Also, since the Archive folder is on your server, you can get to it from any device you are using.
But the disadvantage of this Archive folder is that, since it’s on the server, mail stored there counts against your storage total—meaning that using this is not true archiving. And it does not replicate the folder structure when mail is moved there—it’s simply one big folder. But if you believe in single-folder filing, as I do, that’s not an issue.
I see the Archive folder as best-used for relatively recent mail you want to get out of the Inbox. I cover the Archive folder thoroughly in section 1 of my Outlook Inbox Ninja Video Course.
Archives Group (AutoArchive PST)
You might have an Archives group in your folder pane that is being populated by Outlook AutoArchive.
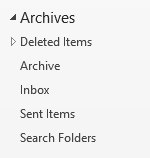
AutoArchive is the oldest variety of archiving that Outlook offers, it’s been around for decades. With this approach, mail is stored locally on your hard drive in a file called archive.pst.
This approach represents true archiving in the sense that mail is moved off your server when it is stored here. And that’s its main advantage: it makes room on your server, should you need it. Also, it preserves your folder structures when it moves the mail.
But there are a ton of disadvantages:
It is not available online; if you aren’t using the same computer on which it’s stored you normally can’t get at it; it’s normally not backed up, and typical online backup approaches don’t work with it;it can fill up without warning and degrade Outlook performance—so you need to monitor its size regularly; and your IT department doesn’t have central access to it should it be needed for legal discovery.
For all these reasons most IT departments discourage its use.
But for individuals with one computer and limited mailbox server space, it’s probably your best archive solution, assuming you monitor its size and back up that archive.pst file periodically.
Appendix B of my book Total Workday Control Using Microsoft Outlook covers this thoroughly, and I have multiple videos on this in section 7 of my Outlook Inbox Ninja Video Course.
In-Place Archiving or Online Archive
You might have a folder group called Online Archive or In-Place Archive in your folder pane in Outlook. Here is how this looks:
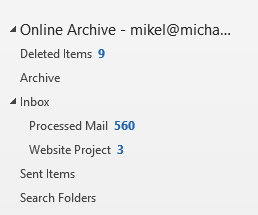 Online Archive on the left side of your desktop Outlook window
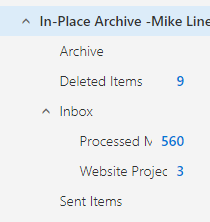 In-Place Archive in Outlook Online
The first figure is how it looks in desktop Outlook; the second in Outlook Online. Notice the name difference, but it’s the same folders and same mail.
This approach is Microsoft’s newer and preferred archive solution for large enterprises, and it’s available to most people using an Office 365 mailbox or recent versions of Exchange (if activated).
Typically, mail is moved there using automatic retention policies set up by your Exchange administrator, but you can also use Outlook rules, or manually drag mail there. Once activated, the default retention policy for this system is to automatically move all your main mail there if it’s older than two years old; but that age trigger can be changed.
The Advantages of the Online Archive mailbox are many:
Storage there is typically unlimited (depending on your Exchange license or internal policy). It is true archiving because it makes room on your main server storage. It preserves the folder structure of mail moved there.Mail stored there is available from any of your computers if connected to the internet. Mail stored there is backed up with Exchange. And your IT department can do legal searches in it.
There are a couple disadvantages to the Online Archive mailbox:
You must be connected to your server to view mail there (it’s not cached in desktop Outlook), and that mail cannot be accessed via mobile mail apps (ActiveSync does not have access to that mailbox). Also, you need Exchange admin privileges to change the built-in retention policies.
For more information on this archive approach, see this recent post. I also have a new video lesson about this in the Outlook Inbox Ninja Video Course, Lesson 7.7, which paid users can watch.
Conclusion
So there can be three different Archive folders or folder groups in your folder pane at the left side of Outlook, and they represent the three main ways to archive in Outlook. Each is very different, and each has its advantages and disadvantages. Hopefully, one or more of them will be the right archive approach for you.


March 11, 2019
Faxing vs. Emailing, and Security
My doctor, who is part of a large modern medical complex, will not let me email him anything–even simple questions. But he is happy for me to fax things to him. I often wondered about that: why?
I just read an interesting article that explains why the use of fax communications is growing—in fact it never stopped growing. Regardless of better technologies being out there.
According to the article, the main reason faxes continue in widespread use is security and the interoperability of that security. A fax, transmitted from fax machine to another, over a phone to phone connection, is supposedly unhackable, which is important for industries that need signed or secured documents.
So the medical industry is still mostly standardized on fax transmissions, again mostly for security reasons. And, according to that article, the use of other secure transmission methods by doctors has been hampered by medical records companies deliberately making their systems incompatible with each other.
Now, the flip side to this is if you use an eFax service with email delivery instead of a phone-to-phone connection on two fax machines, the transmission is most likely quite insecure, according to this article. The point of that article is that the emails that send the attached PDFs are exposed to hacking in the transmission over the internet. The solution is to log on to the eFax website with a secure connection, and do your sending (and receiving) that way, but that’s often not very convenient is it?
Which brings up the whole question of email security in general—emails are a very convenient way of communicating. The email inbox is easy to use. But what does it take for regular emails to be sent securely, particularly in the Outlook world? I have at least one client who says that their corporate policy is that all emails sent outside of their company must be sent encrypted in Outlook. How you do that will be the topic of a future post, soon, I hope.
But in the meantime, reply in the comments section: Does your company still use faxes? Does your company have a means of securing email communications? Please share what you can, thanks!
Michael
March 10, 2019
Using Online (In-Place) Archive in Exchange (New Video)
If you use Exchange and need a True archiving solution (one that makes room on your mail server), you might want to look at Microsoft’s latest and preferred archive solution. You will see it called both In-Place Archive and called Online Archive. You might say that it is a server-version of the older AutoArchive approach, one with a lot more power. It could be the perfect archive solution for you—but maybe not.
I’ve just created a new video about this on the Outlook Inbox Ninja Video Course, Lesson 7.7, which explains this archiving approach. That lesson also shows how to activate this yourself, if you have admin privileges to your hosted Exchange account. All paid users of the Ninja course can watch that video now.
For those who prefer to read about it, I’ve extracted some of that lesson in this writeup.
How it Looks in Outlook
If you have Online (In-Place) Archive active in your Exchange account, here is how it looks in your Outlook folder pane; on the left is desktop Outlook and on the right is Outlook Online.
Online Archive on the left side of your desktop Outlook windowIn-Place Archive in Outlook OnlineNotice the name difference, but it’s the same folders and same mail.
This archive approach is best thought of as creating another mailbox for your email address on your Exchange Server, but one that you move mail to (not one you receive mail directly to).
Typically, mail is moved there using automatic retention policies set up by your Exchange administrator, but you can also use Outlook rules, or manually drag mail there. Once activated, the default retention policy for this system is to automatically move all your main mail there if it’s older than two years old; but that age trigger can be changed.
The Advantages of the Online Archive mailbox are many:
Storage there is typically unlimited (depending on your Exchange license or internal policy). It is true archiving because it makes room on your main server storage. It preserves the folder structure of mail moved there.Mail stored there is available from any of your computers if connected to the internet. Mail stored there is backed up with Exchange. And your IT department can do legal searches in it.
Furthermore, with this Online Archive mailbox, the age trigger can be adjusted, and it can be set by folder. So theoretically, one can design a few different ways of automatically clearing and archiving your main mail storage. In a way, it’s an enterprise-approved version of the older AutoArchive, but without the disadvantages of PST files.
There are a couple disadvantages to the Online Archive mailbox: You must be connected to your server to view mail there (it’s not cached in desktop Outlook), and that mail cannot be accessed via mobile mail apps (ActiveSync does not have access to that mailbox). Also, you need Exchange admin privileges to change the built-in retention policies.
But Why Bother with Online Archive?
As you can see, there is a lot of power here in Online Archive. But for an individual or small business with Exchange you might wonder why bother. Given that these days storage on your main hosted Exchange mailbox is huge—typically 50 GB per user—why not just keep many years’ worth of mail on your main server, perhaps in specialized folders?
It’s true that Online Archive was primarily created to provide an enterprise-level archive solution, mostly using mailbox-wide, age-based, automatic archiving. This helps an enterprise save money on mailbox storage on their internally-deployed Exchange servers.
But, as an individual or small business subscribing to Office 365 with huge mailbox limits, you still might want to use Online Archive. Why?
First, some companies set the mailbox limit much smaller than 50 GB. And there are some people exceeding even that 50 GB limit.
But even well before reaching 50 GB, I could see using it to, say, move old useless mail completely out of your main server. That would speed up and simplify the appearance of Outlook search results, and it could speed up visual scanning of mail in various folders.
Using it for New Mail
And using logic-based Outlook rules to selectively move some new mail to your online archive is also a good reason to use it. For example, let’s say you get lots of automatic system-report emails daily that you never read. But you want to save them in case an incident is reported later—you want to be able go back and examine a report for a given day. You could of course use a rule to move them to another server folder in your normal mailbox. But the problem with that is: 1) they take up a lot of space and 2) they often clog up search results.
So, instead, all these report emails could, using normal Outlook rules, be auto-moved to the Online Archive mailbox as they arrive every day. That way they are out of the way, but you have the option to find them in the Online Archive mailbox on those rare occasions that you need to see them.
Again, I’ve just created a new video on the Outlook Inbox Ninja Video Course, Lesson 7.7, that discusses this topic in more detail. It also shows how to activate it in your Exchange account, if you have admin privileges.
February 20, 2019
The Amazing (and underused) Exchange Retention Policies: They Can Help Clear your Inbox and Folders
Microsoft Exchange includes an elaborate, mostly behind the scenes, facility to automatically delete old mail. It’s got a ton of rather complicated features mostly set by your Exchange Administrator if they choose to use them. But there are some optional and underused “personal” features that might be available for you.
If they are available to you, these personal retention settings can greatly help you clear your Inbox and help you keep your Inbox or folders free of old mail that you don’t need.
I’ve created 4 new video lessons about this in the Outlook Inbox Ninja Video Course, and the first one is free for all. It’s Lesson 1.11. So go to that link now and watch Lesson 1.11. But if you’d rather read about this instead, read on below.
Example of Where Personal Retention Policies Make Sense to Use
Here’s a good example, I get a lot of daily and weekly news-oriented emails. I like to let some of them stay around in my Inbox or Archive folder (often categorized as READ LATER—see Inbox Ninja Lesson 1.6) for about a week or so, just in case I have time to read them.
But after about a week they are old news and useless. So these days, when I first get them, I apply a retention policy to auto-delete them in a week. This helps keep my folders clear and means there is less mail I must delete manually. Doing all this is easy using Exchange retention policies. It’s especially easy if you combine them with Outlook rules or Quick Steps—it takes just a few seconds to set up first, and then it’s automatic after that.
I can’t tell you how useful this is for automatically clearing
out old mail!
Let me go into a bit more detail on how this works. And
again, if you want to go to the Outlook Inbox Ninja video
set, I’ve just added a brand-new video lesson to that Ninja set
(Lesson 1.11) that shows visually what I present in words below, and it’s free
for all to watch.
I’ve also added three more new lessons to the paid set that expand on this and they are mentioned below.
Check to See if You
Can Do this
Here is the first step to using these retention policies.
You should first check in your Windows desktop Outlook to see if the personal retention
policy features are active for you. To check that:
Make sure your menu Ribbon is fully open at the
top of your Inbox;Then activate the Home tab;Find the Tags group on the Ribbon (near the
middle right of the Ribbon). You might have to widen your Outlook window to see
it fully;In that Tags group, look for the Assign Policy
button, like I show below.
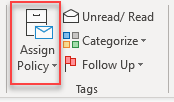
If you can see the Assign Policy button, great! You are part
way there. If you cannot see it, well, you’ll have to talk with your Exchange
Admin staff and ask them to activate it for you. If you have your own Office
365 subscription with Exchange, and you administer your own Exchange account, I’ve
added a video to the Ninja course that may help you add that button, it’s Lesson
8.3.
Inside the Assign
Policy Button
Assuming you have that Assign Policy button active, next we
need to check what’s inside. Default Exchange retention policies usually
display the choices shown in the following figure. The ones we need for this
purpose are the Delete policies.
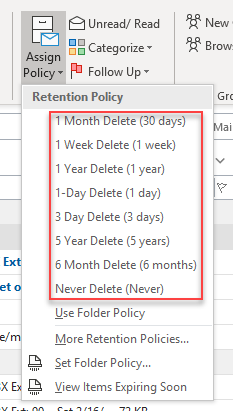
Your list might have more or less to choose from than shown here, but if you’ve got the Delete policies I show above, then you are all set. If you are missing the Delete policies, or you want to add some more choices, say a 3-day or 1-day delete, both of which are useful, the new Inbox Ninja video lesson number 8.3 shows you how to do that.
How to Use Delete
Policies
These policies do what they say. Once you apply them to
mail, the mail will auto delete after the time-period expires. Note that the
time period is measured from the Received date of the mail, not from the day
you applied the policy, so keep that in mind.
How do you apply them? Well, one way is to select one or more emails, and then use that Apply Policy button and menu to manually apply such policies to the selected email.
But you will almost never do that!
Don’t worry, you didn’t waste your time finding or
activating that Assign Policy button, because it IS the first step—it is
required to go to the next step.
But using that button is way too much work. Rather, the idea
is to have policies applied automatically
to certain types of mail. To do that, you will use either Quick Steps or
Outlook Rules with features that become active once that button is active.
Using Quick Steps
with Retention Policies
In prior videos in the Outlook Inbox Ninja set, I show you how to use Quick Steps to quickly process mail (Lesson 1.8). And I show you how to apply a READ LATER category to incoming low-priority mail you possibly want to read later, but that you want to dismiss for now (Lesson 1.6).
Well, I’ve just added a brand-new video lesson to that Ninja set (Lesson 1.12) that shows how to combine all these together. It shows how to create a Quick Step command that both assigns a READ LATER category AND applies a Delete-after-1-week policy to the email. AND it optionally files the mail into your single folder where you can read it before it is deleted. So, if you own that course, go watch that new lesson 1.12, it’s really good.
But that’s only one way to do it. With certain mail it makes sense for you to use an Outlook rule instead.
Create a Rule to Set
the Retention Policy
For certain mail, instead of using a Quick Step, you should create one or more Outlook rules to set some delete retention policies on incoming mail, based on sender name or text in the subject line. This is possible because, once the Assign Policy button discussed above is active, then another Outlook rule choice is added to the “Select Actions” page in the advanced Rules Wizard. Down at the very bottom you will see the choice highlighted in the figure below. This choice will only be there if the Assign Policy button I described above is visible—they are linked.

Next Steps for Rules
It is beyond the scope of this short article to teach you
how to create Outlook rules. My Outlook Inbox Ninja video
course teaches you how, and I’ve just added another video lesson
there specifically for setting these retention rules—see the brand-new Lesson 2.10 Using Retention Rules. It
walks you through all the points for this.
But if you do know how to create Outlook rules, the tips
above should be enough to get you going on this incredibly valuable use of Exchange
retention policies. In no time you’ll be having much of your low-priority mail
get auto-removed after a week, or a month, or whatever time is appropriate for
the given sender or subject. So, use these tools, and enjoy your more-empty
Inbox!
Michael
February 19, 2019
Quick Poll–Next Products?
Hi there, in this quick poll I’d like to simply ask this:
What sort of product do you or your colleagues need next?
First I’d like to thank those of you who responded to my quick poll about whether a Mac version of the MYN video course was needed. The results? Only 18 people said a Mac version was needed. So that pretty much eliminates that idea.
And so I want to keep asking, what do you or your colleagues need next?
The last new product we made, the Outlook Inbox Ninja video course, captured a ton of our latest thinking. So are there variants of that which you think are needed? Or a whole other area of course work? Perhaps smaller, quicker training? Different price points? Different platforms? Note, all of our products are at our store link, so maybe glance at that as you consider what is needed next.
Thanks for your thoughts, I appreciate it. We are planning our next push forward to help people like you get even better control of work and communications, and want to make sure we hit a target that really helps people—lots of people. So write anything that comes to your mind, either in a reply to this email or in the comment section of the blog posting.
Thanks again,
Regards, Michael Linenberger
February 18, 2019
11 Months Left On Clutter Folder
When Microsoft rolled out Outlook’s Focused Inbox a year or so ago, it announced that it would discontinue their support for the Clutter Folder in Outlook.
Well, that time is fast approaching: Microsoft just announced that January 31, 2020 is the final sunset date for Clutter—about 11 months away. So it may be time to make the transition to Focused, if you like the auto-filtering that Clutter offers.
I blogged about Focused Inbox here: https://www.michaellinenberger.com/blog/what-about-outlooks-focused-inbox/
And I have a full description of the differences between these Clutter and Focused Inbox, and how to switch from Clutter to Focused, in Lesson 2.9 in the the Outlook Inbox Ninja Video Course.
Michael
February 16, 2019
Thoughtful Article About Responding to Email
In the big online world of misinformation about email and work habits, it is refreshing to read this thoughtful article in the NY Times about the importance of responding to incoming email.
The author’s point is that workflows break down if email is not a reliable way for people with reasonable work messages to reach you. People are forced to seek you out in person or on a call, which takes much longer. He even says that for managers, email non-responsiveness has become a marker of ineffectiveness when those above you consider you for promotions and new roles—bad email habits can be career limiting.
My thoughts? It depends on the industry and corporate culture of course, but I largely agree. Here are my rules on email responsiveness that go well beyond that article:
Reasonable Response Time
Email readers and writers should assume that a reasonable response time for email is around 24 hours. If, as an email writer, you have an emergency that needs a faster response, use another medium (phone call, text, IMS, or even a walk-in personal visit). (The exception to this is for those in a quick-response help desk or emergency team where quick email response IS expected. But that’s not most of you.)
Supervisors: Don’t Demand Instant Email Response
So, as a supervisor, don’t try to use emails as your method of getting quick responses from your staff. Don’t send an email and then 30 minutes later call the recipient and say “Hey, didn’t you get my email, I need this now.” That forces your staff to be constantly monitoring their Inbox which means they will get lost in other low-priority mail all day. That will lead to them being non-productive for real work. You as the supervisor should use a phone call (or other agreed-to faster means) for urgent, quicker-than-24-hour matters.
A Quick Note Is Better than None
In general, I say try to respond to a deserving email within 24 hours, even if it’s just a quick note saying “I’ll get back to you soon on this, I am really swamped at the moment.” Flag the mail for later reply or make a task out of it, one with a reasonable deadline.
The key word in the sentence above is “deserving” of course. I am talking about relatively important mail. I am not talking about spam or bulk-industry or bulk-corporate messages. Or what I call colleague spam, where colleagues address their mail to too many people leading to mail that really should not go to you. All that does not deserve a response.
But we all get too much undeserving mail—you of course are not alone. So it’s essential that you get good at quickly filtering mail in your Inbox to identify the important stuff, mark it for action, and to move the non-important out quickly.
Consider Taking the Outlook Inbox Ninja Course
And that’s key: filtering out and removing the non-important mail quickly, and clearly marking action on the others. I think the prime reason we get behind in responding to deserving email is that when we don’t filter quickly, our Inbox gets completely out of control. When more is added to it every hour, we then just throw up our hands and we get a bad attitude about even important and deserving mail.
That’s why it is essential to get control, and that’s what the Outlook Inbox Ninja course teaches you how to do. I know this sounds like a self-serving statement, to recommend one of my paid products, but I feel very strongly about this. There is no reason to suffer with an out-of-control Outlook Inbox. Windows Desktop Outlook is full of tools that, when used smartly, can help control ANY Inbox, no matter how much mail you get, and the Ninja course shows how to do that. So really consider giving that course it a try, for your own sanity and career success.
Michael
February 7, 2019
Another Good New Feature in Latest Windows Outlook
As I have mentioned in a previous post, the new versions of Windows of Outlook that are rolling out to the monthly Office Insiders group in Microsoft Office 365 are pretty darn good. You might have to activate the Coming Soon switch to see them, but the things I’ve mentioned so far that I really like are:
The Simplified Ribbon option (Excellent!)Slightly more space between messages in the Inbox (Nice)And slightly more vertical space between tasks in the To-Do Bar task list (Very Nice)
Whoever in Microsoft is managing these new changes, I’d like to take you out to lunch! Unlike changes in years past, each and every one of these changes, I feel, makes desktop Outlook a better product without limiting previous features. Bravo!
One of the new features rolling out in recent Insider Coming Soon versions of Outlook is one I’d like to highlight now. It is this: Flagged mail now gets a yellow highlight.
Here is what I am talking about. Look at the image below. Notice the 4th item down (I added a red box to show it better). See how it is light-yellow in color? That is because the flag is set at its right edge.

And that’s the new feature. In the latest copies of Insider Outlook, when you set a flag on an email, the entire email turns yellow in the List view.
It’s funny, because about six months ago (before this change) I had made note to myself that it was too bad flagged mail did not stand out more. The red flag to the right was often overlooked as I moved quickly through my mail list. Now those items stand out much better. Seriously, it is almost as if Microsoft read my mind with this new feature.
Proper Use of the Flag
As a review, for my 1MTD and MYN users, I recommend you use that flag sparingly. My recommendation for flags is this: only use the flag for deferred replies—for emails you intend to reply to but can’t right now. Mark them with a flag, and don’t use the flag for anything else. And try to reply to all emails marked this way by the end of the day, and remove the flag after you reply. That’s my recommendation.
And now, Microsoft has made it easier to see these items. Thank you!
Michael
February 6, 2019
Quick Poll: Would You Like a Mac Version of the MYN-Outlook Video Training?
Microsoft has been improving Outlook Mac lately, so I am thinking about creating a Mac version of my MYN-Outlook Complete Video Training.
But my Question is this: Is a Mac Version of the Video Training something you would be interested in?
I don’t want to spend the effort to create all these custom videos if there is little demand, so let me know what you think—reply in the comments section of this post, or, if reading this in my email newsletter, by replying to the email. Thanks!
Why not Here Before
As you may know, my current MYN Outlook video training is for Windows Outlook only. That’s because I previously was not a huge fan of the Mac Outlook tasks module—it lacked so many important features that it was almost unusable for MYN.
But I am changing my mind due to an improved status for Mac for Outlook.
Mac Improvements
The first improvement is that Microsoft recently added the ability to drag-drop emails into tasks in Outlook Mac, and that’s huge! Now it is super easy to move action requests in emails into tasks.
Second, while there is still no To-Do Bar, and the Tasks folder still does not format right for MYN, there is some good news: There are now 3rd-party desktop task apps on the Mac that can be configured for MYN, and so you can create the equivalent of the Windows Outlook To-Do Bar with tasks—one that floats next to your Outlook email window. (I am referring to the Mac desktop app Good Tasks 3, which I will write up shortly).
And finally, I am seeing more and more companies that are assigning Macs to their staff. It’s becoming even more common in the workplace.
But my concern is this: is there enough market demand for such a course? Would you be interested?
What would Be in the Course
Such a course would have the same goals and contain mostly the same lessons as the Windows Outlook version of the course—simply showing how to do it on Outlook for Mac instead (there are a ton of differences). The price would be about the same as the Windows version, but there would a be steep discount for someone who already owned the Windows version of the course.
So, please reply to this posting in the comments section, or reply to the email, and let me know if you need this!
Michael
February 2, 2019
Outlook Tip: Create Email from Task (Reverse of what I Normally Recommend)
I’ve covered the normal forward version of this a billion times: in Windows Outlook you can convert an email into a task—with all the text of the email placed automatically in the body of the task. Doing that is one of the core skills of 1MTD and MYN and something I hope you are doing all the time.
But you can do the reverse of that too… Yes, you can convert a task into an email!
Here’s a not uncommon scenario of why you might want to do that:
You create a task from email. Then later, you complete the task and want to write back to the original requestor saying the task is done, and you want to include their original email text to provide context of the accomplishment.
To write that reply, you could search for the original email to create the reply. But wait, the text of that email is in the task—isn’t there a way to convert that task back to an email?
There is! Here is how to create an email from an existing task:
Step 1 is a bit counter-intuitive but it is key: you are going to drag the task out of the To-Do Bar to the Outbox label in the Navigation Pane. When you drop it, an email ready for editing is created. (Be sure your Inbox is active so you can see the Outbox item). See the animated GIF below.
At the end of the video loop above, notice that it creates an email ready to reply, and all the text in the task from the original email is now in this one, providing context.
The caveat is that it puts about 10 lines of task information at the top of the text (see the Subject through Owner lines at top of email text in video).
So Step 2 is to simply edit those 10 lines out before you write the reply. Then add the email address and you are ready to send.
So there you have it, that’s how to convert a task back into an email, with all the info in it.
Michael
Michael Linenberger's Blog

- Michael Linenberger's profile
- 14 followers

