
Michael Linenberger's Blog, page 11
February 1, 2019
Outlook for Mac Drag and Drop Email to Task Conversion
I’ve been meaning to mention this for a while.
Starting in late 2017 Microsoft started releasing a new version of Outlook Mac 2016 and Outlook for Office 365 for Mac that enables drag-and-drop conversion of emails to tasks.
This feature is similar to what is available in the Windows version of Outlook, but no option is provided to include an attachment in the converted task.
I’ll write more about this in the future.
Michael


Blog-Post Subscription List Is Replaced (Old list is Gone)
We’ve got a new blog-post subscription service and form for this blog-series. This was the mailing that you may have subscribed to that sends you an email immediately everytime I post a blog.
The new subscription service replaces the old service and (unfortunately) the old list is gone. So if you were getting these before they are no longer being sent out to the old list.
If you want to receive these emails going forward, then sign up again at right for the new service, using the box that looks like this:
We will still be summarizing most postings in the monthly newsletter (and that subscription is still the same), so getting the immediate post emails is purely optional.
Michael
January 24, 2019
Goals
Hi All, quick reminder: January is coming to a close, so a good time to set goals. Check out my book Master Your Workday Now for good instructions on how to do that.
Michael
January 1, 2019
New Year 20%-Off Coupon for MYN 3-days Only
For the New Year, here is a 20%-off coupon code to use on the MYN Outlook Complete Video Training course. Good for three days only (expires Friday the 4th).
Here is the code: NEWYEARMYN
Enter the above Coupon Code box at checkout.
Start the new year by learning the advanced MYN task management system. It’s an excellent step up from the One Minute To-Do List (1MTD) system. This video course will give you full command over an out-of-control workday and life.
It’s the New Year and let’s Forget Goals—Ask What Your Priorities Are Instead
It’s the start of the new year, and I am asking you what
your priorities are. Notice that I did not ask what your goals are. Why not?
Well, there is nothing wrong with setting goals for the new
year. But nearly everyone suggests setting
goals and I am sure you’ve gotten that message by now.
And really, I think what most people need to do at the start of the year is to learn how to set priorities effectively. There is no point in setting goals if you cannot execute those goals throughout the year by effectively setting and managing your priorities—you need to start there.
The Focus on
Priorities
Priorities refer to shorter term, more tactical activities,
compared to goals. They often refer to tasks
and small projects. If you keep a to-do list, your higher priorities are what’s
at the top of that list.
The problem is, even with a to-do list, most people fail at
prioritizing their activities and instead spin their wheels. Too many people
spend day after day, month after month, consistently focused on various small
stuff—stuff that keeps them feeling busy but not moving ahead.
The Problem with
Priorities
The problem with setting priorities is in answering the
following question: on what basis does a to-do list item get a high priority?
Most people say that things that are important
should get a high priority.
Okay fine. But, what’s important?
Well, that’s where the problem starts. There are a hundred different ways to
measure importance. It can be based on urgency, it can be based on financial matters,
it can be family, it can be career, it can be what your boss wants, and so on.
There are many, many dimensions of
importance.
And unfortunately, almost any task can have one of those dimensions used as a justification
for making it important. Which is why after only a few weeks or months of using
an unregulated to-do list, it seems like everything
ends up in the High section of that list.
What should you do? I recommend the following. In your to-do
list, focus almost exclusively on urgency.
Urgency? Really?
Now wait. Most self-appointed time management gurus state
that urgency is exactly what you should NOT prioritize with. They say if you do
that your day will be spent fighting fires all day and you’ll never get to
longer-term priorities. And there is some truth to that.
But here’s the thing. It’s because you don’t have a formula for dealing with urgency that unregulated urgency derails your
days.
So, my solution is to do this: address urgency head on, first
thing. Get it under control. And then
take a step back, and from a calmer perch address your important things.
The key distinction is this: getting urgency under control is
very different from focusing only on urgent items all day. Those are two
completely separate and distinct things.
The Trick is to Manage Urgent Items
Here is what I mean by that. If you scan your issues for the
day or week—your problems, your regrets, your missed opportunities, your complaining
customers or bosses, then, yes, everything will look urgent. You’ll likely have
tens or hundreds of items that seem to need urgent attention. That list will
always be long, and it will always be there.
But here is the trick. Pick only 5 of them, no more. List those
5 and only those 5 at the top of your
list and commit to doing them today. I know you have way more than 5 urgent
items on your mind but pick the 5 most
urgent and put only them in the top-most
position. That’s the key, you are not committing yourself to a day full of
fire-fighting, rather only committing to a short list. And guess what? That opens
your time to more thoughtful and core-important activities.
So do that—pick only 5. Then below those 5 in a new section
on your to-do list, list the 20 things you’d like to get to today, or this week, or next. Be sure to list a
number of your important items there so that you can address them calmly, once
the 5 urgent things are managed.
Then below that section create a space to list the very large
number of things you’d like to get to eventually, when the above lists are done
or become less urgent. Store things there for later reconsideration.
Bite-Sized Action
Obviously those 5 urgent things at the top should be bite-sized,
action-oriented things that are doable in a relatively quick sitting each. So
instead of recording “Write the Great American Novel” do this: list the next step for that, like: “Pick my topic
for my Great American Novel.”
Again. 5 maximum urgent items for today. 20 at the next
level. And unlimited at the third level.
This is your priority list for today. And here is the
amazing and stupendous outcome: You now have urgency under control, because you’ve made a decision to limit your fire-drill
activities to 5. It’s likely those 5 items will not take all day, and now
your day is largely open for important but less urgent work—work that you can now
do in a more thoughtful way.
Power and Clarity
It’s amazing how much power and clarity you can gain when
you make a firm decision like this. You see, the feeling of being overwhelmed
is just a feeling. It’s one that you can allow or not allow based on how you
manage your day. And the above method gives you a firm way to manage your day,
every day. Just refresh the top part of that list each day, and throughout the
day, and be firm with your 5-item urgent list. If you do that every day, I
promise, the rest of your year will be successful and will have an amazingly
calm demeanor to it.
And by the way, the approach I just showed above is the core
prioritization approach that I use in both my One Minute To-Do List (1MTD) system, and my Master Your Now (MYN) system. There are more details of course, and
I encourage you to take
a bit more study, but that’s essentially it, that’s how both systems work.
So, start your year with a good manageable list of
priorities, and celebrate the control you finally have.
Enjoy the year!
Michael
PS: I dismissed setting goals at the start of this article, but goals are still important, you just need to do them right. If you want to learn more about my recommended way to set and achieve goals, check out my book Master Your Workday Now. That book shows goal-setting methods significantly different from how others do it, and they really work!
December 31, 2018
New Video Player for the MYN-Outlook Complete Video Training Course
If you own the MYN-Outlook
Complete Video Training course, then here’s a free upgrade for you. We’ve
created a new video delivery page, one that works better on mobile devices and on
a variety of browsers. It’s the same video content, just delivered differently.
Go to this
link, log in, and take a look.
Note, you could
still use the older video delivery page, but the technology we used there is
not great for mobile devices, and older browsers like Internet Explorer are
starting to complain about that video technology. The newer delivery page loads
faster and is more problem free. Plus, we are going to start putting all
updates and new videos only on the new page (for example, Lesson 31 on that
page is new).
Once you navigate to the new delivery page, don’t forget to
save the link for future reference.
Michael
Complementary Video on Outlook’s New Ribbon
Subscribers to Office 365 are starting to see a monthly update
to Windows Outlook with a dramatically different Ribbon design.
I mentioned this in December’s newsletter, but now I have a free video that demonstrates it. Go to this link and then scroll down to video 8.2, it’s unlocked and free whether you own the Ninja course or not.
This new Ribbon is an optional Coming Soon feature,
presented for you to commend on. But eventually it will be a solid part of
Windows Outlook, so take
a look.
December 13, 2018
Outlook’s New Simplified Ribbon Menu
Windows Outlook has an optional new “Simplified Ribbon” menu at its top that is now rolling out to many users in the monthly Office 365 updates. I just recently got it, and I really, really like it.

I’ll create a video soon that fully reveals the features of this new simplified Ribbon and put that video in the Outlook Inbox Ninja course. Look for that soon. But in the meantime, here’s how to activate it and some of my initial thoughts on its design.
How to activate it:
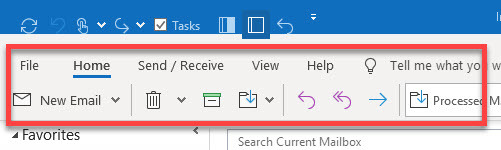
It’s being slowly rolled out. Even if you get monthly updates, you might not have it yet. At first, only Insider Programs members were getting it, but it looks like non-Insiders are starting to get it now.Even if you have access to it, at the time of this writing, this is still only offered as a Coming Soon preview which is turned off by default. If you see the Coming Soon button in the upper right corner of the Outlook window (see image above), then you have the update and probably can activate it.To activate it, flip the Coming Soon button to On, then restart Outlook, and you should have the new Ribbon. You might need to collapse the full ribbon by clicking the up/down pointer in the lower right corner of the Ribbon to see the new design.By the way, this in NOT included in the current Outlook 2019 shrink wrap product, and I have no idea if it will be added in later releases of Office 2019. But it sure looks like it is just for Office 365 subscribers.
My thoughts on this new design:
I love it! After using it a few days, I truly think Microsoft hit a home run with this new design.And that’s good news because too often, when Microsoft “simplifies” one of their applications, they end up discarding important features (for example, the bonehead decision to force people to use the new, greatly feature-limited, OneNote). But so far, in this new Outlook design, it seems like all previous features are still there and not hard to get at.The new Ribbon obviously shows fewer commands, but it seems like it is showing the exact commands I usually use. And it’s so easy to toggle the full Ribbon back in to place, there is zero pain in this transition.
Why use the new Ribbon?
Well first, in the simplified form, this Ribbon obviously takes up less vertical space on the Outlook window.But also, I find I can get at the commands I use quicker. That’s because there are fewer distracting and unneeded buttons in the Ribbon. I like it!The new Ribbon is also available inside new e-mail messages. However, Microsoft has enlarged the addressing header quite a bit in the new message window, so, overall, I am not sure there really is that much more vertical space in the message window. But it IS simpler to use.
Other changes in this new version of Outlook:
Beyond the new ribbon, there are other welcome changes in this new Outlook release.
The Inbox list view has more vertical space above and below each item, which looks and feels good.Same with the To-Do Bar, more space between task items.The New Email window has a more spacious and relaxed feeling to it.There may be more changes, but that’s all I’ve noticed so far.
So, give this new version a try. I think you’ll like it!
Michael
4 Tips for Solving the Mystery of Outlook AutoArchive
New and veteran Outlook users alike are often confused by the Windows Desktop Outlook utility called AutoArchive. In these days of using cloud computing, having huge server storage space, and carrying mobile devices, AutoArchive may seem to many like an antiquated solution—it’s been around since the earliest versions of Outlook.
But AutoArchive is still the best and most powerful way for most or you to offload large volumes of email from your mail server while retaining easy access to that mail from your PC. If you have limited mail server space at home or at work, it’s a prime solution. And it works whether you have Exchange Server, Outlook.com,Gmail, Yahoo mail, and so on—it works with any mail server attached to Windows Outlook.
To completely cover AutoArchive is a long topic, so instead of trying to fully explain it, let me provide a few tips on how to learn more about it. And by the way, AutoArchive only works on Windows Desktop Outlook. So sorry Mac users, and no go if you use Outlook online either.
Here are the tips:
Tip 1: Understand what PST files are. PST’s are the heart and soul of AutoArchive, and you really need to understand PSTs if you are going to use AutoArchive effectively. PSTs are the local files that hold all your old archived mail. I explain PST’s fully in Appendix A of my book Total Workday Control Using Microsoft Outlook; if you have Edition 5 then go to page 363. Or watch Lesson 7.2 in my OutlookInbox Ninja Course—that explains them fully.
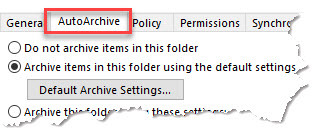
Tip 2: Understand How to Access AutoArchive: You can get to AutoArchive from a number of places in Windows Outlook. The easiest way is to right-click the Outlook folder that you want to archive, choose Properties from the context menu, and then click on the AutoArchive tab.
Tip 3: Understand Default Archive Settings: If you follow Tip 2 above, you’ll see a window with as Default Archive Settings button. It becomes active once you click the second radio button there. Using this button is really the only way to go—don’t try to use AutoArchive without it. Understanding the settings in this button is the toughest part about using AutoArchive. I explain these settings fully in Appendix B of my Total Workday Control Using Microsoft Outlook; if you have Edition 5 then go to page 398. Or watch Lesson 7.3 in my OutlookInbox Ninja Course—that explains it fully. Once you’ve got Default Archive Settings understood, and admittedly it’s a bit challenging, the rest of AutoArchive falls into place easily.
Tip 4: Back up Your Archives: One issue with AutoArchive is that it (usually) stores your archived mail on the local hard drive of your PC. That means you need to back that drive up if you want to safely preserve that old mail. Don’t try to use a file sharing service like DropBox, OneDrive, GoogleDrive, or so on, to back up this mail, because they just don’t work well with the PST-based archive files—the files get too big. And web-based backup services like Carbonite don’t work with these large files either.
Rather, plan on having
an old-fashioned external hard drive and backup software installed on your
PC. Fewer people do that these days, and so this might be the most limiting
part of using AutoArchive. But it’s not hard to set up local backup and it’s
the only way to go. You can get 1 TB of storage—all most people need—for well under
$100 on Amazon, just search on External Hard Drive. If you want to spend more,
check out the premium
solutions at this review article. And while most drives come with
rudimentary backup software pre-installed, here’s a review
of the best backup software choices.
So that’s how to get
going with AutoArchive. It takes just a little bit of study, and my Ninja
course linked above is the simplest way to learn it. AutoArchive may seem dated,
but it is still Outlook’s best email archiving solution.
December 12, 2018
Outlook Tip: Simplest way to Improve Windows Outlook Search Results
A lot of people avoid using the Search box at the top of the Inbox in Windows Outlook because it returns too many hits—that makes finding a specific email very hard. If you are consistently frustrated by that, here’s a simple tip. Narrow the search by using the Subject button (see left side of figure below).

This works because very often the keyword we are looking for is in the subject (title) of the email and using the button forces a search in the subject only. The way to do this is simple (step numbers below correspond to numbers in figure above):
Click once in the empty Search box.
Doing that opens the Search Tools Ribbon, find it.
Find and click the Subject button in the Search Tools Ribbon. That inserts a phrase in the Search box.
In that phrase, overtype the selected “keywords” entry with your specific search term and hit Enter.
That’s it!
For a video demonstration of this tip, and to see a lot more similar tips, watch Lesson 3.2 in the Outlook Inbox Ninja Video Course. Also watch Lesson 3.3 there. In fact, there are a ton of good tools described in the whole section 3 of that course, so check it out.
Michael
Michael Linenberger's Blog

- Michael Linenberger's profile
- 14 followers

