
Michael Linenberger's Blog, page 18
February 24, 2017
Toodledo iOS App for 1MTD and MYN
Feb 24, 2017
The Toodledo company has for a long time had a great iPhone and iPad (iOS) app that syncs with its web tasks account.
 Below are the steps for getting started with it, and then configuring it for either the 1MTD or MYN systems. This updates the various articles and videos I have out there.
The steps below are for version 3.3.10 of the app. I’ll try to keep this page updated if these steps change with new Toodledo app versions. Note, I used to keep streaming videos for these steps on the Extras page for the 1MTD book, but it’s been too much work to keep updating the free videos, so it will just be these text-blog steps from now on that I’ll update. Users of my paid Full MYN Toodledo course will keep having their videos updated.
Also, these steps assume that you already have a Toodledo web account set up before using the Toodledo app.
For both 1MTD and MYN: Getting Started and Syncing Your App
Download Toodledo from Apple App Store
After opening, the app should start at the main tasks navigation screen. But to confirm that, tap the Tasks icon in the lower left corner.
First you want to sync with your Toodledo Web account.
Note the Settings label in upper left, tap that.
The Settings screen has a long list of items. Tap Synchronization near the top.
If you’ve never synced the app before it will take you to a screen that has a button that asks you to enter your Account Login… tap that button. (If you’ve already synced in the past, skip to step 8 below).
Enter your web account e-mail address and password. If correct, you’ll see a note saying Success and that synchronization has started.
Then you’ll be taken to a Synchronization settings screen. At the top is the command Modify Account Login—that’s where you can change to a different Toodledo account if you like. You’ll probably want to keep all the other settings here the same. Tap Settings in upper left to return to the main settings screen. Then tap Done in upper left.
You’ll be back at the main screen with the All Tasks command at top. Tap that. You’ll see your tasks listed there, but not in an order correct for either 1MTD or MYN; we’ll fix that in next section. But first, feel free to tap on tasks to see their details. From task list tap Add Task in upper right to add a new task. When done, tap Tasks in upper left to get back to main screen.
Common Configuration Steps for 1MTD and MYN
At the main screen (All Tasks is shown near top), tap Settings in the upper left.
Tap Start Page, and change setting to All Tasks. That way you go right to your tasks on startup of the app each time. Tap Settings in upper left to go back to Settings page
Tap Fields and Defaults. Upper part are fields that will display in tasks. The lower is unused fields. We are going to remove some fields and add some. You remove by holding your finger on the three-line button at the right of a field, and dragging it to the lower section.
Remove: Due Time, Star, Folder, Alarm (unless you know you are using some of these, then keep them). That will leave you with Priority, Due Date, and Repeat.
Change default priority. Tap on arrow to right of Low Priority and set it to Medium. Now move on to either the 1MTD steps or the MYN steps, depending on which system you are setting up for.
Continuing Configuration Steps for 1MTD
Continuing from Step 5 above, tap Settings in upper left, and tap Done in upper left
Tap All Tasks to get to your task list.
Tap the Show button at top left of your tasks list.
Tap the Hide button under Competed Tasks, tap Done Button in upper left.
Back at tasks list, find the SORT label at the top of list. There are three symbol “clusters” to the right of that label, each corresponds to the first, second, and third levels of sort. Each one has a small triangle arrow next to it. Find the first group (with the first arrow) and tap it.
Tap on the Priority item near the bottom. Make sure the gray arrow to its right is pointed up. Tap it again if it is not. Tap Done.
Back at tasks list, find the SORT label at the top of list, and tap the second arrow to the right of the SORT label.
Tap Alphabetical, and make sure the gray arrow to its right is pointed up. Tap Done.
That it for the 1MTD settings. Notice that tasks are grouped by Priority. 1MTD users will have tasks sorted alphabetically within each priority group. You will add numbers (1, 2, 3, and so on) in front of the task names to sort them within the priority groups.
Continuing Configuration Steps for MYN
Continuing from step 5 in common steps above, drag Start Date up below Priority, and set default value to Today. Tap Settings in upper left, and tap Done in upper left.
Tap All Tasks to get to your task list
Tap the Show button at top left of your tasks list
Tap the Hide button under Competed Tasks
Tap the Hide button under Future Tasks, tap Done Button in upper left
Back at tasks list, find the SORT label at the top of list. There are three symbol “clusters” to the right of that label, each corresponds to the first, second, and third levels of sort. Each one has a small triangle arrow next to it. Find the first group (with the first arrow) and tap it.
Tap on the Priority item near the bottom. Make sure the gray arrow to its right is pointed up. Tap it again if it is not. Tap Done.
Back at tasks list, find the SORT label at the top of list, and tap the second arrow to the right of the SORT label.
Tap Start Date, and make sure the gray arrow to its right is pointed DOWN. The down direction is very important. Tap Done
That’s it for the MYN settings. Notice that tasks are grouped by Priority. MYN users will have tasks sorted by start date descending within each priority group. Notice that start dates are shown. Tasks with a start date of Today have the word Today in them, and these represent the optional Target Now urgency zone. To reprioritize within groups, set the start date to various settings. Tasks with future start dates will be hidden until that date arrives. If you want to see future dated tasks, toggle the Show command for future tasks, but when done, leave future tasks at Hidden—that’s the MYN standard.
Wrap Up
That’s it! Let me know in comments (click the Reply button) how this works for you, or if you have any questions.
Michael


February 20, 2017
MYN Master Tasks View (older material)
Feb 20, 2017
In the edition 5 of my book Total Workday Control Using Microsoft Outlook (due out in late April 2017), I’ve removed the pages about the Master Tasks view from Lesson 12 to make room for other materials. Reason: these days the Master Tasks view is a very low-priority view in MYN. But in case you are still interested in using this view, I’ve posted the text from those pages in this article, so read below if you need this information.
Background
The Master Tasks view is a list-view that uses elements commonly used in other task management methodologies. But the way I have used it has changed over the years of my teaching my MYN system.
In the first edition of my book Total Workday Control Using Microsoft Outlook, the Master Tasks view was a very important part of the system. If you read that edition you may recall that tasks were divided into two types: daily tasks and master tasks. Master tasks represented long-term tasks you were not yet ready to work on (as well as the place to list project and goals). The master tasks concept is common to many task systems and books, including FranklinCovey and the long-famous book The Time Trap, by Alec Mackenzie.
Starting in the second edition of my Outlook book I stopped using master tasks as a storage place for long-term tasks. It’s not that there is no need for long-term tasks; there still is. It’s just that I decided the master tasks list does not work well as a way to manage individual long-term tasks. I discuss why in Lesson 9 of the Outlook book, and discuss there as well why the new Defer-to-Review process solves this problem so well.
But there could still be a place for a master tasks list, and that’s to use it solely to list projects, goals, roles, agendas, and so on. This view enables that. However, this view has a number of disadvantages as well, which I’ll list shortly.
Note: If you followed the first edition but have recently reconfigured your To-Do Bar following Lesson 3 of later editions of the Outlook book (or installed the software MYN Views), you should delete your old Master Tasks view, as it will no longer work with the new To-Do Bar settings. Reason: These new settings no longer filter out tasks with no dates. If you still want to use the master tasks approach, create the new folder and view described next.
Master Tasks View Compared to Category View
You can use this new Master Tasks view as an alternative to the category-based project and goals views described in Lesson 12 of the book. Why might you want to do that? If you like to identify all multistep tasks as projects and so have a long list of projects, this Master Tasks view will work better for you because it will prevent clogging your Outlook Categories list with too many project names. And if you have no need to link individual next-action tasks to higher-level goals or projects, the new Master Tasks folder and view is simpler to use. Or you can use it along with the category-based views.
How This Folder and View Works
Very simply, the way this new master tasks list and view works is this: You list a project as a task entry by placing a task with a P: in front of the name there. Add as many as you like. List goals by placing a G: in front of the task.

And one other very important point: This view is applied in a brand-new Tasks folder. In the old system you shared your current primary Tasks folder for this use, indicating master tasks as tasks with no dates. But no longer; you are now going to create a whole new Tasks folder and call it Master Tasks.
Disadvantages of Using this Folder and View
There are several disadvantages of adopting this master tasks approach. One is you need to modify your To-Do-Bar and To-Do List views so they filter out these entries (as shown in steps ahead). That’s because those lists should only show next actions (Lesson 9). Making the filter change is especially a hassle in the To-Do List because you need to do it for all views you are likely to use there. And if you ever find you must reenter the Lesson 3 settings for the To-Do Bar (sometimes needed due to server changes), you’ll have to remember to put the filter in there.
Because of these many issues, you may not want to use Outlook for your master tasks list, but instead use alternate software (such as Excel or OneNote). That makes sense because you are using very few features of Outlook here—it’s just a simple list. If you do want to do it in Outlook, here’s how:
Create the Master Tasks Folder and View
Note: The view and folder shown here are not included with the optional Outlook add-in called MYN Views. You’ll need to create it with the following steps.
There are three distinct steps to creating the master tasks list. First is to create the folder; next is to create the view; and last is to create filters in other views.
Create the Master Tasks Folder
Activate the Folder List mode in the Folder Pane. To do that: click the ellipsis at the right end of the data type buttons or labels in the lower-left corner of the Outlook window, and then click Folders (see Lesson 2 for more information).
Right-click the primary folder group name in your Outlook Folder list (top of the folder group your Inbox currently resides in) and select New Folder. The Create New folder dialog box is displayed.
In the Name field, type “Master Tasks Folder”.
From the Folder Contains drop-down list, select Task Items.
In the Select Where to Place the Folder box, select the name of your main folder group again (as in step 2). Click OK.
You should now see that new folder appear in your Folder List, as shown here. Again, make sure you activate the complete Folder List view (as described in step 1), or it will not be listed. The new folder should have an Outlook tasks icon (a clipboard with a check mark) next to it. Next you will create the view in that folder.
Create the Master Tasks View
Click and open the new folder in the folder list so it opens in your main Outlook window. It will of course be empty. From the View tab, click Change View, and then click Manage Views.
In the upper-right corner, click the New button. Name the view “MYN Master Tasks View”. Choose This Folder, Visible Only to Me. Or if you know you will be sharing it, choose This Folder, Visible to Everyone. Click OK.
Note: I did not select All Task Folders in step 2. This is because I only want this view applied to this specific tasks folder. It might be confusing if I saw this view in other tasks folders, as it is not applicable.
In the large stack of buttons click the Columns button. Build a field list with the items in the order as shown:
Icon
Complete
Attachment
Subject
Start Date
Due Date
Status
Categories
5. Click OK. Click the Sort button and set sorting to (none).
6. Click OK. Then click Apply View.
Filter Master Tasks Out of the To-Do Bar and To-Do List
The To-Do Bar task list and the To-Do List folder views show tasks from all Outlook folders that hold tasks, so these master tasks will show up there. But you don’t want that. To keep master task entries from appearing there, you will need to add one more filter to the To-Do Bar and to any views you use in the To-Do List folder. Starting with the To-Do Bar:
Right-click anywhere in the To-Do Bar task list header bar (with the heading Task Subject), and select View Settings. The dialog box with the large stack of buttons opens.
Click the Filter button. Click the Advanced tab.
Click the Field button on the left. Select All Task Fields. From the (very long) submenu, select In Folder.
Select the condition Doesn’t Contain.
Type the phrase “Master Tasks” (with the quotation marks) in the Value box. Make sure this wording matches exactly the first two words of your new Master Tasks folder name.
Click Add to List.
Click OK. Click OK again to return to the To-Do Bar.
Repeat these steps for any views you use in the To-Do List folder such as the To-Do List view.
Using the Master Tasks Folder and View
In the future, after selecting the Master Tasks folder, you might need to activate this new view. If so, use the methods in the book Lesson 12 section “Choosing Between Optional Task Views.”
This is a very simple view. Use it this way: Place an entry for each project by creating a task for each one and naming the task <P:Project name>; for example, P:Landscape Front Yard. Do that now for all your projects. Use a similar G: notation to list your goals. Open each project and goal and, in the Notes field for each item, list future tasks that someday might become next-action tasks. You might also want to write in the text field a short narrative of the expected outcome of this project and even a short vision statement.
After all your projects and goals are listed, review the complete project list periodically. During that review, be sure to move to your Now Tasks list any next actions that advance each project or goal. I suggest doing that review in your Monday morning Defer-to-Review session (Lesson 9).
Note: Readers of the first edition of this book, if you have created this view because you want to continue your previous practice of storing most lower-priority tasks here, you now have a new process for doing that. In the first edition, you set the date fields of a daily task to None to move it to the Master Tasks view. With this new approach, to convert a Now Task to a master task, you drag the task from your Now Tasks list to this new Master Tasks folder. Drag the other direction to promote a master task to a Now Task. Again, however, I highly recommend using Strategic Deferrals instead (Lesson 9).
Other Points
Notice that the start date, due date, and status fields are optional but useful. They are especially useful for projects. Unlike next actions, all projects could have distinct due dates; and projects might exist at various levels of status. So use these fields in their traditional ways.
I also left off the Priority field because it is less useful in this view, but feel free to add it if you feel you need it. And I do not filter out completed projects or goals. Those I feel you want to admire for a while. You can delete them later. The Categories column is optional. I use it in case I want to show which project category maps to which project in this list. Usually it’s a one-to-one match.
Notice that the sorting was set to None in the configuration steps. This allows you to drag entries into any order you wish, which is useful. Later, you might be tempted to sort by other columns like Due Date or Subject, by clicking at the top of those columns. But after you do that you will lose your ability to drag entries. To get the drag capability back, from the View tab select View Settings, click the Sort button, and reset the sorting to (none).
Also note that in the first edition of this book, I placed very low-priority tasks, tasks that you may or may not ever get to, ideas, whimsies, low-priority interests, all in the Low priority section of the Master Tasks view. I reviewed that section on a very long cycle and often skipped that review. However, after rethinking this, I’ve realized that no matter how low priority a task may seem, you ought to glance at it periodically to see if your interest in it has increased. Each such item can have a different appropriate schedule to review. So these types of tasks are now made part of the Defer-to-Review process, with generally long review periods assigned (at least six months or more), which are determined individually for each item. For more information, see section “Defer-to-Review Tasks” in Lesson 9 in the book.
February 16, 2017
Good Article on Latest Windows Tablets
Feb 16, 2017
Here’s an article with a good rundown of the latest Windows tablets that are out there. https://www.cnet.com/news/microsoft-surface-pro-5-alternatives/
As you know I am a fan of Windows tablets because they can run a full desktop copy of Microsoft Outlook. You really need a full desktop copy of Outlook to enable the MYN system—don’t try to use a watered-down app or web version of Outlook for that.
However, I am not a fan of the tablet apps available on Windows tablets. The app selection is still pretty lame. I’d only get one because of Outlook, or just to get a thin and lightweight laptop (see next point).
Most of the machines in this list are really hybrids: combination laptops and tablets. So they are not really light enough to replace a ten-inch iPad, say. Two exceptions in the list: The Huawei Matebook, which at 1.4 pounds is the same weight as my favorite Windows tablet the Surface 3 (non-Pro). And the Samsung Galaxy TabPro S which weighs 1.5 lbs. It’s good to see these two because Microsoft’s small Surface 3 line (non-Pro) appears to be discontinued. But even the other, heavier, hybrids listed here still offer usefulness, and most in this list have an active digitizer pen option.
Again, check out the article here: https://www.cnet.com/news/microsoft-surface-pro-5-alternatives/
Michael
January 28, 2017
Outlook Mac seems To Have AppleScript Working Again
Jan 28, 2017
I recently updated my Mac to OS X Sierra and decided to test the AppleScript in Outlook Mac 2016, the script that converts e-mails to tasks. I had to reinstall it, but it is definitely working now. I placed my updated instructions for getting it installed at the old article about this capability, at this link.
History on This (In case Interested)
When Outlook for Mac 2011 was released in 2010, it shipped with an AppleScript installed that converted e-mails to tasks. It was (and still is) the only way to convert e-mails to tasks on the Mac version of Outlook. The drag and drop functionality of Windows Outlook is not present on the Mac. Using the script does not pick up attachments, but otherwise seems to work.
In 2011, Microsoft stopped delivering that script with most Outlook for Mac installs. But if you copied the script from somewhere else and installed it in the right script folder, it would work.
Then in 2014 I think it was (I cannot remember), with an OS X update, all script capabilities on Outlook were blocked “for security reasons.” In the years after that some people were able to hack it in, but we didn’t support that.
So it’s good to see that the capability is back.
Michael
January 21, 2017
Outlook.com is Becoming a Seriously Good Server
Jan 21, 2017

Outlook.com is becoming a seriously good server, both for mail and tasks. Why do I say that? Because, since early 2016, Microsoft has been migrating all Outlook.com accounts to its Exchange Server platform giving it a good share of Exchange features at little or no cost. But it’s still much easier to set up and manage than Exchange. By now that migration is nearly complete, and so Outlook.com (assuming you use it plugged into your desktop Outlook or a mobile app) is now the server I recommend for consumers who want to use my MYN or 1MTD systems and go mobile with it. All the apps I recommend for MYN now connect to Outlook.com, just like to Exchange. And all the functionality I recommend in e-mail and tasks is now present when you plug Outlook.com into your copy of desktop Outlook.
Background
Outlook.com was first released in 2012 as a replacement for Microsoft’s free Hotmail service. I felt at that first release that the Oultook.com name was a bit unfortunate, because it wasn’t really Outlook, it was just web-based Hotmail with a new look and a few new features. I felt that borrowing the Outlook name just confused people. It did have some usefulness, however, because it worked well with other live.com Microsoft consumer modules like their calendar, tasks, and contacts modules, but few people used them and the tasks module was very weak.
The New Outlook.com
Starting in 2016, however, everything changed in a major way. Microsoft quietly redesigned Outlook.com to act just like Exchange Server. In fact, Outlook.com is now hosted on banks of Exchange-like servers at Microsoft. And while it has fewer features than Exchange, the missing ones are not important to an individual user. It has more features than the old Outlook.com. The result is that it is now an excellent option for individuals who need a task server, and it can interface with the same mobile apps that I recommend for use with Exchange Server—I list those ahead. So now, for anyone seeking a personal mail server that supports MYN e-mail and task principles, I point them to Outlook.com.
Versus Exchange?
Why not simply get a hosted Exchange account? Well, if you are in a company with many employees, Exchange is still the best way to go. It has lots of tools useful for employees to collaborate with each other. But the new Outlook.com has a ton of advantages for personal account users compared with activating a hosted Exchange account. First, it’s free (unless you want to use your own domain; see the premium version for that). But most important, it’s very easy to set up, configure, and manage. If you need to maintain the server settings, the administration screens are just normal Outlook.com setting screens, not the complicated ones that come with Exchange. Yet you get the mobile device advantages of Exchange.
And otherwise, it acts like Exchange at the individual level: it loads into desktop Outlook just like Exchange does, so your tasks are fully integrated into desktop Outlook. Nearly all the task features of the Outlook-Exchange combination work too, such as categories, attachments on tasks, converting e-mails to tasks, and so on. It comes with a few collaboration tools for others on your domain (if you use the Premium version). And it has lots of server storage, so you’ll probably never run out of space for your mail.
Disadvantages?
There are a few disadvantages, however, but I think they are worth it and they have workarounds. First, if you use the free version, you have to use an Outlook.com e-mail address (or related e-mail address like a Hotmail address). But the workaround is to get a paid Premium version—if you do you can use a custom domain and use your own e-mail address. And the Premum version removes the advertisements that the free verion of Outlook.com subjects you to when using it on the web. The Premium version (as of this writing) costs $19.95 a year, so it’s definitely not free. But that price is about a quarter what most Exchange Server hosting services costs per user, so it’s still a bargain.
Best if Plugged into Desktop Outlook
And in case you used Outlook.com as a web mail system before, let me be clear about one thing. The key to making Outlook.com work with MYN is for you to not use its web interface; rather, you should connect it into your desktop Outlook (or use mobile apps described ahead).
Why not use the web version, isn’t that the main point of Outlook.com? Well, the Outlook.com web interface, while improved in 2016 (it now shares Exchange’s more powerful web interface design), is still not suitable for use with MYN tasks—it does not sort tasks correctly and there is no way to convert e-mails to tasks. The solution is in installing it into desktop Outlook—that gives you all the full power of MYN in with an easy to use server.
How to Get it, How to Add to Desktop Outlook
If you don’t have an Outlook.com address, just go to Outlook.com, sign up, and then add it as an account in Outlook. You’ll get the new features automatically. But if you already have an Outlook.com account from before 2016, and you already have it installed into desktop Outlook, it’s very likely that you will need to remove it and re-add it to desktop Outlook. Otherwise you’ll probably be stuck in the pre-2106 version of Outlook.com.
How do you add it to Outlook? You simply use desktop Outlook’s standard Add Account commands and type in your Outlook.com e-mail address and password; the rest of the set up is automatic and done in seconds.
Make it Your Primary Account in Desktop Outlook
That said, to have Outlook.com tasks appear in your To-Do Bar in Windows Outlook, you’ll need to make it your primary account in desktop Outlook. That may require removing your old accounts in Outlook first, or installing it on a new copy of Outlook, or creating and using a new Outlook profile (search the Internet for instructions on how to do that).
Apps that Work with Outlook.com
All the task and e-mail apps I recommend for Exchange now work with Outlook.com and I list most of those apps at this link.
Conclusion
So if you’ve been looking for a better way to take MYN and 1MTD mobile, and wanted a good server solution, you no longer need to activate an Exchange account. Outlook.com is now your solution.
Michael
New ClearContext Subscription Model
Jan 21, 2017
ClearContext Corporation, the makers of MYN Views and ClearContext Outlook Add-In, have recently changed the licensing of the ClearContext Outlook Add-In to a subscription model, matching the trend of many other software sellers. It is now $79.95 per year or $8.95 per month. Some points on this:
This licensing plan only applies to the ClearContext add-in. The MYN Views add-in remains a one-time purchase of $15.00.
Existing users of ClearContext Pro users can continue to use their paid versions, but all future ClearContext software updates will only be released in the new subscription model.
If you want access to the MYN Special Edition of ClearContext, then, in the new subscription model, you’ll need to purchase the MYN Views software separately. After that, once you subscribe to ClearContext, it will recognize the existence of the MYN Views add-in and swap in the MYN Special Edition features.
For more information on the new ClearContext, go to http://www.clearcontext.com/new/.
January 17, 2017
Visual Field Guide to Outlook Versions
Jan 17, 2017
Over a year ago I lamented on how many versions of Outlook were out there and how confusing it is figuring out which is which. Microsoft uses the Outlook name on way too many apps these days and it’s only gotten worse since that article. When helping users on the phone or by email, I’ve run into too many people who don’t know what version they are on.
In the old days, you simply told users to go to the About item under the Help or Outlook menu. But that doesn’t work anymore—Microsoft has chosen to hide the version name/number in various places, often many clicks away and very hard to find, if there at all.
But Microsoft now has a graphic identification page to help you sort out the Outlook version just by examining the top of the main window. Go to the following link, and Microsoft presents a visual field guide to all it’s Windows, Mac, and browser based versions of Outlook:
If you are in a support role, and your users may have one of many various Outlook versions, this field guide could save you a lot of confusion. Just send the link to your remote user, and they can sort themselves out. Below is a screenshot of the top of that guide. The actual guide continues for several pages.
Michael

January 5, 2017
Nine – Outlook for Android
Jan 5, 2017
Nine is an Android App that syncs with Exchange or Outlook.com and provides many MYN functions on your smartphone. Benefits:
It allows viewing and entering MYN tasks
It has an E-mail module with Category assignments
It allows conversion of e-mails to tasks
It has Calendar, Contacts, and Notes modules too, and everything syncs with the corresponding modules in Exchange or Outlook.com
Many MYN users have used it for years and love it. I used to recommend Touchdown for Android and MYN, and it’s still a good choice, especially for corporations that need secure connections. But the makers of Touchdown have had a beta version of its replacement version out for a while, and that beta lacks a lot of features we need for MYN. It is unclear when it will become the main version and the old version will be cut off. For that reason, I recommend Android users consider Nine instead.
There is a full video in my paid MYN-Outlook Complete Video Training (the newer 365 version of that class) on how to use Nine. It’s video number 22C. Below I show some notes on how to get started with Nine, in case you have not purchased the video course. Let’s look at those next.
Getting Started
Search for Nine on the Google Play store. It’s called “Nine – Outlook for Android”
Download and Install
Enter your Exchange or Outlook.com username and password.
You’ll be shown a Content to Sync window. By default all types are set to sync: Email, Calendar, Contacts, Tasks, and Notes. If you don’t want any of these to sync (say to speed up usage) then tap the ones that you don’t want and remove the green color. Tap Next.
You are taken to the email module, and it may take a moment to sync.
Email is set in conversation view by default. Tap 3-line-with-arrow menu in upper right to change that and to change many other settings.
Viewing Tasks and Setting up Tasks for MYN
Tap the 3-line menu (hamburger menu) in upper left to navigate to main menu
In main menu at very bottom, tap on the tasks icon. It defaults to Active tasks (good for MYN). Use label-menu at top if you want to change that. But other settings are not set correct for MYN, let’s fix those next.
Tap the funnel shaped button in upper right.
Tap the start date entry, and then select third one down On or Before Today. Tap OK
Tap left arrow next to Filter to get back to task list.
Tap 3-line-with-arrow menu in upper right
If you want to hide flagged mail tasks, then tap the green check mark next to Show Flagged to clear that.
Leave No date on Top checked.
Tap the Group By button and in window tap Priority.
Tap Sort By button. Sort by Start Date, Order by Newest on Top. Tap OK
Back at the tasks list, your list should now match your Outlook To-Do Bar Tasks MYN sorting fairly closely. Target Now tasks are colored light blue, by the way.
Using Nine to Add Tasks
Tap large blue + sign in lower right to add tasks…
You have to choose a start date (defaults to none). Ignore due date (it will set to same)
Set priority, then tap Save in upper right.
Using the E-mail Module to Use Categories
Tap the 3-line menu (hamburger menu) in upper left to navigate to main menu.
In main menu at very bottom, tap on the envelope icon.
Open an email. To choose a category, tap the button to right of subject line. Category choice list is shown. Like all mobile Exchange mail apps, only categories currently in Inbox will be shown in list, and colors won’t match. To fix, first, in Outlook send yourself an email with all categories assigned to it. Then open any email in Nine, tap the button to right of subject line, and use the Edit menu at bottom of category window in Nine to assign proper colors (tap color dots to change color).
Converting Emails to Tasks
Open any e-mail. If you open a conversation, then open an e-mail inside it to select it (conversion to tasks only works on single emails, not on entire conversations).
In the open single email, tap the 3-dot menu in upper right.
Tap Create a Task. In new task edit the subject line and set start date, then priority, then tap save in upper right. No attachments are picked up by the way.
There are a lot more features in Nine, feel free to play around with it and its other modules.
December 7, 2016
Productivity Tools I Use (Hardware)
Dec 7, 2016
A number of technology blog writers periodically write a “What I Use” article to cover the hardware and software they personally use. I’ve never done that before, but since the holiday buying season is approaching, and since many of you may be in the market, I thought, why not? Perhaps this will help you with some decisions.
First of all, if you’ve been following my blog or newsletter for a year or more, let me just say that most of my current choices have not changed since this time last year, and I covered nearly all the devices in my blog articles during that period. So this is primarily for new readers, or for those of you who want a refresh or update from my past reviews. I do share a few new insights here that I did not have back then, for example new thoughts about Windows tablets. So read on.
Dell XPS 15
My main workhorse computer is my Dell XPS 15 laptop (model 9550). I’ve had it for over a year, and I use it mainly as a desktop replacement. By that I mean 99.9% of the time it sits on my desk plugged into a monitor and mouse and keyboard, and I leave it running 24/7. It has 1 TB of SSD storage, 16GB of RAM, a i7-6700HQ processor, which is the quad core version of the newer i7. The quad core processor cuts the rendering time of my video editing in half compared with the same i7 non-quad core.
The reason I am using a laptop instead of a larger desk-sitting or floor-sitting tower is that I find a laptop easier to deal with, and a desktop CPU that’s equally powerful costs about the same. That said, when I first got this XPS, I did use it as a laptop for a short while, and found the borderless touchscreen 15.6-inch 4k monitor to be stunning, and the keyboard and trackpad to be truly excellent—the best I’ve ever used. Battery life is about 5 hrs, which is a bit short by today’s standards, but not too bad and not an issue for a desktop replacement. Other than battery life, everything about it near perfect, performance wise.
That said, the reason I don’t use this Dell as a travel laptop is that it’s pretty big and heavy by today’s standards (it has a 15.6-inch monitor and it’s 4.5 lbs), and I also have a Lenovo Yoga 900 13.3 inch laptop that is super light and slim and powerful, which I’ll talk about next. By the way, if you search on the Dell XPS specs you’ll see a much lighter weight listed (3.9 lbs). But if you get the model I have with the 4K touchscreen monitor, the weight goes up. Here’s a 3rd-party review on the XPS 15.
Lenovo Yoga 900
My travel laptop is a 13.3-inch screen Yoga 900, and I’ve had it for a year, too. I love traveling with it because it is so ridiculously light (2 lbs, 13 oz) and thin (0.59 in). Note, its power brick is small and light too. It has a really nice 4K touch screen, and has a pretty good keyboard and trackpad—way better than most. Battery life is fairly long; I get maybe 8 hours. It has a recent non-quad i7 processor and is super speedy for nearly everything. It has 8GB of RAM and 256 GB of SSD. The latter is not enough storage for everything I work on in the office, but enough for travel work—I use OneDrive to sync folder groups from my XPS that I know I might work on when traveling.
There is not much more for me to say other than it’s been very reliable and handy to travel with. I do extended work on it while I travel—it handles all the work tasks, that I take mobile, with ease.
Oh, one other thing. For occasional tablet-like use, the Yoga 900 keyboard folds all the way back behind it very easily. But I admit, I never use it as a tablet. Even with only a 13-inch screen it’s too big for that—which is my main beef with most 2 in 1 hybrid laptops: it’s a fantasy that many users are really going to use them as a tablet (a few users, yes). You need something really small and light for reading an eBook with one hand, say, which I mention in the next section on the Surface 3. Here’s a 3rd-party review of the Yoga 900. By the way, the Yoga 900’s big brother—the new Yoga 910—competes with the XPS in that it is larger and has a new borderless screen like the XPS. Here’s a 3rd-party review on the Yoga 910.
Surface 3 (non-Pro) Tablet
My go-to tablet is an older Surface 3 (non-Pro). If you’ve been following my blog or newsletter, you know I prefer the non-Pro version of the Surface because it’s much smaller and lighter than the Pro versions—it’s almost as small and light as an iPad. I think that’s very important for a device that you are going to hold with one hand while reading an eBook or to work with while standing. And you can run a full copy of desktop Outlook on it in tablet mode, which is really key for MYN users.
To be honest though, I don’t use my Surface 3 as much as I used to. There are a few reasons for that. First, I had hopes for good Windows 10 tablet apps, but the tablet app market never really took off on Windows 10, and there are no compelling tablet apps that I am drawn to. And to add insult to injury, the one app I used most, the Kindle tablet app, was recently discontinued by Amazon (you now must use the desktop app). So if I carry the Surface 3, it is mainly to surf the web and use desktop Outlook, and for the latter I might as well carry the Yoga 900. But mainly I have an iPhone 7 Plus now, and with its large screen I can do almost all quick tablet-like things on it that I need to do while on the run, which I will talk about next.
Adding to all that, the Surface 3 is a bit dated and Microsoft announced in June that it will stop production of it this month (December 2016). There is still no word on what will replace its form factor in the Microsoft lineup, which is surprising at this late stage. And there is little new in this small Windows tablet size from other manufacturers either. The ASUS T102HA might be an option, but really, I am not sure what Windows device to recommend now in an iPad-like size. I could get an iPad again, but they can’t run desktop Outlook. And perhaps, with the power of large smartphones, it does not make sense anymore to use a tablet, as I discuss next. Here’s a 3rd-party review of the Surface 3.
iPhone 7 Plus
I use an iPhone 7 Plus for my smartphone. I had the 6 plus before that. It’s a great phone obviously, but mainly the screen size is big enough to read eBooks and do a lot of web surfing and even process a lot of email while on the run—things I used to do on my tablet. I am currently using the mail app called Preside (which I will review soon) and it lets me do most MYN e-mail things: assign categories, view by category, and convert e-mails to tasks. I use the tasks app TaskTask which sets up well for MYN task management. The net-net is that the iPhone 7 is just so convenient for most of what I do on the run that I rarely bother to carry a tablet anymore. Pair the iPhone with a thin and light laptop, one that’s always in my briefcase/backpack for more serious mobile work when/where I can sit down, and I am pretty much all set.
So that’s it. Not a deep review of any one thing, but an overview of my personal technology mix and my evolving thoughts on small tablets. By the way, if you search my blog, you’ll find my more detailed reviews from me about most of these devices.
Michael
November 27, 2016
Two Tweaks to the MYN To-Do Bar
Nov 27, 2016
I’ve been using the currently configured MYN To-Do Bar in Windows Outlook with no changes for years now. Occasionally I get a bright idea to try to improve it, and give it a go for a while. Usually the bright idea has to do with adding columns, but after a while I end up resenting the extra horizontal space they add to the To-Do Bar, and so take them out—I go back to the basic settings. And I find most of my clients like the simplicity of the basic settings best too.
So it’s with caution that I suggest two columns you might want to add to the To-Do Bar. Since both of these are pretty narrow columns, their impact is small. It’s to add the Notes column and the Attachments column. I suggest both these so you can tell in the list view whether the task has any notes, and whether it has any attachments (not to be able to actually see their contents).
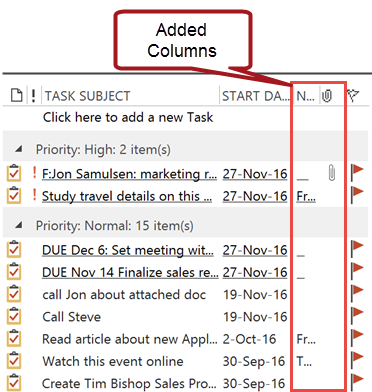
Again, you want to keep these very narrow. With the Notes column, after adding it I drag its size down to only show the first few characters of the Notes fields—that’s all I need to tell whether the task has any notes at all. The attachments column is narrow by default.
The simplest way to add a column is to right click on the phrase Task Subject, select Field Chooser, in the list that pops up find the field name (Notes for example), and then drag it to the position in the To-Do Bar header where you want it (between start date and the flag) and drop it there. Then resize it so its width is narrow. Repeat with Attachment.
Adding these is purely optional but you might want to give it a try. You can always take these out if you don’t like them (right-click the field name in header and choose Remove This Column).
Michael
Michael Linenberger's Blog

- Michael Linenberger's profile
- 14 followers

