
Michael Linenberger's Blog, page 17
September 11, 2017
To-Do List Nightmares
September 11, 2017
I am just wrapping up a huge project: the building of my new house. I just moved in and am getting the loose ends wrapped up. This project has taught me lessons on the importance of using a good to-do list. Not for me—I of course use one. But for the managers on the project: the general contractor and the supervisors there. All were good people and tried to manage well. But none had a good to-do list system in place and the results were frustratingly apparent. All of them, after I pointed out a small (or big) task that needed doing, kept dropping the actions. It was ridiculous how often I’d need to remind them—sometimes 5 or 6 times—before they’d get on the important ones. Sometimes it just required that they make a simple phone call. They really wanted to stay on top and would beat themselves up for not remembering the requests. But it was really sad to watch, because it is so typical of the waste in our work world.
Of course my 1MTD and MYN systems would have solved their issues, but there is that adage about how “you can lead a horse to water…”
It did lead to observations about how an effective to-do list works and why my two systems are effective. Here are some points I saw over and over again that were lacking or to blame.
Quick and reliable way to add items to the list. They did not have an at-hand entry method. For contractors, since they are on the move so much, it should be an app on their smartphone. (For desk jockeys it’s a good system on the computer).
One good single list kept at hand. These guys would write down the item in many cases, but they’d lose the current list or prioritize it wrong. Because of that they would not “see” the things that needed to get done.
Size matters. A list should not be huge. If it is you will give up. Keep the critical-now list at the top and under 5 or you’ll glaze over when you glance at the list for urgent next actions.
Like I said, it’s sad to watch the work world in action these days with so much wheel spinning and wasted time due to disorganization. With this house project that fact really “hit home.” A properly implemented to-do list really can solve so much of the inefficiencies in business these days.
Michael


July 16, 2017
Touchdown App Being Phased Out by Symantec
July 16, 2017
The Android and iPhone app Touchdown has been officially sunsetted by Symantec. More information here:
Years ago I highly encouraged Android users to get the Touchdown app to manage MYN tasks when mobile. About a year ago I switched my recommendation to Nine for Android. Why the switch? The Symantec Touchdown management seemed a bit flaky about their new Android Touchdown version that was in testing for over a year. Feature support was unclear. Release timetable completely unclear. So I steered folks to Nine which had all the needed features for MYN users and a strong support team.
Also, two years ago Touchdown came out with an iOS version, and it was an option for iPhone MYN users for email (handled categories and converted emails to tasks), but the task module was not quite right. I have always recommended TaskTask for iOS tasks instead, and still do. You might combine that with Preside for email (has categories–tags–and converts emails to tasks).
Too bad about Touchdown. The decline started when Symantec bought them out several years ago. They slowly transferred the entire original developer team onto other projects, and the passion for the product seemed to wane. Goes to show that sometimes the best app developers are the small companies who can be nimble and responsive.
Michael
June 3, 2017
Multiple Ways to Convert E-Mails to Tasks (Windows Outlook)
June 3, 2017
Key to both my MYN and 1MTD systems is converting e-mails to tasks. It’s the main way to get control of your Inbox. In Windows desktop Outlook, the primary way to convert e-mails to true Outlook tasks is to drag the e-mail from the Inbox list view to the Tasks icon or label in the lower left portion of the Outlook Window. It’s how I almost always do it.
But there are other ways to convert e-mails to tasks that that have some advantages:
Right-click the e-mail and while holding right mouse button drag to Tasks icon or label, and then choose second item in the 4-part pop-up list. That converts the e-mail as an attachment, with many advantages (can see attachments, can reply).
Create an Outlook Quick Step that converts e-mails to tasks in one click. See this link for how to do that and list of advantages.
Right-click the e-mail, choose Move, and choose Tasks. This deletes email from Inbox after converting.
If you have multiple task folders or multiple e-mail accounts with tasks folders and you want to put converted tasks directly in one of those, do this: drag e-mail to a specific tasks folder on the left. You need to put the Outlook Folder Pane on left into Folders mode first: (Outlook 2013/2016 click ellipsis button in lower left and choose Folders to do that). Then you can see all tasks folders on left.
Other Points:
Don’t drag e-mails to the To-Do Bar on the right. That can appear to create a task, but it doesn’t, it creates a flagged mail task, which we don’t want.
Don’t convert to task by simply flagging the e-mail. It creates a flagged mail task, which we generally don’t want to use (other than for deferred replies).
There is no way to convert an e-mail to a true task in the standard iPhone and Android mobile mail apps. But third-party mail apps do allow this (iPhone: TouchDown or Preside; Android: Nine).
See Lesson (Chapter) 7 in my Outlook book for many more details on converting e-mails to tasks.
Michael
May 12, 2017
New Edition 5 Upgrade Paths
May 12, 2017
We just released Edition 5 of the book Total Workday Control Using Microsoft Outlook.
[image error]
See more details here: http://www.michaellinenberger.com/NewsletterMay12-17.html
Upgrade Paths:
We almost always get questions about upgrade paths when new books come out. There are upgrade paths for the PDF book only. Here is the whole story:
Paper Book: There is no way for us to offer upgrades for paper books you bought from bookstores (online or physical). It’s just not done in the publishing industry mainly because it’s too hard to do.
Kindle, Nook: The same goes with proprietary eBook formats like Kindle and Nook—we have no way to get into the computer systems of Amazon or BN to see who bought it and when, and we have no coupon arrangement with those vendors.
PDF Buyers This Year, you get a free copy: if you bought the PDF book from our PDF store between Jan 1, 2017 and May 12, 2017, directly from us, you can get a free PDF copy of the new 5th edition. Just go to this page, log into your account, and download it. If after logging in it says the product is not available, it means you purchased it before Jan 1 (or you did not log in correctly).
If you are uncertain about when you bought the PDF book, or how to login, check your saved e-mails for a receipt to see when you bought it and/or to confirm your username—you would have gotten an e-mail receipt immediately after purchase with a subject line containing: “MichaelLinenbergerVideoAndTraining”. Search on that term. If you cannot find that email, go to http://www.michaellinenberger.com/amember4/ and log into your account, and click the Payments History link at the right and look up your purchase. But please don’t contact us asking us when or if you bought it or what username you used when you bought it, unless you have done a thorough search first. Thousands of people have bought the book and we can’t look that up for everyone easily—it may take several days to get back to you.
New Video Course Users: Those who own the Complete MYN Outlook 365 Video Course, the one released last fall, you get the new PDF of edition 5 free no matter when you bought access to that video course. You can download the new Ed 5 PDF from the video delivery page (after you log in)—once there, just click the Ed 5 book image on the right once at that page.
$1.00 off coupon: All others who bought the Edition 4 PDF directly from us, but who are not eligible for the free upgrade (you bought before Jan 1 2017), here is a coupon code: U5LH1FIN that will give you $1.00 off your edition 5 PDF purchase: Just go to this page, log into your account, and enter it in the coupon field during purchase. If the coupon is not accepted, it means you did not purchase the book from us on that account—please login again using the correct username. Please don’t contact us asking us when or if you bought it or what username you used when you bought it, unless you have done a thorough search first. Thousands of people have bought the book and we can’t look that up for everyone easily—it may take several days to get back to you, sorry!
May 6, 2017
Using Critical Now on Really Busy Days
May 6, 2017
As you know in all my books I teach a pretty firm rule about keeping the Critical Now section at 5 or fewer items. Well, I received a sincere question from a dedicated 1MTD user who asked the following (I am paraphrasing): “What about those days when one emergency after another come rolling in, and if I write them all down I’ll have well over 5 items on my Critical Now list.”
My Standard Answer
Normally what I say is “when you are about to put the 6th item on the list, stop and get something else done that’s already on the list. Or do that new item immediately. Just try to keep the list at 5 or fewer.” Here is an article that discusses that point and more:
http://www.michaellinenberger.com/blog/what-if-i-have-more-than-5-critical-now-items/
Breaking the Rule
But occasionally the ideas in that article won’t help and even I go over 5 items, under the very circumstances he described in his question: an unusually crazy day where events come piling in faster than normal. So I break the rule that day. Every rule is absolute until it must be broken. But only break it with awareness and a heightened sense of responsibility.
Like Breaking a Road’s Speed Limit
It’s sort of like those days you have to break the speed limit driving on a busy road because of a true emergency. If you must do it, do it with a very high sense of responsibility, scanning the road in front of you with great care and great concern and attention. Knowing you have to slow down as soon as you can.
Same with your list when it gets over 5. Keep in your mind “I have to get that list back down to five—it’s a dangerous letting it get big like that, I could drop something,” and just plunge ahead trying to do that. Try as hard as possible to get it back to 5 relatively quickly so that you can take a step down in your heightened awareness—which cannot be maintained accurately that long. And during that time, keep a very sharp eye on that list knowing it is rather risky to have that many critical items piled up. That’s all you can do.
The Rules are to Allow a Reasonable Work Life
The point of the 5 item limit is to allow you to, on most days, relax and enjoy your work, knowing that you have things under control. That was my reason for creating the rule. It’s a tool to create a reasonable work life. But if you temporarily can’t stick to the rules (and the suggestions in that article above just don’t work because it’s such a busy day), and so you must get above 5, only do so with great care. Just focus very carefully on those days.
And don’t make a habit of it. Otherwise you’ll start dropping things. For a maximum sense of control (and thus a more relaxed work day), I like to keep my Critical Now list no bigger than 3 if I can. There are many days it is zero. Remember the definition of that section: you will only put items there that are so critical you would even work all night if they were not done by the end of the day. Keep using that “Going Home Test” and use that section very conservatively.
Here are some more articles about the 1MTD and MYN Critical Now urgency zone rules:
http://www.michaellinenberger.com/blog/is-the-5-item-limit-in-critical-now-unrealistic/
http://www.michaellinenberger.com/blog/getting-caught-up-with-1mtdmyn-tasks/
Michael
May 4, 2017
Download link for brand new 1MTD 2nd Edition, PDF copy (free)
May 4, 2017
As I promised last week, here is the download link for my brand new second edition of The One Minute To-Do List (1MTD) book, PDF copy. As usual, this is a free download; so help yourself. This new second edition was just released, and it will help you get your tasks and work life under control, even better than the last edition. The new edition is just as quick to study, and includes more Outlook material and many updates.
Here is all that’s new in this Second Edition:
The biggest addition is that I’ve added Outlook to the later chapter on getting started with MYN (Chapter 9). In the previous edition I limited that chapter to Toodledo because Outlook was too complicated to configure for MYN quickly. But I’ve now added Outlook support, primarily because of the new availability of the MYN Views software, which makes adding the MYN To-Do Bar settings to Outlook a breeze. And the latest TaskTask iOS app now has a quick config button to set it up for MYN.
That means the book is now a great MYN introduction for all software users. But of course it’s still a great guide for the simpler 1MTD system.
I’ve updated the mobile chapter (Chapter 8) to incorporate my latest recommended apps, and I’ve now added Outlook apps to that chapter.
Free videos are now hosted and linked on the complete video course pages for Outlook and Toodledo (no longer on a separate Extras page).
Lots of other little changes. The entire book has been updated to reflect newest software versions and my latest thinking on the 1MTD methodology. Perhaps 20 percent new material.
Also note, the $89 paid video class version of this book is not being updated for the second edition book materials, and it won’t be promoted anymore. It wasn’t selling very well and so I guess it did not offer the value we hoped it would. The complete MYN video courses for Outlook and Toodledo (the second is for non-Outlook users) are of course still on sale, and both were recently updated.
So take a look at the new second edition 1MTD book! Download the free PDF, or purchase the paper or Kindle or Nook or iBook editions which are now also available.
Michael
May 2, 2017
Using Search Folders to View Categorized Mail (Windows Outlook 2013 and 2016)
May 2, 2017
[This is an update to a 2011 article that included Outlook 2010, 2007, and 2001. If you are using one of those versions of Windows Outlook, study that article here.]
As you know, I recommend using Outlook Categories, instead of multiple folders, for when you want to file mail by topic. Once used, you would normally view groups of categorized mail in your Inbox or Processed Mail folder by clicking on the Category column header, or by Arranging by Category in the View tab.
But you can also use Outlook’s Search Folders to view category-filed mail. Search Folders are a Windows Outlook feature that allows creation of virtual folders in your folder list. Search Folders can be used, among other things, to create category folders right in your Folders Pane. They appear within and under the Search Folder group.
Why Search Folders
Using Search folders is purely optional, but often useful. Search Folders are virtual folders that populate with an entry for every mail item that matches certain search criteria that are defined at the time the particular Search Folder is created. You create one folder for each set of search criteria. For our purposes, collecting mail that has a given Outlook Category assigned works best; but many other search approaches are also possible.
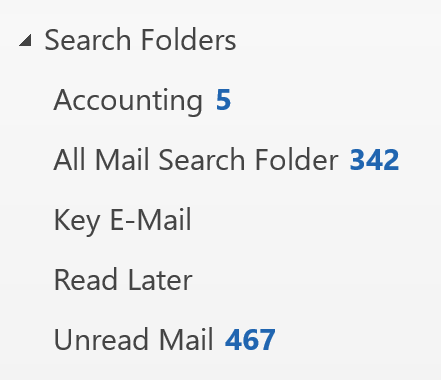
For example, in figure above, five Search Folders are shown; three of them are category Search Folders (Accounting, Key-E-mail, and Read Later). The other two use criteria other than categories. The numbers to the right of each show the count of unread mail in each folder.
Once created, clicking the folder opens a view of all matching mail in a folder view, as if it were a real Outlook folder.
So, consider using Search Folders as your way to view the mail you tag with Outlook Categories. I’ll show you in this article how to set up such folders.
Features of Search Folders
The advantage of using Search Folders to view categorized mail is this: they look and act nearly identical to regular Outlook folders. If you are accustomed to using a folder view in the Folders Pane for manipulating saved mail, Search Folders create a very similar view for your collection of category-assigned mail. When you click a Search Folder, it opens just like any other folder, displaying the mail contained within. So there is a familiarity factor at work here which many find comforting.
There are, however, two disadvantages.
One is that you cannot drag mail items to the Search Folder, as you can with real folders. Rather, using our system, you need to assign categories to the mail. Only then does the item appear in your Search Folder.
The other disadvantage of Search Folders is that you must explicitly create a Search Folder for each category you are using, and as you will see that takes a few steps. So if you consistently create a lot of new categories, Search Folders may not be for you.
Note: There are two other limitations to Search Folders compared with regular Outlook folders: you cannot create nested Search Folders (no subfolders), and you cannot share Search Folders over a network.
Even with those disadvantages, Search Folders have a certain elegance; their folder-like appearance right in the Outlook folder list is quite satisfying. If you have a relatively small and stable set of categories, you may prefer this approach.
Creating Category Search Folders in Windows Outlook 20013/16
Creating Search Folders based on categories in Outlook 2013/16 is fast. Here is how to do it:
1. Make sure you are in the e-mail account you want to search. Search Folders will search only one account at a time. If you use a Processed Mail folder, you might want to select it in the Folders Pane; that way you can see the results immediately.
2. From the Folder tab on the Ribbon, choose New Search Folder at its left end. The dialog box in the next figure appears. Select the Categorized Mail option near the bottom.

3. Click the Choose… button near the bottom and the familiar Color Categories dialog box opens where you can use the check boxes on the left to select which categories to include; do that and click OK. (Note, if you pick more than on category, the resulting Search Folders shows you mail that has either).
4. The setting in the box labeled Search Mail In: should be correct, since you started this process in the in the correct account. Again, you can apply Search Folders to only one data store at a time.
5. Click OK, and the new Search Folder appears under the Search Folders section of your folders list, selected. Outlook will pause a moment as it populates the folder for the first time, and then you’ll see the contents appear in your main Outlook window.
6. The resulting Search Folder will search all mail in all folders of this data store, including the Deleted Items folder and Junk E-Mail, and that may be fine. But you probably want to exclude those, and maybe others. So next, to be more specific about which folders are included, do this:
a. Right-click the new Search Folder in the Folders Pane, and choose Customize This Search Folder.
b. In the small dialog box that opens click the Browse… button. In the folder hierarchy window that opens, clear the check box at the account group level at the top of the list; otherwise all folders will be searched.
c. Next, In that same folder hierarchy window, select only the folders you are interested in. For 1MTD and MYN users, I recommend selecting just Inbox and Processed Mail (assuming you use that single folder filing approach), and perhaps Sent Items; but if you have other folders you normally use, select those too. If you have a complicated hierarchy of folders, you might want to activate the check box at the bottom called Search Subfolders to prevent having to open and check all folders at all levels. Otherwise, deselect that check box. Click OK, and OK again to close the dialog box.
That’s it, your category-based Search Folder is created!
These folders self-update, so if you assign the the category to more mail later, that new mail will also appear in the previously created Search Folder. Once you create a Search Folder, there is nothing you need do to maintain it.
March 2, 2017
TaskTask iOS Tasks App for 1MTD & MYN, Complete Guide
Mar 2, 2017
TaskTask is a great tasks app for iOS (iPhone or iPad) that syncs with Exchange Server. Since most companies use Exchange Server, this is the app most corporate users should choose to sync their tasks with desktop Outlook, so you can use those tasks on your smartphone. TaskTask also syncs with Office 365 mail servers and newer Outlook.com accounts.
I have been recommending TaskTask for years and have various articles and videos about TaskTask spread about in my blogs and lessons. To consolidate and update that information, below are the complete steps for getting started with TaskTask and configuring it for either the 1MTD or MYN systems. TaskTask now provides a one-click setup button for 1MTD and MYN, making setup easy. But there is still a bit to study to understand the TaskTask setting options, and there are other settings you might want to make, so read on.
The article below is for version 5.2.3 of the app. I’ll try to keep this page updated if these steps change with new app versions. Users of my paid MYN-Outlook Complete Video course will continue having the TaskTask video lesson updated, and that video covers everything shown here for MYN users.
Also, these steps assume that you already have either an Exchange Server account, an Office 365 Mail account, or an Outlook.com account, and that you are currently using one of those along with desktop Outlook.
For both 1MTD and MYN: Getting Started and Syncing Your App
Download TaskTask from the Apple App Store. (iPad users look for the TaskTask HD app.) Once downloaded, open it.
When TaskTask starts, it will ask you to indicate if you are using Exchange or Office 365. The Office 365 mail server is essentially the same as Exchange, but choosing Office 365, if you have it, speeds up the configuration. However, if choosing Office 365 fails to connect, go back and choose Exchange. Outlook.com users should choose Exchange.
Enter your email and password for your account. If all goes well, you’ll go to the Folders screen which means you are linked.
However, it fails to connect, it will ask for more details on your Exchange server, like your detailed server address. But before hunting that down, go back and try again on the simple username/password approach, sometimes the link works better on the second or third try. Once linked, TaskTask will remember your credentials and you won’t have to do this linking again.
After linking to your account, you’ll then be taken to the Folders screen. Notice that the sync icon is spinning in the lower left, showing that your tasks are syncing in.
Using TaskTask
We haven’t added the 1MTD or MYN settings yet, but let’s play with TaskTask a bit first to get a feel for it. Here are some steps you might want to try to give you an overview.
From the Folders screen, open either the All Tasks or Tasks view. If your tasks have finished syncing in you’ll see all your tasks here, including flagged mail tasks. But again, note that these are not yet in 1MTD or MYN sorting.
You can edit a task by tapping on it, then making edits, and then tapping Save in the upper right.
To create a new task do this: tap the plus sign at the bottom of the task list screen and a blank new task window opens. Type the task subject at the top and choose an Importance level near the bottom. Generally, you can ignore all the other values in that window. Tap Save in the upper right.
If you want to add several tasks all at once, tap the lightning-bolt-with-plus-sign icon at bottom. Then type several task names with a return in between, and then tap Create in the upper right. That adds all tasks all at once, and default settings are applied to them (e.g. importance is Normal on all of them; start date today with MYN settings).
To mark a task complete, open it and tap complete at the bottom. There is also a trash can at the bottom to delete tasks. Or from the list view drag a task to the left to delete it.
Understanding the concept of Folders in TaskTask (1MTD and MYN):
The TaskTask Folders screen can at first be a bit confusing. Here is how it works.
To get to the Folders screen from your tasks list, click Folders in the upper left corner.
At the Folders screen, tap on All Tasks. Again, this list is not yet in 1MTD or MYN order—we’ll fix that in the next section. With default settings, it shows both true tasks and flagged-mail tasks. If you have linked multiple accounts into TaskTask, the All Tasks view combines them all into one task list, which can be useful. If you only have one account, obviously it only shows tasks from that account.
Click on Folders in upper left to go back to the Folders screen and next chose Flagged Mail, which is a little further down the screen. This list view shows you only flagged mail tasks.
Click on Folders in upper left to go back to the Folders screen and notice there is a Tasks item in the folders list as well. If you only have one account synced in, going to this list shows the same items as All Tasks, again with flagged mail tasks shown.
If you enter multiple accounts in TaskTask, a separate section forms for each account in the Folders Screen. The Tasks item in each account section shows just the tasks in that account (again, initially with flagged-mail tasks), and the All Tasks view at top combines tasks from all your accounts into one list, which is helpful.
I’ll discuss how to filter out flagged mail, if you want, below.
That’s an overview of how the Folders Screen works. Next, you are going to set up TaskTask for either 1MTD or MYN. The latest versions of TaskTask come with presets for MYN and for 1MTD making their setup simple. So, the next step is to choose one of those presets. (Note, you do this separately for each tasks folder/view.)
Configuration Steps for 1MTD and MYN
Open a folder you want to apply the 1MTD or MYN settings to, say the All Tasks folder. You must repeat these settings on each folder you want to use; if you have one account that’s likely All Tasks and Tasks. However, you might want to apply different settings to one of the other folders, which can be useful; just keep that in mind.
Once in the list view for a folder, tap the box-with-arrow icon in the lower right;
Tap Change View in the pop up menu. In the View Options screen that opens, at the top under View Name, it probably initially says Default View. But whatever it says tap it. Then choose either Master Your Now (MYN) or One Minute To-Do List.
To save that setting then click View Options in upper left; then click Done in upper left. You’ll be taken back to the list view for that folder, and the settings should be applied.
For both, looking at your tasks list you’ll see that your tasks are grouped by Importance, which is the same as Priority in Outlook. In MYN, future-dated tasks will be hidden (not so in 1MTD). And default new tasks now come in with a priority of medium, and in MYN they come in with a start date of today. In MYN, to reprioritize within groups, set the start date to various settings.
For both 1MTD and MYN, if you also want to apply these same settings to the Tasks folder, go back to the Folders screen, select Tasks, and repeat these steps.
1MTD and MYN: Hiding Flagged Mail Tasks.
You will quickly see that, by default, TaskTask includes flagged mail in all views. If you like seeing them, then just leave that setting as is. But if you decide you want to remove flagged-mail tasks from your task lists (and these days I think you should), here is how to hide them:
Go to the Folders screen.
Click the box-with-arrow icon in the lower right corner;
Tap Options; click Accounts; choose your current account that is synced in (it will be at the top);
Tap Advanced; turn off Flagged Mail Items choice.
To save that setting then click Account in upper left; choose Done in upper right; choose Options in upper left; click Done in upper left, and you’ll be back at the Folders window.
You’ll see that the Flagged Mail item is gone from the Folders list.
If you open either the All Tasks view or the Tasks view for the account you chose in step 3 of this section, you’ll see flagged-mail items are no longer there, either.
If you have multiple accounts synced into TaskTask, repeat these steps for each account.
If you are not hiding flagged-mail tasks in your desktop copy of Outlook, and want to them there too (so your lists match), scroll down to the next section.
1MTD and MYN: Hiding Flagged-Mail Tasks in Desktop Outlook
If you decided above to hide flagged mail tasks in TaskTask, you might want to hide them in Outlook. If you are using the Mac, simply toggle the Fagged Items setting at the top of any view. If you are using Windows Outlook, here is how to change that in the To-Do Bar:
Click the Arrange by label above your To-Do Bar tasks list.
Choose View Settings
Click the Filter button and then click the Advanced tab.
Next, find the Field dropdown button in the middle left, click it, choose All Mail fields, and from its submenu choose Message Class.
In the value box type the word “task” (no quotes).
Click Add to List button. Then click OK.
Then click OK at the bottom of the View Settings window.
1MTD: Sorting within Priority Groups & Syncing that Sorting with Outlook
If in your copy of Windows desktop Outlook, you are using the standard 1MTD To-Do Bar task list settings that I teach for 1MTD Outlook, recall you can drag tasks into position within priority groups in Outlook. That way you can indicate which tasks are most important in each group. When tasks sync into TaskTask with 1MTD settings, TaskTask attempts to duplicate that dragged order. Check that now; examine your Outlook task order within priority groups, and examine it in TaskTask, and if the orders match, great! If not, read the next section below about changing to an alphabetical Subject sort.
If drag sort is matching in TaskTask, note that you can also drag-sort tasks within priority groups right in TaskTask. Here’s how:
In a task list view in TaskTask, tap the Edit button in the top right.
You’ll see three-line symbols appear to the right of each task.
Tap and hold your finger on one of those, and drag the task into a new position.
When finished, tap Done in the upper right.
Those new sorting positions should sync back to Outlook. You might have to tap the sync button in the lower left of the screen to force a sync to see that. However, if it does not sync back to Outlook, then read the next section about changing to an alphabetical Subject sort.
1MTD: Changing to Alphabetical Subject Sort within Priority Groups
I have found that TaskTask with 1MTD settings is not always able to match the dragged positions in Outlook or visa versa. I am not sure why, but it might be related to using multiple desktop copies of Outlook on the same account, and Exchange getting confused on which sorting to match. So if drag sorting is not syncing for you, and you want the sorting within priority groups to match both in Outlook and TaskTask, you’ll need to switch to another sorting method. As a replacement, I recommend using an alphabetical sorting on Subject within each priority group; that way you can add numbers (1, 2, 3, and so on) in front of the task names to sort them within the priority groups. You’ll need to do that both in TaskTask and in your desktop copy of Outlook in its To-Do Bar task list. Here’s how to do that in TaskTask:
Open a folder you want to apply the 1MTD or MYN settings to, say the All Tasks folder and display the task list. (By the way, you will need to repeat these settings on each folder you want to be using).
Once in the list view for that folder, tap the box-with-arrow icon in the lower right.
Tap Change View in the pop up menu. In the View Options screen, find the section that is titled Grouping and Sorting.
Set the Group By to Importance.
Set the Sort By to Subject. Leave Invert Sort off.
To save those settings, click View Options in upper left; then click Done in upper left. You’ll be taken back to the list view for that folder, and the settings should be applied. Add some numbers to task subjects to sort them.
If you also want to apply these same settings to other folders in TaskTask, like the Tasks folder, go back to the Folders screen, select Tasks, and repeat these steps.
Here’s how to make that same change in the Windows Outlook To-Do Bar, to sort alphabetically on Subject within priority groups:
Click the Arrange by label above your To-Do Bar tasks list.
Choose View Settings
Click the Group By button and clear the checkbox in the upper left. Then group by Priority. Leave at Descending. Click OK and go back to the window with the tall stack of buttons.
Next, click on Sort and in the top Sort Items By section, sort on Subject, Ascending. When you click OK it will ask you if you want to add the Subject field. Respond No.
Then click OK at the bottom of the window with the tall stack of buttons.
Your Outlook To-Do Bar should now be grouped on Priority and sorted within those groups alphabetically by subject. And that sorting should now match that in TaskTask.
Wrap Up
That’s it! Let me know in comments (click the Reply button) how this works for you, or if you have any questions.
Michael
February 28, 2017
New Video about MYN Views Outlook Add-In
Feb 28, 2017
I’ve just added a new video to the MYN-Outlook Complete Video Training. It’s about MYN Views and how to use it. And the video is free for both subscribers and non-subscribers. Just go to this link www.michaellinenberger.com/mvc.htm, and scroll down to Preview Video #29.

Why Use the MYN Views Add-In?
MYN Views is software that you add to Windows Outlook that installs all the MYN settings in your To-Do Bar.
This saves a lot of time compared to hand-entering the settings.
It also installs a Restore Views button that resets the MYN settings in your To-Do Bar, should they get altered or corrupted.
It also installs a button to toggle the appearance or hiding of flagged-mail tasks in your To-Do Bar.
So go watch the video to learn more. Again, scroll down to the free Preview Lesson 29. To purchase the MYN Views software, go to www.mynviews.com; it’s sold and supported by ClearContext Inc. and it’s about $15. I don’t make any money on your purchase of this software but I encourage it because it is so helpful for MYN users.
Michael
February 26, 2017
Toodledo App for Android and 1MTD/MYN
Feb 26, 2017
The Toodledo company has a good app for Android devices that syncs with its web tasks server. Below are the steps for getting started with it, and then for configuring it for either the 1MTD or MYN systems.

The steps below are for version 6.3.3 of the app. I’ll try to keep this page updated if these steps change with new Toodledo app versions. Also, these steps assume that you already have a Toodledo web account set up before using the Toodledo app.
For both 1MTD and MYN: Getting Started and Syncing Your App
Download the Toodledo App from the Google Play Store and open it.
Once opened, it will immediately ask you to sign in to your web Toodledo account (or to create a new account if you don’t have one yet). Enter your email address and password, the same ones that you use on your web Toodledo account.
You’ll be invited to take a slide tour of the product. Tap Got It or Let’s Get Started when done.
Next, if the app tells you that you can pull to refresh the sync, do it. Your tasks will appear, (but they will not be in 1MTD or MYN order; we’ll fix that in the next section). Make sure your screen says All Tasks in the upper left corner; if it does not, tap in the upper left and choose All Tasks. Feel free to try tapping on your tasks to open one or two. Use the orange floating plus sign at bottom to add tasks.
Common Configuration Steps for 1MTD and MYN
Tap the gear icon in upper right to go to the Settings page
Tap New Task Defaults, tap Start Date, and choose today.
Tap Priority, and choose medium, then tap Android back button to get back to main settings.
Tap Fields/Functions Used. With that window open, jump to either the 1MTD section or MYN section below.
Continuing Configuration Steps for 1MTD
Continuing from step 4 in common steps above, clear checkboxes next to Star, Folder, Context, and Start Date (unless you are using them already).
Set the checkbox next to Repeat, then tap the Android back button to get back to main settings, then tap the Android back button again to get back to your task list.
Tap the three-dot menu in upper right. Find the Show menu.
Leave completed tasks at Hide; but put a checkmark next to Future tasks. Then tap the Android back button to get back to your task list.
Tap three-dot menu again, choose Sort and change the settings there by tapping just below the gray titles First Sort and Second Sort. So, tap First Sort and choose Priority, no reverse. Tap Second sort and set to Alphabetical, no reverse. Leave the Third sort at whatever it is set to. Then tap the Android back button to get back to list of tasks.
That’s it for the 1MTD settings. Notice that tasks are grouped by Priority. Also, tasks are sorted alphabetically within each priority group; that’s so you can type a 1, 2, 3, and so on in front of the task names to sort them within the priority groups.
Continuing Configuration Steps for MYN
MYN users, continuing from step 4 in common steps above, you should have the Fields/Functions Used window open. In that window, clear checkboxes next to Star, Folder, and Context, (unless you are using them already).
Set the checkbox next to Repeat, then tap the Android back button to get back to main settings, then tap the Android back button again to get back to your task list.
Tap the three-dot menu in upper right. Find the Show menu.
Leave all settings as is; they should be: Completed tasks is set to Hide; no check boxes activated. Then tap the Android back button to get back to your task list.
Tap three dot-menu again, choose Sort and change the sort settings there by tapping just below the gray titles First Sort, Second Sort. So, tap First Sort and choose Priority, no reverse. Set the Second sort to Start Date, then tap the checkmark next to Reverse to activate it (this is very important). Leave the Third sort at whatever it is set to. Then tap the Android back button to get back to list of tasks.
That’s it for the MYN settings. Notice that tasks are grouped by Priority. MYN users will have tasks sorted by start date descending within each priority group. To reprioritize within groups, set the start date to various settings. Tasks with future start dates will be hidden until that date arrives. If you want to glance for a moment at future dated tasks (say to plan ahead), use the Show command we opened above, and activate Future. But when done, leave future tasks hidden—that’s the MYN standard.
Wrap Up
That’s it! Let me know in comments (click the Leave a Reply button at top left of article) how this works for you, or if you have any questions. And if you see an app update that makes any of the steps above out-of-date, let me know. I may not have noticed that a change is needed.
Michael
Michael Linenberger's Blog

- Michael Linenberger's profile
- 14 followers

