
Michael Linenberger's Blog, page 14
May 29, 2018
Using OneDrive to “Attach” Pictures and Files to Mail Messages
May 29, 2018
I know a lot of us use smartphones to take pictures, and those are easy to text or email directly from our smartphone. But I also like to take higher-res photos with a “real” camera and those are usually very large files. How do you share those? And what about other documents on your computer ? Should you just attach them to an email message in Outlook?
Using OneDrive Links
These days when I send a hi-res photo I took with my “real” camera to share with my family, I almost always send a OneDrive link rather than attaching the image file itself. My hi-res photos are so big that attaching even just a few of them as files to emails does not make sense—my email server or my recipient’s server will reject them due to size. I want to give access to full-resolution images—so a link is perfect. And I can link 10, 20, 30 images all at once with one link in one email and the links create slideshow like views of the images.
There are two ways to create and send OneDrive links in Outlook, and they work with all types of files, not just photos.
Storing Files on OneDrive
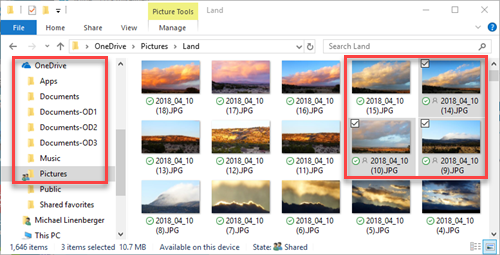
First, nearly ALL my photos and work documents get stored within a multi-layered OneDrive directory on my computer (see left side of image below) and are auto-mirrored to the OneDrive servers shortly after I create the file. It’s my daily backup solution. Setting that up is the first step, of course, and if you are not doing that now, how to set up OneDrive is described here.
Use File Explorer
After a photo session I put the camera storage chip in my computer and, using Windows File Explorer (one way to open File Explorer is to hold down the Windows Key and type E), I drag-copy all the new image files to the Pictures folder in my OneDrive directory (and I then empty and eject the camera chip from my computer). I’ve got years worth of photos on my hard drive and mirrored on OneDrive.
Then, when I want to share some pictures that are on my computer and mirrored to OneDrive I do this: with the Pictures folder open and displayed in File Explorer on my computer (see below, in Windows 10), I simply select one or more images on the right using the checkboxes.
Then I right-click any one of the selected items and choose Share a OneDrive Link from the context menu.
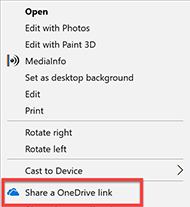
Doing that automatically creates a link to the selected files, and copies the new link to the clipboard. Then I paste that link (I use the CTRL-V keyboard shortcut) into the text of my email message and send it.
For example, below is a link to the images above taken outside my front door where I live near Santa Fe, New Mexico; feel free to click it and check out the images (if it asks you to log in just click Cancel, it will still show you the photos).
https://1drv.ms/f/s!AhuwE9tjdvhqjYlmH9-jarQmmqyf6A
Any recipient who opens the mail and clicks that link gets a OneDrive web view like you just did. They can view the images on their screen, or even download them. And they can start a slide show if multiple images were linked. (Again, you can see all that if you click the link above). This works even if the recipients don’t have a OneDrive account, so I can send it to anyone. This has replaced all my previous photo sharing apps or websites, by the way.
For Office Docs
That’s one way to do it. Another way to do this with Office 365 documents (Word, Excel, Powerpoint) is to use menus that are in the Office 365 document itself. For example, if you are in Word and want to send the file that’s open to someone, do the following (this assumes you are storing your Office docs somewhere in your local OneDrive-linked directory):
If you look in the top right of all Office 365 applications you will find a Share button. Click that and in the pane that opens at the right look at the very bottom and click the Get a Sharing Link. Then you have two choices: you can choose Create an Edit Link, which allows recipients to edit your document on your OneDrive storage (good for team collaboration when creating a team document). Or choose Create a View-Only Link, which allows recipients just to view (or download) your document. Then click Copy. Then paste that link into the text of an email message, as I described above.
Sending OneDrive links is easy and, if you are a OneDrive user, it’s the best way to share large files or a large collection of files. It’s especially good if you are using a “real” camera and constantly create large image files you want to share.
Michael


May 27, 2018
What About Outlook’s Focused Inbox?
May 27, 2018
Many of you may be seeing some labels at the top of your Outlook Inbox that say Focused and Other. This is a new feature available in the latest versions of Outlook that Microsoft is using to reduce clutter in your Inbox.
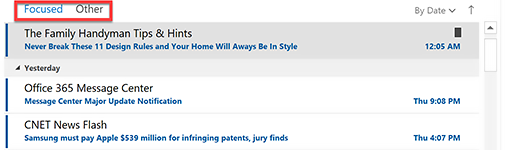
When this is turned on, Microsoft automatically moves “lower value” mail to the Other tab, thus freeing the default-selected Focused tab from that clutter. The Focused tab essentially becomes the Inbox you look at each day. And while Microsoft initially guesses at which mail should be moved, you can adjust that, somewhat, after you start using it. By the way, this replaces Microsoft’s previous method of clearing clutter: its use of the Clutter folder, which has now been deprecated (but that can still be used through 2020).
Not a Spam Filter
Note, this does not replace your Junk folder; true spam still goes there. Rather, the Other tab is for newsletters, or social media notices, or similar mail that you purposely subscribe to, but that flood your Inbox and distract you from your important mail. So mail in the Other tab is considered email you might want to read later.
Implications, Issues
As you can imagine, there are a ton of implications to using this. How does Microsoft initially decide which mail should be moved? If they get it wrong, you might miss some mail you want to see in you main Inbox (I know, I did). And while it is adjustable, those adjustments are limited to sender-name only.
Also, in your standard smartphone Mail app, all mail in both tabs is combined into your single Inbox. Most Mail apps have no visibility of Focused and Other, so your mobile device will still be cluttered. The only way to fix that is to switch to the Outlook app on your smartphone.
Because of these multiple issues, I personally favor using Outlook Rules, instead, to accomplish this sort of Inbox cleaning—Rules offer a ton more decision options. And Rules allow you to auto-move low-value mail to true Outlook folders, ones your mobile apps will recognize.
But using Focused is definitely easier than using Rules, so Focused might be your best solution to Inbox clutter if you are not ready to dig into the Rules menus.
To Learn More
If you want to consider activating Focused Inbox, or if you have it now and want to learn more, then watch Lesson 2.9 in my new Outlook Inbox Ninja video course. It shows you how to turn Focused on and off, and how to “train” it. It also shows how to use the Clutter folder or turn it off. And the entire set of videos in Section 2 of that course, nine excellent videos, teaches you all about using Outlook Rules to auto-clean your Inbox in a more powerful way than the Focused Inbox ever could.
Michael
May 25, 2018
Consider Using Outlook’s Archive Button
May 25, 2018
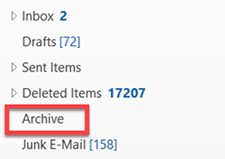
Nearly all new copies of Outlook these days (those on Windows desktop, Mac, Outlook.com, Outlook smartphone app, and Outlook on the Web) have the ability to use the Archive Button. If yours has that button, you should consider using it. It’s an excellent single-folder filing tool.
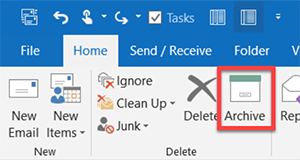
To find it, look on your Home tab next to the Delete button. Note that it’s only available in the latest Outlook versions (e.g. later releases of 2016) and with newer Exchange Server or Outlook.com servers. So if updating your copy Outlook doesn’t make it appear, sorry you are out of luck.
Easy to Use
It’s a great tool because it’s so easy to use. With any mail selected in your Inbox, just click the button (or tap the Backspace key on your keyboard), and the mail gets moved to (an automatically created) Archive folder.
You can use it just like I recommend you use the Processed Mail folder, and it can replace that folder in my MYN system.
The Archive button is also present at the top of each fully opened mail message, so you can file right from an open message, which is convenient.
Not True Archiving
It acts a lot like the Archive button in Gmail in that it simply moves the mail to a different part of your server. So like Gmail it’s not true archiving because it does not free up space on your server. But many of us these days have plenty of server space and can go years without cleaning the server.
For More Information
Lesson 1.4 in the new Outlook Inbox Ninja video course teaches you details of using the Archive button to speed up your mail processing, and many other lessons in that course show you how to integrate its use. And section 7 of that course shows you how to do true archiving in case your server does in fact fill up eventually.
So consider giving the Archive button a try.
Michael
May 8, 2018
Two New 1MTD Videos Added to Outlook Inbox Ninja Video Course
May 8, 2018
If you bought the Outlook Inbox Ninja Course I released last month, and if you bought the version that includes 1MTD Task videos, I’ve added two new videos to the 1MTD Tasks section (section 4) and they are included free with your subscription. If you bought the Outlook Inbox Ninja Course version without 1MTD tasks, then see this blog post about how to upgrade to the 1MTD tasks version for a nominal fee.
The two new videos are about extending the power of 1MTD without upgrading to MYN. The first new video, 4.9, shows how to use 1MTD to handle more tasks, and the second, 4.10, shows how to add a Target Now section to 1MTD to give you better daily focus.
Just log into your paid Ninja Course video page, and scroll down to the bottom of section 4 to watch these videos, they are in there now.
And if you have not yet purchased the new Outlook Inbox Ninja Course, think about doing now, it keeps getting better and better, so check it out.
Michael
May 6, 2018
Upgrade Your Outlook Inbox Ninja Class
May 6, 2018
If you bought the Outlook Inbox Ninja Course that I released last month, but you got the version without the 1MTD Tasks section, you can upgrade to the course version that includes the 1MTD tasks videos, for a nominal fee (slightly more than the price difference). I recently received a few requests for that, so we just added that upgrade option.
To do this, first log into your version, the one without the tasks. You need to do that to tell the system that you are eligible for that upgrade.
Then, in a new tab in the same browser, go to this link to make the upgrade.
And then, after the upgrade purchase is made, go to this link to see and use the full video set, the one with the 1MTD task videos.
Even if you already know how to use 1MTD, these videos in the full Outlook Inbox Ninja class add a number of advanced features compared to what is in the 1MTD book, so they are worth it.
Here is a full list of the 1MTD videos in that upgraded class (and more videos in that section are coming, which you’ll get free when they are added):

Michael
May 1, 2018
The “All” Menu is Gone in recent Windows Outlook 2016 Inbox Update
May 1, 2018
Almost exactly a year ago, Microsoft changed the menus at the top of the Inbox. By “menus” I mean the sorting and filtering controls right above the list of mail, but below the Ribbon menus.
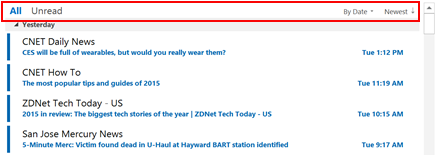
What they’d had for most of 2016 through May of 2017 was this sequence of controls/buttons that you see at the top of the image below, specifically: All; Unread; By Date; and Newest.
In May of 2017 they replaced that with simply the folder name (Inbox), and an “All” menu, as shown here:
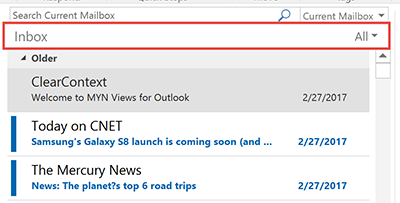
Or if your window was wider it looked like this, with Search box to right:

That new All menu on the right collected all the same menus the previous controls had, but squished them all together into one menu item. That was a lot of stuff to fit in one menu, so you needed to use submenus to get to things. I received a number of complaints from users who didn’t like the new All menu, bemoaning having to go two levels down in menus to get to the controls they previously got to in one step.
Back to the Future (menu-wise)
Well, I noticed today that in the most recent monthly Outlook 2016 build update (Version 1804, Build 9226.2114), Microsoft has reverted back to almost the exact same design as a year ago. Here’s a recent screenshot of the new look:

You can see the only difference from a year ago is the sorting direction arrow on the far right—it now has no label since the arrow is now the control. But otherwise we are back to the old design. And the folder name Inbox is gone, as it was a year ago.
I can’t say I really care one way or the other, but probably prefer the new resumed old look. It gives me quicker access to sorting controls. And I don’t need an Inbox label. However these flip-flopping changes make documenting Outlook in books and videos (my self-assigned job) a bit of a moving target. Let’s hope Microsoft sticks with one design for a while!
Michael
April 18, 2018
Announcing Release of my New Video Course “Outlook Inbox Ninja”
Apr 18, 2018
Today I released my new 45-lesson video set called “Outlook Inbox Ninja.” I’ve been working on this course for over 6 months. It’s a collection of Windows Outlook best practices presented in live and screen capture videos that together enable you to near-empty your Inbox every day.

Now, one might say that the goal of the MYN System is also to do that: empty the Inbox. But in the MYN system the focus was primarily on task management, not as much on Inbox management. While email practices were addressed in MYN, I felt there was more depth needed for those email solutions. And a number of MYN users still had trouble getting their Inbox empty.
So this new Inbox Ninja course provides that depth. For example there are nine video lessons about Outlook rules—quite a deep dive. Similarly, there are six lessons on Outlook Search (and Search Folders). And lot’s of depth on email filing too. Everything here is a deep dive.
Ninja Scan
And the primary really new thing is the focus on something I call the “Ninja Scan,” which is a method of quickly scanning your inbox to empty it briskly, in one quick sitting.
The idea is that the course participant will learn how to, at least once a day, do a complete and focussed scan of the Inbox to keep it well-managed. I provide a step-by-step approach of grouping your mail by several different dimensions to quickly clean and process it. And the course participant will become an expert at setting up Outlook Rules to prefilter much of the mail before that scan.
Good Next Course for MYN Users
So anyone who took my MYN training will find mostly new material here—they will find a nice next-step of training. It will take them to the next level.
Good For New Users Too
If someone has no task system in place, I provide 5 videos on how to do the One Minute To-Do list, and it’s my best video presentation yet on that topic. (But MYN users who don’t need to learn a task system can opt for a reduced price version of the video course that skips those lessons).
In my mind, this is probably the most comprehensive video course I’ve ever created about Windows Outlook. It is complete and thorough and very helpful.
On launch day (today, April 18) I am giving a $30 discount off the course so act now if you think you might be interested.
Michael
March 13, 2018
Personal To-Dos in Work List?
Mar 13, 2018
A lot of people ask me “should I put personal items along with my work items on my single MYN/1MTD task list, or should I separate them into two lists”?
It Depends, but Yes!
This is an individual decision, but I generally do encourage mixing business and personal items on the same list, to a degree. It’s often the only way to accomplish things. For example, many personal calls can and must be made during the day at work because the office hours of those you are calling stops at 5:00, like a dentist office, a car shop, and so on.
Also, critical personal items that come up on short notice should go into your Critical Now list for today even at work. For example, your babysitter for tonight cancels at noon and you need to find another.
Similarly, you might want to think ahead about your ride home from work to do some errands. Listing those commute-back errands on your main list helps you prep for that. So yes, seeing some of those along with your other important work items helps you get them done.
What About a Separate List?
You might think why not just put those on a separate “personal” list? Isn’t your work list what you should work on while at work, shouldn’t you make that a priority?
Well, the urgency zones in the MYN and 1MTD systems take care of priority. If most work things on your list are more important than the personal ones, you’ll raise those to the top. But if attending to a personal item during the day becomes more critical than other work items, it deserves to be at the top of your critical list.
Also, unless you have a large number of personal items to do from work every day, you won’t look at a separate personal list throughout the workday—and you’ll miss those items that need attention during the day. It’s always better to have one list to refer to throughout the day.
Separate Weekend Chores
The key when doing this, though, is to not overload the workday list with all your personal items, especially weekend chore items and the like—things you don’t need to think about during the workday. Those, yes, keep separate and refer to them on Saturday morning. I use OneNote to list and plan out weekend projects and similar. But if you need to stop at Home Depot for a home project item on your way home from work, move just that item to your main daily list, not the whole project plan. So, only put things on the workday list that you might need to do or plan from the perch of your workday.
A Home-Based Business is Different
Now, if you own your own home-based business, and that’s your main work activity and location, and so during the day you constantly intermingle home and business activities, then absolutely, list everything in your single list: all personal and work items. There’s no reason not to mix the whole list if you consistently mix the time spent on them. Just prioritize them right using the urgency zones and their relative positions within those zones.
Keep to Limits
But there are limits because MYN and 1MTD users have numerical maximums for the top two urgency zones: five items max in the Critical Now section and 20 items max in the opportunity now section. You should stick with those limits. I talk about ways to keep your to-do list short here and here, but one way applicable to personal items is to combine multiple entries that are done together into a single task entry. For example, you wouldn’t want to put all the individual items of your grocery list onto your MYN or 1MTD task list, doing that would overwhelm the list and not be helpful. Rather, I would put one item in the list that says Go Grocery Shopping After Work. Then put the individual grocery shopping items in the notes section of that task. Perhaps you can see that notes section in the store in a mobile task app. If not, then transfer or print it to a paper grocery list that you can carry into the store.
OneNote as a Shopping List Tool
However, for shopping lists, the best solution is to use OneNote—OneNote is fantastic for such lists. I use it daily on my iPhone and it works great. It’s easy to add to through the day as you think of things, and it’s easy to take it with you to the store where you can check off items in the store as you put them in the cart. Best of all it’s easy to restudy previously checked-off items from your previous trips to see if you need to restock them. So you’ll still have an entry on your work list that says Go Grocery Shopping After Work but you’ll use OneNote to list the actual items. I have a new video on how to use OneNote for shopping lists here.
Conclusion
As you see, I think it’s fine to put some, or all, of your personal to-do’s on your single workplace task list, as appropriate for your situation. Especially if they are things you’ll need to attend to during the workday. A single list is always the best way to prioritize and manage urgencies throughout the day.
OneNote for Shopping Lists (Video)
March 13, 2018
A few years ago I wrote a blog saying OneNote makes a great shopping list tool, and I used the iPhone app as the example. Since then the OneNote iPhone App has changed its design a lot so this is an update to that post using the latest iPhone app in a video. The Android app should work similar (but let me know!).
February 12, 2018
Reviving your Neglected Outlook To-Do List
Feb 12, 2018
For those of you who have used my 1MTD or MYN task list systems in Outlook, a number of you may have seen the Outlook task list get out of hand as it exploded in size. Perhaps it even got so out of control that you’ve switched back to paper for your daily to-do list. If so, here are some quick steps to get that neglected Outlook task list cleaned up and restarted, all in just a few moments.
By the way, it’s easy for any automated task list to get out of hand. The number-one cause is accumulating too many tasks in the list. Since any computerized list saves everything you write down, it overflows fast, even when most of those tasks have lost relative importance long ago. When the list is huge, you will stop trusting it and give up. At least with paper you can start a new list each day, focusing only on current items, and doing that cleans it. Not so with computerized task lists; if you don’t remove or hide or deprioritize old tasks, your lists will just keep expanding.
The good news is that you can quickly clean the 1MTD and MYN Outlook list too and recover its many advantages. Here’s how.
First, let’s review the simple 1MTD and MYN task rules and how they map to Outlook’s high, normal, and low task priority sections. The urgency of each of the sections are respectively: absolutely due today, due in 1 to 10 days, and due beyond 10 days. The size limits of each are respectively: 5 items, 20 items, and unlimited. And the review cycles of each are respectively: once an hour, once a day, and once a week.
Okay, with that rules review done, let’s clean your list up in 3 steps:
Step 1: Force-Clean the Critical Now Section
Start with the Critical Now (high) section. You’ve probably got way more than 5 items there, so identify which items absolutely must be done today and move the rest down to the top of the Opportunity Now (normal) section. Get the Critical (high) list down to 5 or fewer. Be ruthless and do this quickly. It’s even okay if it’s at zero items. Don’t worry about losing those excess items into the overflowing normal section, we’ll get to that next. And now stay serious about the rule “absolutely due today” for that section.
Step 2: Prioritize Top of Opportunity Now
Next, and this is a key point, in the normal or Opportunity Now section, which probably has way more than the 20-item limit, perhaps hundreds, here’s a shortcut. Don’t try to clean the whole thing quite yet, that may feel overwhelming. Instead just clean and prioritize the top of it. What I mean is, starting at the top, scan down the list and move say 5 or 6 or more items you really want to do today or soon to the very top of the normal list forcing the others lower. With basic 1MTD settings (with the Windows Outlook To-Do Bar simply sorted by Importance), that means dragging the items to the top of the section. With MYN settings that means setting the start date of those items to today, which if your MYN settings are correct, will force them to the top of the normal section and in Windows underline them.
(MYN users only: If that sorting does not work anymore, try clicking the label at the top of the start date column. If that does not work, review chapter 3 of the Outlook book to get sorting reset. Or, perhaps install the MYN Views software. And MYN users may want to reread chapter 4 of the book to understand start-date sorting. Or watch lessons 7 and #11b in the MYN video course. Lesson 8 in that course shows how to make the MYN settings.)
Step 3: Treat these like Paper
If you had switched to a daily paper task list, think of these two sections—the high and the top-of-the-normal section—as your paper list that you create each day. This is your working “must consider today” list. From now on use it like that, and keep it up to date, keep it fluid. Adjust it a lot. Transfer key items from any other lists back to Outlook into the high and top-of-the-normal sections. Just ignore the old items lower in the Outlook list for now. Focusing on the top like this will pull you back into using the Outlook task list and you can benefit from all its advantages (like easy converting of emails into tasks). Use it like that for a few days to get your use of Outlook tasks reinstated.
Later Clean Ups
Then, when and if you have time in the days ahead, clean up the bottom of the normal priority section and get the whole section down to about 20 items again. Bite the bullet and delete as many as these old tasks you can. For those tasks you can’t delete, drag the relatively unimportant ones down into the Over-the-Horizon (low priority) section until the normal section is down to 20 again. Feel free to overload that low priority section for now—consider it a storage area for old tasks you can’t let go of yet.
And don’t fret if you cannot do this deeper cleaning right away. Completely cleaning this all up soon is not crucial; rather, doing the above steps 1-3 is enough to get you going again. But if and when you do get all of the normal section cleaned and down to 20 items, start reviewing that entire list once a day, and keep it clean.
And finally, MYN users, if you have an overflowing low priority section (Over-the-Horizon), when you have 30-minutes or so in the week ahead, try to implement Defer-to-Review in that low section. That will get it cleaned up.
1MTD users, if the low section has more than 75 items and you can’t delete the excess, consider switching to the MYN system and using Defer-to-Review. That will get your list under control.
Michael
Michael Linenberger's Blog

- Michael Linenberger's profile
- 14 followers

