Shawna Coronado's Blog, page 8
December 19, 2018
A Breakfast Culinary Video Recipe – Mexican Huevos Motulenos (Eggs With Tortillas, Beans, Ham, and Vegetables)

The regional Mexican cuisine culinary series continues with Chef Carlos Capistrans’ amazing version of Huevos Motulenos from the Lol-Ha Restaurant. Watch the video to see how we make this delicious and satisfying breakfast together in Akumal, Mexico. It features peas as a topper.

Enjoy this dish – it costs under $10 to prepare for a family of four and I plan to prepare it when the peas are plucked fresh from the garden in the spring.
Happy Breakfast!
HOW TO MAKE CHEF CARLOS’ VERSION OF HUEVOS MOTULEÑOS
Ingredients:
Refried beans – 3 oz
One fried corn tortilla
Two eggs cooked to preference
Ranchero sauce – 3 oz
Diced ham – 1 oz
Shredded mozzarella or queso fresco cheese
Peas – 1 oz
Preparation:
Place the refried beans on the plate and top with the fried tortilla.
Cook the eggs to preference, place on top of the tortilla.
Add ranchero sauce.
Top with ham, cheese, and peas.
Serve.
*Note – Because the FTC requires it, I am noting that the Mayan Riviera Tourism, Hotel Akumal Caribe, Villa Akumal, and Akumal Guide Mexicarte sponsored the trip back in 2011. I was not told what to document or how to document the experience, we were simply asked to attend and film – anything expressed in posts related to the activities is my own opinion expressed from my own personal experience.
The post A Breakfast Culinary Video Recipe – Mexican Huevos Motulenos (Eggs With Tortillas, Beans, Ham, and Vegetables) appeared first on Shawna Coronado.


October 25, 2018
Best Mexican Pozole Soup Recipe; How To Cook Hominy, Onion, Tomato and Pork Soup

Cold? Me too – time for some a delicious re-visit to one of my favorite posts. How to make a yummy fall Mexican pazole soup.
~ ~ ~ ~ ~
Want the perfect recipe to feed a whole family which costs $10 or less for the meal? Pozole soup made with Chef Carlos Capistran from the Lol-Ha Restaurant. Above is a video we made showing how to cook up this delicious soup. We made this regional soup while on the beach in Akumal, Mexico while watching vacationers walk by with margaritas in their hands. Love it!
This inexpensive, yet rich tasting dish is a healthy example of Mexican home cooking – something mothers have prepared for their families for generations. If you use your own home grown vegetables in the dish it is far less than $10 per meal to cook. Of all the dishes I prepared with Chef Capistran, this is my all time favorite – it is filled with home cooked love and is topped with cilantro, radish, onion, chips, and more (see in the above photo) – what a fresh summer vegetable delight!

~~~
HOW TO MAKE POZOLE (Hominy and Pork) SOUP
Ingredients:
Pork tenderloin,
White onion, one sliced thin
Tomato, one, sliced thin
Garlic, whole, 2 oz.
White pozole (hominy), one can – drained.
Guajillo dried pepper, one or two (can be found in Mexican grocer)
Cilantro, handful, torn
Oregano, 1 Tablespoon
Cloves, 3
Water, one gallon
Oil, 2 oz.
Salt and Pepper to taste
Toppings –
Fried tortilla strips
Chopped cabbage
Chopped radishes
Chopped cilantro
Diced red onions
Lime juice
Tabasco sauce
Preparation:
Heat oil in a very hot sauté pan (or large pot), sear the pork.
Add onions, tomatoes, cilantro, oregano, cloves,and dried peppers, cooking for an additional 5 to 10 minutes.
Add garlic, cook for 2 minutes.
Transfer everything into a large pot.
Add water and cook for about 20 to 25 minutes until the pork is cooked completely.
Remove the pork, set aside to rest.
Transfer everything else into a blender or food processor, except the cloves, and puree.
Place puree mixture back in pot and continue to heat.
Shred the pork and set aside.
Add the white pozole (hominy) to the liquid mixture, cook until heated through.
Salt and pepper to taste.
To serve –
Place a portion of shredded pork in a bowl, pour the hot pureed soup over the top, then serve the toppings on the side so the guests can add the toppings themselves to the soup.
~~~
*Note – Because the FTC requires it, I am noting that the Mayan Riviera Tourism, Hotel Akumal Caribe, Villa Akumal, and Akumal Guide Mexicarte sponsored this experience. I was not told what to document or how to document the experience – anything expressed in posts related to the activities is my own opinion expressed from my own experience.
The post Best Mexican Pozole Soup Recipe; How To Cook Hominy, Onion, Tomato and Pork Soup appeared first on Shawna Coronado.
October 23, 2018
Plant Fall Blooming Aster Flowers

Asters are daisy-like flowers named after the Greek word for “star.” When blooming, its stems seem almost invisible, making each flower seem to float star-like above the rest of the bed. There are spring- and summer-blooming aster varieties; however, the most popular varieties in garden centers are typically fall-blooming. During the bloom season, an aster can bring a remarkable amount of color and personality to a perennial border which might be ebbing in its growth and browning up for the year. Growth habits vary from compact mounds to larger perennials nearly 5 feet wide. Asters look surprisingly unattractive until they bloom, something like green sticks with tiny buds. But when cool weather hits, the flowers explode like colorful fireworks show. Below is an excerpt from the Illinois Getting Started Garden Guide which can help you get started with this beautiful late fall bloomer.
Botanical name — Aster spp.
Bloom Period and Seasonal Color — Fall to late fall; white, blue, lavender, and pink flowers (last to bloom in my Midwestern garden – late October)
Mature Height × Spread — 1 to 3 feet × 1 to 5 feet (variable)
Added Benefits – Attracts Beneficial Insects
Sun Requirements – Sun, Part Sun, Part Shade
When, Where, and How to Plant – Asters do well in normal to clay soil, are drought tolerant, and look marvelous naturalized, particularly along a woodland border. Plant in full sun whenever possible, though the plant does well in part sun conditions. When planting, mix into the soil organic matter such as rotted leaf compost or composted manure to keep this long-lived plant happy. Richer soils will produce taller plants that occasionally grow beyond the predicted height and spread.
Growing Tips – Fertilize rarely as over-fertilization results in a large floppy plant. If you get less than 1 inch of rain per week, you should supplement with additional water. Some asters are quite sensitive to water issues; too little or too much water can result in lower leaf drop and less flowering. Consistent watering provides a better environment for your aster plants.
Regional Advice and Care – Asters are susceptible to powdery mildew, so they should be watered at the base of the plant in the morning whenever possible and allowed to dry out before evening. Divide the plants in the spring every three years or so. Tall asters can benefit from staking. Pinching the plants back until the first of July will keep the plant more compact.
Companion Planting and Design – Understand the growing nature of your aster before you plant it so that you know where it might fit best within your garden beds. For example, if it is a dwarf cultivar, it will do well planted as an edger along the front of the border. If it is a taller aster, plant at the back of the border. Asters look fantastic as a companion plant in front of artemisia and goldenrod. Try mixing asters in with ornamental grasses for a shot of amazing color during bloom time.
Try These – Aster oblongifolius ‘October Skies’ is a powerhouse in the late fall and my absolute favorite, blooming through October when the other plants have gone to sleep. A. amellus ‘King George’ has extra-large violet-blue flowers that make a big impact in the fall garden. A. novi-belgii ‘Bonningdale White’ is a remarkably hardy white variety.
Want to learn how to grow all types of plants, particularly in the Midwest? Please get my book, the Illinois Getting Started Garden Guide.

The post Plant Fall Blooming Aster Flowers appeared first on Shawna Coronado.
September 29, 2018
Designing and Blacksmithing a Garden Tool at DeWit Tools in the Netherlands

BLAST FROM THE PAST POST — This post was created 6 years ago when I went to visit the Netherlands and met up with a wonderful team of blacksmiths at the Dewit Tool factory. I wanted to share it again with you because blacksmithing is an important part of gardening we rarely hear about, yet is essential to our gardens. Love the adventure too – I plan to have more. Happy day my friends!
= = = = = = = = = =
What if you could go to a blacksmith, order up the perfect forged garden tool designed to your specifications, and then help make it yourself?
Guess what? I DID THAT! ::jumping up and down with excitement::
This summer I traveled to the Netherlands to visit the Floriade and lecture. While I was there Sietse DeWit, CEO from Dewit Tools, invited me to his blacksmithing factory in Kornhorn, Netherlands so I could experience what it would be like to forge my own garden tool.
One of my complaints about garden trowels is that the soil spills out of the trowel whenever I’m planting my containers. My idea for a new trowel design was to build a rounded trowel – almost a scoop – with a sharp side for cutting the plastic bags of potting soil open, and a sharpened bottom edge to cut old soil out of containers (see photo below). The DeWit’s loved the idea and I was able to work in the factory with the team to develop the prototype tool.
What took me by surprise was that each step in the process involved such attention to detail and such care. It took us four hours to build the prototype from beginning to end. To the DeWit’s, these tools are MORE than tools; they are an investment in the DeWit family. Read below to learn of the entire process for making this special tool and watch the video to see what it sounded like to be there (if you can’t see the video because this is an email, simply click through to the link and come live to my website so you can watch it).

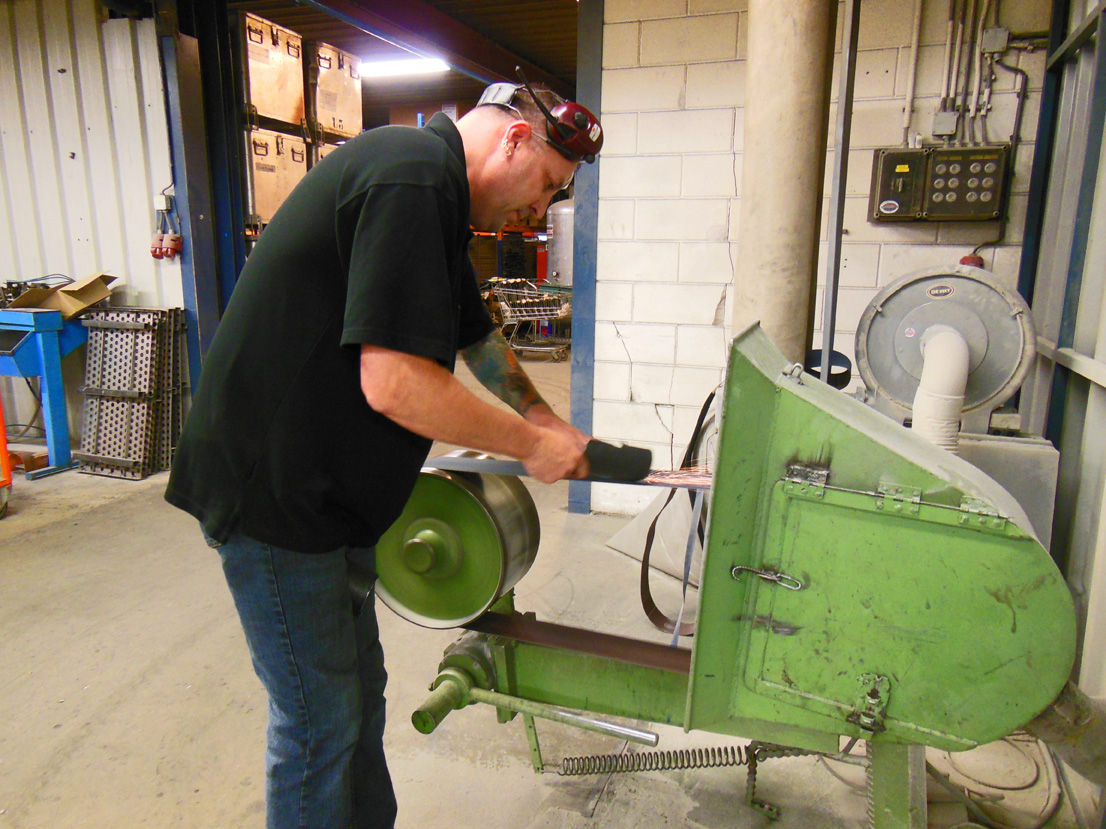
~~~ HOW TO FORGE A DEWIT ‘SHAWNA TROWEL’ ~~~

Building a prototype trowel starts with designing the tool on the computer. Above you see Derk Klaus Dewit designing with me and his uncle, Derk Dewit, supervising (yes, there are two Derk’s).
Once the design is entered into the computer, a machine cuts the heavy metal into the scoop trowel shapes (below). They are flat at this stage and will need to be forged and worked more to be shaped in a curve.


Above I am pushing a button for a giant welding machine to weld the flat metal trowel pieces to the metal handle. Yes. I am happy. This is fun!!
Next, the trowels have to go into a super hot blacksmithing forge. This forge is extremely hot. Even if you stand within three feet of the forge it feels like all the power of the sun is directed at your face. I swear my eyebrows were singed off! I have immense respect for the workers who have to stand at the forge all day long. It saps your strength and would be a difficult job.


 You see a series of two photos above which show me taking the heated flat trowel piece, placing it in a giant smashing machine (that’s a technical term) and smashing the seam together in a reinforcement process.
Once that process is done it must be shaped into a curve shape. The tool is heated and while the blade is red-hot it is then placed in a special mold, squished into shape, removed and cooled in water. Below you see me removing the tool and cooling it in the water.


Back and forth the trowel goes from the hot forge to blacksmith to anvil for the many steps it takes to forge a garden tool. After the seam is reinforced, it goes to a blacksmith so he can shape the handle (see above photos). Once again, the tool has to be heated, then the handle hammered into shape with a delicate touch this time. After even more shaping, the blacksmith sharpens the end of the tool (below). Finally, the wooden portion of the handle is installed and custom laser labeled (see bottom).
That’s the end of an absolutely wonderful tool building adventure. Making your own tool from scratch is amazing fun and learning how much care and love goes into every tool at the DeWit factory makes me appreciate using them and taking care of them all the more. I cannot wait to get out to the garden!


Special Note – Because the FTC requires it, I am letting you know that the factory tour in the Netherlands and the tool building experience were sponsored by DeWit Tools. I have used their products because I WOULD even if they had not given the products to me because I like them and trust them. All opinions are my own!
The post Designing and Blacksmithing a Garden Tool at DeWit Tools in the Netherlands appeared first on Shawna Coronado.
September 26, 2018
Cochinita Pibil Pork Recipe Mayan Style

Shawna Coronado in Akumal, Mexico learning how to cook a pig by burying it underground.
One of my favorite NatGeo-style adventures was visiting Akumal, Mexico to learn how to bury a pig Mayan style and roast it slowly underground to prepare Cochinita Pibil. If you are able to try something this adventurous and wonderful in your part of the world for a family – or neighborhood – dinner adventure, I highly recommend it. Without a doubt this was the most delicious pork recipe I have EVER eaten.
If you like, you can bury the pork like we have done in the video or you can prepare it in the oven using the recipe below. It’s not the precise recipe made in the video, but close. Be sure to remember this recipe needs to be marinated overnight, so must be made ahead of time.
Cochinita Pibil is traditionally served with corn or flour tortillas warmed over the stove, and salsa – onion salsa is a particularly wonderful topping. Confession: I am drooling just thinking about this recipe. YUM!

HOW TO MAKE COCHINITA PIBIL (THE BEST DARNED PORK EVER)
Ingredients:
Boneless Lean Pork – 4 pounds
Achiote Paste – 3 oz (you can find this at a Mexican grocery store)
Lime Juice – 1/2 Cup
Orange Juice – 3/4 Cup
Salt – 2 heaping teaspoons
Two large banana leaves or a large baking dish that you can cover.
Preparations:
Stir the achiote paste, juices, and salt together in a large bowl.
Cut the meat into bite sized pieces, mix it with the achiote mixture and set it in the refrigerator overnight to marinade.
Preheat the over to 325 F.
Hold the banana leaves directly over the flame on the stove until they soften, but do not burn. Line a large baking dish with the leaves.
Place the pork and all the marinade inside the dish on top of the leaves. Cover with a lid or with foil.
Bake for two hours. The meat should be tender and falling apart – if it is not, then bake for another 30 minutes.
Enjoy the buried pork recipe – perhaps Cochinita Pibil – pork Mayan style – will be a new family tradition?
The post Cochinita Pibil Pork Recipe Mayan Style appeared first on Shawna Coronado.
September 10, 2018
Hardy Ice Plant or Delosperma is a Perfect Rock Garden Plant
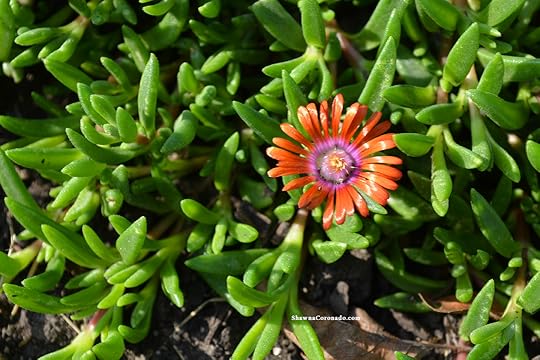
One of the newest fun plants that make a perfect rock garden plant is Delosperma Fire Spinner®. This plant is remarkably heat and drought tolerant and a first choice for water-wise landscapes. Delosperma does very well in containers, on hillsides, and in rock gardens. I love love love the unusual flower color, which is a bold orange with a ring of pink that blends out to magenta. It’s white eye is small, but with all that color in the blossom you are immediately drawn down to look closely at the prolific blooms. Foliage is very succulent like; swollen green leaves with ground cover spreading power.
My Delosperma Fire Spinner® bloomed the first year only once, but in future years I’ll expect an initial bloom with sporadic reblooming throughout summer and early fall. Now is a great time to plant this delightful ground cover as it should over-winter nicely in zones 5 through 9, getting well established over winter and early spring and making a big splash next garden season. This truly makes a spectacular addition to your garden and I placed mine as a ground cover in order to hold soil in place near my sidewalk.

Special thanks to Walters Gardens for providing these delightful Delosperma Fire Spinner® plants – they have been a great easy drought tolerant addition to my garden.

The post Hardy Ice Plant or Delosperma is a Perfect Rock Garden Plant appeared first on Shawna Coronado.
September 3, 2018
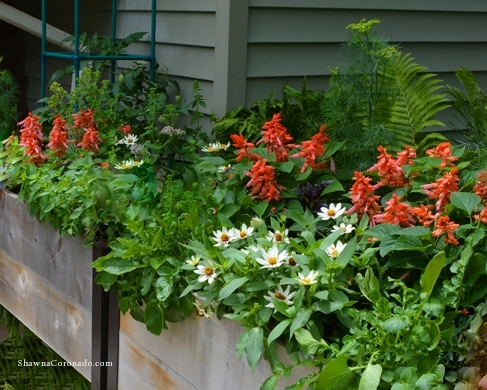
How to Plant a Small Perennial Pollinator Garden
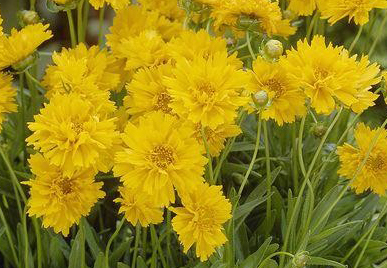

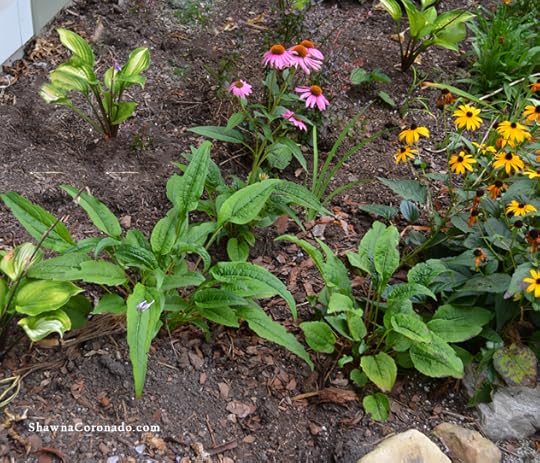
Having a large space is not a requirement in order to plant a perennial pollinator garden. Planting a small urban perennial bed is easy to do and might encourage more pollinators such as bees and butterflies to come into your community. Native plants are a good choice because they have lower watering requirements and, of course, native plants support native pollinators. In this design you will see easy-to-grow perennials that are drought tolerant; Coreopsis ‘Early Sunrise’ (above), Coreopsis ‘Sunfire’, and Echinacea ‘PowWow Wildberry’ (right).
Keep in mind that perennials (below) take a few years to develop, but will soon fill in to be a gorgeous little bed. Watch this short video sponsored by the Wave Petunia company and learn how to plant these perennial plants in your small garden bed.
Video here – https://youtu.be/MGVq7zUq7qM
Special thanks to Wave Petunias for providing the herbs, vegetables, and flowers used in this How to Plant a Small Perennial Pollinator Garden video. Visit www.wave-rave.com to learn more.
The post How to Plant a Small Perennial Pollinator Garden appeared first on Shawna Coronado.
August 20, 2018
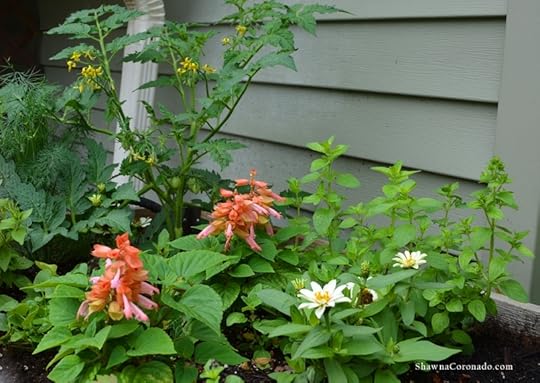
How to Prevent Herbs from Bolting in the Garden
Herbs bolt about this time in our summer gardens. Bolting is the process whereby plants move from flower production into seed production. When herbs and vegetables bolt they sometimes lose or change flavor, the stems get long or gangling, and the plant will begin to slowly lose production. While you cannot permanently prevent bolting, there are some tips to help you keep your herb or vegetable plants in production for a longer period of time.
Plants in this garden include:
Salvia ‘Vista Salmon’
Wave Petunia ‘Easy Wave White’
Zinnia ‘Zahara Starlight Rose’
Basil ‘Purple Ruffles’
Basil ‘Dolce Fresca’
Cress ‘Simply Salad’
Dill ‘SimplyHerbs’
Oregano ‘SimplyHerbs’
Watch this quick video sponsored by the Wave Petunia company and learn how you can help prevent your herbs from bolting.
Video here – https://youtu.be/luy-PA6H8CU
Special thanks to Wave Petunias for providing the herbs, vegetables, and flowers used in this How to Prevent Herbs from Bolting in the Garden video. Visit www.wave-rave.com to learn more.
The post How to Prevent Herbs from Bolting in the Garden appeared first on Shawna Coronado.
August 17, 2018
Easiest Way to Grow Sprouts in Your Kitchen
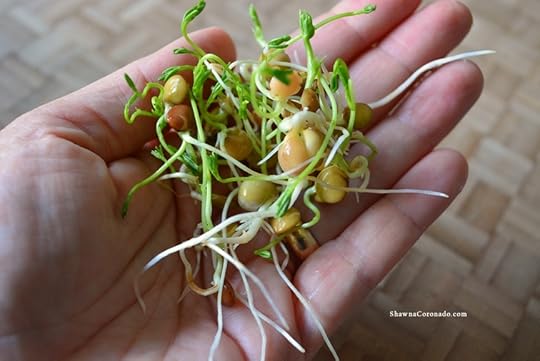
It’s late summer in my garden and frankly – it’s so danged hot and dry! A great way to get your garden on at this time of year is to grow your very own sprouts INSIDE your home. No sweat or weeding required. Of course, you can grow this way anytime of the year you prefer, but I find sprouts particularly refreshing on a summer salad, so highly recommend growth them right now.
Sprouts are actually germinated seeds, which means the tiny seed is pushing out it’s stem. The benefit of consuming the little cuties is that they are densely packed with nutrition – fiber, vitamins, and protein for a start. Perfect for an anti-inflammatory diet if you have chronic pain, diabetes, arthritis, or another inflammatory condition. When you’re consuming sprouts, you are consuming little plant stems. Growing sprouts is super easy and requires very little light and no fertilization in order to grow.
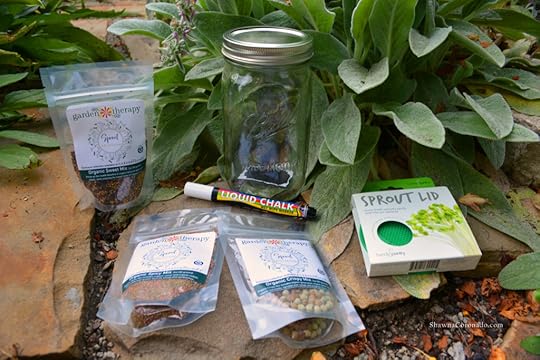
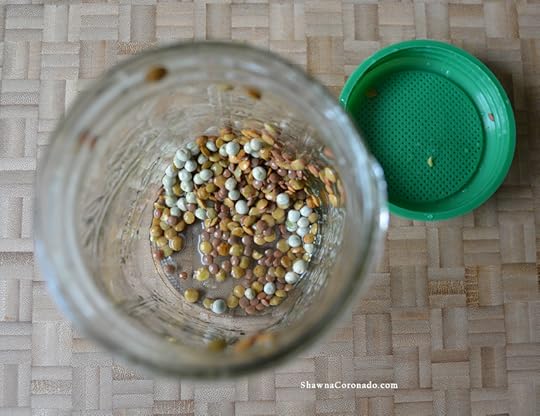
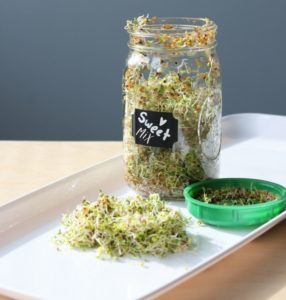
My friend Stephanie Rose from Garden Therapy has developed a line of delicious sprouts – a Crispy Mix, Sweet Mix, and Spicy Mix and it’s all included in the super cool Mason Jar Sprouts Kit she sent me so I could give it a looksee. My review is a definite two green thumbs up! There’s no bleaching or extra processes, which I’ve had to do with other seeds in the past, therefore I found it to be an easy way to grow sprouts. I particularly like the little chalkboard label you can attach (see below) so you can put a label on front easily.
Easy Peasy Instructions for Growing Sprouts
 Using the mason jar with special straining lid, wash the jar, then fill 1/4 way with seeds. Add a few inches of water, put the lid back on, swirl around to wash, then drain.
Refill the jar with 3 inches of warm water and let it soak overnight (8-12 hours).
Strain the water off, then refill with fresh water and give it a swirl, then DRAIN IT THOROUGHLY.
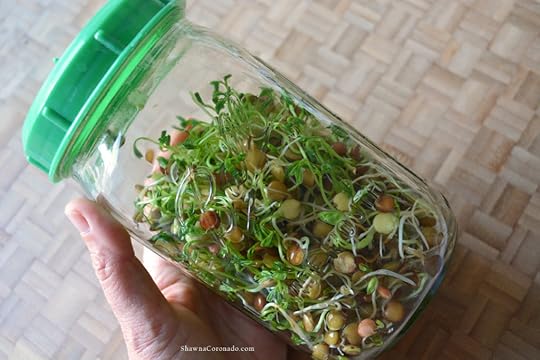
Rinse and strain the seeds like this – once in the morning and another time in the evening – until sprouts are ready to eat.
Harvest time is between 3 and 7 days.
It is particularly important to rinse your sprouts twice a day because bacteria and molds can form if you do not keep the sprouts clean and happy. You can store the sprouts for several days in the fridge.
Stephanie says, “I’ve been sprouting for more than 10 years and based on how easy they are to grow and how much I love the flavor of them, I have mixed seeds to come up with blended recipes that are my favs! Sprouts can pack a lot of flavor and texture, not to mention nutrition. The three sprouts that come in the kit are described for their flavor: crispy mix is great for salads and soups to add some crunch, spicy mix is yummy on eggs and meat as it has the bite of fresh radish, and the sweet mix I almost called nutrition mix because is is power packed with alfalfa broccoli and clover.”
This is by far the easiest way to grow sprouts in your kitchen – simple with no-tech needed and all organic. If you would like to order your very own sprout kit, you can go here on the Garden Therapy website – https://gardentherapy.ca/product/mason-jar-sprouts-kit. Special thanks to Stephanie Rose for sending out the kit and letting me try out this fun way to grow indoors during the hot summer!
The post Easiest Way to Grow Sprouts in Your Kitchen appeared first on Shawna Coronado.
August 6, 2018
How to Prune the Wave Petunia
One of the terrific things about the Wave Petunia is that it requires very little maintenance there are no complex cutting procedures, for instance, if you want to trim back the petunia itself. Cut mercilessly and with vigor. The results will be more waves of flowers and a beautiful display.
Watch this quick video sponsored by the Wave Petunia company and learn how to easily prune the Wave Petunia. It’s easy. It’s simple. It’s wonderful.
Video here – https://youtu.be/03Wjxo2DmCY
Special thanks to the Wave Petunia company for providing the herbs, vegetables, and flowers used in this How to Prune the Wave Petunia video and the photos on this page. Visit www.wave-rave.com to learn more. Thanks to Organic Mechanics Soil for the worm casting filled organic soil.
The post How to Prune the Wave Petunia appeared first on Shawna Coronado.