Shawna Coronado's Blog, page 6
April 6, 2020
How to Stretch Out COVID19 Coronavirus Ration Series – Grow Sprouts in Your Kitchen
THIS FLASHBACK POST IS ON HOW TO GROW SPROUTS — Sprouts are easy to grow inside your house and if you are looking to supplement your COVID-19 / Coronavirus food rations, sprouts are nutritionally sound. Here’s a quick guide on how easy they are to create in your kitchen.
~~~~~~~~~
A great way to get your garden on at this time of year is to grow your very own sprouts INSIDE your home. No sweat or weeding required. Of course, you can grow this way anytime of the year you prefer, but I find sprouts particularly refreshing on a summer salad, so highly recommend growth them right now.
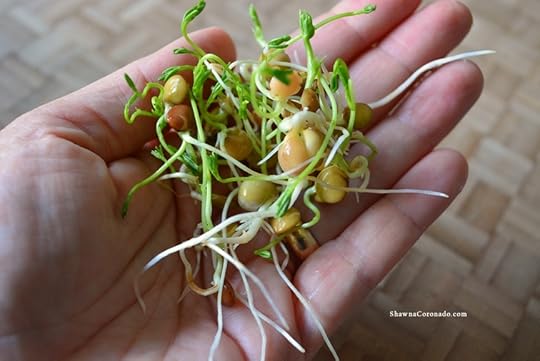
Sprouts are actually germinated seeds, which means the tiny seed is pushing out it’s stem. The benefit of consuming the little cuties is that they are densely packed with nutrition – fiber, vitamins, and protein for a start. Perfect for an anti-inflammatory diet if you have chronic pain, diabetes, arthritis, or another inflammatory condition. When you’re consuming sprouts, you are consuming little plant stems. Growing sprouts is super easy and requires very little light and no fertilization in order to grow.
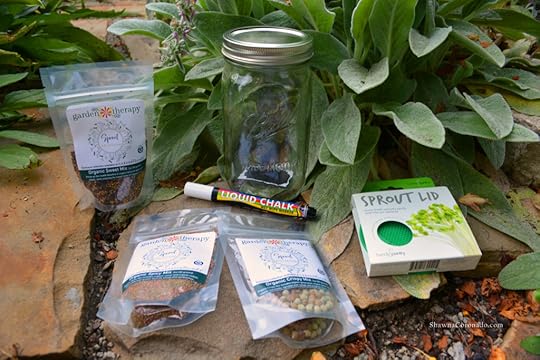
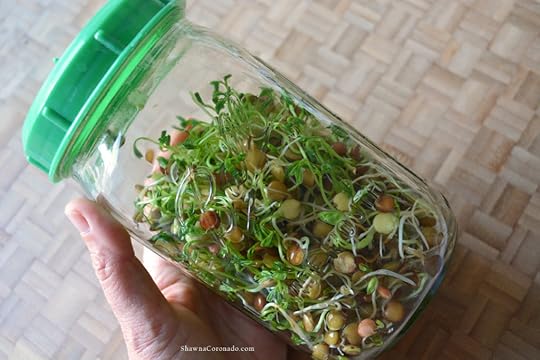
My friend Stephanie Rose from Garden Therapy has developed a line of delicious sprouts – a Crispy Mix, Sweet Mix, and Spicy Mix and it’s all included in the super cool Mason Jar Sprouts Kit she sent me so I could give it a looksee. My review is a definite two green thumbs up! There’s no bleaching or extra processes, which I’ve had to do with other seeds in the past, therefore I found it to be an easy way to grow sprouts. I particularly like the little chalkboard label you can attach (see below) so you can put a label on front easily.
Easy Peasy Instructions for Growing Sprouts
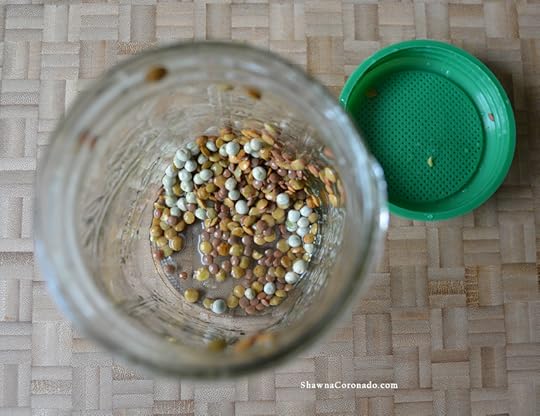
 Using the mason jar with special straining lid, wash the jar, then fill 1/4 way with seeds. Add a few inches of water, put the lid back on, swirl around to wash, then drain.
Refill the jar with 3 inches of warm water and let it soak overnight (8-12 hours).
Strain the water off, then refill with fresh water and give it a swirl, then DRAIN IT THOROUGHLY.
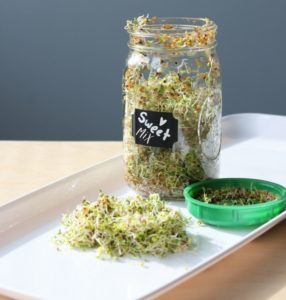
Rinse and strain the seeds like this – once in the morning and another time in the evening – until sprouts are ready to eat.
Harvest time is between 3 and 7 days.
It is particularly important to rinse your sprouts twice a day because bacteria and molds can form if you do not keep the sprouts clean and happy. You can store the sprouts for several days in the fridge.
Stephanie says, “I’ve been sprouting for more than 10 years and based on how easy they are to grow and how much I love the flavor of them, I have mixed seeds to come up with blended recipes that are my favs! Sprouts can pack a lot of flavor and texture, not to mention nutrition. The three sprouts that come in the kit are described for their flavor: crispy mix is great for salads and soups to add some crunch, spicy mix is yummy on eggs and meat as it has the bite of fresh radish, and the sweet mix I almost called nutrition mix because is is power packed with alfalfa broccoli and clover.”
This is by far the easiest way to grow sprouts in your kitchen – simple with no-tech needed and all organic. If you would like to order your very own sprout kit, you can go here on the Garden Therapy website – https://gardentherapy.ca/product/mason-jar-sprouts-kit. Special thanks to Stephanie Rose for sending out the kit and letting me try out this fun way to grow indoors during the hot summer!


April 1, 2020
Pre-Cook Your Food MIX N MATCH TRICK – How to Stretch Out Quarantine Cooking Food Rations Series
We are all looking to stretch out the coronavirus covid19 rations, keep nutritious food in your diet, and prevent boredom while you might be self-isolating. A smart way to do this is to meal plan, pre-cook some of your ingredients all on one day, then mix-n-match in various meals.
For example, one of the things I do is pre-make a ground turkey and vegetable mixture (you could use whatever protein you are able to consume with your health concerns in mind like ground beef or pork, beans, lentils, or peas into a mixture – poultry or plant-based foods are the least inflammatory), then freeze this mixture into meal-sized servings.
Next — If you have fresh produce that is about to “go bad” or you are concerned about it molding, wash it up and pre-cook the vegetables, then freeze in usable portions so that you prevent waste.
Pre-make rice and beans. I am primarily grain-free and bean-free in my diet due to my particular health concerns. However, if you are desperate and can’t find the regular anti-inflammatory food you eat you could probably consider consuming GLUTEN-FREE instead all the way grain-free. Your health professional should guide you – so please reach out if you have questions.
Now here’s the trick — I pull all these things out as I need them and then combine them with a variety of seasonings or additional vegetables and you have a lot of variety with little effort the rest of the week.
Day 1 – Stir Fry all the meats and vegetables together with garlic, ginger, and Asian flavors, serve it over riced cauliflower
Day 2 – Heat the meat up and serve it hot over a cold salad with salad dressing
Day 3 – Add taco seasonings and mush it all together in a taco or lettuce wrap
Day 4 – Add your favorite seasonings to the meat, then layer vegetables and meat over a baked sweet potato
Day 5 – Throw all the ingredients in with some broth and make a delicious soup
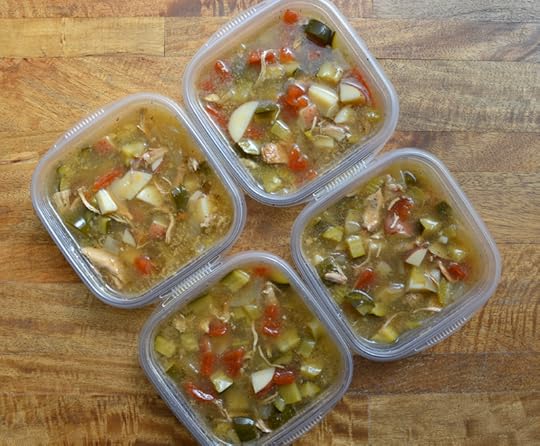
You prevent waste by cooking all in advance – but separately – and freezing in individual or family sized portions. It only takes a quick minute to assemble with new flavors once pulled out of the freezer.
I’d love it if you signed up for my regular newsletter which has easy tips on how to eat smart and live an anti-inflammatory lifestyle. Just click over to the right in the box to subscribe. If you want to get my anti-inflammatory cookbook to help guide you on a healthy meal plan, Ogden Publishing is listing my cookbook at a discount right now for anyone who needs it. JUST CLICK HERE AND IT WILL LINK THROUGH FOR YOU.
BE SAFE and BE WELL – help each other my friends!
Pre-Cook Your Food MIX N MATCH TRICK – How to Stretch Out COVID19 Coronavirus Food Ration Series
We are all looking to stretch out the coronavirus covid19 rations, keep nutritious food in your diet, and prevent boredom while you might be self-isolating. A smart way to do this is to meal plan, pre-cook some of your ingredients all on one day, then mix-n-match in various meals.
For example, one of the things I do is pre-make a ground turkey and vegetable mixture (you could use whatever protein you are able to consume with your health concerns in mind like ground beef or pork, beans, lentils, or peas into a mixture – poultry or plant-based foods are the least inflammatory), then freeze this mixture into meal-sized servings.
Next — If you have fresh produce that is about to “go bad” or you are concerned about it molding, wash it up and pre-cook the vegetables, then freeze in usable portions so that you prevent waste.
Pre-make rice and beans. I am primarily grain-free and bean-free in my diet due to my particular health concerns. However, if you are desperate and can’t find the regular anti-inflammatory food you eat you could probably consider consuming GLUTEN-FREE instead all the way grain-free. Your health professional should guide you – so please reach out if you have questions.
Now here’s the trick — I pull all these things out as I need them and then combine them with a variety of seasonings or additional vegetables and you have a lot of variety with little effort the rest of the week.
Day 1 – Stir Fry all the meats and vegetables together with garlic, ginger, and Asian flavors, serve it over riced cauliflower
Day 2 – Heat the meat up and serve it hot over a cold salad with salad dressing
Day 3 – Add taco seasonings and mush it all together in a taco or lettuce wrap
Day 4 – Add your favorite seasonings to the meat, then layer vegetables and meat over a baked sweet potato
Day 5 – Throw all the ingredients in with some broth and make a delicious soup
You prevent waste by cooking all in advance – but separately – and freezing in individual or family sized portions. It only takes a quick minute to assemble with new flavors once pulled out of the freezer.
I’d love it if you signed up for my regular newsletter which has easy tips on how to eat smart and live an anti-inflammatory lifestyle. Just click over to the right in the box to subscribe. If you want to get my anti-inflammatory cookbook to help guide you on a healthy meal plan, Ogden Publishing is listing my cookbook at a discount right now for anyone who needs it. JUST CLICK HERE AND IT WILL LINK THROUGH FOR YOU.
BE SAFE and BE WELL – help each other my friends!
March 31, 2020
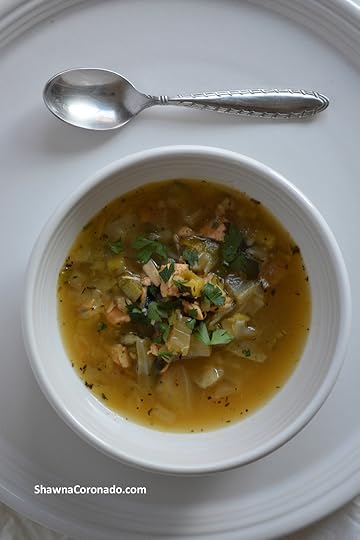
8 Cup WHATCHOOGOT Soup Recipe – How to Stretch Out Quarantine Cooking Food Rations Series
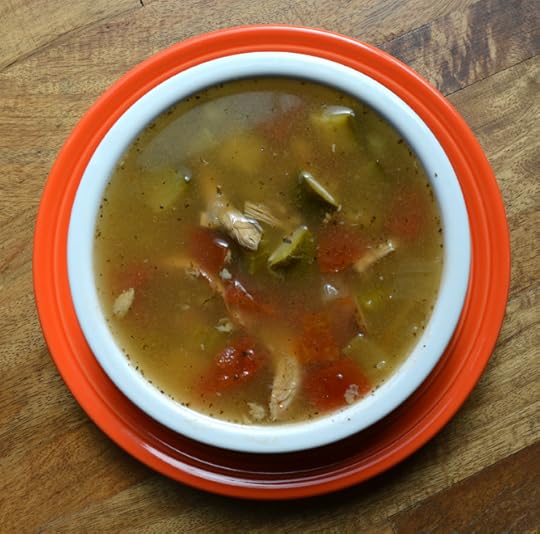
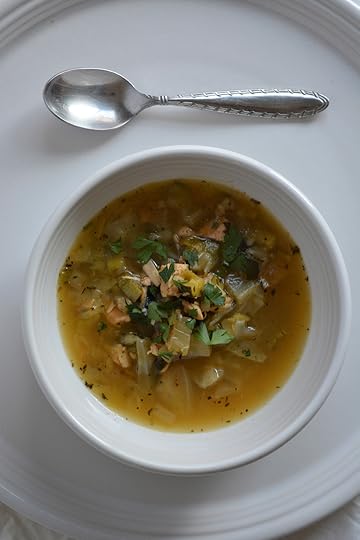
We are all looking to stretch out the coronavirus covid19 rations to save money and help our families and I have a terrific idea for you – I call it 8 cup WATCHOOGOT Soup. Because it features whatever you have in your home – fresh veg, frozen veg, canned veg, beans, rice whatever – and it allows you to adapt the recipe to any variety of food you might have on hand. Seriously, the best way to conserve rations and to stretch that food out is to turn a little bit of something into a whole lot of soup because you can double or triple the consumption capacity with broth.
If you want to know how to home make your very own broth from items you might throw in the bin (old bones, limp veg, etc.), you can GO HERE TO THIS LINK to see the recipe and video.
Remember, this is not a fancy soup, just a hearty soup, so you should use whatever you have. I have one pound of leftover pre-cooked chicken and turkey (cubed or shredded makes no difference), you could use any meat or no meat at all and just focus on the vegetables
8 Cup WHATCHOOGOT Soup Recipe
Ingredients:
1 pound chicken, turkey, or any other kind of meat, cubed or shredded (optional)
8 cups of cubed vegetables – whatever fresh veggies you have in the cupboard, freezer, or cans
3 – 32 oz boxes broth (or 96 oz water, tomato juice, or your own homemade broth)
3 tablespoons garlic, crushed
1-2 Tablespoons favorite seasoning (I prefer Italian seasoning or Herbs de Provence)
Salt and pepper to taste
Instructions:
Brown meat in pan or pre-cook poultry
Deglaze pan with a cup of broth, transfer ingredients to a stew pot or crockpot.
Add all other vegetable and seasoning ingredients.
Bring to a boil. Cover and reduce temperature to low and slow simmer for two to three hours.
OR if using a crockpot, toss it all in and simmer on high 3 – 5 hours.
Refrigerate or freeze
This super-easy soup recipe feeds a small army and you will have stretched your food out by transforming it into soup.
Sign up for my regular newsletter which has easy tips on how to eat smart and live an anti-inflammatory lifestyle right here on the website. If you would like to get my anti-inflammatory cookbook to help guide you on a healthy meal plan, Ogden Publishing is listing my cookbook at a discount right now for anyone who needs it. JUST CLICK HERE AND IT WILL LINK THROUGH FOR YOU.
BE SAFE and BE WELL – I love you my friends!
8 Cup WHATCHOOGOT Soup Recipe – How to Stretch Out COVID19 Coronavirus Food Ration Series
We are all looking to stretch out the coronavirus covid19 rations to save money and help our families and I have a terrific idea for you – I call it 8 cup WATCHOOGOT Soup. Because it features whatever you have in your home – fresh veg, frozen veg, canned veg, beans, rice whatever – and it allows you to adapt the recipe to any variety of food you might have on hand. Seriously, the best way to conserve rations and to stretch that food out is to turn a little bit of something into a whole lot of soup because you can double or triple the consumption capacity with broth.
If you want to know how to home make your very own broth from items you might throw in the bin (old bones, limp veg, etc.), you can GO HERE TO THIS LINK to see the recipe and video.
Remember, this is not a fancy soup, just a hearty soup, so you should use whatever you have. I have one pound of leftover pre-cooked chicken and turkey (cubed or shredded makes no difference), you could use any meat or no meat at all and just focus on the vegetables
8 Cup WHATCHOOGOT Soup Recipe
Ingredients:
1 pound chicken, turkey, or any other kind of meat, cubed or shredded (optional)
8 cups of cubed vegetables – whatever fresh veggies you have in the cupboard, freezer, or cans
3 – 32 oz boxes broth (or 96 oz water, tomato juice, or your own homemade broth)
3 tablespoons garlic, crushed
1-2 Tablespoons favorite seasoning (I prefer Italian seasoning or Herbs de Provence)
Salt and pepper to taste
Instructions:
Brown meat in pan or pre-cook poultry
Deglaze pan with a cup of broth, transfer ingredients to a stew pot or crockpot.
Add all other vegetable and seasoning ingredients.
Bring to a boil. Cover and reduce temperature to low and slow simmer for two to three hours.
OR if using a crockpot, toss it all in and simmer on high 3 – 5 hours.
Refrigerate or freeze
This super-easy soup recipe feeds a small army and you will have stretched your food out by transforming it into soup.
Sign up for my regular newsletter which has easy tips on how to eat smart and live an anti-inflammatory lifestyle right here on the website. If you would like to get my anti-inflammatory cookbook to help guide you on a healthy meal plan, Ogden Publishing is listing my cookbook at a discount right now for anyone who needs it. JUST CLICK HERE AND IT WILL LINK THROUGH FOR YOU.
BE SAFE and BE WELL – I love you my friends!
March 30, 2020
Easy Broth Recipe – How to Stretch Out Quarantine Cooking Food Rations Series
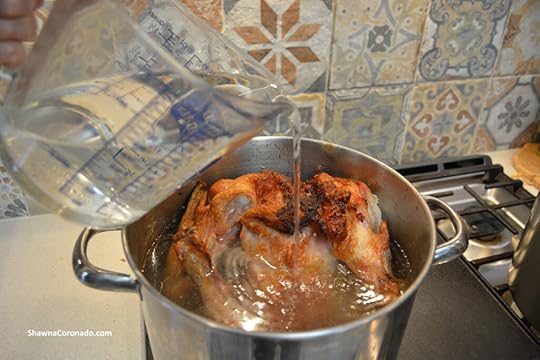
Want to save money and stretch your food while you are stuck at home self-isolating? We are all looking to stretch out the coronavirus covid19 rations. The best way to conserve some cashola and to stretch that food out is to turn a little bit of something into a whole lot of broth or soup. With a small amount of ingredients which we normally toss in the garbage, you can feed you and your family over a longer period of time. If you are concerned about social isolating for COVID-19 or the Zombie Apocalypse, or what have you, then consider using all your bottom of the bin items to make this absolutely delightful broth (video below).
Now a very important thing to note is that we are not making fancy-pants “I’ve got a culinary degree and I know how to use it” broth! This broth is all about rescuing items you might have thrown in the garbage and – instead – creating something magical and delicious from those used bits.
You should use whatever you have – I have Rotisserie chicken bones and old turkey bones, but you can use any bones you have available OR if you want to make a vegan broth you can use all vegetables and skip past the bones entirely – it’s purely based on whatever you have in your house RIGHT NOW. Don’t season your chicken stock with salt, instead season whenever you use the broth in a recipe so you do not double salt.

EASY BROTH RECIPE
Ingredients:
Chicken, beef, pork, or lamb bones (optional)
Vegetables [whatever you have] – raw carrots, celery, and onions with skin on
Peppercorns (optional)
Instructions:
Roast bones at 425 F or 218 C for 45 minutes
Rough chop celery, carrots, onions
Add peppercorns (optional)
Cover all the ingredients in a large stock pot with water
Put on to boil, then low simmer 2 to 4 hours
Take a spoon and remove scum from the top of the pot
Add fresh herbs THEN if you like but DO NOT SEASON WITH SALT
Remove bones and vegetables and toss out, then cool and strain broth
Store in refrigerator 3 – 4 days or freeze 4 – 6 months
Once it’s done, you will have the most beautiful delicious broth ever made from a bunch of stuff that was going in the bin and it is absolutely the foundation to truly stretch out your food. You can freeze it like I have done below and heat it up on the stove or the crockpot for lots of amazing recipes. From this foundation you can make soups, add to ground meat mixtures, and add flavor to casseroles and more.

Sign up for my regular newsletter which has easy tips on how to eat smart and live an anti-inflammatory lifestyle right here on the website. Also, if you want my anti-inflammatory cookbook to help guide you on a healthy meal plan, Ogden Publishing is listing the book at a discount right now for anyone who needs it. JUST CLICK HERE AND IT WILL LINK THROUGH FOR YOU.
BE SAFE and BE WELL!
Easy Broth Recipe – How to Stretch Out COVID19 Coronavirus Food Ration Series
Want to save money and stretch your food while you are stuck at home self-isolating? We are all looking to stretch out the coronavirus covid19 rations. The best way to conserve some cashola and to stretch that food out is to turn a little bit of something into a whole lot of broth or soup. With a small amount of ingredients which we normally toss in the garbage, you can feed you and your family over a longer period of time. If you are concerned about social isolating for COVID-19 or the Zombie Apocalypse, or what have you, then consider using all your bottom of the bin items to make this absolutely delightful broth (video below).
Now a very important thing to note is that we are not making fancy-pants “I’ve got a culinary degree and I know how to use it” broth! This broth is all about rescuing items you might have thrown in the garbage and – instead – creating something magical and delicious from those used bits.
You should use whatever you have – I have Rotisserie chicken bones and old turkey bones, but you can use any bones you have available OR if you want to make a vegan broth you can use all vegetables and skip past the bones entirely – it’s purely based on whatever you have in your house RIGHT NOW. Don’t season your chicken stock with salt, instead season whenever you use the broth in a recipe so you do not double salt.
EASY BROTH RECIPE
Ingredients:
Chicken, beef, pork, or lamb bones (optional)
Vegetables [whatever you have] – raw carrots, celery, and onions with skin on
Peppercorns (optional)
Instructions:
Roast bones at 425 F or 218 C for 45 minutes
Rough chop celery, carrots, onions
Add peppercorns (optional)
Cover all the ingredients in a large stock pot with water
Put on to boil, then low simmer 2 to 4 hours
Take a spoon and remove scum from the top of the pot
Add fresh herbs THEN if you like but DO NOT SEASON WITH SALT
Remove bones and vegetables and toss out, then cool and strain broth
Store in refrigerator 3 – 4 days or freeze 4 – 6 months
Once it’s done, you will have the most beautiful delicious broth ever made from a bunch of stuff that was going in the bin and it is absolutely the foundation to truly stretch out your food. You can freeze it like I have done below and heat it up on the stove or the crockpot for lots of amazing recipes. From this foundation you can make soups, add to ground meat mixtures, and add flavor to casseroles and more.
Sign up for my regular newsletter which has easy tips on how to eat smart and live an anti-inflammatory lifestyle right here on the website. Also, if you want my anti-inflammatory cookbook to help guide you on a healthy meal plan, Ogden Publishing is listing the book at a discount right now for anyone who needs it. JUST CLICK HERE AND IT WILL LINK THROUGH FOR YOU.
BE SAFE and BE WELL!
March 2, 2020
Barberry Growing Tips

Barberry is a vivid, multihued shrub, found in shades that range from golden to burgundy, that keep their colorful foliage year-round. They have red berries and often have thorny barbs that act as a protection for birds that like to eat the berries and hide in safety below their prickly branches. Barberry prefers dry conditions, can tolerate part-shade, and has a superb mounding habit; this makes it an excellent solution for difficult locations. I have a little barberry that grows beneath my home’s overhang, gets no direct sunshine, very little consistent water, and it has flourished for years, offering a brightly colored solution in a trouble-filled location. However, landscapers and gardeners should be cautious – certain varieties of Japanese barberry have been declared severely invasive; check local restrictions and research the appropriate cultivar before planting. Below is an excerpt from the Indiana Getting Started Gardening Guide which can give you some insight into the barberry.
Botanical name — Berberis spp.
Bloom Period and Seasonal Color — Fall; yellow, golden, burgundy, purple, and
red foliage
Mature Height × Spread — 1½ to 6 feet × 1½ to 12 feet
Added Benefits – Foliage color
Sun Requirements – Sun, Part-Sun, Part-Shade
When, Where, and How to Plant – Barberry shrubs have a higher success rate if purchased from local growers that have been planted in local soil. Dig a hole in a well-drained planting area, the same depth of the rootball but 2 times as wide. Scratch the sides of the hole with a spade so the roots can break through the soil more easily. If the shrubs roots are container-bound, be sure to use a sharp knife to slice through the roots on each side of the rootball to encourage growth. Plant the top of the rootball so it is level with the ground. Backfill around the rootball until the hole is about half filled. Water the rootball and backfill well. Place the rest of the soil around the rootball, forming a “well” at the base of the plant, which will help collect and hold water.
Growing Tips – Mulch the soil with a 2- to 3-inch layer of compost or organic matter, being cautious not to smother the shrub’s trunk. Barberry shrubs need about an inch of water per week upon initial planting but very little attention thereafter. Fertilize with an organic fertilizer before new growth occurs in spring only if the plant shows signs of undernourishment.
Advice and Care – Shear or prune anytime after the new growth has developed in early summer. Shrubs that are over-crowded or planted in shadier, wet conditions are vulnerable to fungal problems. Keep water off the foliage and treat powdery mildew, blackspot, and other fungal conditions with an organic fungicide.
Companion Planting and Design – Colorful shrubs like barberry are an excellent choice as a feature plant, a shrubby groundcover, as well as a lovely low hedge that helps support a birding landscape.
Try These – ‘Sunjoy® Mini Salsa’ is a tiny dwarf variety growing 18 to 24 inches that can be used in containers as well as the landscape. ‘Sunjoy Gold Pillar’ has a vertical habit, grows to 3 feet, and has golden yellow leaves that turn orange-red in fall. ‘Atropurpurea Nana’ is deep red throughout the season.
Please get my book, the Indiana Getting Started Garden Guide for more tips on shrubs, perennials, annuals, and trees, particularly if you live in the Midwest. Thanks!

Save
September 4, 2019
How to Grow a Beech Tree

Beech trees have smooth silver trunks that stand quite straight, with glossy green leaves that turn yellow, then brown in fall. There are many varieties of beech. European beeches are typically taller than the American species, at up to 90 feet, with an affinity for full sun and browner autumnal leaves. The tree is more tolerant of pollution than other species of beech. American beeches grow to a height of 70 feet, and while they prefer full sun, they will also tolerate part shade. As a native tree, American beeches serve many positive purposes for the environment. Hollow trees house birds and small mammals. Interesting shaped triangular beechnuts provide food for wildlife. Beech trees are also grown and harvested for flooring and furniture. Below is an excerpt from the Indiana Getting Started Gardening Guide which can give you an idea of how to care for a beech tree.
Botanical name — Fagus spp.
Bloom Period and Seasonal Color — Fall; yellow and brown foliage; green and multicolor leaves in spring and summer
Mature Height × Spread — 40 to 90 feet × 40 to 90 feet
Added Benefits – Foliage color
Sun Requirements – Sun, Part-Sun, Part-Shade – Garden Zones 3 to 9
When, Where, and How to Plant – When purchasing a beech, make sure you understand if the variety prefers part shade or sun conditions before choosing your site. Beeches appreciate a rich soil that is well drained, with very consistent moisture. Water the rootball well before planting. Dig a hole at the same depth of the rootball but at least twice as broad. Plants that are balled and burlapped should have as much of the burlap and wire basket removed as possible. Do not plant beneath power lines as the tree grows too large.
Growing Tips – Mulch after planting with 3 inches of compost to help the tree get established. Beeches are susceptible to root area disturbances. Continue mulching annually to assist the beeches’ shallow roots stay protected and hold more moisture. Compost or mulching material should be kept at least 3 inches away from the tree trunk to prevent rot. Do not add any amendments to the planting hole as fertilizers and some manures can burn the roots. Consistent moisture is key.
Advice and Care – Aphids are easily dislodged with a spray of water from a hose. Beech bark disease happens when a tree is attacked by scale and fungus; there is no cure. It can sometimes be challenging to grow turfgrass beneath a beech due to its shallow root system and dense foliage growth.
Companion Planting and Design – Beeches do not do well in parking lots or along streets where their root structure cannot expand significantly. They are sensitive to salt so should not be planted near sidewalks that are salted. They are great in an area where the roots will have plenty of space to expand, such as large lawns, estate parkways, or as a specimen in a parklike setting.
Try These – ‘Roseo-Marginata’ is a tricolor European beech that has green, white, and pink leaves with copper fall colors. It is best suited to part-shade. ‘Asplenifolia’ has an interesting fine-cut leaf with golden fall color. ‘Pendula’ is a weeping European beech with astounding arching branches. ‘Riversii’ has deep purple foliage all season that fades to coppery orange in fall.
If you would like more growing and gardening ideas for landscaping for trees like the beech, particularly for gardens in the Midwest, please get my book, the Indiana Getting Started Garden Guide.
September 1, 2019
How to Grow Brassica oleracea ‘Ruby Perfection’ Cabbage
One of my favorite vegetables to consider for the winter garden is Brassica oleracea ‘Ruby Perfection’ Cabbage. When it opens to it’s full gorgeousness it is like looking at a giant purple rose. So beautiful! Cabbage is best grown as a cool weather crop in rich organic soil that is well drained. Once temperatures exceed 80 degrees F the plants do poorly, so having a cooler growing season – in the fall or early spring – is beneficial for the plants. Planting as a winter crop to harvest in spring means you should sow the seeds indoors 6-8 weeks before the last spring frost date or you could sow the seeds outdoors around 4 weeks prior to the last frost date.
Watch the video above to learn how to plant and grow this delicious and pretty ornamental edible vegetable. Rotate your cabbage crops annually as cabbage is stressful to soil and needs replenishing. If you cannot see the video above, go to this LINK for YouTube viewing. Meanwhile, Brassica oleracea ‘Ruby Perfection’ Cabbage is a must have for the cool season garden and is easy to grow and maintain.

Save
Save
Save