Shawna Coronado's Blog, page 14
June 26, 2017
RazorUltra Portable Battery Charge Review – Travel

I frequently travel the country speaking and sharing my books. A LOT. This month I was in Burlington, Vermont speaking at the Mother Earth News Fair there and absolutely fell in love with the region. Quaint, beautiful, and filled with charming people who made the trip an amazing experience (see photos below). One of the number one problems I have when I am traveling is remembering all my gear like the portable battery charge equipment and keeping it all charged so that  my GPS does not die in middle of nowhere. GPS power crashing has happened countless times and I have vowed that 2017 is my year for preventing all that pain and heartache. I’ve started carrying my gear in my purse or carry-on inside a little netting bag to keep everything centrally located.
When the team from myCharge asked me to test one of their batteries, I was all-in. They sent out a RazorUltra Portable Battery for me at no cost to try. I told them I would review it for a few months and I have been using it since the first of March. When I received the charger I thought that all batteries are the same. Turns out that a RazorUltra is far more than a normal battery. Unlike my old charger, this one is good for much more than an emergency charge on your cell; it comes with a cable and charges smartphones, tablets, and USB devices.
It’s been a superhero – I’ve started carrying it every where – the RazorUltra has a 3.4A shared output and can power two tablets simultaneously. With 90 extra hours of power the product boosts enough to keep your devices powered during a multiple day trip. My review — it has more power than any battery charger I have ever used before and with the extra ability to charge multiple devices, I can charge my husbands phone while we’re simultaneously charging the tablet. I have the power!!!!


On a personal, non portable battery charge note – YOU MUST GET TO VERMONT. What a beautiful place. We especially liked Lake Champlain and all the boats and sunset beauty. Special thanks to myCharge for letting me tap into ALL the power and test the zap outta their RazorUltra tool.

Save
Save
Save
The post RazorUltra Portable Battery Charge Review – Travel appeared first on Shawna Coronado.


June 13, 2017
Greek Olive Oil Tastes Delicious
Olive oil – I love it and use it for cooking, salad dressings, and over vegetables to add a little extra flavor. Several years ago I would have told you that it is all much the same. Yet since that time I have traveled to Europe and tried many different types of olive oils from many different regions – Portugal, Spain, Italy, and Greece. Much of the olive oil in the United States is a mix of blended olive oils from various locations, so tasters are unable to distinguish regional flavors. My advice is to investigate regional oils and compare them to your typical grocery store olive oil and the taste difference will astound you.
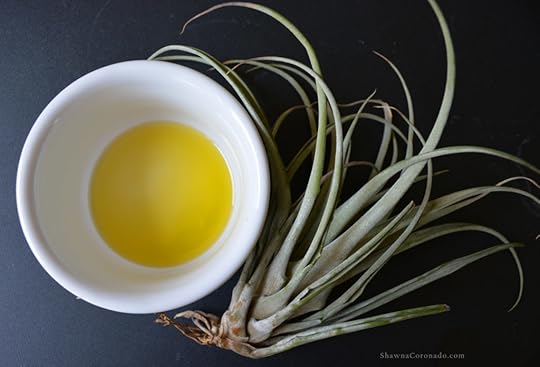
This month I’ve been sampling an Estate Grown Kalamata Extra Virgin Olive Oil which comes from Greece (above). My whole living mind IS BLOWN. I have sautéed with it, used it as a salad dressing, and drizzled it over vegetables for several weeks now. The flavor is green and peppery with a hint of kalamata olive tang. The difference was more powerfully noticed when used raw and not heated.
Olive oils have experienced a bit of controversy lately due to disreputable companies marketing their products as higher quality than they actually are. If you truly want better tasting olive oil much like the olive oil I tried from Greece (I’ve named it “Nectar of the Gods”), I recommend you seek small estate grown olive oil companies which are reputable and have a name in the industry. This means you might pay a little more for a bottle, but will be well rewarded with a full flavored, authentic, and 100% natural taste. How can you tell the difference? Do a taste test — set out a plate and pour any cheap grocery olive oil on a raw vegetable, then use Greek olive oil on another raw vegetable and compare flavors. There is a clear taste difference – the kalamata will stand out as far more flavorful.
Greek olive oil is delicious, is incredibly healthy for you, and is the only olive oil which can be labeled with the fresh, green handpicked Koroneiki – or Kalamata – olive name. My favorite treat with Greek olive oil is a snack I make (below) with hummus drizzled with kalamata olive oil and served with carrots. Crunchy, spicy, and delicious. Give it a try!

Special thanks to HomerLaughlin.com for their wonderful white ramekin and blue dish in the above photos. Aren’t they lovely? And absolutely the perfect way to set off the delicious Greek olive oil.
Save
Save
Save
Save
Save
The post Greek Olive Oil Tastes Delicious appeared first on Shawna Coronado.
June 5, 2017
Flowering Tobacco – Nicotiana Growing Tips

A scented flowering tobacco bloom can be a little bit of heaven; many varieties have a scent that is downright alluring and are more likely to have a stronger scent toward late evening and at night. Heirlooms often have a stronger scent, some cultivars are scentless, and a few newer hybrids have light scents. Each flower is a colorful, trumpet-shaped tube with star-shaped petals. Hummingbirds adore the plant during the day, and hummingbird moths will spend hours circling flowering tobacco in the evening. While it is a member of the tobacco family, it is not recommended for consumption; it is addictive when smoked or sniffed and poisonous if eaten. Some cultivars can reach up to 4 feet tall and are narrow, so fit in most compact gardens quite nicely. Below is an excerpt from the Illinois Getting Started Garden Guide which can help you learn to grow this deliciously scented plant.
Botanical name — Nicotiana alata
Bloom Period and Seasonal Color — Summer to fall; white, yellow, lime green, pink, and red flowers
Mature Height × Spread — 12 to 48 inches × 12 to 24 inches
Added Benefits – Attracts Beneficial Insects, Attracts Hummingbirds
Sun Requirements – Sun, Part Sun, Part Shade
When, Where, and How to Plant
Nicotiana grows best in a sunny spot but prefers afternoon shade during the hot season. Soil should be well drained, rich organically, and consistently moist. Start seeds indoors 4 to 6 weeks before the last frost or plant directly on to the soil. Seeds are incredibly tiny, so try mixing the seed with sand for easier spreading. Press seeds lightly into the seed starting mix and do not cover them as they require light to germinate.
Growing Tips
Water at the base of the plant to prevent powdery mildew; container plants typically require more watering. Mulching your plants will help hold the moisture around the base of the plant during hot weather.
Regional Advice and Care
Newer hybrid varieties are self-cleaning and require no deadheading. Although relatively pest-free, should spider mites or aphids settle on the plants, spray with insecticidal soap. Aphids can be dislodged with a spray of water, but be careful not to break the stems or leaves. Although rare, flowering tobacco is sometimes susceptible to tobacco mosaic virus or downy mildew (Peronospora tabaci). Signs include ringspots on leaves or yellowed crinkled growth; pull these diseased plants from the garden and inoculate the soil with an amendment that has chelated iron. Many varieties self-seed; supervise this to make sure the plant does not invade.
Companion Planting and Design
Night gardens and evening paths are enhanced when filled with fragrant varieties of flowering tobacco. Shorter varieties work well in containers, along borders, and in mass plantings. Taller varieties do well at the back of an annual bed or mixed into an informal cottage garden. Plant scented varieties in window boxes where their evening scent can drift into your home at night.
If you would like more plant growing ideas, particularly in the Midwest, please check out the Illinois Getting Started Garden Guide for further tips and information.
Save
The post Flowering Tobacco – Nicotiana Growing Tips appeared first on Shawna Coronado.
May 22, 2017
Grilled Romaine Lettuce Salad with Fennel
 Grilled Romaine Lettuce Salad Print Prep time 10 mins Cook time 5 mins Total time 15 mins Delicious recipe for grilled romaine lettuce salad - below are the ingredients - improvise and make the quantities and flavors your own. Author: Shawna Coronado at www.shawnacoronado.com Recipe type: Salad Cuisine: Salad Ingredients Romaine lettuce heads washed and sliced in half lenthwise or left whole if small (it is important to keep the head connected at the base so it does not fall apart on the grill) Salt and Pepper Fennel, sliced thin Micro-greens or sprouts Extra Virgin Olive Oil Lemon juice Cayenne pepper Instructions Brush all sides of the romaine lettuce with olive oil, salt and pepper Grill until lightly roasted on each side Place on plate with portions of fennel and microgreens Drizzle with olive oil Drizzle with lemon juice Sprinkle with cayenne pepper Serve 3.4.3177
When I went to the Biltmore Estate last summer I was bowled over by a seasonal anti-inflammatory salad I had at Cedric’s Tavern off the Gluten Free menu – Grilled Romaine Lettuce Salad (above). Whut? You can grill lettuce you say? Oh yeah. And it is still crisp and absolutely tasty with just a hint of that grilled edge – perfect for a spring or summer lunch.
This deliciousness was served to me as I sat people watching and munching away while overlooking a beautiful little container-garden filled patio on the estate (see below). Cedric’s Tavern chef added estate micro-greens and fennel for some extra flavor which I love. Dependent upon the dressing, this recipe is perfectly healthy and fantastic if you are looking for an addition to your anti-inflammatory diet. Below is my own interpretation of the Grilled Romaine Lettuce Salad they prepared me.
 Save
Save
Save
The post Grilled Romaine Lettuce Salad with Fennel appeared first on Shawna Coronado.
May 12, 2017
Contest and Easy Elegance® Roses in My Garden
My garden has become this sprawling affair filled with passion and color and all things green. The love of my life, a.k.a. The Husband, has come to reference our suburban acreage as “the farm” due to the sheer volume of plants housed within the fence line. With this in mind, my goal with the garden is to keep the shrubs and perennials basic and absolutely easy to grow – no delicate flowers or prima donna’s allowed. Essentially, if you are not tough and beautiful, you will be promptly ripped out of the ground and composted. Only the strong survive in my beds, which makes my life filled with significantly less drama.
The Growing Experiment
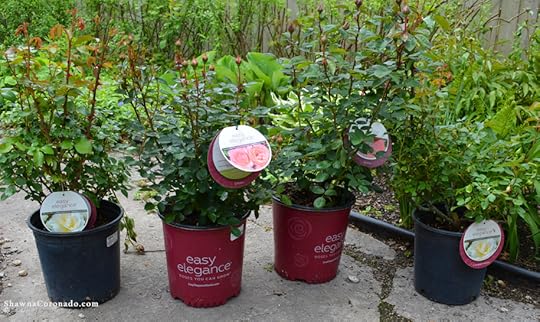
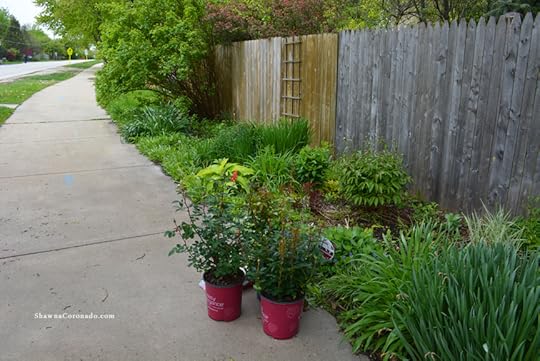
Several years ago I ripped all the roses out of my garden with glee because of the average rose’s demanding nature – managing prima donna roses was driving me bonkers. Then along came Easy Elegance® Roses which are disease resistant, bloom from the beginning of the season to the end, and are completely no-fuss and ultra easy-to-grow. They have the classic hybrid tea look of my grandmother’s rose shrubs without the hard work, because they have superior heat and cold tolerance and you don’t have to use a lot of chemicals to keep them looking fantastic. I want to conduct an experiment and see how they perform for the season in one of the toughest places to grow in my garden that gets the least amount of attention – out by the street behind my property fence.
Mother’s Day
The Easy Elegance® brand provided roses and supplies for me to use in the garden – several different varieties of Roses You Can Grow™ – then asked me to share my results with you. I wanted to get started on Mother’s Day week because this is the perfect gift idea for Mom. Buy her easy care shrub roses that will last, blooming over and over, instead of a bunch of cut flowers which will lose their bloom quickly. These easy care shrub roses should make an excellent addition to your cutting garden since they bloom all summer.
The Easy Elegance® Roses are great planted in large landscape swaths or alone in the garden as a special feature. I shopped for them for my growing experiment so that I could plant them to share some color and flower with my community. I think these roses will bring a special touch of florific love for my neighbors out back. Three roses were planted behind the fence and one rose planted in my front garden.

Planting and Care
I found the Easy Elegance® Roses in the red pot at the local independent garden center. I also purchased some dry organic rose fertilizer, compost, and mulch. According to the Easy Elegance® instructions, you do not have to add fertilizer to the planting hole, but I felt a little boost might be good. They do best in a minimum of 6 hours of sunlight in well-drained soil. First I found my planting spot,  added some compost, and then dug holes that were about one and a half times wider than the containered root ball. Next step, I placed fertilizer in the hole according to package directions, then planted the roses. Place two to three inches of mulch around the base of the plant, being sure not to “volcano” the mulch.
If you would like to get more growing instructions, go to this link — http://www.easyeleganceroses.com/design-and-grow/planting-and-care.
Super Cool Text Program
Easy Elegance® Roses also has this nifty “text program” to help make growing the roses even easier. To opt in to the program, just text EASYELEGANCE to 73095 on your cell phone for timely care tips for your region.
Follow along this season on the blog and I will give you updates on the Easy Elegance® Roses and how they perform in my garden. I am excited to see if they pass my “no prima donna allowed” plant test and cannot wait to show you my results. Happy rose gardening my friends!

Contest!!!
If you would like to win an Easy Elegance® gardening tool kit that includes: a knee pad, pruning shears, soft grip hose nozzles, quick hose connects, and water splitter/controller, and one (1) pair of Easy Elegance branded gloves, LEAVE A COMMENT BELOW TELLING ME YOUR FAVORITE GARDEN STORY ABOUT ROSES. I will randomly select a winner on Mother’s Day morning!
This is a sponsored conversation written by me on behalf of Easy Elegance Roses. The opinions and text are all mine.
Save
The post Contest and Easy Elegance® Roses in My Garden appeared first on Shawna Coronado.
May 1, 2017
Dragon Wing Begonia Growing Tips
There are many varieties of begonia, from perennial to tuberous, but my absolute favorite heat-tolerant variety of Begonia × hybrida is ‘Dragon Wing’. This beautiful hybrid from the Begoniaceae family is an introduction that blooms nonstop from May until October. Because it is a sterile hybrid, it does not self-seed and puts all its energy into flowering. Dragon Wing has exceptional tolerance for heat and humidity, performs well in deep shade areas, and has few disease problems. Dragon Wing leaves are elongated, pointy, and waxy with hints of bronze around the edges. When you see the begonia at the first of the season at the garden center they look ugly without flowers, but once planted, they quickly become the queen of the shade annuals. Below is an excerpt from the Illinois Getting Started Garden Guide which can help you get started with this gorgeous shade loving plant.
Botanical name — Begonia x hybrida
Bloom Period and Seasonal Color — Spring to fall; red and pink flowers
Mature Height × Spread — 12 to 15 inches × 12 to 15 inches
Added Benefits – Attracts Beneficial Insects, Attracts Hummingbirds
Sun Requirements – Sun, Part Sun, Part Shade
Plant this flower in the spring after the last frost in a rich, well-drained soil with compost or manure mixed in for better root development. This is a compact plant that forms dense mounds, so be sure to give it plenty of room to grow. While the plant will do well in part sun, it really prefers part shade or shade. Make sure the plant gets afternoon shade if it is in sunnier conditions.
Growing Tips
Dragon Wing likes an organic fertilizer once every four weeks. Dragon Wing prefers moisture but will tolerate short periods of drought. Dragon Wing can be overwintered indoors by cutting the plant back, placing in a low light area, and reducing water to hibernate. Should you want to enjoy the blooms indoors, bring the plant in and place in a container with exposure to a brightly lit area. Begonias enjoy moisture, so misting the plant as well as watering regularly will be critical for the plant’s survival.
Advice and Care
Deadheading is not needed for this flower; however, trimming overgrowth or leaning stems will not harm the plant. There are no serious insect or disease problems. Over watering in shady conditions can sometimes encourage powdery mildew or blight. These fungus issues can be treated with an organic fungicide.
Companion Planting and Design
Since Dragon Wing does so well in shade, I prefer to partner it with colorful shade companions like sweet potato vine and coleus. Ornamental edibles such as lacinato kale and Swiss chard make wonderful container companions as well. Dragon Wing looks amazing planted en masse beneath shade trees.
If you would like more ideas on how to grow all types of plants, particularly in the Midwest, please resource the Illinois Getting Started Garden Guide in order to understand more about the growth needs of various plants for your garden.
Save
Save
Save
The post Dragon Wing Begonia Growing Tips appeared first on Shawna Coronado.
April 16, 2017
Seed Starting Tips
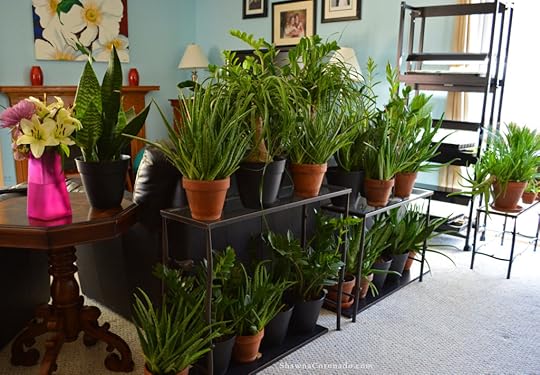
Seed starting for your garden in mid-April is happening at the Coronado house – here is how to get started. My friends, it is never too late to plant a seed, so if you are thinking, “It’s too late to start seeds.” Last fall I featured a trick for bringing in all those tropical plants using plant stands and a special Compact 3-Tier SunLite Garden from Gardeners.com. I have multi-purposed the 3-tier stand for seed starting. I pulled all the plants off of the lighted stand and doubled them up on my regular plant stands. Then I got to work planting the seeds. My goal – to have fresh microgreens for the kitchen throughout spring and to pull the other seedlings outside in six weeks for a few days of hardening off before I plant the babies directly in the soil.
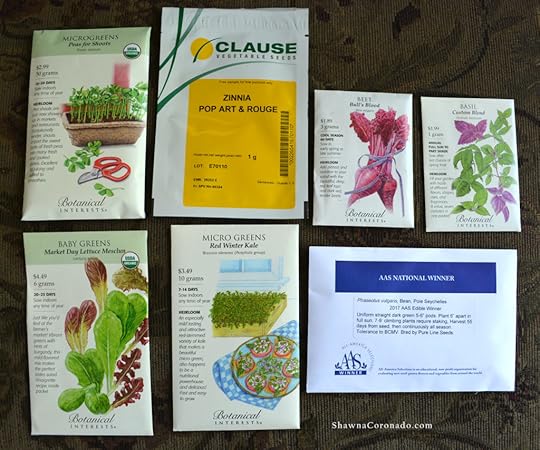
First I started by selecting the seeds I wanted to sprout (see photo above). I chose Botanical Interests Red Winter Kale Microgreens, Market Day Lettuce Mesclun, Peas for Shoots, Bull’s Blood Beets, Custom Blend Basil, Clause Garden Pop Art White & Red Zinnia, and the All American Selections Winner Pole Bean Seychelles.
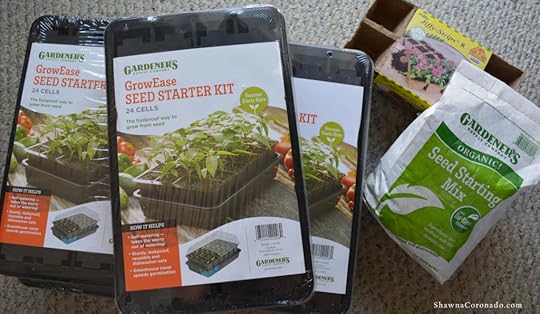
Once I had my seeds, I used the GrowEase Seed Starter Kit and followed the directions on the package. Using the Organic Seed Starting Mix, I moistened the mix, moistened the capillary matting, and put water in the bottom of the seed starter kit. Then I placed the moistened mix in the cells and planted the seeds according to directions. I also used a few peat pots to fill in the extra space on the shelves. Repeating the process of moistening the soil, I placed the seeds on top of the soil according to package directions.


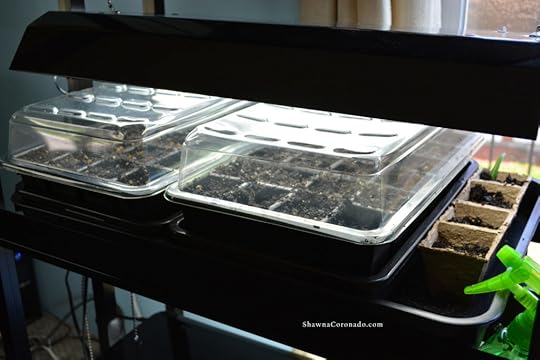
Once you fill the containers and plant the seeds, it is important to keep the soil well watered until the seedlings sprout. Be cautious and gentle with watering so that you do not jar the seeds loose. Gardeners.com suggests that you keep the capillary matting damp at all times in order to help support the plants. Supplemental, full-spectrum light, such as that provided by the special Compact 3-Tier SunLite Garden helps the seedlings get started. Be sure to keep the lights within a few inches of the growing seedlings and turned on 14 to 16 hours per day if possible. Keep the area warm – between 68 and 75 degrees Fahrenheit. One terrific benefit to the growing trays is that they are dishwasher safe for end-of-season clean up.
In my experience, the clear top to the kit is only needed for a short time. Once the seedlings get started, they like fresh air circulation. This also helps prevent fungal problems and damping off. Seed starting becomes easier when you use these miniature green house starting kits – special thanks to Gardeners.com for sending them out so that I could see how they work. As soon as the little babies start sprouting I will share the photos with you on social media.
Do you have seed starting tips and ideas? Please leave them in the comments below so we can share your knowledge and love of plants. Thanks a bunch and Happy Spring!
Save
Save
Save
Save
Save
Save
Save
Save
Save
Save
Save
Save
Save
The post Seed Starting Tips appeared first on Shawna Coronado.
April 11, 2017
Sweet Alyssum Growing Tips
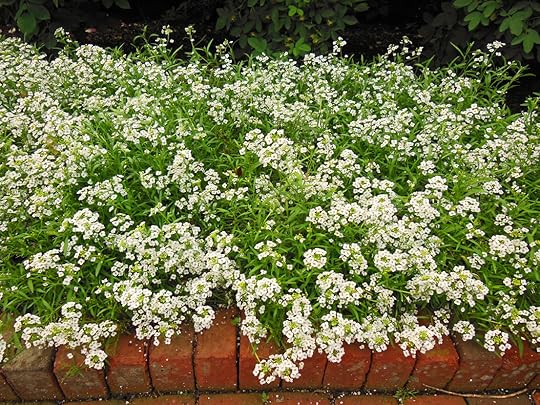
Seemingly dainty Alyssum, or Lobularia maritima, is actually a tough little annual plant known for its explosive flower power. Reseeding is common with alyssum, so plants that flower early could easily spread by the end of the season. Flowers perform best in coolweather conditions and have a wonderfully sweet scent that attracts beneficial pollinators. Because alyssum has a mounding nature, it functions as a superb edger and the perfect filler in annual and perennial beds. Below is an excerpt from the Illinois Getting Started Garden Guide which can help you get started with this sweet flowering annual.
Alyssum plants make excellent rock garden specimens as well, surviving brief periods of drought. They look fabulous spilling out of window boxes and container gardens. Alyssum is edible and tastes slightly like kale. Its flowers look very attractive sprinkled in salads, desserts, and even frozen in ice cubes for cocktails.
Alyssum botanical name — Lobularia maritima
Bloom Period and Seasonal Color — Spring, summer, and fall blooms; white, yellow, pink, rose, violet, and lilac
Mature Height × Spread — 4 to 8 inches × 6 to 12 inches
Added Benefits – Edible, Attracts Beneficial Insects, Attracts Hummingbirds
Sun Requirements – Sun, Part Sun, Part Shade
When, Where, and How to Plant
Alyssum is an annual and killed by a heavy frost, so plant seed in spring and summer after your last frost. It favors cool weather, and it prefers sun or part sun locations with good drainage, although it will adapt to part shade and continue to flower. Its seeds need light to germinate, so sow seeds on top of the soil, then water gently until rooted to prevent seeds from washing away. Or start indoors four weeks before planting outside. Be sure to amend soil according to soil testing results before planting seeds or baby plants.
Growing Tips
Water plants regularly for the first week. After the initial week, water as you would the other annuals in your garden. Fertilize once per month with a liquid organic fertilizer to see stronger plant performance. If plants get leggy, simply shear back their growth with clippers; they will grow fresh flowers.
Known as a low-maintenance annual, deadheading alyssum is not typically needed. Alyssum will grow well in clay and sand, but do better with organic matter added to the soil. Plants grown in shadier conditions might be prone to powdery mildew, which can be treated with an organic fungicide.
Companion Planting and Design
Alyssum is easy to grow, and the plants make a wonderful living mulch as they keep soil cool and attract beneficial insects which will stay for the
companion plants. Planting the flowers in between roses, perennials, and even vegetable rows helps keep pests off the companion plantings. Good
companion plants include roses, geraniums, zinnias, and edible ornamental vegetables such as kale, cabbage, and Swiss chard.
If you would like more ideas on how to grow all types of plants, particularly in the Midwest, please pick up my book, the Illinois Getting Started Garden Guide online or at a book store and jump into natural gardening.
Save
The post Sweet Alyssum Growing Tips appeared first on Shawna Coronado.
March 20, 2017
Secret Pro Tips for Cut Flowers – Part II
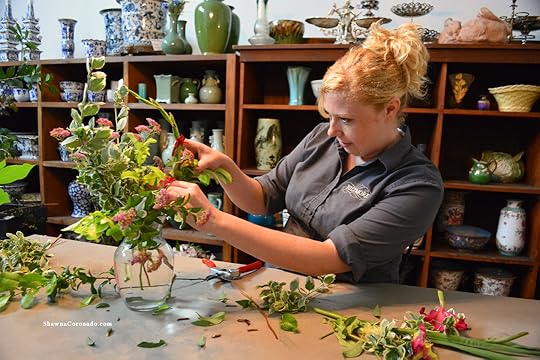
Last week we looked at the first part of my series Secret Pro Tips for Cut Flowers where Molly Reed, head florist and all around flower super star (above), gives us a tour of the floral department in the basement of the Biltmore mansion with tips for floral arranging. Above you see Molly collecting beautiful foliage from the gardens on site.
Molly and I discussed flower design and it’s effect on wellness. Fresh scents of cut flowers can bring joy to someone who is stuck inside over winter or can relieve stress and anxiety for office workers. Further evidence of this wellness factor comes from a study done by Rutgers University which shows that people receiving flowers reacted with more genuine pleasure and remained emotionally connected for days after with the giver of the flowers. Below are flower arranging tips from Molly which will help you design and keep fresh flowers longer.
How to Create a Flower Arrangement
Supplies:
Vase

[Illustration Credit – UT HS – ehs.uen.org]
Floral tape
Scissors
Flowers and foliage stems
Floral food or Homemade Anti-Bacterial Formula
Water
Tips:
Cut all flowers and foliage stems at a 45 angle under running water
Pull off any leaves that will be below the water line to prevent bacterial growth
Fill vase with floral food or homemade formula
Add water (right)
If you do not have a floral frog or placeholder of some kind, cut floral tape and criss-cross a grid over the top of the vase in order to hold stems in position
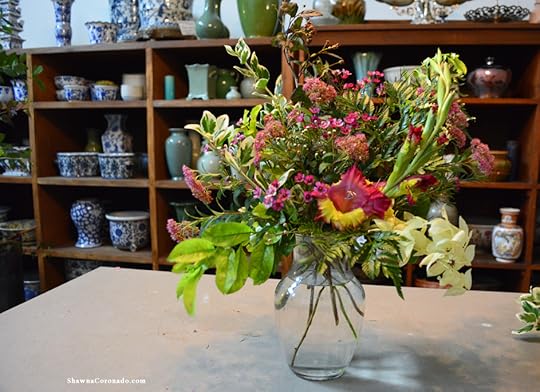
Start with greenery or foliage (Molly got hers from the gardens at Biltmore Estate above) – do an outline shape first, followed by accent pieces second. As an estimate – height of the design should be 1 1/2 times the height of the vase
Shape the floral arrangement in the design you prefer (see right)
Add smaller flowers and accent bits first and finish with large focal flowers
Molly recommends carefully dumping the water mixture out once the arrangement is finished, then adding new before displaying. Do this every couple days to maintain clean water with low bacterial growth
Thanks for joining Molly and me for our secret pro tips for cut flowers. Biltmore is known for it’s Victorian era beauty and emphasis on gardens and flowers – a passion of the Victorian’s that continues on today. If you would like to learn more about the Victoria Language of Flowers, check out this LINK from Biltmore. I hope you’ll gather some foliage and flowers this week and brighten up your season.

Save
Save
Save
Save
Save
Save
The post Secret Pro Tips for Cut Flowers – Part II appeared first on Shawna Coronado.
March 17, 2017
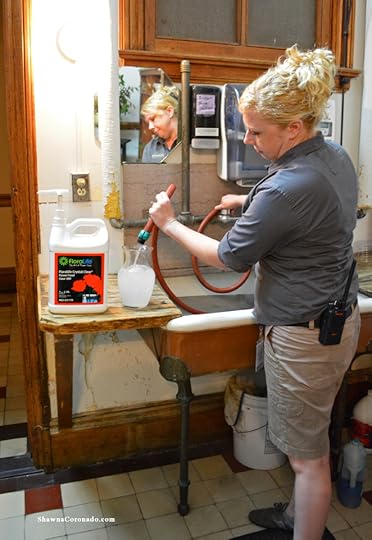
Secret Pro Tips for Cut Flowers – Part I
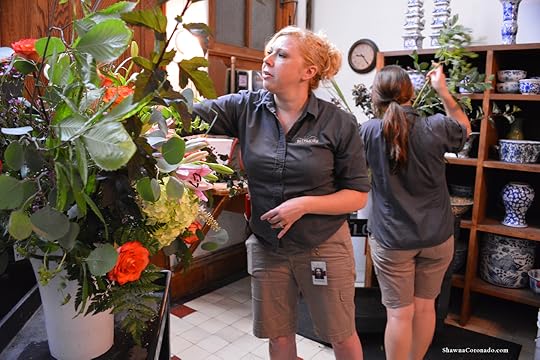
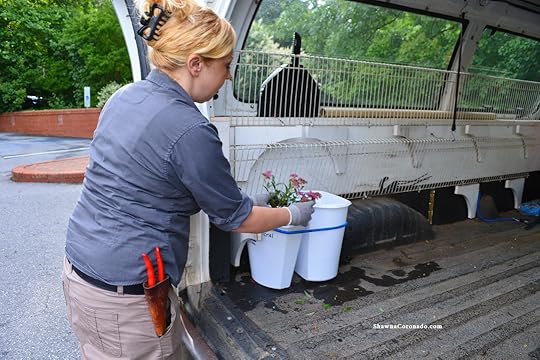
Deep in the heart of Biltmore Estate in a quiet room filled with the scent of flowers you will discover Molly Reed, head florist (above), arm deep in a floral masterpiece – one of hundreds she creates every month for the property. She is passionate about design and the “wellness effect” that the flowers have on visitors to the estate. I learned a few secret pro tips for cut flowers from Molly and wanted to share them with you in a two part series.
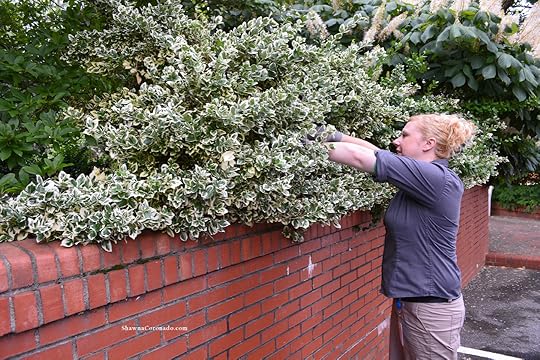
Molly and I meet one summer morning to gather flowers from the property. During the spring and summer months most of the floral arrangements are a mix of flowers which are shipped in (right) and flowers cut directly from plants at the Biltmore Estate (below). The result is a magnificent explosion of color and creativity in almost every room of the mansion. Molly shows me how she cuts flowers from shrubs like hydrangea, spirea, and bottlebrush buckeye; by cutting the blooms out near the stem with an artistic eye so that the shrub looks as if it has not been cut. This way visitors to the park can enjoy the flowers and she can use hundreds of varieties of plants in her arrangements. We ride in her truck back to the mansion where we layout the property flowers and foliage next to the existing flowers in order to create a design.
One of Molly’s best tips is a secret formula that she uses with her own floral designs at home which help preserve the flower arrangements longer by increasing the sugar content of the water and providing an anti-bacterial solution which kills bacteria in the water and allows for a longer display of beauty.
Secret Water Preservation Anti-Bacterial Formula
Fill vase with water
Add 1/4 cup clear lemon-lime soda
1/4 teaspoon bleach
Change water mixture every other day or so
Part II of the secret pro tips for cut flowers will show how Molly creates a flower arrangement so that the flowers stay in place in the vase. Biltmore Estate is in Asheville, North Carolina and over-flowing with creative floral and growing ideas. Tulips begin blooming in early April at Biltmore, so plan your visit soon in order to flower spot this season.
Save
Save
Save
Save
Save
The post Secret Pro Tips for Cut Flowers – Part I appeared first on Shawna Coronado.