Shawna Coronado's Blog, page 13
September 13, 2017
Easy Elegance® Fall Rose Maintenance Tips
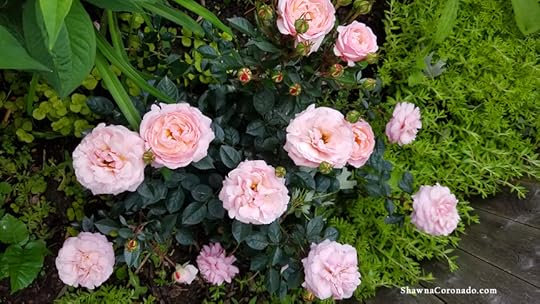
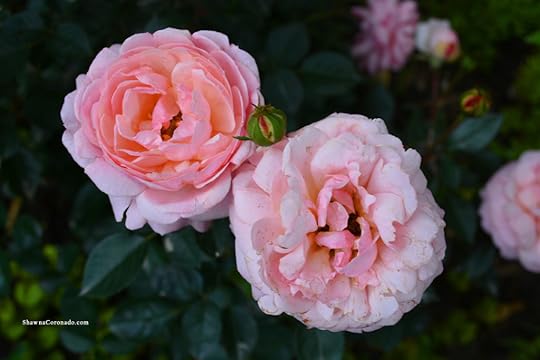
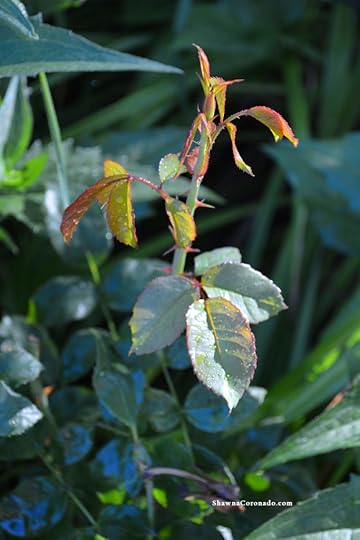
Growing roses has been challenging for me in the past, but this season my Easy Elegance® roses were planted in the back garden in a very difficult location where I ignored them most of the season. They performed very well under these harsh conditions, resisting disease and performing well in high heat. Late this season I went out behind the fence to check on the roses and noticed that although they were surrounded by perennials and weeds, they still performed like champs. We cleaned up the weeds, and pruned the roses a bit. The good news is there is no complicated pruning techniques or chemical applications are needed to keep this rose variety healthy. My favorite of the selections I planted was the Easy Elegance® Calypso Rose bush. Below are a few fall rose maintenance tips on how you prepare your roses for winter.
Fall Maintenance for Easy Elegance® Roses
Thrilled that the roses did so well this season I have been prepping all the roses for fall and winter. Fall maintenance or winter prepping is super easy with the Easy Elegance® rose line. Easy Elegance® roses are specifically bred to stand up to winter cold, so you don’t need to do any of the in-depth winter protection like you do for many other roses such as cone covering or plant tipping. Follow the below steps for fall prepping:
Reduce watering in late summer
Stop deadheading plants after September 1
Apply no further fertilizers in order to encourage root growth versus leaf growth
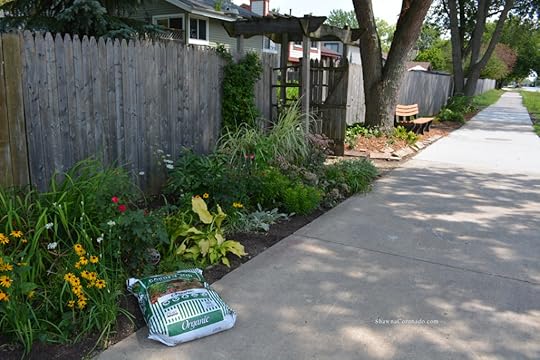
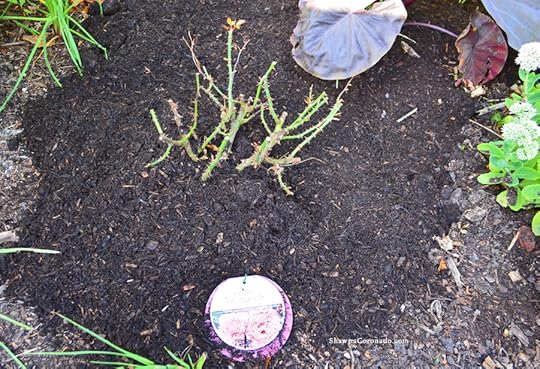
After a few nights of hard freezes mound loose mulch or compost around the base of the canes up to a height of twelve inches. (see photo above) If you do not have traditional mulch, soil or compost will work fine as an amendment and protective covering (see photo below)

Easy Elegance® Text Program –
Easy Elegance® helps you to be a successful rose gardener by sending you messages throughout the season reminding you to care for your plants. If you would like to join the text program simply Text EASYELEGANCE to 73095 for timely care tips. I used it all season and the program is a great reminder.
I learned a lot about how easy it is to take care of these roses. When I was approached by Easy Elegance® roses at the first of the season and asked to review their roses I had no idea that I would be defending them with my heart and soul. I liked experimenting with the roses and review them positively. They performed well and I found them remarkably easy to grow because there were no complicated pruning techniques and the roses are naturally disease resistant. They were beautiful all season because they are Roses You Can Grow™.
GIVE-AWAY and CONTEST!!!
If you would like to win an Easy Elegance® Prize Package – One (1) pair of Rose Gloves, one (1) Pocket Pruner, and one (1) pair of Easy Elegance branded gloves, LEAVE A COMMENT SHARING A FALL GARDEN TIP IN THE COMMENTS BELOW.

This is a sponsored conversation written by me on behalf of Easy Elegance® Roses. The opinions and text are all mine. Special thanks to Easy Elegance for allowing me to tell the story of Fall Rose Maintenance Tips.
This is a sponsored conversation written by me on behalf of Easy Elegance Roses. The opinions and text are all mine.
Growing roses has been challenging for me in the past, but this season my Easy Elegance® roses were planted in the back garden in a very difficult location where I ignored them most of the season. They performed very well under these harsh conditions, resisting disease and performing well in high heat. Late this season I went out behind the fence to check on the roses and noticed that although they were surrounded by perennials and weeds, they still performed like champs. We cleaned up the weeds, and pruned the roses a bit. The good news is there is no complicated pruning techniques or chemical applications are needed to keep this rose variety healthy. My favorite of the selections I planted was the Easy Elegance® Calypso Rose bush. Below are a few fall rose maintenance tips on how you prepare your roses for winter.
Fall Maintenance for Easy Elegance® Roses
Thrilled that the roses did so well this season I have been prepping all the roses for fall and winter. Fall maintenance or winter prepping is super easy with the Easy Elegance® rose line. Easy Elegance® roses are specifically bred to stand up to winter cold, so you don’t need to do any of the in-depth winter protection like you do for many other roses such as cone covering or plant tipping. Follow the below steps for fall prepping:
Reduce watering in late summer
Stop deadheading plants after September 1
Apply no further fertilizers in order to encourage root growth versus leaf growth
After a few nights of hard freezes mound loose mulch or compost around the base of the canes up to a height of twelve inches. (see photo above) If you do not have traditional mulch, soil or compost will work fine as an amendment and protective covering (see photo below)
Easy Elegance® Text Program –
Easy Elegance® helps you to be a successful rose gardener by sending you messages throughout the season reminding you to care for your plants. If you would like to join the text program simply Text EASYELEGANCE to 73095 for timely care tips. I used it all season and the program is a great reminder.
I learned a lot about how easy it is to take care of these roses. When I was approached by Easy Elegance® roses at the first of the season and asked to review their roses I had no idea that I would be defending them with my heart and soul. I liked experimenting with the roses and review them positively. They performed well and I found them remarkably easy to grow because there were no complicated pruning techniques and the roses are naturally disease resistant. They were beautiful all season because they are Roses You Can Grow™.
GIVE-AWAY and CONTEST!!!
If you would like to win an Easy Elegance® Prize Package – One (1) pair of Rose Gloves, one (1) Pocket Pruner, and one (1) pair of Easy Elegance branded gloves, LEAVE A COMMENT SHARING A FALL GARDEN TIP IN THE COMMENTS BELOW.
This is a sponsored conversation written by me on behalf of Easy Elegance® Roses. The opinions and text are all mine. Special thanks to Easy Elegance for allowing me to tell the story of Fall Rose Maintenance Tips.
The post Easy Elegance® Fall Rose Maintenance Tips appeared first on Shawna Coronado.


September 4, 2017
Plant Milkweed for the Monarchs
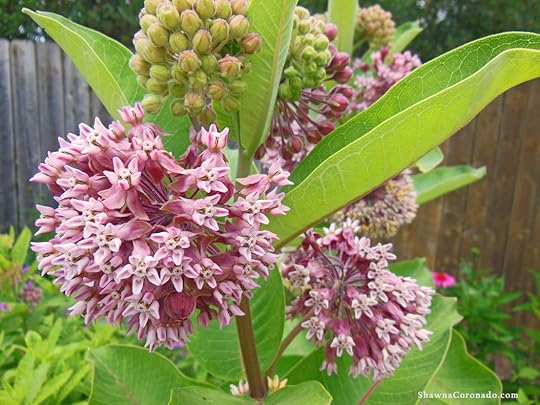
When I was a young girl growing up on a Midwestern farm, milkweed grew prolifically in ditches and along fence rows. The plant looks rather uninteresting on a day-to-day basis, but it is truly an essential monarch butterfly garden plant. When they bloom (see photo), the air is filled with the most magnificent fragrance from the milkweed flower. Seductively sweet milkweed blooms attract butterflies to their nectar, particularly monarch butterflies that use the plant as a host to lay their eggs, harbor the monarch caterpillar, and feed the newly emerged butterflies. Native Americans used milkweed for making twine, rope, and medicines. Milkweed plants can be toxic to pets and humans, so place the plants in gardens away from areas where children and pets might be tempted.
Botanical name — Asclepias syriaca
Bloom Period and Seasonal Color — Summer; pale pink flowers
Mature Height × Spread — 5 feet × 2 feet
Added Benefits – Attracts Butterflies
Sun Requirements – Sun
When, Where, and How to Plant – Milkweed is fairly drought tolerant and performs well in dry, poor soils. Do not plant in areas with standing water. It’s most commonly and easily propagated via seed; milkweed will self-seed in the landscape if seedpods are not removed prior to splitting open. Milkweed should be planted in fall when the seeds will be exposed to up to six weeks of cold conditions. Milkweed can spread somewhat rapidly by rhizomes and often form extensive colonies.
Advice and Care – There’s absolutely no need to fertilize; don’t over water. While aphids and a variety of milkweed beetles can commonly be found on milkweed, do not spray or treat the plants in any way as the butterfly larvae on the plant will be killed with chemical treatments. Cut stems at the base of the plant in late winter in order to clean up the garden and prepare them for the spring growth season. No other heavy maintenance or care is required. Broken stems produce a white, sappy latex liquid that can cause skin irritation. Wear gloves when transplanting or digging the milkweed. To collect milkweed seeds directly from the plant, collect the seedpods after they have split. Hold the end and gently strip the seeds. These seeds can be stored in a paper bag in a cool, dark location until ready to use. It typically takes two to three seasons for the seedlings to develop into flower-producing plants.
Companion Planting and Design – While this plant is considered to be too vigorous and weedy for borders, it does marvelously in butterfly gardens or naturalized in prairies, meadows, and native plant areas. Plant milkweed with sunflowers, Russian sage, black-eyed Susans, butterfly weed, and other drought-tolerant plants for a colorful and ongoing variety of bloom throughout summer.
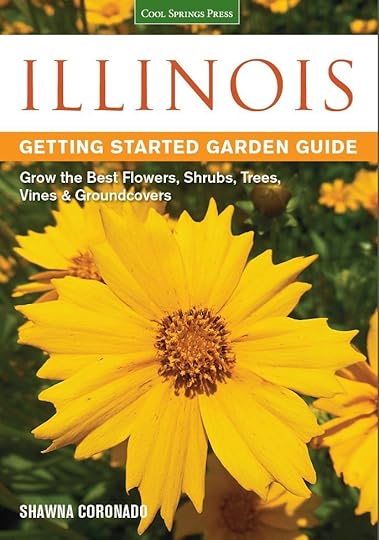
Growing milkweed is just the beginning – there’s so much to grow! If you would like more ideas on how to grow all types of plants, particularly in the Midwest, please get my book, the Illinois Getting Started Garden Guide.
The post Plant Milkweed for the Monarchs appeared first on Shawna Coronado.
August 31, 2017
Garden Clothing Review
When I first began the journey with spinal osteoarthritis treatment, I was in tremendous pain. The most obvious thoughts on my personal healing agenda were how to exercise and strengthen my body in order to have less pain and how to eat better so that my inflammation would go down. These two categories became my focus points. As I began sharing this story publicly I received hundreds of notes from women who suffer from chronic conditions other than spinal-related pain and these people shared their stories privately with me. They all requested answers for every day concerns outside of gardening and food, like how to use kitchen tools, how to clean, how to dress, how to walk, and how to drive with less chronic pain. Today’s garden clothing review is in response to these ladies who need answers. I will do my best to continue bringing product reviews and smart ideas forward to help all of you with your chronic pain conditions.
Wearing clothing that is looser makes it easier for someone with chronic pain to pull clothing on and off. Today’s reviews focus on two products – Boody Eco Wear and Rosie’s Workwear – both products offer light weight comfort and ease of wear while allowing you to do all the normal worky-things you do in your life and in your garden.
Boody Review
First let’s talk about the white t-shirt I’m modeling below in my garden. This Boody Eco-Wear V-Neck Shirt is the softest shirt I have ever worn. It feels like silk or a wisp of feathers and I’m not exaggerating in the slightest. It’s made from bamboo which has not been chemically treated which makes this particularly good for people who have sensitive skin or who might be going through chemo therapy. Very very soft and stretchy, it’s wonderfully easy to put on. If white shirts aren’t your thing, this t-shirt comes in black as well. I got the white shirt dirty in the garden and it washed out quite easily. This shirt would be excellent for yoga, but would not be good for painting projects and that sort of thing because of the white color. I am wearing size large in this image. My review is definitely positive, although I think I’d like the shirt even better for wearing under scratchy sweaters and perhaps even for sleepwear.
Rosies Workwear Review
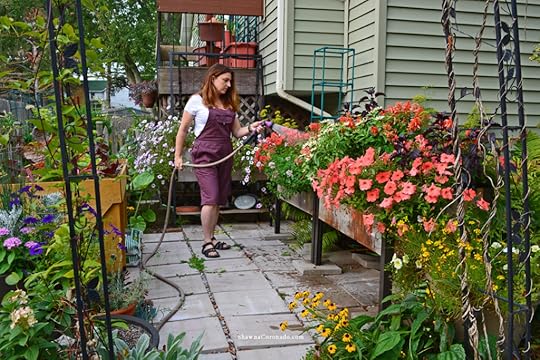
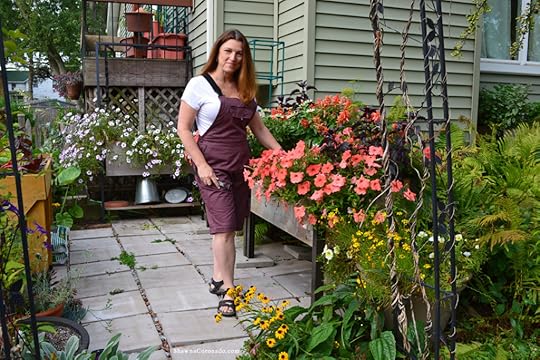
Next let’s chat abut the Rosies Workwear Overalls in Eggplant – WOW WOW WOW! My review on this product is over-the-top positive. These overalls are perfect for any season because YOU CAN ZIP THE LEGS OFF and turn them magically into capri-overalls. I LOVE THIS FEATURE! Typically overalls are too heavy or too long. This overall is the “Short Small” size and as a woman who lost two inches because of my spinal osteoarthritis, I’m deeply appreciative of the fact that the crotch of the overalls are not down to my knees.
Rosies Workwear fits well and better yet, you can snap the bibs together while you are not wearing them and then step into the pants legs and slip the bibs up over your shoulders without having to squeeze your hands tight or hurt your back. This is perfect for my osteoarthritis condition and I know it would be helpful for so many of you with chronic pain as well. These overalls are tough, but made for a women’s figure. The overalls are made for hard work in the garden as well and wash very well. These clothes are great if you are a professional landscaper or horticulturist or especially an ordinary every day gardener. I think these overalls are far more than fashionable; they are built durable for REAL work in the garden by REAL gardeners who have issues and concerns about being active.
Both Rosies Workwear and Boody Eco-Wear get an “A” review after I put them through the Shawna-marator garden clothing review experience. My advice on both the clothing pieces is to wash them following directions and be sure to hang them to dry to increase their life and wear value. Very special thanks to both Rosie’s and Boody for sending the clothing out for me to test.
The post Garden Clothing Review appeared first on Shawna Coronado.
August 24, 2017
Garden Mulch Can Be Toxic
Your garden mulch might be toxic – this season I did a lot of research on mulch and I am concerned about the level of toxic chemical exposure for gardeners because garden mulch can be toxic. According to the UMassAmherst Center for Agriculture, Food, and Environment, mulch “comes from recycled wood, i.e. wood scraps, wood pallets, and wood reclaimed from construction and demolition waste”. This wood is often used for high-end dyed mulch because it is extremely dry and ready to absorb the dyes at the mulch processing facility. Dying the mulch covers up the ugly wood and enables companies to charge the end consumer more for a product which is less-than-perfect.
Unfortunately, recycled waste bark and wood is often contaminated with chemicals such as chromated copper arsenate and creosote. Construction and demolition waste seems to have the highest chemical levels that negatively impact the soil in your garden. Another form of chemical exposure happens when mulch is “treated” with pre-emergent herbicides. The idea of this treatment is to keep weeds down, but it also prevents you from planting seeds in your soil because the herbicide stops seeds from growing. Having these types of chemicals in your garden is not good for you or the environment.
3 Reasons to Consider an Organic Mulch Product –
Organic mulch is certified so you can be assured your organic vegetables and herbs will be safer to eat

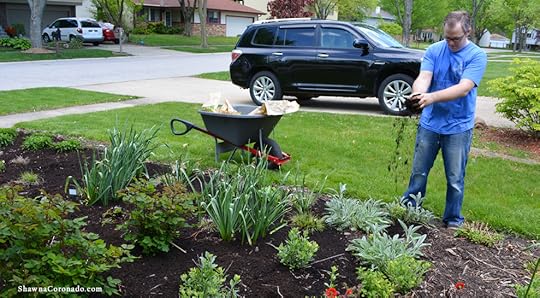
Organic mulch is better for your regional water table and the environment as a whole because you know what chemicals – or lack of chemicals – will be put on your garden (top photo is my garden with organic mulch)
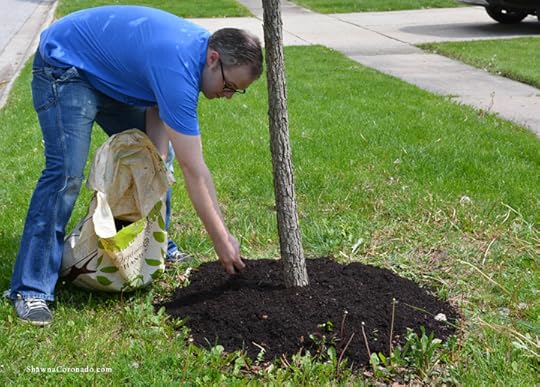
Organic mulch is safe for you to use without gloves (see my friend Steve Kroiss helping in the garden above) and reduces chemical exposure to the gardeners on your property
How do you know if your mulch is organic? If you use chipped wood or bark from your own property, chances are you will be able to determine how much chemical exposure has happened to your trees and shrubs. Another way is to purchase organic bagged mulch. This season I used Organic Mechanics® Organic Hardwood Bark Mulch with great results. This organic mulch looks great in your garden and is safe for kids and pets. It is a mix of hardwood bark mulch and compost and is 100% organic so it helps with beneficial biology in your garden areas.
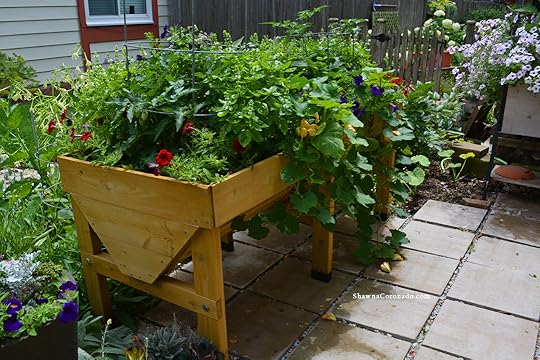
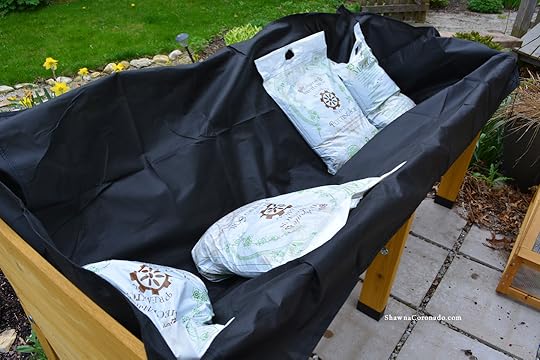
I used the mulch to rebuild several gardens, mulch my native front lawn bed, use around my baby oak tree, and to top off my elevated beds. Above you see the Classic VegTrug Planter growing like crazy even though I did not water every day, because mulch helps hold the moisture for the plants so you can water less often. I also used Organic Mechanics® Premium Blend Potting Soil to fill the elevated bed for planting. Below my friend Steve Kroiss is helping me mulch my native and drought tolerant plant beds in the front garden.
Since your garden mulch might be toxic, it is important to research the source of your mulch whenever possible. Taking it a step further by using organic mulch can help with chemical exposure for you and your family.
The post Garden Mulch Can Be Toxic appeared first on Shawna Coronado.
August 9, 2017
Drinking Water Safe Garden Hoses for Organic Gardens
This post contains sponsored videos and links from Flexzilla Garden Hoses. However, to be clear, I really do use these garden hoses in my garden and my review is based on my real life experiences with the product and opinion based on research within the industry.
If you are gardening with a hose that is filled with lead and BPA – a standard American garden hose by the way – then how can you grow organic vegetables in your garden? Your veg is being sprayed with the chemicals that come out of a drinking hose. If you need to water your garden, drinking water safe hose use is the way to go to prevent heavier chemical absorption by your flowers, herbs, and vegetables.
Summer has become a time when I am focused on what foods I am consuming because I often wonder what specific chemicals might cause a reaction in my body. After my osteoarthritis diagnosis I have noticed that certain chemicals trigger a pain reaction, preservatives for instance. With this in mind, my goal has become focused on lessening my chemical exposure. Watering my garden with a drinking water safe hose is a smart plan for an organic garden as it brings the plants one step closer to healthy for you and your family.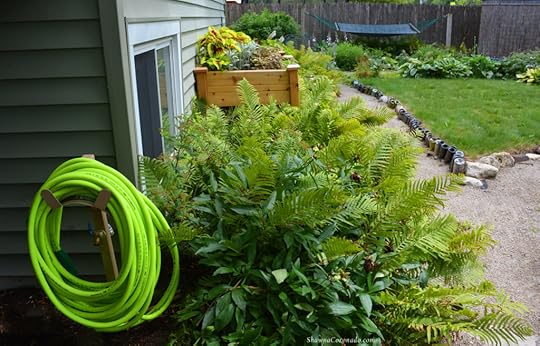
This post contains sponsored videos and links from Flexzilla Garden Hoses. However, to be clear, I really do use these garden hoses in my garden and my review is based on my real life experiences with the product and opinion based on research within the industry.
Originally I learned about Flexzilla® Garden Hoses at an event at P. Allen Smith’s in Arkansas. The hoses are drinking water safe and are engineered with a lightweight Flexible Hybrid Polymer to lie flat and eliminate kinking under pressure. Above you see the Flexzilla Green hose resting on a hose stand from Liberty Garden Products in my back garden. These hoses are flexible making it easy to maneuver around trees, bushes or other obstacles and, most importantly, making your drinking water safe hose good to sip water from or water your edibles in the garden.
Save
Save
Save
The post Drinking Water Safe Garden Hoses for Organic Gardens appeared first on Shawna Coronado.
August 7, 2017
How to Grow Big Bluestem Grass

Big bluestem or Turkey Foot Grass is a perennial bunchgrass with greenish blue stems that can grow between 4 to 8 feet tall. It has interesting seedheads that branch into three parts that resemble a turkey’s foot, hence its nickname. Big bluestem is known as the “king of the prairie” and is one of the top four native grass species that colonized most of the prairies of central North America. Cattle have been quite destructive to this native species: because the animals are not migratory, they will decimate areas of grass to the root level. Big bluestem is an essential plant for a prairie bird garden as it provides cover for more than twenty species of songbirds and nesting sites and seeds for sparrows, wrens, and meadowlarks. Below is an excerpt from the Illinois Getting Started Garden Guide which can help you get started with this astoundingly special plant for your garden.
Botanical name — Andropogon gerardii
Bloom Period and Seasonal Color — Late summer to early fall; green or blue-green stems; russet, purple, or bronze blooms
Mature Height × Spread — 4 to 8 feet × 3 feet
Added Benefits – Attracts Beneficial Insects
Sun Requirements – Sun, Part Sun, Part Shade
When, Where, and How to Plant – Big bluestem prefers average, well-drained soils in full sun; plant this grass from seed or plants in spring. Once established, it readily self-seeds and has a spreading nature with good drought tolerance. Do not plant in fertile or overly moist soils as it will become taller, develop weaker stems, and topple over in windy conditions.
Growing Tips – Water well until it’s established, then water infrequently if you want shorter plants, or water a bit more heavily if you prefer taller plants. No fertilizer is needed.
Advice and Care – Cut or mow stems to the ground in late winter before new shoots appear in order to keep the plant clean looking in the garden; however, do not mow or cut during its active summer growth period as that could kill the plant. Big bluestem is relatively disease- and pest-free, although it’s likely to have fungal spot in shadier conditions; ignore it. Once the grass is established, digging it up to split or relocate the plant will become a challenge; big bluestem’s thick root base is tough to cut through and will take heavy spades or a handsaw to separate.
Companion Planting and Design – Big bluestems are a great selection for a bird garden. Birds use the grass clumps as protection, pick grass for their nests, and eat the seeds. Place the tall grass in clumps at the back of the garden area with seed-bearing flowers such as echinacea, black-eyed Susan, and coreopsis planted in front. Big bluestem is wonderful in naturalized prairies or in modern-day ornamental grass gardens. To highlight this native grass in a textural perennial bed, try planting it behind foxglove, Russian sage, and sea holly for a strong visual impact.
The Illinois Getting Started Garden Guide is a guide to grow all types of plants, particularly in the Midwest, please find my book online for easy garden and plant tips. Happy Gardening!
Save
The post How to Grow Big Bluestem Grass appeared first on Shawna Coronado.
July 27, 2017
Easy Elegance Roses Shrub Tips

Midsummer is a great time to give you an update on my Easy Elegance® Roses adventure. While traditional roses need extensive care such as spraying for rust or black spot, pest management, and adding extra fertilizer, I was surprised to learn that Easy Elegance® Roses are pretty easy to care for and the only consistent care I’ve tended to is dead-heading. Above you see the view of one of the rose bushes mixed in a perennial border. The border is organic and receives no fertilizer, no bug spraying, and no extra attention whatsoever – the roses are doing very well.
TEXT TIPS – The Easy Elegance Text Program reminded me to do the dead-heading and has helped me with care tips the entire season. Simply text EASYELEGANCE to 73095 for timely rose care tips.
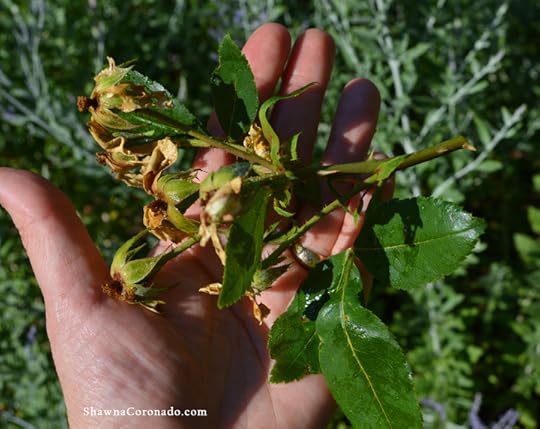
Dead-Heading How To
Dead-heading is easy – simply prune the rose back to a five-leaflet leaf, cutting sharply just above a leaflet. Above is an example of a freshly trimmed bud. You can see that it is dried up and all the petals have fallen off the plant. Once I cut the dead-head, I throw it in the compost pile so that it turns into soil for next season.
Within a few days of deadheading, each of my roses began to build fresh growth. See the photos below which features bright green growth at the top of the stems. Also note that I have no disease or pest issues with any of the roses and they are planted in the most difficult and challenging of growing conditions in my garden. Behind my fence has been a mess this season because part of the area was ripped out by the city and reconstructed. This has meant the city employees have walked – and sometimes driven – through my perennial beds where the roses are planted. Beyond that abuse, these plants are also placed where they receive no extra water or love of any kind and clearly they are doing marvelously.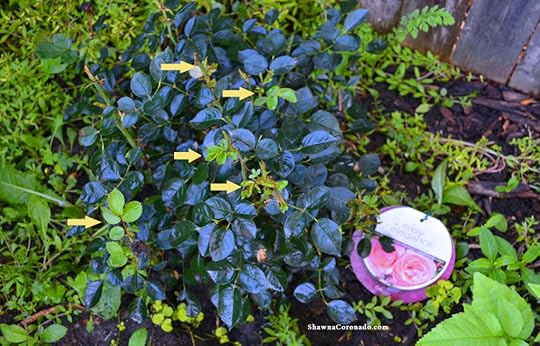

These roses are truly easy care shrub roses and I am looking forward to the late summer and early fall re-flower. With these healthy new buds forming on the shrubs, we should see a beautiful display just about the time everything else in the garden is slowing down. I will bring you another report on this summer long review of how the Easy Elegance® Roses are doing. So far they seem truly easy Roses You Can Grow™.
FYI – If you would like to see some more awesome plants and ideas on Easy Elegance® Roses, go to their YouTube page at this LINK. This is a sponsored conversation written by me on behalf of Easy Elegance Roses. The opinions and text are all mine.
For a chance to win a prepaid $50.00 Visa gift card, and a pair of Easy Elegance branded gloves, leave a comment below. A randomly selected winner will be chosen July 30th, so get your comments in today!
This is a sponsored conversation written by me on behalf of Easy Elegance® Roses. The opinions and text are all mine.
Save
Save
Save
Save
Save
The post Easy Elegance Roses Shrub Tips appeared first on Shawna Coronado.
July 17, 2017
How to Make Hosta Leaves Bigger
Hosta plants are the low work, super easy, perennial plants of the north. Park Seed has a great line of hostas to choose from. In the below photo you see two of my absolute favorite hostas; Hosta ‘Guacamole’ on the left and Hosta ‘idontknowwhaththeheckthisis’ — yep, I’m a classic gardener just like you and I sometimes lose or forget what my plants are called. I believe the plant on the right is ‘Blue Angel’, but I’m not for certain. I have a total fascination for larger hosta varieties and have picked up some tricks over the years for increasing the size of the leaf during the growing season. Watch the video to see how I divide a hosta and make the leaves bigger (if you can’t see the video, go to this LINK).
Tips for Making Hosta Leaves Bigger
Variety — #1 tip — if you want a larger hosta leaf, get a hosta that has naturally large leaves. Top “large” varieties I love include; Blue Angel, Blue Mammoth, Empress Wu, Komodo Dragon, Sum and Substance, and T Rex.
Planting — Plant in super rich, organic soil. Amend soil if needed – my favorite amendment for hosta is composted manure.
Feeding — Test your soil and see what the soil is lacking – add as recommended. Hosta plants like to be fed and adding blood meal fertilizer to the soil on top of your traditional organic fertilizer amendments surrounding the plant will give it extra nitrogen. This nitrogen will help the leaves get and stay larger.
Schedule — Fertilize at the first of the season, then again a second time 4 to 6 weeks after the leaves emerge to give the leaves an extra nudge
Watering — Water regularly at the base of the plant. Hosta survive well in drought and I rarely water the plants, depending on Mother Nature to water them with rain. However, once in a while I want to give a hosta a growing boost. Drown the plant thoroughly once a week with a heavy watering. I water until the ground is saturated, then come back with a hose two hours later and water again until the ground is saturated again. Wait a week, then repeat the process.
Light — While hostas are known as shade plants, they do indeed like sun. Full sun will burn the plants leaves in the heat of summer. Part sun or part shade will do very well for a hosta and you will notice that the leaves get larger in a semi-sunny location if it is regularly watered and fertilized. Prevent leaf scorch by giving it more water than if it were planted in shadier spots.
If you notice that your hosta leaves are mysteriously getting smaller year after year, even on the plant varieties that are supposed to be larger, there’s a good chance that something else is sucking the water and nutrition away from the plant. In my garden, the number one culprit is buried tree roots from our maple trees. If a hosta is planted directly on top of an active tree root, the tree takes all the energy it can and there is nothing left for the hosta. My suggestion would be to dig up the hosta and relocate it. Hosta plants are generally low-maintenance and grow well in garden zones 3 to 8, preferring a winter break seasonally.
Save
Save
Save
Save
Save
The post How to Make Hosta Leaves Bigger appeared first on Shawna Coronado.
July 11, 2017
Organic Control Of The Japanese Beetles
 Want a Japanese beetle? I have about 2 million of the shiny, metallic green creatures. They have copper-colored wing covers and look quite beautiful for a beetle. I can assure you, they are not nice creatures to have in your garden. In 1908 some yahoo accidentally introduced Japanese beetles to the United States. In Japan they are not a problem, in the United States they have become a crop devastating scourge. Above you see a beetle munching on my prized basil just moments before I snatched him off and ground him under my flip-flopped heel. Die! Evil Beetle! Die!
While getting rid of the beetles completely is impossible, organic control can help. Fortunately, the little devils are only around for about a month during the prime growing season and are most heavy on the East Coast and throughout the Midwestern states. This means you have about a month of hard work ahead of you. Truly the best natural control is to knock the beetles into a jar of soapy water. Japanese beetles sometimes feed in large groups, starting at the top of plants, so finding them will be easy – and they do not bite humans so are easy to snatch off the plants.
Insecticidal soap will kill adult Japanese beetles, but only if sprayed directly on the beetle. Unfortunately, beetles which are not sprayed will not die. You must approach each one individually. In my opinion, it is easier just to pluck them off and throw them in the soapy water directly.
My advice is DO NOT USE the pheromone beetle trap bags. They only seem to attract more beetles, and that is the last thing you need when trying to control the population.
If you have large and repeated infestations, it would be best to check your soil in late summer to discover the grub population count. It is easy to do this by lifting a square foot section of turf and checking to see if you discover more than twelve grubs or so in the area. If so, you can try treating your lawn with some form of organic grub control such as milky spore (Bacillus popilliae), which is a bacteria that causes an infection in the grubs, or nematodes, which is a parasite that attacks larval insects.
When you get done murdering all the Japanese beetle bugs in your garden, can you come over to mine and help me out? We can make it a picnic, there will be martinis and a happy little celebration. I’ll see you then!
Save
Save
The post Organic Control Of The Japanese Beetles appeared first on Shawna Coronado.
July 1, 2017
Native Plants are a Smart Garden Choice

Whether mixed in heavily or lightly in your landscape, native plants and wildflowers are an amazing addition to any garden, both for their beauty and their value to the environment. Native plants attract favorable insects, butterflies, songbirds, hummingbirds, and wildlife that live in your specific region of the state. They eliminate the need for pesticides or herbicides, require very little watering once established, and offer a gorgeous contribution to the modern landscape. This excerpt, below, from my book the Illinois Getting Started Garden Guide tells why.
Native Plants Solve Problems
Consistently, native plants are the superheroes in your garden as they solve many challenging problems. For example, do you have heavy clay soil in your garden? Native plants have deeper roots that break up hard clay naturally. If you have a particularly wet spot on your property where grass won’t grow and other perennials drown, a native plant rain garden could solve that problem. Native plants have the ability to soak up large quantities of water, particularly if you plant water-loving natives. Alternately, the same water-loving plants will survive drought, wind, and other harsh conditions and come back swinging like a champ. There is a native plant to solve nearly any landscaping difficulty.
As convenient problem-solvers in the garden, native plants can be intermingled amongst traditional perennials, trees, and shrubs as working tools that help you with your difficult landscaping issues. They are also solutions we should all be tapping into for our environment.
Ecological Value
Encouraging biodiversity in your landscape means you are creating a more sustainable landscape that requires less maintenance and work. Native plants require minimal watering, survive difficult and variable conditions, can have four-season interest, and can live for decades. Planting natives creates a wildlife habitat, which can be a beautiful contribution to your birding or pollinator garden. More important, by bringing insects, birds, amphibians, and mammals into your landscape, you are solving a problem: the more wildlife you have, the fewer bad insects you’ll have eating the plants. Native wildlife, particularly birds, eat seeds and insects.
Use native plants to help your greater community with storm water management: natives are excellent in rain gardens, bioretention areas, and wetland retention basins because they slow down and absorb masses of rainwater, enabling a reduction in the magnitude and speed of storm water run-off issues.
Native plants are often deer resistant. With well over 500,000 deer in the state [of Illinois where I currently live], planting more native plants makes common sense if your garden is plagued by the animal. Deer do not prefer the aromatic foliage of wild bergamot or the painful barbs of prickly pear cactus, for instance. A deer-resistant garden is possible if you use a mix of the right native plants.
Beautiful Gardens
In recent years, native gardens have received praise for their low chemical needs and water retentiveness, but harsh criticism as well for their wild look in a traditional garden. Planting natives in a design just as you would a more traditional landscape tree, shrub, or perennial, and then maintaining it properly means that your garden can look attractive, not weedy or wild.
Native flowering vines, shrubs, trees, and wildflowers offer an enormous range of textures, colors, and shapes to create astounding seasonal displays. Whether you’re designing a natural prairie or a contemporary urban landscape design, natives should be a part of your plan. You’ll solve soil and insect problems, create a haven for pollinators and other wildlife, enjoy more success in your entire landscape plan, and help the environment as well.
If you would like more ideas on how to grow all types of plants, particularly native plants and wildflowers from the Midwest, please get the Illinois Getting Started Garden Guide.

Save
The post Native Plants are a Smart Garden Choice appeared first on Shawna Coronado.