
Sam Fury's Blog, page 26
May 19, 2018
Land-Based Water Rescue Techniques
Learn how to save someone from drowning using land-based water rescue techniques. Land-based rescue techniques are safe to use by almost anyone. Here they are in escalating order, i.e., only use the second one if the first doesn’t work.
GET YOUR FREE SWIM WORKOUTS AND WATER RESCUE SKILLS SCHEDULE
The information in this post is from the book “Swim Workouts and Water Rescue Skills” by Sam Fury.
Swim Workouts and Water Rescue Skills: Techniques to Swim Faster, Longer, and Safer (Survival Fitness Book 9)

Price Disclaimer
Land-Based Water Rescue Techniques
Watch the victim as much as possible while preparing his rescue. This way, if he goes under you can tell others the best place to look. If a second person is present have him watch the victim while you find equipment and/or help.
Shout and Signal
Your victim may be in a panic. Sometimes giving simple instructions will be enough for him to save himself. Get his attentional by waving and shouting. Then, in a loud, clear voice, tell him to kick his legs and push towards you or the nearest safe spot (waters edge, shallow water, etc.).
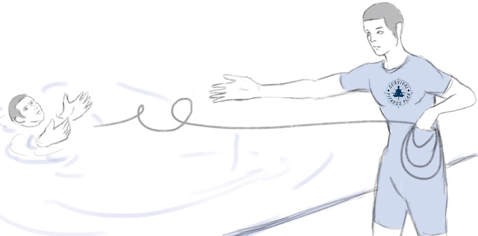
Throw Rescue
Look for something the victim can use to float on and throw it to him. The object must be small enough for you to throw but buoyant enough for the casualty to use as a float. Aim it so the victim can reach it, but do not hit him in the head. Allow for wind and current and aim upstream of the victim. Once he has the object, instruct him on how to paddle to safety. Unless it presents more danger, he should swim with the current.
Tossing a rope is also considered a throw rescue. Throw one end fo the rope to him and then help to pull him to safety. Stay back at least 1 meter from the water’s edge to prevent you from falling or getting pulled in.
LEARN HOW TO SURVIVE A RIP CURRENT
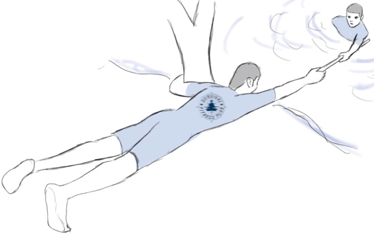
Reach Rescue
Find something that you can reach out to the victim with from dry land, e.g., a stick. Lie down at the edge of the water while reaching out. If possible, also hold onto something. Lying down and holding onto something prevents the victim from pulling you in.
GET YOUR FREE SWIM WORKOUTS AND WATER RESCUE SKILLS TRAINING SCHEDULE
Swim Workouts and Water Rescue Skills: Techniques to Swim Faster, Longer, and Safer (Survival Fitness Book 9)
Price Disclaimer
Photo Credit: Alejandro Pena.
Did you find this article about land-based water rescue techniques useful? If so, please share it with your friends.
The post Land-Based Water Rescue Techniques appeared first on Survival Fitness Plan.


May 6, 2018
Safe River Crossing Techniques
Learn about wading, swimming, and other safe river crossing techniques. This post also includes ways to cross a river with rope or an improvised raft. You will also learn how to cross bogs, swamps, marches, quicksand, and more. When crossing a body of water with no bridge you need to use safe river fording techniques. They will give you the best chance of making it to the other side unharmed.
GET YOUR FREE SWIM WORKOUTS AND WATER RESCUE SKILLS SCHEDULE
The information in this post is from the book “Swim Workouts and Water Rescue Skills” by Sam Fury.
Swim Workouts and Water Rescue Skills: Techniques to Swim Faster, Longer, and Safer (Survival Fitness Book 9)
Price Disclaimer
Contents
How to choose where to cross a river
Ways to wade across a river
Waterproofing a backpack
Solo wading
Group wading
Inline crossing wading
The best way to swim across a river
Improvised floatation aids
How to make a floating backpack
River crossing rope technique
Looped rope river crossing
Line river crossing technique
Best rope throwing technique
Improvised raft building techniques
How to make a brush raft
How to make a pressure raft
How to build a bamboo raft
River rafting tips
How to escape quicksand, bogs, swamps, etc.
How to cross swamps and bogs
Surviving quicksand
How to escape from quicksand if you fall in
How to swim though dense vegetation
How to cross a mangrove swamp
How to move through back bays
Conclusion
River Crossing Techniques
How to Choose Where to Cross a River
It is very important to find a safe crossing point before attempting to cross. When practical (and not dangerous), it is best to scout the river from an elevated perspective.
When choosing where to cross a river, unless you can jump it, narrow is not best. Look for straight, wide, and shallow water. Current is faster at the bends and usually deeper in narrow channels. Lots of debris is also a sign of fast flow. Test the current by throwing a branch in and seeing how fast it goes.
Although it may be wider, where a river breaks into channels is usually a good crossing location. The energy of the current dissipates and there may be small patches of land where you can take breaks.
Mild ripples are generally safe to cross. Whitecaps (small, surface breaking waves) will be slippery.
Also, check downstream 100 meters of where you plan to cross. Make sure there are not any hazards that you could get swept into.
Consider your entry and exit points. An easy exit point is especially important. You want something low and open so you don’t have to climb through or up anything.
You may be able to avoid getting wet if you find a fallen log that spans the width of the river. If you do find one, don’t try to walk over it. It is much safer to straddle it and scoot yourself across. You must be very sure it will hold your weight. When you are in a group, only cross one person at a time.
LEARN THE BEST WAYS TO SWIM IN OCEAN WAVES
Ways to Wade Across a River
Wading is a method of walking through water. Use it solo or in a group to cross water no deeper than thigh height.
When learning how to wade across a river, take your pants, shirt, and socks off. This is to lessen the water’s drag. Doing this also gives you dry clothes on the other side.
Keep your shoes on. You don’t want to risk damaging your feet and they will also give you more traction.
Tie your clothing to the top of your pack or in one bundle if you don’t have a pack. The idea is to keep everything together so it is easier to find if you have to discard them while crossing.
If wading across with a pack, waterproof the contents. Carry it well upon your shoulders. Leave your waist belt unclipped and loosen your shoulder straps so you can discard it if needed. You will not want to be struggling to get it off if the current sweeps you off your feet.
Don’t worry about having a heavy pack when crossing. It will keep you more stable.
Waterproofing a Backpack
Knowing how to waterproof a backpack will ensure you keep all your kit dry. Waterproofing your bag can also make an effective flotation device.
Double waterproof everything at the very least.
Line your pack with a large, tough, plastic bag. If you don’t want to buy a pack liner then you can use a dead-dog bag from the vet. Even a large, tough, plastic trash bag will work.
Group your things into separate, smaller dry-sacks before putting them in your pack. You could use plastic bags and/or zip-locks.
Seal all the bags watertight by following the manufacturer’s directions.
For a DIY waterproof bag, you can use generic plastic bags. The twist and fold method works well. Leave enough space at the top so you can put several twists in the bag. Fold the twisted part down over itself and secure it with some twine.
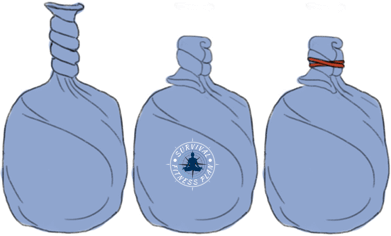
It may be faster to line your pack with two large bags, but it is not as good. This method for how to waterproof your backpack is more functional. It means you can access one group of things without having to expose everything else to the elements.
Solo Wading
When wading alone, use a strong branch to support you as you cross. Three legs are far more stable than two.
Position yourself upstream of your chosen exit point so that you can cross at a 45º angle to the current.
Face upstream and place the tip of your branch on the bottom of the river in front of you. Have it well slanted and let the current push it against your shoulder. Your branch breaks the current and provides stability. Shuffle sideways and a little downstream across the river. Use small, low, steps. Do not cross your feet.
Always maintain at least two points of contact with the bottom of the river. Don’t move too far on either side of your branch. You do not want to be leaning.
Only reposition the branch once your feet are very stable on the river floor. Shift it in small increments feeling for your next placement. Lift it off the river floor only as much as you need to.
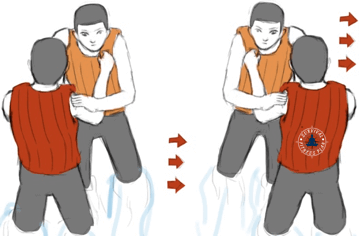
Group Wading
Wading in a group is a good river crossing challenge for teambuilding.
When two or more people need to get across you can use group wading. The technique differs a little depending on how many people you have.
For two people wading, the stronger person is upstream, and he faces downstream. The second person faces the first person (looking upstream).
Grab each other by the shoulder straps of each other’s life jackets. If you don’t have lifejackets then grab t-shirts or upper arms.
One person stays stationary while the other moves. Use the same small sideways steps as explained. Next, the other moves and the first person stays still. Repeat this process.
For three to five people, huddle together and each person grabs the people on either side of him. One or more people stay stationary while the rest move. Due to the group formation, you may end up rotating the group around the stationary person/people. It is okay to do this.
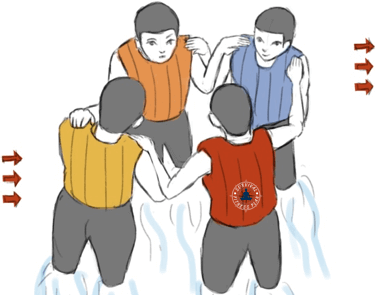
Wading in groups larger than five is not recommended as it becomes too hard to coordinate.
As with all group co-ordination activities, clear communication is very important. Agree on a plan of movement beforehand and appoint one person to direct it as you go.
Inline Crossing
Use inline crossing to move larger numbers of inexperienced people.
With this method, you use your bodies to redirect the current so people can move behind each-other.
The strongest person enters the water facing upstream. The second person moves behind the first. He takes up his position immediately to the side of the first person. They link arms.
Everyone else copies this action until they form one line across the water. More than one person can move at a time.
Once the line is steady, the first person moves down it to take his new position at the end.

Everyone does this in the order that they entered. Continue to do this until the line reaches the other side and everyone is on shore.
LEARN HOW TO LASH
The Best Way to Swim Across a River
Swimming across a river is the last resort move, but you may have to.
When swimming across a river you must allow for the drag of the current. Choose your exit point and then choose an entry point upstream. How far upstream you need to enter depends on the strength of the current and how strong of a swimmer you are. Use your best judgment.
Use the aggressive swimming technique (freestyle with your head above water).
When there is more than one swimmer it is a good idea to pair (or triple if there is an odd number) them up. Pair a good swimmer that knows proper rescue techniques with a weak one so he can help if needed.
Improvised Flotation Aids
Any medium-sized object that floats can aid you when swimming across a body of water. A football, styrofoam cooler, floating log, etc.
Lashing together smaller empty containers also works well in slow water.
Tie your flotation device to your wrist and grab onto it if you get tired. You could also hug it with one arm although you would need to improvise your stroke. Sidestroke would work well for this.
How to Make a Floating Backpack
Waterproofing your pack as described before will give it some buoyancy.
If you know you will need the pack as a floatation device, trap air inside the pack liner before sealing it off.
It is also a good idea to then put your whole bag in one more large waterproof bag. This gives an extra layer of waterproofing and means you can trap more air before entering the water. This outer layer will also prevent the actual pack from becoming waterlogged.
Tether your pack to your wrist using a quick release knot so it is easy to detach it if needed. Also, it is best if the tether is long.
You can hold onto your pack as you swim to use it for buoyancy. Another way is to push it in front of you while using the aggressive stroke.
If the pack gets waterlogged, let it go so you can swim and then pull it to shore by the tether.
LEARN WHITE WATER SWIMMING SKILLS
River Crossing Rope Technique
Having a rope increases safety when crossing water and may also increase the speed. This information assumes you only have rope and no other specialist equipment.
You can adapt some of these as a teambuilding river crossing activity for use on dry land also.
Looped Rope River Crossing
This is one of the safest ways to cross a river when you have a rope but no other special equipment. You need at least three people and a rope three times the width of the river.
The first and last people to cross should be the strongest in the group, with the stronger of the two going first.
Tie the rope into a large loop and secure the person who is going to cross first (person A) to the loop. You can tie a loop in the rope and put it over his/her chest.
As person A crosses the other two people let the rope out as needed. They must do their best to keep the rope out of the water and be ready to haul person A back if needed.
Person A is the only one secured to the rope.
When person A reaches the other side he unties himself.
As many people as needed can now cross (B), one at a time, by securing themselves to the rope and crossing over.
Extra people can help while others are crossing, but person A takes most of the strain. This person should be as close as possible to the position across from the person crossing.
Line River Crossing Technique
When you don’t have enough rope and/or people to do the looped rope crossing, you can use the line crossing.
Stretch the rope across the water and secure it on both ends. To do this you must get one end of the rope across the other side of the river.
If there is already someone on the other side you can throw it over. If not then you can attach one end of the rope to the strongest swimmer (or wader) in the group and have him take it over.
It is preferable not to attach the rope directly to the swimmer, e.g., attach it to the back of his life vest instead. That way it will be easier for the swimmer to discard the line if needed.

If you must attach the rope directly to the swimmer you can use a bowline.
One person should feed the line out as the swimmer crosses. When feeding the line out, let it drift in the current to reduce drag on the swimmer.
To secure the rope tie it to a sturdy tree, rock, or something similar. If nothing else is available you can use a human anchor. When doing so, is best to have at least one other person pushing down on him so he doesn’t get dragged into the water.
Once the rope is secure on both sides, people can start wading across. Wade across facing the current, using the rope for support. Apply tension to the line by leaning back a little. This will help keep you stable.
Do not cross your legs as you wade across and only move one foot at a time.
To keep the rope, the last person must release the knot and then attach himself to it. The people on the other side can pull him across if needed.
The Best Rope Throwing Technique
Before you can do the line crossing you need to get one end of it secured to the other side of the water. Knowing the correct way of throwing rope will increase the distance you can throw it.
When throwing rope, in most cases you should aim to over-throw it.
If you intend to keep one end of the rope (which is usually the case) be sure to secure it to something.
Note: Even when throwing all the rope to someone it is a good idea to secure one end. If your throw does not make it over the obstacle you can pull it back. If it does make it then un-secure your end and your friend can pull it over.
Tie a weight or a bulky stopper knot to the end you are going to throw over.
Coil half the rope on the palm of your right hand.
Coil the rest of it on your fingers.
Stand on one end to secure it, or tie it to something.

Grab the coils you made on your fingers with your left hand.
As you throw release the right-hand coil a split second before the left.
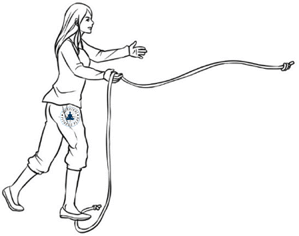
When throwing a weighted rope over a branch beware of it swinging back.
LEARN HOW TO MAKE IMPROVISED ROPE
Improvised Raft Building
If the water body you want to cross is too wide, deep, cold, and/or contains dangerous animals, it is a good idea to build a raft. It also helps for keeping you and your gear dry. Raft building is also a great river crossing game for teambuilding.
Building a raft can be very helpful, but if you do it wrong the results can be disastrous.
Build the raft near to the water in which you want to launch it.
Improvised rafts are not suitable for the ocean. It is unlikely that they will stand up to the force of an angry sea.
There are many ways to build a raft. You can use bamboo, un-rotted wood, or other floating objects.
Always test your raft before committing to using it.
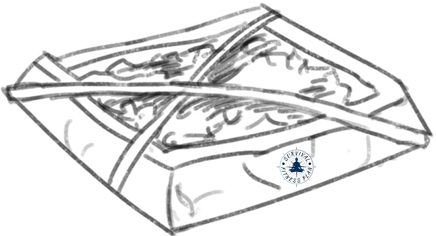
How to Make a Brush Raft
If you have a couple of ponchos in your group you can construct a brush raft. When done right it can float over 100 kilograms, which is good for one average sized person and his kit.
A tarpaulin (groundsheet) or something similar also works. As long as it is impermeable (waterproof) and about the same size as a poncho.
Spread one poncho on the ground with the inner side facing the sky. Tie a length of cord (vines work) at each corner and also one in the center of each side. Each line must be long enough to reach the opposite diagonal or side. If there isn’t dedicated tie points (grommets) then you can bunch up the material in a package around a small rock. Tie a clove hitch below the rock. The rock prevents the knot from slipping off.
Pile fresh, green brush on top of the poncho about half a meter high. It must be all brush, no thick branches or anything that could pierce the ponchos.
Next, find two small saplings and construct an x-frame. Place this x-frame on top of the brush.
LEARN HOW TO TIE A CLOVE HITCH
Pile another 50 cm of brush on top of that. Push down on it all to compress it a little.
Pull the sides of the poncho up and around the brush and then tie all the lines together with their opposites. Tie them very secure.
Spread the second poncho on the ground next to your brush package, the inner side facing the sky. Tie cord at the corners and the sides in the same way as the first time. Place your brush package onto the second poncho with the tied side facing down.
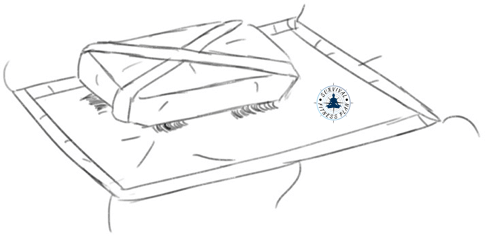
Secure it in the same manner. When you place the brush raft in the water, do it with the tied side of the second poncho facing up.
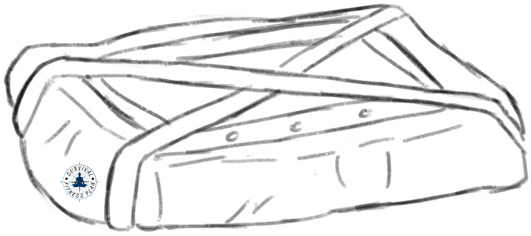
How to Make a Pressure Raft
A pressure raft takes a lot more effort to build than the brush raft. The tradeoff is that it is much sturdier and can support much more weight.
It is best to use dry, dead, standing trees for logs. Also, not all wood floats. Test the species you intend to use before constructing the raft.
Collect logs of approximately the same diameter and make them the same length. These are your base logs.
How many base logs you collect depends on how wide you want the raft.
Also, gather four logs of thinner diameter. Have them about one meter longer than the thickness of the raft. These are your pressure logs.
Lay two pressure logs on the ground at a distance apart about one meter less than the length of the base logs.
Lay the base logs on top of the pressure logs so that they are perpendicular to them. The ends should have enough overhang so they cannot slip off.
Place the other two pressure bars on top of the thicker ones. Make them in alignment and parallel with the pressure bars on the bottom.
Lash the ends of the top and bottom pressure bars together at all corners so they “clamp” the raft together. Do it as tight as you can.

How to Build a Bamboo Raft
Bamboo is one of the best materials for raft building. It is strong, flexible, and floats well. Here are instructions on how to make a bamboo raft.
Note: Bamboo that has not dried out can sink so is not good for bamboo raft construction. It can take a while for it to dry out if it is fresh cut.
Cut thick-ish bamboo in 3-meter lengths. If it is too hard to cut down then you can burn it at its base until it falls. Make a hole in the lower sections before burning it to prevent it from exploding.
Make holes in each of the lengths about 30 cm from the ends and also in the center. Make sure the holes will be in alignment when you put the lengths side by side.
Place the bamboo side by side until you get your desired width. Pass a sapling through all the holes.
Create a second row, in the same manner, using one less length of bamboo. Place this second row on top of the first with the lengths of the top row sitting in the valleys of the first.
Lash the lengths of bamboo together, top and bottom and side by side. Also lash the saplings together.
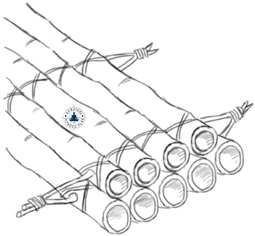
You can do this with materials other than bamboo also, but bamboo works best.
River Rafting Tips
Follow these tips for rafting to have as safe and dry journey as possible.
Always test your raft before committing to taking it across a water body.
Keep near the shore if possible and head to the bank if the raft gets out of control.
If rafting between islands, do it so the ebb takes you out and the high tide takes you to the new island. Study the currents by floating something you can observe.
If there are several rafts put one out in front as a scout. It should have the most capable members of the group and carry minimal equipment.
Use a pole to move the raft through shallow water. Use an oar through deep water.
Stay near the inside edge of river bends. The current will be slower.
Tie all equipment to the raft and make sure nothing trails over the edges.
Tie everyone to the raft (use a bowline around the waist), except in swift water. Lifelines should allow free movement but should not trail in the water.
Avoid obstructions.
When you come across rapids (or other dangerous ground) do the following:
Unload the raft and secure it to the bank.
Carry all equipment downstream by land.
If the raft is too heavy to carry past the obstacle then place at least one member downstream of the raft.
He/they should be at a safe spot where they will be able to recover it.
Release the raft.
Be sure to make repairs if needed.
At night secure the raft well and take shelter on high ground away from the river.
LEARN HOW TO SURVIVE A RIP CURRENT
How to Escape Quicksand, Bogs, Swamps, etc.
Besides rivers, lakes, and the ocean, there are other types of water bodies that you may come across. These include bogs, swamps, quicksand, quagmires, and more.
Do not try to walk across them. Lifting your feet while standing will make you sink further.
Go around them or build an improvised bridge using logs, branches, or whatever is around. If this is not viable, there are other specific methods you can use.
How to Cross Swamps and Bogs
You can cross a bog or swamp by lying face down with your arms and legs spread. Use a flotation device and slowly swim/pull yourself along. Keep your body horizontal.
Surviving Quicksand
Quicksand is a mixture of sand and water that sucks down objects that put weight on its surface. It usually occurs on flat shores, in silt-choked rivers with shifting watercourses, and near the mouths of large rivers. You can test for quicksand by throwing a small stone into the suspected area. It will sink in quicksand.
Although it has more suction, it is possible to cross quicksand in the same manner as bogs and swamps.
When walking in quicksand country carry a pole as it will help you get out.
How to Escape from Quicksand if you Fall In
When escaping quicksand you must remain calm and use slow movements.
Lay the pole on the surface of the quicksand. Use it to guide you onto your back in a floating position, with your arms and legs spread out.
Shift the pole under your hips at right angles to your spine.
Pull out your legs, one after the other, and move to the nearest solid ground.
How to Swim Through Dense Vegetation
When swimming in dense vegetation stay near the surface. Thrashing about will get you in trouble. Use a gentle breaststroke and peel away the vegetation around you as you pass through.
How to Cross a Mangrove Swamp
Mangrove swamps are usually found along tropical coastlines. They are best crossed during low tide.
If you are inland trying to get to the ocean you can work your way through a narrow grove of trees.
When you are trying to get inland you are better off going to the small watercourses (streams or channels).
Always be on the lookout for crocodiles. If you see one, leave the water and get over the mangrove roots.
If the amount of water in the swamp allows it, build a raft.
How to Move Through Back Bays
Back bays are muddy islands found behind the dunes near the ocean. They are very tiring to cross. If you must, it is better to find the deep water sections so you can swim as opposed to trekking through the soft mud. Failing that, look for firmer bottom terrain such as sand, shell or stone. Trying to cross the muddy islands is a bad idea as they are usually too soft.
Conclusion
In this post, you have learned how to cross a river safely using a variety of methods. Remember to choose where to cross the river carefully. This will depend on which of the ways to cross a river you decide to use. In shallow water, use one of the ways to wade a river. Don’t forget about waterproofing your backpack.
In deeper water, use the safest way to swim across a river as described. Use a flotation aid for kids and weak swimmers. In fact, I recommend a floatation aid for everyone. Using rope is a safe river crossing method in comparison to swimming. Learn how to throw a rope properly and always secure one end first.
For very deep or wide rivers, consider making a bamboo raft. Pressure and brush rafts are also good options. The type of raft you choose to construct will depend on what raft building resources you have. Follow the water rafting tips to stay as safe and dry as possible.
Finally, you now know how to survive quicksand and other water-based terrains.
These ways to cross a river are important survival skills to have. You can also use them as river crossing teambuilding activities.
GET YOUR FREE SWIM WORKOUTS AND WATER RESCUE SKILLS TRAINING SCHEDULE
Swim Workouts and Water Rescue Skills: Techniques to Swim Faster, Longer, and Safer (Survival Fitness Book 9)
Price Disclaimer
Photo Credit: Staff Sgt. Bennie J. Davis III.
Did you find this article about how to ford across a river useful? If so, please share it with your friends.
The post Safe River Crossing Techniques appeared first on Survival Fitness Plan.
April 22, 2018
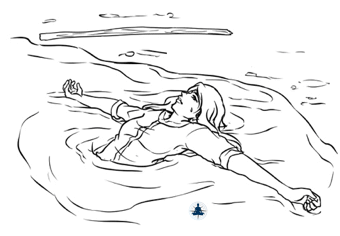
How to Survive a Rip Current
In this post, you will learn how to survive a rip current. It explains how to identify a rip current and what to do to get out of one. You will also learn the difference between tides and currents and how to use them in water survival.
GET YOUR FREE SWIM WORKOUTS AND WATER RESCUE SKILLS SCHEDULE
The information in this post is from the book “Swim Workouts and Water Rescue Skills” by Sam Fury.
GET YOUR COPY OF “SWIM WORKOUTS AND WATER RESCUE SKILLS”
Tides and Currents
Tides
Tide refers to the rising and falling of the sea. High tide is when the water is at its highest level, and low tide is when it is at its lowest level.
A few different natural forces influence tidal characteristics. It is important to check the tidal times depending on where and when you plan to visit the beach.
The change of water level due to tides can completely change the landscape within a short period of time. For example, if you walk out to a land mass in the morning, in the afternoon the path that you used may be underwater.
Currents
Current refers to the constant flow of water. It is always there and it acts differently depending on many factors. These include water volume, channel width, gradient, weather, obstructions, etc.
Although you can use water currents in your favor, they can also take you where you do not want to go. Even slow ones can knock a person off his feet and carry him out to sea/downstream.
Currents are usually slower along the inside bend of rivers opposed to the outside bend. Also, currents are faster on the surface of the water.
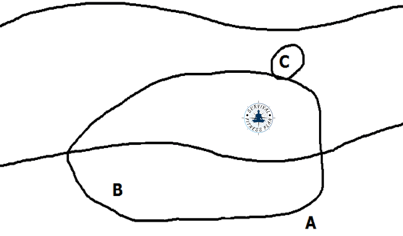
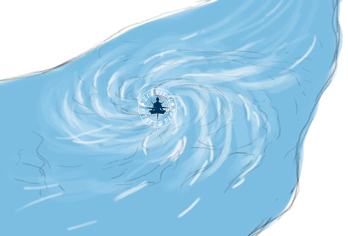
How to Survive a Rip Current
What is a rip current?
Rip currents can occur near beaches with breaking waves. They are strong currents which drag swimmers out to sea. Generally, the larger the waves, the stronger the rip current will be.
How far can a rip current take you?
There is not an exact distance since each rip current is different. The good news is that the current will always fade out, so there is a definite limit.
Did You Know?
There are over 100 rip current deaths in the US every year – US Lifesaving Association.
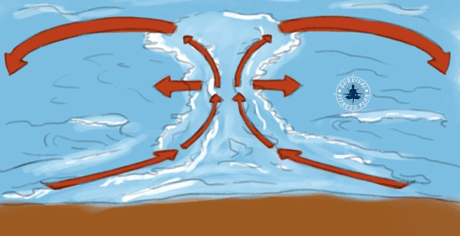
How to Spot a Rip Current
What does a rip current look like?
A channel of rippled water (more-so than the surrounding water).
Dark water (indicates greater depth).
Debris and/or sea-foam moving in a steady line out to sea.
Different colored water beyond the breaking waves.
Murky water (indicates disturbed sand by the rip).
Waves breaking further out to sea on both sides of the rip.
Look for a channel of water that is different (calmer or choppier) than the water surrounding it.
A rip current may also be present with none of these characteristics showing.

LEARN THE BEST WAYS TO SWIM IN OCEAN WAVES
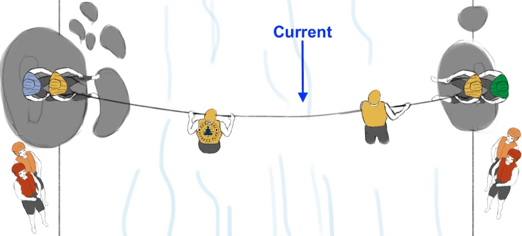
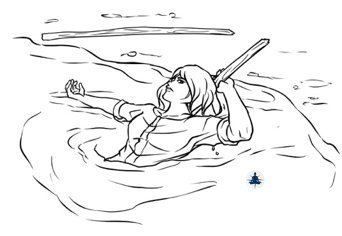
How to Swim Out of a Rip Current
Do not try to swim against it!
Stay calm.
Swim parallel to the shore until you reach the breaking waves zone, then swim back to shore.
If you can’t escape it, conserve your energy (float or tread water) and signal for help.
In this picture, the thin arrows show the direction of the current. The 4 thicker arrows are your channels of escape.
LEARN HOW TO TREAD WATER
Rip Current Video
Here is a short video about how to escape a rip current.
GET YOUR FREE SWIM WORKOUTS AND WATER RESCUE SKILLS TRAINING SCHEDULE
GET YOUR COPY OF “SWIM WORKOUTS AND WATER RESCUE SKILLS”
Did you find this article about how to get out of a rip current useful? If so, please share it with your friends.
The post How to Survive a Rip Current appeared first on Survival Fitness Plan.
April 20, 2018
Swimming in Waves – Wave Identification and Swimming Techniques
Learn how to swim in the ocean waves and how to identify different types of waves. Knowing how to identify and use them to your advantage makes swimming in waves much safer. You will also discover why waves break.
GET YOUR FREE SWIM WORKOUTS AND WATER RESCUE SKILLS SCHEDULE
The information in this post is from the book “Swim Workouts and Water Rescue Skills” by Sam Fury.
GET YOUR COPY OF “SWIM WORKOUTS AND WATER RESCUE SKILLS”
Swimming in Waves
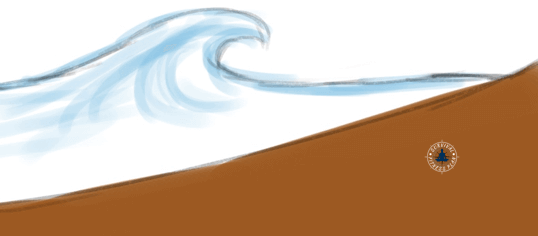
Why do waves break?
When a wave gets to shallow water the base of it slows down. Since the top part has more speed it overtakes the deeper part (the base). Then gravity takes effect and the top part crashes down, i.e., it breaks.
There are three basic types of waves to look for. Spilling, plunging, and surging.
Spilling Waves
A spilling wave is when the crest of the wave tumbles down its front. If the sandbank it breaks on is shallow it will form a “tube”.
Spilling waves occur on ocean floors with a gradual slope. They are most common with onshore winds (winds that blow across the ocean towards land). They break for longer and in a gentle fashion when compared to other waves.
They are the safest types of waves to swim in.

Plunging Waves
Plunging waves occur when the beach slope is moderate to steep or if it has a sudden change in depth, e.g., a reef or sandbar. They usually occur with offshore winds (winds that blow across the land towards the ocean) and at low tide.
These waves become more vertical than spilling waves and break with much more force. Experienced surfers often enjoy them for the “tube” they may create.
Plunging waves have a lot more potential to cause serious injury to the swimmer. It is best to not swim in them.
If caught in a plunging wave, hug your knees and roll up into a ball.
Surging Waves
Surging waves occur when long period swells meet steep beach slopes. The bottom of the wave is fast enough that the crest never forms. As a result, there is little sign of breaking/whitewash.
Surging waves are dangerous. Although the wave break is minimal, the force of the wave is still powerful. They can knock you over and then drag you out to sea.
Do not to swim when there are surging waves.
Although not waves, another thing to be aware of is rough or choppy water. Rough seas can drain your energy. It is best to get out and wait until the water is calm again.
LEARN MORE SURVIVAL SWIMMING TECHNIQUES
Riding Waves to Shore
When the waves are not too large you can use them to carry you to shore. Choose your wave and swim forward with it. Before it breaks dive down a little so the break goes over you.
Large Waves
With larger surf, it is better to swim towards shore between oncoming waves. As a wave approaches, face it and go under water until it has passed over you. Swim towards the shore as much as you can before repeating the process with the next wave.
You may get caught in the undertow of a large wave. Get to the surface to avoid getting dragged out too far.
Rocky Shores
Only try to land on rocky shores if there is no other option. It is better to do a long distance swim to an easier landing point than it is to risk injury on rocky shores.
When you have to land on a rocky shore you must choose a safe landing point. Avoid where the waves crash into the rocks with a high white spray. Instead, aim for where the waves rush up onto rocks.
Once you know where you want to land, approach slow. Use a large wave to carry you in. Get into the defensive position so you can absorb the impact.
If you do not reach the shore on the first wave, swim in the aggressive position with your hands only. When the next wave approaches, re-adopt the defensive position.
When you climb up the rocks keep your knees a little bent and your feet close together.
LEARN THE AGGRESSIVE AND DEFENSIVE SWIMMING POSISTIONS
How to Swim Through Waves
There are two simple techniques you can use when swimming against the waves.
The first method is more avoiding the wave than swimming through it. Face the wave. As it approaches, take a breath, duck down, and lean forward. Once it passes over you, resurface.
The second way for swimming through the waves is to use the dolphin dive. You can learn more about how to dolphin dive here.
GET YOUR FREE SWIM WORKOUTS AND WATER RESCUE SKILLS TRAINING SCHEDULE
GET YOUR COPY OF “SWIM WORKOUTS AND WATER RESCUE SKILLS”
Did you find this article on how to swim in waves useful? If so, please share it with your friends.
The post Swimming in Waves – Wave Identification and Swimming Techniques appeared first on Survival Fitness Plan.
April 15, 2018
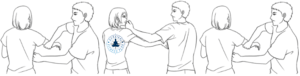
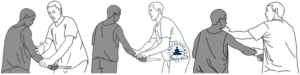
Self-Defense Combinations Hand Formula
Learn the Vortex-Control Self-Defense combinations hand formula. Once you have completed your entry and are in the check-mate position you can go into the hand formula. Some of these entry techniques are in the Survival Fitness Plan Self-Defense combinations.
GET YOUR FREE SELF-DEFENSE TRAINING SCHEDULES
The information in this post is from “The Vortex Control Self-Defense Bundle” by Sam Fury.
GET YOUR COPY OF “THE VORTEX CONTROL SELF-DEFENSE BUNDLE”
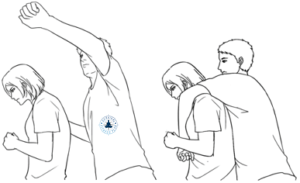
Self-Defense Combinations Hand Formula
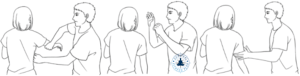
From the check-mate position, take control of your opponent’s lead arm with your rear hand. Twist his body as you hook with your lead.
LEARN THE OFFICAL SFP SELF-DEFENSE COMBINATIONS
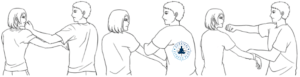
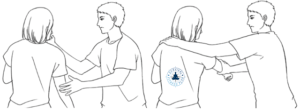
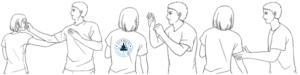
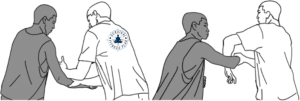
If your opponent puts his/her hand up to block the hook, curl your wrist down to guide it out of the way. Finish the curling circle and continue the hooking motion. It is one fluid movement.
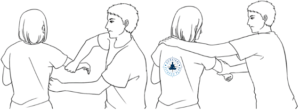
Take control of your opponent’s lead with your lead and twist his/her body back the other way. Attack your opponent’s ribs.
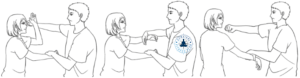
Use both your hands to jerk down on your opponent’s lead arm. Drop your weight into it to give a whiplash effect.
Immediately after pulling him down bring your lead hand back up to strike him underneath the jaw.
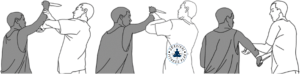
Pull your opponent’s rear shoulder as you push on his/her lead upper arm to twist his/her back towards you.
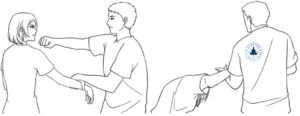
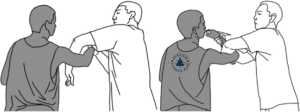
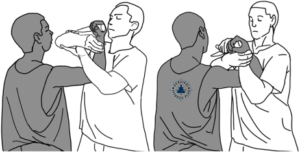
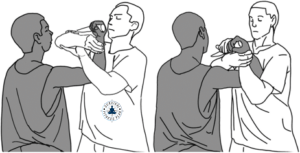
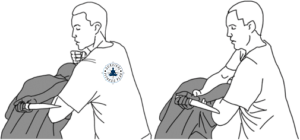
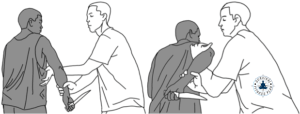
Bring your opponent to his knees by applying pressure on the suprascapular nerve. At the same time, use the heel of your foot to push down and forward on the top of his/her calf, a little below the knee.
How you do this exactly will depend on your angle in relation to your opponent.
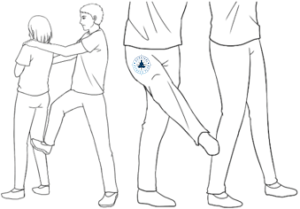
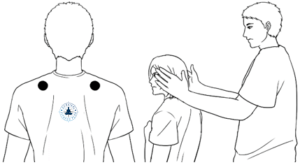
The picture on the left (below) shows the location of the suprascapular nerve. You do not have to be very accurate when applying pressure point techniques. Dig in, rub, and press your fingers around the area. You’ll know when you hit something from your opponent’s reaction.
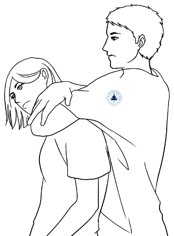
Chop down on your opponent’s suprascapular nerves. Next, Cup your hands and clap them on your opponent’s ears, i.e., with his head in-between your hands.
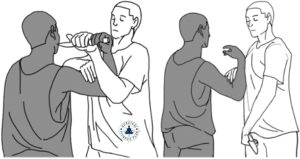
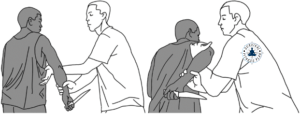
An alternative ending is to do a hammer-fist strike over your opponent’s shoulder. The ideal target would be the solar plexus. This is instead of bringing him to his knees.
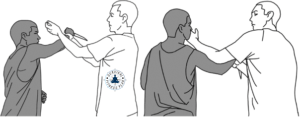
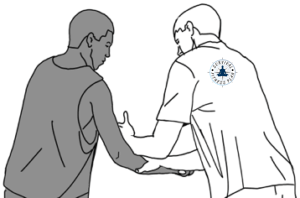
Apply a choke hold. Encircling your arms around your opponent’s neck and then squeeze them together.
Wrap your left arm around the front of your opponent’s neck and grab your right elbow. With your right hand along the back of your opponent’s neck, you grab your left elbow.
You can also apply this choke once your opponent is on his/her knees.
It is important to know that you do not have to get to check-mate before starting the formula. In a real fight, you will probably not need to go through the whole formula. Often the entry will be enough to finish a fight.
Furthermore, you need not do the formula in order. You can mix and match all the elements of Vortex Control Self-Defense as needed. Exactly what you do depends on the circumstance and your opponent’s reaction(s).
Here are a few of the uncountable variations that you may choose to use:
After attacking the ribs go into attacking your opponent’s back.
After the hammer entry go into arm pulling.
From attacking the ribs go back into check-mate. You can repeat this many times.
After the hook go into an underarm pressure lock.
LEARN THE UNDERARM PRESSURE LOCK
GET YOUR FREE SELF-DEFENSE TRAINING SCHEDULES
GET YOUR COPY OF “THE VORTEX CONTROL SELF-DEFENSE BUNDLE”
Photo Credit: By Judokickbox (Own work) [CC BY-SA 3.0], via Wikimedia Commons. Cropped.
Did you find this article on the Vortex Control Self-Defense combinations hand formula useful? If so, please share it with your friends.
The post Self-Defense Combinations Hand Formula appeared first on Survival Fitness Plan.
April 14, 2018
White Water Swimming Skills
Learn white water swimming skills and how to overcome swift water obstacles. They are useful for white water rafting safety, open water swimming, and other white water adventures. If possible, it is best to practice these techniques in a controlled environment. Use a white water park or white water swimming pool. Having a white water lifeguard present is necessary for all scenarios.
GET YOUR FREE SWIM WORKOUTS AND WATER RESCUE SKILLS SCHEDULE
The information in this post is from “Swim Workouts and Water Rescue Skills” by Sam Fury.
GET YOUR COPY OF “SWIM WORKOUTS AND WATER RESCUE SKILLS”
Contents
White Water Swimming Skills
The Defensive Position
The Aggressive Position
How to Negotiate Obstructions in Swift Water
Drops
Eddies
Entrapments
Holes
Pillows
Rapids
Rocks
Sweepers and Strainers
Undercut Rocks
Water Debris
People
White Water Swimming Skills
Before you can overcome obstacles in white water rapids, you need to adjust your swimming style depending on the situation and what lays ahead.
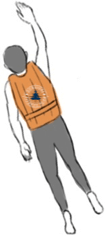
The Defensive Position
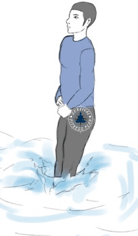
In most cases, the best thing to do when experiencing trouble in the water is to tread water and signal for help. When in swift water treading may not be practical as the current will drag you away.
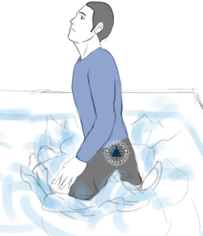
When you first fall in swift water, e.g., out of your white water kayak, adopt the defensive position. Get on your back with your feet up so you can see your toes. Float downstream feet first.
This position will enable you to see the path ahead. Guide yourself through the safest route of passage. If you meet any obstructions you can absorb the impact with your legs.
Keeping your feet up ensures they don’t get caught in obstructions beneath the surface. Never try to stand up in river rapids that are deep enough for you to float in.
When you see an obstruction you want to avoid, angle your body so that your feet point towards the obstacle. Aim the top of your head towards your destination and use a modified skulling motion to get there.
LEARN HOW TO TREAD WATER
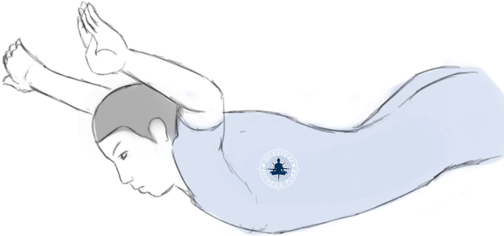
The Aggressive Position
If you see an opportunity to get to safety, and it is deep enough to do so, you can use an aggressive position to get there. The aggressive position is doing freestyle while keeping your head out of the water.
The aggressive position is very tiring so reserve it for when you need short bursts of power. You could also use breast or side stroke. They will be slower but with better visibility.
How to Negotiate Obstructions in Swift Water
An obstruction is anything in the water which changes the normal flow (current) of the water. Almost anything in the water will do this, such as rocks, branches, etc.
Drops
A drop is when water drops straight down. A waterfall is an obvious example.
Never go in the water upstream from a drop. Even if the water is shallow and appears calm before the drop, it is still very dangerous.
When going over a drop is unavoidable, ball up and try to land feet first. Landing feet first is best to protect your head. Balling up will lessen the possibility of getting caught in a foot entrapment.
If it is a high drop, as you go over the edge adopt the high-level entry position.
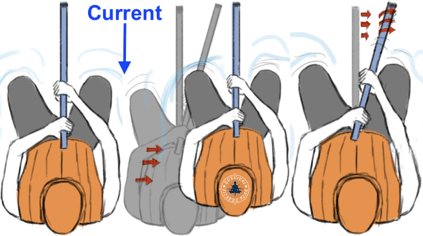
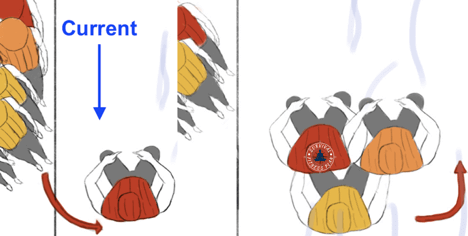
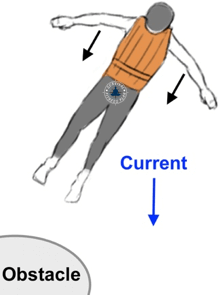
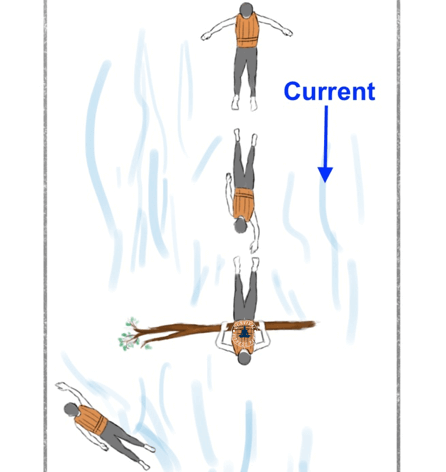
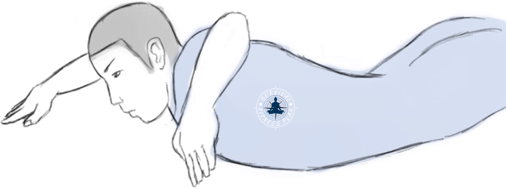
Eddies
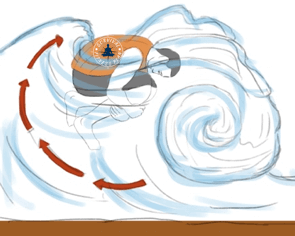
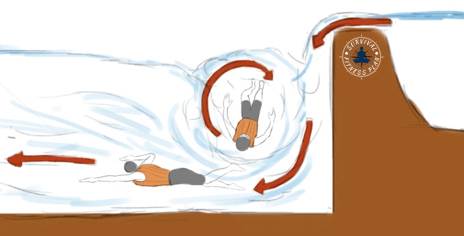
Eddies occur when water rushes around obstacles and the current comes back on itself. They are often a safe-haven since the water in the eddy is generally calmer.
The barrier of separation between the upstream and downstream water is the eddy line. Problems can occur when crossing this line, especially if the flow is fast. Unless you are in a craft that can capsize (like a kayak) you shouldn’t face much danger.

You can break through the eddy line with barrel rolls.
As you approach the eddy, place your closest hand into the upstream moving water inside it.
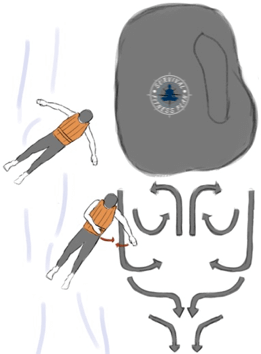
Scoop the water with this hand as you roll over onto your stomach. You are now in the aggressive swimming position.
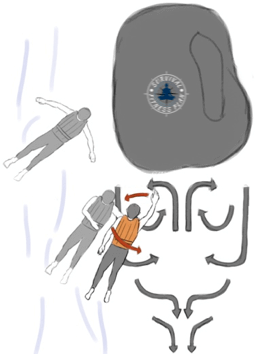
Continue to roll until you are back in the defensive swimming position.
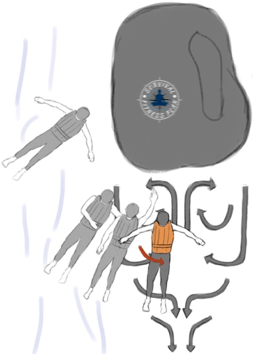
You may need to barrel roll a few times to get into the eddy. You can finish in either the defensive or aggressive swimming position.
This image is a demonstration of using defensive and aggressive swimming to get out of a river.

Sometimes an eddy can create a whirlpool effect. This is when eddies become dangerous since the whirlpool can suck you down. In this case, you should stay clear of them.
Entrapments
An entrapment is anything that you can get snagged on, e.g., your clothing snagging on a branch underwater.
To prevent this make sure all your gear and clothing is a snug fit.
A foot entrapment is when you get your foot stuck. It is very dangerous as the force of the water can hold you under.
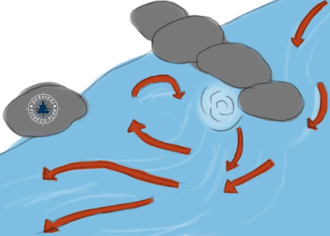
Holes
Holes occur when water flows over a ledge (such as a rock). This creates a hydraulic flow (water circulating on top of itself) which can trap things. It is like a vertical eddy and is very dangerous.
Dams and dam-like structures (weirs, spillways, ledges) have severe hydraulic action. Keep away from their downstream base.
If caught in a hole you need to relax and swim out the bottom (where the slower current flows out) or to the side.
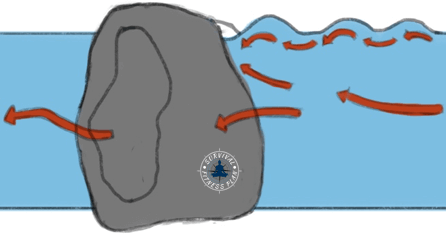
Pillows
When a rock is close to the waters surface the water hits the top of it, forcing it upwards. This creates a “pillow” of water downstream of the rock.
The more submerged a rock is, the further downstream the pillow will be. If the rock is very close to the surface the pillow will be right on top of it. With enough experience, you will be able to tell when a rock is close to the surface or not by the type of pillow it creates.
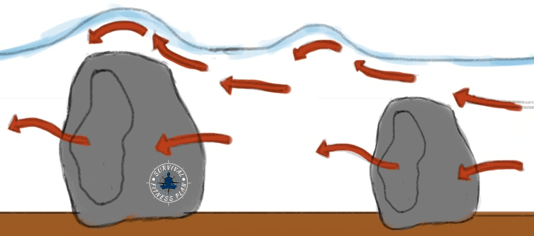
If the rock is out of the water then the pillow becomes a cushion. This is due to the water flowing up against it. When the current is strong enough, it may form a series of compression waves.
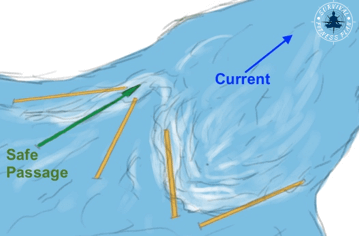
Rapids
A rapid is a turbulent section of water created by faster flowing water over obstacles, such as rocks. These obstacles may or may not break the water’s surface. This faster water is due to an increased gradient and/or a constriction in the channel.
To negotiate a rapid, look for a downstream “V” in the water (the bottom of the V pointing downstream). This indicates an unobstructed flow of water. In most cases, it will be the preferred path of passage.
Rocks
Apart from being a cause for other types of obstructions, the rock itself can present danger. Avoid these obstructions altogether by entering the water downstream of them.
Walking on slippery rocks (or any slippery surface) near water is never a good idea.
Rocks under the water’s surface can become foot entrapments. It is very dangerous and is one of the main reasons to keep your feet up in the defensive position.
When in the water heading towards a rock, use the defensive position as described before.
If you get pinned up against a rock, lean downstream to get loose.
Rocks are not all bad. They may serve as a lifeline to hold onto. They can also create eddies which can be safe havens in turbulent waters.
Sweepers and Strainers
Strainers are objects in the water that allow water to pass through them but not objects. They can be natural like branches, or artificial such as wire fences.
A sweeper is a strainer that hangs low over or into the water.
Both of these things can impede your safe passage, and they often double as entrapments.
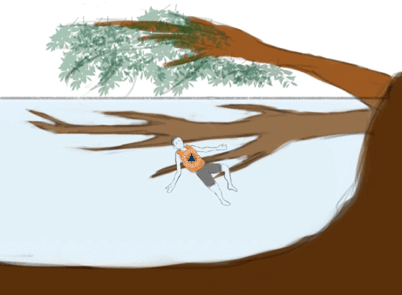
When swimming into a strainer is unavoidable, maneuver into the aggressive swimming position. Swim hard to launch yourself up and onto (or over) the obstruction.
When forced below the surface swim downstream using your hands in front of you to part the branches.
If your legs get tangled in long weeds swim downstream using only your arms.
Like friendly rocks, sometimes sweepers (not strainers) can serve as a lifeline. You might be able to use them to climb to shore.
Undercut Rocks
An undercut rock is one where the water flows below it as opposed to around. The water’s current can drag the swimmer underneath it and pin him there.
Normal river features acting strangely are good indications of an undercut rock, e.g.,
The pillow or cushion is missing
There is a boil (where the water is not flowing down or upstream) on the downstream side of the obstacle.
The eddy has weak (or missing) lines and/or an abnormal current flow.
Water Debris
Water debris is anything floating in the water. It can be either natural or unnatural, such as seaweed, logs, trash, etc.
Keep an eye out for these things and avoid them as they can become entrapments.
If there is a lot of debris, such as lots of seaweed, try to avoid it. If you must go through it then crawl over the top by grasping at it with overhand movements. When you are in a group put the strongest person first. He will create a path through the debris for the others to follow.
Manmade pools created behind dams often have many stumps lying below the surface. This is due to the cutting of trees before the flooding of the lowlands.
People
Other people can be a hazard, although more often they are a good thing in a survival situation.
When in open water there are more recreational hazards. Surfers, jet-skis, boats, etc. Stay away from areas in which these activities take place. If available, use the designated swimming areas instead.
Pollution
Another by-product of people is pollution. Water systems are often used as a dumping ground for all sorts of human and industrial waste.
Swimming in polluted waters may not have an immediate effect, but it could result in illness later.
GET YOUR FREE SWIM WORKOUTS AND WATER RESCUE SKILLS TRAINING SCHEDULE
GET YOUR COPY OF “SWIM WORKOUTS AND WATER RESCUE SKILLS”
Photo Credit: By DoD photo by Staff Sgt. Tim Chacon, U.S. Air Force. (Released) [Public domain], via Wikimedia Commons.
Practice these white water swimming skills in a safe environment. White water pools are good. To enhance your white water rafting swimming ability, join a white water swim club.
Did you find this article about white water swimming skills useful? If so, please share it with your friends.
The post White Water Swimming Skills appeared first on Survival Fitness Plan.
April 8, 2018
Universal Knife Defense Techniques
Universal knife defense techniques are those that you can use at any time. It doesn’t matter which foot you step in with, which block and/or grab you use, or what angle the attack is. There are 2 universal knife disarming techniques. Here is how you can use each of them against the four angles of attack. These knife defense techniques are part of Vortex Control Self-Defense.
GET YOUR FREE SELF-DEFENSE TRAINING SCHEDULES
The information in this post is from “The Vortex Control Self-Defense Bundle” by Sam Fury.
GET YOUR COPY OF “THE VORTEX CONTROL SELF-DEFENSE BUNDLE” TODAY
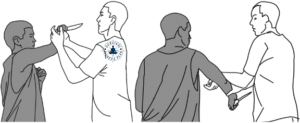
Universal Knife Defense Techniques
Universals 1A
Your opponent attacks with a right downward thrust. Defend with a left bong sau and right underhand grab.
Guide your opponent’s arm down as you curl your left hand towards you and then on top of your opponent’s upper arm.
You may choose to strike your opponent in the face.

Continue to hook down inside your opponent’s guard with your left arm until you grab your own right forearm.
Drive your right elbow into your opponent’s face and then grip the top of the knife with your left hand.
Release your right hand and move it away so you can pry the knife out of your opponent’s hand. Pry it towards the outside of his guard.
LEARN MORE ABOUT SFP SELF-DEFENSE WEAPON DISAMS
Universals 1B
Your opponent attacks with a left downward thrust. Defend with a left chop and right underhand grip.
Use your left to strike your opponent.
Continue to hook down inside your opponent’s guard with your left arm until you grab your own right forearm.
Continue the disarm as previously described.
Universals 1C
Your opponent attacks with a right straight thrust. Defend with a right chop and left overhand grip.
Pass your opponent’s right arm between your two bodies.
As you do this your right hand adopts an overhand grip on your opponent’s wrist. At the same time, your left-hand strikes him in the face.
Continue the disarm as previously described. Your right hand can stay in an overhand grip.
Universals 1D
Your opponent attacks with a left straight thrust. Defend with a left chop and right overhand grip.
Use your right hand to raise your opponent’s arm a little so you can curl your left arm under.
Perform the disarm as previously described.
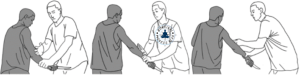
Universals 2A
Your opponent attacks with a right downward stab. Defend using a left bong sau and a right underhand grip.
As you guide your opponent’s arm down, curl your left arm so it ends on top of his right elbow.
Pass your left hand between your opponent’s arm and torso to grab the back of his shoulder. Your right hand moves your opponent’s arm back at the same time so you stay clear of the knife.
Use your left hand to apply downward pressure on your opponent’s shoulder to lock it in place.
Let go of your right hand. Bring it over your opponent’s shoulder and grab his right wrist using an underhand grip.
LEARN KNIFE DEFENSE BREAK TECHNIQUES
Pull your opponent’s wrist towards his right shoulder to apply the lock/break and then take the knife.
Universals 2B
Your opponent attacks with a left downward stab. Defend with a left chop and right overhand grip.
From there bring your opponent’s arm down and perform the disarm as previously described.
Universals 2C
Your opponent attacks with a right straight thrust. Defend with a right chop and a left overhand grab.
Step to your left so you are on the outside of your opponent’s guard. As you do this adopt an overhand grip on your opponent’s wrist with your right hand.
Once you have a good grip with your left hand, use your right arm to pass between your opponent’s arm and body.
Continue to apply the disarm as previously described.

Universals 2D
Your opponent attacks with a left straight thrust. Defend using a left chop and right overhand grab.
Pass your left arm between your opponent’s arm and body. Continue to apply the disarm as previously described.
GET YOUR COPY OF “THE VORTEX CONTROL SELF-DEFENSE BUNDLE” TODAY
Photo Credit: Senior Airman Nathan Clark. Cropped.
Did you find this article about universal knife-defense techniques useful? If so, please share it with your friends.
The post Universal Knife Defense Techniques appeared first on Survival Fitness Plan.
April 7, 2018
Safe Water Entries – Water Safety Training
Learn safe water entries as part of water safety training. They are also useful basic water rescue techniques. You can use these water entries in group water safety classes or for personal training. They are good water safety activities for children and adults alike.
The information in this post is from the book “Swim Workouts and Water Rescue Skills” by Sam Fury.
GET YOUR FREE SWIM WORKOUTS TRAINING SCHEDULE
Safe Water Entries
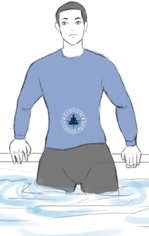
What is the safest way to enter the water?
The answer to this question depends on the circumstance. In general, you should always enter shallow or unknown waters feet first. Unknown waters are when you are unsure of the water depth, and/or if you can’t see what lays beneath the surface.
When practicing pool or open water swimming safety, be sure to follow all water safety rules. Having a water safety instructor present is a good idea.
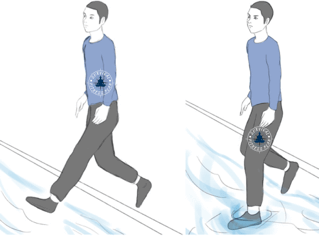
Wade Entry
When possible, the wade entry is the best way to enter unknown waters.
It is entering the water with a slow walk. Feel your way forward with your feet until the water is chest deep, then start to swim.
Slide Entry
Use the slide entry for shallow or unknown waters with a steep angled edge, such as a pool edge. It is also useful in crowded areas since it is easier to control than other entry methods.
The slide entry is very simple. Sit down with your feet/legs hanging down into (or above) the water. Use your hands to slide yourself into the water.
For shallow waters, once your feet are firm, continue forward using the wade entry.
If speed is a factor and you plan to push off the wall once you are in the water, don’t push too hard during the slide entry. If you are too far away from the edge you won’t be able to do a good push off, which is where your initial propulsion comes from.
Step-off Entry
When entering shallow or unknown waters, and you are too high for a slide entry, use the step-off.
Step off your platform into the water. Keep your knees flexed and be ready to absorb any impact in case you hit the floor.
You can then wade or swim depending on the situation.
Stride Entry
Only use the stride entry when you know the water is at least 1.5 meters deep, and the slide entry is not appropriate. This is the best method to use when jumping into deep waters.
One of the big advantages of the stride entry is that you keep your head above the water. This means you can keep your sight on something, such as a drowning victim.
Put your arms out to your sides and step one foot out in front of you. Planted your foot well so you don’t slip. Keep looking at your target the whole time.
Look up a little as you lean forward into the water.
LEARN WATER ENTRY TECHNIQUES FOR MAXIMUM SPEED
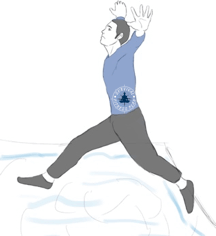
Slap your hands down as you hit the water.
Looking up and slapping down helps to keep your head above the water.
High-Level Entry
This is good to use when you have to enter the water from a height of 3+ meters. You must be sure that the water depth is appropriate for the height you are jumping from. Also ensure that your landing zone is a large enough area-wise, i.e., length and width.
Unlike all the previous entry methods, the high-level entry is not safe to do while carrying gear. If you have a backpack or anything else, throw it in before jumping.
Consider wearing long clothing as it will help protect your body.
Take a large breath and jump away from the surface. You don’t want to hit anything on the way down.
Cross your ankles and place your hands in fists in front of your thighs. This puts your arms down and close to your body.
Bend your knees a little.
Look straight ahead at the horizon and arch your back. Looking down or up will cause you to lean forward or back respectively. Arching your back will help keep you straight. You want to hit the water as vertical and straight as possible.
Allow your knees to flex once you hit the water. This will help slow you down.
Height vs Water Depth
The higher your jumping-off platform, the deeper the water needs to be.
The best way to judge is if you have seen others do it, and even then you must be very careful.
Note: All these calculations are only approximate so it is easy to do them in your head. The results are good enough to use.
Start with at least 2.5 meters (m) of water depth. If you’re jumping from higher than 1.5 m you need to add an extra 0.6 m of depth for every 3 m increase in height.
Calculating Height
A simple but effective way to calculate your height from the water is to drop something into it. Any solid object that won’t catch air will work, like a rock. Time how long it takes to hit the water.
Multiply that number by itself, and then multiply that answer by 16, i.e., (x⌃2) x 16.
This gives you the approximate height in feet. Multiply it by 0.3 to convert it into meters.
Calculating Water Depth
Get a long stick (or something similar) and put it in the water until it hits the floor. Measure how much of it got wet.
This is easy in theory but hard in practice.
GET YOUR FREE SWIM WORKOUTS TRAINING SCHEDULE
Photo Credit: Senior Airman Katie Spencer.
In this article, you learned water entry techniques for swimming and water safety. They are also useful for performing life saving techniques in water.
Did you find this article about safe water entries useful? If so, please share it with your friends.
The post Safe Water Entries – Water Safety Training appeared first on Survival Fitness Plan.
April 5, 2018
How to do a 50m Underwater Swim – Part 2: Underwater Swimming Technique
Learn how to do a 50m underwater swim. This is the 2nd part of how to swim underwater longer. It will teach you an underwater swimming technique for beginners. It is not the fastest way to swim underwater, but if you want to swim 50 meters underwater, then this is the stroke for you.
The information in this post is from the book “Swim Workouts and Water Rescue Skills” by Sam Fury.
GET YOUR FREE SWIM WORKOUTS TRAINING SCHEDULE
Pin and Share it!


How to do a 50m Underwater Swim
This post covers stage 4 and 5 of the 50 meter underwater swim training. If you haven’t already, please read the post on Breath Hold Training which covers stages 1, 2, and 3. It also has VERY important safety information.
Stage Four – Efficient Stroke
This teaches the best technique for how to swim farther underwater. The only aim is to learn the stroke. Don’t try to break any underwater swimming record.
DID YOU KNOW? The Guinness Book Record for the longest underwater swim is 200m by Tom Sietas (German).
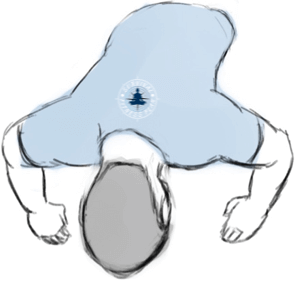
This underwater swimming stroke uses a modified breast-stroke with the underwater dolphin kick. Do it as one fluid motion. This is also how to swim underwater without floating up.
Start off in a streamlined glide and stay in it for as long as possible.

When you are almost to a complete stop, turn your palms out and separate your hands. Do the out-sweep of the breast-stroke. Use webbed finger as described in the freestyle post (under the heading Catch). Allow your legs to float up, the higher the better. Keep your head down.
LEARN THE FASTEST WAY TO SWIM ABOVE WATER

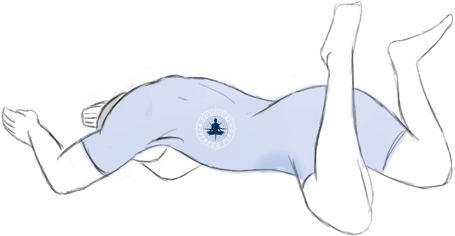
As you do the breaststroke arm movement, arch your body extending your back and shoulders. You aim is to make your body like a spring which you will snap down to propel you forward.
Bring your arms and forearms into a vertical position, elbows facing up. Snap your arms and legs down together.
Your legs/torso do the underwater dolphin kick technique. Your arms go into a double arm pull stroke by pushing against the water down along your body. Remember your webbed fingers.
LEARN THE UNDERWATER DOLPHIN KICK
Keep your arms vertical for as long as you can and end in a streamline position with your arms by your sides. Glide in this position for as long as you can.

Do a standard breaststroke frog kick. At the same time bring your hands back into the streamline glide you started in, with your arms/hands in front of you.
Repeat this sequence. When you start to run out of breath go into your preferred surface stroke. Combat side stroke or freestyle is best.
LEARN HOW TO DO COMBAT SIDE STROKE
Stage 5 – 50 Meters Underwater Swim
Before attempting this final stage you should be able to:
Swim a 25m underwater swim in under 30 seconds and using 5 strokes or less.
Hold your breath for at least 90 seconds while walking on dry land.
The first part of stage 5 is to build up your breath holding ability while moving on dry land.
Hold your breath while doing SFP Super-Burpees for a minute. When you can do 6 in a minute you are ready to attempt the navy seal 50 meter underwater swim.
GET YOUR FREE SWIM WORKOUTS TRAINING SCHEDULE
This concludes the training for how to swim longer underwater. There are other underwater swimming strokes, but they are not as efficient. You can even use this technique to conquer the Navy Seal underwater swim for distance test.
Did you find this article on how to swim 50 meters underwater useful? If so, please share it with your friends.
The post How to do a 50m Underwater Swim – Part 2: Underwater Swimming Technique appeared first on Survival Fitness Plan.
How to do a 50m Underwater Swim – Part 3: Underwater Swimming Technique
Learn how to do a 50m underwater swim. This is the 3rd and final post for how to swim underwater longer. It will teach you an underwater swimming technique for beginners. It is not the fastest way to swim underwater, but if you want to swim 50 meters underwater, then this is the stroke for you.
The information in this post is from the book “Swim Workouts and Water Rescue Skills” by Sam Fury.
GET YOUR FREE SWIM WORKOUTS TRAINING SCHEDULE
Pin and Share it!
How to do a 50m Underwater Swim
Part 3 covers stage 4 and 5 of the 50 meter underwater swim training. If you haven’t already, please read parts 1 and 2. Part 1 of how to do underwater swimming is particularly important.
Part 1: Introduction and Safety
Part 2: Breath Holding (stages 1, 2, and 3)
Stage Four – Efficient Stroke
This teaches the best technique for how to swim farther underwater. The only aim is to learn the stroke. Don’t try to break any underwater swimming record.
DID YOU KNOW? The Guinness Book Record for the longest underwater swim is 200m by Tom Sietas (German).
This underwater swimming stroke uses a modified breast-stroke with the underwater dolphin kick. Do it as one fluid motion. This is also how to swim underwater without floating up.
Start off in a streamlined glide and stay in it for as long as possible.
When you are almost to a complete stop, turn your palms out and separate your hands. Do the out-sweep of the breast-stroke. Use webbed finger as described in the freestyle post (under the heading Catch). Allow your legs to float up, the higher the better. Keep your head down.
LEARN THE FASTEST WAY TO SWIM ABOVE WATER
As you do the breaststroke arm movement, arch your body extending your back and shoulders. You aim is to make your body like a spring which you will snap down to propel you forward.
Bring your arms and forearms into a vertical position, elbows facing up. Snap your arms and legs down together.
Your legs/torso do the underwater dolphin kick technique. Your arms go into a double arm pull stroke by pushing against the water down along your body. Remember your webbed fingers.
LEARN THE UNDERWATER DOLPHIN KICK
Keep your arms vertical for as long as you can and end in a streamline position with your arms by your sides. Glide in this position for as long as you can.
Do a standard breaststroke frog kick. At the same time bring your hands back into the streamline glide you started in, with your arms/hands in front of you.
Repeat this sequence. When you start to run out of breath go into your preferred surface stroke. Combat side stroke or freestyle is best.
LEARN HOW TO DO COMBAT SIDE STROKE
Stage 5 – 50 Meters Underwater Swim
Before attempting this final stage you should be able to:
Swim a 25m underwater swim in under 30 seconds and using 5 strokes or less.
Hold your breath for at least 90 seconds while walking on dry land.
The first part of stage 5 is to build up your breath holding ability while moving on dry land.
Hold your breath while doing SFP Super-Burpees for a minute. When you can do 6 in a minute you are ready to attempt the navy seal 50 meter underwater swim.
GET YOUR FREE SWIM WORKOUTS TRAINING SCHEDULE
This concludes the training for how to swim longer underwater. There are other underwater swimming strokes, but they are not as efficient. You can even use this technique to conquer the navy seal underwater swim for distance test.
Did you find this article on how to swim 50 meters underwater useful? If so, please share it with your friends.
The post How to do a 50m Underwater Swim – Part 3: Underwater Swimming Technique appeared first on Survival Fitness Plan.


