
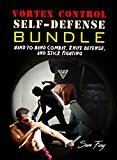
Sam Fury's Blog, page 24
July 5, 2018
Eating for Optimal Health – 5 Basic Nutrition Guidelines
There are a lot of health and fads popping up all the time. But the truth is, good health will only ever be the result of 3 things. Nutrition, exercise, and meditation. This page is about eating for optimal health with 5 basic nutrition guidelines. Survival Fitness Plan nutrition to be exact. It is not a “fad diet”. It is a lifestyle of healthy eating, based on the fundamental rule of healthy eating:
“Eat more good stuff, eat less bad stuff.”
Yep, that’s all. Go do it!
Haha, just kidding. For most people, it isn’t so easy. So I have made these 5 daily nutrition guidelines to help you stay on track. It follows the above basic rule and adds some tweaks to boost your diet for optimal health in the simplest way.
5 Healthy Nutrition Guidelines:
Fast for 16 hours a day – adults only
Break your fast with kefir
Eat a plant-based wholefoods diet
Minimise refined sugar
Minimise drug use
The Ultimate Fitness Plan for Escape, Evasion, and SurvivalGet Your Copy of the Survival Fitness Bundle Today
The Survival Fitness Bundle: The Ultimate Fitness Plan for Escape, Evasion, and Survival

Price Disclaimer
Eating for Optimal Health – 5 Basic Nutrition Guidelines
1. 16 Hour Fasting
This is intermittent fasting. There are several ways to do it but I find this one way the best because it becomes part of your daily routine. It keeps things simple.
Note: These are good food and nutrition guidelines for adults and children alike, except for this first one. I don’t encourage for children to skip meals. They need the fuel to develop into healthy adults.
The times you choose depends on your lifestyle, as long as it is 16 hours. I like to fast between 8 pm and 12 noon the following day. All I am doing is skipping breakfast.
During the fasting period, you can drink water, herbal tea, or black coffee. If you get hungry try having a tablespoon of apple cider vinegar in a glass of water. A tablespoon of coconut oil is also good. You should consume these two things every day anyway. Both are good for your health.
Intermittent fasting has some great benefits such as:
Boosts immune system.
Fat loss.
Improves longevity.
Lowers risk if diabetes.
Reduces risk of cancer (non yet proven).
Sleep better.
Slows aging.
Think clearer.
2. Drink Kefir Daily
Kefir is a fermented drink. It is like yogurt but a thinner texture and is very good for your gut health. A healthy gut makes a healthy person! It is also very easy to make.
Drink a glass of kefir every day. Make it the first thing you drink to break your fast and have it at least 30 minutes before eating your first meal.
You can make Kefir in sugar water or whole milk. I prefer to make it in coconut water and drink it straight. If you don’t like the taste you can mix it into a fruit smoothie. Get some kefir here.
3. Plant Based Whole Foods
What are whole foods? Here is a definition straight from Wikipedia:
“Whole foods are plant foods that are unprocessed and unrefined, or processed and refined as little as possible, before being consumed. Examples of whole foods include whole grains, tubers, legumes, fruits, vegetables.”
As a bonus, eating a whole foods diet will cut your food bill. Quite a lot in some cases.
Anything made with white flour is not a whole food. This includes bread, cereals, crackers, granola bars, pasta, etc. You can still eat these things but choose the non-white whole grain version instead.
Same goes for white rice. Eat wild or brown rice instead.


Daily Conditioning Workout
Here’s a daily conditioning workout that only uses 2 body-weight exercises. These 2 muscle conditioning exercises give you the greatest benefit in the least amount of time. This is a bodyweight-only fitness conditioning routine. You do not need any special equipment. It works your whole body and you can do it in under 10 minutes a day.
Contents
Super Burpees
Super burpee benefits
How to do super burpees
How to do a box squat jump
How to do fingertip pushups
How to do pushups
How to do clap pushups
How to do hindu pushups
How to do the knee to elbow plank
The SFP super burpee
Super burpee workout plan
Super burpee ladder workout
Super burpee alternatives
Pull ups
How to do pull ups
Pull up variations
How to do towel pull ups
How to do one armed pull ups
How to do muscle ups
Conclusion
Discover a Health and Fitness Program Like No OtherGet Your Copy of the Survival Fitness Bundle Today
The Survival Fitness Bundle: The Ultimate Fitness Plan for Escape, Evasion, and Survival
Price Disclaimer
Daily Conditioning Workout
A conditioning exercise is an exercise that enhances the physical body in one or more ways. It may increase endurance, speed, strength, etc.
Doing these 2 conditioning exercises means you no longer need to worry about how to survive conditioning. You can keep fit with minimal effort. Combine it with good nutrition and it is all you need to keep your body toned and healthy.
5 SFP super burpees are the least amount of daily exercise.
The ideal daily conditioning routine is:
10 SFP super burpees.
10 pull ups.
Do this simple routine every day except on your rest day. On your rest day, only do 5 SFP super burpees.
Super Burpees
Learn how to do super burpees – the Survival Fitness Plan way! This alternative to burpees is a full body muscle conditioning exercise. It is also a warm-up, light stretch, and cardio workout all in one. The SFP super burpee also gives extra benefits for Fight and Flight activities.
That makes this the best burpee workout for the Survival Fitness Plan. It is the single most effective exercise you can do.
SFP Super Burpee Benefits
Here is a list of the main benefits gained from the SFP super burpee:
Balance.
Cardiovascular workout.
Circulation of life force.
Coordination.
Explosiveness.
Improve body functions (digestion, respiratory, etc.)
Flexibility.
Muscle conditioning.
Hang time (the ability to stay airborne).
Striking strength and speed.
Warm-up.
How to do Super Burpees
The SFP super burpee is 5 separate exercises in one. You can build up to a full super burpee by doing each individual exercise on its own. Once you can do 10 repetitions of each exercise you can put them together.
Box squat jump
Fingertip pushup
Clap pushup
Hindu pushup
Knee to elbow plank
IMPORTANT: Do the first SFP super burpee you do slow and with much purpose.
If you try to do fast super burpees straight away chances of injury increase. By doing the first one very well, it will warm-up and stretch your body. After that, you can increase the speed.
How to do a Box Squat Jump
Box squat jumps develop leg strength, core strength, and explosiveness. They also improve soft landing skills, jumping ability, and hang-time. Once you learn box jumps you will be able to jump higher without getting injured. This is good for parkour. It also develops explosiveness in your legs. This will make your kicks faster and more powerful which is great for self-defense.
Here is a great video by Scott Herman on how to box squat jump. The video after it, also from Scott Herman, gives some great tips for improving the height of your box squat jump.
How to do Fingertip Pushups
Fingertip pushups develop striking power, explosiveness, and core strength. They also increase finger strength and grip. Developing finger strength and grip is beneficial in many fight and flight activities. Before trying fingertip push ups, you should be able to do at least 20 regular push ups.
Here is a fingertip pushups video. It is a good demonstration but is not made for the Survival Fitness Plan so it is missing some key points. To reap the most benefits you should:
Push up fast. This will increase your explosive power.
Press your fingers into the floor, i.e., try to grip it. This will increase strength building in your fingers.
Keep your elbows close to your body. This is so your muscle action will replicate the straight palm-heel as close as possible.
How to do Push ups
Push ups are an excellent exercise. They work the whole body, need no equipment, and little space. When doing push ups, do not sacrifice quality to increase the number of repetitions. It is far better to do less proper ones than many bad ones. If you do not do them using the full range of motion, then you will not build the strength needed.
Once you can do 30 standard push ups, advance to fingertip and clap pushups.
When doing push ups for the Survival Fitness Plan, keep your elbows close to your body. This mimics the straight strike used in Survival Fitness Plan Self-Defense. In the video below he calls them closed push ups.
How to do Clap Pushups
Clap push ups benefits include increasing striking power and all over body conditioning. The clapping part improves explosiveness which is awesome for speed and power. They also condition your hands for the palm heel strike.
Like all push ups in the Survival Fitness Plan, keep your elbows as close to your body as possible. Doing so mimics the action of the self-defense straight palm heel.
Since this video was not made for the Survival Fitness Plan, her elbows are too far away from her body.
How to do Hindu Pushups
Hindu pushups use the downward dog and the upward dog yoga poses. Hindu push ups benefits include:
Brain (stimulates).
Breathing (chest).
Concentration.
Eyesight.
Hearing.
Kidneys.
Memory.
Nervous system.
Spine.
Whole body strengthening.
Here is a Hindu pushup video by Original Strength.
How to do the Knee to Elbow Plank
The knee to elbow plank adds to the cardiovascular workout in the super burpee. Other knee to elbow plank benefits include flexibility, core strength, and ab strength.
The traditional plank knee to elbow method is to bring the knee to the same side elbow, e.g. right knee to right elbow. There is also the twisting plank knee to elbow. This is when you bring your knee to your opposite elbow, e.g., right knee to left elbow. The latter is best for the Survival Fitness Plan as it mimics the kneeing action in self-defense.
The following video is not in English, but it is still the best demonstration I found.
The Complete SFP Super Burpee
Once you can do 10 of each of the above exercises, you can put them together for a complete super burpee.

Super Burbee Workout Plan
Doing 5 SFP super burpees every day is a good super burpee challenge for beginners. Doing them in the morning is a great way to prepare your body for the day.
One SFP super burpee takes less than 10 seconds.
Even if you only have 5 minutes to spare for exercise, you have time to do the above super burpee exercise routine!
It is also recommended to do SFP super burpees as a warm-up before any vigorous exercise.
Super Burpee Ladder Workout
If you want more of a super burpee cardio workout, you can try doing a super burpee ladder workout. This uses the same method as a pushup pyramid. To do a super burpee push up pyramid, do 1 super burpee and take a short rest. 5 to 10 seconds is a good rest time. Then do 2 super burpees and rest. Then 3, rest, 4, rest, etc. All the way up to 10. Then repeat the process in reverse. 10 then rest, 9, rest, 8, rest etc. All the way back down to 0.
You can alter this super burpee challenge by shrinking the super burpee pyramid. Start with 5 and work your way up to 10 as you build strength.
Another way to make it easier is to alternate the pyramid with another exercise. For example, if doing super burpees and squats:
1 super burpee, rest
2 squats, rest
3 super burpees, rest
4 squats, rest, etc.
Super Burpee Alternatives
Here are some super burpee variations you can try out.
Super burpee no push up. Doing super burpees without push ups will make the exercise easier. You can choose to skip either the fingertip or clap pushup or both. Don’t skip the hindu pushup.
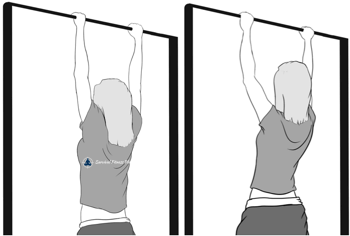
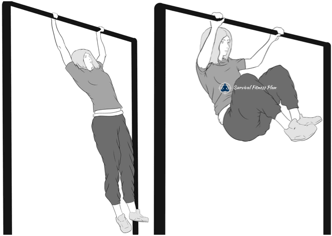
Super burpee pull up. My second favorite conditioning exercise is the pull up. I like to do 10 super burpees and 10 pull ups every morning. A super burpee pull up combines the two into one awesome exercise. When doing the box squat jump, grab onto the pull up bar and do a pull up.
Super burpee pull over. This is step up from the super burpee pull up. When doing the pull up part, pull your chest over the bar. This is a great exercise for parkour strength building. It mimics wall-climbs and muscle-ups.
Super burpee broad jump. If you have the room, instead of doing a box jump, jump horizontally as far as you can. Try to land without stumbling forward, like a parkour precision jump.
Super burpees with weights. For beasts only! You can use a weight vest to add resistance to your super burpees.
Pull ups
Many people think pull ups are only for arm conditioning, but they work many muscles in the body. People that do pull ups regularly have great core strength. Also, being able to pull yourself up is a very useful skill. There are many variations of the pull up, but the best way to condition yourself is with the classic pull up.
The pull-up is an especially useful exercise for the Survival Fitness Plan. You will build strength for parkour wall-climbs and eventually muscle ups.
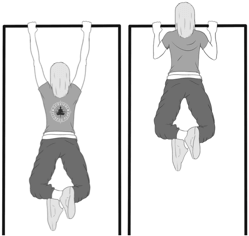
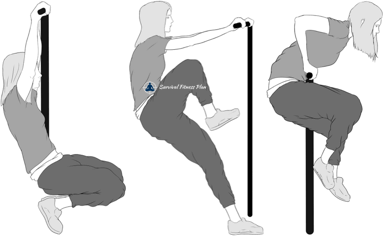
How to do Pull ups
Grab the bar with a grip a little wider than shoulder-width apart and with your palms facing away from you.
Let yourself hang all the way down.
Pull yourself up by pulling your shoulder blades down and together. Keep your chest up and pull up until your chin is above the bar. Touch your chest on it.
As you are pulling up, keep your body in a vertical line. Do not swing. Concentrate on isolating your back and biceps.
Pause at the top and then lower yourself back down into the hanging position.
Here’s a good video on how to do a perfect pull-up.
Pull-Up Variations
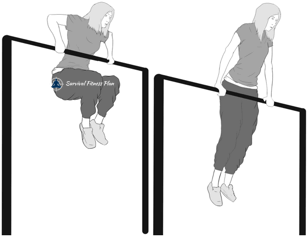
How to do Towel Pull Ups
Towel pull ups work different muscles than normal pull ups. They also improve grip strength which is beneficial for many Survival Fitness activities. I first started using towel pull ups many years ago when I saw an interview with the Rock. He uses them for grip strength since wrestlers have to grab their opponents a lot. It is easy to see how applicable this is to self defense, climbing, and parkour.
You will want to be able to do at least 10 towel pull ups. If you cannot do 10 towel pull ups then do as many as you can. Make up the rest with hanging, i.e., hold onto the towel and hang there. 10 seconds of hanging is equal to 1 towel pull-up. For example, if you can only do 10 towel pull ups then you should also hang for 50 seconds.
As with most exercises, there are many variations. In the Survival Fitness Plan, standard towel pull ups with no extra weights are fine. Feel free to variate if you want. In this video, he uses two towels so he works his lats, which is better for enhancing striking power.
If you do not have a suitable bar and/or two towels then use one towel and grab and ends with each hand.
Towel Pull Ups Progression Steps
First be able to do 15 standard pull ups.
Once you have accomplished that, attempt to do 15 towel pull ups. If you can not make it to 15 then do as many as you can and replace the rest with 10 seconds of hanging per pull up missed.
How to do a One Armed Pull Up
Once you can do at least 15 normal pull ups, you can progress to the one armed pull up.
Being able to do a one armed pull-up has the potential to save you, much more-so than the one armed push up. You should also practice the one armed chin up.
Here is an excellent video showing how to do one armed pull ups.
One Armed Pull Ups Progression Steps
Here is a summary of the progression steps for how to do one armed pull ups.
To begin with, be able to do at least 15 good quality pull ups.
After that, start working on the scapular raise exercise.
Also start to do typewriter pull ups.
Progress further with archer pull ups.
Next try uneven pull ups. Gradually increase the distance in height between your hands.
Now do one armed pull ups with the help of a resistance band.
Continure to progress with the negative one armed pull up.
Finally, do one armed pull ups.
How to do Muscle Ups
You can use muscle-ups to get on top of higher obstacles where a wall climb-up cannot, e.g., an overhanging ledge. The muscle up is quite a demanding exercise. Gradual progression is the key to success.
Start with the hanging knee to elbow leg raise.
Hang off the bar and pull yourself up a little up to retract your shoulder blades. This helps keep you stable while doing the exercise.
Keep your core tight and swing forward a little bit. As your body starts to swing back thrust your knees to your chest.
Next, you need to learn how to use the momentum from the hanging knee to elbow raise to pull yourself over the bar.
Start the hanging knee to elbow leg raise as normal. At the height of your backswing pull yourself forward and thrust your knees into your chest. Allow your wrists to rotate over the bar.
Allowing your wrists to rotate over the bar is very important.
It will help if you have access to a lower bar to practice the movement. If not, then keep it in mind when doing the muscle up.
Now you can put everything together to do the muscle up. It is important to use everything learned so far. Remember to keep your core tight and to retract your shoulder blades.
Also, pull your arms forward a little bit when pulling yourself over the bar.
You can use some chalk to get an extra grip, although you won’t have this luxury in “real life” scenarios.
Get some momentum and then thrust your knees into your chest.
As you do so ensure your wrists are loose and then at the right moment pull yourself up over the bar. Push yourself up until your arms are completely extended.
If this was an obstacle, you would bring your foot up and stand.
To do more muscle-ups, use the momentum you gain when lowering down to go into the next repetition.
Once you have built more strength try to do the muscle up with less and less swing until you can do it from a dead hang.
Also practice muscle-ups on overhanging ledges i.e., where there is no wall for your feet to push against. To do this you need to adjust your technique a little since you don’t have a bar for your wrist to rotate over. Use the “pop” hand movement you use when doing a wall climb-up.
Inspired? Pin it for Later↓


The Ultimate Fitness Plan for Escape, Evasion, and SurvivalGet Your Copy of the Survival Fitness Bundle Today
The Survival Fitness Bundle: The Ultimate Fitness Plan for Escape, Evasion, and Survival
Price Disclaimer
Daily Conditioning Workout Conclusion
I’ve covered a lot in this post, but the main things to take away are the super burpee and the basic pull up. You do not need to do the other variations of these 2 exercises. I put them in for those that want to increase their abilities and/or get bored of doing the same exercises every day.
Personally, I do 10 super burpees 6 days a week without fail, and 5 on the 7th day. If I have something to hang off I will also do 10 pull ups 6 days a week. I like to alternate between normal pull ups and towel pull ups if I can.
I can’t stress enough that the super burpee is the ultimate exercise. Do 10 of them a day, the 15-minute yoga stretch routine, and follow a healthy diet. This is all you need to stay fit and healthy.
Did you find this article about daily fitness conditioning useful? If so, please share it with your friends.
The post Daily Conditioning Workout appeared first on Survival Fitness Plan.
Arm Locks in Self Defense
Learn 15+ of the best arm locks in self defense with this lock-flow drill. It includes a variety of basic wrist locks, finger locks, shoulder locks, and other arm joint locks.
I learned these self defense locks as part of my Vortex Control Self Defense training in the Philippines. I present them here in the same drill format. These fighting locks are a combination of aikido joint locks, bjj arm locks, and other martial arts wrist locks.
For ease of memory and writing the following locks have semi-descriptive, non-official, names.
The Martial arts locks you will learn include:
Shoulder lock
Wrist twist
Wrist twist variation
Wrist lock
Wrist pressure
Overarm pressure
Underarm pressure
Bent arm lock
One handed bent arm lock
Reverse one handed bent arm lock
Crook elbow lock
Over shoulder arm bar
Finger control
Finger lock
Forarm torque
Lock flow drill alternatives
Wrist twist alternative
Crook elbow lock to figure-4 armbar
Alternative ending
3 Self Defense Training Manuals for 1 Low PriceGet Your Copy of the Vortex Control Self Defense Bundle Today
Vortex Control Self Defense Bundle: Hand to Hand Combat, Knife Defense, and Stick Fighting
Price Disclaimer
Arm Locks in Self Defense
In a self-defense situation, you can use these locks alone or in small combinations.
Some reasons you may want to apply an armlock are to:
Gain pain compliance, e.g., to escort somebody out of a room.
Break an opponent’s limb which is likely to end the conflict.
Disarm an armed assailant.
When practicing the following lock flow drill keep in mind the following:
As you flow from lock to lock, as a general rule, always have at least one hand gripping your opponent’s limb. This helps to prevent escape.
You can slide your hands along your opponent’s limb while still keeping a grip. You will get better at this with practice.
Where possible, keep your elbows close to your body. This will enable you to best use your center of gravity to generate power.
Use jerking, vibrating, strikes, etc., to “soften” your opponent up. This makes it easier to apply locks and/or to increase the damage done. Some examples of these things are below.
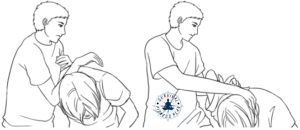
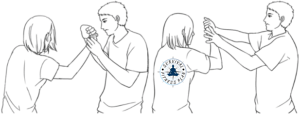
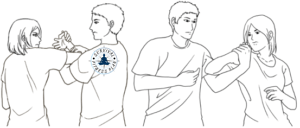
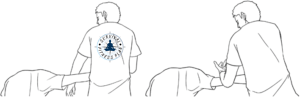
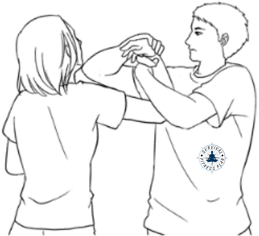
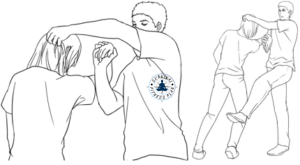
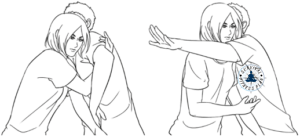
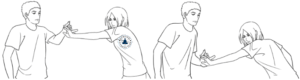
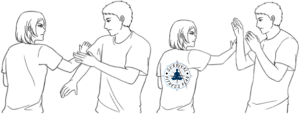
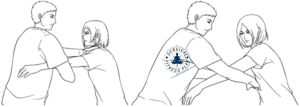
Shoulder Lock
From the check-mate position use your left hand to move your opponent’s right hand down. At the same time, move your right hand towards your opponent’s left shoulder.
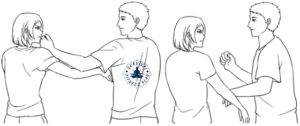
Move your left arm under your opponent’s arm to his rear. The underside of your elbow, which is facing up, “hooks” onto his/her arm. Apply pressure on his shoulder with your right hand to bend your opponent forward.
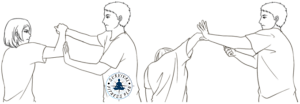
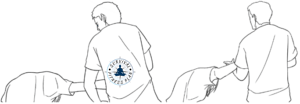
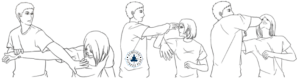
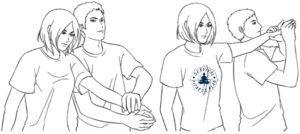
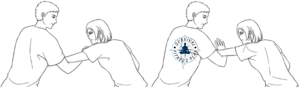
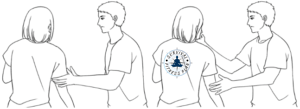
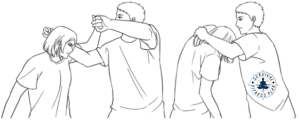
Here the shoulder lock is from the opposite side and aggressiveness is also added.
With the hand that is not hooking your opponent’s arm, strike his/her face on the way to grabbing his/her neck.
As you come back to grab your opponent’s neck do so with force using a cupped hand.
Follow up with another elbow to your opponent’s head. You can repeat these two strikes and you can also knee him.
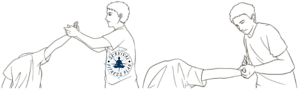
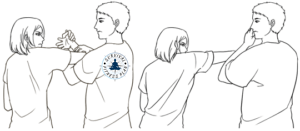
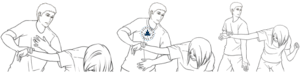
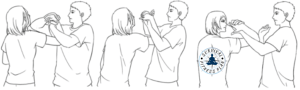
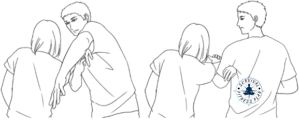
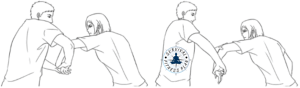
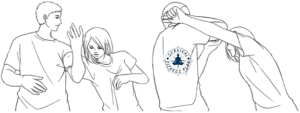
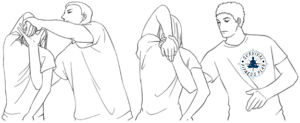
Wrist Twist
Slide your right hand down your opponent’s arm to control his/her elbow. At the same time slide your left hand down and take a grip on your opponent’s wrist.
Your left hand is on the inside of your opponent’s guard with your palm facing out. Grip your opponent’s wrist and then pull his/her arm across your centerline. You can use your right hand to help with a push at your opponent’s elbow, although this is usually not needed.
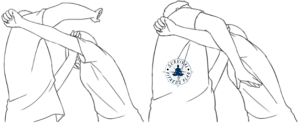
As you bring your opponent’s arm across your centerline continue to slide your right hand down his arm. Meet your left hand at your opponent’s wrist.
Use both your hands to bring your opponent’s hand up and then over to the outside of his guard. Use the waterfall principle.
Applying the wrist twist in full has the potential to damage the whole limb.
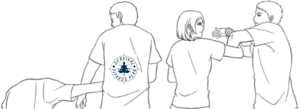
Wrist Twist Variation
Release the pressure and then apply a variation of the wrist twist. Do this by pushing your opponent’s wrist down towards him/her.
LEARN ABOUT THE PRINCIPLES OF SELF-DEFENSE
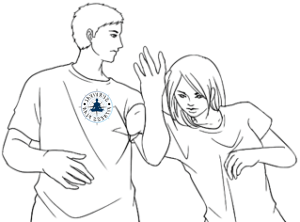
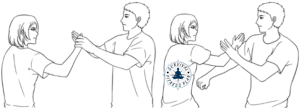
Wrist Lock
Release the pressure from the wrist twist variation. Use your right hand to grip your opponent’s fingers.
Push your opponent’s hand into his/her face.
Move your left hand to your opponent’s elbow.
Push your opponent’s elbow as you pull his/her fingers down and towards your centerline.
As your opponent’s arm straightens grab hold of his thumb with your left hand. Pull his hand towards your center. Lock your elbows close to your body and apply pressure towards your opponent to apply the wrist lock. The pressure is a torquing one, a vortex.
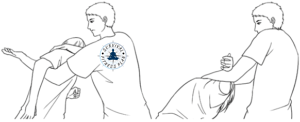
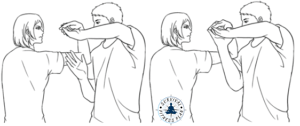
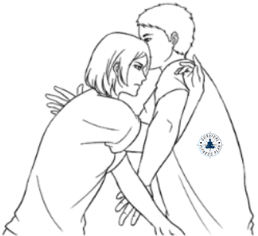
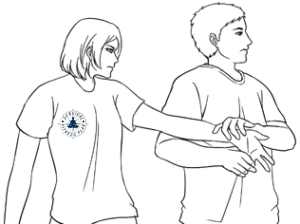
Wrist Pressure
Keep a good grip on your opponent’s thumb with your left hand while sliding your right hand up to his/her elbow.
Bend your opponent’s arm down at his/her elbow and use a circular motion to move it to the inside and up.
Use your right hand to help secure your opponent’s upper arm in the crook of your elbow.
Apply pressure on your opponent’s wrist with your left hand to cause pain and lock his/her arm in. You can use your right to strike.
The image on the right shows the Wrist Pressure lock from the opposite side. It also shows that you can put your opponent’s elbow either on your bicep or your chest. Putting it on your chest is more secure.
Also, instead of striking, you can use your spare hand to increase the pressure on your opponent’s wrist.
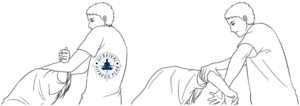
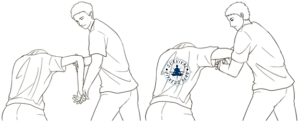
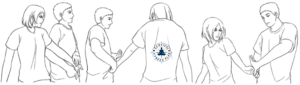
Overarm Pressure
Grip your opponent’s wrist with your right hand and then curl your left arm underneath his/hers.
At the same time, pull your opponent’s arm straight with your right hand.
The end result is with your opponent’s arm straight and his/her elbow facing up. Apply pressure on his/her elbow with your forearm.
As you apply pressure down with your left, pull up with your right. At the same time apply pressure with your forearm as you roll it over your opponent’s elbow. Use the waterfall principle.
Here it is from the opposite side. You can see the waterfall action clearer.
Underarm Pressure
Curl your left a little toward yourself and then underneath your opponent’s arm.
This rolls your opponent’s arm so that his/her elbow faces the ground.
The crook of your elbow applies pressure upwards on your opponent’s elbow. Your left palm faces up. Apply downward pressure on his/her hand with your right hand.
Here it is from the opposite side.
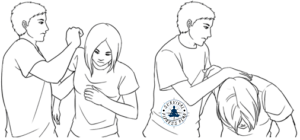
Bent Arm Lock
Return to the overarm pressure lock and then, without letting go of your right hand, bend your opponent’s arm towards him/her and grab your right wrist with your left hand.
Strike your opponent with your right elbow.
Here it is from the opposite side. From the position where your arm is on top, you can strike to your opponent’s eyes before bending his/her arm.
One Handed Bent Arm Lock
Let go of your right wrist and grab your opponent’s fingers from the side facing towards you. Your palm faces your opponent.
Now your left hand has control of your opponent’s limb. Move his/her arm away from yourself and to the outside of your opponent’s shoulder.
You can strike your opponent with your right.
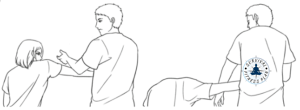
Reverse One Handed Bent Arm Lock
Bring your right hand up on the outside of your opponent’s right arm. Pass it up through the gap between your opponent’s wrist and shoulder. Next, take hold of his fingers, replacing your left hand.
Grab your opponent’s hair with your right and pull him/her down by the hair and the wrist. Do these two things at the same time.
You can also stomp the rear of your opponent’s knee.
Crook Elbow Lock
Swing your left arm between your opponent’s wrist and shoulder. Do this until the crook of your elbow is on the crook of his elbow with your palm facing up.
As you do this release your right hand and capture his/her wrist under your armpit.
Apply upward pressure with your left arm.
Here is the crook elbow lock from the opposite side.
Over Shoulder Arm Bar
Reach over with your right arm, grab your opponent’s left wrist, and pull it towards yourself.
Pass it across your opponent’s body in-between his/her body and your left hand.

Use your right hand on the back of your opponent’s left shoulder and your left hand on your opponent’s left lower arm. Twist his body towards your left shoulder.
Drop your left arm and use it to attack your opponent’s neck. The twist and strike action is very fast. Use the momentum created by the twist of his body to gain more force behind the strike.
Turn your body to face the same way as your opponent and at the same time drop both your hands to grab his/her left hand.
When you drop your hands be sure to keep your opponent’s arm between them. Your left-hand grabs your opponent’s wrist and your right-hand takes hold of his/her fingers.
Continue to turn your body to the left as you straighten your opponent’s arm over your shoulder. His/her elbow sits on your shoulder with the underside of the elbow facing up.
Pull down on your opponent’s wrist to apply pressure.
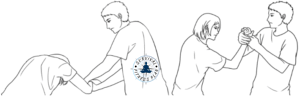
Finger Control
Use your right hand to grab your opponent’s ring and pinky fingers. Bend those two fingers down back towards your opponent. As you do so bring his lower arm down so that it is on top of yours. Keep your left hand on his/her wrist.
Begin to spin your opponent so that you swap sides. Do so by bending his/her fingers back as you apply pressure to his/her left arm with your right arm.
Keep your opponent’s hand near your waist for better leverage on his/her fingers. Pain compliance will keep him/her spinning once your lower arms lose contact.
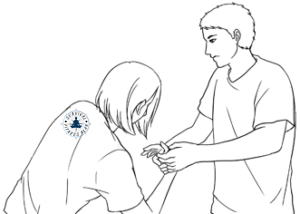
Finger Lock
Towards the end of the spin use your left hand to grab his/her index and middle fingers.
The third image below shows the finger grab from the opposite side.
Keeping your opponent’s arm straight, bring his/her hand up with his/her bent fingers pointing up. Jerk your opponent’s hand down towards you.
Forearm Torque
Bring your right arm, with your palm facing up, under your opponent’s left arm. Place the crook of your elbow above your opponent’s elbow.
Grab your opponent’s right wrist with your right hand. Pull his/her hand down by the wrist while applying pressure on his/her elbow with your right arm.
At this point, your opponent’s forearm is vertical with his elbow pointing up. His upper arm is horizontal.
This completes the basic lock flow drill.
Lock Flow Drill Alternatives
Here are a few alternative movements to show how you can alter the drill depending on the situation at hand. The actual number of variations possible are countless, limited only to your imagination.
Wrist Twist Alternative
This demonstrates how you can go back to the formula from the lock flow drill. It also shows how you can flow from the rib entry to an upward chin strike as opposed to going to check-mate.
From the end of the wrist twist, release the pressure on your opponent’s wrist. Strike him/her in the ribs as you would in the rib entry.
Continue with the rib entry as normal by bringing your hand up to the outside of your opponent’s guard.
Instead of going into check-mate you can go straight into the arm pull. Follow this with an upward palm heel to your opponent’s jaw.
Crook Elbow Lock to Figure-4 Armbar
After releasing pressure from the crook elbow lock it is possible for your opponent to swing at you. Use a variation of the elbow entry to block the attack, i.e., raise your right elbow.
Capture your opponent’s arm by circling your right arm over his/her left arm. At the same time place your left hand on your opponent’s right shoulder.
Grab your left forearm with your right hand. Your opponent’s straight arm should be in the crook of your right elbow.
Apply the figure-4 armbar. Push down on your opponent’s shoulder while applying upward pressure on his elbow.
As you release the lock strike your opponent’s solar plexus with your right hand.
Slide your left hand down your opponent’s left arm and grab hold of his/her wrist. As you do this give him/her a right hook to the jaw.
Continue into the over shoulder armbar.

Alternative Ending
This demonstration gives a different ending to the lock flow drill. It starts from the finger lock.
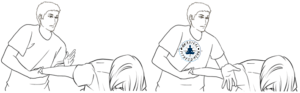
Bring your opponent’s fingers up to the right side of your chest. With your left hand deliver an uppercut underneath your opponent’s left arm to his/her jaw.

Use your right hand to control the back of your opponent’s head so you can bend his/her left arm behind and down his/her back. You will need to adjust the grip of your left hand to do so.
Bring your right hand up underneath your opponent’s right armpit to grab his/her left hand. Use your right hand to help feed it down.
You can release your left hand.
Inspired? Pin it for Later↓


Effective and Easy to Learn Hand to Hand Combat, Knife Defense, and Stick Fighting.Get Your Copy of the Vortex Control Self Defense Bundle Today
Vortex Control Self Defense Bundle: Hand to Hand Combat, Knife Defense, and Stick Fighting
Price Disclaimer
In this drill, you have learned a variety arm and wrist locks. You can use them in self defense or other martial arts, including combat sports like MMA. There are many more wrist and arm locks in the world of martial arts, but for practical reasons, 15 is more than enough. For my personal self defense training I include less than half of these, but also add a couple more suited for ground fighting.
Photo Credit: Senior Airman Stephanie Sauberan. Cropped.
Did you find these self defense locks useful? If so, please share it with your friends.
The post Arm Locks in Self Defense appeared first on Survival Fitness Plan.
Mass Casualty Critical Assessment
This post details the steps in a mass casualty critical assessment. A mass casualty is when you don’t have enough resources to treat the injuries sustained. In the case of disaster, there is a good chance of mass casualty. If you choose to help your goal is to help as many people as possible whilst keeping rescuers safe.
There are 3 major steps when dealing with a mass casualty first aid scenario:
Assess the risk
Sort the casualties
Treat the casualties
This is the Only First Aid Book You Will Ever NeedGet Your Copy of Wilderness and Travel Medicine Today
Wilderness and Travel Medicine: A Complete Wilderness Medicine and Travel Medicine Handbook (Escape, Evasion, and Survival 4)
Price Disclaimer
Mass Casualty Critical Assessment
IMPORTANT: No amount of reading can compare to a medical course with a professional trainer. A standard first aid course is good. A wilderness first aid course or higher is best.
Assess for Danger
This step is almost identical to the normal DRABC danger assessment.
You want to slow down so you can assess the entire situation. With many casualties, it will be more complex, but with some practice, you will be able to do it quite fast.
First look for any general dangers which may cause harm to you, fellow rescuers, the public, and the patients. The priority of wellbeing is in the order I have listed. Yes, patients come last!
Next, you need to identify the cause of the incident. This will help you predict the type of injuries you are more likely to come across. For example, if it is a fire, you can expect more burns and breathing problems.
Knowing the cause is also very useful to prevent everyone else getting hurt by the same thing.
These first two assessments happen quite fast. The last one can take some time. You need to assess the number of patients, the need for more rescuers, and what resources you have or need.
If you have a team of responders, you (the team leader) must stay in one spot. Fight the urge to try to help everyone. You will be more useful as the “central brain”, directing the other rescuers in what to do. Have them assess individual patients, gather equipment, find help, etc.
Once you have a plan of action you can get hands-on.
Sort the Casualties
Now that you have a good idea of the situation, you can sort the casualties. Quickly go through them and “tag” each one in order of priority. You can tag with numbers or colors. There is no international standard, but the following are well recognized (US Standard):
1 or Red: Highest priority. Probable loss of life or limb if immediate medical care is not given.
2 or Yellow: Needs medical care but can wait 2 to 4 hours. The patient may enter Red over time.
3 or Green: Minor injuries. Referred to as the “walking wounded”. Can help with other patients.
4 or Black: No chance of saving. Do not start CPR unless the cause is lightning.
Depending on your situation and/or resources, red or yellow tags may become black. Lack of advanced medical care is a big factor here.
Fix critical problems quickly if possible, but do not spend very much time on any one patient. 30 seconds or less is a good guide.
Tell each patient who you are and that you are there to help. Stay calm and reassure them.
If you have a team and you are the “central brain”, each rescuer must asses the casualties they see and report back to you. You will then assign patients to each rescuer in order of priority.
If you have enough rescuers, pair them up. One treats the patient. The other does the legwork such as reporting back to you, getting equipment, etc.
Treat the Casualties
Now you have a good plan of attack. Start fixing patients! Here are some useful articles on that:
DRABC first aid
Secondary assessment
Advanced first aid
Mass Casualty Primary Assessment Flow Chart
Open airway if necessary:
If victim begins breathing once the airway is clear, tag red.
If patient’s respirations are too slow or fast, tag red.
Tag black if the airway is open but they are not breathing.
If breathing is normal, check pulse and perfusion:
Tag red if there is no pulse or capillary refill takes longer than 2 seconds.
If a pulse is present and capillary refill is normal, move to mental status:
If patient is unconscious or disorientated, tag red. Explosions may cause temporary hearing loss, which is different from disorientation.
If they can follow commands but are unable to get up, tag yellow.
Tag green if they follow commands and can get up.
While doing the above, consider the following:
Elevate legs if there are signs of shock.
If there is any doubt about the category, always tag the highest priority triage level. For example, if you’re not sure between yellow and red, tag red.
Once you have identified someone as level 1/red, tag them and move immediately to the next patient. The only exception is if you have major bleeding to stop.
Only administer CPR if you have enough resources.
Protect the spine only if resources are available.
Stop severe bleeding. Use a bystander if available. If bleeding doesn’t stop, tag Red.
Once you finish tagging, move patients in order of priority. Put them in a safe area for further treatment and secondary exams.
Inspired? Pin it for Later↓


Could You Save a Loved One When There are No Doctors Around?Get Your Copy of Wilderness and Travel Medicine Today
Wilderness and Travel Medicine: A Complete Wilderness Medicine and Travel Medicine Handbook (Escape, Evasion, and Survival 4)
Price Disclaimer
Dealing with a mass casualty situation can overwhelm even experienced responders. Remember to slow down and assess the situation. The safety of you and your team trumps all else. Next, take the time to make a good plan of attack. This will save you time in the long run, and lives.
If you are the team leader, give clear and confident instructions. You can take advice, but in these situations, dictatorships are better than democracies. If you can’t handle it, swallow your pride and let someone who can take over.
Photo Credit: By Alejandro Pena [Public domain], via Wikimedia Commons
Did you find this article about mass casualty critical assessment useful? If so, please share it with your friends.
The post Mass Casualty Critical Assessment appeared first on Survival Fitness Plan.
July 3, 2018
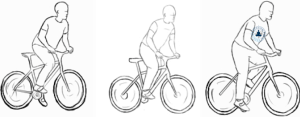
Mountain Bike Training Plan for Beginners
This is a free mountain bike training plan for beginners. It also includes basic mountain bike riding tips. Push bikes are one of the most common non-motorised forms of transport you will encounter. That is why we learn it in Survival Fitness Plan (SFP). It omits anything “showy” that you would not use if someone was chasing you. Bicycle riding also has a couple of other very good benefits:
It is a low impact form of exercise (much better for your knees than running).
It is good for the environment.
Contents
Mountain Bike Training Beginner Skills
Braking
Using gears
Looking ahead
Basic Mountain Bike Riding Drills
Stand and coast
Stand and pedal
Trackstand
Slow ride
Heel grab
Bottle pick-up
Slalom
Offset slalom
Figure 8’s
Gap storming
Down a curb
Advanced Mountain Bike Riding Skills
Fixing a dropped chain
Learning to crash
Cornering
Riding Faster
Downhill mountain bike riding techniques
Mountain bike climbing training
Floating over terrain
Looking behind yourself
Overcoming Obstacles While Mountain Bike Riding
Down a ledge
Log hopping
Bunny Hopping
The Ultimate Fitness Plan for Escape, Evasion, and SurvivalGet Your Copy of the Survival Fitness Bundle Today
The Survival Fitness Bundle: The Ultimate Fitness Plan for Escape, Evasion, and Survival
Price Disclaimer
Basic Mountain Bike Training Plan
The skills in this mountain bike training programme are useful in urban settings too. It is the skills that are important. You do not actually need to go find mountain bike tracks, especially if you are a city dweller. It will be more beneficial to learn in the environment you most frequent. If that means riding a mountain bike on the road, then that’s fine. Be careful of traffic when riding a mountain bike in the city.
You don’t actually need a mountain bike. Use a BMX or a road bike if you prefer, or whatever you have.
Once you know the basics you only need to practice the techniques and build endurance. Don’t get too used to gears. The bike you pick up off the street when running from your enemy may not have them. Also, you don’t need to get too much into endurance mountain bike training. If you can ride hard for 30 minutes it will be more than most others can do.
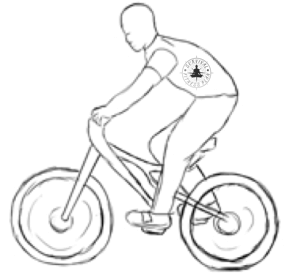
Mountain Bike Training Beginner Skills
You can apply these skills to bicycle riding in general. Many people know how to ride a bike but they may not know the basic skills needed to make riding easier and safer.
Straddle the bike with your strongest foot on the peddle. Lightly squeeze the brakes and steady the bike. Release the brakes and push down with your foot. As you start moving, push off the ground with your other foot and lift yourself up away from the bike frame. Keep a firm grip on the bars, pointing the bike forward.
Place your other foot on the pedal and start pedaling. Look forward and continue to pedal as you sit. Don’t grip the handle too tight.
Braking
Use the brakes together. Pull the rear brake lever first and then gradually squeeze the front. Brace yourself against the handlebars. Too much front brake and you will go over the handlebars (endo), too much rear brake and you will skid out of control.
The more weight over the wheel the more stopping power it will have. Use this to your advantage e.g. leaning back while braking downhill will help to prevent endos.
The faster you are going the longer it will take to slow down. Keep your brakes covered at all times.
Using Gears
Higher gears are harder to pedal and will help you go faster. Lower gears are easier to pedal and help you get up hills. Shift before you get to the hill.
It is better to pedal faster in a low (easy) gear as opposed to slow in a high gear.
Looking Ahead
As you ride, look ahead so you can adjust to any obstacles. Slow down for blind corners and brake or steer early and smooth rather than leaving it to the last minute.
Once you are confident with your basic mountain bike riding skills, move onto the drills.
Basic Mountain Bike Riding Drills
Some of mountain bike riding techniques may be challenging when first practicing. Like everything, keep at it.
Stand and Coast
Stand on your pedals without sitting on the seat and coast. Keep your arms bent and don’t lock your knees. Put your pedals horizontal, i.e., pedals level.
Next, shift your body towards the rear of the bike. Use this mountain bike riding position when coasting over obstacles or rough terrain.
Stand and Pedal
Lift yourself off the seat and pedal.
Track Stand
The track stand is when you balance the bicycle in place, keeping your feet on the pedals. Use it so you can go fast from a still position, or to stop short to analyze an obstacle without losing your rhythm.
Coast at a slow speed, pedals level, and then come to a stop. Find your balance position. You can stand, sit, turn your wheel at an angle, etc. Whatever works for you.
Rock back and forth a little. To rock forward let off the brake a little. To rock back pull the bike back underneath you. Repeat this procedure.
Keep some pressure on your front pedal whilst holding the brake to keep you in place.
Slow Ride
Ride between two points as slow as possible without putting your foot down. Ride forward at all times. No zigzagging, etc.
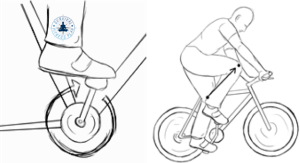
Heel Grab
The goal is to grab onto one of your heels and keep riding along.
Pedal and then lean to your left. Use your left hand to grab onto your left heel. Continue to hold your heel as you pedal.
You can start off holding your calf, then move to your ankle, then your heel.
Bottle Pick Up
Ride towards an upright bottle so it is off to your side. As you ride past the bottle, lean over and pick it up off the ground. Next, place it back on the ground in an upright position.
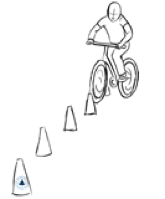
Slalom
Look straight ahead and weave in and out of a set of obstacles in a zigzag fashion. Go to the left of the first obstacle, right of the second, left of the third, and so on. Start with the obstacles in a straight line about 6 feet apart. Bring them closer together as you improve.
LEARN ABOUT ESSENTIAL PARKOUR TRAINING
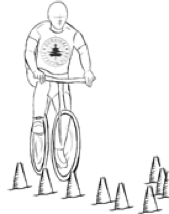
Offset Slalom
Use the same set-up as with the regular slalom but take every other cone and move it left or right 2-3 feet. You’ll have to take wider, sweeping turns, and lean over more to get around the obstacles. Continue to look ahead.
Figure 8′s
Ride your bike in a figure-8 in as small a space as possible without putting your foot down.
Gap Storming
Arrange two lines of cones in a V formation. Ride between them without hitting any. As your confidence increases, move the final pair closer and closer together.
LEARN ABOUT SFP SELF-DEFENSE TRAINING
Down A Curb
Coast straight down off a curb. Absorb the drop with your arms and legs.
Advanced Mountain Bike Riding Skills
Learn these advanced mountain bike riding skills only when you are ready. You should be confident in the basic mountain bike riding skills and drills first.
Fixing a Dropped Chain
If your chain drops onto the bottom bracket, pedal easy and shift up with the ‘big’ gears.
When you jam your chain you must get off the bike and put it back on with your hands.
If the chain falls outside the crank arm, e.g., on your foot, coast and shift down toward the small ring. You can use your foot to help place it back on.
Learning to Crash
First learn how to safety roll and then how to dive roll.
When you are confident you can progress to a crash simulation. While riding on grass, slam on your front brakes. Dismount and roll.
Cornering
When cornering, always look where you want to go. Approach the corner wide and slow down as you approach it. Always apply your brake before turning, never during.
Cut to the apex (the straightest line through a corner), and finish wide.
If you stop pedaling, put all your weight on the outside pedal so it faces down towards the road. Resume peddling as soon as you have passed the apex.
Riding Faster
To ride faster, pull the pedal around as if keeping the pedal to the outside of the circle. Lift your knees faster and higher.
Mountain Bike Climbing Training
If you need to shift gears during a climb take a couple power strokes first. Soft pedal for a stroke while you shift, then pedal hard again.
On the road, you can stand, but on dirt stay seated. Slide your bum forward on your seat, and lean over the handlebars. Put your elbows back (not down). Pedal smooth.
Downhill Mountain Bike Riding Techniques
Downhill mountain bike training is more dangerous but you must practice it.
To prevent the chain from falling off, shift into the big chain-ring.
Stand with pedals level and shift your weight over the back wheel. Stay loose on the bike. Don’t lock your elbows or clench your grip. Steer with your body. Let your shoulders guide you.
Brake on solid dirt or rock where you can get traction, as opposed to loose soil or gravel.
Floating Over Terrain
On rough terrain, let the bike float underneath you. It will move in different directions as it hits bumps. Keep your body upright and the bike pointed down the trail.
Looking Behind Yourself
Make sure the path ahead is clear. Relax your right arm to drop your shoulder a little. Bend your elbow and relax your right hand. Turn your head left and slide your butt to the right as you glance over your shoulder.
Overcoming Obstacles While Mountain Bike Riding
Down A Ledge
Shift your weight back, drop your wrists to pull up the handlebars and level the bike. Shift your weight forward as the rear wheel goes airborne.
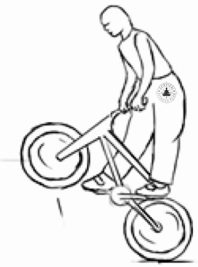
Log Hopping
Get in the same position as if you were riding downhill.
Front Pull
Coast at medium speed and, without applying the brakes, push down on the handlebars. Pull upward and straighten your arms to bring the front wheel off the ground. Place it back down gently.
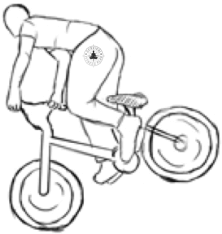
Hip Hop
Shift your weight forward and turn your pedals so that your feet are almost vertical. Press back against the pedals as you push your legs up. Pull the back end up with your leg muscles then bring it down gently.
Log Hopping
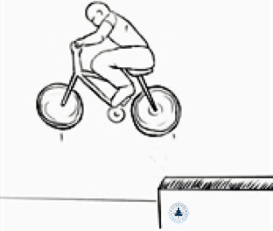
When you are log hopping, the front pull and hip-hop become one motion. Perform the front pull and bring it high enough to clear the log. Touch the front wheel on top of the log and as the front wheel starts to roll over do a hip-hop.
If the log is wet avoid touching your wheels on the top of it.
Bunny Hopping
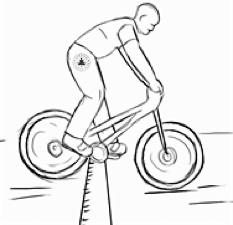
A bunny hop is like a log hop but with the intention of having both wheels off the ground at the same time.
Perform a front pull and whilst your front wheel is in the air use the push/pull motion to get the back wheel up. Level your bike in the air and try to squeeze your legs together. Land your back wheel first.
Inspired? Pin it for Later↓


Discover a Health and Fitness Program Like No OtherGet Your Copy of the Survival Fitness Bundle Today
The Survival Fitness Bundle: The Ultimate Fitness Plan for Escape, Evasion, and Survival
Price Disclaimer
Conclusion
Although not as important as self-defense and parkour, mountain bike riding is an essential skill to have. If someone is chasing you and you come across a bike of any kind, these mountain bike riding skills will give you the best chance of escape. You will be able to go as fast as possible in the safest possible manner.
Did you find this mountain bike training for beginners useful? If so, please share it with your friends.
The post Mountain Bike Training Plan for Beginners appeared first on Survival Fitness Plan.
June 26, 2018
First Aid for Severe Bleeding
Learn first aid for severe bleeding. Severe bleeding is a critical situation which, if not taken care of, can lead to volume shock and death. This post explains the best methods for the control of bleeding.
IMPORTANT: No amount of reading can compare to a medical course with a professional trainer. A standard first aid course is good. A Remote Area First Aid Course or higher is best.
Contents
Well-Aimed, Direct Pressure
Pressure Point Constriction
Tourniquet
How to Tie a Tourniquet
How to Control Severe Nose Bleeding
The information in this post is from the book “Wilderness and Travel Medicine” by Sam Fury.
Get Your Copy Today on Kindle or in Print
Wilderness and Travel Medicine: A Complete Wilderness Medicine and Travel Medicine Handbook (Escape, Evasion, and Survival 4)
Price Disclaimer
First Aid for Severe Bleeding
Well-Aimed, Direct Pressure
This is the go-to method for controlling severe bleeding in first aid. Apply well-aimed, direct pressure to the wound.
Elevate the wounded area above the patient’s heart (if possible).
Wait 10 minutes then check if bleeding has stopped.
If it is spurting, stick your finger down on the wound and hold it there.
Pressure Point Constriction
If bleeding doesn’t subside after 20 minutes, use pressure point constriction. Choose an arterial pressure point between the injury and the heart. The closer to the bleeding site the better.

Arterial pressure points.
Do not perform pressure point constriction for more than 10 minutes. Doing so can result in necrosis (death of body tissue). Be extra careful of the carotid artery, as it hinders oxygen to the brain.
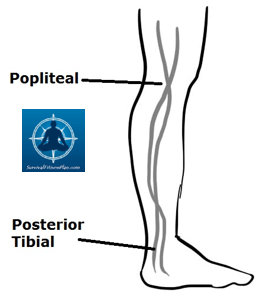
Arterial pressure points on the leg.
Tourniquet
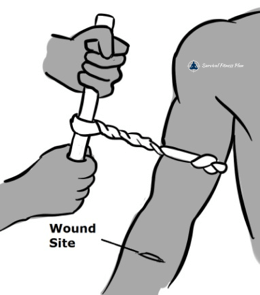
If the patient is still bleeding, consider appling a tourniquet.
Note: This is a last resort. Only use a tourniquet if it is severe, uncontrolled bleeding that will cause loss of life.
Long-term use of a tourniquet may cause loss of limb.
LEARN MORE FIRST AID SKILLS
How to Tie a Tourniquet
To make an improvised tourniquet, find a length of strong, pliable cloth. It is best if it is no less than 5cm wide (2 inches), e.g., backpack strap, clothing, long sock.
Apply it on the limb. Use padding underneath if possible, e.g., rolled up clothing. Place it between the wound and the heart, approximately 5 to 10 cm (2 to 4 inches) from the wound.
If possible, wrap it around the limb several times keeping the material as flat as possible. Tie a simple overhand knot to hold it in place.
Place a torsion device, e.g., a strong stick, on top of the knot. Secure it in place with 2 overhand knots.
Only twist the torsion device enough to stop arterial bleeding (bright red bleeding). Do not over-tighten. Continued dark bleeding for a short while is normal in cases of amputation.
Once tightened, secure the torsion device in place. One way to do this is to loop the ends of the tourniquet over the ends of the stick and tie them together under the limb.
Note what time you applied it. Do not cover it.
Check it after 20 minutes. Ensure a pressure dressing is in place and bleeding has stopped.
Very slowly loosen the tourniquet to restore circulation. Leave the loosened tourniquet in position in case the bleeding resumes.
When you transfer the patient to other caregivers write the letters “TK” on the patient’s forehead. Also, write the time you applied the tourniquet.
How to Control Severe Nose Bleeding
First aid for a severe bleeding nose needs special attention since there is no visual would for you to work on.
First, you must know how to control nose bleeding in general. Try these methods first then escalate as needed.
As with any method of how to control bleeding, you want to reduce the blood flow. Reduce the blood pressure by sitting upright. Leaning forward a little will prevent you from swallowing blood.
To apply direct pressure, pinch your nostrils closed. Do this for 5 minutes and then check to see if the bleeding has stopped. If not, do it again for 10 minutes. If your nose continues to bleed after this 2nd attempt, try it one more time for another full 10 minutes.
If your nose still continues to bleed, it is time to find a doctor. If there isn’t one, pack gauze into your nose.
Inspired? Pin it for Later↓


Wilderness and Travel Medicine: A Complete Wilderness Medicine and Travel Medicine Handbook (Escape, Evasion, and Survival 4)
Price Disclaimer
Photo Credit: Steve Pivnick
I hope the information in this post answers your question on what is the best way to stop severe bleeding. In most cases, the well-aimed direct pressure will work. Always try that first since it is also the least likely to cause further complications. If well-aimed direct pressure doesn’t work, you can try pressure point constriction. And finally, for dire situations, apply a tourniquet.
Did you find this article about how to stop severe bleeding useful? If so, please share it with your friends.
The post First Aid for Severe Bleeding appeared first on Survival Fitness Plan.
June 24, 2018
Long Distance Hiking Tips
Learn the tips and tricks for trail hiking with these long-distance hiking tips. It includes general hiking tips as well as what to do in different terrains and weather. When you go hiking, to get the most benefit, incorporate navigation training.
The information in this post is from the book “Survival Fitness” by Sam Fury.
The Survival Fitness Bundle: The Ultimate Fitness Plan for Escape, Evasion, and Survival
Price Disclaimer
Contents
General Hiking Tips
Find Your Pace
Maintaining Your Hiking Pace
Taking Breaks when Hiking
Hiking with a Pack
Beware of the Environment
Specific Long Distance Hiking Tips
Hiking Uphill
Hiking Downhill
Off Trail Hiking
Crossing Water
Hiking in Hot Weather
Hiking in Cold Weather
Mountain Hiking
Hiking in the Desert
General Long Distance Hiking Tips
Find Your Hiking Pace
Your pace is how fast you walk. Develop a pace that you can maintain for a long time without requiring a break.
Take a series of 5-minute walks and concentrate on maintaining pace length and speed. Find a pace that raises your breathing a little but does not make you sweat.
Walk a known distance at this pace, e.g., from your home to the corner store, and time how long it takes. Make the walk between 15 and 25 minutes. Repeat the same walk daily until you are covering the distance at a consistent time. This is your steady pace.
Maintaining Your Hiking Pace
This is mental. Sing a song in rhythm with your steps, count your steps, breathe in time with your steps, etc.
Breathing
Use slow, deliberate, deep breaths from your stomach. On flat ground use a 3-2-3 breathing rhythm. Inhale for 3 steps, e.g., right, left, right, then exhale for 3 steps.
Taking Breaks when Hiking
Use breaks to stretch, refuel your body, go to the toilet, and fix any problems with yourself or your gear.
Unless having a meal, keep breaks short to prevent your muscles from stiffening up.
Hiking with a Pack
Carry your pack with your legs. Fasten your hip belt and adjust your shoulder straps so the bulk of the bag’s weight rests on your hips.
Beware of the Environment
Hiking is an outdoor activity. Watch out for dangerous plants and animals. Protect yourself from the sun. Don’t freeze, overheat, or dehydrate.
LEARN WHAT TO DO WHEN ANIMALS ATTACK
Specific Long Distance Hiking Tips
Hiking Uphill
Before ascending refuel your body and keep some snacks and water handy for during the climb.
Take smaller steps to maintain your pace. Avoid obstacles that need large steps.
For very steep ascents zigzagging will reduce the gradient, but adds distance.
Use a two-to-two breathing rhythm, i.e., inhale for two steps and exhale for two steps.
If your pack straps are constricting you, loosen them.
Hiking Downhill
Keep your center of gravity over your legs, i.e., don’t lean forward or back. Stay light on your feet and keep your leg s little bent as you plant it. Tightening your pack will improve balance.
You may get tired from the ascent, but pay attention to your foot placement.
If very steep, stand side on and lower yourself down one step at a time. Zigzagging will help to slow your pace.
Off Trail Hiking
Look for the path of least resistance. Check your bearings often and do not rush. If possible, do not strap things to the outside of your pack.
Crossing Water
Triple waterproof your gear. Take your hiking shoes and socks off and keep them dry.
Wider crossings usually bring shallower water, especially where ripples begin. Ripples also indicate rocks or faster flowing areas. Crossing downstream of larger rocks has less current and often an even floor.
Keep slow moving water below mid-thigh and fast-moving water below the knee. Plan where you will place each step. Face a little upstream and slide your foot forward through the water.
Use a pole on the downstream side. Place it firmly, make sure it is stable, and lean on it as you step forward.
Note: Water that is deep and/or fast may pull at your poles.
If you are crossing with your pack on your back undo your hip strap and remove one shoulder. If floating your pack across, have a tether as a back-up.
If swimming across, start upstream of your exit point.
If you get swept downstream in rapids, float on your back with your feet downstream to absorb crashes. Use your hands to steer and work your way toward shore.
When in a group put the strongest, biggest hiker on the upstream side.
LEARN THE SAFEST WAYS CROSS A RIVER
Hiking in Hot Weather
If possible, hike in forest land that follows a stream, or has stream crossings. Mountains are cooler than the valley.
Use electrolytes in your water at half the strength of the recommended directions. Eat salty snacks while hiking.
Break more. Blisters will occur faster in the heat.
Wear loose-fitting clothes. Polyester is better than cotton.
Hiking in Cold Weather
Use the layer system. Use thermals. Avoid cotton. Cover/uncover your head to regulate heat.
Avoid sweating. If you start warming up, slow down. When you do sweat, take off layers and replace them during breaks.
Start your hike a little cold. If after 20 minutes of hiking you are still cold, add layers.
Use sunscreen and lip balm.
Eat small amounts often and continue to rehydrate.
Be aware than tubes from hydration packs can freeze.
Mountain Hiking
High altitude hiking is trekking at an elevation that may affect your body. Some people get affected as low as 7000 feet.
Adjust your pace. Take deeper breaths and smaller steps. Perform two-to-two or one-to-one rhythmic breathing to adjust to the thinner air.
Use sunscreen and sunglasses.
Be aware that the weather can change fast.
Hiking in the Desert
Don’t count on finding water, even if it’s marked on your map.
Watch for distant storms and beware of flash floods.
Wear light clothes that cover your whole body. Use sunscreen, sunglasses, and insect repellent.
Inspired? Pin it for Later↓


The Survival Fitness Bundle: The Ultimate Fitness Plan for Escape, Evasion, and Survival
Price Disclaimer
I hope you got some good hiking tips from this article. By applying the above hiking techniques you will increase endurance, reduce the chance of injury, and have a more enjoyable experience.
Did you find these long distance hiking tips useful? If so, please share it with your friends.
The post Long Distance Hiking Tips appeared first on Survival Fitness Plan.
Handstand Pushup Progression Steps
In this post, you will learn handstand pushup progression steps. It is handstand pushups for beginners. With a bit of effort, you will learn how to handstand pushup, even if you can’t do a basic handstand yet.
Contents
How to do a yoga handstand
How to do a bent-arm handstand
How to do yoga crow pose
How to do wall handstand pushups
How to do pike pushups
How to do negative wall handstand pushups
Modified handstand pushups
Handstand pushup tutorial summary
Get the Training Manual!
The Survival Fitness Bundle: The Ultimate Fitness Plan for Escape, Evasion, and Survival
Price Disclaimer
Handstand Pushup Progression Steps
Being able to do freestanding handstand pushups takes A LOT of strength. You will need to condition the right muscles before attempting them to avoid injury. This handstand pushup program will teach you how to practice handstand pushups. It also gives some handstand pushup tips.
First, train in the following conditioning exercises:
Handstand for 30 seconds
Bent-arm handstand for 30 seconds
10 wall handstand push-ups
You do not have to progress in the above exercises in order. You can train for them at the same time. Let’s go into each of them in more detail.
How to do a Handstand
In this video, Esther teaches you how to do yoga handstands against a wall. There is an emphasis on proper technique and body alignment which is why I chose it.
Once you can do a yoga handstand against a wall move onto doing them unassisted.
Work your way up to a continuous 30-second handstand. You can use a timer if you want but then every time you fall you will need to stop/start the timer. It’s more efficient to count. I find my counting is faster than one second so I count to 50. You can time your counting rhythm to see how long you need to count to get to one minute.
When you start to lose balance go into a controlled roll. Tuck your chin to your chest, bend your arms and roll over your upper back. This will improve your rolling technique. It also means you can put your weight towards the back of your body because you won’t be afraid to fall that way. This will make it easier to do the handstand.
LEARN HOW TO SAFETY ROLL
Most people prefer to fall back on their feet so they place more of their weight in that direction. This makes the handstand harder to control and you will lose balance more often. When your weight is more to your back you can use your finger-strength to correct yourself. This is great for other Survival Fitness Plan activities also. Finger strength is very useful in parkour and self-defense.
How to do a Bent-Arm Handstand
To begin with, learn the yoga crow pose. Here’s a video to teach you that.
After you can do the crow pose for at least 30 seconds, try extending into a bent-arm handstand. I could not find an actual tutorial on how to do a bent-arm handstand. Maybe I’ll make one myself one day. In the meantime, this video shows someone doing a bent arm handstand by using the yoga crow pose.
Continue to practice the bent-arm handstand until you can do it for at least 30 seconds.
How to do Wall Handstand Push-ups
To learn wall handstand push-ups, build yourself up to the following in order:
15 pike push-ups
15 negative wall handstand push-ups
10 wall handstand push-ups
How to do Pike Pushups
When doing the pike push-up, mimic the handstand push-up as close as possible. This is so you strengthen the correct muscles.
Here is an excellent tutorial by ‘Global Bodyweight Training’ on how to do pike push-ups. It will help if you can first do either 30 normal push-ups or 10 SFP super-burpees. The latter is best.
LEARN HOW TO DO SUPER-BURPEES
How to do Negative Wall Handstand Pushups
To do negative wall handstand push-ups, start in a handstand. Slowly lower yourself to the ground. Mimic as close as possible the exact reverse motion of the handstand pushup. This is so you target the right muscles.
When your head touches the ground, fall you your feet. Then go into a wall handstand again and repeat it.
How to do Handstand Pushups – Final Progression Steps
Once you can do 15 negative wall handstand push-ups, switch to wall handstand push-ups. Continue to practice handstand push-ups on the wall until you can do 10 in a row.
As you gain strength, rely less and less on the wall. Push away from it a little. Do a pushup, regain your balance in the handstand position, and then do another one. Build yourself up to one handstand pushup. Then go for 5 or 10 and you’ll be a beast!
Here is a video of a guy with PERFECT handstand pushup form. I was gob-smacked when I first watched this.
Modified Handstand Pushups
There are many variations to the basic handstand pushup. I won’t go into them in detail but here are some ideas in case you feel like mixing it up a bit. They are from easy to hard. You can use the first two as extra progression steps to the basic handstand pushup if you want.
Banded handstand pushups. Get a little help from a giant rubber band.
Pike handstand pushup. Another scaled handstand pushup. It’s a pike pushup but with your feet up higher, like on a box.
Diamond handstand pushups. Put your hands in a diamond shape on the ground to work different muscles.
Weighted handstand pushups. Challenge yourself by adding extra weight.
One arm handstand pushup. For if you feel like being a beast.
One finger handstand pushup. Because you have decided to become Superman!
Handstand Pushup Tutorial Summary
Here are my suggested handstand push-up progression steps. Aim to do handstand pushups everyday for the fastest results.
Be able to do the following 3 exercises:
Handstand for 30 seconds.
Bent-arm handstand for 30 seconds.
10 wall handstand push-ups.
To learn how to do a wall handstand push-up, use the following progression steps in order:
Build yourself up to 15 pike push-ups.
Do 15 negative wall handstand push-ups, i.e., start in a handstand and slowly lower yourself to the ground.
Work your way up to 10 wall handstand push-ups.
Once you can do all three exercises, progress into handstand push-ups without the wall.
Build up to 10 negative handstand push-ups.
Finally, do 5 handstand push-ups.
Try modified handstand pushups (optional)
Inspired? Pin it for Later↓


The Survival Fitness Bundle: The Ultimate Fitness Plan for Escape, Evasion, and Survival
Price Disclaimer
Image Credit: Senior Airman Derek VanHorn
Did you find this article about how to do handstand push-ups useful? If so, please share it with your friends.
The post Handstand Pushup Progression Steps appeared first on Survival Fitness Plan.
June 21, 2018
Discount Training Manuals
Practical Arnis Stick Fighting by Sam Fury – Only 99c From the 26th to the 29th of June
Get Your Copy Before the Price Goes Back Up!
Practical Arnis Stick Fighting: Vortex Control Stick Fighting for Self Defense
Price Disclaimer
All Upcoming Discount Training Manual Promotions
Get Notified of Book Promos the Day They Go on Sale via Twitter and/or Facebook
www.Facebook.com/SurvivalFitnessPlan
www.Twitter.com/Survival_Fitnes
The post Discount Training Manuals appeared first on Survival Fitness Plan.
How to Give a Complete First Aid Secondary Survey
Learn how to give a complete first aid secondary survey. This post includes how to take and record a patients SAMPLE history and vital signs. It also goes through how to give a full body physical exam and the use of SOAP notes to record your findings. In a secondary survey, look for injuries unseen during the primary assessment (DRABC).
GET YOUR FREE EMERGENCY FIRST AID CHEAT SHEET
The information in this post is from the book “Wilderness and Travel Medicine” by Sam Fury.
Wilderness and Travel Medicine is a comprehensive handbook with a minimalist approach. It contains prevention, diagnoses, and treatments for a wide range of ailments using modern and “survival” medicines.
Get Your Copy Today on Kindle and/or in Print
Inspired? Pin it for Later↓


Contents
Recording your findings (SOAP Notes)
SAMPLE secondary assessment
How to take a patients vital signs
How to give a full body physical exam
How to Give a Complete First Aid Secondary Survey
IMPORTANT: No amount of reading can compare to a medical course with a professional trainer. A standard first aid course is good. A Remote Area First Aid Course or higher is best.
After stabilizing your patient using DRABC, do the first aid secondary assessment. To give a first aid secondary examination means to check your patient from head to toe. Do it in a methodical way so you do not miss anything.
In critical first aid (DRABC), you treat the problems as you find them. With the secondary exam, you complete the full assessment first. Then you treat what you find in order of priority.
SAMPLE History, vital signs, and the full body exam make up the secondary survey steps. A secondary survey should start with whichever is most appropriate for the situation. For example, if the patient is incoherent then taking a SAMPLE History will have to wait.
Recording Your Findings (SOAP Notes)
While doing the secondary assessment of a medical patient, record your findings with SOAP notes. Record your findings of the primary and secondary assessment of a patient. Use the luxury of time during the secondary examination to “catch up on your paperwork”.
Recording your findings in first aid is very important. Give the information you find to all caretakers of the patient.
Use the acronym SOAAP to record your findings.
Subjective information: History, scene, story and symptoms.
Objective information: Exam findings, vital signs.
Assessment: All the problems you found.
Anticipated Problems: Any problems that may arise.
Plan: What you are going to do.
Write the patient’s personal details at the top. Include his/her name, age, sex, birth date, weight, phone number, etc.
There are many SOAAP (SOAP) Note templates on the internet, but a pencil and paper will suffice if that’s all you have. Using an actual SOAP note is best. They are like a secondary survey checklist.
SAMPLE Secondary Assessment
The best/easiest way to extract your patient’s history is to talk to him. It is important that the patient feels comfortable with you. If not, he/she might be too embarrassed to tell you what may be important information. Ensure them that everything they tell you is confidential and not to leave anything out.
Use the acronym SAMPLE to make sure you do not miss anything.
Symptoms: What are the patient’s symptoms?
Allergies: Does the patient have any known allergies? This includes medication.
Medications: Is the patient on any medication?
Past History: Is the problem reoccurring? Does the patient or the patient’s family have a history of a suspected ailment?
Last: A history of the last things that went in and out of the person’s body.
Events: A detailed description of the events that led up to the problem.
How to Take a Patient’s Vital Signs
Assessing and monitoring your patient’s vital signs will provide you with important information. It will help you decide on a treatment and then track the effectiveness.
LEARN HOW TO DO DRABC
Pulse
Count the pulse for 15 seconds and multiply it by 4.
60 to 100 beats per minute is normal.
Respiration
Check for an entire minute.
Normal rate of breaths per minute (BPM) for an adult at rest is 12-18 breaths per minute. Over 20 is a sign of distress.
The younger a child, the faster their respiratory rate. An infant may have between 30 to 60 breaths per minute whereas a school age child (6 to 12 years) may have 18 to 30.
Note any unusual noises, e.g., wheezing or gurgling.
Blood Pressure
Check blood pressure if the equipment is available.
Blood pressure measures the amount of work the heart has to do to pump blood through the body.
A reading less than 140/90 at rest is normal. It may be high after extreme physical exertion but goes back down after a short while.
High blood pressure may be a medical condition and low blood pressure may mean hemorrhage or shock.
LEARN MORE ABOUT REMOTE AREA FIRST AID TRAINING
Skin
Check color (red, pale), temperature (hot, cold) and moisture (clammy, dry, moist etc.).
Body Temperature
A normal temperature ranges between 36.1 °C (97 °F) and 37.2 °C (99 °F).
Above 38 °C (100.4 °F) or below 35 °C (95 °F) and there is something wrong. Hyper or hypothermia may be an issue.
Mental Status
Gauge with AVPU.
If there is a problem with the patient’s mental status, use the acronym STOPEATS to discover the cause:
Sugar: Hypo or hyperglycemia.
Temperature: Hypo or hyperthermia.
Oxygen: Abnormal levels of oxygen.
Pressure: Increasing ICP.
Electricity: Trauma from electric shock or problems in the brain.
Altitude: High altitudes can result in various altitude related illnesses. Very low altitudes (i.e., underwater) can result in various diving related illnesses.
Toxins: Drugs, alcohol, poisons, etc.
Salts: Low sodium or potassium levels.
How to Give a Full Body Physical Exam
Examine the areas about which the patient has a specific complaint about. Compare any outer physical complaints to the patient’s non-injured side.
Check the range of motion, circulation, motor skills, sensation etc. Be very careful about forcing something to move.
Do this in a systematic manner, from head to toe. Use only as much physical pressure as is necessary to discover an injury or lack thereof. Check the whole body for obvious signs of injury, e.g., bruises, bleeding, etc.
A stethoscope, penlight, gloves and tongue depressor will be useful.
Head. Bumps, bruises, bleeding from orifices, etc.
Eyes. Redness, whether the pupils respond equally to light.
Mouth. Inside and outside. Redness, sores, dental issues.
Neck. All around neck and back of the head, neck bones (vertebrae).
Chest. Use a stethoscope if available. Check lungs for abnormal sounds. Wheezing, gurgles, crackles, etc.
Heart. Rhythm of heart beat, e.g., fast, slow regular, irregular.
Ribs. Possible fracture.
Armpits. Injury, parasites (lice, ticks etc.), tenderness.
Breast. Move your fingers in a circular motion over the breast tissue. Start from where the arm connects to the shoulder and end at the nipple.
Abdomen.
Press on the abdomen with your open hand. Check for pain, tenderness, swelling, abnormal masses, etc.
Listen for bowel sounds and note if there is too much or too little.
Check percussion. Place your open hand on the different quadrants of the abdomen and tap on your middle finger. It should sound hollow.
Liver and Spleen. Press down on the patient’s right side below the rib cage to determine an enlarged liver. You won’t feel it if it isn’t. An enlarged spleen will appear as a mass on the left side under the bottom of the rib cage.
Spine. Check along the patient’s spine for evidence of pain or injury. Never press on the vertebrae. Learn how to give a proper spinal assessment in this post.
Kidneys. Pound lightly with a closed hand on each side of the back below the last rib. An injury or infection of the kidneys will result in pain.
Extremities.
Examine each extremity by feeling the muscle groups for pain or decreased range of motion.
Check perfusion.
Check for sensation by lightly tapping with sharp and dull sensations on the hands and feet. A safety pin works well.
General Strength.
Place your hands on their thighs and ask them to lift up.
Ask them to grasp your fingers with each hand then try to pull your hand away; if you can’t, that’s good.
Strength should be about equal on both sides of the body.
GET YOUR FREE EMERGENCY FIRST AID CHEAT SHEET
Wilderness and Travel Medicine: A Complete Wilderness Medicine and Travel Medicine Handbook (Escape, Evasion, and Survival 4)
Price Disclaimer
Photo Credit: Mass Communication Specialist 3rd Class Justin W. Galvin
Did you find this article about how to give a complete first aid secondary survey useful? If so, please share it with your friends.
The post How to Give a Complete First Aid Secondary Survey appeared first on Survival Fitness Plan.


