
Sam Fury's Blog, page 23
September 27, 2018
Jin Shin Jyutsu Exercises for Self Help
In this article you will learn how to do Jin Shin Jyutsu exercises for general health.
It includes an introduction to Jin Shin Jyutsu theory and is a good first step for becoming a self help Jin Shin Jyutsu practitioner.
Contents
What is Jin Shin Jyutsu?
Jin Shin Jyutsu Safety Energy Locks and Flows
Applying Jin Shin Jyutsu Sequences
Jin Shin Jyutsu Main Central Flow
Jin Shin Jyutsu Diagonal Mediator Flow
Jin Shin Jyutsu Spleen Flow
Jin Shin Jyutsu Stomach Flow
Jin Shin Jyutsu Bladder Flow
Jin Shin Jyutsu Chart
Jin Shin Jyutsu Mudras
Jin Shin Jyutsu Finger Holds
Jin Shin Jyutsu Training Conclusion
Discover How to Use Yoga as Medicine to Cure 50+ Common AilmentsGet Your Copy of Curing Yoga Today
Curing Yoga: 100+ Healing Yoga Sequences to Alleviate Over 50 Ailments (Health and Fitness Book 2)

Price Disclaimer
Jin Shin Jyutsu Exercises
What is Jin Shin Jyutsu?
Jin Shin Jyutsu is an ancient form of touch therapy. It is gentle and you can do it at a basic level with no formal training.
Learning how to do Jin Shin Jyustu is as easy as placing your hands on certain spots of the body (SEL’s). Doing this helps to unblock stagnant energy, i.e., life-force.
Jin Shin Jyutsu Safety Energy Locks and Flows
Blood uses arteries and veins to get to different parts of the body. Life force also follows specific (although different) channels. These channels are “flows”.
There are 12 organ flows, called “function energy’s”. For example, the “Spleen Flow” is the “Spleen Function Energy.”
There are also 3 main harmonizing flows. The Main Central Flow and the 2 Supervisor Flows. Together, these 3 main flows are the Trinity Flows.
Safety Energy Locks (SEL’s) are like fuses which allow energy (life force) to flow free. If one shuts down, energy will pool and stagnate creating disharmony.
When energy becomes stuck in any area, you can free it by applying your hands on Jin Shin Jyutsu points (SEL’s) to open them.
Applying Jin Shin Jyutsu Sequences
Jin Shin Jyutsu isn’t massage, but you can do it while giving a massage. In fact, there are no set rules to Jin Shin Jyutsu. It is very much an art. Do it in how feels right for you.
Saying that, there is a consensus of the best way to do Jin Shin Jyutsu for beginners.
Place your hands/fingers on the SEL’s for at about 2 minutes or until you feel your pulses align. You may also feel a sense of calmness.
You can skip any position that is too uncomfortable to reach. Go to the next position in the sequence.
You can also use positions and/or full Jin Shin Jyutsu massage sequences on their own, e.g., when a specific problem arises.
Accuracy in where you place your hands/fingers is not strict. Your touch will be effective within a 3-inch radius of the exact point described.
You can do sequences from a seated position or lie down. You can also apply them to other people.
Jin Shin Jyutsu Main Central Flow
The Jin Shin Jyutsu main central flow is the most important energy flow stream in the body. All other flows connect and draw energy from this flow. It is the flow of life.
There are 8 Jin Shin Jyutsu positions in the main central energy flow.
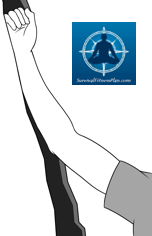
Right hand on top of your head, left fingers on your 3rd eye.
Right hand on top of your head, left fingers on tip of nose.
Right hand on top of your head, left fingers on V of neck.
Right hand on top of your head, left fingers below the 3rd rib, at the middle of the breastbone.
Right hand on top of your head, left fingers on base of the breastbone, at solar plexus.
Right hand on top of your head, left fingers one inch above belly button.
Right hand on top of your head, left fingers to the top of pubic bone.
Right hand to your coccyx, left fingers to the top of pubic bone.

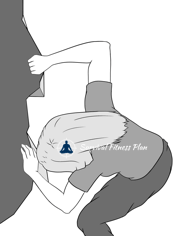
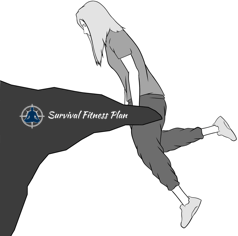
Jin Shin Jyutsu Diagonal Mediator Flow
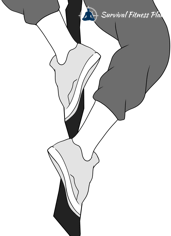
In Jin Shin Jyutsu there are 2 diagonal flows, one for each side of the body. They make diagonal ovals across the body. This connects all the flows with the primary energy source, the Main Central Flow.
Do this on both sides of your body.
Make a circle with your left thumb and left ring finger. Place the pad of your thumb over the fingernail of your finger.
Put your right hand over your left shoulder.
Bring your knees together so they touch on the inside. You could also place the sole of your right foot on the inner side of your left knee instead.

Jin Shin Jyutsu Spleen Flow
The Jin Shin Jyutsu Spleen Flow improves blood chemistry, digestive function, and problems in the nervous system. It also helps with vitality and white cell blood count.
The proper name for the Spleen Flow in Jin Shin Jyutsu is the Spleen Function Energy Sequence.
There are 4 positions in the spleen function energy sequence. Do it on both sides of your body.
Left hand on your coccyx. Right hand on the inside of your right ankle bone towards your heel (right SEL 5).
Left hand on your coccyx. Right hand on the base of the center of the left rib cage (left SEL 14).
Left hand below your right third rib (right SEL 13). Right hand on the base of the center of your left rib cage (left SEL 14).
Left hand below the center of your left collarbone (to left SEL 22). Right hand on the base of the center of your left rib cage (left SEL 14).

Jin Shin Jyutsu Stomach Flow
This Jin Shin Jyutsu flow sequence improves congestion above the waist (such as bloat), mental stress, weight issues, and worry.
The official name of the Jin Shin Jyustu Stomach Flow is the Stomach Function Energy Sequence.
There are 7 positions in the stomach function energy sequence. Do the sequence on both sides of your body.
Right fingers at the base of your left cheekbone (left SEL 21). Left fingers on the center of your left collarbone (left SEL 22).
Right fingers at the base of your left cheekbone (left SEL 21). Left fingers at the base of the center of your right front rib cage (left SEL 14).
Right fingers at the base of your left cheekbone (left SEL 21). Left fingers at the small of your back (right SEL 23).
Right fingers at the base of your left cheekbone (left SEL 21). Left fingers at the base of the center of your left front rib cage (to left SEL 14).
Right fingers at the base of your left cheekbone (left SEL 21). Left fingers on your right inner thigh, about 3 inches above your right knee (right SEL High 1).
Right fingers at the base of your left cheekbone (left SEL 21). Left fingers on your right calf, about midway between the outside of your knee and ankle. A little off your shinbone (right SEL Low 8).
Right fingers at the base of your left cheekbone (left SEL 21). Hold your right middle toe with your left thumb and any finger.

Jin Shin Jyutsu Bladder Flow
The Jin Shin Jyutsu Bladder Flow sequence improves back stress, elimination processes of the body, and headaches.
It also helps with muscle and leg discomfort.
There are 4 positions in the bladder function energy sequence. Do the sequence on both sides of your body.
Right fingers on the side of your neck between your left ear and spine (left SEL 12). Left hand on your coccyx.
Right fingers on the side of your neck between your left ear and spine (left SEL 12). Left hand on the bend in the back of your left knee.
Right fingers on the side of your neck between your left ear and spine (left SEL 12). Left hand on the outside of your left ankle, below the left ankle bone (left SEL 16).
Right fingers on the side of your neck between your left ear and spine (left SEL 12). Hold your left little toe with your left thumb and any finger.

Jin Shin Jyutsu Chart
Here is a chart with the Jin Shin Jyutsu SEL’s.

By Rjbmeertens [CC BY-SA 3.0 ], from Wikimedia Commons
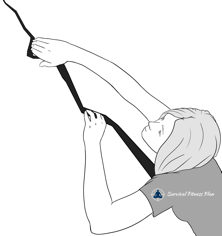
Jin Shin Jyutsu Mudras
The exploration of ancient hand mudras is how the re-discovery of Jin Shin Jyutsu began. From them come the 8 most powerful Jin Shin Jyutsu hand mudras to practice.
Place your hands in the positions described below. Hold each mudra for 2 minutes or until you feel your pulses align and/or you feel a sense of calmness.
When doing these hand mudras keep your hands, arms, and shoulders as relaxed as possible. Don’t grip your fingers tight. Hold them loosely.
Hold your left middle finger with your right hand. Your thumb is on the palm side and the rest of your fingers are on the back of the hand. Repeat this with opposite hands.
Hold your left middle finger with your right hand. Your thumb is on the back of the finger and the rest of your fingers are on the palm side. Repeat this with opposite hands.
Hold your left little and ring fingers with your right hand. Your thumb is on the palm side of these fingers and the rest of your fingers are on the back. Repeat this with opposite hands.
Hold your left thumb, index, and middle fingers with your right hand. Your thumb is on the back and the rest of your fingers are on the palm side. Repeat this with opposite hands.
Make a circle with your right thumb and right middle finger. Place the pad of your thumb over the fingernail of your finger. Place your left thumb in-between your right middle finger and right thumb. Repeat this with opposite hands.
Touch the palm side of your right thumb and ring fingernail. Repeat this with opposite hands or do both hands at the same time.
Touch the palm sides of your middles fingers together. Interlock the rest of your fingers.
Touch the fingernails of your middle fingers together.

For those of you that like to see it in action, here’s a Jin Shin Jyutsu hand mudras video. The first 2 minutes of the video is a general introduction, so I set it to start where the hand mudras start.
Jin Shin Jyutsu Finger Holds
Using the Jin Shin Jyutsu finger holds is an easy way to balance your emotions.
Hold the finger (or thumb) on one hand with the other. The finger you hold depends on what you want to achieve.
Thumb. Decreases depression and worry. Improves digestion, stress, and tension in the head, shoulders and lungs.
Index finger. Decreases fear and self-criticism. Improves backaches, digestion, joint aches, and mouth ailments.
Middle finger. Decreases anger and irritability. Improves fatigue, headache, indecision, nursing mothers, and vision.
Ring finger. Decreases negativity and sadness. Improves respiratory functions, skin conditions, and tinnitus (ringing in the ear).
Little finger. Decreases anxiety and stress. Improves bloating and heart conditions.
The more often you hold a finger the longer lasting the effect will be. A good practice for overall wellbeing is to hold each finger for a few minutes every day. If you have a specific problem, hold that finger more.
Here is a video showing the Jin Shin Jyutsu finger method. Again, the first 2 minutes is a general introduction to Jin Shin Jyutsu, so I set it to skip that.
Inspired? Pin it for Later↓


100+ Healing Yoga Sequences to Alleviate Over 50 AilmentsGet Your Copy of Curing Yoga Today
Curing Yoga: 100+ Healing Yoga Sequences to Alleviate Over 50 Ailments (Health and Fitness Book 2)
Price Disclaimer
Jin Shin Jyutsu Training Conclusion
I hope you found this basic Jin Shin Jyutsu training useful. This only touches the surface of this ancient art.
Although not a mainstream healing method, people all over the world are becoming more aware of it.
You can use it to resolve minor ailments and as a supplement for more serious diseases. There are positive reports of Jin Shin Jyutsu cancer treatments.
The thing about Jin Shin Jyutsu is that it is so non-invasive that it does no harm to give it a go.
Did you find these Jin Shin Jyutsu exercises useful? If so, please share them with your friends.
The post Jin Shin Jyutsu Exercises for Self Help appeared first on Survival Fitness Plan.


September 25, 2018
8 Basic Knots and Their Uses
In this article you will learn 8 basic knots and their uses. You will also learn about the different types of knots, and how to choose the right one for the job.
You can use these 8 basic knots in scouting, camping, climbing, general maintenance, first aid, etc.
I admit there are over 8 different knots and their uses in this article. But in trying to cover the most useful knots and uses I branched out. All the knots stem from 8 basic knots and their uses. You’ll see what I mean.
Contents
Basic Knot Terminology
The Different Types of Knots and Their Uses
How to Choose the Right Knot for the Job
8 Basic Knots and Their Uses
1. How to Tie an Overhand Knot
How to Tie an Overhand Loop Knot
2. How to Tie a Clove Hitch Knot
Clove Hitch Method 2
3. How to Tie a Reef Knot
How to Tie a Surgeons Knot
4. How to tie a Round Turn and Two Half Hitches Knot
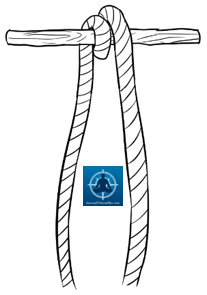
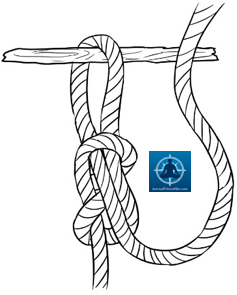
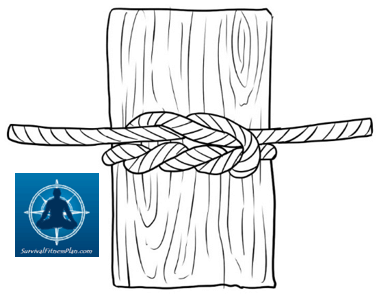
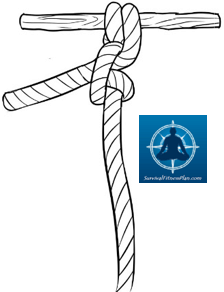
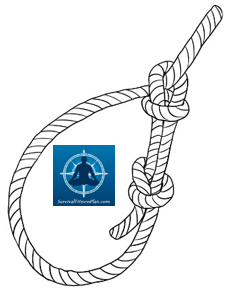
5. How to Tie a Bowline Knot
How to Tie the Self Rescue Bowline Knot
6. How to Tie an Alpine Butterfly Loop Knot
7. How to Tie a Figure 8 Bend Knot
Tying a Figure 8 Knot
Tying a Figure 8 Bend Knot
How to Tie a Figure 8 Slip Knot
The Figure 8 Climbing Knot (Figure 8 on a Bight)
8. Knots for Lashing
Square Lashing Knot
Diagonal Lashing Knot
Sheer Lashing
Tripod Lashing
Useful Knots to Know Conclusion
Learn How to Tie the 25+ Most Practical KnotsGet Your Copy of The Useful Knots Book Today

The Useful Knots Book: How to Tie the 25+ Most Practical Rope Knots (Escape, Evasion, and Survival Book 9)
Price Disclaimer
Basic Knot Tying Terminology
First, I will explain the basic knot tying terminology in this post. It will make learning and tying the knots easier.
Bight
Any bend in-between the ends of the rope which does not cross over itself.
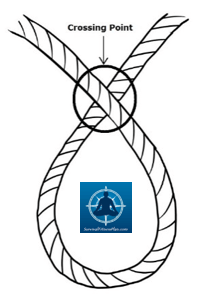
Crossing Point
The point where the rope crosses over itself.
Load
Refers to the weight of the object you tie onto, e.g., if you are pulling a log then the log is the load.
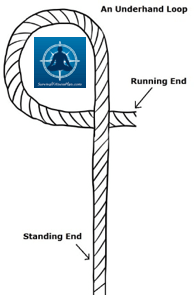
Loop
Like a bight but the ends cross over creating a closed circle.
An overhand loop is when the running end lies over the top of the standing part. An underhand loop is opposite (the standing part lies on top of the running end).
Rope
A generic term referring to cord, rope, string, twine, or whatever material which is being used to tie a knot.
Running End
The part of the rope used to tie the knot. Also known as the working end.
Standing End
The part of the rope other than the running end.
Shock Load
Shock load occurs when there is a sudden increase in load. In such a case the load will be much more than the actual weight of the object. An example of this is when a climber falls and his/her weight suddenly loads the rope.
Turn
A single wrap of the rope around an object. A round turn (pictured) is where the rope encircles the object.
The Different Types of Knots
Although you can use any knot any way you wish, most of them are best for specific tasks. Here they are in 5 broad categories.
Stopper Knots
Stopper knots have a few uses. They can add weight to a rope, stop the rope from slipping through a hole, stop a cut rope from fraying, etc. You can also use them as a backup knot against knot failure, i.e., tied around the standing end.
Loops
Make loops by tying the rope to itself to create an enclosed circle. Their main use is as attachment points, e.g., as holds to climb up or to clip a carabineer onto it.
Hitches
Hitches are useful for securing the rope to an object, e.g., a boat to the jetty or around a log you wish to drag.
Bends
Use bend knots to join 2 or more lengths of rope together. This can be useful to repair broken rope or for creating a longer length from 2 shorter ones.
Lashing
Use lashing to join objects together. It is useful for construction.
How to Choose the Right Knot for the Job
Although all knots are useful, there will always be one that is best for the job you are doing. To decide which knot to use you must consider the characteristics of each knot. Gaining in one characteristic will mean compromising on another. You must find the knot with the best balance of these characteristics for the job you need it for.
Your choice of knot must be one that will fulfill the task you need it for. For instance, a loop knot will not be as effective for binding 2 objects together as a lashing would.
Security
Security of a knot is about its ability to stay tied and tight, i.e., not come undone on its own.
Pressure, violent movement, vibration, and other things can compromise a knot’s security.
Choose the most secure knot you can. Remember that increase in one characteristic will decrease others. , e.g., a very secure knot may become very hard to untie. This will be a problem if you need it to be “quick-release”.
Strength
Every knot will weaken the integrity of the rope, some more than others. The strength of the knot refers to how much the knot weakens the rope.
This is important when the rope needs to hold weight and/or take shock load. This characteristic becomes important when doing things such as climbing and rescue.
Ease of Tying
When you have to tie something fast or it is a repetitive job, then ease of tying becomes more important.
Ease of Untying
Sometimes you may want the knot to be easy to untie. For example, if you want to release the knot fast without cutting it.
At other times you may want the knot to be more difficult to untie. For example, if you don’t want an animal to release itself, or to stop other people from being able to untie it.
Another factor is how easy the knot will be to untie after it has done its job. Some knots are easy to untie even after baring tension or swelling underwater, or both.
8 Basic Knots and Their Uses
1. How to Tie an Overhand Knot
This is the simplest of knots and is the basis of many other knots. Overhand knots are difficult to untie once tightened.
Make an underhand loop by taking the running end of the rope and passing it under the standing end.
Pass the running end through the loop from the front to the back.
Pull both ends to tighten it.
You can make the overhand knot bulkier by passing the running end through the loop more times. Push the first turn into the middle of the knot.
Doing it twice makes a double overhand and doing it 3 or more times creates a blood knot.
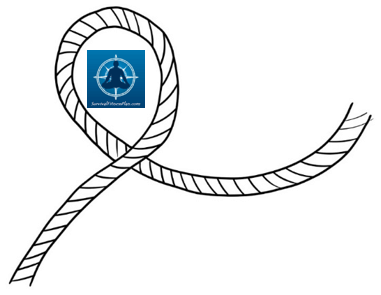
Overhand Loop
You can use the overhand knot can to create a loop. It works well with fishing line but can be hard to untie.
Double up the rope to make a bight and then tie an overhand knot in the bight.
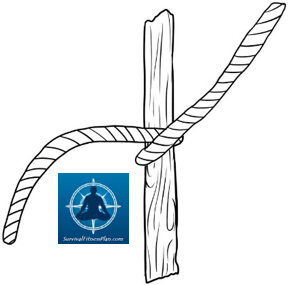
2. How to Tie a Clove Hitch
Clove hitches are a useful base for many other knots (such as lashing a tripod) and are good in their own right for binding.
There are 2 sets of clove hitch knot instructions.
This first method is good for when the rope is not under strain as you are tying it and you can slip it over your object.
Make 2 loops in the rope which face opposite directions as pictured below.
Put the right loop over the left one.
Put both loops over the object and pull the running end and the standing end apart to tighten the knot.
Clove Hitch Method 2
Here’s an alternative method for how to tie a clove hitch knot step by step. Follow the clove hitch diagrams if you have troubles.
Wrap the running end of the rope around the object you wish to tie onto. The running end crosses over the standing end.
Wrap the running end around a second time and then pass it underneath itself.
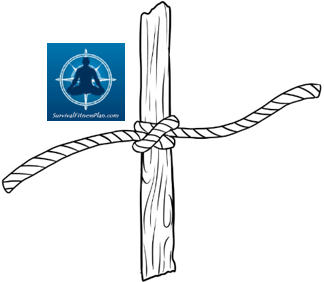
Pull it tight as before.
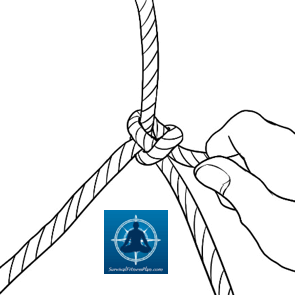
3. How to do a Reef Knot
A reef knot (square knot) is a good binding knot that’s easy to tie and untie.
Reef knot uses does NOT include joining 2 ropes together. There are far better joining-knots available.
To tie a reef knot put the rope around the object you want to bind.
Take the left end and pass it over the right from the bottom and then tuck it under the right end.
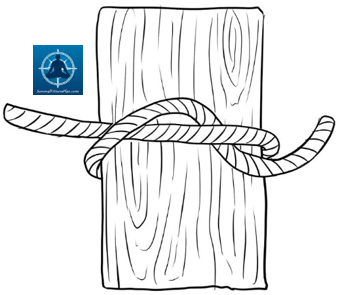
Now take this new right end and cross it over the left end and then tuck it under.
Pull the left strands and the right strands apart to tighten the knot.
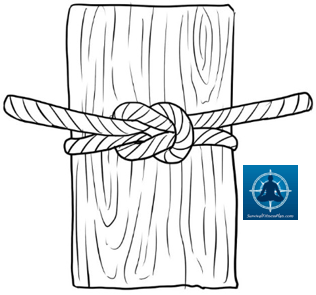
An easy way to remember how to make a reef knot is with the rhyme “left over right and under, right over left and under.”
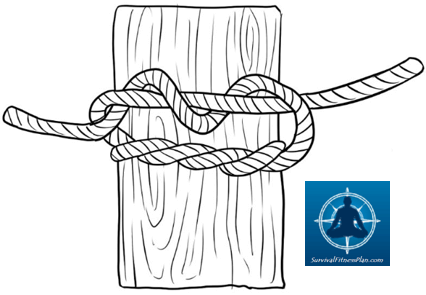
How to Tie a Surgeons Square Knot
A more secure version of tying a reef knot is the surgeons knot.
To tie a surgeons knot, make an extra turn when tying the “left over right” part of a reef knot. This keeps the knot in place while you tie the rest of the knot.
You could also make an extra turn in the “right over left” part to make it even more secure.
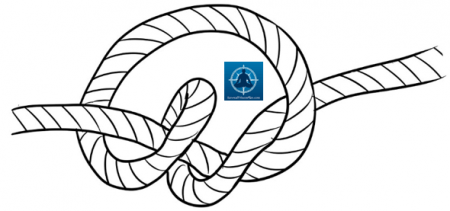
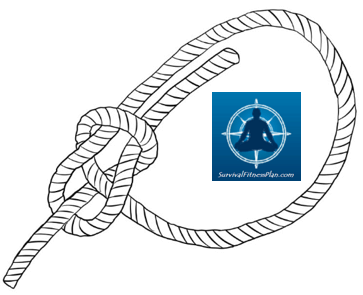
4. Round Turn and Two Half Hitches
This knot is fast to tie and very secure. It is also easy to untie even when placed under heavy strain.
To create the round turn, loop the running end of the rope around your object so the rope envelops it.
Tie a half hitch by bringing the running end behind the standing end. Make a turn around the standing end. Next, thread it through the gap you made between the running and standing ends.
Create a second half hitch, in the same way, ensuring it is underneath the first half hitch. Pull both ends to tighten.
In learning to tie a round turn and two half hitches you also learn how to tie the half hitch knot.
Adding the round turn makes it more secure, but if you don’t have enough rope, then tying half hitches may suffice.
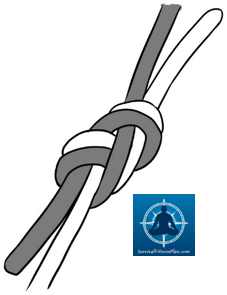
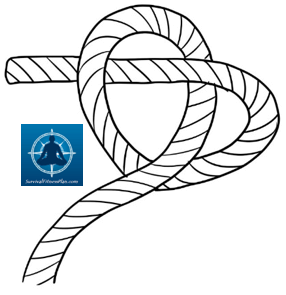
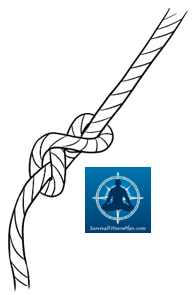
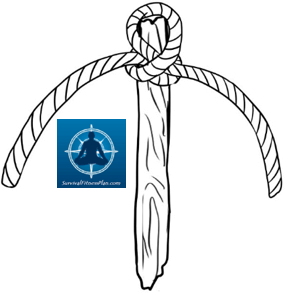
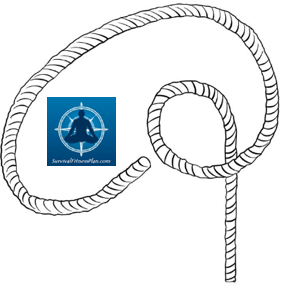
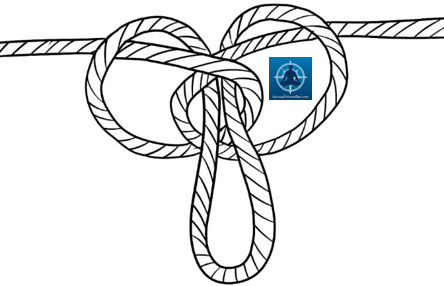
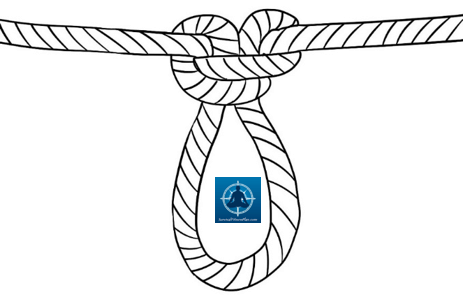
5. Tying a Bowline on a Bight
A bowline is a fixed loop that will neither tighten nor slip under strain.
The main bowline knot uses are to tie around things you want to secure/tether, e.g., a raft or a person.
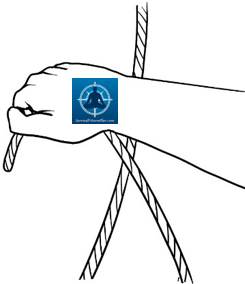
To learn how to tie a bowline knot around something, hold the rope in your right hand with the standing end at the rear.
Make an overhand loop so that the loop faces to the left.
Pass the running end up through the loop you made and then around the back of standing end.
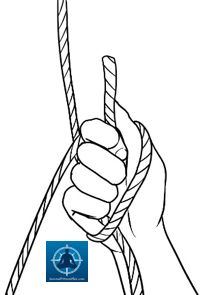
The running end then goes over the crossing point and back through the original loop.
Pull the standing end and the doubled-up running end in opposite directions. This will tighten it.
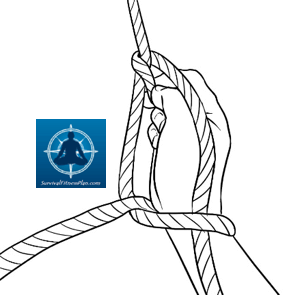
You can finish the bowline off with a stopper knot (e.g., overhand) tied to the side of the loop.
Once you can tie the bowline practice doing it around things. It changes the orientation so you will need to practice it.
How to Tie a Bowline Around Your Waist
The self-rescue bowline is good for if you find yourself in a “man-overboard” situation. It is tying a bowline around your waist with only one hand.
Wrap the rope around your waist so that both the standing and running ends are to your front. Your waist is between them. In this demonstration, the running end is on your right.
Hold the running end in your right hand allowing at least 15cm of rope beyond your hand.
Without letting go of the running end bring it over the standing part to make a crossing point.
Bring it up through the gap created between your body and the crossing point. This will wrap the rope around your hand.
Using your fingers, but without letting go of the rope, pass the running end under the standing part. Do it after the first crossing point. This creates a second crossing point.

Maneuver the running end with your fingers so it feeds between the 2 crossing points. It feeds from the top down. It should end with you holding the running end.
Next, pull your hand out from the loop on your wrist bringing the running end with you. Pull the knot tight.
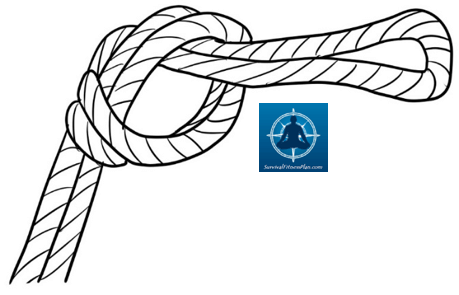
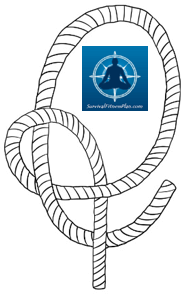
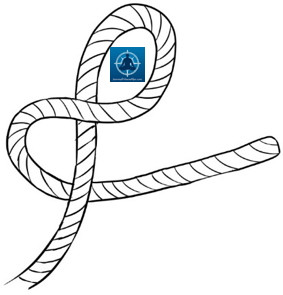
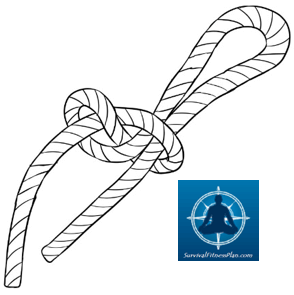
6. The Alpine Butterfly Loop
The alpine butterfly loop (lineman’s loop) is a useful knot for creating a fixed loop in the middle of a rope. It is secure, can bear weight in several directions, and is easy to untie even after a heavy load.
Amongst other things, the butterfly loop is good to shorten a rope or to exclude a damaged section. Doing so is better than cutting a rope since a re-joined rope has less strength.
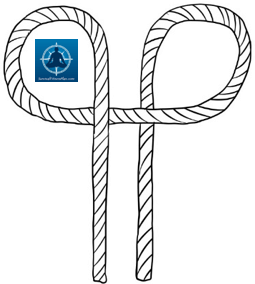
Get a bight of the rope and twist it 2 times in the same direction. You will have 2 crossing points and thus 2 loops.
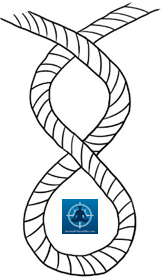
For ease of explanation, the loop furthest away from the ends of the rope will be loop one. The loop between the ends of the rope and loop one will be loop 2.
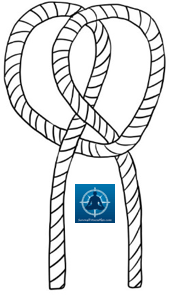
Grab the tip of the bight of loop one and bring it beyond the crossing point of loop 2.
Next, bring the tip of loop one up through loop 2.
Pull all ends to tighten.
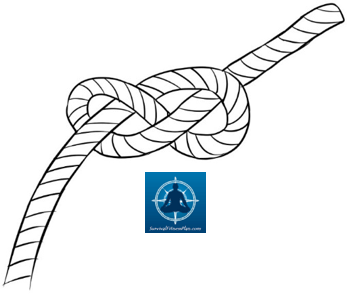
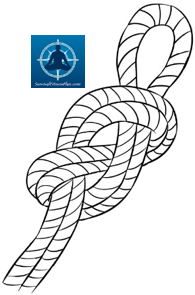
7. Figure 8 Bend Knot
The figure 8 bend is a good way to join 2 ropes together. It is also good for making a prusik loop of rope which you can use for ascending.
It is best done with ropes of equal width.
First you need to learn how to tie a figure 8 stopper knot
How To Tie a Figure 8 Knot
A figure of 8 knot can do all the same things as the overhand knot but is much easier to untie.
Here’s how to tie a figure 8 knot step by step.
Make an upward facing overhand loop and then make the running end pass back under the standing end.
Pass the running end back through the first loop you made. Pull both ends away from each other to tighten the knot.
Tying the Figure 8 Bend Knot
Tie a loose figure 8 at the end of one rope.
With the other rope follow the path of the original figure 8.
Ensure that there is no crossover in the rope and that the ends face in an opposite direction.
Pull on all ends to tighten.
How to Tie a Slip Knot
To tie a figure 8 slip knot, put the running end back through the first loop before tightening the knot.
To release the knot pull the running end.
You can also do this with the overhand knot.
How to Tie a Figure 8 Loop Knot
Like the overhand knot, you can turn the figure 8 into a fixed loop by making the figure 8 on a bight.
To tighten it pull on each loose end, i.e., on the loop and the running/standing ends.
Work the knot so it is neat with no crossover on the rope. This will keep the knot strong and easier to untie.
8. How to Lash
Lashes are useful basic knots for scouts or any outdoor enthusiast. Use them to join objects together.
Described here are 4 types of lashing. For all, you will need quite a long running-end.
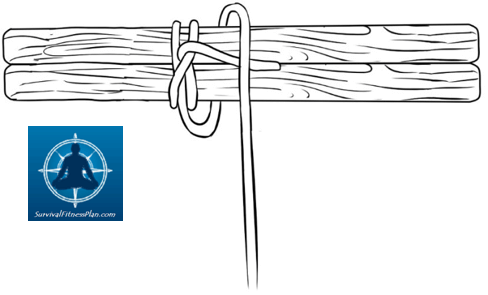
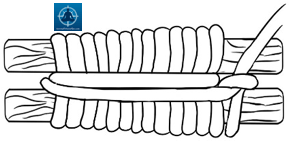
The Square Lashing Knot
Use square lashing to hold poles together at a 90° angle.
Place 2 poles together in a cross formation so that the vertical one is on top of the horizontal one.
On the vertical pole, below the horizontal one, tie a clove hitch.
Pass the running end under the horizontal pole, on the right side of the vertical pole. Next, pass it over the vertical one, on the upper side of the horizontal pole.
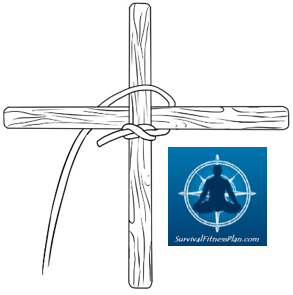
Pass the running end under the horizontal pole on the left side. Pull it tight so that the clove hitch slips to the right side of the vertical pole.
Continue to pass the rope over the verticals and then under the horizontals. This is in an anti-clockwise fashion. Pull each pass tight as you go. Make 3 full rotations.
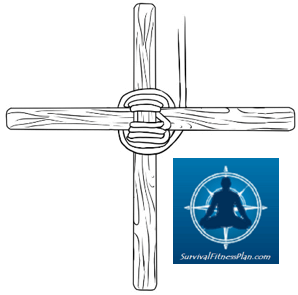
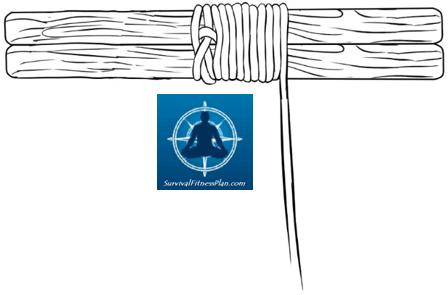
The long end of the rope should finish having come underneath the right side of the horizontal pole. Bring it back to the front of the horizontal pole and then behind the lower end of the vertical pole. This is frapping. Pull it tight.
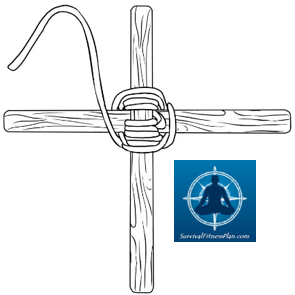
Go over the left side of the horizontal and then under the top side of the vertical and pull it tight. This is one frapping rotation. Do 3 frapping rotations and then tie a clove hitch on the lower side of the vertical pole.
When doing the clove hitch, pull the first half hitch tight before doing the second.

Trim any excess away and/or tuck it under the lashing.
The Diagonal Lashing Knot
Use diagonal lashing when the poles do not cross at right angles. It is also useful for when you need to pull the poles toward each-other for tying.
Cross 2 poles on top of each other. Tie a surgeons knot around them so that the running end is to the right.
Pass the running end back behind the poles so it is on the left side.
Bring the running end over and under the poles. Pull it tight. Do this 3 times.
The running-end finishes on the left. Go over the bottom left pole and then under the cross so it comes over the top. Pull it tight.
Do 3 vertical turns pulling tight after each one. Your running end finishes running down.
Do some frapping turns by passing the rope under then over each pole in an anti-clockwise fashion. Keep it tight. Do 3 full rotations.

Finish it with a clove hitch and trim if needed.
GET YOUR FREE BASIC KNOTS PDF CHEAT SHEET
How to Tie a Sheer Lashing
Follow these sheer lashing instructions to learn how to join 2 poles together side by side.
Sheer lashing has a few names:
Parallel lashing
Pole lashing
Round Lashing
Put 2 poles together side by side so they lay horizontal. Tie one clove hitch around both the poles to the left of where you intend to make the rest of the lashing.
Lay the short end between the 2 poles to the right of your clove hitch so you will lash over them.
Wrap the running end around the 2 poles pulling it tight after each turn.
Do at least as many turns so that the lashing is the same length as the width of the 2 poles.
Do frapping turns by passing the rope between the 2 poles. Start at the right side and then come back up between them on the left. This should be hard to do since you pulled the lashing turns tight.
Do 2 frapping turns and finish it with a clove hitch on the end of one pole.
Note: You can place wedges between the 2 poles instead of frapping.
You can make an A-Frame lashing by doing a loose sheer lashing.
Pull the legs apart to make the A-Frame.
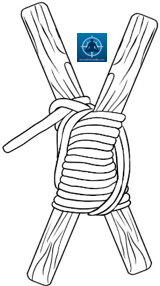
How to Lash a Tripod
Lashing a tripod is sheer lashing 3 poles together and then pulling them into place.
Tie a clove hitch around one pole, not the middle one.

Wrap the rope around all 3 poles so they are stay parallel.
Weaving the rope around the poles also works.

Make frapping turns where the poles meet.

Finish with a clove hitch on the end pole.

Cross the 2 outer poles to make a rope lashing tripod.

Tripod Lashing images credit: Lwan98 [GFDL, CC-BY-SA-3.0 or CC BY-SA 2.5 ], from Wikimedia Commons
Inspired? Pin it for Later↓


The Most Useful Knots and How to Tie ThemGet Your Copy of The Useful Knots Book Today
The Useful Knots Book: How to Tie the 25+ Most Practical Rope Knots (Escape, Evasion, and Survival Book 9)
Price Disclaimer
Common Knots and Their Uses Conclusion
Now you know a bunch of scout knots and their uses. They are also useful knots for camping, climbing, and a range of other things.
Learning how to tie useful knots is a handy skill. And knowing the different kinds of knots and their uses will help you choose the right knot for the job.
Did you find these 8 kinds of knots and their uses useful? If so, please share it with your friends.
The post 8 Basic Knots and Their Uses appeared first on Survival Fitness Plan.
September 23, 2018
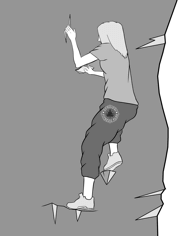
Survival Outdoor Rope Climbing Techniques for Beginners
Learn outdoor rope climbing techniques with no climbing gear other than rope and what you can make from it.
It includes how to to climb rope with and without a harness, and how to make a rope climbing harness.
You will also learn climbing rope techniques for descending with and without your self-made harness.
To practice these rope climbing exercises you will need rope for climbing and some basic knowledge of knots. Rope for rock climbing works best for most of these.
You can find instructions on how to tie the knots you need in this post.
Contents
Climbing Rope Without a Harness
Brake and Squat
Make a Rope with Knots to Climb
Make a Rope Climbing Ladder
How to Climb a Rope Ladder
How to Rapel Without a Harness
How to Make a Rope Harness
How to Tie a Triple Bowline Harness
How to Tie a Swiss Seat Rope Harness
Climbing a Rope with a Prusik
How to Tie a Prusik Knot for Climbing
Prusik Knot Ascending
Prusik Knot Climbing Without a Harness
How to Climb a Rope Conclusion
Learn Climbing and Roping Skills for SurvivalGet Your Copy of Emergency Roping and Bouldering Today
Emergency Roping and Bouldering: Survival Roping, Rock-Climbing, and Knot Tying (Escape, Evasion, and Survival Book 5)
Price Disclaimer
Outdoor Rope Climbing Techniques
Climbing Rope Without a Harness
These static rope climbing skills are useful when bouldering is too dangerous and you aren’t able to make a prusik.
Brake and Squat
If you want to climb the rope without a harness, and it is a thicker rope, try the brake and squat method.
This works well with climbing gym rope and is good for rope climbing crossfit workouts.
It is the classic military rope climb method, and you can also use it as a gymnastics rope climb.
Let the rope fall to the outside of one of your legs and step on it with your closest foot. Put your other foot underneath the rope.
You are now in the basic position.
Grab the rope as high as possible and hang off it.
Bring your feet up as high as possible. Pull yourself up and bring your knees to your chest and place them in the basic position.
The basic position locks the rope in so you can stand (and rest if needed).
Reach up as high as you can again and repeat the process.
You can do this rope climb exercise at home if you can find a good place to hang crossfit climbing rope. Get some here.
Make a Rope with Knots to Climb
A series of overhand knots tied at intervals along a smooth rope will make climbing much easier.
Climbing a knot rope is another good rope climb exercise. You can get a decent rope climb workout from it.
How to Make a Rope Climbing Ladder
Climbing a rope ladder is yet another way to get a good workout climbing rope.
One way to make a rope ladder is to tie as many fixed loops (butterfly loops work well) in a rope as you need hand and footholds.
Another way is by using 2 ropes, or one rope doubled up.
Tie fixed loops opposite each other along the ropes. Alpine butterflies or figure 8 loops work well.
As you tie the loops, put sticks (the rungs of the ladder) in them. Ease the knot tight around them to hold them in place.
Allow the rung ends to protrude out the sides of the knots so they will not slip out.
How to Climb a Rope Ladder
For the knot ladder you will need to exercise your rope climbing muscles a little. Always keep two hands on the rope and rest with your feet on top of the knots.
The best way to climb a rope ladder with rungs is to climb up the side of it instead of the normal way.
So one hand and one foot on one side, and the other hand and foot on the other. You still hold and step on the middle of the rungs between the rope sides.
Always keep at least 3 points of contact on the ladder.
How to Rapel Without Harness
You can learn how to rappel without a harness using the Dulfersitz method. You may wish to use rope climbing gloves for protection.
For this to work, you need a rope at least twice the length of the distance you wish to descend. It must also be strong enough to hold your weight.
Find the middle of the rope and wrap it around a solid anchor. Ensure it is not rubbing against any sharp edges and test its stability with all your weight. Jerk on it to make sure.
Pass both ends of the rope between your legs from front to back and then to the left of your body. Continue it over your right shoulder and down your back.
For comfort, you can put padding around your shoulders and groin.
Hold the rope in front with your left hand and at the back with your right.
Plant your feet against the slope about 45cm apart and lean back so that the rope supports your weight. Do not hold yourself up with your hands.
Step downwards while lowering your hands one at a time.
Go slow!
How to Make a Rope Harness
In this section you will learn how to make 2 types of improvised rope harnesses so you can climb a rope safer.
One is the triple bowline. The other is the more complicated (but more comfortable) swiss seat.
Improvised rope harnesses may not be that comfortable but they are useful to know.
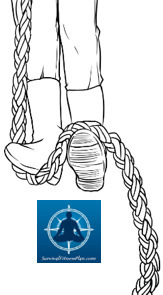
How to Tie a Triple Bowline Harness
A triple bowline is a bowline made with a doubled-up line.
It produces 3 loops which you can use as a sit sling or a lifting harness. One loop goes around each thigh and the third will go around the chest.
Tie it in the same way as a bowline using the “middle” of the rope, i.e., do not use the ends. The running end must protrude out long enough to create the third loop.

When using this to haul people be careful of the pressure the rope on the chest. You can make a foot loop to ease the pressure.
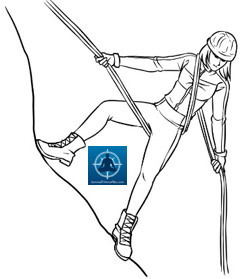
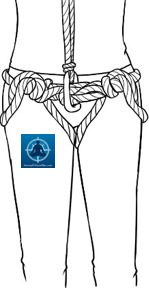
How to Tie a Swiss Seat Rope Harness
The swiss seat rappel harness is sturdy enough to use for anything a commercial harness can do. It won’t be comfortable, but it will work.
Swiss seat webbing will be more comfortable but rock climbing rope will work too.
To make a swiss seat rappelling harness, first find the center of the rope. Loop it around your waist and tie the first half of a surgeon’s knot at your front.
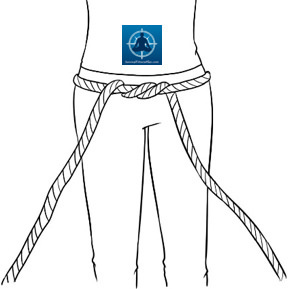
Pass the ends between your legs. Now tuck them up through the wrap you made around your waist, on either side of your waist.

Pull down on the ends as you do a few squats. This will tighten it and check for comfortability. Next, do a full wrap around your “belt” with each end of the rope.
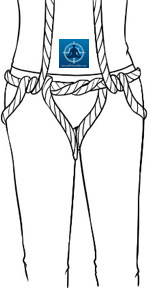
Tie the ends together using a reef knot. Do it off center.
Make half hitches with the left-over rope that goes around both “belts”.
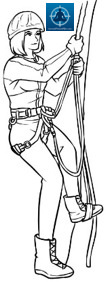
Climbing a Rope with a Prusik
Prusiking up a rope is a safe way to ascend when there is no easy way to climb out. You can also use it in reverse to descend.
It is a good way of climbing a tree with rope and gives a good rope climbing workout too.
The first thing you must do is create 2 closed loops. These will be your prusik loops. Many types of knots can make a closed loop but most of them are not safe to use when prusiking.
Climbers often use a double fisherman’s knot but a faster way is to use a figure 8 bend. The figure 8 bend is also easier to tie than a double fisherman’s and easier to untie, even after your weight has been on it. Refer to the post on bend knots for instructions on how to tie a figure 8 bend.
Make your 2 prusik loops from a rope with a thickness of about half the diameter of the rope you will ascend. Have one rope about as long as you are high plus 20cm, and the second rope twice your height.
The rope you use for your prusik loops must strong enough to hold you if you fall. Being able to hold your weight is not enough. It has to be strong enough to handle the shock load.
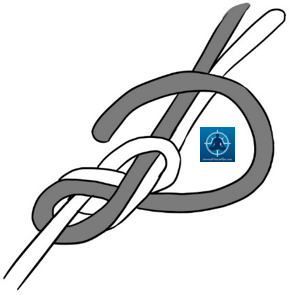
How to Tie a Prusik Knot for Climbing
Once you have made your prusik loops use the prusik hitch to attach them to the rope you want to climb.
To tie a prusik hitch put the loop on your main line with the joining knot (figure 8 bend) facing the right.

With the knotted side, wrap your prusik loop around the main line.

Do it at least twice. The more wraps you make the more friction you will have.
Ease the loops tight. As you do so ensure all the lines are neat next to each other. Do not let them overlap/cross each-other.
Also, as you tighten it, do your best to position the fig 8 bend close to the main-line.

Prusik Knot Ascending
Using prusik knots to ascend is a good way of climbing a tree with a rope.
Tie both prusik loops onto the main line using prusik hitches. Tie the smaller prusik loop above the larger one.
A prusik hitch works because you can slide it up but when there is downward tension it does not slip. Test it well with all your weight before using it to climb. If needed, add extra turns.
Attach the top prusik loop to your harness.
Note: Rope on rope friction can cut rope. If you have a carabiner, use it. If not, be extra careful there is not too much friction between your harness and the prusik loop.
Slide the top prusik loop up as high as you can reach.
Slide the bottom prusik loop to about head height, or as high as possible so you can still put your foot in it.
Put your foot in the loop and stand up. The joining knot of the prusik loop is the weak part so keep off it.
Slide the top prusik loop as high as possible and then put your weight on it by sitting in your harness.
Now slide your bottom prusik loop up as high as possible and put your foot in it. Stand up and slide the top prusik loop up again.
Repeat this motion.
To use a prusik knot for rappeling, reverse the motions.
Prusik Knot Climbing Without a Harness
It is possible to ascend using prusik loops with no harness but doing so is risky and you will use more energy. It requires more strength and stamina.
Make your loops smaller than usual and have at least two. Four is best.
Assuming you are using four prusik loops, the top 2 are for your hands and the bottom two are for your feet. You want them all to be snug so you can slide them up with minimal movement.
Place your feet in the two bottom prusik loops and hold on to the top ones with your hands.
Slide your hands up with the top prusik loops as high as you can. Pull yourself up and use your legs to slide the bottom prusik loops up as high as you can.
Stand up whilst sliding the top prusik loops up again.
Repeat this process.
Inspired? Pin it for Later↓


A One-of-a-Kind Climbing and Survival Roping BookGet Your Copy of Emergency Roping and Bouldering Today
Emergency Roping and Bouldering: Survival Roping, Rock-Climbing, and Knot Tying (Escape, Evasion, and Survival Book 5)
Price Disclaimer
Climbing Rope Technique Conclusion
Now you know all the outdoors climbing rope skills you need for if you have no special rope climbing gear.
You can do rope climbing gymnastics using the methods for climbing rope without a harness. This includes army rope climb techniques and how to make a rope ladder.
The safest way to rappel without a harness is the Dulfersitz method.
For how to rope climb a tree or rock face, make a harness. You now know how to tie a swiss seat harness and the easier but less comfortable triple bowline harness.
The last of the rope climbing training is solo rope climbing with prussiks.
Whether rope climbing at home as a fun backyard rope climb activity, rope climbing in gym class, indoor rope climbing on a rope climbing course, or practicing tree climbing techniques with rope, safety is paramount.
Many of these rope climbing tips infer solo climbing with rope, but having a buddy is for safety is smart.
Did you find this article about how to rope climb useful? If so, please share it with your friends.
The post Survival Outdoor Rope Climbing Techniques for Beginners appeared first on Survival Fitness Plan.
September 20, 2018
Outdoor Bouldering for Beginners
In this guide to outdoor bouldering for beginners you will learn all the beginners rock climbing techniques you need to have fun and stay safe.
Contents
Bouldering Vs Climbing
The Benefits of Rock Climbing
Rock Climbing Fundamentals
Rock Climbing Grips Technique
Rock Climbing Foot Techniques
Tips for the Different Types of Climbing Faces
Basic Crack Climbing Techniques
Bouldering for Beginners Conclusion
A One-of-a-Kind Climbing and Survival Roping BookGet Your Copy of Emergency Roping and Bouldering Today
Emergency Roping and Bouldering: Survival Roping, Rock-Climbing, and Knot Tying (Escape, Evasion, and Survival Book 5)
Price Disclaimer
Bouldering Vs Climbing
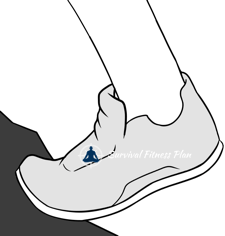
Bouldering is rock climbing without special equipment such as ropes and harnesses. And you don’t climb high. No higher than is safe to fall.
Often people bouldering will still use climbing shoes and chalk. These things make bouldering easier but are not 100% necessary.
For safety I recommend using a crash mat to pad your fall. Check out some crash mats here.
In this article, I use the terms bouldering and rock climbing interchangeably.
Bouldering and rock climbing techniques are the same as far as rock climbing for beginners goes.
Rock climbing with ropes requires technical knowledge to use the equipment safely.
This article on rock climbing focuses on bouldering technique for beginners. You don‘t need any special climbing equipment.
The Benefits of Rock Climbing
There a many rock climbing benefits. Here are a few off the top of my head:
A bouldering workout plan. Using bouldering for fitness is a fun way to keep in shape. If you want to get toned up, a bouldering workout routine will get you there faster than most other sports, and it’s more interesting than hitting the gym.
Make friends. You may think of climbing as a solo-sport, but it really isn’t. Although you can do it alone, I recommended having at least one person to do it with. Apart from that, climbing communities are close-knit in most cities. Everyone has the same passion and a similar mindset.
See the world in a new light. When beginning rock climbing, you will see things from a different perspective. Rocks, trees, buildings, and anything else that you might climb.
Get outdoors. Although there are plenty of indoor climbing gyms for those rainy days, outdoor bouldering will get you into nature. Going outside is also cheap rock climbing since you don’t have to pay gym fees. And there are no “gym rules” you need to stick by. You could try out barefoot rock climbing.
Improve your mind. Climbing isn’t only muscle and technique. A lot of your success depends on choosing a strategic route. There will also be times when you will want to give up from sore muscles. Mind of matter will get you through.
A useful “flight” skill. This is the main reason I outline the basics of rock climbing on this website. Knowing how to climb may save your life one day.
Rock Climbing Fundamentals
When beginning rock climbing you need to start with the basic principles.
In fact, if the only things you learn from this climbing article are these bouldering fundamentals, you will be a better climber than most people on the planet.
The rock climbing term “holds” refers to what you place your feet and hands onto to climb. They are what you ‘hold’ onto.
Climb With Your Legs
As far as rock climbing basics go, you can’t get more fundamental than to climb with your legs.
Your legs do the climbing, not your arms. Though you often need a little pull-up, your arms are primarily for keeping balance.
To conserve energy, move your feet up the wall first and use your leg muscles to push you up. Once balanced, rest your weight over your legs.
Don’t use your arms to hold you up. This will tire your out too fast.
Here are more leg-related beginner rock climbing tips:
Step light and place your foot carefully and firmly. Don’t ‘stomp’ into the holds.
Use the edges of your feet or the ball of your big toe.
Press your foot downwards and into the wall.
Trust you can stand.
Plan Your Route
Plan your route before you climb and at least one move ahead whilst climbing. Know where you will place your foot of hand before taking it off the hold.
You can adjust your plan as needed while you are climbing.
Climb Smooth
Climbing smooth means to be fluid. Don’t pause between moves. Planning your route is essential for you to achieve this.
It doesn’t mean you can never stop. Look 3 or 4 moves ahead and plan where you think a good ‘rest point’ will be. Climb smooth until you get there and then rest and plan your next moves.
Another part of climbing smooth is to breathe. Like with all physical activities, holding your breath will stifle your movement and also wear you out faster.
Gaining Reach
Reaching to grab holds will drain your energy. Though it is necessary sometimes, there are other ways to grain reach which you can try first.
Reach Backwards. Turn away from the hold and reach backwards for it. It is like reaching for something far under a bed.
Stand Up. Stand straight and keep your hips close to the wall with your weight over your feet. This is as opposed to leaning against the rock.
Bumping. Gain momentum off one hold to reach a better one.
The key takeaway from the above bouldering tips for beginners is to conserve your energy.
Rock Climbing Grips Technique
In this section you will learn the different bouldering grips and which rock climbing holds to use them on.
To conserve energy, only grip a hold as hard as you need to.
Edges
Edges are horizontal holds that have an edge you can grab onto. They can be flat or may have a lip wish you can pull on.
Crimp Grip
To grab an edge, use the crimp grip. This is where you grab the edge with your fingertips flat and your fingers arched above the tips.
Crimping too hard can cause tendon damage.
Full Crimp
The full crimp is when you place the pads of your fingertips on an edge and curl your fingers so that you flex the second joint.
Press your thumb on top of the index finger’s fingernail to secure the grip.
Half Crimp
If you let your thumb press against the side of your index finger, you are using the half crimp.
The half crimp is weaker but less damaging to your fingers.
If you can, use the half crimp.
Slopers
Slopers are round handholds without an edge.
They are easiest to grab if they are above you.
When griping a sloper, use the open hand grip and keep your arms straight for leverage.
Open Hand Grip
The Open Hand Grip uses the friction against the rock surface.
Wrap your hand onto the hold with your fingers close together. Feel around with your fingers to find grip spots.
Also, feel around with your thumb to see if there is a bump you can press against.
Pinches
Pinches are holds which you can grip by pinching with your fingers on one side and your thumb on the other.
If the pinch hold is small, use your thumb opposed to your index finger with your middle finger stacked on top.
With larger pinch holds, oppose your thumb with all your fingers.
Side Pulls
Side pulls are holds you pull on sideways instead of straight down. You would do this depending on the orientation of the hold.
You can pull outward on the side pull while pushing a foot in the opposite direction to keep you in place.
Pockets
Pockets are holes in the rock surface which you can place one or more of your fingers in. Insert as many fingers as you can comfortably fit.
Use your strongest fingers first. Feel inside the pocket to find a surface you can pull against.
Gastons
A gaston is a vertical or diagonal hold, usually to your front.
Grab a gaston with your fingers and palm facing the rock and your thumb pointing downward.
Bend your elbow at a sharp angle and point it away from your body.
Crimp your fingers on the edge and pull outward.
Undercling
An undercling is any hold you have to grip on its underside. To do it correctly requires body tension and opposition.
Grip the rock with your palm facing up and your thumb pointing out.
Pull out on the undercling and push your feet against the wall.

Palming
If no handhold exists, you can keep your hand in place by pushing into a dimple in the rock with the heel of your palm.
Matching Hands
The matching hands rock climbing technique is when you you place your hands next to each other on the same hold so you can change hands.
You can do a similar technique with your feet. Do so by slowly replacing the foot and without jumping.
You can also do it with a hand and foot.
While matching is important to know, try not to use it.
It is better to reach for an extra hold over so your trailing hand can have its own hold.
Reaching will cause fatigue, but matching increases the chance of falling. Ideally you want to do neither of these rock climbing skills, but if you have no choice, reaching is better than matching.
Rock Climbing Foot Techniques
We covered hand climbing techniques for beginners. Now we will focus on the legs and feet.
Smearing
Smearing is like palming for the feet.
Push the flat of your foot hard on the wall, using friction to hold you up.
If you want to go up direct the force a little downward.
Return to a foothold as soon as you can.
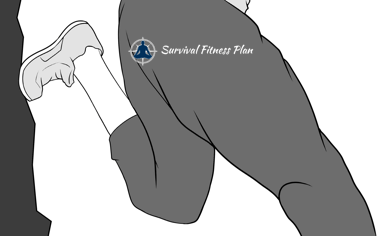
Back Stepping
Back stepping is one of the basic rock climbing techniques for gaining reach.
Step on a hold so that the outside of your hip faces into the rock. You will have a longer reach in the same direction as the foot you back stepped.
Drop one knee toward the ground with the other pointing up for an exaggerated back step.
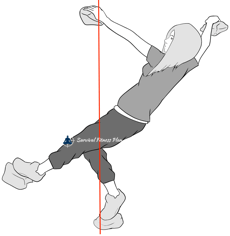
Flagging
Use flagging to balance your body when reaching for a hold.
Cross one foot behind the other to avoid swinging out from the rock.
Mantle
You can use the mantle to climb up onto a ledge that you are hanging off. This bouldering technique uses your hands and feet.
Pull yourself up onto a ledge by rocking sideways. Turn your hand around and push yourself up until you can place a foot and stand up.
If you want to build strength for mantling, one of the best rock climbing exercises for beginners is the pull up.
Stemming
Stemming is a good rock climbing tips for beginners to climb opposing walls, or “chimneys”.
This is another of my climbing tips for beginners that uses your hands and feet.
To do stemming, press one foot into one of the walls and your other foot against the other. Push out with an opposing force to hold your weight up.
Do the same with your hands.
Hold your weight with your arms/hands and shift both feet up.
Once you are stable on your feet, hold your weight with your legs and move your hands up. Repeat this ‘shuffling’ with your hands and feet to climb the chimney.
Hooking
Heel and toe hooks can aid in balance and provide leverage for movement.
There are many ways to use the hook, e.g., with your foot to climb onto a ledge.
You can hook under a rock to keep stability whilst negotiating an overhang.
Tips for the Different Types of Climbing Faces
The final section of outdoor and indoor rock climbing for beginners is how to climb different types of faces.
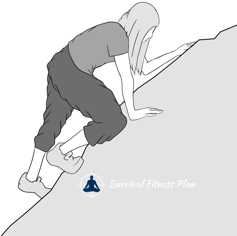
Climbing Slabs
A slab is any rock face than is at an angle less than 90°.
To climb a slab, keep your weight centered on your feet. As you climb, be precise with your toe placement.
Stand upright on the rock and away from the slab surface.
Aim for big holds but don’t make big steps to get to them. It is better to make small steps on small footholds and then reach once you reach your big hold target. Plan 3 to 5 of your intended foot holds ahead at a time.
Look for variations in the surface and smear on tiny holds. You can also feel the hold with a finger to find the best spot for your foot placement.
Climbing Vertical Faces
Vertical faces are at a 90° angle, i.e., straight up, or near enough. This is the type of face you commonly see climbers with ropes climbing.
When climbing vertical faces, have an upright body position and keep your weight over your feet as much as possible.
Use your hands and arms for pulling if needed.
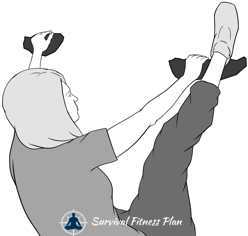
Climbing Overhangs
Overhangs are rock faces that are overhung or angled over 90°.
Climbing an overhang is one of the hardest rock climbing techniques for beginners to do. This is because it requires more strength.
Use heel and toe hooks to take the weight off your arms.
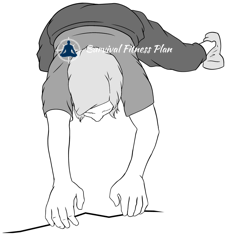
Basic Crack Climbing Techniques
You can climb the natural cracks in rocks by wedging your body parts into them.
This rock climbing technique is jamming. Jamming in crack climbing holds can cut your hands. Over time you can condition them, but to prevent injury when you first practice this basic bouldering technique you can tape your hands.
Hand Jam
Perform a hand jam by wedging the side of your hand in the crack with the thumb on top.
Tuck your thumb into the palm of your hand.
Next, expand your hand to exert opposing pressure against the walls of the crack.
Once conditioned, you can hang your weight off your wedged hand.
You can also do this in smaller cracks with your finger. This is finger crack climbing and is an advanced crack climbing technique.
Foot Jam
After jamming your hands into the crack, lift a foot and push the front part of your shoe into the crack.
Stand up on the jammed foot.
Step the other foot up to calf level and jam it in the crack.
Shuffling
Now that your hands and feet are in position, you can move upward by shuffling.
There are 3 ways to do this.
Move your top hand up first, then the lower one below it.
Lift the bottom hand out of the crack and hand jam above your upper hand.
Use the above 2 techniques together.
Do the same with your feet.
Learn Climbing and Roping Skills for SurvivalGet Your Copy of Emergency Roping and Bouldering Today
Emergency Roping and Bouldering: Survival Roping, Rock-Climbing, and Knot Tying (Escape, Evasion, and Survival Book 5)
Price Disclaimer
Bouldering for Beginners Conclusion
In this rock climbing beginners guide are all the basic bouldering skills you need.
Remember to always keep in mind the basic climbing principles while using the hand and foot techniques.
You now also know more advanced rock climbing techniques such as overhangs and crack climbing.
Please remember that safety is paramount. You don’t need fancy equipment when outdoor bouldering, but a crash mat, a friend, and a cell phone is advisable.
Never climb higher than you can safely fall when bouldering. And if you start climbing higher with ropes, take a professional course or hire a guide.
Also, be sure to take care in the weather. Have enough food, water, and clothing to keep you healthy whilst enjoying your amazing rock climbing experience.
Did you find this rock climbing training for beginners useful? If so, please share it with your friends.
The post Outdoor Bouldering for Beginners appeared first on Survival Fitness Plan.
July 20, 2018
Sea Survival Skills
Knowing a few sea survival techniques is worth the effort. The ocean is, after all, one of the harshest environments to survive in. And for anyone that travels international, having to survive at sea is not so far fetched.
70% of the world is the ocean! That means if your plane goes down, chances are that it will be over water. And if you like cruises, fishing, diving, or any other ocean activity, well.. you get the picture.
In this article, we will go through the sea safety and survival skills you need to have the best chance.
Contents
Surviving the Cause
How to Survive a Sinking Ship
How to Survive a Plane Crash in Ocean
How to Stay Afloat in Deep Water
In a Liferaft
How to Fix a Leak in a Liferaft
Without a Life Raft
Planning for Survival at Sea and The Will to Live
Attracting Rescue at Sea
Signs of Land when Lost at Sea
Survival Navigation at Sea
How to Find North Using the Sun
Navigating with the Stars
Finding Direction with the Moon
How to Make a Compass
Movement at Sea
Using the Current
Using the Wind
How to Swim Long Distance with Survival Backstroke
Creating Shelter
How to Drink Sea Water to Survive
Catching Food at Sea
How to Fight a Shark
Embarking on Land
Swimming to Shore
Conclusion
Would You Know What to Do When Disaster Strikes?Get Your Copy of the Disaster Survival Handbook Today
The Disaster Survival Handbook: A Disaster Survival Guide for Man-Made and Natural Disasters (Escape, Evasion, and Survival Book 7)
Price Disclaimer
Sea Survival Techniques
Survival in Sea – Surviving the Cause
Before you can start surviving at sea, you will have to survive what put you there in the first place.
Two major reasons for this will be if your boat is sinking or your plane crashes.
Chances of surviving a passenger plane crashing in the ocean are slim, but not impossible. Getting off a sinking boat is easy in comparison, so let’s cover that one first.
How to Survive a Sinking Ship
When you suspect you may need to survive a sinking boat, take the following steps:
Put on warm clothing. Wool is best.
Cover as much of your body as you can and put on a life jacket.
Gather whatever survival provisions you can and get to a lifeboat.
Note: Do not exceed the maximum passengers in a life vessel. Have the healthy hang off the side and swap often.
If you need to jump off the boat, throw something that floats in first and then jump close to it. Once you are in the ocean, inflate your life jacket.
Once in the ocean, get away from the sinking vessel, upwind if you can. If you are too close to it, it is likely to drag you under.
How to Survive a Plane Crash in Ocean
If your plane is crashing into the sea (or anywhere), the same initial steps apply. Put on warm clothes and a life jacket. Gathering provisions will be harder but do it if you can.
To be honest, there isn’t much you can do in a plane crash except to follow the pilot’s/crew’s instructions. If the pilot is down you may need to land the plane yourself. Get to the controls and radio for help.
Using the Radio to Call for Help
Put on the headset if there is one.
Check the steering wheel or instrument panel for the talk button.
Press the button and use the international distress call of “Mayday! Mayday!”
Give your situation, destination, and plane call numbers. These should be on the top of the instrument panel.
Let go of the talk button and listen for a response.
If there is no response, try again.
Try three to five times waiting ten seconds between each time for a response.
If there is still no response tune the radio to 121.5 and try again. 121.5 is the international emergency channel.
Once you have made contact with someone, follow their instructions to land.
If you cannot contact anyone, you’ll have to try land the plane unguided. The first thing you will want to do is make sure you are flying straight.
Like cars, every model of plane is different, but they will all have the same basic functions.
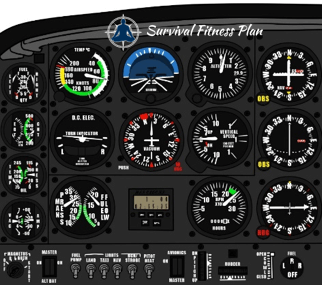
Yolk
The Yolk is the steering wheel.
It has the same effect as if in a car but is much more sensitive.
It also allows you to control pitch.
Pull back to pull up and push forward to dive.
To fly steady you want to keep the nose about 8cm below the horizon and the wings even.
Altimeter
This is the red dial on the instrument panel.
It indicates your altitude.
The small hand shows your height above sea level in thousand foot increments.
The large hand shows the same in hundreds.
Compass
The instrument with a small plane on it.
The nose of the plane is the direction you are going.
Speedometer
Usually in knots.
120 knots is cruising speed.
Below 70 knots and you may stall.
Throttle
Controls thrust.
Pull it towards you to slow the plane and descend.
Push it away to speed the plane up and ascend.
Fuel Gauge
Usually on the lower part of the panel.
Landing Gear
If the plane has a retractable landing gear there will be another leaver between the seats. Most likely near the throttle.
It looks like a tire.
Some planes have a fixed landing gear so there will not be this leaver.
Ground Pedals
Use these pedals when on the ground.
The upper ones are the brakes.
The lower ones control the direction of the nose wheel.
The right pedal will move the plane right.
The left one will move the plane left.
How to Land a Plane in an Emergency
Slow down to about 90 knots by pulling back on the throttle.
Let the nose drop to about 11cm below the horizon.
Deploy the landing gear (if applicable) unless landing on water.
Find the longest and smoothest place to land that you can.
If you have enough fuel, fly over to look for obstructions, then circle back to land. Give yourself a wide birth.
Line up the landing strip so that it is just off the right-wing tip at one thousand feet.
As you approach to land pull back on the throttle.
Do not let the nose drop more than 15cm below the horizon.
The rear wheels should touch first at about 60 knots (stall speed).
Pull all the way back on the throttle ensuring the nose doesn’t dip too steep.
Gently pull back on the yolk as the plane touches the ground.
Use the pedals on the floor to steer and brake.
If you are going into an obstruction (e.g., trees) let the wings take the impact.
Once you have stopped get everyone out as soon as possible.
Assuming you have landed in the ocean and are still alive, get out of the plane. You do not want to sink with it.
Swim upwind from it so you do not get dragged under by its pull.
Also, whether you are abandoning ship or surviving a plane crash:
If there is a chance of underwater explosion swim on your back.
Swim under any danger, e.g., fire.
Instruction for how to swim on your back using the survival backstroke is later in this article.
How to Stay Afloat in Deep Water
Once off and away from the sinking vessel, you need to know how to survive adrift at sea.
How to Survive at Sea in a Liferaft
Whether your liferaft is inflatable or a hard boat, there are things you must do to ensure surviving a disaster lost at sea.
Secure all passengers and equipment to it
Do not jump into it
Check for leaks daily
Waterproof everything that requires it
In addition to the above, if in an inflatable liferaft:
Wait until you are clear of the wreck before inflating it unless you can board it and stay dry
Inflate the liferaft so it is firm, but not too hard. Compensate for the surrounding temperature (heat makes air expand)
Check inflation daily
Make sure nothing can puncture it
To board a liferaft from the water
Move to one end (not the side)
Put one leg over the edge and roll inside
If the liferaft has a line attached
Grab the line from the opposite side of where it is attached
Brace your feet against the liferaft and pull yourself in
Expect the other end of the liferaft to come up
You can adjust this technique to right an overturned liferaft
To help someone else on board
Hold them by their shoulders
Have them lift one leg over the end of the raft (if possible)
Roll them in
How to Fix a Leak in a Liferaft
If you are in a hard life raft (not inflatable) you are more likely to get a leak on impact with the water.
When you see little bubbles in an inflatable liferaft, it is a sign of leaks.
In either case, place plastic it across the leak on the outside of the boat. Water pressure will help to hold it on place, but also try to seal it with duct tape, glue, etc.
Duct tape can repair small cracks also.
LEARN HOW TO STAY ALIVE IN COLD WATER HERE
How to Survive in the Sea Without a Life Raft
When you don’t have a liferaft, your first priority is to get one! If there is one nearby, attract attention using noise and light.
When there is no liferaft, build one with whatever you can, e.g., wreckage from your crash.
How to Improvise a Flotation Device with a Pair of Trousers
When there is no other option, you can use your clothing to stay afloat.
To do it with your trousers:
Knot the bottoms of the legs
Hold the trousers behind your head by the waistband
Bring them over your head in front of you in a sharp motion to fill them with air.
Hold the waist below water to trap the air.
If you need more air, go underwater and breathe into the pants.

Planning for Survival at Sea and The Will to Live
Ok, so you have survived the initial crash and are floating in the ocean.
Now what?
Now you need to survive until rescue arrives. But it may take a while.
For most people, there will be times that you feel like giving up. The moment you give up is the moment you die. You must keep your will to live.
Never give up!
I know that is much easier to say from behind my computer than it is from the middle of the ocean, but it is still true.
The longest survival at sea so far is 484 days!
Reference: Guinness Book of World Records
The will to live is very important and applies to ALL survival situations. You must keep a strong will to live and have faith that you will live. Different things motivate different people. Common ones are family and god.
Of course, having blind faith is not enough. Having the will to live also means being proactive in your survival. Always be vigilant for things that will help you, as well as pre-empting problems. If you are in a group, assign lookouts on short shifts. Look out for signs of life, land, rescue, leaks, and anything that could be useful.
How to Survive in Sea – Attracting Rescue at Sea
From the very first moment you become stranded at sea, you must be on the lookout for rescue. It is your best chance of survival, and the sooner you get it, the better.
Your liferaft may have some signaling devices. There are various types of flares. Follow the instructions on them. Check out some signal flares here.
If you have nothing else, improvise. A mirror is an effective signaling tool. Use it to reflect the sun towards a possible rescue ship or plane. In fact, you can use any screen, e.g., your smartphone.
Most life jackets will have a whistle and lights. You can also use these to maintain contact with other survivors in other liferafts. View the best lifejackets on the market.
If there is no land in sight, or you are near shipping lanes, wait at the crash site for at least 72 hours. You can keep your position by making a sea anchor. Tie weighted objects to a line.
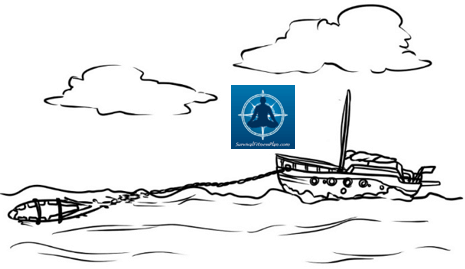
Keep your position by making a sea anchor.
How to Survive Lost at Sea – Signs of Land when Lost at Sea
Besides a fast rescue, your best chance of surviving at sea is to find land. So if you see it, or know where it is, head for it.
Signs of land include:
A constant wind with a decreasing swell. Land is wind-ward.
A green tint on the underside of clouds.
Isolated cumulus clouds.
Muddy water indicates silt from a large river mouth.
Lighter colored water indicates shallow water.
Seabirds fly away from land before noon and return to it in the afternoon.
Odors and sounds of land including smoke, vegetation, surf, animals, etc.

Survival Navigation at Sea
Maybe you can not spot land, but you know where it is. Great! You need to navigate there.
In this section, you will learn how to survive being lost at sea using survival navigation.
With today’s technology, there are easy ways to navigate, such as GPS. But batteries run out, and salt water is never good for electronics. Still, a good marine GPS can’t be beaten. Check here to see the best in today’s market.
Knowledge of map and compass navigation is an excellent skill to have for life in general. You can learn more about that here. A reliable compass is essential. My favorites are by Silva. Get yours here.
The navigation I want to look at in this article is survival navigation for the sea. That is, when you do not have a GPS or even a compass.
How to Find North Using the Sun
Here are some basics of sun navigation:
The sun rises in the east and sets in the west.
In the northern hemisphere the sun is due south at midday. In the southern hemisphere it is due north.
Now for something a little more accurate, how to tell direction with a watch.
For this method you need an analog watch. I’ll explain how to do it with a digital watch after I’ve explained how to do it normally.
Hold your wristwatch in front of you like a compass, and line a small twig or something similar along the edge of it. Your aim is to cast a shadow toward the center of the watch.
Now turn the watch until the shadow splits in half the distance between the hour hand and 12 on the watch face. In the Northern hemisphere, 6 is pointing north. In the Southern hemisphere it is opposite, i.e., 12 points north.
If you do not have a twig you can still do this, but it won’t be as accurate. In the Northern Hemisphere, point the hour hand towards the sun. The center of the angle between the hour hand and twelve o’clock mark is the north-south line.
In the Southern Hemisphere, point the 12 mark towards the sun instead.
If you only have a digital watch you can still use it in the same way. You have to estimate where the hour hand will be. Use 12, 3, 6, and 9 o-clock angles to guide you to the other hours, and smaller increments for half/quarter hours.
Note: Your watch must be set to the time zone you are in. So if you were flying internationally and have no idea where you are, this may be a problem. Also, make sure your watch isn’t set to daylight savings.
Navigating with the Stars
Navigating by the stars is more accurate than doing it by the sun.
Finding the North Star Polaris
By locating the North Star, you can draw an imaginary line from it to a landmark back on earth. With this, you can steer north.
Finding a landmark in the open sea is difficult, but do your best. You can even use another star lower to the horizon.
The North Star is NOT the brightest star in the sky. The reason it is good for navigation is because it does not move. To help you find the North Star you can use two other constellations. The Big Dipper and Cassiopeia. Cassiopeia is like an upside down “W”.
Follow the ‘ladle’ of the big dipper up about 5x its length. This is about halfway to Cassiopeia. The bright star you see in this area is the North Star.
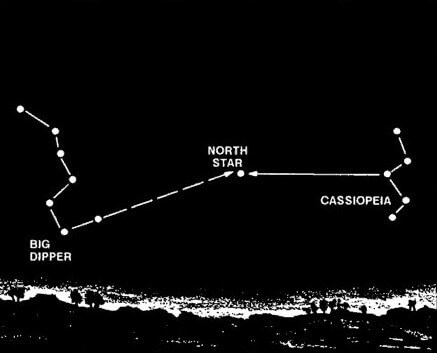
By United States Army [Public domain], via Wikimedia Commons
Navigating by the Southern Cross
In the Southern Hemisphere, you can use the Southern Cross to find South. The Southern Cross constellation is 5 stars, and the 4 brightest stars make a cross that is angled to one side.
Imagine a line 5 times the distance between the two stars that make up the long axis of the cross. Now imagine a line from this point to a landmark on “the ground”.
This gives true south. True north will be behind you as you are looking at the point.

By United States Army [Public domain], via Wikimedia Commons
Finding Direction with the Moon
This is not very accurate but is simple to use and easy to remember.
If it is before midnight, the illuminated side of the moon faces west. If it is after midnight, the illuminated side faces east.
How to Make a Compass
To make an improvised compass you need to magnetize metal. A sewing needle is in most survival kits and is perfect for the job. Anything similar will also work.
There are 2 basic ways to magnetize metal:
Rub it with a magnet, always in the same direction. Speakers have magnets at the back of them which you can use, but do not break your radio!
Place it in a coil with a direct current in it.
You can magnetize iron, nickel, and steel. That means aluminum soda cans won’t work.
Hang the magnetized needle on a string or float it in the water on top of anything that is not metal.
How to Survive Stranded at Sea – Movement at Sea
Once you know where land is, you have to get to it. You can paddle, but that uses a lot of energy. It is better to save your strength until actually shoring.
So unless you have a motor, you will need to use either the current or the wind.
Using the Current
The current is more useful when approaching land, but you can use it in open sea also. To use the current, deflate your raft a little so it rides low in the water. Also, keep yourselves low in the raft. Deploying your sea anchor if you have one will also help.
Using the Wind
To use the wind, you will need to improvise a sail. If you do, prevent capsizing by holding the bottom of it with your hands. This way you can release it if there is a sudden gust of wind.
Using the wind is opposite to using the current. You want to ride high, not low. Inflate the raft, sit up, and pull in your sea anchor.
How to Survive a Storm at Sea
To prevent capsizing in rough waters you should keep low. Stream your sea anchor from the bow (front). If there is more than one liferaft in your groups, tying them together will improve stability.
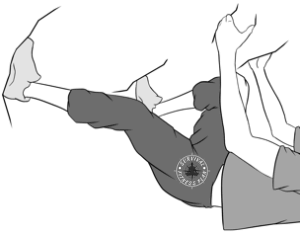
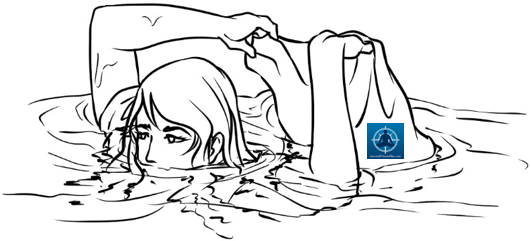
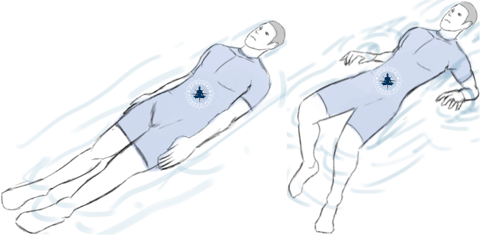
How to Swim Long Distance with Survival Backstroke
When you need to swim long distance and/or stay afloat in the water for a really long time, do survival backstroke.
Survival backstroke is floating on your back as you propel through the water. You use a simultaneous frog/breaststroke kick and a sculling motion with your hands. Your arms and legs move and come together at the same time.
The main goal of the survival backstroke is to conserve energy and reduce heat loss.
To maximize energy conservation, do the survival backstroke very slow. Take short strokes and glide for as long as possible. Only take the next stroke when you feel your legs dropping or you loose forward momentum.
Short strokes minimize heat loss from under your armpits and between your legs. Your arms should not extend beyond your shoulders. Also, at the end of each stroke, bring your arms and legs together. Hold them close but comfortable against your body.

Also use the survival backstroke is if an underwater explosion is likely. You will want to go faster so you can escape the blast, so make your strokes larger. Take your next stroke sooner than normal, but not too soon. Make the most out of your streamlined glide position while achieving the most speed.

How to Survive Being Stranded at Sea – Creating Shelter
Finding shelter when stranded out in sea is harder than on land, but not impossible. You can use any clothing or tarpaulin to shelter you from the cold and sun. If you have some poles you can even construct a roof.
How to Drink Sea Water to Survive
IMPORTANT: Ration any food and water you have in supplies from the start. Even if you are expecting rescue, anything can happen.
Also, always try to live off the sea before using your rations.
Learning how to survive at sea without water means learning how to find water!
First of all, never drink sea water. It will lead to faster dehydration. Instead, you need to catch and store rainwater whenever you can. Any plastic will do the trick. A tarpaulin, sails, the raft itself, etc.
Although not as effective, fabric will also work. It will absorb water which you can wring out into containers.
The first rainwater you catch will wash the salt off whatever you are catching it with, so don’t drink that. It is still useful to clean wounds and wash food.
If you are at sea for a while, fabrics will have salt crystals, so wash them out with sea water first. Seawater is salty, but salt crystals are worse!
Catching Food at Sea
If you don’t get rescued or find land within a day, you will want to find food. Fishing is the obvious answer, but you can also eat seabirds, planktons, seaweed, etc.
Small fish will gather underneath your raft. A simple handline, hook, and lure will do the trick. Even a simple survival kit will have a small fishing kit in it. Get yourself a survival kit!
If you don’t have fishing line, any string can work. Shoelaces, paracord, etc. If you do have fishing line, be careful not to cut yourself. Anything flashy makes a good lure. Be very careful with the hook or anything sharp if in an inflatable liferaft.
When you do catch a fish, use its guts as bait.
Do not hang around after spilling blood in the ocean. It may attract sharks.
How to Fight a Shark
The vast majority of shark attacks on humans are mistaken identity. Humans don’t taste good to sharks! Still, they are the king of the ocean, so you want to stay out of their way.
Like most animals, food is what will attract a shark, whether it is real or mistaken identity. Blood and fish are the biggest attractions. So is anything that resembles these, like shiny objects or human waste.
Whether you are in a life raft or not, if you spot a shark, be loud and slap the water.
If you don’t have a liferaft and are in a group, bunch together and face out. Everyone should shout underwater and slap the surface.
When a shark starts circling you, it is a sign of attack. When it comes at you, strike at its gills, eyes, and nose.
What to do When Lost at Sea – Embarking on Land
Once you find land you must first choose a good landing point. This is much easier to do in daylight. It is better to land on the downwind side of an island. Also, select somewhere that will be easy to beach or swim ashore.
As you approach the shore, note the landscape. Look for high ground, vegetation, water courses, etc. It is easier to see these things from a distance so make the most of it. If you are in a group, choose a meeting point in case of separation. Also, secure all your gear to your body and have a floatation aid ready.
As you come in to beach, do the following:
Stay in the raft for as long as possible
Take down the sail
Deflate the raft a little so it rides low in the water
Keep low in the raft
Put a sea anchor out to keep you pointing at the shore, unless you are going through coral
Head for gaps in the surf. Waves usually occur in sets of 7, from small to large
Steer clear of rocks, ice, and other obstacles
If possible, keep the sun out of your eyes
Attempt to use the waves to carry you into shore
Paddle hard
In Heavy Surf
Point towards the sea
Paddle into approaching waves
Once you are past the wave breaks you want to avoid getting swept back out to sea. Make the liferaft as light as possible and take out the sea anchor.
If the under-current is taking you back out, partly fill the raft with water and stream the anchor towards the shore.
LEARN THE BEST WAYS TO SWIM IN OCEAN WAVES
Swimming to Shore
When swimming to shore without a raft, face the shore and sit with your feet about a meter below your head. This way, you can take any impact with your feet.
When the waves are big, swim to shore in the troughs between them.
If a wave going out to sea approaches, go under it.
Finally, if you get caught in the undertow, don’t try to swim against it. Instead, swim parallel to the shore until you can swim in.
Inspired? Pin it for Later↓


Knowledge is the Best Survival Tool You Can HaveGet Your Copy of the Disaster Survival Handbook Today
The Disaster Survival Handbook: A Disaster Survival Guide for Man-Made and Natural Disasters (Escape, Evasion, and Survival Book 7)
Price Disclaimer
Conclusion
Sea safety & survival is an important subject to learn about. If you survive the accident, ration any supplies you may have and stick around the site for rescue. If nothing comes after a few days, and/or you know where land is, head for it.
While navigating the seas you will need all the things of any survival situation. Shelter, food, and water. Try to live off the sea as much as possible before using your rations. Never drink sea water and keep an eye out for anything useful. This includes rescue, raft leaks, sharks, land, etc.
Finally, remember to never give up. The longest person to survive at sea did so for 484 days, and the 2nd longest was 438 days.
Photo Credit: Senior Airman Mariette Adams
Did you find these sea survival techniques useful? If so, please share them with your friends.
The post Sea Survival Skills appeared first on Survival Fitness Plan.
Poisonous Snake Bite First Aid Procedures
In this article, you will learn poisonous snake bite first aid procedures. It covers snake bite symptoms and snake bite treatment. This is life-saving information if you live in or visit a country with poisonous snakes.
It also talks about dog snake bite symptoms and treatment, and snake bite on cats. Finally, it gives specific information on some of the most poisonous snakes in the world.
Contents
Prevention of Snake Bites
Snake Bite Protection
Poisonous Snake Bite Symptoms
Snake Bite Treatment
Pressure Immobilization Technique
Non-Poisonous Snake Bites
Snake Bite on Dogs and Cats
Snake Bite Dog Symptoms
Cat and Dog Snake Bite Treatment
Specific Snake Bite Information
Black Mamba
Blue Krait
Copperhead
Coral Snake
Death Adder
Eastern Brown Snake
Philippines Cobra
Rattlesnake
Sea Snake (Cottonmouth)
Taipan
Tiger Snake
Viper Snake Bite First Aid
Conclusion
Could You Save a Loved One When There are No Doctors Around?Get Your Copy of Wilderness and Travel Medicine Today
Wilderness and Travel Medicine: A Complete Wilderness Medicine and Travel Medicine Handbook (Escape, Evasion, and Survival 4)
Price Disclaimer
Poisonous Snake Bite First Aid Procedures
Prevention of Snake Bites
Prevention is always the best cure, and most poisonous snake bites are easy to avoid.
As with any animal, stay away from them. Most will run away before you know they are there anyway. If you do come across one, stand still and back away. Give it plenty of room to escape. Do not tease or try to move it. That is asking for trouble.
Although each snake likes slightly different conditions, most like to hide. Watch out in tall grass, piles of wood or rocks, piles of leaves, etc.
Snakes are cold-blooded so need to warm in the sun. Be extra careful when hiking on a sunny but cool day. This is when snakes are most likely to be sunbathing in the open.
Snake Bite Protection
If working in snake territory, wear protective clothing. Long pants, tall boots, and leather gloves are good.
You can even get special snake bite proof pants and snake bite proof boots. Get your snake bite proof clothing here.
Poisonous Snake Bite Symptoms
Different snakes can present different symptoms. In general, you will get some or all the following:
2 puncture marks
Blurred vision
Breathing difficulty, sometimes extreme
Local swelling and redness
Local pain, often severe
Nausea and vomiting
Numbness or tingling
Salivation
Sweating
*Local refers to being near/around the bite site.
Snake Bite Treatment
As with all life-threatening first aid situations, follow DRABC. Read a detailed article about DRABC here.
Besides DRABC, specific first aid treatment for snake bites is as follows:
Record the time of bite
*Identify the snake if possible
Keep the victim calm and and as still as possible
Remove constricting clothing and jewelry
Administer antivenin if available
Get to a hospital ASAP
*Only do this if it is safe. Don’t try to hunt it down. Take a picture from a safe distance if possible.
DO NOT:
Apply a cold compress
Apply a tourniquet
Cut the snake bite
Give medication (unless directed by a medical professional)
Pump or suck the venom out
Raise the bite
If you live or work close to poisonous snakes it is wise to have a snake bite first aid kit. Ensure you have snake bite antivenin for the snakes you are most likely to come in contact with.
Pressure Immobilization Technique
The pressure immobilization technique is not only for treating snake bites. Use can use it for most venomous bites and stings. The idea is to slow the venom’s movement into the circulatory system. This buys time until the arrival of advanced medical care.
When applying the pressure immobilization technique, keep the patient as still as possible. Especially the site of the venomous snake bite. Do not elevate the wound.
In general, only apply the pressure immobilization technique for:
Australian snakes, all species
Blue-ringed octopus
Conus
Funnel-web spiders
If possible, use an elastic roller bandage
Bandage upwards from the lower part of the bitten or stung limb, and continue up as high as possible. Each wrap should overlap the last.
Ensure the bandage does not impair perfusion (blood flow)
Mark the location of the bite on the bandage
Immobilize the limb
Check perfusion often as continued swelling may impair it
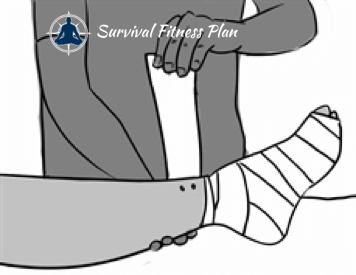
Note: Do not bandage bites/stings to the head or torso. Keep patient still and seek medical care ASAP.
Non-Poisonous Snake Bites
This article focuses on poisonous snake bites, but I want to touch on non-poisonous snake bites too.
The physical symptoms will be the same:
2 puncture wounds
Local swelling and redness
Local pain
You will not normally get the other symptoms (vomiting, blurred vision, etc).
Treat a non-venomous snake wound as a puncture wound. If you have any doubt, treat the snake bite as venomous!
The basic steps for treating a non-venomous snake wound are:
Apply direct pressure to stop the bleeding
Clean the wound with mild soap and clean water
Apply a topical antiseptic such as Povidone Iodine
Cover the wound with a sterile bandage
See a doctor for follow-up asap. You may need antibiotics.
Snake Bite on Dogs and Cats
Dogs and cats may try to play with or kill snakes. This often results in them getting bit.
Snake Bite Dog Symptoms
Symptoms of a snake bite in dogs are like those on humans, but the onset will be faster since they are smaller. In general, the smaller the dog, the less chance of survival it will have. Following this logic, a cat snake bite is even more lethal.
Look for the following symptoms:
Blood in urine
Collapse
Dilated pupils
Loss of bladder and bowel control
Muscle spasm
Paralysis
Sudden weakness
Vomiting
Cat and Dog Snake Bite Treatment
The treatment for snake bites on animals is the same as for humans. The only difference is to go to a vet instead of a hospital.
Carry your pet wherever it needs to go and get antivenin as quickly as possible.
If possible, you can use the pressure immobilization technique, e.g., for a snake bite on dog leg.
Whether it is a rattlesnake bite on a dog or some other species, the main thing is to keep the animal still. Get to a vet and give it some snake bite antivenom ASAP.
Specific Snake Bite Information
There are many types of snakes around the world. Here we will go over some of the most poisonous ones.
The general treatment is the same for all poisonous snakes. The difference is the type of antivenin. This is why it is important to identify the type of snake bite. Study the pictures.
Note: If someone gets bitten and did not identify the type of snake, do not bother trying to find out. Get to a hospital. They have tests to discover the type of venom.
Black Mamba Bite First Aid
This fast striking snake is in many parts of Africa. Unlike other Mamba species, the Black Mamba is not primarily a tree dweller. Except in the jungle, it prefers rocky crevices, scrub, abandoned burrows, etc.
It is not as aggressive as most people are lead to believe, but I would definitely not mess with it.
Black Mamba bite symptoms include:
Abdominal pain
Confusion
Convulsions
Distorted vision
Fever
Lack of muscle control
Local pain
Nausea and vomiting
Pallor
Paralysis
Respiratory failure
Salivation and foaming of the mouth
Shock
Tingling in extremities
Tingling in mouth

Danleo~commonswiki assumed (based on copyright claims). [GFDL, CC-BY-SA-3.0 or CC BY 2.5 ], via Wikimedia Commons
Blue Krait Bite First Aid
This nocturnal snake is from South East Asia. They are timid most of the time but are highly venomous. They like to hang around water and can grow up to 1m long.
Blue Krait bite symptoms include:
Cramps
Muscle paralysis
Paralysis
Spasms
Tremors

By Bramadi Arya [CC BY-SA 4.0 ], from Wikimedia Commons
Copperhead Bite First Aid
Copperheads are not aggressive, but if you step on one it will react. They are common in the Eastern states of North America. You will find them among rocks, in the woods, or near water sources.
There are also Copperheads in Australia, but they are a different species.
Copperhead bite symptoms include:
Change in skin color
Low blood pressure
Pain
Shock
Weakness

Via Wikicommons, Public Domain.
Coral Snake Bite First Aid
Coral snakes are common in the south of the US. They like to hide in leaf piles, so don’t step or kick one while you are walking!
The symptoms of Coral Snake bites are often delayed by hours.
Coral Snake bite symptoms include:
Change in skin color
Convulsions
Difficulty swallowing
Drooping eyelids
Headache
Pain
Paralysis
Shock
Stomach pain

By Norman.benton [CC BY-SA 3.0 or GFDL], from Wikimedia Commons
Death Adder Bite First Aid
The Death Adder is in Australia and New Guinea. It likes to hide among loose leaf litter and debris and is quite hard to see, especially if not keeping an eye out for one.
Deathadder bite symptoms include:
Drooping eyelids
Muscle weakness
Nausea
Paralysis
Respiratory failure
Speech impairment

CSIRO [CC BY 3.0 ], via Wikimedia Commons
Eastern Brown Snake Bite First Aid
This venomous snake makes its home in the major population centers of Australia. It is fast and may chase you. Luckily, less than half their bites contain venom, and they only react to movement. If you encounter one, stand very still.
Eastern Brown Snake bite symptoms include:
Cardiac arrest
Collapse
Convulsions
Diarrhea
Dizziness
Paralysis
Renal failure

By Poyt448 Peter Woodard [Public domain], from Wikimedia Commons
Philippines Cobra Bite First Aid
This snake has the most poisonous venom of all the cobra’s, and it can spit up to 3 meters. It lives almost anywhere, especially near water.
Philippines Cobra bite symptoms include:
Abdominal pain
Cardiac failure
Convulsions
Diarrhea
Dizziness
Headache
Nausea
Respiratory failure
Vomiting
By Mario Lutz [CC BY-SA 3.0 ], via Wikimedia Commons
Rattlesnake Bite First Aid
Rattlesnakes are one of the most common poisonous snakes in North America. They are also the largest of the poisonous snakes. They like to sunbathe so watch for them on top of rocks, logs, and in open areas.
If you hear the rattle of a rattlesnake, back away. It is your warning!
Rattlesnake bite symptoms include:
Drooping eyelids
Muscle fatigue
Low blood pressure
Severe pain
Thirst
Tiredness

Sea Snake Bite First Aid
Can a snake bite in water? Yes, it can. And all sea/water snakes are very poisonous. In fact, some think the most venomous snake in the world is the Belcher’s Sea Snake from SE Asia and Northern Australia.
The water moccasin is a common water-snake in the southeastern states of the US. They are commonly called a Cottonmouth snake.
Cottonmouth bite symptoms include:
Change in skin color
Low blood pressure
Pain
Shock
Weakness

By Patrick Feller via www.Flickr.com.
Taipan Bite First Aid
There are 3 sub-species of Taipan, all found in Australia. The Coastal Taipan is like the Australian version of the Black Mamba. It has similar aggressive behavior and toxicity.
The Inland Taipan is more venomous but not as aggressive as its coastal relative. This competes with the Belcher’s Sea Snake as most venomous snake in the world.
The 3rd is the Central Ranges Taipan which was only discovered in 2007.
Inland Taipan bite symptoms include:
Abdominal pain
Collapse
Headache
Nausea
Paralysis
Vomiting

Inland Taipan. By Kapa65 via Pixabay.com.
Tiger Snake Bite First Aid
Tiger Snakes are common near water in Australia. They will often run from loud noises but will attack if cornered.
Tiger Snake bite symptoms include:
Foot pain
Neck pain
Tingling
Numbness
Sweating
Reparatory failure
Paralysis

By Catching The Eye via Flickr.com.
Viper Snake Bite First Aid
Vipers are all over the world, but the most poisonous ones are in Asia. They are most active at night and after rain. They anger easily which make them especially dangerous.
Viper bite symptoms include:
Bleeding from the gums
Delayed cardiac failure
Delayed respiratory failure
Facial swelling
Local blistering
Local pain
Local swelling
Low blood pressure
Necrosis
Vomiting

Green Pit Viper. Via Maxpixel.com.
Inspired? Pin it for Later↓


This is the Only First Aid Book You Will Ever NeedGet Your Copy of Wilderness and Travel Medicine Today
Wilderness and Travel Medicine: A Complete Wilderness Medicine and Travel Medicine Handbook (Escape, Evasion, and Survival 4)
Price Disclaimer
Conclusion
There are many venomous snakes in the world and most people will come across one every now and again. If you do, remember to stay still and back away slowly. Give it plenty of room to escape and it will have no reason to attack you.
General first aid for snake bites is not complicated. Keep the victim still and get them some snake bite antivenin ASAP. For Australian snake bites, use the pressure immobilization technique.
Did you find this article about treatment for a snake bite useful? If so, please share it with your friends.
The post Poisonous Snake Bite First Aid Procedures appeared first on Survival Fitness Plan.
How to do the Illinois Agility Test
Learn how to do the Illinois Agility Test. So what is the Illinois Agility Test? The normal purpose of Illinois agility test is to assess speed and athletic agility. The Australian Police use it in their recruitment test, which is how I came across it. My friend was joining the police.
In the Survival Fitness Plan, the Illinois Agility Test is a training tool as opposed to a test of agility. Being agile is great for parkour and other Survival Fitness Plan activities.
Contents
How to Set up the Illinois Agility Test
Illinois Agility Test Diagram
How to do the Illinois Agility Test
How to do the Illinois Agility Test Video
Illinois Agility Test Tips
Get up and Sprint
How to Sprint Faster
Slalom Running (Weaving)
Conclusion
The Ultimate Fitness Plan for Escape, Evasion, and SurvivalGet Your Copy of the Survival Fitness Bundle Today
The Survival Fitness Bundle: The Ultimate Fitness Plan for Escape, Evasion, and Survival
Price Disclaimer
How to Set up the Illinois Agility Test
To set up the Illinois Agility Test you a space at least 5m x 10m in area and 7 markers. Athletic cone markers (witches hats) are ideal. You can get some here.
Have a baseline for your start and finish. Place the starter marker on the far left and the finish marker 5 meters to the starter marker’s right.
In the middle of these markers place another marker, but put it a little above the baseline. You need to have enough room to run between it and the baseline. A 1/2 m gap is good.
Place another 3 markers along the same line vertically. Spread them out 3.3 meters apart.
Finally, 2 meters to the side of the top marker, place another marker. Also, place one on the other side.
The placement of the markers does not have to be exact. 4 or 5 natural steps is more or less 3.3 meters. The exception to this is if you want to compare times and/or are testing for some professional purposes. In that case, a long measuring tape. Get a sports measuring tape here.
Illinois Agility Test Diagram
I got this Illinois Agility Test diagram from sjosm.org but I see it all over the web so I doubt they drew it. I can only assume the creator has allowed liberal use of it. If you are the creator of this image and want me to take it off this website please let me know.

How to do the Illinois Agility Test
To do the Illinois Agility Test, start at the start marker lying flat on your stomach. Your hands are behind the start line. Start on your timers command.
Sprint up and around the first marker on the left, at the 10m marker.
Sprint back and then weave through the center cones, up and back.
Sprint up and around the last marker on the right, at the 10m marker.
Sprint back and stop the timer when you cross the finish marker.
How to do the Illinois Agility Test Video
This video gives a good break-down of how to do the Illinois Agility Test. The markers are set up a little differently, but the actual test process is the same.
FYI. The maximum Illinois Agility Test time allowed for the Australian Police is 20 seconds. Try to be better than that so you can outrun the police if you need to
July 19, 2018
Beginner Yoga for Flexibility and Strength
This is a beginner yoga for flexibility and strength routine. The best yoga for flexibility for beginners is basic yoga. This is so you can go into a deep stretch without fear of injury. This daily yoga for flexibility routine is a full body stretch. It goes for 10-15 minutes, but you can make it longer if you want.
Each pose described also has safety information which you should follow. Also listed are the ailments each post can help with in relation to curing yoga.
Contents
Breathing
Poses
Picture of All Yoga Poses in Sequence
Yoga Nidra
Conclusion
Discover How to Use Yoga as Medicine to Cure 50+ Common AilmentsGet Your Copy of Curing Yoga Today
Curing Yoga: 100+ Healing Yoga Sequences to Alleviate Over 50 Ailments (Health and Fitness Book 2)
Price Disclaimer
Beginner Yoga for Flexibility and Strength Routine
This basic yoga for flexibility routine is a good morning yoga routine. But you can do it at any time if mornings don’t suit you.
After the routine, it is a good idea to meditate. I like yoga nidra, but any meditation is good.
Life Force and Breathing
Correct breathing is a big part of yoga.
Life force is a non-physical essential energy. It is present throughout the universe, and the universe provides it in abundance for all. Although science rejects the concept of life force, the notion of it is present in most cultures.
You may know the concept of life force as Chi, Élan vital, Gi, Khi, Ki, Manitou, Prana, Ruah, Qi, Vitalism, etc.
In relation to living creatures, this essential energy flows through the body. If it gets blocked, the symptoms of the blockage manifest as illness and/or pain. In other words, it is the blockage of energy which causes any sickness you have. That sickness may be physical, mental, emotional, etc.
You can prevent and reduce sickness by releasing the blockage. The simplest way to encourage and maintain the flow of this energy through the body is the breath.
Every breath circulates life force through the body, but taking full breaths is best. Unfortunately, most people do not take full breaths. Take the time to concentrate on proper breathing. Doing so will promote better breathing even when you are not concentrating on it.
If you only want to do one thing a day to maintain your health, do conscious breathing.
3-Part Breath
This is the breath to do when practicing yoga, but when first learning it, do it from a sitting or lying position.
Breathe in long and deep through your nose. Feel it enter your lower belly, then your lower chest/rib cage, and finally into your lower throat/top of the sternum. Feel the clear, positive energies of happiness and love come up from your toes to your head.
When you are ready, exhale fully through your nose. Feel it leave in the opposite order it came in, i.e., first from your sternum, then your chest, and finally your belly. Release all negative energy and tension out of your body from your head to your toes.
Continue to breathe in and out like this, smooth and continuous.
When you first start to practice this type of breathing it may help to put your hands on each of the three areas as you do it. Belly, chest, and sternum. You can also try breathing into each area on its own.
Alternate Nostril Breathing
Alternate nostril breathing is in some of the curing yoga sequences. It is a quick and easy way to calm your nervous system and raise your happiness. It also helps clear congestion.
Sit tall and comfortable.
Curl down your middle and index fingers of your right hand into your palm.
Press your right ring finger on your left nostril to close it and breathe in until the count of four.
Now use your thumb to close off your right nostril so you close both your nostrils. Count to four.
Release your ring finger and breathe out through your left nostril to the count of four.
Repeat this same sequence but now breathe in through your right nostril.
Continue this alternation for 3 to 5 minutes.
Beginner Yoga Poses for Flexibility
This part of the article will explain how to do each pose in the routine. They are in the order you do them.
To do this basic yoga routine in 10-15 minutes, hold each pose for 10 seconds. It is about 2 deep breaths.
Once you are familiar with the poses, it will be easiest to use the free Yoga Routine Quick Sheet. You can get it by joining the newsletter. Scroll to the top of this page to do that.
Mountain Pose
Avoid doing mountain pose if you have a shoulder injury.
Stand with your feet parallel and either together or hip width apart.
Spread your toes wide and balance your weight evenly and centered over each foot.
Pull up your kneecaps and tense your thighs. Keep your legs straight but do not lock your knees.
Ensure your hips are directly over your ankles.
As you inhale, lengthen your spine so that the crown of your head goes straight up towards the sky.
When you exhale drop your shoulders and lengthen your finger-tips towards the ground. Keep extending your head upwards.
At the same time gently direct your chest straight ahead.
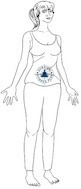
While continuing to lengthen, inhale and bring your arms up above your head. Reach for the sky, palms facing each other.
As you exhale relax your shoulders but continue to lengthen your crown and fingers to the sky.
You could also interlace your fingers with your index fingers pointing up.
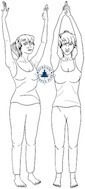
When you are ready, exhale and bring your palms together in front of your chest in a prayer position.
Take a breath and on the exhale allow your hands to drop to your sides.
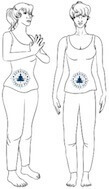
Standing Backbend
Avoid doing standing back bends if you have a back, hip, and/or neck injury.
As you breathe in place the palms of your hands on your lower back (sacrum) with your fingers pointing to the ground.
Squeeze your buttocks and thighs tight, pull up your kneecaps, and press into your feet.
Exhale and press your hips forward as you arch your back.
You can either look straight ahead or allow your head to drop all the way back.
Increase the stretch by walking your hands down the back of your legs.
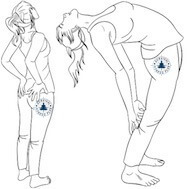
When you are ready, slowly come back to a standing position with your hands by your sides.
Crescent Moon Pose
Avoid doing crescent moon pose if you have a back, hip, and/or shoulder injury.
While inhaling adopt mountain pose. Interlace your fingers and point your index fingers to the sky.
As you exhale press your left hip out to the side and arch to your right.
Keep your body strong and lengthened.
Inhale as you return to the position with your fingers interlaced and pointing to the sky. Repeat it on your other side.
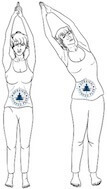
Return to mountain pose.
In curing yoga, crescent moon pose can help with:
Balance
Digestion
Flexibility
Relaxation
Weight loss
Standing Forward Fold
Avoid doing standing forward folds if you have a back, hip, leg, and/or shoulder injury.
Exhale and bring your head to your knees with your palms flat on the floor.
Stretch your spine by pulling your head down while pushing your hips up.
Bend your knees if you need to but aim to be able to do it with straight legs.
Press your belly into your thighs when inhaling.
For a deeper stretch hold the back of your calves and pull your head closer to your legs.
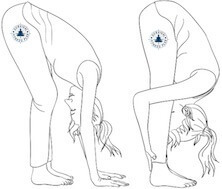
You can make it easier by spreading your legs apart a little.
Stand back in mountain pose when you are ready.
In curing yoga, standing forward fold can help with:
Anxiety
Asthma
Backaches
Circulation
Cold and flu
Complexion
Constipation
Depression
Digestion
Energy
Flexibility
Headaches
Migraines
High blood pressure
Immunity
Indigestion
Insomnia
Knee problems
Menopause
Menstruation
Posture
Prolapsed uterus
Relaxation
Stress
Varicose veins
Weight loss
Table Pose
Avoid doing table pose if you have a knee and/or wrist injury.
As you inhale, place your hands and knees on the floor with your palms underneath your shoulders. Your fingers face forwards.
Ensure your knees are shoulder width apart and your feet are behind them. The tops of your feet and your toes are on the floor.
Look at the ground between your hands and press down into your palms.
Have your back flat and exhale while lengthening your spine. Lengthen your spine by pressing the crown of your head forward and your tailbone back.
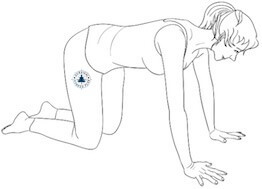
In curing yoga, table pose can help with:
Aches and pains
Arthritis
Backaches
Flexibility
Hangovers
Knee problems
Menstruation
General strength
Stress
Varicose veins
Weight loss
Threading the Needle
Avoid doing threading the needle pose if you have a knee, neck, and/or shoulder injury.
As you exhale slide your right hand between your left knee and left hand. Do it until your right shoulder and the side of your head are resting on the floor.
Inhale and reach towards the sky with your left hand.
Find where you get the deepest stretch and stay there, reaching out through your fingers.
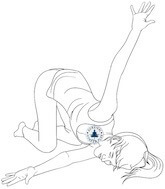
When ready exhale as you bring your hand back to the floor and then inhale to readopt table pose.
Repeat the pose on your left side.
In curing yoga, threading the needle pose can help with:
Aches and pains
Anxiety
Arthritis
Backaches
Flexibility
Menstruation
Stress
Low Warrior
Avoid doing low warrior pose if you have an ankle, arm, hip, and/or shoulder injury.
Step your right foot forward placing it in-between your hands. Your knee is over your ankle.
Ensure your left knee, and your left and right feet are firm with the ground and then place your hands on your right knee.
Straighten your arms and bring your torso back. Do not lock your elbows.
Relax your shoulders. Stick your chest out by bringing your shoulder blades towards each other.
As you inhale, raise your arms over your head with your palms facing each other and arch your back as you look up to the sky.
If this is difficult then you can keep your hands on your bent knee.
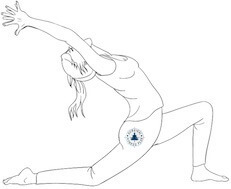
When ready exhale as you bring your palms back to the floor on either side of your right foot.
In curing yoga, low warrior pose can help with:
Circulation
Depression
Self-esteem
Respiratory ailments
Sciatica
Energy levels
Flexibility
Relaxation
Weight loss
Half Prayer Twist
Avoid doing half prayer twist if you have a back, hip, knee, and/or shoulder injury.
As you inhale bring your torso up and place your hands together in a prayer position.
Place your right elbow to the outside of your left knee and use your arms to press your right shoulder up and back. Feel it twist your upper back.
Ensure your palms remain in the center of your chest. Point your fingers towards your throat.
You can either look straight ahead or up towards the sky.
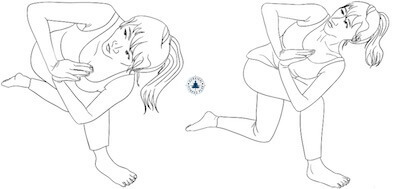
When ready exhale as you bring your palms back to the floor, one on each side of your right foot.
In curing yoga, half prayer twist can help with:
Balance
Depression
Hangover
Hot flashes
Indigestion
Sciatica
Energy
Flexibility
Weight loss
Half Pyramid
Avoid doing half pyramid pose if you have a knee, and/or leg injury.
While exhaling, straighten your right leg as you press your hips back towards your left heel.
Round your spine and lift your toes to the sky as you push your forehead to your right knee.
Walk your hands back towards you to support your torso.
Relax your elbows, face, neck, and shoulders.
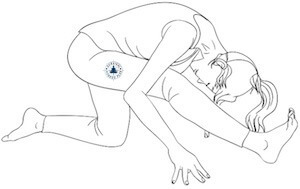
When ready inhale and bend your right knee back over your ankle. Then exhale and bring your right knee back into table pose.
In curing yoga, half pyramid pose can help with foot cramping, hot flashes, and shin splints.
*Do low Warrior, half prayer twist, and half pyramid on your other side*
Extended Dog Pose
Avoid doing extended dog pose if you have an arm, back, knee, and/or shoulder injury.
As you inhale push your tailbone towards the sky. Exhale and lower your forehead to the floor by sliding your hands forward. Ensure you keep your hips lifted over your knees.
Arch the middle of your back by allowing your chest to sink.
To deepen the stretch, straighten your arms, lift your elbows off the floor, and bring your hips back. Try not to let your hands slide while you do this.
Place your chin on the ground to stretch your neck.
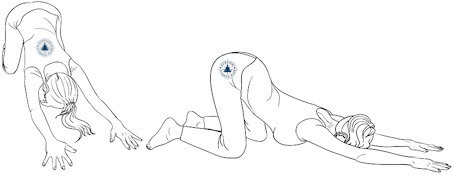
When ready, inhale and return to the table pose.
In curing yoga, extended dog pose can help with relaxation, weight loss, and more.
Hero Pose
Avoid doing hero pose if you have a knee injury.
Kneel on the ground with your knees together and your feet hip-width apart. Sit with your bum on the ground and your heels on the outside of your hips.
If this is too difficult you can sit on your heels.
Place your hands on your knees. Your palms can face up or down.
Lengthen your torso by reaching the crown of your head to the sky.
Push your lower legs into the ground, drop your shoulders, and press your chest forward.
Relax your belly, face, jaw, and tongue.
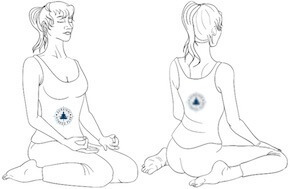
In curing yoga, hero pose can help with:
Anxiety
Asthma
Backaches
Cold and flu
Depression
Detox
Diarrhea
Foot-cramps
Hangovers
Headaches
Indigestion
Knee problems
Menopause
Menstruation
Migraines
Prolapsed uterus
Self-esteem
Shin splints
Stress
Tense neck and shoulders
Vertigo/dizzy spells
Hero pose is also an excellent pose to rest and/or for meditation.
Lion Pose
Avoid doing lion pose if you have a face, knee, neck, and/or tongue injury.
From hero pose, bring your feet together and spread your knees as wide as you can without straining. Sit on your heels.
Inhale and lengthen your spine by reaching the crown of your head to the sky.
Bring your palms to the floor between your knees with your fingers facing your body.
Arch your spine, stick your tongue out and exhale via your mouth. Be ferocious like a lion!
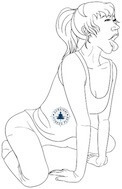
Repeat this a few times and then return to hero pose.
In curing yoga, lion pose can help with complexion, self-esteem, and flexibility.
Downward Facing Frog
Avoid doing downward facing frog if you have a knee, hip, and/or leg injury.
Spread your knees as wide as you can without hurting yourself. Align your feet so that they are behind your knees, i.e. right foot behind right knee and left foot behind left knee.
Turn your feet outwards so your toes are facing away from your body.
Place your elbows, forearms, and palms flat on the floor.
Exhale as you push your hips back.
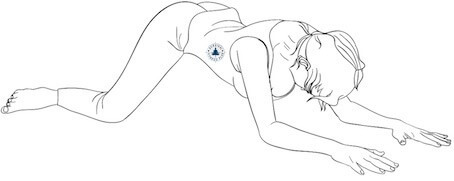
When ready, return to hero pose.
Staff
Move into a seated position with your legs extended straight out in front of you.
Place your hands beside your hips with your fingers pointed forward.
Lengthen your spine by pressing your hip bones down whilst pushing the crown of your head up.
Use your arms for support as you push your chest forward and lower your shoulders.
Pull your toes towards your head as you push your heels away from you.
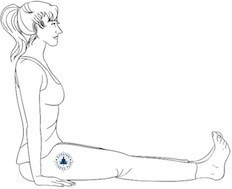
In curing yoga, staff pose can help with:
Asthma
Cold and flu
Fibromyalgia
Flexibility
Headaches
Insomnia
Menopause
Migraines
Weight loss
Seated Forward Bend
Avoid doing a seated forward bend if you have an ankle, arm, hip, and/or shoulder injury.
From staff pose, inhale and raise your arms up to the sky with your palms facing each other. Lengthen your torso through your fingers and the crown of your head.
As you exhale bend at the hips, lowering your upper body to your legs. Grab your ankles, feet, or toes.
Push out through your heels as you pull your toes back towards you.
You can use your arms to pull yourself closer to your legs. For those with more flexibility reach your hands in front of your feet.
If you are having difficulties bend your knees enough so you can reach your feet and place your head on your knees.
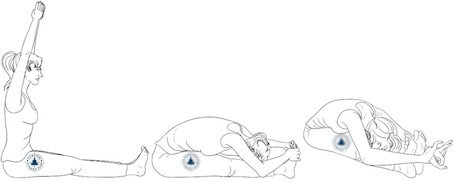
When you are ready slowly roll up your spine back into staff pose.
In curing yoga, seated forward bend can help with:
Anxiety
Constipation
Craving and addiction
Depression
Energy
Flexibility
Headaches
Migraines
Insomnia
Knee problems
Menopause
Menstruation
Relaxation
Stress
Weight loss
Bound Angle
Avoid doing bound angle pose if you have a hip and/or knee injury.
Bend your legs to bring the bottoms of your feet together. Your knees bend facing out.
Hold onto your toes by interlacing your fingers around them.
As you inhale stretch the crown of your head up towards the sky while pushing your hips down.
Push your chest forward and relax your shoulders down.
Close your eyes and look to your third eye (behind the middle of your forehead).
As you exhale push your knees to the ground and gently pull your torso forward. Ensure to keep your chest open and back flat.
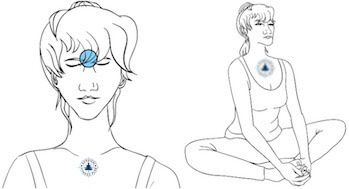
For a deeper stretch, pull your forehead or chest towards your feet.
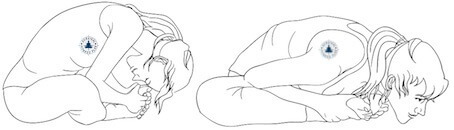
When you’re ready, return to staff pose.
In curing yoga, bound angle pose can help with:
Aches and pains
Anxiety
Asthma
Back-ache
Cold and flu
Depression
Diarrhea
Energy
Flexibility
Headache
Migraine
Hip discomfort
Indigestion
Insomnia
Knee problems
Menopause
Menstruation
Prolapsed uterus
Relaxation
Sciatica
Stress
Thyroid imbalance
Weight loss
Seated Angle
Avoid doing seated angle pose if you have an arm, hip, knee, and/or shoulder injury.
As you inhale spread your legs out as wide as comfortable. Ensure your knees and toes are pointing up and reach through your fingers up to the sky.
Exhale as you lower your palms to the floor. Deepen the stretch by walking your hands forward. Stay focused on keeping your spine long.
You could also hold your big toes and use them to help pull your torso down.

When ready, inhale and slowly walk your hands in as your roll back your spine. Finish with a straight back.
In curing yoga, seated angle pose can help with:
Asthma
Cravings and addictions
Fibromyalgia
Headache
Migraine
Hip discomfort
Knee problems
Menopause
Menstruation
Pregnancy
Sciatica
Vertigo/dizziness
Flexibility
Relaxation
Weight loss
Side Seated Angle
Avoid doing side seated angle pose if you have a hip, leg, and/or lower back injury.
Turn to face your right foot by twisting at your waist.
Walk your hands towards your right foot as you exhale. Try to reach your forehead to your knee and hold your right ankle or foot if you are able.
Relax your shoulders and neck. Increase the stretch by pressing your heel out while pulling your toes back.
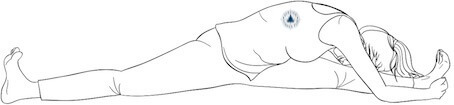
When ready, return to the center with your back straight and then do the same thing on your left side.
Go back to seated angle, then to staff pose, and lie flat on your back.
Joyful Baby Pose
Avoid doing joyful baby pose if you have a leg, neck, and/or shoulder injury.
As you inhale bring your knees to your chest.
Weave your arms through the inside of your knees. Hold onto the pinkie toe side edges of your feet with your hands.
Keep your head on the ground and tuck your chin to your chest.
Push your heels up to the sky as you pull back with your arms. At the same time press the back of your neck, shoulders, sacrum, and tailbone to the floor.
Open your legs wider for a deeper hip stretch.
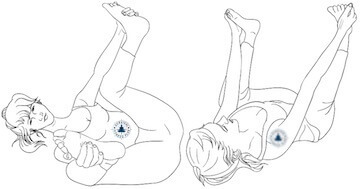
When you’re ready, exhale and slowly roll your spine back to the ground until you are lying flat again.
In curing yoga, joyful baby pose can help with:
Fibromyalgia
Flexibility
Insomnia
Lethargy
Pregnancy
Wind Relieving Pose
Avoid doing wind relieving pose if have a hernia and/or have had recent abdominal surgery.
As you inhale bring both knees up to your chest. Hug your knees and hold onto your opposite elbows, forearms, fingers, or wrists.
Keep your head on the floor whilst tucking your chin to your chest.
Pull your knees to your chest as you press the back of your neck, shoulders, sacrum, and tailbone to the floor.
Relax your feet, hips, and legs.
Inhale deep into your belly and press it against your thighs as you do so.
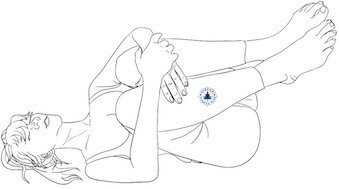
When ready exhale and relax all your limbs to the ground so you are lying flat again.
In curing yoga, wind relieving pose can help with:
Anxiety
Back-ache
Circulation
Constipation
Diarrhea
Fibromyalgia
Flexibility
Hip discomfort
Immunity
Knee problems
Lethargy
Menstruation
Relaxation
Runner’s aches
Sciatica
Stomach ache
Stress
Varicose veins
Weight loss
Supine Bound Angle
Avoid doing supine bound angle pose if you have a hip and/or shoulder injury.
Bend your legs to bring the bottoms of your feet together. Your knees bend facing out like with bound angle pose but lying down.
Allow your knees to drop to the ground. You can rest your hands on your thighs to “encourage” them but do not push down.
As you inhale slide your arms on the ground over your head until your palms are together. Cross your thumbs.
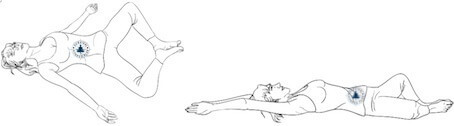
When ready exhale as you return to a lying position.
In curing yoga, supine bound angle pose can help with:
Back-ache
Circulation
Constipation
Flexibility
Fibromyalgia
Hip discomfort
Immunity
Knee problems
Lethargy
Menstruation
Relaxation
Runner’s aches
Sciatica
Stomach ache
Stress and anxiety
Varicose veins
Weight loss
Corpse Pose (Shavasana)
In the last few poses you are lying flat on your back. This is corpse pose. Now you will do it properly.
Lie flat on your back on the floor. You can place a pillow under your head if you want.
Keep your head straight, i.e., don’t let it fall to the side.
Draw your shoulder blades down and open your chest towards your chin.
Have your arms at a comfortable distance from your body with your palms facing up. Completely relax your arms and fingers.
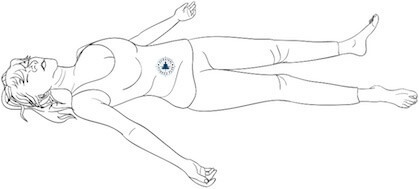
Lift and extend your buttocks to your heels so that your whole sacrum rests on the floor.
Keep your abdomen soft and relaxed.
Slowly stretch your legs out straight one at the time. Allow them to roll out to the side from the hips to the feet. Check that your body is in a straight line and you are resting evenly on the left and right sides.
Once you are comfortable stay still and quiet. Be aware of your body relaxing deeper into the floor.
Allow your eyes to rest completely so they sink deeper towards the back of the skull. Relax your whole face and body.
Be aware of your breath, quiet and soft.
Now is the perfect time to do yoga nidra or some other meditation.
Picture of All Yoga Poses in Sequence
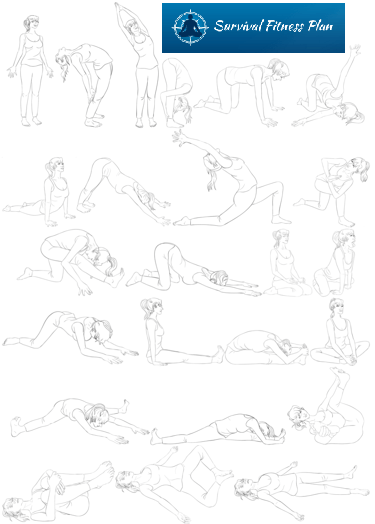
How to do Yoga Nidra
Yoga Nidra is a form of guided meditation which has many health benefits. Yoga Nidra is my favorite form of meditation because it is easy to do, especially for beginners. For those of you that use other forms of mediation that you enjoy then feel free to stick to them. The main thing is the meditation.
You can guide yourself through yoga nidra but the easiest way to do it is to listen to a yoga nidra practice. You only need to do what the instructor says.
It is good to do AT LEAST 10 minutes of yoga nidra immediately following the yoga stretch routine.
Find a place where your body can be comfortable and you can practice undisturbed. Not too hot or cold. Put on some soothing background music if you want.
It is best not to do yoga nidra in bed because you will be more likely to fall asleep. A yoga mat on the floor is ideal.
Yoga nidra is a conscious practice.
Lie in Corpse Pose
Corpse pose is at the end of almost every yoga practice. Going straight from your yoga practice to yoga nidra is ideal.
You can also do yoga nidra from a seated position if lying down is inappropriate.
Close your eyes.
Notice your Breath
Notice your breathing. Feel your lungs filling with air, your stomach expanding, and then deflating.
Imagine a light around your body expanding and contracting as you breathe in and out.
Feel the energy coursing through your body.
Use Your Senses
Notice each of your senses, one by one.
What sounds do you hear? Near, far, inside, outside.
What smells can you smell? Take small sniffs, like a dog does.
Taste the air.
Feel your body supported on the floor. Which parts of your body are touching?
What can you see with your eyes closed? Does the light make shapes in your eyelids?
Repeat Your Mantra
Your mantra is a short sentence stating your intentions. It’s kind of like an affirmation. It may be a broad statement such as overall health or relaxation. It could also be a visualization of something you want to achieve.
Whatever it is, repeat it mentally three times. Try to feel how it feels as if it was true.
One I use often is “My entire being is completely relaxed and at one with the universe.”
Scan Your Body
This is where you consciously relax each part of your body.
Mentally go through your body. Bring your attention to and relax each part. You can be very detailed about this or only do large areas. It depends on how long you want to spend.
I start from the top of my head and work my way down. Sometimes I even do internal organs.
After you have relaxed smaller body parts relax them as a whole. For example, shoulder, upper arm, bicep, elbow, forearm, hand, fingers, relax the whole arm.
At the end relax the whole body as one.
Awaken the Body
The last step is to deepen your breath and start to move your fingers and toes, then your hands and feet.
In your own time stretch your body out in whatever way feels right. Open your eyes when you are ready.
When you finish stretching, gently hug your knees. It is wind relieving pose. Fall to your right side and then gently sit up.
Take a moment to reflect on the practice and then go about your day.
Yoga Nidra Playlist
Here’s a playlist of the three ten minute videos which I use to do my daily yoga nidra.
Note: 10 minutes is very short for Yoga Nidra. None of these ten-minute yoga nidra practices go through all the steps above. If you can spare the extra time, download some very good yoga nidra practices for free at YogaNidraNetwork.org/downloads. There are also some shorter ones which I use in the mornings.
Inspired? Pin it for Later↓


100+ Healing Yoga Sequences to Alleviate Over 50 AilmentsGet Your Copy of Curing Yoga Today
Curing Yoga: 100+ Healing Yoga Sequences to Alleviate Over 50 Ailments (Health and Fitness Book 2)
Price Disclaimer
Beginner Yoga Routine for Flexibility and Strength Conclusion
A 15-minute yoga routine is quite short. The longer you do this simple yoga routine the better. You can make it longer by extending the time you stay in each pose. The longer you stay in each pose, the more your flexibility will improve.
Don’t forget to use correct breathing techniques while doing the poses. Also, do yoga nidra or some other type of meditation at the end.
If you want to learn more about how yoga can help cure different ailments, check out Curing Yoga by Aventuras De Viaje.
Did you find this beginner yoga flexibility and strength routine useful? If so, please share it with your friends.
The post Beginner Yoga for Flexibility and Strength appeared first on Survival Fitness Plan.
July 14, 2018
Cold Water Survival, Rescue, and First Aid
In this article, you will learn how to survive cold water. It covers prevention and specific action steps for surviving cold water once immersed. There is also information on cold water rescue and first aid for common cold water illnesses.
Although the focus is on cold water survival, a lot of this information applies to the cold in general.
IMPORTANT: This article is for reference only. Please never attempt cold water survival training without a professional instructor.
Contents
Prevention
How to Dress for Cold Water Survival
Layering
Footwear
Goggles
Poncho
Visibility
Maintenance
Restrictions
How Long Can You Survive in Cold Water
Cold Water Survival 1 10 1 Rule
Survival Time in Cold Water Chart
Cold Water Drowning Survival Record
How to Survive in Cold Water
HELP Position in Swimming
Huddle Position in Swimming
How to Escape Ice Water
Cold Water Rescue
Cold Water First Aid
Hypothermia
Drowning
Frostbite
Conclusion
Could You Save a Loved One When There are No Doctors Around?Get Your Copy of Wilderness and Travel Medicine Today
Wilderness and Travel Medicine: A Complete Wilderness Medicine and Travel Medicine Handbook (Escape, Evasion, and Survival 4)
Price Disclaimer
Cold Water Survival
Prevention
As always, prevention is the best form of survival. The obvious one would be to stay out of cold water. But if your job requires it, or you enjoy water sports, that may not be an option. And there is always the possibility of an accident. In these cases, knowledge is the next best thing, in which case, you have come to the right place.
C.O.L.D. is an acronym you can use to help you remember the prevention techniques for cold illnesses.
Cover your extremities, i.e., head, hands (mittens work better than gloves) and feet.
Overexertion will cause you to sweat. This will make your clothes wet, which will make you colder.
Layering. Layers of loose fitting, lightweight clothing is a good way to insulate your body. Wool and silk for inner layers are better than cotton.
Dry. Keep as dry as you can.
Other cold water immersion prevention tips include:
Enter cold water slowly, keeping the head above the water
Wear a PFD. They will help keep the head above water, and they also provide warmth. Look here for the best PFD’s.
How to Dress for Cold Water Survival
If you know you will be in or around cold water, then dressing for the occasion can save your life in case of an accident. Also, being hot outside does not mean it will be warm in the water. It only takes a slight change in weather to take the situation from fun to dangerous.
Be prepared with the right clothing and use layering.
Choose fabrics that provide warmth even when wet. Not cotton or jeans.
In colder conditions, use a wetsuit.
Once out of the water, put on warm clothes. Use clothing that blocks the wind, such as a poncho.
If you know you will be entering cold water, use a cold water survival suit. Look here for the best cold water wetsuit.
Layering
Layering means using several items of thin clothing as opposed to one or two thick ones. If you get too warm you can strip one or two layers without losing all your protection.
There are 3 basic layers. Base, insulator, and outer.
Base Layer
The first layer, (base layer), will reduce water flowing past your skin and is also good for sun protection. You want a skin-tight, quick-drying material that will wick the water away. Rash vests are a good example. Polypropylene, polyester, and lycra are good materials for your base layer. Look here for the best base layers.
Insulating Layer
The insulating layer keeps you warm when it gets colder. It should fit snug. Not too tight or too loose. Use materials that dry fast. Unlined tracksuits work well, as does wool and fleece. Unlined is important, otherwise, it will hold air and water. A hooded top helps to prevent heat from escaping through your head. It also provides sun protection.
Adjust the number of insulating layers you use depending on the temperature. In warmer climates, you may not even need one.
Outer Layer
Your outer layer should be a water and windproof shell. Its purpose is to keep you warm and the elements (such as wind and rain) out. You will still get wet, either from perspiration or from being in the water.
A rain jacket, an anorak or a light nylon over-all works well. It should be large enough so you have good freedom of movement. This will also trap a warm layer of air inside it.
Being windproof is very important for the outer layer. Look here for the best outer layers.
Footwear
Footwear is especially important in unknown waters where your feet may get injured. Simple canvas shoes with drain holes work well. Wear ones that are easy to remove in case you get caught in rocks.
Wearing socks provides insulation and also prevents chafing.
Swimming in footwear, as with any clothing, will create extra drag. Experiment with it during training.
Goggles
Swimming goggles, or a mask, are not essential but are useful if you want to see underwater.
It is a good idea to always wear goggles in a chlorinated/chemical pool. Look here for the best swimming goggles.
Poncho
A poncho is an excellent all-around piece of survival equipment. When it comes to water training, you will use ponchos for some self-rescue exercises. It can also become an improvised shelter or emergency blanket (extra warmth) when not in the water. Look here for the best ponchos.
Visibility
Being visible in the water is for safety and survival. You want to be easy to spot by any water traffic. Also, if you get in trouble you will be easier to find by rescue services.
Maintenance
Always wash yourself and all your gear in fresh water after training in any type of water. This will keep everything in the best working condition for as long as possible.
Rinsing your gear under a tap is not enough. Most of the bad stuff (salt, chemicals, etc.) will not get washed out. It is best to wear it in the shower or put it in the washing machine.
Restrictions
The more clothes you have on the harder it will be to swim. The best way to prepare is to simulate falling into the water while clothed and then swimming to safety.
Water-logged clothes will also make climbing out of the water harder.
How Long Can You Survive in Cold Water
Can cold water kill you? Yes it can, and in more ways than one.
Drowning and hypothermia are the obvious killers. Cold water and heart attacks happen due to vasoconstriction. Cold water and asthma is also a concern since cold in general can be a trigger. Treatments for some of these cold water illnesses are later on in this article.
Cold Water Survival 1 10 1 Rule
The cold water survival 1 10 1 rule states how long each stage of cold water immersion takes for the average human. Cold water immersion does not lead to immediate hypothermia. There are 4 phases:
Cold Shock Response
This is the most common cause of drowning in cold water. It can cause a few life-threatening conditions:
Gasp Reflex. When cold water is first entered it causes an automatic gasp reflex. This reflex usually lasts about 1 minute, but if the head is under water at the time, it will lead to drowning.
Hyperventilation. Panic can cause hyperventilation which can lead to fainting. This can lead to drowning.
Cardiac Arrest. Vasoconstriction (narrowing of the arteries) means the heart must work harder.
Cold Incapacitation
Prolonged vasoconstriction will cause the extremities to ‘shut down’. This means the limbs will not be able to help keep the body afloat. This happens after about 10 minutes in the water.
Hypothermia
Hypothermia will set in after about 30 minutes in ice water for most adults. For the 1 – 10 – 1 rule the say being in cold water 1 hour is the onset of hypothermia.
Circum-rescue Collapse
This is not part of the 1 – 10 – 1 rule but is important to understand. When a patient knows they are being rescued, their mental state relaxes. Blood pressure drops, muscles fail and it may even cause cardiac arrest. It can happen before, during, or after the rescue.
Survival Time in Cold Water Chart
This cold water survival chart gives a bit more detail for cold water survival times.

Cold Water Drowning Survival Record
There have been a few cases where people have been underwater for long periods of time and survived. A quick google search revealed, amongst others, a story of a boy that was underwater for 42 minutes. Another was a child that was revived almost 2 hours after drowning.
In both cases, the experts said that their survival was most likely due to youth and that they fell in cold water. I won’t go into the scientific details of why cold water helped them survive, but I do bring this up for a reason.
People may seem dead, but there is still hope. Never give up on a cold water drowning victim (or any drowning victim) until announced dead by a physician. In Norway, there is a recorded cold water drowning survival time of close to 7 hours!
How to Survive in Cold Water
Being immersed in cold water will sap your breath and energy quicker than normal. Panicking will make things worse. You must relax and get out. Concentrate on deep breathing to calm your mind and body.
If you cannot get on dry land you have to do whatever you can to keep your body heat until help arrives.
Button or zip up your clothes and keep them on
Don’t use up energy swimming unless you have a dry place to swim to
Get as much of yourself out of the water as possible
Use the HELP or Huddle position
Once you get out of the water it is important to remove all your wet clothing, dry yourself off, and get warm. Watch yourself and others for signs of hypothermia and treat as necessary.
HELP Position in Swimming
HELP is an acronym for the Heat Escape Lessening Posture. It is the position to adopt when you are alone in the water and want to conserve your body heat.
The general idea of the HELP position is to protect your major areas of heat loss. These are your armpits, groin, head, neck, and rib cage.
When you are wearing a life-jacket, keep your head out of the water and lean back on it. Fold your arms and hug your jacket close to your body.
Cross your lower legs and bring your knees as high on your chest as you can.

If you do not have a life jacket, do your best to get as close to the HELP position as possible.
Huddle Position in Swimming
The huddle position is the HELP position for groups of people (2+). Huddling together in a group has benefits such as:
Lessen loss of body heat
Increase morale
Be easier to spot for rescuers
Stronger swimmers can aid weaker ones
To adopt the huddle position form a ring and group together. Everyone groups together as close as possible. Use your arms and legs to wrap around each other. Place those in need (such as children) in the middle.
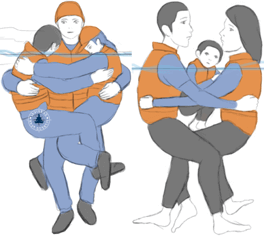
How to Escape Ice Water
Escaping from a fall into ice water is not easy and the result can be deadly.
DO NOT PRACTICE THIS IN ICE WATER! Go through the motions in a pool instead.
When you first fall into ice water you will start to hyperventilate. Try to stay calm and keep your head above the water. Taking deep breathes may help but do not breathe in the water.
After 1 to 3 minutes the shock response will begin to wear off. Now you have about 10 minutes to get out before you fall unconscious.
Once you have got your hyperventilation under control, find where you first fell in. You want to get out where you know it was strong enough to support your weight. Going to where you came from is your best bet.
Place your hands on the surface and pull yourself up while staying as horizontal as possible. Pulling yourself straight up will be far less effective and a waste of energy.
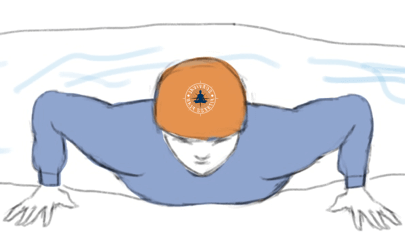
Kick your legs as your creep yourself out of the water. It will be very slippery.
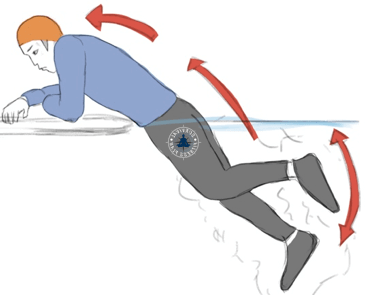
Once you are out of the water, lie flat on the ice and roll away.

Rolling away keeps your weight distributed. It has less of a chance of creating further cracks in the ice.
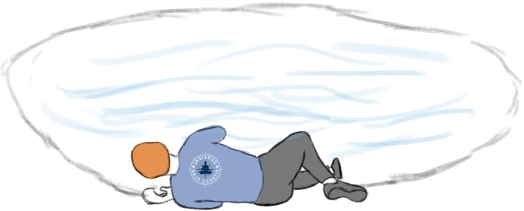
If you know you will be crossing ice country it is very wise to get some ice picks. They will make it far easier to pull yourself out of the water, although it will still be difficult.
If you cannot get out, then you need to conserve your heat and energy. Put your arms on the ice and keep them there so they freeze to the surface. This way, when you become unconscious you will have a better chance of not falling into the water.
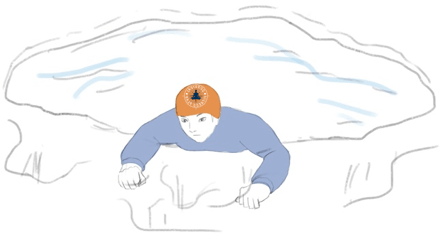
Never go out to someone who has fallen into ice. Coach them on what to do from a safe distance and reach something out for them to hold onto such as a stick or rope.

Once out of the water get out of the wet clothes and get warm as soon as possible.
Escaping Ice Water Video
Cold Water Rescue
If rescuing someone from cold water immersion:
Only enter water to rescue if no other option
Extract from water slowly
Use in-water rescue breathing if needed
Treat critical systems as needed, e.g., CPR, hypothermia
Start with 5 rescue breaths, and then continue as normal
If patient is breathing but unconscious, put on his/her side
If you think you may need to rescue someone from cold water, invest in a cold water rescue suit. The Stearns cold water rescue suit is a good choice. Look here for the best prices.
Cold Water First Aid
In this section, we will cover the first aid procedures in the case of cold water immersion.
Most of what is here is not only for cold water cases. You can use the same steps for general treatment also.
Hypothermia
Hypothermia occurs when the cold overwhelms the body’s ability to produce and keep heat. It usually occurs when exposed to the cold.
Symptoms of Hypothermia
Hypothermia can be mild or severe and it progresses through very definite symptoms. The patient will have mild hypothermia and, if untreated, it will become severe.
Symptoms of Mild Hypothermia
The first symptoms of hypothermia are:
Body temperature between 35.5 °C (96 °F) to 32 °C (90 °F)
Difficulty speaking
Intense shivering
Irritable
Lethargic
Loss of fine motor coordination
Sluggish thinking
Violent shivering
Withdrawn
Symptoms of Severe Hypothermia
Body temperature below 32 °C (90 °F)
Blue, puffy skin
Coma
Decreased vital signs (pulse, respiratory, B/P)
Jerky movements
Muscular rigidity, i.e., no more shivering
Respiratory and cardiac failure
Hypothermia Treatment
The treatment whether mild or severe is basically the same. The earlier you treat it the better
Cover the top of the head
Do not rub or massage extremities (in case of frostbite)
Heat packs on armpits, chest, groin and neck
Insulate from below and above, starting from the ground up
Increase heat production, i.e., exercise
Note: Only exercise after the patient has an improved mental status. Ensure he has had enough food and fluids.
Remove causes, e.g., exit cold water, block the wind, remove wet layers
Warm, non-alcoholic and non-caffeinated liquid (only if patient is capable)
Immersion heating, e.g., a warm bath. Only if in a controlled environment; the possibility of after-chill may make it worse
Skin-to-skin rewarming inside of a sleeping bag (or similar) is a survival technique. The problem is that it may cause the body-temperatures of all involved to drop.
Hypothermia Packaging
Hypothermia packaging is useful when you need to transport the patient. Even if you don’t need to move the patient, it is a great way to keep him/her warm.
Ensure the patient is dry
Keep patient horizontal
Stabilize any injuries, including covering any open wounds
Sandwich the patient between layers of insulation and waterproof layers
Suggested Hypothermia Packaging
The face should be partially covered, but allow for breathing, monitoring etc.
Place a large plastic sheet on the ground
Next, place an insulated sleeping pad
On the pad place a sleeping bag (or blankets or whatever you have)
The patient goes on top of this, along with heating bottles, IV’s etc.
Fold tops and bottom over the patient, then fold the corners over
Fold the sides over, keeping wrinkles to a minimum
Strap in place

Drowning First Aid Treatment
There are 3 basic classifications of drowning: Asymptomatic, symptomatic, and respiratory or cardiopulmonary arrest.
Symptoms of Asymptomatic Drowning
The is out of the water
Alert
No respiratory distress
With or without coughing
Treatment for Asymptomatic Drowning
Watch for respiratory symptoms
If respiratory symptoms develop seek advanced medical care ASAP
Protect against and assess for hypothermia
Patients that do not worsen after 15 minutes are not likely to diminish but should still be monitored
Symptoms of Symptomatic Drowning
Patient requires resuscitation or shows signs of distress
Treatment for Symptomatic Drowning
Seek advanced medical care
Symptoms of and Treatment for Respiratory or Cardiopulmonary Arrest
DRABC
If patient is still in the water, only use rescue breathing
First Aid for Frostbite
Frostbite is the freezing of the water in the cells. The most commonly affected areas are the earlobes, nose, fingers, and toes.
Frostnip is a very mild form of frostbite. Frostnip does not do any permanent damage to the skin.
Exposure to the cold is the main cause. Constriction, dehydration, exhaustion, prior cold injuries and vasoconstrictors (coffee) are also contributing factors.
Symptoms of Frostbite
There are 3 levels of frostbite severity: Superficial, partial and severe.
Superficial Frostbite Symptoms
Cold and uncomfortable
Pink or pale complexion
Partial Thickness Frostbite Symptoms
Reduced perfusion (blood flow)
Numbness
Pale and soft
Treatment for Frostnip, Superficial and Partial Frostbite
Note: Thawing tissue and refreezing it will create more damage. Unless a stable environment is more than 24 hours away, it is best to wait.
Do not drink alcohol or smoke
Do not massage or rub affected area
Elevate extremity
General re-warming of whole body
Loosen constrictive clothing
Maintain food and water intake
Re-warm the affected body part with heat packs, skin to skin (do not rub or massage), warm water etc
When re-warming, be careful not to burn the patient as he/she may not feel it
Analgesics before re-warming
Symptoms of Full Thickness Frostbite
Numbness
Pale and hard body part
Possible ice crystals
Perfusion absent
Note: If the skin turns black it has died from a loss of circulation. It is gangrene. Amputation is usually necessary.
First Aid Treatment for Frostbite
Immersion of frozen area into 37 to 39 °C (98 to 102 °F) water
Dry dressings. Separate digits when bandaging
Analgesics before re-warming
NSAIDs for circulation
Inspired? Pin it for Later↓


Could You Save a Loved One When There are No Doctors Around?Get Your Copy of Wilderness and Travel Medicine Today
Wilderness and Travel Medicine: A Complete Wilderness Medicine and Travel Medicine Handbook (Escape, Evasion, and Survival 4)
Price Disclaimer
Conclusion
Surviving in cold water is not easy. Once you get in panic can set in fast which impairs your thinking. Stay calm and get out as fast as possible.
Once on dry land, you can concentrate on surviving cold water illnesses.
If you can’t get out of the water, using the HELP or Huddle position. This will give you the best chance to survive in cold water until rescue arrives.
Did you find this article on survival in cold water useful? If so, please share it with your friends.
The post Cold Water Survival, Rescue, and First Aid appeared first on Survival Fitness Plan.
July 6, 2018
Advanced First Aid Training Online
This online advanced first aid training is for medical emergencies. Use what you learn here in life-threatening cases and/or when you need a “quick fix”. Taking an accredited emergency first aid training course is HIGHLY recommended. It will cover more material and you can’t beat live accredited instructor.
Could You Save a Loved One When There are No Doctors Around?Get Your Copy of Wilderness and Travel Medicine Today
Wilderness and Travel Medicine: A Complete Wilderness Medicine and Travel Medicine Handbook (Escape, Evasion, and Survival 4)
Price Disclaimer
Advanced Online First Aid Training
Immediate First Aid
This is the 1st of the first aid training levels. They are practical skills for what to do in immediate, life-threatening situations. You should be able to perform these skills without having to reference a field guide or manual. In these situations, seconds count.
The main goal is to keep the patient alive until advanced medical care arrives. It is basic first aid training online.
It also includes how to perform a secondary exam. A secondary exam allows you to anticipate and prevent any further complications.
The following links will take you to the corresponding article.
DRABC (including advanced first aid CPR and AED use.)
Severe Bleeding
Anaphylaxis
Heart Attack
Pressure Immobilization Technique
Sucking Chest Wound
Complete First Aid Secondary Survey
Spinal Assessment and Stabilization
Mass Casualty Critical Assessment
Diagnosis and Treatments
What follows is the contents of the Diagnosis and Treatments section of Sam Fury’s Wilderness and Travel Medicine. These things are not part of Survival Fitness Plan training so they are not detailed on this website.
These subjects allow you to treat what you discovered during the secondary exam. You do not need to know the information “off-hand”.
If you know of a certain risk, you should memorize the necessary information. For example, if traveling at high altitudes or if bushwalking in hot temperatures.
Due to the large subject matter, I have made the top level categories collapsable. Click on the heading to see all the sub-categories. If it is not collapsed it is because your browser does not support it.
Preliminary Information
Basic Human Anatomy
Circulatory System
Digestive System
Endocrine System
Immune System
Integumentary System
Genitourinary System
Musculoskeletal System
Nervous System
Respiratory System
Prevention Medicine
Nutrition
Exercise
Recharging
Personal Hygiene
Vaccinations
Medications Guide
General Safe Use Information
Analgesics, Anti-inflammatory and Fever Reducers
Antibiotics
Anti-fungals
Antihistamines
Antiseptics
Antiviral Drugs
Hemostatic’s
High-Altitude Medications
Motion Sickness, Nausea and Vomiting
Hot Water, Rest, Placebos, and the Will to Live
Moving a Patient
Correct Lifting Technique
Drags
Carries
Improvised Litters
Improvised Sled
Other
Patient Care
Advanced First Aid Kit
Open Wounds, Skin Infections and Sepsis
Open Wounds
Impaling Objects
Skin Infection and Sepsis
Environment Induced
Allergic Reactions and Hay-fever
Allergic Reactions
Hay-Fever
Altitude Induced
General Prevention of Altitude Induced Illnesses
Acclimatizing to Altitude
Acute Mountain Sickness (AMS)
HAPE and HACE
HAFE
High-Altitude Pharyngitis and Bronchitis
Peripheral Edema
Animals: Marine
Marine Toxins
Spiny Injuries
Barracuda
Blue-Ringed Octopus
Bristle-Worm
Catfish
Conus
Coral
Jellyfish
Leeches
Moray Eel
Sea Cucumber
Sea Lion
Sea Snake
Sea Urchin
Sharks
Spine Fish
Sponges
Stingray
Weever Fish
Animals: Terrestrial
General Prevention of Animal Attack
Ant Bites
Bed Bugs
Bee/Wasp Sting
Caterpillars
Cat-Scratch Disease
Fleas
Insects: General
Lice
Head Lice
Pubic Lice
Body Lice
Mammalian Bites
Rabies
Mosquitoes
Dengue Fever
Japanese Encephalitis
Malaria
West Nile Virus
Yellow Fever
Cutaneous Myiasis
Mites and Chiggers
Chiggers
Scabies
Porcupines
Scorpions
Snakes
Spider Bite
Ticks
Lyme Disease
Rocky Mountain Spotted Fever
Tick Paralysis
Cold and/or Water-Induced
Cold-Water Immersion
Drowning
Frostbite
Hypothermia
Saltwater Sores
Trench Foot
Diving Induced
Alternobaric Vertigo
Arterial Gas Embolism
Contaminated Breathing Gas
Decompression Sickness
Inner Ear Barotrauma
Mask Squeeze
Nitrogen Narcosis
Hot Tub Folliculitis
Pulmonary Barotrauma
Sinus Squeeze
Tooth Squeeze
Heat and/or Sun Induced
General Prevention of Heat-Related Illnesses
Burns
Heat Edema
Heat Exhaustion
Heat Rash
Heat Stroke
Heat Syncope
Hyponatremia
Other
Carbon Monoxide Poisoning
Jet Lag
Lightning
Radiation Sickness
Smoke Inhalation
Toxic Plants
Head
Brain
Acute Stress Reaction
Epidural Hematoma
Headaches and Migraines
Dehydration Headache
Sinus Headache
Tension Headaches
Migraines
Increasing Intracranial Pressure
Insomnia
Meningitis
Seizure
Stroke
Traumatic Brain Injury
Ears
Ear Infections
External Otitis
Otitis Media
Ear Wax
Foreign Bodies in the Ear
Perforated Eardrum
Eyes
Eye Patching
Foreign Bodies in the Eye
Corneal Abrasion
Acute Angle-Closure Glaucoma
Conjunctivitis
Corneal Erosion
Corneal Ulcer
Displaced Contact Lens
Giant Cell Arteritis
Hyphema
Impaling Object in the Eye
Solar/Ultraviolet Keratitis
Stye
Mouth and Teeth
For Any Dental Procedure:
Toothache
Dental Extraction
Avulsion
Dry Socket
Aphthous Ulcers
Broken or Chipped Tooth
Cold Sores
Condensing Osteitis
Dental Abscess
Fractured Tooth
Gingivitis and Gum Disease
Lost Filling
Luxation
Mandibular Dislocation
Myofascial Dysfunction/Pain
Thrush
Tonsillitis
Nose
Broken Nose
Foreign Body in the Nose
Nosebleed
Raw Nose
Sinusitis
Circulatory System
Dehydration and Volume Shock
Dehydration
Volume Shock
Rehydration Plan
Diabetic Related Illnesses
Hypoglycemia
Hyperglycemia
Other
Fainting
Internal Bleeding
Digestive System
Alcohol Related Illnesses
Alcohol Poisoning
Hangovers
Diarrhea and Dysentery
Diarrhea
More Serious than Diarrhea
Dysentery
Salmonella, Typhoid Fever and Paratyphoid Fever
Salmonellosis
Typhoid/Paratyphoid Fever
Other
Abdominal Pain
Appendicitis
Constipation
Diverticulitis
Food Poisoning
Gas
Heartburn
Hemorrhoids
Hepatitis
Nausea and Vomiting
Peptic Ulcer
Worms
Genitourinary System
Pregnancy
Delivery
Pregnancy Complications
Hyperemesis Gravidarum
Miscarriage
Pregnancy-Induced Hypertension
Sexually Transmitted Infections
Chlamydia
Genital Herpes
Gonorrhea
Pelvic Inflammatory Disease
Yeast Infection
Vaginal Yeast Infection
Bacterial Vaginosis
Other
Kidney Infection
Kidney Stones
Prostatitis
Tubal Pregnancy
Urinary Tract Infections
Integumentary System
Nail Injuries
Nail Avulsion
Crush Injuries
Other
Abscesses
Acne
Blisters and Hot Spots
Bruises
Chickenpox
Eczema
Ingrown Toenail
Shingles
Splinters and Fishhooks
Tinea/Ringworm and Athlete’s Foot
Musculoskeletal System
Musculoskeletal Injuries in General
RICES
Impaired CSM
Immobilization
Collars
Mobility Aids
Slings
Splints
Taping
Dislocations
Reduction
Shoulder Reduction
Patella Reduction
Digit Reduction
Ankle Reduction
Elbow Reduction
Wrist Reduction
Hip Reduction
Fractures
Fractured Ribs
Flail Chest
Fractured Pelvis
Sprains and Strains
Sprains
Strains
Amputations
When to Amputate
Where to Amputate
Amputation Procedure
Other
Backache
Pneumothorax
Tetanus
Respiratory System
Asthma
Bronchitis
Cold and Flu
Dry Cough
Pneumonia
Sore Throat
Strep Throat
Whooping Cough
Inspired? Pin it for Later↓


This is the Only First Aid Book You Will Ever NeedGet Your Copy of Wilderness and Travel Medicine Today
Wilderness and Travel Medicine: A Complete Wilderness Medicine and Travel Medicine Handbook (Escape, Evasion, and Survival 4)
Price Disclaimer
This online wilderness advanced first aid course only covers a small part of Sam Fury’s book. But it covers the most important parts. The links in the Immediate First Aid section are what will save you and your loved one’s lives.
I want to repeat my earlier advice of taking a live first aid class. All the reading in the world can not compare to professional training. I hope you use the first aid articles on this website as a reference, not an actual training tool.
Did you find this advanced first aid training useful? If so, please share it with your friends.
The post Advanced First Aid Training Online appeared first on Survival Fitness Plan.


