
Sam Fury's Blog, page 27
March 30, 2018
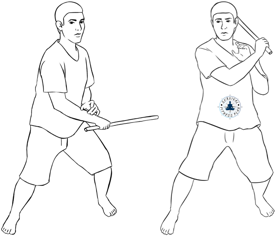
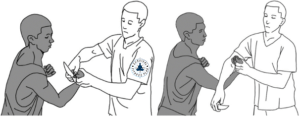
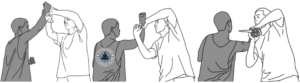
Stick Combat Cutting Strikes
Learn 3 stick combat cutting strikes used in Vortex Control Self-Defense. They stem from Kali stick fighting and Escrima stick fighting. Both of these are Filipino stick fighting martial arts. Cutting strikes are stick fighting techniques that you follow through on. Like a slash with a sword. This is as opposed to stopping or bouncing off when you make contact. The strikes in this post include the backhand to the head, forehand to the knee, and the backhand to the knee.
The information in this post is from the book “Vortex Control Self-Defense Bundle” by Sam Fury.
GET YOUR FREE SFP SELF DEFENSE TRAINING SCHEDULE
Pin and Share it!


Stick Combat Cutting Strikes
When practicing these Philipino stick fighting strikes, stand a little wider than shoulder width. Lead with your strong side and have your body at 45° to your target. Point your feet toward your enemy.
Practice using circular forces. Roll your strikes using your waist. The power and majority of movement come from body motion, not your arm.
Using your arm and wrist lacks power. It is good for the sport to get fast points but not very effective on the street. Big hits end fights.
These strikes are short range. Do not extend your arm too much. You may get more distance but it loses power at your shoulder. It will also make it easier for your opponent to manipulate/grab your stick and/or arm.
Aim to hit your target with the top couple of inches of your stick. The strikes go through your opponent in a cutting motion.
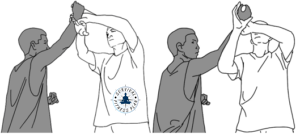
Backhand to the Head
Start with the stick on your left side to the top of your left shoulder. Strike diagonal and down across your body to your bottom right.

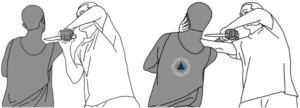
Forehand to Knee
Bring the stick up to shoulder height and squat down to lower your body. Strike down at your opponent’s knee.

Backhand to Knee
Raise the stick up to your left shoulder. Stay low.
Do a backhand strike to your opponent’s knee.

You can learn other single stick fighting strikes in the following posts:
King strike and thrust
Queen strike and but strikes (coming soon)
GET YOUR FREE SFP SELF DEFENSE TRAINING SCHEDULE
Photo Credit: Matt Cloutier via Flickr.com
If you have any questions or comments about stick combat cutting strikes feel free to leave a comment below. And don’t forget to share this article with your friends!
The post Stick Combat Cutting Strikes appeared first on Survival Fitness Plan.


March 28, 2018
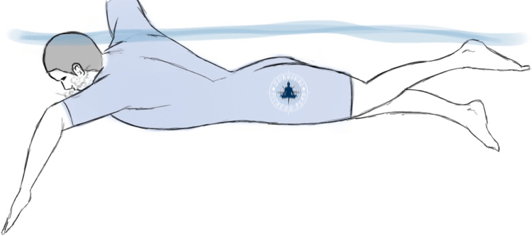
Breath Hold Training – Learn to Swim 50+ Meters Underwater: Part 1
How long can you hold your breath? The average human can hold their breath for about 2 minutes. With this breath hold training, you will be able to do it for 5+ minutes. This training focuses on how to hold your breath longer underwater. In the Survival Fitness Plan, you combine it with an efficient swimming stroke. Your aim is to swim 50+ meters underwater.
The information in this post is from the book “Swim Workouts and Water Rescue Skills” by Sam Fury.
GET YOUR FREE SWIM WORKOUTS TRAINING SCHEDULE
Pin and Share it!


Breath Hold Training
Important! Breath holding training is dangerous! Read, understand, and follow the safety guidelines.
This post is stages 1, 2, and 3 of long-distance underwater swimming training. It will teach you how to hold your breath longer. Start with increasing your current breath holding ability. You then advance to static apnea training. Static apnea training is what free-divers use to increase their lung capacity.
READ THE SAFETY GUIDELINES HERE
Stage One – Dry Land Breath Holding
Practice holding your breath for longer periods of time while on dry land.
In the Survival Fitness Plan, we use minimal preparation for breath holding. This is so you know how far you can get in emergency situations. Breathe in, breathe out, breathe in, then go.
Take these breaths slowly from deep within your diaphragm. This is to rid your lungs of low-quality air (CO2).
Tip: You know you’re using correct breathing if your belly is moving up and down rather than your shoulders. When your chest and shoulders move it means you’re breathing with only the top part of your lungs. This deep breathing is also useful for recovery after a workout.
Here are more detailed instructions for the inhale, exhale, inhale, sequence.
Whilst doing the following, relax your muscles and remain as still and as calm as possible. This includes not “clock watching” which will make you anxious. The more relaxed and still you are, the less oxygen your body will consume.
Breathe in for a count of 5 seconds, hold it for 1 second, then breathe out for a count of 10 seconds.
When exhaling, push out every last drop of air, and push your tongue up against your teeth. This forms a valve which helps to control the release of air. Your breath should make a hissing sound as you exhale.
Inhale slowly to about 80-85% capacity. Start at the bottom near your diaphragm, then up into your sternum, and finally into your chest.
Hold your breath for as long as you can, and when you first start to feel the need to breathe, swallow a little spit. This helps to relax your breathing reflex.
When you need to breathe out, let out little puffs of air at a time.
When you’re finished, push out as much air as possible to get rid of any extra carbon dioxide.
Don’t try this sequence again until you get your body back to normal oxygen levels. Breathe steadily for at least 5 minutes and don’t do it more than 3 times in a single session. Only do one session a day.
After a few practice sessions try adding in slow movements, such as walking. This will prepare your body to dive and swim with less air.
Stage Two – Static Underwater Breath Holding
Stage two is the same as stage one, but underwater. The point of this stage is to get you comfortable holding your breath underwater.
Inhale, exhale fully, inhale to 80% capacity, then hold and submerge.
Keep your mouth and nose closed while underwater. Use your fingers to hold your nose shut if you need.
Stay relaxed, and once you are near your limit, resurface. Blow out any extra air as you rise so that you can take a fresh breath immediately.
Stage Three – Static Apnea Training
In this stage, you will use static apnea training. This conditions your lungs and body to withstand the effects of prolonged breath-holding.
This stage is ongoing. You can move on to stage 4 while doing it.
IMPORTANT: This is a dry land activity. DO NOT try it underwater!
There are two separate programs for static apnea training. One conditions your CO2 tolerance. The other increases the amount of oxygen your lungs can store.
Each program has its own training table. The recovery stage is when you can breathe — breath normal for the allocated time. During the breath hold stage, hold your breath for the allocated time.
Only start O2 tolerance training once you can hold your breath for at least 90 seconds.
You can do both CO2 and O2 sessions on the same day, but do not do them immediately after one another. Do one in the morning and one at night.
Do not do more than one training session of each per day.
CO2 Tolerance
CO2 tolerance training consists of a series of alternating breath-holds and rest periods. Your breathing time gets less and less while your breath holding stays the same.
Start off with a breath-hold period that you’re comfortable with. 50-70% of your capability is good. Add 5 or 10 seconds each day.
This table represents one training session, i.e., you recover and breath hold 8 times. Use the same breath hold time for each one. In your next training session (the following day), you increase your breath hold time by 5 or 10 seconds.

O2 Tolerance
In O2 tolerance training, your recovery period stays the same. Instead, you increase your breath holding.
Only start O2 tolerance training once you can hold your breath for at least 90 seconds.
This table represents one training session.

Additional Ways to Increase your Breath Holding Ability
There are some other things you can do to increase your breath holding ability:
Exercise often.
Lose weight (if you are overweight).
Learn to play a wind or brass instrument.
Take up singing.
Don’t do drugs, especially smoking!
Body Response Information
Important! This is for informational purposes. DO NOT practice/experiment with it.
When you hold your breath for an extended period of time your body goes through three response stages.
Convulsions. When you first get an urge to take a breath and you don’t, you will have convulsions in your diaphragm. You can learn to fight through this, and if you do then you will gain a couple of minutes before you need to breathe.
Spleen Release. If you fight through the convulsions your spleen responds by releasing oxygen-rich blood. Your body will calm down and you will get a surge of energy. Use this energy to get somewhere that you can breathe!
Blackout. If you do not find fresh oxygen you will black out, and if you are underwater at the time you will drown.
GET YOUR FREE SWIM WORKOUTS TRAINING SCHEDULE
If you have any questions or comments about this breath hold training feel free to leave a comment below. And don’t forget to share this article with your friends!
The post Breath Hold Training – Learn to Swim 50+ Meters Underwater: Part 1 appeared first on Survival Fitness Plan.
Breath Hold Training – Learn to Swim 50+ Meters Underwater
How long can you hold your breath? The average human can hold their breath for about 2 minutes. With this breath hold training, you will be able to do it for 5+ minutes. This training focuses on how to hold your breath longer underwater. In the Survival Fitness Plan, you combine it with an efficient swimming stroke. Your aim is to swim 50+ meters underwater.
The information in this post is from the book “Swim Workouts and Water Rescue Skills” by Sam Fury.
GET YOUR FREE SWIM WORKOUTS TRAINING SCHEDULE
Pin and Share it!
Breath Hold Training
Important! Breath holding training is dangerous! Read, understand, and follow the safety guidelines.
This post is stages 1, 2, and 3 of long-distance underwater swimming training. It will teach you how to hold your breath longer. Start with increasing your current breath holding ability. You then advance to static apnea training. Static apnea training is what free-divers use to increase their lung capacity.
READ THE SAFETY GUIDELINES HERE
Stage One – Dry Land Breath Holding
Practice holding your breath for longer periods of time while on dry land.
In the Survival Fitness Plan, we use minimal preparation for breath holding. This is so you know how far you can get in emergency situations. Breathe in, breathe out, breathe in, then go.
Take these breaths slowly from deep within your diaphragm. This is to rid your lungs of low-quality air (CO2).
Tip: You know you’re using correct breathing if your belly is moving up and down rather than your shoulders. When your chest and shoulders move it means you’re breathing with only the top part of your lungs. This deep breathing is also useful for recovery after a workout.
Here are more detailed instructions for the inhale, exhale, inhale, sequence.
Whilst doing the following, relax your muscles and remain as still and as calm as possible. This includes not “clock watching” which will make you anxious. The more relaxed and still you are, the less oxygen your body will consume.
Breathe in for a count of 5 seconds, hold it for 1 second, then breathe out for a count of 10 seconds.
When exhaling, push out every last drop of air, and push your tongue up against your teeth. This forms a valve which helps to control the release of air. Your breath should make a hissing sound as you exhale.
Inhale slowly to about 80-85% capacity. Start at the bottom near your diaphragm, then up into your sternum, and finally into your chest.
Hold your breath for as long as you can, and when you first start to feel the need to breathe, swallow a little spit. This helps to relax your breathing reflex.
When you need to breathe out, let out little puffs of air at a time.
When you’re finished, push out as much air as possible to get rid of any extra carbon dioxide.
Don’t try this sequence again until you get your body back to normal oxygen levels. Breathe steadily for at least 5 minutes and don’t do it more than 3 times in a single session. Only do one session a day.
After a few practice sessions try adding in slow movements, such as walking. This will prepare your body to dive and swim with less air.
Stage Two – Static Underwater Breath Holding
Stage two is the same as stage one, but underwater. The point of this stage is to get you comfortable holding your breath underwater.
Inhale, exhale fully, inhale to 80% capacity, then hold and submerge.
Keep your mouth and nose closed while underwater. Use your fingers to hold your nose shut if you need.
Stay relaxed, and once you are near your limit, resurface. Blow out any extra air as you rise so that you can take a fresh breath immediately.
Stage Three – Static Apnea Training
In this stage, you will use static apnea training. This conditions your lungs and body to withstand the effects of prolonged breath-holding.
This stage is ongoing. You can move on to stage 4 while doing it.
IMPORTANT: This is a dry land activity. DO NOT try it underwater!
There are two separate programs for static apnea training. One conditions your CO2 tolerance. The other increases the amount of oxygen your lungs can store.
Each program has its own training table. The recovery stage is when you can breathe — breath normal for the allocated time. During the breath hold stage, hold your breath for the allocated time.
Only start O2 tolerance training once you can hold your breath for at least 90 seconds.
You can do both CO2 and O2 sessions on the same day, but do not do them immediately after one another. Do one in the morning and one at night.
Do not do more than one training session of each per day.
CO2 Tolerance
CO2 tolerance training consists of a series of alternating breath-holds and rest periods. Your breathing time gets less and less while your breath holding stays the same.
Start off with a breath-hold period that you’re comfortable with. 50-70% of your capability is good. Add 5 or 10 seconds each day.
This table represents one training session, i.e., you recover and breath hold 8 times. Use the same breath hold time for each one. In your next training session (the following day), you increase your breath hold time by 5 or 10 seconds.
O2 Tolerance
In O2 tolerance training, your recovery period stays the same. Instead, you increase your breath holding.
Only start O2 tolerance training once you can hold your breath for at least 90 seconds.
This table represents one training session.
Additional Ways to Increase your Breath Holding Ability
There are some other things you can do to increase your breath holding ability:
Exercise often.
Lose weight (if you are overweight).
Learn to play a wind or brass instrument.
Take up singing.
Don’t do drugs, especially smoking!
Body Response Information
Important! This is for informational purposes. DO NOT practice/experiment with it.
When you hold your breath for an extended period of time your body goes through three response stages.
Convulsions. When you first get an urge to take a breath and you don’t, you will have convulsions in your diaphragm. You can learn to fight through this, and if you do then you will gain a couple of minutes before you need to breathe.
Spleen Release. If you fight through the convulsions your spleen responds by releasing oxygen-rich blood. Your body will calm down and you will get a surge of energy. Use this energy to get somewhere that you can breathe!
Blackout. If you do not find fresh oxygen you will black out, and if you are underwater at the time you will drown.
GET YOUR FREE SWIM WORKOUTS TRAINING SCHEDULE
If you have any questions or comments about this breath hold training feel free to leave a comment below. And don’t forget to share this article with your friends!
The post Breath Hold Training – Learn to Swim 50+ Meters Underwater appeared first on Survival Fitness Plan.
March 20, 2018
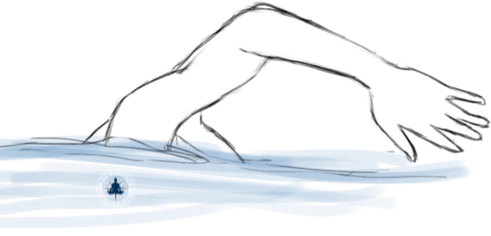
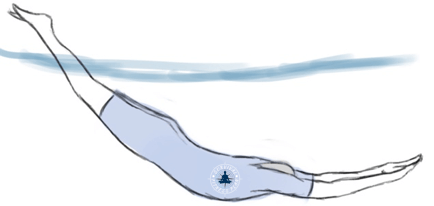
How to do Combat Side Stroke
Learn how to do Combat Side Stroke. The Navy Seals developed the Combat Side Stroke (CSS) as a stealth and efficient way of swimming long-distance. It is a mix of freestyle, breaststroke, and sidestroke.
The information in this post is from the book “Swim Workouts and Water Rescue Skills” by Sam Fury.
GET YOUR FREE SWIM WORKOUTS TRAINING SCHEDULE
Pin This for Later!


How to do Combat Side Stroke
There are 4 basic stages to the CSS. The streamline position, two catch and pull movements, and the recovery. The recovery involves a scissor kick paired with a breaststroke-like arm movement.
Note: A lot of the terminology used in this chapter is explained in the freestyle section.
Streamline Position
Get some initial propulsion and adopt the streamline position.

First Catch and Pull
Do your first catch by pressing the palm of your top hand down. If you are rolling to your right then your right hand is/will be on top. Bend your arm at the elbow.
Ensure to keep your arm aligned at a downward angle. Your shoulder is at the top, your elbow below that, then your wrist, and finally your fingers at the bottom. Doing this will maximize your first pull.

Continue the catch as you rotate onto your side. Your forearm is vertical, elbow above your wrist.
Stay on your side until your recovery stage.

Flow into the pull by continuing the movement of your top arm until your hand is in line with your upper thigh. Your hand follows your midline. Be careful not to raise your elbow too high.
At this stage, your arm is almost fully extended. Do not let your hand come out of the water.
Now is a good time to take a breath. When you exhale, do so in a slow and steady manner.

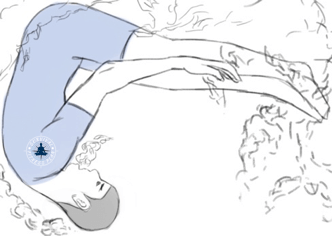
Second Catch and Pull
Start your second catch and pull with your other arm by sweeping it down. Your palm faces down and stays fixed in that position. As you sweep down it creates resistance against the water, propelling you forward.

When your arm is vertical, your palm will be facing to your rear.

Continue the arc of your bottom arm until your hand is on your thigh.
The catch, pull, and recovery of your lower arm is almost identical to a breaststroke motion.
Note: As you do the second pull you can either leave your head up breathing or look back down. If you have a tendency to sink you are better off looking back down.
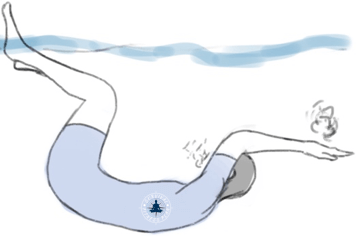
Recovery
Start the recovery with a simultaneous scissor kick and arm movement.
Bring both your arms up through the center-line of your body. They then travel back into the streamline position, like breaststroke. Keep your arms and hands underwater and as close to your body as possible.

Continue your arms forward past your face as you do the scissor kick. Finish in the streamlined position.
Scissor Kick
Do the scissor kick as you bring your arms forward. This helps with propulsion and corkscrew’s your body back into the streamline position.
Move your top leg forward and your bottom leg backward at the same time. Bring them back together in the streamlined position. Keep your toes flexed towards your shin until you adopt the streamlined position.
Draw your top knee up so there is a 90º angle at your hip and knee. At the same time, bend your bottom leg back at the knee.
Extend the lower part of your top leg in front of your torso as you kick your bottom leg back.
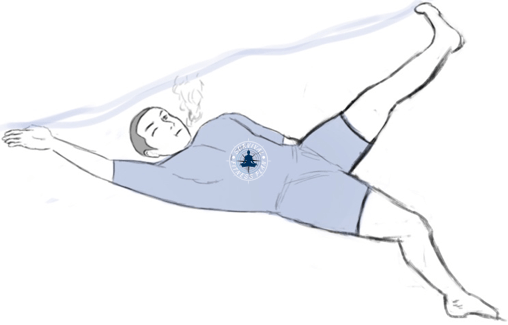
Point your toes once you have extended your legs, then draw them into the streamline position.

Slowly exhale as you glide in the streamline position. Be sure to get the most out of the glide before starting the next arm cycle.
If speed is more important you can flutter kick before initiating your first pull again. You could also use the sprinter’s CSS.
Sprinter’s CSS
Use the sprinter’s CSS when you need to go faster. The tradeoff is that you will use more energy since will use a greater stroke count over the same distance.
To do the sprinter’s CSS do a half stroke on your second pull. Everything else stays the same.
From the start of the second pull, bring your arm down as normal until it is almost at a right angle to your body.
Instead of pulling it all the way to your thigh, scoop it up into your armpit.
From here, push it forward into a full extension as normal.
Guide Stroke
Use the guide stroke to check your direction when using the CSS to swim a long distance.
It uses a breaststroke-type movement for your arms and the dolphin kick for your legs.
Start in the streamline position. Push your palms out against the water to a position a little wider than your shoulders.
LEARN THE DOLPHIN KICK

Press your palms against the water as you rotate your hands and lower arms into a vertical position. Your finger-tips point down and your palms angle toward your chest.
Pull your palms towards your chest. This creates forward propulsion and allows you to raise your head above the surface. Now you can breathe and look around.
Try not to lift your head too far out of the water. This will cause your hips and legs to sink, which will decrease your momentum.
LEARN HOW TO TREAD WATER
Recover your arms back to the streamline position as you would with breast-stroke. Keep them close to your body along your centerline.
As you recover your arms, use the downward motion of the dolphin kick. This helps with propulsion back into the streamline position. From here you can continue into CSS or another guide stroke.
Note: For more instruction on the dolphin kick, see the underwater fly-kick section.
If you get disorientated, tread water until you figure out which direction you need to swim in.
GET YOUR FREE SWIM WORKOUTS TRAINING SCHEDULE
Photo Credit: By Cpl. Christina Oneil (https://www.dvidshub.net/image/1254958) [Public domain], via Wikimedia Commons
Did you find this article about how to do the combat side stroke useful? If so, please share it and/or leave a comment below.
The post How to do Combat Side Stroke appeared first on Survival Fitness Plan.
March 16, 2018
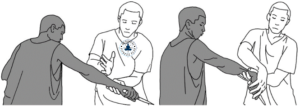
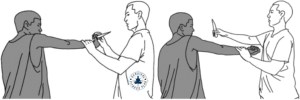
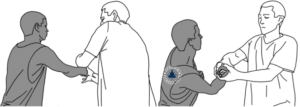
Group A Knife Defense Techniques
Group A knife defense techniques take the knife away from your attacker. They all follow a similar pattern.
Block/Grab.
Hand/thumb grab.
Create a “tap” (or twist the limb).
Disarm your opponent.
The information in this post is from the book “Vortex Control Self-Defense Bundle” by Sam Fury.
GET YOUR FREE SFP SELF DEFENSE TRAINING SCHEDULE
Pin This for Later!


Group A Knife Defense Techniques
These knife defense techniques are part of Vortex Control Self-Defense. Some modified versions of them are also used in SFPSD Weapons Disarms Training.
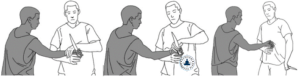
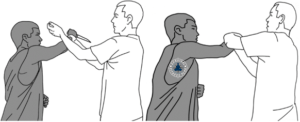
A1
Your opponent attacks with a right downward stab. Step in and block with your right using bong sau. At almost the same time, grab your opponent’s wrist using an underhand grip.
Without losing contact with your opponent’s arm, use your right hand to grab his right hand. Grab the thumb as much as you can.
As you do this turn your body so you are facing to your left.
LEARN MORE ABOUT SFPSD WEAPON DISARMS
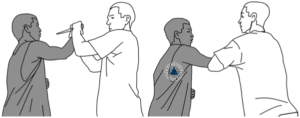
Bring your opponent’s arm hard against your torso at about the height of your solar plexus. If you haven’t already, get a good grip on his thumb with your right hand.
Use your left hand to pry the knife out of your opponent’s grip.
A2
Your opponent attacks with a left downward stab. Block with your left using a chop. Your right grabs your opponent’s wrist using an underhand grip.
Use your left hand to grab your opponent’s hand. Grab the thumb as much as you can.
As you turn to your left draw your elbows into your body and bring your opponent’s hand close to your chest.
Use your right hand to grab the knife and pry it out of your opponent’s hand.
A3
Your opponent attacks with a right straight thrust. Defend with a right chop and left underhand grab.
Use your left hand to grab your opponent’s hand and bend his wrist down.
Without letting go of your hands, turn to your right so you are facing your opponent. This “untwists” you and leaves your opponent’s elbow and hand facing up.
Pry the knife toward your opponent to disarm him.
A4
Your opponent attacks with a left straight thrust. Chop block with your left hand and use an underhand grip with your right.
Use your left hand to grab your opponent’s thumb and then bring his hand up vertical.
Bend your opponent’s hand to the outside of his guard into a wrist lock and then use your left hand to pry the knife out.
GET YOUR FREE SFP SELF DEFENSE TRAINING SCHEDULE
Photo Credit: Staff Sgt. Christopher Ruano. Cropped.
Got anything you want to say about Group A knife defense techniques? Feel free to leave any questions and/or comments below.
The post Group A Knife Defense Techniques appeared first on Survival Fitness Plan.
March 13, 2018
How to do Survival Backstroke
Learn how to do survival backstroke for swimming long distance in a survival situation. Survival backstroke is floating on your back as you propel through the water. You use a simultaneous frog/breaststroke kick and a sculling motion with your hands. Your arms and legs move and come together at the same time.
The information in this post is from the book “Swim Workouts and Water Rescue Skills” by Sam Fury. Available on Amazon.com in Kindle and Print. Get your copy today!
Pin This for Later!


How to do Survival Backstroke
The main goal of the survival backstroke is to conserve energy and reduce heat loss.
To maximize energy conservation, do the survival backstroke very slow. Take short strokes and glide for as long as possible. Only take the next stroke when you feel your legs dropping or you loose forward momentum.

Taking short strokes minimizes heat loss from under your armpits and between your legs. Your arms should not extend beyond your shoulders. Also, at the end of each stroke, bring your arms and legs together. Hold them close but comfortable against your body.

Also use the survival backstroke is if an underwater explosion is likely. You will want to go faster so you can escape the blast, so make your strokes larger. Take your next stroke sooner than normal, but not too soon. Make the most out of your streamlined glide position while achieving the most speed.

GET YOUR FREE SWIM WORKOUTS TRAINING SCHEDULE
Photo Credit: Lance Cpl. Caleb McDonald.
Got anything you want to say about how to do survival backstroke? Feel free to leave any questions and/or comments below.
The post How to do Survival Backstroke appeared first on Survival Fitness Plan.
March 9, 2018
The Fastest Way to Swim Above Water
Learn the fastest way to swim above water. Freestyle (overarm) is the fastest way to surface swim. By improving your technique you will become faster and more energy efficient.
There are a few different areas which you can “tweak”. Practice in each individual area, and then put them all together when you are ready.
The information in this post is from the book “Swim Workouts and Water Rescue Skills” by Sam Fury.
GET YOUR FREE SWIM WORKOUTS TRAINING SCHEDULE
Pin This for Later!


The Fastest Way to Swim Above Water
Balance
Being balanced in the water will make you more streamlined and so will increase your speed.
Maintain a position that is as horizontal as possible.
Except when taking a breath, keep your head down and your neck relaxed. Imagine you have a blowhole in the back of your neck that you have to keep open. Looking down (as opposed to forwards) will also help.

Breathing
Breathing while swimming (as opposed to holding your breath under-water) increases your stamina. Start blowing out as soon as you finish inhaling and continue to do so until you take your next breath.
Experiment with breathing rhythms (e.g. take a breath every 3rd or 5th stroke) to see what works best for you. It may help to count your arm strokes (e.g., 1, 2, 3, 4, breathe) or whatever method you prefer.
It is important to completely exhale before taking your next breath so that you get rid of all the stale air. This increases your stamina and keeps you streamlined for longer. Every time you breathe you are breaking your streamlined position.
Keep as close as possible to your streamlined position while breathing. Do this by turning your head as opposed to lifting it out of the water. Your mouth only needs to be a little bit out of the water to inhale. Your eye line should be no higher than to the side. If you’re looking to the sky, you are turning your head way too much.

Breathing on alternate sides of your body (bilaterally) is a good habit.
Always inhale through your mouth, but try to exhale most of the air through your nose. This is especially true when turning/flipping to avoid getting water up your nose.
Rolling
Roll from side to side with each arm stroke. This will engage your back muscles and improve propulsion.
Engage your core as you do it.


Rolling Drills
This drill is good for getting used to floating on your sides.
Float flat on your back and do a light flutter kick for propulsion. Keep your body straight with your arms at your sides. Apply downward pressure on the back of your head and on your shoulder blades so that your hips and legs buoy up.

Once you feel balanced in this position, do the following:
Roll onto your side so that your top arm and some of your top thigh clear the water.
Your head does not move while you roll on your side. Keep looking at the sky and roll your body as one.
Continue to flutter kick.

Roll as far as you are comfortable. A 45° body roll is good for most people.
Practice this on both sides of your body.
Once you are comfortable with the above, advance by rolling to 90° so you face down.

Keep flutter kicking and keep balanced. Continue to roll in the same direction until you are in the 45° body position, but on your opposite side.
Remember to roll your whole body together. Don’t lead with your head.
When balanced, roll back the other way.
Arm Technique
The freestyle stroke is explained in four parts. The catch, pull, exit, and recovery. These four stages occur and repeat in the order listed.
There is a more advanced arm stroke known as the Early Vertical Forearm Position (EVF). It is harder to master, holds a greater risk of injury, and the gain in speed is minimal. It is more for elite competitive swimmers.
The following technique is like a non-extreme EVF.
Catch
The catch is when your hand first enters the water.
Create a “web” with your hand by spacing your fingers apart a little, about 30% of the diameter of one finger. Keep this spacing for the whole time.
As you roll your body, lengthen your arm out with your palm faced down. Angle your fingertips a little downward and flex your wrist. Point your middle finger in your direction of travel.
Enter your hand into the water fingertips first. Ensure your arm/hand does not cross your centerline.

Once your hand is in the water, bend your elbow and press back on the water. Your forearm is in a near-vertical position.
Do not push forward once your hand is in the water. It is better to go straight into the pull phase of the stroke.
It may help to imagine your arm is moving over a big ball.
You can use finger paddles to help you perfect your catch. Wear them loose. If you over-reach or have some other bad technique, the finger paddle will come off.
Another thing you can do is use a kick-board. Focus on a good catch with only one arm. The kickboard will prevent you reaching forward.
Pull
The pull is the movement of your arm in the water down the length of your body.
After doing a good catch your elbow will be in the “high” position. Your elbow faces the sky and your palm faces to your rear. Keep this high elbow as you push the water behind you.

A good catch and pull is an easy, flowing feeling. You get great forward propulsion utilizing your pecs and lats.
Exit
This phase of your stroke is when your arm/hand leaves the water, just past your hip.
It is important not to be too eager to bring your arm out of the water. Push beyond your hip as if you are trying to reach your knee, using the same press-up motion you would when exiting a pool on the wall.
Do this push for the whole range of your pull, and as your thumb touches your thigh, flick the water out.

Recovery
The recovery is the time when your arm is in the air. It flicks out of the exit and then re-enters into the catch.
It is best not to think about your recovery. Let it take its natural path. Your mental effort is better spent focusing on a great catch.
You can use stretch cords to practice all phases of your stroke on dry land. It is also useful for focusing on problem areas.
Efficient Kicking
A good kick is a compact one. It shouldn’t be too low nor break the water’s surface. Do not disturb your natural body alignment.
Move your feet/legs independently of each other. Push one down as you pull the other up. Putting energy into both the up and down strokes is important.
Use short, quick kicks with your whole leg, starting at the hip. Keep your legs long and straight, but not rigid. Have a slight, natural bend in your knees.
Point your toes behind you but keep your ankles relaxed. Only the bottom of your feet meet the water’s surface.
Find a rhythm that is comfortable and stick with it. Around 15 kicks every 10 seconds is good.

Vertical Kicking Drill
This vertical kicking drill will help to improve your flutter kick. It is also good for your dolphin kick.
Do this drill in deep water, but make sure you are near something you can hold onto when you get tired.
Be vertical in the water and do nothing but flutter kicking to keep your mouth and nose above the surface. You will be kicking hard. Concentrate on correct kicking technique as described before.
Begin with your arms underwater and use a small sculling motion.
As you improve, try keeping your arms and hands tight against your body.
LEARN THE DOLPHIN KICK

Advance further by raising your fingertips out of the water. Raise your arms higher and higher as you gain strength.
Transitioning from the Fly Kick to Freestyle
As you begin to surface begin to flutter kick and start to pull one of your arms down from the streamline position. Time the completion of your pull phase so that you arm exits the water as if you were doing freestyle all along. This takes practice.
Complete a few strokes before taking a breath and then continue into freestyle as normal.
GET YOUR FREE SWIM WORKOUTS TRAINING SCHEDULE
Got anything you want to say about the fastest way to swim above water? Feel free to leave any questions and/or comments below.
The post The Fastest Way to Swim Above Water appeared first on Survival Fitness Plan.
Related posts:
How to Tread Water for Survival
Fast Water Entry Techniques
The Fastest Way to Swim Underwater
March 6, 2018
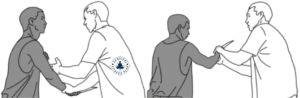
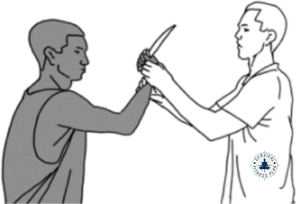
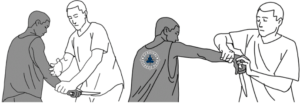
Self-Kill Knife Defense Techniques
Self-kill knife defense techniques are when you use the attacker’s knife against himself. The knife will still be in his hand. In this way, you can tell the authorities that you never even touched the knife. He pulled it out on you, there was a messy struggle, and he ended up getting hurt. The label self-kill does not mean you have to kill your opponent. A shallow stab in a superficial area will be enough to finish most confrontations.
The information in this post is from the book “Vortex Control Self-Defense Bundle” by Sam Fury.
GET YOUR FREE SFP SELF-DEFENSE TRAINING SCHEDULE
Pin This for Later!


Self-Kill Knife Defense Techniques
These knife defense techniques are part of Vortex Control Self-Defense. Some modified versions of them are also used in SFPSD Weapons Disarms Training.
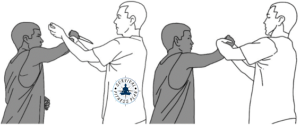
Self-Kill 1
Your opponent attacks with a right downward stab. Defend using a right bong sau and left underhand grab.
Use your right hand to grab your opponent’s right wrist with an underhand grip. Your left hand helps by bending your opponent’s right upper arm to the outside of his guard.
Once you have a good grip with your right hand place your left hand over your opponent’s hand. This prevents him from letting go of the knife.
Drive the knife into your opponent’s neck. If needed you can grab the other side of your opponent’s neck and pull it into the knife.
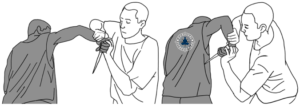
Self-Kill 2
Your opponent attacks with a left downward stab. Defend using a left chop and right underhand grab.
Use your left hand to grab over your opponent’s right hand using an overhand grip so that he cannot let go of the knife.
Once you have a good grip, turn the knife towards your opponent and stab him with it.
You can also use your left elbow to apply quick pressure to your opponent’s right elbow. This can be a break and/or to “soften” up his arm.
LEARN KNIFE DEFENSE BREAK TECHNIQUES
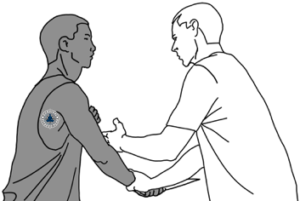
Self-Kill 3
Your opponent attacks with a right straight thrust. Defend using a right chop and left overhand grab.
Use your right hand to grab hold of your opponent’s wrist and then move your left hand over his hand. Bend your opponent’s wrist down.
Pull up on your opponent’s wrist whilst pushing his hand down and towards his side.
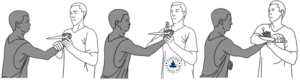
Self-Kill 4
Your opponent attacks with a left straight thrust. Defend using a left chop and right underhand grip.
Grab your opponent’s hand with your left hand using an overhand grip. Once you have a good grip move your right hand over the same hand. Your two hands ensure your opponent can not let go of the knife.
Pull your opponent’s arm to the outside of your right shoulder and then fold his wrist back towards him. This will cause your opponent’s arm to bend so you can slash or stab him.
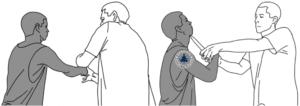
You could also go into a wrist lock.
GET YOUR FREE SFP SELF DEFENSE TRAINING SCHEDULE
Photo Credit: Preston Webb. Cropped.
Got anything you want to say about these self-kill knife defense techniques? Feel free to leave any questions and/or comments below.
The post Self-Kill Knife Defense Techniques appeared first on Survival Fitness Plan.
Related posts:
Weapon Defense Overview
Knife Defense Knife Stepping Drills
Group D Knife Defense Techniques
March 2, 2018
The Fastest Way to Swim Underwater
The fastest way to swim underwater is using the underwater fly- kick. When you know how to do it, swimming underwater is faster than swimming on the surface of it. When you want to go fast, swim underwater for as long as you can.
The information in this post is from the book “Swim Workouts and Water Rescue Skills” by Sam Fury.
GET YOUR FREE SWIM WORKOUTS TRAINING SCHEDULE
Pin This for Later!


The Fastest Way to Swim Underwater
There are two main ways to do the underwater fly-kick. The dolphin kick and the fish kick.
If you are good at it, the fish kick is faster than the dolphin kick, but in the SFP we focus on the dolphin kick because it is:
Easier to master.
Easier to control, especially in open water.
Used in other SFP Swim Workout Training strokes.
Once you have the standard dolphin kick mastered, you may wish to progress to the fish-tale kick.
After your initial propulsion (e.g., dive or push-off) maintain your streamline position. You want to maximize this glide phase before you start kicking.

Just before you start to slow down, use both feet/legs at the same time to kick up and down. Keep your upper body in the streamline position.
Bend your knees so that your kicks finish/start well in front (or behind) your body, but do not kick from your knees. Use your core/hips to generate the power. To do this, suck in your tummy and squeeze your buttocks together.

You must also snap your toes and ankle. It may help to think of your body as a whip. The power comes from your core (the handle), and your feet/toes are the tip of the whip which snap up and down. Kick fast and kick small.
Ensure you also kick backward instead of only up and down. You want to push the water behind you.
Your up and down kicks should be of equal force. Use the vertical kicking drill to develop your coordination and strength for this. The vertical kicking drill is in the freestyle chapter.
When you start to surface, begin freestyle.
Ankle Strength and Flexibility
Increasing your ankle strength and flexibility will improve your dolphin (and flutter) kick. Here are some exercises you can do.
Ankle rotations. Move your foot and ankle in a circle as large as possible without pain. Do 15-20 circles in each direction.

Ankle stretches. There are four levels of this exercise. Each one increases in difficulty from the previous one.
From a standing position, place the top of your toes on the ground a half step behind your other foot. Push down and forward into the ground.

Sit on your heels, with your shins and the top of your feet flat on the ground.

Lean back onto your hands to increase the stretch.
Finally, put your hands up in the streamline position and then lift your knees off the ground.

Ankle Inversion. From a standing position, roll one foot to the outside. Press the edge of your foot into the ground in a gentle manner. Only do one foot at a time.

GET YOUR FREE SWIM WORKOUTS TRAINING SCHEDULE
Photo Credit: Senior Airman Ryan Conroy
Got anything you want to say about the fastest way to swim underwater? Feel free to leave any questions and/or comments below.
The post The Fastest Way to Swim Underwater appeared first on Survival Fitness Plan.
Related posts:
How to Tread Water for Survival
Fast Water Entry Techniques
How to Swim Long Distance Underwater
February 26, 2018
Fast Water Entry Techniques
Learn fast water entry techniques for escape or rescue in water. There are different entry and/or initial propulsion techniques which you can use. The one you choose depends on the situation.
Push-off
Shallow dive
Dolphin dive
Deep-water floating start
Flip Turn and push-off
The information in this post is from the book “Swim Workouts and Water Rescue Skills” by Sam Fury.
GET YOUR FREE SWIM WORKOUTS TRAINING SCHEDULE
Pin This for Later!


Fast Water Entry Techniques
When speed is your primary goal, all these actions will lead into the underwater fly-kick.
Note: When you need to enter unknown waters, use the safe entry techniques described in Part Two of this manual. Opting for a safer entry technique may slow you down, but you won’t be very fast at swimming if you get injured. Safety first, always.
Push-off / Streamlined Position
For the greatest speed when pushing-off the edge, drop below the water 1 to 3 feet. When doing a flip turn this will be automatic.
The best position for your legs/feet is shoulder width apart and with a bend in your knees. Push hard off the edge with strong legs and a tight core.
When you push off your body must be as streamlined as possible. Become a straight arrow, stretching your body from your toes to your fingertips.
Place the palm of one hand on the back of the other. Wrap your upper hand’s pinky and thumb around your lower hand and then raise them over your head. Point your fingers in the direction you are going.
Straighten your arms. Tuck them behind your head and squeeze your shoulder blades together. Another method is to squeeze your ears between your biceps.
Keep your head down (swimming down-hill) with the top of your head pointing in the direction you want to go.
Point your feet and turn your toes in towards each other a little (pigeon-toed).
Keep your chin tucked and use a smooth exhale in whatever way is most comfortable for you.

Maintain this streamline position as you push off the wall. Start the underwater fly-kick to maintain momentum underwater before surfacing into freestyle.
Note: Being on your side (as opposed to facing down) creates less resistance and you may gain some speed. You should experiment with this.
Diving
Diving will give you the most propulsion but is also the most dangerous entry method.
Important! If you are unsure of the water depth and/or what lies below the surface, DO NOT DIVE!
In an emergency situation, you may be pretty sure it is safe to dive but do not have the time for a thorough assessment. For this reason, use the shallow dive.
A shallow dive is when you “arc” into the water hands first whilst you adopt the streamlined position.
When starting to perfect your dive, do so from a stationary position. Place your lead (strongest) leg on the edge of the water (e.g. poolside) with your toes a little over the edge. Your rear foot is flat on the ground.
Balance your weight evenly on both feet.
Place your arms above your head in the streamlined position, with your chin tucked to your chest.
Push off with your lead foot so you get some distance. Arc over as you push.

Adopt the streamline position as you enter the water.
Once you are in the water, hold your head up and arch your back. This will steer your body up away from the bottom.
The more you arch, the more speed you will lose. You have to compromise depending on the water depth. Also remember, that you will be faster streamlining a couple of feet below the surface.
Note: Do not look/arch up before you are in the water. You will lose speed and may get injured.
When you’re ready, try diving from a walking and then a running start. In this case, your arms will start by your sides. Once you leap off the edge adopt the correct position so you can enter the water using the same basic form.
Dolphin Dive
Dolphin dives are useful when running into the water in a beach scenario. It will allow you to overcome waist/chest deep water as fast as possible. Run until the water is knee/waist high and then use the dolphin dive.
As you run in, be vigilant for obstacles in the terrain, e.g., rocks or holes. Once you hit the water, lift your feet completely out of the water for as long as possible. This decreases “drag time”.
Put your hands in the streamline position and leap/arc over into a dive. Do this before the water decreases your forward momentum. Roughly knee to waist deep.

Don’t dive too hard (you might injure yourself) but dive deep enough to grab the sand on the bottom. Grab hold of the sand and lock your feet in one in front of the other. Push forward off the ground as fast as you can into your next dolphin dive. Continue to dolphin dive in rapid succession until it is too deep to continue (about neck deep).

Do not look up whilst dolphin diving. Like in the shallow dive, this is important for safety and speed.
If a wave is approaching, dolphin dive under it, grab the sand and stay under until the wave passes over you.
Once it is too deep to dolphin dive, transition into the underwater fly-kick.
You can use the dolphin dive to come back into shore also. Swim until it is shallow enough to dolphin dive, then continue to dolphin dive until you can run out.
Floating Start
Use a floating start from a floating/treading position when you have nothing to push off.
The key for this is to use an explosive initial kick (such as a side scissor kick) and then go straight into freestyle.
If you know that you will need a floating start, get as close to the freestyle position as possible.
Adopt a horizontal position. Place your dominant hand in front, ready to pull back into your first stroke. Have your other arm in a half-stroke position. Your heels should be close to the surface of the water. Tread water in this position.
LEARN HOW TO TREAD WATER

When it is time to swim kick hard as you pull with your first stroke and transition into normal freestyle.
Flip Turns
Flip turns are often identified with swimming races in a pool. In an emergency situation having to turn in the water is not likely, but it is possible. Knowing how to flip turn will make it much faster.
First, learn the flip turn without having to push off the wall. In an emergency situation, this is most likely the style you will use, and it also makes it easier to learn.
The main flip part of the flip turn is actually only a half-flip. Start by swimming on your stomach (e.g., freestyle). As your arm enters the water for the turn, start a half-flip by tucking your chin and doing a small dolphin kick. At the same time, move your hands to your sides. Breath out through your nose to prevent any water getting up it.
Continue the half-flip by tucking your knees towards your eyes and your feet to your bum. At the same time, push down with the palms of your hands to get your feet over your head. Keep your elbows close to your body while doing this.
As you complete the half-flip, bring your arms into the streamline position. You are now pointing in your new direction of travel.
Roll onto your stomach by twisting your hands a little and looking in the direction you want to rotate. Don’t turn your head, only move your eyes.

Use an explosive kick and arm pull to set you off in your new direction like you would in a floating start.
Note: Don’t try to look where you are going during the flip. It will slow you down and mess up your co-ordination. Look at your knees instead.
To turn and push off a wall (such as in a pool swimming race) speed up (kick harder) when you are about 5 meters away from the wall. Ensure you have enough air to make the turn, but don’t take a breath before it as you will slow down.
Once you are a bit more than an arm’s length away from the wall, do the turn as normal. Push off the wall as described before (Push-off / Streamlined Position). The difference is that you will be face up when you do the push off, toes pointing up.

Once you push off, start to turn onto your stomach and then do underwater fly-kicks.
You may wish to start to fly-kick before (whilst on your back) and/or during your turn also. Experiment to discover what you prefer/works best for you.
Continue to fly-kick until you need to start surface swimming.
Once you can do the basic turn and push off, work on perfecting your distance in relation to the wall. Land your feet with your knees bent close to 90º and your hips bent close to 110º.
GET YOUR FREE SWIM WORKOUTS TRAINING SCHEDULE
Got anything you want to say about fast water entry techniques? Feel free to leave any questions and/or comments below.
The post Fast Water Entry Techniques appeared first on Survival Fitness Plan.
Related posts:
How to Tread Water for Survival
How to Swim Long Distance Underwater
Getting Used to Water – Survival Swimming Training


