Sam Fury's Blog, page 22
June 12, 2019
The Best Crossfit Climbing Ropes 2020


April 8, 2019
How to Survive a Rip Current
In this post, you will learn how to survive a rip current.
It explains how to identify a rip current and what to do to get out of one.
You will also learn the difference between tides and currents and how to use them in water survival.
CLICK HERE TO DOWNLOAD YOUR FREE WATER RESCUE TRAINING SCHEDULE
Learn to Swim Faster and Longer + Water Rescue Skills!Get Your Copy of Swim Workouts and Water Rescue Skills Today

Swim Workouts and Water Rescue Skills: Techniques to Swim Faster, Longer, and Safer (Escape, Evasion, and Survival Book 6)

Price Disclaimer
How to Survive a Rip Current Contents
Tides and Currents
Tides
Tide refers to the rising and falling of the sea. High tide is when the water is at its highest level, and low tide is when it is at its lowest level.
A few different natural forces influence tidal characteristics. It is important to check the tidal times depending on where and when you plan to visit the beach.
The change of water level due to tides can completely change the landscape within a short period of time. For example, if you walk out to a land mass in the morning, in the afternoon the path that you used may be underwater.
Currents
Current refers to the constant flow of water. It is always there and it acts differently depending on many factors. These include water volume, channel width, gradient, weather, obstructions, etc.
Although you can use water currents in your favor, they can also take you where you do not want to go. Even slow ones can knock a person off his feet and carry him out to sea/downstream.
Currents are usually slower along the inside bend of rivers opposed to the outside bend. Also, currents are faster on the surface of the water.
How to Survive a Rip Current
What is a rip current?
Rip currents can occur near beaches with breaking waves. They are strong currents which drag swimmers out to sea. Generally, the larger the waves, the stronger the rip current will be.
How far can a rip current take you?
There is not an exact distance since each rip current is different. The good news is that the current will always fade out, so there is a definite limit.
Did You Know?
There are over 100 rip current deaths in the US every year – US Lifesaving Association.
CLICK HERE TO DOWNLOAD YOUR FREE WATER RESCUE TRAINING SCHEDULE
How to Spot a Rip Current
What does a rip current look like?
A channel of rippled water (more-so than the surrounding water).
Dark water (indicates greater depth).
Debris and/or sea-foam moving in a steady line out to sea.
Different colored water beyond the breaking waves.
Murky water (indicates disturbed sand by the rip).
Waves breaking further out to sea on both sides of the rip.
Look for a channel of water that is different (calmer or choppier) than the water surrounding it.
A rip current may also be present with none of these characteristics showing.

LEARN THE BEST WAYS TO SWIM IN OCEAN WAVES
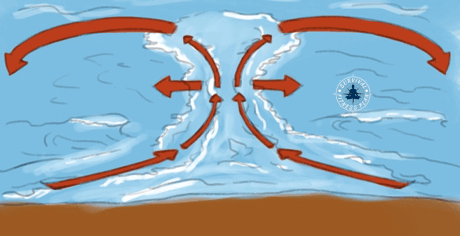
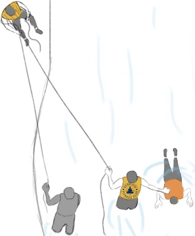
How to Swim Out of a Rip Current
Do not try to swim against it!
Stay calm.
Swim parallel to the shore until you reach the breaking waves zone, then swim back to shore.
If you can’t escape it, conserve your energy (float or tread water) and signal for help.
In this picture, the thin arrows show the direction of the current. The 4 thicker arrows are your channels of escape.
Rip Current Video
Here is a short video about how to escape a rip current.
Inspired? Pin it for Later↓


Swim Faster, Longer, and SaferGet Your Copy of Swim Workouts and Water Rescue Skills Today
Swim Workouts and Water Rescue Skills: Techniques to Swim Faster, Longer, and Safer (Escape, Evasion, and Survival Book 6)
Price Disclaimer
How to Escape a Rip Current Conclusion
Rip currents can be killers for those that don’t know about them. Growing up in Australia I heard many stories about tourists getting taken out to sea by rip currents. Locals get taken out also, but most get taught as children how to escape it.
Luckily, most rip currents are easy to spot if you know what to look for. Prevention is always the best cure. If you spot a rip current, stay away from it. And if you get caught in one, remember to stay calm and conserve your energy. Do not try to swim against it. Swim parallel to the shore until you are clear of it then you can make your way back to land.
Did you find this article about how to get out of a rip current useful? If so, please share it with your friends.
The post How to Survive a Rip Current appeared first on Survival Fitness Plan.
January 22, 2019
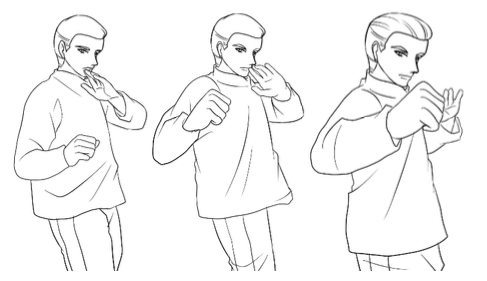
Wing Chun Techniques for Beginners
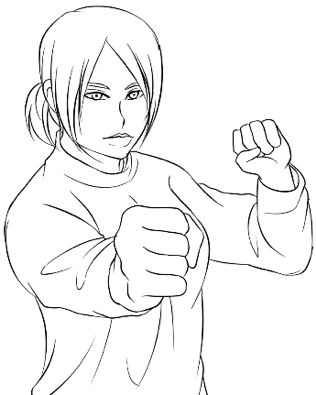
In this article you will learn basic Wing Chun training techniques.
There are some Wing Chun drills, but these techniques don’t come from any specific Wing Chun lineage.
Rather, it is an overview of some fundamental Wing Chun techniques so you can get a feel for this martial art.
It includes stance, Wing Chun blocks and punches, basic Wing Chun kicks and other fundamentals.
If you do some Wing Chun exercises in this article and you like what you learn, then you can take classes or buy some Wing Chun books to learn more.
DOWNLOAD YOUR FREE WING CHUN EXERCISES PDF
Contents
Wing Chun Kung Fu Philosophy
Wing Chun Stance Structure
Wing Chun Basic Footwork
Wing Chun Punching Drills
Wing Chun Block Training
Wing Chun Hand Drills
Wing Chun Kicking Drills
Wing Chun Elbow Drill
Wing Chun Fight Videos
Wing Chun Beginner Drills Conclusion
Learn Wing Chun Adapted for the StreetsGet Your Copy of Basic Wing Chun Training Today
Basic Wing Chun Training: Wing Chun Street Fight Training and Techniques (Self Defense Book 4)
Price Disclaimer
Then he/she pulls your arm down. Repeat this process.

To know if your Bong Sau is correct try to palm your partner. If your arm is not firm or too straight he/she can hit you. If your arm is firm and in the correct position, it will deflect your partner’s hand above your head.

If while you pull your partner holds on to your wrist the action will break the hold.
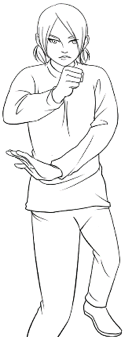
Chi Sao is an advanced Wing Chun drill used to improve touch sensitivity and harnesses flowing energy (chi). It also increases body balance and promotes the looseness of the arms and body.
If Chi Sao interests you, you can get Sam Fury’s book here.
Or, for a quick introduction, check out this article.
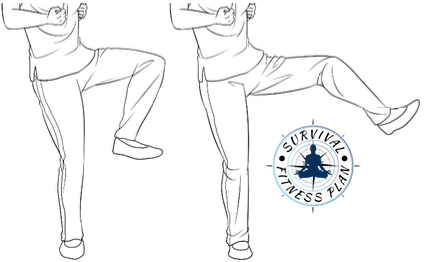
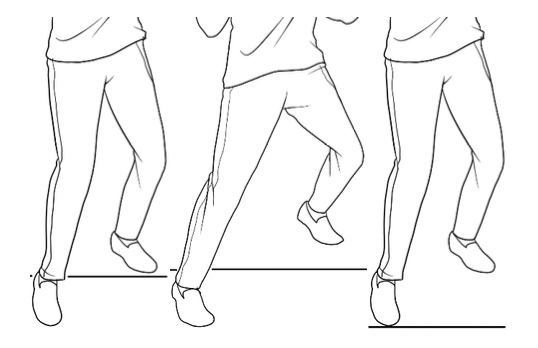
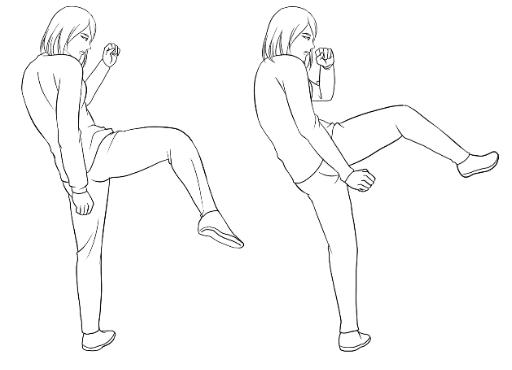
Wing Chun Kicks Training
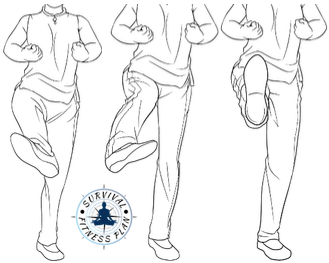
The stomp kick, sidekick, and front kick are fundamental Wing Chun kicking forms. This lesson teaches how to do these 3 basic kicks on a single spot. It helps to improve balance, body position, leg strength and technique.
Start from the half squat position and then turn into the switching side’s position with approximately 70% of your weight on your rear leg.
Raise your rear leg so your knee is parallel to the floor.
Angle your foot out slightly as you kick your foot out. The sole of your foot is what would hit the target. The target is your opponent’s thigh or knee. Do not straighten your leg fully, i.e., your knee should not “lock” into place.
This is the stomp kick.
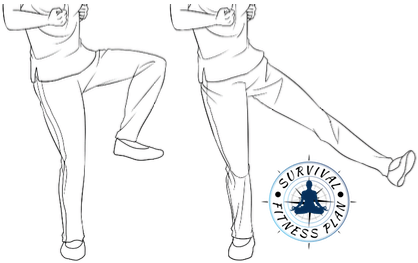
Bring your leg back to the position where your knee is parallel to the floor. Angle your foot slightly in so you can do a sidekick. The sidekick strikes at an imaginary shin target.
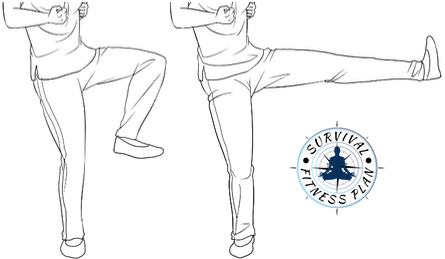
Bring your leg back to the position where your knee is parallel to the floor. Thrust it straight out into a front kick. The target would be the gut of your opponent. Your foot is vertical.
Bring your leg back and then down to the ground. As you do so, adopt the half squat position.
Turn to your other side and repeat the three kicks with your other leg.
Finally, do the 3 kicks to the center, i.e., do not turn to the side.
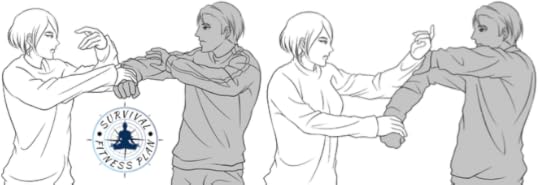
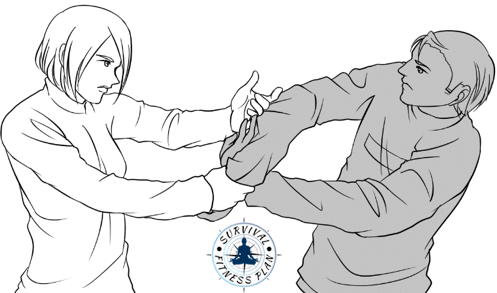
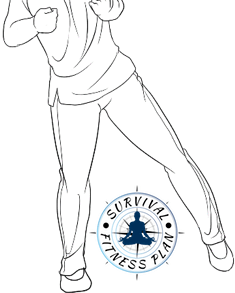
Wing Chun Elbow Drill
This Wing Chun elbow form will help increase response time, muscle memory, etc.
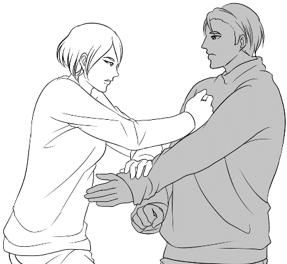
Your partner comes in to elbow. Step back and use your hand to defend. This stepping back helps to absorb the Wing Chun Elbow energy. If you do not step back, you will probably get hurt.
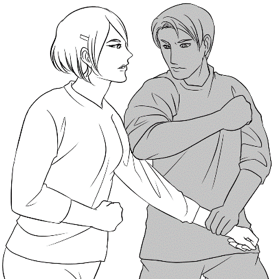
Your other hand then comes from underneath.

Use your initial hand to pin down your opponent’s Wing Chun elbow position.
Now you step forward with your own Wing Chun elbow force. Do not lean in. Keep your body upright and use your whole body to produce the Wing Chun elbow power.

As you come in your partner steps back and defends. This back and forth continues.

Wing Chun Demonstration Videos
Mostly what these Wing Chun videos show is that when pitted against other pure martial arts, Wing Chun doesn’t fair too badly. But against an opponent that knows modern MMA, Wing Chun in a real fight is not practical.
These days, people take techniques from a variety of martial arts and combine them into street fighting that works. This is what you should do too if your aim is to learn practical self defense.
Of course, if you want to learn a traditional martial art for all the other reasons people like to study martial arts, then Wing Chun is one of my favorites.
Anyway, this playlist includes:
Wing Chun Hand Forms
Wing Chun in UFC
Wing Chun Vs Aikido
Wing Chun Vs BJJ
Wing Chun Vs Karate
Wing Chun Vs Muay Thai
Wing Chun Vs MMA
Wing Chun Vs Silat
Inspired? Pin it for Later↓


Wing Chun Martial Arts as Modern Self DefenseGet Your Copy of Basic Wing Chun Training Today
Basic Wing Chun Training: Wing Chun Street Fight Training and Techniques (Self Defense Book 4)
Price Disclaimer
Wing Chun Basics Conclusion
Now you have seen a few of the fundamentals of Wing Chun. It is not much in the big scheme of things, but you can put together a basic Wing Chun workout with what is in this article.
If you want more Wing Chun practice lessons, I recommend Sam Fury’s Basic Wing Chun Training. It has many more Wing Chun drills and shows how to apply them in real life self-defense situations.
Did you enjoy these basic Wing Chun lessons? If so, please share it with your friends.
The post Wing Chun Techniques for Beginners appeared first on Survival Fitness Plan.
January 20, 2019
Jeet Kune Do Techniques for Beginners
This article focuses on Jeet Kune Do techniques for beginners.
Perhaps you want a peek into what Jeet Kune Do Kung Fu is all about. Or maybe you need ideas for Jeet Kune Do drills you can practice when not in class.
I limited the information in this post to Jeet Kune Do for beginners because learning Jeet Kune Do online in-depth is not practical. If you like what you see here, then consider taking a class to learn more.
Also, be sure to get your free Jeet Kune Do PDF. It contains a never-ending Jeet Kune Do lessons schedule so you can do your own Jeet Kune Do workout as home study. Click here to get it.
Contents
A Brief History of Jeet Kune Do
Jeet Kune Do Basic Stance
Jeet Kune Do Basic Footwork
Jeet Kune Do Basic Punches
Jeet Kune Do Parry
Jeet Kune Do Basic Kicks
Jeet Kune Do Trapping Hands
Jeet Kune Do Fight Videos
Jeet Kune Do Exercises Conclusion
Discover the Secrets Behind Bruce Lee’s Jeet Kune DoGet Your Copy of Bruce Lee’s Jeet Kune Do Today
Bruce Lee's Jeet Kune Do: Jeet Kune Do Training and Fighting Strategies (Self Defense Book 6)
Price Disclaimer
Jeet Kune Do Training for Beginners
A Brief Jeet Kune Do History Lesson
Jeet Kune Do’s founder was the very famous Bruce Lee. I’m sure you have heard of him.
He created it by studying many martial arts and combining what he thought to be the best ideas and techniques for practical use. It was one of the first Mixed Martial Arts brought to the public and it came into fruition circa 1967.
One aspect of Jeet Kune Do philosophy is to take what works for you and disregard what doesn’t. With this, one might say Jeet Kune Do history is evolving for each individual that studies it.
If you would like to learn more about the history and characteristics of Jeet Kune Do you can check out this article.
Okay, let’s get into some Jeet Kune Do fighting techniques.
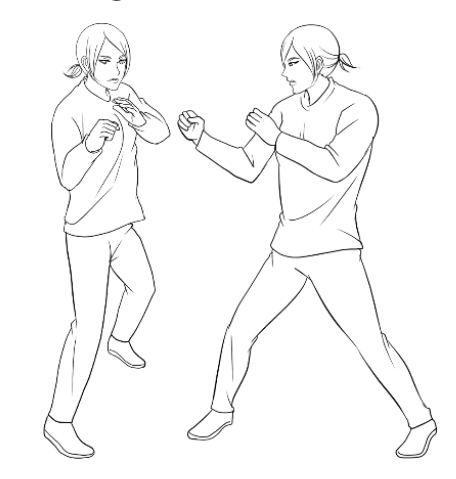
Jeet Kune Do Fighting Stance
If there is such a thing, the “proper” Jeet Kune Do stance is the On Guard Position (On Guard Stance, OGP).
The Jeet Kune Do On Guard stance is an effective fighting stance which allows balance during movement. It is a perfect stance to attack and defend without telegraphing.
Lower Body
The OGP is a semi-crouched position.
Stand with your feet shoulder width apart then take a natural step forward with your dominant foot. If needed, adjust your feet so they are a little wider than shoulder width apart. Keep your knees a little bent.
Never lock your knees and elbows straight when fighting.
Keep your lead knee fairly straight and turn it a little inward to protect your groin. To stay light on your feet your lead heel has only light ground contact.
Your torso forms a straight line with your lead leg. Your lead foot’s position will determine the structure of your torso. What you do depends on your intention. If your lead foot is inward, it will give you a narrower profile. This is good for defense.
Some attacks will require a wider profile so you will need to turn your foot outward. In a neutral stance, have your lead foot at a 25° to 30° angle.
Place your rear foot at a 45° to 50° angle with your heel raised.
The raised heel enhances mobility. It will allow for a quick shifting of weight when advancing and some give when defending.
Your feet are directly under your body. When in a neutral position (neither attacking nor defending) spread your weight even over both legs, or a little more over your lead foot.
To put more weight on your lead just bend your lead knee a little more.
Upper Body
Hold your lead shoulder raised with your chin a little lowered to protect it. Your chin and lead shoulder meet about half-way.
Both your hands help to protect your face and groin. Your lead hand hovers just below shoulder height. Your rear hand is at chest height and about five inches away from your body.
Hold your elbows close to your body to protect your torso. They must remain relaxed but sturdy, i.e., they can move side-to-side if needed but should withstand an attack without collapsing toward your body.
Your head is mobile to avoid getting hit. When fighting in-close you can tuck the side of your chin to your shoulder for more protection. In extreme defense, tuck the point of your chin to your shoulder.
Keep your back relaxed and contract your stomach muscles a little.
The OGP is a non-rigid stance. Relax with your hands and body in constant light motion whilst keeping covered. Curved motions are more energy efficient than straight lines, but do not overdo it, and do not shift your weight from one foot to the other without reason.
You may need to learn to keep your body relaxed. Do this with conscious effort until you can gain the feeling at will. You will then be able to induce this attitude in tense environments.
The above described is how to adopt the OGP in general, however, everything depends on the situation you face.
When practicing different techniques launch them from the OGP and return to the OGP as soon as possible.
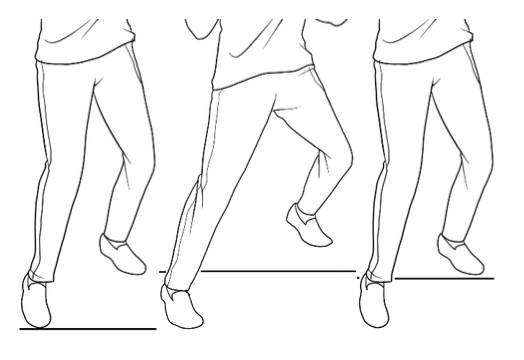
Basic Jeet Kune Do Footwork
Use the shuffle to move forward (advance) or back (retreat) to either use an attack or avoid one.
Advance Shuffle
From the On-Guard Position move your front foot forward about half a step. Your rear foot then slides up to take your front foot’s original position. Repeat this motion to advance further.
Throughout the movement keep your guard up with your knees a little bent and relaxed. Glide on the balls of your feet with your weight spread as even as you can over your legs. When advancing your lead foot your weight will favor that foot, but only for a short time.
Retreat Shuffle
The retreat shuffle is the opposite of the advance shuffle. Your rear foot goes back about half a step and your front foot takes your rear foots original position.
As you slide your front foot back your weight will shift to your stationary rear foot. Keep your rear heel raised. Repeat this motion to retreat further.
Like all techniques, when practicing the shuffles, go slow to begin with until you are confident you are keeping perfect balance. Add speed when ready. Practice on both sides, i.e., left and right leads.
When confident with single steps, do doubles and triples.
Shuffle on a Stimulus – Jeet Kune Do Footwork Drill
You can use a noise stimulus to induce a reaction, e.g., a clap. You need someone to make the noise.
One clap (or whatever) is one movement, either forward or back. The forward and back movements alternate. 2 claps means to do 2 movements i.e. 1 forward and then 1 back.
You can also apply this exercise to double movements or whatever your imagination comes up with, e.g., strikes.
Jeet Kune Do Punch
There are a few Jeet Kune Do punching techniques. Here we cover some fundamental ones. It is enough for you to create your own Jeet Kune Do punching drills if you wish.
Jeet Kune Do pressure points are not a thing. Primary targets are the eyes, chin, solar plexus, ribs, knee, shin, and groin.
Jeet Kune Do Lead Straight Punch
The JKD straight lead punch is the primary Jeet Kune Do weapon. It is fast, accurate, powerful, and practical.
Train to throw the straight punch (lead or rear) from any position that your hand happens to be in and without telegraphing your intention.
Stand relaxed in the OGP. During the delivery of the punch keep your rear hand up ready for defense and/or counter-attack.
Use your whole body to generate power.
The power comes up from the ground and through your hips with a twist on the ball of your foot. Whip your hand straight out in front of your nose from the center of your body.
To prevent telegraphing start your hand moving first.
The preferred point of contact for the lead straight is in line with the surface of your shoulder. If your target is lower or higher than this height, adjust the height of your shoulder-line to match, i.e., crouch or stand on the balls of your feet.
Your elbow stays in and close to your body. This helps with protection and minimizes telegraphing.
As with all hand strikes, your weight shifts a little over your front leg. This increases power and speed.
As your strike makes contact snap your wrist and clench your hand into a vertical fist with your thumb up and knuckles pointed toward your target. Align your fist with your forearm and not bent down at the wrist.
As you snap your lead, draw your rear hand towards your body. The bottom three knuckles make contact as you punch through your target.
With all strikes, it is important that they end with a snap a few inches behind your target. You are striking through your opponent with a snap as opposed to pushing.

The pivot of your hips, the snap back of your rear hand and other body movements help to increase power in the lead straight, but these things will add to telegraphing your punch. Against a fast opponent you may have to sacrifice power to increase the speed of the punch.
Allow your arm to come back to the OGP. Don’t let it drop as this will leave an opening.

The whole punch is a continuous motion.
Keep your body upright and balanced throughout the movement. Leaning back will negate power. If you lean back while fighting, e.g., to avoid getting hit, ensure you reposition your body before punching.
Leaning too far forward will cause you to become unbalanced. You must commit to your strike but do not over-reach so you’re unbalanced. This over-reaching results from being too far away from your target. Use your footwork to close the distance, not the lean of your body. This applies to all strikes.
Trying to put too much body-weight behind the punch will also negate power. It will turn the punch into a push which may move your opponent back but will have nowhere near the same devastating impact as a whip-like punch.
Never start a strike with a foot off the ground.
In relation to reach, the lead straight can be short or long. Lengthen your reach by extending your shoulder into the strike. Use your whole reach.
Jeet Kune Do Cross Punch
Though technically different, the Jeet Kune Do Cross Punch is comparable to the rear cross in boxing. Its official name is the rear straight punch.
A rear straight is more powerful than a lead straight punch and is best used as a counter or as part of a combination.
Assuming you are in a right lead OGP, rotate your hips clockwise pivoting on the sole of your left foot. As your body weight shifts forward, your lead hand adjusts to protect your face. Throw the punch straight out in front of your nose and hit your target with a snap in your rear shoulder.
To maximize the force behind the punch, use momentum and drive your body behind the punch. Remember to snap, not push.

Jeet Kune Do Hook Punch
The hook is a good short-range weapon which you can use against an advancing opponent, as a follow-up (e.g., after a lead or feint) or as an initial and/or single strike when the opportunity arises, e.g., if your opponent can not move out of the way.
The power of the hook comes from footwork. Do not pull your hand back. It is unnecessary and telegraphs your intention.
From the right lead OGP have your lead heel raised outward and your rear hand high to protect your face with your rear elbow protecting your ribs.
Keep your lead arm loose and rotate counter-clockwise as your shift your weight to your rear foot. Allow your arm to whip forward following the momentum of your body. Keep your elbow bent so your hook does not swing out. Just before contact make your arm rigid from the elbow to the knuckles. There is no bend of the wrist or twist of the fist.
Contact with a vertical fist and your knuckles pointing in the direction of your strike. Drive the punch through your target and be ready to follow-up or return to the OGP.
The hook works best with footwork and the lead hook will most likely require you to advance to reach your opponent.
Because of the horizontal angle of this strike any lateral movement by you (such as a side step) or your opponent into the hook will increase its effectiveness.
The lead hook is also great in close range fighting because it comes from outside your opponent’s field of vision and can go around his/her guard.
This has described the actions for throwing a lead hook because you will use it more often. You can adapt it to the rear to use in very close range fighting, especially when you are separating from your opponent.
When throwing the hook to the body bend your front knee so your shoulder is about the same height as your target. To put more power behind it, as you throw the hook duck to the opposite side of the hand that is throwing the hook. The kidney can be a good target for lower level hooks.
Being a much bigger target and less mobile than the head means that body blows have a higher chance of landing than head shots.
To defend against a hook when in-close move into it so it passes around your neck.
DOWNLOAD YOUR FREE JEET KUNE DO TRAINING SCHEDULE
Jeet Kune Do Parry
Parrying is a quick hand motion used to deflect blows away from you. It is better than blocking which uses force to stop a blow. In parrying, timing and economy of motion are important, not force. It is a fundamental Jeet Kune Do punch defense.
Only parry when needed and at the last possible moment. Also, only move as much as needed to deflect a strike and/or create openings for counters.
Parry’s are not your first line of defense (evasiveness and footwork are better) but they are often useful in a fight.
There are 4 basic parry movements. For all of them your elbow stays fixed while you use your hand and arm to move.
Most of the time you will parry with your rear hand which leaves your lead free to counter.
When parrying without a counter you can shift your weight a little over your rear leg. This will increase distance which gives you more time to react. When simultaneously parrying and countering your weight will shift forward.
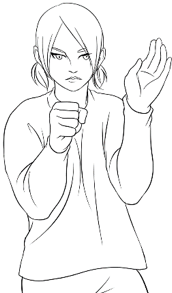
Inside High Parry
The inside high parry is the most used parry since most attacks are punches to the face. It angles the attack away.
Assuming you are in a right lead OGP meet the strike with your rear hand using a slight counter-clockwise twist of your wrist.
The following picture shows the parry as it would be if everything were symmetrical but in a real fight this is rare. It also shows the simultaneous counter of a lead straight.
Clench your fist against a kick or other strong strikes. Apply this to all parries.
Inside Low Parry
Use the inside low parry against an attack as low as your groin.
Assuming you are in a right lead OGP your rear hand makes a semicircular, clockwise, downward motion.
When countering, as your hand parry’s shift your weight to your lead leg, bend your knee a little and counter with your lead hand.
Outside High Parry
Whereas the inside high parry angles the attack away, an outside high parry is more of a slap. It diverts the attack on the opposite side of your body, i.e., your hand comes across your body.

Outside Low Parry
The outside low parry deflects a blow downward, just like the inside low parry does, but it crosses over your body. It is useful against a mid-level kick.
Against a fast opponent you may need to move back whilst parrying. Do not lean back. Use your footwork. Your rear foot must move before the attack and you must make the parry while your back foot is in motion.
How far you step back depends on your opponent’s movements. Keep the fighting measure so you can counter-attack, however, it is better to go too far back than not enough.
Jeet Kune Do Kicking Techniques
Jeet Kune Do kick training gives you a great advantage over a non-kicking opponent. The leg has a greater reach and more power than the arm. Also, Jeet Kune Do kicks are harder to defend against.
Kicks that snap from the knee are best to use as they are faster and more powerful.
Like punches, train to throw kicks from all angles, at all levels of height, and whilst moving.
Jeet Kune Do Side Kick
The Low Lead Side Kick is like the straight punch of Jeet Kune Do low kicks. It is both fast and powerful.
You can use it to keep an opponent at bay or to close the gap so you can attack in combination. A solid side kick to the knee can even be a fight finisher.
Assuming you are in a right lead OGP slide your lead foot forward a few inches. As soon as possible bring your rear foot up just behind your lead. Lift your lead foot and twist your hips as you thrust the edge or flat of your foot into your target. Lean away from your opponent as you kick so you are out of reach. All of this is one smooth motion.

Attacking the rear leg is uncommon in Jeet Kune Do but it may be useful against an opponent who places his/her weight on the rear foot instead of taking a short step back. When your opponent places all his weight on the rear leg he cannot move away quickly.
Also, if you attack the rear knee while it occupies a lot of weight more damage will occur.
To focus chi into your kicks, concentrate on the heaviness of your foot and the energy flowing through your body.
To develop speed via a Jeet Kune Do kicking drill, do a series of low lead side kicks in the air at an imaginary target. Focus on speed, snap and strength. Keep your eyes focused at your imaginary opponent’s eyes as you do it. Looking down will telegraph your intentions.
Jeet Kune Do Front Kick
The front kick is a fast kick which you can aim at the groin.
Delivery of the front kick is straight up into the target, like kicking a football. Make contact with your instep or shin.
To increase power in the front kick, jerk your hips forward just before hitting your target.
Hitting the bottom of a heavy bag or having a partner hold a punching pad with his/her palm facing the floor are good ways to practice the front kick.
There are Jeet Kune Do high kicks but in actual combat it is best to stick to low kicks. They are easier to control and leave you less vulnerable to counter attack.
Jeet Kune Do Trapping
Trapping is an advanced technique but I include it to give you a taste of Jeet Kune Do strategy.
For me, the fighting strategy is what sets JKD apart from most other martial arts. Knowing the strategic principles means you can pick the techniques that work for you and use them efficiently, instead of just following ineffective drills and katas.
This Jeet Kune Do strategic principle (of several) is the Immobilization Attack (IA).
You prevent your opponent from moving a part of his/her body and then attack in the opening.
It is good for close range fighting.
You can do this in a variety of ways such as holding, grabbing, pinning, and trapping.
The term trapping can also describe all immobilization techniques.
An IA can be instinctive (made possible with trapping drills such as Chi Sao) or planned, and you can do them alone or as part of a combination.
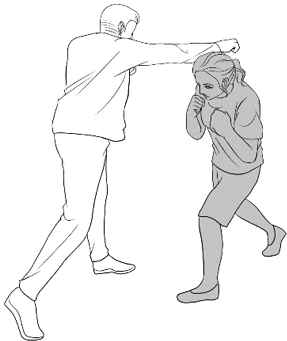
A basic trapping technique would be to use one hand to pin your opponent’s arm down whilst your free arm strikes. Aim to be out of the range of his free hand while you strike, or perhaps pin both his/her hands with one of yours.
In this example he immobilizes her hair by grabbing it. He then pulls her towards him as he strikes.
In this final example holds his arm hook kicks his groin.
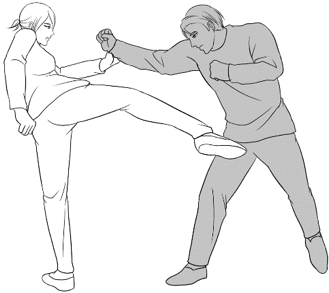
You can use immobilization in many ways. Arm to leg, leg to leg, his/her head, hair etc. is all possible.
A bind is when you meet your opponent’s hand and then direct it diagonally across his/her body from a high to low line, e.g., from high right to low left.
A croise is when you direct the hand from high to low on the same side, i.e., right high to right low or left high to left low. Do NOT do it from low to high.
An envelopment is when you direct the hand in a full circular motion. Don’t lose contact and finish in the same line. It is basically a circular parry and is good to use against those who like to feint.
Pressure is pressing your opponent’s hand.
Jeet Kune Do Videos
Here is a playlist of Jeet Kune Do fight videos.
It is a good overview of Jeet Kune Do demonstrations pitted against other popular martial arts.
The playlist includes:
Jeet Kune Do Sparring
Jeet Kune Do in MMA (UFC)
Jeet Kune Do vs BJJ (Brazilian Jiu Jitsu)
Jeet Kune Do vs Jiu Jitsu
Jeet Kune Do vs Muay Thai
Jeet Kune Do vs Wing Chun
Jeet Kune Do vs Karate
Jeet Kune Do vs Tae Kwon Do
Inspired? Pin it for Later↓


Train in the Way of the Intercepting FistGet Your Copy of Bruce Lee’s Jeet Kune Do Today
Bruce Lee's Jeet Kune Do: Jeet Kune Do Training and Fighting Strategies (Self Defense Book 6)
Price Disclaimer
Basic Jeet Kune Do Moves Conclusion
Learning Jeet Kune Do has many benefits. You will learn effective fighting techniques and strategies. Jeet Kune Do is also one of the more physically intense “styles” of Kung Fu, so it is enough to keep you fit and healthy.
But Jeet Kune Do is much more than a Martial Art. It is a whole way of life. You can apply the philosophies and principles that Bruce Lee built JKD on in all aspects of life.
This article is a small sample of basic Jeet Kune Do techniques. If you want to learn more, you can check out Sam Fury’s book “Bruce Lee’s Jeet Kune Do”. And if you want even more, go enroll in classes.
Did you enjoy this article about Jeet Kune Do martial arts? If so, please share it with your friends.
The post Jeet Kune Do Techniques for Beginners appeared first on Survival Fitness Plan.
January 2, 2019
Common Basic Training Injuries: Prevention and Management
In this article you will learn the prevention and management of common basic training injuries.
First, we will look at how to prevent training and musculoskeletal injuries. The information is the same whether you need it for common military training injuries or personal training injuries.
Next we go into how to manage notable training injuries.
Environmental injuries are heat and cold related ailments.
Then comes common musculoskeletal injuries that, in most cases, you can self-diagnose and treat.
Finally, we talk about superficial injuries, e.g., cuts, bruises, and blisters.
Superficial, environmental, and musculoskeletal injuries in the military are the same as you might get when training in the Survival Fitness Plan.
In the last section you will learn about how you can still undertake personal training with injuries.
IMPORTANT: None of what is in this article replaces professional medical advise. If you get injured, ask your physician for the best course of action.
Could You Save a Loved One When There are No Doctors Around?Get Your Copy of Wilderness and Travel Medicine Today
Wilderness and Travel Medicine: A Complete Wilderness Medicine and Travel Medicine Handbook (Escape, Evasion, and Survival 4)
Price Disclaimer
Contents
Preventing Injuries During Exercise
Sports Injury Management
Environmental Sports Injuries
Dehydration and Heat Exhaustion in Sports
Fainting
Hyponatremia Management
Hypothermia
Managing Minor Musculoskeletal Injuries and Conditions
Sprains
Strains
Taping Injuries for Sports
Broken Nose Recovery
Cuts and Bruises Treatment
Bruises Treatment
Cuts and Scrapes Treatment
Blisters Treatment
How to Stop Nose Bleeding
Training Through Injuries
General Tips for Training When Injured
Training Tips for Specific Injuries
Lower Back Injury Exercises
Wrist Injury Exercises
Elbow Injury Exercises
Shoulder Injury Exercises
Ankle Injury Exercises
Knee Injuries Exercises
Common Sports Injuries Conclusion
Training Injury Prevention
Injury prevention is best type of injury management.
Here are fundamental guidelines that will help prevent most types of training injuries.
Aim for all-round health and fitness. Cardio, strength, and flexibility.
Avoid uneven and/or hard surfaces when doing high impact activities, e.g., running
Eat a nutritious diet.
Hydrate! Drink lots of water before, during, and after training. But don’t gulp it. Drink small, slow, and often.
Lose excess weight.
Maintain your gear. If your gear breaks your chances of injury increase. In activities such as rock-climbing, it can be a big issue.
Replace salts. Nutritious food and diluted sports drinks.
Research environmental conditions before training. adjust your dress and regime to suit. Some examples of bad training ideas are:
Doing parkour in the rain.
Swimming in a lightening storm.
Distance running or hiking in extreme heat
Start easy and gradually increase intensity. This applies to single training sessions and overall long-term goals.
Strengthen your supporting muscles before trying anything major. For example, strengthening your calf muscles will prevent tendonitis. Superburpees will strengthen these and many other supportive muscles.
Take extra good care of your knees and back. Don’t overuse them. If they hurt, let them rest.
Warm up/Cool down and stretch before and after training. Learn more about that here.
Wear the right clothing for the activity. Footwear that provides proper support is important.
Training Injury Management
While injury prevention is general, specific sports training injuries need specific treatments.
Environmental Injuries in Sport
Dehydration and Heat Exhaustion in Sports
Dehydration and heat exhaustion occurs when fluid loss is greater than fluid intake.
Dehydration leading to heat exhaustion is one of the more common endurance training injuries, but it is easy to prevent.
Avoid drugs (including medical) and alcohol.
Maintain adequate hydration and nutrition.
Take the time to acclimatize.
How to Acclimatize to Heat
The body can deal with heat if introduced to it slowly.
Acclimatize in similar conditions to what you will be in, e.g., if you are going somewhere hot, it is best to acclimatize somewhere hot.
Exercise moderately for 1 to 2 hours a day for 8 to 10 days.
As the days go on, gradually increase intensity and time spent working.
Dehydration and Heat Exhaustion Symptoms
Chills.
Dizziness.
Elevated respirations, pulse and temperature.
Headache.
Nausea.
Sweating.
Vomiting.
How to Treat Heat Exhaustion
Rehydration (using a re-hydration plan).
Place a moist, cold compress on the armpits, chest, groin and neck.
Remove restrictive clothing.
Rest in a cool environment.
Rehydration Plan
Only use oral rehydration if the patient is capable or it may cause more harm than good, e.g., if the water goes into the airways.
You can buy oral rehydration solutions or make it by combining 6 teaspoons sugar, 0.5 teaspoon salt and 1 liter of drinkable water.
Intake 50 to 200 ml/kg/24 hours (the stomach can only absorb 1 liter of liquid per hour).
Fainting
Dehydration and/or low blood sugar are casues of exercise induced fainting.
Fainting Treatment
Unless there is a serious underlying problem, most people won’t take long to regain alertness.
If the patient feels he/she will faint before it happens, have them sit down and put their head between their knees.
If you see them fainting, lower them to the ground onto their back.
Cool the patient if hot.
Give the patient fresh air.
Loosen constrictive clothing.
Lie patient flat on his/her back and raise their legs 60cm above their heart/head.
Slowly sit the patient up when ready.
Eat and drink when alert.
Continue to rest until strength returns.
Assess for other injuries, e.g., concussion from fall.
Note: A person who faints from a seizure will have jerky movements or will stare into space. This requires different treatment not covered in this article.
Heat Rash
Heat rash (prickly heat) occurs when the sweat ducts become blocked and swell. You will usually find it on body areas covered by clothing.
Symptoms of Heat Rash
Itching.
Red or pink rash-like dots or tiny pimples.
Heat Rash Treatment
Avoid ointments or other lotions.
Dry and cool affected site.
Heat rash will usually dissipate within 10 days.
Loosen or remove clothing.
Antihistamine.
Hyponatremia Management
Hyponatremia occurs when there is excessive water consumption with inadequate salt replacement, e.g., when someone sweats a lot and drinks water to stay hydrated, but does not eat to replace salts.
Hyponatremia Symptoms
Decreased mental status.
Dizziness.
Headache.
Muscle Cramps.
Nausea.
Loss of co-ordination.
Tremors.
Vomiting.
Vital signs and core temperature are often normal.
Hyponatremia Treatment
Drink a full strength sports drink, but only if mental status is okay.
Eat when able.
If unable to drink, consider intravenous therapy.
Hypothermia
Hypothermia occurs when the cold overwhelms the body’s ability to produce and keep heat.
You can prevent hypothermia by:
Acclimatizing to cold weather.
Avoiding alcohol and other recreational substance use.
Dressing for the cold.
Hypothermia can be mild or severe and it progresses through very definite symptoms, i.e., the patient will have mild hypothermia and, if untreated, it will progress into severe hypothermia.
Symptoms of Mild Hypothermia
Body temperature between 35.5 °C (96 °F) to 32 °C (90 °F).
Difficulty speaking.
Intense shivering.
Irritable.
Lethargic.
Loss of fine motor coordination.
Sluggish thinking.
Withdrawn.
Symptoms of Severe Hypothermia
Body temperature below 32 °C (90 °F).
Blue, puffy skin.
Coma.
Decreased vital signs (pulse, respiratory, B/P).
Jerky movements.
Muscular rigidity, i.e., no more shivering.
Respiratory and cardiac failure.
Hypothermia Treatment
The treatment for hypothermia whether mild or severe is the same. The earlier you treat it the better.
Cover the top of the head.
Do not rub or massage extremities (in case of frostbite).
Heat packs on armpits, chest, groin and neck.
Insulate from below and above, starting from the ground up.
Increase heat production, i.e., exercise.
Remove causes, e.g., block the wind, remove wet layers.
Warm, non-alcoholic and non-caffeinated liquid (only if the patient is capable).
Immersion heating (e.g., a warm bath), only if in a controlled environment. Yhe possibility of after-chill may make it worse.
Notes:
Only exercise after eating sufficient food and fluid, and when mental status has improved.
Re-warming a patient with skin-to-skin contact inside a sleeping bag (or similar) is a survival technique but may cause the body-temperatures of all involved to drop.
Minor Musculoskeletal Injuries
Sprains
A sprain is when a ligament (the fibrous tissue that connects one bone to another) is over-stretched due to the forcing of a joint beyond its normal range of motion.
A twisted ankle is a common sprain.
Symptoms of Sprains
Bruising.
Pain.
Swelling.
Treatment for Sprains
Most sprains will heal over time. Severe knee sprains may require surgery.
RICES
Anti-inflammatory.
RICES
RICES is an acronym for a common treatment of musculoskeletal injuries.
Rest. Do your best to cease using the limb.
Ice. Apply a cold compress (or similar) 4 times a day for twenty minutes during the first 48 hours of the injury occurring.
Compression. Apply a compression bandage after each cold therapy. Pad the area then wrap it starting below the joint and working your way up beyond it. The wrap should be as tight as possible without causing discomfort or impaired CSM
Elevation. Elevate the affected limb above the heart.
Stabilization. Depending on the seriousness of the injury, it may need a splint or cast.
Strains
Strains are when the muscle or its tendon (tissue that connects the muscle to connect to bone) is partially torn. Back muscles are most commonly strained.
Strains are common weight training injuries because of poor form.
Daily morning stretches and using correct lifting techniques will help prevent strains.
Correct Lifting Techniques
Don’t lift things whilst unbalanced.
Don’t reach for an object, i.e., hold it as close to your body as possible whilst lifting.
Don’t twist while lifting.
Lift with your legs and a straight back.
If carrying a pack, keep the weight on your hips as opposed to your shoulders.
Treatment for Strains
Mild massage.
Anti-inflammatory.
Muscle relaxer.
Ginger and raw honey tea.
Salicin poultice.
Taping Injuries for Sports
Taping is good for immobilizing whilst healing and for preventing injuries, e.g., during sporting activities.
If taping around a whole body part (circumferential wrapping), e.g., for anchors, ensure swelling does not impair CSM, i.e., it is best to tape after swelling has gone down.
Here are some sports injury taping tips:
Anchor points are those to which tape can stick.
Avoid leaving gaps as they can lead to blisters.
You can use duct tape in emergencies, but it does not ventilate.
Ensure your skin is dry.
Follow the contour of the skin.
Keep your limb in a neutral position.
Overlap a half-width on each strip.
Ankle Taping

Taping a Wrist Injury

Broken Nose Recovery
A broken nose is a fracture of the nose caused by some form of trauma, such as a punch. It is one of the more common MMA training injuries.
Broken Nose Symptoms
Difficulty breathing through the nose.
Pain, especially when applying pressure.
Possible deformity.
Minor Broken Nose Treatment
Use both hands to straighten the cartilage.
Consider taping into position.
Place some ice wrapped in a cloth over the nose, for periods of 20 minutes throughout the day; do this for 48 hours.
Nasal decongestant may help with swelling in the nasal passages.
Cuts and Bruises Treatment
This last set of training injuries are usually minor and also the most common.
Bruises
A bruise occurs from some kind of trauma which ruptures the blood vessels. They are a little painful to the touch and may change color from blackish-blue to brown to yellow.
How to Get Rid of Bruises
RICES
In later stages, stretching may help.
Cuts and Scrapes Treatment (Open Wounds)
An open wound is anything that breaks the skin, e.g., cuts, scrapes, abrasions, punctures.
Basic Treatment for Open Wounds
Control bleeding with well-aimed, direct pressure.
Clean.
Cover with a sterile dressing.
Immobilize high-risk wounds if possible.
Change the bandage and clean the wound regularly.
Monitor for infection and treat as needed.
Blisters
A blister is a protective pocket of clear fluid (plasma) underneath the layers of the skin. If filled with blood they are blood blisters, and if they become infected, they will fill with puss.
Cold, exposure to chemicals, friction, heat etc. are all causes of blisters.
The most common, troublesome blisters are those found on the feet caused by friction and heat whilst hiking or engaging in similar activities.
Before a blister forms, the area will often get red and painful. This is a hot spot. Treat it before it becomes a blister.
Treatment for Hot Spots
You can cover a hot spot, e.g., Band-Aid.
Ideally, raise the area around it and then cover it.
Blisters Treatment
In controlled environments, leave the blister intact. The skin will keep it protected from infection.
Pad it like a hotspot.
If the blister may rupture, it is often better to drain it so you can clean and dress it.
Draining a Blister
Clean the area around blister.
Sterilize a needle and pierce the side of the blister.
Let the fluid drain.
Apply antibiotic ointment.
Cover and monitor.
Preventing of Friction Blisters
Proper footwear.
Sock liners.
Cover blister-prone areas with Fixamol, a Band-Aid, etc.
Change wet/sweaty socks.
Foot powders to keep feet dry.
Nose Bleeding First Aid
The common nosebleed (epistaxis) is a hemorrhage caused by dry air, excessive picking, hypertension, irritation, trauma, underlying illness, upper respiratory infection, etc.
A blood nose is one of the most common boxing training injuries.
Treatment for a Nosebleed
Breathe through the mouth.
Do not swallow blood; spit it out instead.
Sit upright with head tipped slightly forward.
Ice pack to bleeding side of nose.
Pinch nostrils and push towards the face for 10 to 15 minutes.
If after 15 minutes the nose is still bleeding, repeat the pressure for another 10 to 15 minutes.
If still bleeding, flush with sterile saline, and then insert a thin strip of cloth drenched in epinephrine. Do not remove the packing for several hours.
Training Through Injuries
Training injured is possible, but extra care is needed. Here are some tips for training with injuries.
Training on injuries will only make things worse if you don’t rest the injured body part, but that doesn’t mean you have to stop training altogether. With a little extra care and creativity you can work around the injury.
General Tips for Training When Injured
Seek professional advise. They will tell you when you can resume exercise and the best way to do so.
Test all movements. And by all I mean ALL movements. It may surprise you at what movements will aggravate your injury. Test slowly and without resistance of every action you plan to do. Check range of motion, pushing, pulling, etc. If you feel any pain, stop doing that movement.
Rest. Rest the injured part and yourself as a whole. Get plenty of sleep.
Eat well. Lots of vitamin-rich foods.
Keep positive. Getting an injury will slow you down, but you can still train. Keep a positive mindset and find work-arounds.
Training Tips for Specific Injuries
Lower back Injury Recovery
Training for back injuries needs special attention as there are different types. Consult your physician before trying anything.
As a general rule, avoid any exercise that will put pressure on your back and stick to bodyweight exercises.
Low impact activities such as swimming and walking should be fine.
Wrist Injury
Wrist injuries are easy to work around. Avoid anything that puts too much strain on your wrists, e.g., push-ups.
Unless you have a major injury (like a broken wrist), athletic training with hand injuries such as running should be fine.
So are most other lower body exercises.
Elbow Injury Recovery
An elbow injury will hinder you from doing most upper body exercises. Lower body exercises will be fine. Abdominal crunches, lunges, sprints, etc.
Shoulder Injury Recovery
Be very careful with joint injuries such as shoulders and hips. Start easy and stop as soon as you feel pain.
Athletic training for shoulder injuries, like other upper body injuries, will confine you to lower body work.
Ankle Injury Recovery
An ankle injury means no jumping or other high impact movements. Also avoid anything that directly uses the ankle, e.g., heel raises and squats.
Non weight-bearing cardio and upper body strength training will be fine, e.g., swimming, crunches, and pull ups.
Kneecap Injury Recovery
A knee injury training program means avoiding high-impact movements. This rules out most team sports, running, parkour, etc.
Boxing drills are possible but you must be careful. Kicking is out of the question.
The biggest issue when training after knee injuries is that it rules out most cardio exercises. Training an injured knee confines to upper body strength activities while you heal. Ab work, decline pushups, planks, and pull-ups are good ones.
Inspired? Pin it for Later↓


This is the Only First Aid Book You Will Ever NeedGet Your Copy of Wilderness and Travel Medicine Today
Wilderness and Travel Medicine: A Complete Wilderness Medicine and Travel Medicine Handbook (Escape, Evasion, and Survival 4)
Price Disclaimer
Common Exercise Injuries Conclusion
Physical training and injuries come hand-in-hand, and anyone that trains regularly will get injured every once in a while.
Minimize the chances of training exercise injuries with prevention methods such as warming up and stretching.
When you have an injury, rest the injured body part and your body as a whole.
Training around injuries is possible. Just choose your exercises carefully and test every movement you plan to do. Be sure to consult a physician for guidance.
Don’t try to “train through” your injury. It will only make recovery time longer and may cause permanent damage that wouldn’t occur otherwise.
Did you enjoy this article about basic training related injuries? If so, please share it with your friends.
The post Common Basic Training Injuries: Prevention and Management appeared first on Survival Fitness Plan.
October 10, 2018
Basic Water Rescue Training Online
In this article you will learn various types of lifeguard rescues and swift water rescue and recovery.
The information in this water rescue article does NOT replace professional water rescue training.
Treat it as water rescue guidelines or as water rescue training drills to use for any water rescue training situation such as:
Flood water rescue training
Open water rescue training
Swift water rescue training
White water rescue training
Contents
How to Assess a Water Rescue Scenario
When You See a Water Rescue Victim
Situational Assessment
Casualty Priorities and Recognition
Making a Plan
Land-Based Water Rescue Techniques
Shout and Signal
Throw Rescue
Reach Rescue
Water-Based Water Rescue Techniques
Wading Rescue
Boat Rescue
Swim with an Aid
Tow Rescues
Armpit Tow
Single Armpit Tow
Double Armpit Tow
Cross Chest Carry
Vice Grip Rollover and Tow
How to Defend Yourself Against a Drowning Victim
General Defense
Block
Wrist/Arm Grab Escape
Head Hold Escape
Swift Water Rescues Using Rope
Land Rope Rescues
Pendulum Rescue
Stabilization Line
Kiwi Cinch
Swimming Rope Rescues
Simple Rope Tether
Tethered Swimmer
Conclusion
Swim Faster, Longer, and SaferGet Your Copy of Swim Workouts and Water Rescue Skills Today

Swim Workouts and Water Rescue Skills: Techniques to Swim Faster, Longer, and Safer (Escape, Evasion, and Survival Book 6)
Price Disclaimer
Basic Water Rescue Techniques
Water Rescue Basics – How to Assess a Water Rescue Scenario
This section covers the 10-20 system, prioritizing casualties, planning a rescue, and steps that anyone can follow when they see someone that needs help in the water.
When You See a Water Rescue Victim
Anyone can use the following passive water rescue steps. It is simple water rescue policy you can teach your friends and family, including children.
Keep calm. A person who panics cannot think clear.
Shout for help as loud as you can.
Ask everyone else to clear the area.
Ensure there will be no immediate danger to you while attempting the rescue. Animals, electricity, fire, etc.
Use land-based rescue techniques in the order given.
If you cannot perform a land-based rescue, call the emergency services.
IMPORTANT: Unless trained in water rescue protocol, never enter the water to save a victim. A drowning victim can pull you down with him. Even when trained, entering the water is a last resort.
Water Rescue Operations – Situational Assessment
The 10:20 System
When you manage the well-being of others near water, you can use the 10:20 system. It is a good way to oversee a designated area.
The 10 stands for 10 seconds. You scan the designated area (e.g., a pool) from one side to the other in 10 seconds.
The 20 means you should be less than 20 seconds away from getting to any swimmer in your area.
Water Rescue Skills – Casualty Priorities and Recognition
This chapter explains the different water casualties.
When there is over one victim, rescue them in the order given.
Casualty Priorities
The general rule of thumb is to rescue those making the least noise first and the unconscious last.
The 4 types of casualties in order of rescue priority are:
Conscious non-swimmers. Unable to swim and often vertical in the water. They may grab hold and drag you down.
Conscious weak swimmers. Can swim but either exhausted or in some other distress. Usually in a forward position trying to swim. Often cooperative in a rescue.
Conscious injured swimmers. Can keep themselves afloat but have an injury they may or may not tell you about. Look if they are holding their injury and be careful of it during the rescue.
Unconscious swimmers. Often floating motionless and face down in the water, but can be at any depth.
Rescue the unconscious victim last. You do not want to waste time you could spend rescuing a victim with a higher chance of survival.
Recognizing a Distressed Swimmer
A distressed swimmer is any conscious swimmer that is having trouble in the water. If he does not find safety he can become an unconscious swimmer. You must learn how to recognize the distressed swimmer so you can rescue them before it is too late.
There are 2 basic types of swimmers in distress: non-panicking or panicking.
The non-panicking casualty knows they need help to get to safety. They will try to communicate this to you.
A panicking casualty is likely to already be in the drowning phase. He will thrash around trying to keep afloat. He may try to communicate (either silent or noisy) but it will be ineffective.
Water Rescue Drills – Making a Plan
It is very important to create a plan of rescue instead of acting straight away.
The human brain can process a lot of information at great speed, even in high-stress situations.
Once you recognize a casualty, it will only take a few seconds to assess the situation. This will keep you safe and will also give the victim the best chance of survival.
The first thing you should look for is danger. Why is the victim in trouble in the first place? Is the danger still there?
Next, consider your victim’s profile. Is he/she big, small, an adult, child, unconscious, panicked, injured, etc?
Finally, what basic water rescue equipment do you have, and/or what can you improvise?
Use the information you gather and the knowledge of your own abilities to decide the best form of rescue.
Due to the endless possibilities of scenarios you will need to be very flexible. For example, should you take the time to find a rescue aid? And if so, which water rescue aid is best for the situation?
Types of Water Rescue Techniques – Land-Based
Land-based rescue techniques are safe to use by almost anyone. Here they are in escalating order, i.e., only use the second one if the first doesn’t work.
Watch the victim as much as possible while preparing his rescue. This way, if he goes under you can tell others the best place to look.
If a second person is there have him watch the victim while you find equipment and/or help.
Shout and Signal
Your victim may be in a panic. Sometimes giving simple instructions will be enough for him to save himself.
Get his attentional by waving and shouting. Then, in a loud, clear voice, tell him to kick his legs and push towards you or the nearest safe spot (waters edge, shallow water, etc.).
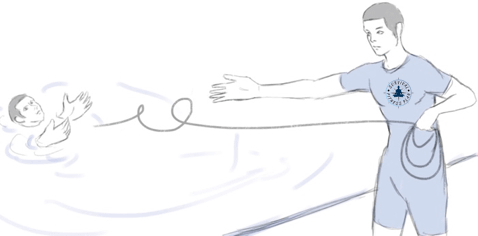
Throw Rescue
Look for something the victim can use to float on and throw it to him.
The object must be small enough for you to throw but buoyant enough for the casualty to use as a float.
Aim it so the victim can reach it, but do not hit him in the head. Allow for wind and current and aim upstream of the victim.
Once he has the object, instruct him on how to paddle to safety. Unless it presents more danger, he should swim with the current.
Tossing a rope is also a throw rescue. Throw one end of the rope to him and then help to pull him to safety. Stay back at least 1 meter from the water’s edge to prevent you from falling or getting pulled in.
Reach Rescue
Find something you can reach out to the victim with from dry land, e.g., a stick. Lie down at the edge of the water while reaching out. If possible, also hold on to something.
Lying down and holding onto something prevents the victim from pulling you in.

Water-Based Water Rescue Techniques
In this section you will learn 4 basic water rescue methods for when land based rescues are not possible.
Only use water-based rescues if land-based rescues are not possible. Like land-based rescues, water-based rescues have a preferred order of use. Here they are in that order.
Wading Rescue
The wading rescue is good in shallow water up to waist deep. Any more than that and it turns into a towing rescue. Also, the victim must be conscious.
Find a rescue aid and enter the water as close to the victim as you can while still keeping safe and out of his arms reach. If possible, keep hold of something on shore.
Instruct the victim to grab onto the aid and pull him to safety.
Boat Rescue
When there is a boat nearby and you know how to use it, you can use the boat rescue. As a general rule, avoid bringing the victim on board the boat.
For an unconscious victim, it is best to have a second rescuer hold his head above water as you drag him to safety. A solo rescuer will have to bring him on board. Be careful not to capsize the boat as you do so.
Throw a tow rope/float to the conscious victim. If he is calm, he could even hold on to the boat although this is risky with a panicking victim.

There are many situations where you will have to bring the victim on board. For example, if there is something dangerous in the water or when the distance to land is very far. Remember to be flexible.
Swimming with Water Rescue Aids
This is same as the wading rescue except you swim the rescue aid to the victim instead of wading. It is useful for conscious victims in deeper waters.
Swimming while holding water rescue aids requires prior practice. Also, practice taking off your clothes while in the water. You can use them as an improvised rescue aid if you are already in the water when someone needs help.
Like the wading rescue, be sure to stay out of arms reach from the victim. Using the aid is much safer. Help drag him to safety and make sure you are stable before helping him onto land.
Swimming Rescue Methods – Tow Rescue
Towing is when you have to grab the victim and bring him to safety. This may be for an unconscious victim, because you have no aid, or because the person is too panicked to grab your aid. The latter is the most dangerous as they may drag you under the water.
There are several types of rescue tows and the one you use will depend on the specific scenario.
Whenever you approach any victim for a tow, stop a few meters back from him first. Re-access the situation and calm the patient from a safe distance. Assuming he is conscious, tell him what you plan to do and that he should stay calm throughout the process. Continue to reassure him until he is safe on shore.
Armpit Tow
The armpit tow is useful with a cooperative or unconscious victim.
It allows you to approach from behind which is the safest position for you.
There are 2 types of armpit tows, i.e., the single and double. The one you use depends on what you prefer and the situation at hand.
To do an armpit tow you must first level the victim off. This is so you can keep his face out of the water and his airway clear. It also makes the victim horizontal to the water, making it easier for you to take him to safety.
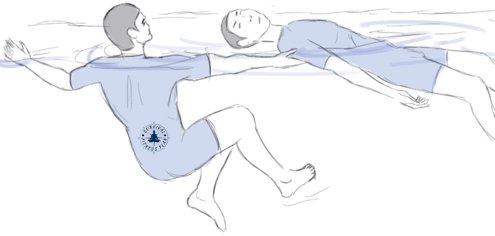
Single Armpit Tow
Approach the victim from behind and grab his armpit with your same side hand (e.g., right armpit with right hand).
Place your elbow of your other arm in the center of his back. Pull with your hand as you push with your elbow. At the same time use a scissor kick to level him out, face up. Your other hand can assist in the process if needed.

While keeping hold of his armpit, swim so you will drag him in the direction you want to go. Sidestroke works well. Allow your arm to extend until you start to pull him.
Double Armpit Tow
When the victim is larger than you the double-armpit tow may be easier to use, especially to level him off.
Approach the victim from behind and grab both his armpits. Grab his right armpit with your right hand and his left armpit with your left hand.
Place both your elbows on his back and pull with your hands as you push with your elbows. As you do this, use an inverted breaststroke (like in survival backstroke) to help pull him flat on his back. He is now leveled.
Continue to kick until your arms lock straight and you pull him. You will need to use a continuous and strong kick to keep your victim’s face out of the water.
Using the double-armpit tow long distance is hard since you have no arms to assist with swimming. A good idea is to start with the double-armpit tow and then switch to the single armpit tow once you have momentum.
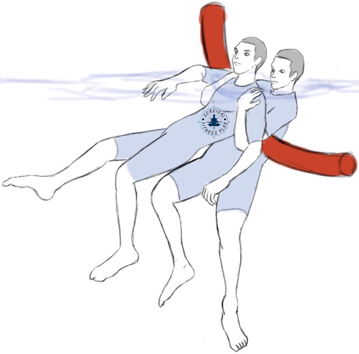
You can make the double-armpit tow easier with a flotation aid. Place any long, thin, buoyant object between you and your victim and then tow him as normal. A pool noodle or rolled up sleeping mat work well. If possible, swim up with it in place, e.g., across your chest and under your armpits.
When using an aid in this manner you may find it more difficult to level the victim. You will need to experiment to see what works best for you. You may even skip the leveling.
Once you have momentum, you can free up one of your hands to help you swim.
Every flotation device will act a little different. Experiment with things you are likely to have.
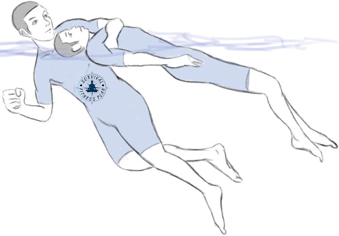
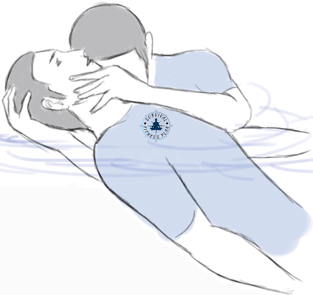
Cross Chest Carry
Use the cross chest carry when rescuing a victim through heavy surf. It is a good passive victim rear rescue but is more tiring than other rescues.
Approach the victim from behind and level him off (described in armpit tows). Encircle his chest with one arm. You can use your other hand on his side to help position him into a secure position.
Once you get a good grip, use sidestroke to swim him to safety. Your hip on his back helps to support him.
If the victim struggles, you can either tighten your grip or use a defense technique.
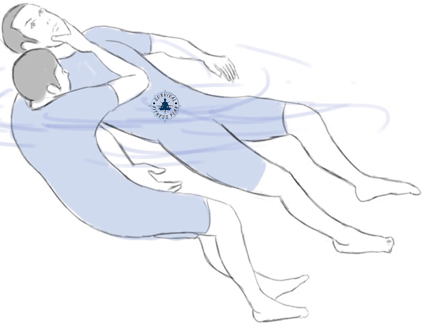
Vice Grip Rollover and Tow
When you suspect your victim has a spinal injury, use the vice grip rollover and tow.
The vice grip rollover and tow allows you to turn a faced down victim over and tow him while protecting his spine. You can also provide rescue breaths to an unconscious victim while towing him. You may wish to do this if the distance to shore is further than you want to wait to perform CPR.
To do the vice grip rollover you need to be in water deep enough to allow you to submerge the victim. Grip his jaw with one hand and align your fore-arm along his sternum.
Place your other hand on the back of the victim’s head and align your forearm along his spine. Squeeze your elbows together. Create a “vice” on his head, neck, and spine between your forearms.
Move forward to level him off. While keeping him level and stable, roll under him to turn him over.
Keep this vice grip and use a scissor kick to swim.
Giving rescue breaths is challenging but you can do it if the victim is not too big for you. Change your hand on his chin to a pistol grip and lean over to give the breaths.
Note: Giving rescue breaths will compromise the spinal support.
How to Defend Yourself Against a Drowning Victim
A drowning victim can be dangerous to anyone that gets within arms reach of him. He can grab and pull you down with extreme strength (due to increased adrenalin) to save himself.
This is why you only use a tow rescue as a last resort.
Practice these techniques on land first and then in the water. You want to do them instinctively.
Hold escape techniques in the water are different to on land. They consider the water and are non-violent.
They are non-violent because the victim does not intend to harm you. His instinct for survival over-rides his ability to see the negative effects. Defend yourself and then help the victim if possible.
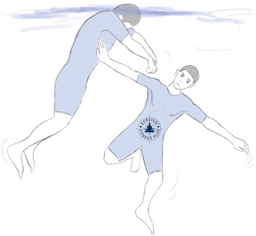
General Defense
Whenever a casualty tries to grab you, or as soon as you escape his grip, treat him as an obstruction.
Adopt the defensive position by lying on your back with your feet pointed towards him. Kick your legs to make a big splash. Be careful not to kick the victim.
Kicking your legs does a few things:
Creates distance.
Communicates to the victim to not grab you.
Breaks the victim’s grip if he grabs your legs.
When grabbed there are universal things you can do to escape without harming the victim.
Press your chin to your chest, raise your shoulders, and cross your arms over your face. This prevents the victim grabbing you around your neck.
Pull a finger or toe of the victim to loosen his grip.
Poke his armpit.
Take a big breath and submerge. All releases are more effective when done underwater. Your victim will want to stay above water so if you go under he is likely to let you go. He will at least loosen his grip which makes your escape easier.
The following techniques show how to escape the most common drowning victim holds. You can adapt these to other situations.
Block
The block is a good preventative technique to use when the victim lunges at you as you approach him from the front.
As he lunges raise your open palm against his upper chest.
Lean back and submerge, keeping your arm(s) extended as you do so. Swim away while you are underwater and the re-surface at a safe distance from the victim.
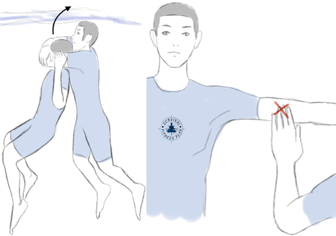
Wrist/Arm Grab Escape
When grabbed by your arm or wrist, reach across with your free hand and push down on your victim’s shoulder. Kick upward at the same time.
While keeping downward pressure on his shoulder jerk up hard with your trapped arm. Repeat this until you are free.
Release the victim and swim back to a safe distance.
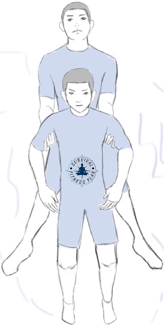
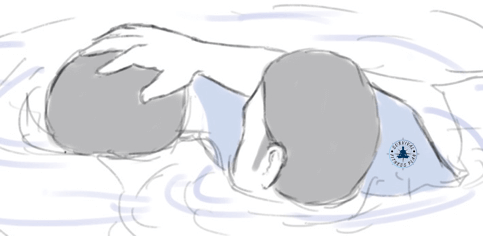
Head Hold Escape
Use this technique when the victim grabs you around your head and neck from either the front or back.
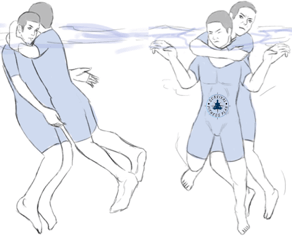
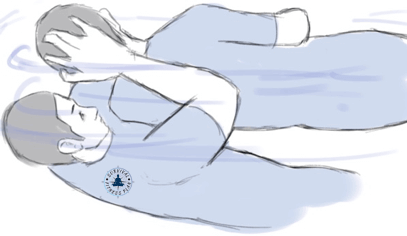
Protect your throat by taking a quick breath and tucking your chin into your shoulder. Clap your hands above your head a few times so you submerge underwater. This will also drag the victim underwater which often encourages him to let you go.
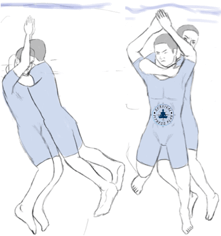
Apply an upward grab and thrust with your thumbs on his brachial pressure points. Find these on the inside of his upper arm, a little above his elbow.
Swim away while you are underwater and the re-surface at a safe distance from the victim.
Swift Water Rescue Procedures
These rescues assume you only have one rope (such as a throw bag) and no other specialist equipment. Using this minimalist approach leaves you with the simplest of rope rescue techniques.
If you enjoy whitewater sports you should carry more equipment. Take a professional course on how to use it.
Be sure to use proper rope throwing techniques when training in these rope rescues.
With all rope rescues, if you have the manpower, place safety rescuers. Put one upstream of the rescue to warn and redirect or stop anyone coming down the river. Also place one or more safety rescuers downstream of the rescue. This is in case a rescuer becomes a victim (e.g., if he falls in the water). Also, if the first rescue fails, there will be an immediate backup.
Note: Safety rescuers are not in most of the following demonstration pictures. Place them if you have the man-power.
Land Rope Rescues
Entering water is always more dangerous than performing a land-based rescue. With swift water the danger of a water-based rescue increases. Use a land-based rope rescue if possible.
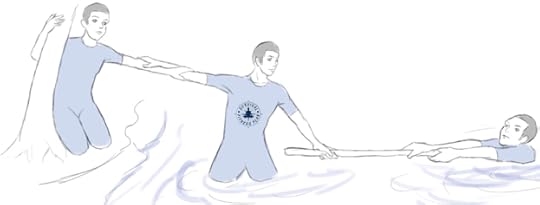
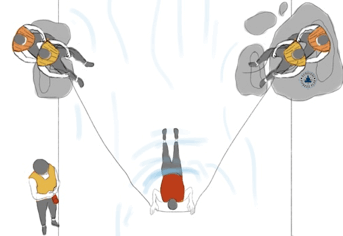
Pendulum Rescue
The general idea of a pendulum rescue is to throw a rope to the victim so he can grab onto it as he drifts by. He then “swings” in an arc (like a pendulum) to shore.
The pendulum rescue is fast to deploy but two things can go wrong.
The victim may miss the rope.
If the rescuer is not anchored he may get pulled into the water.
To do the pendulum rescue you must position yourself downstream of the victim. Be sure to give yourself enough time to deploy the rope. Anchor yourself if needed, depending on the weight of the victim and the force of the current. If possible, hold on to a tree or have a second rescuer hold on to you.
You should also consider what obstacles the victim may swing into due to your placement.
Throw the rope a little in front of and past the victim so he can grab it as he floats past in the defensive position.
Instruct the victim to grab hold of the line and place it over his shoulder. This will orientate his head towards the rescuer. He must stay on his back. Keep stationary and allow the current to swing the victim towards the shore. Once the pendulum effect has finished, pull the victim the rest of the way.
LEARN HOW TO SURVIVE A RIP CURRENT

To counter-act the victim’s weight, use a belay position by passing the rope around the upper bit of your butt. For extra stability, you can sit on it, and if you have a water rescue team, have someone help to hold you down.
If possible (and not dangerous), after you have thrown the rope, take a few steps back inland. This will increase the pendulum effect and reduce the load you need to bear. Let out some rope as you get repositioned. Once you are stable, pull the rope tight to start the pendulum.
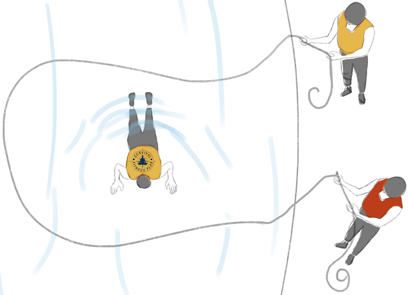
Stabilization Line
A stabilization line is where you fix a rope across the river to catch the victim. It takes more time to set up but lessens the chances of missing the catch.
It is also useful for providing a general support line which the victim can use to hold his head above water. This can be a lifesaver in cases such as a foot entrapment when the current is forcing the victim down.
The stabilization line requires at least two people. One on either side of the river. You could do it with one person by tying one or both ends to something, but you would have to cross the river.
The smaller the angle between the rescuer(s) and the victim the easier it will on the rescuers.
Once the victim catches the line, he can traverse himself to safety.
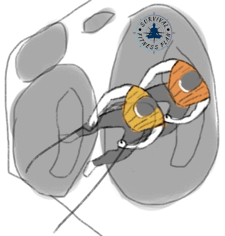
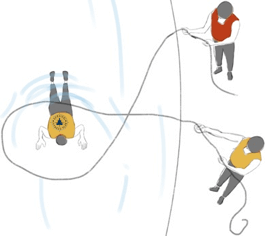
Kiwi Cinch
The Kiwi Cinch is the only simple land-based rescue you can use with an unconscious victim. It requires the victim to be drifting close to shore.
Do it by looping the rope around the victim and then pulling him in.
Like the stabilization line, it is possible to do the Kiwi Cinch with one person, but it is much easier with two. This demonstration uses two people.
Each rescuer coils one half of the rope from the center out. This way they will have the same length of rope.
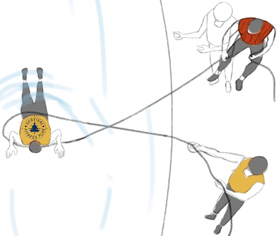
As the victim drifts past, the rescuers throw the rope around him in a big loop. The two rescuers must communicate well so they throw their ends of the rope at the same time. They must hold on to the other end of the rope.
Cross the rope to create a closed loop around the victim. To do this, the two rescuers must swap places. The upstream rescuer walks behind the downstream rescuer. His rope will cross on top. The downstream rescuer moves up at the same time.
Once in place, tighten the loop (the cinch) around the victim’s torso. The new upstream rescuer anchors himself in a sitting belay. The downstream rescuer pulls his side of the rope to swing the victim to shore.
LEARN WHITE WATER SWIMMING SKILLS
Swimming Rope Rescues
Swimming rope rescues need the rescuer to enter the water to save the victim. This includes wading. Use them for unconscious victims, floating equipment, or anything that can’t self-rescue.
Simple Rope Tether
With the simple rope tether, attach the rescuer to a rope as he wades out to rescue the victim. Secure the other end of the rope on shore by tying it to something or having a second rescuer as a belayer.
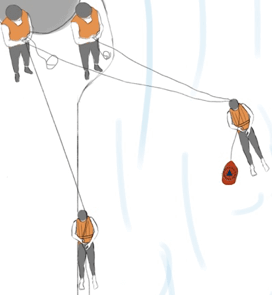
Tethered Swimmer
The tethered swimmer rescue is when the rescuer swims up to the victim instead of wading. The rescuer will need two hands, so tie him to the tether.
Although a tied belay would work, it is best if the belayer is human. This way he can feed out the line as needed and help pull the rescuer and victim to shore. The belayer should feed the rope loose so the swimmer restricted by it.
When the victim is wearing something on his upper body (such as a life jacket) the rescuer can grab onto it. If not, use an armpit tow.
When there is a human rescuer on shore he can pendulum/pull the rescuer and victim to shore. If not, then they can drift downstream until the line gets taught. They will then swing towards shore.
All water rescue is risky, but river rescue training is more-so. This is a subject you need professional training in to keep safe.
Besides swift water rescue and recovery techniques, a professional course can teach you swift water rescue terminology, water rescue knots, swift water rescue hand signals, and more.
Inspired? Pin it for Later↓


Learn to Swim Faster and Longer + Water Rescue Skills!Get Your Copy of Swim Workouts and Water Rescue Skills Today
Swim Workouts and Water Rescue Skills: Techniques to Swim Faster, Longer, and Safer (Escape, Evasion, and Survival Book 6)
Price Disclaimer
Water Rescue Awareness Online Conclusion
Now you know different types of water rescues which you can use as water rescue drill ideas, as open water rescue emergency response, for inland water rescue, and more.
They also make good water safety and rescue training exercises for flood rescue training or whatever.
Water rescue is dangerous. Follow these water safety basic rescue procedures to give yourself the best chance of success.
Did you enjoy this article about basic water rescue training? If so, please share it with your friends.
The post Basic Water Rescue Training Online appeared first on Survival Fitness Plan.
October 3, 2018
Basic Stick Fighting Techniques for Self-Defense
Basic Stick Fighting Techniques for Self Defense
Here are some basic stick fighting techniques for self defense. It covers stance, stepping, strikes, and defense.
There are many stick fighting styles from around the world. This stick fighting training is a mixture of Filipino stick fighting forms.
I use the terms Kali, Escrima, and Filipino stick fighting interchangeably in this article. They all mean the same thing – fighting with a stick.
Contents
Stick Fighting Basics – Stance
Stick Fighting Tutorial – Stepping
Stick Fighting Lessons – Strikes
Stick Fighting Moves – King Strike
Stick Fighting Drills – Cutting Strikes
Stick Fighting Exercises – Stick Fight Blocking
Stick Fighting Filipino King Block
Stick Fighting Routine – Parry Drill
Stick Fighting Instruction – Returning to 7 Drill
Stick Fighting Locks and Disarms
Twist Snatches
Lever Snatches
But Strike Snatches
3 Self Defense Training Manuals for 1 Low PriceGet Your Copy of the Vortex Control Self Defense Bundle Today
Vortex Control Self Defense Bundle: Hand to Hand Combat, Knife Defense, and Stick Fighting
Price Disclaimer
Basic Stick Fighting Techniques for Self Defense
Stick Fighting for Beginners – Stick Fighting Stance
When Escrima fighting with a stick the first thing to learn is correct stance.
When stationary stand with your feet a bit wider than shoulder width apart.
Hold the stick in your strongest hand and have your strong side as your lead. The bottom of your weapon extends between 1 and 2 inches below your little finger.
Unless striking or blocking, hold your stick over your shoulder. Your hand is near your ear on the same side and the tip of your weapon points to your rear. Doing this will:
Keep your hand out of range from your opponent’s strike. If he hits your hand you might drop your weapon.
Give your strikes the greatest power and speed for attacking your primary target, i.e., your opponent’s head.
Your rear hand is a back-up for defense or secondary attack. Keep it close to your centerline most of the time.
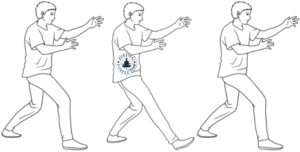
Your stance never exaggerates too long or short.
Keep most of your weight on your rear leg. The heel of your front foot lands first and then the toes from both feet land at the same time. This keeps you grounded and ready for the next move.
Stick Fighting Elementary Strikes
When practicing self taught stick fighting you want to stick to the basics. Here are the single stick elementary strikes.
The King Strike
The best strike in stick fighting by far is the “king strike”. Filipino stick fighting drills this is the number 7 strike.
The number 7 strike comes straight down between your eyes. With it, you own the center-line, and who-ever owns the center-line has the advantage.
When striking, target your opponent’s face or the top of his head. In a defensive capability, it protects you from any angulated strike.
To do the number 7 strike, start in the basic stance. Bring your stick straight down the center into your target.
As the stick comes down your other hand comes up. This helps keep you balanced/symmetrical and is also a backup defense.
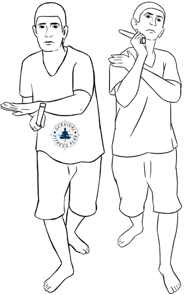
Escrima Stick Fighting Drills – Cutting Strikes Drill
In this single stick training drill you will practice cutting strikes.
Cutting strikes are those that you follow through on. Like a slash with a sword.
This is as opposed to stopping or bouncing off when you make contact.
When practicing these kali stick fighting strikes, stand a little wider than shoulder width. Lead with your strong side and have your body at 45° to your target. Point your feet toward your enemy.
Practice using circular forces. Roll your strikes using your waist. The power comes from body motion, not your arm.
Using your arm and wrist lacks power. It is good for the sport to get fast points but not very effective on the street. Big hits end fights.
These martial arts stick fighting techniques are short range. Do not extend your arm too much. You may get more distance but it loses power at your shoulder. It will also make it easier for your opponent to manipulate/grab your stick and/or arm.
Aim to hit your target with the top couple of inches of your stick. The strikes go through your opponent in a cutting motion.
Backhand to the Head
Start with the stick on your left side to the top of your left shoulder. Strike diagonal and down across your body to your bottom right.
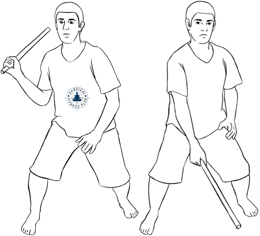
Backhand to Knee
Raise the stick up to your left shoulder. Stay low.
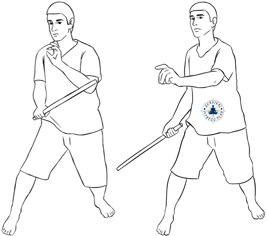
Stick Fighting for Self Defense – Blocks
Learning defensive Escrima stick fighting techniques is important.
The following are practical and easy to do.
King Block
If your opponent uses an angled attack, your number 7 will win.
When you both use king strikes then whoever is first to the target has the advantage. If you are not the first, you must turn your attack to defense.
Note: If both fighters use king strikes at the same time then the tips of the stick will clash. In reality, this is unlikely because doing a perfect king strike is rare. In most cases, it will angle a little to one side.
To make the king strike defensive place your rear hand behind your stick as you do the strike.
If needed you can turn a little toward the angle your opponent’s strike is coming on. Do not turn over 10°.
Creating triangles makes the defense structure strong.
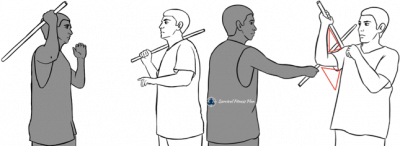
Once you have deflected the attack, counter-attack (left picture below).
You can use your other hand to help guide his stick out of the way (right picture below), or if you are ahead of his timing, your sticks may not even come into contact.
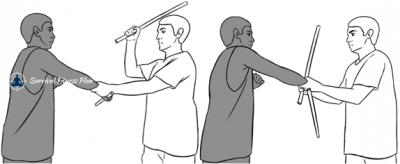
When you need to deflect on your left side point your stick over your left shoulder. The triangle is still there.
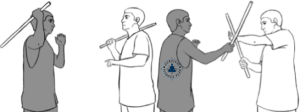
Grab the top of your opponent’s stick with your left hand. Use an overhand grip (palm facing down).
Pull your opponent’s stick down towards the outside of his guard so it is horizontal.
Your 2 sticks form a cross. Your stick is close to your opponent’s hand.
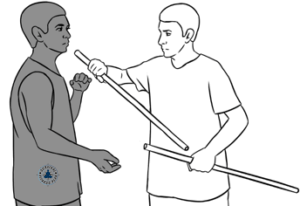
Fist on Fist
Your opponent attacks with a forward downward strike. Block the strike.
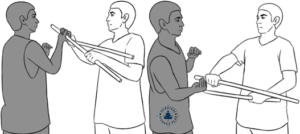
Finish with a strike to your opponent’s face.
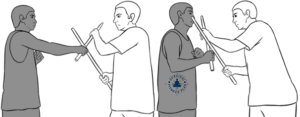
Twist your opponent’s stick anti-clockwise to your left using your stick as a fulcrum.
As you do this, you need to let the stick “spin” in your right hand so you finish with an overhand grip. Once your opponent’s stick is towards your left side tighten your grip.
Keep twisting until the stick comes out of your opponent’s grip. Aim the bottom of the stick towards his groin. Not only will this hit him, it also makes it easier to get the stick out of his grip.
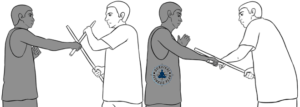
Do a second thrust past your opponent’s head. This may also be unintentional if you missed the first thrust. Next, use your arm as the fulcrum point to disarm your opponent in the same way as snatch 8.
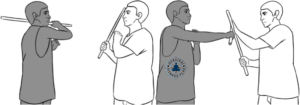
Grab your opponent’s right wrist using an underhand grip.
September 30, 2018
The Ultimate Parkour Tutorial for Beginners
This parkour tutorial for beginners aims to teach you the parkour fundamentals.
It includes a basic parkour moves list with pictures, top parkour tips, and some parkour facts.
DOWNLOAD YOUR FREE ESSENTIAL PARKOUR TRAINING SCHEDULE
Parkour Tutorial for Beginners Contents
What is Parkour?
A standard parkour definition is:
“An activity where you move from one point to another as fast as possible.”
While doing this you can use parkour techniques to negotiate obstacles including running, jumping, climbing, and more.
Where to Practice Parkour
You can learn how to practice parkour at home, in the park, in a parkour training gym, etc.
In fact, you can go parkouring anywhere there are structures to practice your parkour skills on. Oh, and as long as the authorities allow it.
Parkour Exercises for Conditioning
Before you can learn parkour tricks for beginners at home you need to develop your parkour muscles.
Conditioning will get you closer to the ideal parkour body type.
The Survival Fitness Plan conditioning exercises are a good start. Do super burpees and pull-ups every day. Pull ups are also one of the best upper body parkour workout exercises. Learn about those exercises here.
Yoga also compliments parkour well. The Survival Fitness Plan yoga stretch is a good parkour yoga routine as it works the whole body. You can find it here.
The best workout routine for parkour depends on what you need to develop in. The hardest parkour moves to do are those which you don’t have the strength. Focus on developing those muscles.
Here are some additional basic parkour core workouts that only use bodyweight so you can do your parkour conditioning at home.
How to Catwalk for Parkour Movement and Conditioning
Catwalking is a form of quadrupedal movement. Quadrupedal movement is the act of moving on all-fours.
Other types of quadrupedal movement include side sapiens and ground kongs. They all have their practical use and also make great conditioning exercises.
The catwalk is useful when having to traverse across thin surfaces such as ledges and rails. They are also useful to get through or under small areas. It gives you more balance and control on the obstacle and also lowers your profile. This makes it great for escape and evasion.
Start by getting down on your hands (flat palms) and feet. Put your right hand in front of your left hand, and your left foot in front of your right foot.
Your hands and feet form a line and as you move forward, you want to maintain this line as close as possible.
When first starting it will help to follow an actual line on the ground. When you are on a ledge or rail you will have little choice.
To move forward first move your rear hand to the front, then your rear foot to the front. Repeat this. Start with small steps. Transfer your weight between your arm and legs — front and back, left and right.
For stability, keep three points of contact on the surface at all times.
Once you have gained the coordination of movement concentrate on perfecting your posture. Make yourself as level as possible from your hips to your head.
Keep your back horizontal to the ground and your head forward.
Don’t stretch yourself out, bring your knees too close to your body, or stick your bum out.
When you need a rest, crouch. Do not put your knees on the ground.
Progress further and work different muscles by cat-walking in different ways. Backward, up and down stairs, getting low, on ledges, on rails, etc.
How to do Side Sapiens
Side Sapiens (a.k.a. side monkeys) are good to displace momentum when landing from a drop or to continue flow into your next movement. They are also a good progression step when learning the reverse vault.
Start in a low squat position.
Reach your arms out across your body to your left and plant them firm on the ground. Your right-hand lands first closely followed by your left.
Keep your arms strong and use them to support your body weight as you bring your legs to your left. Your right foot lands first closely followed by your left so you are back in the low squat position.
Engage your core and land with control. Land light with your feet and as quiet as you can.
Repeat this movement a few times and then go back the other way.
This is also good to practice on ledges and rails.
For more of a challenge, you can do this exercise with straight legs.
How to do Parkour Ground Kongs
Ground Kongs are another type of quadrupedal movement. They are a progression to the kong vault but are also practical in their own right. Use the ground kong to displace momentum from a drop and/or to continue flow into your next movement.
Start in a low squat position.
Reach forward and plant both your hands on the ground.
Keep your arms strong and use them to support your body weight as you bring your legs up to your hands (or as close as you can).
Engage your core and land with control. Light and quiet is the key.
Repeat this movement a few times.
When you are confident practice on ledges and rails.
As you build strength, you can try to cover more ground.
[image error]
You can also do ground kongs backward which will target a different set of muscles.
Parkour Roll Landing
The parkour safety roll is one of the best parkour moves to learn for safety. It is also useful in self defense.
Use the safety roll to prevent injury from a technique gone wrong, a big drop, a general fall, or if someone pushes you. It is also a good technique for transitioning between movements.
Your aim should be to make your safety roll instinctive. This is because the times you will need it most are those when you are not ready.
How high can a parkour roll save you?
Landing with a well-executed parkour roll will allow you to jump from higher than without, but how high depends on your training.
As a beginner, start small and work your way up. If you start with something half your height, you can work your way up to 2x your height within a few months.
This tutorial will teach you how to do a parkour roll without hurting yourself.
You can do the parkour safety roll forwards, sideways, or backward. You will use the forward roll most often but practice them all.
When first learning how to do a safety roll, do so on soft ground such as on grass, mats, or sand. Take it slow and start low. Once you have the technique you can progress by increasing height and/or momentum.
Gymnastic mats work well for this kind of thing. You can compare the best safety mats for training here.
When you are confident, you can learn how to do a parkour roll on concrete. If you are get parkour roll shoulder pain, take a rest from the concrete for a few days.
Forward Parkour Roll
Choose which side you are most comfortable rolling over, right or left. You want to learn to roll on both sides, but for now, start on one.
If rolling over your right shoulder, kneel with your right foot forward.
Place your hands on the ground in front of you so that your thumbs and index fingers form a kind of diamond shape. Put them at a 45º angle in the direction you want to roll in.
Note: You can roll straight over your shoulder if you have something in your hands. When you have your hands available, it is preferable to use them to help control your motion. They also absorb some impact.
Look over your left shoulder and use your rear leg to push you over into the roll. Use your hands to control your momentum and your arms to lift you a little. You want to land on the back of your shoulder blade. Try not to hit the top of your shoulder.
Roll across your back to your opposite hip. If you roll wrong (which is common when first learning) you will feel it. It is a learning curve.
Come up from your roll between your tail and hip bones. Use the side of your leg and your momentum to get back on your feet.
You could also come straight up to your feet as opposed to using your thigh. This saves your knee contacting the ground but puts more pressure on your ankle as you stand.
As you get more confident start from taller positions such as squatting and standing.
A good exercise is to stand straight and let your body fall forward like a plank.
At the last moment roll out. You can do this with side and back rolls also.
Also, progress to rolling with momentum and with jumps.
When jumping into the roll keep your legs flexed as you land and allow the momentum to push you into the roll.
Once you are confident, you can jump and roll from ledges. Work your way up to this with both confidence and strength. You need to increase the strength in your legs to do bigger and bigger drops.
As you increase height and speed, it will help to land with your feet closer together. Also, be more adaptable with your arms.
Note: Dropping into a roll is not the same as a dive roll. When dropping from height your feet still make contact first.
Side Parkour Roll
Side rolls are good for preventing injury when falling in a weird direction.
This parkour technique is like a forward roll except that you will roll at a more horizontal angle across your back. The exact rolling path also depends on the angle you are falling at.
As you fall use your hands to help control your movement. Ensure you clear your arm/shoulder and land somewhere on your back.
Use the momentum to create as smooth a roll as possible and then come back onto your feet.
Back Parkour Roll
When first learning backward safety rolls it helps to do the forward roll first. Do the forward roll and stop before getting to your feet, then roll back using the same line as you rolled forward on.
Roll forward and back a few times to get the feeling.
When ready you can back roll and come up to stand. At the end of your back roll continue to go over your shoulder.
Use your hands to push yourself up a little so you can get on your feet.
When back rolling from a drop always try to absorb the impact with your legs as much as possible.
Landing with one foot in behind the other will make going into the roll much easier.
Lower yourself down as much as possible and then go into the roll.
Get back on your feet as before.
[image error]
It is important to practice rolling until it is an instinctive reaction and then to continue to practice them with all variations (jumping, momentum, both sides of the body, landing at different angles, etc.).
Parkour Dive Roll
I consider dive rolls an advanced parkour technique but they are a good skill to know for safety.
Use the dive roll in parkour or self-defense to prevent injury when coming down on your head. In most cases, dive rolls are intentional. Such as when diving over an obstacle. You can also use it in accidental falls where you are low to the ground and don’t have the room to land feet first.
Note: If possible, landing feet first and doing a safety roll is your best option.
Ensure you are proficient at the safety roll before continuing with this dive roll tutorial.
Avoid doing the parkour dive roll on hard ground, even when proficient.
The technique for doing the dive roll is like the forward roll but there is a lot more impact and momentum. Also, you are coming doing toward your head as opposed to landing on your feet first.
Start by practicing the forward roll from a handstand. You don’t need to be great at handstands, you only have to get at the right angle for a moment so you can go into the roll.
Lower yourself with your arms then lean forward a little to tuck your head as you go into the roll.
Keep your body strong (arms, core, legs, and neck) as you allow your body to “collapse” into the roll.
Once you are comfortable, you can jump into the dive roll from a standing position.
Kick your leg back as you jump to help get your hips over.
As you hit the ground absorb some impact with your arms. Do this by keeping them strong whilst allowing them to collapse. Also, use your arms to ensure you get over your head.
Use the momentum to flow onto your back and into the roll.
[image error]
Next, try it with a short run-up, and then try jumping off with two feet.
Progress until you are doing a full dive roll. Dive and stretch out like a cat.
Absorb the impact with your arms.
[image error]
Tuck your head as you go into the roll.
Train at this level until you have it instinctive. Progress by jumping higher and over things.
When jumping over things ensure your hips clear the obstacle and your legs/feet follow the same path.
Parkour Jumping Techniques
Parkour Precision Jumping
Precision jumping is a fundamental parkour skill in which you jump from one point to another. It allows you to land on small spaces like ledges and handrails.
You want to land right on your intended landing spot. There is no extra movement such as stumbling forward or backward.
Begin with your feet together and bend your knees a little so you are in a semi-crouch position.
Move your arms behind you as you shift your weight to the balls of your feet.
Lean forward. The greater the distance you need to jump, the more you need to lean.
As you jump throw your arms forwards and upwards.
Your energy travels up the legs, through the torso, and into the hands.
Aim to arc up and then come down on to the landing area, landing on the balls of your feet as quiet as you can. Land on both feet simultaneously.
When ready, jump from farther back and with small level differences, such as onto a curb.
[image error]
You can also try high to low, to/from rails, etc.
Note: When jumping onto handrails it is extra important that you aim to land on the balls of your feet. This way if you slip a little then you have the whole of your foot to recover. If you land on your heels and slip, you will fall.
Running Precision Jumps
When precision jumping over very large gaps you can use the running precision jump. The running precision jump is what it sounds like, i.e., a precision jump with a run-up.
The running precision jump uses a one-foot take-off. You still land in the same way as a standing precision jump, i.e., a precise double foot landing.
Since you are jumping with much more momentum “sticking” the landing is more difficult. Many people find they jump too far and/or stumble forward when landing.
How to do Parkour Striding
Parkour striding (or bounding) is useful for running across elevated obstacles. It is like precision jumping but instead of a stationary landing, you leap from one foot to another.
Approach the stride like a running precision. Run up and take off from one foot.
Instead of trying to land with 2 feet, elongate and stretch your legs out front and back.
As your lead leg lands, you want your center of gravity to be over your foot so you can push off into the next stride. If you are too far forward or back it will mess up your momentum.
It will help to get your arms and leg in sync. It is the same as walking, i.e., whichever foot is in front the opposite arm is also in front.
You can use this arm swing to generate more power. The further the distance between your obstacles the more you should swing your arms.
Parkour Vaults for Beginners
How to do the Parkour Safety Vault
You can use the safety vault to pass a low and short obstacle in front of you such as a waist-height wall. The safety vault is the first vault to learn. This is because it is the easiest to learn and the safest to do.
An easy way to learn the safety vault is by numbering your hands and feet. It will help you remember the order of placement.
Left hand.
Right leg.
Left leg.
Right hand.
Take it slow at the start. Get the pattern into your head, and then into your muscle memory.
Approach the obstacle and place your left hand (#1) on it. Next place your right leg (#2). Stretch it out far enough to allow your left leg (#3) to pass through between your left hand and right leg.
[image error]
Step straight through with your left leg. Keep your right arm (#4) up so you can pass your leg through easier.
Here is what it looks like from the front.
Practice on both sides of your body.
When you add speed your #1 leg doesn’t have to push off that much. It becomes a touch on top of the obstacle so you can gauge where it is.
As you run up to the obstacle, be sure not to stop to prepare for the vault. Stride onto it and go up and over the object in an arc.
Land with your chest above or in front of your foot. Also, use your #1 and #2 to push the object behind you so you get more forward momentum. At the same time reach with your #3 leg down to the floor.
[image error]
How to do the Parkour Lazy Vault
The lazy vault is useful when approaching a small to medium sized obstacle at an angle. You can approach at any speed.
You can also use it when coming in and out at a similar angle and when you want to exit at a different angle.
Assuming you are approaching the obstacle from the right, your limbs will go over the wall in this order:
Right hand.
Right leg.
Left leg.
Left hand.
This first progression step will help you get the mechanics of the technique.
Approach the wall on a diagonal from the right and place your right hand (#1) on the wall as you jump up. Your right leg (#2) goes through and you land on the wall with your left foot (#3).
Drop to the ground landing on your right foot first (#2) and then continue to run.
Here it is from behind.
Once you are ready, you can learn the actual lazy vault which means you will not place your left foot (#3) on the wall.
Kick your legs up, over the wall, and then bring your hips up.
As you go over your left hand (#4) replaces your right on the obstacle.
Use your left hand to help push your hips away from the obstacle so you can continue running.
A “proper” lazy vault means you approach on an angle and exit along the same path. Ensure your limbs go over in the right order and that you land/run out on #2.
If you want to exit at a different angle, turn your hips in the direction you want to go while in the air.
If you are exiting at a different angle without meaning to, it may be because you are forgetting to put your #4 hand down.
How to Parkour Kong Vault
The kong vault is useful for vaulting longer or higher obstacles. It is more difficult than other vaults but is worth the practice.
Other names for the kong vault include the cat pass, monkey vault, kong leap, and others.
Start on something like a picnic table, i.e., wide enough to land on but not too high, and small enough to vault over.
This first progression exercise is helpful to get over the fear of hitting your toes on the obstacle.
Stand at one end of the obstacle and place your palms flat on it a little more than shoulder-width apart. Have your fingers facing forwards.
Use your arms to support you as you jump up onto the obstacle, landing with your feet between your hands. Move your hands away as needed.
[image error]
Repeat this exercise until you are comfortable with the mechanics.
When ready, try to land further forward by pushing the obstacle back underneath you. The more you push the further you can go.
[image error]
Next, try starting with some distance between you and the obstacle.
[image error]
Take a 1 or 2 step “run up” then do the same as before.
[image error]
Let the momentum help you get further onto the obstacle.
To get even further, you can run up with more momentum using one of 2 take-offs depending on the obstacle.
First, try the 2-foot punch take off which most people find easier. It will redirect momentum up which makes it better for high obstacles.
Start further away from the obstacle than you have been.
[image error]
Run up and hop on one foot, then land on both feet together. You will need practice to learn where a good distance is for you to land back from the obstacle.
[image error]
Use the momentum to go into a dive onto the obstacle then complete the vault as normal.
Next, try the split foot take off. The split foot takeoff has more forward momentum than the two-foot punch takeoff. This makes it better for longer obstacles.
Start at about the same distance as you did for the 2-foot punch take off.
[image error]
Run up and hop on one foot and then land on the opposite one. Take another quick step and then push up with both feet to go into the dive.
[image error]
Complete the vault as before.
Try to get further and further until you can clear the obstacle.
To get more distance increase your approach speed and use the split foot take off.
[image error]
Kick out your feet to raise your hips which will help stretch out your dive.
[image error]
Spot where you want your hands to land and then push up and forward as your arms make contact.
Land on 2 feet to begin with and then progress into landing in a one-two motion so you can resume running.
Once you are comfortable, try the kong vault on higher and/or longer obstacles. Be sure to use the right take-off, i.e., 2-foot punch for higher and split foot for longer.
How to Parkour Wall Run
Here you will learn 2 types of wall runs.
The first is how to run up a wall. This will also include the parkour climb up.
The second is how to wall run sideways.
How to Wall Run Vertically
If you want to know how to climb a high wall, parkour has you covered.
To practice the vertical wall run you can use any obstacle that is tall enough. You don’t have to reach the top of the wall to practice. If you can reach the top of the wall, it means you can also practice your wall climb (or other techniques) at the same time.
To begin with, you need to get the right spacing with your steps when approaching the obstacle. After a while this becomes intuitive.
Find a spot where you are comfortable with your leg resting on the obstacle at about hip height. Not too close where you’re pushing in and not too far away from where you are stretching to reach.
Now you can get comfortable stepping a foot onto the obstacle and jumping off it. Don’t worry about gaining height yet.
Use your strong leg against the obstacle first as that is the one that will have the most impact. Afterwards, you can practice on both sides.
As your foot hits the obstacle push into it in an upward motion. The aim is to get your center of gravity to go up. Do not apply too much downward pressure as it will cause you to slip. Run into the obstacle and “bounce” up off it.
Once you are comfortable add speed so you can get more height. Don’t go too fast too soon otherwise you might slam into the obstacle.
Jump and plant your foot as high as you can then kick off. If you are too slow to kick off, you will lose power.
[image error]
When there is a small obstacle you can try grabbing onto the edge. If not, aim to touch it as high as you can, keeping in mind that the higher you go the longer the drop back down.
After some practice, you will recognize how to react according to the obstacle such as approach speed, when to jump, and how high to plant your foot.
Throwing your arms up will give you more reach as will leading with one arm.
Leaving your hand on the obstacle can be useful to give you a little extra push up. It can also prevent you from slamming into it.
How to do the Parkour Wall Climb
You can use the parkour wall climb up to pull yourself from a hanging position up onto a wall in a quick and efficient manner.
When first learning it will help to use the momentum from a cat leap or wall run to help get up the wall. Your aim should be to do it from a static hang.
Start on a wall you can wall run up so you can get the most out of momentum.
As soon as you have a grip on the obstacle use your feet to push your hips back as you pull up and in with your arms. Push your feet into the obstacle, not down. Try to straighten your highest leg.
Your leg push and arm pull is one smooth motion. The aim is to get your chest above the top of the obstacle.
As your chest comes over, you need to transition from your hands hanging to your hands on top. For most people, this is the hardest part of the climb-up.
[image error]
Using the momentum from the push/pull, take the weight off your hands and ‘pop’ them on top of the obstacle. Your aim is to get your palms on top.
The more you can push against the obstacle and the more momentum you have the easier it will be.
Once your hands are on top, push up. Keep your chest forward so you don’t fall back.
To make things a little easier you can transition one arm at a time. Progress to doing them together when you’re ready.
To stand on the obstacle use one of your feet to kick out a little so you can bring your other foot up on top.
Avoid using your elbows and knees to help you.
Once you can do the parkour wall climb up from a wall run, try doing it from a static hang. Push your body against the obstacle a little to help pop your hips back.
As your legs swing back in, place one foot on the wall and then get your other leg as high as possible. This will allow you to transition into the wall climb.
Correct technique is what will get you on top of an obstacle but having more strength will make it easier. Some useful exercises to help build strength are:
Dips. Do them with your hands in front of your chest as opposed to being out to your sides. This will mimic the climb-up.
Pull ups. Standard pull-ups. Not chin-ups.
Reverse climb-ups. Start from on top of the wall and lower yourself down by reversing the climb-up action. Do it slow.
SFP Super-burpees. The ultimate all-round conditioning exercise.
Traversing. Hang off an obstacle and climb around it.
DOWNLOAD YOUR FREE ESSENTIAL PARKOUR TRAINING SCHEDULE
How to Tic Tac and Horizontal Wall Run
Now you can use parkour for running up a wall. Next you will learn how to wall run horizontally.
A tic-tac is when you push your foot off an obstacle in an angled direction. It is a simple parkour technique which you can use for a few things. It can help you clear gaps, leap over obstacles, gain height, or for a quick redirection of your momentum.
A horizontal wall run is a progression of the tic-tac. It is when you take several steps along the wall as opposed to only one.
To begin with, get used to how the obstacle feels under your foot. Walk up to the obstacle and place your foot on it. Now push off in a slight upward manner so you arc back onto the ground. Whichever foot your push off with land on your opposite foot first and then continue to walk away.
You can focus your tic-tac to push away or along the obstacle. Face your chest and shoulders towards the destination you want to go.
Next add momentum and try to get more distance and/or height.
The more momentum you have the harder you can push off the wall and the higher and/or farther you will get. Also, the higher you place your foot on the obstacle the more lift and distance you will achieve.
Once you are confident, you can do it over objects.
Concentrate on your foot placement so you can get enough leverage off the wall to clear the object.
Then try with more steps. This is where the tic-tac turns into the horizontal wall run.
Approach at a smaller angle between you and the wall.
First, try with 3 steps, then 3 or more.
[image error]
You can also use the tic-tac to help overcome higher obstacles.
You’ll love this parkour book,
because it teaches you what you need to escape your enemy.
[image error]
Beginners Parkour Sport Tutorial Conclusion
I hope this parkour article is enough to get you started. Once you master these basic techniques you can move onto more advanced parkour moves.
If you need more visual guidance, I recommend watching parkour videos on YouTube. Ronnie Street Stunts tutorials are where I started off, but there are many to choose from.
It is also a good idea to join a parkour group in your home town. Training with other parkour enthusiasts will push you to improve, give you hands on guidance, and is safer than training alone. Not to mention all the friends you will make.
After a while you may also want to get into freerunning. This is the more “showy” version which uses parkour flips and other techniques. Perhaps you can post your best parkour tricks on YouTube yourself one day.
Happy parkour training!
Did you enjoy this parkour tutorial for beginners? If so, please share it with your friends.
Pin it for Later↓


The post The Ultimate Parkour Tutorial for Beginners appeared first on Survival Fitness Plan.
September 28, 2018
Surviving a Natural Disaster
Surviving a natural disaster is difficult no matter which type of natural disaster it is.
Knowing how to prepare for natural disaster will give you the best chance for survival.
In this article are 10 natural disasters types and how to survive them.
List of Natural Disasters
How to Escape From Fire
Fire Break Construction
How to Survive a Flood
How to Survive a Landslide
Severe Thunderstorm Safety Tips
How to Survive a Hurricane
How to Survive a Tornado Outside
How to Survive a Blizzard in the Wilderness
How to Build a Snow Cave
How to Survive Avalanche
What to do During a Volcanic Eruption
How to Survive in an Earthquake
Natural Disaster Survival Conclusion
Would You Know What to Do When Disaster Strikes?Get Your Copy of the Disaster Survival Handbook Today
The Disaster Survival Handbook: A Disaster Survival Guide for Man-Made and Natural Disasters (Escape, Evasion, and Survival Book 7)

Price Disclaimer
Surviving a Natural Disaster
How to Escape a Fire
This will teach you how to escape fire whether you are at home, in the car, or in the wilderness.
Signs of Fire
The first sign of fire is the smell of smoke. Animals will smell this before you so watch for strange animal behavior.
You may hear the roar of the fire before seeing the flames.
Fire Escape Plan for Home
A fire can destroy everything in its path. But for most people, abandoning the family home to escape from the fire is a last resort.
To avoid this, minimize and fuel for the fire around your house:
Keep gutters clean.
Keep surrounding vegetation to a minimum.
Store flammable materials well.
In addition, educate your family. Have fire extinguishers in the kitchen and in other places fires are likely. Make sure everyone knows how to use them.
If a fire is approaching douse your house with water.
Have a fire escape route and use it to escape the fire if it gets too close.
If you live in an apartment building, check the fire escape staircase works every few months. You can install fire escape stairs if you have a multilevel house.
If you do not evacuate in time, or if the fire is passing near you, stay inside. Block all the gaps around doors and windows and close all blinds and curtains.
Stay away from outside walls and wait for the fire to pass.
Once the fire passes, you can put out any small fires outside.
If the fire is inside and too big to extinguish, you must evacuate. Shut all doors on your way out to contain it.
Stay low and test door handles with the back of your hand before opening them.
Extinguishing a Fire
To put out a fire, you need to deprive it of oxygen. Smother it with sand, fire blankets, fire extinguishers, or other firefighting tools.
Water works too but if it is an electrical or oil fire, it will make it worse.
As soon as you feel you cannot control a fire get out of danger and call for help.
How to Make a Firebreak
Making a fire break is good if the fire is some distance away and there is no way of avoiding it.
The object is to burn off all the fuel in an area so that the main fire has nothing to burn.
The burnt area you create is the fire break and is safe for you to stand in.
Make sure you determine the wind direction before setting your fire.
The fire break width is as wide a line as possible. Good fire break guidelines are to make it 100+ meters wide. It can work as little as 10 meters depending on the size of the fire and strength of the wind.
Maintaining fire breaks if you are in a bush fire area is a must.
Saving a Person on Fire
Everyone has heard of Stop, Drop, and Roll for if you catch on fire.
Use the same principles on others on fire. This goes for animals too.
Your own safety comes first, so wait until they are clear of the main fire.
Push them to the ground, smother them with a blanket, and tell them to roll around. The heavier the fabric of the blanket the better it will work.
Cool any burned areas of the victim’s skin with lots of water and get them to a hospital.
Vehicle Fire
It is good practice to keep a fire extinguisher in your car. Not in the trunk! It must be somewhere easy to get to.
Beer cans make a good improvised fire extinguisher for small fires. Shake it up and open it facing the fire. The carbon dioxide will starve the fire of oxygen.
Protecting the fuel tank is the priority.
When you are in the car that catches on fire, try to put it out. If it that fails, evacuate.
Get out of the car even if the fire is out. The fumes will be toxic.
When a vehicle is on fire in a confined space you can try to remove it from the building, but don’t get into it.
From the outside, put it in a low or reverse gear and bounce the car out with short bursts of the ignition. Be careful. It will jerk forward.
Ways to Escape a Forest Fire
When you see a fire in the wilderness, avoid it.
First try to go around it.
The next best option is to move downhill and/or into the wind. These are the directions that fire travels the slowest. Smoke is a good indicator of wind direction.
When that is not possible, head for a natural firebreak. Natural firebreaks are things like water, a large clearing, a deep ravine, etc.
If you can’t avoid the fire, you can try to run through it as long as the vegetation is not thick.
If you plan to do this, the sooner the better.
Cover as much exposed skin as you can and soak yourself in water. Protect your mouth and nose with a damp cloth.
As a last resort, bury yourself.
Clear the area of foliage and dig as much of a hollow as possible. Throw the dirt onto a coat, blanket, or something similar.
Lie face down and pull the coat with the dirt on it over the top of yourself.
Cup your hands over your mouth and nose and try to hold your breath as fire passes over.
When you are in a vehicle, stay in it.
Don’t drive through thick smoke. Instead, park in a clear area.
If there is no clear areas, pull off the road but don’t risk getting bogged.
Turn on your headlights, shut the windows, and seal the air vents.
How to Survive Flood as a Natural Disaster
Flood is a natural disaster that often happens as an aftermath to some other disaster such as hurricanes or tidal waves.
If you expect a flood, avoid it by getting to higher ground.
How to Survive a Flood at Home
If you are at home or in a building during a flood, prepare survival kits and a raft as soon as possible.
Also, turn off gas, electricity and water at the mains.
Once you are ready, move to an upper floor or roof with a shelter.
If it is a sloping roof, tie everyone on. Stay put as long as possible.
How to Survive a Flood in a Car
When evacuating, or if caught in a flash flood in a car, be extra careful on the roads.
Do not cross water unless certain of the depth. It must be shallower than the center of your vehicles wheels or your knees if on foot.
Bridges underwater may have missing sections and even a small drop in a hill can make a big difference in water level.
If your car dies, abandon it.
How to Survive Massive Flood – The Aftermath
Once the flood is over, you need to be very careful of contamination and disease. Do not walk around in, drink, or bathe in flood water.
Purify all water and clean anything that has come in contact with flood water before consuming it.
Don’t eat animal corpses or any fresh food that has come in contact with flood water.
Burn the dead.
What to Do during a Landslide
There can be multiple names for natural disasters. Landslides, mudslides, debris slides, etc. are all the same.
Indications of a Landslide
One of the important survival skills during landslides is to recognize when one is approaching.
Signs of a landslide include:
A change from clear to muddy water.
Cracks appearing on your walls.
Doors or windows jamming.
Landscape changes, e.g., leaning trees.
Rumbling and/or cracking sounds of nature moving.
Widening cracks in the ground.
Stairs, outside walls etc. pulling away from buildings.
Sudden increase or decrease in water flow.
Water surfacing from the ground.
Landslides are most likely to occur:
After heavy rain.
After snow melt.
In heavy saturated ground.
In past landslide areas.
On embankments along roadsides.
With or after other natural disasters (earthquake, flooding, volcanic eruption, etc.)
How do you Prepare For a Landslide?
When you suspect a landslide, move away and get to high ground as fast as possible.
If you get caught in a landslide, roll into a tight ball on the ground. Protect your head.
After the Landslide
Once the landslide is over, keep away from the disaster area in case there are more.
Watch for associated dangers including broken electrical, water, gas, etc.
Repair and replant in damaged ground as soon as possible.
What to do During a Lightning Storm
In this section you will learn how to stay safe in a lightning storm including what not to do during a lightning storm.
The chances of getting struck by lightning are smaller, but you get hit your chances of survival are even smaller.
Knowing how to stay safe during a lightning storm is as easy as staying inside.
How to be Safe During a Lightning Storm Outdoors
When outside during a thunderstorm, avoid high ground and isolated tall objects.
You can try to find natural shelter, but not in the mouth of a cave or under an overhang of rock. Deep inside a cave is okay, but have at least one meter of space around you.
If you feel a tingling of the skin and/or hair standing on end, crouch down and place your hands on the ground. Make yourself as compact as possible and try to get on something for insulation – nothing metal or wet.
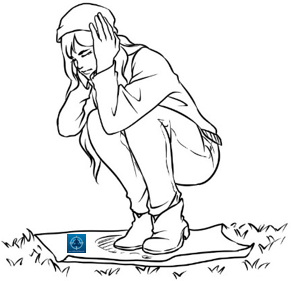
What to do in a Blizzard
A blizzard is a snowstorm which lasts 3+ hours and has 50km+ winds.
There are also ground blizzards where it is not snowing. Instead, strong winds blow the loose snow on the ground up.
This section aims to answer the question “what should someone do if they are caught in a blizzard?”
The best advice on how to prepare for a blizzard is to take shelter until it passes.
If camping in a snow blizzard stay inside your shelter. One of the biggest dangers of camping in blizzard conditions is getting buried in snow. Make sure you have tools inside your shelter so you can dig yourself out.
How to Survive a Blizzard in Your Car
If you have fuel to spare run the engine for heating.
Cover the engine so you lose as little heat as possible, but make sure the exhaust is clear.
If you feel drowsy stop the engine and open a window.
Only keep the heater on as needed.
If the snow is building up get out and build a snow shelter. This will prevent you getting trapped inside the car.
How to Build a Snow Cave
Building a blizzard shelter is the answer for how to survive a blizzard outside.
An easy to build emergency snow shelter is the boy scout snow cave. Here are the steps:
Try to find a level site not in danger of an avalanche.
Make a large pile of snow and stomp it down as much as you can.
Wait for the pile to harden so you won’t get a snow cave collapse.
Dig down about a meter, then a few meters into the snow on a slight upward angle.
Hollow out enough space for the amount of people you have. Consider sleeping and sitting space.
Create a ventilation hole.
Put something in the entrance to stop the wind.
Smoothing the roof on the inside will help with dripping.
Consider making levels so the cold air settles beneath you.
Insulate the ground if you can. Greenery will work if you have nothing else.
Be sure snowfall does not trap you in. Keep your snow cave tools inside.
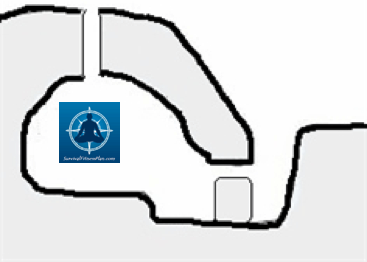
Moving in a Blizzard
If you need to move from your shelter during a blizzard, make sure you can find it again. Hang something bright off it.
Never move at night!
Tips to Survive a Hurricane
The term hurricane covers a few kinds of natural disasters including cyclones, typhoons, and other large storms.
All these types of storms are a little different, but the steps to survive them is the same.
During a hurricane, there will be a period of calm. This is the eye of the storm and may last up to an hour before the storm picks up again.
Signs of a hurricane include:
Abnormal barometric pressure variations.
Dense cirrus clouds converging towards the storm.
Increased ocean swell, especially if coupled with colored sunsets or sunrises.
If you have time before the hurricane hits, go as far inland as possible and away from river banks.
You best chance of surviving a typhoon is to stay indoors. Board up windows and secure any outdoor objects that might blow away.
Get as low as possible, e.g., in the basement.
If you are outside, try to find natural shelter such as a cave.
A ditch is the next best place and failing that, to the lee side of any solid structure. The lee side is the side that shelters you from the wind.
If there is no shelter, lie flat on the ground.
If you move, keep as low as possible.
During the calm eye of the storm, move to the other side of your windbreak or find better shelter.
Try to stay clear of things that may turn into flying debris during the storm. Examples include fences, coconuts, small trees, etc.
When at sea during a hurricane you need to batten down the hatches, stow all gear, and take down any canvas.
If your boat is small, tie yourself to it.
Tips to Survive a Tornado
You can hear tornadoes from great distances. They sound like a spinning top. They also have a calm eye like that of a hurricane.
Your best chance for surviving a tornado is to take shelter below ground.
If there is no below-ground or re-enforced shelter, close all doors and windows.
Go to the center of the lowest floor and into a small room such as a bathroom or closet. Stay away from glass and where there is heavy furniture on the floor above you.
Get under sturdy furniture or cover your body with a mattress.
How to Survive a Tornado in a Car
Do not stay in a car or caravan unless there is no other option. Any building is better than a car.
If you have no choice, put your seatbelt on, cover yourself, and keep low.
How to Survive a Tornado Outdoors
When there is no shelter, go to an open area.
Move at right angles to the tornado’s predicted path and take shelter in a ditch or depression.
Lie flat and cover your head with your arms.
What to do in a Volcanic Eruption
What is a volcanic eruption? A volcanic eruption is when lava and gas spurt from a volcano. It poses many threats. All are life-threatening.
Knowing what to do in case of volcanic eruption starts with recognizing the signs.
Signs of volcanic eruption include:
Acid rain.
Signs of activeness from the volcano like rumblings, steam, etc.
Sulfurous smells from rivers.
What to do before a volcanic eruption? Evacuate!
Volcanoes give warning most of the time, so the best answer for how to stay safe during a volcanic eruption is to get out of the danger zone.
Volcanic Eruption Hazards and Action
Here is what happens during a volcanic eruption and tips for how to survive a volcanic eruption.
Lava
You can outrun lava but it won’t stop until it hits a valley or cools off.
Missiles
Missiles can be of ash, rock, molten lava, etc. Wear a hard hat.
Ash and Acid Rain
Ash will make the roads slippery so be extra careful when driving.
Cover your mouth and nose with a damp cloth or an industrial mask and wear goggles that seal around the eyes.
Once you reach shelter, remove your clothing. Wash any exposed skin well, and flush your eyes with clean water.
Gas Balls
Take refuge in an underground shelter or under water while it passes overhead.
Mud flows
Mud flows can occur during the eruption or after it has finished. Deal with them in the same way as land slides.
Knowing what to do after a volcanic eruption depends on which of the above things occurred. You will want to stay clear of the area for a while. Follow what the rescue services say.
I hope these volcano survival tips help you decide what to do before, during, and after a volcanic eruption.
How to Survive an Avalanche
When in avalanche territory there are times and places where avalanche is more likely. They include:
After a rise in temperature.
After rain.
In deep, snow filled gullies.
In the afternoon if the morning has been sunny.
On angles of 30° to 45°.
On the side which faces away from the wind (leeward side).
On snow covered convex slopes.
Within 24 hours of snowfall lasting 2 or more hours.
When crossing avalanche territory carry an avalanche probe and a beacon.
Avoid small gullies and valleys with steep side walls. Instead, stick to ridges and high ground above avalanche paths.
After midday, keep on slopes already exposed to the sun.
Before noon, travel in shaded areas.
When in a group, which is best, keep at least 20 meters apart.
Rope together and use belays, unless skiing.
When you are skiing, ski down any slopes one at a time.
If Caught in an Avalanche
As soon as you see the avalanche approaching, get rid of access weight such as packs.
Use the freestyle swimming stroke to stay on top of the snow.
If you can’t stay on top, cover your mouth and nose.
As soon as you stop, make as big an area as possible whilst trying to reach the surface.
To figure out where the surface is, use gravity and an object or your spit to determine which way is down. Dig up.
You can use your ski pole to poke the snow to find open air.
Note: It is common to find people buried next to trees and benches.
Tips to Survive an Earthquake
When you live in an earthquake prone area, having an earthquake preparedness plan is a must.
How to Prepare for a Earthquake
Often you will have prior warning. If this is the case gather all useful provisions such as medical and survival kits as soon as possible.
Prepare your home by turning off gas, electricity, and water at the mains. Also, remove large and heavy objects from high places.
Continue to listen to the media and do as instructed.
If Indoors
Here’s how to survive an earthquake at school, what to do in an earthquake in an apartment, or in any building.
The number one rule to survive and earthquake in a building is to stay inside the building. The lower you are the better, e.g., basement.
Get to one of the following (in a rough order of preference):
Inside a well-supported interior door frame.
Under a large piece of furniture (hang onto it).
An inside corner of the building.
In a hallway.
Avoid being underneath unstable objects, including on the floor above you.
Also avoid elevators, glass, the kitchen, tool sheds, etc.
How to Survive an Earthquake in a Car
When you are in a car and an earthquake hits stop in an open area and stay inside it. Crouch below seat level.
Do not stop on or under a bridge!
Be extra careful on the road when you resume driving.
How to Survive an Earthquake if You’re Outside
If you are outside during an earthquake your best bet is to find an open space and lie flat.
Beaches not below cliffs are safe during the earthquake but evacuate as soon as the major tremors finish in case of a tidal wave.
Do not go underground or in any tunnels and get away from tall structures including trees.
The safest place on a hill is on the top.
What to do After an Earthquake
After the earthquake there is likely to be structural damage. Do not take shelter in a damaged building. Build a temporary one from debris instead.
When at home, shut off electricity, gas, and water at the mains. If your gas is already off, let the gas company turn it back on.
Do not make any sparks or flames or use electricity until 100% sure there are no gas leaks.
Keep your phone line available for emergency calls. If your phone line is down, send someone for help.
Be careful when opening cupboards.
When venturing outside, stay clear of downed electrical lines and other hazards.
Inspired? Pin it for Later↓


Knowledge is the Best Survival Tool You Can HaveGet Your Copy of the Disaster Survival Handbook Today
The Disaster Survival Handbook: A Disaster Survival Guide for Man-Made and Natural Disasters (Escape, Evasion, and Survival Book 7)
Price Disclaimer
Surviving a Natural Disaster Conclusion
Now you know how to prepare for a natural disaster, and how to survive a natural disaster too.
The above natural disaster list does not include all the natural disasters you may face but I think it covers a good range.
Knowing the facts about natural disasters is important and managing natural disasters is different in different places.
Learn the information you need to survive natural disasters in any area you plan to be in.
Did you enjoy this article about how to survive natural disasters? If so, please share it with your friends.
The post Surviving a Natural Disaster appeared first on Survival Fitness Plan.