
Sam Fury's Blog, page 25
June 20, 2018
First Aid DRABC
DRABC is a primary assessment and action plan for a first aid situation. This post will explain how to carry out each step in the First Aid DRABC assessment. It also covers AVPU, the emergency roll, rescue breathing, CPR, and more. By performing DRABC you can determine urgent problems in the body’s critical systems. The human body’s critical systems are circulatory, nervous, and respiratory.
GET YOUR FREE EMERGENCY FIRST AID CHEAT SHEET
The information in this post is from the book “Wilderness and Travel Medicine” by Sam Fury.
Wilderness and Travel Medicine is a comprehensive handbook with a minimalist approach. It contains prevention, diagnoses, and treatments for a wide range of ailments using modern and “survival” medicines.
Get Your Copy Today on Kindle and/or in Print
Inspired? Pin it for Later↓


Contents
Overall advice
Danger
Response (AVPU)
How to do the first aid emergency roll
Airway
How to do the first aid chin lift
How to do the first aid finger sweep
How to do first aid rescue breathing
How to do first aid abdominal compressions
Breathing (PROP)
Circulation
How to check a patient’s pulse
How to do CPR (cardiopulmonary resuscitation)
How to do CPR chest compressions
When not to give CPR
How to do check perfusion
First Aid DRABC Summary
First Aid DRABC Overview
IMPORTANT: No amount of reading can compare to a medical course with a professional trainer. A standard first aid course is good. A Remote Area First Aid Course or higher is best.
DRABC in first aid means:
Danger. Assessing the situation and ensuring the safety of everyone involved.
Response. Using AVPU to check the patient’s level of consciousness. Includes the emergency roll.
Airway. Checking if air is moving in and out. Includes the chin lift, rescue breathing, and abdominal compressions.
Breathing. Ensuring the patient’s breathing is adequate. Includes PROP.
Circulation. Checking the patient’s heart is beating and the flow of blood is in tact.
Nowadays there is DRABCD. The last D stands for Defibrillation. This refers to applying a defibrillator to the patient. In SFP Remote Area First Aid we do not consider this step. If there is a defibrillator around then there is also someone qualified to use it close-by. In any case, defibrillators are very easy to use. The machine tells you what to do! So if you do need to use one I am sure you’ll figure it out.
There is also DRABCDE, which is more suited to Remote Area First Aid than DRABCD. In DRABCDE the last two letters D and E stand for preventing Disability and minimizing Exposure.. These two steps are important but are not immediately life-threatening. You can “take a breather” and think a few minutes before attending to them. We deal with them in the Diagnoses and Treatments section of SFP Remote Area First Aid Training.
Overall Advice
If possible, the first thing to do in all first aid situations is to call emergency medical services. Know what the emergency services number is in whatever country you visit.
Stop and fix problems as you find them. Some may be obvious, others will need further investigation.
DRABC is in a “do this, then this” format. In real life, it is unlikely that you will be able to follow the steps smoothly. You have to be flexible.
Whoever is the most qualified ‘medic’ on the scene is the one in charge. If someone comes along that is more qualified, that new person takes charge.
After assessing critical systems and treating critical problems continue onto the secondary exam.
Danger
“Danger” refers to situational assessment. Its primary use is to ensure there is no further danger to anyone involved in the situation. Also, use it to gather information.
When you come across any situation it is important to not rush in.
To ensure the safety of you and everyone around you must first assess the entire situation. Ensure the surroundings are safe for you, your rescue partners, the public, and then the patient(s). In that order.
Next try to determine what may have caused the situation and if there may be spinal damage to the patient. Knowing the cause will help you to determine likely injuries. It will also help you predict further complications and avoid injury by the same thing.
Finally, assess the number of patients, the need for more rescuers, and what resources you have or need.
All this may seem overwhelming but your brain is awesome. Depending on the situation you can gather all this information within seconds.
Response
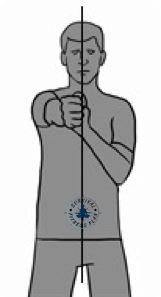
“Response” is when you assess your patients level of consciousness, i.e., his level of response. It is your first contact with the casualty and is necessary to determine your next step. Use the first aid acronym AVPU.
AVPU
Approach the victim and check his mental status using AVPU.
Gently shake the individual and ask in a clear voice “Hello, can you hear me? Are you okay?”
Alert: Patient is alert.
Verbal: Patient responds to verbal stimulus.
Pain: Patient responds to pain stimulus.
Unresponsive: Patient is unresponsive.
Anything below “Alert” may be the result of other critical system injuries, or could also give rise to them. If you need to and are able, put on gloves and call for help.
Use the emergency roll to get the patient on his back and check his critical systems at the same time.
LEARN HOW TO GIVE A COMPLETE FIRST AID SECONDARY SURVEY
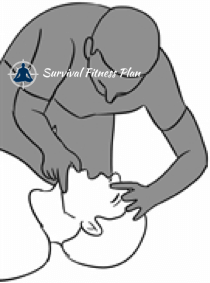
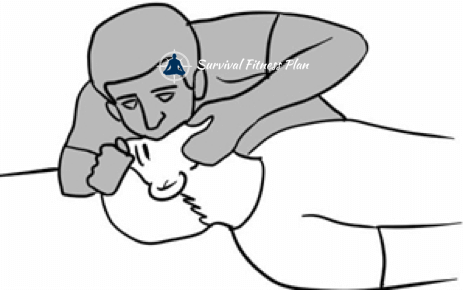
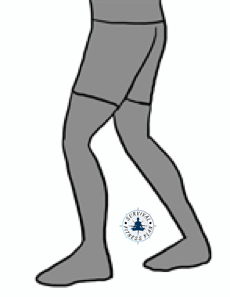
How to do the First Aid Emergency Roll
Vice lock the patient’s spine.
Support the head and spinal column.
Grasp the jaw and the back of the head and squeeze the center line of the torso between your forearms.
Roll the patient onto his back. For larger patients use the heel of your foot to nudge his pelvis so it rolls with the upper body.
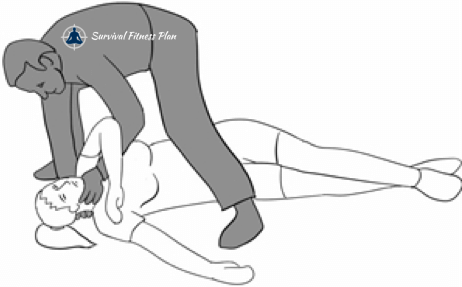
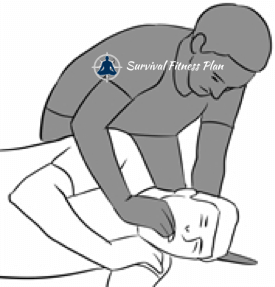
Put the patients spine into a vice grip.
Move to the back of the patient. Hover your closer hand over the mouth to check for breath.
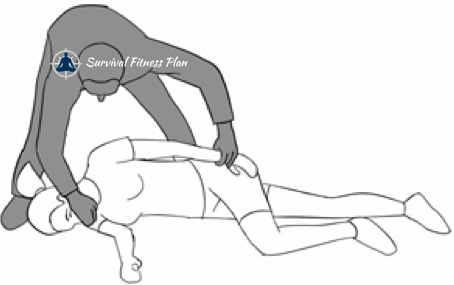
Check for breath and pulse.
At the same time, with your other hand, check the radial pulse. The radial pulse is below the wrist at the base of the thumb.
Note: Do not use your thumb to check pulse, as the thumb has a light pulse of its own.
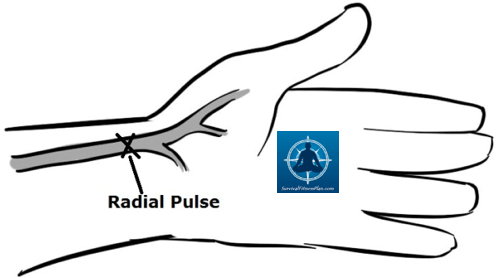
Don’t use your thumb to check for pulse.
Also, check for and treat any severe bleeding.
LEARN HOW TO DEAL WITH SEVERE BLEEDING
Spinal Injury
If you suspect a spine injury or are unsure, do not move the patient unless absolutely necessary. Protect and stabilize the spine.
Airway
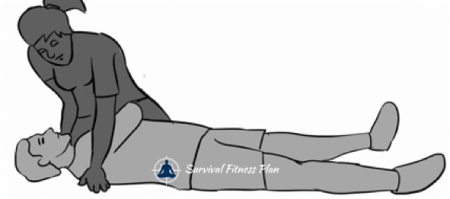
Check if air is moving in and out. If the patient is breathing, air is moving. Put your ear close to the patients face so that you are looking down his torso. Place your hand on his abdomen and look, listen, and feel for signs of breathing.
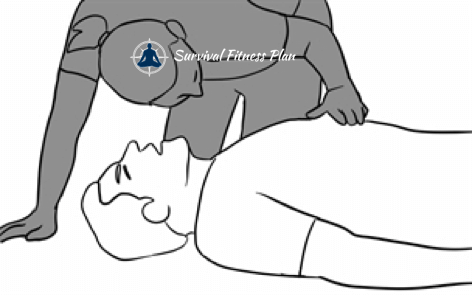
Check if air is moving in and out.
How to do the First Aid Chin Lift
If the airway is not open, use the chin lift. Lift up the chin gently with one hand while pushing down on the forehead with the other to tilt the head back.
If the airway is not open, use the chin lift.
When you suspect a neck injury, open the airway using the chin-lift without tilting the head back.
If the airway remains blocked, carefully tilt the head until the airway is open.
With infants (under 1-year-old) be careful not to tilt the head back too far. Doing so may block the breathing passage instead of opening it.
How to do the First Aid Finger Sweep
If the airway is still not open check for a blockage. You can use the finger sweep to remove a blockage. Sweep your finger into the patient’s mouth. Be careful of his teeth.
Be careful of his teeth when doing the finger sweep.
If there is any fluid (blood, water, vomit) use gravity to help drain it.
Support the patient’s head and neck with one hand and reach around to the center of his back with the other.
Support the patient’s head and neck in case he has a spinal injury.
Roll the patient onto your thighs and clear the airway using the finger sweep if needed.
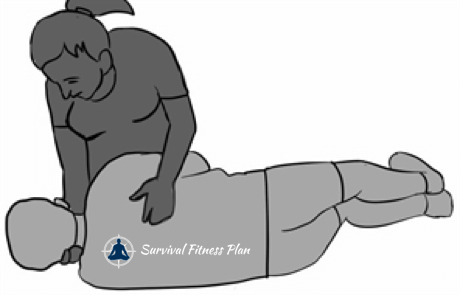
Use gravity and the finger sweep to clear his airway.
If the airway is being blocked due to swelling, e.g., trauma, burns, anaphylaxis, treat the cause (if possible).
LEARN MORE WILDERNESS FIRST AID
How to do First Aid Rescue Breathing
Next, give two rescue breaths.
Transmission of infection between rescuer and patient is rare. As far as we know, no one has ever caught HIV or AIDS via rescue breathing. If it worries you, improvise a barrier slitting a small hole in some sort of material, e.g., glove, plastic bag.
Pinch the person’s nose shut using your thumb and forefinger. Your hand stays on the patient’s forehead to maintain the head tilt. Your other hand also remains to lift up under his chin. Take a normal breath (not deep), and then form a tight seal between yours and the patient’s mouths.
Take a normal breath and form a tight seal.
With your mouth sealed tight on the patient’s, breathe into him for one second. Do a steady breath. Not fast. Do two of these breaths.
If the patient’s chest does not rise after the first breath it means the air is not going in. Perform the head tilt again before attempting the second breath.
For small children: The breath into the child lasts for 1.5 seconds. Do chest compressions with these two rescue breaths. Be careful with your force of breath. Only use enough to make the chest rise.
For infants: Cover the nose and mouth with your mouth. The breath into the infant lasts for 1.5 seconds. Be careful with your force of breath. Only use enough to make the chest rise.
How to do First Aid Abdominal Compressions
If the rescue breaths do not go in it means there is still a blockage. Use abdominal compressions.
Straddle over the patient’s legs. Place a fist between the breastbone and belly button. Thrust upwards up to five times to dislodge the obstruction. Attempt the rescue breaths again.
Do five more abdominal compressions if needed, then two more rescue breaths.
If the rescue breaths do not go in it means there is still a blockage. Use abdominal compressions.
Repeat the 5 abdominal compressions and two rescue breaths until your breaths go in.
Breathing
If his breathing is not adequate, treat the underlying cause (if possible). Use the first aid acronym PROP as a general treatment.
PROP
Position: Put the patient in a position of comfort
Reassurance: Reassure the patient.
Oxygen: Provide 100% oxygen if available.
Positive Pressure Ventilation is artificial respiration by mechanical means. The non-mechanical equivalent is to do rescue breathing. Use one breath every 6 to 8 seconds, which is about 8 to 10 breaths a minute.
Note: If there is no pulse you will do CPR instead of rescue breathing.
Circulation
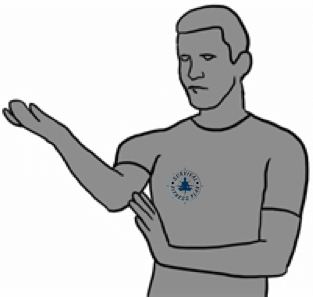
How to Check a Patient’s Pulse
If you didn’t check pulse with an emergency roll, do so now.
Lightly press the pads of your index and middle fingers on either the radial or carotid pulse. Do not use your thumb to check pulse since your thumb has a light pulse of its own.
The carotid pulse is on the neck in the hollow between the windpipe and the large muscle.
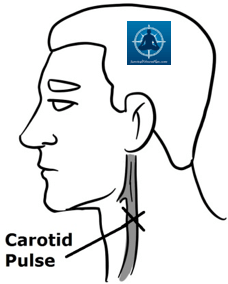
The carotid pulse.
LEARN HOW TO DIAGNOSE AND TREAT ANAPHALAXIS
How to do CPR (Cardiopulmonary Resuscitation)
If there is no pulse start CPR.
Don’t waste time. If you are unsure about whether the heart is beating and you can’t find a pulse within a few seconds, start CPR.
During CPR, consider three things: Airway, breathing, and circulation.
Open the airway with the chin lift.
Give two rescue breaths.
Give 30 chest compressions at the rate of 100 compressions per minute.
Opening the airway and rescue breathing is explained earlier in this article. This section will focus on how to do chest compressions.
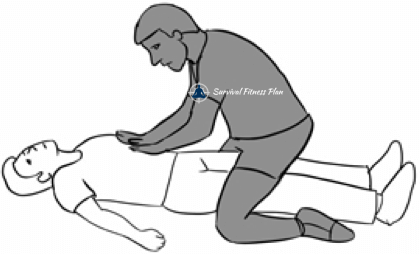
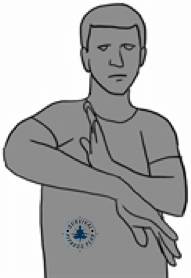
How to give CPR Chest Compressions
Kneel at the patient’s side near his chest. Place the heel of your hand on his breastbone (sternum) between the nipples at the bottom of the ribcage. It is where there is a little notch.
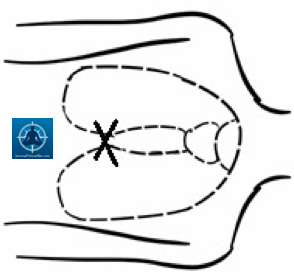
Place the heel of your hand on his sternum.
Place your other hand on top of the one that is in position. Lock your fingers together pulling them up a little so they are off the chest wall.

Place your other hand on top.
Bring your shoulders over his sternum.
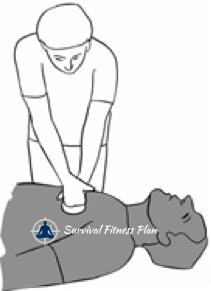
Bring your shoulders over his sternum.
A chest compression is two parts:
Compression (pushing down).
Relaxation (releasing the chest back up).
Compression and relaxation should go for an equal length of time.
With your hands in position press downward, keeping your arms straight. Push down to about a third of the chest depth then relax to let it return to the normal position. Push hard and fast.
A cracking sound may be due to the ribs or cartilage cracking. Don’t worry about it for now. Keep doing the compressions. Do 30 compressions for every two breaths at a rate of about 100 compressions per minute.
For an infant: Encircle your hands around the chest and use only your thumbs to do the compressions.
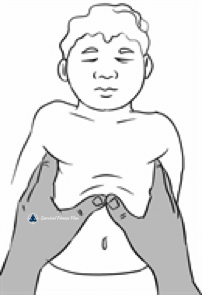
For an infant use only your thumbs to do the compressions.
For children aged one to eight: Compress at about the nipple line.
If there are 2 rescuers: The person pumping the chest stops while the other gives rescue breaths.
If the victim starts to vomit: Turn the patient’s head to the side and try to sweep out or wipe off the vomit, then continue with CPR.
When not to do CPR
If advanced medical care is not within a few hours away you need to make a decision whether to even start CPR or not.
To make a tough decision a little easier you can follow these points as a standard. In case of one of the following, do not start CPR:
The patient’s core temperature is below 32 °C (90 °F).
He/she has been underwater without air for more than 1 hour.
The patient has an obvious lethal injury, e.g., massive hemorrhaging.
Note: You must treat severe bleeding before giving compressions.
Also, any time that you do start CPR you need to decide for how long you will continue. If advanced help is likely then continuing until it arrives is reasonable.
If you are unsure whether help will arrive, then for how long should you continue? 1 hour? 2 hours? These are decisions you have to make depending on the situation.
LEARN HOW TO CONTROL SEVERE BLEEDING
How to Check Perfusion
If CPR is not needed check perfusion.
Perfusion is the flow of fluid, e.g., blood, through a certain area of the body. Signs of inadequate perfusion include:
Cold/clammy skin
Low mental status
Slow capillary refill
Weak pulse in extremities, e.g., radial pulse.
If there is inadequate perfusion, treat the cause (if possible) and use PROP.
Testing Capillary Refill
Apply pressure to the skin and then wait to see how long it takes for blood to flow back into the site. A slow capillary refill means a slow return of blood. This indicates decreased perfusion. Returning from white to pink in less than 2 seconds is normal. 3 or more seconds may mean something is wrong.
Good places to check capillary refill for general perfusion are the fingers and toes.
First Aid DRABC Summary
In this post you have learned all the steps in First Aid DRABC.
Call emergency services.
Danger. Ensure it is safe to approach the victim.
Response. Use AVPU to check the patient’s metal state.
Airway. Check the victims airway and if needed, clear it using the finger sweep and gravity.
Breathing. Ensuring the patient’s is breathing. Use PROP to assist him if needed.
Circulation. Check the patient’s heart is beating. Give CPR if needed.
Something to think about:
The idea of first aid is to keep the patient alive until advanced medical care becomes available. In a survival situation, advanced care may not be available. Nursing a patient takes valuable time and resources. If there is no possibility of advanced medical care you may only be delaying an inevitable death. And in the process, the patient may be taking away resources from other survivors. Is it worth risking everybody? This is a choice you may have to make.
GET YOUR FREE EMERGENCY FIRST AID CHEAT SHEET
Wilderness and Travel Medicine: A Complete Wilderness Medicine and Travel Medicine Handbook (Escape, Evasion, and Survival 4)

Price Disclaimer
Image Credit: U.S. Air Force graphic
Did you found this article about First Aid DRABC useful? If so, please share it with your friends.
The post First Aid DRABC appeared first on Survival Fitness Plan.


Signs of Anaphylaxis and Anaphylaxis Action Plan
Learn the signs of anaphylaxis, the common causes, and an anaphylaxis action plan for treatment.
Anaphylaxis Shock Definition: Anaphylaxis is a very severe allergic reaction. If untreated, it can lead to death. A history of mild reaction does not mean you will never have a severe allergic reaction to the same thing.
GET YOUR EMERGENCY FIRST AID CHEAT SHEET
The information in this post is from the book “Wilderness and Travel Medicine” by Sam Fury.
Wilderness and Travel Medicine is a comprehensive handbook with a minimalist approach. It contains prevention, diagnoses, and treatments for a wide range of ailments using modern and “survival” medicines.
Get Your Copy Today on Kindle and/or in Print
Inspired? Pin it for Later↓


Anaphylaxis Causes, Diagnosis, and Treatment
IMPORTANT: No amount of reading can compare to a medical course with a professional trainer. A standard first aid course is good. A Remote Area First Aid Course or higher is best.
Causes of Anaphylaxis
Drugs: Common ones include anesthetics, antibiotics, x-ray dyes, heart and blood pressure medicine, and NSAIDs.
Exercise: Refered to as exercise induced anaphylaxis. Often occurs after eating.
Foods: Nuts, fruit, seafood etc.
Insect Stings: Bees, wasps etc.
Latex: Rubber gloves, condoms etc.
There are also many unknown causes.
Anaphylaxis Reaction Symptoms
Symptoms usually show within minutes of exposure. The faster you treat it the better. Recurrent reactions can occur within 24 hours of the original episode. Treat these in the same way as the initial reaction.
Abdominal Pain.
Decreased mental state.
Diarrhea.
Dizziness.
Hives.
Itching.
Nausea.
Respiratory problems.
Shock (rapid heart rate, low blood pressure etc.).
Skin-redness.
Swelling of the mouth and face.
Paresthesias (tingling).
Vomiting.
Weakness.
Treatment for Anaphylaxis
Diphenhydramine, e.g., Benadryl: 1 mg/kg of body weight, maximum of 50 mg, every 4 to 6 hours. Chewing the pill will make it work faster.
Rescue Breathing or CPR as needed.
Administer epinephrine if:
There is an obvious major reaction, e.g., difficulty breathing, unconsciousness.
A reaction worsens over a few minutes.
If in doubt, administer the epinephrine.
Administer diphenhydramine as soon as able.
Consider a corticosteroid, e.g., prednisone
Observe for at least 24 hours in case of a secondary reaction.
Dosages of Drugs used to Treat Anaphylaxis
Epinephrine: 0.01 ml/kg of body weight, maximum of 0.3 ml. You can repeat injections every 5 minutes if needed.
Prednisone: 1 mg/kg of body weight, maximum of 60 mg, once a day.
LEARN MORE WILDERNESS FIRST AID
How to Administer Epinephrine
The easiest way to do this is with a commercial injector, e.g., EpiPen. Patients that have a history of anaphylaxis should carry these with them. It is a good idea to have one in your first aid kit. They are usually allowed on planes.
The instructions on how to use an EpiPen are on them. Exact usage varies. Remove the cap and press it into the patient’s thigh.
There is no need to stab the patient with it. That will cause unnecessary bruising and pain.
Do not put your finger or thumb on the top of the device. This ensures you do not inject yourself by accident.
You can also give epinephrine with a normal syringe.
EMERGENCY FIRST AID CHEAT SHEET
Wilderness and Travel Medicine: A Complete Wilderness Medicine and Travel Medicine Handbook (Escape, Evasion, and Survival 4)
Price Disclaimer
Image Credit: By BruceBlaus. Blausen.com staff (2014). “Medical gallery of Blausen Medical 2014”. WikiJournal of Medicine 1 (2). DOI:10.15347/wjm/2014.010. ISSN 2002-4436. (Own work) [CC BY 3.0], via Wikimedia Commons
Did you find this article about anaphylaxis causes, diagnosis, and treatment useful? If so, please share it with your friends.
The post Signs of Anaphylaxis and Anaphylaxis Action Plan appeared first on Survival Fitness Plan.
June 19, 2018
Wing Chun Chi Sao Training
Wing Chun Chi Sao Training will develop your touch sensitivity. You will be able to read your opponent’s intentions and respond to his movements much faster than by eye. Besides Wing Chun, many other forms use Chi Sao. This goes to show how highly regarded the benefits of Chi Sao are.
GET YOUR FREE CHI SAO TRAINING SCHEDULE
The information in this post is from Sam Fury’s How to do Chi Sao. Wing Tsun Chi Sao is a complex exercise when you get into it. For SFP Self Defense we only learn the basics needed to adapt it to modern self defense. If you want to develop your Chi Sao Wing Chun skills more, you can learn advanced drills from the book.
Get Your Copy Today on Kindle and/or in Print
Inspired? Pin it for Later↓


Contents
Centerline Principle
Stance
Hand Positions
Dan Chi Sao
Luk Sao
Basic Attack
The 4 Positions
Multiple Strikes
Free Flowing Chi Sao
Wing Chun Chi Sao Training
The exercises in this article are in the order in which you should learn the skills.
If there is a size difference between you and your partner, adjust the angle of your body. You want to direct energy towards your opponent.
If you don’t have a training partner, you can train with a wooden Chi Sao dummy.
See some examples of Wing Chun wooden dummies here.
Whenever there are 2 people in a demonstration, the person on the left (the female) is P1. The person on the right (the male) is P2. Practice all drills from both sides of the body. Use padding if needed, but gloves are cumbersome. Adjust the movements so they work for you.
The Centerline Principle
The centerline is an imaginary line that runs vertically down the center of the body. Attack and defend on this line, i.e., guide incoming attacks out of your center, past your body. Attack your opponent along his center.
Always keep the centerline of you and your opponent in mind when fighting. Have control of your centerline whilst penetrating his.
Stance
To enable ease of transference from practice to real life, stand in the Fighters Position. The following description of the Fighters Position is from How to Street Fight by Sam Fury.
Your Lead Side
If your right leg is forward most, then your right side is your lead and your left side is your rear. When fighting, have your strong side as your lead most of the time, but train on both sides. Most of your strikes come off your lead.
Stand with your feet shoulder-width apart and take a natural step back. Put a slight bend in your knees. Relax your body and have a slight forward lean. Find the point at which you are most balanced. Be firm and flexible as opposed to stiff and rigid. To test, have someone push you from the front.
Hand Positions
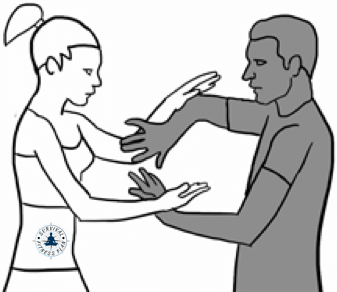
There are 3 main hand positions used in Chi Sao. They are Tan Sao (Palm up Block/Taun Sao), Bong Sau (Wing Arm Block/Bon Sao) and Fook Sao (Bridge-On Arm Block/Fok Sao/Fuk Sao). Practice each of these hand positions separately as well as switching from one to the other.
Tan Sao
Using Tan Sao limits your opponent’s ability to strike straight in. Drive it forward from the center of your body in a slight upward motion.
Ensure the following:
Your palm is open, almost flat, and facing the sky.
There is approximately a 30° bend at the elbow.
The whole arm is slightly towards your centerline.
Bong Sau
Use Bong Sau to redirect the opponent’s attack to a neutral position. It is best used when you are already in contact with the opponent’s arm.
Ensure the following:
Point your elbow straight out and a little in.
Angle your forearm at a 45° downward slope in towards the centerline.
The forearm is also angled 45° forward.
The wrist is in the centerline.
The elbow is higher than the wrist.
The hand/fingers continue in the same direction as the forearm.
The upper arm is in a fairly straight line, pointing to the front.
The angle of the elbow is slightly greater than 90°.
LEARN MORE SELF DEFENSE
Fook Sao
This is a defensive position. Place is over your opponent’s arm. Adjust your exact positioning to fit the situation and is often described as either high or low.
Ensure the following:
The elbow is about 6-8 inches from the body and angles in towards the center of your body.
The forearm angles up with the hand open and the fingers hooked down towards the wrist.
Dan Chi Sao/Single Sticky Hands
Don’t apply the movements in this drill with the intent of striking. They are for teaching the feeling of movement and. Do them gently to begin with.
Contrary to the name, it is the forearms that ‘stick’, not the hands. They stay in touch throughout the entire drill.
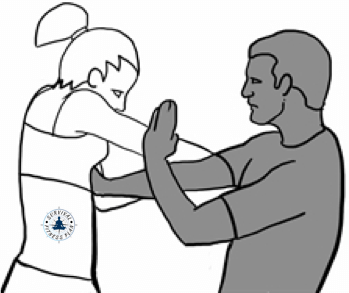
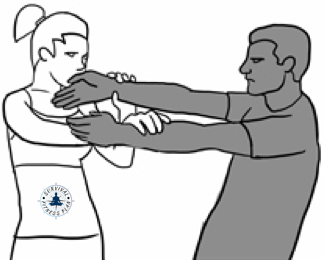
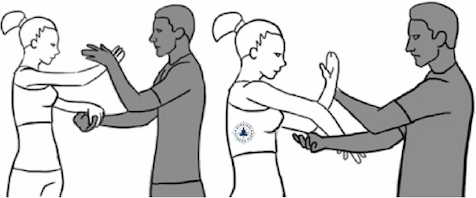
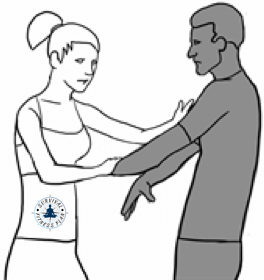
P1’s right arm is in Tan Sao. P2 adopts Fook Sao with his left arm on top of P1’s arm. P2 presses his elbow inwards towards his centerline. Both exert a slight forward pressure.
In one motion, P1 uses the Tan Sao to guide P2’s left arm off the centerline then attempts to strike with the same hand. P2 defends by dropping his elbow down and inward.
P2 attempts to strike P1’s face. P1 defends with Bong Sao. P1 and P2 return to the starting position. They repeat the drill.
Double Dan Chi Sao
This is the same as Dan Chi Sao but with P1’s free hand in a Low Fook Sao over P2’s Tan Sao. This position does not change whilst the other hand performs Dan Chi Sao as normal. At the completion of one complete round, switch arms. Practice until the switch between arms is seamless.
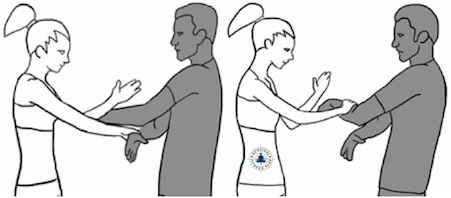
Luk Sao
Luk Sao is the base of Chi Sao. Practice it on its own until fluid before incorporating attack and defense drills. Throughout the movement, keep the shoulders relaxed and apply a slight forward pressure.
Note: If your hand positions are correct, forward pressure will be automatic. If your opponent removes opposing pressure, your hand will strike forward by reflex.
Luk Sao is basically moving between 2 positions. From Bong Sao and Low Fook Sao, to High Fook Sao and Tan Sao.
P1’s right hand is in Tan Sao. P2’s right hand is in Bong Sao. Both of their other arms are in the Fook Sao position. They are over their partners opposing arms, i.e. right on left, left on right. P1’s Fook Sao is in a high position whilst P2’s is low. Constantly press the elbow of the Fook Sao into the centerline.
P1 rotates her right elbow up, keeping the wrist in towards her centerline. As her elbow rises up to shoulder height, her forearm drops into the Bong Sao. Her left hand stays in Fook Sao throughout the movement but moves to a low position. Keep the elbow down on the Fook Sao or you will lose forward pressure.
As P1 one does the above, P2 drops his Bong Sao back down into Tan Sao. As his Bong Sao drops, he moves his wrist outward and the elbow lowers back into its drawn-in position of the Tan Sao. As his Bong Sao settles into a Tan Sao, his Fook Sao moves from low to high while staying in contact with P1’s right Bong Sao.
They then reverse the roll and return to the starting position.
Do this in a flowing manner. It is important to do it with intent. Turn and push to interlock the hands. Be tense but flexible.
All drills from now on start from Luk Sao unless otherwise stated.
When explaining when to start a drill sequence from Luk Sao, the terms ‘high or low point/position’ are used. This does not mean to start the movement at the very highest or lowest point. The exact point of where one should begin a technique is impossible to describe. With practice, you will discover the best timing.
Basic Attack
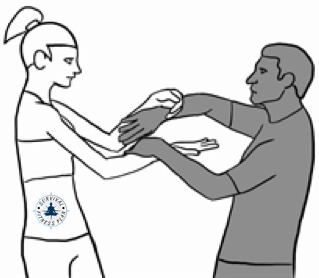
P2 grabs P1’s arms. His right hand grabs the inside of P1’s left and his left hand grabs the outside of her right. P2 shifts his body to his left, whilst directing P1’s arms forward and to the right.
Whilst still gripping with his right arm, P2 uses his left hand to apply pressure a little above the elbow. If it is below the elbow P1 will be able to elbow P2.
P2 moves into P1 as he continues to push on P1’s arm. He strikes P1’s mid-section with his right hand as he moves in.
Defense against the Basic Attack
As P1 attempts the Double Arm Grab, P2 relaxes his upper body. He must keep grounded through his legs to avoid getting pulled off balance.
As P1 moves in to press P2’s arm, P2 turns toward her and deflects her arms away. P2’s left arm angels down sharply to suppress both of P1’s hands. At the same time, P2’s right hand strikes P1’s mid-section.
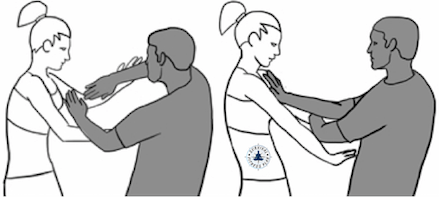
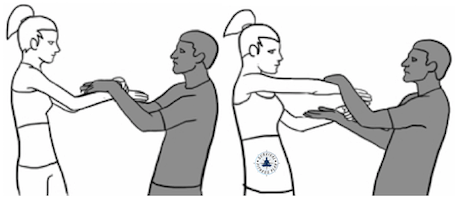
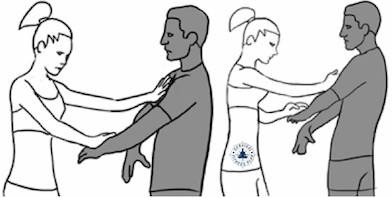
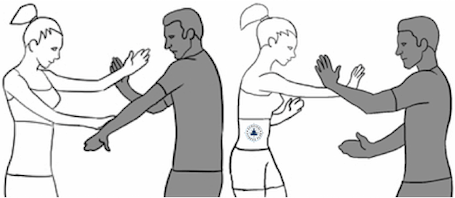
The 4 Positions
There are 4 positions in which the arms can be in relation to the opponent’s guard. This is a basic explanation so you can follow the movements in the drills. More detailed explanations are in the book.
Right Out, Left In
Left Out, Right In
Both Out
Both In
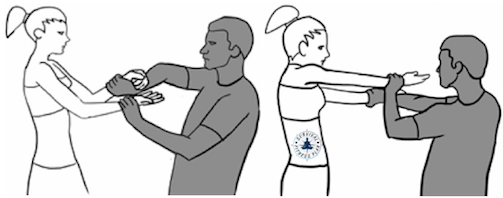
In the left picture, they are Right Out, Left In. In the right, they are Left Out, Right In.
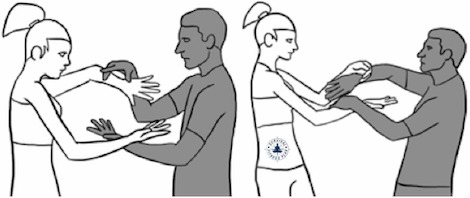
In this picture, P1 is Both Out. P2 is Both In. In this case, P1 is using a High Fook Sao and Tan Sao, and P2 is using a Tan Sao and Bong Sao.
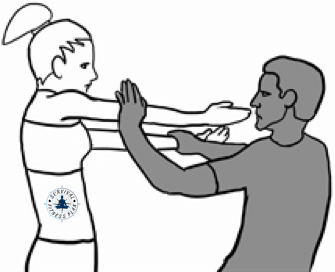
Multiple Strikes
This multiple strike attack drill is good for showing the application of trapping in a more realistic fighting scenario. It is also in the SFP self defense combinations.
P1 is in the Left Out, Right In position. As her right arm reaches a high point she brings it down over P2’s right arm. At the same time, her left arm comes up to the outside of P2’s left arm and brings it down to cross over his right.
P1 pulls her left arm out and uses it to cover the top of P2’s right arm.
She suppresses P2’s arm and strikes with her left, then her right, then again with her left.
Notice that whichever hand she is striking with, the other comes down to cover P2’s hands.
Multiple Strikes Defense
The start is the same as Multiple Strikes, but this time P1 steps in to punch. As P1 strikes, P2 steps back and deflects the strike. P1 steps forward for a second strike. Again, P2 steps back and deflects the strike. This can continue.
Free Form Chi Sao
Now that you have a basic understanding of various techniques, you can go into Free Form Chi Sao.
Although often referred to as Sticky Hands, the goal of the exercise is not to stick to your opponent. Instead, the aim is to protect oneself whilst exploiting your opponent’s openings.
Like all sparring, it is a good time to test what works and/or how your opponent reacts to your actions.
Here are some general tips:
Don’t pull your limb back in preparation for a strike.
Be aware of force. If he uses too much, give then attack. If his force is too weak, attack through his defense.
Strike only when there is an opening. This is especially true if kicking.
Always be aware of distance.
Stay on the centerline and respond to his actions. Let it flow.
“Stay with what comes, follow through as it retreats, and spring forward as our hand is freed.” – Wing Tsun Motto
Free Form Sticky Hands Variations
There are many ways to vary Chi Sao apart from “going at it”. The only limit is your imagination. Here are a few ideas:
Start over whenever a strike makes solid contact. This is good when first learning.
With or without footwork. Without footwork is good when first learning.
One arm or two arm. Can also try cross arm e.g. right arm vs. right arm.
Only defend or only attack.
Blindfolded. Great for advanced training in sensitivity. Start slow.
Stop after every move. This gives you time to think/talk about your technique and your next move. Aim to streamline your movements.
Wing Chun Chi Sao Videos
Here is a video playlist with videos teaching and demonstrating Chi Sao.
Sifu Lamar explains basic Chi Sao hand positioning and then a few drills.
Dan Inosanto with a few drills that Bruce Lee taught him – Bruce Lee Chi Sao.
Wing Chun Kung Fu Chi Sao demonstration. It shows how Chi Sao is applies to fighting.
Chi Sao Tutorial Summary
In this article you learned:
The basics of Chi Sao including the centerline principle, stance, and hand positions.
Chi Sao drills to get you to the fundamental movement of Luk Sao.
Intermediate Chi Sao techniques showing how to adapt attack and defense.
Free-flowing Chi Sao. From here, you can experiment to create your own drills.
GET YOUR FREE CHI SAO TRAINING SCHEDULE
How To Do Chi Sao: Wing Chun Sticky Hands (Self Defense Book 5)
Price Disclaimer
Did you find this article about how to do Chi Sao useful? If so, please share it with your friends.
The post Wing Chun Chi Sao Training appeared first on Survival Fitness Plan.
May 19, 2018
How to Inflate Your Clothes for Water Survival
Learn how to inflate your clothes for water survival. Being stranded in the water and having to tread water to stay afloat expends precious energy. When you are wearing long clothes you can trap air inside them to help you float.
GET YOUR FREE SWIM WORKOUTS AND WATER RESCUE SKILLS SCHEDULE
The information in this post is from the book “Swim Workouts and Water Rescue Skills” by Sam Fury.
Swim Workouts and Water Rescue Skills: Techniques to Swim Faster, Longer, and Safer (Survival Fitness Book 9)
Price Disclaimer
How to Inflate Your Clothes for Water Survival
These methods work best with waterproof materials. For cotton clothing, keep the material that is out of the water wet to prevent air escaping.
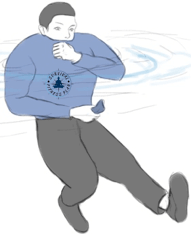
Inflating Your Top
As you tread water (feet only), pull up your collar and bunch your shirt around your mouth to make a tight seal. Keep your nose out in the open.
Breathe in through your nose and exhale out your mouth into your shirt. Direct air into your shoulder area by leaning forward.
LEARN HOW TO TREAD WATER
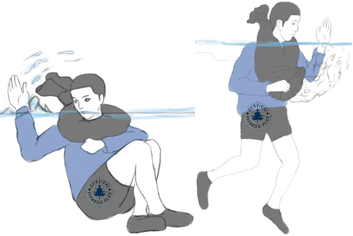
Inflating Your Trousers
If you cannot take your trousers off over your shoes, remove them. Tie the laces together, and then hang them around your neck.
Remove your pants, do the zip up, and tie the bottom of the trouser legs together.
Inflate your trouser legs using either the blow, sling, or splash method.
After inflating your pants keep the waistband underwater. Put your head between the legs and hug the pants with the fly facing your body. Fold or twist the waistband closed to create a seal.
Rest your head back on the knot and adopt the H.E.L.P. position until rescue arrives.
Keep the exposed material wet by splashing water on it.
When needed, open the waistband (while keeping it underwater) and scoop more air in.
Blow Method
This method is best for weak swimmers.
Hold the pants the right way up by the waistband, with the fly facing you.
Take a deep breath and go underwater with the pants. Blow air into them.
Keeping the pants underwater, take another breath and blow more air into them. Repeat this until they filled with air.
Sling Method
Hold the trousers behind your head by the waistband ensuring you keep it open.
Using a forceful motion, sling the pants over your head in front of you and into the water to fill them with air.
Splash Method
Hold the waistband open underwater with one hand, fly facing up and trousers on the surface. Use your other hand inside the waistband to scoop water and air bubbles into your trousers. Scoop fast.
The water will pass through leaving the air trapped.
GET YOUR FREE SWIM WORKOUTS AND WATER RESCUE SKILLS TRAINING SCHEDULE
Swim Workouts and Water Rescue Skills: Techniques to Swim Faster, Longer, and Safer (Survival Fitness Book 9)
Price Disclaimer
Photo Credit: Sgt. Roberta A. Thompson.
Did you find this article about how to inflate your clothes for water survival useful? If so, please share it with your friends.
The post How to Inflate Your Clothes for Water Survival appeared first on Survival Fitness Plan.
How to Assess a Water Rescue Scenario
Learn how to assess a water rescue scenario. It covers the 10-20 system, prioritizing casualties, planning a rescue, and steps that anyone can follow when they see someone that needs help in the water.
GET YOUR FREE SWIM WORKOUTS AND WATER RESCUE SKILLS SCHEDULE
The information in this post is from the book “Swim Workouts and Water Rescue Skills” by Sam Fury.
Swim Workouts and Water Rescue Skills: Techniques to Swim Faster, Longer, and Safer (Survival Fitness Book 9)
Price Disclaimer
How to Assess a Water Rescue Scenario
When You See Someone in Trouble
Anyone can use the following steps if they see someone that needs help in the water. They are simple steps that you can teach your friends and family, including children.
Keep calm. A person that panics cannot think clearly.
Shout for help as loud as you can.
Ask everyone else to clear the area.
Ensure there will be no immediate danger to you while attempting the rescue. Animals, electricity, fire, etc.
Use land-based rescue techniques in the order given.
If you cannot perform a land-based rescue, call the emergency services.
IMPORTANT: Unless trained in water rescue, never enter the water to try and save a victim. A drowning victim can pull you down with him. Even when trained, entering the water is a last resort.
Situational Assessment
The 10:20 System
When you are responsible for the well-being of others near water you can use the 10:20 system. It is a good way to oversee a designated area.
The 10 stands for 10 seconds. You scan the designated area (e.g., a pool) from one side to the other in 10 seconds.
The 20 means that you should be no more than 20 seconds away from getting to any swimmer in your area.
Casualty Priorities and Recognition
This chapter explains the different types of casualties. When there is more than one victim, rescue them in the order given.
Casualty Priorities
The general rule of thumb is to rescue those making the least noise first and the unconscious last.
The four types of casualties in order of rescue priority are as follows:
Conscious non-swimmers. Unable to swim and usually vertical in the water. They may grab hold and drag you down.
Conscious weak swimmers. Can swim but either exhausted or in some other distress. Usually in a forward position attempting to swim. Often co-operative in a rescue.
Conscious injured swimmers. Can usually keep themselves afloat but have an injury that they may or may not tell you about. They could be holding their injury. Be careful of the injury while performing a rescue.
Unconscious swimmers. Often floating motionless and face down in the water, but can be at any depth.
You should rescue the unconscious victim last because they may already be a lost cause. You do not want to waste time that you could spend rescuing a victim with a higher chance of survival.
Recognizing a Distressed Swimmer
A distressed swimmer is any conscious swimmer that is having trouble in the water. If he does not find safety he can become an unconscious swimmer. You must learn how to recognize the distressed swimmer so you can rescue them before it is too late.
There are two basic types of swimmers in distress: non-panicking or panicking.
The non-panicking casualty knows they need help to get to safety. They will be trying to communicate this to you.
A panicking casualty is likely to already be in the drowning phase. He will be thrashing around trying to keep afloat. He may be trying to communicate (either silent or noisy) but it will be ineffective.
Making a Plan
It is very important to create a plan of rescue instead of acting straight away. The human brain can process a lot of information at great speed, even in high-stress situations. Once you recognize a casualty it will only take a couple of seconds to assess the situation. This will keep you safe and will also give the victim the best chance of survival.
The first thing you should look for is possible dangers. Why is the victim in trouble in the first place? Is the danger still there?
Next, consider your victim’s profile. Is he big, small, an adult, child, unconscious, panicked, injured, etc?
Finally, what rescue equipment do you have, and/or what can you improvise?
Use the information you gather and the knowledge of your own abilities to decide the best form of rescue.
Due to the endless possibilities of scenarios you will need to be very flexible. For example, should you take the time to find a rescue aid? And if so, which rescue aid is best for the situation?
GET YOUR FREE SWIM WORKOUTS AND WATER RESCUE SKILLS TRAINING SCHEDULE
Swim Workouts and Water Rescue Skills: Techniques to Swim Faster, Longer, and Safer (Survival Fitness Book 9)
Price Disclaimer
Photo Credit: Senior Airman Joseph A. Pagán Jr.
Did you find this article about how to assess a water rescue scenario useful? If so, please share it with your friends.
The post How to Assess a Water Rescue Scenario appeared first on Survival Fitness Plan.
How to Defend Yourself Against a Drowning Victim
Learn how to defend yourself against a drowning victim. A drowning victim can be dangerous to anyone that gets within arms reach of him. He can grab and pull you down with extreme strength (due to increased adrenalin) to save himself. This is why you should only use a tow rescue as a last resort, especially with a panicking victim.
GET YOUR FREE SWIM WORKOUTS AND WATER RESCUE SKILLS SCHEDULE
The information in this post is from the book “Swim Workouts and Water Rescue Skills” by Sam Fury.
Swim Workouts and Water Rescue Skills: Techniques to Swim Faster, Longer, and Safer (Survival Fitness Book 9)
Price Disclaimer
How to Defend Yourself Against a Drowning Victim
Practice these techniques on land first and then in the water. You want to be able to do them instinctively.
Hold escape techniques in the water are different to SFP Self-Defense techniques. They take into account the water and are non-violent. They are non-violent because the victim does not intend to harm you. His instinct for survival over-rides his ability to see the negative effects. Defend yourself and then help the victim if possible.
General Defense
Whenever a casualty tries to grab you, or as soon as you escape his grip, treat him as an obstruction. Adopt the defensive position by lying on your back with your feet pointed towards him. Kick your legs with the aim of making a big splash. Be careful not to kick the victim.
Kicking your legs does a few things:
Creates distance.
Communicates to the victim to not grab you.
Breaks the victim’s grip if he grabs your legs.
When grabbed there are some universal things you can do to escape without harming the victim.
Press your chin to your chest, raise your shoulders, and cross your arms over your face. This prevents the victim grabbing you around your neck.
Pull a finger or toe of the victim to loosen his grip.
Poke his armpit.
Take a big breath and submerge. All releases are more effective when done underwater. Your victim will want to stay above water so if you go under he is likely to let you go. At the very least he will loosen his grip which makes your escape easier.
The following techniques show how to escape the most common drowning victim holds. With these and the introductory information given you can adapt to other situations.
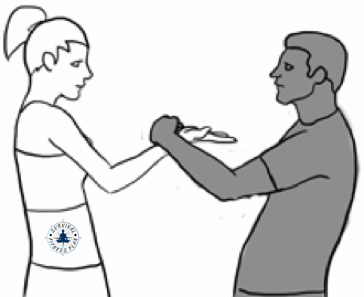
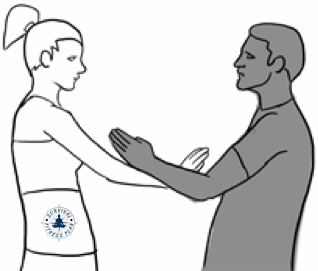
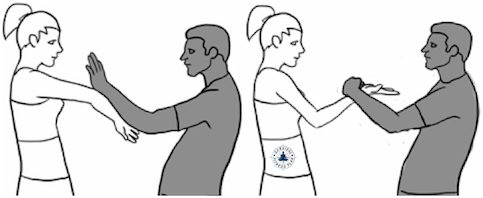
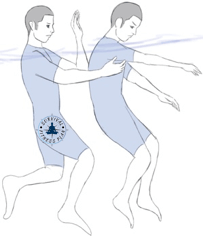
Block
The block is a good preventative technique to use when the victim lunges at you as you approach him from the front.
As he lunges raise your open palm against his upper chest.
LEARN SOME LAND-BASED SELF-DEFENSE TECHNIQUES
Lean back and submerge, keeping your arm(s) extended as you do so. Swim away while you are underwater and the re-surface at a safe distance from the victim.
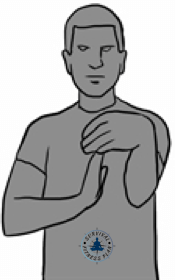
Wrist/Arm Grab Escape
When grabbed by your arm or wrist, reach across with your free hand and push down on your victim’s shoulder. Kick upward at the same time.
While retaining downward pressure on his shoulder jerk up hard with your trapped arm. Repeat this until you are free.
Release the victim and swim back to a safe distance.
Head Hold Escape
Use this technique when the victim grabs you around your head and neck from either the front or back.
Protect your throat by taking a quick breath and tucking your chin into your shoulder. Clap your hands above your head a few times so that you submerge underwater. This will also drag the victim underwater which often encourages him to let you go.
Apply an upward grab and thrust with your thumbs on his brachial pressure points. Find these on the inside of his upper arm, a little above his elbow.
Swim away while you are underwater and the re-surface at a safe distance from the victim.
GET YOUR FREE SWIM WORKOUTS AND WATER RESCUE SKILLS TRAINING SCHEDULE
Swim Workouts and Water Rescue Skills: Techniques to Swim Faster, Longer, and Safer (Survival Fitness Book 9)
Price Disclaimer
Photo Credit: Airman 1st Class J.T. Armstrong.
Did you find this article about how to defend yourself against a drowning victim useful? If so, please share it with your friends.
The post How to Defend Yourself Against a Drowning Victim appeared first on Survival Fitness Plan.
How to Escape Falling Through Ice
Learn how to escape falling through ice. Escaping from a fall into ice water is not easy and the result can be deadly.
DO NOT PRACTICE THIS IN ICE WATER! Go through the motions in a pool instead.
GET YOUR FREE SWIM WORKOUTS AND WATER RESCUE SKILLS SCHEDULE
The information in this post is from the book “Swim Workouts and Water Rescue Skills” by Sam Fury.
Swim Workouts and Water Rescue Skills: Techniques to Swim Faster, Longer, and Safer (Survival Fitness Book 9)
Price Disclaimer
How to Escape Falling Through Ice
When you first fall into ice water you will start to hyperventilate. Try to stay calm and keep your head above the water. Taking deep breathes may help but do not breathe in the water.
After 1 to 3 minutes the shock response will begin to wear off. Now you have about 10 minutes to get out before you fall unconscious.
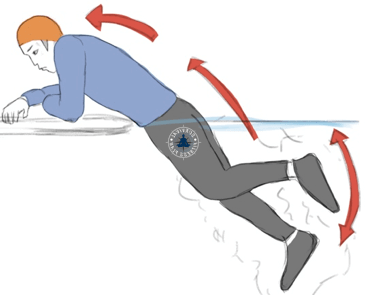
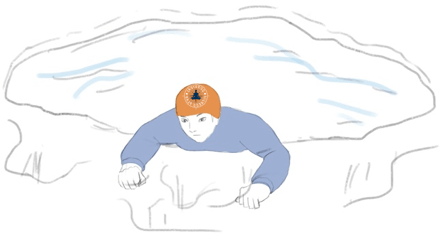
Once you have got your hyperventilation under control, find where you first fell in. You want to get out where you know it was strong enough to support your weight. Going to where you came from is your best bet.
Place your hands on the surface and pull yourself up while staying as horizontal as possible. Pulling yourself straight up will be far less effective and a waste of energy.
Kick your legs as your creep yourself out of the water. It will be very slippery.
Once you are out of the water, lie flat on the ice and roll away.

Rolling away keeps your weight distributed. It has less of a chance of creating further cracks in the ice.
If you know you will be crossing ice country it is very wise to get some ice picks. They will make it far easier to pull yourself out of the water, although it will still be difficult.
If you cannot get out, then you need to conserve your heat and energy. Put your arms on the ice and keep them there so they freeze to the surface. This way, when you become unconscious you will have a better chance of not falling into the water.
Never go out to someone who has fallen into ice. Coach them on what to do from a safe distance and reach something out for them to hold onto such as a stick or rope.

Once out of the water get out of the wet clothes and get warm as soon as possible.
GET YOUR FREE SWIM WORKOUTS AND WATER RESCUE SKILLS TRAINING SCHEDULE
Swim Workouts and Water Rescue Skills: Techniques to Swim Faster, Longer, and Safer (Survival Fitness Book 9)
Price Disclaimer
Photo Credit: Scott Sturkol.
Did you find this article about how to escape falling through ice? If so, please share it with your friends.
The post How to Escape Falling Through Ice appeared first on Survival Fitness Plan.
The HELP and Huddle Positions for Cold Water Survival
Learn how to do the HELP and Huddle positions for cold water survival. Being immersed in cold water will sap your breath and energy quicker than normal. Panicking will make things worse. You must relax and get out. Concentrate on deep breathing to calm your mind and body.
GET YOUR FREE SWIM WORKOUTS AND WATER RESCUE SKILLS SCHEDULE
The information in this post is from the book “Swim Workouts and Water Rescue Skills” by Sam Fury.
Swim Workouts and Water Rescue Skills: Techniques to Swim Faster, Longer, and Safer (Survival Fitness Book 9)
Price Disclaimer
HELP and Huddle Positions for Cold Water Survival
If you cannot get on dry land you have to do whatever you can to keep your body heat until help arrives.
Button or zip up your clothes and keep them on
Don’t use up energy swimming unless you have a dry place to swim to
Get as much of yourself out of the water as possible
Use the H.E.L.P. or Huddle position
Once you get out of the water it is important to remove all your wet clothing, dry yourself off, and get warm. Watch yourself and others for signs of hypothermia and treat as necessary.
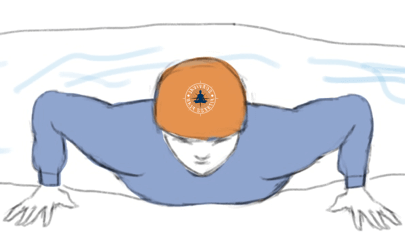
H.E.L.P
H.E.L.P. is an acronym for the Heat Escape Lessening Posture. It is the position to adopt when you are alone in the water and want to conserve your body heat.
The general idea of H.E.L.P. is to protect your major areas of heat loss, i.e., armpits, groin, head, neck, and rib cage.
When you are wearing a life-jacket, keep your head out of the water and lean back on it. Fold your arms and hug your jacket close to your body.
Cross your lower legs and bring your knees as high on your chest as you can.

If you do not have a life jacket, do your best to get as close to H.E.L.P. as possible.
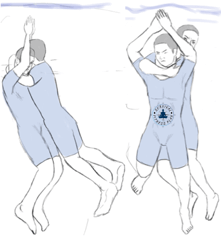
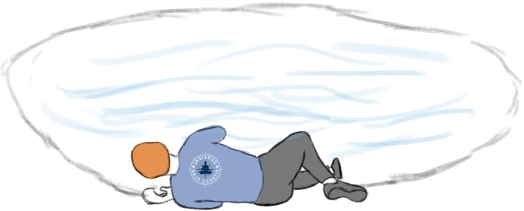
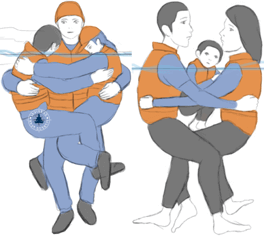
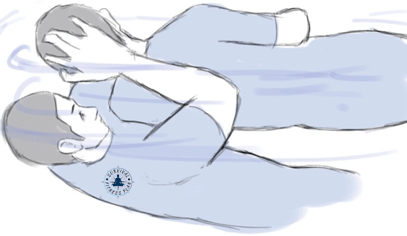
Huddle Position
The huddle position is H.E.L.P. for groups of people (2+). Huddling together in a group has benefits such as:
Lessen loss of body heat
Increase morale
Be easier to spot for rescuers
Stronger swimmers can aid weaker ones
To adopt the huddle position form a ring and group together. Everyone groups together as close as possible. Use your arms and legs to wrap around each other. Place those in need (such as children) in the middle.
GET YOUR FREE SWIM WORKOUTS AND WATER RESCUE SKILLS TRAINING SCHEDULE
Swim Workouts and Water Rescue Skills: Techniques to Swim Faster, Longer, and Safer (Survival Fitness Book 9)
Price Disclaimer
Photo Credit: Christine Cabalo.
Did you find this article about the HELP and Huddle positions for cold water survival useful? If so, please share it with your friends.
The post The HELP and Huddle Positions for Cold Water Survival appeared first on Survival Fitness Plan.
Water-Based Water Rescue Techniques
Learn water-based water rescue techniques to save someone when drowning. Only use water-based rescues if land-based rescues are not possible. Like land-based rescues, water-based rescues have a preferred order of use. Here they are in that order.
GET YOUR FREE SWIM WORKOUTS AND WATER RESCUE SKILLS SCHEDULE
The information in this post is from the book “Swim Workouts and Water Rescue Skills” by Sam Fury.
Swim Workouts and Water Rescue Skills: Techniques to Swim Faster, Longer, and Safer (Survival Fitness Book 9)
Price Disclaimer
Water-Based Water Rescue Techniques
Wading Rescue
The wading rescue is good in shallow water no more than waist deep. Any more than that and it turns into a towing rescue. Also, the victim must be conscious.
Find a rescue aid and enter the water as close to the victim as you can while still keeping safe and out of his arms reach. If possible, keep hold of something on shore.
Instruct the victim to grab onto the aid and pull him to safety.

Boat Rescue
When there is a boat nearby and you know how to use it, you can use the boat rescue. As a general rule, avoid bringing the victim on board the boat.
For an unconscious victim, it is best to have a second rescuer hold his head above water as you drag him to safety. A solo rescuer will have to bring him on board. Be careful not to capsize the boat as you do so.
Throw a tow rope/float to the conscious victim. If he is calm he could even hold onto the boat, although this is risky with a panicking victim.

There are many situations where you will have to bring the victim on board. For example, if there is something dangerous in the water or when the distance to land is very far. Remember to be flexible.
Swim with an Aid
This is same as the wading rescue except you swim the rescue aid to the victim instead of wading. It is useful for conscious victims in deeper waters.
Swimming while holding an aid requires prior practice. Also, practice taking off your clothes while in the water. You can use them as an improvised rescue aid if you are already in the water when someone needs help.
Like the wading rescue, be sure to stay out of arms reach from the victim. Using the aid is much safer. Help drag him to safety and make sure you are stable before helping him onto land.
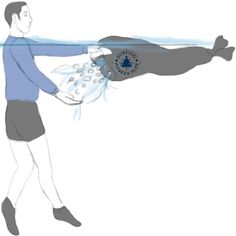
Towing
Towing is when you have to grab the victim and bring him to safety. This may be for an unconscious victim, because you have no aid, or because the person is too panicked to grab your aid. The latter is the most dangerous as they may drag you under the water.
There are several types of rescue tows and the one you use will depend on the specific scenario.
Whenever you approach any victim for a tow, stop a few meters back from him first. Re-access the situation and calm the patient from a safe distance. Assuming he is conscious, tell him what you plan to do and that he should stay calm throughout the process. Continue to reassure him until he is safe on shore.
Armpit Tow
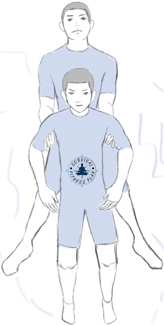
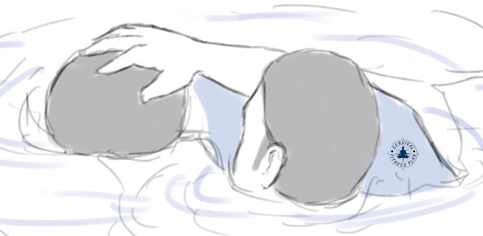
The armpit tow is useful with a co-operative or unconscious victim. It allows you to approach from behind which is the safest position for you.
There are two types of armpit tows, i.e., the single and double. The one you use depends on what you prefer and the situation at hand.
To do an armpit tow you must first level the victim off. This is so you can keep his face out of the water and his airway clear. It also makes the victim horizontal to the water, making it easier for you to take him to safety.
Single Armpit Tow
Approach the victim from behind and grab his armpit with your same side hand (e.g., right armpit with right hand).
Place your elbow of your other arm in the center of his back. Pull with your hand as you push with your elbow. At the same time use a scissor kick to level him out, face up. Your other hand can assist in the process if needed.
While keeping hold of his armpit start swimming so that you will drag him in the direction you want to go. Sidestroke works well. Allow your arm to extend until you start to pull him.
Double Armpit Tow
When the victim is larger than you the double-armpit tow may be easier to use, especially to level him off.
Approach the victim from behind and grab both his armpits. Grab his right armpit with your right hand and his left armpit with your left hand.
Place both your elbows on his back and pull with your hands as you push with your elbows. As you do this, use an inverted breaststroke (like in survival backstroke) to help pull him flat on his back. He is now leveled.
Continue to kick until your arms lock straight and you start to pull him. You will need to use a continuous and strong kick to keep your victim’s face out of the water.
LEARN HOW TO DO SURVIVAL BACKSTROKE
Using the double-armpit tow long distance is hard since you have no arms to assist with swimming. A good idea is to start with the double-armpit tow and then switch to the single armpit tow once you have momentum.
You can make the double-armpit tow easier with a flotation aid. Place any long, thin, buoyant object between you and your victim and then tow him as normal. A pool noodle or rolled up sleeping mat work well. If possible, swim up with it in place, e.g., across your chest and under your armpits.
When using an aid in this manner you may find it more difficult to level the victim. You will need to experiment to see what works best for you. You may even choose to skip the leveling.
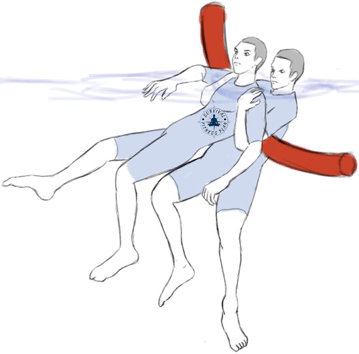
Once you have some momentum you may be able to free up one of your hands to help you swim.
Every flotation device will act a little different. Experiment with various options, especially with things you are likely to have.
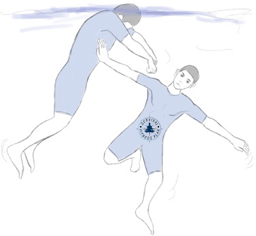
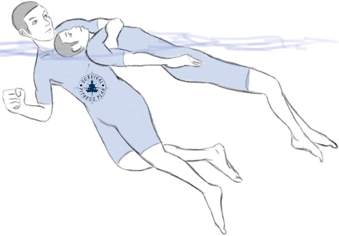
Cross Chest Carry
Use the cross chest carry when rescuing a victim through heavy surf. It is more tiring than other rescues.
Approach the victim from behind and level him off (described in armpit tows). Encircle his chest with one arm. You can use your other hand on his side to help position him into a secure position.
Once you get a good grip, use sidestroke to swim him to safety. Your hip on his back helps to support him.
If the victim struggles you can either tighten your grip or use a defense technique (next chapter).
Vice Grip Rollover and Tow
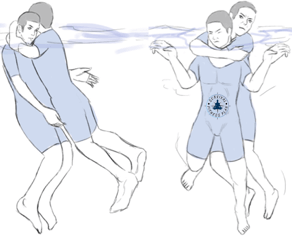
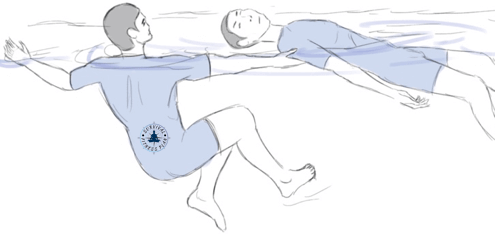
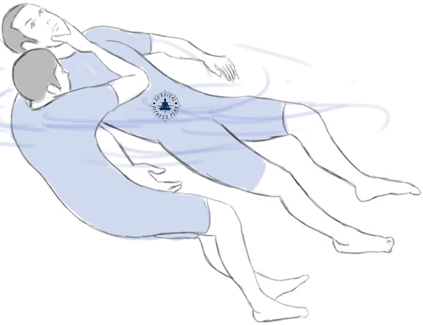
When you suspect your victim has a spinal injury, use the vice grip rollover and tow.
The vice grip rollover and tow allows you to turn a faced down victim over and tow him while protecting his spine. You can also provide rescue breaths to an unconscious victim while towing him. You may wish to do this if the distance to shore is further than you are willing to wait to perform CPR.
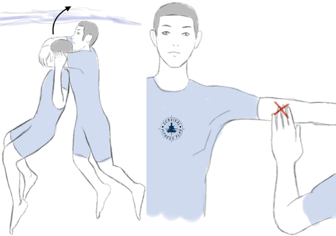
To do the vice grip rollover you need to be in water deep enough to allow you to submerge the victim. Grip his jaw with one hand and align your fore-arm along his sternum.
Place your other hand on the back of the victim’s head and align your forearm along his spine. Squeeze your elbows together. Create a “vice” on his head, neck, and spine between your forearms.
LEARN WHITE WATER SWIMMING SKILLS
Move forward to level him off. While keeping him as level and stable as you can, roll under him to turn him over.

Keep this vice grip and use a scissor kick to swim.
Giving rescue breaths is challenging but you can do it if the victim is not too big for you. Change your hand on his chin to a pistol grip and lean over to give the breaths.
Note: Giving rescue breaths will compromise the spinal support.
GET YOUR FREE SWIM WORKOUTS AND WATER RESCUE SKILLS TRAINING SCHEDULE
Swim Workouts and Water Rescue Skills: Techniques to Swim Faster, Longer, and Safer (Survival Fitness Book 9)
Price Disclaimer
Photo Credit: Airman 1st Class Tryphena Mayhugh.
Did you find this article on water-based water rescue techniques useful? If so, please share it with your friends.
The post Water-Based Water Rescue Techniques appeared first on Survival Fitness Plan.
Swift-Water Rescues Using Rope
Learn how to perform swift-water rescues using rope. These rescues assume you only have one rope (such as a throw bag) and no other specialist equipment. Using this minimalist approach leaves you with the simplest of rope rescue techniques. If you enjoy whitewater sports then you should be carrying more equipment. Take a professional course on how to use it.
GET YOUR FREE SWIM WORKOUTS AND WATER RESCUE SKILLS SCHEDULE
The information in this post is from the book “Swim Workouts and Water Rescue Skills” by Sam Fury.
Swim Workouts and Water Rescue Skills: Techniques to Swim Faster, Longer, and Safer (Survival Fitness Book 9)
Price Disclaimer
Swift-Water Rescues Using Rope
Be sure to use proper rope throwing techniques when training in these rope rescues.
LEARN THE PROPER WAY TO THROW ROPE–
With all rope rescues, if you have the manpower, place safety rescuers. Put one upstream of the rescue to warn and redirect or stop anyone coming down the river. Also place one or more safety rescuers downstream of the rescue. This is in case a rescuer becomes a victim (e.g., if he falls in the water). Also, if the first rescue fails there will be an immediate backup.
Note: Safety rescuers are not drawn in most of the following demonstration pictures. Place them if you have the man-power.
Land Rope Rescues
Entering water is always more dangerous than performing a land-based rescue. In the case of swift water the danger of a water-based rescue increases. Use a land-based rope rescue if possible.
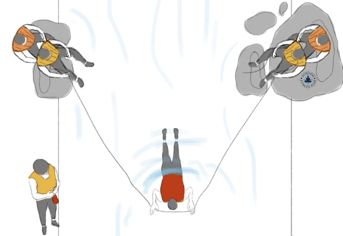
Pendulum Rescue
The general idea of a pendulum rescue is to throw a rope to the victim so he can grab onto it as he drifts by. He then “swings” in an arc (like a pendulum) to shore.
The pendulum rescue is fast to deploy but a couple of things can go wrong.
The victim may miss the rope.
If the rescuer is not well anchored he may get pulled into the water.
To do the pendulum rescue you must position yourself downstream of the victim. Be sure to give yourself enough time to deploy the rope. Anchor yourself if needed, depending on the weight of the victim and the force of the current. It is a good idea to hold onto a tree or have a second rescuer hold onto you.
You should also consider what obstacles the victim may swing into due to your placement.
Throw the rope a little in front of and past the victim so that he can grab it as he floats past in the defensive position.
Instruct the victim to grab hold of the line and place it over his shoulder. This will orientate his head towards the rescuer. He must stay on his back. Keep stationary and allow the current to swing the victim towards the shore. Once the pendulum effect has finished, pull the victim the rest of the way.
LEARN HOW TO SURVIVE A RIP CURRENT

To counter-act the victim’s weight, use a belay position by passing the rope around the upper bit of your butt. For extra stability, you can sit on it, and if you have the manpower have someone help to hold you down.
If possible (and not dangerous), after you have thrown the rope, take a few steps back inland. This will increase the pendulum effect as well as reduce the load you need to bear. Let out some of the rope as you get repositioned. Once you are stable, pull the rope tight to start the pendulum.
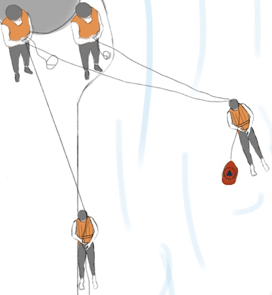
Stabilization Line
A stabilization line is where you fix a rope across the river to catch the victim. It takes more time to set up but lessens the chances of missing the catch.
It is also useful for providing a general support line which the victim can use to hold his head above water. This can be a lifesaver in cases such as a foot entrapment when the current is forcing the victim down.
The stabilization line generally requires at least two people. One on either side of the river. You could do it with one person by tying one or both ends to something, but you would have to cross the river.
The smaller the angle between the rescuer(s) and the victim the easier it will on the rescuers.
Once the victim catches the line he can traverse himself to safety.
LEARN WHITE WATER SWIMMING SKILLS
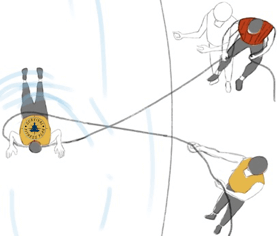
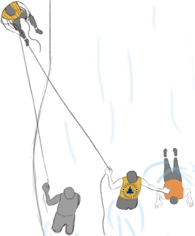
Kiwi Cinch
The Kiwi Cinch is the only simple land-based rescue you can use with an unconscious victim. It requires the victim to be drifting close to shore.
Do it by looping the rope around the victim and then pulling him in.
Like the stabilization line, it is possible to do the Kiwi Cinch with one person, but it is much easier with two. This demonstration uses two people.
Each rescuer coils one half of the rope from the center out. This way they will have the same length of rope.
As the victim drifts past, the rescuers throw the rope around him in a big loop. The two rescuers must communicate well so that they throw their ends of the rope at the same time. They must hold onto the other end of the rope.
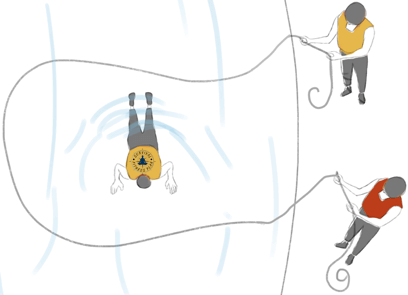
Cross the rope to create a closed loop around the victim. To do this the two rescuers must swap places. The upstream rescuer walks behind the downstream rescuer. His rope will cross on top. The downstream rescuer moves up at the same time.
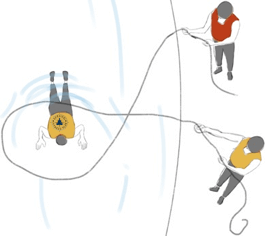
Once in place, tighten the loop (the cinch) around the victim. Preferably around his torso. The new upstream rescuer anchors himself in a sitting belay. The downstream rescuer pulls his side of the rope to swing the victim to shore.
Swimming Rope Rescues
Swimming rope rescues need the rescuer to enter the water to save the victim. This includes wading. Use them for unconscious victims, floating equipment, or anything that can’t self-rescue.
Simple Rope Tether
With the simple rope tether, attach the rescuer to a rope as he wades out to rescue the victim. Secure the other end of the rope on shore by tying it to something or having a second rescuer as a belayer.
Tethered Swimmer
The tethered swimmer rescue is when the rescuer swims up to the victim instead of wading. The rescuer will need two hands, so tie him to the tether.
Although a tied belay would work, it is best if the belayer is human. This way he can feed out the line as needed as well as help pull the rescuer and victim to shore. The belayer should feed the rope loose so that the swimmer isn’t held back by it.
If the victim is wearing something on his upper body (such as a life jacket) the rescuer can grab onto it. If not, use an armpit tow. If there is a human rescuer on shore he can pendulum/pull the rescuer and victim to shore. If not, then they can drift downstream until the line gets taught. They will then swing towards shore.
GET YOUR FREE SWIM WORKOUTS AND WATER RESCUE SKILLS TRAINING SCHEDULE
Swim Workouts and Water Rescue Skills: Techniques to Swim Faster, Longer, and Safer (Survival Fitness Book 9)
Price Disclaimer
Photo Credit: Staff Sgt. Sandra Welch.
Did you find this article about swift-water rescue techniques using rope useful? If so, please share it with your friends.
The post Swift-Water Rescues Using Rope appeared first on Survival Fitness Plan.


