Swift-Water Rescues Using Rope
Learn how to perform swift-water rescues using rope. These rescues assume you only have one rope (such as a throw bag) and no other specialist equipment. Using this minimalist approach leaves you with the simplest of rope rescue techniques. If you enjoy whitewater sports then you should be carrying more equipment. Take a professional course on how to use it.
GET YOUR FREE SWIM WORKOUTS AND WATER RESCUE SKILLS SCHEDULE
The information in this post is from the book “Swim Workouts and Water Rescue Skills” by Sam Fury.

Swim Workouts and Water Rescue Skills: Techniques to Swim Faster, Longer, and Safer (Survival Fitness Book 9)

Price Disclaimer
Swift-Water Rescues Using Rope
Be sure to use proper rope throwing techniques when training in these rope rescues.
LEARN THE PROPER WAY TO THROW ROPE–
With all rope rescues, if you have the manpower, place safety rescuers. Put one upstream of the rescue to warn and redirect or stop anyone coming down the river. Also place one or more safety rescuers downstream of the rescue. This is in case a rescuer becomes a victim (e.g., if he falls in the water). Also, if the first rescue fails there will be an immediate backup.
Note: Safety rescuers are not drawn in most of the following demonstration pictures. Place them if you have the man-power.
Land Rope Rescues
Entering water is always more dangerous than performing a land-based rescue. In the case of swift water the danger of a water-based rescue increases. Use a land-based rope rescue if possible.
Pendulum Rescue
The general idea of a pendulum rescue is to throw a rope to the victim so he can grab onto it as he drifts by. He then “swings” in an arc (like a pendulum) to shore.
The pendulum rescue is fast to deploy but a couple of things can go wrong.
The victim may miss the rope.
If the rescuer is not well anchored he may get pulled into the water.
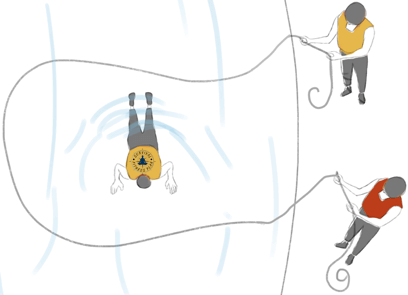
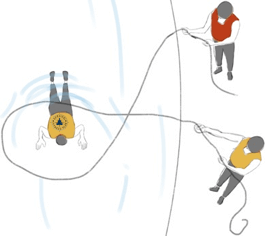
To do the pendulum rescue you must position yourself downstream of the victim. Be sure to give yourself enough time to deploy the rope. Anchor yourself if needed, depending on the weight of the victim and the force of the current. It is a good idea to hold onto a tree or have a second rescuer hold onto you.
You should also consider what obstacles the victim may swing into due to your placement.
Throw the rope a little in front of and past the victim so that he can grab it as he floats past in the defensive position.
Instruct the victim to grab hold of the line and place it over his shoulder. This will orientate his head towards the rescuer. He must stay on his back. Keep stationary and allow the current to swing the victim towards the shore. Once the pendulum effect has finished, pull the victim the rest of the way.
LEARN HOW TO SURVIVE A RIP CURRENT

To counter-act the victim’s weight, use a belay position by passing the rope around the upper bit of your butt. For extra stability, you can sit on it, and if you have the manpower have someone help to hold you down.
If possible (and not dangerous), after you have thrown the rope, take a few steps back inland. This will increase the pendulum effect as well as reduce the load you need to bear. Let out some of the rope as you get repositioned. Once you are stable, pull the rope tight to start the pendulum.
Stabilization Line
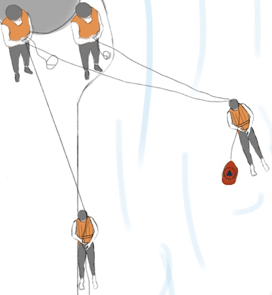
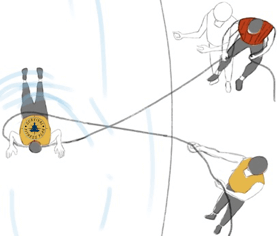
A stabilization line is where you fix a rope across the river to catch the victim. It takes more time to set up but lessens the chances of missing the catch.
It is also useful for providing a general support line which the victim can use to hold his head above water. This can be a lifesaver in cases such as a foot entrapment when the current is forcing the victim down.
The stabilization line generally requires at least two people. One on either side of the river. You could do it with one person by tying one or both ends to something, but you would have to cross the river.
The smaller the angle between the rescuer(s) and the victim the easier it will on the rescuers.
Once the victim catches the line he can traverse himself to safety.
LEARN WHITE WATER SWIMMING SKILLS
Kiwi Cinch
The Kiwi Cinch is the only simple land-based rescue you can use with an unconscious victim. It requires the victim to be drifting close to shore.
Do it by looping the rope around the victim and then pulling him in.
Like the stabilization line, it is possible to do the Kiwi Cinch with one person, but it is much easier with two. This demonstration uses two people.
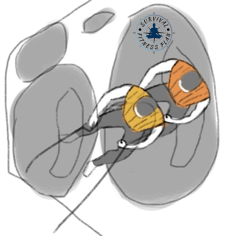
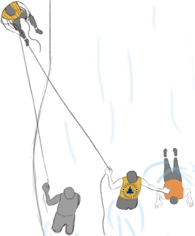
Each rescuer coils one half of the rope from the center out. This way they will have the same length of rope.
As the victim drifts past, the rescuers throw the rope around him in a big loop. The two rescuers must communicate well so that they throw their ends of the rope at the same time. They must hold onto the other end of the rope.
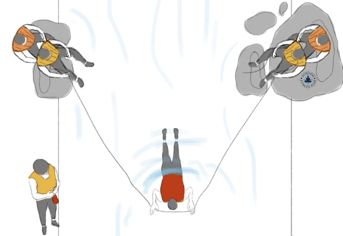
Cross the rope to create a closed loop around the victim. To do this the two rescuers must swap places. The upstream rescuer walks behind the downstream rescuer. His rope will cross on top. The downstream rescuer moves up at the same time.
Once in place, tighten the loop (the cinch) around the victim. Preferably around his torso. The new upstream rescuer anchors himself in a sitting belay. The downstream rescuer pulls his side of the rope to swing the victim to shore.
Swimming Rope Rescues
Swimming rope rescues need the rescuer to enter the water to save the victim. This includes wading. Use them for unconscious victims, floating equipment, or anything that can’t self-rescue.
Simple Rope Tether
With the simple rope tether, attach the rescuer to a rope as he wades out to rescue the victim. Secure the other end of the rope on shore by tying it to something or having a second rescuer as a belayer.
Tethered Swimmer
The tethered swimmer rescue is when the rescuer swims up to the victim instead of wading. The rescuer will need two hands, so tie him to the tether.
Although a tied belay would work, it is best if the belayer is human. This way he can feed out the line as needed as well as help pull the rescuer and victim to shore. The belayer should feed the rope loose so that the swimmer isn’t held back by it.
If the victim is wearing something on his upper body (such as a life jacket) the rescuer can grab onto it. If not, use an armpit tow. If there is a human rescuer on shore he can pendulum/pull the rescuer and victim to shore. If not, then they can drift downstream until the line gets taught. They will then swing towards shore.
GET YOUR FREE SWIM WORKOUTS AND WATER RESCUE SKILLS TRAINING SCHEDULE
Swim Workouts and Water Rescue Skills: Techniques to Swim Faster, Longer, and Safer (Survival Fitness Book 9)
Price Disclaimer
Photo Credit: Staff Sgt. Sandra Welch.
Did you find this article about swift-water rescue techniques using rope useful? If so, please share it with your friends.
The post Swift-Water Rescues Using Rope appeared first on Survival Fitness Plan.