
Doug Lemov's Blog, page 19
February 12, 2021
Ben Kamara-Adams: How to Coach a Rondo
 Everybody loves a rondo. Here’s how to get more out of it
Ben Kamara-Adams is a Pre Academy Coach at Shrewsbury Town FC in England and an ambassador for Albert Puig’s APFC soccer. He and I met last year when I did a workshop for the club and have kept in touch as he spends a lot of time thinking about how best to develop players through his teaching. He shared some thoughts about rondos on social media a few weeks back and I was struck by how well it demonstrated both teaching methodology and clarity about the knowledge he was trying to build in players. I asked him if he’d consider writing a guest post and this excellent reflection is the result.
The rondo might be the single most commonly used training exercise for football players around the world. But from my experience most coaches don’t use rondos nearly as well as they might. Often a rondo is simply done as a warm up, an activation exercise. If there are “rules” they are to merely to add a two touch limit or to set a goal of “7 passes.”
But the rondo is so much more than that. “All concepts in soccer are inside of a rondo,” Albert Puig likes to say.
One of the things he has taught me is to label, isolate and focus on key principles of the game. This helps young people identify learn and remember these actions. In this post I will discuss here how you can coach a rondo with some of these concepts as your objective.
Before I describe the individual concepts, there are two general rules for rondos that you must follow:
Rondos must always be practiced at game speed and intensityA 4 v 2 rondo must be in the shape of a diamond and not a square. This is to ensure that the passes are diagonal. I will explain the benefits and objectives of this later. It also often helps players conceptualize concepts if you make your diamond directional, with a defensive midfielder at the base and a striker at the top.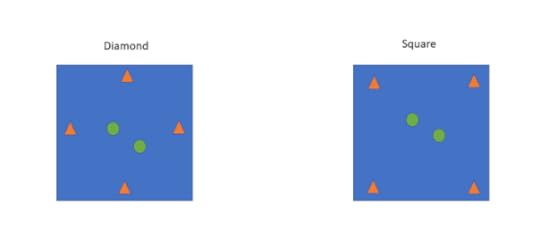 In the diamond the player at the top would be playing a center forward role and the player at the base a defensive midfielder.
Here are my favorite game-related technical principles to build a rondo around:
Head upBack FootBreak linesDiagonal passesOpposite movementBall never stopsHead up is the most important of them all. Teaching players how to see the game will stand them in great stead in every match they play for their entire career but how often do you see a session built around it? It is usually reduced to reminders of head up, check your shoulders and scan.
Here’s how to teach head up in a rondo.
What to teach when it comes to head up
A player should be able to keep their head up before, during and after receiving the ball. This can be taught to u8s all the way up to u18s. Once I see the ball coming towards me—or even while I am anticipating that it might–I must look for my next pass. I mustn’t look down whilst receiving the ball and I must keep my head up while making a decision.
Planning a 4 v 2 rondo with head up as the focus.
Organisation – 10 by 10 (or 10 steps in each direction) diamond.
Objective – Playing with the head up, looking for the next pass before you receive the ball.
Structure – start as a 6 v 0 rondo, passing with the head up practice, then introduce 1 defender to make it a 5 v 1 and finally introduce a second defender 4 v 2.
Error planning: What will most likely go wrong – Players will keep looking at the ball; they will stare directly at the person who has passed them the ball; they will improve without pressure but as I introduce a defender they will revert.
Timings and coaching points – 90 seconds each block.
Start with a demonstration of what it should look like.
First block 90 seconds – Focus on having your head up; no interventions.
Second block of 90 seconds – Discuss what went wrong and demonstrate the correct technique. I have to look for my next pass. I mustn’t watch the ball at any point.
Third block of 90 seconds – Challenge them to do it with a bit more speed and keeping their head up 80 percent of the time. If you hear me say “yes” I like it. If you hear me say “up” you know you can still do better.
Fourth block of 90 seconds – Introduce a defender. I reiterate: I would rather you lose the ball with your head up than succeed with your head down. I explain that a ‘thinking touch’ where they control the ball and then lift their head takes 1 or 2 seconds. In football, that might as well be two hours.
Fifth block of 90 seconds – Do it again focusing on decisions. Were they quicker? Was it easier?
Sixth block- Introduce the second defender.
At the end of this I will decide what comes next based on their proficiency. I may get them to go back and repeat if they are struggling, or I may start to add more details. And I’m planning on doing it again tomorrow. And the day after. 80 percent of the value in learning comes from 20 percent of the ideas. This is one of those ideas.
The Other Concepts
It’s worth spending time really mastering head up because if players can’t do it, the other concepts are difficult to teach- and possibly not worth teaching. The purpose of being ‘side on’ or having a forward-facing body profile is so that you can see more of the pitch. If your head’s not up there’s no benefit to those things. Similarly without your head up you won’t know where the defenders are and will not be able to use the back foot to control away from pressure.
For purposes of brevity I will condense the six remaining concepts into one practice. But my purpose is to show how you can progress a rondo, week-in, week-out, and teach actionable things.
What is the back foot?
Coaches at grassroots and academy level tell kids back foot, back foot all the time. One day I asked some kids, “Do you even know what the back foot is?” One said it was their left foot, one said it was their heel, one said it was their strong foot. You can simply convey this concept to kids by saying the back foot is the one furthest away from the ball. What foot is furthest away? It may be their left or right, then ask them to pivot. Now what foot is furthest away?
Why the back foot?
Using the inside of the furthest away foot we can control forward quicker. We can also control away from pressure.
What is a ‘line’ in football?
Imagine Iniesta on the half-way line. That is a line. Each individual player creates a horizontal line. Picture Iniesta standing on that same halfway line with Luca Modric. These are now two players standing in the same horizontal line. In a rondo the two players in the middle are opposition centre midfielders. One of those midfielders has gone to press our striker. The other midfielder is in the centre of the rondo waiting to see if he can intercept the next pass. If the winger on the right stands in the same horizontal line as him and has the correct body position, he can receive a pass on his back foot and control in the space behind the defender. This is what we call beating the line with your first touch.
Break Lines
One of the best things to teach in a 4 v 2 rondo is a pass that breaks lines, either via first touch as I described above or via a pass that splits defenders. This is a great pass because you have now effectively eliminated these two opposing players leaving the striker alone to play forward or facing less players. The opposing players also have to turn around which allows the receiver of the pass in a rondo more time and space.
Diagonal Pass and Opposite Movement
‘Opposite movement’: A defender gains the advantage when he can see both the ball and the player. If teammates without the ball move diagonally away from a teammate with the ball, they practice being in a channel away from the opponent’s eyes. The opponent cannot watch both the ball and us. This is one of the most important off-the-ball habits in football.
Placing the rondo in a diamond is key to this. In a square you have limited room for movement. In a diamond players can move up and down to break lines and reduce the defender’s knowledge of their position.
In a 4 v 2 rondo and in a game. When a teammate is under pressure, we must stand close to them to offer a line of support and ensure we retain possession. So, in a rondo if the defender is under pressure the left winger can come as far down the 10 v 10 square as he can. In a match this could be Gerard Pique under pressure from Benzema and Busquets coming down in the same horizontal line as Pique give him a supporting option.
But when this happens the other winger can move in the opposite direction–as far up the rondo square as possible. This ensures that we will maintain a diagonal line for a pass away from pressure and that breaks lines. This idea is called ‘opposite movement.’ One player down and the other up, with the two players off the ball reading one another’s movements as much as those of the player on the ball.
Ball Never Stops
In a rondo one of the basic rules is: Never stop the ball. Do not control the ball in front of you, always move it in a different direction: away from pressure in many cases but towards pressure—to lure defenders away from the teammate you’ll pass to–if you have time and space.
Pep Guardiola says that the object of the pass is not to move the ball but to move defenders. If you keep the ball moving and circulating, you never give the opposition players time to set and reshape.
Below is another plan I did for the u13 shadow squads.
Building on the Head Up concept with the same 4 v 2 rondo.
Organisation – 10 by 10. 10 steps each way. Or 10 yards each way.
Objectives – Keeping the head up, Using the back foot. Breaking lines
Coaching points – Instead of just looking for our next pass we are looking for a pass that breaks lines and eliminates defenders. When we see the ball coming, look around and identify: can you use the back foot to control forward, pass to beat lines or must you control away from pressure.
What most likely will go wrong?
They will force a pass to break lines. They will play safely around the defenders and not make that clinical pass through the middle. They will control with their front foot when they could have progressed forward, beat a line or controlled away from pressure. They will control towards pressure.
Structure – 4 v 2
Timing and interventions – 90 second blocks.
First block of 90 seconds – I will demonstrate a break the lines pass and will explain what it is. I will then explain that I want to see them look and make as many of these as possible.
Second block of 90 seconds – If they have been forcing the pass, I will tell them to keep the ball moving and make the pass when it presents itself. I will also show how and when they should control on the back foot.
Third block of 90 seconds – In this round I will make stoppages during play. For example, if a pass has come through the opposing player in the same line as you and you have space to control on the back foot with your first touch and play in the other direction but instead, you controlled forward and lost the ball or played it back to the person whom played it to you. I will ask the team what we missed then I will replay the pass with me as the receiver explaining step by step. “If I have the space and the time, and I have had my head up to see his positioning I can do what?” If they don’t get it, I will say receive on what? They should say back foot. And then I will explain how they could beat the player with their first touch.
Fourth block of 90 seconds – Same coaching points but fewer stoppages. I make corrections and reinforce strong execution while they are playing.
Fifth block of 90 seconds – Same again. I will ask them if they see a difference? Are we playing more efficient and quicker?
If You Want to Learn More About Rondos.
I hope this has been helpful. If there is anything you have questions about you can message me on LinkedIn. My name there is Ben Kamara-Adams and my bio should say I am Pre-Academy coach for Shrewsbury Town- or you can look up apfcourses.com or email info@apfcourses.com
The post Ben Kamara-Adams: How to Coach a Rondo appeared first on Teach Like a Champion.


February 11, 2021
Jasmine Lane: Hasan Clayton’s ‘Double Chat’
Team TLAC has written a lot about different uses of the chat function, especially different types of chat and their purposes and we’re excited to share more insights with you today. This clip from Nashville Classical’s Hasan Clayton teaching a lesson on the novel Freak the Mighty shows how Hasan uses the chat function to build community, keep momentum and ensure academic rigor. Here’s the Clip:
Building a classroom community is one of the most important aspects of in-person teaching, and is made more difficult by the online setting. From the beginning of the clip, however, you’ll notice Hasan gives students two opening questions for the Do Now– a Chat to Me question and a Chat to Everyone. Hassan uses the Chat to Me as an academic Check for Understanding to review key on the content knowledge—what’s the difference between nature and nurture– while the Chat to Everyone creates an opportunity for a playful moment in which students can connect- the sort of thing that’s often present in in-person classrooms, but difficult to build into the online setting.
As he does this Hasan also gives students a time constraint- four minutes. This is great for pacing and attention. It gives students enough time to complete their answers, but not so much time that it allows students’ focus to wane or negatively impacts momentum—instruction that’s too slow is especially troublesome online because a there’s always an alternative just a click away.
While students are writing, Hasan playfully narrates a few responses to the Chat to Everyone question—Students have to say whether they’d choose having one eye or two noses—but just enough to avoid having it compete with the Chat to Me question.
When it’s time to synthesize student responses to the Nature versus Nurture prompt, Hassan Show Calls a few of the answers students chatted. He is thoughtful about which student answers to lift up in order further the learning and his naming of the work of individual students further supports a strong classroom culture in which students are actively encouraged to participate and are praised for their contributions. This is all just within the first few minutes of class during a Do Now.
Thanks to Hassan for sharing his classroom with us.
The post Jasmine Lane: Hasan Clayton’s ‘Double Chat’ appeared first on Teach Like a Champion.
February 8, 2021
An Annotated Forgetting Curve
 This should simplify things….
Just last month I finally completed and published The Coach’s Guide to Teaching; this month I’m wrapping up the manuscript to the new 3.0 version of Teach Like a Champion.
One of its themes of 3.0 is making clearer and more extensive connections to research so one thing the two books will have in common is discussion of the importance of forgetting–Retrieval Practice is a new technique in 3.0 and the role of forgetting for athletes is the subject of chapter 2 in CGT.
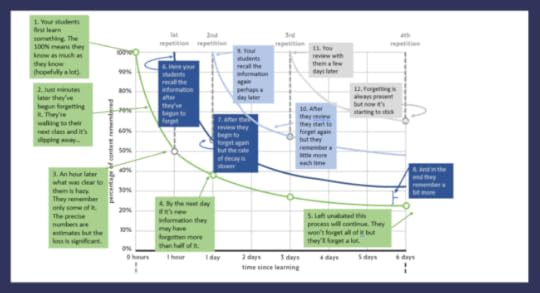
As a result, both books discuss the ‘Forgetting Curve,’ the graph describing how learners forget things over time and how retrieval practice can arrest this process.
The original Forgetting Curve was derived in the 1880s by the German psychologist Hermann Ebbinghaus and plotted the actual rate at which he was able to remember a series of nonsense syllables after learning them. The general shape of the curve is broadly accepted by cognitive psychologists. But since your students aren’t learning nonsense syllables, the rate at which they forget what they have learned after they learned it is less clear. So what the Forgetting curve tells us that:
as soon as you learn something, you begin forgetting it almost immediately.the rate of forgetting is often shockingly high; a few hours after learning something, people routinely remember only a small fraction of it.each time you practice recalling what you know, the rate and amount of forgetting is reduced somewhat.retrieving something back into working memory slows the rate of forgetting, but how and when the retrieval happens is important.But a Forgetting Curve cannot tell you exactly what the rate of retention will be for your students generally or for a specific student at time A or time B for a specific topic you’ve taught. There are individual differences and factors in the learning environment, like how much attention students are paying and how new to students the information is/ There are differences in content too: abstract and complex ideas; simpler and more concrete.
So the curve in is also theoretical or hypothetical in any specific case.
And it also leaves open what the magic number of times students have to engage something to learn it. Graham Nuthall’s Hidden Lives of Learners proposes that whether a student was exposed to content three times can predict with 80-85% accuracy whether they successfully learned it.
Anyway, the Forgetting Curve is a highly useful and also imperfect tool but one educators should know. That said it’s actually complex to read one the first time you encounter it and I get questions from educators about it all the time. So as part of TLAC 3.0 i am toying with the idea of an annotated Forgetting Curve… one with descriptions build in so it’s more portable and how to read it is more readily apparent. Here’s a draft in case it’s useful first the annotated curve:
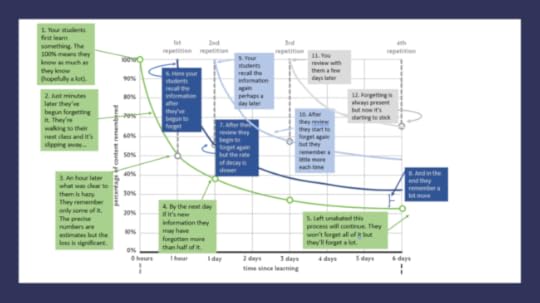
And then a clean version:
I’ve temporarily adapted both from a drawing of it the amazing Oliver Caviglioli made for CGT. Hope its useful!
The post An Annotated Forgetting Curve appeared first on Teach Like a Champion.
January 29, 2021
Beth Verrilli on Sadie McCleary’s (Online) ‘Culture of Error’

Team TLAC was thrilled to have ace teacher Sadie McCleary of West Guilford HS in Greensboro, NC join us in a video review meeting recently, bringing some footage of her online AP Chemistry classroom for us to watch together. Team member Beth Verrilli shared some observations about one particular thing we loved:
We learned so much from all of Sadie’s teaching, but were especially moved by the moments in which she masterfully maintains a Culture of Error in her on-line classroom. It is one thing to say that there is a Culture of Error in your classroom, but we were struck by the different moves Sadie employs throughout just one lesson to show she believes in it.
In the initial moment, our first clue that Sadie has already established a Culture of Error is Ciara’s straightforward honesty: Ciara is comfortable enough to admit that she is confused. With a warm, positive tone, Sadie says that confusion is OK, and signals her next steps: “I am going to ask you a couple of questions to get there because I know you can get there.” There is no blame or gotcha, just Sadie reminding her students that they truly do possess the cognitive foundation necessary for success—and that Sadie will stick by them, thinking through the steps together, until the right answer is achieved.
In the next moment, there is no student voice, just Sadie noting the rigor of her subject (“I want to name for you right now that finding the Units for K is always the hardest skill of this unit”) and norming the struggle (“If it feels tricky, that makes sense.”) Sadie has taken the time before class to identify places where students might falter, and frontloads that information so they can gear up for a challenge. Then, she closes by reminding students that this is a skill which they will continue to practice, signaling Sadie’s commitment to getting her students to own the rigor and move beyond struggle.
In the last moment of the montage, Sadie tells Kendall she is “glad” she made an error. In Sadie’s class, it is normal—and necessary—and right to be wrong. Being wrong puts you in a group of people who will also make that common error, because you are still learning. Because errors are how you learn, and why you practice, and necessary for mastery.
Just a note—Sadie’s Culture of Error does not blur the line between right and wrong. The answer IS wrong, and Sadie is clear about it. She is maintaining an environment where students can accept that they are wrong, because they trust Sadie will get them to right.
-Beth Verrilli
The post Beth Verrilli on Sadie McCleary’s (Online) ‘Culture of Error’ appeared first on Teach Like a Champion.
January 24, 2021
The Coach’s Guide to Teaching: What’s Inside?
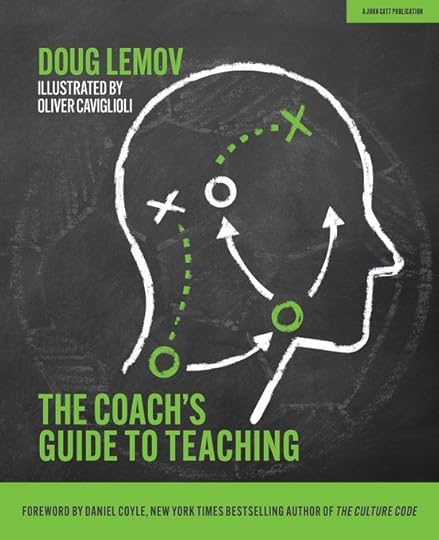 Weighing down shelves and propping open doors everywhere!
My latest book, The Coach’s Guide to Teaching hit the shelves in December. Yes, it’s about coaching athletes. I tried to take what I know about teaching, combine it with what cognitive science says about learning shoot it through the lens of the game I love: soccer/football. Hope that doesn’t sound narrow; It’s for coaches but I think a lot of people in the broader education sector might enjoy it.
Writing it was a journey of more than five years’ duration, during which time I spend perhaps 20 days a year working with coaches in professional sports franchises and national federations. At first I kept my life working with coaches separate from my day job training and studying teachers but the book wouldn’t stay in its lane. Every time I watched video of a classroom or visited a school I was reminded of some issue raised in my conversation with coaches.
Anyway, a fair number of people have asked ‘What’s it about?’ it so here’s a quick summary of what’s inside it and links to a few excerpts:
WHAT’S INSIDE
This book consists of six chapters. The first, “The Ability to Decide,” is about decision-making, which I call the most important proficiency of all. It focuses heavily on the under-acknowledged role of perception. Expertise is in the eyes. You cannot make the right decisions unless your eyes are in the right place and know what to look for. How then do we develop athletes’ eyes and the more advanced cognitive processes they support?
Sneak Preview From the Coach’s Guide to Teaching: On ‘The Ability to Decide’
Chapter 2 is about planning and session design, both within a session and within a unit. Planning units of learning (of four or six weeks’ duration, say) is far less common than planning single sessions, but at least as important because long-term memory can only be built over time. As I hope to show, the role of long-term memory is vastly underappreciated by most educators—coaches included. Consider this: you have forgotten almost everything you’ve learned in your life. Athletes are no different. How do you know they will remember what you’ve taught them when they need it?
Chapter 3 is about giving feedback, which is perhaps the single coaching action we do most. That it is so familiar to us makes it easy for us to rely on old and untested habits. We give feedback the way we do because…well, who knows. Perhaps because Coach Carlton gave us feedback that way 25 years ago. And why did he do it that way? Well, Chapter 3 is your chance to think about some of the decisions you make about feedback. The science of
working memory and attention will play a key role.
Chapter 4 is about John Wooden’s adage that teaching is knowing the difference between “I taught it” and ”They learned it.” It’s among the hardest things to do in teaching and the science of perception will come back to play a key role.
Excerpt: The Coach’s Guide to Teaching
Chapter 5 is about building culture. Culture is often the thing we remember best from our own sporting days, and its messages are what we carry with us longest, perhaps because our individual behaviors have evolved to be extremely responsive to group culture. In the end, you can get a lot wrong if you get culture right.
Excerpt:
An Excerpt from The Coach’s Guide to Teaching, Chapter 5: Building Culture
The sixth chapter is about long-term growth and development—your players’ and your own. I’ll discuss, among other things, how to balance long-term learning goals with the short-term task of winning, how gameday
coaching is different from coaching in practice, how to make good decisions when selecting talent, and how to make sure that you grow and develop as much as you can in your own coaching journey.
Book Excerpt: On Sideline Coaching and Post-Game Talks
IS IT A GENERAL COACHING BOOK OR A SOCCER
COACHING BOOK?
The book is intended to offer lessons and guidance that are applicable to coaches of any sporting endeavor. But because I take domain knowledge seriously and have immense respect for how much coaches know about their chosen sport, I’ve chosen to write through the lens of the sport I know
best: soccer. My hope is that coaches of other sports will be able adapt and apply the lessons to their own contexts without my giving direct examples from them. I do this because I am reluctant to try to provide examples from
games I do not sufficiently understand. That said, while my examples are drawn heavily from soccer, you’ll notice throughout the book that I’ve asked top-tier coaches from other sports or with different perspectives to provide reflections and context in sidebars.
They include, in addition to several soccer coaches:
Jeff Albert, Hitting Coach, St. Louis CardinalsSefu Bernard, Director of Player Development, Washington MysticsJoe Mazzulla, Assistant Coach, Boston CelticsDan McFarland, Head Coach, Ulster RugbyDave Love, consulting shooting coach for several NBA teamsI asked them to reflect on how they do or might adapt and apply the ideas in this book to their own sports. I hope this will provide support and insight for coaches who seek to take some of the concepts in the book and apply them to other sports or other settings.
Here’s an example:
From the Coach’s Guide to Teaching: Sefu Bernard on Training Core Principles
The post The Coach’s Guide to Teaching: What’s Inside? appeared first on Teach Like a Champion.
January 22, 2021
Deaning is Teaching: Introducing our New “Dean of Students’ Curriculum”
On the Teach Like a Champion Team we think Deans of Students* play a massive role in building strong school communities. On any given day you can find a dean having a thought-provoking or challenging discussion with a student about accomplishing goals or changing habits, collaborating with families and stakeholders, or perhaps developing character education lessons for their school. In a dozen ways every day, deans are teachers!
That’s why we are excited to share a new tool we’ve developed to support Deans in their teaching–our Dean of Students Curriculum.
It’s built on the idea that when a Dean works with students, he or she should be teaching as much as possible- seeking to guide the thoughts and actions of students by building their knowledge and skills- even (or especially) when the topic is learning to be productive and positive in school.
Deans of Students know that some young person will struggle at some point with impulse control and call out in class repeatedly, or will make a poor decision on social media- they just don’t know which student when. If it’s true that much of the behavior Deans seek to address is predictable, we should be prepared in advance them with a curriculum of productive learning activities to help ensure the learning is substantive and enduring.
Our curriculum is comprised of 40+ lessons which were created to develop character and to help replace unproductive behaviors with better ones. The lessons explore common issues that students face in school and provide resources to help them address those behaviors through teaching.
Designed with middle school students in mind, our curriculum explores a range of topics such as peer pressure, managing anger, showing gratitude, and more. When completing our lesson on “The Power of an Apology,” for example, students read an article that highlights the benefits of apologizing when they have done something wrong. Through questioning, students take what they have learned to identify effective apologies, reflect on their own experiences with apologies, and write their own apology.
The Dean of Students Curriculum can be used to:
Help students reflect on challenging situations, their actions, and learn replacement behaviors for counterproductive actions.· Help students understand how their actions impact themselves and others.Help students understand how their actions impact themselves and others.Proactively teach virtues and values to support student character development.Develop students’ critical thinking, writing, and character development through carefully curated activities broken up by topic.
Please visit our website where you can learn more about how to pilot or purchase the curriculum: https://teachlikeachampion.com/dean-of-students-curriculum/.
–Brittany Hargrove
* It could be the Dean of Students… or an Assistant Principal or Pastoral Leader or whatever a school calls the person who is asked to step in when students struggle to meet community expectations or behave counter-productively.
The post Deaning is Teaching: Introducing our New “Dean of Students’ Curriculum” appeared first on Teach Like a Champion.
January 19, 2021
Jasmine Lane on Rachel Harley & the Velocity of Data
 The Velocity of Data; It’s a Thing
In the virtual version of TLAC Towers we’re planning a new workshop on Checking for Understanding Online and so have been studying footage of teachers with strong dynamic online classrooms, looking for exemplars. At a meeting last week Jasmine Lane presented video of a reading lesson taught by Rachel Harley at Nashville Classical Charter School and the whole team pretty much went crazy for it. Jasmine wrote this post describing some of the things we loved and a new term we’ve been using.
On a normal day in the classroom with everything going perfectly, attention and focus are hard to manage, but the shift to online learning makes this challenge doubly difficult. One way many educators have engaged students is to ask them type and send responses in the chat. This approach, while useful, notably has its own drawbacks. In a brick and mortar classroom, we might give students a specific turn-and-talk task with a single partner, but by asking them to read responses in the chat, we’ve essentially paired students with 28 others and have asked them to skim a stream of responses. While all students have the opportunity to share their thinking in this manner, the follow up step can result in information overload for both teacher and student. Rachel Harley, a 5th grade teacher from Nashville Classical Academy, has given us a few ideas to address this challenge.
Here’s Rachel in Action:
After having just done a read aloud, Rachel gives her students two minutes to type their responses explaining “what just happened” to her in a private message. One might be tempted to narrate while students work to fill the void of silences already longer and awkward, but Rachel does doesn’t talk over their silence, and instead gives students space to think deeply about their work.
Next, notice how Rachel slows the pace of the lesson down. Instead of asking students to skim all of their classmates’ responses and reflect, she intentionally selects a few exemplar responses and transfers them onto the shared screen to begin curating a discussion. Building on this, Rachel reads the exemplar responses and then cold calls a student to extend and further explain their thinking to the class. Sometimes we make it harder on ourselves as teachers and on our students by asking them to respond to an overwhelming stream of data. Perhaps you’ve experienced this yourself. You’re on a call and the presenter asks for observations in the chat and suddenly there are 20 answers to try and read.
The chat function makes it possible for use to gather narrative data very rapidly and sometimes it’s too fast for us or our students to give ideas there due. We’ve started calling this idea “velocity of data”. And that’s why we loved Rachel’s moves here. She slows down the velocity of data by selecting just a few comments to share. This encourages processing for meaning rather than skimming for accountability. Through an intentionally curated discussion, Rachel centers student thinking and gives it the attention it deserves.
One big takeaway from Rachel is that while engagement is important, fast and speedy responses aren’t always the best way to check for understanding and clarify misconceptions. No strategy is perfect for every situation, but hopefully Rachel gives you a few examples of what can be done to optimize student voice when attention and time are limited.
If you’d like to learn more, this will also be a topic of discussion in our upcoming Webinar on Checking For Understanding Online. Watch this space for news.
The post Jasmine Lane on Rachel Harley & the Velocity of Data appeared first on Teach Like a Champion.
January 14, 2021
Double Bonus: Video of Jill Mattis’ Hybrid Lesson & Her Insights From a Follow-up Interview
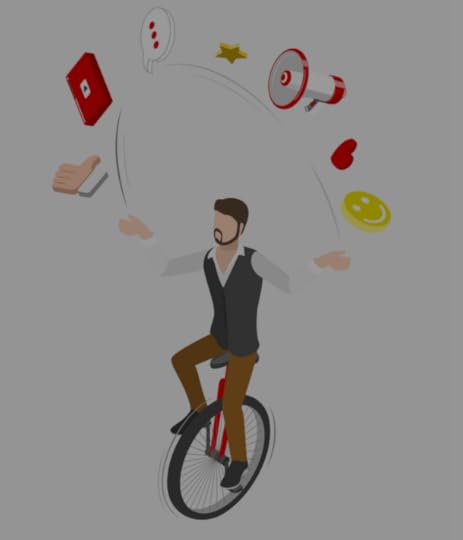 Figure 1: Teaching a hybrid lesson
Hybrid instruction can feel a bit like juggling–it offers all the challenges of in-person teaching while you also teach an online lesson.
But a good model can really make a difference so this video of math teacher Jill Mattis (Bethlehem Central Middle School (NY)) is super-helpful. As a double bonus, I got to ask Jill some questions about her lesson and her answers are just as good as the video.
So, first, here are three minutes of Jill’s math class:
A few things I loved about her teaching:
Her mix of questions is outstanding. She goes back and forth between kids in the class and kids at home in an almost-alternating pattern and she does this via a variety of cold call questions and volunteers question (ie where students raise their hands). One result is that it all feels like a seamless whole—the message is: we are all in this class together. In many hybrid rooms it feels like one group or the other is on stage and the other is on the back burner… I ask questions of the kids in class for then minutes and then shift: now it’s the at-home kids’ turn. But Jill goes back and forth so effortlessly, question by question, that students always feel relevant and like they are in the game. There isn’t even any “Ok now let’s hear from someone at home…” She just calls on Henry, who’s at home. This is accentuated by the combination of Cold Call, which keeps them lovingly on their toes, and volunteers, which rewards students who choose to participate.
I asked Jill about this and her comments were insightful:
DL: Were the kids at home raising their hands, were you cold calling them or both? JM: I like to do a little of both. I will definitely call on the students that have their hands raised at home for the first few problems, but then I like to cold call on others to make sure they are there and paying attention. When you wait a few examples in to do this, I find that students are more comfortable being cold called because they know if they are getting the first few problems right or wrong.Pacing matters: You probably noticed that Jill’s students are focused, attentive and on the ball. I asked her why and she said she didn’t do anything special but in many ways her teaching incentivizes it. There’s no downtime. They’re always active so they feel involved.
Having cameras on also makes a big difference: it allows her to see students, understand the affect of their responses, and see what they are doing and thus to hold them lovingly accountable and help keep them out of the Sea of Tik-Tok. It also makes it easier for class members to respond to and build community with their classmates. It’s hard to connect with your listener when your listener is a blank screen that says “David.”
So I asked Jill about this and she had a really great insight about why cameras should be on and how hands should be raised:
Google Meets recently had changed their setup so that students have a “raised hand” feature. I find this feature annoying because it makes the same sound as the chat feature, but also because when I’m looking at the kids in the room, the main board to write on, and then my laptop where the kids are at home, the icon is so small it’s difficult to see quickly who raised their hand. So, my expectation is that when you are participating, you must have your camera on so that I can physically see you raise your hand and see you answer or ask a question.
Jill’s use of the screen is fantastic. Students at home can see both classmates in the room and the “board” where she’s doing work. The visuals are simple and easy to follow. The love tracking–writing each answer up over the image of the worksheet students are completing keeps them focused. You want your screen to be simple visually so students aren’t distracted by extraneous content but also changing in response to the content so that it has a sort of narrative. We want to draw students eyes to the important learning places and a bit of movement does that.
It helps that her handwriting is so good. Jill mentioned that her secret was having her handwriting graded as a student in the Catholic schools she attended growing up. That part’s going to be harder to replicate for some of you!
Any questions from home? One of my favorite moments comes right at the end. “Any questions?” she asks. And then: “Any questions from home?” It’s so easy to have the question “any questions” feel like it’s really only for the in-person kids unless you’re explicit like that. Loved it!
Anyway, Jill was so insightful in answering my questions that I asked her if she had any parting advice. I thought people would find her answer helpful and insightful:
I have 17 years teaching experience (16 in the middle school setting) so I am comfortable enough to adapt to change quickly and I always tell the students this is a learning experience for all of us and we will all make mistakes. We will see what works and doesn’t work for our experience together and make adjustments accordingly. I think teachers need to be willing to step out of their comfort zone and let the kids know that they are all in this together.
The post Double Bonus: Video of Jill Mattis’ Hybrid Lesson & Her Insights From a Follow-up Interview appeared first on Teach Like a Champion.

January 7, 2021
“Chat for Understanding”: Sadie McCleary uses the chat to assess student mastery
What a great video I get to share today! This clip is from Sadie McCleary’s Chemistry class at West Guilford HS in Greensboro, NC. It’s striking not just because Sadie uses the chat function brilliantly to keep students active and attentive but because she uses it so effectively to Check for Understanding.
Here’s the clip. In it you’ll notice that Sadie uses the chat three different times in rapid succession:
Presenting students with a chart showing reaction rates for various concentrations of two compounds, she wants to ask them to assess whether they understand what they’re seeing.
She cleverly asks them to complete her sentence in the chat:
“As [HCL] doubles and “Mg(OH)2 remains constant, the rate….”
One thing this prompt does for her is allow her to assess quickly. She’s streamlined the data. By asking for students to complete her sentence she makes sure she gathers exactly the information she wants and also that, as she glances at students answers streaming in, it will be easy for her to assess because there won’t be too much information. If she’s said: “Please chat me, what will happen to the rate to the rate here,” she might have had students answering based on observations about a different interaction on the chart, and their answers might look every which way. She avoids having spend unnecessary time assessing varied and vague sentences (e.g. “the rate will be different because the inputs are different…”) that might or might not answer the question she wants them to answer .
As you can see she’s made her first assessment in just seconds.
Her next chat asks students just to identify the exponent in her next formula. Again a precise question and a clear specific format for the answer allows her to assess efficiently. Notice also how active her steady use of the chat is making students as well as the appreciation she shows as soon as students engage. “Thanks, Harrison. Thank you, Noah. Thank you, Luke.
Now the third question. The hardest of the three and most summative. “What is Y based on our data table?”
Here she modifies her use of the chat. For those of you who are TLAC nerds she’s been using “Now Questions” so far… allowing students to chat right away to build energy and momentum and keep the pace up. But here she slows down to a “Wait Question.” Students can’t share their answer until enough time has elapsed for everyone to have had a chance to think the question through. She wants wait time and thinking. She doesn’t want students to piggy back off of early answers.
Again she quickly assesses. “Most of us got it.” And as the video closes asks a student–via Cold Call–to explain to her peers how she got the correct answer.
As a side note–I’ll be blogging about this soon–Sadie teaches is a school where she and her colleagues can’t require cameras on. Obviously we think that’s a big loss for students and teachers but Sadie doesn’t make that decision, she just lives with it.
Using the chat so frequently here makes it easy for her to Cold Call since seeing who is chatting basically tells her who is engaging with the lesson. It’s awful but true that teachers who can’t ask for cameras on live with the angst of teaching blank screens that often represent students who aren’t even there (or who are on tik-tok). Who’d want to risk a cold call revealing that in fact half the class isn’t even listening? [No one]. But frequent chatting before hand gives her what she called “presence data” which allows her to allay that concern and engage student verbally as well.
It’s great stuff all around!
Thanks to Sadie for sharing.
The post “Chat for Understanding”: Sadie McCleary uses the chat to assess student mastery appeared first on Teach Like a Champion.

December 15, 2020
Hybrid Teaching with Hailey Rebyak
 Said no teacher ever….
To state the obvious, hybrid teaching is really hard. Harder, possibly than online teaching. I mean, it IS online teaching except that at the same time you’re also teaching a classroom full of kids. So some days it’s about as hard as online teaching would be if you also had to juggle and sing light rock classics from the 80s at the same time…
We know it’s been hard sledding so we’re really happy to share with you this video of second grade teacher Hailey Rebyak of Walnut Street Elementary in Woodbury, NJ.
She and her students are reviewing a book they’ve read on sharks. She starts by calling on Daveon. “Love the hand” she adds, reminding online students how to get called on and how much she appreciates their efforts to be involved. Daveon has a strong observation to share, but his answer also reveals clear additional established procedures beyond hand-raising- for muting and un-muting; for speaking loudly.
Her pacing is great… she keeps the energy flowing by moving briskly from one students to the next and the next student here is in-class: “Aiden, what else did we say?” It seems that this is probably a cold call (it happens fast and there was no indication another question was coming so unless Aiden was sitting with his hand raised the whole time it was a cold call) but either way it’s a great question for a couple of reasons.
Hailey does a great job of going back and forth between remote and in-person kids. You can see that pattern starting. She makes both groups feel continually involved. It’s easy to say things like: “Let’s hear from some of my at-home students” but doing so partitions the participation-if you’re called on at a designated time it also means someone is not called on at a designated time.Hailey’s question reinforces not just students listening to one anther but in-class kids listening to–and having to build off of–at-home kids and vice versa. Answering, “What else did we say?” requires Aiden to have listened to Daveon.
Next up is Sofia. Another at-home student. More reinforcement for hand-raising. Another cheery engaged answer from at home that’s loud enough for in class kids to hear. Anther key detail: the cherry-ness in Hailey’s voice. “It’s a lot bigger” being just one example. No wonder Daveon and Sofia are so upbeat. They’re matching her energy. And her voice is times ten important. Connecting and expressing positive energy is already plenty challenging online without a mask on to hide a smiles and a facial expressions. Hailey’s got to do a lot of work with voice inflection but you can hear it over and over and her students respond.
Lastly, notice the preparation on Hailey’s part. Students in class are looking at a hard copy of the book but to make sure kids at home can see the page clearly she’s got her screen shot ready.
All in all a great example of how carefully executed details can make doing something really challenging a little easier for teachers and a lot more engaging for students!
The post Hybrid Teaching with Hailey Rebyak appeared first on Teach Like a Champion.

Doug Lemov's Blog

- Doug Lemov's profile
- 112 followers

