
Ree Drummond's Blog, page 23
December 16, 2014
Sweet Roll Central
It’s that time of year again: Time to have an excuse to eat bread rolled up with all kinds of sweet, gooey stuff, baked, and topped with some kind of glaze or icing.
It’s time for SWEET ROLLS!
I’ve made a lot of sweet rolls through the years, and I mean a lot. And I’ve made a lot of variations of sweet rolls. I mean a lot. And I’ve taken a lot of steps on the treadmill to compensate for it all.
And okay, probably not enough steps to compensate. But I’ve tried!
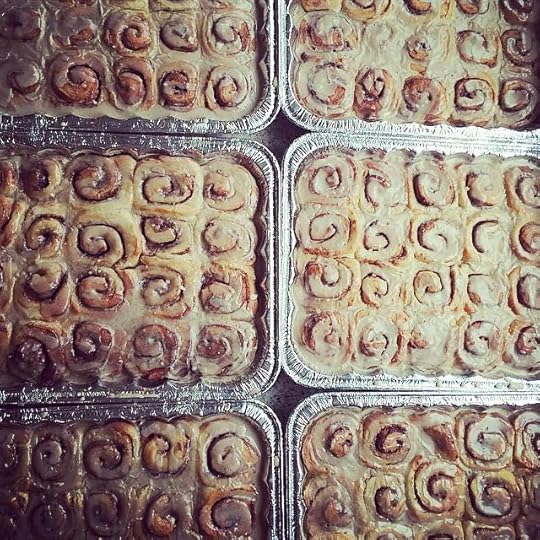
I wanted to bring all my favorite sweet rolls together in one place today, just so you’ll have all the necessary links and instructions. Make them for your friends and neighbors—there’s still plenty of time! Nothing says “Merry Christmas” like a homemade batch of cinnamon rolls!
(Click on the photos OR the links to be taken to the individual step-by-step recipes.)
Note: In some recipes below, I start with a full batch of dough (the amounts shown in the original Cinnamon Roll recipe.) In others, I make half a batch of dough. Just keep in mind that any of the recipes below can be adapted for a full or half recipe!
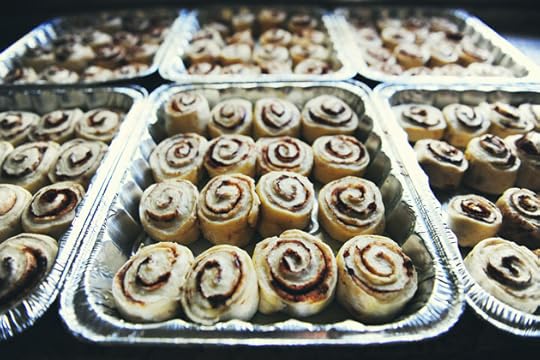
 Cinnamon Rolls 101. This is the recipe from which all the other sweet rolls I make come from. If you’ve never made sweet rolls/cinnamon rolls/whatever you want to call them, this is the perfect place to start. They’re the ones my mom always made, and there is nothing better in the world.
 Notes on Cinnamon Rolls. In this post, I answer some frequently asked questions about making the cinnamon rolls: whether to refrigerate the dough first, how much butter is too much, when/how to freeze them, etc.
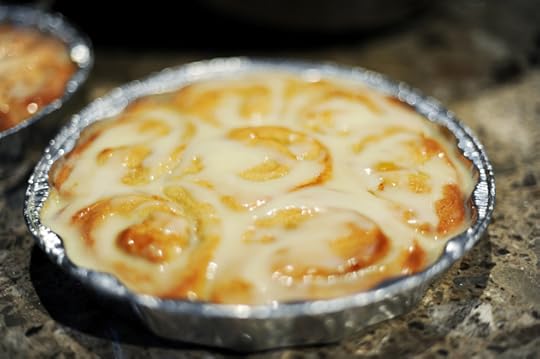 Orange Marmalade Rolls, also known as Orange Sweet Rolls. This is probably one of my very favorite variations of the cinnamon rolls because the bitterness of the marmalade balances out the sticky sweetness. They’re just magical!
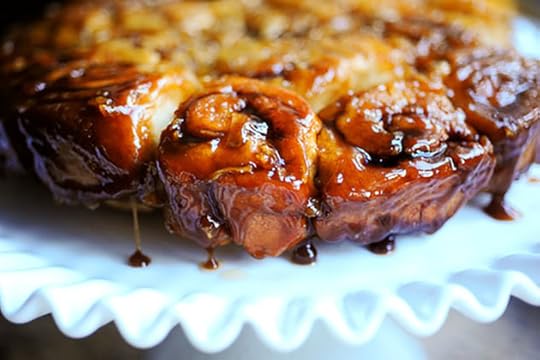 Caramel Apple Sticky Buns. This is what I think of when I hear the term “sticky bun.” They’re a mess to eat, and worth every bite!
 Chocolate Chip Cookie Sweet Rolls. These are naughty. Just naughty. Enter at your own risk!
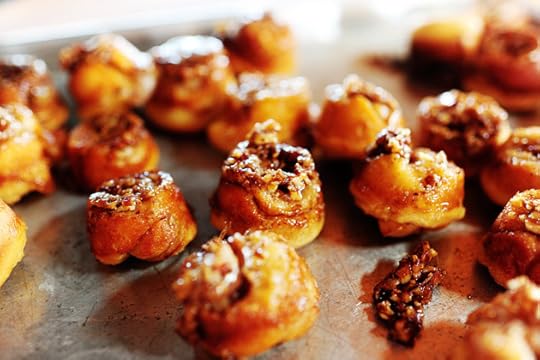 Sticky Pecan Mini Buns, also known as Mini Pecan Sticky Buns, also known as little bites of wonderfulness. I make these either with the original cinnamon roll dough OR storebought frozen bread dough! Either works just fine.
 Blueberry Lemon Sweet Rolls. These are absolutely lovely, with beautiful blueberries throughout and a nice citrus flavor. Gorgeous!
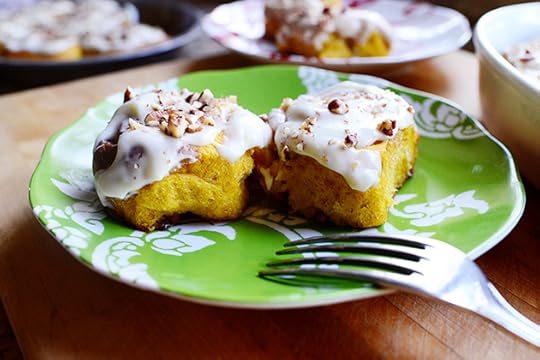 Pumpkin Cinnamon Rolls. My goodness. My goodness. You’ve gotta make these soon. They’re tremendously yummy.
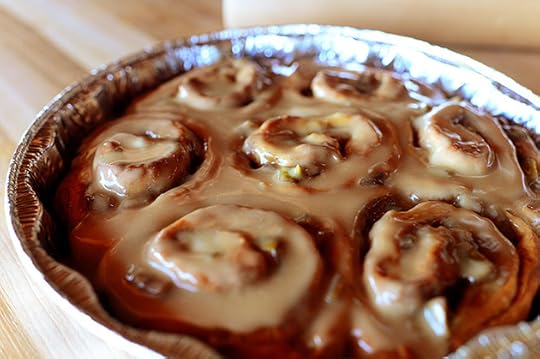 Caramel Apple Sweet Rolls. The apples are bathed in caramel. The finished rolls are bathed in caramel icing. You will go crazy over these!
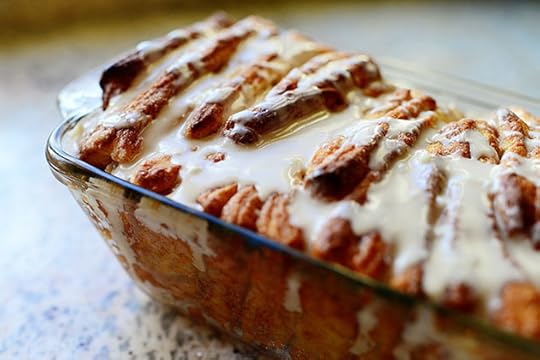 And for a delicious bonus: Pull-Apart Bread! Talk about fun.
Be sure to share if you make cinnamon/orange/sweet/sticky/pumpkin/blueberry rolls over the next week! Would love to hear about the fun you’re having.
Lots of sweet roll love,
Pioneer Woman


December 15, 2014
Gingerbread Cookies
 This is one of my favorite recipes from my holiday cookbook…
 And I also made them (albeit in different shapes) on my recent Food Network Christmas special. It’s just a good, basic, rich, flavorful gingerbread cookie recipe cut into any shape and decorated with gorgeous, bright white royal icing and adorned with all sorts of fun candies, sprinkles, and decorations.
It just doesn’t get more ‘Christmas’ than this.
Here’s how to make the gingerbread cookies!
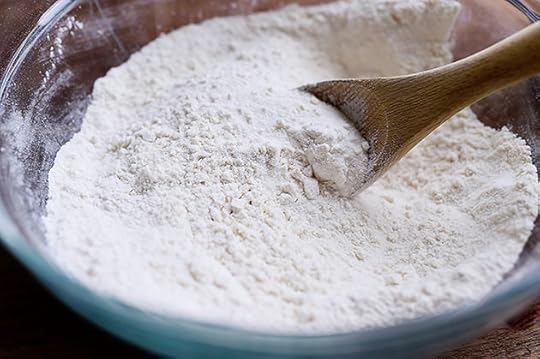
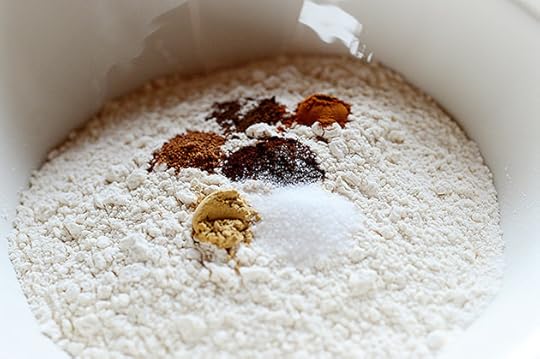 First, mix up the dry ingredients, which consists of flour, salt, and a whole buncha nice spice: allspice, ground cloves, ground ginger, ground nutmeg, and cinnamon.
If those flavors are wrong…I don’t wanna be right.
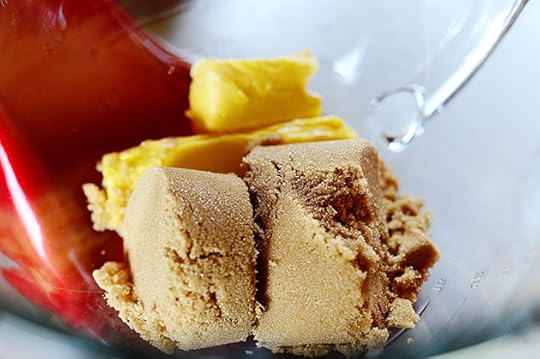 Next, throw some brown sugar and butter (or brown sugar and margarine) into a mixer…
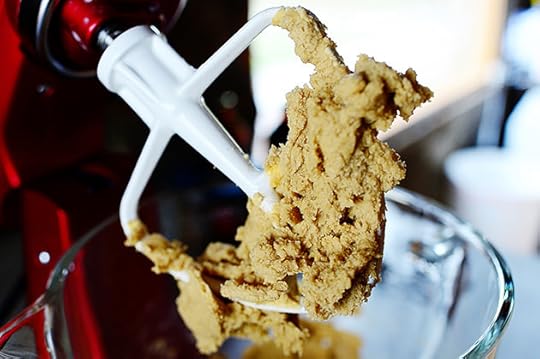 And mix it until it’s fluffy.
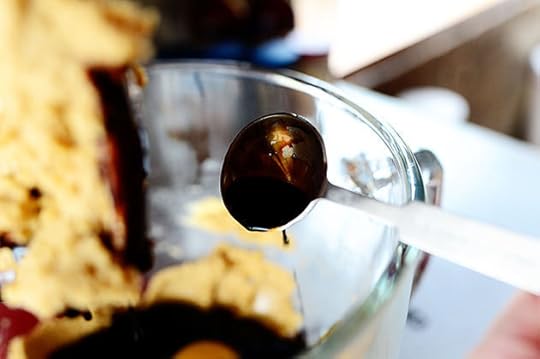
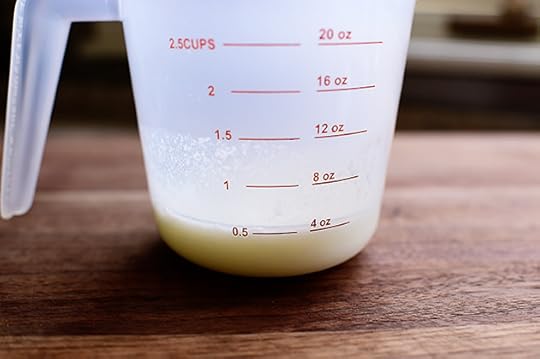
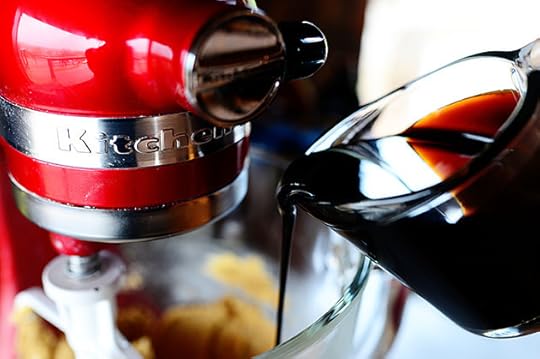 Next, drizzle in some dark, thick, beautiful, glossy molasses…
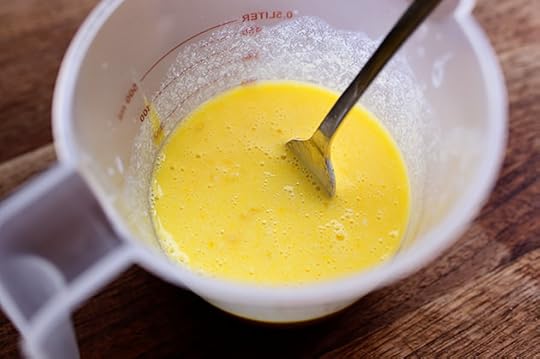
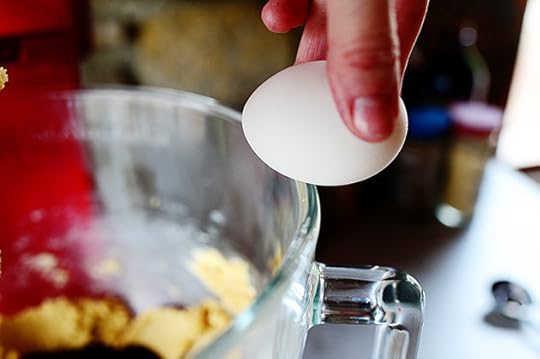 Crack in two eggs…
 Add some maple extract, and mix this all together, scraping the sides of the bowl a couple of times in the process.
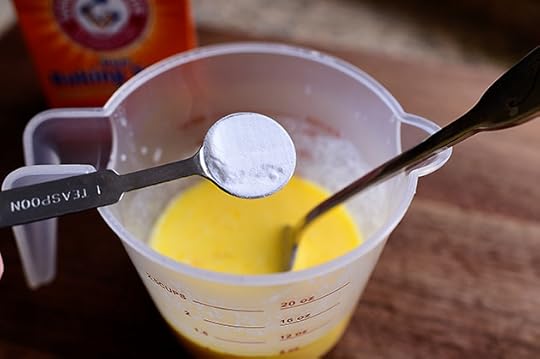
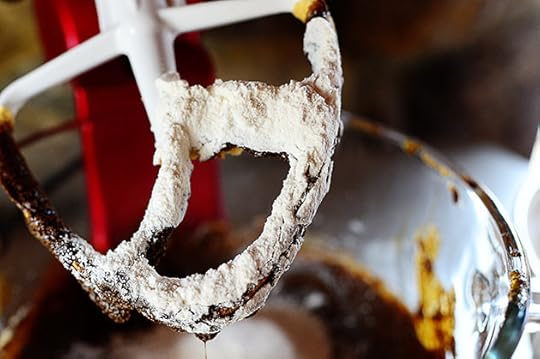 Add the flour mixture in three batches, beating well after each addition…
 And when you’re done, you’ll be left with this amazing dark brown, beautiful dough. Such a pretty color!
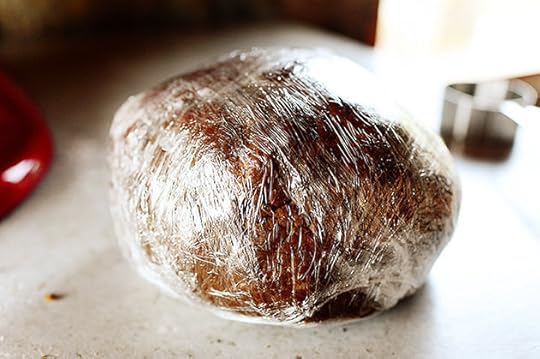 Wrap the dough in plastic wrap (sneaking a couple of bites as you’re transferring it since you have to be sure it tastes good; it’s your duty) and refrigerate it for at least two hours, longer if you have time.
Then, when you’re ready to roll it out, just take it out of the fridge for a little bit before you roll it out. (If you used margarine, you won’t have to take it out very far ahead; if you used butter, you’ll need to give it a little time to soften enough to be able to roll it out.)
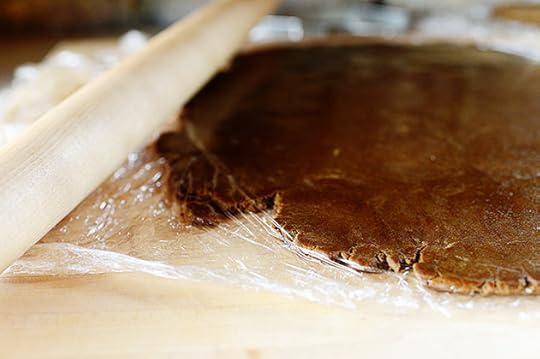 When you’re ready to bake the cookies, preheat the oven to 350 degrees and divide the dough in half. Roll out the dough between 2 pieces of plastic wrap for one very important reason: if you just throw flour on the board and roll it out as you would a regular sugar cookie dough, the beautiful gingerbread will be splotched with white and your whole Christmas will be ruined.
Plastic Wrap: It saves holidays.
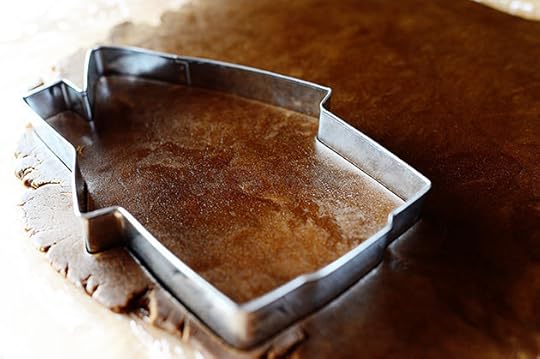 When it’s rolled out to about 1/3 inch thick, you can cut out whatever shapes you want! When I shot this recipe for my cookbook, I had just gotten this huge cookie cutter in the shape of a house and was dying to use it, but you can do gingerbread men, cowboys (as I did on the show), or basically any shape.
On the show I used shapes like Oklahoma, cowboy, boot, horse, etc. and I got my cutters here. They’re copper and a little pricier than regular metal cutters, but the quality is great and they’ll last a long time.
*Note: The source where I previously found the huge house cookie cutter (it’s about 7-8 inches tall!) pictured above no longer has them. It’ll probably take some searching, but I’m sure they exist online somewhere!
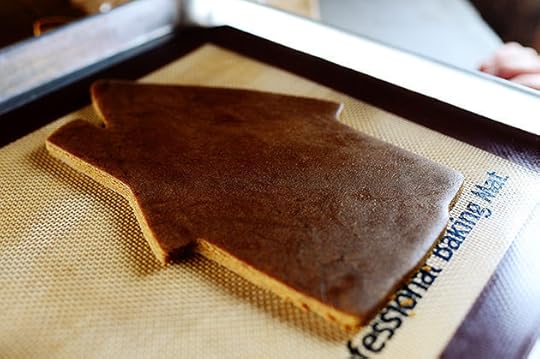 Transfer them to a baking sheet lined with parchment or a baking mat, then bake them for 12-15 minutes (depending on the size of the cookies), until the cookies are baked through but still soft.
***IMPORTANT BAKING NOTE: If you like a softer cookie, bake them for less time. Keep an eye on them in the oven and remove them as soon as the cookies have begun to set.
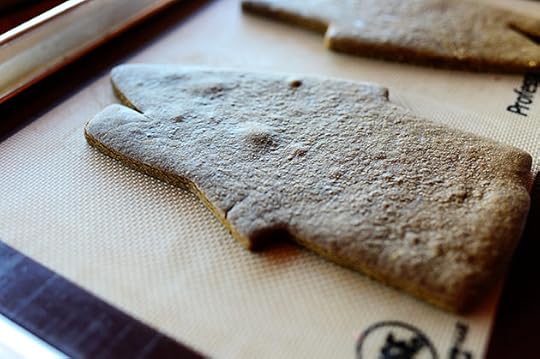 Don’t worry if a couple of your cookies have little bubbles. You’re gonna decorate over those!
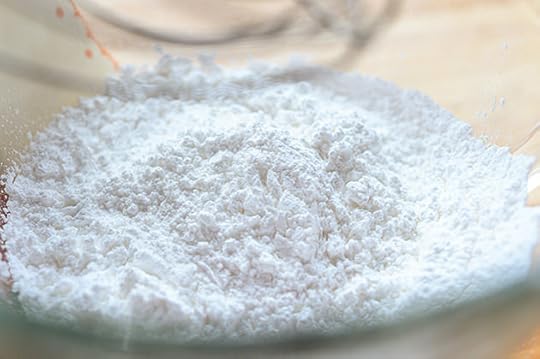 Speaking of decorating: While the cookies are cooling (and they need to cool completely), whip up a batch of royal icing, which is the bright white, beautiful icing that hardens as it dries, acts as a glue for candies and decorations, and always makes cookies look extra beautiful. Add some powdered sugar to a mixer…
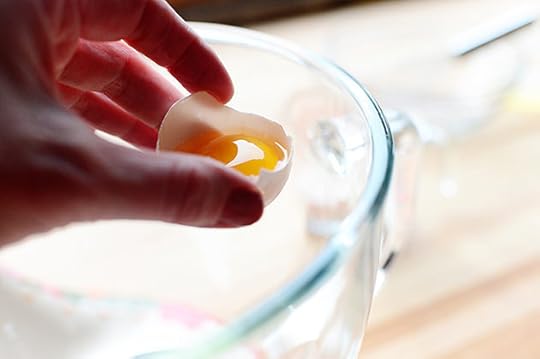 With some egg white (I just let it drip out of the shell, leaving the yolk behind), which is the essential ingredient that gives Royal Icing its perfect texture. Note that you can also mess around with meringue powder if you don’t like the idea of using egg white. (But I like the real thing, baby!)
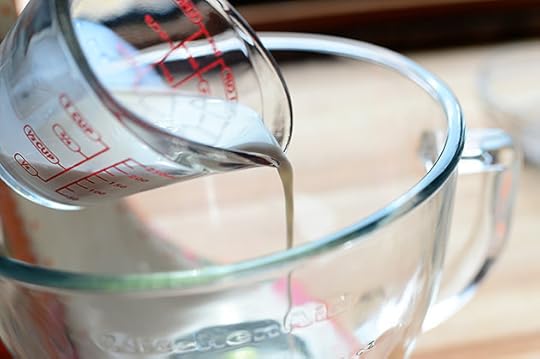 Then just drizzle in a little milk (or you can also use lemon juice!)
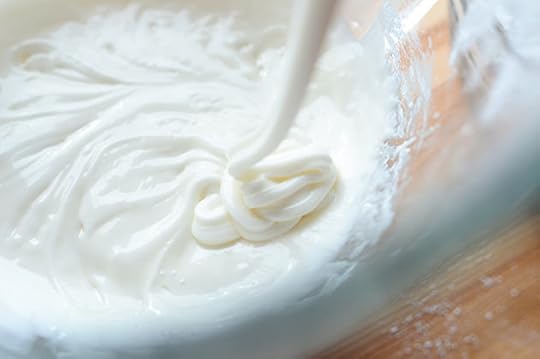 Royal icing is definitely one of those things you need to play with in order to get the perfect thickness/thinness. It needs to be thick enough to hold its shape/stay where you put it (especially when you’re going to use it for details) but thin enough that it will come out of a piping bag or squirt bottle. So just mess around until it’s right!
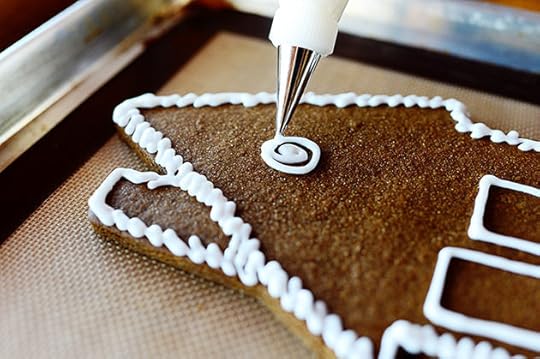 I like to use a fine tip…and I just jump in and go to town!
Figuratively speaking.
It’s funny, I always used to say “go to town!” as a way of saying “go for it!” But when you say “go to town!” to a country person, they literally think you mean “go to town.”
Many confusing conversations have resulted.
 Did you know there are no rules when it comes to decorating gingerbread cookies?
There aren’t.
 Gumdrops, peppermints, licorice…anything goes.
 Actually, there is one rule…
 No two cookies can be the same!
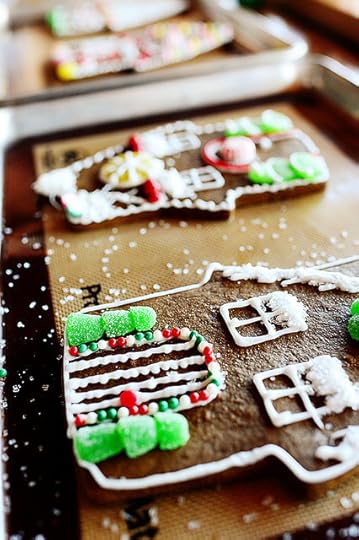 What a fun cookie party this would be. Just have the cookies baked, the icing made and in piping bags, and the candies/decorations in bowls. Done!
 And displaying them is so much fun.
Here’s the handy dandy printable.
Have fun, no matter what shape you decide to do!
.recipe-actions {
position: relative;
z-index: 2;
}
#pdf-popover {
background: rgba(255,255,255,.9);
border: 1px solid #efeeed;
color: #6e5c3a;
display: none;
font-family: Helvetica, Arial, sans-serif;
right: 20px;
margin: 2px;
padding: 54px 20px 7px 10px;
position: absolute;
top: 0;
width: 380px;
z-index: 10;
}
#pdf-popover form {
margin: 0;
}
#pdf-popover h4 {
background: #b15818;
color: #fff;
font-family: Helvetica, Arial, sans-serif;
font-size: 20px;
font-weight: normal;
left: 3px;
margin: 0;
position: absolute;
padding: 6px 12px;
right: 3px;
top: 3px;
}
#pdf-popover legend {
font-family: Helvetica, Arial, sans-serif;
font-size: 120%;
font-weight: bold;
margin-bottom: 2px;
margin-left: 10px;
text-transform: uppercase;
}
#pdf-popover fieldset {
margin-bottom: 15px;
}
#pdf-popover input[type="checkbox"] {
height: 14px;
margin: 2px 0 10px 10px;
padding-left: 14px;
position: relative;
visibility: visible;
width: 14px;
}
#pdf-popover input[type="checkbox"],
#pdf-popover input[type="radio"] {
margin-left: 10px;
}
#pdf-popover .close {
background: #b15818;
color: #FFFFFF;
cursor: pointer;
height: 35px;
font-size: 16px;
font-weight: bold;
line-height: 26px;
position: absolute;
right: 3px;
text-align: center;
top: 3px;
width: 25px;
z-index: 1;
}
#pdf-popover .button {
background-color: #b15818;
border: 0;
color: #fff;
cursor: pointer;
font-family: Helvetica, Arial, sans-serif;
margin-left: 10px;
padding: 8px 10px;
text-transform: uppercase;
}
x
Print Options
Page size
Letter
3x5
4x6
Text Size
Small
Medium
Large
Content
Include description
Include prep time, etc.
Show image
Recipe
Gingerbread Cookies
Prep Time: 3 Hours
Cook Time: 18 Minutes
Difficulty: Easy
Servings: 24
 Print Recipe
Ingredients
FOR THE COOKIE:6 cups All-purpose Flour1 teaspoon Salt1/2 teaspoon Allspice1/2 teaspoon Ground Cloves1/2 teaspoon Ground Ginger1/2 teaspoon Ground Nutmeg1/2 teaspoon Ground Cinnamon3/4 cups Margarine Or Softened Butter1-1/2 cup Firmly Packed Dark Brown Sugar1 cup Molasses2 whole Eggs1 Tablespoon Maple Extract FOR THE ROYAL ICING:2 pounds Powdered Sugar, Sifted1/3 cup Whole Milk, Plus More If Needed For Thinning2 whole Large Egg Whites Miscellaneous Candies, Sprinkles, And Other Decorations Preparation Instructions
In a large bowl, combine the flour, salt, allspice, cloves, ginger, nutmeg, and cinnamon. Set aside.
In a mixer, beat the margarine (or butter) and brown sugar until fluffy. Drizzle in the molasses, mixing well and scraping the sides of the bowl a couple of times to make sure it's evenly combined. Add the eggs and maple extract and mix. Add the flour mixture in three batches, beating until just combined after each addition.
Wrap the dough in plastic wrap and refrigerate for at least 2 hours or more if you have time!
When you're ready to bake the cookies, remove the dough from the fridge and preheat the oven to 350 F. When the dough is soft enough to roll but still firm, divide it in half and roll out each half between 2 sheets of plastic wrap (dividing it in half just makes it more manageable.) Cut out shapes of your choosing and place on a baking sheet lined with parchment or a baking mat. Bake for 12-15 minutes, depending on the size of cutters used, until the cookies are baked through but still soft. Remove with a spatula and allow to cool completely.
***IMPORTANT NOTE: Bake for less time if you desire a softer cookie and if cookies are small. Keep an eye on them and don't let them get too crisp.
To make the royal icing, beat the powdered sugar, milk, and egg whites until thick but still able to be piped. Transfer to a piping bag fitted with a fine tip (or a squirt bottle.)
Decorate the cookies however you'd like, using icing as an accent and as glue to hold on the candies. Allow icing to set before transporting or serving.
Posted by Ree | The Pioneer Woman on December 15 2014
December 10, 2014
Positively Peppermint!
Christmas is coming and peppermint is everywhere, so I wanted to share a small handful of my favorite peppermint recipes here on The Pioneer Woman Cooks!
There are some good ones here, friends.
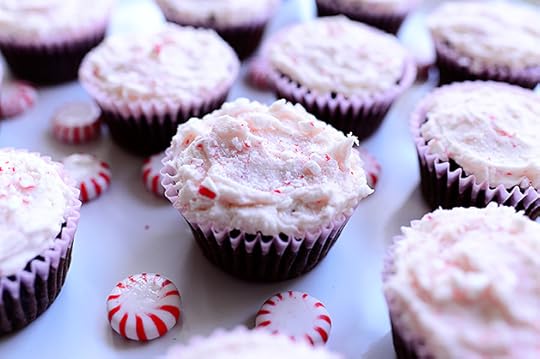 Chocolate Cupcakes with Peppermint Frosting. These are a delicious treat!
 Easy Peppermint Fudge. Just posted this recently, but didn’t want you to miss it. Quick, easy, and so unbelievably tasty.
 Chocolate Candy Cane Cookies. The photos in the post may be old, but the cookies never get old. I love them!
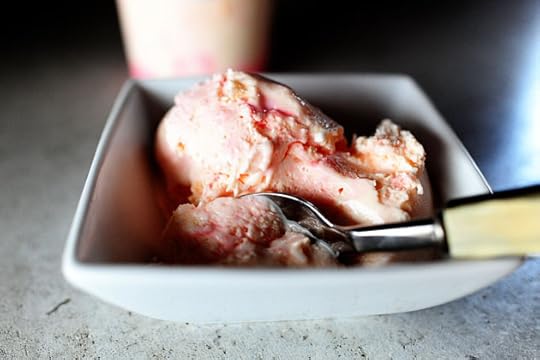 Peppermint Ice Cream. Talk about a TREAT. It doesn’t have to be summertime to make ice cream!
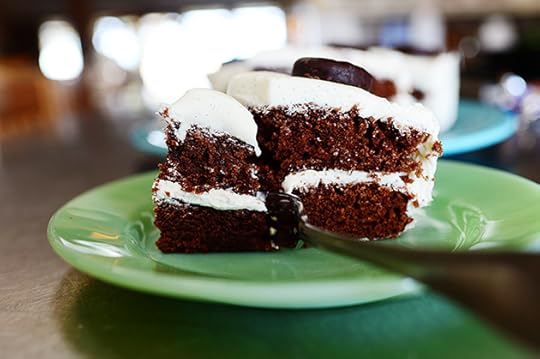 Peppermint Patty Cake. Same cake recipe as the cupcakes above…but a totally different presentation and result. This is a good one, folks.
Hope you find one or two you minty marvels you enjoy!
Love,
P-Dub
December 8, 2014
Pretty Red Mixer Giveaway (Winners!)
NOTE: Because of the large response to the giveaway, I am addition an additional mixer for a total of 4 prizes.
The winners are:
#19898 Peggy F: “Tree was up two weeks ago but not decorated until Sat.”
#22122 Diane H: “No tree this year.”
#81151 Loyce: “Just got it up today.”
#85587 Audra: “Ours is going up tonight!”
Congratulations, winners! Contact prizes@thepioneerwoman.com to claim your beautiful mixers!
 Today, because it’s Monday, because Christmas is coming, and because I love ya, I’m giving away three (3) of these beautiful, bright red KitchenAid Artisan Stand Mixers. Impossible not to love this color!
TO ENTER
To enter the giveaway, just answer the following question in the Comments section of this post:
“Have you put up your Christmas tree yet?”
Are you one of those day-after-Thanksgiving tree people? Or do you wait until December 17? Just shout out the status of your Christmas tree and you’re automatically entered to win a red mixer! (If you don’t do Christmas trees, no problem! Just leave any response in the Comments section and you’re entered to win.)
THE RULES
One entry per person, pretty please.
Winners will be announced Tuesday and mixers shipped out immediately!
Good luck!
Giveaway is over and comments are closed.
Pretty Red Mixer Giveaway!
Today, because it’s Monday, because Christmas is coming, and because I love ya, I’m giving away three (3) of these beautiful, bright red KitchenAid Artisan Stand Mixers. Impossible not to love this color!
TO ENTER
To enter the giveaway, just answer the following question in the Comments section of this post:
“Have you put up your Christmas tree yet?”
Are you one of those day-after-Thanksgiving tree people? Or do you wait until December 17? Just shout out the status of your Christmas tree and you’re automatically entered to win a red mixer! (If you don’t do Christmas trees, no problem! Just leave any response in the Comments section and you’re entered to win.)
THE RULES
One entry per person, pretty please.
Winners will be announced Tuesday and mixers shipped out immediately!
Good luck!
December 1, 2014
Easy Peppermint Fudge
 I made this impossibly easy (impossibly easy? I love contradicting phrases like that) fudge on my Christmas episode last year, and I never did get around to posting the recipe here on my wacky website (alliteration alert!), The Pioneer Woman Cooks. I hope you can forgive me for the year-long delay!
I promise you, the wait will be worth it. This is the easiest—and I mean easiest—fudge you will ever make in your life, and with the exception of the topping you choose to sprinkle on top (I chose peppermint candies), the fudge itself has all of two ingredients. Two. As in, one-two. And there’s no cooking, no need for a candy thermometer, no finesse required whatsoever. It’s pretty much just melt, stir, spread, and cool.
And at Christmastime, when everything around us is busy, that’s just the kind of fudge I love.
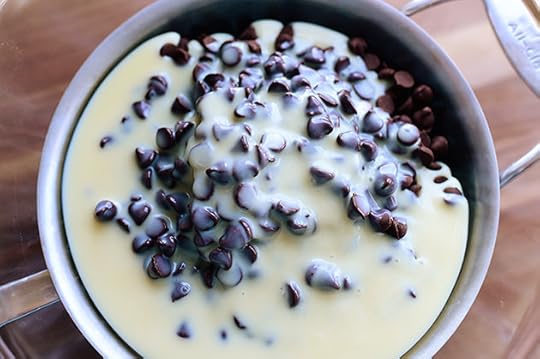
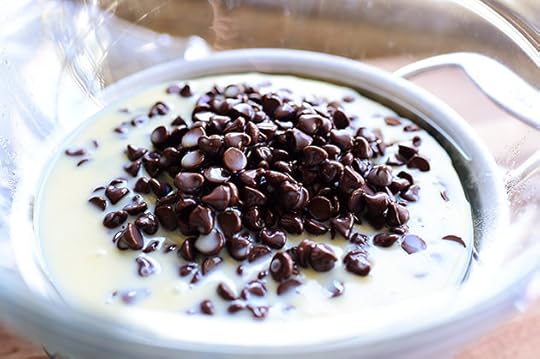
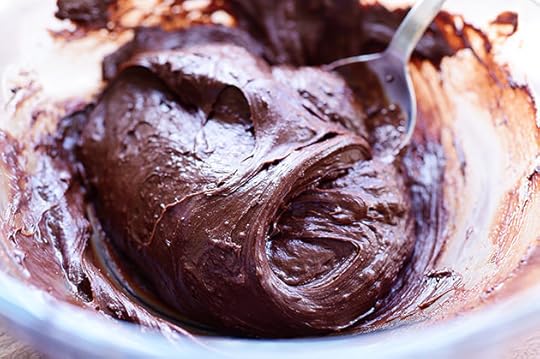
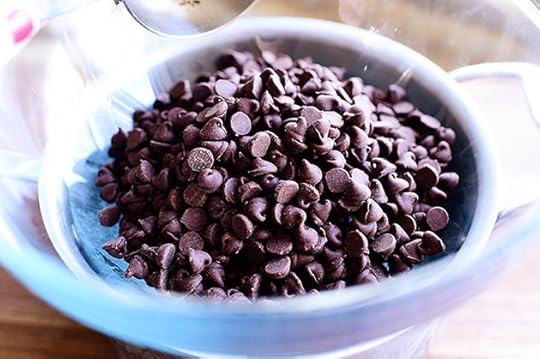 Violently hurl some regular chocolate chips into a double boiler or, in my case, a glass mixing bowl set over a saucepan of simmering water.
That was a really long sentence.
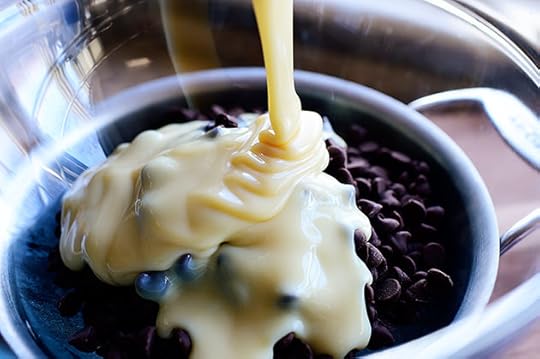 Then—and this is the kicker—pour in a can of sweetened condensed milk.
I’m gonna need you to go ahead and have a can of sweetened condensed milk in your pantry at all times, okay? Thank you for your cooperation.
 Is this not a beautiful sight? I mean, come on. The natural, unbridled beauty!
Now, just let it warm up/soften in the double boiler over medium heat for a few minutes while you get everything else ready.
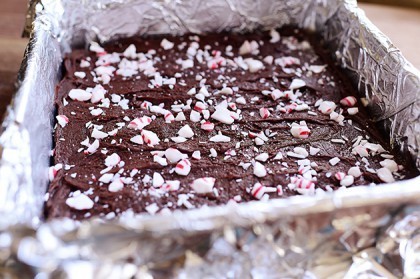
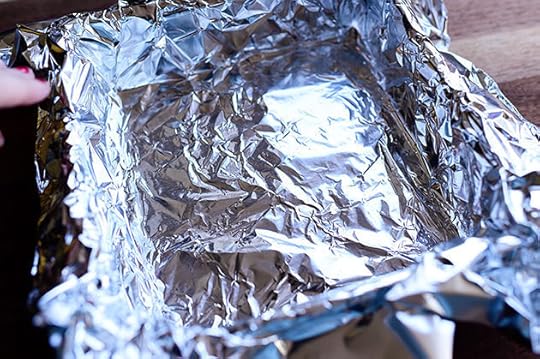 Grab a square (I used 8 x 8) pan and press a sheet of aluminum foil in the bottom.
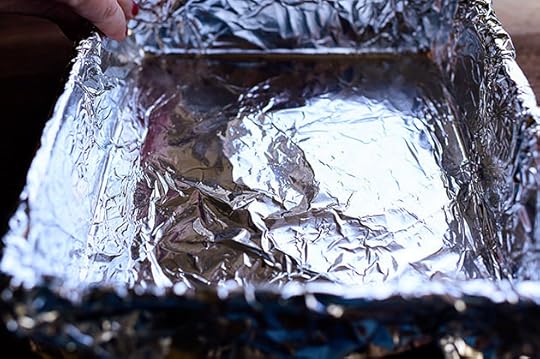 Use your fingers to smooth the surface as much as you can so it isn’t lumpy and bumpy and craggy and…
Nothing rhymes with craggy. Except “shaggy,” which reminds me of hair, which is not something I want to think about when I’m making fudge.
And “baggy,” which my jeans are not after this Thanksgiving weekend, which is also not something I want to think about when I’m making fudge.
And let’s not even talk about the word “gaggy,” which has no place on this post at all.
So let’s just leave it at that.
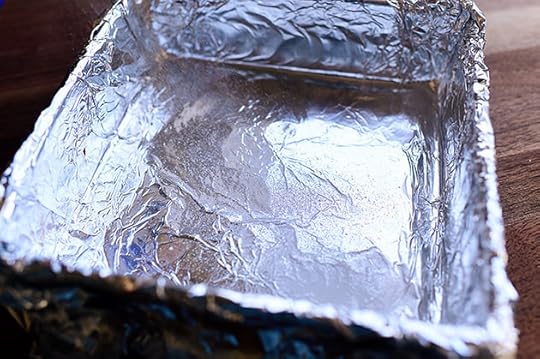 Spray the foil with cooking or baking spray and set it aside.
“Set it aside.” What else are you going to do with it, Ree? Balance it on your head while you get the rest of the stuff ready? Why do you say “set aside” so much?
(I have to have conversations with myself sometimes to keep myself on the straight and narrow.)
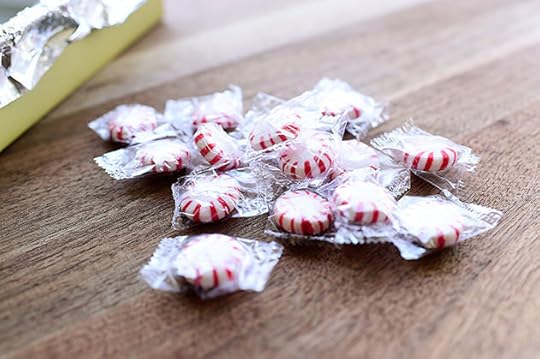 So, while you’re not balancing the pan on your head, grab some peppermint candies. You can use red or green or a mix of red and green!
Green peppermints scare me, though, because sometimes you pop one in your mouth and find that it’s lime-flavored, not peppermint flavored. Nooooooooo!
 Unwrap ‘em and throw ‘em into a ziploc…
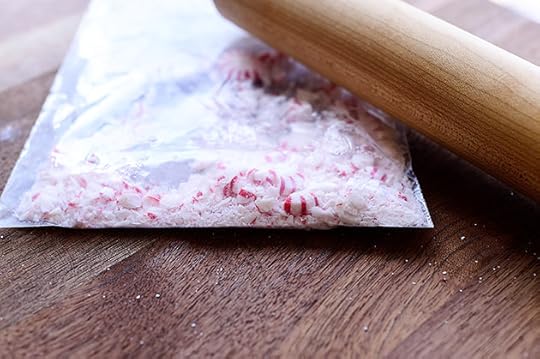 Then use a rolling pin (or a hammer or an iron skillet or anything heavy!) to crush them up. I basically crush them until there are no longer any pieces large enough to break a tooth.
 By now, guess what? Everything’s nice and warm and soft.
 Stir it slowly…
 Until it just barely comes together. Now, this is a time you really don’t want to dawdle; once it comes together, you need to get it into the pan pretty quickly or the mixture starts to wig out a little bit. It doesn’t stay this silky/marshmallowy/soft/perfect forever.
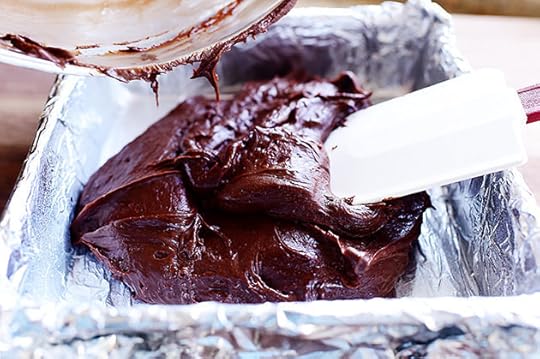 Use a rubber spatula to get it all out of the bowl and into the pan…
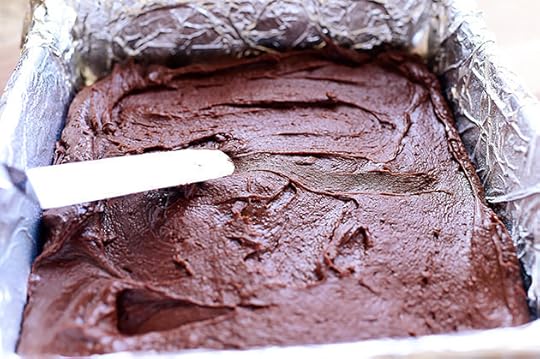 And use a dinner knife or offset spatula to smooth out the surface. Again, time is of the essence here, so don’t go reciting all the states and capitals thinking you’re gonna get to Cheyenne, Wyoming in the time it takes to spread it into the pan.
That was a really roundabout way of saying, “Work quickly.”
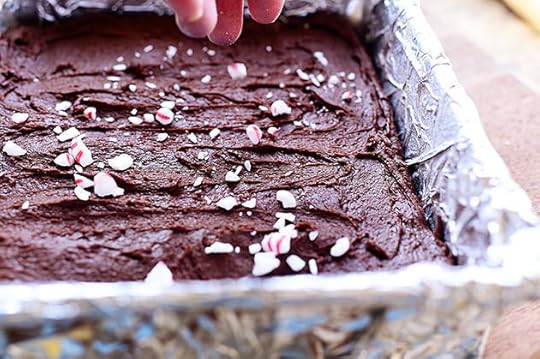 As soon as it’s all spread out, start sprinkling the crushed peppermint all over the surface…
 Until it has the amount you want. Press them lightly into the surface of the chocolate so they stick.
 I sprinkled on a little of the peppermint “powder”—the fine particles—because I think it looks like a dusting of snow. A dusting of snow on a rich chocolate meadow.
Only we don’t say meadow here in rural Oklahoma. We say pasture. And that reminds me of manure.
So again: Never mind.
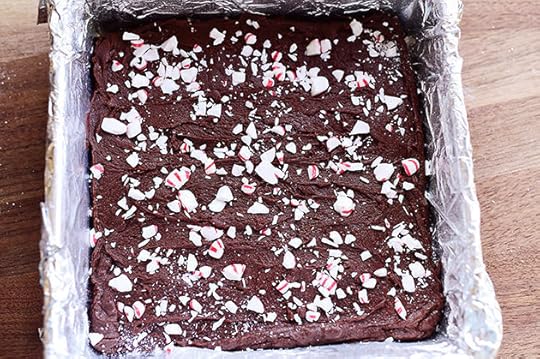
 Now just cover the pan with plastic wrap and refrigerate it for two hours to firm everything up.
 It’s ready!
 Here’s the beauty of the foil-lined pan: The whole thing lifts right out.
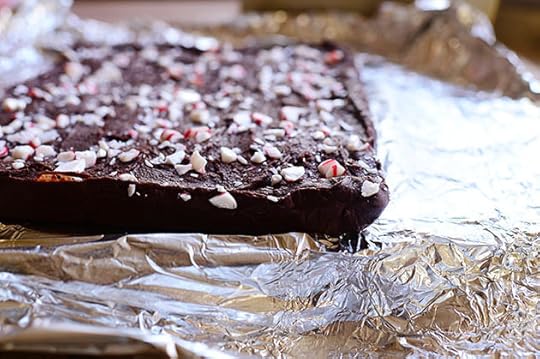 Then I just peel back the edges of the foil so it’s out of the way…
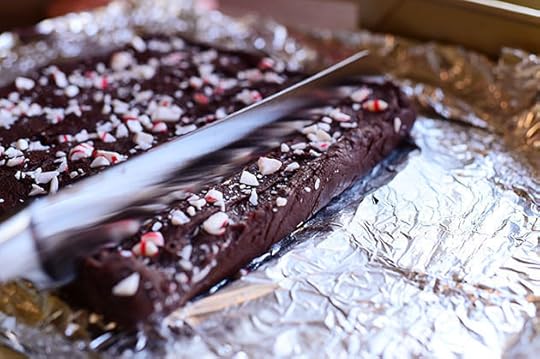 And then I slice it up using a long serrated bread knife.
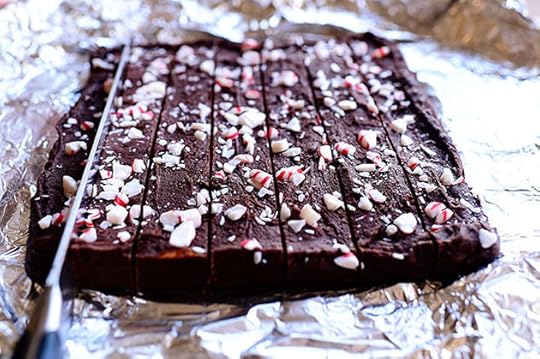 You can cut the fudge into whatever size you like.
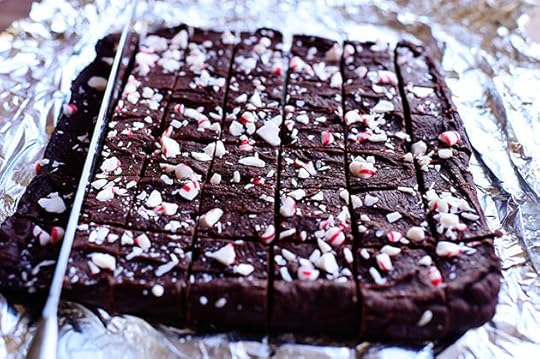 Since it’s so very, very rich, I like to do small, pop-in-your mouth squares.
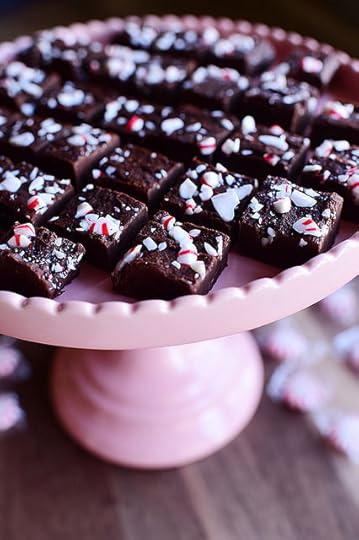 Then just serve them on a pretty tray or stand!
So very pretty. So very festive.
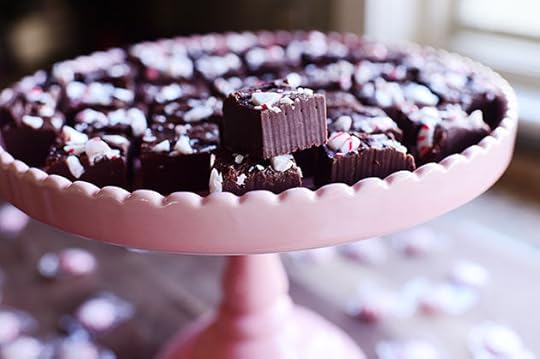 And sooooo very good.
It’s the easiest fudge around! Hope you try it sometime soon.
Here’s the handy dandy printable.
.recipe-actions {
position: relative;
z-index: 2;
}
#pdf-popover {
background: rgba(255,255,255,.9);
border: 1px solid #efeeed;
color: #6e5c3a;
display: none;
font-family: Helvetica, Arial, sans-serif;
right: 20px;
margin: 2px;
padding: 54px 20px 7px 10px;
position: absolute;
top: 0;
width: 380px;
z-index: 10;
}
#pdf-popover form {
margin: 0;
}
#pdf-popover h4 {
background: #b15818;
color: #fff;
font-family: Helvetica, Arial, sans-serif;
font-size: 20px;
font-weight: normal;
left: 3px;
margin: 0;
position: absolute;
padding: 6px 12px;
right: 3px;
top: 3px;
}
#pdf-popover legend {
font-family: Helvetica, Arial, sans-serif;
font-size: 120%;
font-weight: bold;
margin-bottom: 2px;
margin-left: 10px;
text-transform: uppercase;
}
#pdf-popover fieldset {
margin-bottom: 15px;
}
#pdf-popover input[type="checkbox"] {
height: 14px;
margin: 2px 0 10px 10px;
padding-left: 14px;
position: relative;
visibility: visible;
width: 14px;
}
#pdf-popover input[type="checkbox"],
#pdf-popover input[type="radio"] {
margin-left: 10px;
}
#pdf-popover .close {
background: #b15818;
color: #FFFFFF;
cursor: pointer;
height: 35px;
font-size: 16px;
font-weight: bold;
line-height: 26px;
position: absolute;
right: 3px;
text-align: center;
top: 3px;
width: 25px;
z-index: 1;
}
#pdf-popover .button {
background-color: #b15818;
border: 0;
color: #fff;
cursor: pointer;
font-family: Helvetica, Arial, sans-serif;
margin-left: 10px;
padding: 8px 10px;
text-transform: uppercase;
}
x
Print Options
Page size
Letter
3x5
4x6
Text Size
Small
Medium
Large
Content
Include description
Include prep time, etc.
Show image
Recipe
Easy Peppermint Fudge
Prep Time: 2 Hours
Cook Time: 10 Minutes
Difficulty: Easy
Servings: 12
 Print Recipe
Ingredients
3 cups Semi-Sweet Chocolate Chips1 can (14 Oz. Size) Sweetened Condensed Milk8 whole Peppermint Candies, Crushed Preparation Instructions
Line a square 8 x 8 pan with foil and smooth the surface. Spray foil with nonstick spray.
Combine the chocolate chips and sweetened condensed milk in a double boiler over medium heat. Heat until melted, about 5-7 minutes. Stir until smooth, then immediately pour it into the foil-lined pan. Use an offset spatula to smooth the surface, then sprinkle on the crushed peppermints.
Refrigerate for 2 hours, then cut into small squares.
Posted by Ree | The Pioneer Woman on December 1 2014

November 24, 2014
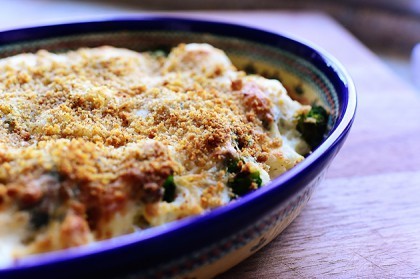
Broccoli-Cauliflower Casserole
 This is about as close to an as-it-happens recipe post as it gets here on The Pioneer Woman Cooks, because I made the casserole last night, covered it, popped it in the fridge, and am baking it right now as I type up this post.
The important thing you need to know about me is that I am a planner. I plan ahead, weeks—sometimes months—in advance, the posts I’m going to write here on my website. I never do things last minute. And I always have plenty of lead time between my cooking and my posting it here.
On Opposite Day.
This is a delicious side dish! Perfect for Thanksgiving for those of you who just want a veggie dish without all the rice and potatoes to carb it up. Here’s how to make it!
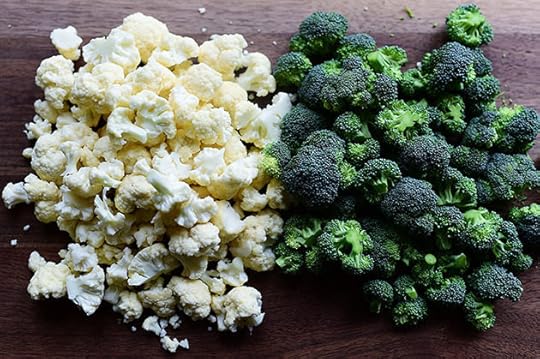
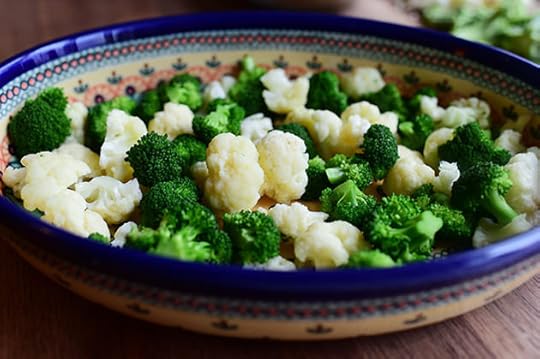
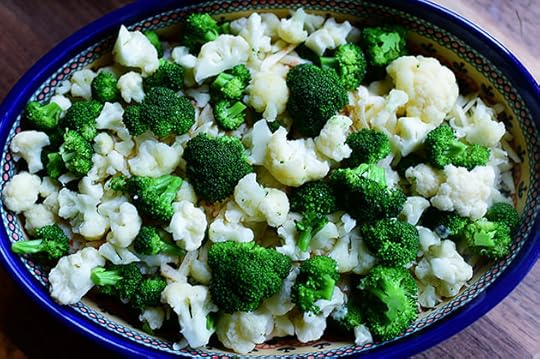
 Start with a head of broccoli: Break it into small florets, cutting the stalks off as you go…
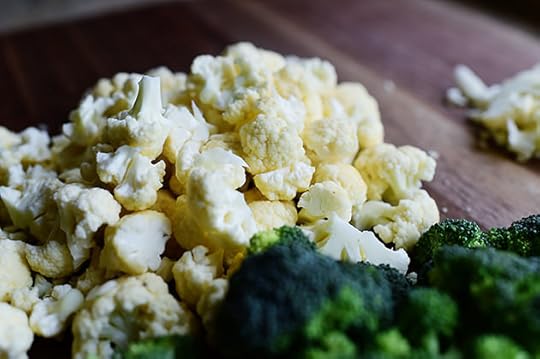 And do the same with the cauliflower.
 In other news, I made this casserole while watching “For Love of the Game” with Kevin Costner and Kelly Preston. I can’t handle how much I love that movie. It’s beautiful and emotional, and the final kissing scene is one of my top three favorite movie kisses of all time. In fact, I think I’m going to kiss Marlboro Man like that when he gets home from working cattle later this morning and see where it gets me.
“I love you, Jane.”
“I never believed!”
“Believe it.”
UGH! IT’S SO BEAUTIFUL!
Okay, I’m back now. Thank you for listening.
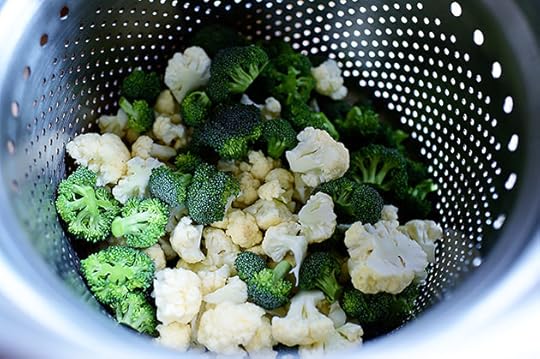 Put the veggies in a steamer basket and steam ‘em for 3 to 4 minutes or so, just until they’re nice and bright.
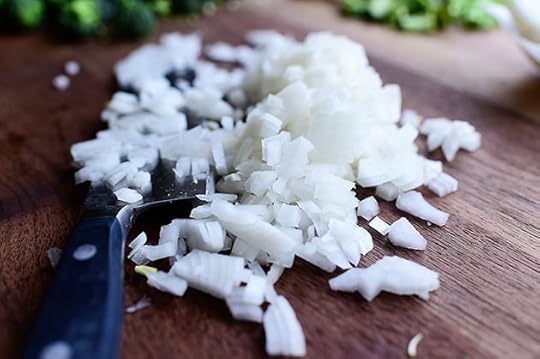 Now it’s time to make the sauce, which is lovely! Start by dicing some onion…
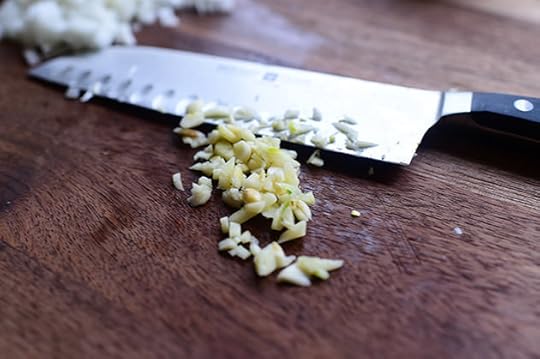 And mincing some garlic.
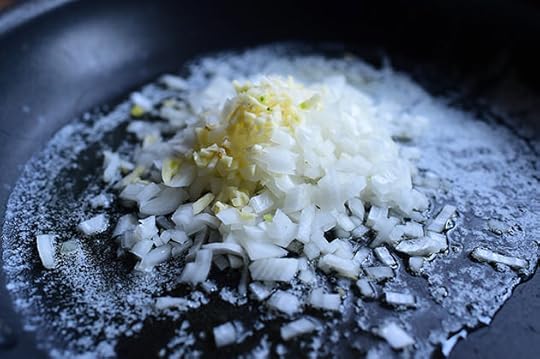 Throw ‘em into a skillet with a good amount of butter…
 And saute it for 3 to 4 minutes, until the onions start to soften.
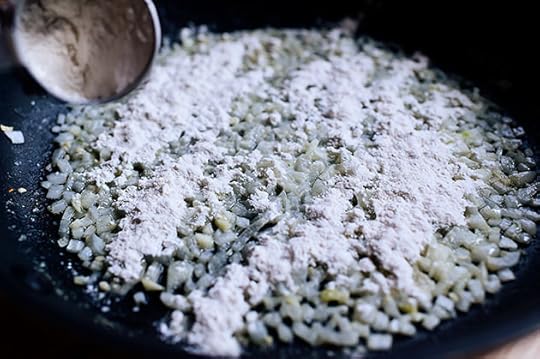 Then, to make it saucy (say with a Jersey accent), sprinkle some flour over the top…
 Then stir it together and cook it for a minute or so…
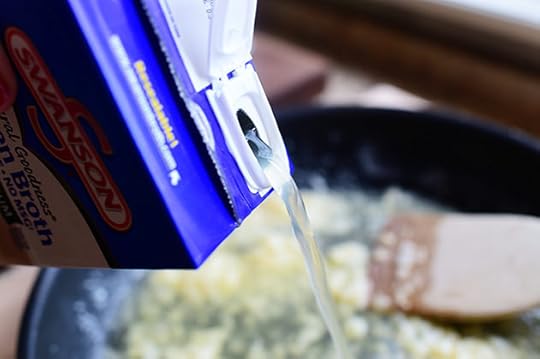 Then pour in the chicken broth. Definitely use low sodium if you have it; you can always add more salt if it needs it.
 Stir in the broth…
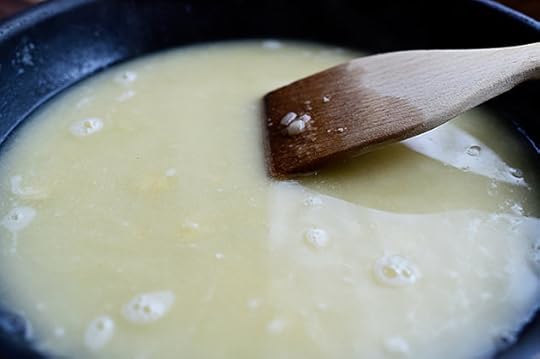
 And cook it over medium heat until it thickens, about 3-4 minutes or so.
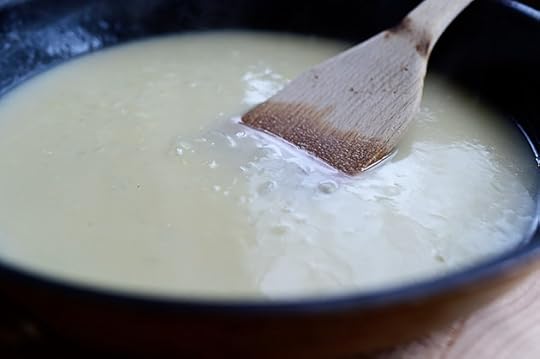
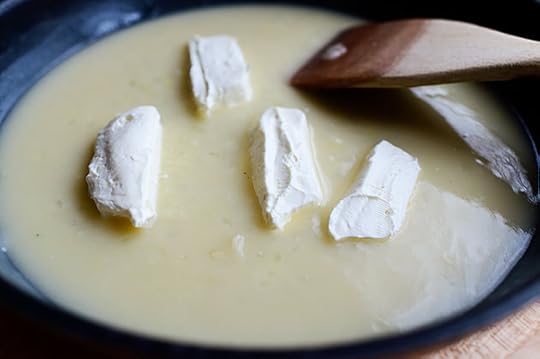 And now? And now. And now! Things are about to get serious: Add 4 ounces of softened cream cheese. It should be room temperature, that way it’ll mix into the sauce really well, so if you’re pulling it straight out of the fridge, remove it from the foil wrapper and warm it in the microwave for about 30 seconds.
 Stir it around until it’s smooth…
 Then stir in salt and pepper…
 Seasoned salt and paprika.
 Tremendously yummy! Now taste it and make sure it’s plenty flavorful, and add a little more of whatever it needs.
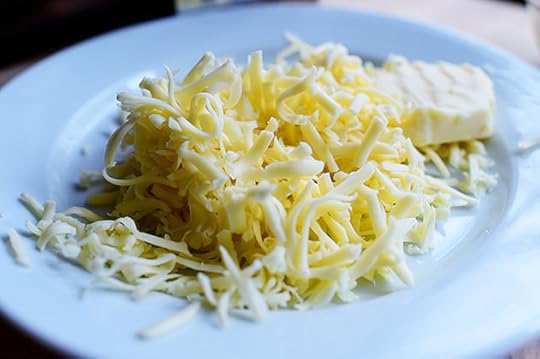 Another thing you need for the casserole is cheese! I used Monterey Jack, but you can use cheddar, cheddar-jack, even Parmesan or Romano…anything goes.
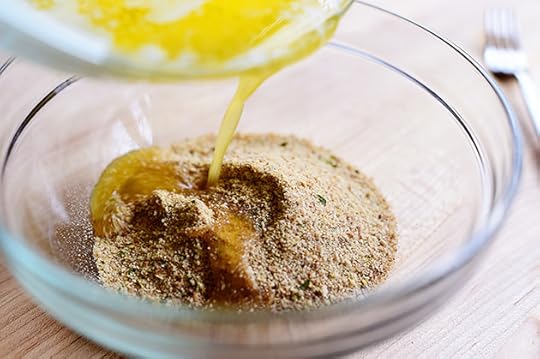 And finally, put some seasoned breadcrumbs into a bowl, add some melted butter…
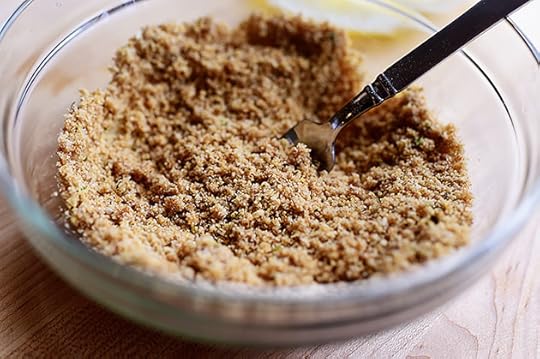 And stir it with a fork until they’re all coated.
 To assemble the casserole, add half the broccoli and cauliflower to a small casserole dish…
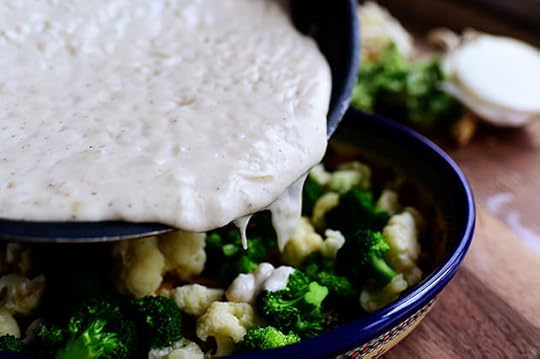 Then pour on half the sauce.
 Actually used a little less than half, as I wanted the sauce to coat the veggies but not just totally take over.
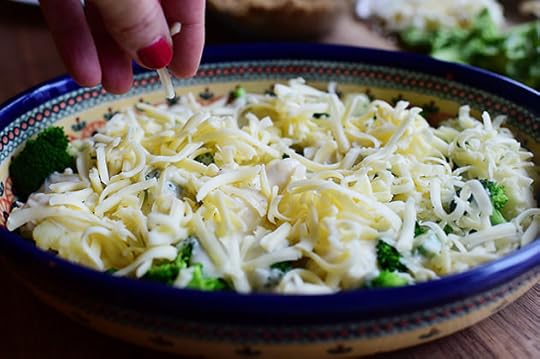 Next comes a layer of cheese…
 And, just for kicks, a sprinkling of paprika.
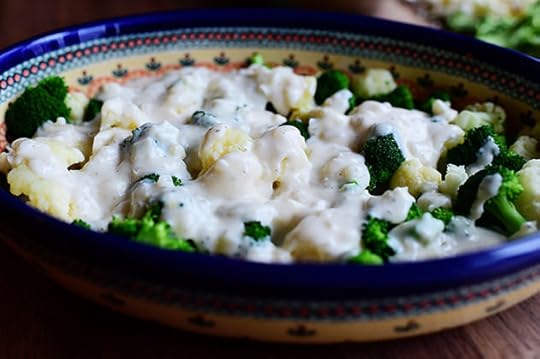
 Now, another layer! Veggies…
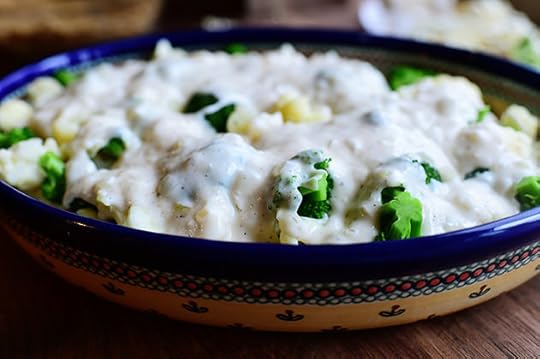 Sauce…
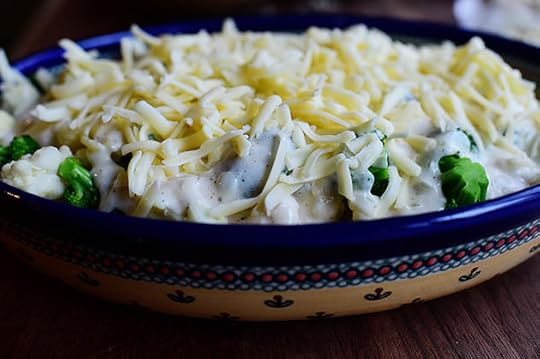 And cheese, baby.
Amen.
 Now, this is where I stopped (and this is where you can stop, too, if you want to make it ahead of time), covered the dish, and popped it in the fridge overnight.
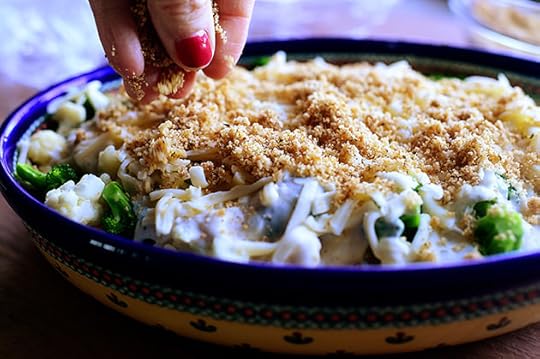 I also popped the breadcrumbs in the fridge overnight, and this morning, I just sprinkled them right over the cheese.
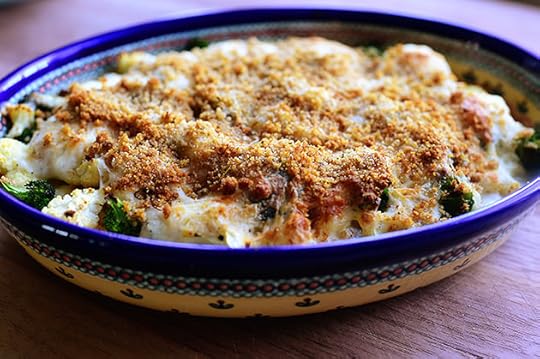 Then I baked it at 375 for about 35 minutes! If you make it straight through, it won’t have to bake quite that long; since this was cold, it took a little more time.
Hot, bubbly, delicious. The house smells so darn good right now.
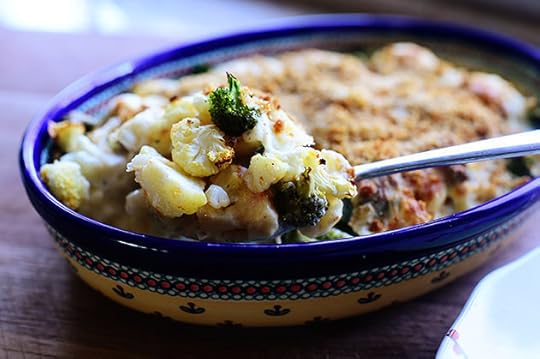 The veggies are nice—I like the small florets.
 And the sauce is creamy and rich, but not heavy and gloopy.
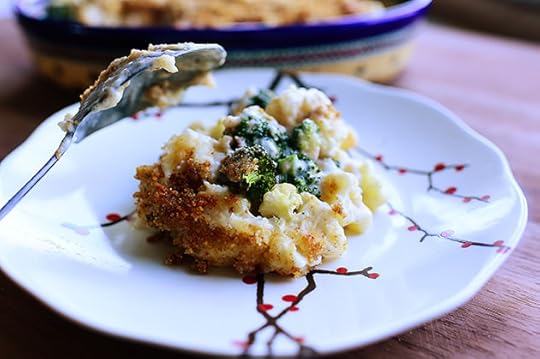 Delicious! I’m eating it as I type this.
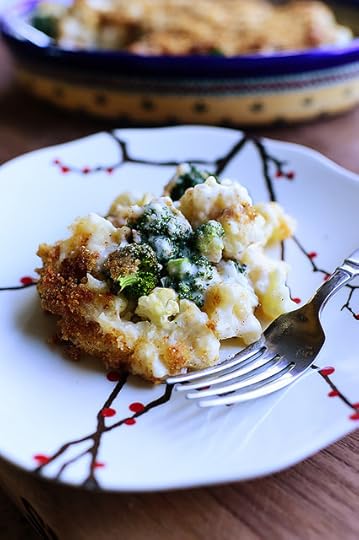 A dreamy side dish for Thanksgiving…or for any night of the week.
Here’s the handy dandy printable.
.recipe-actions {
position: relative;
z-index: 2;
}
#pdf-popover {
background: rgba(255,255,255,.9);
border: 1px solid #efeeed;
color: #6e5c3a;
display: none;
font-family: Helvetica, Arial, sans-serif;
right: 20px;
margin: 2px;
padding: 54px 20px 7px 10px;
position: absolute;
top: 0;
width: 380px;
z-index: 10;
}
#pdf-popover form {
margin: 0;
}
#pdf-popover h4 {
background: #b15818;
color: #fff;
font-family: Helvetica, Arial, sans-serif;
font-size: 20px;
font-weight: normal;
left: 3px;
margin: 0;
position: absolute;
padding: 6px 12px;
right: 3px;
top: 3px;
}
#pdf-popover legend {
font-family: Helvetica, Arial, sans-serif;
font-size: 120%;
font-weight: bold;
margin-bottom: 2px;
margin-left: 10px;
text-transform: uppercase;
}
#pdf-popover fieldset {
margin-bottom: 15px;
}
#pdf-popover input[type="checkbox"] {
height: 14px;
margin: 2px 0 10px 10px;
padding-left: 14px;
position: relative;
visibility: visible;
width: 14px;
}
#pdf-popover input[type="checkbox"],
#pdf-popover input[type="radio"] {
margin-left: 10px;
}
#pdf-popover .close {
background: #b15818;
color: #FFFFFF;
cursor: pointer;
height: 35px;
font-size: 16px;
font-weight: bold;
line-height: 26px;
position: absolute;
right: 3px;
text-align: center;
top: 3px;
width: 25px;
z-index: 1;
}
#pdf-popover .button {
background-color: #b15818;
border: 0;
color: #fff;
cursor: pointer;
font-family: Helvetica, Arial, sans-serif;
margin-left: 10px;
padding: 8px 10px;
text-transform: uppercase;
}
x
Print Options
Page size
Letter
3x5
4x6
Text Size
Small
Medium
Large
Content
Include description
Include prep time, etc.
Show image
Print
Recipe
Broccoli-Cauliflower Casserole
Prep Time: 10 Minutes
Cook Time: 30 Minutes
Difficulty: Easy
Servings: 8
 Print Recipe
Ingredients
1 head (large) Broccoli1 head Cauliflower6 Tablespoons Butter1/2 whole Medium Onion, Diced2 cloves Garlic, Minced1/4 cup Flour2-1/2 cups Low Sodium Chicken Broth4 ounces, weight Cream Cheese, Room Temperature1/4 teaspoon Salt1/2 teaspoon Black Pepper1/4 teaspoon Seasoned Salt, More To Taste1/4 teaspoon Paprika1-1/2 cup Grated Monterey Jack Cheese, More To Taste1 Tablespoon Butter1/3 cup Seasoned Breadcrumbs Preparation Instructions
Break the broccoli and cauliflower into small florets, cutting off the thick stalks as you go. Steam them for 3 to 4 minutes until the broccoli is bright green, then remove them from the heat. Set aside.
In a large skillet, melt the 6 tablespoons of butter and saute the onion and garlic until the onion starts to turn translucent, about 3-4 minutes. Sprinkle the flour over the top, whisk to combine, and cook for another 45 seconds. Pour in broth, whisking constantly, then cook until the sauce thickens. Reduce the heat to low and add the softened cream cheese, salt, pepper, seasoned salt, and paprika. Stir to combine until the sauce is nice and smooth. Taste and adjust seasonings, making sure it's nice and flavorful! Keep warm.
In a small bowl, stir together the breadcrumbs and melted butter. Set aside.
Layer half the broccoli and cauliflower in a small casserole dish. Pour on half the cream sauce, then sprinkle on half the cheese. Sprinkle a little paprika on the cheese, then repeat with another layer of broccoli, sauce, and cheese.
End with a sprinkling of breadcrumbs. Bake in a 375 degree oven for 25-30 minutes, until cheese is melted and bubbly and the breadcrumbs are golden brown. Serve warm.
Posted by Ree | The Pioneer Woman on November 24 2014

November 20, 2014
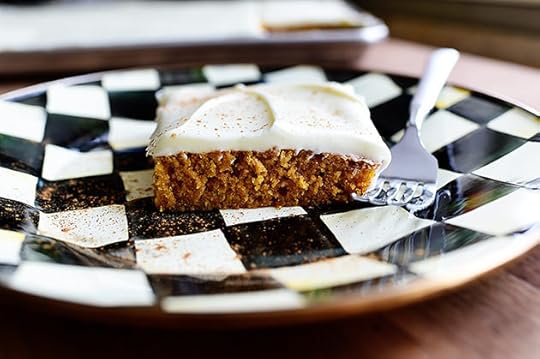
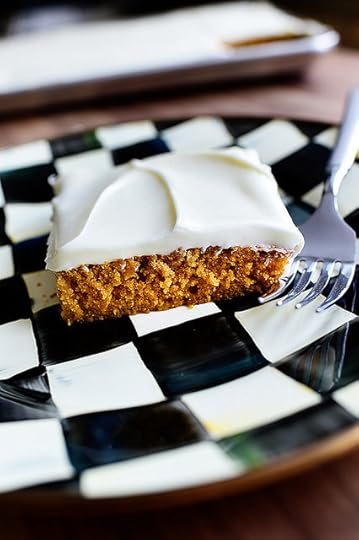
Pumpkin Sheet Cake
 This was the cake I made the other day that resulted in leftover pumpkin puree, which I used to make Pumpkin Ravioli, which I posted here bright and early on Monday morning. It was a triumph.
But this cake is even more of a triumph.
I’ve made pumpkin cakes before, but this time I decided to do a pumpkin version of the old standby Chocolate Sheet Cake that has saved marriages and brought about family harmony all over the land. And the result was a moist, heavenly pumpkin cake that was happily devoured by many a loved one in my life.
Here’s how I made it!
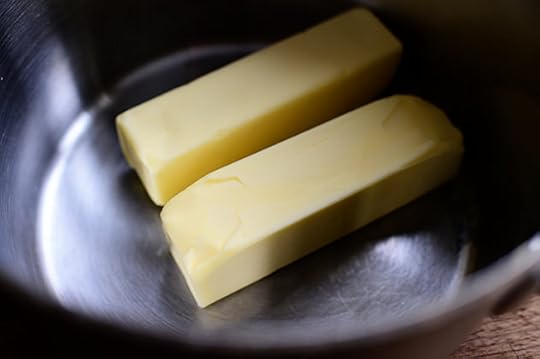 First, the pumpkin mixture: Add 2 sticks of butter to a saucepan…
 And melt them over medium-low heat.
 Measure 2 cups of pumpkin puree (the plain puree, not pumpkin pie filling)…
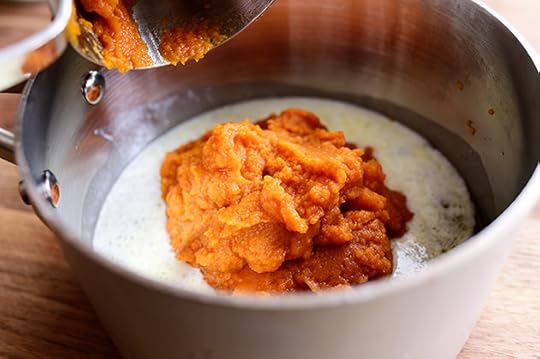 And add it in with the butter.
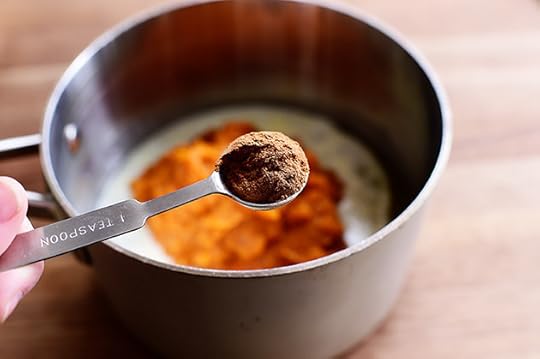 Next, for a little spice, I added some pumpkin pie seasoning.
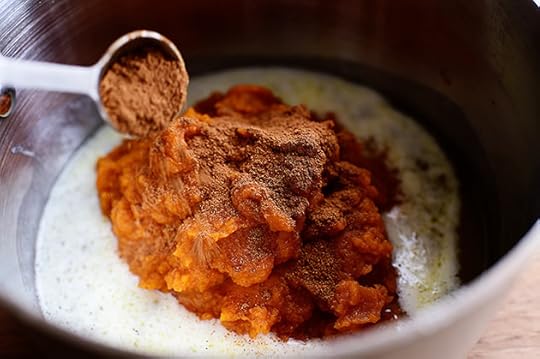 If you want to be all fancy, you can add your own mix of spices instead: cinnamon, nutmeg, cloves, cardamom…whatever brings you an inner sense of pumpkin peace.
 Whisk this to combine, and don’t be at all alarmed if it looks really weird and disturbing at this stage. It’s supposed to.
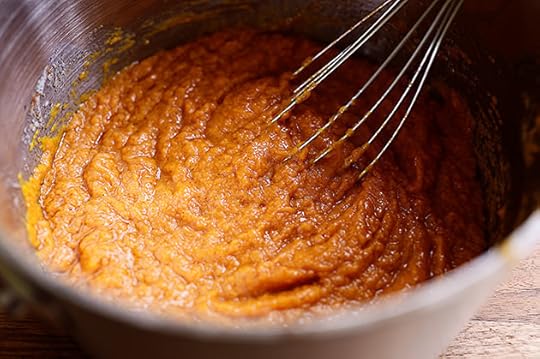
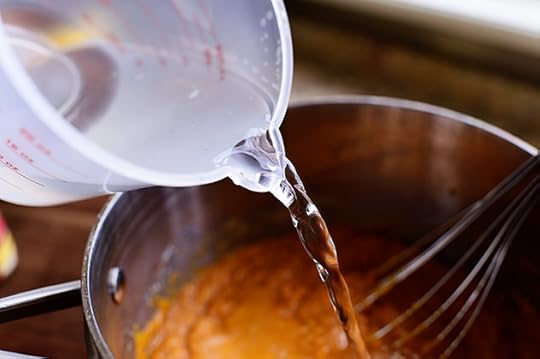 Next comes 3/4 cup boiling water! (The regular sheet cake recipe calls for 1 cup, but since the pumpkin naturally has some water in it, I decreased it a little bit.)
 Whisk it all together and set it aside.
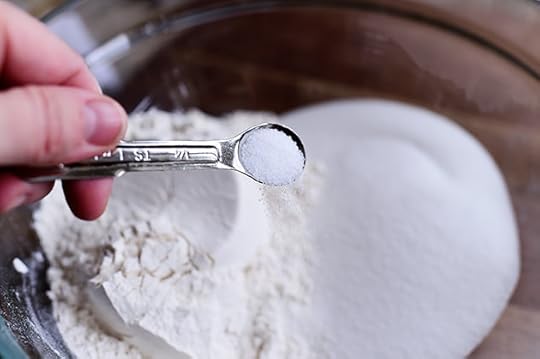 Now for the dry ingredients: Flour, sugar, salt…
 And stir it together in a large bowl.
 And finally, the wet ingredients: Measure a little buttermilk in a pitcher (or, if you’re me, some milk mixed with a little white vinegar.)
 Whisk in a couple of eggs…
 Some baking soda (I added 2 teaspoons instead of the 1 teaspoon in the original sheet cake recipe)…
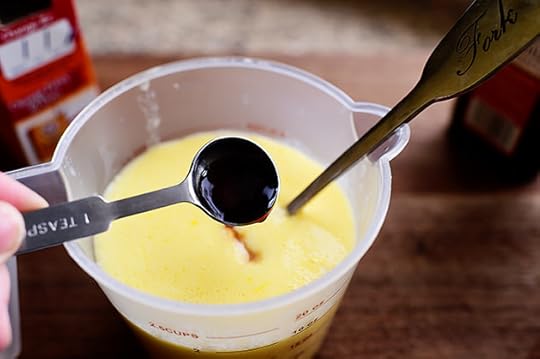 Some vanilla extract…
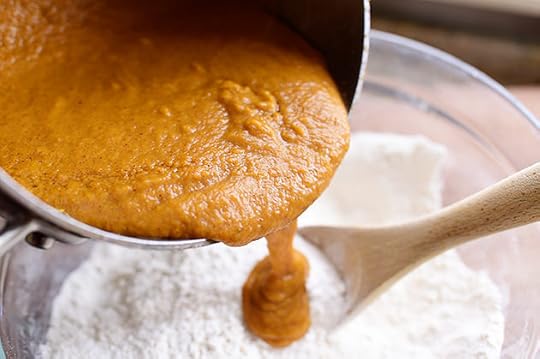 So now it’s time to mix the elements together! I pour the pumpkin into the dry ingredients…
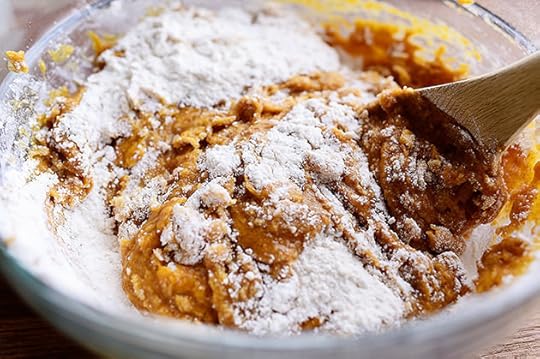 And stir them just to cool down the pumpkin a bit.
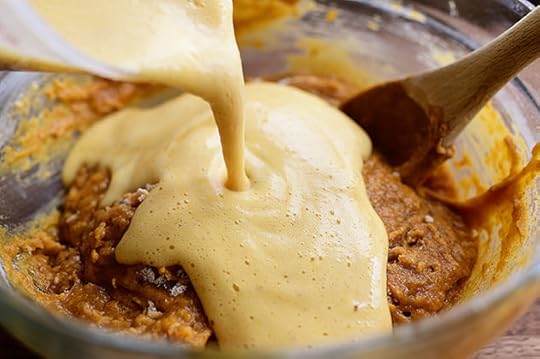 Pour in the buttermilk/egg mixture…
 And stir it together…
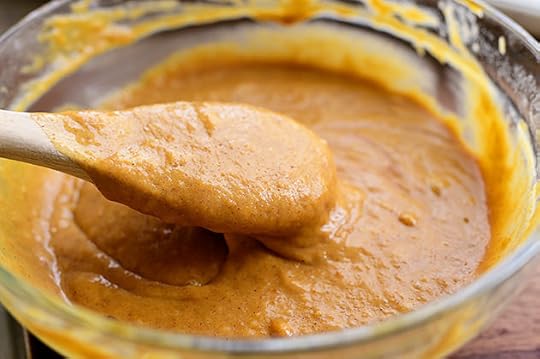
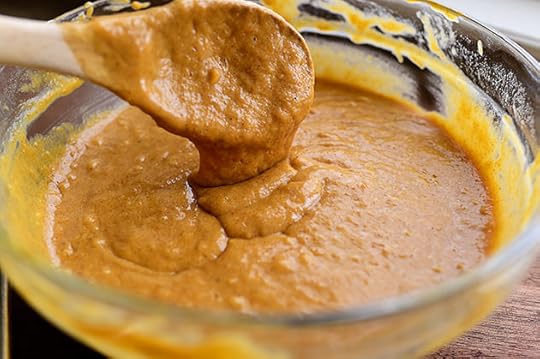 Until it all comes together in a beautiful, orange batter.
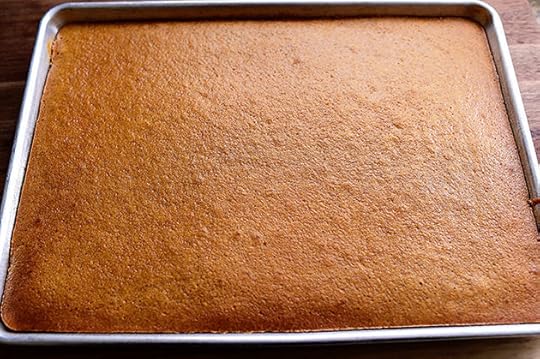
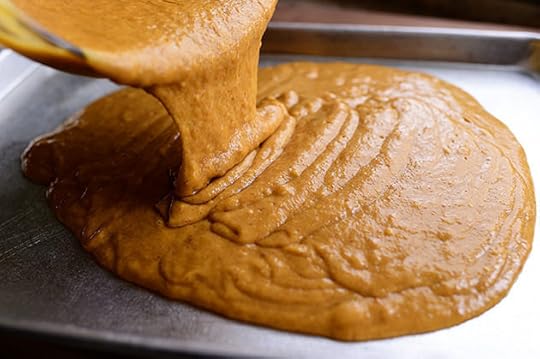 Pour it into a sheet pan (actually, a “half sheet pan”) that’s been sprayed with cooking spray…
(Update: This is a half sheet pan at 13 x 18. You can use a slightly smaller jelly roll pan OR a 9 x 13 inch pan. The 9 x 13 cake will be quite a bit thicker and you might need to bake it a little longer!)
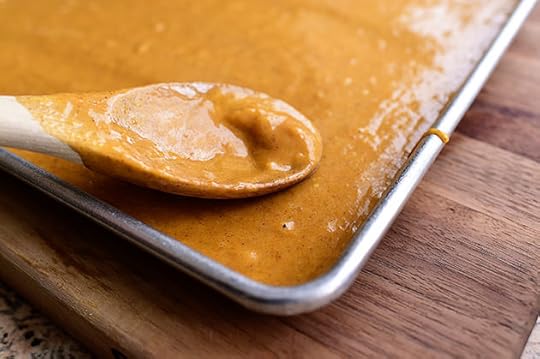 And smooth out the surface.
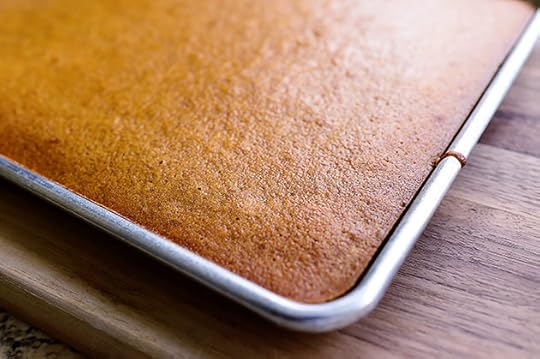 Then bake it at 350 degrees for 20 minutes until it’s lovely and golden!
 You can’t believe how good the house smelled at this point. Have you ever noticed that the smell of pumpkin baked goods makes you feel like everything’s gonna be okay?
 Now, let’s discuss the icing! You could do a seven-minute icing or a buttercream icing—both would be delicious. I decided to go the cream cheese icing route, because…well…
Because…well…
Because…well…IT’S CREAM CHEESE ICING! No other explanation is required.
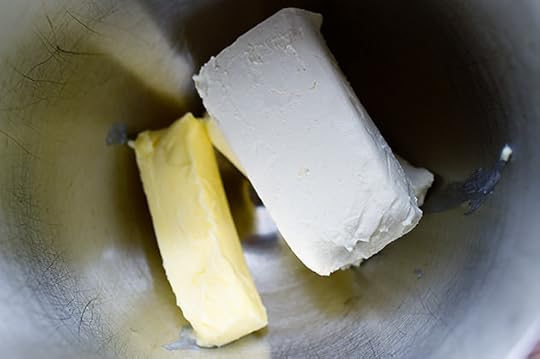
Combine softened butter and softened cream cheese in the bowl of a mixer…
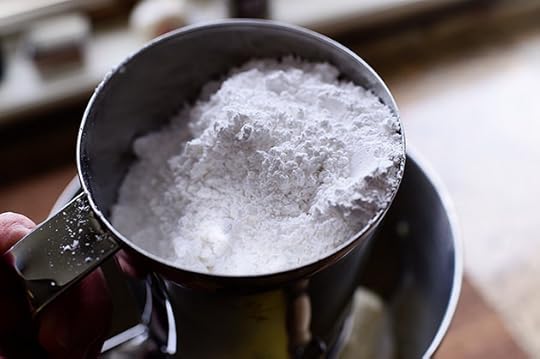 Then sift in some powdered sugar…
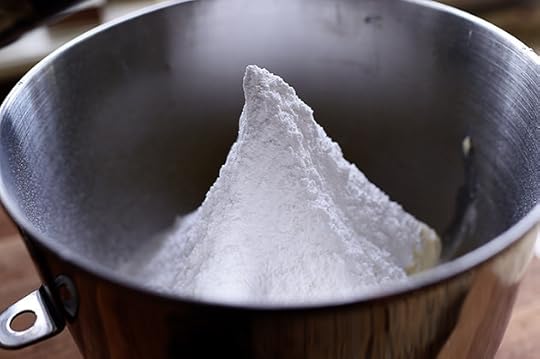 See how much you can sift in before it comes crumbling down!
I have these little contests with myself daily. “If this conical mountain of powdered sugar doesn’t crumble, I’m the coolest person in the world.”
If it keeps from crumbling, I high-five myself and say “YES!”
If it does crumble, I dismiss the whole exercise as silly superstition.
 Mix it together until it’s smooth…
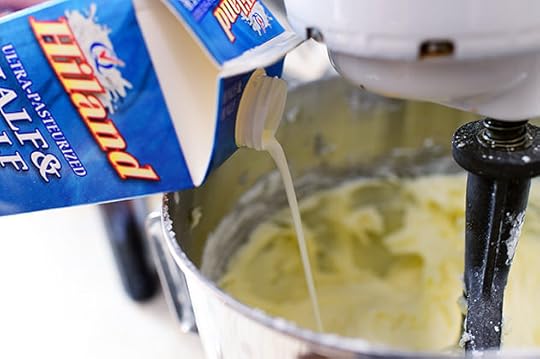 Then splash in a little half and half or milk…
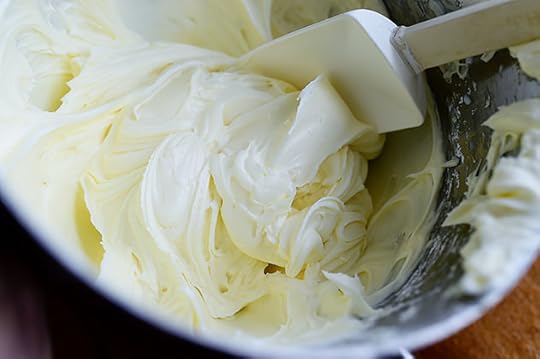 Until it gets to the consistency you want. I like it nice and thick, but really smooth and luscious looking.
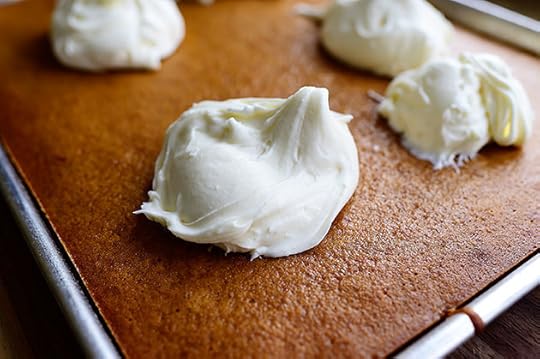 Plop the icing all over the cake…
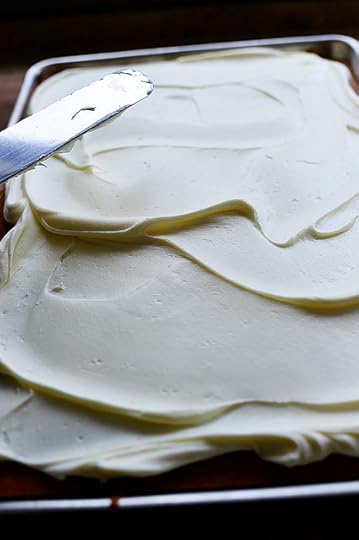 Then smear it all over the surface.
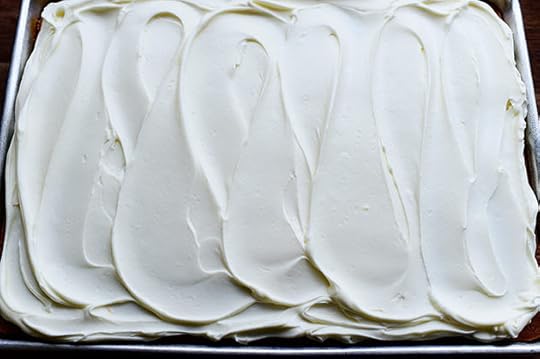 Important Icing Note! I actually made double the amount of icing as in the recipe below. While it wound up being thick and delicious, it really was too much. If you like a whole bunch of cream cheese icing, you can double it as I did…but next time I make it, I’ll use the amounts in the printable. Cream cheese icing is rich, man!
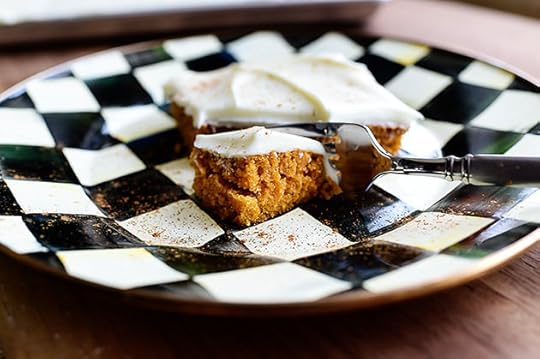
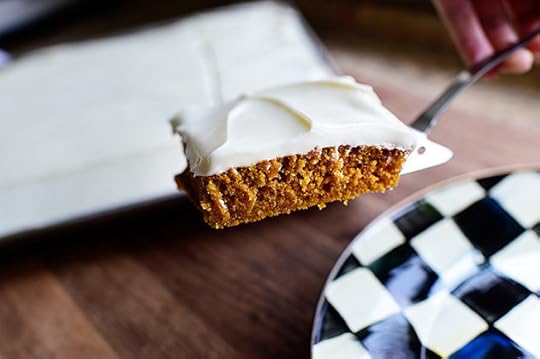 Cut it into squares…
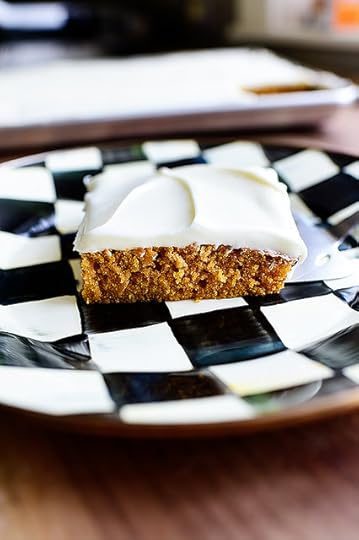 And serve it up!
 It’s pretty much impossible to describe how delicious this was. But I’ll give it my best shot:
It was ding dang darn delicious.
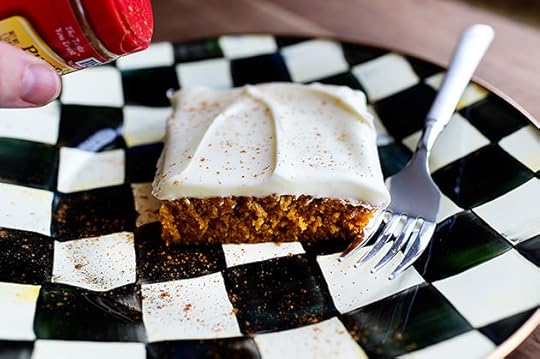 Oh, and if you want to get all fancy-like, sprinkle on a little pumpkin pie spice!
 Then dig in and enjoy every bite.
You’ll love it! It’s perfect for Thanksgiving!
It’s also perfect for the other 364 days of the year.
Here’s the handy dandy printable!
.recipe-actions {
position: relative;
z-index: 2;
}
#pdf-popover {
background: rgba(255,255,255,.9);
border: 1px solid #efeeed;
color: #6e5c3a;
display: none;
font-family: Helvetica, Arial, sans-serif;
right: 20px;
margin: 2px;
padding: 54px 20px 7px 10px;
position: absolute;
top: 0;
width: 380px;
z-index: 10;
}
#pdf-popover form {
margin: 0;
}
#pdf-popover h4 {
background: #b15818;
color: #fff;
font-family: Helvetica, Arial, sans-serif;
font-size: 20px;
font-weight: normal;
left: 3px;
margin: 0;
position: absolute;
padding: 6px 12px;
right: 3px;
top: 3px;
}
#pdf-popover legend {
font-family: Helvetica, Arial, sans-serif;
font-size: 120%;
font-weight: bold;
margin-bottom: 2px;
margin-left: 10px;
text-transform: uppercase;
}
#pdf-popover fieldset {
margin-bottom: 15px;
}
#pdf-popover input[type="checkbox"] {
height: 14px;
margin: 2px 0 10px 10px;
padding-left: 14px;
position: relative;
visibility: visible;
width: 14px;
}
#pdf-popover input[type="checkbox"],
#pdf-popover input[type="radio"] {
margin-left: 10px;
}
#pdf-popover .close {
background: #b15818;
color: #FFFFFF;
cursor: pointer;
height: 35px;
font-size: 16px;
font-weight: bold;
line-height: 26px;
position: absolute;
right: 3px;
text-align: center;
top: 3px;
width: 25px;
z-index: 1;
}
#pdf-popover .button {
background-color: #b15818;
border: 0;
color: #fff;
cursor: pointer;
font-family: Helvetica, Arial, sans-serif;
margin-left: 10px;
padding: 8px 10px;
text-transform: uppercase;
}
x
Print Options
Page size
Letter
3x5
4x6
Text Size
Small
Medium
Large
Content
Include description
Include prep time, etc.
Show image
Print
Recipe
Pumpkin Sheet Cake
Prep Time: 35 Minutes
Cook Time: 25 Minutes
Difficulty: Easy
Servings: 18
 Print Recipe
Ingredients
2 sticks Salted Butter2 cups Pumpkin Puree (not Pumpkin Pie Filling!)2 teaspoons Pumpkin Pie Spice3/4 cups Boiling Water2 cups Flour2 cups Sugar1/4 teaspoon Salt1/2 cup Buttermilk2 whole Eggs2 teaspoons Baking Soda2 teaspoons Vanilla Extract1/2 teaspoon Maple Extract (optional) FROSTING8 ounces, weight Cream Cheese, Softened1 stick Butter, Softened1 pound Powdered Sugar, Sifted Dash Of Salt1 Tablespoon Half-and-half Or Milk (more If Needed For Thinning) Preparation Instructions
Preheat oven to 350 degrees. Spray a sheet pan with baking spray and set aside.
In a medium saucepan, melt 2 sticks butter. Whisk in pumpkin until it's totally combined. Whisk in boiling water until mixture is smooth and combined. Set aside.
In a measuring pitcher, combine buttermilk, eggs, baking soda, vanilla, and maple extract. Whisk and set aside.
In a large bowl, combine flour, sugar, and salt. Pour in the pumpkin mixture and stir until halfway combined. Pour in the buttermilk mixture and stir until combined. Pour into the pan and bake the cake for 20 minutes. Remove and allow to cool.
To make the frosting, mix together the cream cheese, butter, powdered sugar, and salt until smooth. Add half and half and check the consistency. It should be somewhat thick but thin enough to spread in a thin layer.
Spread the frosting all over the surface of the cake. Cut into squares and serve. Keep leftovers in the fridge, as frosting will get soft.
NOTE: You may double the frosting amounts if you like a very thick layer of frosting!
Posted by Ree | The Pioneer Woman on November 20 2014

November 17, 2014
Pumpkin Ravioli
 I made a cake yesterday that used exactly half of a large can of pumpkin puree (I’ll post the cake recipe later this week), which meant, if my math is correct, that I had exactly half of a large can of pumpkin puree leftover. Check my calculations there, will you?
I think canned pumpkin puree is one of the best canned foods there is—right up there with whole tomatoes and sweetened condensed milk—and rather than pack the extra away in a container and let it languish in the fridge, only to be forgotten, I decided to make a batch of pumpkin ravioli for a late Sunday lunch. I had everything I needed, after all: Pumpkin, garlic, butter, wonton wrappers, Parmesan, pine nuts…and will. Sheer will.
The results? Delicious! I love making ravioli with wonton wrappers—so much easier than spending the time to make pasta dough—and this would make a great little appetizer for Thanksgiving OR just a lovely fall weeknight meal.
Here’s how to make it!
 Put a little butter and garlic in a skillet over medium heat…
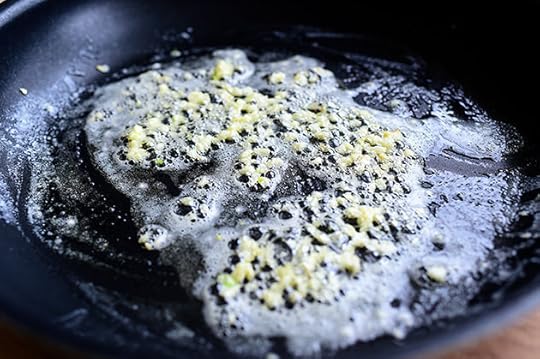 And cook the garlic for a minute or two, being careful not to burn it.
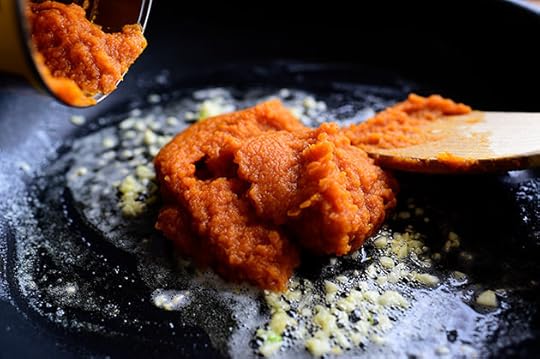 Add the pumpkin! Now, as I said, this is the good canned stuff. But if you’re a stickler for homemade, you can make your own pumpkin puree! Whatever floats your boat, baby.
And I’m just going to say it for the sake of saying it: I’m talking about pumpkin puree here. NOT pumpkin pie filling. The two cans look similar, so make sure you don’t grab the wrong one because then the ravioli would taste weird.
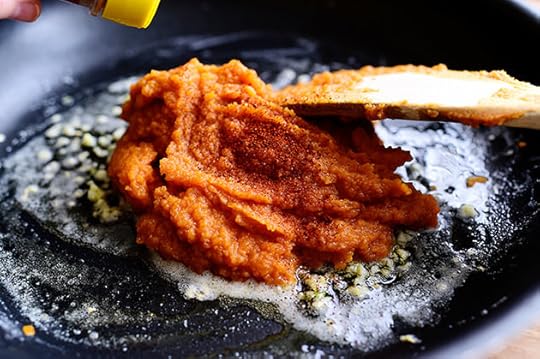 Sprinkle on some salt and chili powder, just to give it a little zip…
 Then stir it around and cook it over medium heat…
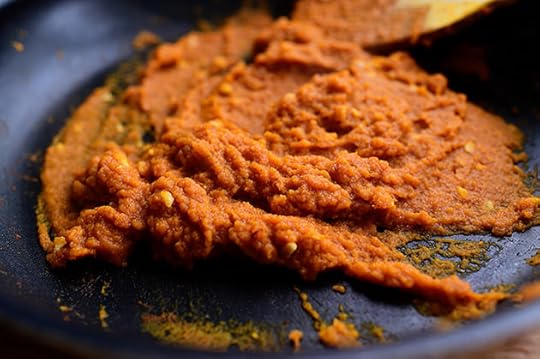 For a few minutes. This helps cook off a little of the liquid in the puree, which will help the mixture be nice and thick and ravioli filling-y…but it will also help the flavors deepen, which will in turn help you be a happier person.
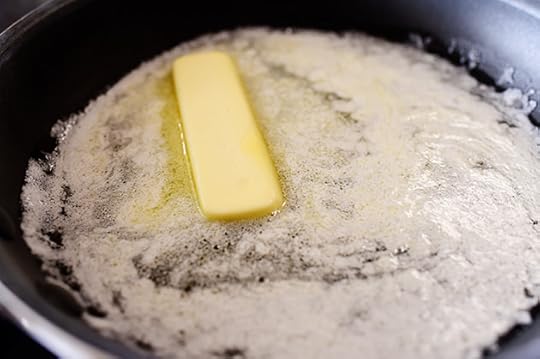 For the “sauce” for the ravioli, I’m keepin’ it simple: Just melt a stick of butter in a skillet!
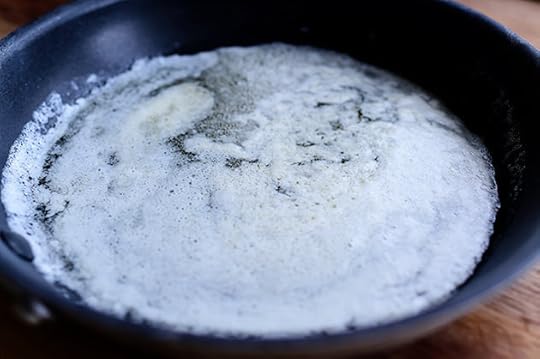 Let it start to bubble up…
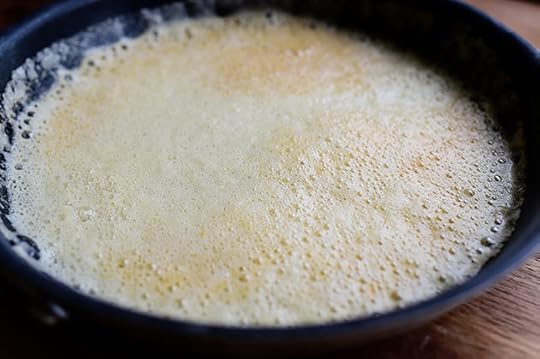 Then get foamy…then the foam will suddenly start to turn golden brown. Then just take the skillet off the stove and set it aside, and marvel at the fact that you just made a batch of brown butter. The foam will settle down a bit, then you can easily skim it off the top.
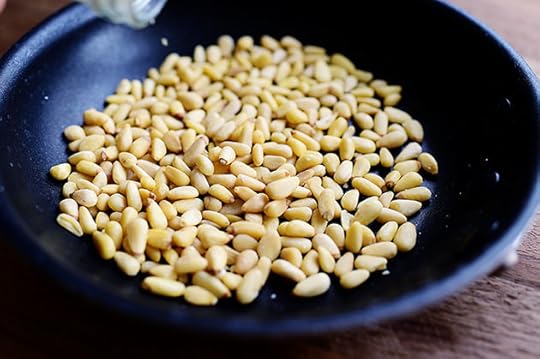 I also toasted up some pine nuts! (Feel free to use walnuts or raw almonds instead.) Just put a small amount in a small skillet…
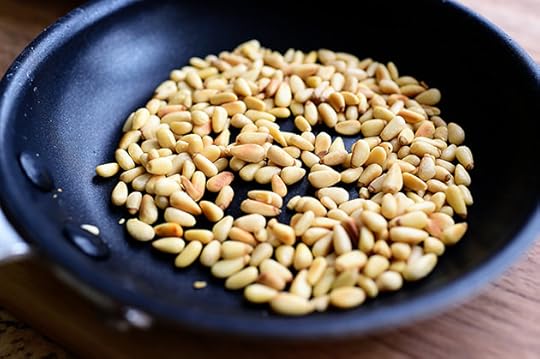 And toast them over medium heat until golden brown.
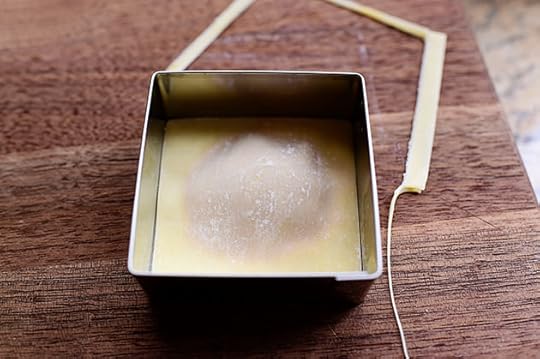
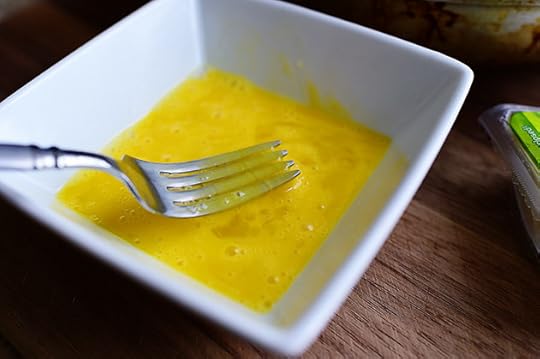 Now, get ready to assemble the ravioli! Beat an egg with about a tablespoon of water. This is the glue that holds the ravioli all together.
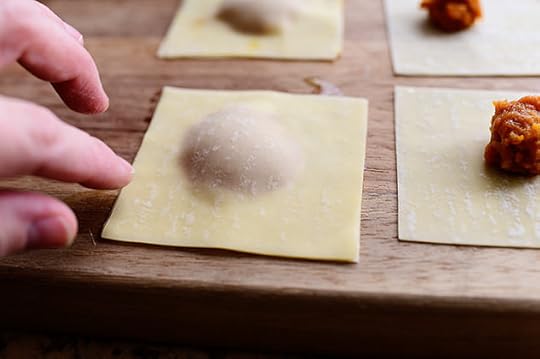
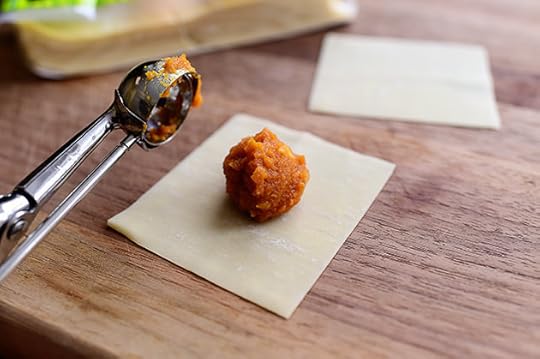 Now, here’s what makes the ravioli quick and easy: Wonton wrappers! They are wonderful and miraculous and while they don’t fall under the category of “fine artisan pasta dough,” they sure provide a fast way to get “homemade” ravioli in yo’ mouth as soon as humanly possible. Lay out a few squares and drop a small spoonful of pumpkin filling in the center. (I used a teaspoon scoop and underfilled it just a bit.)
 Lay out a few at a time—just keep in mind that the wrappers dry out pretty quickly, so you’ll want to keep a steady pace going.
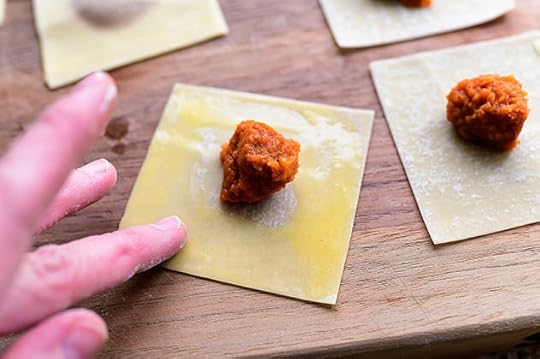 Dip your finger in the egg mixture, then smear it all over the wrapper around the pumpkin.
 Lay a second wrapper on top and match up the edges, then gently press all around the edge to stick them together.
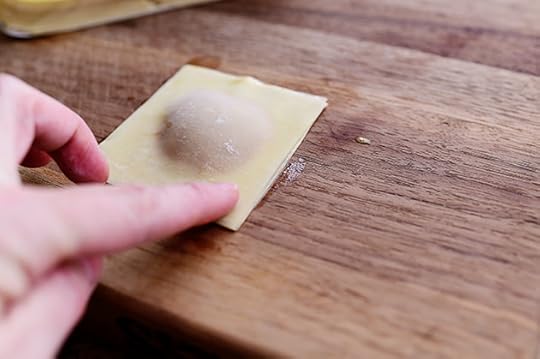 Next—and this is important—gently press your fingers all around the pumpkin, forcing out any small air pockets that have formed. This is important, as air pockets will wreak havoc on the ravioli when you cook ‘em…so pick ‘em up, talk to ‘em, work with ‘em. Do whatever you need to do to make sure the pumpkin is in a nice, tight pocket.
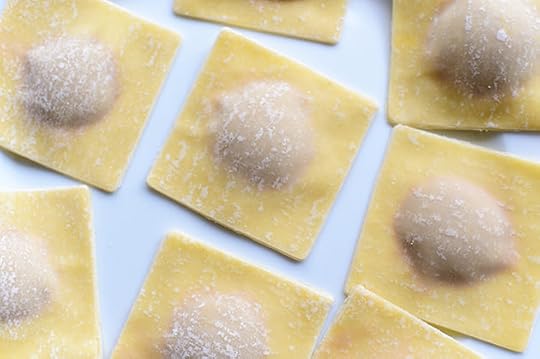
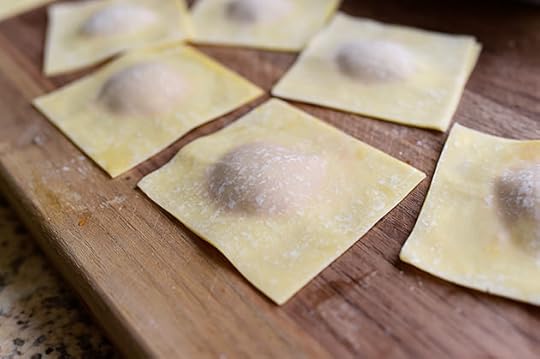 Keep going until they’re all done!
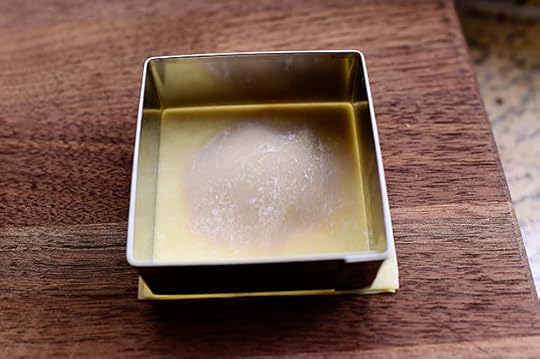 Now, this is totally, completely, absolutely, entirely, utterly, 100% optional: You can trim around the edge of the ravioli with a square or round cutter in order to give them a nice, neat edge. Again, as I just repeated a couple hundred times, this is not required at all. But sometimes I like to do it so that the ravioli all look perfectly uniform, because then I sleep more soundly at night.
Just kidding. I think.
 Just press hard if you have a cookie cutter, or you could just use a knife.
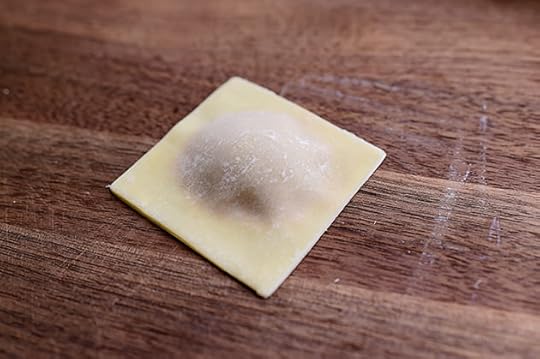 See? Perfect!
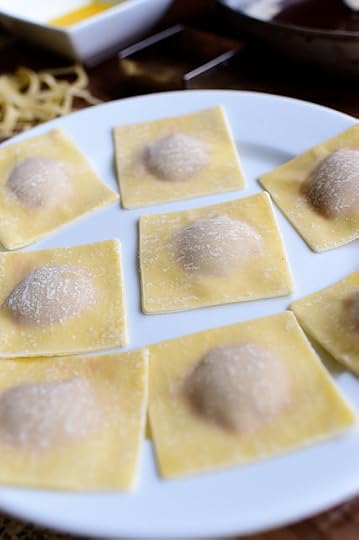 All ready to go.
 Oh, and one other important thing: I love life. Have I mentioned that lately?
Because I do.
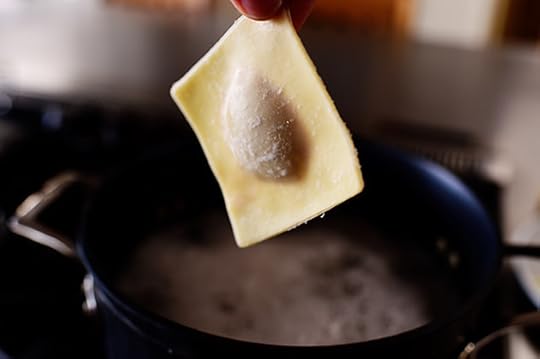 Now, to cook the ravioli, I bring a pot of water to a boil and drop in 3 or 4 at a time. This just makes it easier to manage the delicious little wonders.
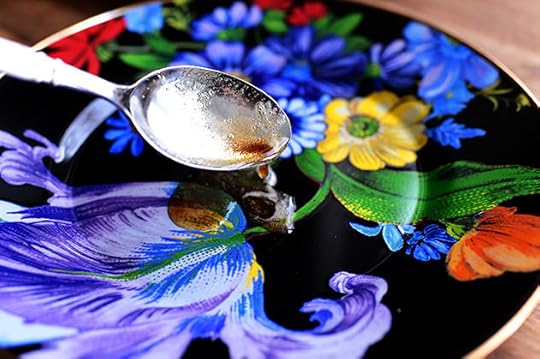 To serve up the ravioli, drizzle just a little browned butter onto each plate and smear it around…
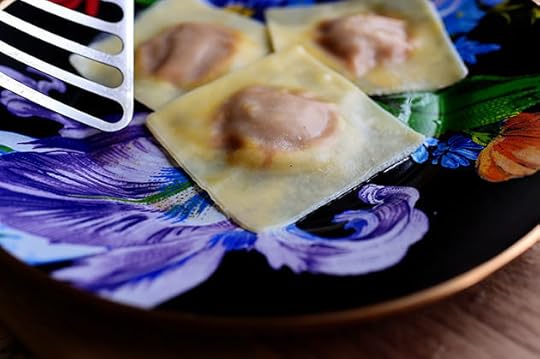 Then put about 3 cooked ravioli on the plate…
 And drizzle on a little more browned butter. Yum!
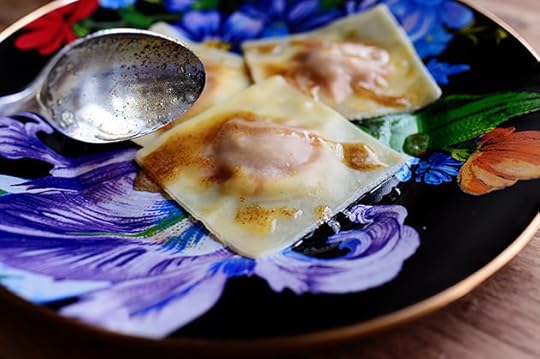
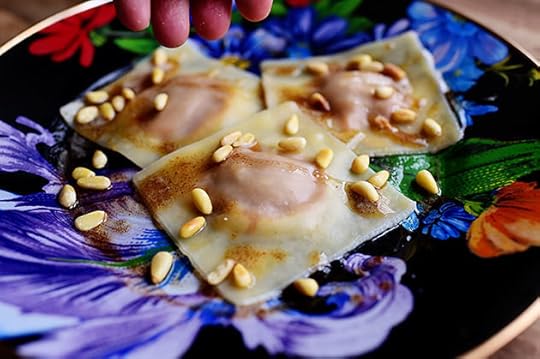 And sprinkle on some of the toasted pine nuts.
 I repeat: Yum!
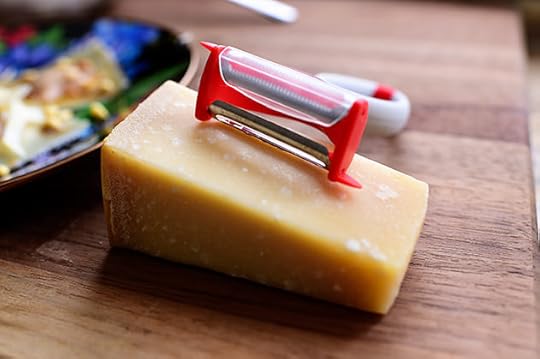 Next, grab some Parmesan and a peeler…
 And shave some right on top.
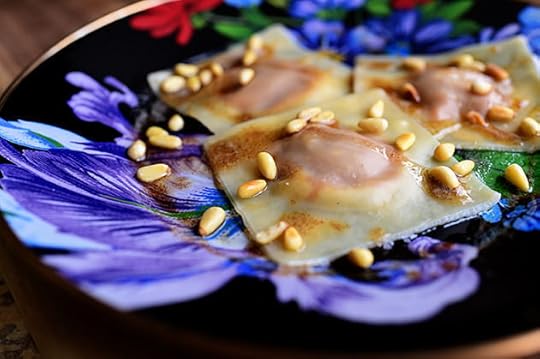
 A little black pepper is nice.
 Oh, look! Sage from my garden! And the snow didn’t kill it.
Yet.
Amen.
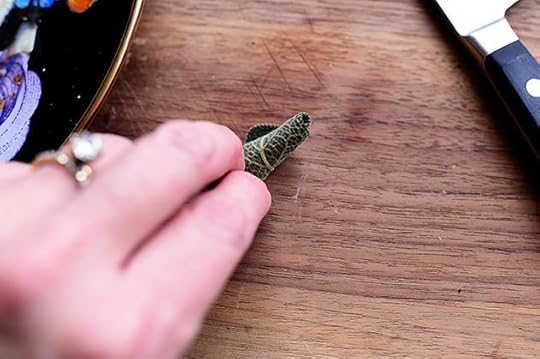 Roll it up like you would a leaf or two of basil…
 And, with a really sharp knife, slice it really thin.
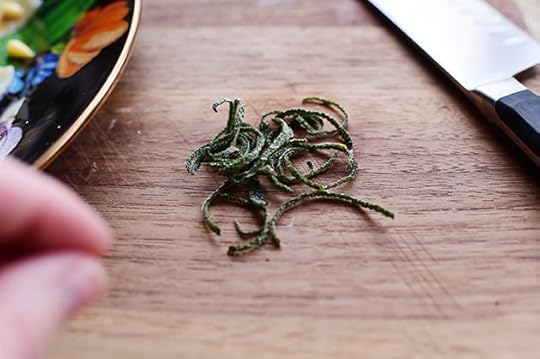 Sage is strong! A little goes a long way.
(Pssst. You could also slice up the sage and add it to the skillet when you brown the butter.)
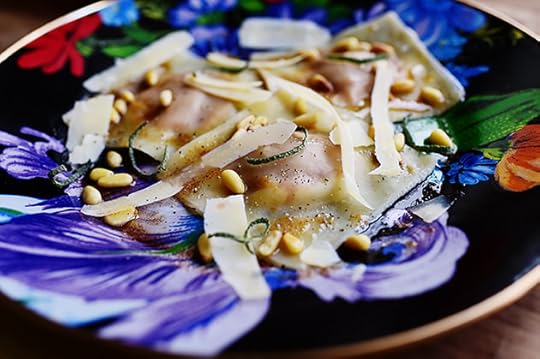 Sprinkle just a few slivers on top.
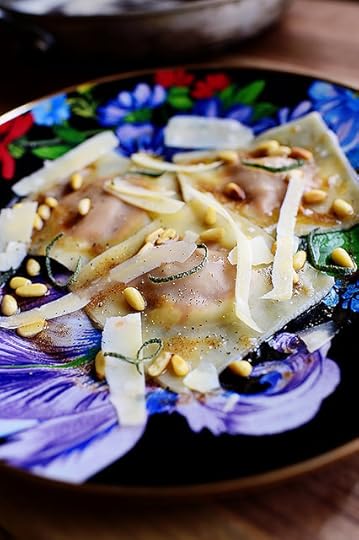 Pretty!
But even more than that: Yummy!
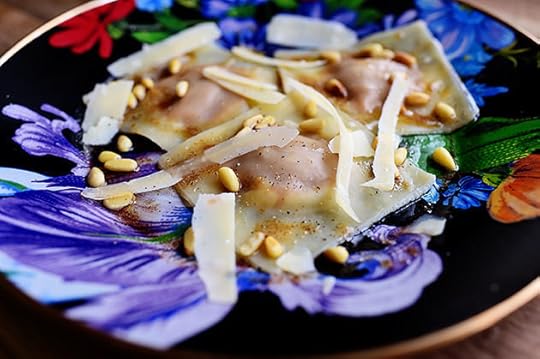
Here. I’ll prove it.
 This was my plate few minutes later.
I rest my case.
Here’s the handy dandy printable!
.recipe-actions {
position: relative;
z-index: 2;
}
#pdf-popover {
background: rgba(255,255,255,.9);
border: 1px solid #efeeed;
color: #6e5c3a;
display: none;
font-family: Helvetica, Arial, sans-serif;
right: 20px;
margin: 2px;
padding: 54px 20px 7px 10px;
position: absolute;
top: 0;
width: 380px;
z-index: 10;
}
#pdf-popover form {
margin: 0;
}
#pdf-popover h4 {
background: #b15818;
color: #fff;
font-family: Helvetica, Arial, sans-serif;
font-size: 20px;
font-weight: normal;
left: 3px;
margin: 0;
position: absolute;
padding: 6px 12px;
right: 3px;
top: 3px;
}
#pdf-popover legend {
font-family: Helvetica, Arial, sans-serif;
font-size: 120%;
font-weight: bold;
margin-bottom: 2px;
margin-left: 10px;
text-transform: uppercase;
}
#pdf-popover fieldset {
margin-bottom: 15px;
}
#pdf-popover input[type="checkbox"] {
height: 14px;
margin: 2px 0 10px 10px;
padding-left: 14px;
position: relative;
visibility: visible;
width: 14px;
}
#pdf-popover input[type="checkbox"],
#pdf-popover input[type="radio"] {
margin-left: 10px;
}
#pdf-popover .close {
background: #b15818;
color: #FFFFFF;
cursor: pointer;
height: 35px;
font-size: 16px;
font-weight: bold;
line-height: 26px;
position: absolute;
right: 3px;
text-align: center;
top: 3px;
width: 25px;
z-index: 1;
}
#pdf-popover .button {
background-color: #b15818;
border: 0;
color: #fff;
cursor: pointer;
font-family: Helvetica, Arial, sans-serif;
margin-left: 10px;
padding: 8px 10px;
text-transform: uppercase;
}
x
Print Options
Page size
Letter
3x5
4x6
Text Size
Small
Medium
Large
Content
Include description
Include prep time, etc.
Show image
Print
Recipe
Pumpkin Ravioli
Prep Time: 15 Minutes
Cook Time: 10 Minutes
Difficulty: Easy
Servings: 6
 Print Recipe
Ingredients
2 Tablespoons Butter2 cloves Garlic, Minced1 can (15 Oz. Size) Pumpkin Puree1/4 teaspoon Salt1/4 teaspoon Chili Powder (more To Taste)1/4 cup Pine Nuts1 stick Butter36 whole Wonton Wrappers1 whole Egg, Beaten Black Pepper To Taste Fresh Parmesan Fresh Sage, Sliced Very Thin Preparation Instructions
Melt butter with the garlic in a skillet over medium heat and cook for a couple of minutes to release the garlic flavor. Add the pumpkin puree, salt and chili powder. Stir and cook over medium heat for a few minutes, stirring constantly. Remove from heat and let cool slightly.
Toast pine nuts in a small skillet over medium-low heat, tossing occasionally, until golden. Remove from heat and pour the pine nuts onto a small plate.
In a small skillet (you can use the same one you toasted the pine nuts in) brown the butter by melting it over medium-high heat, then letting it cook and bubble for an additional minute or so until the foam is golden brown. Remove from heat and set aside.
Assemble the ravioli: Lay out 18 wonton wrappers and put 1/2 teaspoon of the pumpkin mixture in the center. Beat the egg with 1 tablespoon water. Using your finger, smear the egg mixture all over the surface of one of the wrappers surrounding the pumpkin. Place a clean wrapper on top, matching up the edges. Press the edges together and use your fingers to press out any air pockets that form. Repeat with the rest of the wrappers. (Keep in mind the wrappers dry out quickly, so you might want to assemble 9 ravioli at a time, keeping the other wrappers covered.)
(If you like, you can trim the raviolis using a circular or square cutter to make the edges uniform. Totally optional!)
Bring a pot of water to a boil. 3 at a time, drop the ravioli into the water and cook for about 1 1/2 to 2 minutes. Remove with a slotted spatula and put the ravioli on a plate. Continue cooking the ravioli in batches of 3.
To serve, spoon a little browned butter onto each plate and smear it around. Place 3 ravioli on each plate, then spoon a little more browned butter over the top. Sprinkle on toasted pine nuts, sprinkle with a little black pepper, and sprinkle on shaved Parmesan. Finally, sprinkle on the sage and serve!
Posted by Ree | The Pioneer Woman on November 17 2014

November 12, 2014
Rice Pudding
 I don’t make rice pudding very often, but whenever I do, I always stop dead in my tracks and confront myself with the same question:
“Why don’t you make rice pudding more often?!?”
I mean…rice pudding. Rice pudding. There’s nothing like it in the world. Creamy, sweet, dreamy, perfect.
I’ll say it again: Perfect. It’s just one of those things you eat that causes you to roll your eyes and sigh. Like you’ve finally come home again. Like the world finally, at long last, makes sense again. Like all the questions of life are now answered.
And a bonus: It also happens to be one of the easiest desserts in the world to make!
C’mon…I’ll show ya.
 First, I want to get the raisins ready. And by ready…
 I mean douse them in bourbon or other whiskey…
 And let them sit while you get all the other components ready. If you can do this a little ahead of time, it’s best to let them soak up the boozy goodness for at least an hour.
And two things about the raisins:
1. You can use regular raisins or golden raisins. Whatever floats your boat.
2. I realize that there is a percentage of the rice pudding-eating population that recoils at the thought of putting raisins in their rice pudding. But all I am saying: Give raisins a chance. Especially if they’re soaked in whiskey, man.
 Next up: The rice. You’ve gotta use medium-grain rice when you make rice pudding. It’s in the rulebook. I’ve made it with long-grain and it just isn’t the same at all.
Medium-grain all the way, baby.
(I’m sorry I called you baby.)
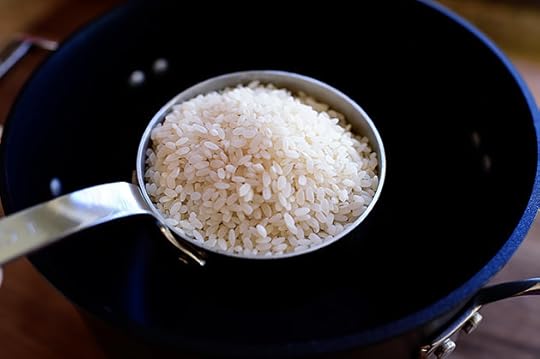 Measure a cup or so…
 And pour it into a medium saucepan.
Which brings me to the second point: The pan. Overwhelmingly, my rice pudding always turns out better if I use a nonstick saucepan. Now, that’s not to say I always make it in a nonstick saucepan, and that’s not to say you need to run out and buy a nonstick saucepan if you don’t have one. But if you do have one, now’s the time to whip it out!
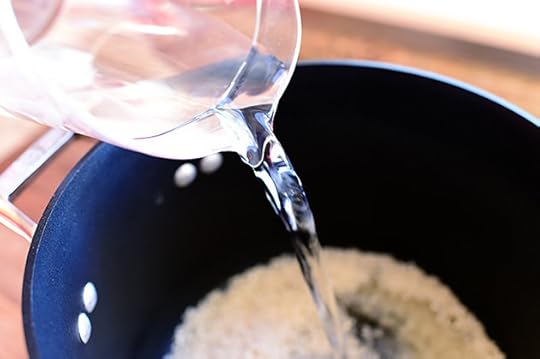 The rice needs to cook in a mixture of water…
 And milk. I used 1% because that’s what I had in my fridge, but you can use 2% or whole if that’s whatcha got.
 And okay. How about a splash of cream?
Just a splash!
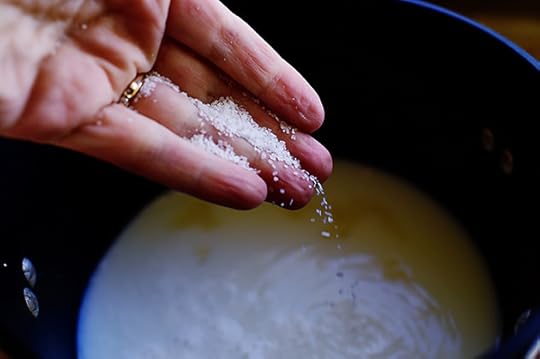 Next, a pinch of salt…
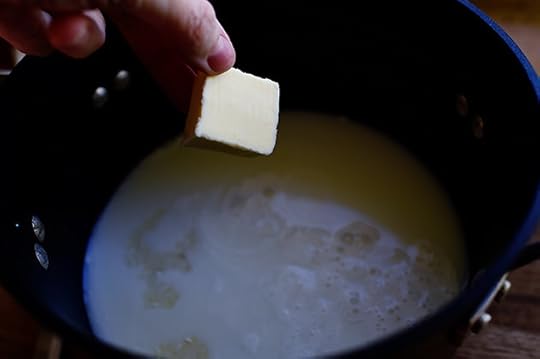 And a pat of butter.
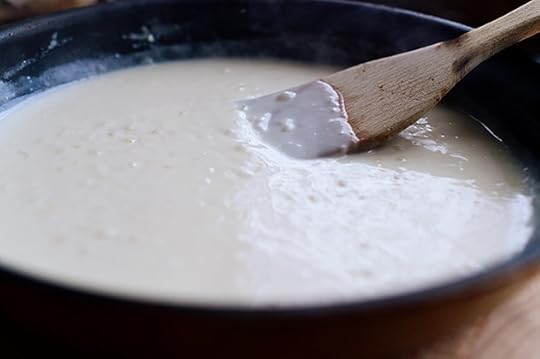
So basically, you’re cooking a batch of rice…but upping the liquid quantity a bit and substituting milk for some of the water.
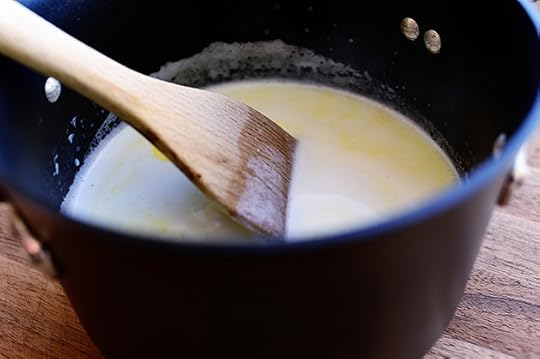 Stir it together, bring it to a boil over medium-high heat, then reduce the heat to the lowest heat you can muster, cover the pot, and cook it for 20-25 minutes.
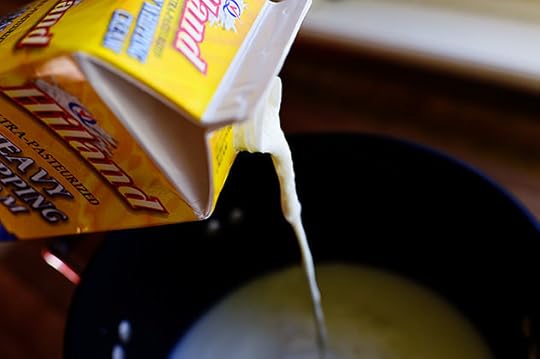
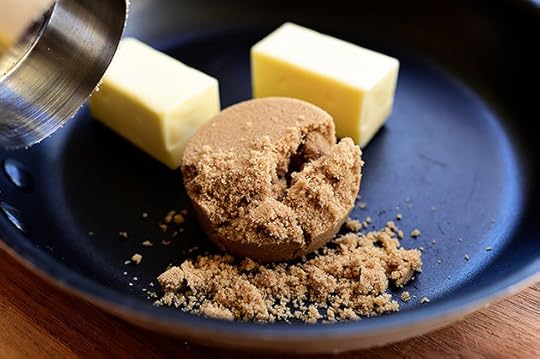 While the rice is cooking, whip up a caramel-pecan topping to get spooned over the rice pudding. This is totally optional, but totally heavenly. Combine butter and brown sugar in a small saucepan…
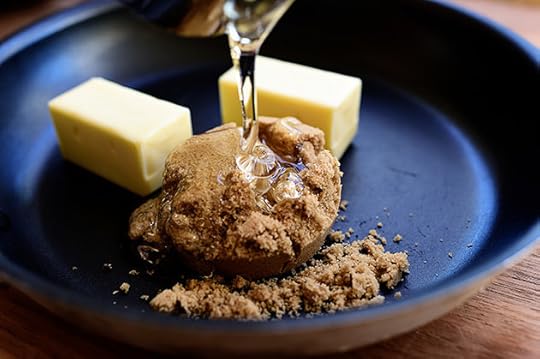 With some light corn syrup…
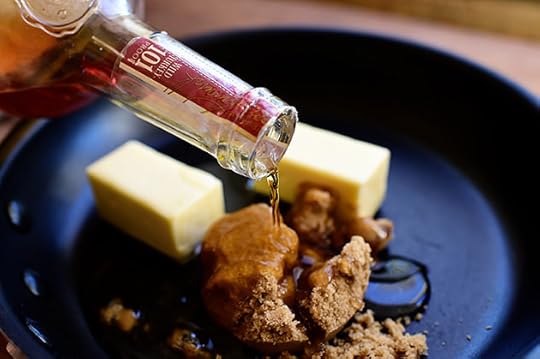 Some (*hiccup*) whiskey…
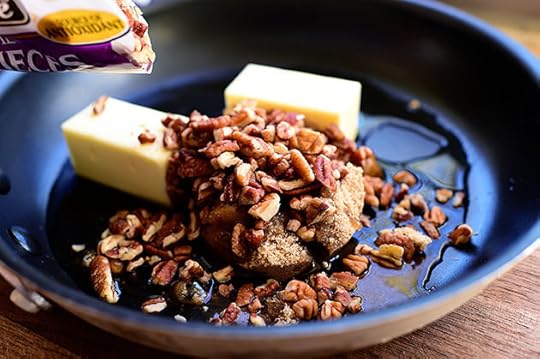 And some chopped pecans or walnuts.
(Pssst. With the exception of the whiskey, this is the very same mixture I use when I make mini pecan sticky buns! But instead of winding up as the topping of the buns, it’s going to be the topping of the rice pudding. I’m crazy that way.)
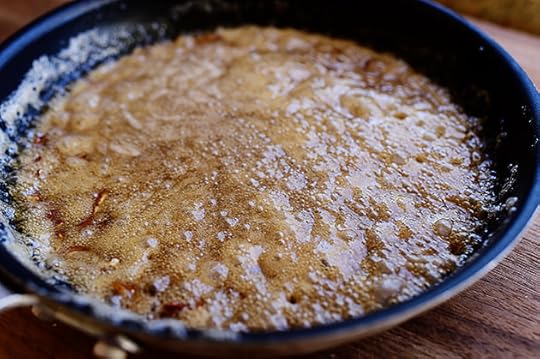 Bring it to a gentle boil over medium to medium-high heat and let it cook for 3 to 4 minutes or so…
 Then remove it from the heat and let it calm down a bit. And when it does…look what you’re left with! Absolutely luscious.
(Just set it aside, and if it firms up too much before the rice pudding is done, you can just warm it up again to soften it.)
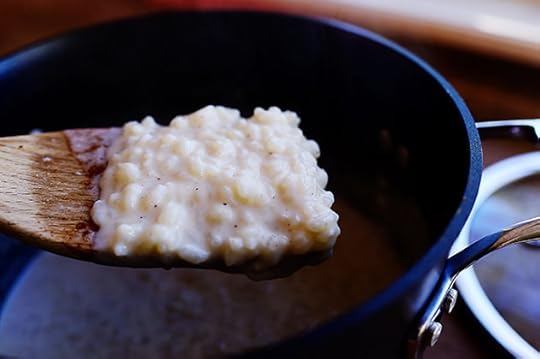
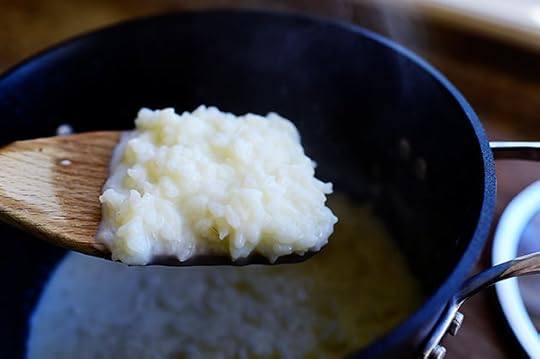 Back to the rice pudding: This is what it looks like after the initial cooking stage (20 to 25 minutes). So nice!
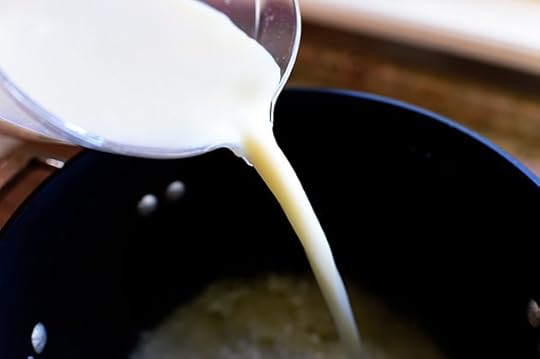
And now it’s time to add the sweetness, and there are so many different ways to do this. You can add a little more milk or cream mixed with white sugar. You can add a little more milk or cream mixed with brown sugar.
Or…
OR…
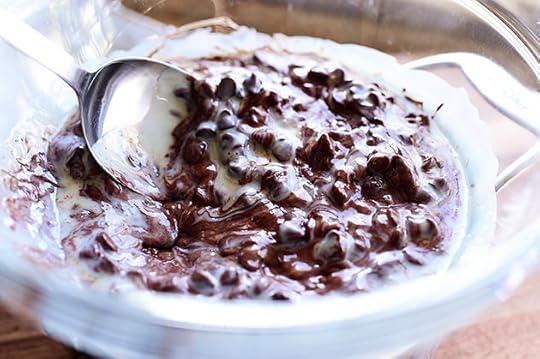
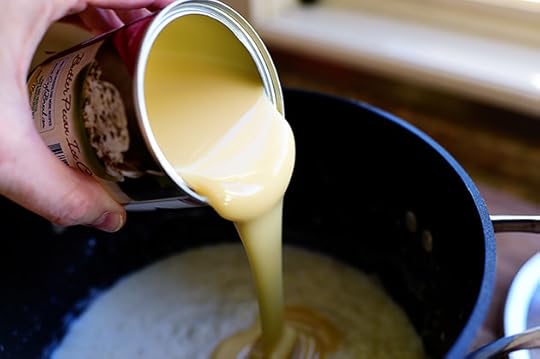 You can crack open a can of sweetened condensed milk…
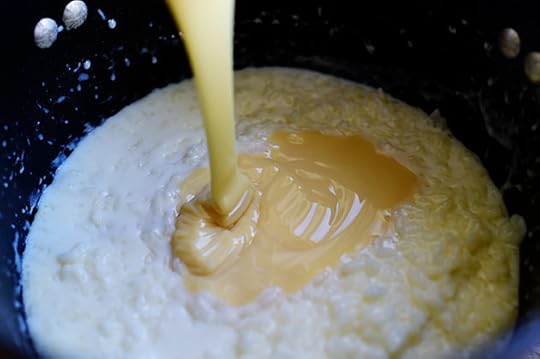 And drizzle in about half of it. I absolutely love using sweetened condensed milk in rice pudding because it’s creamy and sweet and serves a dual purpose.
And because sweetened condensed milk is one of my favorite ingredients on earth. I have a serious problem with it.
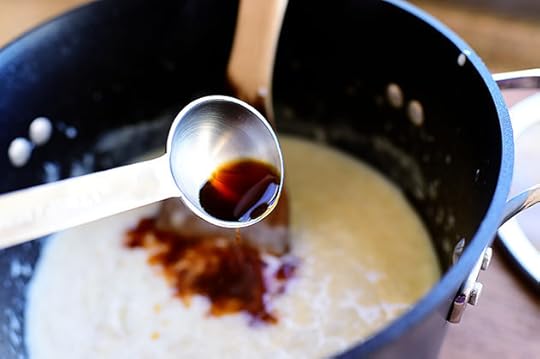 Stir it in, then add some vanilla for even more flavor…
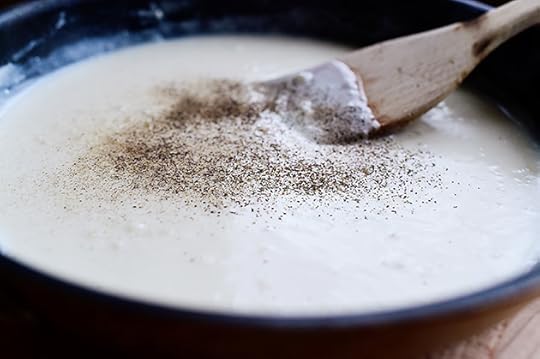
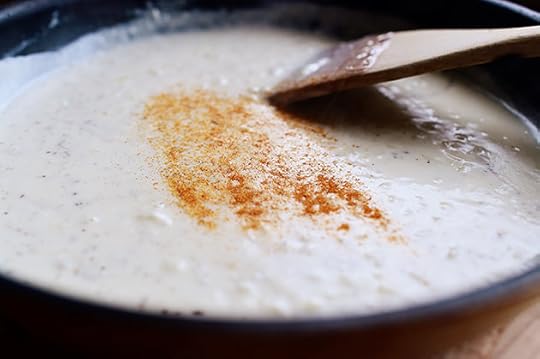
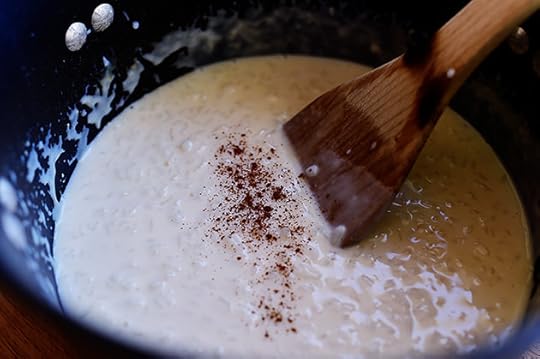 Along with a little cinnamon…
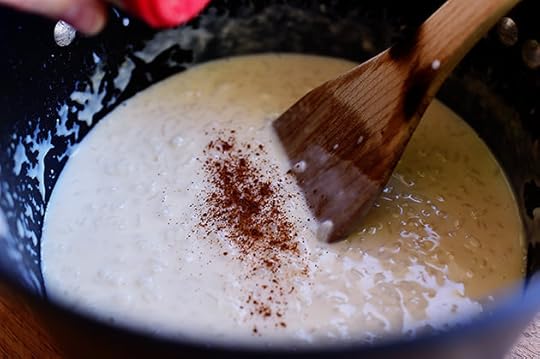 And nutmeg.
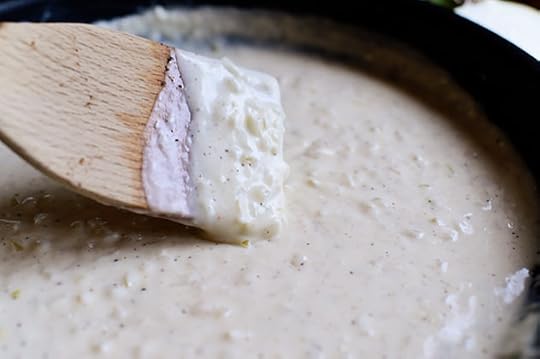
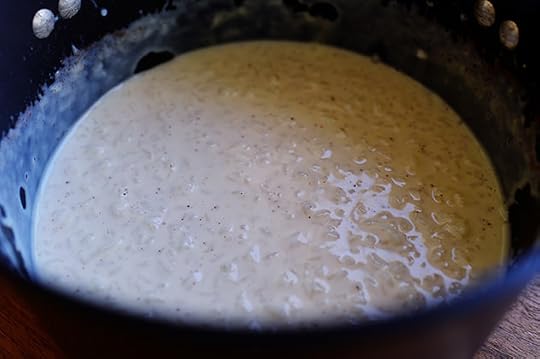 Now stir it around and return the pan to the stove for just 4 or 5 more minutes, just to finish off the cooking process.
 And at that point…here’s what it looks like. Just bee-yoo-ti-full!
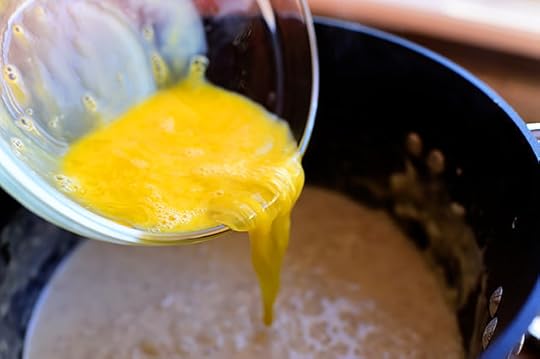 Just two final things: stir in a beaten egg…
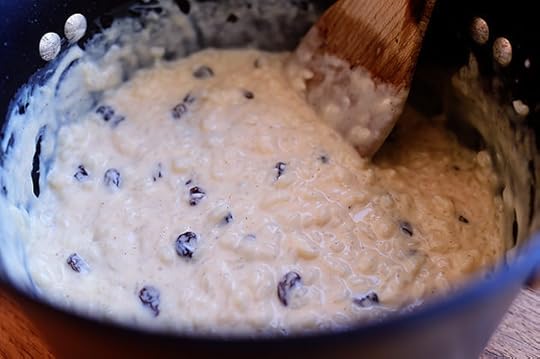
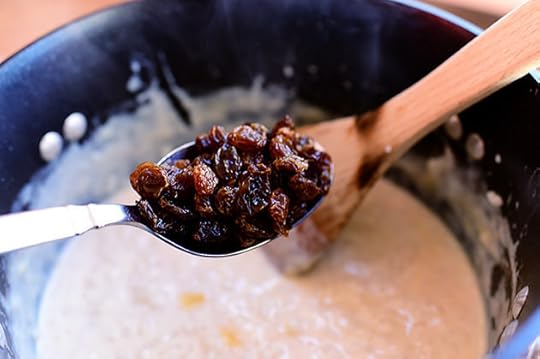 Then drain the whiskey from the raisins and add them in.
 Stir it together slowly (the temperature is so hot that it immediately takes care of the egg; no need to return it to the stove.) And now’s the time to check the consistency of the rice pudding: It should be creamy but not overly soupy. If it isn’t creamy enough, all you need to do is drizzle in a little bit more sweetened condensed milk. If it’s overly creamy, just let it sit for 5 minutes and it should be just right.
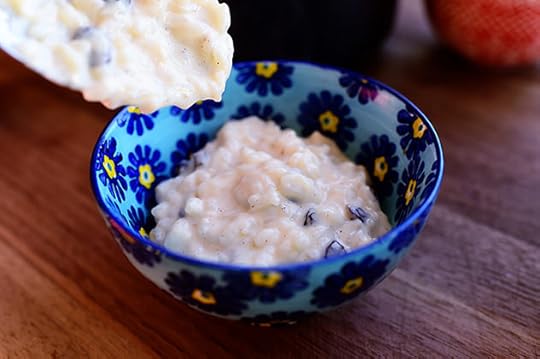 Not that you can wait that long.
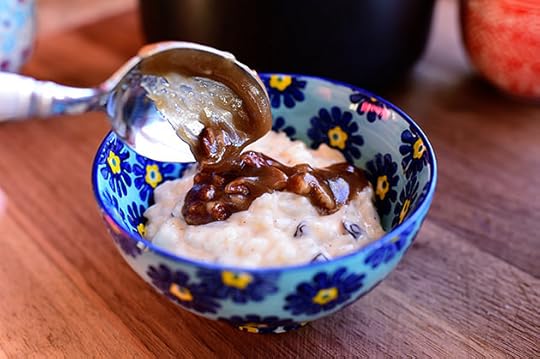 Now, you can serve it plain and unadulterated, or you can spoon on a little bit of the caramel-pecan topping.
 Here’s the thing about rice pudding: A little goes a long way, so you can serve it in little teacups, small bowls…an assortment is fun!
 This is life. Creamy, perfectly cooked rice pudding. Juicy raisins that lend just the faintest flavor of booze. Caramel topping with the crunch of pecans.
Sweet dreams are made of this. Make it as soon as you can.
Here’s the handy dandy printable!
.recipe-actions {
position: relative;
z-index: 2;
}
#pdf-popover {
background: rgba(255,255,255,.9);
border: 1px solid #efeeed;
color: #6e5c3a;
display: none;
font-family: Helvetica, Arial, sans-serif;
right: 20px;
margin: 2px;
padding: 54px 20px 7px 10px;
position: absolute;
top: 0;
width: 380px;
z-index: 10;
}
#pdf-popover form {
margin: 0;
}
#pdf-popover h4 {
background: #b15818;
color: #fff;
font-family: Helvetica, Arial, sans-serif;
font-size: 20px;
font-weight: normal;
left: 3px;
margin: 0;
position: absolute;
padding: 6px 12px;
right: 3px;
top: 3px;
}
#pdf-popover legend {
font-family: Helvetica, Arial, sans-serif;
font-size: 120%;
font-weight: bold;
margin-bottom: 2px;
margin-left: 10px;
text-transform: uppercase;
}
#pdf-popover fieldset {
margin-bottom: 15px;
}
#pdf-popover input[type="checkbox"] {
height: 14px;
margin: 2px 0 10px 10px;
padding-left: 14px;
position: relative;
visibility: visible;
width: 14px;
}
#pdf-popover input[type="checkbox"],
#pdf-popover input[type="radio"] {
margin-left: 10px;
}
#pdf-popover .close {
background: #b15818;
color: #FFFFFF;
cursor: pointer;
height: 35px;
font-size: 16px;
font-weight: bold;
line-height: 26px;
position: absolute;
right: 3px;
text-align: center;
top: 3px;
width: 25px;
z-index: 1;
}
#pdf-popover .button {
background-color: #b15818;
border: 0;
color: #fff;
cursor: pointer;
font-family: Helvetica, Arial, sans-serif;
margin-left: 10px;
padding: 8px 10px;
text-transform: uppercase;
}
x
Print Options
Page size
Letter
3x5
4x6
Text Size
Small
Medium
Large
Content
Include description
Include prep time, etc.
Show image
Recipe
Rice Pudding
Prep Time: 5 Minutes
Cook Time: 40 Minutes
Difficulty: Easy
Servings: 8
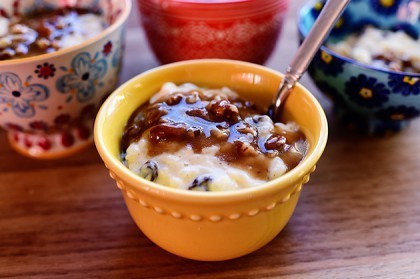 Print Recipe
Ingredients
1/2 cup Raisins (golden Or Regular)1/2 cup Bourbon Or Other Whiskey (optional)1 cup Medium Grain White Rice2 cups Water2 cups Milk (I Used 1%)2 Tablespoons Heavy Cream1 Tablespoon Salted Butter Pinch Of Salt8 ounces, fluid Sweetened Condensed Milk, More If Needed Dash Of Ground Cinnamon Dash Of Ground Nutmeg1 Tablespoon Vanilla Extract1 whole Egg, Beaten Caramel-Pecan Sauce1/2 cup Butter1/2 cup Packed Brown Sugar1/2 cup Light Corn Syrup1/2 cup Chopped Pecans1 Tablespoon Bourbon Or Other Whiskey (optional) Preparation Instructions
***Be sure to use medium-grain rice (not long-grain.)
***Use a nonstick saucepan if you have one.
In a small bowl, combine the raisins and whiskey. Set aside for 1 hour.
In a medium saucepan or pot, combine the rice, water, milk, cream, butter, and salt. Bring it to a gentle boil, then cover the pot, reduce it to low, and simmer for 20 to 25 minutes, stirring twice during this stage. Note: The rice should be cooked, but there should still be visible creamy liquid; it should not all be absorbed. If the liquid looks like it is absorbing more quickly than this, you can cut this stage to 18-20 minutes.
Remove the pot from the stove and add the sweetened condensed milk, cinnamon, nutmeg, and vanilla. Return to low heat for 5 minutes to finish cooking.
Remove the pot from the stove and slowly drizzle in the beaten egg, stirring constantly. Drain the raisins and stir them in. If you'd like the pudding to be a little creamier, stir in a little more sweetened condensed milk. If it's too creamy, return to the stovetop and cook for another 3 to 4 minutes. Serve immediately in a small bowl.
***While the rice is cooking for the first stage, make the Caramel-Pecan Sauce: Combine 1/2 cup butter, brown sugar, light corn syrup, and chopped pecans. Heat up the mixture over medium-low heat, then allow to bubbly gently for 5 minutes, or until consistency is like a nice caramel sauce.. Remove from the heat and set aside.
Top each portion of rice pudding with some of the Caramel-Pecan Sauce.
Posted by Ree | The Pioneer Woman on November 12 2014

Ree Drummond's Blog

- Ree Drummond's profile
- 2029 followers

