
Ree Drummond's Blog, page 19
May 6, 2015
Brown Eggs and Jam Jars Giveaway (Winners!)
Here are the winners!
#17719 Allison L: “Grilled Panini sandwiches!”
#60590 Marie: “Turkey meatloaf and fresh yeast rolls”
Congratulations, winners! Contact prizes@thepioneerwoman.com to claim your prize package!
 Some of you may be familiar with Aimée Wimbush-Bourque from her beautiful cooking blog Simple Bites. Aimée is a former chef and mom of three who lives on an urban homestead outside of Montréal, Canada. I’ve known her for years as a foodblogger, and I love her beautiful recipes, her attention to detail, and her homey, delicious take on life. She’s no-nonsense, practical, and down-to-earth but in an entirely accessible, appealing way. You can read more about here. She’s an amazing girl/woman/homesteader/chef/cook/blogger/mom!
 Aimée’s new cookbook, Brown Eggs and Jam Jars, was released this spring, and it is truly a treasure. It’s split into the four seasons and features gorgeous scenes from her homestead, sweet shots of family and friends, and some of the most irresistible recipes I’ve ever seen.
There are pancakes, scones, cookies, breads, salads, vegetables, pastas, sauces, soups…
 And this Seafood Chowder. Oh my goodness, I must have this now.
And that’s what happens as you look through the pages of Aimée’s cookbook—you’ll want to dive into the pages and take a big bite of everything. Her recipes are just beautiful, but in an accessible and attainable way. She has stayed true to her “Simple Bites” moniker and made sure that the recipes she shares are ones that most anyone can make.
THE GIVEAWAY
Today, to celebrate Aimée’s beautiful cookbook, I’m giving away two copies of Brown Eggs and Jam Jars…
 Each with a 7 quart Le Creuset Dutch Oven in “Indigo…”
 Along with four matching Le Creuset mini gratin dishes.
 There are so many things in the cookbook that you’ll be able to cook and bake with these. This set will take you far in life!
TO ENTER
To enter the giveaway, just shout out the last thing you cooked in the Comments section of this post.
One entry per person, please.
Winners will be announced Thursday!
Here is the link to Aimée’s cookbook if you’d like to take a look:
Brown Eggs and Jam Jars by Aimée Wimbush-Bourque
Good luck, everyone! (And congratulations on your new book, Aimée!)


May 5, 2015
My Favorite Cinco de Mayo Recipes!
Happy Cinco de Mayo, friends! And by the way, have you ever wondered what the heck Cinco de Mayo is? Well, here’s a post explaining it! In a nutshell, it’s a holiday whose celebration is pretty much limited to America, but has come to be a time to celebrate Mexican heritage and pride.
A large part of that is delicious food! Here are some of my VERY favorite Cinco de Mayo recipes.
Click on the photos or links below to see the step-by-step and printable recipes!
 Blackberry Margaritas! Margaritas are a must, whether with or without alcohol, and this recipe is probably my favorite.
 Ooops. I lied. These Mango Margaritas are my favorite. They are beautiful and tasty.
 Grilled Corn Guacamole. Holy moly. Yes, please!
 Queso Fundido. My absolute favorite Cinco de Mayo recipe these days, and I really mean it this time. Whether you call it an appetizer or main course, it really doesn’t matter…just make it. It’s cheesy, delicious heaven.
 Watermelon Pico de Gallo. Besides being colorful and gorgeous, this salty-sweet-spicy salsa is so tasty and adds freshness to all the other things on the table.
 Quesadillas de Camarones. If I could eat anything for breakfast right this minute (weird as it sounds) this would be it. There’s nothing better in the world.
 If hearty, family-friendly soup is more your thing, this Chicken Tortilla Soup is muy bueno. One of my favorite things on earth.
 And how about a big ol’ batch of Black Beans? Whether a main dish or a side, they go with everything!
 Fajitas! If you’re feeding a crowd, this is the best way to go. Do all beef, all chicken, all shrimp…or just a mix of all three.
 To cool things down, try this Cinnamon Ice Cream. Oh dear.
 Or just use storebought ice cream and make a batch of these ridiculously addictive Cinnamon Crisps using flour tortillas. They are out of this world.
Here’s the rest of my Cinco de Mayo archive if you’d like to browse!
Cinco de Mayo Recipes on The Pioneer Woman Cooks

Homemade Dulce de Leche: Alternate Methods
 One benefit of posting recipes and methods here is that I receive immediate feedback as well as different methods people have tried. I’ll be posting a Cinco de Mayo recipe roundup in just a bit, but first I wanted to provide some alternate methods to the simmer-the-can method dulce de leche method I posted yesterday in case you have any concerns about safety. I have never had an issue with cans popping open (or exploding), and many people have used this method for years—however, I have heard from a few folks who have.
Evidently, the key to the simmering method is watching the water level of the pot and making absolutely sure that it doesn’t fall below the top of the cans—which can be difficult to monitor when something is simmering for 3 hours. In addition, cans must be allowed to come to room temperature inside the water before opening them. This is true no matter what method you use: do not open the cans while they are still hot/warm.
So, in the interest of providing safer (and less potentially messy) options, here are three alternate dulce de leche ideas. Thank you so much to everyone who sent these links and ideas to me!
DULCE DE LECHE: ALTERNATE METHODS
Making Dulce de Leche in a Slowcooker by Taylor Takes a Taste. This method takes longer, but is raved about by many—and the water level is less of an issue.
Crock Pot Dulce de Leche by Spicy Southern Kitchen. Pretty much the same slowcooker method, but the sweetened condensed milk is transferred to jars so that the color can be monitored as it darkens. Great idea!
Making Dulce de Leche in a Double Boiler by The Tough Cookie. The sweetened condensed milk is slowly caramelized in a double boiler rather than in the can.
I hope these are helpful! Thank you again to everyone who shared these and other methods with me yesterday.
Love,
PW

May 4, 2015
“Homemade” Dulce de Leche
 NOTE: Please read all instructions below. It’s very important to keep the water level above the cans at all times, as well as keep the heat on very low.
(See alternate methods at the bottom of this post!)
Dulce de Leche is a heavenly substance. At first glance, it looks a little like caramel, but it’s actually sweetened milk that’s been heated long enough to cause a caramelizing to occur. That’s the long-winded explanation, so here’s the short one: It’s creamy, dreamy substance used as an ingredient in so many desserts.
 This is a can of ready-to-go dulce de leche, but I’ve always thought it was cool that you can pretty much make this yourself by simmering cans of sweetened condensed milk! It’s nice if you’re stuck in Antarctica and need dulce de leche but can’t find any in your local supermarket.
Of course, you might also have trouble finding sweetened condensed milk in that scenario. But work with me here.
 Start with regular ol’ cans of sweetened condensed milk, otherwise known as the nectar of life.
Put it in coffee. You’ll love it. Make a Tres Leches Cake. You’ll swoon. Make Rice Pudding. Oh my word. And this Key Lime Pie? Oh my.
 Or make dulce de leche, which is what we started doing to begin with! Peel the labels off the cans…
 Place the cans into a pot (it needs to be deep enough to allow you to cover the cans with 1 to 2 inches of water)…
 Pour water right into the pot…
 Again, covering it by an inch or so.
****NOTE: During the simmering process, it is VERY important to keep a watch on the water level and continue topping off the water if it starts to drop. You don’t want the water going below the top of the can.
***UPDATE: Evidently, cans with solid lids (as opposed to the tab lids pictured) are preferred. I have never had an issue with the tab lids exploding or popping open…but proceed with caution!
 Bring it to a boil, then immediately turn it down to LOW so that you have a nice, gentle simmer. Let it simmer for 1 1/2 hours…
***IMPORTANT: Watch the water level and add water if the level of water falls below the top of the cans. Do not let the water drop below the level of the cans.
 Then use tongs to very carefully turn the cans over. Then simmer them for another hour…or two! (I’ll explain the differences below.)
Note: Please don’t get grossed out by the particles floating in my water. It’s calcium, and just a peek into the hardness that is our water here in the country. And yes, we have a water softener. In fact, we have a water system that would probably have enough machinery to fly into orbit. But our water is so hard, it can only soften it to a point that it still measures harder than most regular water.
And please feel sorry for us.
 Now, if you’re doing all the cans the same, just simmer them for the length of time you want, then turn off the heat and let them come to room temperature with the water.
***VERY IMPORTANT: Do not open the cans of dulce de leche while they’re still hot!***
 Now, this is a can that wound up simmering for probably 2 hours. It’s nice and golden for the most part, but you can see little pockets of uncaramelized sweetened condensed milk around the edge.
 So when I stirred it together, it wound up being a beautiful butterscotch color. Still creamy and dreamy, lightly caramelized flavor, but pretty mild. You could actually use this as you would sweetened condensed milk (for instance, Tres Leches Cake) and it would be divine.
This is what it looks like if it simmers longer—probably an additional 45 minutes. Deep, beautiful color, and the difference in flavor is profound. This just has that unmistakable “yum” factor that you can’t deny.
 Here’s the difference between the two! The left simmered for probably 2:45 before it was all said and done; the right simmered for 2 hours.
And here’s the thing: If you have longer, let it go longer. 3 1/2 hours would allow more liquid to cook down and results in a really thick dulce de leche like this one. You have to heat this to get it to a thinner/pourable consistency, though, so it’s kind of nice to have the above all ready to go! Just experiment with different simmer times and see what you like.
Here’s the handy dandy printable. Try it sometime, friends! Just use caution and keep the heat low.
UPDATE: Here are some alternate methods I’ve learned about since post this!
Making Dulce de Leche in a Slowcooker by Taylor Takes a Taste. This method takes longer, but is raved about by many—and the water level is less of an issue.
Crock Pot Dulce de Leche by Spicy Southern Kitchen. Pretty much the same slowcooker method, but the sweetened condensed milk is transferred to jars so that the color can be monitored as it darkens. Great idea!
Making Dulce de Leche in a Double Boiler by The Tough Cookie. The sweetened condensed milk is slowly caramelized in a double boiler rather than in the can.
.recipe-actions {
position: relative;
z-index: 2;
}
#pdf-popover {
background: rgba(255,255,255,.9);
border: 1px solid #efeeed;
color: #6e5c3a;
display: none;
font-family: Helvetica, Arial, sans-serif;
right: 20px;
margin: 2px;
padding: 54px 20px 7px 10px;
position: absolute;
top: 0;
width: 380px;
z-index: 10;
}
#pdf-popover form {
margin: 0;
}
#pdf-popover h4 {
background: #b15818;
color: #fff;
font-family: Helvetica, Arial, sans-serif;
font-size: 20px;
font-weight: normal;
left: 3px;
margin: 0;
position: absolute;
padding: 6px 12px;
right: 3px;
top: 3px;
}
#pdf-popover legend {
font-family: Helvetica, Arial, sans-serif;
font-size: 120%;
font-weight: bold;
margin-bottom: 2px;
margin-left: 10px;
text-transform: uppercase;
}
#pdf-popover fieldset {
margin-bottom: 15px;
}
#pdf-popover input[type="checkbox"] {
height: 14px;
margin: 2px 0 10px 10px;
padding-left: 14px;
position: relative;
visibility: visible;
width: 14px;
}
#pdf-popover input[type="checkbox"],
#pdf-popover input[type="radio"] {
margin-left: 10px;
}
#pdf-popover .close {
background: #b15818;
color: #FFFFFF;
cursor: pointer;
height: 35px;
font-size: 16px;
font-weight: bold;
line-height: 26px;
position: absolute;
right: 3px;
text-align: center;
top: 3px;
width: 25px;
z-index: 1;
}
#pdf-popover .button {
background-color: #b15818;
border: 0;
color: #fff;
cursor: pointer;
font-family: Helvetica, Arial, sans-serif;
margin-left: 10px;
padding: 8px 10px;
text-transform: uppercase;
}
x
Print Options
Page size
Letter
3x5
4x6
Text Size
Small
Medium
Large
Content
Include description
Include prep time, etc.
Show image
Print
Recipe
“Homemade” Dulce de Leche
Prep Time: 1Minute
Cook Time: 3 Hours
Difficulty: Easy
Servings: 8
 Print Recipe
Ingredients
1 can Sweetened Condensed Milk (or As Many Cans As You'd Like.) Preparation Instructions
Peel the label off the can (or cans!) of sweetened condensed milk, place it in a pot or large saucepan, and cover it with water by 1 to 2 inches. Bring it to a very gentle boil, then reduce the heat to LOW, so that the water has a nice slow simmer.
NOTE: Solid cans (without tab lids) are preferred.
***VERY IMPORTANT: Watch the water level and add water if the level of water falls below the top of the cans. Very important to keep a watch on the water level!
Simmer the can(s) for 2 to 2 1/2 hours for a lighter golden dulce de leche. Simmer it/them for 3 1/2 hours for a deeper color and flavor. (Using tongs, VERY CAREFULLY turn over the cans halfway through the simmering process.)
After the simmering time, turn off the heat and allow the cans to come to room temperature.
***IMPORTANT: Do not open the cans while they are still hot! Let them cool completely before opening.
Open the cans, stir the dulce de leche, transfer it to mason jars, and store it in the fridge for up to 1 month.
Posted by Ree | The Pioneer Woman on

April 27, 2015
Roasted Carrots with Vinaigrette
 Roasted vegetables are just downright delightful, no two ways about it. Something happens when the high heat of the oven hits the natural sugars in the vegetables . . . wait, what’s that called again? . . . It’s on the tip of my tongue . . .
Oh! I just remembered: Bliss. Bliss is what happens.
I love these beautiful roasted carrots straight out of the oven, but when they’re drizzled with a simple, herbalicious vinaigrette? Well, they’re pretty much too tasty to take. Perfect for this time of year!
 First, for the dressing, strip some leaves off of rosemary and thyme springs…
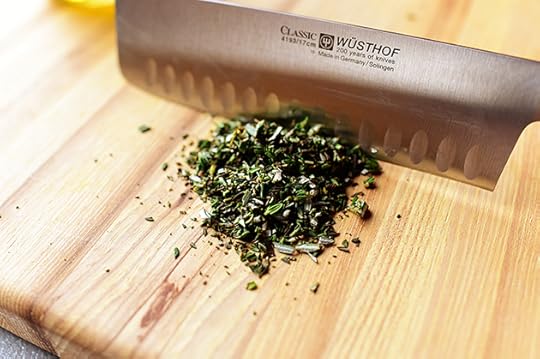 And chop them up really fine. The fresh herbs in the vinaigrette are spuh-lendid!
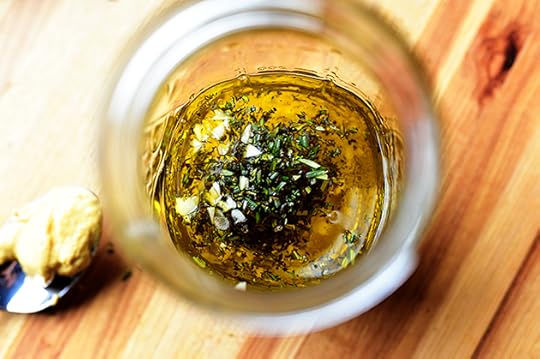 Combine ¼ cup of the olive oil, the vinegar, Dijon, garlic, thyme, rosemary, and salt and pepper to taste in a jar. Shake it vigorously for 30 seconds or so to emulsify it (I didn’t take a picture of this because I’m an airhed), then set it aside.
 To prep the carrots, slice them in half lengthwise . . .
 Then cut them into quarters.
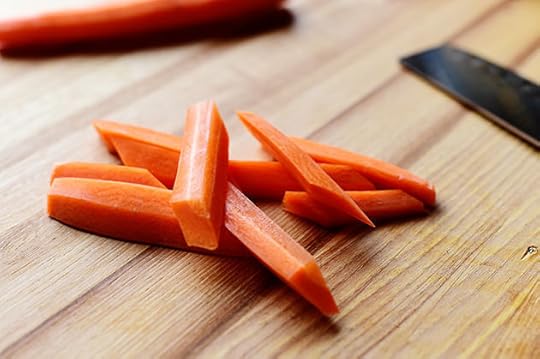 Next, cut them on a diagonal into 2 to 3-inch pieces. I love this shape!
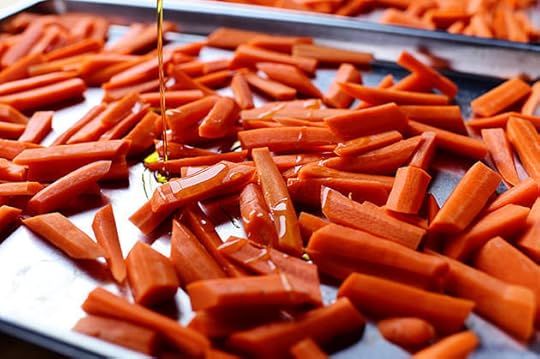 Arrange them on 2 rimmed baking sheets and drizzle them with the remaining 2 tablespoons of olive oil . . .
 Then sprinkle them with salt and pepper…
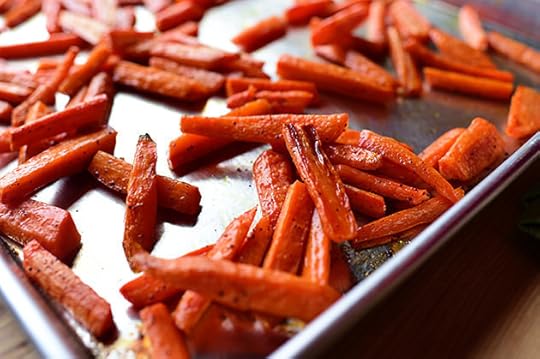 And roast the carrots at 475 degrees for 15 minutes, shaking the pan twice to toss them, until the carrots are tender and brown along the edges.
Note: 475 is a pretty hot oven, but it does a good job roasting the carrots in a shorter period of time. You can do 450 if you’d like a little more room to work with!
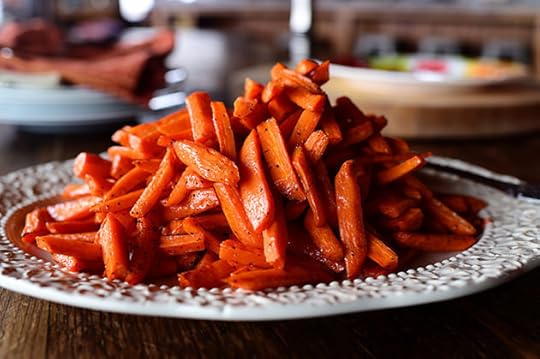 Pile the carrots onto a serving plate…
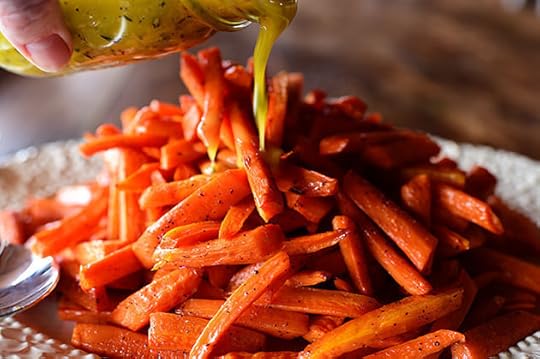 And drizzle on the vinaigrette.
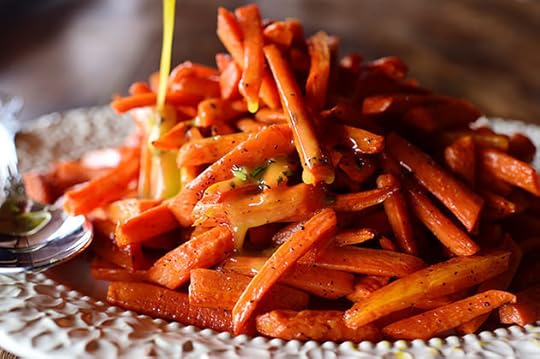 (You might not want to use all the vinaigrette; store the extra in the fridge for a future salad!)
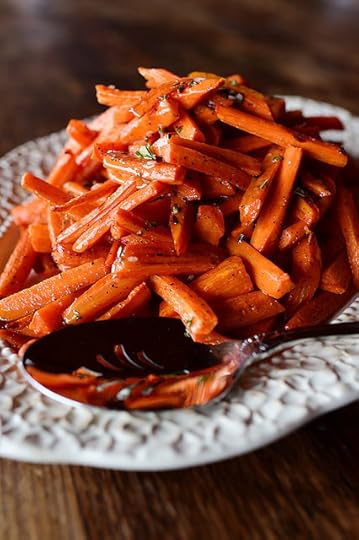 Serve these delectable carrots hot, warm, or at room temperature. Or even cold, right out of the fridge! They’re totally lovely and they go very well with…
* Steak
* Pork Chops
* Grilled Chicken
* Meatloaf
* Salisbury Steak
* Anything!
Here’s the handy dandy printable! (Note: This makes a lot of carrots, so the recipe can easily be halved.)
.recipe-actions {
position: relative;
z-index: 2;
}
#pdf-popover {
background: rgba(255,255,255,.9);
border: 1px solid #efeeed;
color: #6e5c3a;
display: none;
font-family: Helvetica, Arial, sans-serif;
right: 20px;
margin: 2px;
padding: 54px 20px 7px 10px;
position: absolute;
top: 0;
width: 380px;
z-index: 10;
}
#pdf-popover form {
margin: 0;
}
#pdf-popover h4 {
background: #b15818;
color: #fff;
font-family: Helvetica, Arial, sans-serif;
font-size: 20px;
font-weight: normal;
left: 3px;
margin: 0;
position: absolute;
padding: 6px 12px;
right: 3px;
top: 3px;
}
#pdf-popover legend {
font-family: Helvetica, Arial, sans-serif;
font-size: 120%;
font-weight: bold;
margin-bottom: 2px;
margin-left: 10px;
text-transform: uppercase;
}
#pdf-popover fieldset {
margin-bottom: 15px;
}
#pdf-popover input[type="checkbox"] {
height: 14px;
margin: 2px 0 10px 10px;
padding-left: 14px;
position: relative;
visibility: visible;
width: 14px;
}
#pdf-popover input[type="checkbox"],
#pdf-popover input[type="radio"] {
margin-left: 10px;
}
#pdf-popover .close {
background: #b15818;
color: #FFFFFF;
cursor: pointer;
height: 35px;
font-size: 16px;
font-weight: bold;
line-height: 26px;
position: absolute;
right: 3px;
text-align: center;
top: 3px;
width: 25px;
z-index: 1;
}
#pdf-popover .button {
background-color: #b15818;
border: 0;
color: #fff;
cursor: pointer;
font-family: Helvetica, Arial, sans-serif;
margin-left: 10px;
padding: 8px 10px;
text-transform: uppercase;
}
x
Print Options
Page size
Letter
3x5
4x6
Text Size
Small
Medium
Large
Content
Include description
Include prep time, etc.
Show image
Recipe
Roasted Carrots with Vinaigrette
Prep Time: 15 Minutes
Cook Time: 15 Minutes
Difficulty: Easy
Servings: 10
 Print Recipe
Ingredients
1/4 cup Olive Oil2 Tablespoons Olive Oil1 Tablespoon Dijon Mustard1 Tablespoon Minced Garlic3 sprigs Fresh Thyme, Leaves Removed And Minced1 sprig Fresh Rosemary, Leaves Removed And Minced5 pounds Carrots, Trimmed And Peeled Salt And Pepper, to taste Preparation Instructions
Preheat the oven to 475 degrees.
Cut the carrots in quarters lengthwise, then into 2 to 3-inch pieces. Spread them out onto two sheet pans. Toss with 2 tablespoons olive oil and season with salt and pepper. Bake for 15 minutes, tossing them once or twice, until the carrots are tender and brown along the edges. (You may roast them at 450 if you'd like a little room to work with.)
To a jar add 1/4 cup olive oil, vinegar, mustard, garlic, herbs, and salt and pepper. Shake to emulsify.
Place the carrots into a dish or platter. Pour over the vinaigrette and serve.
Will keep for two days in the refrigerator. Serve at room temperature or reheat.
Posted by Ree | The Pioneer Woman on

April 23, 2015
Grilled Veggie Enchiladas
 I hate to state the obvious on a Thursday morning, but I’m gonna: I love Tex Mex food. Call me pedestrian, call me cliché, call me predictable, call me Herman…I don’t care. Just feed me Tex Mex food and I’m putty in your hands.
You’ve gotta make these enchiladas soon. They’re easy, breezy, beautiful (wait…that’s CoverGirl), and you can easily double and triple the recipe to feed as many as you need.
Here’s how I made ‘em!
 First grill up the veggies! I used a grill pan, but you can do it outside if that’s more within your set of values. Brush the grill with olive oil, sprinkle the veggies with salt and pepper, then grill them, brushing them with a little oil, until they have great grill marks but are still somewhat firm (i.e. not flimsy and hopeless.)
 I did mushrooms, zucchini, and yellow squash…
 And I thought red onion would be gorgeous.
 After they’re grilled, let them cool a little and cut them into a large dice. You can do this well in advance and keep ‘em in the fridge to save time!
 Now, when you want to assemble the enchiladas, heat a small skillet of enchilada sauce. This is homemade sauce (I’ll share the recipe sometime soon), which is why it has some character to it. And how do you like the hurricane in the middle? I love it when meteorological events occur in my skillets.
Anyway, you can use your own homemade enchilada sauce recipe or you can totally used canned sauce, which I do all the time!
 Now, for the tortillas: I’m using corn tortillas, and I like to soften them in oil before assembling the enchiladas. Here’s why:
1. It makes them pliable, which makes building/rolling easier.
2. The brief time in the hot oil awakens the corn flavor of tortillas.
3. I believe it makes them hold up better and not fall apart as easily as if you were to simply warm them in the microwave (or not warm them at all.)
But here’s the thing! You just want to drop them in oil for about 10 seconds per side, max. You don’t want them to crisp at all, just soften and become more glorious.
 As you fry them, set them onto paper towels to drain the excess oil.
 Now, to assemble: Quickly dunk a tortilla in the sauce and set it on a plate.
 Sprinkle a neat row of veggies down the middle…
 Sprinkle on some grated cheese (this is Monterey Jack that I grated myself)…
 Then sprinkle on some sliced green onion for an extra pop of flavor.
(It is currently 9:38 in the morning and I am getting really hungry looking at these photos. Being a foodblogger is a struggle.)
 Roll up the tortilla, overlapping the edges…
 And put them seam side down in a baking dish. (I spread some sauce in the bottom of the dish first—forgot to tell you that!)
 Keep going until you have all the tortillas filled, then spoon on whatever extra sauce you have left. And you can totally warm more sauce if you like a really thick layer of enchilada sauce on top, but I kept my sauce a little light.
 Sprinkle more cheese and green onions on top…
 And bake the beauties at 375 for about 20 minutes, until everything is melted and bubbly.
 If you can possibly stand it, let them sit about 5 minutes before you serve them up. Note that this will be very difficult.
 I like to serve them with diced tomato, cilantro, and some crumbled queso fresco or Cotija!
A side of black beans is always delicious, too.
Yum! I made these weeks ago but I think I’ll make some more over the weekend. I love them truly, madly, deeply.
Here’s the handy dandy printable!
.recipe-actions {
position: relative;
z-index: 2;
}
#pdf-popover {
background: rgba(255,255,255,.9);
border: 1px solid #efeeed;
color: #6e5c3a;
display: none;
font-family: Helvetica, Arial, sans-serif;
right: 20px;
margin: 2px;
padding: 54px 20px 7px 10px;
position: absolute;
top: 0;
width: 380px;
z-index: 10;
}
#pdf-popover form {
margin: 0;
}
#pdf-popover h4 {
background: #b15818;
color: #fff;
font-family: Helvetica, Arial, sans-serif;
font-size: 20px;
font-weight: normal;
left: 3px;
margin: 0;
position: absolute;
padding: 6px 12px;
right: 3px;
top: 3px;
}
#pdf-popover legend {
font-family: Helvetica, Arial, sans-serif;
font-size: 120%;
font-weight: bold;
margin-bottom: 2px;
margin-left: 10px;
text-transform: uppercase;
}
#pdf-popover fieldset {
margin-bottom: 15px;
}
#pdf-popover input[type="checkbox"] {
height: 14px;
margin: 2px 0 10px 10px;
padding-left: 14px;
position: relative;
visibility: visible;
width: 14px;
}
#pdf-popover input[type="checkbox"],
#pdf-popover input[type="radio"] {
margin-left: 10px;
}
#pdf-popover .close {
background: #b15818;
color: #FFFFFF;
cursor: pointer;
height: 35px;
font-size: 16px;
font-weight: bold;
line-height: 26px;
position: absolute;
right: 3px;
text-align: center;
top: 3px;
width: 25px;
z-index: 1;
}
#pdf-popover .button {
background-color: #b15818;
border: 0;
color: #fff;
cursor: pointer;
font-family: Helvetica, Arial, sans-serif;
margin-left: 10px;
padding: 8px 10px;
text-transform: uppercase;
}
x
Print Options
Page size
Letter
3x5
4x6
Text Size
Small
Medium
Large
Content
Include description
Include prep time, etc.
Show image
Recipe
Grilled Veggie Enchiladas
Prep Time: 30 Minutes
Cook Time: 45 Minutes
Difficulty: Easy
Servings: 6
 Print Recipe
Ingredients
1 whole Zucchini, Quartered Lengthwise2 whole Yellow Squash, Quartered Lengthwise1 whole Red Onion, Sliced Thick8 whole Mushrooms, Halved Salt And Pepper Olive Oil - For Grilling3 cups Enchilada Sauce (homemade Or Canned)12 whole Corn Tortillas Vegetable Oil, For Frying3 cups Grated Monterey Jack Cheese, More If Needed2 whole Green Onions, Sliced4 whole Roma Tomatoes, Diced, For Serving Chopped Cilantro, For Serving Crumbled Queso Fresco Or Cotija Cheese, For Serving Preparation Instructions
Heat a grill or grill pan. Lightly oil the grill and grill the vegetables, sprinkling with salt and pepper, until nice grill marks formed and vegetables are slightly tender but not overly so. Remove from the grill and cut the vegetables into a large dice. Mix together and set aside.
Heat the enchilada sauce in a separate skillet until warm.
Heat 1/2 inch vegetable oil in a small skillet over medium heat. Using tongs, fry tortillas one at a time for only ten seconds per side (don't allow to crisp.) Remove from oil and place on a paper towel-lined plate to drain.
Preheat the oven to 375 degrees F.
Using tongs, dunk one tortilla in the sauce. Lay it on a plate and spoon one or two tablespoons of the vegetable mix in a line down the middle. Top with some cheese and green onion. Roll the tortilla, then place it seam side down in a 9 x 13 inch baking pan. Repeat with remaining tortillas.
Spoon some more sauce over the enchiladas and sprinkle on the remaining cheese. Bake for 20 minutes until the cheese is melted and bubbly. Serve immediately with diced tomatoes, cilantro, and crumbled queso fresco.
Posted by Ree | The Pioneer Woman on April 23 2015

April 20, 2015
Breakfast Patty Melt
 If this breakfast sandwich and this patty melt met at a bar, flirted, began dating, fell madly in love, became engaged, got married, and went on a 3-week honeymoon to the Grand Canyon, this is what their first child—born 9 months later—would look like.
And what a beautiful child it would be!
 First, slice up an onion and grab some sausage. This sausage is just fine, or you can get fancy and use chorizo.
 Melt a little butter in a skillet and throw in the onions.
 Cook ‘em low and slow for probably 15 minutes or so, tossing/stirring them occasionally, until they’re lovely and soft and beautifully golden brown and irresistible.
Sauteed onions are my life. My purpose. My reason for being. There’s nothing in life that sauteed onions won’t make better.
Except my cowlick. Nothing can make that better.
 Put the onions on a plate and set them aside for a sec.
 Now, grab some sausage and form it into a thin patty a little larger in circumference than the bread you’re planning to use. Keep in mind that sausage packs much more of a flavor punch than regular ground beef, so you can go really thin and still have sausage flavor all over the place.
 Throw it into the same skillet in which you cooked the onions and raise the heat to medium to medium-high.
 Cook it on both sides for a good 5 minutes total, pressing it here and there to make sure it stays nice and flat.
 Now, whip up a couple of eggs (and if you’re feeling sassy, add several drops of hot sauce)…
 Wipe the sausagey (is that a word? I fear it isn’t) skillet almost—but not entirely—clean…
 Push it into a rough circle around the size of the sausage patty, then when it sets, flip it to the other side and let it finish cooking. Set it aside when it’s done.
 Now, to assemble the sandwich: Piece of bread (I used sourdough sandwich bread), slice of cheese (I used cheddar)…
 Sausage patty…
 Eggs…
Eggs…
 Cheese again (this is a patty melt, after all!)…
 A bunch of onions (this is a patty melt, after all!)…
 Yes, another slice of cheese (this is a patty…never mind. You get the idea)…
 Second slice of bread…
 And into a very buttery skillet on low heat.
Buttery skillet, because you want the bread very, very buttery and golden and crisp when it’s all said and done.
Low heat, because there is a lot to heat up/melt inside this sandwich, and you want to give it a chance to do so without burning the bread.
 Just watch it, flip it, add more butter if necessary…
 Until the cheese is melted and perilously close to running out of the sandwich and into the next county.
 Good lands.
 Good morning, Sunshine!
 This was perfect. Paige and I split it for an early dinner.
 (If I’d had my wits about me, I would have stuck another slice of cheese in between the sausage and the egg. Live and learn. Still scrumptious, though!)
Here’s the handy dandy printable.
.recipe-actions {
position: relative;
z-index: 2;
}
#pdf-popover {
background: rgba(255,255,255,.9);
border: 1px solid #efeeed;
color: #6e5c3a;
display: none;
font-family: Helvetica, Arial, sans-serif;
right: 20px;
margin: 2px;
padding: 54px 20px 7px 10px;
position: absolute;
top: 0;
width: 380px;
z-index: 10;
}
#pdf-popover form {
margin: 0;
}
#pdf-popover h4 {
background: #b15818;
color: #fff;
font-family: Helvetica, Arial, sans-serif;
font-size: 20px;
font-weight: normal;
left: 3px;
margin: 0;
position: absolute;
padding: 6px 12px;
right: 3px;
top: 3px;
}
#pdf-popover legend {
font-family: Helvetica, Arial, sans-serif;
font-size: 120%;
font-weight: bold;
margin-bottom: 2px;
margin-left: 10px;
text-transform: uppercase;
}
#pdf-popover fieldset {
margin-bottom: 15px;
}
#pdf-popover input[type="checkbox"] {
height: 14px;
margin: 2px 0 10px 10px;
padding-left: 14px;
position: relative;
visibility: visible;
width: 14px;
}
#pdf-popover input[type="checkbox"],
#pdf-popover input[type="radio"] {
margin-left: 10px;
}
#pdf-popover .close {
background: #b15818;
color: #FFFFFF;
cursor: pointer;
height: 35px;
font-size: 16px;
font-weight: bold;
line-height: 26px;
position: absolute;
right: 3px;
text-align: center;
top: 3px;
width: 25px;
z-index: 1;
}
#pdf-popover .button {
background-color: #b15818;
border: 0;
color: #fff;
cursor: pointer;
font-family: Helvetica, Arial, sans-serif;
margin-left: 10px;
padding: 8px 10px;
text-transform: uppercase;
}
x
Print Options
Page size
Letter
3x5
4x6
Text Size
Small
Medium
Large
Content
Include description
Include prep time, etc.
Show image
Recipe
Breakfast Patty Melt
Prep Time: 5 Minutes
Cook Time: 30 Minutes
Difficulty: Easy
Servings: 2
 Print Recipe
Ingredients
4 Tablespoons Butter, More If Needed1/2 whole Medium Yellow Onion, Sliced1/4 pound Breakfast Sausage (Jimmy Dean, JC Potter, Etc)2 whole Eggs, Beaten3 slices Cheddar, Swiss, Provolone, Or Other Cheese2 slices Bread (sourdough, Rye, Whole Wheat, Etc.) Preparation Instructions
Heat a non-stick skillet over low heat and melt 2 tablespoons of the butter. Add the onions and cook, stirring occasionally, for 15 to 20 minutes, until onions are soft and slightly caramelized. Remove them to a plate and set them aside.
Form the sausage into a thin patty about the width of the bread you're using. Add it to the same skillet and increase the heat to medium. Cook the patty on both sides until fully cooked through, about 5 minutes. Remove to a plate and set aside. Wipe the skillet clean with a paper towel.
Pour in the beaten eggs and cook, forming them into a rough circle as they set up. Flip to finish cooking on the other side.
Assemble the patty melt: bread, cheese, patty, eggs, cheese, onions, cheese, bread. Melt the remaining butter in a clean skillet over low heat. Place the sandwich in the skillet and cook low and slow for a good 8 to 10 minutes, until the cheese is melted and the bread is deliciously crisp. Add more butter to the skillet if the bread needs it (you don't want the bread to be dry!)
Slice in half and serve.
Posted by Ree | The Pioneer Woman on April 20 2015

April 13, 2015
Toasts!
 I was in Los Angeles last week, and my sister Betsy and I ate our way across the city. One thing I noticed was that toasts were absolutely everywhere, on every menu, in a million different forms. And if you don’t know what “a toast” is, you’re about to laugh at the simple description.
A toast is basically a piece of toast with stuff on top. As a foodblogger, I noticed over the past two years or so that avocado toast—a piece of toast with avocado mashed all over the top—has become a thing. And now, toast is, like, soooooo much bigger than avocado toast. There is no end to the possibilities!
Yesterday I made a handful of toast variations—a couple of which I saw along my journey across eating establishments in L.A.—just to show you that the sky’s the limit! Think of toasts as sandwiches without lids, and it’ll open up worlds of fun.
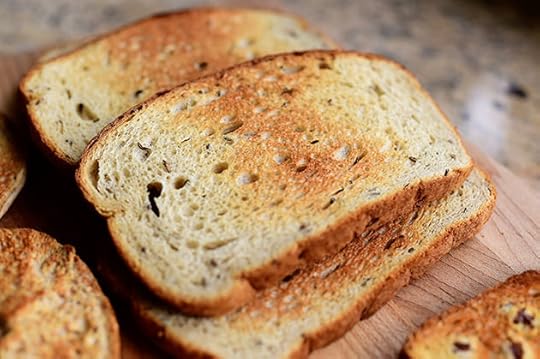
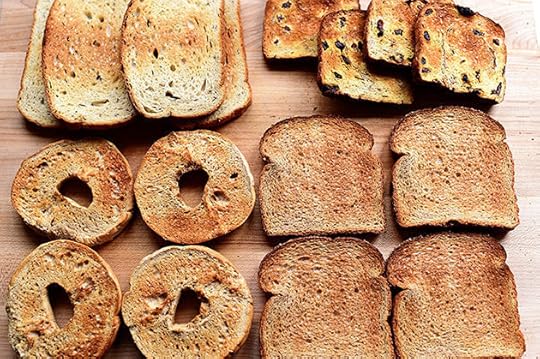 Start with…toast! Any kind you want, toasted in the toaster until golden. And use any kind of bread you’d like…
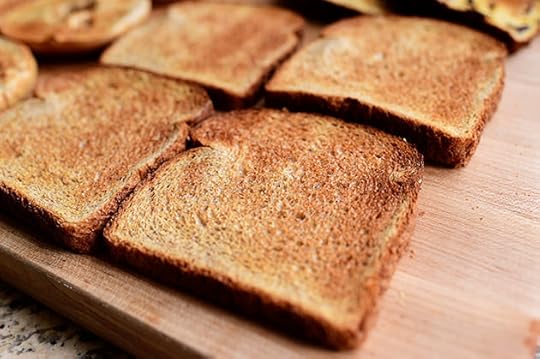 Plain old wheat sandwich bread…
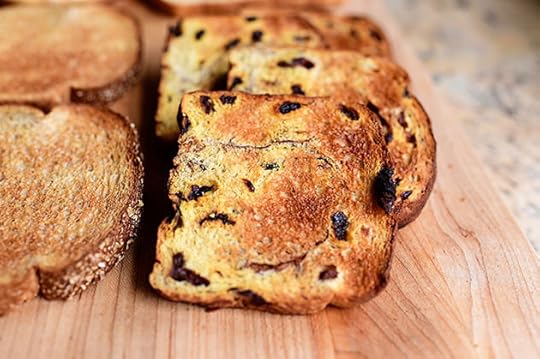 Cinnamon-raisin bread…
 Rye bread…
 Heck, you can even toast up some bagels!
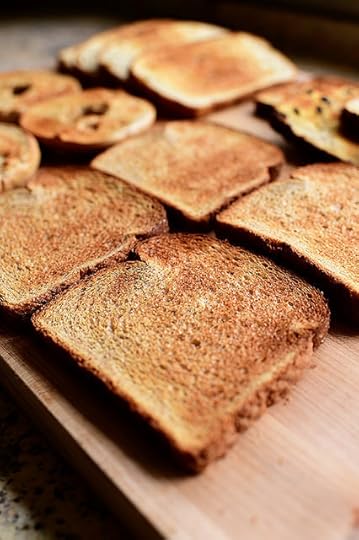 All of this bread is average, buy-at-the-supermarket bread, but keep in mind that the better the bread you use, the better the toast. If you can score some sourdough or other nice, crisp, crusty toasting bread, even better.
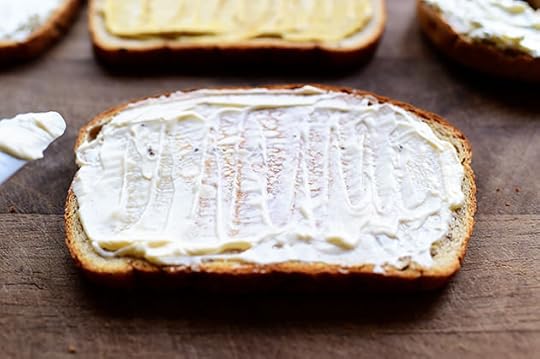
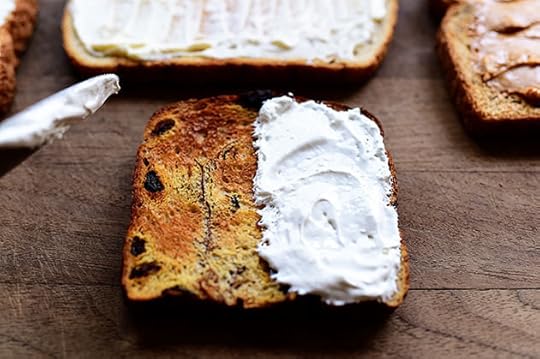
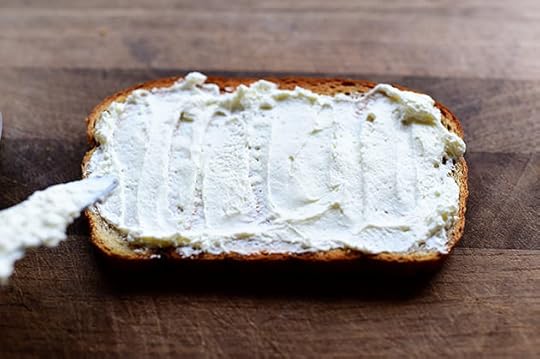 Next, spread stuff on the toast. This is whipped cream cheese on rye toast.
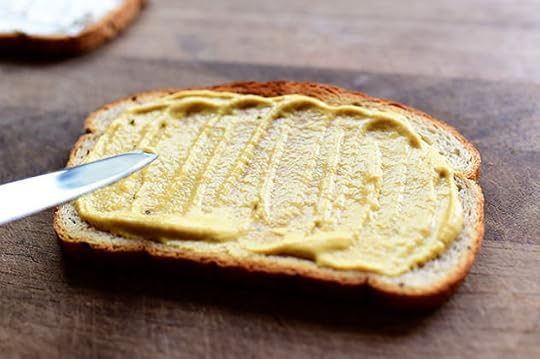 This is Dijon mustard on rye toast.
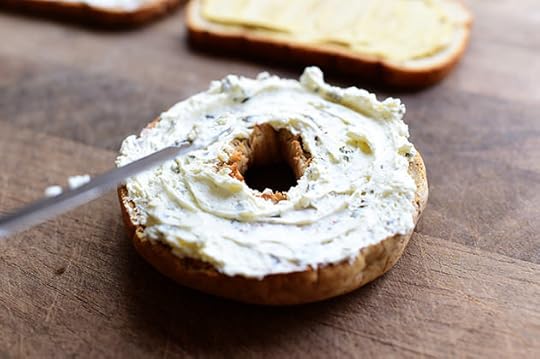 This is whipped cream cheese with herbs on a toasted bagel.
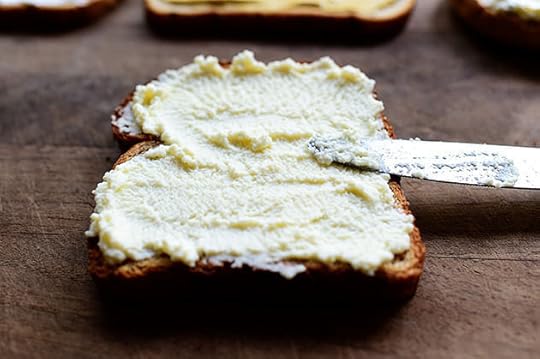 And ooooh. This is ricotta cheese on regular wheat toast. Now, I’m fairly sure the ricotta on the toast at Superba in L.A. was homemade…but this ain’t.
And I’m okay with that.
 This is mayo on rye.
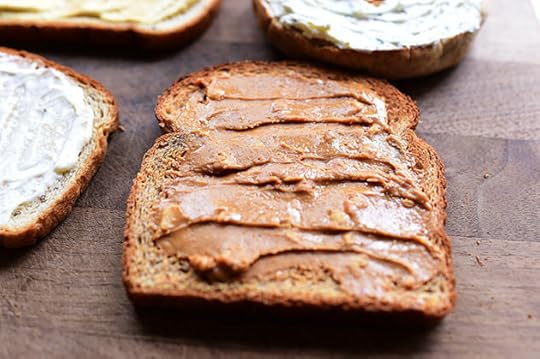 This is crunchy peanut butter on wheat.
 And this? This is (forgive me) marshmallow creme on cinnamon-raisin toast.
 With a side of Nutella.
I’m sorry!
 Now…just put stuff on top! Strawberries are good on the Nutella toast…
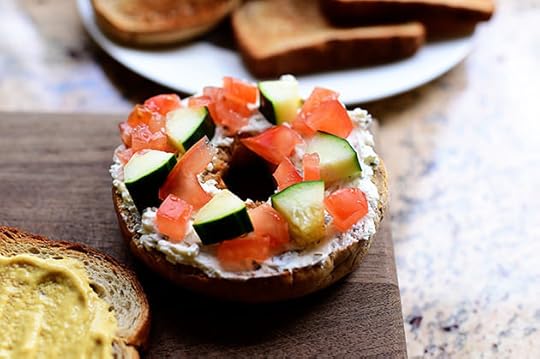 And on the toasted bagel with herbed cream cheese, I added some tomato and cucumber…
 And some feta and parsley.
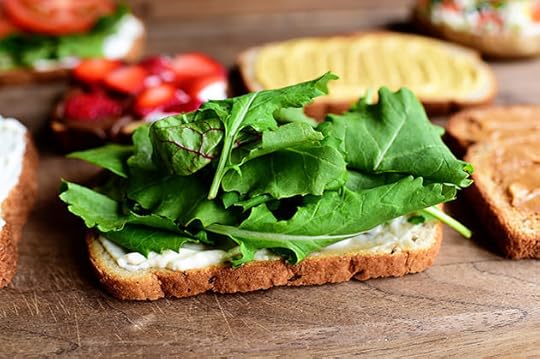
 Then, just some greens and tomato on the plain cream cheese version. Simple!
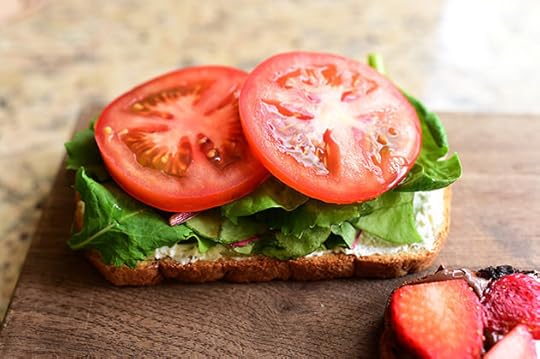
 And check this one out: Rye toast, mayo, greens…
 And a perfect sunny side up egg!
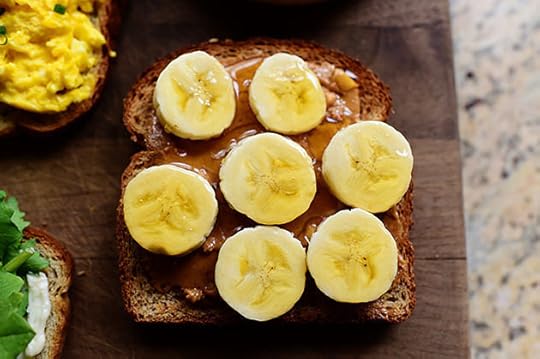
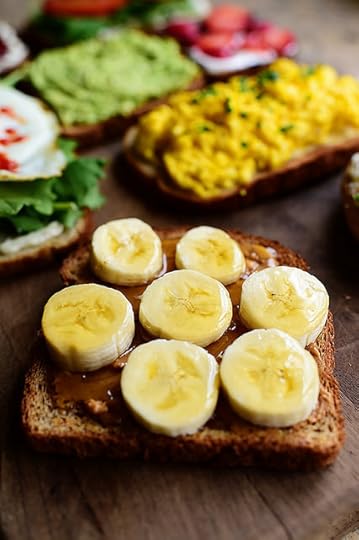
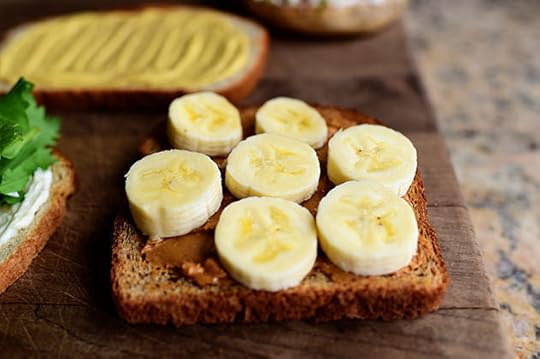 Against my better judgment, I put some banana slices on the peanut butter version…but only because I have children who like bananas.
Otherwise, I never would have gone near a banana. YUCK.
 So check this out…
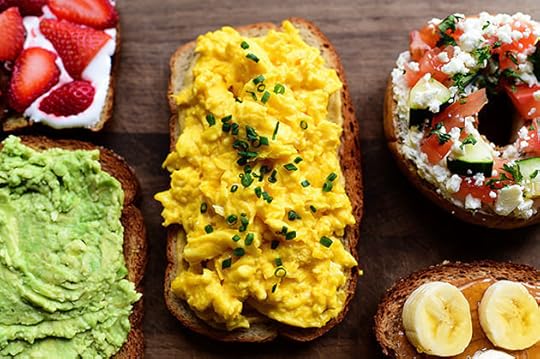
 Perfectly scrambled eggs on the Dijon version. Yum.
 Chives are growing in my garden, and they’re the perfect adornment.
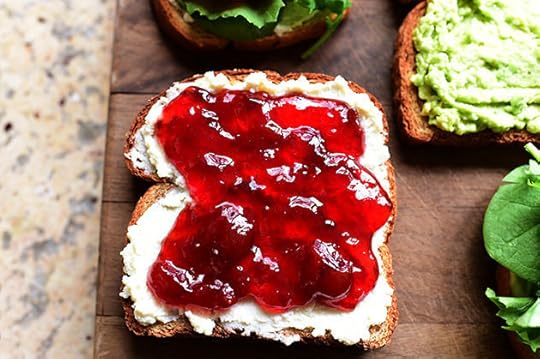
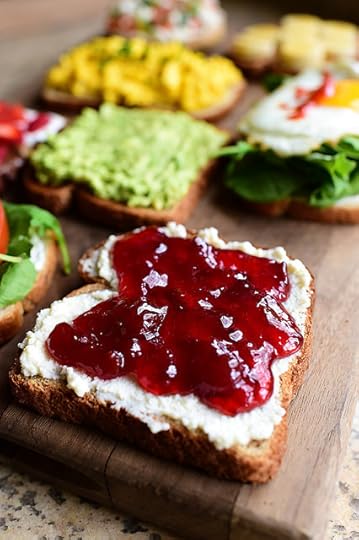
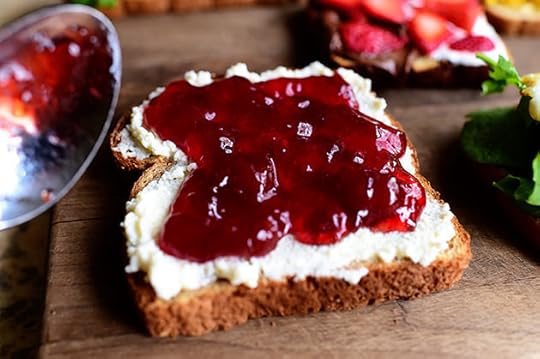 And oooooh. Cherry preserves on the ricotta toast! Absolutely delicious.
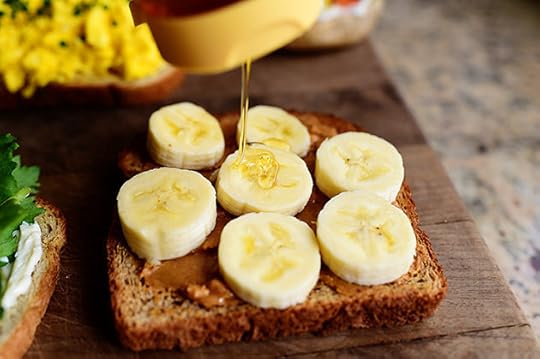 And back to the banana-peanut butter toast…
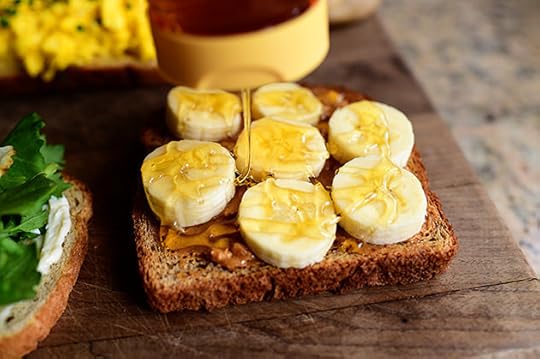 How about a little honey?
 Sriracha (or any hot sauce) is a must for the fried egg…
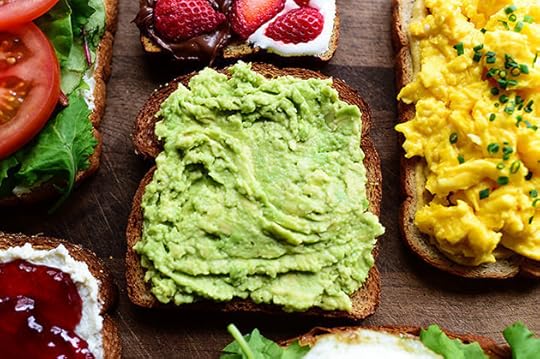
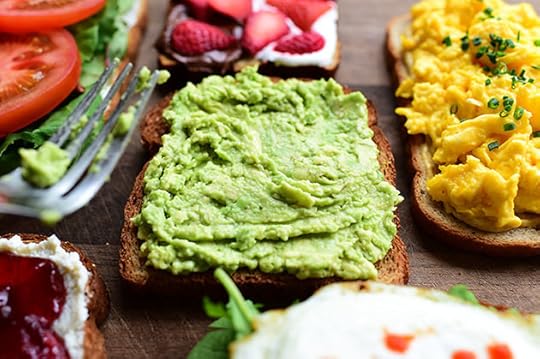 And have you had toast topped with nothing but mashed avocado?
Then you haven’t lived.
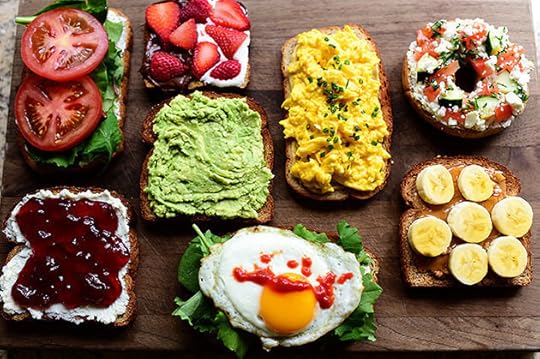 Oh my gosh. What fun!
 Perfect for breakfast!
 Perfect for everyone but me.
 Perfect for breakfast…or lunch!
 Perfect for a mid-morning or mid-afternoon snack.
 Perfect for breakfast or a snack!
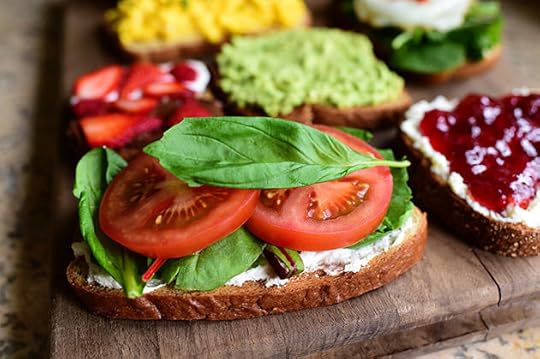 I put a basil leaf on this one. Perfect for lunch.
 And can we just call this one perfect…period?
 No specific recipe is needed for this, as it’s just toast and whatever you want to put on top.
 But here’s a handy dandy printable, just for kicks.
.recipe-actions {
position: relative;
z-index: 2;
}
#pdf-popover {
background: rgba(255,255,255,.9);
border: 1px solid #efeeed;
color: #6e5c3a;
display: none;
font-family: Helvetica, Arial, sans-serif;
right: 20px;
margin: 2px;
padding: 54px 20px 7px 10px;
position: absolute;
top: 0;
width: 380px;
z-index: 10;
}
#pdf-popover form {
margin: 0;
}
#pdf-popover h4 {
background: #b15818;
color: #fff;
font-family: Helvetica, Arial, sans-serif;
font-size: 20px;
font-weight: normal;
left: 3px;
margin: 0;
position: absolute;
padding: 6px 12px;
right: 3px;
top: 3px;
}
#pdf-popover legend {
font-family: Helvetica, Arial, sans-serif;
font-size: 120%;
font-weight: bold;
margin-bottom: 2px;
margin-left: 10px;
text-transform: uppercase;
}
#pdf-popover fieldset {
margin-bottom: 15px;
}
#pdf-popover input[type="checkbox"] {
height: 14px;
margin: 2px 0 10px 10px;
padding-left: 14px;
position: relative;
visibility: visible;
width: 14px;
}
#pdf-popover input[type="checkbox"],
#pdf-popover input[type="radio"] {
margin-left: 10px;
}
#pdf-popover .close {
background: #b15818;
color: #FFFFFF;
cursor: pointer;
height: 35px;
font-size: 16px;
font-weight: bold;
line-height: 26px;
position: absolute;
right: 3px;
text-align: center;
top: 3px;
width: 25px;
z-index: 1;
}
#pdf-popover .button {
background-color: #b15818;
border: 0;
color: #fff;
cursor: pointer;
font-family: Helvetica, Arial, sans-serif;
margin-left: 10px;
padding: 8px 10px;
text-transform: uppercase;
}
x
Print Options
Page size
Letter
3x5
4x6
Text Size
Small
Medium
Large
Content
Include description
Include prep time, etc.
Show image
Recipe
Assorted Toasts
Prep Time: 10 Minutes
Cook Time:
Difficulty: Easy
Servings: 1
 Print Recipe
Ingredients
1 piece Toast (wheat, White, Sourdough, Rye, Cinnamon-raisin, Bagel, Etc) Spread Of Your Choice (mayo, Mustard, Ricotta, Honey, Cream Cheese, Herbed Cream Cheese, Peanut Butter, Nutella, Marshmallow Creme, Sriracha) Topping Of Your Choice (jam, Lettuce, Tomato, Cucumbers, Avocado, Scrambled Eggs, Fried Eggs, Banana Slices, Apple Slices, Strawberries, Etc) Preparation Instructions
Spread and top the toast with whatever combination you'd like! Here are some suggestions:
Mayo + lettuce + tomato + basil leaf
Dijon + scrambled eggs + chives
Ricotta + jam
Whipped cream cheese + lettuce + fried egg + Sriracha
Nutella + strawberries
Nutella + marshmallow creme + sliced strawberries
Peanut butter + banana + honey
Posted by Ree | The Pioneer Woman on April 13 2015

April 6, 2015
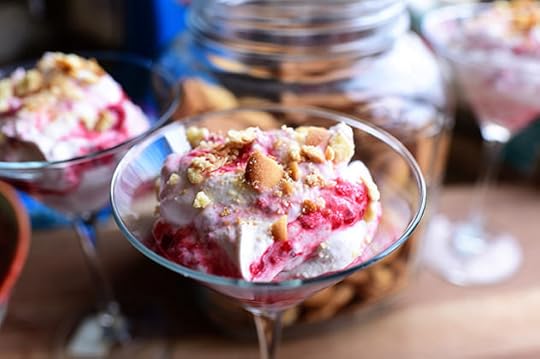
Raspberry Fool
 I made Raspberry Fool on a recent episode of my cooking show, and it reminded me that I had never posted it here or put it in one of my cookbooks—both of which I’m going to remedy tout de suite! Fruit Fool is such an easy dessert to make, whether on a weeknight (you can just plop it into a chipped bowl and enjoy every bite) or for company (you can delicately spoon it into pretty glasses and call it fancy.)
Raspberry Fool is a traditional English dessert (similar to Eton Mess), and is basically just berries and cream; what’s different about it is the presentation. I love the raspberry version, but you can use any berry you want for fool—blackberries are also lovely—and you can soak the berries in booze as I do here…but you don’t have to.
Here’s how to make it!
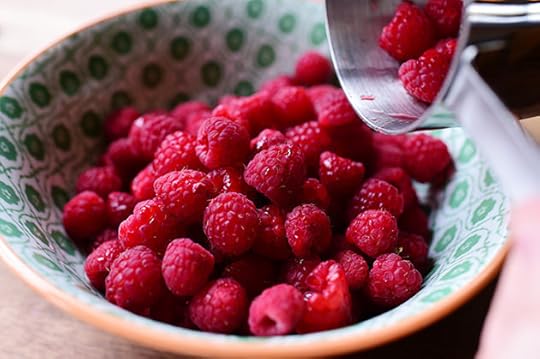 First, get the raspberries ready! Big ones, small ones, it doesn’t really matter because they’ll eventually be all mashed to smithereens.
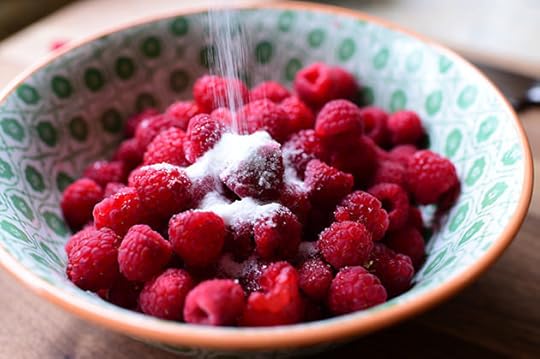 Sprinkle on some sugar. Of course.
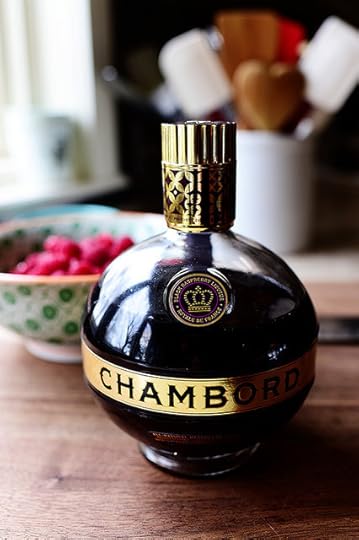 Now, this is optional, but if you have a little booze on hand—this is raspberry liqueur, but you can use orange liqueur, or even a little rum.
(Or you can just add a little water and skip the hard stuff altogether.)
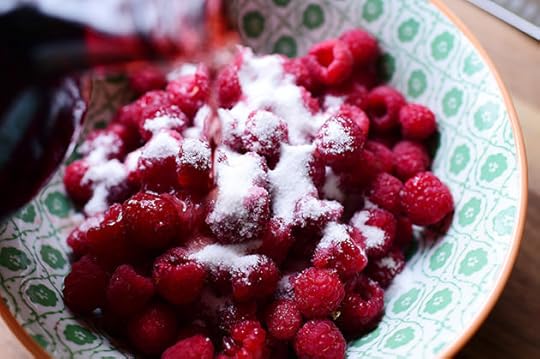 (I did not select the water option. Of course.)
 Now just stir it all together…
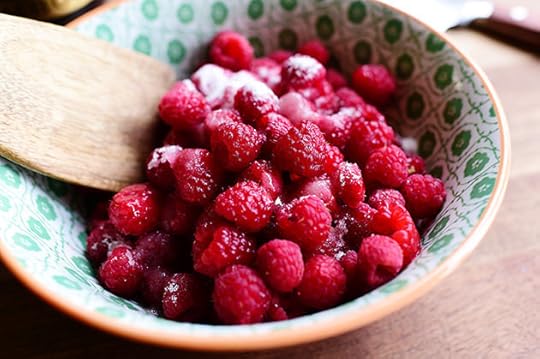
 And let it sit for about 10 to 15 minutes.
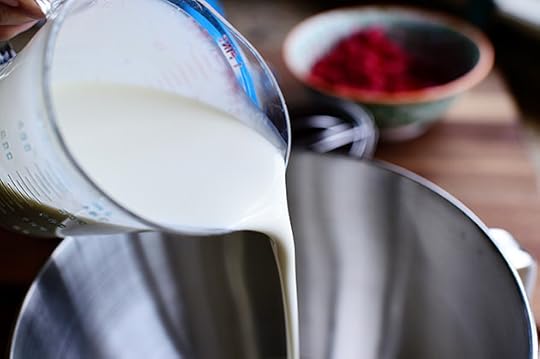 Meanwhile pour some nice, cold heavy cream into the bowl of a mixer (or into a bowl if you’re using a hand mixer.)
 Sprinkle in some powdered sugar this time. You can totally use regular sugar if you want, it really doesn’t matter that much. I was just trying to be unpredictable in my old age.
Turn the mixer on medium-high to slowly start to whip it. Whip it good. (Name that band.)
 And look at what happened during that time!
Someone pass me a straw, please. Thank you.
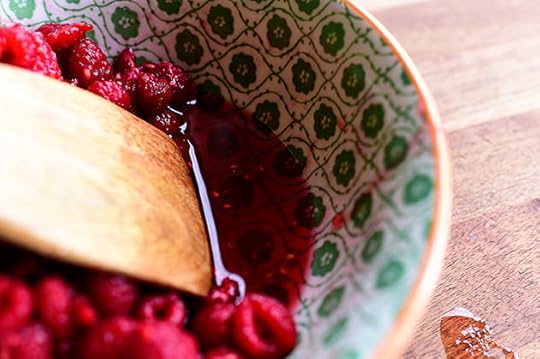
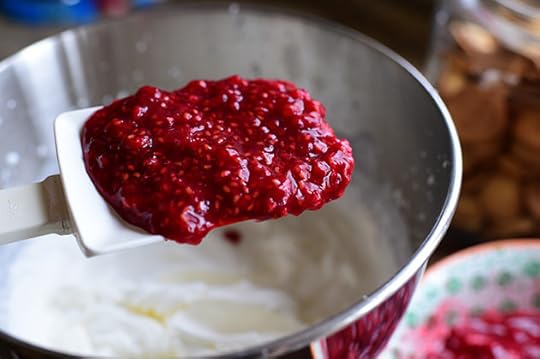
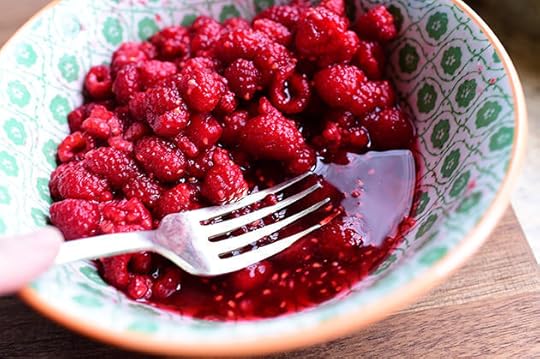 Wait! Put away the straw! We’re gonna need that juice. Just grab a fork…
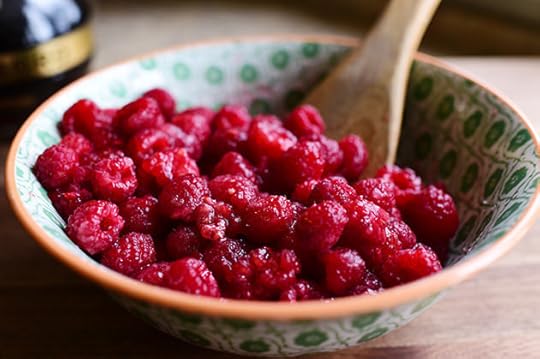
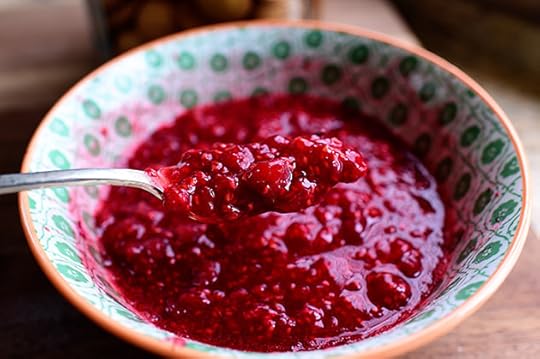 And smush them up until most of the big chunks are gone and it’s just one big mess of fruit so bright red, white carpets cower when it walks into a room.
That is some really weird imagery.
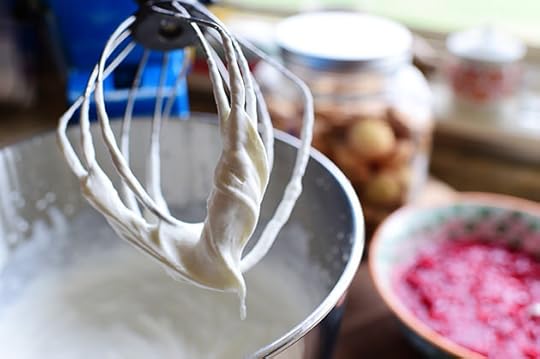 The cream is whipped!
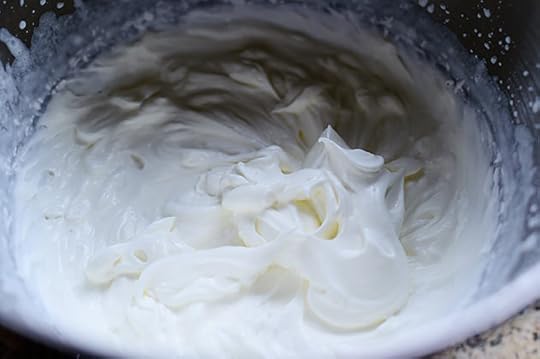 Basically, you want to stop just before it gets really stiff, when it’s still somewhat billowy.
Speaking of old age, one thing I’ve learned as I’ve gone through the ages and stages of life is that if I can be in the presence of billowy whipped cream at least once a month, I’m a much more centered, contented person.
Just sharing what I know.
 Now, for the next step. You probably saw this coming.
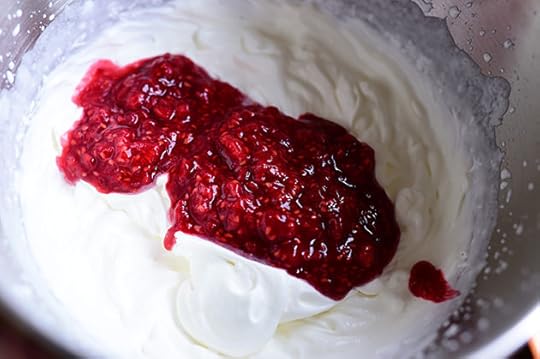 Gently spoon about half the berry mixture right on top of the whipped cream.
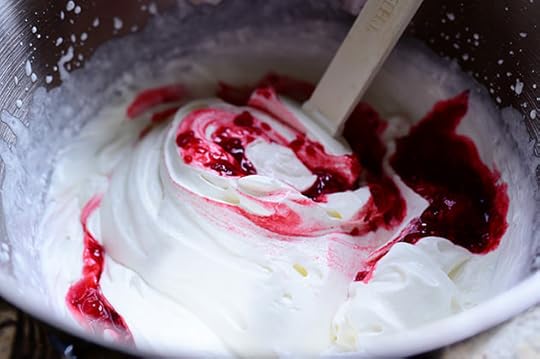 And then—this is very important!—use a rubber spatula to fold the mixture once or twice. When I say once or twice, I’m being quite literal! The biggest mistake you can make when you’re making raspberry fool (or any fruit fool) is to overmix the fruit and cream.
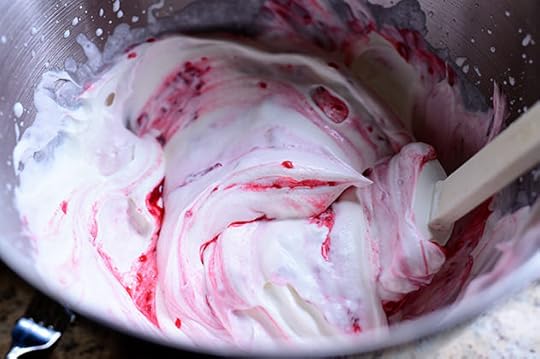 You want to see white cream, pink cream, and beautifully glossy streaks of red.
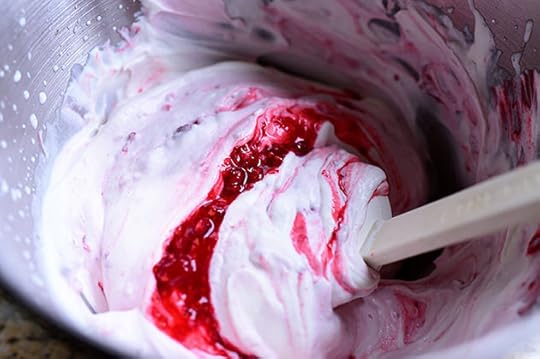 Add more of the fruit mixture and fold it once. Twice at the most. Then stop! Don’t fold it any more! If the mixture looks uniformly pink, well…it will still be delicious. But it won’t be as gorgeous and mysterious as this.
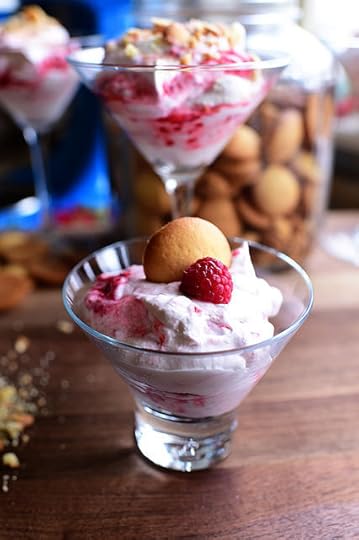
 And that’s basically it! To serve it up, grab a big spoonful of the mixture…
 Spoon it into pretty glasses…
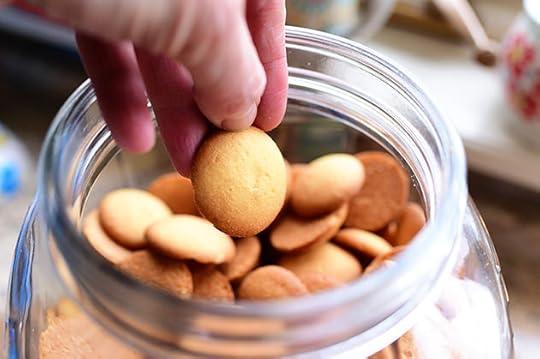 Then grab a vanilla wafer or two…
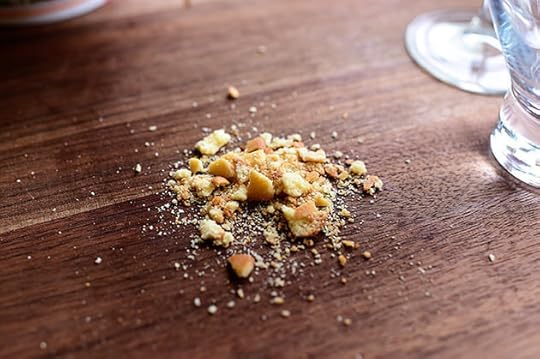 Crush them into crumbs…
 And sprinkle them over the top. Now, original fruit fools call for crushed ladyfingers, which I use if I have ladyfingers in my pantry. But vanilla wafers work too, as do any little cookie or wafer you happen to have.
Another approach you can take is to add the cream mixture and crumbs in alternating layers.
Still another approach you can take is to layer the whipped cream and the fruit mixture without folding them together. That’s pretty, too, but I love the folding approach.
 You can also do this…
 And this…
 And this. You’ll just want to assemble it this way about 20-30 minutes ahead of time so the wafers have a chance to slightly soften.
 The regular way, the one with just crumbs, you can just assemble right before serving.
 Either way is delicious.
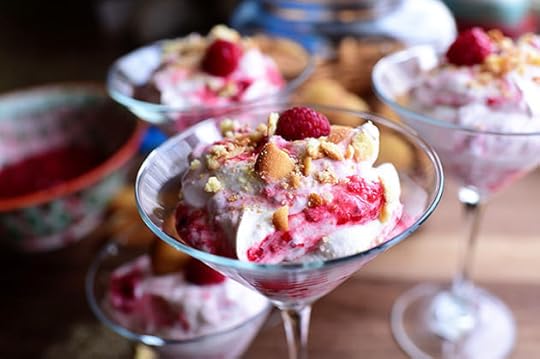 A raspberry on top makes it extra pretty.
 And speaking of pretty…look at the side view.
This is a gorgeous, easy, quick dessert to whip up for family or for company.
Here’s the handy dandy printable!
.recipe-actions {
position: relative;
z-index: 2;
}
#pdf-popover {
background: rgba(255,255,255,.9);
border: 1px solid #efeeed;
color: #6e5c3a;
display: none;
font-family: Helvetica, Arial, sans-serif;
right: 20px;
margin: 2px;
padding: 54px 20px 7px 10px;
position: absolute;
top: 0;
width: 380px;
z-index: 10;
}
#pdf-popover form {
margin: 0;
}
#pdf-popover h4 {
background: #b15818;
color: #fff;
font-family: Helvetica, Arial, sans-serif;
font-size: 20px;
font-weight: normal;
left: 3px;
margin: 0;
position: absolute;
padding: 6px 12px;
right: 3px;
top: 3px;
}
#pdf-popover legend {
font-family: Helvetica, Arial, sans-serif;
font-size: 120%;
font-weight: bold;
margin-bottom: 2px;
margin-left: 10px;
text-transform: uppercase;
}
#pdf-popover fieldset {
margin-bottom: 15px;
}
#pdf-popover input[type="checkbox"] {
height: 14px;
margin: 2px 0 10px 10px;
padding-left: 14px;
position: relative;
visibility: visible;
width: 14px;
}
#pdf-popover input[type="checkbox"],
#pdf-popover input[type="radio"] {
margin-left: 10px;
}
#pdf-popover .close {
background: #b15818;
color: #FFFFFF;
cursor: pointer;
height: 35px;
font-size: 16px;
font-weight: bold;
line-height: 26px;
position: absolute;
right: 3px;
text-align: center;
top: 3px;
width: 25px;
z-index: 1;
}
#pdf-popover .button {
background-color: #b15818;
border: 0;
color: #fff;
cursor: pointer;
font-family: Helvetica, Arial, sans-serif;
margin-left: 10px;
padding: 8px 10px;
text-transform: uppercase;
}
x
Print Options
Page size
Letter
3x5
4x6
Text Size
Small
Medium
Large
Content
Include description
Include prep time, etc.
Show image
Recipe
Raspberry Fool
Prep Time: 15 Minutes
Cook Time:
Difficulty: Easy
Servings: 8
 Print Recipe
Ingredients
3 cups Raspberries, Plus A Few More For Serving1/4 cup Sugar3 Tablespoons Raspberry Liqueur (or You May Just Use Water)2 cups Cold Heavy Cream1/2 cup Powdered Sugar8 whole Vanilla Wafers (or Other Cookie) Fresh Mint Sprigs, For Garnish (optional) Preparation Instructions
In a bowl, stir together the raspberries, sugar, and liqueur (or water) and let it sit for 10 to 15 minutes.
Whip the cream with the powdered sugar until soft peaks form.
Mash the raspberries with a fork until all the liquid and fruit are mashed together.
Spoon half the fruit into the cream and fold once or twice with a rubber spatula; do not overmix!
Add half of the remaining fruit and fold once or twice. If you want more fruit, add the rest; if not, use remaining fruit puree as a garnish on top.
Serve in pretty glasses with crumbed cookies on top!
***Best if made right before serving.
Posted by Ree | The Pioneer Woman on April 6 2015
April 3, 2015
Food on Good Friday
Good Friday is a solemn, sacred day in the life of a Christian, and when it comes to food, those who do observe Good Friday can take a few different approaches. For many Catholics, Good Friday is a day of fasting and abstinence—basically, “putting food aside” as my BFF Hyacinth explained. Other observers of Good Friday take the seafood-only route as they do every Friday during Lent, saying no to meat, chicken, and pork. Still others take a vegetarian/meatless approach, forsaking all meat of every kind. I grew up Episcopalian and am now Presbyterian, and through the years I’ve found that how one approaches food on Good Friday is a very individual and personal thing.
To cover all bases, here are some Good Friday recipe options for you!
(And if you’re planning for Sunday, here is my entire Easter Recipe Archive.)
FASTING
The first option is fasting. Here is one of my favorite recipes for that.
(Keep scrolling)
(Keep scrolling)
The end.
SEAFOOD-ONLY
Beef, pork, chicken, and other meats are verboten on Good Friday, but fish is permissible for many observers. Here are a few options if that’s the way you like to go!
 Shrimp Scampi. A quick-and-easy pasta dish everyone goes crazy for (especially my oldest child!)
 Tuscan Bean Soup with Shrimp. If it’s still a little chilly where you live, this is a cozy, satisfying Good Friday fish dish.
 Seafood Pasta in a Foil Package. If you’re having company over for dinner tonight and want to serve an elegant seafood dinner, look no further than this parcel of deliciousness. You cook the seafood in a skillet and make a light tomato sauce, then throw it into heavy duty foil with al dente pasta and finish it in the oven. Oh my heavens.
 How about an easy batch of Shrimp Tacos? Another great Good Friday fish option, whether for the family or for company.
 Coconut Curry Shrimp. Super easy, super flavorful…and super shrimpy!
 And one of my very favorites: Lemon Basil Shrimp Risotto. So lovely and citrusy and comforting. I love this one!
MEATLESSS
Still other observers of Good Friday take the meatless route. Here are five of my favorites from that category.
 Zucchini Noodles. I just posted this last week, and it’s one of my favorite easy, ultra-light veggie dishes. All you need is a vegetable peeler.
 Heavenly Hummus Wrap. Mmmm…hummus, roasted red peppers, artichoke hearts, caramelized red onions, feta…all rolled up in a spinach tortilla.
 Kale Citrus Salad. So light, so flavorful, so absolutely delightful. If I could eat one salad the rest of my life, I’m pretty sure it would be this one. Never gets old!
 Spicy Cauliflower Stir Fry. A quick-and-easy, seriously meatless dish that’s so addictive, I once made it four times in one week. It really is that good.
 Super simple Veggie Scramble. Eggs, veggies, cheese—nothing complicated about it.
P.S.
 And don’t forget to deliver Hot Cross Buns to your loved ones today! It’s a beautiful Good Friday tradition.
Wherever you are today and whatever you’re doing, I hope you have a blessed Good Friday, friends.
Love,
Pioneer Woman
Ree Drummond's Blog

- Ree Drummond's profile
- 2016 followers

