
Ree Drummond's Blog, page 20
March 30, 2015
Pea Salad
First things first: It’s Easter week, so here is my entire Easter Recipe Archive if you’d like to start planning your weekend cooking.
 Growing up, my family would go to Sunday brunch a few times a year, and I still remember going through the buffet line and loading up on…well, everything. From ham to eggs benedict to waffles to mashed potatoes to fruit salad to desserts, all those Sunday brunch delights will forever be etched in my comfort food memory. A couple of years ago, when my sister and I went to our hometown and had Sunday brunch with our dad, you’d better believe all those same brunchie wonders were still there…and you’d better believe I loaded up just like I did as a child. It was all about the nostalgia, after all!
Oh, and I was really, really hungry.
Despite all the other dishes competing for attention at Sunday brunch, the one I most remember was a delicious pea salad with big chunks of cheese, slivers of red onion, and a light, creamy dressing. I don’t even want to think about how many metric tons of the stuff I must have consumed through the years, but I loved it…and still love it every bit as much today. It’s a fun, simple salad that’s great for any spring or summer gathering, but is particularly nice for Easter since it’s bursting with lovely green peas.
Here’s how I make it! Nothing complicated about it.
 Start with peas! Frozen peas are great, and here’s what I do: I let them thaw for just a bit at room temperature, but I don’t let them go all the way. You want them to stay nice and cold and firm so they don’t freak out and get mushy when you mix the salad together.
 While the peas are thawing a bit, fry some bacon. I would highly recommend waiting until your husband leaves the house to meet with his father-in-law about an issue with a fence before you do this. Otherwise, the bacon won’t wind up in the pea salad. It will wind up in his mouth.
 For supah flavah, slice a red onion (otherwise known as a purple onion) in half and remove the weird core if it’s large like this.
 Then slice the onion as thin as you can.
 This is way more than I need for the salad, but if I’m going to slice a red onion (otherwise known as a purple onion), I’m going to slice a red onion (otherwise known as a purple onion.) Can I get an amen?
I have no idea what I just said.
 One of the defining ingredients in the pea salad I’ve always loved are nice chunks of cheese throughout the whole darn thing. Now, I can’t speak with authority on this since I never watched the Sunday brunch chef make the pea salad, but I’m 80% sure the cheese used in that pea salad was American cheese. It just had that unapologetic American cheese quality about it. I should make an anonymous phone call over there someday and pretend I’m taking a survey of country clubs across the nation and ask them what kind of cheese they use in their pea salads.
(And while I’m at it, I’ll ask them if their refrigerator is running…)
(Man, I love prank calling. It’s a shame it’s a fading art form.)
As for me, I’m using sharp cheddar, just to be rebellious.
Monterey Jack would be nice, too!
 Slice the cheese into slices…
 Then cut the slices into sticks…
 And cut the sticks into cubes.
 While you’ve got the knife handy, chop the bacon into little bits…
 And grab some parsley and mince it up.
 Next, for the dressing, measure some mayo…
 And some sour cream…
 And put them in a bowl with a little vinegar, salt, and pepper.
 And stir it until it’s nice and smooth.
 Put the peas into a bowl and plop on about 3/4 of the dressing, reserving the rest for later if you think it needs it.
 Stir until the peas are coated…
 Then add the red onion…
 The bacon…
 And the cheese.
 Stir it together until it’s all coated…
 Then sprinkle in some parsley…
 And stir until it’s all mixed. Taste and adjust seasonings—add more salt and pepper if it needs it…
 Then cover it with plastic wrap and pop it in the fridge for at least a couple of hours.
 When you pull it out of the fridge, give it a stir and a taste and make sure it’s all good. Add a little more dressing if it needs it (sometimes the dressing “disappears” a tiny bit when it sits in the fridge) and definitely add more salt and pepper if it needs it.
 Serve it in a pretty bowl with whatever else is on your Easter table! (Note: The salad is even better if you let it sit at room temperature for about 30 minutes before serving.)
 Mmmmm. *Almost* as good as the original!
Here’s the handy dandy printable.
.recipe-actions {
position: relative;
z-index: 2;
}
#pdf-popover {
background: rgba(255,255,255,.9);
border: 1px solid #efeeed;
color: #6e5c3a;
display: none;
font-family: Helvetica, Arial, sans-serif;
right: 20px;
margin: 2px;
padding: 54px 20px 7px 10px;
position: absolute;
top: 0;
width: 380px;
z-index: 10;
}
#pdf-popover form {
margin: 0;
}
#pdf-popover h4 {
background: #b15818;
color: #fff;
font-family: Helvetica, Arial, sans-serif;
font-size: 20px;
font-weight: normal;
left: 3px;
margin: 0;
position: absolute;
padding: 6px 12px;
right: 3px;
top: 3px;
}
#pdf-popover legend {
font-family: Helvetica, Arial, sans-serif;
font-size: 120%;
font-weight: bold;
margin-bottom: 2px;
margin-left: 10px;
text-transform: uppercase;
}
#pdf-popover fieldset {
margin-bottom: 15px;
}
#pdf-popover input[type="checkbox"] {
height: 14px;
margin: 2px 0 10px 10px;
padding-left: 14px;
position: relative;
visibility: visible;
width: 14px;
}
#pdf-popover input[type="checkbox"],
#pdf-popover input[type="radio"] {
margin-left: 10px;
}
#pdf-popover .close {
background: #b15818;
color: #FFFFFF;
cursor: pointer;
height: 35px;
font-size: 16px;
font-weight: bold;
line-height: 26px;
position: absolute;
right: 3px;
text-align: center;
top: 3px;
width: 25px;
z-index: 1;
}
#pdf-popover .button {
background-color: #b15818;
border: 0;
color: #fff;
cursor: pointer;
font-family: Helvetica, Arial, sans-serif;
margin-left: 10px;
padding: 8px 10px;
text-transform: uppercase;
}
x
Print Options
Page size
Letter
3x5
4x6
Text Size
Small
Medium
Large
Content
Include description
Include prep time, etc.
Show image
Print
Recipe
Pea Salad
Prep Time: 15 Minutes
Cook Time:
Difficulty: Easy
Servings: 12
 Print Recipe
Ingredients
1/3 cup Sour Cream1 Tablespoon Mayonnaise Salt And Pepper1 Tablespoon White Vinegar4 cups Frozen Green Peas, Almost Totally Thawed8 slices Bacon, Cooked Until Crisp And Chopped1/2 whole Small Red Onion, Halved And Sliced Very Thin6 ounces, weight Cheddar Or American Cheese, Cut Into Small Cubes3 Tablespoons Minced Fresh Parsley Preparation Instructions
Mix the sour cream, mayonnaise, salt, pepper, and vinegar together to make the dressing. Add more salt and pepper to taste.
Stir 2/3 of the dressing into the peas until the peas are coated. Gently stir in the bacon, onion, cheese, and parsley until all combined. Taste and adjust seasonings. Cover with plastic wrap and refrigerate 2 to 4 hours before serving. (Pop the extra dressing in the fridge, too.)
Remove from the fridge and stir in the rest of the dressing to your liking. Sprinkle with more parsley before serving.
Posted by Ree | The Pioneer Woman on March 30 2015


March 27, 2015
Weekend Pot Giveaway!
 Today, because it’s Friday, because Easter is next weekend, and because I love ya, I’m giving away 3 Le Creuset 7 1/4 quart dutch ovens in this gorgeous “Cassis” color.
This pot will take you far in life!
TO ENTER
To enter the giveaway, just answer the following question in the Comments section of this post:
“If you could have dinner tonight with one person from throughout the history of time, whom would it be?”
I love this question and ask it from time to time: If you could choose any dinner guest in the universe, whom would you select? Would it be a famous figure in history? Would it be someone in your family you never had a chance to know? Someone you always wanted to meet? Just shout out your ideal dinner date and you’re automatically entered to win the Le Creuset.
THE RULES
One entry per person, please
Winners will be announced Sunday night.
Good luck!
Giveaway sponsored by Pioneer Woman.
March 24, 2015
Zucchini Noodles
 If you’ve never tried zucchini noodles, take note: They’re delicious! A light alternative to pasta, and while I add a simple tomato/garlic sauce here, you can pretty much do any sauce you’d normally put on pasta. So dang delightful and so fun to make!
(Note: There are machines available that cut the zucchini into thin spaghetti-like noodles called “zoodles,” and those are delicious, too. I don’t happen to have one of those, so I go old school with the vegetable peeler. Either way is delicious!)
 Using a vegetable peeler, cut the zucchini into long, thin ribbons.
 Until you have a big pile of gorgeous greenness.
 In a large skillet (I used nonstick) over medium heat, add the butter and olive oil. When the butter is melted, add the garlic and stir/cook it for 1 minute.
 Sprinkle the zucchini ribbons into the skillet separately so that they don’t stick together, then sprinkle on salt and pepper.
 Very gently stir and/or toss them around to lightly cook them for about 1 minute. It doesn’t take long!
 Add some diced fresh tomato…
 And toss them gently…
 Then add some fresh Parmesan…
 And toss it in! The key is just to cook it all very quickly so the zucchini don’t get get soggy and the tomatoes and Parmesan just get heated.
 Serve the zucchini noodles in a pretty pile topped with some of the tomatoes…
 And sprinkle on a little basil!
You will absolutely go crazy over this. Fresh, delicious, and oh, so easy.
Here’s the handy dandy printable!
.recipe-actions {
position: relative;
z-index: 2;
}
#pdf-popover {
background: rgba(255,255,255,.9);
border: 1px solid #efeeed;
color: #6e5c3a;
display: none;
font-family: Helvetica, Arial, sans-serif;
right: 20px;
margin: 2px;
padding: 54px 20px 7px 10px;
position: absolute;
top: 0;
width: 380px;
z-index: 10;
}
#pdf-popover form {
margin: 0;
}
#pdf-popover h4 {
background: #b15818;
color: #fff;
font-family: Helvetica, Arial, sans-serif;
font-size: 20px;
font-weight: normal;
left: 3px;
margin: 0;
position: absolute;
padding: 6px 12px;
right: 3px;
top: 3px;
}
#pdf-popover legend {
font-family: Helvetica, Arial, sans-serif;
font-size: 120%;
font-weight: bold;
margin-bottom: 2px;
margin-left: 10px;
text-transform: uppercase;
}
#pdf-popover fieldset {
margin-bottom: 15px;
}
#pdf-popover input[type="checkbox"] {
height: 14px;
margin: 2px 0 10px 10px;
padding-left: 14px;
position: relative;
visibility: visible;
width: 14px;
}
#pdf-popover input[type="checkbox"],
#pdf-popover input[type="radio"] {
margin-left: 10px;
}
#pdf-popover .close {
background: #b15818;
color: #FFFFFF;
cursor: pointer;
height: 35px;
font-size: 16px;
font-weight: bold;
line-height: 26px;
position: absolute;
right: 3px;
text-align: center;
top: 3px;
width: 25px;
z-index: 1;
}
#pdf-popover .button {
background-color: #b15818;
border: 0;
color: #fff;
cursor: pointer;
font-family: Helvetica, Arial, sans-serif;
margin-left: 10px;
padding: 8px 10px;
text-transform: uppercase;
}
x
Print Options
Page size
Letter
3x5
4x6
Text Size
Small
Medium
Large
Content
Include description
Include prep time, etc.
Show image
Recipe
Zucchini Noodles
Prep Time: 10 Minutes
Cook Time: 5 Minutes
Difficulty: Easy
Servings: 4
 Print Recipe
Ingredients
2 whole Zucchini1 Tablespoon Butter1 Tablespoon Olive Oil2 cloves Garlic, Minced3 whole Roma Tomatoes, Diced1/4 cup Shredded Parmesan3 whole Basil Leaves (chiffonade) Salt And Pepper, to taste Preparation Instructions
Use a vegetable peeler to peel long ribbons of zucchini.
Heat a nonstick skillet over medium-high heat and heat the butter and olive oil. Add the zucchini and toss around in the pan for 1 to 2 minutes. Sprinkle in salt and pepper. Add the tomatoes and parmesan and toss to heat everything up.
Serve within a few minutes, before the zucchini get too soft!
Posted by Ree | The Pioneer Woman on March 24 2015
March 20, 2015
Crazy Coffee
 A couple of weeks ago, I was working on my new cookbook. My friend Andy was helping me prep food and get things organized, and to charge me up for what was about to become an epic day of cooking, he made me a concoction he referred to as “Bulletproof Coffee.” He’d seen it on Jimmy Fallon or Jimmy Kimmel or one of those late night shows, and he knew I’d be interested in trying it since coffee is my life.
I took a sip. My eyes widened.
I took another sip and said, “Oh…my…gosh.”
I took another sip and cried, “WHAT IS THIS?”
And then he told me what it was. And I’ll admit, I thought it was weird. Actually, I thought it was extremely weird. And evidently, all kinds of debate exists online about the benefits (or lack thereof) of this coffee drink, a version of which is also known as Bulletproof Coffee. Some people say it’s healthy. Others say it’s a fad. Some people say it will give you an energy boost like no other. Others say this is placebo.
Me? I just say it’s magical. And I’ll just leave it at that.
 The craziness requires a few extremely simple steps: First, pour strong, very hot coffee into a blender.
(Note: You’re supposed to use special coffee beans for this…but I used a Keurig Starbucks French Roast K-Cup. It’s how I roll, man.)
 Then grab a tablespoon of *unrefined* coconut oil…
(Yes, I said coconut oil.)
(YES…coconut oil.)
 And add it to the coffee.
 Next, slice up a pat of cold butter…
(Yes, I said butter.)
(YES. BUTTER.)
 And throw it in, too.
I know what you’re thinking.
Believe me, I thought the same thing, too.
This is the weirdest thing you’ve ever seen, right?
I know. I understand.
 But just wait…
 Until you blend it…
 And the coffee, coconut oil, and butter emulsify.
 You’re left with this impossibly creamy, frothy concoction.
 Now, you wanna drink it while it’s warm, so immediately pour it into one of your favorite coffee cups…
And enjoy every sip!
I have made myself a few cups in the last three weeks, and while I haven’t gained any weight during this period of madness, I have determined that this isn’t something I need to be drinking every morning.
But a couple a week to enjoy a little indulgence in the middle of the day? Abso-darn-lutely! Without hesitation.
Here’s the handy dandy printable, my friends! Enter at your own risk…
.recipe-actions {
position: relative;
z-index: 2;
}
#pdf-popover {
background: rgba(255,255,255,.9);
border: 1px solid #efeeed;
color: #6e5c3a;
display: none;
font-family: Helvetica, Arial, sans-serif;
right: 20px;
margin: 2px;
padding: 54px 20px 7px 10px;
position: absolute;
top: 0;
width: 380px;
z-index: 10;
}
#pdf-popover form {
margin: 0;
}
#pdf-popover h4 {
background: #b15818;
color: #fff;
font-family: Helvetica, Arial, sans-serif;
font-size: 20px;
font-weight: normal;
left: 3px;
margin: 0;
position: absolute;
padding: 6px 12px;
right: 3px;
top: 3px;
}
#pdf-popover legend {
font-family: Helvetica, Arial, sans-serif;
font-size: 120%;
font-weight: bold;
margin-bottom: 2px;
margin-left: 10px;
text-transform: uppercase;
}
#pdf-popover fieldset {
margin-bottom: 15px;
}
#pdf-popover input[type="checkbox"] {
height: 14px;
margin: 2px 0 10px 10px;
padding-left: 14px;
position: relative;
visibility: visible;
width: 14px;
}
#pdf-popover input[type="checkbox"],
#pdf-popover input[type="radio"] {
margin-left: 10px;
}
#pdf-popover .close {
background: #b15818;
color: #FFFFFF;
cursor: pointer;
height: 35px;
font-size: 16px;
font-weight: bold;
line-height: 26px;
position: absolute;
right: 3px;
text-align: center;
top: 3px;
width: 25px;
z-index: 1;
}
#pdf-popover .button {
background-color: #b15818;
border: 0;
color: #fff;
cursor: pointer;
font-family: Helvetica, Arial, sans-serif;
margin-left: 10px;
padding: 8px 10px;
text-transform: uppercase;
}
x
Print Options
Page size
Letter
3x5
4x6
Text Size
Small
Medium
Large
Content
Include description
Include prep time, etc.
Show image
Recipe
Crazy Coffee
Prep Time: 5 Minutes
Cook Time:
Difficulty: Easy
Servings: 1
 Print Recipe
Ingredients
12 ounces, fluid Strong Coffee, Very Hot1 Tablespoon Coconut Oil1 Tablespoon Cold Butter (unsalted Is Recommended) Preparation Instructions
Place all three ingredients in a blender and blend until emulsified, about 10-15 seconds (it will look like very creamy coffee). Pour into a coffee cup and enjoy immediately! (Warm it for 15 seconds in the microwave after blending if you'd like it to be very hot; blending cools it down slightly.)
Posted by Ree | The Pioneer Woman on March 20 2015
March 19, 2015
Chicken Broccolini with Mustard Cream Sauce
 (Note from PW: I have partnered with Land O’ Lakes for this post.)
Oh, boy…is this ever good! I’ve made breaded chicken breasts stuffed with all sorts of delicious ingredients throughout the course of my 46.2 years on this earth: mushrooms, ham, cheese, spinach, and other various things. But this variety, stuffed with delicious broccolini and topped with a creamy mustard-and-brandy sauce, is definitely my current fave. So much flavor going on, and it can be elegant enough for company or casual enough for just a weeknight meal.
Bonus: This recipe not only tastes good, but also allows you to do good in communities across the country. This recipe is part of Land O’Lakes’ program. Between now and April 30, for every Land O’Lakes recipe (including this one!) that’s pinned (or repinned!) on Pinterest, the Land O’Lakes Foundation will donate ten meals to Feeding America®, which works to fight hunger in the United States. Our goal is to donate 3.5 million meals. Land O’Lakes has increased their donation this year (thanks, Land O’ Lakes!), so we’d love for you to help by pinning this recipe on Pinterest—as well as other recipes that you find!
So to recap: Any Land O’Lakes recipe you pin on Pinterest (including this one!) will trigger a donation of 10 meals to Feeding America®. Pin as many as you want! Here’s Land O’ Lakes’ Pinterest page, where you can browse the deliciousness and start pinning away:
But wait! There’s more! Ha. Join me for a Pin A Meal. Give a Meal. Live Cooking Event with Becky (from Land O’ Lakes Test Kitchen) on Wednesday, April 1 at noon Eastern Time. To cook or pin along, just RSVP at the link below. During this event, each pin from our recipes will contribute an EXTRA 10 meals to Feeding America. Woo-hoo! We hope you can join us. If you have any questions or comments during the event, just use the hashtag #pinameal on Twitter.
Now, back to this recipe: It’s extra good because it’s cooked in—drumroll, please—butter. And let’s face it: that’s why it’s so darn delicious. Not only does the butter make the golden crust of the chicken absolutely perfect, it also serves as the foundation of the gorgeous sauce.
This dish involves a few steps, but none of them are complicated in the least! Just follow along and you’ll see:
First, preheat the oven to 350 degrees.
 Next, make the breading assembly line! You need a dish of flour…
 A dish of egg mixed with milk…
 And a dish of seasoned breadcrumbs. The perfect ingredients for the perfect breading! (I use this same breading combination whenever I make Chicken Milanese—another recipe I posted on Land O’ Lakes a couple of years ago! Yum.)
 Next, prepare the chicken by slicing it into cutlets: Place your palm on the top of each chicken breast and use a knife to carefully slice it in half through the middle.
 Separate them…
 And you’ll be left with four thinner/smaller cutlets.
 One at a time, place the cutlets in between two pieces of plastic wrap…
 And use a rolling pin to pound them thin.
 Since the chicken breasts are going to be rolled up, you definitely want to get them nice and thin, so pound away until you get out all of your daily frustrations. Unless you’re extremely frustrated today, then you might want to stop just short of getting them all out.
 Sprinkle the chicken with a little salt and pepper, then grab a couple of stalks of broccolini and lay them crosswise on the chicken breast so that the “trees” on the end are slightly hanging off the side. You can also use broccoli if that’s what you have available; broccolini is my life these days, however, and I was able to find some in the big, beautiful city of Tulsa.
NOTE: To up the “easy” factor of this recipe, I just rinsed/washed the broccolini and laid them on the chicken. If you’d like the finished product to be a little more tender, you may steam or blanch the broccolini for a couple of minutes before this stage. Either way works fine!
 Roll it tightly, folding one end over the other, and secure it closed with a toothpick. Cute! (And here’s where you can see that if you don’t pound the chicken very thin, it could get a little cumbersome/bulky.)
 Repeat with the rest of the chicken until they all look like adorable little bundles.
 Now it’s time to bread the chicken: Carefully roll the chicken in the flour to dredge, being careful not to get too much on the broccolini. (You can brush off the excess if some gets on there.)
 Immediately roll the chicken in the egg mixture (again, being careful not to coat the broccolini)…
 Then immediately roll it in the breadcrumbs to coat well. Use your hands to press crumbs into the surface to thoroughly coat in crumbs.
 Keep going until they’re all ready to go! (If there are any big clumps of breading on the broccolini, you can just brush them off…but a little here and there is fine.)
 To cook the chicken, I’m using a half-stick of Land O Lakes Butter with Olive Oil and Sea Salt, which I’ve loved since I first started using in 2012. This recipe calls for exactly ¼ cup of butter, so the half-sticks are the perfect amount!
 Melt the Half Stick of Land O Lakes® Butter in a large skillet over medium heat.
 When the gorgeous butter is sizzling, place the bundles in the skillet…
 And cook them, carefully turning, for 2 to 3 minutes, or until golden on the outside. (The chicken will finish cooking in the oven, so don’t worry about that in the skillet!)
 Remove them from the pan and place them on a baking sheet, then put them in the oven for 15 to 18 minutes to finish the chicken.
 And while the chicken is in the oven, that’s the perfect time to finish the sauce! In the same skillet with all that glorious butter, add minced garlic and immediately stir it around and cook it for 1 minute, being careful to avoid burning.
 Temporarily turn off the stove if you’re using an open flame, and pour in a good amount of brandy or white wine. Such amazing flavor! (Pssst. If you’d prefer not to use booze, you can substitute low sodium chicken broth! All three options are yummy.)
 Stir the liquid and allow it to bubble up and cook for a minute or two, until the liquid reduces by half.
 Once it’s reduced, add both mustards…
 And stir it around until it’s completely mixed with the luscious, buttery brandy.
 Add a little broth and let it bubble up and thicken a bit…
 Then pour in the gorgeous cream…
 And stir it in. Add a little salt and pepper, then let the cream sauce bubble up and thicken for a couple of minutes. Turn off the heat.
 By now the chicken is done!
 Just serve it on a plate and spoon the sauce right over the top.
 And don’t be shy! Really lay it on thick. The flavor of the sauce is amazing: All the butter, all the chicken flavor, the mustard, and the cream.
 Divine! (And psst. I wanted to add some cooked carrots to the plate, but I was hungry and couldn’t wait that long. But that would be a pretty addition.)
 You’ll love every single bite.
The printable recipe is below, but first, here are some other recipes in the Pin a Meal, Give a Meal program. Some of my best blogging friends are participating as well, and these recipes are utterly delicious (and utterly pinnable!)
1. Citrus White Chocolate Truffle Cookies at A Spicy Perspective
2. Make Ahead Cheesy Hash Browns Cups with Bacon and Chives at A Farmgirl’s Dabbles
3. Leek Gratin with Gruyere at Fifteen Spatulas
4. Spring Panzenella Salad at Two Peas & Their Pod
5. Cookie Bars with Strawberry Glaze and Edible Flowers at Bake at 350
6. Brown Butter Pasta with Asparagus and Bacon at The Little Kitchen
*The Land O’Lakes Foundation will donate $1 to Feeding America® for every recipe pinned or repinned between March 2, 2015 and April 30, 2015. (Pin any Land O’Lakes recipe or submit any recipe pin at ). $1 helps provide 10 meals secured by Feeding America® on behalf of local member food banks. Land O’Lakes guarantees a minimum of 3.5 million meals (monetary equivalent of $350,000).
I have partnered with Land O’Lakes for an exclusive endorsement of Land O Lakes® Butter. This blog post is sponsored by Land O’Lakes.
Here’s the handy dandy printable!
.recipe-actions {
position: relative;
z-index: 2;
}
#pdf-popover {
background: rgba(255,255,255,.9);
border: 1px solid #efeeed;
color: #6e5c3a;
display: none;
font-family: Helvetica, Arial, sans-serif;
right: 20px;
margin: 2px;
padding: 54px 20px 7px 10px;
position: absolute;
top: 0;
width: 380px;
z-index: 10;
}
#pdf-popover form {
margin: 0;
}
#pdf-popover h4 {
background: #b15818;
color: #fff;
font-family: Helvetica, Arial, sans-serif;
font-size: 20px;
font-weight: normal;
left: 3px;
margin: 0;
position: absolute;
padding: 6px 12px;
right: 3px;
top: 3px;
}
#pdf-popover legend {
font-family: Helvetica, Arial, sans-serif;
font-size: 120%;
font-weight: bold;
margin-bottom: 2px;
margin-left: 10px;
text-transform: uppercase;
}
#pdf-popover fieldset {
margin-bottom: 15px;
}
#pdf-popover input[type="checkbox"] {
height: 14px;
margin: 2px 0 10px 10px;
padding-left: 14px;
position: relative;
visibility: visible;
width: 14px;
}
#pdf-popover input[type="checkbox"],
#pdf-popover input[type="radio"] {
margin-left: 10px;
}
#pdf-popover .close {
background: #b15818;
color: #FFFFFF;
cursor: pointer;
height: 35px;
font-size: 16px;
font-weight: bold;
line-height: 26px;
position: absolute;
right: 3px;
text-align: center;
top: 3px;
width: 25px;
z-index: 1;
}
#pdf-popover .button {
background-color: #b15818;
border: 0;
color: #fff;
cursor: pointer;
font-family: Helvetica, Arial, sans-serif;
margin-left: 10px;
padding: 8px 10px;
text-transform: uppercase;
}
x
Print Options
Page size
Letter
3x5
4x6
Text Size
Small
Medium
Large
Content
Include description
Include prep time, etc.
Show image
Recipe
Chicken Broccolini with Mustard Cream Sauce
Prep Time: 20 Minutes
Cook Time: 20 Minutes
Difficulty: Intermediate
Servings: 4
 Print Recipe
Ingredients
1 whole Boneless, Skinless Chicken Breasts1 bunch Broccolini (steamed For 1 To 2 Minute If Preferred)1/3 cup All-purpose Flour2 whole Large Eggs2 Tablespoons Milk3/4 cups Seasoned Breadcrumbs1 whole 1 Half Stick (1/4 Cup) Land O Lakes® Butter With Olive Oil & Sea Salt3 cloves Garlic, Minced (about 1 Tablespoon)1/4 cup Brandy Or White Wine (can Use Chicken Broth As A Substitute)1-1/2 teaspoon Dijon Mustard1-1/2 teaspoon Grainy Brown Mustard1/3 cup Chicken Broth, Plus More If Needed For Thinning1/3 cup Heavy Cream Salt And Pepper, to taste Preparation Instructions
Preheat the oven to 350 degrees.
Cut the chicken breasts into cutlets: Place one hand flat on the breast and use a knife to carefully slice through the middle. Repeat with the other and you’ll be left with four smaller cutlets. Place them between two pieces of plastic wrap and use a rolling pin to pound them thin.
Place one to two stalks of broccolini in the middle of each cutlet, sprinkle with salt and pepper, then fold up the edges and secure with toothpicks.
Prepare an assembly line for breading: a dish with the flour, a dish with the egg mixed with milk, and a dish with the breadcrumbs. One at a time, bread the chicken by carefully dredging it in flour, then dunking it in the egg wash, then coating it in the breadcrumbs. Set them aside as you coat the other pieces. (Be careful not to coat the broccolini.)
Melt the Land O Lakes® Butter with Olive Oil & Sea Salt in a large nonstick skillet over medium heat. Add the chicken and brown it on both sides until the breadcrumbs are golden and the chicken is partly cooked, about 3 minutes per side. Transfer the chicken to a baking sheet, seam side up, and finish in the oven for 10 minutes.
While you are finishing the chicken, make the Mustard Cream Sauce: Return the skillet to medium heat and add the garlic, stirring for 1 minute to ensure it doesn’t burn. Pour in the brandy or wine, whisking, and let it reduce for 1 minute. Whisk in the mustard, let it bubble up for 1 minute, then add the broth and let it heat. Finally, whisk in the cream and stir until the sauce is thick and bubbly (5-7 minutes). Add salt and pepper.
Serve the chicken with the mustard cream spooned over the top. Serve immediately!
(Recipe sponsored by Land O' Lakes as part of their Pin a Meal. Give a Meal. program.)
Posted by Ree | The Pioneer Woman on March 19 2015
March 17, 2015
Healthy Green Smoothie
 Happy St. Patrick’s Day! Rather than share a decadent Shamrock Shake or a moist-and-delicious Guinness Cake or other drippy, sinful St. Paddy’s Day treat, I thought I’d be a rebellious little leprechaun and share a simple, relatively healthy green smoothie for those among us who are in the mood!
This smoothie would go great with a Shamrock Shake, by the way…)
(Ha.)
 Start by adding a heap of yogurt to the blender. This is plain Greek yogurt, but you can use vanilla Greek yogurt, regular vanilla yogurt, or any flavor of yogurt (including yogurt containing fruit) you’d like!
It’s a smoothie, baby. There are no rules.
 Add a little bit of milk. I used whole milk because whole milk is my life, but you can do anything all the way down to nonfat…or you can use soy milk, almond milk—whatever makes your skirt fly up.
 Pile in some fruit. I kept it in the yellow/green family so the smoothie would wind up being nice and bright green later: pineapple, banana (against my better judgment, but bananas and smoothies just go together), green apple, pear, and grapes.
OTHER POSSIBILITIES: Mango, avocado (yes!), cucumber, zucchini.
 A little ice is nice! I like smoothies that are undeniably, unapologetically freezing cold.
 Blend that baby until it’s super blended and smooth…
 And then it’s time for the green to assert itself. Grab some kale and add a bunch to the blender…
 Then blend it again…
 Until it’s all mixed in.
OTHER POSSIBILITIES: Spinach, collard greens, mustard greens, or a mix of all of the above.
 Oops! Don’t forget the honey or whatever sweetness you want. (If you use vanilla or other flavored yogurt, you won’t have to sweeten it quite as much.)
OTHER POSSIBILITIES: Sugar, brown sugar, stevia, maple syrup,
OPTIONAL INGREDIENT: Don’t quote me on this, but if you added a very small spoonful of coconut oil OR a little coconut
 Then serve it up!
The green intensifies a bit in the minutes following blending it up, and your soul will thank you as you drink it down.
Go have a Shamrock Shake if that’s what your heart tells you to do!
(Or whip up one of these…whichever you prefer.)
 Here’s the handy dandy printable, though it’s really a customizable recipe. Just make it all yours.
.recipe-actions {
position: relative;
z-index: 2;
}
#pdf-popover {
background: rgba(255,255,255,.9);
border: 1px solid #efeeed;
color: #6e5c3a;
display: none;
font-family: Helvetica, Arial, sans-serif;
right: 20px;
margin: 2px;
padding: 54px 20px 7px 10px;
position: absolute;
top: 0;
width: 380px;
z-index: 10;
}
#pdf-popover form {
margin: 0;
}
#pdf-popover h4 {
background: #b15818;
color: #fff;
font-family: Helvetica, Arial, sans-serif;
font-size: 20px;
font-weight: normal;
left: 3px;
margin: 0;
position: absolute;
padding: 6px 12px;
right: 3px;
top: 3px;
}
#pdf-popover legend {
font-family: Helvetica, Arial, sans-serif;
font-size: 120%;
font-weight: bold;
margin-bottom: 2px;
margin-left: 10px;
text-transform: uppercase;
}
#pdf-popover fieldset {
margin-bottom: 15px;
}
#pdf-popover input[type="checkbox"] {
height: 14px;
margin: 2px 0 10px 10px;
padding-left: 14px;
position: relative;
visibility: visible;
width: 14px;
}
#pdf-popover input[type="checkbox"],
#pdf-popover input[type="radio"] {
margin-left: 10px;
}
#pdf-popover .close {
background: #b15818;
color: #FFFFFF;
cursor: pointer;
height: 35px;
font-size: 16px;
font-weight: bold;
line-height: 26px;
position: absolute;
right: 3px;
text-align: center;
top: 3px;
width: 25px;
z-index: 1;
}
#pdf-popover .button {
background-color: #b15818;
border: 0;
color: #fff;
cursor: pointer;
font-family: Helvetica, Arial, sans-serif;
margin-left: 10px;
padding: 8px 10px;
text-transform: uppercase;
}
x
Print Options
Page size
Letter
3x5
4x6
Text Size
Small
Medium
Large
Content
Include description
Include prep time, etc.
Show image
Recipe
Healthy Green Smoothie
Prep Time: 5 Minutes
Cook Time:
Difficulty: Easy
Servings: 8
Print Recipe
Ingredients
2 cups Greek Yogurt (or You Can Use Vanilla Or Any Flavor)1 cup Milk (whole, 2%, Etc---or You Can Use Soy, Almond, Etc.)2 cups Pineapple, Chunks1 cup Green, Seedless Grapes1 whole Green Apple, Cut Into Chunks1 whole Pear, Cut Into Chunks1 whole Banana, Peeled1/2 bunch Kale Leaves (or Spinach, Collard, Or Mustard Greens)1/4 cup Honey (or Other Sweetener) (optional) OTHER OPTIONAL INGREDIENTS: Mango, Spinach, Cucumber, Zucchini, Coconut Oil Or Milk Preparation Instructions
Put everything in a blender and top off with ice. Blend until smooth and serve in small amounts!
Posted by Ree | The Pioneer Woman on March 17 2015
March 16, 2015
St. Paddy’s Day Recipes
Tomorrow is St. Patrick’s Day—do you have your green clothes picked out yet?
Do you have your recipes picked out yet? Here are some suggestions for ya!
 Irish Coffee. Dreamy, delectable, and a real problem on those years I give up booze for Lent.
 Irish Hills Cupcakes. The only thing Irish about ‘em is that they’re green…but the same can be said about the lime jello salad I’m making tomorrow, and I’m learning to forgive myself.
 Irish Grilled Cheese. Irish cheddar, delicious rye bread, Irish mustard…bliss!
 Corned Beef & Cabbage. Now we’re talkin’! I love this classic St. Paddy’s Day meal, and the balsamic reduction is so delicious on the cabbage!
 Guinness Float! I apologize to all mankind for this one. So weird, so wonderful…and vanilla ice cream isn’t the only flavor that works. Try coffee, try cinnamon…try dulce de leche (wow)…just try it!
 Sunday Night Stew. Not a traditional Irish Stew, but it’ll definitely work in a pinch! (If you’d like to get a little more traditional, use lamb instead of beef.) This stew is scrumptious!
 Then I have a handful of recipes to show you that lend themselves well to adapting to St. Patrick’s Day: For these cream cheese-tortilla roll-ups, simply use green bell pepper, jalapenos, green herbs, green onions, and/or green chiles to make a St. Paddy’s version!
 Kale Pasta Salad! Nothing Irish about it, but it’s nice and green. (And delicious!)
 Marshmallow Pops! Cover them with any green sprinkle your heart tells you to use. Super cute, super quick, always fun.
 Holiday Bark. Green M&M’s, pistachios, green melting candy for a drizzle…a St. Paddy’s Day version would be adorable.
 Finger Jello. It’s a royal pain to make…but so colorful and fun. Use lime jello to make the perfect St. Patrick’s Day treat.
That’s all for now! I’ll have a quick little green recipe to share tomorrow…but meantime, hope you find something here to whip up tomorrow.
Happy St. Paddy’s Day Eve, everyone!
March 12, 2015
Brownie Cookies
 When a brownie and a cookie meet, fall in love, and get married, this is the wedded bliss that results. I love these beautiful babies, because they’re everything that’s wonderful about brownies, but in easy-to-eat cookie form.
And the easier chocolate is to eat, the happier and more contended my days on this earth are.
Here’s how I made them!
 Start with some baking chocolate. I actually used bittersweet, but for a deeper, more chocolatey cookie, unsweetened is good!
 Melt the chocolate in the microwave for 45 seconds or so, then give it a stir. Then, by no means do what I did: I was in a hurry, so I set the little dish of chocolate into a bowl of ice and stirred it around for a second to get it to rapidly cool down. Then I got distracted and wound up going outside to deal with some dog drama, and when I came back inside, the chocolate was hard again and the fork was wedged in the middle of the bowl.
I can’t be trusted with life.
 While the chocolate is cooling after being microwaved for the second time because you messed it up the first time (or maybe that was just me), get the other ingredients ready: softened butter and sugar are a good start.
 Just cream them together until they’re totally combined.
 When you’re sure the chocolate is no longer warm (because if it is, it will wreak havoc on the butter), turn the mixer on low and slowly drizzle it in.
 You’ll be left with this madness! Scrape the bowl really well, then mix it so the chocolate is all combined.
 Next come the eggs. Three of ‘em.
 Would it be weird if I packed up my bags, said goodbye to my family, and moved into this bowl?
Great. I’ll get started now.
 Next, add a good amount of vanilla…
 And mix it till combined. Again, give the bowl a good scrape and mix again to make sure everything’s incorporated.
 Now it’s time for the dry ingredients! Flour, a little cocoa powder (so you’ll have chocolate coming from two different directions), baking powder, and salt. Simple stuff here, Maynard!
 Mix it together…
 And then, with the mixer on low, add scoops of the dry ingredients gradually until they’re all mixed in.
 This is…this is…this is outrageous! This is preposterous!
This is life, my friends.
 Preheat the oven to 350 degrees and scoop generous tablespoons of dough onto a baking sheet lined with parchment or a baking mat. (This mat is for bread because all my regular baking mats have found their way up to the lodge and haven’t made it back because I’m disorganized, but this mat is better than no mat. Amen.)
 Bake them for 10 to 11 minutes, until they’re nice and puffed up and lovely.
 Let them cool on the pan for a minute or two, then transfer them to a cooling rack. As they settle down, they’ll get a nice wrinkly/crinkly texture on top; that’s how you know they’re brownie cookies instead of regular cookies.
Or something like that.
 Keep going until they’re all done!
My house smells really good right now.
 Let the cookies cool completely (well, first eat a warm one straight off the pan, of course), then sift on some powdered sugar.
 Sprinkle on a little…
 Or a lot!
 A responsible mother always tastes the food she’s about to feed her children.
It’s for the children. Always for the children.
 Then serve them with ice gold glasses of milk.
 Enjoy these. They’re chocolatey and lovely.
Here’s the handy dandy printable!
.recipe-actions {
position: relative;
z-index: 2;
}
#pdf-popover {
background: rgba(255,255,255,.9);
border: 1px solid #efeeed;
color: #6e5c3a;
display: none;
font-family: Helvetica, Arial, sans-serif;
right: 20px;
margin: 2px;
padding: 54px 20px 7px 10px;
position: absolute;
top: 0;
width: 380px;
z-index: 10;
}
#pdf-popover form {
margin: 0;
}
#pdf-popover h4 {
background: #b15818;
color: #fff;
font-family: Helvetica, Arial, sans-serif;
font-size: 20px;
font-weight: normal;
left: 3px;
margin: 0;
position: absolute;
padding: 6px 12px;
right: 3px;
top: 3px;
}
#pdf-popover legend {
font-family: Helvetica, Arial, sans-serif;
font-size: 120%;
font-weight: bold;
margin-bottom: 2px;
margin-left: 10px;
text-transform: uppercase;
}
#pdf-popover fieldset {
margin-bottom: 15px;
}
#pdf-popover input[type="checkbox"] {
height: 14px;
margin: 2px 0 10px 10px;
padding-left: 14px;
position: relative;
visibility: visible;
width: 14px;
}
#pdf-popover input[type="checkbox"],
#pdf-popover input[type="radio"] {
margin-left: 10px;
}
#pdf-popover .close {
background: #b15818;
color: #FFFFFF;
cursor: pointer;
height: 35px;
font-size: 16px;
font-weight: bold;
line-height: 26px;
position: absolute;
right: 3px;
text-align: center;
top: 3px;
width: 25px;
z-index: 1;
}
#pdf-popover .button {
background-color: #b15818;
border: 0;
color: #fff;
cursor: pointer;
font-family: Helvetica, Arial, sans-serif;
margin-left: 10px;
padding: 8px 10px;
text-transform: uppercase;
}
x
Print Options
Page size
Letter
3x5
4x6
Text Size
Small
Medium
Large
Content
Include description
Include prep time, etc.
Show image
Recipe
Brownie Cookies
Prep Time: 15 Minutes
Cook Time: 11 Minutes
Difficulty: Easy
Servings: 36
 Print Recipe
Ingredients
2 ounces, weight Baking Chocolate (unsweetened Or Bittersweet)2 sticks Softened Butter2 cups Sugar3 whole Large Eggs1 Tablespoon Vanilla Extract2-1/4 cups Flour1/4 cup Cocoa Powder1 Tablespoon (additional) Cocoa Powder1 teaspoon Baking Powder1/2 teaspoon Salt Powdered Sugar, For Dusting Preparation Instructions
Preheat the oven to 350 degrees.
Melt the chocolate in the microwave, stir, and let it cool.
Mix the butter and sugar together until totally combined. With the mixer on low, slowly drizzle in the cooled chocolate. Scrape the bowl and mix again. Mix in the eggs one at a time, then the vanilla. Scrape the bowl once more and mix.
Combine the flour, cocoa powder, baking powder, and salt in a bowl. Stir it together, then add it in scoops to the mixing bowl with the mixer on low. Scrape the bowl once and mix one final time until all combined.
Scoop generous tablespoons onto a baking sheet lined with a baking mat or parchment, then bake them for 11 minutes until poufy and set. Remove them from the oven, let them sit on the pan for 1 to 2 minutes, then remove them to a baking rack to cool completely. Once cool, sprinkle generously with powdered sugar.
Posted by Ree | The Pioneer Woman on March 12 2015
March 10, 2015
Italian Meatloaf
 I can’t draw to save my life. I can’t paint a pretty picture. I can’t write a sonnet, sing an aria, or sculpt.
But I can make meatloaf. And this Italian version will make you feel like you can do all of the above, times a hundred. I made this meatloaf on a Food Network episode with my boy Bryce last year, and we both loved every bite.
Meatloaf is my love language.
 Tear some crusty Italian bread into chunks and place it in a bowl. Pour the milk over the bread, toss it around, and allow it to soak in for several minutes.
 Place the ground beef, milk-soaked bread, Parmesan, eggs, parsley, Italian seasoning, salt, and pepper into a large bowl…
 And smush/knead it around with your hands until everything is completely mixed.
 Meanwhile, make the sauce that goes on top of the meatloaf: In a separate bowl, combine the diced tomatoes, brown sugar, mustard, cayenne, and Worcestershire…
 And stir it together.
 Place the meat mixture on a drip pan (a pan with a slotted tray on top) and form it into a big honkin’ loaf shape.
 Arrange thin pancetta slices in an overlapping pattern all over the surface (with my normal meatloaf, I use regular bacon…but pancetta is lovely!)…
 Then spoon the tomato mixture all over the top. (Leave any excess juices in the bowl.)
 Tent the pan with foil and bake it for 40 minutes to start the cooking process and keep the pancetta from burning. Remove the foil and continue baking it for another 30 to 40 minutes, until the internal temperature reaches 160 degrees and the meatloaf is no longer pink in the middle.
 Cut it into thick slices…
 And serve it with your favorite sides. (Mac & Cheese and green beans are good!)
 This takes meatloaf to a whole new level. You’ll love it, adore it, and want to marry it.
And here are some variations!
• Use a combination of ground beef and ground turkey.
• Use a combination of ground beef and Italian sausage.
• Add 12 to 15 cloves of roasted garlic to the meat mixture. Mmmm…the flavor!
• Add a mixture of chopped fresh herbs (oregano, basil, etc.) instead of Italian seasoning.
• Add 1 cup grated Asiago cheese instead of Parmesan for a sharper flavor.
Here’s the handy dandy printable!
.recipe-actions {
position: relative;
z-index: 2;
}
#pdf-popover {
background: rgba(255,255,255,.9);
border: 1px solid #efeeed;
color: #6e5c3a;
display: none;
font-family: Helvetica, Arial, sans-serif;
right: 20px;
margin: 2px;
padding: 54px 20px 7px 10px;
position: absolute;
top: 0;
width: 380px;
z-index: 10;
}
#pdf-popover form {
margin: 0;
}
#pdf-popover h4 {
background: #b15818;
color: #fff;
font-family: Helvetica, Arial, sans-serif;
font-size: 20px;
font-weight: normal;
left: 3px;
margin: 0;
position: absolute;
padding: 6px 12px;
right: 3px;
top: 3px;
}
#pdf-popover legend {
font-family: Helvetica, Arial, sans-serif;
font-size: 120%;
font-weight: bold;
margin-bottom: 2px;
margin-left: 10px;
text-transform: uppercase;
}
#pdf-popover fieldset {
margin-bottom: 15px;
}
#pdf-popover input[type="checkbox"] {
height: 14px;
margin: 2px 0 10px 10px;
padding-left: 14px;
position: relative;
visibility: visible;
width: 14px;
}
#pdf-popover input[type="checkbox"],
#pdf-popover input[type="radio"] {
margin-left: 10px;
}
#pdf-popover .close {
background: #b15818;
color: #FFFFFF;
cursor: pointer;
height: 35px;
font-size: 16px;
font-weight: bold;
line-height: 26px;
position: absolute;
right: 3px;
text-align: center;
top: 3px;
width: 25px;
z-index: 1;
}
#pdf-popover .button {
background-color: #b15818;
border: 0;
color: #fff;
cursor: pointer;
font-family: Helvetica, Arial, sans-serif;
margin-left: 10px;
padding: 8px 10px;
text-transform: uppercase;
}
x
Print Options
Page size
Letter
3x5
4x6
Text Size
Small
Medium
Large
Content
Include description
Include prep time, etc.
Show image
Recipe
Italian Meatloaf
Prep Time: 15 Minutes
Cook Time: 1 Hour30 Minutes
Difficulty: Easy
Servings: 12
 Print Recipe
Ingredients
2 pounds Ground Beef6 slices Crusty Italian Bread1 cup Whole Milk1 cup Grated Parmesan4 whole Large Eggs1/3 cup Minced Parsley1 Tablespoon Italian Seasoning1 teaspoon Salt1/2 teaspoon Black Pepper12 slices Thin Pancetta (about 4 To 6 Ounces)2 cans Diced Tomatoes (drained)1/4 cup Brown Sugar1 teaspoon Dry Mustard1 pinch Cayenne Pepper5 dashes Worcestershire Sauce Preparation Instructions
Preheat the oven to 350 degrees.
Place the ground beef, milk-soaked bread, Parmesan, eggs, parsley, Italian seasoning, salt, and pepper into a large bowl and smush/knead it around with your hands until everything is completely mixed.
Meanwhile, make the sauce: In a separate bowl, combine the diced tomatoes, brown sugar, mustard, cayenne, and Worcestershire and stir it together.
Place the meat mixture on a drip pan (a pan with a slotted tray on top) and form it into a big honkin’ loaf shape. Arrange the pancetta slices in an overlapping pattern all over the surface then spoon the tomato mixture all over the top. (Leave any excess juices in the bowl.)
Tent the pan with foil and bake it for 40 minutes. Remove the foil and continue baking it for another 30 to 40 minutes, until the internal temperature reaches 160 degrees and the meatloaf is no longer pink in the middle. Cut it into thick slice and serve it with your favorite sides.
Posted by Ree | The Pioneer Woman on March 10 2015
March 2, 2015
Veggie Scramble
 There’s nothing quicker or easier in life than whipping up a big skillet of scrambled eggs, and if you throw in a bunch of simple add-ins, you can turn it into a delicious, satisfying breakfast (or lunch or dinner!) in no time at all.
Unless you live on an isolated ranch and run out of eggs, in which case you will have to add the time it takes to find your shoes, put them on, drive to town, buy eggs, and drive back to the ranch.
Or, alternatively, you will have to add the time to convince your husband to build a chicken coop, procure some chickens, and wait for them to lay some eggs.
And at that point, the whole “quick and easy” angle to this recipe is pretty much shot. (But I’d encourage you to make it anyway. It’s scrumptious!)
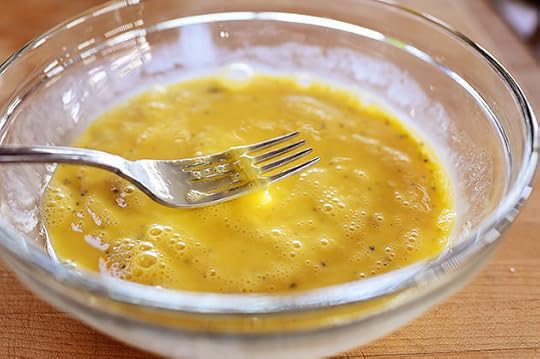 First make the egg mixture by beating together eggs, half-and-half, salt, and pepper. If you’re feeling ornery, you can add in several dashes of hot sauce…or Worcestershire…or Sriracha…or chili powder…or cayenne pepper…or pesto…or salsa…
(Get the picture? There are no rules.)
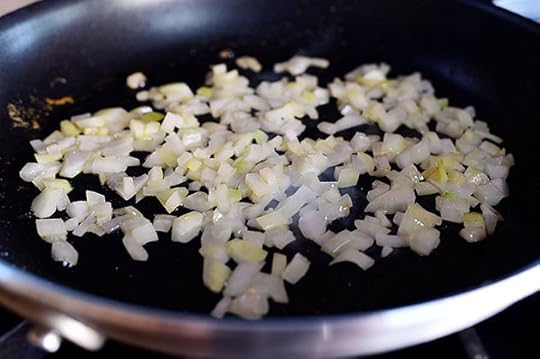 Next, heat a nonstick (if you have it!) skillet over medium heat. Melt a little butter and add some diced onion and cook it for a few minutes, until it starts to soften and turn golden.
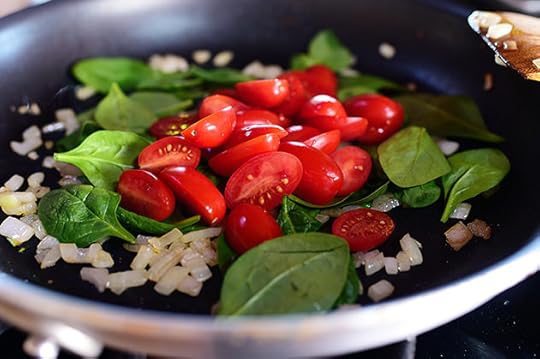 Throw in some baby spinach and halved grape or cherry tomatoes, then stir them for a just a minute or so, until the spinach starts to wilt.
 Turn the heat to low and pour in the egg mixture…
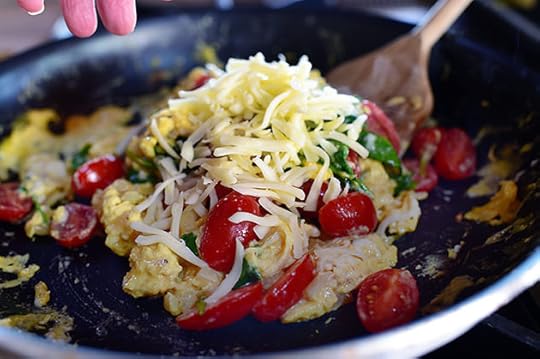 Then use a spatula to stir it/fold it until soft curds form. When the eggs aren’t quite cooked, add some grated Swiss cheese for luck!
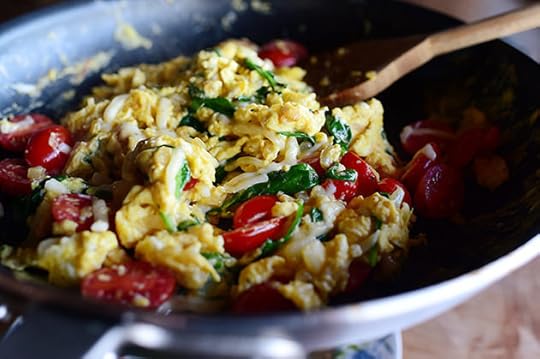 Then stir it slowly until the eggs are set and the cheese is just barely melted.
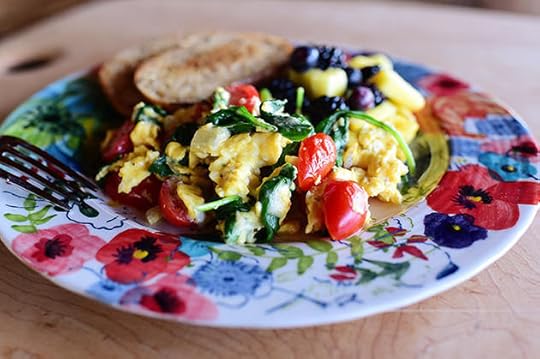
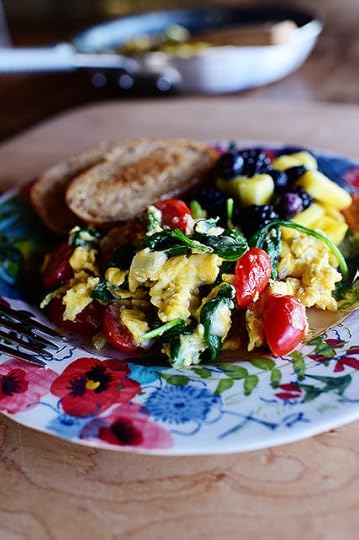 Serve it with toast and fresh fruit for breakfast, lunch, or dinner!
And ooooh…the possibilities. Chopped green olives, diced bell pepper, kale instead of spinach, finely diced ham (of course, then it would no longer be called a veggie scramble), pico de gallo, goat cheese (oh, yum), chopped jarred jalapenos…the list goes on.
Here’s the handy dandy printable. Have fun with this!
.recipe-actions {
position: relative;
z-index: 2;
}
#pdf-popover {
background: rgba(255,255,255,.9);
border: 1px solid #efeeed;
color: #6e5c3a;
display: none;
font-family: Helvetica, Arial, sans-serif;
right: 20px;
margin: 2px;
padding: 54px 20px 7px 10px;
position: absolute;
top: 0;
width: 380px;
z-index: 10;
}
#pdf-popover form {
margin: 0;
}
#pdf-popover h4 {
background: #b15818;
color: #fff;
font-family: Helvetica, Arial, sans-serif;
font-size: 20px;
font-weight: normal;
left: 3px;
margin: 0;
position: absolute;
padding: 6px 12px;
right: 3px;
top: 3px;
}
#pdf-popover legend {
font-family: Helvetica, Arial, sans-serif;
font-size: 120%;
font-weight: bold;
margin-bottom: 2px;
margin-left: 10px;
text-transform: uppercase;
}
#pdf-popover fieldset {
margin-bottom: 15px;
}
#pdf-popover input[type="checkbox"] {
height: 14px;
margin: 2px 0 10px 10px;
padding-left: 14px;
position: relative;
visibility: visible;
width: 14px;
}
#pdf-popover input[type="checkbox"],
#pdf-popover input[type="radio"] {
margin-left: 10px;
}
#pdf-popover .close {
background: #b15818;
color: #FFFFFF;
cursor: pointer;
height: 35px;
font-size: 16px;
font-weight: bold;
line-height: 26px;
position: absolute;
right: 3px;
text-align: center;
top: 3px;
width: 25px;
z-index: 1;
}
#pdf-popover .button {
background-color: #b15818;
border: 0;
color: #fff;
cursor: pointer;
font-family: Helvetica, Arial, sans-serif;
margin-left: 10px;
padding: 8px 10px;
text-transform: uppercase;
}
x
Print Options
Page size
Letter
3x5
4x6
Text Size
Small
Medium
Large
Content
Include description
Include prep time, etc.
Show image
Recipe
Veggie Scramble
Prep Time: 5 Minutes
Cook Time: 10 Minutes
Difficulty: Easy
Servings: 2
 Print Recipe
Ingredients
6 whole Large Eggs1/4 cup Half-and-half Salt And Pepper, to taste2 Tablespoons Butter1/2 whole Onion, Diced Small1/2 cup Cherry Or Grape Tomatoes, Halved1-1/2 cup Baby Spinach1/2 cup Grated Swiss Cheese Preparation Instructions
Mix together the eggs, half-and-half, salt, and pepper. Set aside.
Heat a nonstick skillet over medium heat and melt the butter. Cook the onions for several minutes, until golden brown. Add the tomatoes and spinach and sprinkle with salt and pepper. Stir to begin to wilt the spinach, then pour in the eggs.
Reduce the heat to low and stir, cooking slowly, until soft curds form. Add the Swiss and continue stirring/folding until the eggs are cooked.
Serve with toast and fresh fruit for breakfast, lunch, or dinner!
Optional: Add hot sauce, salsa, Sriracha, pesto, or anything you'd like to the egg mixture.
Posted by Ree | The Pioneer Woman on March 2 2015
Ree Drummond's Blog

- Ree Drummond's profile
- 2016 followers

