
Ree Drummond's Blog, page 26
September 8, 2014
Orange Chicken
 I made this Orange Chicken on my Food Network show a few weeks ago, and I just realized yesterday that I’d never shared the recipe here on my totes cray recipe blog. So yesterday, as I whipped some up for lunch, I took photos and documented the step-by-step process. For I am a foodblogger. And that’s what foodbloggers do.
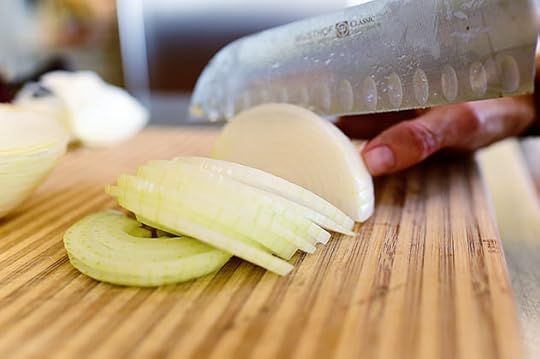
As I explained on the show, wherein I whipped up my girls’ and my favorite Chinese take-out dishes, every Friday when we go to Tulsa to our all-day homeschool co-op, one of the rewards the girls and I look forward to is a lunch from Panda Express. To three females who live on an isolated ranch, being less than 5 minutes away from drive-through Chinese food is enough to keep us going back to co-op week after week. My preferences can fluctuate wildly between things like Kung Pao Chicken and Beijing Beef—whatever I’m in the mood for—and Alex’s stay more in the Beef-and-Broccoli realm. But for Paige, it’s all Orange Chicken, all the time. She loves it and can’t get enough.
Here’s how to make Orange Chicken in the comfort of your own kitchen! It’s a very citrusy, very sweet chicken dish; Definitely worth trying if you’ve never had it before.
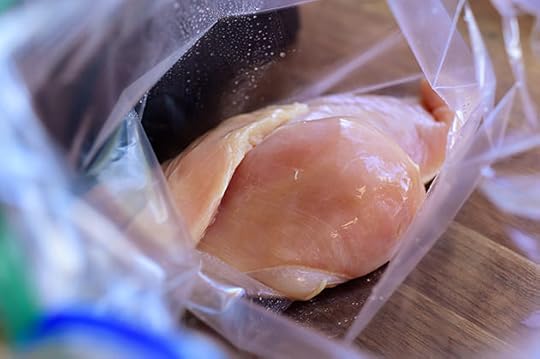
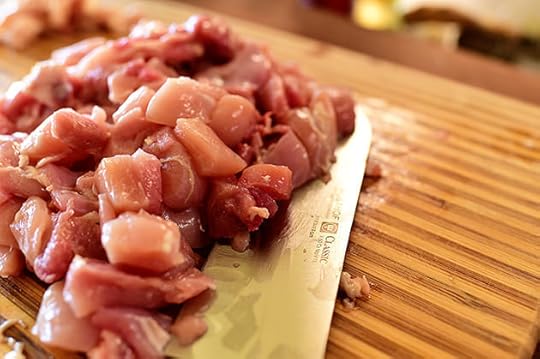 First get the chicken ready. I used boneless, skinless chicken thighs, because I love their texture and flavor—particularly in Chinese dishes. But chicken breasts will work just fine, too; just be sure to cut whatever chicken you use into small, bite-sized pieces.
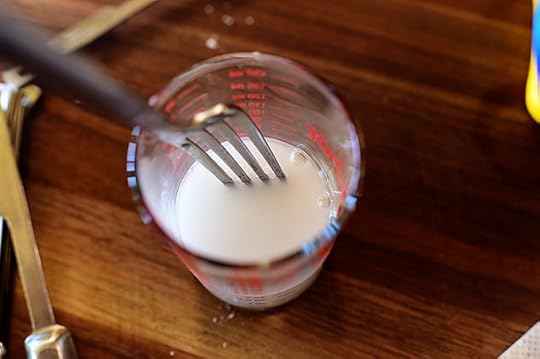
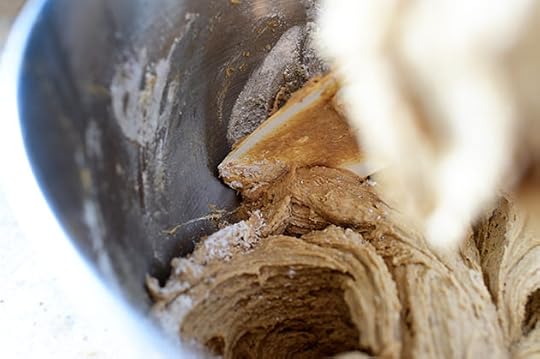
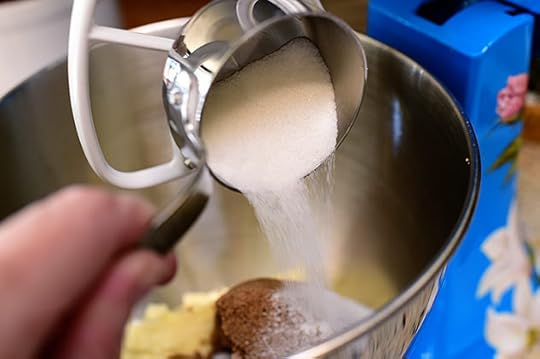
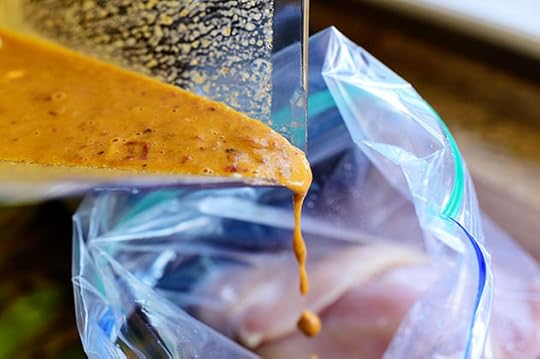
 Now, for orange chicken (and other similar sticky chicken dishes), the coating for the chicken is key! It starts with 4 egg whites. I do the back-and-forth-between-the-two-halves-of-the-shell thing, but you can separate the whites however your heart, soul, or family tradition dictates.
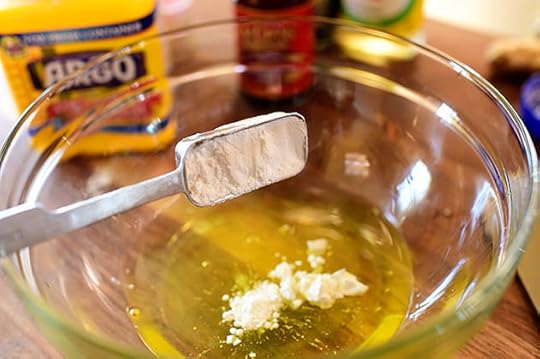 To the egg whites, add some cornstarch…
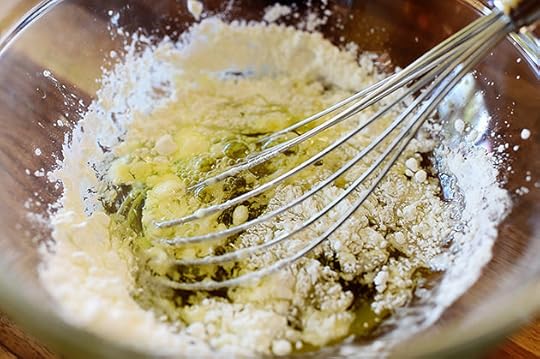 And whisk it together…
 Until the mixture is totally combined and a little bit frothy.
 So now, just throw in the chicken pieces…
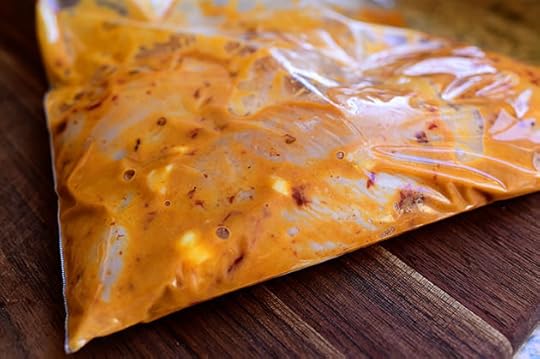
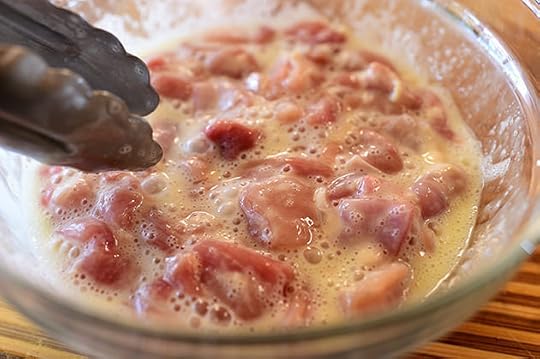 And smush them around so that they’re all coated in the egg white/cornstarch mixture. Just let them sit in there for 5 to 10 minutes while you get the sauce going.
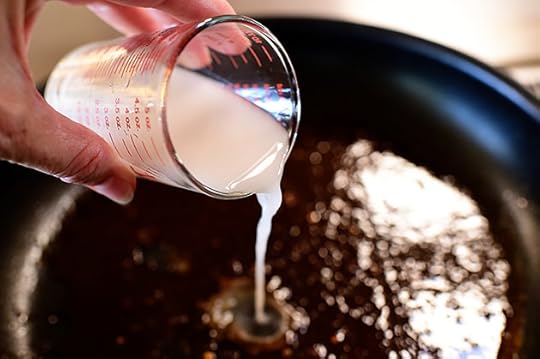
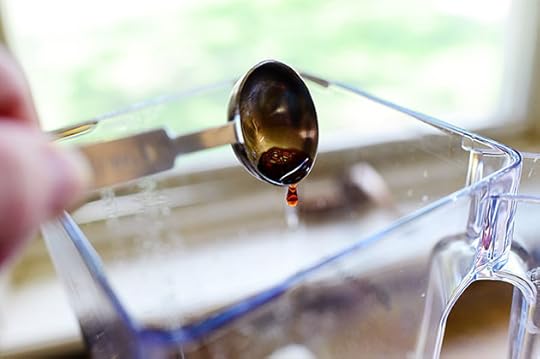
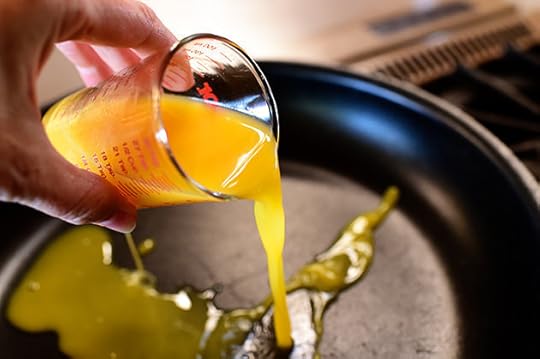 I used a nonstick skillet, which works really well, but you can use any skillet…or just a saucepan. The sauce starts with orange juice! Easy peasy.
 Then comes all the other good stuff: Soy sauce…
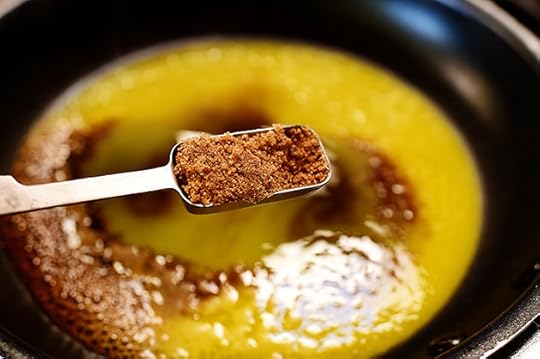 Brown sugar (or you can use white sugar or even honey instead!)…
 Vinegar (this is rice vinegar, but you can just use regular white vinegar)…
 Sesame oil (there’s nothing like it in the world)…
 A little salt…
 Some red pepper flakes (the spice is very nice!)…
 Some garlic (I grated it in with a microplane, but you can just mince it if you prefer)…
 The garlic is important in the sauce, so don’t skip it.
Sorry to be bossy.
 Next up: Fresh ginger, if you can get it. Just cut a piece, slice off the skin…
 And grate it or mince it, just like you did the garlic.
 Finally, a little orange zest.
Orange zest is so purty.
And so citrusy.
And so…zesty.
Yum.
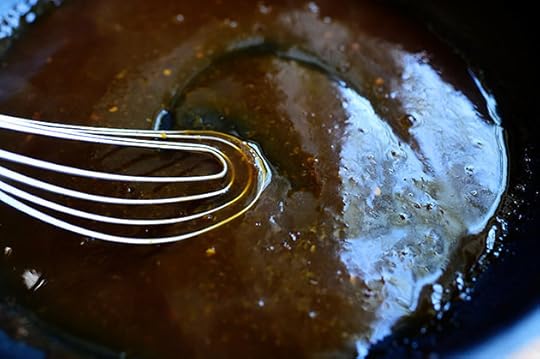
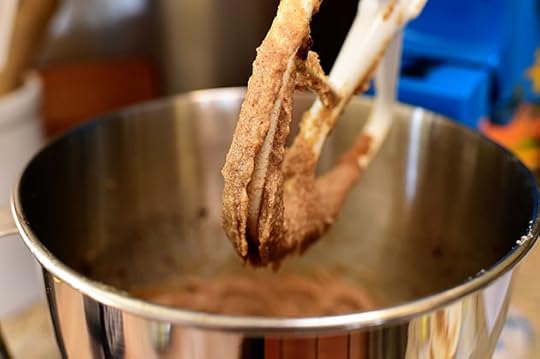
 Whisk it around until it’s all combined and heat it over medium-low heat until it’s heated through and barely starting to thicken.
I’ll say this more than once, but it’s important: Be sure to taste the sauce and add more of whatever your tastebuds want. Some folks like more soy, some like more garlic or ginger, some need a little more salt. I think this sauce is highly personal…so just use my quantities as a guide.
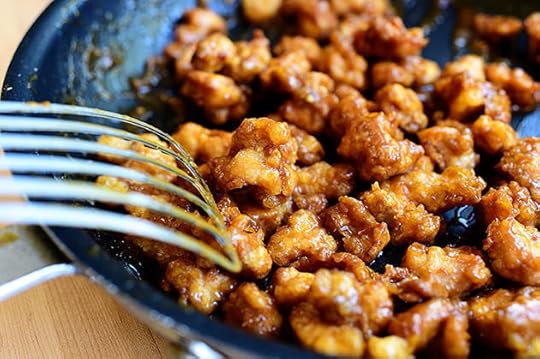
 Now it’s time to fry the chicken: Heat some vegetable or peanut oil (I used the latter) over medium heat, or until it registers around 350 on an oil thermometer—not too hot, but not too cool! Then, using tongs, carefully drop individual chicken pieces in so they won’t stick together. You’ll need to do this in 4 or 5 different batches; you don’t want to crowd the pan or it’ll be a royal mess.
IMPORTANT: If you have small kids in the house, please ALWAYS put pots of hot oil on the back burner. Curious kiddos can reach up and grab handles…and terrible accidents can happen! So hot oil = backburner. Thank you for listening to Pioneer Woman.
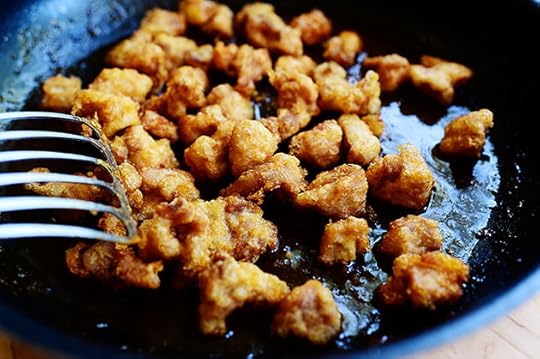
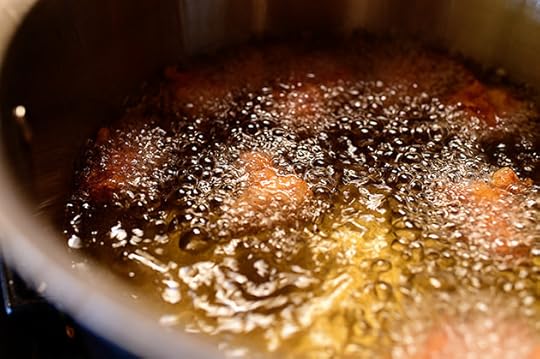 Let the pieces fry for 2 to 3 minutes for the first stage. They’ll be slightly golden, but not dark yet (if they browned really quickly, the oil’s too hot.)
 Take them out…
 And set them on a paper towel-lined plate. Keep going until all the chicken has been fried.
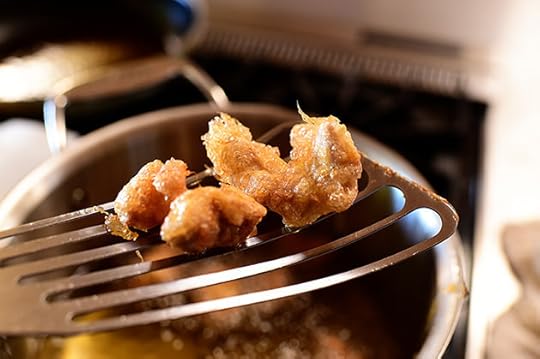
 Then comes the fun part. Grab a batch of the fried chicken from the plate…
 And plunge it back into the hot oil for another minute. This just “solidifies” the coating and gives it a little more structure…whatever that means. Ha. And truth be told, it would probably be fine just to fry the chicken all the way through during the first frying stage. This is just the way I do it, man. I’m old and set in my ways.
 When the chicken has fried for the additional minute, drain it on a new paper towel. Note that the coating isn’t hard and crisp as it would be if you’d used a batter; it’s very light. Just right!
 Now it’s just time to finish up the sauce: Combine a little cornstarch…
 With a little water…
 And pour this into the sauce, whisking it to combine.
 Turn up the heat just long enough to let the cornstarch thicken the sauce…
 Then remove it from the heat…
 And throw in the chicken!
 Quickly toss it around to get the chicken all coated. There is not an abundance of sauce—just enough to coat the chicken.
 I really wanted to drive home the orange, so I grated up some more zest…
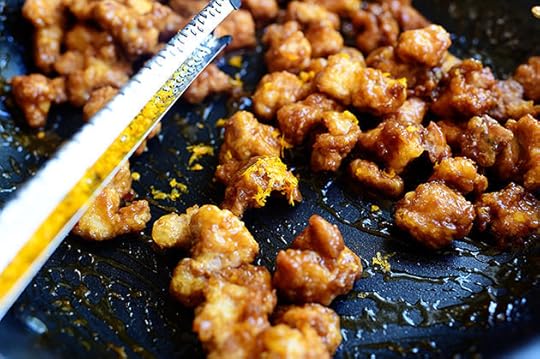 And tossed it in. (You can see the benefit of the nonstick skillet here; all the sauce ends up on the chicken rather than stuck to the pan!)
 Now, of course, you can serve the orange chicken with chow mein or fried rice…but it’s absolutely lovely on its own. (One thing a savory side dish like fried rice or noodles can do, though, is provide a counter to the sweetness of the chicken. Food for thought.)
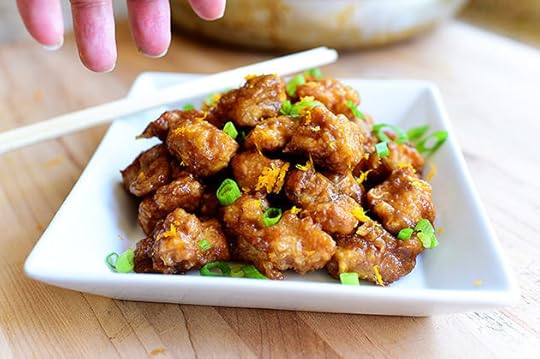 A little sliced green onion adds a little extra prettiness…and flavor, of course.
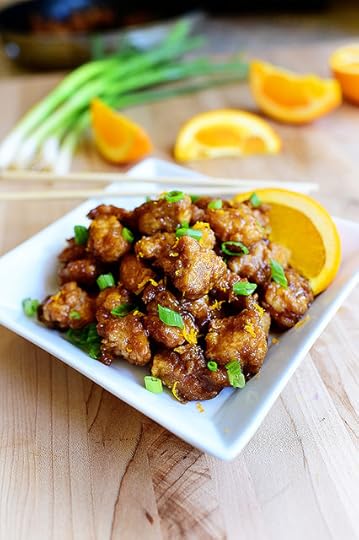 Very flavorful, very citrusy, very good! If you’re a fan of orange chicken, give this one a try sometime. Just remember that you can customize the sauce to your taste, adding more ginger, garlic, soy…anything that makes you happy in life!
 Here’s the handy dandy printable.
Recipe
Orange Chicken
Prep Time: 20 Minutes
Cook Time: 20 Minutes
Difficulty: Easy
Servings: 4

Print Recipe
Ingredients
Vegetable Or Peanut Oil For Frying Chicken4 whole Egg Whites2 Tablespoons Cornstarch4 whole Boneless, Skinless Chicken Thighs, Cut Into Bite Sized Pieces Sauce:1/2 cup Orange Juice1 Tablespoon Soy Sauce1 Tablespoon Packed Brown Sugar (OR White Sugar OR Honey)1 Tablespoon Rice Vinegar (or Regular Distilled Vinegar)1/4 teaspoon Sesame Oil Dash Of Salt Dash Of Crushed Red Pepper, More To Taste1 clove Garlic, Pressed Or Minced2 teaspoons Minced Ginger1 teaspoon Cornstarch (additional) Zest Of 1 Orange (optional)1/4 cup Water2 whole Green Onions, Sliced Preparation Instructions
For the chicken: In a large bowl, whisk together the cornstarch and egg whites with a fork until almost frothy, about 1 minute. Add the chicken to the mixture and allow to sit for 5 to 10 minutes.
For the sauce: Meanwhile, put the orange juice, soy sauce, sugar, vinegar, sesame oil, salt, crushed red pepper, garlic and ginger (and orange zest, if using) in a small nonstick skillet and whisk together. Heat until bubbling and starting to thicken, about 3-4 minutes.
Whisk together the cornstarch and 1/4 cup water in a small bowl and add 1 to 2 tablespoons of the cornstarch slurry to the sauce. Mix in and thicken for 1 minute. (If sauce gets overly thick, just add in another 1/4 cup water and whisk in.)
Heat about 2 inches of vegetable oil in a heavy-bottomed pot until a deep-fry thermometer inserted in the oil registers 350 degrees F. In batches, carefully drop a few pieces of chicken into the oil (drop them in one by one to keep them from sticking together) and move it around, 2-3 minutes or until light golden. Let the pieces drain on a plate lined with paper towels for 2 to 3 minutes. Then drop them back into the oil for 1 minute to really solidify the coating.
Toss the chicken in the sauce and serve immediately with orange zest and sliced green onions on the top.
Posted by Ree | The Pioneer Woman on September 8 2014


September 4, 2014
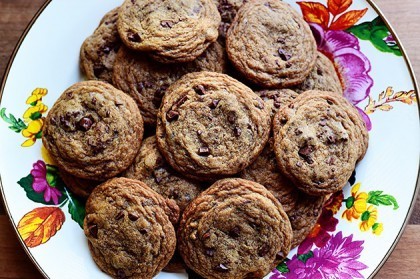
Chocolate Chunk Cookies
 I realize I posted my Browned Butter M&M Cookie recipe just last week, and I realize this recipe is pretty much identical, but I definitely wanted to post it separately because this chocolate chunk version will absolutely knock your socks off.
Just make ‘em.
Just once.
Your life will be forever altered.
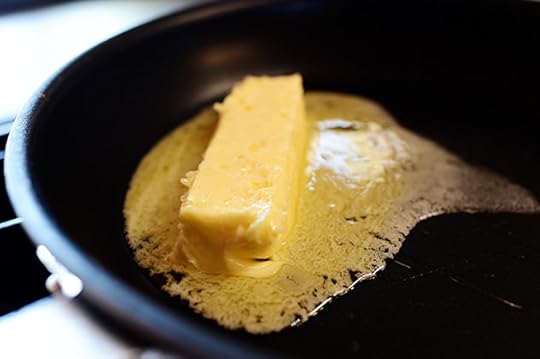 Melt a stick of butter in a medium skillet over medium heat.
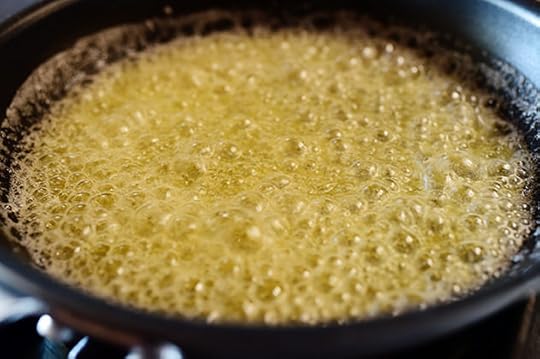 Keep a close watch on it, and swirl the pan around regularly! It will bubble up and sizzle…
 Then, a minute or two later, the foam will appear.
 And when the foam appears, it isn’t long before the butter is nice and brown. Take the pan off the heat when it gets to this light golden stage.
 Because it’ll keep browning even after you take it off the stove.
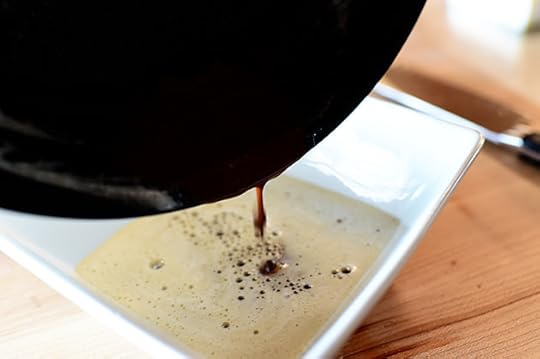 When it’s nice and deep brown—but definitely not burned/black!—pour it into a dish…
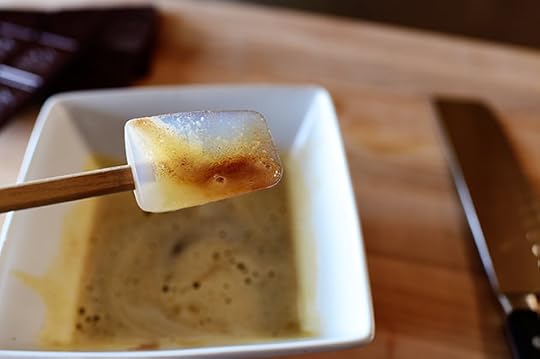 And let it cool completely. This is difficult to do when you have a hankering for warm chocolate chip cookies…but it’s a necessity! If you pour warm butter into the dough, your life will spiral into a series of unfortunate events and you’ll live to regret it.
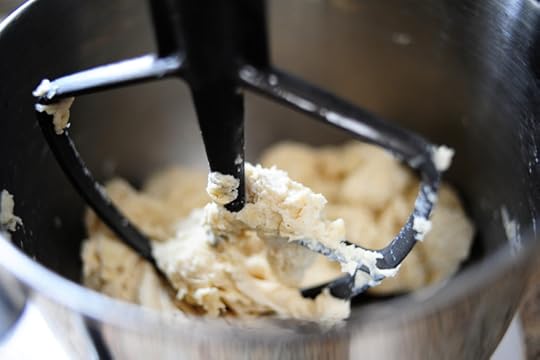
 Once the browned butter has totally cooled, start making the cookie dough! It starts with a stick of softened butter. This, as you can see, is room temperature soft.
 Add brown sugar and regular sugar…
 Then mix it until it’s all combined, scraping the sides at least once to make sure it’s totally mixed together.
 Once the butter and sugars are all mixed together, it’s time to add the browned butter with the mixer on low. And I can not emphasize enough how important it is to add the butter very, very slowly and gradually. If you add it too fast, the mixture will be wet and soupy. So just take your time…
 Stopping halfway through to scrape the bowl and make sure it mixes in nice and slow. (And be sure to get ALL the dark brown, beautiful solids in there. That’s where the flavor is!)
 Add in 2 eggs, one at a time…
 Again (broken record here), scraping and mixing along the way.
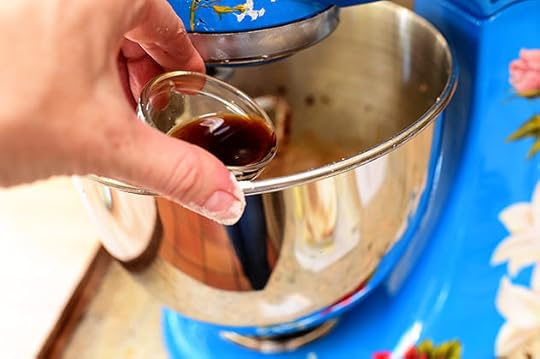
 Next, a good amount of vanilla.
 Yum!
Yum!
 For the dry ingredients, combine flour…
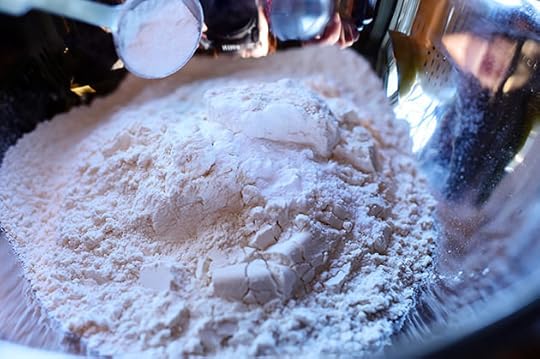 Baking soda…
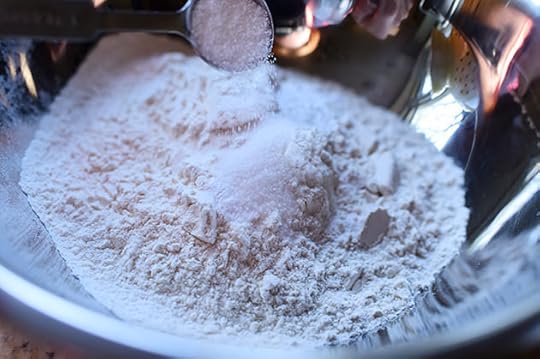 Salt…
Salt…
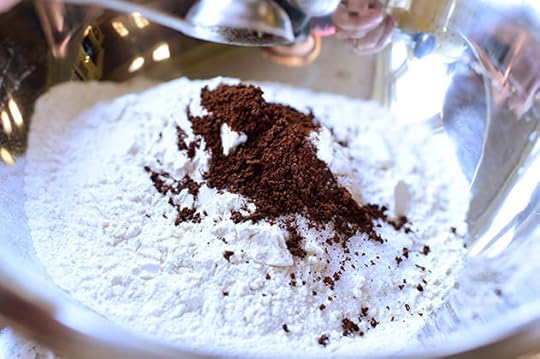 And instant coffee granules! Now, I know the coffee-averse among you are balking at this ingredient…but please pretty please believe me when I tell you that the cookies do not taste like coffee. The coffee simply adds a depth and richness of flavor, and to prove it: Marlboro Man has never had a cup of coffee in his life because he thinks it will taste bad. And he’ll polish off these cookies like there’s no tomorrow.
As long as I never tell him there’s coffee in them.
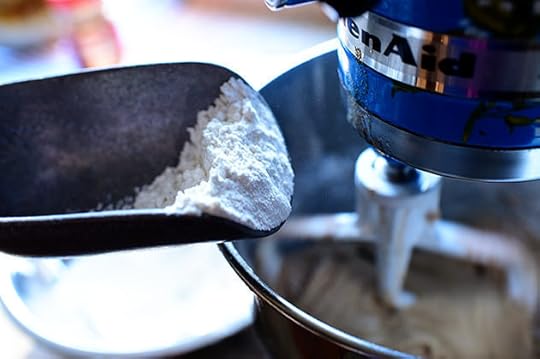 I just turn the mixer on low, and add scoops of the dry ingredients so they mix in gradually.
 And yes…I’m a-gonna say it: Scrape halfway through!
 For the chocolate, I used a couple of these babies.
Soooooo much better than chocolate chips.
You’ve gotta trust me on this.
 Just unwrap ‘em…
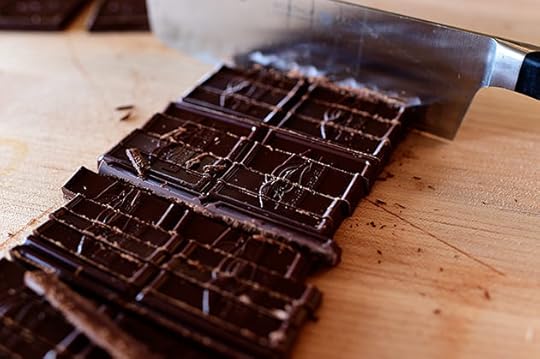 Slice ‘em into sticks…
 Then chop ‘em into chunks!
 Throw them into the dough…
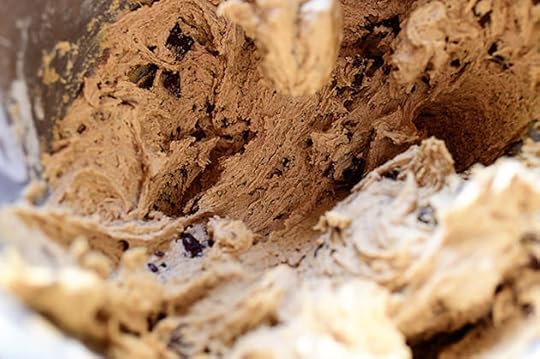 Then stir them in until they’re evenly distributed.
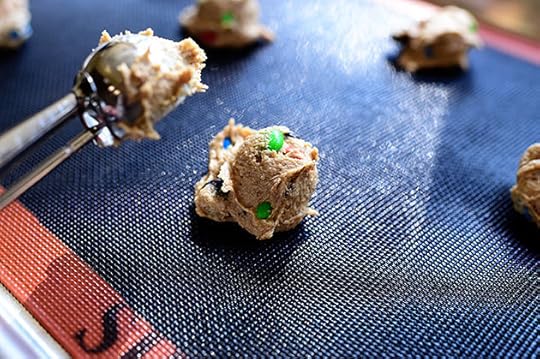
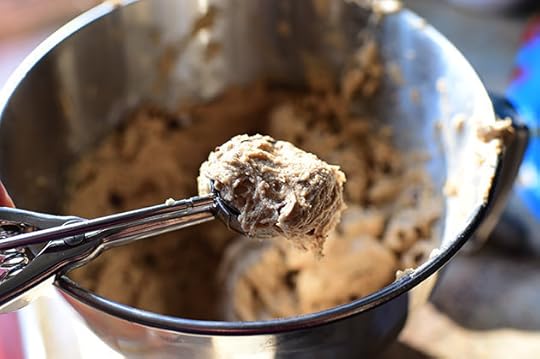 Use a scoop or a spoon…
 To get the dough onto the cookie sheets. I used a baking mat, but you can use parchment…or nothing, if you’re feeling rebellious!
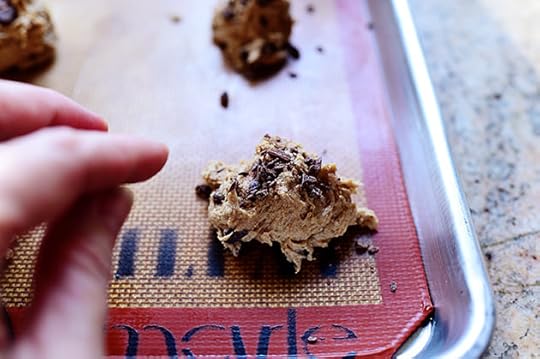 Totally optional here: I gathered up the extra bits of chocolate from the cutting board and sprinkled/pressed a few into each cookie.
Before I baked the cookies, I popped the pans into the fridge for about 15 minutes, just to firm them up a bit before they went into the oven
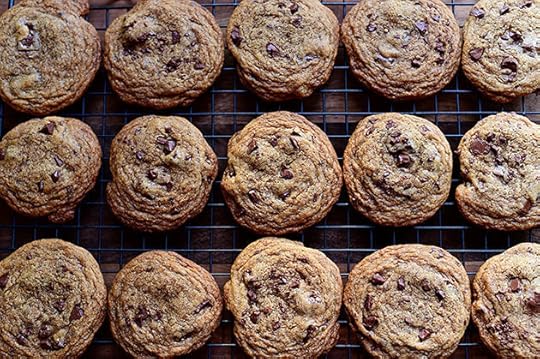
 Then I baked ‘em until they were beautiful and golden!
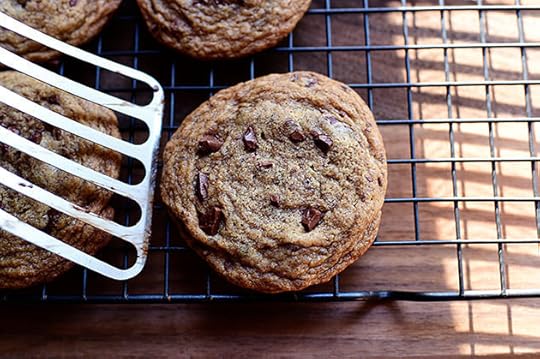 Emphasis on beautiful. And golden.
 Transfer them onto a cooling rack and let them cool for .3554 seconds.
 Then dig right in!
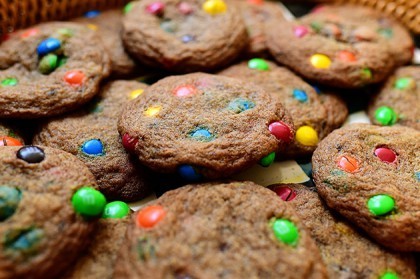
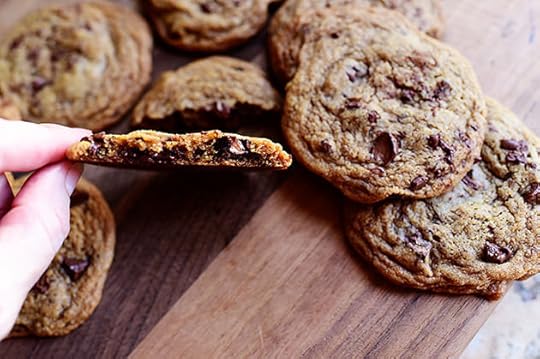 Ahh…look at that luscious chocolate. To die for!
Here’s the handy dandy printable. Just like the M&M cookies from last week…but I like these even better. They’re a keeper!
Recipe
Chocolate Chunk Cookies
Prep Time: 30 Minutes
Cook Time: 10 Minutes
Difficulty: Easy
Servings: 36
Print Recipe
Ingredients
1 cup (2 Sticks) Salted Butter1 cup Brown Sugar, Packed1/2 cup Sugar2 whole Large Eggs1 Tablespoon Vanilla2 cups All-purpose Flour2 Tablespoons (additional) All-purpose Flour (rounded Tablespoons)2 Tablespoons (heaping) Instant Coffee Granules1 teaspoon Baking Soda1 teaspoon Salt8 ounces, weight Good Semi-sweet Chocolate, Chopped Into Chunks1/2 cup Finely Chopped Pecans (optional) Preparation Instructions
Add one stick of butter to a medium skillet over medium heat. Allow it to melt and bubble up for 3 to 4 minutes, swirling the pan to keep the butter moving around. When the butter is a medium golden brown, remove the pan from the heat (it will continue browning in the pan over the next 30 seconds or so!) Pour butter (and any solids in the bottom of the pan) into a heatproof bowl and allow it to cool completely, about 30 minutes. Meanwhile, allow the other stick of butter to soften.
Preheat the oven to 375 degrees*.
Cream the softened butter together with the brown sugar and regular sugar until it’s nice and combined. Add the eggs and vanilla, and beat until smooth, scraping the bowl if necessary to make sure everything is incorporated.
With the mixer on medium-low, very slowly drizzle in the cooled melted butter, making sure to add all the darker brown solids. Scrape the bowl the mix again for 20-30 seconds, until everything is combined.
In a separate bowl, combine the flour, coffee granules, baking soda and salt. Stir together, then add it in 1/3 increments, mixing on low, until it’s totally incorporated. Scrape the bowl and beat for a few more seconds. Stir in the chocolate chunks and nuts, if using.
In batches, scoop by heaping teaspoon onto a baking sheet lined with a baking mat, Press extra chocolate chunks into the tops of each cookie, if desired. Refrigerate scoped cookies for 15 minutes, then bake for 9 to 10 minutes, or until golden brown. Remove from oven, then transfer cookies to a cooling rack. Repeat with the rest of the dough. Serve cookies with a big glass of cold milk!
Posted by Ree | The Pioneer Woman on September 4 2014

September 2, 2014
Chicken Avocado Pizza
 I just got home from a soccer tournament all weekend and was making plans for what I’m cooking all week when I remembered a recipe I photographed a few months ago that I plum forgot to share! And the recipe doesn’t even have plums in it!
Yes, I’m a little loopy today.
This is a really delicious pizza, with warm avocado, bubbly cheese, and other delicious toppings that go on the pizza after it comes out of the oven. You can use a homemade pizza crust (I’m including my recipe below) or you can use a storebought, ready made crust if time is of the essence.
Here’s how I made it!
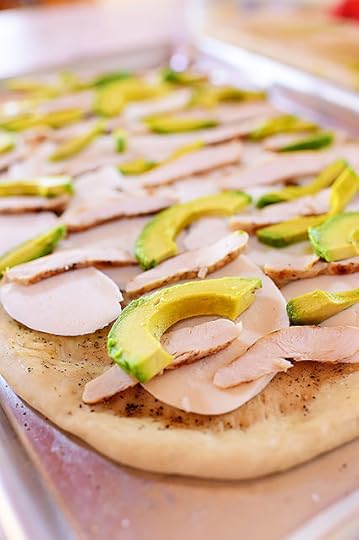
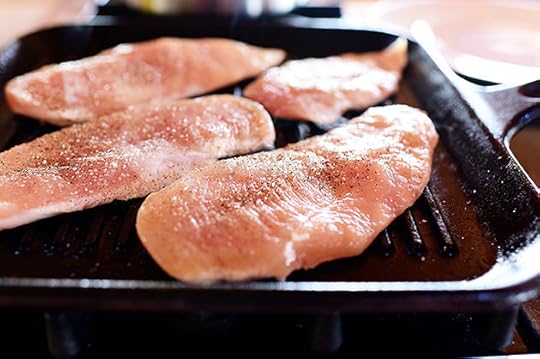 I started by slicing 2 chicken breasts in half across the middle so I wound up with 4 very thin chicken breast-shaped pieces. You don’t have to do this—you can just throw the whole breasts on there. But I like to slice them into thinner pieces like this because a) they take less time to cook through, and b) you wind up with much thinner pieces once you slice them up.
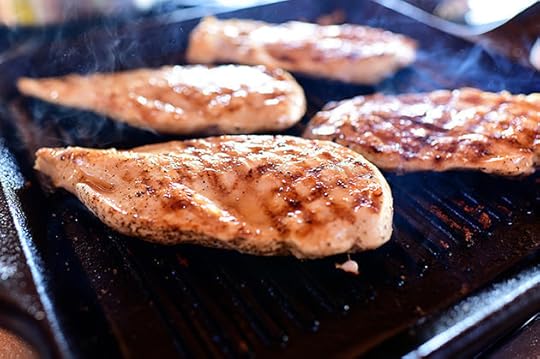 I just seasoned them with salt and pepper, then grilled them until they were all done!
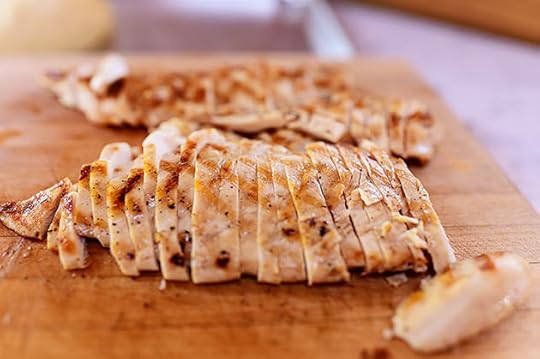 Then I just let ‘em cool and sliced ‘em up.
 My favorite pizza dough on the planet! Below, I’m pasting in the directions for making the dough—I’ve used these same photos in lots of the pizza recipes on my website because, well, they explain it all.
Note: For a time-saver, you can also just use a pre-made pizza crust, storebought flatbread—any pizza crust you want! Just adjust the baking time and temp accordingly.
 Here’s what you need for the pizza crust. Totally simple!
 Sprinkle yeast over warm water and let it stand for a few minutes.
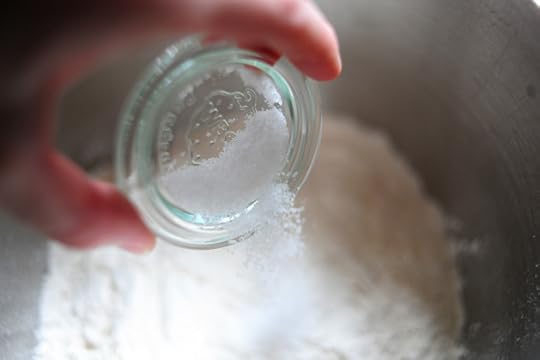 Next, add the salt to the flour.
 And stir it around in the mixer for a few seconds.
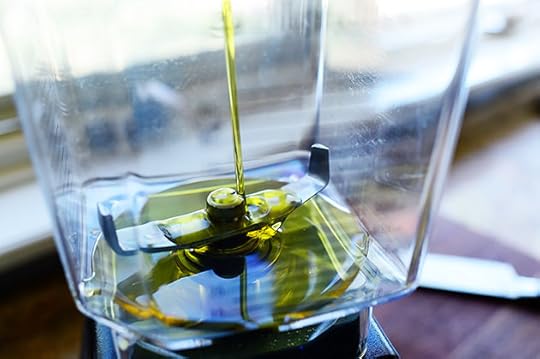
 Next, with the mixer on low, drizzle in the olive oil.
 Stir it together till the olive oil is worked into the flour.
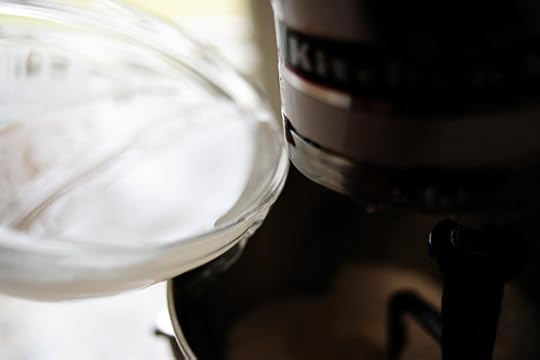 Next, pour in the warm water/yeast mixture.
 Mix it together until the dough all comes together in a sticky mass.
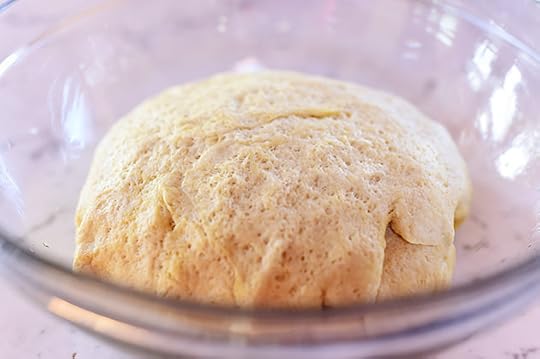
 Then just cover the bowl with plastic wrap and set it aside for 1 to 2 hours. Or, to really step up the flavor and texture, just park it in the fridge for a few days, sealed in a plastic bag.
 Use a rolling pin and/or your hands to get it into a large rough rectangle shape and put it onto a pan.
 Drizzle on some olive oil and smear it around with your fingers…
 Then sprinkle on lots of salt and pepper.
 And now for all the other ingredients! I sliced up a couple of balls of the good, fresh, bright white mozzarella…but you can also use the supermarket mozzarella if you prefer.
(And if you’re feeling really sassy, grate it instead of slice it. C’mon. Take a walk on the wild side.)
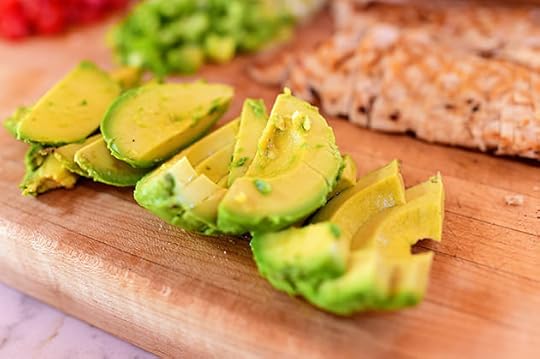 And avocado: Slice up 2 or 3. And here’s where I went horribly wrong in my life: I should have squeezed lime or lemon juice all over the slices and tossed them around, both to give the avocados a little bit of an acidy bite and to keep them from browning. But this was back when limes were approximately $1,800.00 apiece and hard to find and I didn’t keep them around in abundance.
So if you make this…give the avocados a nice coating of lime juice.
Also! It’s best if the avocados aren’t quite this ripe/soft since they’ll soften a bit in the oven.
 I also finely minced up some red onion…
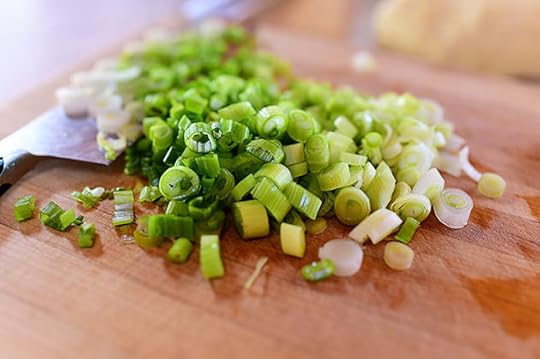 Sliced some green onion…
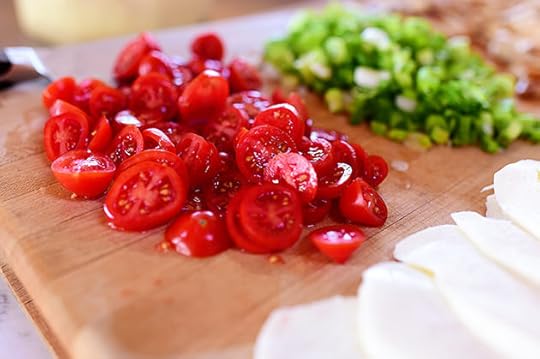 And sliced some grape tomatoes!
(Also: Cilantro. Not shown because I’m an airhead.)
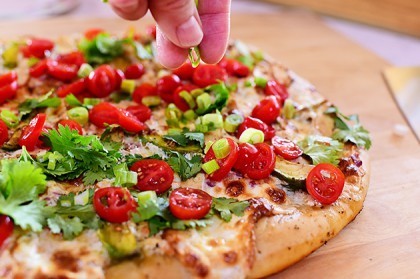
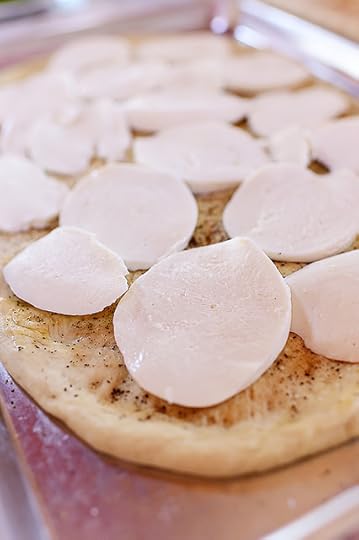 Now it’s time to assemble everything: Lay the mozzarella all over the surface of the dough…
 Then arrange chicken and avocado slices all over the cheese.
 Lookin’ good so far!
 Next, sprinkle on the red onion. I minced it really fine because I want the onion to have a chance to soften in the oven, and it wouldn’t do that if the chunks were big.
Raw, crunchy onion pieces are against my religion.
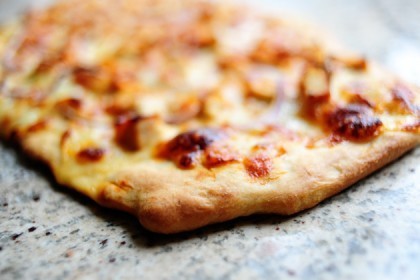
Now, I decided to bake it at this stage, then move on with the other toppings after it came out of the oven. So get it into a really, really hot oven until the crust is golden and the cheese is bubbly. (And pssst. Another squeeze of lime juice would be a really good idea.)
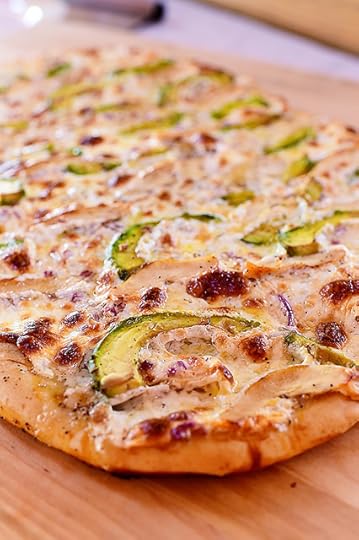 And here ’tis!
 The crust is perfect.
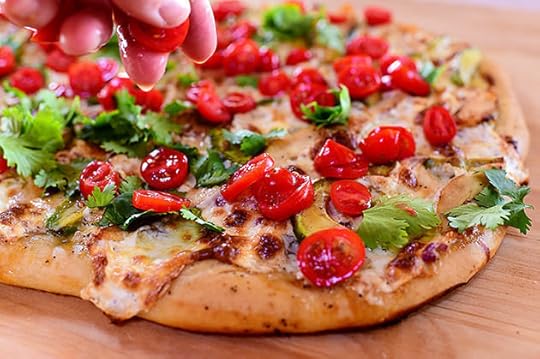 As soon as it comes out of the oven, sprinkle on the cilantro, tomatoes…
And green onions.
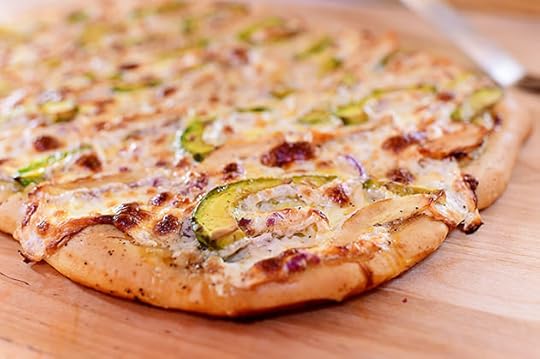
 Then slice it up and serve it right then and there!
Keep in mind that the avocado will tend to brown quickly once it comes out of the oven. (Of course, the lime juice will help, but definitely plan on serving it right away.)
Very simple, very delicious.
Here are the handy dandy printables—both for the pizza and the crust! (Note: the crust recipe below makes two pizza crusts. Store the other one in the fridge for several days until you need it, or make two pizzas at once!)
Recipe
Chicken Avocado Pizza
Prep Time: 1 Hour30 Minutes
Cook Time: 15 Minutes
Difficulty: Easy
Servings: 12
Print Recipe
Ingredients
2 whole Chicken Breasts, Cut Half To Create 4 Thin Breasts Olive Oil Salt And Pepper, to taste1 whole Pizza Crust, Unbaked3 whole Avocados, Ripe But Not Overly Soft, Pitted And Sliced Lime Juice8 ounces, weight Mozzarella Cheese, Sliced Thin Or Grated1 cup Cilantro Leaves1/2 cup Red Grape Or Cherry Tomatoes, Sliced Thin3 whole Green Onions, Sliced1/2 whole Red Onions, Minced Finely Preparation Instructions
Sprinkle chicken breasts with salt and pepper. Heat olive oil on a grill pan or in a skillet, and cook the chicken on both sides until done in the middle. Remove from the pan, allow to cool slightly, then slice into thin pieces. Set aside.
Toss the avocado slices in lime juice. Set aside.
Preheat the oven to 500 degrees. Roll out pizza dough until very thin and place on a large baking sheet. Drizzle with olive oil and smear all over the surface of the dough with your fingers. Sprinkle with salt and pepper. Lay on the mozzarella, chicken, and avocado slices. Sprinkle on minced red onions. Sprinkle with a little more salt and pepper, then place the pan in the oven.
Bake the pizza for 12-15 minutes, or until crust is golden and cheese is melted and bubbly.
Remove from the oven and immediately add cilantro, tomatoes, and green onions on top. Squeeze on a little more lime juice, slice, and serve immediately.
(Note: Use storebought pizza crust to save time! Just adjust cooking temperature and time accordingly.)
Posted by Ree | The Pioneer Woman on September 2 2014
Recipe
Basic Pizza Crust
Prep Time: 5 Minutes
Cook Time:
Difficulty: Easy
Servings: 12
Print Recipe
Ingredients
1 teaspoon Instant Or Active Dry Yeast1-1/2 cup Warm Water4 cups All-purpose Flour1 teaspoon Kosher Salt1/3 cup Olive Oil Preparation Instructions
Sprinkle yeast over 1 1/2 cups warm (not lukewarm) water. Let stand for a few minutes.
In a mixer, combine flour and salt. With the mixer running on low speed (with paddle attachment), drizzle in olive oil until combined with flour. Next, pour in yeast/water mixture and mix until just combined, and the dough comes together in a sticky mass.
Coat a separate mixing bowl with a light drizzle of olive oil, and form the dough into a ball. Toss to coat dough in olive oil, then cover the bowl tightly with plastic wrap and set it aside for 1 to 2 hours, or store in the fridge until you need it.
Note: it’s best to make the dough at least 24 hours in advance, and 3 or 4 days is even better.
When you are ready to make the pizza, grab HALF the pizza dough (recipe makes 2 crusts) and squeeze the dough toward the bottom to form a nice, tight, pulled ball. You can roll out the pizza with a rolling pin if you’d like, but sometimes it’s just as easy to throw it around and pull and stretch till it feels right. And when the crust is nice and thin, lay it on an oiled baking sheet or pizza pan. Drizzle a little olive oil on the dough and spread it with your fingers. Very lightly sprinkle some salt on the crust.
Preheat oven to 375 degrees. Top your crust with your toppings of choice. Then bake for 15 to 17 minutes, or until crust is golden brown and toppings are bubbly.
Posted by Ree | The Pioneer Woman on September 2 2014

August 27, 2014
Browned Butter M & M Cookies
 Browned butter is one of life’s pure pleasures, whether it’s spooned over fish, tossed with popcorn, or sipped with a straw. Just kidding on the straw thing. I think.
Browned butter cookies, as you can imagine, are one of the most miraculous uses of browned butter there is. Whether it’s oatmeal cookies, sugar cookies, peanut butter cookies, or chocolate chip cookies, subbing browned butter for all or some of the butter in whatever recipe you use will catapult your cookie into another dimension. Try it sometime! You’ll be hooked for life.
I made M&M cookies yesterday and because I was feeling saucy, decided to go the browned butter route. I used the recipe I usually use for any incarnation of chocolate chip cookies, but rather than brown all of the butter in the recipe, I did what Joy the Baker does in her browned butter cookie recipe, which is to use half browned butter, half softened butter. Worked like a charm. (Hi, Joy! I love you.)
Here’s the step-by-step recipe! I should add before we continue that I made the cookies at 4:00 yesterday. As of 8:18 this morning, they are all gone.
*Burp*
 First, brown the butter: Add a stick of salted butter to a medium skillet over medium heat.
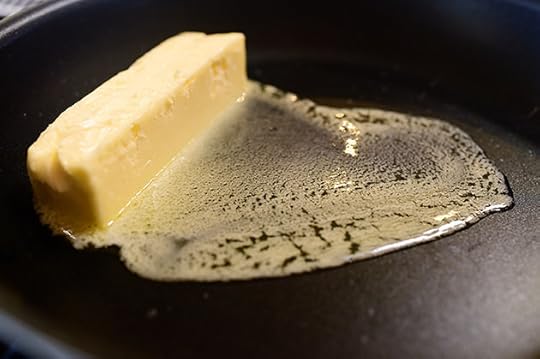 Let it melt…
 All the while resisting the urge to dip in a chunk of warm, crusty bread and eat it as as a snack.
I love butter.
I love bread.
Amen.
 Once the butter is totally melted, there’ll be foam on top and it will start to sizzle. Start gently swirling the butter around to pan to keep everything moving, and keep a watchful eye on the butter. Once it starts to brown, it can brown very quickly, so time is of the essence!
 I took the pan off the stove when I could see that the color of the butter was deep golden brown.
 You want the butter to be deep golden brown, and the solids at the bottom to be an even deeper brown…but definitely not black! If they’re black, the butter is burned, and it’s best to start over with a new stick of butter.
 Pour the butter into a separate bowl pretty quickly after you get it off the stove, as the butter will keep cooking/browning in the pan. (And scrape in all the solids that get left behind. That’s the good stuff, baby.)
 You don’t have to do this step, but I did: Skim the excess foam off the top. Again, totally optional. I just did it because I needed a little exercise.
Then—very important—just let the butter cool almost completely—at least 30 minutes or so!
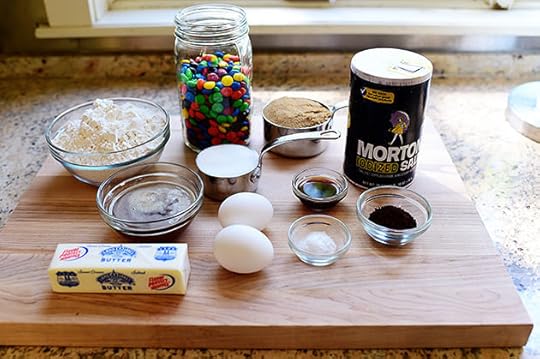 Then get everything else ready for the cookies: another stick of butter (softened), brown sugar, regular sugar, flour, instant coffee, baking soda, salt, vanilla, eggs, and M&M’s. (The browned butter has been transferred to a glass bowl in this pic because evidently I didn’t have enough dishes to do in my life.)
 Cookie time! Preheat the oven to 375 degrees, then add the softened stick of butter to the bowl of a mixer.
 Add brown sugar…
 And regular sugar, and mix it together for a minute, scraping the bowl once to make sure the butter and sugars are all incorporated.
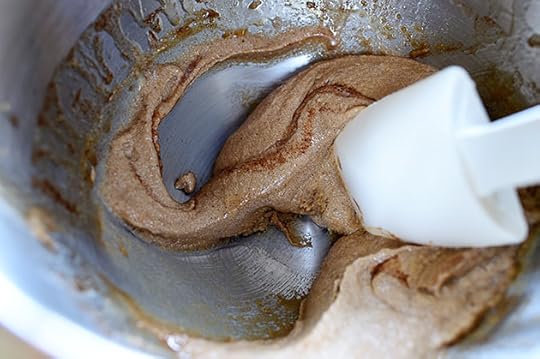
 Next…it’s brown butter time! With the mixer on medium-low, very slowly drizzle in the browned butter. Stop halfway through and scrape the bowl, then keep going. (It’s obviously important here for the browned butter to be totally cooled down, so don’t skip that step or you’ll regret it the rest of your life.)
 And I hate to be a broken record…but be sure all that good stuff makes it in.
 Then mix it until the brown butter is all mixed in. It should be a little runnier than regular chocolate chip cookie dough at this stage…but that’s normal, man.
 Crack in 2 eggs, one at a time, and mix them in.
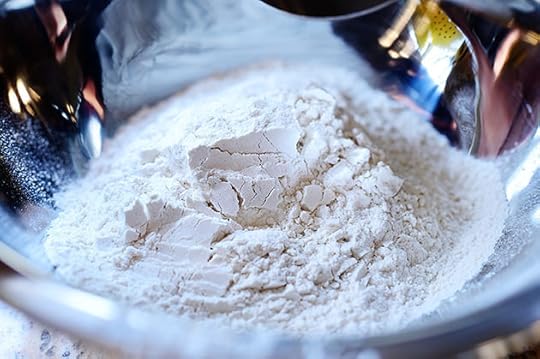
 Then get the dry ingredients ready! Flour, baking soda, salt.
Amen.
 Stir it together…
 Then add the instant coffee…
 And stir it in.
Now, for the coffee haters out there: Don’t worry! You won’t even taste it. My husband has never ingested a cup of coffee in his entire life, but he loves my chocolate chip cookies…and that’s because he has no idea there’s coffee in them. The coffee just adds a nice depth of flavor and a richness, but definitely not an overwhelming coffee flavor. Cross my heart.
 Oh…I forgot the vanilla! (Add it in with the eggs.)
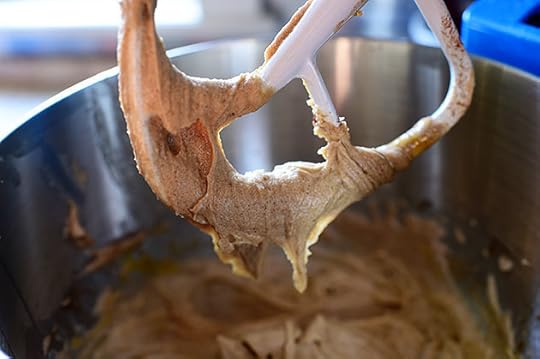
 Mix in the dry ingredients in 3 additions, stopping and scraping the bowl after each addition.
Scraping the bowl is big in this recipe. You just want to make sure everything has a chance to mix in evenly.
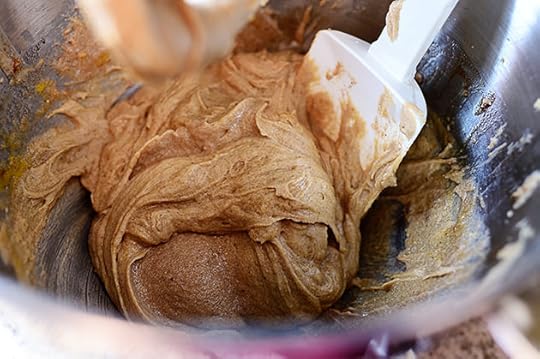
 Glory be. Will you look at that? Complete lusciousness. Little browned bits all over the place—some are from the coffee, some are from the browned butter. I almost didn’t want to add anything to it. I almost didn’t even want to bake it. I just wanted to climb inside the bowl and live there the rest of my days.
But I didn’t.
(I wouldn’t have fit anyway.)
 Next, I added M&M’s!
 Then I mixed them in.
And I’ll just tell you this now: After tasting the finished cookies, which were heavenly, I determined that I wished I would have done a mix of M&M’s and chocolate chips. Using only M&M’s resulted in a super sweet cookie, and I thought they could have used just a little semi-sweet chocolate to take away a little of that milk chocolate sweetness.
So 1 cup of M&M’s and 1 cup of chocolate chips. Perfect!
 So here’s what I did: Scooped out teaspoon-sized helpings…
 Then I pressed 2 or 3 extra M&M’s on the top so the cookies would be extra colorful and crazy.
After that, I stuck the pan(s) into the fridge for about 10 minutes before baking them…but this is totally optional.
 They only took about 7 minutes to bake.
 Beautiful! Now, if you don’t want them quite so toasty brown (I like them that way), you could bake them at 350 for a tiny bit longer. Just play with it and see what you like.
 Serve them with a cup of cold milk.
 Enjoy these, my friends! They’re a treat.
Here’s the handy dandy printable.
Recipe
Browned Butter M&M Cookies
Prep Time: 30 Minutes
Cook Time: 7 Minutes
Difficulty: Easy
Servings: 24
Print Recipe
Ingredients
1 cup (2 Sticks) Salted Butter1 cup Brown Sugar, Packed1/2 cup Sugar2 whole Large Eggs1 Tablespoon Vanilla2 cups All-purpose Flour2 Tablespoons (additional) All-purpose Flour (rounded Tablespoons)2 teaspoons (heaping) Instant Coffee Granules1 teaspoon Baking Soda1 teaspoon Salt2 cups M&M's, Plus Extra For Tops Chopped Pecans (optional) Semi-sweet Chocolate Chips (optional) Preparation Instructions
Add one stick of butter to a medium skillet over medium heat. Allow it to melt and bubble up for 3 to 4 minutes, swirling the pan to keep the butter moving around. When the butter is a medium golden brown, remove the pan from the heat (it will continue browning in the pan over the next 30 seconds or so!) Pour butter (and any solids in the bottom of the pan) into a heatproof bowl and allow it to cool completely, about 30 minutes. Meanwhile, allow the other stick of butter to soften.
Preheat the oven to 375 degrees*.
Cream the softened butter together with the brown sugar and regular sugar until it's nice and combined. Add the eggs and vanilla, and beat until smooth, scraping the bowl if necessary to make sure everything is incorporated.
With the mixer on medium-low, slowly drizzle in the cooled melted butter, making sure to add all the darker brown solids. Scrape the bowl the mix again for 20-30 seconds, until everything is combined.
In a separate bowl, combine the flour, coffee granules, baking soda and salt. Stir together, then add it in 1/3 increments, mixing on low, until it's totally incorporated. Scrape the bowl and beat for a few more seconds. Stir in the M&M's and the chocolate chips, if using. (I think using half chocolate chips, half M&M's would be perfect.)
In batches, scoop by heaping teaspoon onto a baking sheet lined with a baking mat, Press 2 to 3 additional M&M's on top if desired. If you have time, refrigerate scooped dough for 10 minutes (if not, it's fine.) Bake for 7 to 8 minutes, or until deep golden brown. Wait a minute or two, then transfer cookies to a cooling rack. Repeat with the rest of the dough. Serve cookies with a big glass of cold milk!
*You can bake at 350 for a little longer if you don't want the cookies to be quite so brown. (I like brown cookies!)
Posted by Ree | The Pioneer Woman on August 27 2014

Browned Butter M&M Cookies
 Browned butter is one of life’s pure pleasures, whether it’s spooned over fish, tossed with popcorn, or sipped with a straw. Just kidding on the straw thing. I think.
Browned butter cookies, as you can imagine, are one of the most miraculous uses of browned butter there is. Whether it’s oatmeal cookies, sugar cookies, peanut butter cookies, or chocolate chip cookies, subbing browned butter for all or some of the butter in whatever recipe you use will catapult your cookie into another dimension. Try it sometime! You’ll be hooked for life.
I made M&M cookies yesterday and because I was feeling saucy, decided to go the browned butter route. I used the recipe I usually use for any incarnation of chocolate chip cookies, but rather than brown all of the butter in the recipe, I did what Joy the Baker does in her browned butter cookie recipe, which is to use half browned butter, half softened butter. Worked like a charm. (Hi, Joy! I love you.)
Here’s the step-by-step recipe! I should add before we continue that I made the cookies at 4:00 yesterday. As of 8:18 this morning, they are all gone.
*Burp*
First, brown the butter: Add a stick of salted butter to a medium skillet over medium heat.
Let it melt…
All the while resisting the urge to dip in a chunk of warm, crusty bread and eat it as as a snack.
I love butter.
I love bread.
Amen.
Once the butter is totally melted, there’ll be foam on top and it will start to sizzle. Start gently swirling the butter around to pan to keep everything moving, and keep a watchful eye on the butter. Once it starts to brown, it can brown very quickly, so time is of the essence!
I took the pan off the stove when I could see that the color of the butter was deep golden brown.
You want the butter to be deep golden brown, and the solids at the bottom to be an even deeper brown…but definitely not black! If they’re black, the butter is burned, and it’s best to start over with a new stick of butter.
Pour the butter into a separate bowl pretty quickly after you get it off the stove, as the butter will keep cooking/browning in the pan. (And scrape in all the solids that get left behind. That’s the good stuff, baby.)
You don’t have to do this step, but I did: Skim the excess foam off the top. Again, totally optional. I just did it because I needed a little exercise.
Then—very important—just let the butter cool almost completely—at least 30 minutes or so!
Then get everything else ready for the cookies: another stick of butter (softened), brown sugar, regular sugar, flour, instant coffee, baking soda, salt, vanilla, eggs, and M&M’s. (The browned butter has been transferred to a glass bowl in this pic because evidently I didn’t have enough dishes to do in my life.)
Cookie time! Preheat the oven to 375 degrees, then add the softened stick of butter to the bowl of a mixer.
Add brown sugar…
And regular sugar, and mix it together for a minute, scraping the bowl once to make sure the butter and sugars are all incorporated.
Next…it’s brown butter time! With the mixer on medium-low, very slowly drizzle in the browned butter. Stop halfway through and scrape the bowl, then keep going. (It’s obviously important here for the browned butter to be totally cooled down, so don’t skip that step or you’ll regret it the rest of your life.)
And I hate to be a broken record…but be sure all that good stuff makes it in.
Then mix it until the brown butter is all mixed in. It should be a little runnier than regular chocolate chip cookie dough at this stage…but that’s normal, man.
Crack in 2 eggs, one at a time, and mix them in.
Then get the dry ingredients ready! Flour, baking soda, salt.
Amen.
Stir it together…
Then add the instant coffee…
And stir it in.
Now, for the coffee haters out there: Don’t worry! You won’t even taste it. My husband has never ingested a cup of coffee in his entire life, but he loves my chocolate chip cookies…and that’s because he has no idea there’s coffee in them. The coffee just adds a nice depth of flavor and a richness, but definitely not an overwhelming coffee flavor. Cross my heart.
Oh…I forgot the vanilla! (Add it in with the eggs.)
Mix in the dry ingredients in 3 additions, stopping and scraping the bowl after each addition.
Scraping the bowl is big in this recipe. You just want to make sure everything has a chance to mix in evenly.
Glory be. Will you look at that? Complete lusciousness. Little browned bits all over the place—some are from the coffee, some are from the browned butter. I almost didn’t want to add anything to it. I almost didn’t even want to bake it. I just wanted to climb inside the bowl and live there the rest of my days.
But I didn’t.
(I wouldn’t have fit anyway.)
Next, I added M&M’s!
Then I mixed them in.
And I’ll just tell you this now: After tasting the finished cookies, which were heavenly, I determined that I wished I would have done a mix of M&M’s and chocolate chips. Using only M&M’s resulted in a super sweet cookie, and I thought they could have used just a little semi-sweet chocolate to take away a little of that milk chocolate sweetness.
So 1 cup of M&M’s and 1 cup of chocolate chips. Perfect!
So here’s what I did: Scooped out teaspoon-sized helpings…
Then I pressed 2 or 3 extra M&M’s on the top so the cookies would be extra colorful and crazy.
After that, I stuck the pan(s) into the fridge for about 10 minutes before baking them…but this is totally optional.
They only took about 7 minutes to bake.
Beautiful! Now, if you don’t want them quite so toasty brown (I like them that way), you could bake them at 350 for a tiny bit longer. Just play with it and see what you like.
Serve them with a cup of cold milk.
Enjoy these, my friends! They’re a treat.
Here’s the handy dandy printable.
Recipe
Browned Butter M&M Cookies
Prep Time: 30 Minutes
Cook Time: 7 Minutes
Difficulty: Easy
Servings: 24
Print Recipe
Ingredients
1 cup (2 Sticks) Salted Butter1 cup Brown Sugar, Packed1/2 cup Sugar2 whole Large Eggs1 Tablespoon Vanilla2 cups All-purpose Flour2 Tablespoons (additional) All-purpose Flour (rounded Tablespoons)2 teaspoons (heaping) Instant Coffee Granules1 teaspoon Baking Soda1 teaspoon Salt2 cups M&M's, Plus Extra For Tops Chopped Pecans (optional) Semi-sweet Chocolate Chips (optional) Preparation Instructions
Add one stick of butter to a medium skillet over medium heat. Allow it to melt and bubble up for 3 to 4 minutes, swirling the pan to keep the butter moving around. When the butter is a medium golden brown, remove the pan from the heat (it will continue browning in the pan over the next 30 seconds or so!) Pour butter (and any solids in the bottom of the pan) into a heatproof bowl and allow it to cool completely, about 30 minutes. Meanwhile, allow the other stick of butter to soften.
Preheat the oven to 375 degrees*.
Cream the softened butter together with the brown sugar and regular sugar until it's nice and combined. Add the eggs and vanilla, and beat until smooth, scraping the bowl if necessary to make sure everything is incorporated.
With the mixer on medium-low, slowly drizzle in the cooled melted butter, making sure to add all the darker brown solids. Scrape the bowl the mix again for 20-30 seconds, until everything is combined.
In a separate bowl, combine the flour, coffee granules, baking soda and salt. Stir together, then add it in 1/3 increments, mixing on low, until it's totally incorporated. Scrape the bowl and beat for a few more seconds. Stir in the M&M's and the chocolate chips, if using. (I think using half chocolate chips, half M&M's would be perfect.)
In batches, scoop by heaping teaspoon onto a baking sheet lined with a baking mat, Press 2 to 3 additional M&M's on top if desired. If you have time, refrigerate scooped dough for 10 minutes (if not, it's fine.) Bake for 7 to 8 minutes, or until deep golden brown. Wait a minute or two, then transfer cookies to a cooling rack. Repeat with the rest of the dough. Serve cookies with a big glass of cold milk!
*You can bake at 350 for a little longer if you don't want the cookies to be quite so brown. (I like brown cookies!)
Posted by Ree | The Pioneer Woman on August 27 2014
August 25, 2014
Green Chile Chicken
 I made this for dinner last night and it was heaven on a plate. Green chiles are one of my favorite ingredients on earth, and since I had a pile of fresh ones, I decided to roast ‘em and highlight ‘em in a simple grilled chicken dish.
This recipe is ultra versatile! I whipped up my own marinade for the chicken, but you can use storebought…or you could skip the marinade and just season the heck out of the chicken before you grill it. And speaking of grilling…you don’t even have to grill the chicken at all; you can just cook it in a skillet. I served my chicken with rice and beans, but you can serve it with corn tortillas and veggies…or you can serve the chicken on a bun and call it a sandwich.
But the most versatility you have with this recipe is this: You can totally change up what you wear whenever you make it. Plaid, polka dots, skirts, shorts, overalls…anything goes!
Ha.
 First, make the marinade for the chicken. Again, you can basically marinate the chicken in anything you want, homemade or storebought. Take an hour to whip up an elaborate marinade yourself…or crack open a bottle of Italian dressing. Totally up to you! I whipped up something simple: Olive oil…
 Lime juice…
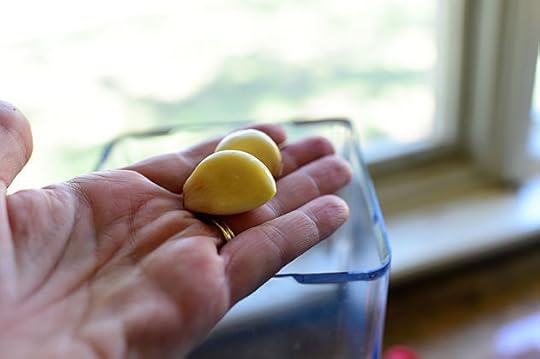 Garlic…
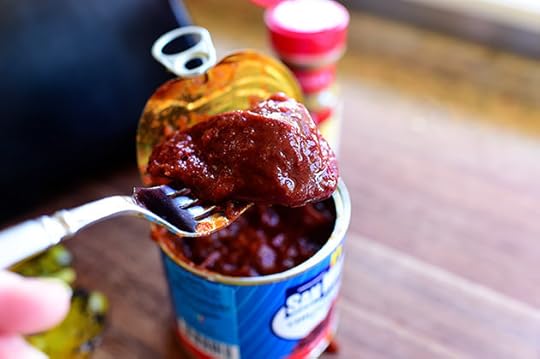 Then I cracked open a can of chipotle peppers…
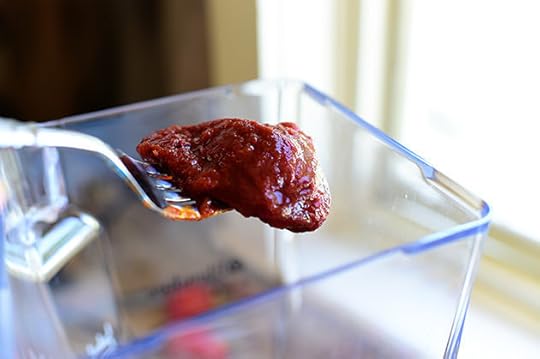 And added in a couple of bigguns.
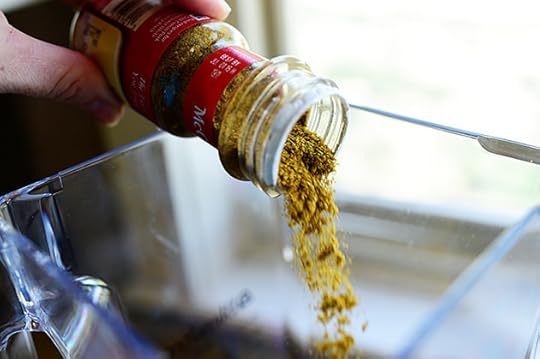 Next came some ground cumin, salt, and pepper…
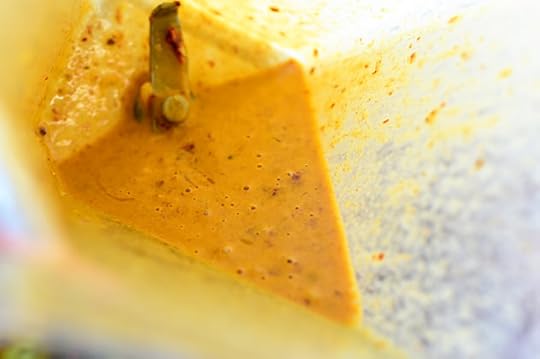 Then I whizzed it together until it was nice and pureed with some little chunks of chipotle.
 Throw some chicken breasts into a ziploc…
 Pour in the marinade…
 And let it marinate in the fridge for at least 4 hours. And I repeat: Use whatever marinade you want! You just want the chicken to be nice and flavorful.
(Oh, and foodblogger confession time: Because I didn’t want to run out of daylight, I didn’t marinate the chicken for the full four hours. Don’t be like me.)
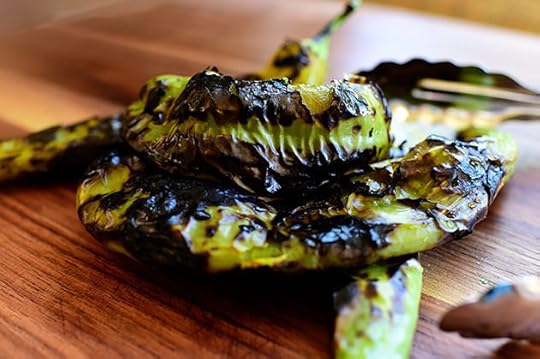
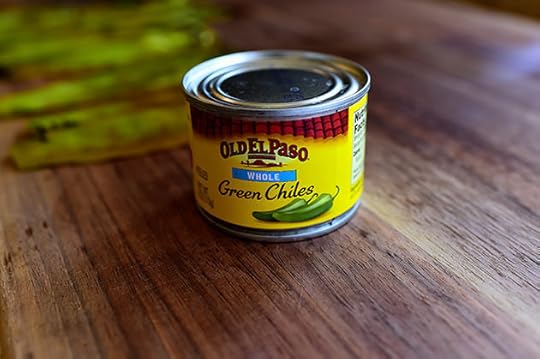
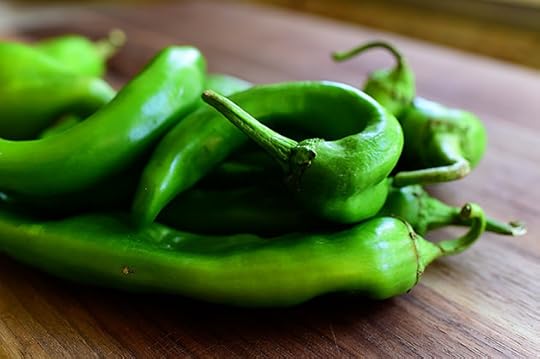 Now it’s time to roast the chiles! These are Hatch chiles, which is a specific variety of chile grown in New Mexico, but you can also use Anaheim chiles (you can find ‘em anywhere) or Poblanos. Any good sized, relatively mild chile will do.
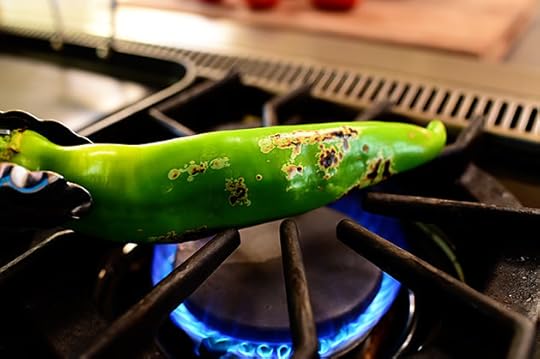 Use metal tongs to hold right over the flame on your stovetop, if you have a gas stove. If you don’t have a gas stove, you can lay the chiles on a baking sheet and put them directly under your oven broiler. Just turn them halfway through and get them as black and blistered as you can.
 This process takes a little while…
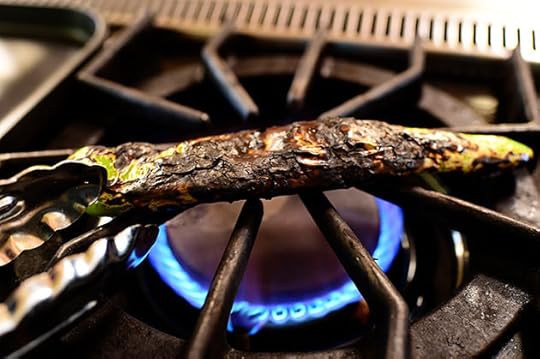 But the blacker…the better!
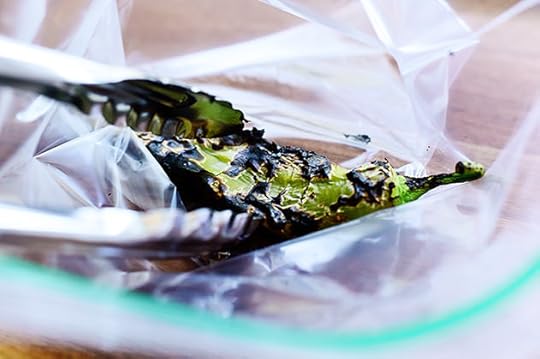 Once they’re blackened, throw them in a big ziploc bag and seal it up.
 Let them sit in the bag for 20 minutes or so, just to give them time to sweat.
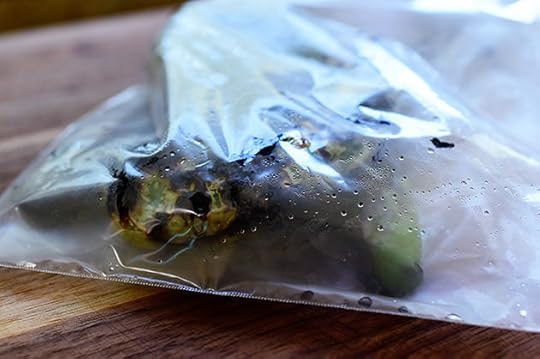
 Then take the chiles out of the bag…
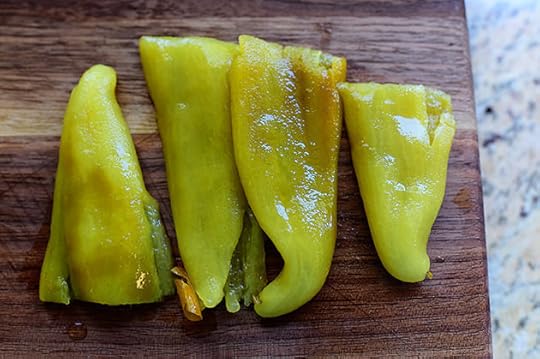
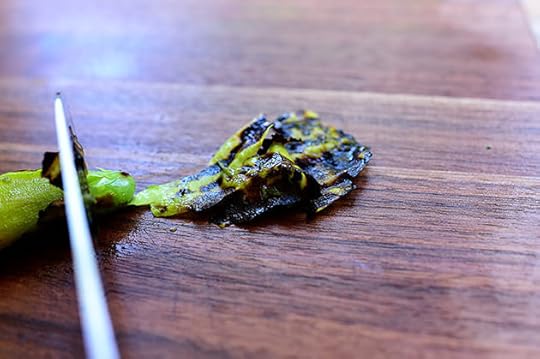 And use a sharp knife to scrape off most of the blackened skin.
 A few little blackened bits are good!
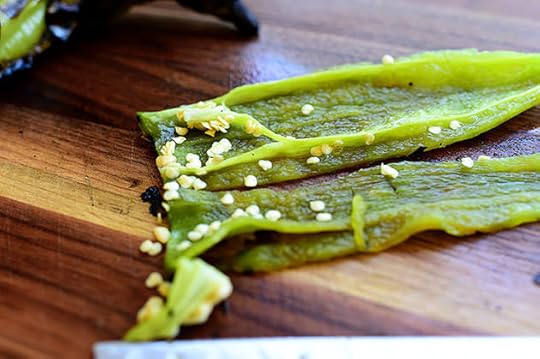 Finally, slice the chiles in half down the middle and remove the seeds and membranes…
 Then lay them out flat so they’re all ready.
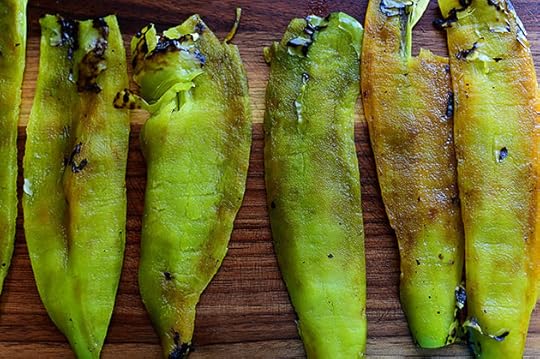
 Here’s another shortcut in case you can’t find whole chiles and/or you don’t have time to roast them.
 They don’t…quite…pack the same punch.
 But again…they’re fine in a pinch! I ain’t afraid to use ‘em.
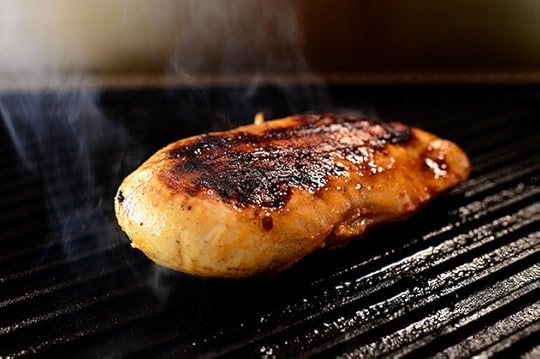 Now you just need to cook the chicken! I used a grill pan, but you can use a regular outdoor grill OR, as I pointed out above, you can do it in a skillet. Just grill/fry the first side for about 4 minutes or so, then flip it over…
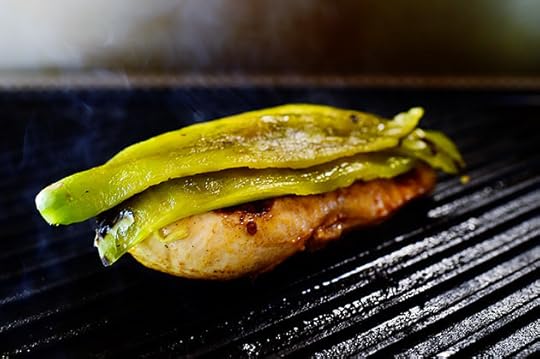 Lay on 2 of the chile halves (so each chicken breast gets a whole chile)…
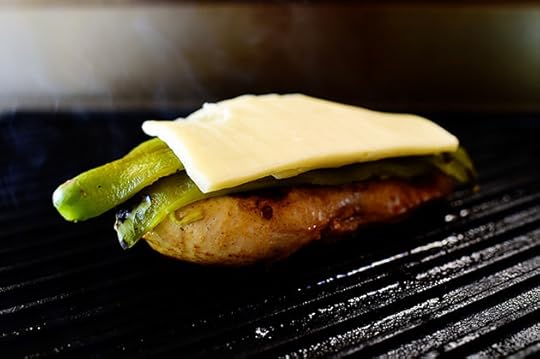 Followed by a nice, generous slice of Monterey Jack cheese.
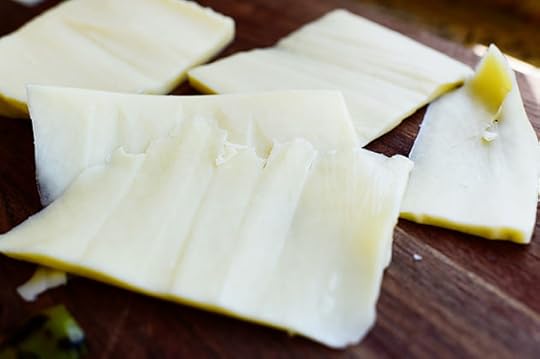 I actually sliced this right off the block…but you can use pre-sliced or, of course, any other kind of cheese your soul leads you to use.
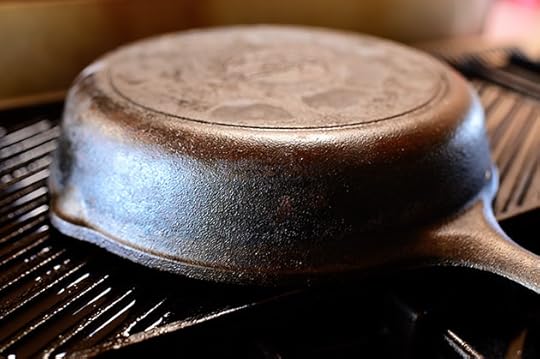 I thought the cheese could use a little help, so I inverted an iron skillet on top of it so it would steam a little bit. Basically, you want the cheese totally melted by the time the chicken finishes cooking in the middle—about 4 to 5 minutes or so.
 Beautiful!
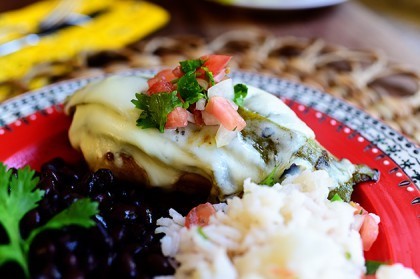
 I served it on a plate…
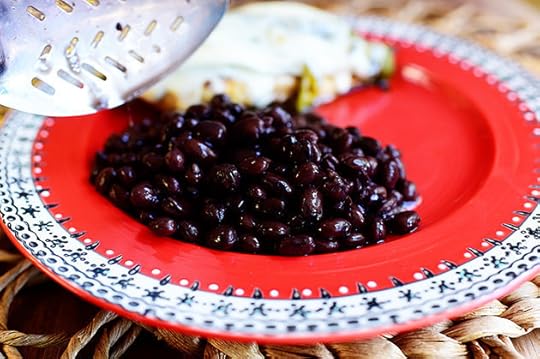 With some seasoned black beans (these are canned, but you can make this homemade recipe if you’ve got the time.)
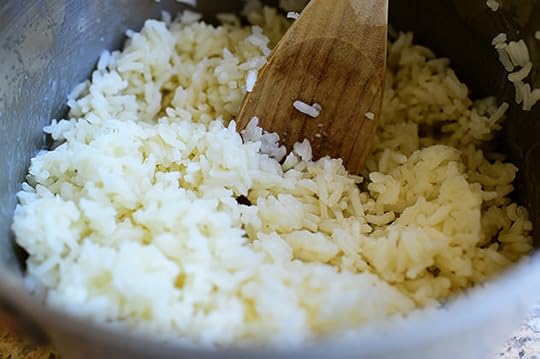 Then this was really simple! I just cooked some white rice…
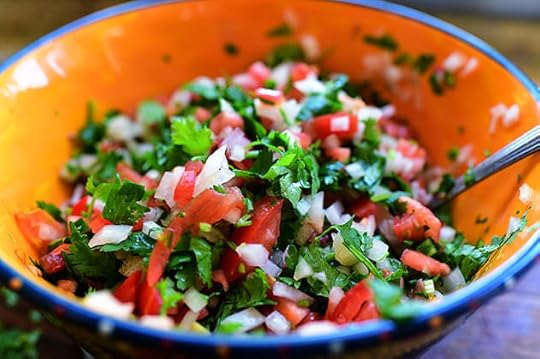 Whipped up a batch of pico de gallo…
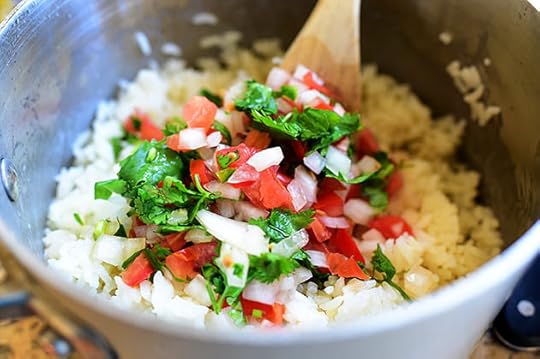 Threw some into the rice…
 And mixed it all together.
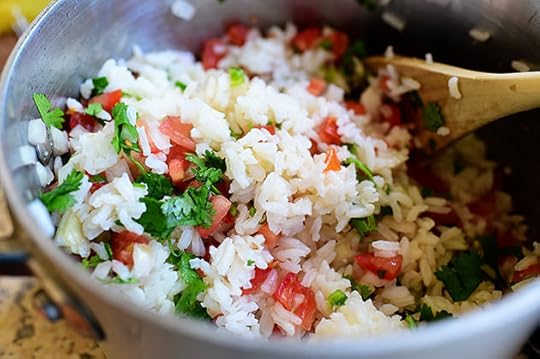
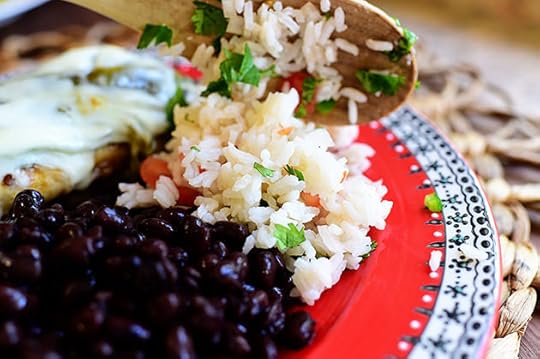 I had let the rice cool before adding the pico de gallo, and it turned to be really nice at room temperature. The beans and chicken were both nice and piping hot, so it worked really well.
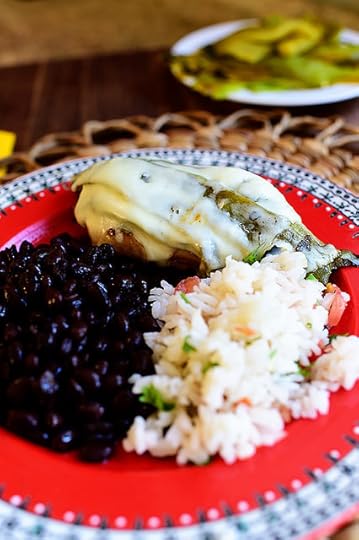 Totally lovely, but I think the chicken looks just a tiny bit lonely.
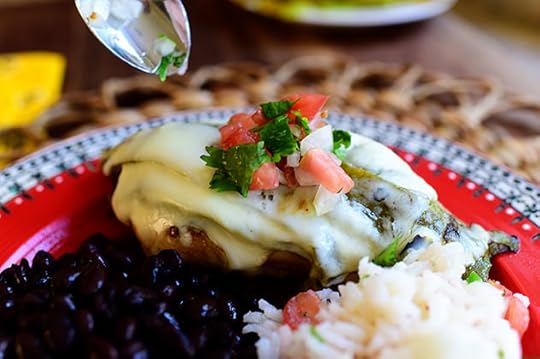 A little pico is perfect!
 This was a downright delightful dinner.
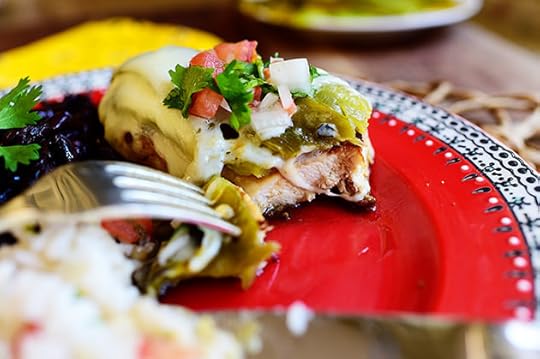 The chicken was moist and flavorful, the cheese nice and luscious, and the roasted green chile was the thing that really sent it over the top.
 Another idea for serving is to slice up one of the green chile chicken breasts…
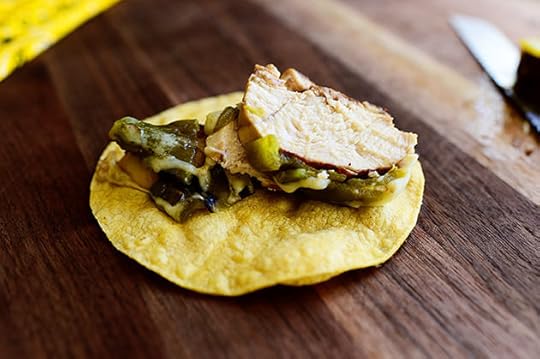 Put it on a warmed corn tortilla…
 Top it with pico de gallo…
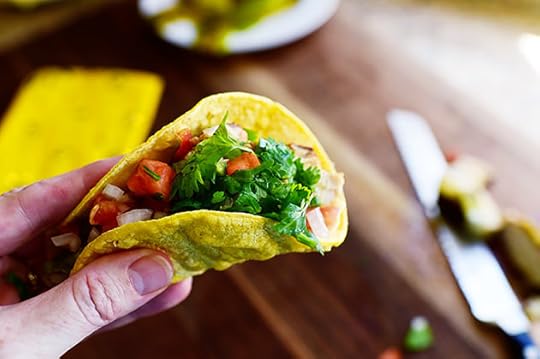 Then roll it up and chow down.
You’ll love this recipe. Lots of options, lots of ways to serve…and lots and lots of flavor, baby.
Here’s the handy dandy printable!
Recipe
Green Chile Chicken
Prep Time: 4 Hours
Cook Time: 45 Minutes
Difficulty: Easy
Servings: 6
Print Recipe
Ingredients
1/2 cup Olive Oil3 Tablespoons Lime Juice2 whole Chipotle Peppers In Adobo Sauce (more To Taste)2 cloves Garlic1 teaspoon Ground Cumin1 teaspoon Salt1/2 teaspoon Black Pepper6 whole Boneless, Skinless Chicken Breasts6 whole Hatch, Anaheim, Or Poblano Chiles1/2 pound Monterey Jack Cheese, Cut Into Slices Or Grated Pico De Gallo Or Salsa, For Serving Beans, For Serving Rice For Serving Preparation Instructions
First, make the marinade for the chicken: Combine olive oil, lime juice, chipotle peppers, garlic, cumin, salt, and pepper in a blender and mix until it's totally pureed. Pour into a large ziploc bag with the chicken breasts. Seal the bag, smush it around to coat the chicken, and place it in the fridge to marinate for at least 4 hours (overnight if possible.) ***Note: You can use any marinade, homemade or storebought, you'd like! Anything works.
After the chicken has marinated, roast the chiles by using metal tongs to hold the peppers one by one over the flame of your stovetop until the skin is totally charred. (If you don't have a gas stove, you can use an outdoor grill OR place them on a baking sheet directly under your oven's broilers.) When the skin is totally blackened, place the chiles in a large ziploc and seal the bag to allow the chiles to sweat for a good 20 minutes. Remove them from the bag and use a knife to scrape off most of the blackened skin. Slice the chiles in half lengthwise, and scrape out the seeds and membranes. Lay out the roasted, seeded chile halves so they'll be ready.
Grill the chicken (or saute it in a skillet) over medium-high heat for 4 minutes on the first side. Turn the chicken over, and on the cooked side lay on 2 chile halves and a nice slice of cheese. Turn the heat to medium-low and allow the chicken to finish cooking for 4 to 5 minutes, until it's totally done in the center. The cheese should melt on its own; if it needs a little help, invert an iron skillet over it (or put the lid on the skillet, if using).
Remove the chicken from the skillet and serve it with rice and beans on the side. Top the chicken with a spoonful of pico de gallo or salsa.
Posted by Ree | The Pioneer Woman on August 25 2014

August 20, 2014
Tomato Tart
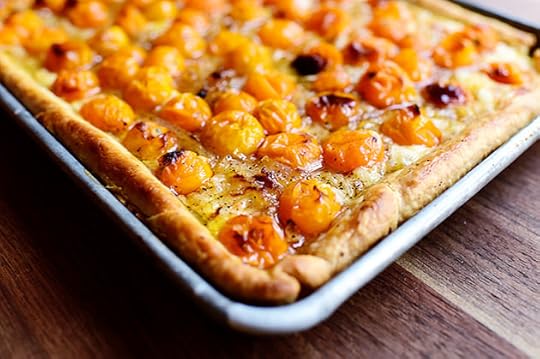
 My sister Betsy just left yesterday after a nice, long visit and while she was here, we did our share of cooking and eating. And cooking. And eating. And eating. The evening before she left, we were trying to figure out how to use a bunch of yellow cherry tomatoes Bets has picked from my garden. They were lusciously ripe and begging to be featured in something special, and after we hemmed and hawed over pasta, frittata, and bruschetta possibilities…we wound up deciding to make a tart.
It would be one of the best decisions either of us has ever made.
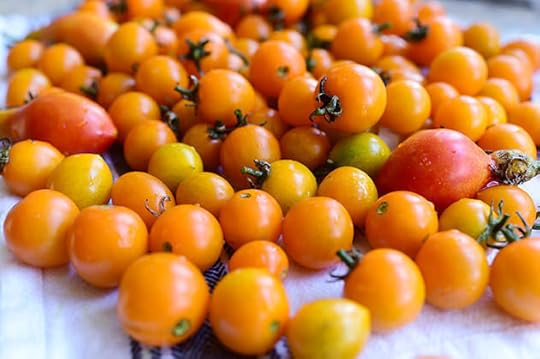 Ahh…the bounty! You can not believe the flavor of these babies. Tomato deliciousness through and through.
 To start, Bets sliced up some onions. Now, taking pictures of this process was tricky for me for two reasons. First, I’m not used to taking photos of someone else’s hands doing the prep and cooking. I’m used to balancing the camera with one hand while I try to do whatever I’m doing with the other hand, all the while trying not to drop said camera in the food. Second, Bets is left-handed, so all the light angles that work well in my kitchen when I’m cooking don’t work with her because she’s facing away from the light.
But with the help of friends, family, and faith…I persevered.
 We wanted to caramelize the onions so they’d add some nice, deep flavor to the tart. So I melted some butter in a skillet…
 Threw in the onions, and started cooking them over medium-low heat.
 Along the way I added salt…
 And pepper…
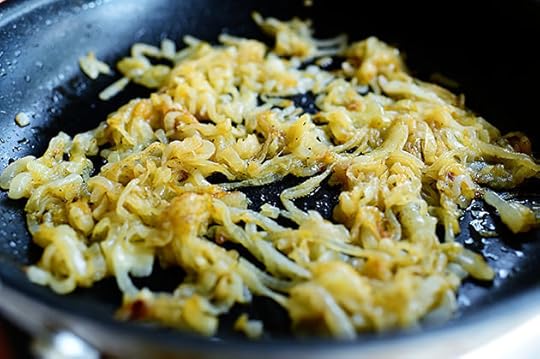 And let them cook for about 20 to 25 minutes, until they were soft and golden brown.
Is there anything better than caramelized onions? I thinketh not. And it is my contention that they’re so darn good because, well, you can’t rush them. They’ve just gotta take their own sweet time.
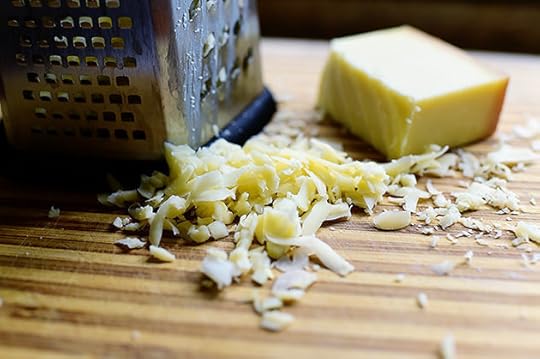 Meanwhile, Betsy was scouring the fridge for different cheeses and grating them up.
 She wound up with a mix of fontina, Parmesan, and Gruyere…but so many different cheeses would work: Monterey Jack, mozzarella, Swiss, Romano…the list goes on. Basically, you want a nice melted cheese combined with a cheese or two that are a little on the sharp side.
 The pie crust was next. For more details on this artisan pastry we created, see the printable recipe below.
(Basically, you can use whatever pie crust recipe your heart tells you to use. Just make sure it’s a generous one! This recipe would be perfect.
 We rolled it really thin—as thin as we could get it…
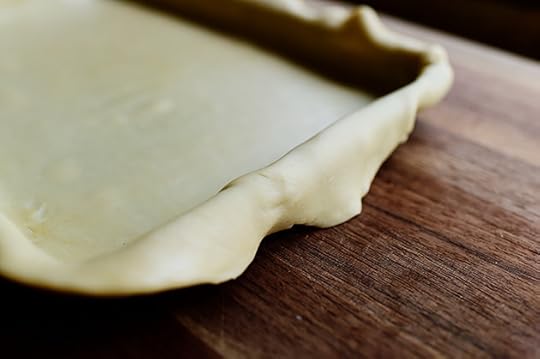 And laid it onto a quarter sheet pan, which is half the size of a half sheet pan. Aren’t you glad you have me here to explain these things to you?
And about the pan: You can go any direction you want! You can use one or two standard pie pans, you can use a tart pan, or you could use a flat cookie sheet and do more of a flat tart with the sides folded up around the edge. Just try to use a pan that is on the short (non-deep) side.
 Just spread a layer of the cheese…
 All over the base of the crust.
 This is what holds everything together!
 Then add the caramelized onions…
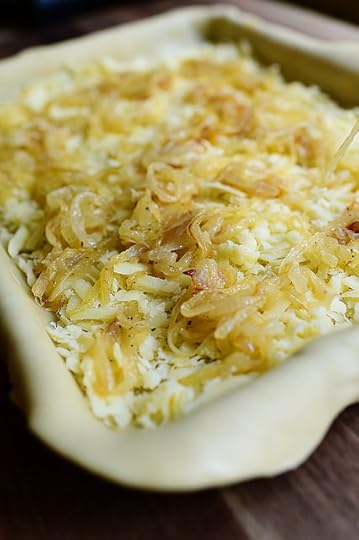 Until they’re totally covering the cheese.
 Then just throw on the tomatoes!
 We considered, for one brief moment of insanity, cutting the tomatoes in half. But we really wanted to celebrate the orbicular beauty of the whole ‘maters, and we wound up being so glad we did.
I sure hope orbicular is a word.
 One last touch: Egg and milk.
 Whisk together.
 Brush on the crust.
Then stick the tart into a 450 degree oven, watch it to make sure the crust doesn’t get too brown…
 And take it out of the oven when it looks absolutely perfect. Wow!
 When you first pull it out of the oven, you’ll see some liquid from the tomatoes…but within a couple of minutes after removing it, the liquid will settle in and become just a beautiful part of the whole picture.
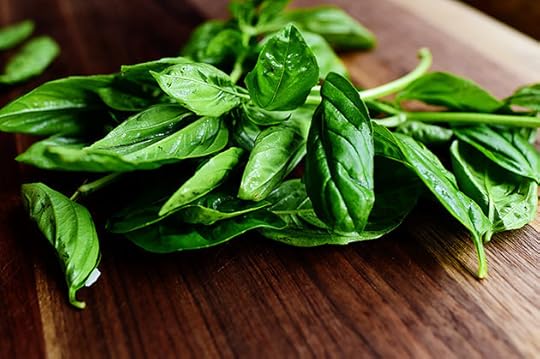 You do want the tart to sit for a few minutes before you serve it, so you have time to grab some basil leaves, cut them into a chiffonade…
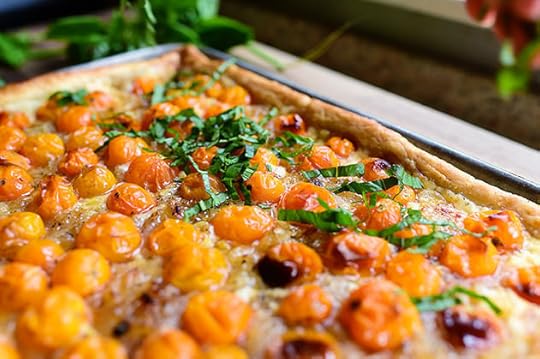 And sprinkle it all over the tart.
Absolute glory. It just screams summer.
 Cut it into large squares…
 And serve it up.
 The verdict? This was one of the most delicious things I’ve ever eaten. The crust was cooked perfectly, the cheese was just the right amount, the caramelized onions sent the flavor through the roof, and the tomatoes were roasted and glorious. Bets and I polished off almost half of it Monday evening, and by noon Tuesday, it was completely gone.
Here’s the handy dandy printable. You’ll love this, my friends!
Recipe
Tomato Tart
Prep Time: 10 Minutes
Cook Time: 35 Minutes
Difficulty: Easy
Servings: 8

Print Recipe
Ingredients
2 whole Large Onions, Halved And Sliced Thin4 Tablespoons Butter Salt And Pepper, to taste2 whole Storebought Pie Crusts (or 1 Good Sized Homemade Crust)1-1/2 cup Grated Fontina Cheese (or Monterey Jack)1/4 cup Grated Parmesan1/4 cup Grated Gruyere (or Swiss)3 cups Cherry Tomatoes (yellow Or Red), Washed And Dried (more If Needed)1 whole Egg1/4 cup Milk16 whole Basil Leaves, Chiffonade (more If Needed) Preparation Instructions
Heat a large skillet over medium-low heat. Add the butter, onions, salt, and pepper and cook for 20 to 25 minutes, stirring occasionally, until the onions are soft and deep golden brown. Set aside.
Preheat the oven to 450.
Smush both pie crusts into a ball, knead it around a bit to combine them, then roll it out into one large, thin crust. Lay onto a shallow quarter sheet pan, a tart pan, or cut in half and use 2 standard pie pans. Sprinkle on the cheese in a single layer, then sprinkle the tomatoes over the cheese.
Mix together the egg and milk and brush it all over the crust around the edge of the tart. Bake the tart for 15 to 18 minutes, watching carefully to make sure the crust doesn't burn. (The tomatoes should be starting to burst apart, with some dark/roasted areas on the skin, and the crust should be deep golden brown.) If the crust is getting brown too fast, reduce the heat to 425.
Remove the tart from the oven and allow it to sit for 5 minutes. Sprinkle the basil all over the top. Cut into squares and serve!
Posted by Ree | The Pioneer Woman on August 20 2014

August 18, 2014
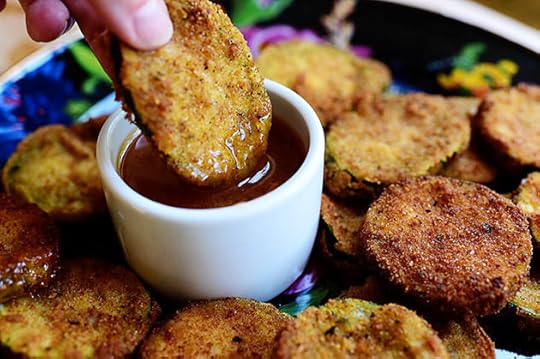
Hamburger Hamlet’s Zucchini Zircles
 Years and years ago, when my mom and kid sister (who was just twelve at the time; she’ll turn forty next month!) drove me out to Los Angeles to drop me off at college, one of the first restaurants we went to was a place called Hamburger Hamlet. It was delicious and while the restaurant offered a lot of different dishes, I actually did order a burger on that first trip there. Then my mom and sister left me at college and I decided to become a vegetarian for several years. Then I married a cattle rancher and that was all over. The end.
There you have it, folks. A Brief History of My Eating Habits, by Ree Drummond. Copyright 2014.
Anyway, despite my vegetarianism, I continued going to Hamburger Hamlet through the years, and one of my favorite things I always ordered (and my mom, sister, and I had ordered them during our first visit there) were their famous Zucchini Zircles—a platter of fried zucchini with a delicious sweet dipping sauce.
A few weeks ago, although I hadn’t been to Hamburger Hamlet in over twenty years, Zucchini Zircles popped into my mind and I wound up finding an official recipe for them after an internet search. I haven’t been able to get them out of my mind since, and yesterday after church, I finally whipped up a batch.
Here’s how to make Zucchini Zircles!
(I miss you, Hamburger Hamlet.)
 First make the apricot dipping sauce: Add some pineapple juice to a blender.
 Then add soy sauce…
 And dry mustard.
 The original recipe for the sauce actually called for “2 1/2 tablespoons” of mustard powder, which I did add…but boy, did it seem like a lot.
And it was kind of a lot. I think 1 tablespoon to 1 1/2 tablespoons would be great!
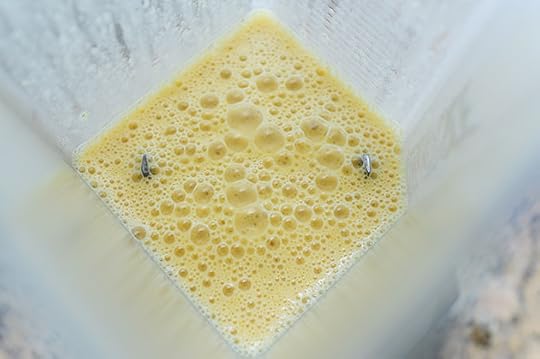 Whiz it around in the blender until it’s all mixed together.
 But the key ingredient to the dipping sauce is apricot preserves!
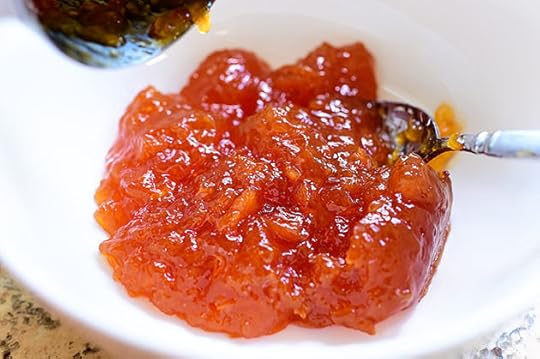 Put some in a bowl…
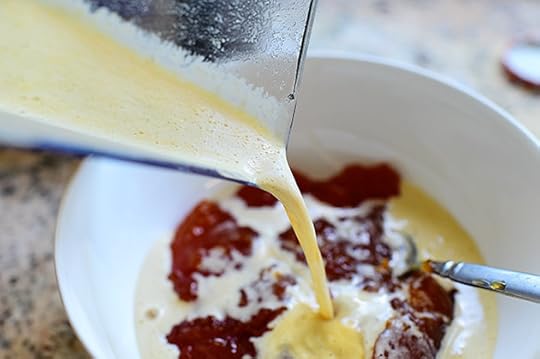 Then pour in that crazy pineapple/soy/mustard concoction. Oh, and don’t be confused by the amount of this liquid: I made a mistake and used 1 cup of pineapple juice instead of the 1/2 cup the recipe called for. Once I realized it, I poured a bit of the liquid out.
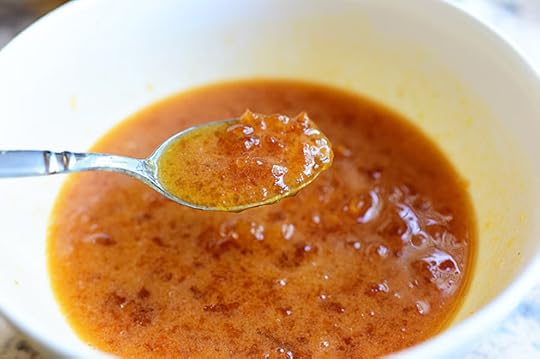 Then I mixed it all together and popped it in the fridge! As with any mixture like this, if you give it a little time in the fridge, the flavors will deepen and develop and all that jazz.
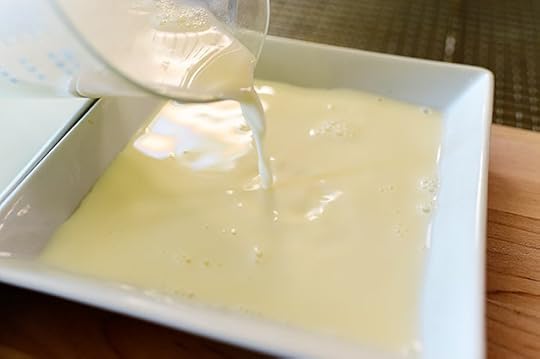 And now, for the breading for the zucchini, which is part of what makes them so ding dang delightful: Get three shallow dishes. Into one, pour some milk. And no, this isn’t egg nog. It’s only August and there’s no way I could find egg nog even if I wanted to. This is pure, white milk but my camera had a little bit of a hiccup and gave the milk a nice golden tinge. But instead of editing it and correcting the color balance of this photo, I instead decided to give you a boring explanation about why it looks like egg nog.
I’m glad we had this talk.
 Into the second bowl, also known as the “next” bowl, add some flour. Simple enough!
 And into the third bowl, also known as the “final” bowl, add some seasoned breadcrumbs. As in, I bought them seasoned. As in, I’m not ashamed!
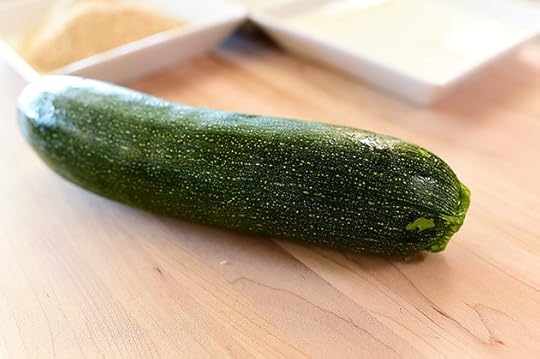 Now, grab a zuke.
 And slice it…
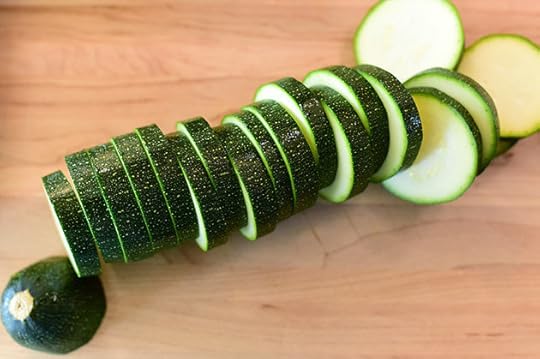 Into “circles like a poker chip, about twice the thickness of a silver dollar.”
I find that description very charming.
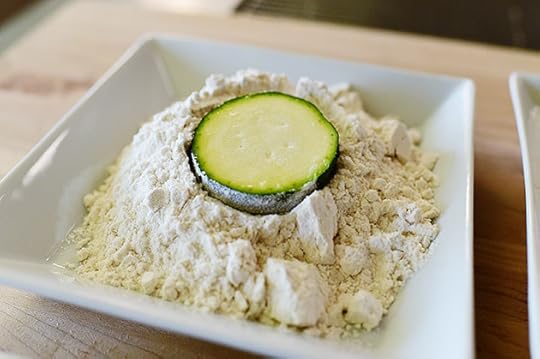 One by one, drop a slice into the flour…
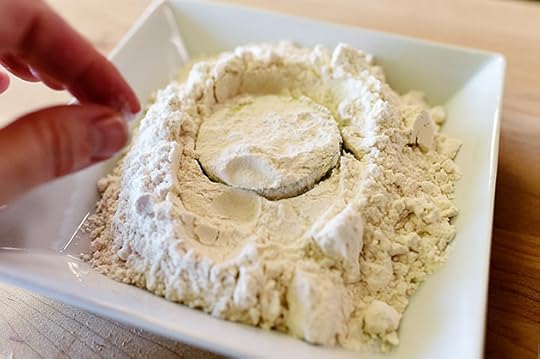 And dredge both sides.
 Then drop it in the milk…
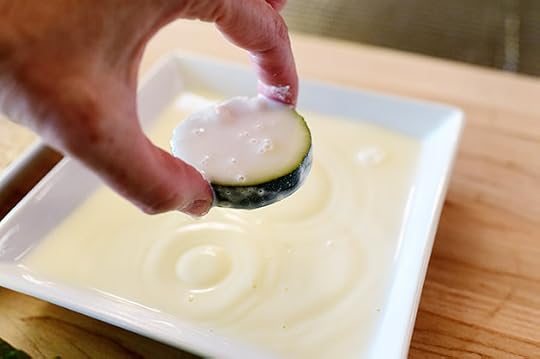 Turn it over a time or two…
 Then drop it in the breadcrumbs…
 And turn it over to coat.
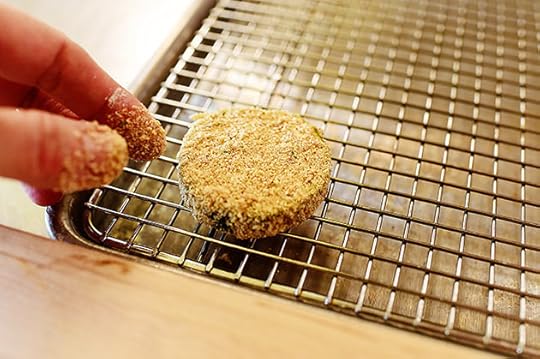 Then lay it on a wire rack over a sheet pan.
 Keep going until they’re all breaded!
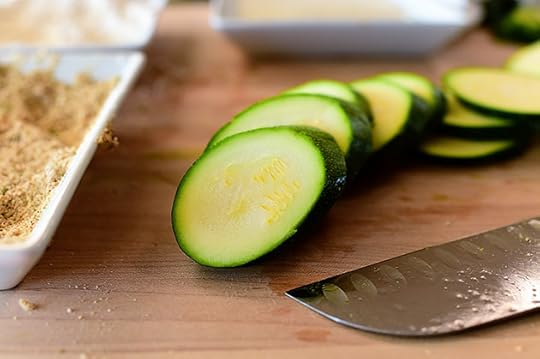 For the second zucchini, I cut them a little on a diagonal, which is how I remember the Zucchini Zircles at the Hamburger Hamlet I used to frequent.
 I just breaded ‘em one by one..
 And set ‘em on the pan.
 Now it was time to fry ‘em up!
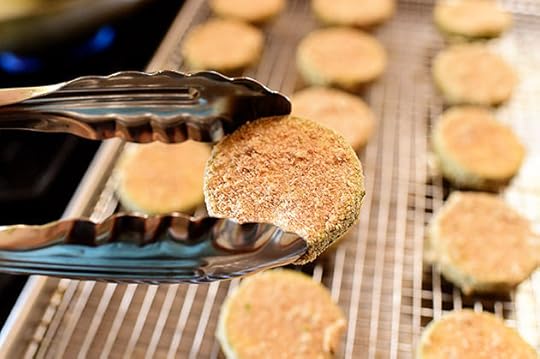 I heated vegetable oil over medium heat until a few drops of breadcrumbs sizzled. Then I used tongs…
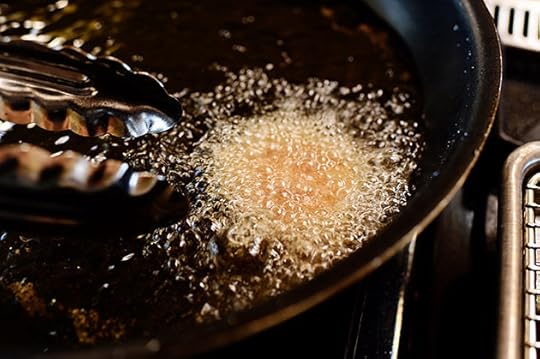 To carefully drop them in. I had enough oil in the skillet to just barely submerge the zircles.
I’m saying “zircles” as if it’s an actual word.
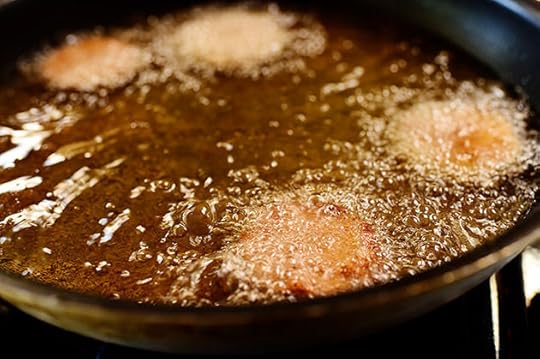 The directions say to just fry 3 or 4 at a time. And they do fry pretty quickly. You want the oil hot enough to brown them in a minute to a minute-and-a-half, but not burn them in that time. Just watch how the first batch goes, and adjust the heat accordingly.
 Then pull them out when they’re deep golden brown…
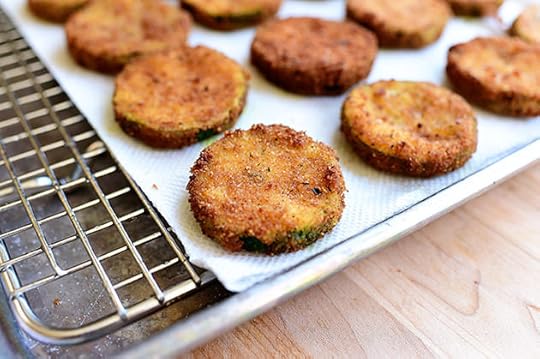 And set them on a paper towel.
 Keep going until they’re all perfectly fried.
 Sprinkle them with a good amount of salt after they come out of the oil.
 Then serve them warm with a dish of dipping sauce.
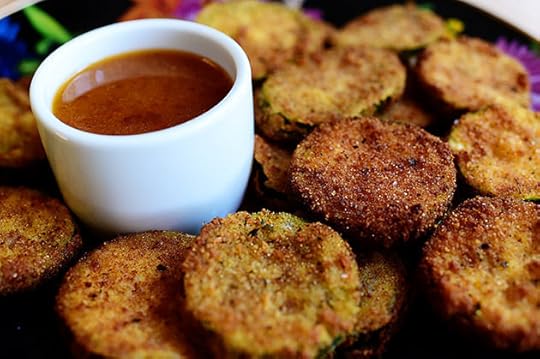 The perfect munchie!
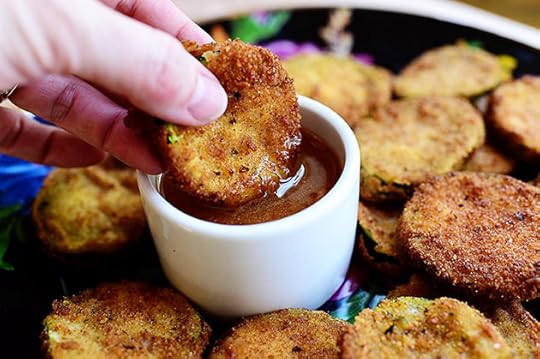 It was amazing how much this whole experience took me back to Hamburger Hamlet and a time when I wore scrunchies and high top Reeboks.
Try these sometime! You’ll be glad you did.
(Thank you, Hamlet. You’ll forever be a part of my L.A. memories.)
Here’s the handy dandy printable!
Recipe
Hamburger Hamlet’s Zucchini Zircles
Prep Time: 15 Minutes
Cook Time: 10 Minutes
Difficulty: Easy
Servings: 6
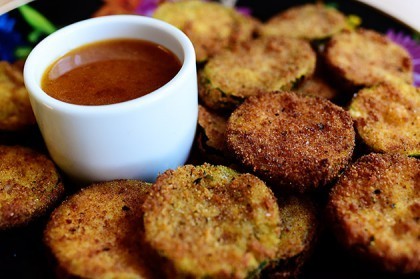
Print Recipe
Ingredients
FOR THE DIPPING SAUCE:1/2 cup Pineapple Juice1-1/2 Tablespoon Soy Sauce1-1/2 Tablespoon Dry Mustard Powder1-1/2 cup Apricot Preserves FOR THE ZUCCHINI:2 whole Zucchini1/2 cup Flour1/2 cup Milk1 cup Seasoned Breadcrumbs Salt For Sprinkling1 quart Vegetable Oil, For Frying Preparation Instructions
Make the dipping sauce by mixing pineapple juice, soy sauce, and mustard powder in a blender. Pour it into a bowl and mix in the apricot preserves. Set aside (or make ahead of time and chill.)
To make the zucchini zircles, slice the zucchini into rounds about 1/3 of an inch thick. One at a time, bread them by dredging them in flour, dipping them in the milk, and coating them in the breadcrumbs. Set on a wire rack over a cookie sheet as you do the rest.
To fry them, heat the vegetable oil in a large skillet over medium heat. When it's hot, add the zircles 3 to 4 at a time using tongs. (Oil should sizzle and envelop the zircles.) Allow to fry for 1 to 1 1/2 minutes or until deep golden brown, then remove to a paper towel lined baking sheet. Repeat with the rest. Sprinkle with salt when they're out of the oil.
Serve zucchini zircles with the apricot dipping sauce...and reminisce about the last time you were at Hamburger Hamlet! (For me, it was around 1990.)
***From a Hamburger Hamlet recipe.
Posted by Ree | The Pioneer Woman on August 18 2014

Hamburger Hamlet’s Zucchini Zircles!
Years and years ago, when my mom and kid sister (who was just twelve at the time; she’ll turn forty next month!) drove me out to Los Angeles to drop me off at college, one of the first restaurants we went to was a place called Hamburger Hamlet. It was delicious and while the restaurant offered a lot of different dishes, I actually did order a burger on that first trip there. Then my mom and sister left me at college and I decided to become a vegetarian for several years. Then I married a cattle rancher and that was all over. The end.
There you have it, folks. A Brief History of My Eating Habits, by Ree Drummond. Copyright 2014.
Anyway, despite my vegetarianism, I continued going to Hamburger Hamlet through the years, and one of my favorite things I always ordered (and my mom, sister, and I had ordered them during our first visit there) were their famous Zucchini Zircles—a platter of fried zucchini with a delicious sweet dipping sauce.
A few weeks ago, although I hadn’t been to Hamburger Hamlet in over twenty years, Zucchini Zircles popped into my mind and I wound up finding an official recipe for them after an internet search. I haven’t been able to get them out of my mind since, and yesterday after church, I finally whipped up a batch.
Here’s how to make Zucchini Zircles!
(I miss you, Hamburger Hamlet.)
First make the apricot dipping sauce: Add some pineapple juice to a blender.
Then add soy sauce…
And dry mustard.
The original recipe for the sauce actually called for “2 1/2 tablespoons” of mustard powder, which I did add…but boy, did it seem like a lot.
And it was kind of a lot. I think 1 tablespoon to 1 1/2 tablespoons would be great!
Whiz it around in the blender until it’s all mixed together.
But the key ingredient to the dipping sauce is apricot preserves!
Put some in a bowl…
Then pour in that crazy pineapple/soy/mustard concoction. Oh, and don’t be confused by the amount of this liquid: I made a mistake and used 1 cup of pineapple juice instead of the 1/2 cup the recipe called for. Once I realized it, I poured a bit of the liquid out.
Then I mixed it all together and popped it in the fridge! As with any mixture like this, if you give it a little time in the fridge, the flavors will deepen and develop and all that jazz.
And now, for the breading for the zucchini, which is part of what makes them so ding dang delightful: Get three shallow dishes. Into one, pour some milk. And no, this isn’t egg nog. It’s only August and there’s no way I could find egg nog even if I wanted to. This is pure, white milk but my camera had a little bit of a hiccup and gave the milk a nice golden tinge. But instead of editing it and correcting the color balance of this photo, I instead decided to give you a boring explanation about why it looks like egg nog.
I’m glad we had this talk.
Into the second bowl, also known as the “next” bowl, add some flour. Simple enough!
And into the third bowl, also known as the “final” bowl, add some seasoned breadcrumbs. As in, I bought them seasoned. As in, I’m not ashamed!
Now, grab a zuke.
And slice it…
Into “circles like a poker chip, about twice the thickness of a silver dollar.”
I find that description very charming.
One by one, drop a slice into the flour…
And dredge both sides.
Then drop it in the milk…
Turn it over a time or two…
Then drop it in the breadcrumbs…
And turn it over to coat.
Then lay it on a wire rack over a sheet pan.
Keep going until they’re all breaded!
For the second zucchini, I cut them a little on a diagonal, which is how I remember the Zucchini Zircles at the Hamburger Hamlet I used to frequent.
I just breaded ‘em one by one..
And set ‘em on the pan.
Now it was time to fry ‘em up!
I heated vegetable oil over medium heat until a few drops of breadcrumbs sizzled. Then I used tongs…
To carefully drop them in. I had enough oil in the skillet to just barely submerge the zircles.
I’m saying “zircles” as if it’s an actual word.
The directions say to just fry 3 or 4 at a time. And they do fry pretty quickly. You want the oil hot enough to brown them in a minute to a minute-and-a-half, but not burn them in that time. Just watch how the first batch goes, and adjust the heat accordingly.
Then pull them out when they’re deep golden brown…
And set them on a paper towel.
Keep going until they’re all perfectly fried.
Sprinkle them with a good amount of salt after they come out of the oil.
Then serve them warm with a dish of dipping sauce.
The perfect munchie!
It was amazing how much this whole experience took me back to Hamburger Hamlet and a time when I wore scrunchies and high top Reeboks.
Try these sometime! You’ll be glad you did.
(Thank you, Hamlet. You’ll forever be a part of my L.A. memories.)
Here’s the handy dandy printable!
Recipe
Hamburger Hamlet’s Zucchini Zircles
Prep Time: 15 Minutes
Cook Time: 10 Minutes
Difficulty: Easy
Servings: 6
Print Recipe
Ingredients
FOR THE DIPPING SAUCE:1/2 cup Pineapple Juice1-1/2 Tablespoon Soy Sauce1-1/2 Tablespoon Dry Mustard Powder1-1/2 cup Apricot Preserves FOR THE ZUCCHINI:2 whole Zucchini1/2 cup Flour1/2 cup Milk1 cup Seasoned Breadcrumbs Salt For Sprinkling1 quart Vegetable Oil, For Frying Preparation Instructions
Make the dipping sauce by mixing pineapple juice, soy sauce, and mustard powder in a blender. Pour it into a bowl and mix in the apricot preserves. Set aside (or make ahead of time and chill.)
To make the zucchini zircles, slice the zucchini into rounds about 1/3 of an inch thick. One at a time, bread them by dredging them in flour, dipping them in the milk, and coating them in the breadcrumbs. Set on a wire rack over a cookie sheet as you do the rest.
To fry them, heat the vegetable oil in a large skillet over medium heat. When it's hot, add the zircles 3 to 4 at a time using tongs. (Oil should sizzle and envelop the zircles.) Allow to fry for 1 to 1 1/2 minutes or until deep golden brown, then remove to a paper towel lined baking sheet. Repeat with the rest. Sprinkle with salt when they're out of the oil.
Serve zucchini zircles with the apricot dipping sauce...and reminisce about the last time you were at Hamburger Hamlet! (For me, it was around 1990.)
***From a Hamburger Hamlet recipe.
Posted by Ree | The Pioneer Woman on August 18 2014
August 14, 2014
Mexican Macaroni Salad
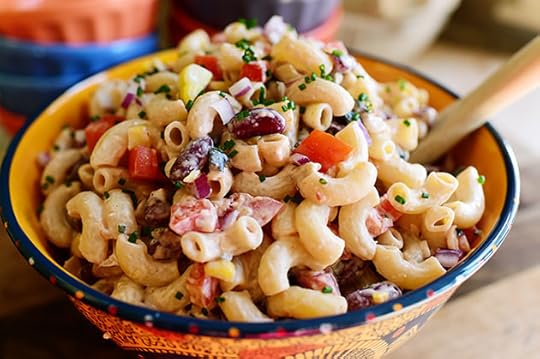 I’ve made this simple pasta salad for years and years, and have always loved the heck out of it. It’s zippy, flavorful, and fun, and is as delicious by itself as it is alongside grilled chicken, shrimp, or steaks. I made it recently on one of my Food Network episodes, and realized I’d never shared it on this here website o’ mine! It’s versatile, and you can add whatever other ingredients you want: diced avocado, chopped cilantro, chipotle (to the dressing), lime juice…or all the spices and seasonings you want.
I hope you love it as much as I do. We’ve still got some days of summer left…and this is a good one, my friends!
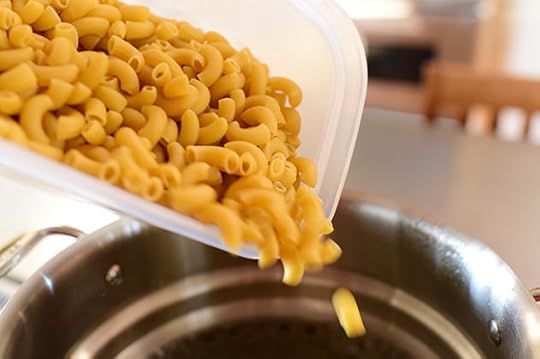 Throw some macaroni in a pot of boiling water and cook it until al dente.
 Drain it, rinse it with cold water, throw it in a bowl, and smile because macaroni makes you happy.
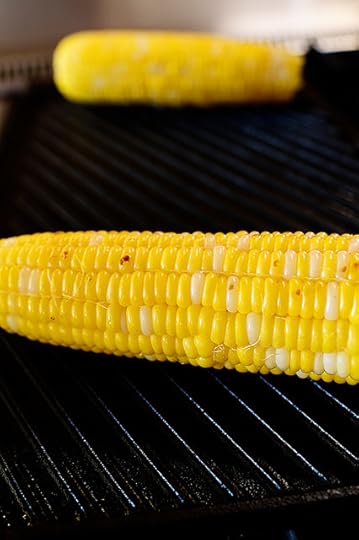 Meanwhile, throw a couple of ears of corn on a grill pan over medium heat; or, if you don’t have a grill pan, just any ol’ skillet will do. You just want to “grill” or cook the surface of the corn so it gets some nice grill marks on the outside.
 While the corn is going, get some of the other ingredients ready: Finely diced red onion…
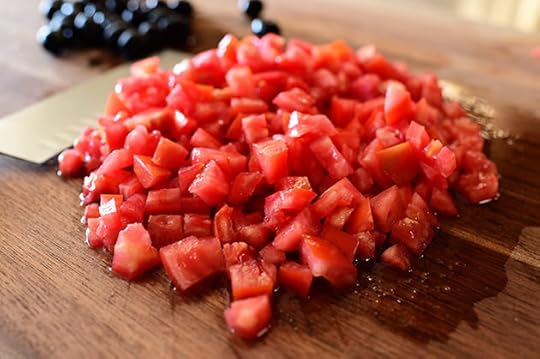 A couple of big ol’ tomatoes (or a few smaller ones), diced…
 A pile of chopped black olives, roughly chopped…
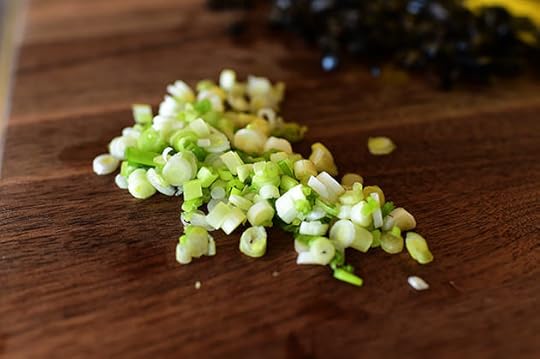 And some green onions, sliced.
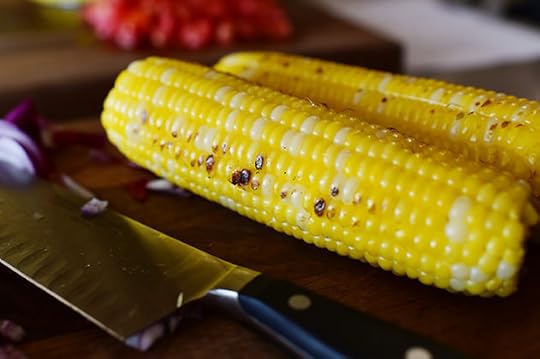 When the corn is ready, remove it from the pan…
 And use a sharp knife to cut off the kernels.
 Now for the beans! Normally, I’d use a can of black beans…but I’m out. Scandal! So kidney beans were the next best thing. I just drained ‘em and rinsed ‘em. All ready to go!
 Now, for the dressing: Combine a cup of salsa (the spicier, the better!)…
 A cup of sour cream…
 And some mayonnaise, to give it a little richness.
 I also grate in a clove of garlic (you can just use a garlic press!)
 Adds all the garlic flavor without adding chunks.
 Finally, some cumin…
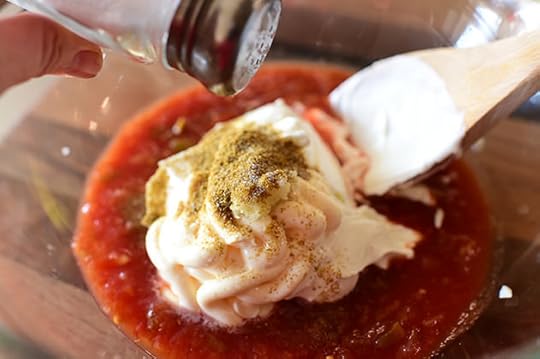 And some salt and pepper.
 Then just stir it all together…
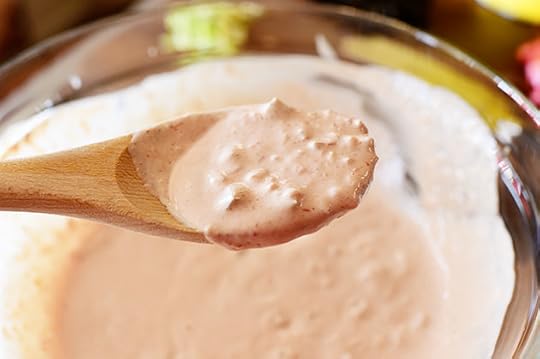 Until it’s all combined! And whatever you do, don’t grab a blue corn tortilla chip dip it in here.
At least if you do…don’t say you heard it from me.
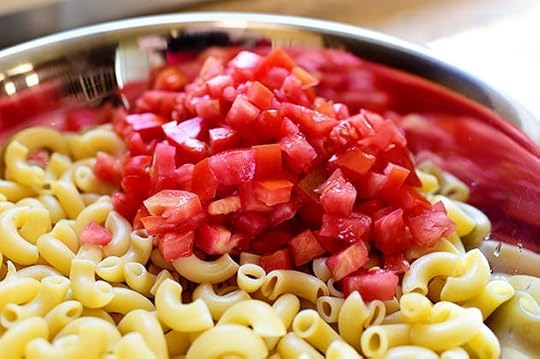 To assemble the salad, just add the tomatoes…
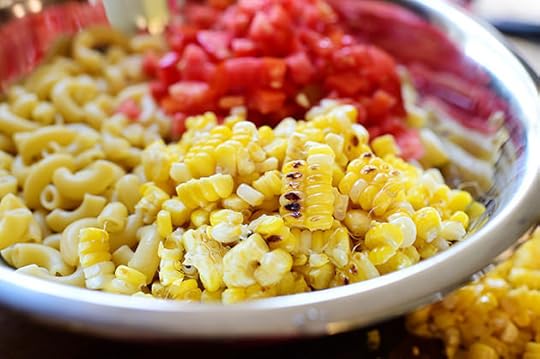 The corn…
 The beans…
 The olives…
 The green onion…
 And the red onion.
 I didn’t have cilantro, but would have added some if I did, so I decided to grab some chives from my garden and chop them up just to add a little more color.
 A little extra green never hurt anyone!
 Finally…on goes the beautiful dressing. I start by adding about 3/4 of it at first, just to make sure it doesn’t get too heavy.
 Toss it around and check it out…
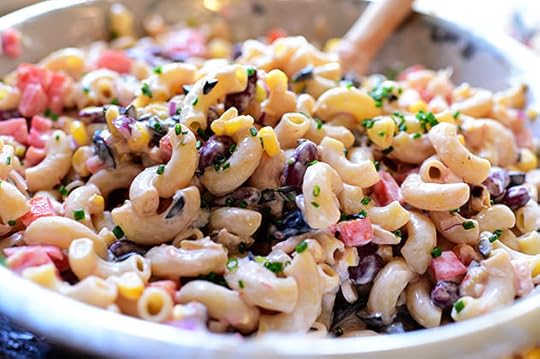 Then sprinkle in more of whatever you think it needs. If you want more dressing, go ahead and add the rest and toss it in!
 Pile it in a serving bowl, and at this point, you’ll want to cover it with plastic wrap and refrigerate it for at least a couple of hours to let the flavors all mix and mingle.
And jingle.
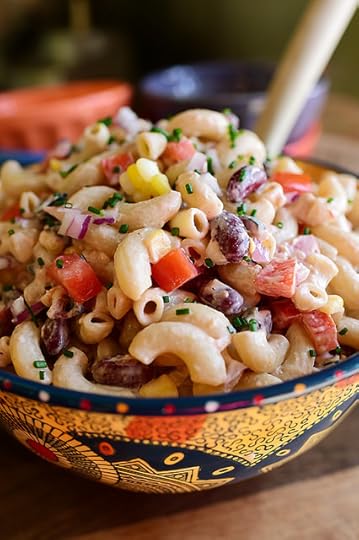 This is such a great little pasta salad. Great on its own, or alongside grilled or roasted chicken…or with cubed grilled chicken mixed in!
 Here’s the handy dandy printable!
Recipe
Mexican Macaroni Salad
Prep Time: 15 Minutes
Cook Time: 15 Minutes
Difficulty: Easy
Servings: 12
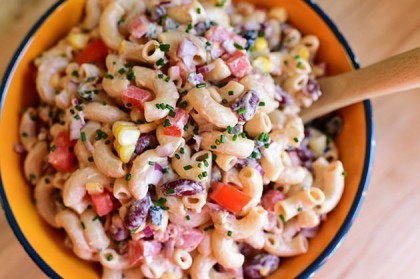
Print Recipe
Ingredients
FOR THE SALAD:1 pound Elbow Macaroni, Cooked To Package Instructions, Drained, And Rinsed With Cold Water2 ears Fresh Corn, Husks And Silks Removed1 can (15 Oz. Size) Black Beans (or Kidney Beans), Drained And Rinsed1/2 cup Chopped Black Olives6 whole Roma Tomatoes (or 2 Large Tomatoes), Chopped3 whole Green Onions, Sliced Thin1/2 whole Red Onions, Finely Diced Chopped Cilantro (optional) FOR THE DRESSING:1 cup Jarred Salsa (spicy Is Best!)1 cup Sour Cream1/4 cup Mayonnaise1 clove Garlic, Minced Or Pressed1/2 teaspoon Cumin Salt And Pepper, to taste2 Limes, Juiced (optional) Preparation Instructions
Grill the corn on a grill pan, or just place it in a hot skillet to brown some of the kernels. Remove from pan, allow to cool slightly, then use a sharp knife to cut the kernels off the cob.
Combine all the dressing ingredients in a bowl and stir until combined.
Place the macaroni, corn, beans, olives, tomatoes, green onions, red onion, and cilantro (if using) in a large bowl. Pour 3/4 of the dressing over the top and gently toss until all the ingredients are coated. Add the final 1/4 of the dressing if you think it needs it. Cover and allow salad to chill for 2 hours.
Garnish with cilantro, lime wedge, and any other extra ingredients you have!
Posted by Ree | The Pioneer Woman on August 14 2014

Ree Drummond's Blog

- Ree Drummond's profile
- 2036 followers

