
Gesine Bullock-Prado's Blog, page 7
February 13, 2015
Top Ten Valentine's Treats!
With Valentine's Day hot on our heels, I've put together a list of my top 10 favorite treats from the blog for your sweetheart!
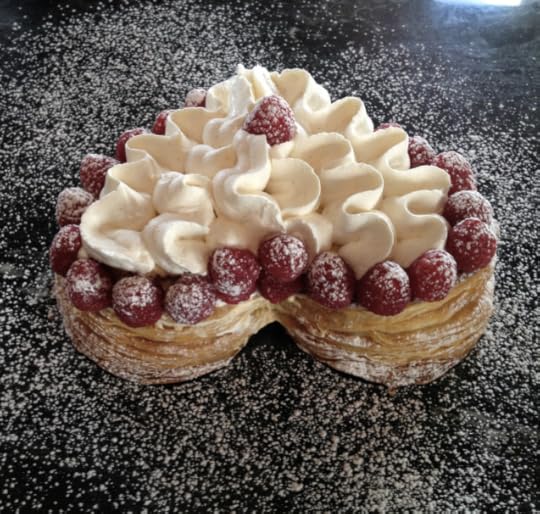
#1 A SLICE OF LOVE

#2 PUFFY HEART

#3 LOVE IS PATIENT

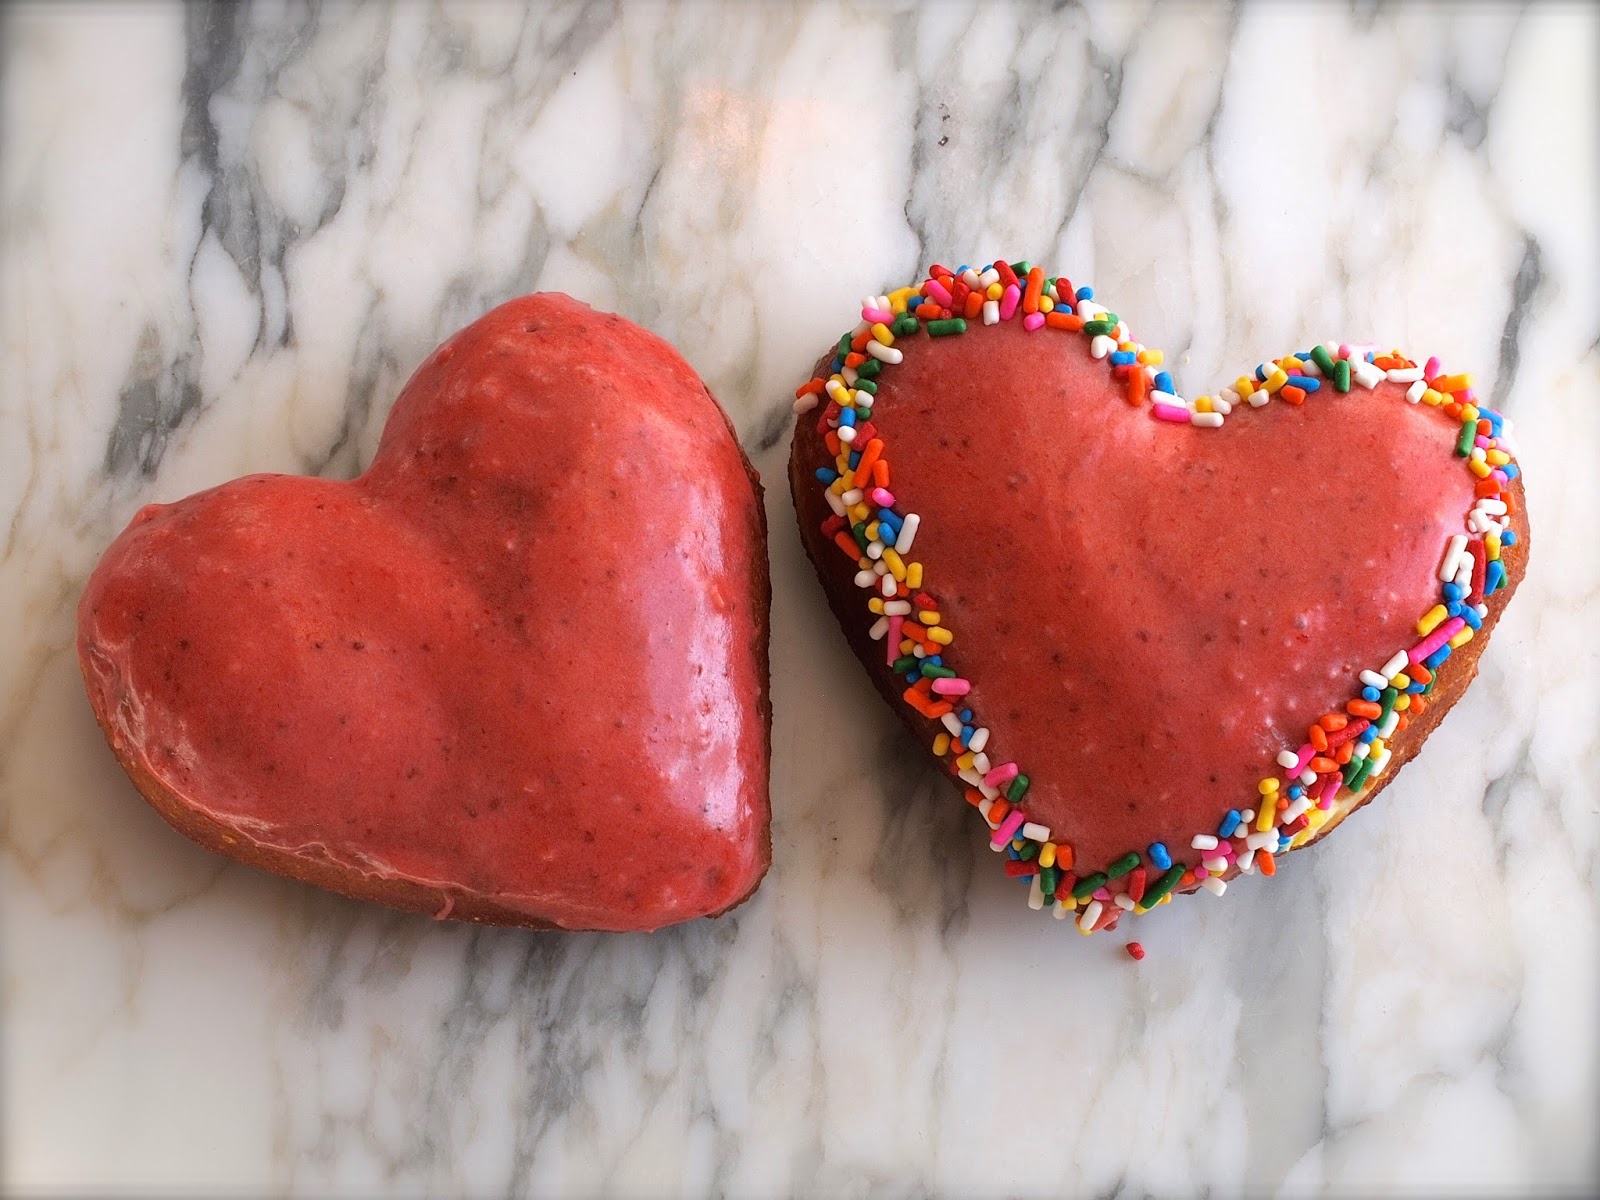
#4 STRAWBERRIES AND CREAM DONUTS

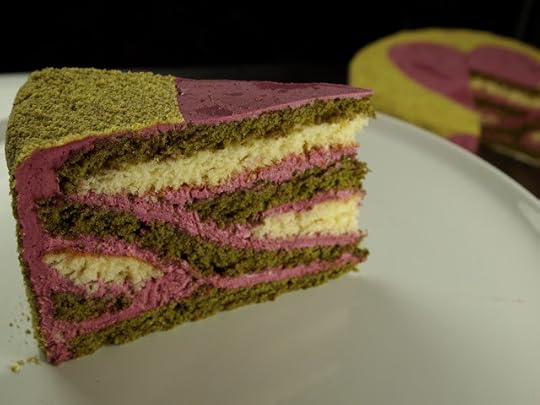
#5 THE LOVERS AND DREAMERS CAKE

#6 MCLOVIN' MUFFINS

#7 EASY LOVE ECLAIRS

#8 DEEP FRIED LOVE

#9 LOVE THE ONE YOU'RE WITH APRICOT TART

#10 RED VELVET PIECE OF MY HEART CAKE

#1 A SLICE OF LOVE

#2 PUFFY HEART


#3 LOVE IS PATIENT


#4 STRAWBERRIES AND CREAM DONUTS
#5 THE LOVERS AND DREAMERS CAKE

#6 MCLOVIN' MUFFINS

#7 EASY LOVE ECLAIRS

#8 DEEP FRIED LOVE

#9 LOVE THE ONE YOU'RE WITH APRICOT TART

#10 RED VELVET PIECE OF MY HEART CAKE


February 11, 2015
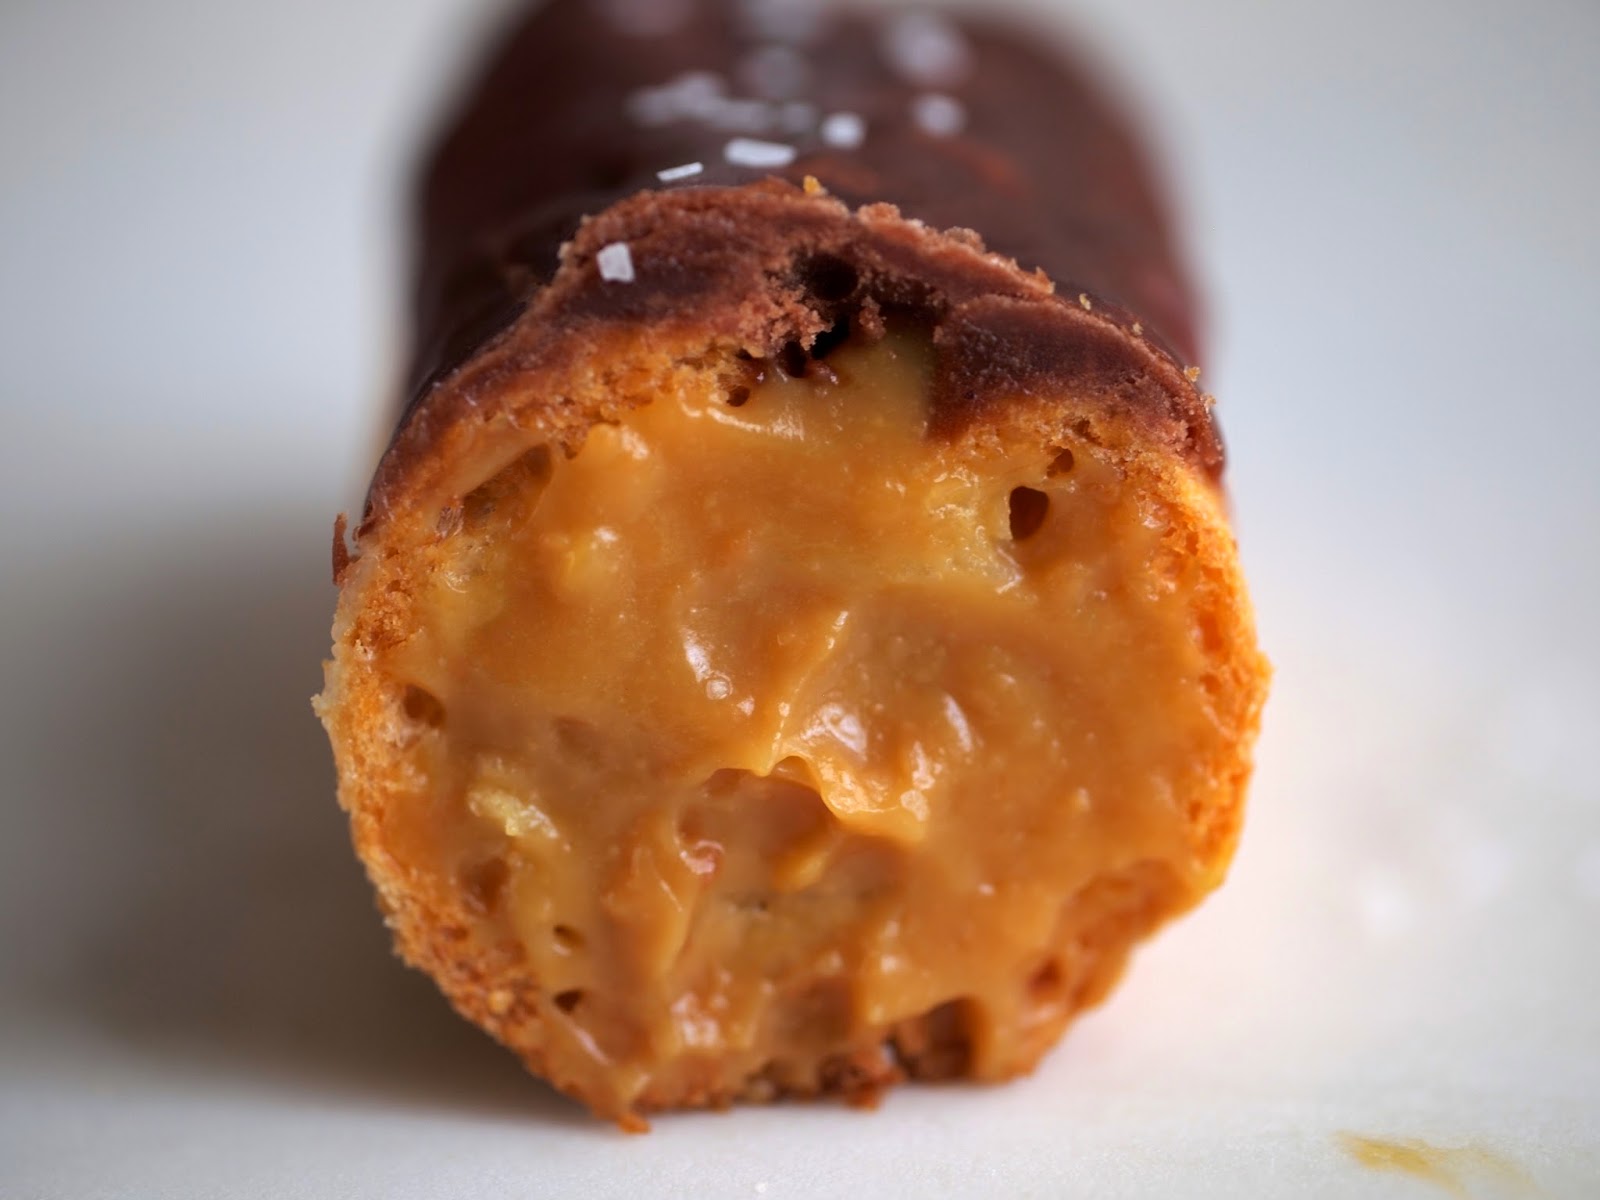
STRAWBERRIES AND CREAM DONUTS

I've dreamt of this recipe, of the textures and the taste. It's a recipe that I've been rearranging in my head, the ratios and ingredients shifting and merging to spawn what I imagine is my perfect donut experience.

That I have a soft spot for donuts is not a secret. That I make great donuts is well known. But I've been hankering for a fried gustatorial experience that hasn't yet crossed paths with my fryer or my tastebuds.

So this culinary conundrum has pestered me and I've been heeding its call. I've had it in my noggin' that what I've wanted, a donut with volume but not burdened by density, would require a special ingredient. A donut with an open and airy crumb but not vacant of some mouthy chew needed something special. A donut with sparks of brightness and depth needed a hearty partner in crime.
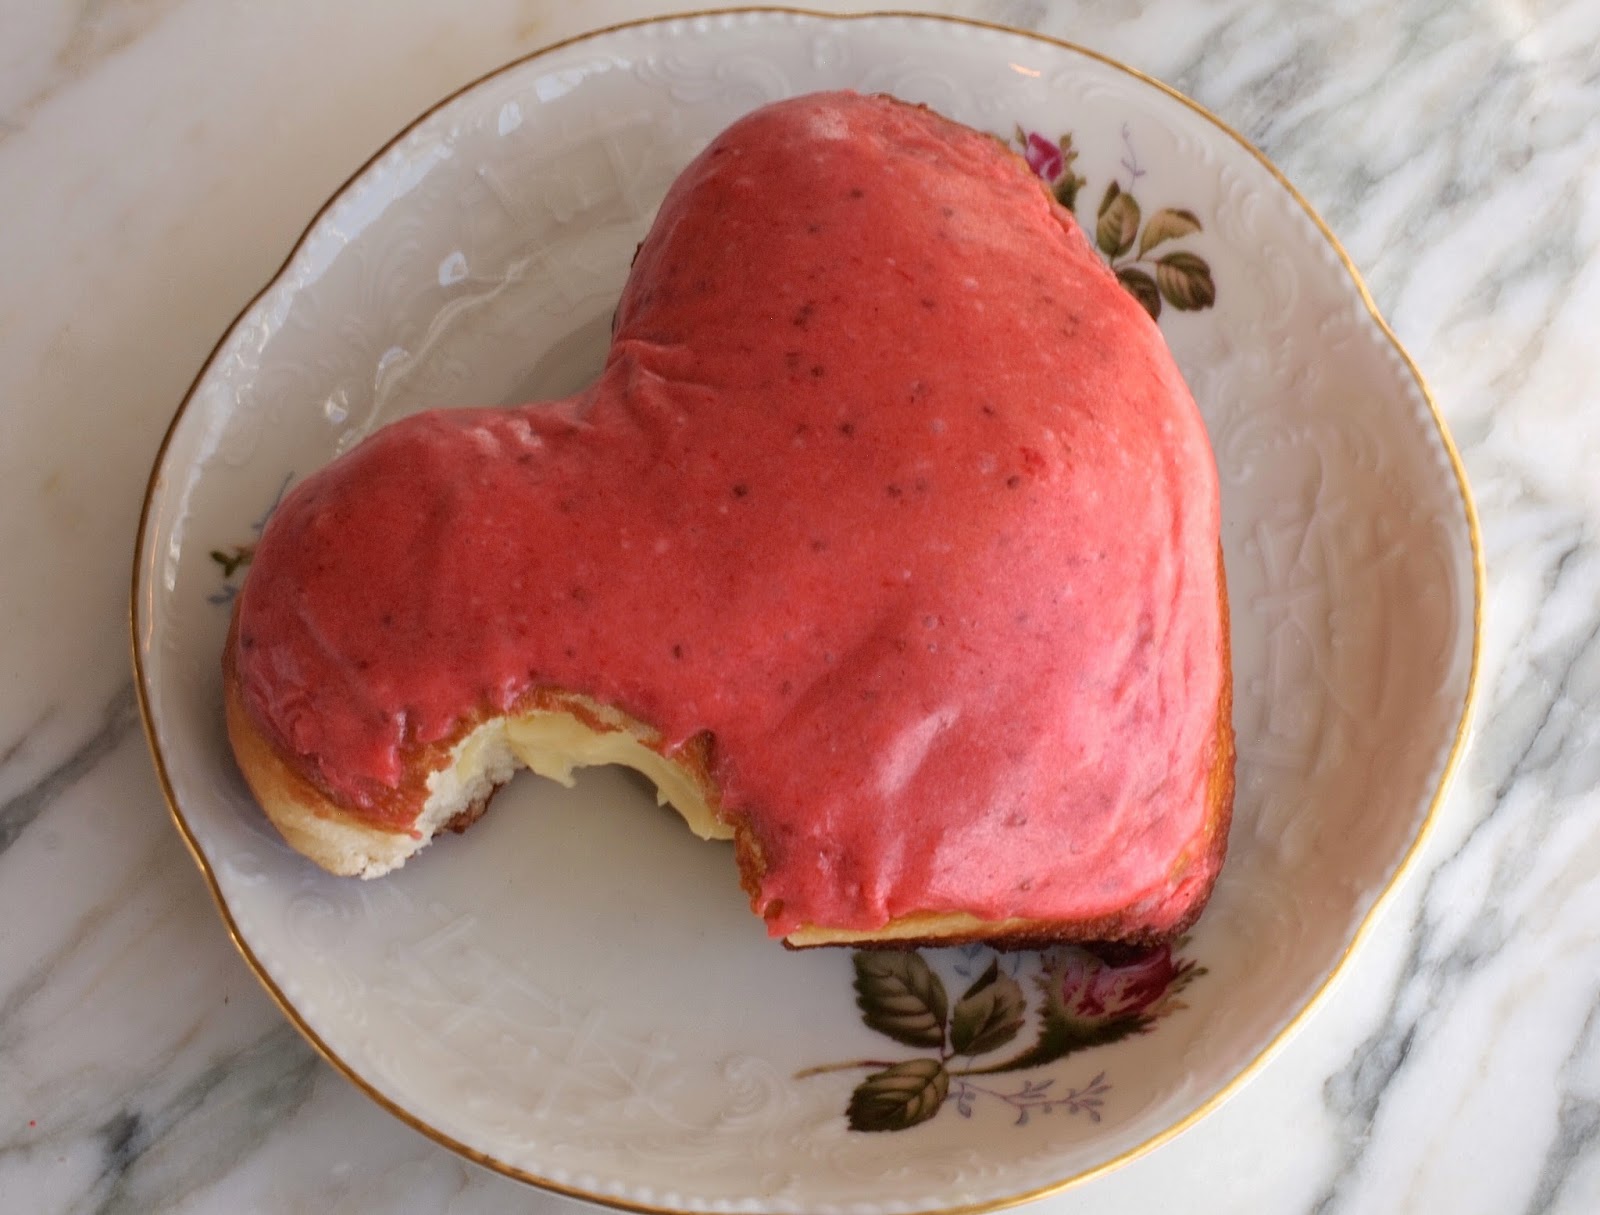
And what I kept going back to was "potato." I've had donuts with mashed potato. That slightly stodgy texture isn't for me. But potatoes made sense to me, in the way that dried mashed potato flakes bring sandwich bread straight back to childhood. It's this interplay of defined texture that simultaneously steers clear of dense and airy; it lives somewhere in the heavenly center.

I think I got there. Just in time for St. Valentine to eat his heart out.
STRAWBERRIES AND CREAM DONUTS
(makes approximately 18 filled donuts)
For the donuts
5 cups all purpose flour (I use King Arthur)
1/2 cup sugar
1/2 cup instant dried potato flakes, pulverized in a food processor or blender (get plain flavored)
1/4 cup instant non-fat dry milk (I used Nestle's Carnation brand)

2 packages instant yeast (I use Red Star's PLATINUM)
1 teaspoon salt
zest 1 lemon
1 3/4 cups room temperature water
2 eggs
1 tablespoon vanilla
1/3 cup vegetable shortening
In a large mixing bowl, combine the flour, sugar, ground potato flakes, dry milk, yeast, salt and zest. Whisk for 30 seconds to distribute the ingredients. Set aside.
In the bowl of a stand mixer fitted with the dough hook, combine the water, eggs and vanilla. Whisk to break up the eggs and then add the shortening. Add all the flour mixture and mix on low speed for 10-15 minutes or until the dough comes away from the sides of the bowl and is very smooth. It should be slightly tacky but not wet and sticky. If you feel it's too wet, add a tablespoon at a time of flour until you've reached the desired texture.
Transfer the dough to a bowl coated with oil and turn the dough over a few times in the bowl to coat the dough with oil. Cover with plastic wrap and place in a warm area of your kitchen until doubled in size, 1 - 2 hours.
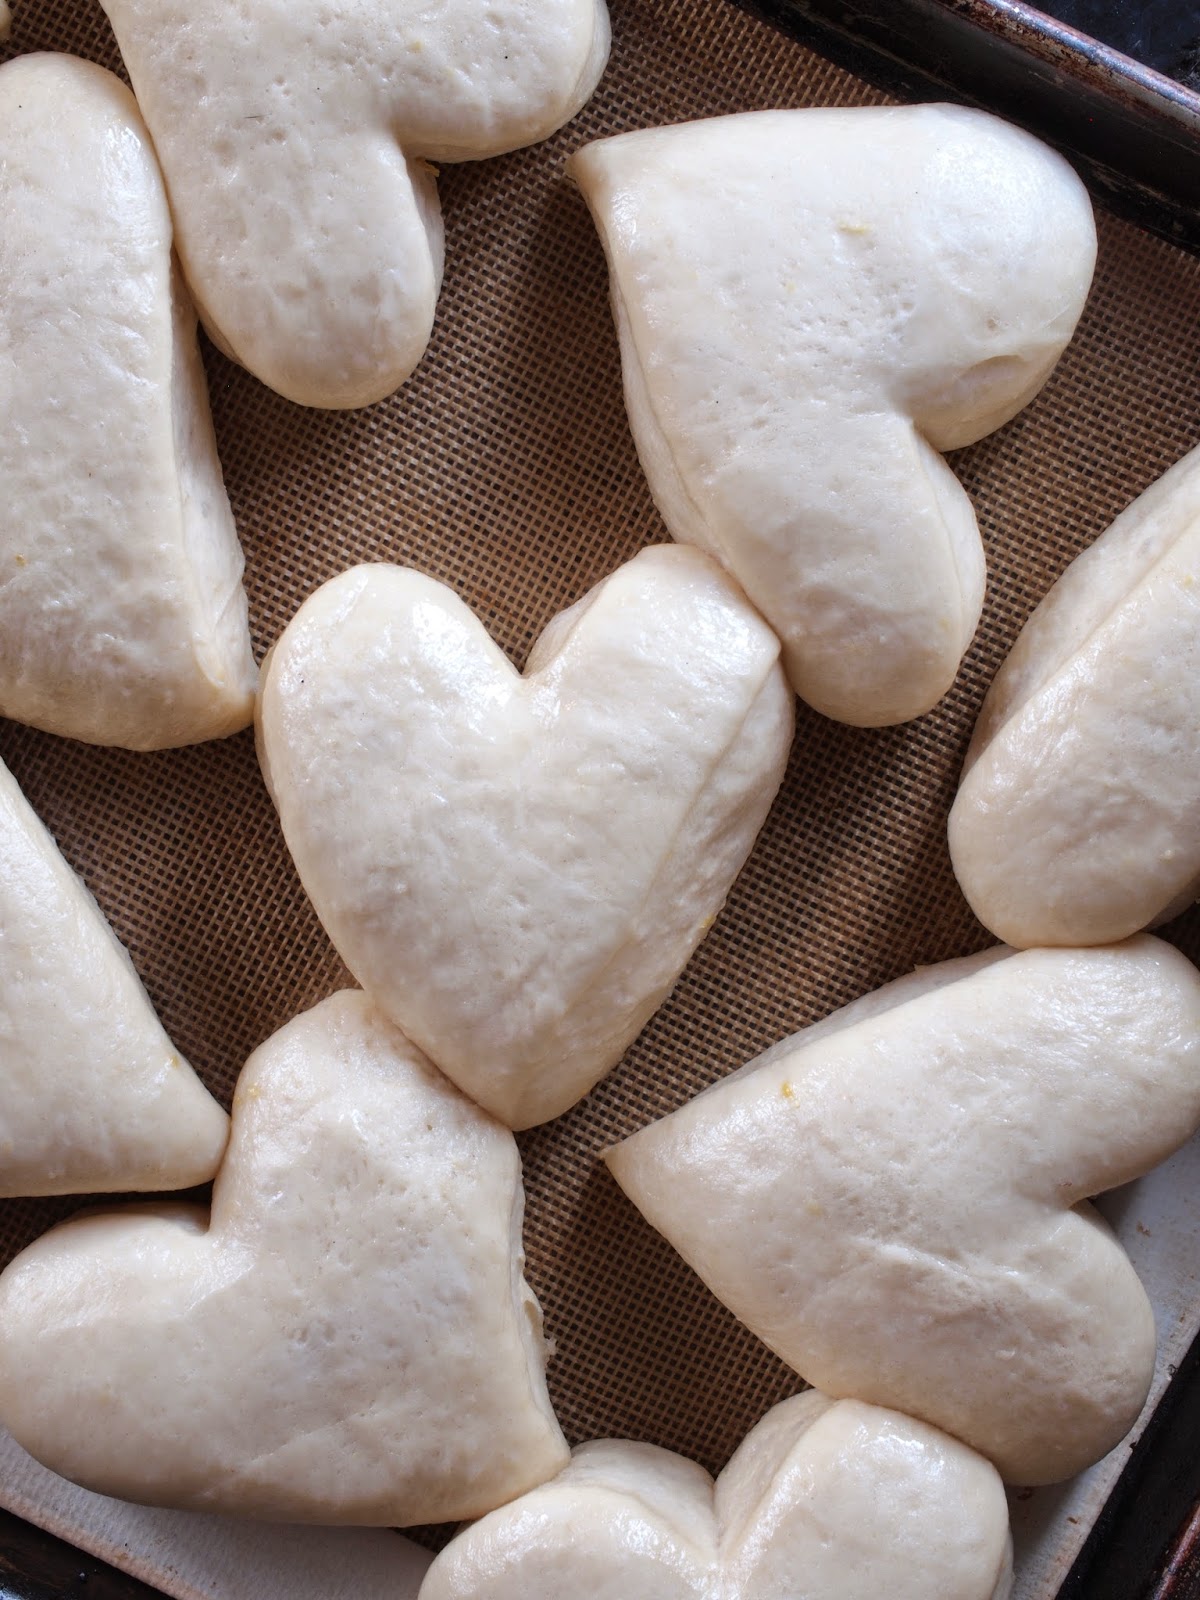
Roll the dough out to 1/2 inch thick and using a sharp heart shaped cutter, cut out the dough and place on a parchment lined sheet pan, a few inches apart. Clean the edges of your cutter every few cuts so the process goes more smoothly.

At this point I cover my hearts with plastic wrap and refrigerate overnight. If you'd like to move on with the process instead of fridging overnight, still cover the hearts with plastic wrap but leave them out to proof until puffy and not quite doubled in size (be careful not to over proof) about 30-40 minutes or longer if your kitchen is cold.
For the filling
2 cups whole milk
1/2 cup sugar
1/4 cup cornstarch
pinch salt
1 tablespoon vanilla
5 egg yolks
In a large bowl, combine the sugar, cornstarch, salt, vanilla and egg yolks. Whisk until smooth.
In a large saucepan, bring the milk to a simmer and careful pour the hot milk into the sugar/yolk mixture, whisking constantly, until the two are combine and smooth.
Return the mixture to the saucepan and whisk constantly over low heat until the mixture thickens to the consistency of mayonnaise. Transfer to a large bowl and cover with plastic wrap, making sure the wrap touches the surface of the cream so a skin doesn't form. Refrigerate until cool, about 45 minutes.
For the strawberry glaze
1/2 pound fresh strawberries, hulled and sliced in half
1/4 cup sugar
1 tablespoon fresh lemon juice
2 cups confectioner's sugar
2 tablespoons unsalted butter, softened
In a large saucepan, combine the strawberries, sugar and lemon juice and stir over low heat until the strawberries are soft, the sugar has melted and the entire mixture has thickened, about 20 - 30 minutes.
Transfer the mixture to a blender or food processor and puree until smooth. Refrigerate until cool, still in the blender or food processor container, about 20 minutes.
Add the confectioner's sugar and butter and blend until smooth. Transfer the mixture to a shallow bowl and cover until needed.
To fry and finish
4 cups vegetable oil
rainbow sprinkles (optional)
Take the hearts from the fridge, leaving them covered, and place in a warm area of your kitchen to proof. They should puff to almost double their size but not quite.
While they are proofing, heat the oil in a large pan to 350ºF. Fry off 2-3 donuts at a time but not more otherwise the temperature of the oil will drop too drastically. Fry on one side for 1 to 1 1/2 minutes and then flip (I use chopsticks to flip) and fry for 1 - 1 1/2 minutes more. Transfer to a cooling rack. Continue frying until all your donuts are cooked and allow to cool completely, about 20 minutes.
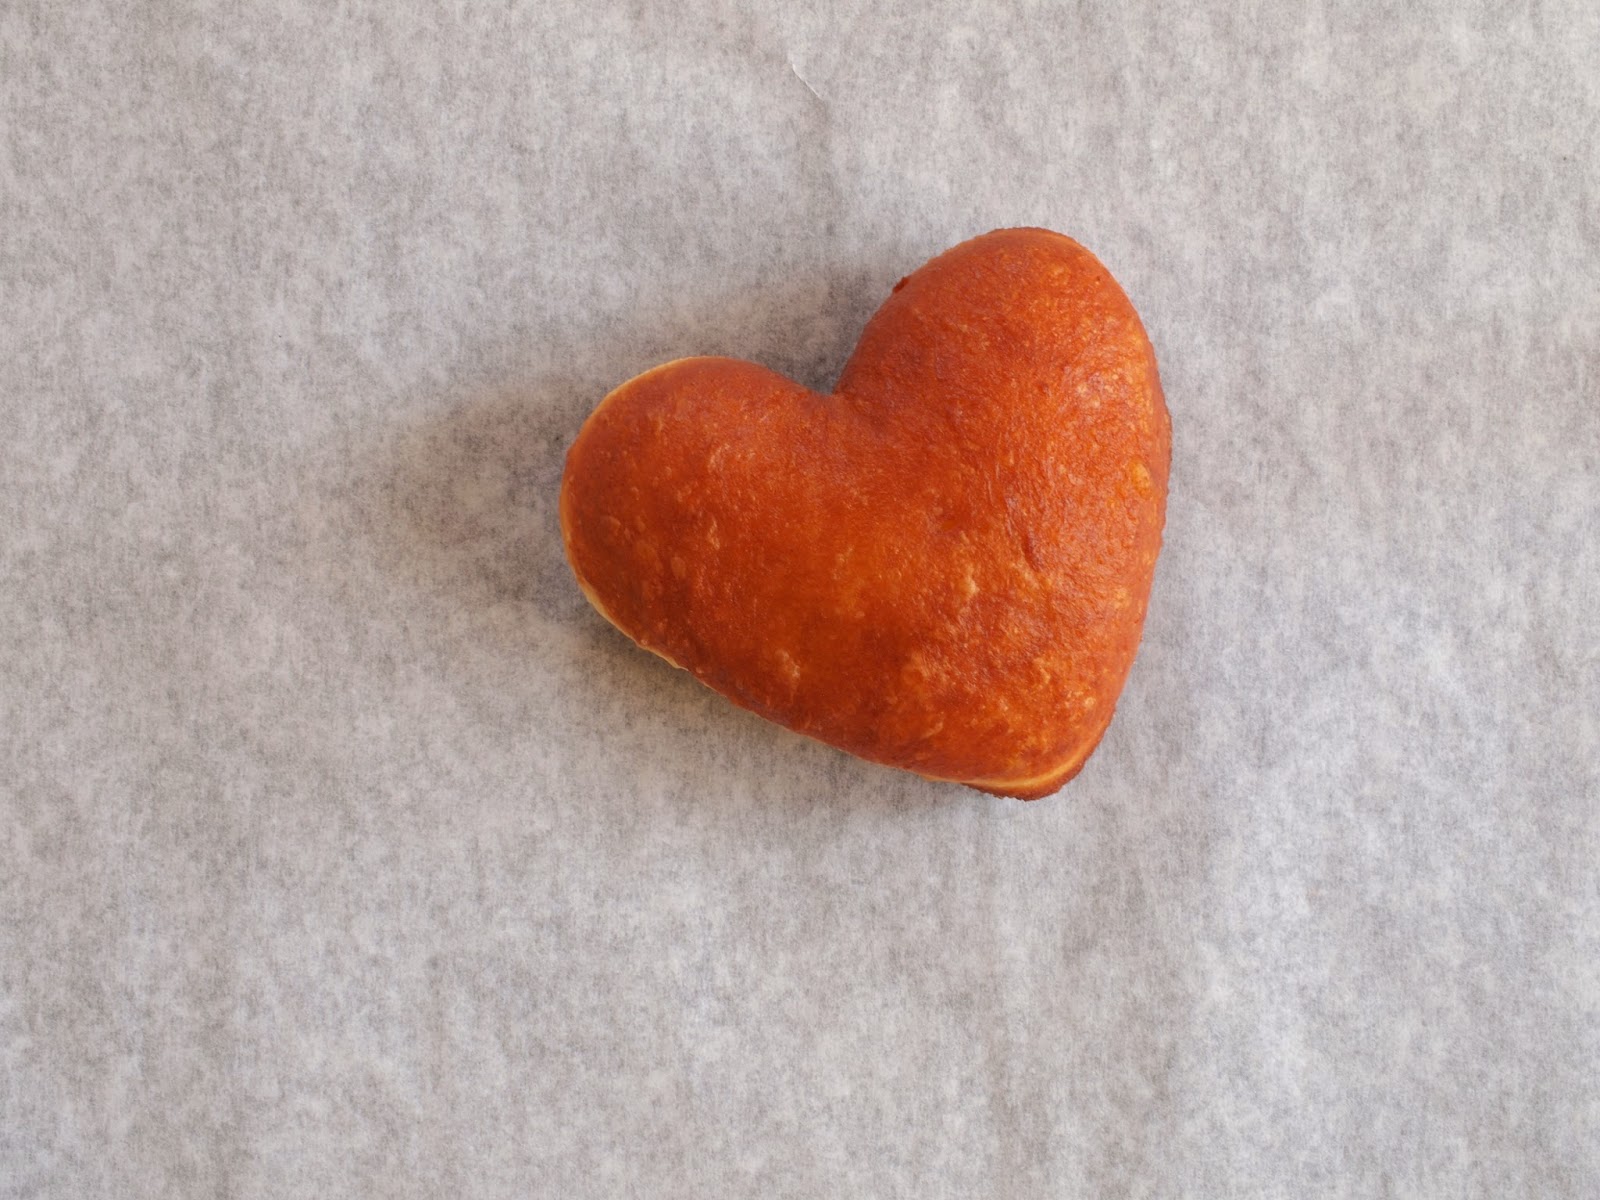
Transfer the filling to a large pastry bag fitted with a medium/small open tip. Using a wooden skewer or chopstick, poke a hole in the side of each donut and insert the tip of the pastry bag as close to the center of the donut as you can. Squirt about 2-3 tablespoons of filling (as much as you can without an explosion) into the donut. Dip the top of each donut in the strawberry glaze and, if using, decorate with sprinkles. Serve immediately.
February 9, 2015
Chocolate-Praline Napoleons: a study in puff pastry
 The question I'm asked most often as a pastry chef: "What's your favorite thing to bake?" I hem and haw at the question, not wanting to choose a favorite in front of the other pastries because they're awfully sensitive. My diplomatic response on these occasions: "It depends on the season."
But the honest truth is I do have a favorite. My most treasured recipe, recipes actually, are for laminated doughs. This qualifies as a favorite category rather than a single pastry because laminated doughs include traditional puff pastry, croissant, danish, and kouign amann: doughs that have a block of butter folded into a prepared dough that's continuously folded in many layers to create buttery, flaky, crispy, luxuriously delicious delicacies.

Some are leavened, like croissant, danish and Kouign Amann. They get lift from both the addition of yeast and the rise that comes from careful lamination. But the unleavened variety, puff pastry, gets its rise from the lamination of a butter block into a simple dough alone. The result is magical. Pure alchemy.

It's this, both the utter delectability of the stuff and the pure transformative nature of the act of sandwiching a supple dough with a block of butter and watching the heat of the oven all but whisper "Abracadabra" and the pastry not only rises but utterly transforms, that has me proclaim that laminated doughs are my favorite pastry child. Hands down. When I had my pastry shop, hundreds of inquiries to work with me in the bakery came in. My first test, before you could even touch the ovens, was to prove you could make a beautiful traditional puff without consulting a recipe. That's how important puff is in my baking world.

While laminating isn't the simplest of pastry acts, it is one of the purest forms of baking. One of the best ways to let this purity shine is to layer sheets of puff with pastry cream to create a great standard in pastry: the Napoleon.
CHOCOLATE-PRALINE NAPOLEON

For the puff pastry butter block
1 1/2 pounds unsalted butter, room temperature
6 ounces bread flour
1 tablespoon Dutched cocoa powder (I use Cacao Barry's Extra Brute)
1/2 teaspoon salt
2 drops lemon juice
In the bowl of a stand mixer fitted with the paddle attachment, combine all ingredients and mix until all ingredients are well incorporated and the mixture is smooth.
Fold a piece of parchment the size of a half sheet pan (18" x 13") in half to measure 9" x 13". Open the parchment and spread the butter mixture onto one half of the sheet, using the folded seam as a guide, into a rough rectangle approximately 9" x 7". Fold the other half of the parchment over the butter block and then fold over the sides of the parchment surrounding the butter block to form a package. Tape the sides down and then wrap the entire package in plastic wrap. Using a rolling pin, roll the butter flat and into the edges of the packet. Go to THIS link and scroll down to the recipe to actually SEE this process! Just reading about it can be awfully confusing.
If your kitchen is cool, leave the butter block out. If not, refrigerate while you make the dough. The test for the butter block is that it should be cool enough that the parchment lifts off the butter easily and you should be able to hold the butter block in your hand and it'll keep it's shape. On the other hand, it should be malleable enough that you can bend it without it breaking. If the butter is too cold, it won't properly laminate and won't puff properly. Too warm and you won't be able to handle the butter well enough to transfer it neatly to the dough and it will likely leak out during the folding process.
For the puff pastry dough
18 ounces flour
1/2 cup Dutched cocoa (I use Cacao Barry's Extra Brute)
1 cup cold coffee
1/2 cup cold water, divided
1 1/2 teaspoons salt
1 teaspoon lemon juice
1/3 cup unsalted butter, melted and brought to room temperature
In a mixing bowl, stir together the flour and cocoa to combine.
In the bowl of a stand mixer fitted with the dough hook, add the coffee, half the water, salt, lemon juice and melted butter. Stir to combine. Add the flour/cocoa mixture and mix on low speed until the dough comes together and comes away from the sides of the bowl. There's a chance close to the beginning of the process where the dough will look dry and not smooth. If this is the case, add the remaining water a tablespoon at a time until the dough comes together smoothly but still comes off the side of the bowl.
Mix until shiny and smooth, about 10 - 15 minutes. Wrap in plastic wrap and allow to rest, about 20 minutes, before rolling out.
Assembly of the puff
.jpg) This is from my book Pie it Forward. It shows the method of puff pastry assembly but with a large volume of dough and butter. (A) is me smoothing out the butter in it's secure little package from (B) on you see the placement of the block and then we proceed to the "lock in" to rolling out and folding.
This is from my book Pie it Forward. It shows the method of puff pastry assembly but with a large volume of dough and butter. (A) is me smoothing out the butter in it's secure little package from (B) on you see the placement of the block and then we proceed to the "lock in" to rolling out and folding.
On a lightly floured work surface, roll out the dough to a rough rectangle measuring 16" long x 11" high. Place the unwrapped butter block on one half of the dough and fold the other half to cover the butter block. See the pictures above and consult THIS link to see how this looks. Press along the edges to lock in the dough.
Turn the dough 90º and roll the dough out to a 20" x 16" rectangle. Fold the short end towards the middle of the dough and then fold the other half to cover the first, like folding a letter (this is also called a single fold). Wrap the dough in plastic wrap and allow to rest. Do this 2 more times, rolling and folding like a letter, and then refrigerate the dough for at least 1/2 an hour.
Preheat the oven to 375ºF. Line two half sheet pans with parchment. Have to more sheet pans ready to go as well.
Cut the dough in half lengthwise. Roll each half into a rectangle that measures slightly larger than the interior of a half sheet pan (I'm not going to give you an exact measure because you may not have a traditional 1/2 sheet pan that measures 18 x 13 but one that's slightly smaller. I suggest using a tape measure and get the calculations of your particular sheet pan and use this as your guide). Trim the edges of each rectangle so that it fits perfectly inside the parchment lined sheet pan. Place a piece of parchment on top of the dough and then the reserve, unlined sheet pan on top of the parchment as a weight. Bake for 1/2 hour and then remove the sheet pan that's acting as a weight. Bake for 10 minutes more so that the puff is completely baked through.
NOTE: This might seems counterintuitive, to weigh down the puff when it's nature and purpose is to PUFF! But with a Napoleon, you want the puff to have symmetry and a measure of flatness so that the layers are even. It will still be diabolically flaky and butter! Don't worry!
While the puff is still warm, cut each puff rectangle into 14" x 3 1/2 " strips. You'll end up with 6 strips in total. Allow to cool completely.
For the pastry cream
1 cup heavy cream
1 cup whole milk
1 teaspoon instant espresso powder, such as Medaglia Doro
1/4 cup hazelnut praline paste, such as "Love 'n Bakes" praline paste. If you can't readily find this, substitute with an equal measure of Nutella
5 egg yolks
1/2 cup sugar
1/4 cup corn starch
pinch salt
2 cups heavy cream
In the bowl of a stand mixer fitted with the whisk attachment, combine the praline paste, yolks, sugar, cornstarch, and salt and whisk on high until smooth and light.
In a large saucepan, combine the heavy cream, whole milk and espresso powder. Bring to a simmer.
With the mixer running, carefully add the simmering cream into the whisking egg mixture and continue whisking until combined. Transfer back to the saucepan and constantly whisk over low heat until the mixture thickens to consistency of mayonnaise.
Immediately transfer the pastry cream to a clean bowl and top with plastic wrap, making sure the plastic wrap touches the surface of the pastry cream so it doesn't form a skin. Refrigerate to cool, about 1 hour.
In the bowl of a stand mixer, whisk the 2 cups heavy cream to stiff peaks.
Stir the cooled pastry cream in the bowl to loosen and add 1/4 of the whipped heavy cream to lighten and loosen the mixture. Fold the remaining 1 1/2 cups whipped heavy cream into the pastry cream carefully and gently until no white streaks remain. Transfer the pastry cream to a large pastry bag fitted with a large open tip.
Pipe 1/5 of the cream in an even layer over one of the puff strips. Top with a second puff strip. Continue layering with cream and topping with puff until you reach the last strip of puff. Work slowly and carefully as the puff is delicate. You might also find that the pastry cream is looser than you'd like and as you layer, the "tower" may become unstable. If this happens, feel free to put your work in progress in the freezer to set a bit, about 10-15 minutes, and then continue on.
Once you've added the last strip of puff, carefully cover with a piece of plastic wrap and freeze the long strip of Napoleon until it's very firm, if not frozen solid, about 1-2 hours.
Using a very sharp and hot knife, cut the looooong Napoleon into 7 individual Napoleons. The top of the Napoleon should measure approximately 2" x 3 1/2". That's one tower of puff power! Now gently tip the puff over so that the layers are now vertical. This does two things, it makes for a more interesting presentation AND it makes the pastry easier to manage and eat.
At this point, I take a strip of parchment and wrap it around the base of the pastry and tie a baker's ribbon around it. This makes for a lovely little pastry package and it contains any errant puff that has the need to slough off. This isn't a problem with you have the pastry stacked in the other, more traditional direction but gravity comes into play when you've got the pastry on its side.
To finish
2 cups heavy cream
1/4 cup confectioner's sugar
Whip the heavy cream and confectioner's sugar to medium stiff peaks. Transfer the cream to a large pastry bag fitted with a St. Honoré or large ribbon tip and pipe a snaky ribbon onto half of the top of the pastry. Refrigerate until you're ready to serve, no more than a few hours.
Optional
Caramel Hazelnuts!
14 blanched, whole hazelnuts
1/2 cup sugar
2 tablespoons water
2 drops lemon juice
Pierce each hazelnut with a wooden skewer. Be careful that the hazelnut is secure on the skewer but don't be so forceful that you split the hazelnuts in half. This is why I have double the amount of hazelnuts that you'll need. Set aside.
In a large mixing bowl, add a few cups of ice. Set aside.
Place a cutting board at the edge of a table and place a strip of parchment directly below.
In a heavy saucepan, combine the sugar, water and lemon juice. Stir over low heat until the sugar has completely melted. Stop stirring and continue cooking until the sugar turns a medium/dark amber. Immediately place the pan on top of the ice to stop it from cooking and to thicken the mixture.
Stir the mixture now and again to check its consistency. Once it's still fluid but has thickened, drag a hazelnut through the caramel to coat it completely. Hold the hazelnut over the caramel to allow excess to drip off. Once the dripping has died down but you've still got a "tail" hanging from the hazelnut, tuck the naked end of the skewer under the cutting board to secure it, allowing the caramel dipped hazelnut with its tail to hang suspended over the newspaper). Continue dipping and securing until you have at least 7 caramel covered and tailed hazelnuts.
Snap off the tail to your preferred length and then place one hazelnut on top of each pastry, to the side of the whipped cream. Serve immediately.
February 2, 2015
The Jackie-OH! Chocolate Cake with Caramel Buttercream

At my pastry shop, I'd roll out new pastries often. One of my first offerings was a decadent, fudgy chocolate layer cake slathered in caramel buttercream. We hadn't had the cake in the case more than 2 seconds when a customer remarked, "That's as beautiful and perky as one of Jackie O's pillbox hats."

So it came to be that one of our most popular cakes was named the "Jackie-OH!" It's elegant and understated with gorgeous hidden depths. I'd say we landed on the perfect name, alright.

For the cake
2 cups sugar
3 eggs
3/4 cup neutral vegetable oil (like canola)
1 cup piping hot, freshly brewed coffee
3 ounces bittersweet chocolate, 60-70%, finely chopped
1 1/2 cups all purpose flour
1 cup cake flour
1 1/2 cups Dutched cocoa (I use Cacao Barry Extra Brute)
1 1/2 cups lowfat buttermilk, room temperature
2 teaspoons baking powder
1 teaspoon baking soda
1 teaspoon salt
1 teapsoon vanilla
Line the bottom of four 9" cake pans with a round of parchment and spray with non-stick cooking spray. Set aside.
Preheat the oven to 325ºF.
Place the chopped chocolate in a heat proof bowl. Pour the coffee over the chocolate to cover completely. Allow to sit undisturbed to melt. Set aside.
In a large bowl, combine both flours, cocoa, baking powder, baking soda and salt. Whisk at least 30 seconds to combine.
In the bowl of a stand mixer combine the sugar, eggs and oil. Whisk on high until lightened and combined.
Stir the chocolate and coffee mixture, making sure that the chocolate has completely melted. If chunks of unmelted chocolate remain, briefly microwave on low power to completely melt the stray bits Add the chocolate mixture and vanilla to the buttermilk and stir to combine.
With the mixer running on low speed, add 1/3 of the flour mixture to the stand mixer and mix just to combine and then add 1/2 of the chocolate/buttermilk mixture. Continue alternating between the buttermilk mixture and flour mixture until they are both completely incorporated into the batter.
Divide the batter among the 4 pans evenly. To get the batter perfectly divided, I weigh my mixing bowl before getting started and then weigh the batter filled mixing bowl once the batter is complete and subtract the weight of the bowl from the total. What's left, you divide by four. In my case, I ended up adding 16.75 ounces to each pan.
Bake for 25-30 minutes or until the cakes just spring back when gently poked. Allow to cool completely.
For the Italian caramel buttercream
2 cups sugar
1/2 teaspoon salt
10 egg whites
1 teaspoon vanilla
squirt lemon juice
1 pound 8 ounces unsalted butter, room temperature
In the bowl of a stand mixer fitted with the whisk attachment, combine the egg whites, vanilla and salt.
In a heavy bottomed and large saucepan, combine the sugar, 1/2 cup water and the squirt of lemon juice. Stir over low heat until the sugar has completely melted. Stop stirring and raise the heat to medium-high. Cook the sugar until it turns a medium deep amber. Have 1/2 cup room temperature water on standby.
Once the sugar has turned the appropriate amber, take the caramel from the heat and CAREFULLY add the 1/2 cup of reserve water. The mixture will spatter and bubble vigorously so be very careful in doing this. The mixture will settle down quickly. Once the carmel has stopped erupting, attach a candy thermometer to the side of the pan and stir over low heat to ensure any hardened bits of caramel melt. Heat the mixture until the temperature reaches 234º-240ºF.

Turn the mixer on high and whisk the egg whites until they become foamy, carefully pour the caramel syrup down the side of the bowl and into the whisking egg whites until all the caramel syrup is added. Whisk until stiff peaks form and the bowl is cool to the touch.
 Adding butter to the point that the meringue has turned liquidy and starting to look a bit curdled.
 Add the butter, a few tablespoons at a time, with the mixer running on medium speed. Allow each addition to incorporate until adding more. The meringue will deflate at first and start to look more "liquidy." This is normal. It will often then start to look broken or curdled. This is also right on the money. At this point, add a few more tablespoons of butter and mix on high until the buttercream thickens and smooths out.
 Finished Buttercream
To assemble
Sugar pearls (optional)
Place a layer of cake onto a cake stand. Spread a little over 1 1/2 cups buttercream in an even layer over the cake layer. Continue building the cake like this, adding a layer and then 1 1/2 cups buttercream until all four layers are on the cake. Spread a thin, crumb coat, over the top and sides of the cake and refrigerate to set, about 15 minutes.

Spread all but 1/2 cup of the remaining butter cream in a smooth finishing coat over the remainder of the cake and then, using a pastry bag fitted with a small open tip, add the remaining buttercream to the bag and pipe beads along the perimeter of the top of the cake and along the bottom of the cake. Refrigerate to set, about 20 minutes.
January 23, 2015
RED VELVET PIECE OF MY HEART CAKE

Years ago, I created a cake called the "Because You're Mine Cake." It ended up gracing the cover of my 2013 book Bake It Like You Mean It. A few years before that, I put the first version of the on this blog after having worked on the recipe and design ideas since having my pastry shop.

Every iteration of this cake, from its first inception 10 years ago, has been dark chocolate vertical cake stripes against white icing. It's dramatic. It's delicious. It's a showstopper.

But this cake is, at its heart, a Valentine's day cake. I've been thinking lately, why not make it red? Red velvet, in fact.

So I bring you the updated version of the "Because You're Mine" cake in red velvet. I've simplified it by taking away the top and bottom layers that I'd originally added to the cake. So with all these sweet changes, I think it deserves a name of it's own, don't you?
RED VELVET PIECE OF MY HEART CAKE
For the cake
4 large eggs, room temperature
2/3 cup sugar
2 tablespoons warm water
1 teaspoon vanilla
1 cup all purpose flour
2 tablespoons natural cocoa
1/2 teaspoon baking powder
1/2 teaspoon salt
6-7 drops red gel food coloring
2 tablespoons confectioner's sugar
Preheat the oven to 375ºF. Line a half sheet pan with parchment and spray with non-stick spray. Set aside.
In the bowl of a stand mixer fitted with the whisk attachment, combine the eggs, sugar, warm water and vanilla. Whisk together. Place the bowl over a pan of simmering water and whisk constantly until the sugar has completely melted and the mixture is warm to the touch.
Transfer the bowl to the stand mixer, add the dye, and whisk on high until the eggs have tripled in volume and ribbon when you raise the whisk attachment. Adjust the color as you go, adding another drop of dye here and there for a deeper red.

In a mixing bowl, whisk together the flour, cocoa powder, baking powder and salt. Sift onto a piece of parchment and then sift back into the bowl.
Sift the flour mixture over the beaten eggs, 1/3 of the flour mixture at a time, and gently fold the flour into the eggs after each addition.
Smooth the batter in an even layer onto the prepared sheet pan and bake for 15-20 minutes or until the cake starts to pull from the sides of the pan and springs back when gently poked.
Immediately sprinkle the confectioner's sugar over the top of the cake and spread to make sure the surface is evenly coated. Using a paring knife, run the knife along the edges of the cake to release it.
Place a piece of parchment over the top of the cake and then place a clean kitchen towel over the parchment and then place another sheet pan over that and flip the cake over. Lift up the sheet pan but leave the parchment attached to the cake. Roll the cake up, from the short side, to form a roll inside the kitchen towel. Keep the cake rolled until it has cooled.

For the buttercream
10 egg whites
2 cups sugar
1-2 pounds unsalted butter, room temperature
1/4 teaspoon salt
Combine the egg whites, sugar and salt into the bowl of a stand mixer. Place the bowl over simmering water and whisk until the sugar has completely melted and the mixture reaches at least 160ºF.
Transfer the bowl to the stand mixer fitted with the whisk attachment and whisk on high until the meringue is white and shiny and the bowl is cool to the touch.
Add the butter, a few tablespoons at a time, and continue whisking all the while until the buttercream thickens and is spreadable. There's a change that before the transformation takes place, the buttercream will look as if it has curdled. This is normal. Add a small hob of butter more and continue whisking! Keep in mind that you may not need all the butter, so work slowly and watch the progress of the buttercream.
To assemble
1 jar red sprinkles
Roll out the cake and remove the parchment. Cut the cake into 3 long strips, each strip measuring about 4" wide. Spread an even layer of the buttercream over the entire cake, using a little less than 1/3 of the buttercream. Roll one of the strips into a tight roll. Move the roll over to the next strip, allowing the ends to meet, and continue rolling the cake. Continue this with the last strip until you have a large roll of cake!

Turn the cake over, with the spiral side down. Immediately cover the cake in a very light and rough coat of buttercream. This is your opportunity to even out the sides of the cake, especially where the tail end of the cake sits. You'll notice that it isn't perfectly round due to this little piece sticking out, so compensate for this with buttercream. Refrigerate the cake after your rough coat to allow the cake to set. About 30 minutes.
 rough coat of buttercream
Once the first layer of buttercream has set, smooth the remaining buttercream over the cake.
Cut two strips of parchment, about 2" wide, and wrap around the center of the cake. Cut a large 3" heart from the parchment and adhere to the middle of the top of the cake. Press the red sprinkles all along the exposed buttercream parts of the cake and then carefully remove the parchment.
Cut a small heart from a larger piece of parchment and place the parchment over the center strip of exposed buttercream. Press red sprinkles onto the "heart" area and gently remove the parchment to reveal a single red heart.

January 20, 2015
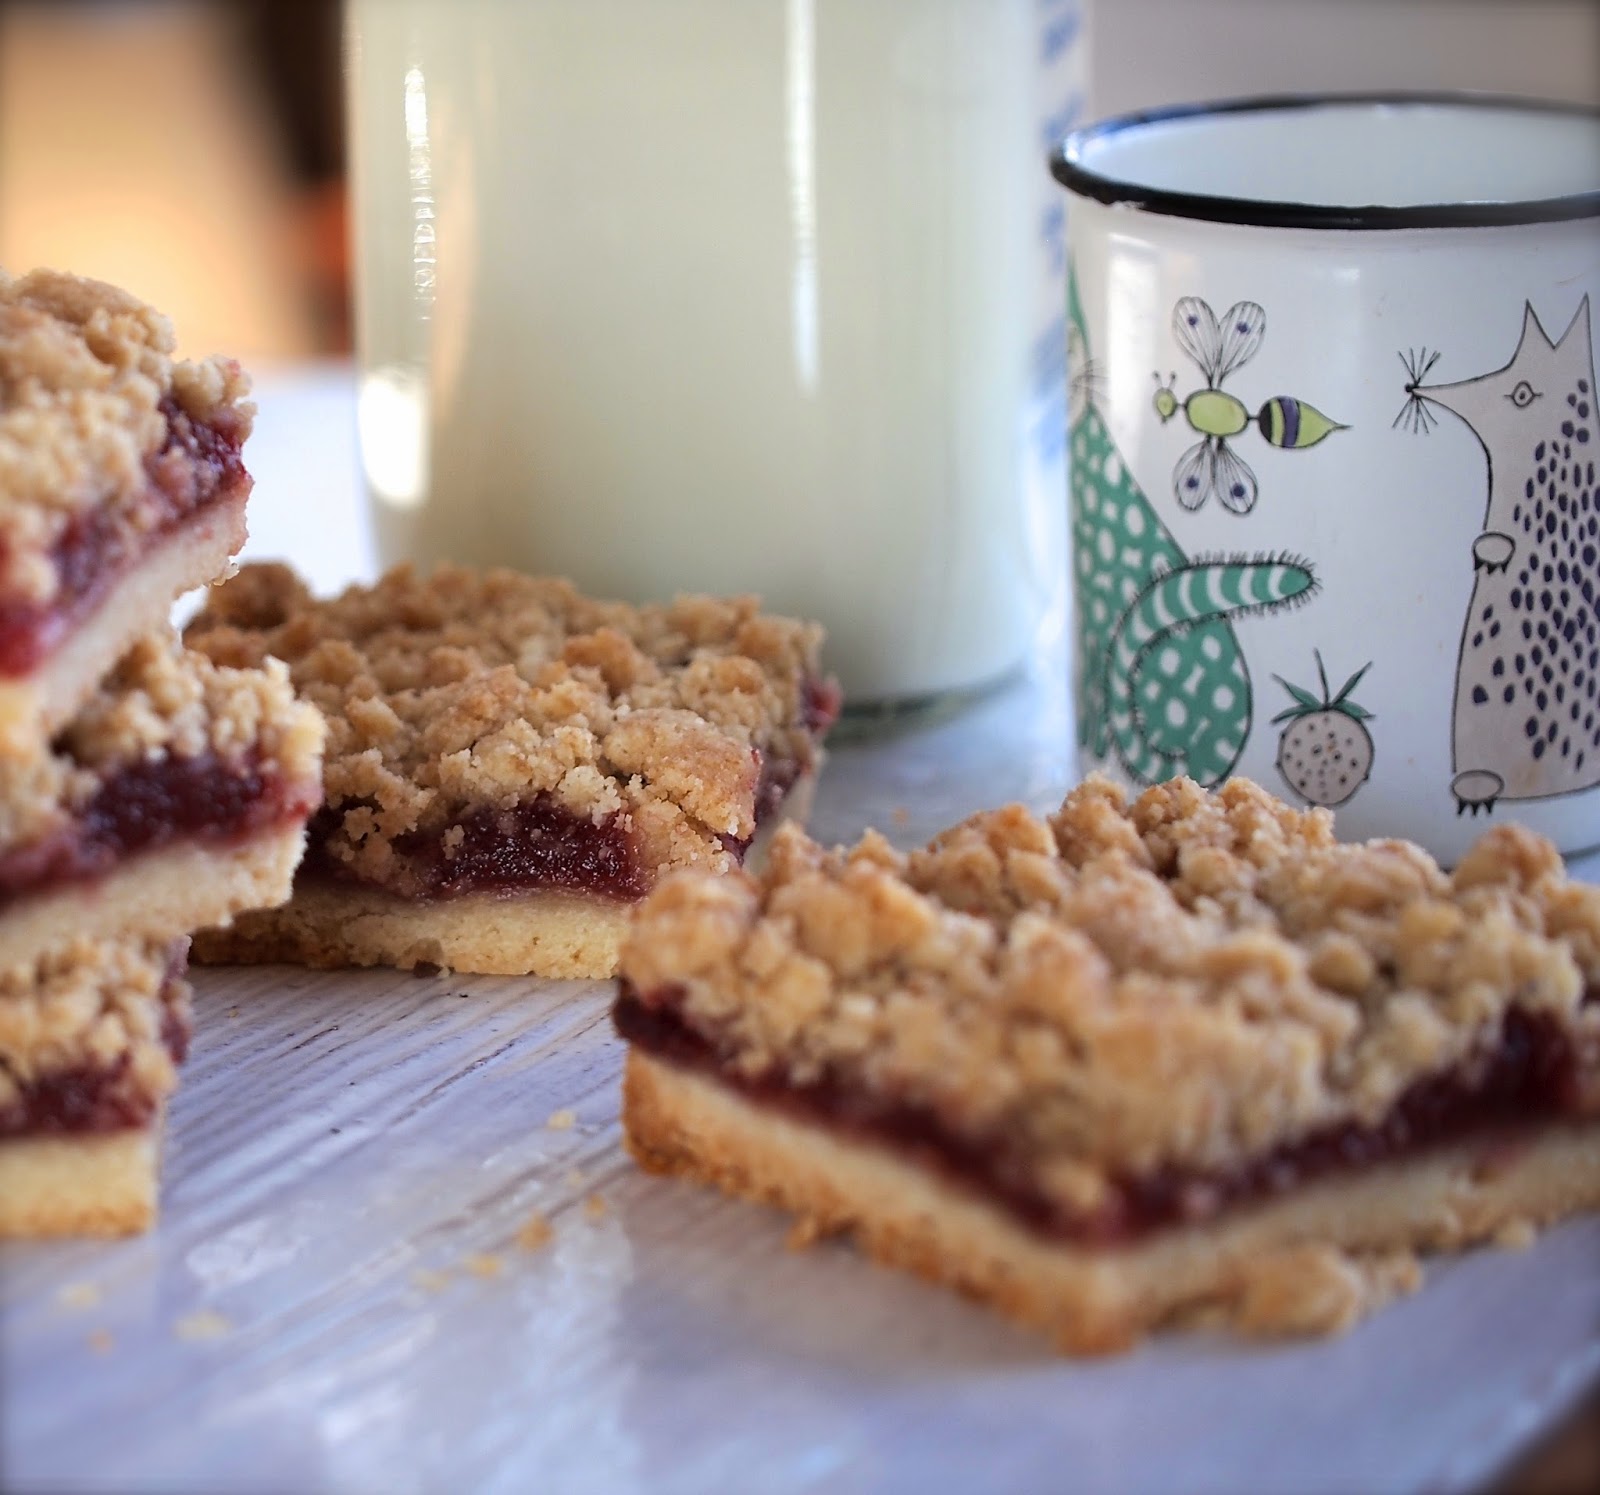
CRANBERRY CRUMBLE BARS

I found a half case of canned cranberry sauce in the pantry. Funny thing with those cans, once Thanksgiving is over they tend to linger, unloved and untouched.

I'm not a hoarder. I'm not stocking up in the event of a zombie apocalypse. I had an assignment late last year that required a boatload but, apparently, not a full caseload of the stuff. Don't judge.

Staring at those forsaken little cans, I realized that there must be thousands of lonely Ocean Sprays sauces waiting to be noticed. I resolved that it would be my mission to bring those little tin encased jelly jewels out of the pantry and back into our lives.
I'd make something simple! Delicious! Crumbly!
I give you....
CRANBERRY CRUMBLE BARS
For the shortbread
I've been told that many bakers have trouble with shortbread, especially the classic recipe that requires only flour, butter and sugar. I've come up with a fix that makes the process pretty foolproof: I grate cold butter into the flour. This does two crucial things: keeps the butter cold and gets the butter bits small without heating it up. This way, you get that wonderful buttery/sandy texture and not a tough cookie.
2 cups all purpose flour
1/2 cup sugar
1 cup unsalted butter, cold (I put it in the freezer for 10 minutes before grating)
1/2 teaspoon salt
Line a 9" x 13" baking pan with parchment so that the parchment hangs over the sides of the pan. Spray with non-stick cooking spray. Preheat the oven to 350ºF.
Combine the flour, sugar and salt in a mixing bowl. Whisk for 30 seconds. Using the largest holes in a box grater, grate the cold butter onto the flour mixture.

Using your fingers, massage the butter into the flour until the mixture resembles cornmeal and holds together when you squeeze it between your fingers.
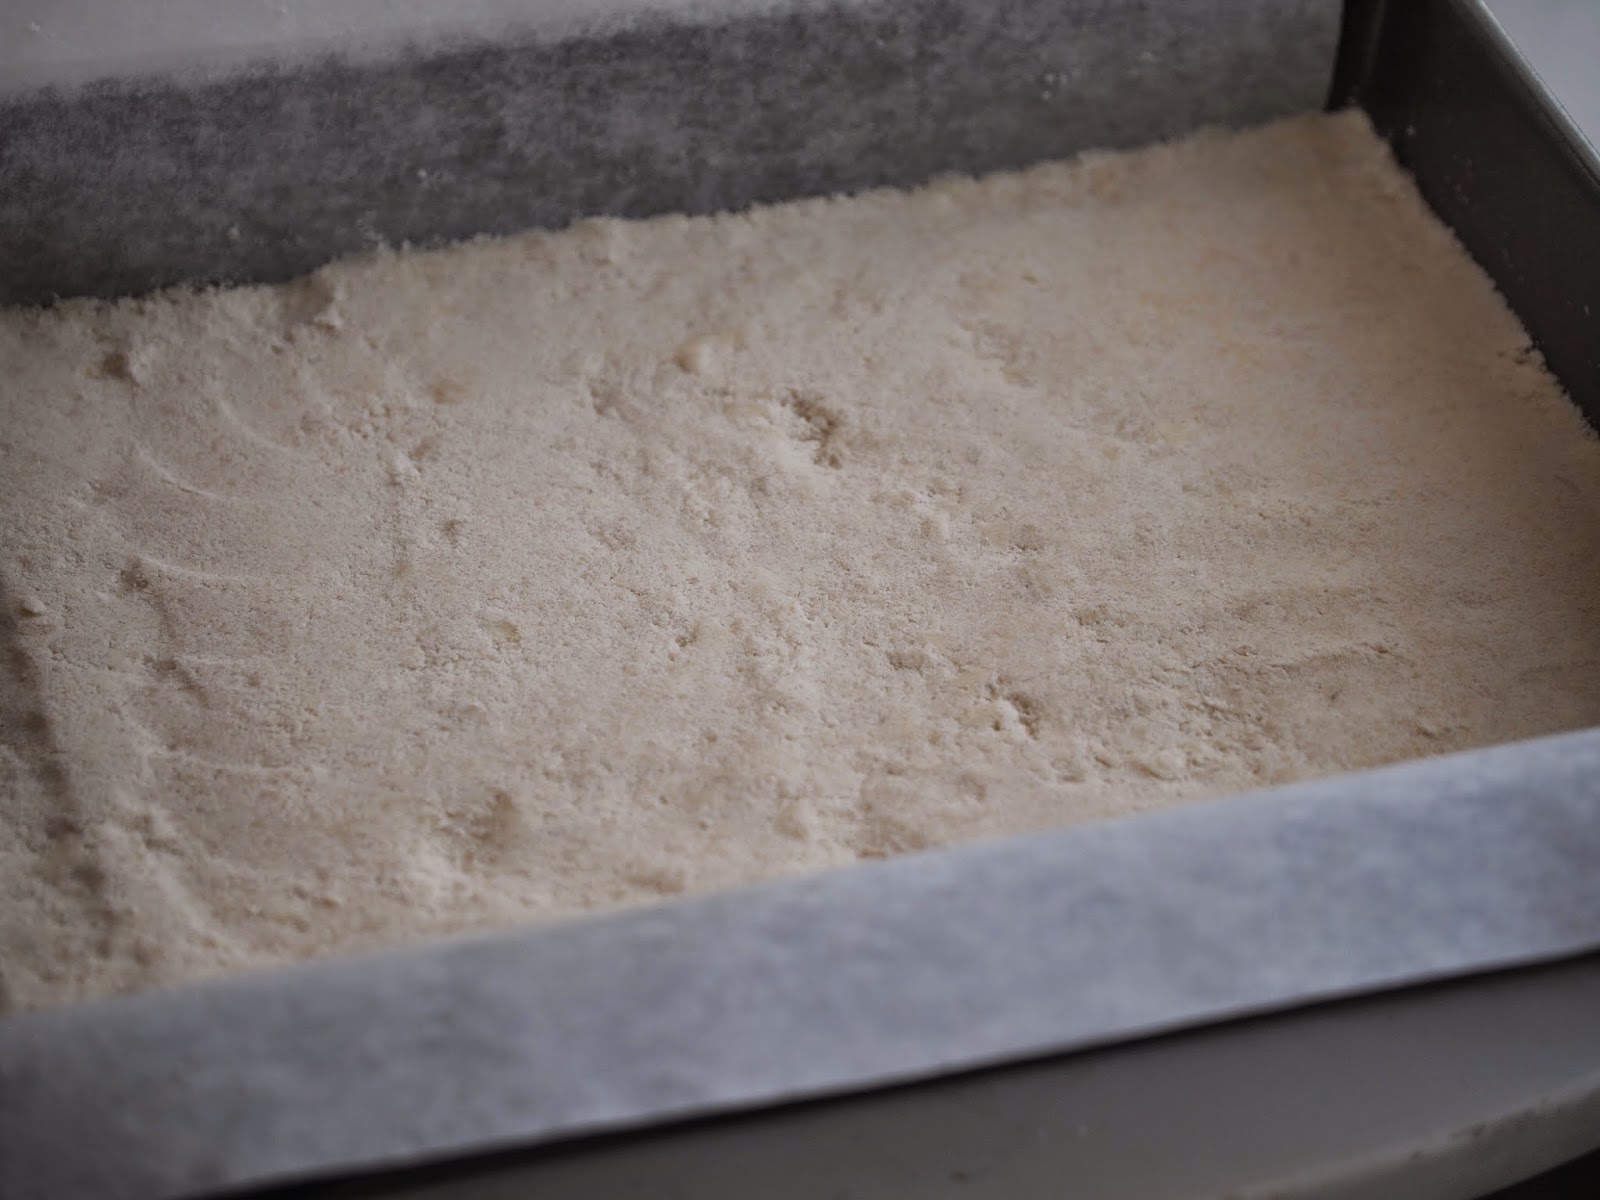
Dump the shortbread into the prepared pan and press the dough into an even layer into the pan. Bake for 20 minutes and remove from the oven. Leave the oven on.
For the filling
2 (14 ounce) cans Jellied Cranberry Sauce
Puree both cans in a food processor or smash the jelly with a fork in a large bowl to break down the jelly into a spreadable consistency.

Spread the cranberry sauce onto the shortbread in an even layer.
For the crumble
1 cup unsalted butter, melted
1/2 cup granulated sugar
1/2 cup brown sugar
2 1/2 cups all purpose flour
1/2 teaspoon salt
In a large bowl, whisk together the sugars, the flour and the salt. Pour the butter over the flour mixture and stir with a spoon to incorporate the butter. You'll likely have to switch to using your fingers to ensure that all the ingredients are evenly distributed and the mixture forms large clumps.

Sprinkle the crumble evenly over the cranberry layer. Some people like a LOT of crumble. If that's you, use the entire batch. Otherwise, you can freeze any remaining crumble that you don't use for up to a month and have it on hand if you need to make a last minute apple crumble or want to save it to sprinkle on muffins, etc.
Bake for 30-40 minutes more or until the crumble starts to evenly brown.
Allow to cool completely and then lift the one large bar from the baking pan using the overhanging parchment. Cut into squares. Keep in an airtight container up to a week.
January 19, 2015
CHOCOLATE CARAMEL-PEANUT TART a la Sadaharu Aoki

A few years ago, I was introduced to the work of pastry chef Sadaharu Aoki. I visited his shop in Paris. I left enamored by the beauty and precision of his work. His treats were delicious but it was his delightful interplay of geometry and deliciousness that stayed with me.

But the look of the tart, this is wholly influenced by Sadaharu Aoki's brilliant French/Japanese pastry aesthetic.

CHOCOLATE CARAMEL-PEANUT TART

For the shortbread tart shell
1 cup all purpose flour
1/4 cup sugar
1/2 teaspoon sea salt
1/2 cup unsalted butter, very cold
In a mixing bowl, whisk together the flour, sugar and salt. Using a cheese grater, grate the butter into the flour mixture (use the largest holes on the grater).
Using your fingers, massage the butter into the flour until the mixture resembles coarse cornmeal.

Place an 8" flan ring or tart pan on a Silpat or parchment lined sheet pan and spray with non-stick cooking spray.
Using your fingers, press the shortbread dough onto the bottom and sides of the ring/pan. Line the pan with plastic and using a flat bottomed measuring cup, smooth the dough by tamping the flat side of the measuring cup to smooth the sides and bottom of the dough. Trim the top edge of the dough flat with the top of the ring.

Dock the dough with a fork and freeze for 20 minutes.

Preheat the oven to 350ºF.
Bake the tart shell for 10 minutes. Turn the pan 180º and bake for 10 - 15 minutes more or until the tart shell is golden brown and baked through. Set aside to cool completely.
For the chocolate caramel filling
1 cup sugar
1/2 cup corn syrup
1/2 teaspoon salt
squirt lemon juice
1/2 cup heavy cream
1 tablespoon unsalted butter
2 ounces bittersweet chocolate, 70% cocoa, finely chopped
1/4 cup salted peanuts, chopped
In a heavy bottomed saucepan, combine the sugar, corn syrup, salt, lemon juice and 1/3 cup water. Stir over medium heat until the sugar has completely melted. Stop stirring and cook the sugar syrup until it becomes medium amber.
Take the sugar from the heat and stir in the butter. Slowly add the cream and stir. The caramel will have hardened, so return the pan to low heat and stir until the caramel has melted completely into the cream. Clip on a candy thermometer, increase the heat to medium, and heat the caramel to 240ºF, stirring the mixture every once in a while. Take the caramel from the heat and stir in the chocolate until it's melted.

Spread the peanuts in an even layer on to the tart shell and then pour the caramel on top of the peanuts. Allow the caramel to set and cool, about 1 hour.

For the peanut butter ganache
4 ounces bittersweet chocolate, 70% cocoa, finely chopped
1/4 cup heavy cream
1 tablespoon butter
pinch salt
2 tablespoons smooth peanut butter
In a saucepan, combine the heavy cream, butter and salt. Bring to a simmer, making sure the butter has melted. Take from the heat and add the chocolate. Stir to ensure that the chocolate is completely coated by the hot cream. Allow to sit a few minutes and then whisk to combine.
Transfer the hot ganache to the bowl of a stand mixer fitted with the paddle attachment and add the peanut butter. Allow the ganache to cool a bit, about 10 - 15 minutes.
Mix the ganache on medium speed until it's cool, spreadable and has lightened in color a bit.
Transfer the ganache to a large pastry bag fitted with a medium open tip. Pipe the ganache in a spiral over the cooled caramel. Refrigerate the tart until the ganache is firm, about 20 minutes.
To finish
1 tablespoon natural cocoa powder
8" parchment round
Cut the parchment round as indicated in the photo below. Place the parchment over the set ganache but don't press down (make sure that the ganache is firm).

Place the cocoa in a sieve and sprinkle the cocoa over the top of the tart. Carefully remove the parchment triangles. Serve immediately at room temperature or refrigerate for up 3 days (the caramel firms up quite a bit when cold so bring to room temperature before serving unless you like a firmer caramel).
January 16, 2015
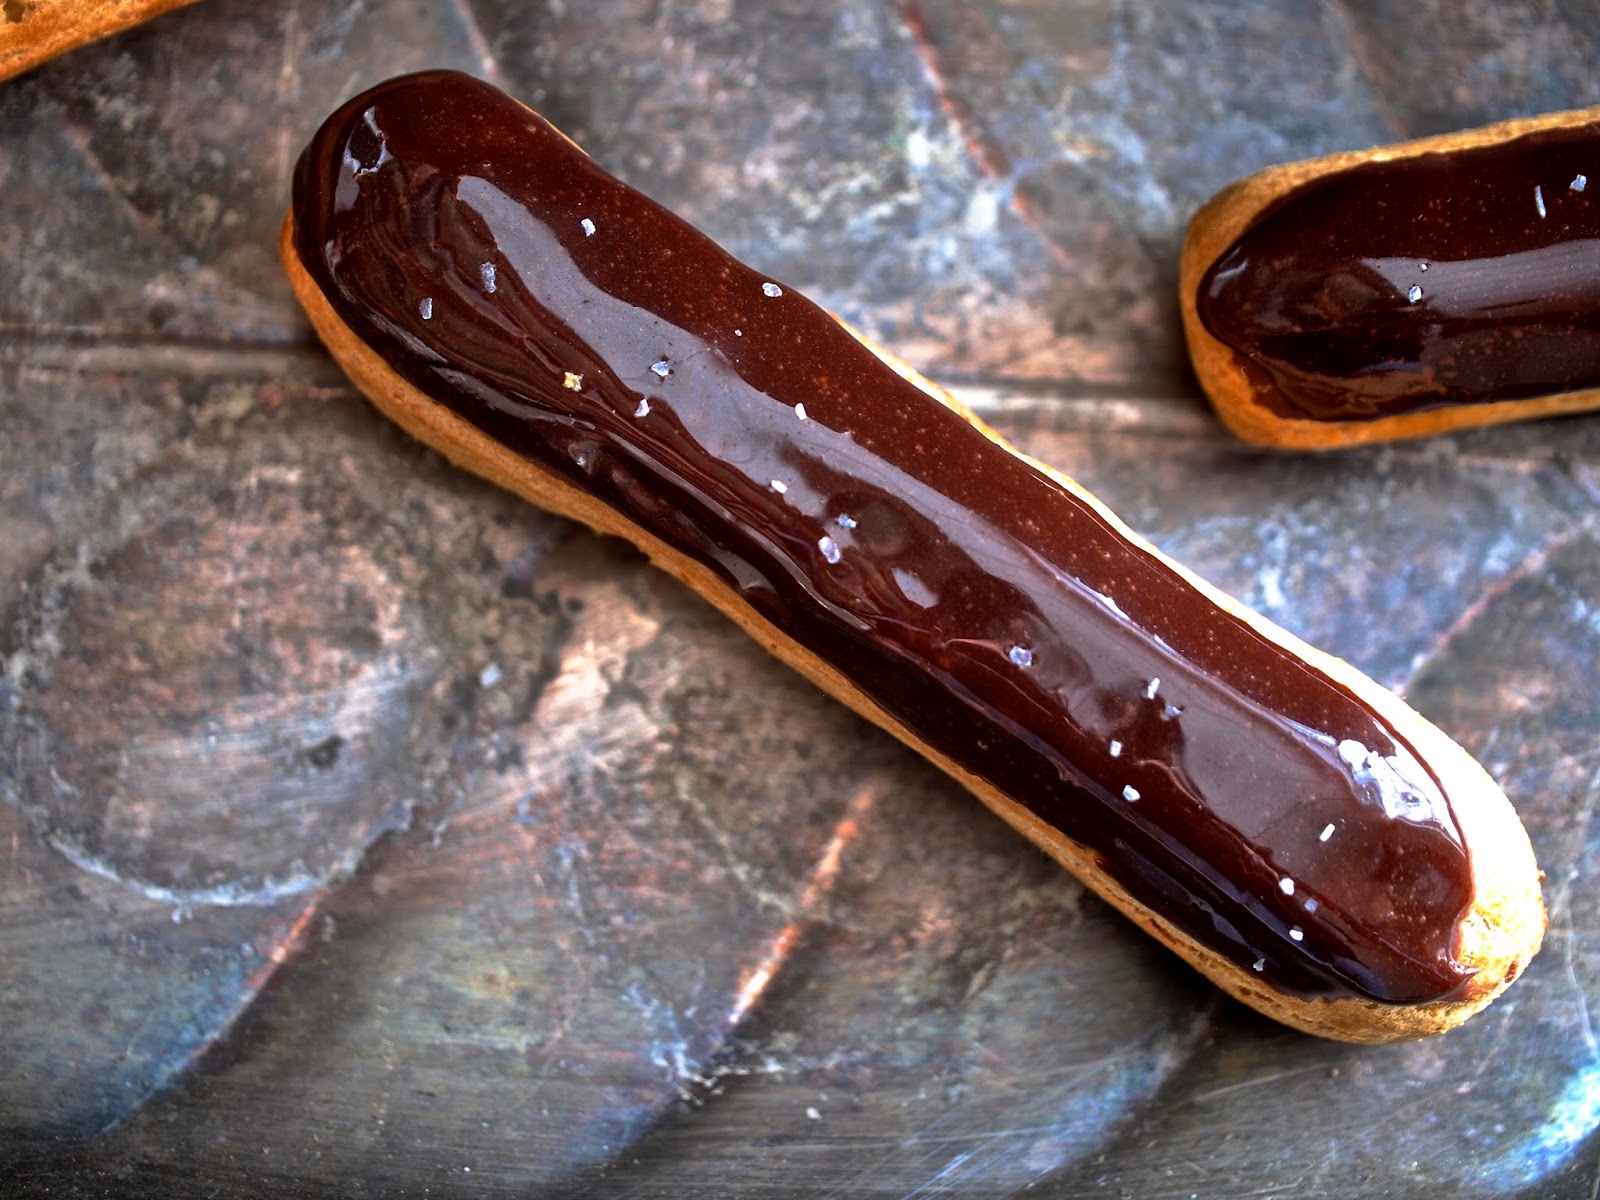
SALTED CARAMEL ECLAIRS

I'm repainting my bakery. The color that's calling me is a soft green a la Ladurée. While searching for just the right shade, flipping through color swatches and comparing them to the little green box carted from Paris, Ruthie lay on the sofa, staring off in the distance wondering when I'd start baking again.
At one point, the light hit her just so and suddenly that perfect shade of green no longer mattered. All I could think about was caramel. Miss Ruthie just happens to be the perfect shade of burnt sugar.

With that sweet imagery in swirling around in my head, I whipped up some caramel pastry cream. As that was cooling, I piped some choux. While that cooled, I made chocolate pouring fondant. Ruthie sat at a respectable distance in the kitchen, indicating that had I need of her, she was ready and willing to dispose of any unwanted bits of baking product. I gave her a piece of choux with a tiny dollop of caramel. She was, afterall, the architect of all this yumminess.

CARAMEL ECLAIRS
(makes 10 eclairs)
For the caramel pastry cream
1 cup sugar
1/3 cup water
splash lemon juice or vinegar
1/2 teaspoon salt
2 cups whole milk
6 egg yolks
1 tablespoon vanilla bean paste (can substitute vanilla extract)
1/4 cup cornstarch
2 tablespoons unsalted butter, room temperature
In a heavy saucepan, combine the sugar, water and lemon juice or vinegar. Stir over low heat until the sugar has melted. Increase the heat to medium and allow to cook until the sugar turns a dark amber (the color of Miss Ruthie).

Take the caramel from the heat and add the milk. The mixture will bubble up furiously, so step back. Once the mixture has calmed down, return the mixture to the stove and stir over low heat until the caramel has melted into the milk.
In a mixing bowl, combine the egg yolks, cornstarch and salt. Whisk until smooth. While constantly whisking, add a small ladle of the hot caramel/milk mixture to the egg yolk mixture to temper the two. Continue adding the hot mixture to the egg yolks until they are completely combined and then transfer this mixture to another, larger, saucepan and whisk over medium-low heat until the mixture thickens to the consistency of mayonnaise. Take from the heat and add the butter. Continue stirring until the butter has melted and has been completely incorporated. Transfer the mixture to a clean bowl and cover the pastry cream with plastic wrap, making sure the plastic wrap touches the surface of the pastry cream so it doesn't form a skin. Refrigerate until cool, about 1 hour.
For the choux
1 cup flour
1/2 cup water
1/2 cup milk
2 tablespoons sugar
4 ounces unsalted butter, cut into small pieces
1/2 teaspoon salt
4-5 eggs
Preheat oven to 400ºF.
Line 2 half sheet pans with parchment paper. Fit a large pastry bag with a large open tip. Set aside.
In a large saucepan, combine the water, milk, sugar, butter and salt. Stir over medium heat until the butter has melted. Add the flour all at once and, using a wooden spoon, stir over medium heat until the mixture is smooth and pulls away from the sides of the saucepan. The mixture, when it's ready, should be a thick paste.
Transfer the paste to the bowl of a stand mixer fitted with the paddle attachment. Mix the paste on medium speed for a minute or two to dissipate some of the heat.
Add the eggs, one at a time, until the mixture becomes a smooth, pipable paste.
Transfer the choux paste to the prepared pastry bag. Pipe 4" long strips about 1-2 inches apart onto the parchment. Put the sheet pans in the freezer until the piped choux is firm, about 15 minutes.

Trim the ends of each choux strip eradicate any unevenness. Dip a fork in water and run it along the top of each eclair to create a slight ridge along the top. Spray the tops of the choux with a light mist of non-stick cooking spray. Bake the choux in the middle of the oven for 15 minutes and then turn the heat down to 350ºF and bake for 1/2 hour more. Allow to cool completely.
Fill the eclairs
Using a wooden skewer, poke 3 holes into the bottom of each eclair.
Transfer the pastry cream to a pastry bag fitted with a medium-small open tip. Pipe the pastry cream into the eclair via those holes (I could have phrased this differently but every time I did, it sounded NSFW).

For the chocolate pouring fondant
3 cups confectioner's sugar
1/4 cup water
2 tablespoons unsalted butter
1 tablespoon whole milk
1 tablespoon corn syrup
1/4 teaspoon salt
2 ounces unsweetened chocolate (I used Lindt 100%), finely chopped
1 tablespoons coarse sea salt
In a large saucepan, combine the confectioner's sugar, water, unsalted butter, milk, corn syrup and salt. Stir over low heat until the butter has melted. Add the chocolate and continue stirring until the chocolate has melted. Take from the heat and immediately start dipping the tops of the eclairs into the pouring fondant. Sprinkle the tops with the coarse sea salt
If the fondant starts to crust over in the pot, stir over low heat just until it smooths out again.
Allow the tops of the eclairs to set, about 10-15 minutes. Serve immediately or refrigerate for 1 day (keep them too long in fridge and the choux becomes soggy).
January 13, 2015
MAPLE CRUNCH BRIOCHE BUNS

We've got a little less than 1 cup left of last year's homemade maple syrup. At this time yesterday, we had a little over 2 cups. If my sweet calculations are correct, we'll have just enough to tide us over until sugaring season comes around. If not, I'm in big trouble because we've already eaten the delicious proceeds from that missing cup of maple.

I opened the bottle, eyeballed the pour into my copper candy pan, and put heat to our fancy amber. At 250ºF, I took the pot off the burner but left the sugar thermometer in place. Every 5 minutes or so, I checked the temperature and the second it hit 150ºF, I started stirring. Once the sticky mixture started to crystallize and looked pale, I transferred the gooey mass to a sheet of parchment, gave it a few pulls as if it were taffy, and left it to cool.
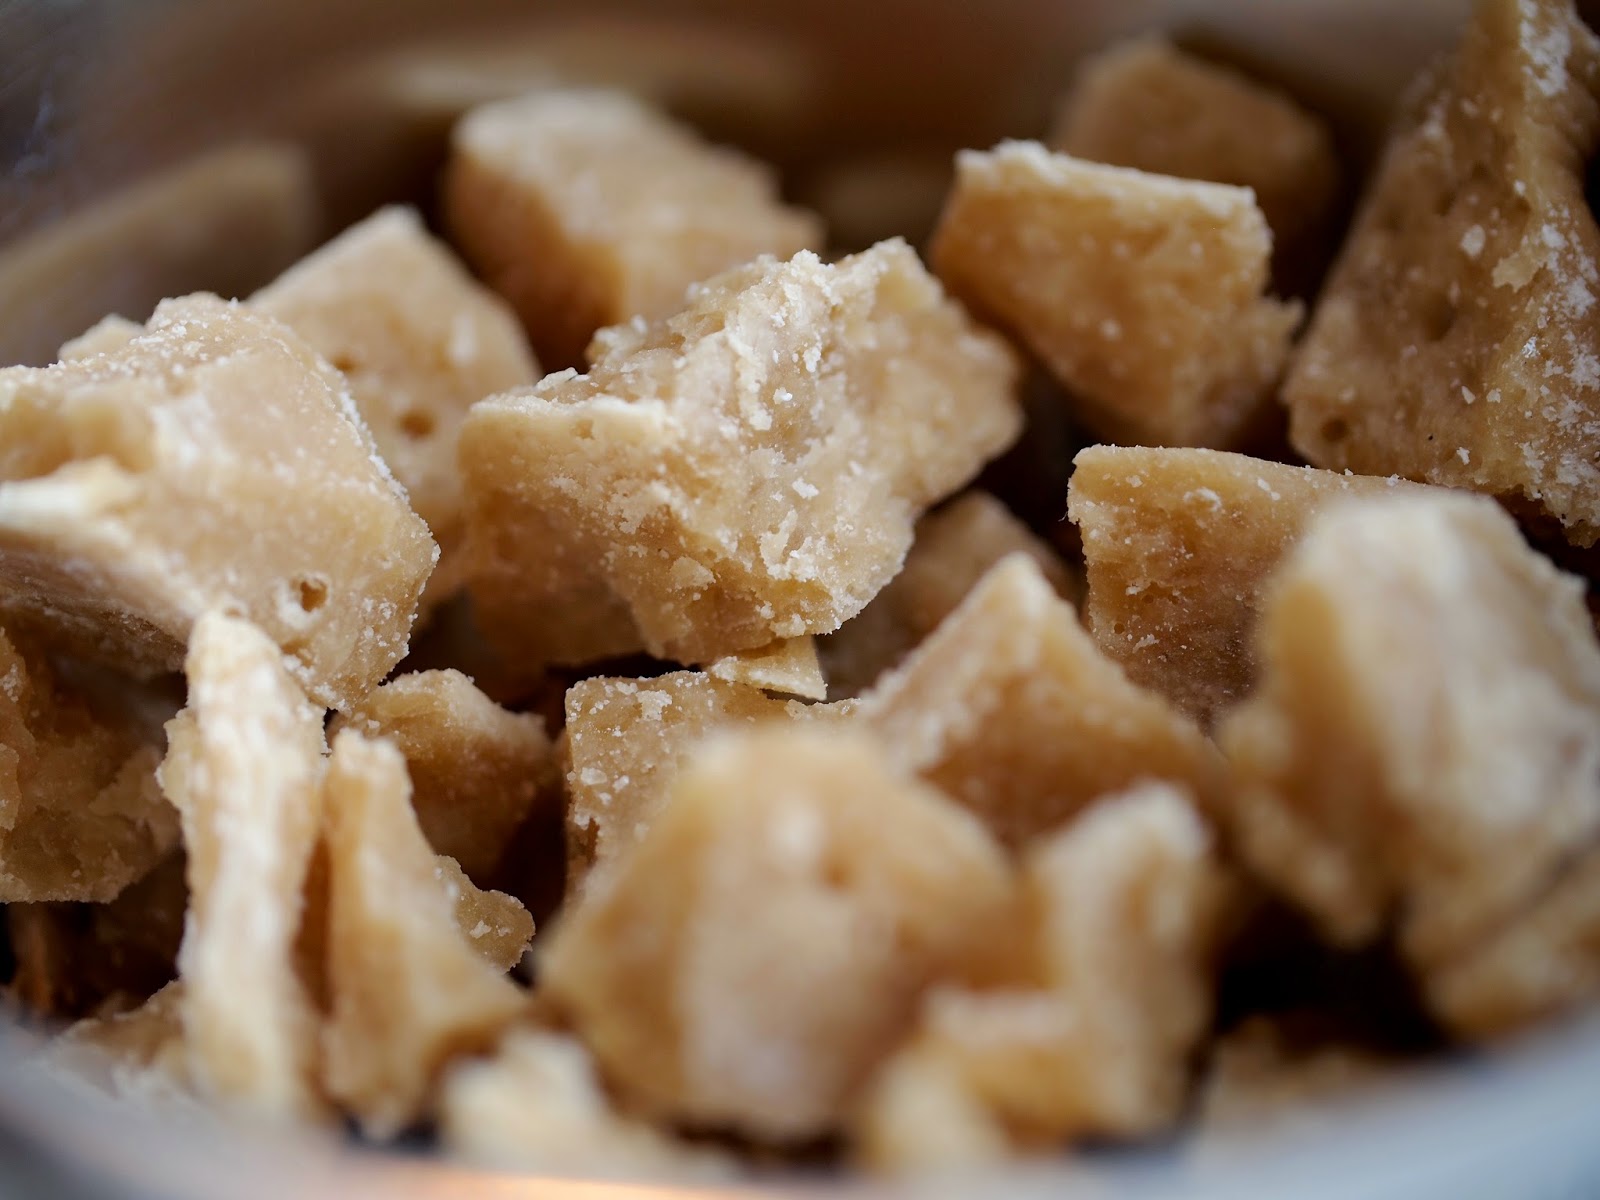 Maple candy, chopped.
Within 10 minutes, my little block started to look more pale. Within 45 minutes, it was cool and hard. I took a chef's knife and cut the block into 1/4" irregular pieces. I nibbled at small bits as they flaked off the sweet block. If you've had maple candy, you'd be surprised at the texture of this particular version. It's not the soft, slightly sandy confection that you get at specialty shops. It's harder. More like a rock candy but still crumbly and supple enough that it's easy to bite through.
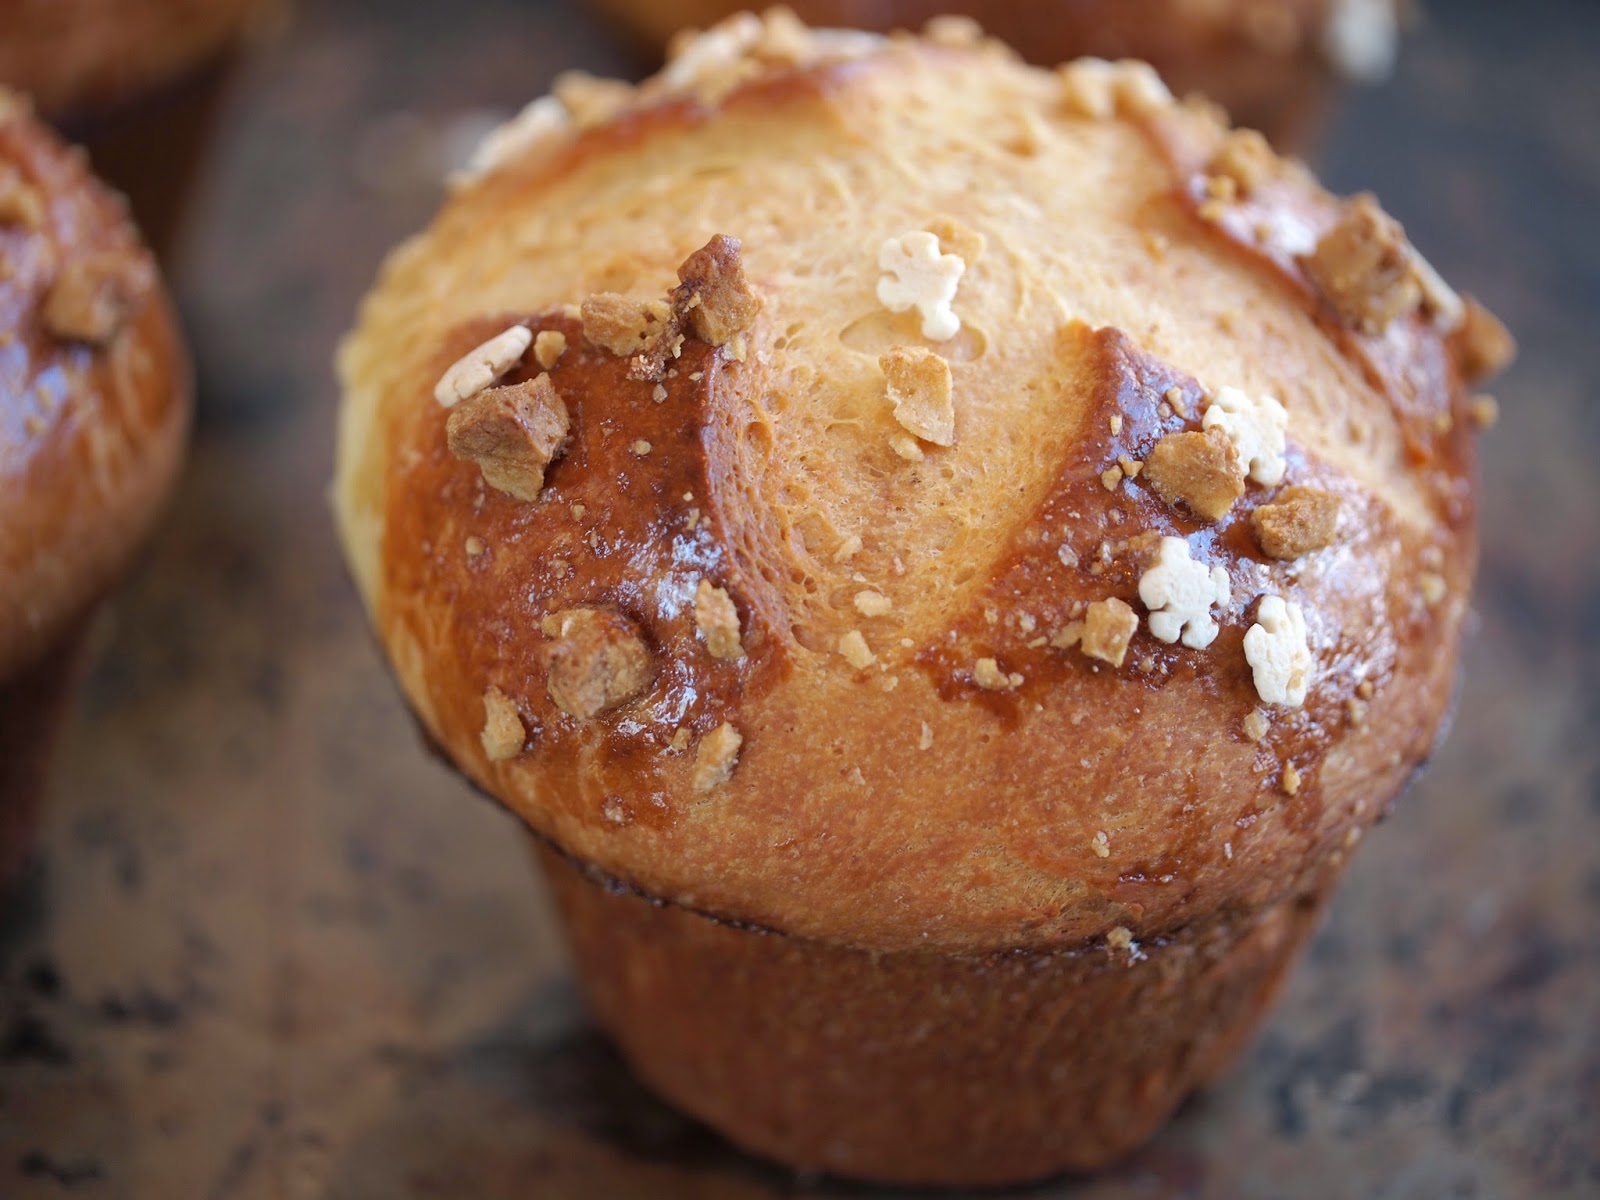
I hid my little jar of maple nibbles from myself and made a maple sweetened brioche dough. I've had this brioche plan in the works for months now. I've been calculating when I might drain off 1 1/3 cups of maple but still be left with enough to enjoy until the sap starts to flow in early spring. With outdoor temperatures dipping to -10, today seemed as good a day as any to enjoy a warm, earthy sweet brioche with pockets of crunchy sweetness hidden inside.
MAPLE CRUNCH BRIOCHE BUNS
For the maple candy
1 cup medium amber maple syrup
pinch salt
In a small saucepan, combine the maple syrup and the salt. Add a candy thermometer and heat the maple syrup to 250ºF. To be technical, you want to bring the syrup to a temperature that equals 30 degrees higher than the temperature of boiling water in your area. At sea level, the temperature of boiling water is 212ºF. I've calculated the temperature in my house nestled in the Green Mountains to be between 219º and 220ºF, hence the 250ºF calculation.
Watch the pot, the maple boils over quite easily. You can run a little butter along the edges of the pot to keep it from boiling over if you aren't going to be Johnny on the Spot.
Take the syrup from the heat but leave the thermometer in place, don't stir just yet. Check the temperature of the syrup every few minutes and once it's reached 150ºF, stir. The syrup will have thickened quite a bit and will start to crystallize once you agitate it. This is what you want. Stir for a few minutes to encourage this crystallization and to aerate the candy, this takes a few minutes. Transfer the mixture to a piece of parchment paper and "pull" the candy and fold it over for a few minutes to aerate even more. Pat into a rough rectangle that's about 1/4" to 1/2" thick. Allow to set and cool, 45 minutes to an hour.
Cut the candy into rough cubes and set aside.
For the maple brioche
2 1/2 cups all purpose flour, I use King Arthur All Purpose (plus 1/2 cup flour on reserve)
2 large eggs, cold
1/4 cup whole milk, room temperature
1/4 cup maple syrup
zest of 1 orange
1 teaspoon salt
1 packet instant yeast, I use Red Star's "Platinum" instant yeast
4 ounces unsalted butter, room temperature (I browned the butter first by heating in a small saucepan until the butter started to smell "nutty" and began to brown slightly. I transferred the butter to a heat proof bowl and allowed to come back to room temperature. You can use browned butter or regular-old room temperature butter)
In the bowl of a stand mixer fitted with the hook attachment, combine the eggs, milk, maple syrup, and orange zest. Whisk to combine.
In a small bowl, combine the flour, salt and yeast, stir to combine. Add the flour to the wet ingredients in the mixing bowl. Mix the dough on low until it comes together in a smooth ball but is still shaggy looking. Add the butter, a small knob at a time, continue mixing until the butter is fully incorporated. The dough should be slack and a little sticky but should still crawl up the hook a bit. If it's still primarily sticking to the sides of the bowl, add a little of the reserve flour, a tablespoon at a time, until the dough starts to come together. Mix until the dough is smooth and shiny, 15-20 minutes.
 Dough, just finished mixing.
Transfer the dough to a bowl sprayed with non-stick cooking spray. Spray the dough itself with non-stick spray and cover with plastic wrap. Allow to sit at room temperature for 1 hour or until it's just barely doubled in size and then refrigerate overnight.
 Ready for the fridge.
The next morning, divide the dough into 8 even pieces, weighing about 3.1 ounces each. Gently flatten each piece of dough into a rough round and place 3 - 4 pieces of the maple candy onto the dough. You should use only a little over 1/2 of the maple candy.
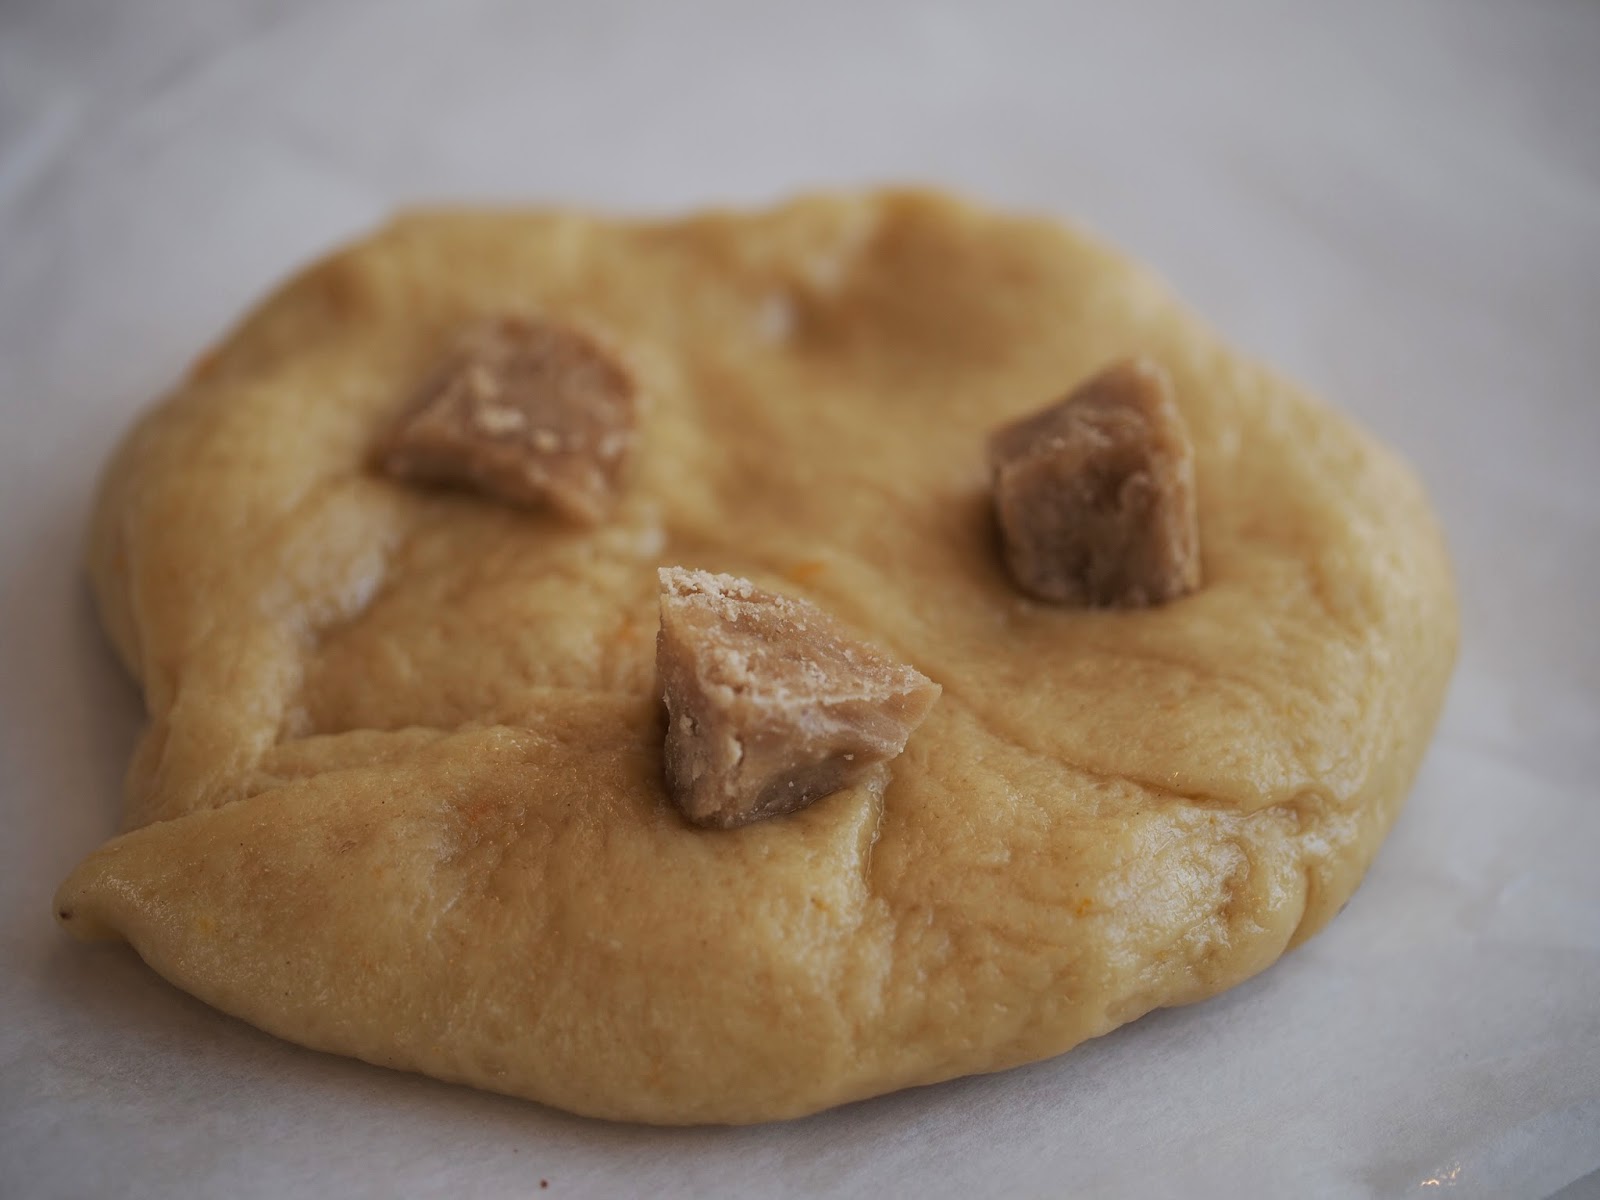
Fold the dough over the candy and pinch to create a pouch.
 Tucking in the little cubesTurn the dough over, seam side down, and place your hand over the ball and make a little "claw" with your hand, with your fingers tucked under just slightly. Allow your palm to touch the surface of the dough ball and gently roll the dough in a circular motion to tighten the ball into a neat circle. Transfer the ball to a muffin tin sprayed with non-stick cooking spray.
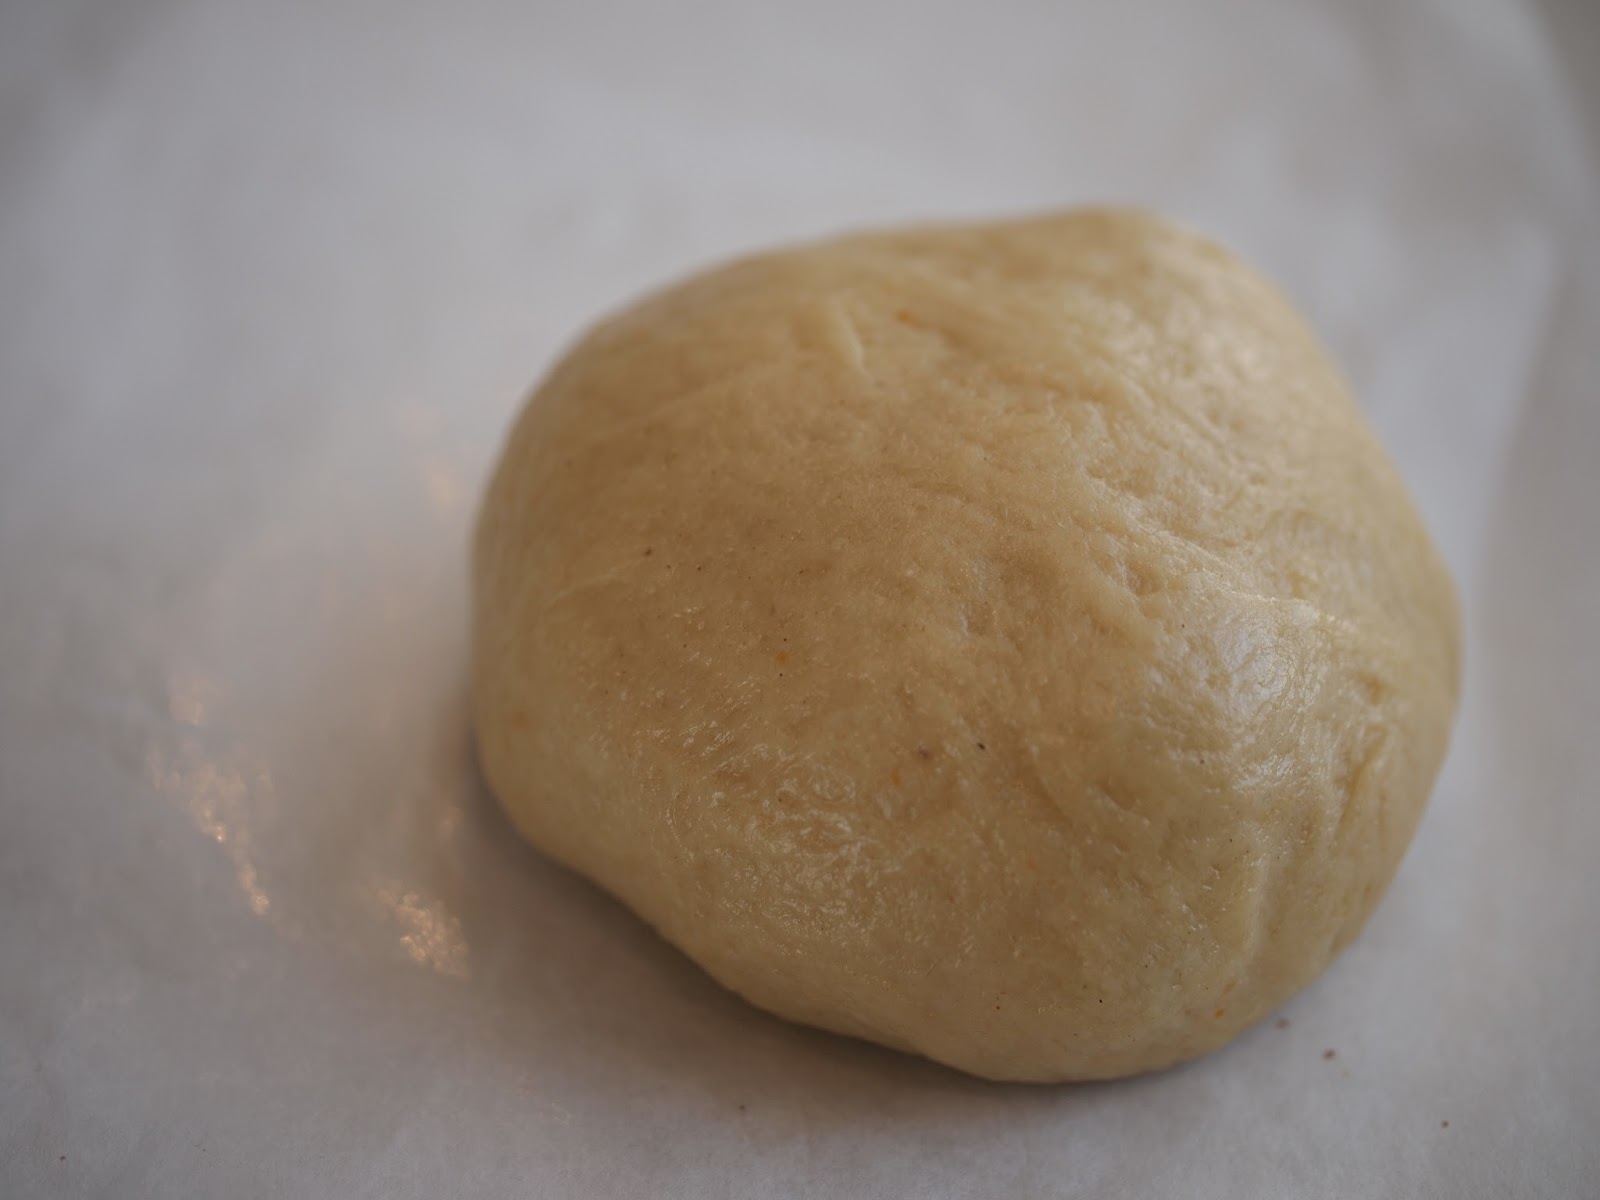
Continue with the remaining dough, spray the top of the dough with plastic wrap and cover the muffin pan with plastic wrap, tenting it slightly so that the wrap doesn't touch the top of the dough. Allow to sit at room temperature to proof, about 1 hour, until the dough starts to puff and slowly springs back when gently poked.
To finish
Egg wash (1 egg whisked together with 1 tablespoon lukewarm water)
Snow flake sprinkles OR Swedish pearl sugar
reserved maple candy, chopped into small bits
Preheat the oven to 375ºF.
Chop about 1/2 remaining maple candy into small bits, about half the size of a corn kernel. Set aside. You'll have extra maple candy for nibbling. It's likely that you've already done the nibbling, though. That's why I have you making extra...because I know you so well.

Using a pastry brush, brush the tops of the buns with egg wash.

Using a razor blade or very sharp knife, cut a "+" onto the top of each bun.
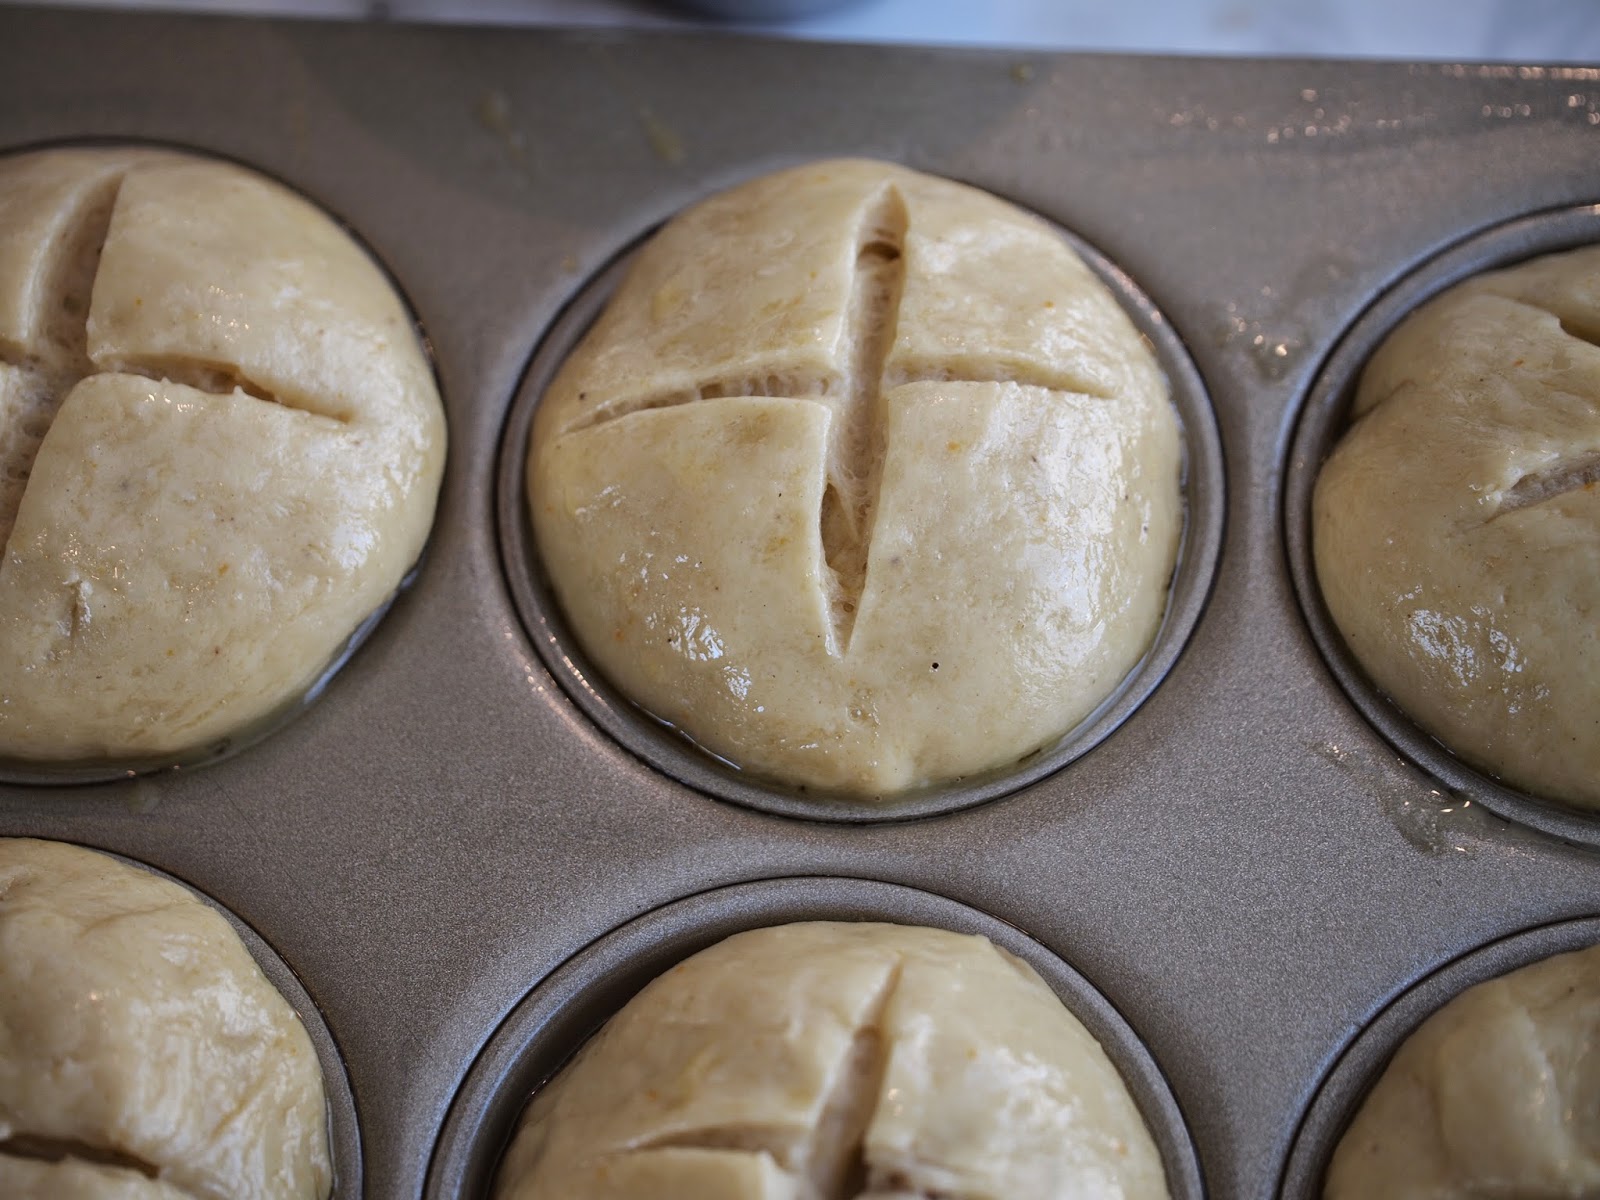
Sprinkle the tops with the chopped maple candy and a few snow sprinkles or a smattering of pearl sugar.

Bake for 15-20 minutes or until the brioche puffs and is deeply golden brown.

Serve still slightly warm (you want the buns a little warm but to have cooled enough that the maple crystals solidify just enough to give you a satisfying crunch when you take a bite) or allow to come to room temperature, cover well with plastic wrap, and freeze for up to a month.
January 11, 2015
THE MARVELOUS MERVEILLEUX

Meringue. Chocolate laced Chantilly cream. Shaved chocolate. Those simple elements come together in a magical fusion to create merveilleux, a confection that has held France in thrall for years. I have a feeling that we won't have to wait long to see this pastry take hold of American imaginations and pie holes. In fact, if my pastry fairies are right, the Mac Daddy of merveilleux purveyors, Aux Merveilleux de Fred , is scheduled to open shop in NYC any moment now. In the meantime, it takes very little effort to make your own.

Merveilleux
(makes 12)

For the French (dry) meringue
5 egg whites
1 cup super fine sugar
1/4 teaspoon salt
a few drops lemon juice
Preheat oven to 250º. Line two half sheet pans with parchment and set aside. Fit a large pastry bag with a large open tip. Set aside.
In the bowl of a stand mixer fitted with the whisk attachment, combine the egg whites, lemon juice and salt. Whisk on high until the egg whites look foamy and just start to take on a bit of volume. Slowly add the sugar just a tablespoon at a time. Continue slowly adding and whisking until all the sugar is added and the meringue is very stiff, white and shiny.
Transfer the meringue to the prepared pastry bag and pipe the meringue onto the prepared parchment lined sheet pans in 2 - 3 inch circles. I never worry too much about uniformity, just as long as the meringues are vaguely the same size.

Bake in the middle of the oven for 15 minutes. Turn the sheet pan and bake or 10 to 15 minutes more or until the meringues are baked through and just begin to take on a little color. Allow to cool completely.
 For the Chantilly cream
3 cups cold heavy cream
1/3 cup cocoa powder (I prefer Dutched cocoa)
1/3 cup confectioner's sugar
pinch salt
In a small bowl, whisk together the cocoa, confectioner's sugar and salt. Add a few tablespoons of cream and stir together to form a smooth paste. Transfer to the bowl of a stand mixer fitted with the whisk attachment and add the remainder of the heavy cream. Whisk until stiff peaks form.
Dollop a hearty spoonful of the whipping cream onto a meringue round and smooth over the top and the sides. Add a second meringue and place another dollop of cream on top and, using a small offset spatula, smooth the Chantilly cream over the top and sides of the meringue. Continue with the remaining meringues and place on a parchment lined sheet pan. Place in the freezer to set, about 1/2 hour.

To finish
1 - 2 (3 oz.) bars semi-sweet chocolate


Using a clean vegetable peeler, shave a bar of semi sweet chocolate into fine bits. Coat the top and sides of the set Chantilly cream covered meringues, using a dinner knife to press the shavings onto the sides of the meringue.

Prior to serving, I like my merveilleux to set in the freezer about 20 minutes but no more. This gives the cream a little more structure but not so much that it's frozen.
Gesine Bullock-Prado's Blog

- Gesine Bullock-Prado's profile
- 69 followers
Gesine Bullock-Prado isn't a Goodreads Author
(yet),
but they
do have a blog,
so here are some recent posts imported from
their feed.

