
Gesine Bullock-Prado's Blog, page 9
December 10, 2014
BUTTERSCOTCH-COFFEE BUDINO

Budino is Italian for pudding. I think that's reason enough to make it. Add a generous dollop of rich caramel flavor and a soupçon of coffee and you have no excuses not to serve it at your next dinner party.

It's also terrifically easy to put together and gluten free to boot.
Like I said, no excuses.

BUTTERSCOTCH-COFFEE BUDINO
(makes 2 1/2 cups)
For the pudding
1 cup light brown sugar
1/3 cup water
squirt lemon juice
1 cup heavy cream
1 cup whole milk
5 egg yolks
1/4 cup tapioca starch or tapioca flour
1/2 teaspoon salt
1 teaspoon coffee extract or 1 teaspoon espresso powder
2 tablespoons unsalted butter, room temperature
In the bowl of a stand mixer fitted with the whisk attachment, combine the egg yolks, tapioca starch, salt and coffee extract. Whisk to combine.
In a large saucepan, combine the brown sugar, water, and lemon juice. Stir over low heat until the sugar has completely melted. Stop stirring and increase heat to medium/high. Continue cooking the sugar mixture until it darkens in color, about 2 shades darker, it thickens a bit and the bubbles start to get smaller.
.jpg)
Add the cream and milk, stand back as the mixture will bubble vigorously, and continue stirring over low heat to melt the caramel as it will have "seized" from adding the cool cream/milk.
.jpg) Seized caramel! Melt away you gloppy mess!
Seized caramel! Melt away you gloppy mess!With the mixer running on medium speed, carefully pour a small amount of the hot caramel mixture down the side of the bowl and into the eggs. Continue pouring in the mixture until it's all added. Transfer the mixture back into the saucepan and whisk over medium-low heat until the mixture thickens to the consistency of mayonnaise, about 5 minutes.
.jpg) Thick enough.
Thick enough.Take from the heat and immediately add the butter. Continue whisking until the butter is incorporated. Immediately divide the pudding among individual serving containers and top each with a piece of plastic wrap, making sure the wrap touches the pudding so that it doesn't form a skin. Refrigerate until cool, about an hour.
For the topping
1 cup heavy or whipping cream
1/4 cup mascarpone cheese
2 tablespoons confectioner's sugar
1/2 teaspoon vanilla bean paste or extract (optional)
pinch salt
Combine all ingredients in the bowl of a stand mixer fitted with the whisk attachment. Whisk until the cream achieves medium stiff peaks. Dollop a generous spoonful of cream onto each budino and serve immediately.


December 9, 2014
IT TAKES A HOLIDAY VILLAGE: gluten free!

I've been in the mind to make a village. Remember the one I made last year for Better Homes and Gardens? For a refresher, click HERE.

What's so lovely about the idea of making a cookie village of any sort is that it's something to share with all your friends who have a hankering to nibble a cookie, or two. But what about your Gluten-Free friends? They usually miss out on the messy glee.
This year I developed a chocolate sugar cookie recipe for my gluten-free friends. It keeps its shape, whether you're making a single cookie or an entire village. In this case, instead of propping my village in a jar, I used the panels to cover up the sides of an otherwise dull looking, rectangular shaped, gluten-free cake but you can also attach the panels to each other with royal icing without a cake to hold up the sides (the buttercream in the cake acted as glue along with an extra dab of royal icing). Or you can simply roll out the dough and make regular old cookies!
These cookies are loaded with chocolate flavor and are buttery crisp, something that everyone will enjoy, not just the flour averse.
For the cookie village
2 cups gluten-free flour blend(*Note: Check the ingredients of your chosen gluten-free flour blend. Some contain xanthan gum and others do not. In the event your blend does, do not include more xanthan as indicated in this recipe. If not, add the amount recommended below)1 teaspoon xanthan gum (see above note)1/2 teaspoon salt1/3 cup cocoa, Dutched1 cup unsalted butter, room temperature1 cup sugar1 whole large egg1 tablespoon sweetened condensed milk
1/4 cup confectioner's sugar
Preheat oven to 350ºF. Line a half sheet pan with parchment. Set aside.
In a large bowl, whisk together the gluten-free flour, the cocoa powder, xanthan gum (if using) and salt. Set aside.
In a small bowl, whisk together the egg and sweetened condensed milk. Set aside
In the bowl of a stand mixer fitted with the paddle attachment, combine the sugar and butter. Cream until light and fluffy. Scrape down the bottom and sides of the bowl. Add the egg mixture and mix to combine. Scrape down the bottom and sides again. Add the gluten-free flour mixture all at once and mix to combine.
Transfer the dough to a large piece of plastic wrap and cover completely. Refrigerate for at least 20 minutes.
Roll out the dough to between 1/4" and 1/8" thick in between two pieces of parchment paper. Wrap any pieces of dough that come out the sides and refrigerate!
Measure the sides of the cake, if you're planning on using the panels to cover the sides of one. Remove the top piece of parchment from the rolled out dough, keeping the dough on the bottom piece of parchment.
Cut 2 pieces of dough that are the length of the cake and double the height. Cut 2 pieces of dough that are the width of the cake and double the height. For the longer pieces, use a paring knife and cut out 3 distinct roof lines (see the top picture). For the shorter, side pieces, I just cut out a pitched roof. I do each piece on a separate piece of parchment and bake each piece separately. Wrap the remaining dough in plastic wrap and refrigerate.
Transfer each piece of cut dough, on its parchment, to the prepared sheet pan. Bake for 10 minutes. Turn the sheet pan 180º and bake for 10 minutes more. Gluten-free dough takes more time to bake than traditional, so check to make sure it's baked through. Trim the sides of the dough while the panels are still hot in the event they've lost their perfect edge. Allow to cool completely
OPTION: dust the cookies with confectioner's sugar and then rub in slightly. Brush any excess off with a pastry brush. This gives the cookies a more "snowy" appearance.
For the royal icing
2 cups confectioner's sugar
1 teaspoon powdered egg whites
Stir together the confectioner's sugar and egg white powder. Add just enough water to create an icing with an almost paste like consistency that holds its shape when piped. Add more confectioner's sugar if it's too loose and a bit more water if too stiff.
Fill a pastry bag fitted with a small open pastry tip with the royal icing. Outline windows, doors and roofs with the royal icing. Allow the royal icing to harden completely before moving a panel.
Pipe a small amount of royal icing to the back of each panel and attach to the sides of the cake.
December 7, 2014
BLACK FOREST TART with CHERRY FILLED DELIGHTFULLS™

It's been snowing here in Vermont. Yesterday morning the air was still. Every tree had a perfect dusting of powdery white. The dawn light filtered through the branches and all at once, our entire backyard sparkled.


I've had a bag of Nestle® Toll House® Cherry filled Delightfulls™ morsels calling to me from my pantry and that moment of pure natural beauty sparked an idea. I saw a forest of meringue nestled atop a creamy filling of cherry-laced chocolate pastry cream and all of that splendid goodness cradled by a buttery crust absolutely brimming with those luscious, dark chocolate morsels filled with smooth cherry deliciousness.
And lo, I made it and it was as good as I'd imagined it would be. Perhaps even better.
BLACK FOREST TART with CHERRY FILLED DELIGHTFULLS™
For the crust
4 ounces (one stick) unsalted butter, room temperature
1/2 cup granulated sugar
1 egg yolk
1 1/2 teaspoons sweetened condensed milk
1 1/2 cups all purpose flour
1/2 teaspoon salt
1/4 teaspoon baking powder
1/2 cup Nestle® Toll House® Cherry Flavor Filled Delightfulls™

Preheat the oven to 350ºF. Spray a 9 1/2" fluted tart pan with a removable bottom with non-stick baker's spray. Set aside.
In a small bowl, whisk together the egg yolk and sweetened condensed milk. Set aside.
In a medium sized mixing bowl, combine the flour, salt and baking powder. Whisk for 30 seconds to distribute the leavening. Set aside.
In the bowl of a stand mixer fitted with the paddle attachment, mix together the butter and sugar until light and fluffy. Scrape down the bottom and sides of the bowl. Add the egg yolk and sweetened condensed mixture and mix until combined. Scrape down the bottom and sides of the bowl.
Add the flour mixture all at once and mix until combined. Removed the bowl from the mixer stand and stir in the morsels by hand.
Dump the dough into the prepared tart pan and, using your fingers, press the tart dough in an even layer onto the bottom and sides of the pan. Freeze the dough lined tart pan for at least 20 minutes.
Line the tart pan with parchment and fill with baking weights or dry beans. Bake for 15 minutes. Remove the weights and parchment and continue baking for 15-20 minutes or until the tart dough is baked through. Allow to cool completely.

For the chocolate/cherry pastry cream filling
1 cup heavy cream1 cup whole milk1/2 cup sugar1/4 cup cornstarch6 egg yolks (keep the egg whites for the meringue)1/4 teaspoon salt2 drops cherry flavored oil or 2 tablespoons Kirsch 4 ounces bittersweet chocolate, at least 60%, finely chopped
In the bowl of a stand mixer fitted with the whisk attachment, combine the sugar, cornstarch, yolks, salt and flavored oil or kirsch. Whisk to combine.
In a large saucepan, combine the cream and whole milk and heat over low heat until the mixture simmers With the mixer running on medium/low, slowly pour the cream/milk mixture down the side of the bowl and mix to combine.
Transfer the mixture back to the saucepan and whisk over medium/low heat until the mixture thickens to the consistency of mayonnaise. Immediately take from the heat and add the chocolate. Allow to sit 5 minutes undisturbed and then whisk to combine. Immediately transfer the mixture to the prepared tart pan and smooth the top. (NOTE: If you worry that your pastry cream is lumpy, run it through a sieve before filling the tart pan). Cover the top of the tart with plastic wrap. Refrigerate until completely cool and set, at least 1-2 hours.

For the meringue
6 egg whites1 and 1/8 cup granulated sugarpinch salt
Combine all ingredients in the bowl (CLEAN!) of a stand mixer fitted with the whisk attachment. Place the mixing bowl over a pan of simmering water and whisk constantly until the sugar is completely melted, the mixture starts to feel "looser" and is hot to the touch. Continue whisking constantly and add a thermometer to make sure the mixture has reached 160ºF.
Transfer the bowl to the stand mixer and whisk on high until the meringue is stiff, white and shiny and the meringue clumps inside the bowl of the whisk. Transfer the meringue to a large piping bag fitted with a large, closed star tip. Pipe "trees" by pressing down to create a star, rotate the bag slightly and press down again to pipe another star, slightly smaller, on top of the first. Continue piping until the tree is the height you prefer (usually 5 "stars" on top of the other is as high as you can go without the tree falling over). Continue piping trees of varying heights all along the top of the tart.
Serve immediately, using a dry, hot knife to cut cleanly through the tart.
PAID/AD
December 5, 2014
GINGERSNAPS with LEMON/LEMON BASIL CREAM

I hadn't intended to become addicted to something new. It just happened. I was minding my own business in the baking aisle of our village grocery store and they appeared as if by demon magic.

Let me digress for a moment and just ask, what kind of nefarious grocer combines the "I'm going to bake cookies" aisle and "I'm an already baked cookie" aisle?
.jpg)
To continue, I spied a box of Carr's Ginger Lemon Cremes and I was a goner.
I bought them. I ate them. I bought some more. I ate those. And then I put horse blinders on and went back to the grocery store with a belly full of ginger and lemon, stomped down that baking aisle and bought ingredients to make my own.
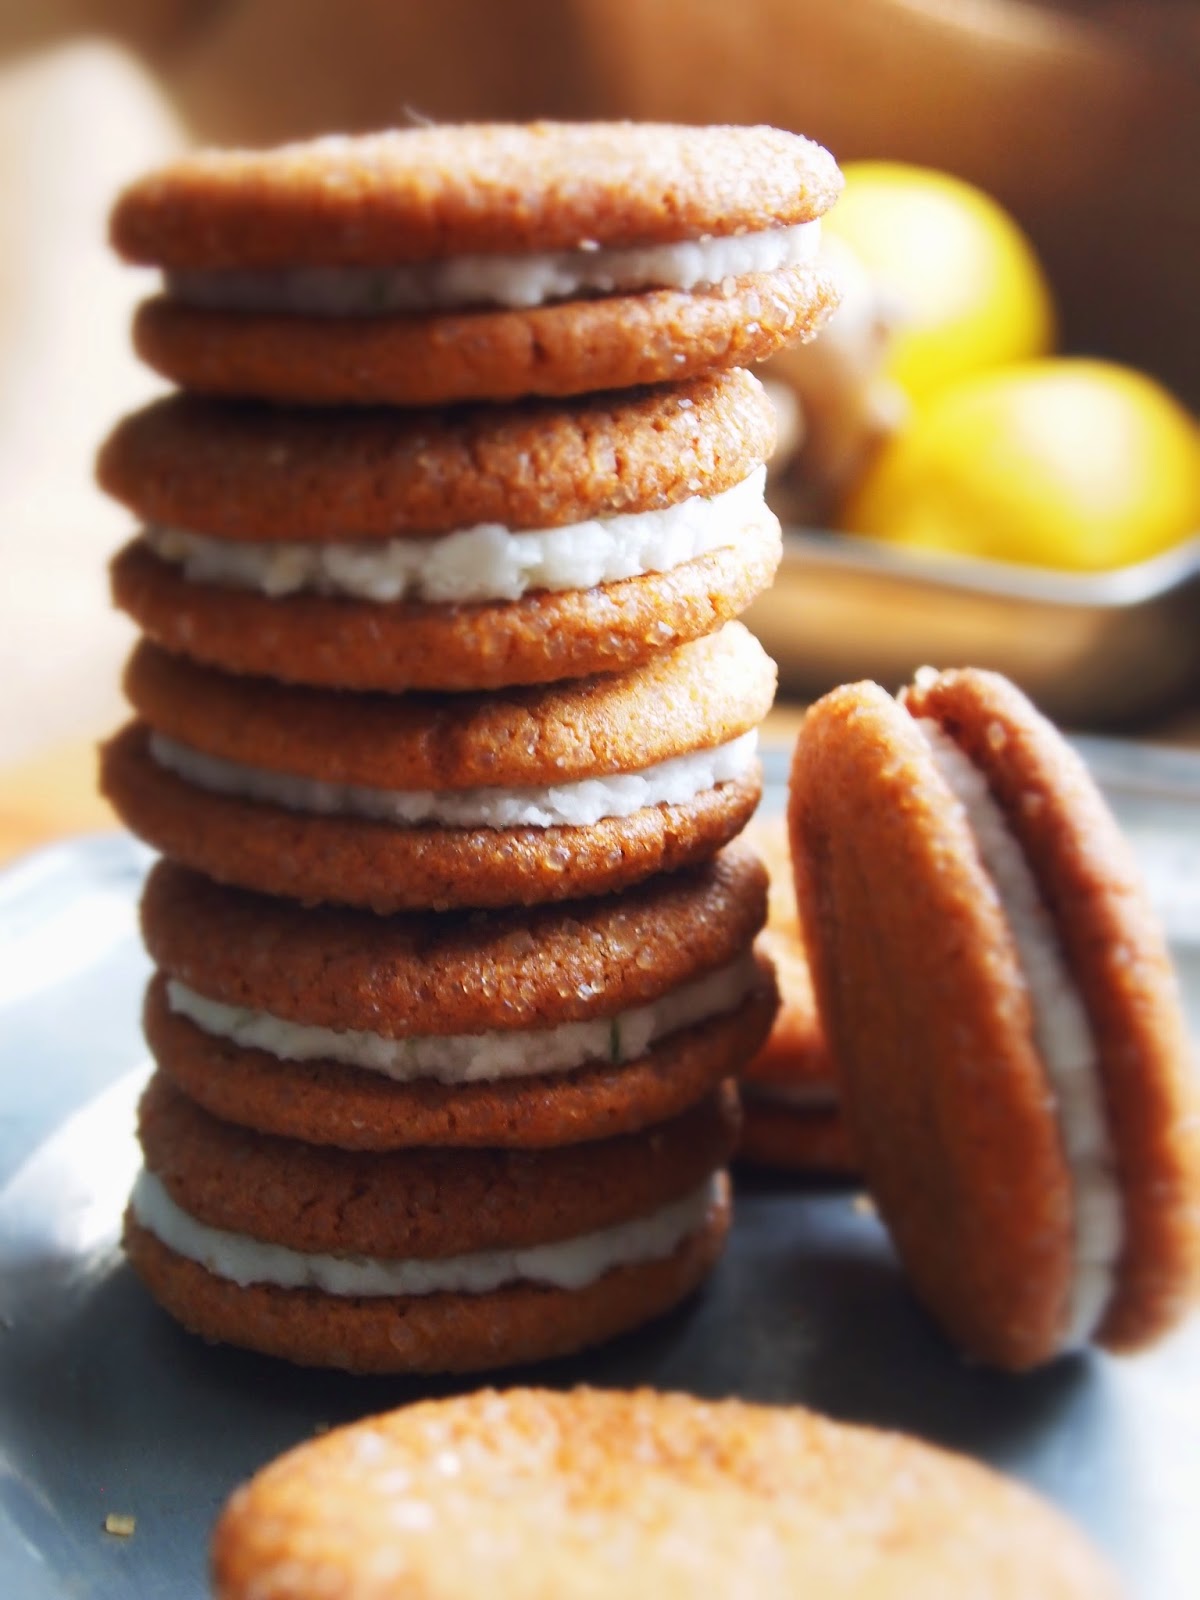
GINGERSNAPS with LEMON/LEMON BASIL CREAM
(makes 33 sandwich cookies)
For the cookies
1 1/3 cups flour1 teaspoon baking powder2 teaspoons powdered ginger1/2 teaspoon cinnamon1/2 teaspoon salt1/8 teaspoon white pepper3/4 cup sugar1/4 cup molasses4 ounces unsalted butter, room temperature2 tablespoons neutral oil, like canola1/2 teaspoon fresh grated ginger1 egg
1/4 cup Sugar in the Raw to finish

Preheat oven to 350º.
Line a half sheet pan with parchment. Place a second sheet pan beneath the first to create a "double pan." This keeps the bottoms of the cookies from over browning. Set aside.
In a mixing bowl, combine the flour, salt, baking powder, powdered ginger, cinnamon and white pepper. Whisk for 30 seconds to distribute the leavening. Set aside.
In the bowl of a stand mixer fitted with the paddle attachment, combine the butter and sugar. Mix on high until the mixture is light, fluffy and significantly lighter. Scrape down the sides and bottom of the bowl. Add the molasses and grated ginger and mix to combine. Add the egg and oil and mix until combined.
Add the flour all at once and mix until combined. Cover and refrigerate the dough for at least 1/2 hour.
.jpg)
Using a teaspoon cookie scoop, scoop the dough and dip the top in the Sugar in the Raw. Place on the sheet pan and flatten with the palm of your hand. Space the cookies an inch apart. Place the remaining dough in the fridge until you're ready to use it. I only bake off one sheet pan of cookies at a time, placed in the center of the oven.
Bake for 9 minutes. Spin the baking pan 180º and gently "slam" the pan down the deflate the cookies a bit. Bake for 9 minutes more or until the cookies are baked through. They should be crisp throughout, slightly browned on the edge but check to make sure they don't overly brown. Allow to cool completely. Continue baking off cookies until all the dough is baked off. NOTE: check your cookies after 4-5 minutes after you've turned the sheet pan. Ovens differ and you may have to bake your cookies a few minutes more or less than indicated.
For the filling
4 tablespoons unsalted butter, room temperature2 tablespoons cream cheese, room temperature2 cups confectioner's sugar1/4 teaspoon lemon extractzest of half a lemonjuice of half a lemonpinch salt
OPTIONAL: 1 tablespoon finely chopped fresh lemon basil (gives a lovely aromatic and fresh quality to the filling)
OPTIONAL: pinch citric acid (this gives the filling a true tartness. It's available online or in baking supply stores)
Combine all the ingredients in the bowl of a stand mixer fitted with the paddle attachment. mix until smooth.
Place a scant teaspoon on the underside of one ginger cookie and then place another on top. Press the cookies gently together to smoosh the filing evenly between the two.
December 4, 2014
CHRISTMAS TREATS: Better Homes & Gardens' December Issue Featured on the Today Show

I spent a lovely morning with the Today Show "elves"making DIY goodies for the holidays.
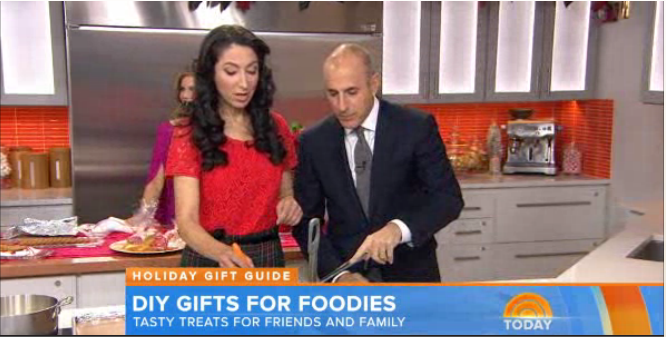
And remember, pick up Better Homes & Gardens' December issue to see all 25 treats I developed for the "Nice List."
Christmas Treats for Better Homes & Gardens' December Issue: Featured on the Today Show
I spent a lovely morning with the Today Show "elves"making DIY goodies for the holidays. If you missed the segment, click on the LINK. This also leads to some nummy recipes.
And remember, pick up Better Homes & Gardens' December issue to see all 25 treats I developed for the "Nice List."
November 27, 2014
MITTENS THE CAT CAKE: A cat, a cake, a 16th birthday. From NPR's All Things Considered

If you'd like the recipe to my Mittens the Cat Cake, you can follow this LINK to get your paws on it. You can also hear the story behind my favorite Thanksgiving concoction on the same page.
Mittens the Cat Cake: A cat, a cake, a 16th birthday. From NPR's All Things Considered
If you'd like the recipe to my Mittens the Cat Cake, you can follow this LINK to get your paws on it. You can also hear the story behind my favorite Thanksgiving concoction on the same page.
November 20, 2014
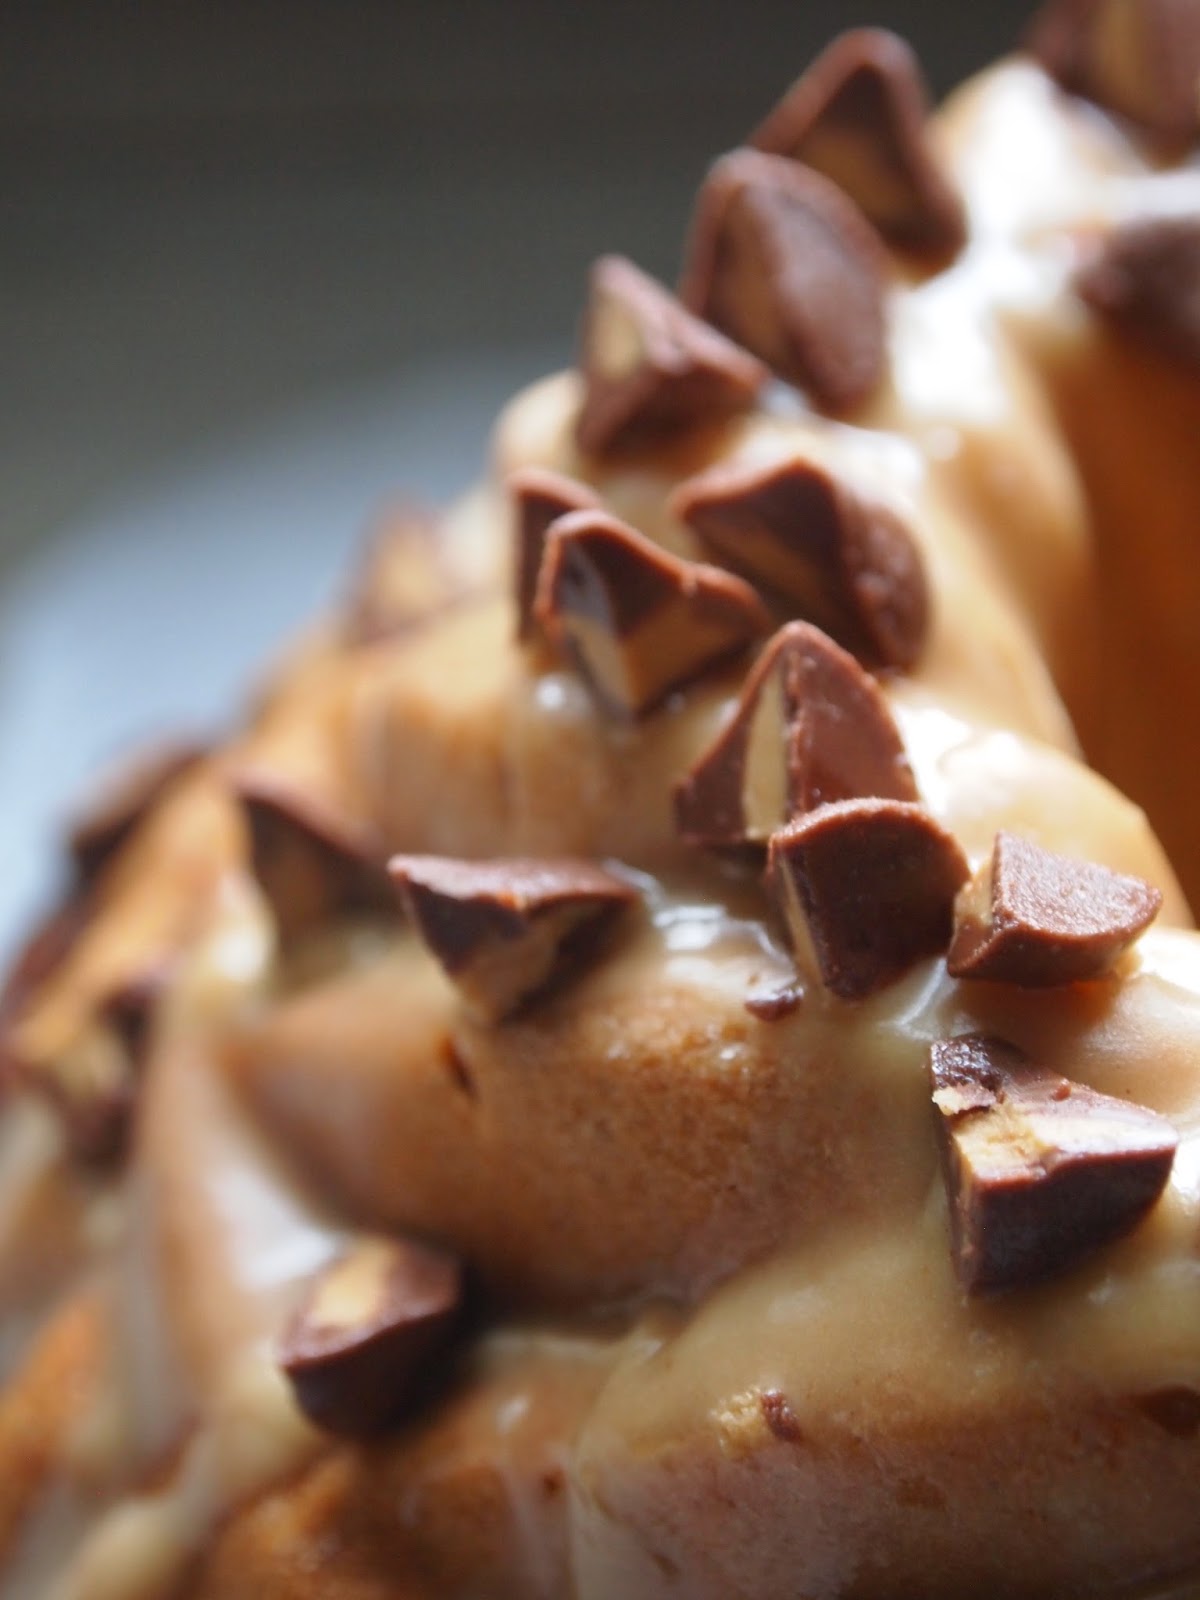
PEANUT BUTTER FILLED DELIGHTFULLS™ BANANA BUNDT

You’ve heard it here first: I’ve just raised your banana bread game. This is so huge that if Elvis hadn’t already left the building, he’d be in my kitchen right now noshing on this glorious concoction.

What do banana bread and Elvis have to do with a groundbreaking baking extravaganza? Peanut butter and chocolate, people! Those genius confectioners over at Nestlé® Toll House® have created the perfect peanut butter and chocolate baking vehicle that will elevate any and all banana breads (and pretty much everything else, for that matter). Elvis’ favorite flavor combo is now truly worthy of The King.
PEANUT BUTTER DELIGHTFULLS™ BANANA BUNDT CAKE
(makes 1 small bundt cake)
Ingredients
For the cake
4-5 overly ripe bananas (about 1 ½ cups)1 cup light brown sugar, packed
1 stick unsalted butter, room temperature1/4 cup neutral oil, like canola or safflower2 large eggs, room temperature2 cups all purpose flour1/2 teaspoon salt1 teaspoon baking powder1 teaspoon vanilla extract1 (9 ounce) package peanut butter fill DelightFulls™, divided1 tablespoon all purpose flour
For the glaze
½ cup confectioner’s sugar1 tablespoon whole milk1 tablespoon creamy peanut butter½ teaspoon vanilla extractpinch salt
Procedure
For the cake
Take ½ cup of the DelightFulls™ from the bag and chop into halfs and ¼ pieces. Set aside.In a small bowl, toss together the remaining DelightFulls™ and 1 tablespoon flour to coat the morsels. Set aside.
Preheat oven to 350°. Spray a small bundt pan with non-stick baking spray. Set aside.In a small mixing bowl, whisk together the flour, baking powder and salt for 30 seconds to distribute the leavening.
In the bowl of a food processor, puree the bananas until smooth. Add the oil and then the eggs, one at a time, mixing until combined. Add the vanilla.
In the bowl of a stand mixer fitted with the paddle attachment, cream together the sugar and butter until light and fluffy. Scrape down the bottom and sides of the bowl and mix again for 30 seconds.
Add the banana mixture and mix to combine.
Add the flour, all at once, and mix on low until just combined and smooth.
Pour 1/3 of the batter into the prepared bundt pan. Sprinkle ½ of the flour coated morsels over the batter. Pour 1/3 of the batter over the morsels and sprinkle with the remaining flour-coated morsels and top with the remaining batter.
.jpg)
Bake for 1 hour to 1 hour and 15 minutes or until the cake springs back when gently poked and a wooden skewer comes out clean.
Turn the warm cake out onto a serving platter. Allow to cool completely.
For the glaze
In a small bowl, stir together the confectioner’s sugar, peanut butter, milk, vanilla and salt until smooth. Spoon over the cooled cake and sprinkle with the reserved, chopped DelightFulls™.
PAID/AD
Peanut Butter Filled DelightFulls™ Banana Bundt
You’ve heard it here first: I’ve just raised your banana bread game. This is so huge that if Elvis hadn’t already left the building, he’d be in my kitchen right now noshing on this glorious concoction.
What do banana bread and Elvis have to do with a groundbreaking baking extravaganza? Peanut butter and chocolate, people! Those genius confectioners over at Nestlé® Toll House® have created the perfect peanut butter and chocolate baking vehicle that will elevate any and all banana breads (and pretty much everything else, for that matter). Elvis’ favorite flavor combo is now truly worthy of The King.
PEANUT BUTTER DELIGHTFULLS™ BANANA BUNDT CAKE
(makes 1 small bundt cake)
Ingredients
For the cake
4-5 overly ripe bananas (about 1 ½ cups)1 cup light brown sugar, packed
1 stick unsalted butter, room temperature1/4 cup neutral oil, like canola or safflower2 large eggs, room temperature2 cups all purpose flour1/2 teaspoon salt1 teaspoon baking powder1 teaspoon vanilla extract1 (9 ounce) package peanut butter fill DelightFulls™, divided1 tablespoon all purpose flour
For the glaze
½ cup confectioner’s sugar1 tablespoon whole milk1 tablespoon creamy peanut butter½ teaspoon vanilla extractpinch salt
Procedure
For the cake
Take ½ cup of the DelightFulls™ from the bag and chop into halfs and ¼ pieces. Set aside.In a small bowl, toss together the remaining DelightFulls™ and 1 tablespoon flour to coat the morsels. Set aside.
Preheat oven to 350°. Spray a small bundt pan with non-stick baking spray. Set aside.In a small mixing bowl, whisk together the flour, baking powder and salt for 30 seconds to distribute the leavening.
In the bowl of a food processor, puree the bananas until smooth. Add the oil and then the eggs, one at a time, mixing until combined. Add the vanilla.
In the bowl of a stand mixer fitted with the paddle attachment, cream together the sugar and butter until light and fluffy. Scrape down the bottom and sides of the bowl and mix again for 30 seconds.
Add the banana mixture and mix to combine.
Add the flour, all at once, and mix on low until just combined and smooth.
Pour 1/3 of the batter into the prepared bundt pan. Sprinkle ½ of the flour coated morsels over the batter. Pour 1/3 of the batter over the morsels and sprinkle with the remaining flour-coated morsels and top with the remaining batter.
Bake for 1 hour to 1 hour and 15 minutes or until the cake springs back when gently poked and a wooden skewer comes out clean.
Turn the warm cake out onto a serving platter. Allow to cool completely.
For the glaze
In a small bowl, stir together the confectioner’s sugar, peanut butter, milk, vanilla and salt until smooth. Spoon over the cooled cake and sprinkle with the reserved, chopped DelightFulls™.
PAID/AD
Gesine Bullock-Prado's Blog

- Gesine Bullock-Prado's profile
- 69 followers
Gesine Bullock-Prado isn't a Goodreads Author
(yet),
but they
do have a blog,
so here are some recent posts imported from
their feed.

