
Gesine Bullock-Prado's Blog, page 4
March 21, 2016
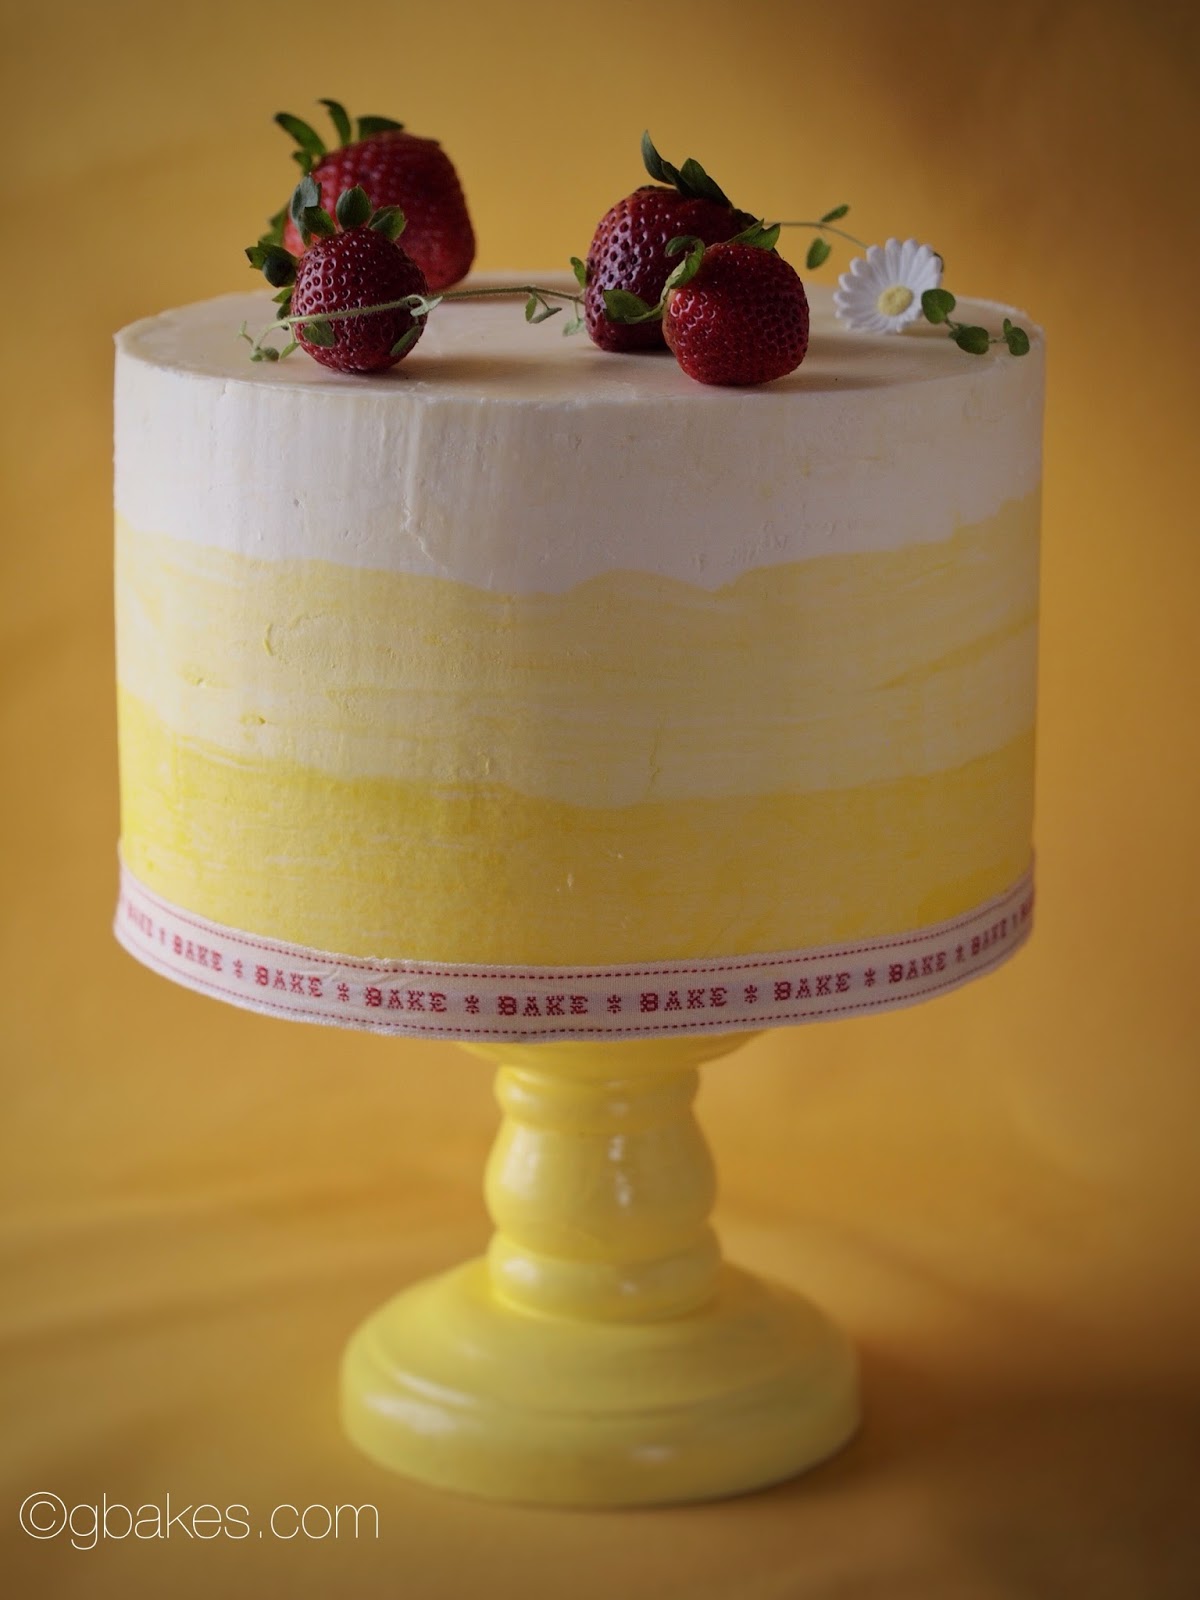
STRAWBERRY-LEMON YOGURT CAKE

As much as I love going over the top when it comes to baking, shoving dozens of steps into the creation of a solitary dessert, there are days when only simple will do. No mixer, loaf pan kinda simple. Today's that day.
But let's get one thing straight, I didn't skimp on delicious. All the delicious is there in this dump and stir wonder of a supple and moist (ugh) cake. I've not been entirely true to the origins of the French staple upon which this is based, either. I messed with a few ratios and added a few things. Even then, it's dead simple. And delicious. Let's not forget about the delicious.
And in case you've ever wondered what to do with hulled strawberry tops, my top three choices are: (1) freeze them for smoothies, (2) put them in the compost pile or, the last and best option, (3) give them to your chickens. There's nothing better than watching a chicken's goofy run when you tell it they're getting a strawberry snack.
STRAWBERRY-LEMON YOGURT CAKE
1 1/2 cups all-purpose flour (I use King Arthur all-purpose)
2 1/4 teaspoons baking powder
1/2 teaspoon fine sea salt
1 cup sugar
1/2 cup non-fat greek yogurt
1/2 cup neutral oil, such as canola or organic grapeseed oil
2 large eggs, room temperature
1/4 cup whole fat buttermilk
2 tablespoons honey
zest of 1 lemon
1 teaspoon lemon extract
1/2 cup strawberries, hulled and cut into small pieces

Preheat oven to 350ºF. Spray an 8" x 4" loaf pan with a very light coat of non-stick baking spray. Set aside.
Add the lemon zest to the oil and stir to distribute. Set aside.
In a small bowl, whisk together the flour, baking powder and salt for about 30 seconds to distribute the leavening. Set aside.
In a mixing bowl, combine the sugar, yogurt, oil with zest, eggs, buttermilk, and lemon extract. Whisk to combine. Sift the flour mixture over the wet ingredients, folding the flour into the batter as you add. Continue folding until the flour is distributed, being careful not to overmix. Fold in the strawberries and transfer the batter to the loaf pan.
Bake for 55-60 minutes on the middle rack, checking the cake at about 45-50 minutes. Insert a toothpick into the middle of the cake to check for doneness. If a few moist crumbs take a ride on the toothpick, it's done. If there's wet batter, bake a few minutes more and test again. If the top gets too brown during the bake, tent with foil.


March 18, 2016
EASTER BUNNY CAKE

If you garden, you know full well that it's not the carrots you have to look out for when you've got rampaging bunnies in your yard. It's the lettuce and cabbage. Carrots are tucked in the earth, their frondy heads just peaking above the surface. All the juicy stuff is well hidden. But those tender leaves of the cabbage, they are easy pickins for a hungry bunny. And boy, those rascally rabbits sure like their cabbage.

Knowing this, when I was developing this year's Easter dessert, I thought it only right to give my marzipan bunny the things she likes most: carrots AND cabbage. I think you'll enjoy them just as much as she does.
for the egg shaped cake
1 cup sugar
2 large eggs plus one yolk, room temperature
1 1/4 cups all purpose flour
1/2 cup buttermilk
1/3 cup neutral oil, such as canola
1 teaspoon baking powder
1/2 teaspoon salt
1 teaspoon almond extract
1 teaspoon lemon extract
for the strawberry filling
1 cup strawberries, hulled and quartered
2 tablespoons granulated sugar
1 (8 ounces) package cream cheese, room temperature
4 tablespoons unsalted butter, room temperature
1 1/2 cups confectioners sugar
to finish
3 packages Odense marzipan
pink gel dye
leaf green gel dye
for the cake
(makes about 5 - {two halves combined and filled} cakes)
Preheat oven to 350ºF. Spray a 9 cavity egg hold with non-stick baker's spray. Set aside.
In the bowl of a stand mixer fitted with the whisk attachment, combine the sugar and eggs/egg yolk. Whisk on high for 2 minutes until light and fluffy.
In a small bowl, whisk together the flour, baking powder and salt for 30 seconds. Add the flour mixture and whisk to combine.
Add the buttermilk, oil and extracts and whisk for about 1 minute until smooth. Fill the egg cavities about 3/4 full. Bake for about 20 minutes or until the cakes spring back when gently poked. Turn out and allow to cool. Continue baking off any extra batter.

Once the cakes are cool, freeze the cakes for at least an hour to 2 hours. When well frozen, use a serrated knife and trim the cakes if they've risen above the pan line so that two fitted together make a nicely formed single egg.

for the strawberry cream filling
In a small bowl, toss the strawberries and sugar and allow to sit for about 20 minutes to 30 minutes to macerate, until the juices are running and the sugar has melted. Transfer to a food processor and pulse until smooth and then sieve into the bowl of a stand mixer, fitted with the paddle attachment. Add the remaining filling ingredients and mix until smooth.
Scoop a small portion of the cake from the eggs (see picture). Fill with strawberry cream and spread a small layer on the remaining underside. Gently press two filled egg halves together.
for the cabbage
Take 1 ounce of marzipan and knead a small drop of leaf green gel dye into the marzipan. Form a small piece into a ball and then roll out the remaining marzipan very thin. Stamp out six flower shapes and make a small cut between each petal (see picture). Reserve left over green marzipan, covered well with plastic wrap.

Place the ball on top of one scored leaf and gently pull the individual leaves up and around the ball.

Continue with the remainin "leaves" until the cabbage is complete. Set aside.
to cover
Take 2 1/2 ounces of marzipan and knead a small drop of pink gel dye into the marzipan. Sprinkle confectioner's sugar on a smooth rolling surface. Roll it out slightly into an egg shape . Take the remaining green marzipan and pinch off small pieces and roll into pea sized pieces. Place the peas onto the slightly rolled out pink piece and gently push into the pink marzipan to flatten.

Continue rolling out the pink marzipan until the marzipan drapes over the egg to cover completely.

Smooth the marzipan over the egg and tuck under any excess. Set aside.
for the bunny
Roll one 1 ounce piece and a 1/2 ounce piece in to small egg shapes.

Take the smaller piece and gently scribe a smile and upturned nose into the small pointy end. Make to small divets for eyes. Using a black Gourmet Writer, fill in the "eye" divets with black. Use the pink to make a small pink "nose."
Snap a toothpick in half and anchor the head on the "body" by impaling the poor bunny head onto the top of the big egg.
Shape two small pieces into "ears" and score a small divet in the middle of each. Use pink Gourmet Writer to shade the middle of each ear. Poke each ear with a small piece of toothpick and fasten them on top of the bunny head.

Take to small pieces and shape into small teardrops for arms and slightly larger teardrops for the feet.

Adhere the arms and feet to the bunny (clear piping gel helps to keep the appendages on but they'll often stay well enough if you press gently).
For the carrot
Take a wee bit of marzipan and shape into a tiny carrot. Use the orange Gourmet Writer to give it a carroty hue. Take tiny pieces of marzipan and roll into a rice shape and tint with the green marker. Gently adhere to the top of the carrot with a toothpick. Insert a toothpick into the bunny's belly with a small portion sticking out and gently press the carrot into the toothpick and gently press the bunny arms closer to the carrot.

March 15, 2016
DOUBLE RAINBOW CAKE

At the risk of offending my Irish friends who find the manner in which we Americans celebrate St. Patrick's Day a tad offensive (leprechauns! rainbows! green beer!), I'm going to suffer their wrath and give you my contribution to our March 17th festivities: A Double Rainbow Cake, dammit.
I have a smooth, round bundt pan, which makes this process rather simple but you can use a more sculptural bundt if that's all you've got lying around the house.
You may ask, where's the double in this rainbow. Well, the second one is on the inside because that's where it really counts.
Happy St. Patrick's Day, sweet people!
DOUBLE RAINBOW CAKE
for the cake
7 ounces cake flour
7 ounces superfine sugar
1/2 teaspoon salt
2 teaspoons baking powder
4 ounces unsalted butter, room temperature, cut into small pieces
3 large egg whites, room temperature
1 large whole egg, room temperature
6 ounces buttermilk
1 teaspoon vanilla extract
gel dye in red, orange, yellow, green, blue and violet
for the buttercream
3 egg whites
1/2 cup plus 2 tablespoons granulated sugar
1 teaspoon vanilla
8 ounces unsalted butter, room temperature
1 1/2 pounds plain, white fondant
for the cake
Preheat oven to 350ºF. Spray a smooth bundt pan with non-stick baking spray. Set aside.
In the bowl of a stand mixer fitted with the paddle attachment, combine the flour, sugar, salt, and baking powder. Stir to combined. Add the butter and mix until the mixture looks like wet sand.
Add the egg whites, one at a time, and then the whole egg, mixing between each addition. The mixture should look like smooth paste.
Stir together the buttermilk and the vanilla and add in three additions, mixing on medium speed between each addition.
Divide the batter evenly between 6 bowls. Add 2 drops of dye to each of the bowl to get the 6 colors.
Spoon the red batter into the pan, all the way around. Add the orange on top of the red, being careful not to press down on the batters. Continue layering the colors until they're all added. It's easier to transfer the batter(s) to separate piping bags and pipe them, one on top of the other, but that's a lot of piping bags and it doesn't have to be perfect.

Bake for 35-40 minutes or until a toothpick comes out clean and the cake springs back when gently poked. Allow to cool completely.

Once cool, cut the cake evenly in half.
for the buttercream
In the bowl of a stand mixer fitted with the whisk attachment, add the egg whites and sugar. Whisk over a pan of simmering water until the sugar has melted and the mixture is hot (it should reach 160ºF). Transfer to the mixer and whisk until the meringue reaches stiff peaks and the bowl is cool to the touch. Add the vanilla and whisk to combine.
Add the butter, a few pieces at a time, whisking well between additions. Continue adding the butter until the mixture thickens and then smooths out. It will look broken just before coming together. You may not need all the butter.
Spread a few tablespoons of buttercream on one flat side of the cut cake and place the second cake half on top. Press to adhere the two together and stand the now combined halves so that the cake is "standing" like an arch. Spread a thin crumb coat over the cake and refrigerate to firm.

Transfer the remaining buttercream to a piping bag fitted with a large, plain tip and set aside.
to finish
Divide the fondant into 6 even pieces. Add a few drops of dye to each piece, one red, another orange, another yellow, another green, then blue and violet. Knead the dye into the fondant until the color is evenly distributed. At the moment, my hands are riddled with colorful splotches so it behooves me to recommend that you wear latex gloves when you do this.
Roll each piece into a 10-12 inch rope and place the pieces next to each other, leaving a slight gap between each. Roll out the pieces until somewhat flat and then slightly moisten the sides of each pieces (not the top or bottom) and continue rolling until the pieces are touching and the fondant is about 1/8" thick. The entire piece should be about 18" x 10", more or less.
Transfer the piece on top of the arch and gently smooth the fondant with your hands over and around the arch, gently stretching as you go along for optimal coverage. Trim any errant pieces at the base. Pipe the remaining buttercream in small, cloud-like blogs along the base of the rainbow.
March 10, 2016
LIGHT AS A FEATHER STRAWBERRY-ORANGE CHEESECAKE

Come springtime, there's nothing I want more than something fruity. As long as the fruit comes with cheesecake. On most occasions, I'm a New York cheesecake kinda gal. But cheesecake needn't be dense, as damn good as dense can be. Sometimes it can and should be light. Feather light, in fact.

Today, a weightless cheesecake, one that melts in your mouth called to me. By whisking the egg whites into a meringue and gently folding the meringue into the base, you'll create as much of a soufflé as a cheesecake...and you'll be happier for it. Adding a small amount of strawberry purée to about 1/4 of the batter leaves you in no doubt that spring is almost here.

LIGHT AS A FEATHER STRAWBERRY-ORANGE CHEESECAKE
for the strawberry purée
1/2 cup strawberries, hulled and cut in quarters
2 tablespoons sugar
for the cheesecake
4.5 ounces Philadelphia cream cheese, room temperature and cut into cubes
2 ounces unsalted butter, room temperature
4.5 ounces whole milk
2.5 ounces cake flour
1.5 ounces cornstarch
5 eggs, room temperature and separated
4.5 ounces sugar
1 teaspoon orange extract
1 tablespoon orange zest
1/2 teaspoon salt
1/8 teaspoon cream of tartar
for the purée
Combine the strawberries and 2 tablespoons sugar in a small saucepan. Stir over low heat until the strawberries are completely broken down and the sugar has melted. Transfer to a food processor, process until smooth and then run through a fine sieve. Set aside.

for the cheesecake
Preheat your oven to 350ºF. Spray a 7" wide x 4" tall soufflé dish with non-stick baking spray (baking spray contains flour in the mix). Line the bottom with a round of parchment paper. Set aside. Grab a 9" or 10" cake pan and keep it handy.
In a heatproof bowl, combine the cream cheese, butter and milk. Place over a saucepan with simmering water and stir until the butter and cream cheese have melted. Don't worry if there are still small lumps of cream cheese left.
Take the mixture from the stovetop and whisk to combine. Continue whisking and slowly add the egg yolks. Sift the flour and cornstarch over the mixture and whisk to combine.
Transfer a little more than 1/4 of the batter to a small bowl and add 2 tablespoons of the strawberry purée to the small bowl. Stir to combine.
In the bowl of a stand mixer fitted with the whisk attachment, combine the egg whites, salt and cream of tartar. Whisk until foamy and slowly add the sugar. Whisk until medium peaks form but be careful not to whisk to stiff peaks.
Transfer a little less than 1/4 of the meringue to the small "strawberry" bowl and gently fold until combined.
In the bowl with the larger amount of base mixture, stir in the extract and zest and then gently fold in the remaining meringue in three batches.
Spoon 1/4 cup of the orange batter into the prepared soufflé dish, as close to the middle as you can, and then add a heaping tablespoon of the strawberry batter right in the middle. Don't tamp or squash it down. Let gravity do the work. Continue adding a quarter cup of orange batter and the tablespoons of strawberry, one on top of the other, until all the batter is added.
Place the empty cake pan in the oven and pour enough hot water into it so that it reaches about 1/4 - 1/3 of the way up the pan. Place the soufflé dish in the water bath. Close the oven and reduce the temperature to 325ºF. Bake for one hour. As the top gets golden, keep an eye on it and tent the top with aluminum foil if you feel it's getting too dark.
Take the cheesecake from the bath and, using a paring knife, run it along the edge of the dish and the cheesecake to release the sides from the dish and return to the oven without the water bath for 10 - 15 more minutes. The cheesecake may sink a bit. That's fine.
Turn the oven off and open the door a bit an allow the cheesecake to cool for about 20 - 30 minutes. Turn the cheesecake over onto a serving dish, remove the parchment, and refrigerate until completely cool. Two hours to overnight.
Serve with berries.
March 4, 2016
STRAWBERRY-LEMON THYME CHIFFON BIRTHDAY CAKE
To know me is to know that I'm going to make my own birthday cake. The outside consensus is that I shouldn't, that I deserve to take a break and have someone else do the baking for once.
"BUT BAKING'S THE BEST PART!" I whine. "Don't take that away from me."
What others don't understand, what only fellow bakers comprehend, is that we find the greatest joy in the process. Happiness is planning the cake, baking the layers, allowing the filling to set and then putting everything together with precision. It's a meditation and a pleasure. It's a gift.

It's my birthday and I'll bake if I want to.
STRAWBERRY-LEMON THYME CHIFFON BIRTHDAY CAKE
For the lemon chiffon cake
(this is adapted from my book Bake It Like You Mean It)
1/3 cup canola oil
4 eggs, room temperature and separated
1 tablespoon lemon zest
1/2 cup fresh lemon juice
1 1/2 cups King Arthur Flour cake flour, sifted
1 cup granulated sugar, divided
2 teaspoons baking powder
1 teaspoon fine sea salt
For the filling
1 pint fresh strawberries, hulled and sliced in 1/4 inch thick slices lengthwise and macerated in 2 tablespoons sugar (to macerate: place the cut strawberries in a small bowl and toss with the sugar. Allow to sit until the juices run and the sugar's melted)
1 batch lemon cream
(this is Pierre Hermé's lemon cream filling, posted by Dorie Greenspan. I didn't change the recipe but simply added finely minced lemon thyme to the cream at the very beginning and strained it before adding the butter. You can find the recipe here.)
For the lemon buttercream
7 egg whites, large
1 1/2 cups sugar
1 teaspoon lemon extract (not oil)
1 pound 8 ounces unsalted butter, room temperature
yellow gel dye
For the cake
(I make 2 batches for four layers total. I don't double the recipe but make the cake twice)
Preheat the oven to 375ºF (conventional). Butter the bottom of two 8" pans but not the sides. Line the pans with parchment. Set aside.
In a large mixing bowl, combine the oil, egg yolks, lemon zest, and lemon juice and stir just to combine the ingredients.
Sift the flour, one-third of the granulated sugar, the baking powder, and salt over the egg yolk mixture and, using a large balloon whisk, whisk all the ingredients until well combined, about 2 minutes.
In the bowl of a stand mixer fitted with the whisk attachment, add the egg whites and whisk until white and foamy. Slowly add the granulated sugar and whisk until stiff, glossy white peaks form.
Gently stir 1/3 of the egg white meringue into the egg yolk-flour mixture. Using a large rubber spatula, fold the remaining meringue into the batter and divide evenly among the 2 pans. Bake 35-30 minutes or until the tops are golden brown and gently spring back when poked. Run a paring knife along the edges to release the cake from the sides of the pan the minute they're out but don't turn them out until completely cool.
For the buttercream
Place the egg whites and sugar in the bowl of a stand mixer. Place the bowl over a double boiler, with the water just simmering. Whisk the egg white mixture constantly over the simmering water until the sugar has completely melted and the mixture reaches 160ºF. Transfer to the mixer and whisk on high until cool and you've got a stiff meringue. Add the extract and mix to combine.
Add the butter, an inch cube at a time, allowing each addition of butter to incorporate before adding the next. Continue adding butter until the mixture thickens and smooths out into a spreadable icing. Most often, just before the buttercream comes together, the mixture will appear separated and curdled. This is normal. Continue mixing, add another small hob of butter, and let the mixer to its thing. You probably will not need all the butter so don't throw it in all at once. Be patient.
Divide the buttercream among three bowls, adding a little less than half to one. Add 2 drops yellow dye to one and one drop to another, keeping the third, the bowl with most buttercream, plain.

To finish
Place a cake layer on a cake round and brush the cake with juice of the macerated strawberries. Place a layer of strawberries on top of the cake and then top with 1/3 of the lemon cream filling. Freeze for about 5 minutes to set and continue building the cake as you did with the 1st layer until all 4 layers of cake are stacked. Freeze for 1/2 hour until set.
Spread a thin layer of plain buttercream in a crumb coat over the assembled cake and refrigerate about 10-15 minutes to set. Make sure to keep the remaining plain buttercream crumb free for the finishing layer.
Place the three buttercreams in separate piping bags and cut a 1/2 inch opening in each bag. Pipe the darkest yellow in concentric circles along the bottom 1/3 of the cake, follow by piping concentric circles of the lighter yellow in the middle 1/3 of the cake and then finish with the plain icing.
Place a second cake circle on top of the cake to use as a guide and using a bench scraper or large "taping knife" (I get them at the hardware store), smooth the sides of the cake.

Remove the top cake board and smooth any remaining plain buttercream in a smooth coat on top.
Garnish with gorgeous strawberries. And wish yourself happy birthday while you're at it.
February 1, 2016
DEPRESSION ERA CHOCOLATE CRAZY CAKE: the original vegan treat

Here are a few things that were almost impossible to find (or afford) during the Great Depression: butter, eggs and milk. You know what you could find? A great chocolate cake. You just couldn't have a cold glass of milk with it.
While I'm pretty certain that the 1940s baker who served the cake was proud as punch at how delicious it was, I'm equally certain that none of them were bragging that the scrumptious and moist cake was vegan. But it was and it still is.

A few modern twists make this cake as good as any chocolate cake around: high quality cocoa powder and coffee. And while the traditional method is to prepare the cake batter in a 9" x 13" baking dish conveniently leaves you with only the one dirty dish, you can make the batter and divide it evenly among two 9" cake rounds to build a more traditional cake. Either way, I guarantee that vegans and non-vegans alike will fall in love with this cake. CHOCOLATE CRAZY CAKE(makes one 9" x 13" cake)
You'll notice that there's vinegar and a good deal of baking soda in the ingredients list. First, the baking soda requires an acid to work and the vinegar provides the active ingredient for this. Secondly, without an egg, you need a super boost of leavening and the baking soda/vinegar combo provides this as well. Depression era baker's discovered this trick all on their own and it's a technique that has become a staple in vegan baking.
2 cups King Arthur Flour cake flour1 1/2 cups sugar (make sure it's vegan)1/2 cup high quality, Dutched cocoa powder (I use Cacao Barry's Extra Brute)2 teaspoons baking soda1 teaspoon kosher salt1 cup cold coffee1 cup cold water3/4 cup canola oil1 teaspoon vanilla2 tablespoons distilled white vinegar
•Preheat the oven to 350ºF.
•Sift the cake flour into a 9" x 13" baking pan. Add the sugar, cocoa, baking soda and salt. Whisk the dry ingredients together for at least 30 seconds to distribute the ingredients.
•Make 3 small wells in the dry ingredients. Add the vanilla in one, the vinegar in another and the oil in the third. Pour the cold coffee and water over everything and immediately whisk the batter until well combined. Be quick about it as the soda is activated once it touches the vinegar.
•Bake for 30-40 minutes or until the cake springs back when gently poked.
January 31, 2016
MAC and CHEESE a la Gesine Confectionary

Sunday at the shop in Montpelier was always one of my happiest days. We'd open a little later than the rest of the week, giving me an extra hour of sleep and an extra solitary hour in the pastry kitchen. Customers would amble in, unhurried and bed headed. I'd take the benefits of that extra hour of sleep to fuel my creative culinary juices, testing new recipes on whomever was on front of the house duty. To temper the effects of so much sugar, I'd make a big Sunday lunch for the crew. Some days I'd make a cold soba noodle salad. Other times I'd make sandwiches. But mostly, it was mac and cheese. It was everyone's favorite.
The base recipe follows Fannie Farmer's solid bechamel based creation, a recipe that seems to have spawned almost every baked mac and cheese in America since it was published. What I added to the mix was access to all the supplies in my little pastry shop and an outsized love of Vermont cheddar cheese (something shared by my entire Vermont native staff). And potato chips. This recipes isn't the same without a barrel of cheese and a potato chips. And a few other surprise ingredients.
MAC AND CHEESE a la GESINE CONFECTIONARY
1 (16 oz) box de Cecco cavatappi pasta
4 tablespoons unsalted butter (plus 1 tablespoon to grease the casserole dish)
4 tablespoons flour
1/4 teaspoon cayenne pepper
1 1/2 cups heavy cream, warmed
1/2 cup whole milk, warmed
1/4 cup dill pickle juice, room temperature
1 tablespoon sriracha
12-16 ounces extra sharp Vermont cheddar cheese, shredded (house preference as to how much cheese you add. My preference is to add more.)
8-12 strips bacon, cooked to crispy
1 (8 ounce) bag ridged potato chips, lightly crushed
salt and pepper to taste
Optional:
1 large russet potato, peeled and cubed into 1/4" cubes
2 tablespoons olive oil
1/4 cup picked jalapeño, chopped
1 cup frozen peas
•Preheat oven to 375ºF. Grease a 2 quart casserole dish with the 1 tablespoon extra butter. Set aside.
•If you're using the potato, and I like to because it gives this recipe a subtle boost of lusciousness, peel and cube the potato into 1/4" squares. Heat the olive oil in an oven proof skillet over medium-high heat and add cubed potatoes. Brown the potatoes to golden and transfer to the oven to cook through while you cook the pasta and make the bechamel.
•Cook pasta per manufacturers "al dente" specifications, drain and set aside.
•In a large saucepan, add the 4 tablespoons butter and melt over medium heat, then add the flour and cayenne (if using). Stir until combined and a paste forms. Slowly add the cream, whisking constantly and then add the milk, dill pickle juice and sriracha. (I know the pickle juice sounds weird but it adds an element of savory zing that helps balance all the fat). Whisk until the mixture simmers and begins to thicken. Continue whisking over medium-low heat for 5 minutes longer. Season with salt and pepper to taste. Add the cheese and stir to combined.
•Check the potatoes to make sure they are fork tender and have a crisp exterior and fold into the bechamel, along with the pasta, making sure the pasta is evenly coated. Fold in the peas, if using. Crumble the bacon into small pieces and fold into the pasta along with the jalapeño, if using. Transfer to the prepared casserole dish and cover with the crushed potato chips. Bake for 30 minutes or until the sauce is bubbling. Serve immediately.
January 17, 2016
WEEKEND BAKE
If you're like me, weekends are made for baking projects. Even if I'm baking and testing all week, I keep the weekend for personal projects. This weekend, it was a chocolate and raspberry mousse with a chocolate soufflé sponge surround that was coated with ganache and then a mirror glaze. I dipped into a few recipes from my book Bake It Like You Mean It to make this celebratory cake. It just happened to be gluten free, which makes it that much sweeter.

What did you create this weekend?

What did you create this weekend?
January 10, 2016
PLAY WITH YOUR PASTRY
 Puff, choux and pastry cream. Three elements made modern. My favorite thing about pastry is sharing my love of its inherent magic. Baking is alchemy. When you cook, you take a piece of meat, potatoes and perhaps some veg. You roast, sauté and cook your ingredients to perfection. When you serve them, there they are on the plate: meat, potato and veg. All elements clearly identifiable as being exactly what they are: meat, potato and veg.
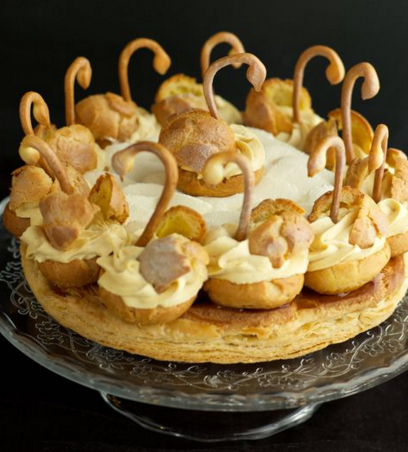 My Gateaux St. Swanaré from my book Let Them Eat Cake (photo by Tina Rupp). The elements: puff pastry, choux puffs and pastry cream. You can learn to make this, step by step, in my Craftsy Choux class.
In baking, you take butter, flour and water and from them you can make puff pastry and choux paste. You don't look at your plate and say, "Hey! There's a stick of butter!" because that butter has been transformed. That's the magic.
The other thing I love about baking is that you can take those exact same elements, the puffs and the choux, and create entirely different looking creation.
This, my sweet friends, is why I teach. I love sharing the magic. It's the next best thing to being Professor McGonagall at Hogwarts.
Join me in learning some magic at Craftsy, online classes you own for life and can enjoy from the comfort of your own home (and pajamas!). Take my Perfect Puff Pastry Class and my Choux (cream puff and eclairs!) Class to share in the beauty of pastry with me.
January 5, 2016
50% OFF! Learn to make Perfect Puff Pastry with my new King Arthur/Craftsy online class!

I'm so pleased to announce the launch of my newest Craftsy/King Arthur Flour online class: PERFECT PUFF PASTRY! Puff pastry is one of my favorite things on the planet. When the pastry curious ask, "What's your favorite thing to bake?" my answer is always PUFF PASTRY.
 Chocolate puff? Yes please!My delight isn't only in the eating, it's in the making and the teaching. It's truly magical in all ways baking should be magical. And now, you can take my new class at 50% off without having to travel to Vermont to learn all my tips and tricks. Click THIS LINK and you'll enjoy all the flaky goodness in no time.
  Puff pastry is perfect for things sweet AND savory. Just look at this fresh veggie tart for a small example of the delicious paths you can go down using puff pastry.But wait, there's more! To top it all off, learn to make a show stopping, centerpiece worthy puff pastry masterpiece with the addition of joconde decor sides!
  Banana Caramel Cream Pie transformed into a show stopping, centerpiece worthy dessert? Yes, indeed!
Gesine Bullock-Prado's Blog

- Gesine Bullock-Prado's profile
- 69 followers
Gesine Bullock-Prado isn't a Goodreads Author
(yet),
but they
do have a blog,
so here are some recent posts imported from
their feed.

