
Gesine Bullock-Prado's Blog, page 3
August 9, 2016
The Heaven and H.E. Double Hockey Sticks Cake

I appreciate an impossibly tall cake. They happen to be in fashion now too. The official term is: Barrel Cake. But I liked tall cakes before they were cool or had a trendy moniker. As a matter of fact, I can't remember when I didn't like tall cakes because it means you get more cake.
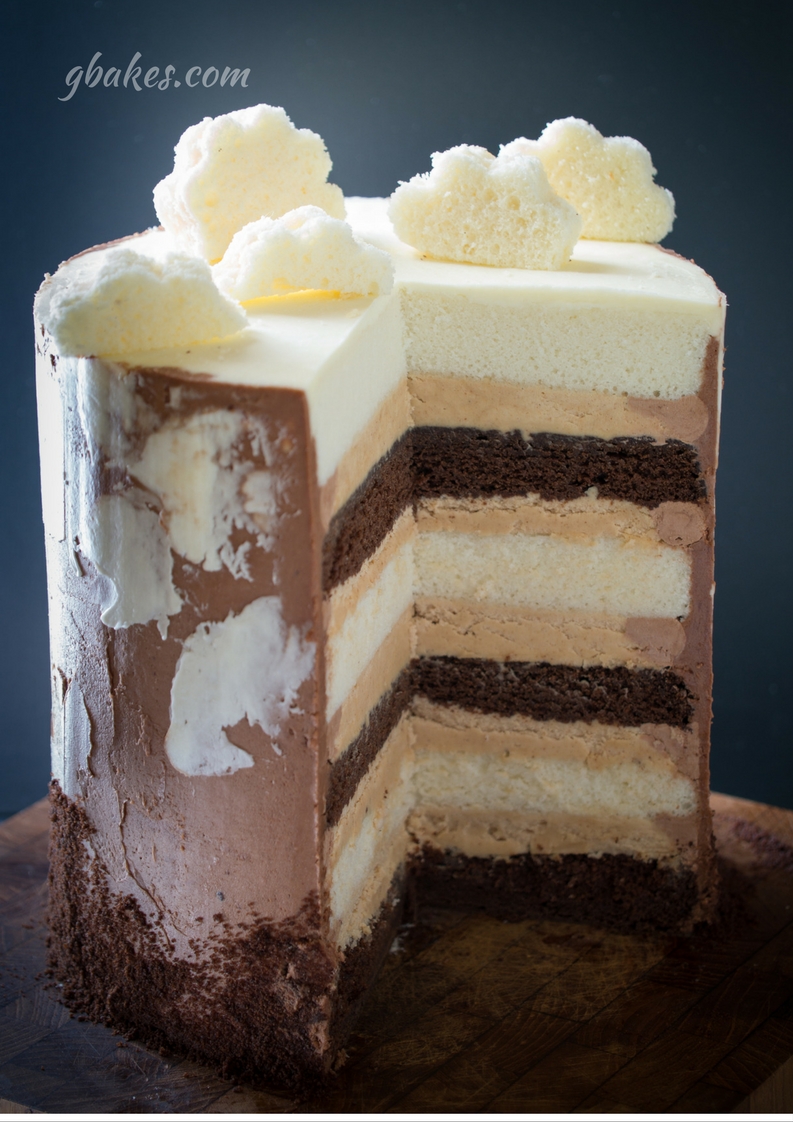
It occurred to me that a favorite standard, the Heaven and Hell Cake, could stand for the tall treatment because it only seems right that the distance between the two should be realllllly far apart, hence a tall cake.
If you aren't familiar, a Heaven and Hell Cake is layers of Devil's Food and Angel Food cake, sandwiched by peanut butter mousse. I like to work with a white cake that has a bit more structure than an angel food but that still has a lovely amount of moisture and delicacy to make the framework sound, so instead I make a white cake that utilizes the "paste method" wherein you start with all the dry ingredients in the bowl, add softened butter to create a sandy like texture and then you add the liquids. The result is a cake with lots of flavor and structure but still manages to be fine grained. In short, it's heavenly.
Heaven & Hell Cake
You'll need:
1 batch Almost an Angel Cake (recipe follows)
1 batch Devil's Food cake (recipe follows)
1 batch peanut butter mousse (recipe follows)
2 batches plain Italian Buttercream plus 225 grams bittersweet chocolate (recipe follows)
***
8" cake pans
8" cake board
8" acrylic round (or 2nd cake board)
8" round parchment paper
808 Ateco large open piping tip
1 half-sheet parchment paper
small offset spatula
2" flower cookie cutter
20" Taping Knife (you can find taping knives at the hardware store)
***
For the Almost an Angel Cake
12 ounces unbleached cake flour (I use King Arthur. Unbleached is important)
8 ounces whole milk, room temperature
6 ounces egg whites, room temperature (about 6 egg whites)
1 tablespoon vanilla extract
13 ounces granulated sugar
1 tablespoon + 1 teaspoon baking powder
1 teaspoon salt
6 ounces unsalted butter, room temperature
Preheat the oven to 350ºF. Spray two 8" cake pans with non-stick cooking spray and line the bottoms with rounds of parchment. Set aside.
In the bowl of a stand mixer fitted with the paddle attachment, combine the flour, sugar, baking powder and salt. Whisk for 30 seconds to distribute the leavening.
Cut the butter into tablespoon pieces and place on top of the dry ingredients. Mix on low until the flour/butter mixture looks like wet sand and there are no dry streaks remaining.
In a small pitcher, stir together the milk, egg whites, and vanilla. Add half the mixture with the mixer on low and once relatively combined, mix on high for 1 1/2 minutes. Scrape down the bottom and sides of the bowl. Add the remaining egg white/milk and mix for 1 minute on high.
Divide the batter among the 2 prepared cake pans and bake for 25 - 30 minutes on the middle rack of the oven or until the cakes spring back when gently poked. Allow the cakes to rest 10 minutes in the pan and then run a paring knife along the edge of the cake pan to release the cakes. Turn them over onto a cooling rack and allow to cool completely.
Once cool wrap loosely in plastic wrap and freeze for 1 hour. Trim any doming on the top of the cake and then torte each layer evenly in half (aka, cut them in half) with a long serrate knife. Set aside.
For the Devil's Food
6 ounces unsalted butter, room temperature
12 ounces granulated sugar
1 teaspoon salt
9 ounces unbleached cake flour
3 ounces Dutched cocoa
2 teaspoons baking powder
4 large eggs, room temperature
12 ounces whole milk, room temperature
1 tablespoon vanilla extract
Preheat oven to 350ºF. Spray two 8" cake pans with non-stick cooking spray and line the bottoms with rounds of parchment. Set aside.
In the bowl of a stand mixer fitted with the paddle attachment, combine the butter and sugar and beat on high until the mixture is light and fluffy, about 4 minutes.
In a small bowl, whisk together the flour, cocoa, baking powder, and salt for 30 seconds to distribute the leavening.
With the mixer on low, add the eggs, one at a time, mixing until each is incorporated and scraping the sides and bottom of the bowl between each addition.
Add the vanilla and mix to combine.
Add 1/3 of the flour mixture with the mixer on low and then 1/2 of the milk, then another 1/3 of the flour mixture, then the rest of the milk and then the rest of the flour mixture. Scrape the sides and bottom of the bowl every once in a while to make sure everything's incorporated. Divide the mixture evenly among the two prepared pans and bake for 30 - 35 minutes or until a toothpick comes out clean. Allow the cake to rest 10 minutes in the pan and then run a paring knife along the edge of the pan to release. Turn out onto a cooling rack and allow to cool completely. Once cool, wrap loosely in plastic wrap and freeze for 1 hour.
Trim any doming on the top of the cake and then torte each layer evenly in half (aka, cut them in half) with a long serrate knife. Set aside.
For the peanut butter mousseOne 8 ounce package of Philadelphia cream cheese, room temperature
2 cups smooth peanut butter
1 1/2 cups confectioner's sugar
3/4 cup heavy cream
1 teaspoon vanilla
Combine all ingredients in the bowl of a stand mixer fitted with the whisk attachment. Whisk on low until the confectioner's sugar is somewhat distributed and then mix on high until smooth.
For the chocolate buttercream10 egg whites2 cups sugar2/3 cup waterpinch salt1/2 teaspoon lemon juice2 pounds unsalted butter, slightly cooler than room temperature but NOT hard (you likely won't need all of it, so don't precut it. Just cut pieces as you go)8 ounces bittersweet chocolate (at least 60%), melted and slightly cooled
In a heavy saucepan, combine the sugar, water, salt and lemon juice. Stir over low heat until the sugar has completely melted. Using a damp pastry brush, wipe down any sugar crystals back into the mix, clip on a sugar thermometer and raise heat to medium-high. Heat the sugar syrup to 240º - 245ºF.
While the sugar is heating, add the egg whites to the CLEAN bowl of a stand mixer and using a whisk attachment, whisk until the egg whites are foamy. Stream the hot sugar syrup down the side of the bowl with the mixer running and then mix on high until the bowl is cool to the touch and the meringue is shiny white and reaches stiff peak stage.
Add the butter, a few tablespoons at a time, and continue adding the butter until the buttercream tightens, smooths out and becomes spreadable. Again, you may not need all the butter and you'll know when you're getting close when the mixture looks as if it's breaking or curdling. It doesn't always do this but if it does, that's perfectly normal and a sign that you're getting close. Add a few more knobs of butter and let the mixer do the work. Once the buttercream comes together, take out 350g of plain buttercream and set aside. Stream in the melted chocolate into the remaining buttercream and mix until combined.
To assemble
Take a layer from both the Almost an Angel cake and devil's food that is the least perfect. Using a 2" flower cookie cutter, stamp out flower shapes from the Angel layer and then cut in half to make clouds. Wrap the clouds in plastic wrap and set aside.
Break the set aside devil's food layer into small pieces and place on a parchment lined sheet pan. Bake the devil's food pieces in a low oven, about 200ºF, until the pieces have dried out completely. Allow to cool and then pulverize in a food processor. Set aside.
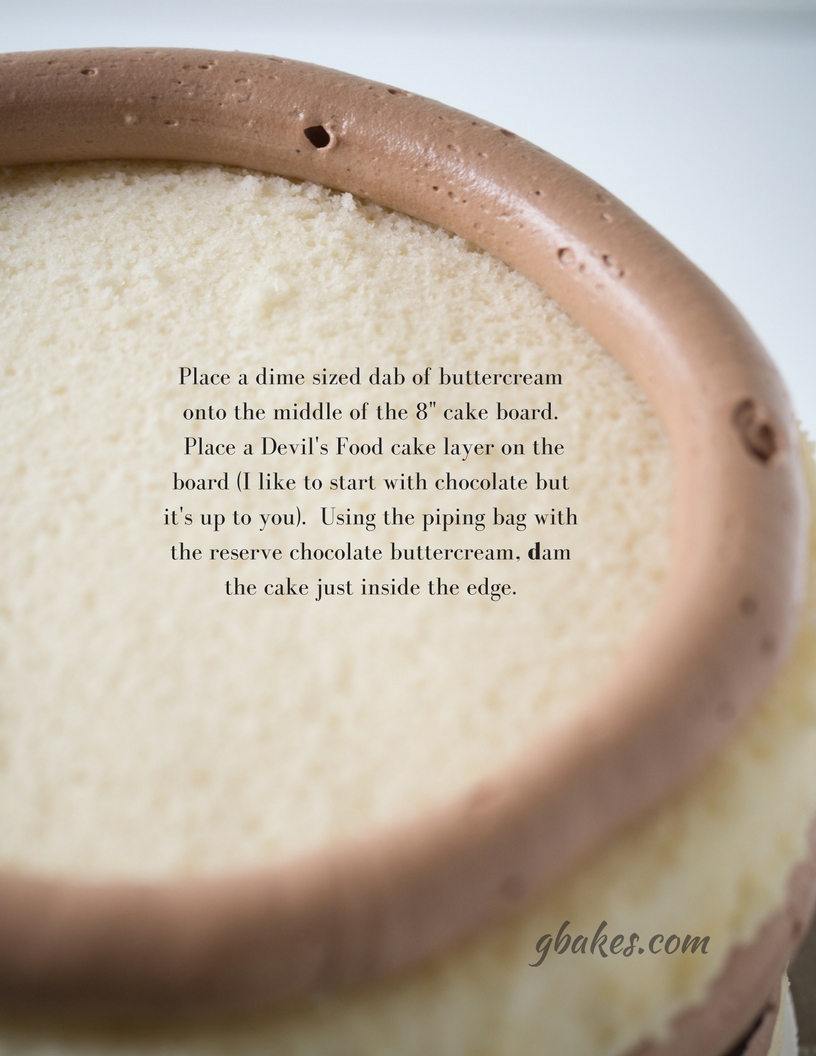
Place a Devil's Food layer on an 8" cake round. Fill a large pastry bag fitted with a large open tip ( I used an 808 Ateco tube) with 425g of chocolate buttercream, set the remaining buttercream aside for finishing the sides. Pipe a perimeter of buttercream on the outside edge of the cake and then spread 1/5 of the peanut butter mousse (about 300g) inside the buttercream dam.


August 8, 2016
"SURPRISE! You're a STAR!" Mousse Cake with mirror drip glaze.


If you have a favorite mousse recipe, you can feel free to adapt it to this technique. The following rule applies to ALL mousse cakes made with both the interior surprise AND the glaze: (1) whichever mousse you choose to use as the interior image mousse, it must be frozen solid in order to be handled properly (2) the mousse cake, once finished and ready for glazing, must be FROZEN and the glaze should register between 90-95ºF.
Before we get into the photo montage, let me just state unequivocally that you shouldn't use a traditional metal bundt pan for this cake. It won't unmold, at least not easily. So while the following does a good job of visually explaining how to make the surprise inside, if you use a metal bundt the real surprise is that it will NEVER RELEASE! Instead, invest in a silicone bundt pan like these. That's what I did after spending hours gently heating the sides of this bundt pan only to end up with soup. With silicone, you can just peel that sucker off the frozen mousse.


SURPRISE! YOU'RE A STAR! Mousse Cake
For the mousse
NOTE: For the surrounding/outer mousse, use a double recipe. Make the inner/image mousse first and spread it into a parchment lined 9" x 13" pan and freeze solid. Once frozen, make the double recipe for the outer mousse.
1 tablespoon unflavored, powdered gelatin
1/4 cup plus 1/3 cup water (cool)
1 cup fruit purée
1 cup sugar
5 egg whites
pinch salt
1 1/2 cups heavy cream
1/2 cup mascarpone cheese
Pour 1/4 cup water into a microwave safe bowl and sprinkle the gelatin in an even layer over the water and allow to sit for about 10 minutes or until the gelatin looks completely saturated, like wet sand.
NOTE! Always use cool water to bloom gelatin. If it's too warm, only the outer portion of the granule with absorb water and the gelatin won't melt once warmed .
Microwave the gelatin mixture on 50-percent power for 20 seconds at a time, swirling the bowl between each heating, until the gelatin is completely melted. Be careful not to overheat because this can kill the efficacy of the gelatin. You want to time the melting of the gelatin so that it is still liquid when you incorporate it into the cold whipped cream mixture it's tough to fold in gelatin that has already solidified. You'll end up with chunks.
In a medium saucepan, gently heat the purée (I used passion fruit puree for the outer mousse and strawberry puree for the inner/image mousse) and stir in the gelatin mixture. Set aside.
In a heavy saucepan over low heat, combine the sugar and 1/3 cup water. Stir until the sugar completely dissolves. Wash down the sides of the pan with a damp pastry brush. Clip on a thermometer, stop stirring, and heat the syrup to 234ºF.
Meanwhile, whisk the egg whites with salt in the CLEAN bowl of a stand mixer until foamy. When the sugar reaches the correct temperature, lower the speed of the mixer to medium-high and carefully pour the hot sugar syrup down the side of the bowl. Once all of the syrup has been added, increase the speed to high and whip until the meringue is a shiny, bright white and maintains stiff peaks when you lift the whisk attachment. Transfer the meringue to a metal bowl and set aside.
Using the same mixing bowl the meringue was in (you don't have to clean it), add the heavy cream and mascarpone and whip until they achieve medium-stiff peaks.
Combine the whipped cream and meringue, gently folding the two together.
Add 1/2 cup of the cream meringue mixture to the purée and whisk to lighten.
Quickly add the gelatin-purée mixture, make sure the gelatin mixture isn't too warm or the cream-meringue mixture will break and deflate. But also make sure that the gelatin hasn't cooled so much that it's begun to set-it should be fluid so you're not left with nibs of Jell-O in the mousse. Work quickly to ensure a smooth, silken texture.
For the surrounding mousse, gently spray the mold with non-stick cooking spray and add a little more than half into your surrounding mousse into the silicone mold. Using a cookie cutter that is no taller than the height of the silicone bundt pan, stamp out shapes from the frozen interior/image mousse and gently push them into the surround mousse. You can see I used TWO cutters and punched an image out of the larger shape. This gives you more bang for you buck surprise wise. Make sure to place the shapes as close together as you can so that you get more surprise for each slice. Spread the remaining mousse over the images and freeze until solid, preferably overnight.
For the glaze
25 ounces white chocolate, finely chopped
12 ounces cool water, divided
20 ounces sugar
14 ounces sweetened condensed milk
1.5 ounces granulated gelatin
gel dye
Place half the water in a bowl and sprinkle the gelatin evenly over the water. Allow to sit until the gelatin is uniformly soaked and looks like wet sand. Once the gelatin is bloomed, move onto the next step.
In a heavy saucepan, combine the remaining water, sugar and sweetened condensed milk. Stir over low heat until the sugar has completely melted. Take from the heat and stir in the gelatin. Continue stirring until the gelatin is melted.
Place the white chocolate in a shallow bowl and pour the hot gelatin mixture over the chocolate. Shimmy the bowl to make sure the chocolate is covered. Allow to sit until the chocolate is melted, add a few drops of gel dye (color is your choice!) and then whisk until smooth. Pour the mixture through a sieve and into a pitcher with a spout and melt occasionally, checking the temperature often. Once the temperature has reached 95ºF, unmold the mousse cake from the silicone mold and place on a cooling grate over a parchment lined sheetpan. Pour the glaze over the frozen mousse cake, making sure not to return to an area of the cake you've already covered otherwise the finish will be lumpy. Serve immediately or refrigerate for 1/2 hour before serving. Using a very hot, clean knife to make each slice.
August 4, 2016
Everyone Gets a Chocolate Chip Cookie
 Picture from Let Them Eat Cake taken by Tina Rupp
On this wonderful day, National Chocolate Chip Cookie Day, I am posting the very first recipe from my book Let Them Eat Cake. This recipe, like all the others in the book, offers a traditional option, with all the butter bells and whistles, but it also includes a gluten-free option, a vegan option and a healthier option...because EVERYONE should get to eat a chocolate chip cookie on such an auspicious Thursday.


August 1, 2016
Creamy Artichoke and Heirloom Tomato Tart

I remember the exact moment I first tried an artichoke. It was in Jennifer Nunes' kitchen in Arlington, VA. We were in the fifth grade. Her mother set down a ramekin with melted butter. I'm half German, I am born to love butter. If this family enjoyed it melted, I could get down with that tradition. I just needed bread. But what Mrs. Nunes set before me wasn't bread, not nearly. Here was an alien flower, its petals topped with delicate spikes. I watched Jennifer pluck a leaf and dip the fleshy end into the butter then gently scraping the meat with her teeth. I followed suit, making sure that my introductory leaf cradled a healthy puddle of butter.

 No. Just, no.
I'm happy to join the artichoke parade, borrowing from my culinary ancestors and adding to their yummy legacy with a tart that uses puff pastry as a base, which adds a flaky crispness that compliments the simple creaminess of the baked filling. Fresh heirloom tomatoes, just off the vine and thinly sliced, are a juicy foil for all that buttery lusciousness. Top with fresh herbs and you've got yourself the ultimate summer tart. Betty Crocker would approve.
CREAMY ARTICHOKE and HEIRLOOM TOMATO TART
(makes one 18" x 13" tart)

For the pastry
2 pounds puff pastry, either frozen (blech) or homemade. Here's a link to my Craftsy puff pastry class at a 50% off discount so you can get yourself away from the freezer aisle and enjoy the beauty of real puff pastry. You can also do a search on this blog for quick puff as well!
For the filling
1 (8 ounce) package Philadelphia cream cheese
1 (6.5 ounce) tin marinated artichoke hearts, drained and quartered
1 cup grated parmigiano reggiano
1/2 cup Hellman's (or Good Food) mayonnaise
1 small onion, roughly chopped
3 small cloves garlic, roughly chopped
1 tablespoon olive oil
1/2 teaspoon smoked paprika
1/2 teaspoon maple syrup
salt and pepper to taste
For the topping
5-6 fresh, heirloom tomatoes of differing color and size
fresh herbs
Procedure
Preheat the oven to 375ºF. Line a half-sheet pan with parchment. Set aside.
Roll the puff pastry into a rough 18" x 13" rectangle. Use a half-sheet pan as a guide. Allow the dough to rest for 20 minutes in the refrigerator and then trim the sides with a sharp knife. Dock the dough using a fork. Bake for 20-25 minutes or until the puff has risen, is golden brown and is just set. Set aside.

While the dough is baking, add the 1 tablespoon of olive oil into a pan and add the onion and garlic. Sauté over low heat until softened. Add the maple syrup and paprika and stir to combine.
In the bowl of a food processor, add the cream cheese, artichoke hearts, parmigiano, mayo, onion & garlic mixture, salt and pepper. Pulse until smooth.
Gently spread the artichoke mixture over the puff, leaving about 1/2 inch of the edge naked. Top with sliced tomatoes and bake for 10-15 minutes or until the edges of the filling just start to brown.
Top with fresh herbs and serve warm.
July 25, 2016
DEVIL'S CREAM PIE with a twist
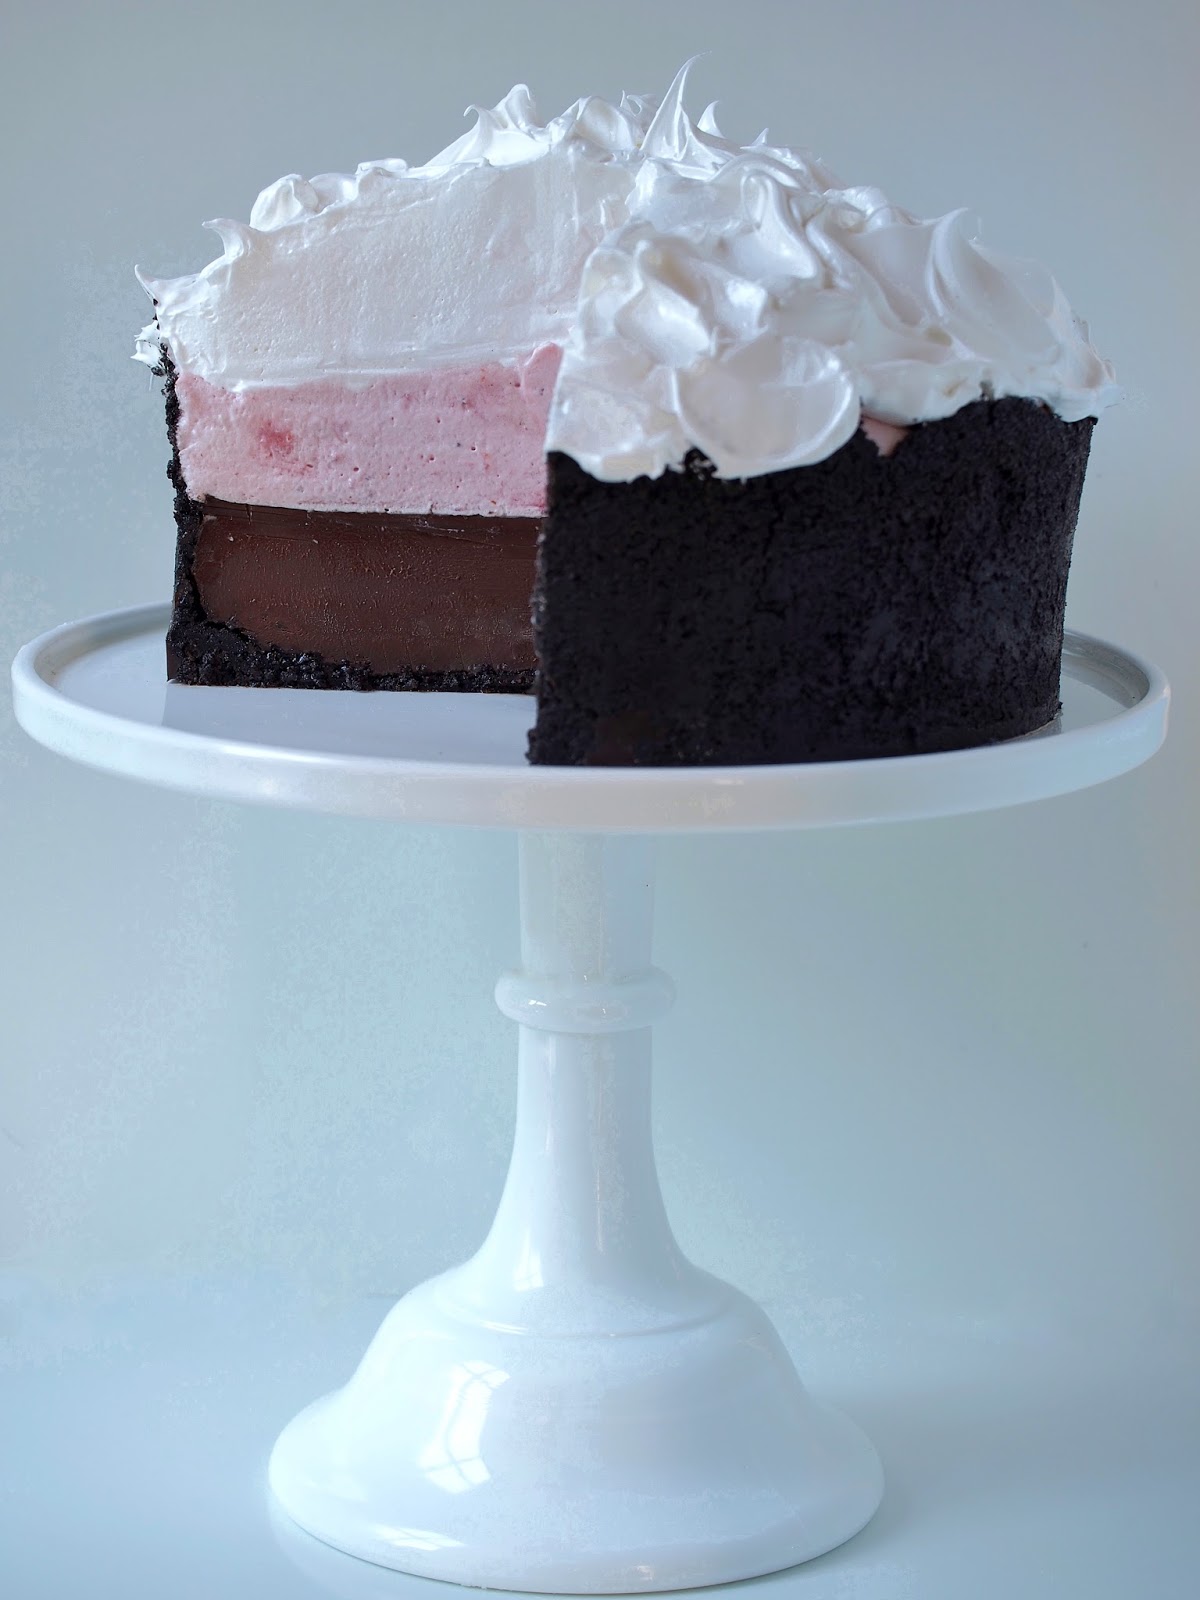 Devil's Cream with an added layer of strawberry mousse.
When I was a kid, I was obsessed with Oreos. Who am I kidding? I'm still obsessed with Oreos. I went so far as to steal an entire package from my neighbors house and I've not matured enough to say I'd not steal again. I wrote a chapter in my baking memoir, My Life from Scratch, all about my Oreo capers and I finished it with the recipe for Devil's Cream Pie, a favorite in my Montpelier pastry shop.
 From "My Life from Scratch". Illustration by Raymond Prado
I've updated the recipe a bit, adding alternatives so you can jazz up the intensely chocolate pie with strawberry or peanut butter mousse. But I've gotta say, it's plenty special in it's original state: Oreos, deep dark chocolate, and luscious Swiss meringue.
If you missed me making the Devil's Cream Pie on the Today Show, here's the video.
DEVIL'S CREAM PIE
For the Crust
36 Oreos (which is exactly 1 regular sized bag's worth of cookies)
6 tablespoons unsalted butter, melted
Preheat oven to 350ºF.
Line the bottom of an 8" springform pan with parchment and spray with non-stick baker's spray. Set aside.
Break up the cookies (the cookie and innards, we're using the filling too) and place in a food processor. Pulse until they are almost a sand consistency and then break up any large pieces with your fingers. Transfer 2 tablespoons of the cookie crumbs into a small bowl. Set aside.
Transfer the ground cookies to a large bowl. Pour the butter onto the cookies and immediate stir the mixture until the butter evenly saturates the cookie dust, making sure there are no pockets of butter or dry cookies left. Squeeze a small amount of the crust between your fingers to make sure it holds it shape.
Press the cookie mixture onto the the bottom and along the sides of the springform pan. Don't worry about the sides of the pie looking perfect and even along the edge. It looks great with a little jagged on top. Make sure that there are no gaps!
Bake the crust for 10 minutes. Once out of the oven, check to make sure there are no cracks that have formed in the crust. If so, while the crust is still warm and malleable, gently work the crust to fill the gaps.
Alternatively, gently line the cookie filled pan with parchment and fill with pie weights (for this, sometimes beans or rice are better since you need quite a bit of pie weights to fill up the cavity) up to the top. Bake for 10 minutes. Remove the parchment and weights and bake for 5 minutes more.
Set aside to cool completely.
For the Filling
2 cups heavy (or whipping) cream1 tablespoon vanilla bean paste (or vanilla extract)2 tablespoons sugar2 tablespoons granulated unflavored gelatin1 cup whole milk1 tablespoon espresso powder (optional)1 pound bittersweet chocolate (at least 60%), finely chopped1/4 teaspoon salt
In a heavy saucepan, combine the heavy cream, sugar and salt. Stir over low heat until the sugar has melted. Increase the heat to medium high and allow the mixture to just come to a boil.
In the meanwhile, in a wide shallow bowl, add the milk and sprinkle the gelatin evenly over the milk and let it sit until it blooms (the gelatin will look like wet sand and be saturated with moisture. Make sure there are no dry patches of gelatin).
Take the cream off the heat once it reaches a boil and immediately add the gelatin/milk mixture and then the vanilla. Stir with a whisk to incorporate the gelatin and then immediately add the chocolate. Tip the pan back and forth to make sure the chocolate is is completely covered with the hot liquid. Let this sit for a few minutes then whisk the chocolate, making sure that it is completely melted and combined with the liquid (this is when you'd add any extra extracts).
Holding a sieve over the crust, pour the chocolate mixture through the sieve and into the crust to keep any lumps of unmelted gelatin from joining the chocolate pie party. Carefully transfer the pie to the refrigerator and cool until completely set, about 3 hours but preferably overnight.
Alternative: The pie sets up very firmly and it's silky and lovely. To soften it up, you can pour the chocolate mixture into a bowl and refrigerate until it's cooled and firmed just a litte, to the consistency of pudding. If you allow the filling to set too long, it will be impossible to loosen. Whip 1 cup of heavy cream/whipping cream and fold it into the chocolate mixture and then add to the cooled crust.
For the Swiss Meringue Topping
10 egg whites2 cups sugar1/8 teaspoon salt
Place the egg whites, sugar and salt in the bowl of a stand mixer and set over simmering water. Whisk constantly until the sugar has completely melted, the mixture feels as if it has thinned a bit and the temperature of the egg whites reaches 160ºF (this is the temperature at which any harmful bacteria are killed).
Transfer the bowl to a stand mixer fitted with the whisk attachment. Whisk on high until the meringue has very stiff, shiny peaks.
Prior to adding the meringue, sprinkle the reserved 2 tablespoons of cookie dust over the top of the filling. This creates something of a barrier between the filling and the meringue, helping the meringue to keep from weeping (sugar is hygroscopic, which means it draws in moisture and that's why meringue beads when it sits on top of a filling for a while).
You can dump all the meringue straight on top and use a spoon or offset spatula to spread it in a jaunty fashion or you can pipe lovely peaks all along the top. You can also quickly torch the meringue to make it marshmallow toasty or serve glistening and white.
ALTERNATIVES!
You can stir in extracts to the chocolate mixture just before pouring into the crust. Almond, mint, orange and raspberry extracts go beautifully with chocolate.
Or, you can add a layer of strawberry or peanut butter mousse to the set chocolate filling before adding the topping! This not only looks great when you cut into the pie, it's also insanely delicious. On top of all that, they are super fast. One thing that's important: HALVE the meringue recipe if you're going to add the mousse.
Easy Strawberry Mousse
1/2 (4 ounce) package Philadelphia cream cheese, room temperature (very soft)
1 cups heavy cream
1 1/2 cups hulled and diced strawberries
1/2 cup granulated sugar
1/2 cup confectioner's sugar
1/2 packet gelatin
1/4 cup freshly squeezed lemon
1/4 cup water
In a bowl, combine the diced strawberries and the sugar. Stir to combine. Allow to sit about 20 minutes for the juices to start running. Transfer to a saucepan and stir over low heat until the strawberries are soft and the juices start to thicken to the point they coat the back of a spoon. Transfer to a blender or food processor and pulse until smooth. Run the puree through a fine sieve.
Combine the lemon juice and water in a bowl and sprinkle the gelatin in an even layer over the top. Allow to sit for at least 5 minutes to bloom (the gelatin should look like wet sand). Once bloomed, melt the gelatin in the microwave in 30 second bursts at 30-40%. Swirl the bowl in between blasts and continue until the gelatin is completely melted. Combine the strawberry puree and the gelatin mixture and stir to combine. Allow to cool to room temperature but make sure it doesn't set.
In a food processor combine the cream cheese, confectioner's sugar and cooled puree and mix until smooth. Transfer to a large bowl. Whip the heavy cream to stiff peaks and fold into the cream cheese/puree mixture. Alternatively, use a stand mixer: in the bowl of a stand mixer fitted with paddle attachment, combine the cream cheese and the confectioner's sugar. Mix until smooth. Swap out the paddle attachment for the whisk attachment. Add the heavy cream and whisk on high until the mixture is thick and almost has stiff peaks. With the mixer running on low, slowly add the strawberry mixture. Once added, mix on high until combined.
Easy Peanut Butter Mousse
One 8 ounce package of Philadelphia cream cheese, room temperature
2 cups smooth peanut butter
1 1/2 cups confectioner's sugar
3/4 cup heavy cream
1 teaspoon vanilla
Combine all ingredients in the bowl of a stand mixer fitted with the whisk attachment. Whisk on low until the confectioner's sugar is somewhat distributed and then mix on high until the mousse is smooth and fluffy.
ASSEMBLE
For both mousses, the procedure is the same. Allow the chocolate filling to set and then spoon or pipe the mousse filling gently on top. You can refrigerate an hour to set more firmly or you can immediately add the Swiss meringue topping. Serve immediately!
July 20, 2016
Eclairs.

I wonder how you feel about eclairs. What you know about them. For example, right now there's something of a renaissance in Paris when it concerns eclairs. Fauchon's Cristophe Adam started a revolution by creating inventive designs and flavors on the slim, crisp choux bodies. He went on to open his own shop, L'éclair de Génie. You guessed it. It's all about eclairs.
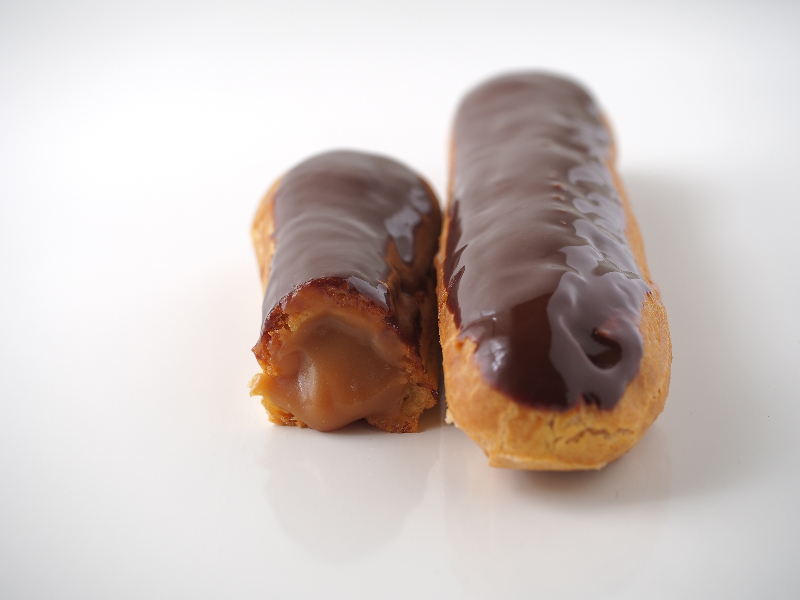
One thing you have to know about baking this wonderful pastry is that they need to be crisp and a lovely golden brown. In order to stand up to the filling and still maintain a semblance of structure, you have to bake them until they caramelize. This is also crucial for flavor.
Want to know more? Well, it just so happens that I've got an online class on just the subject...and so much more! Here's a little preview.
June 16, 2016
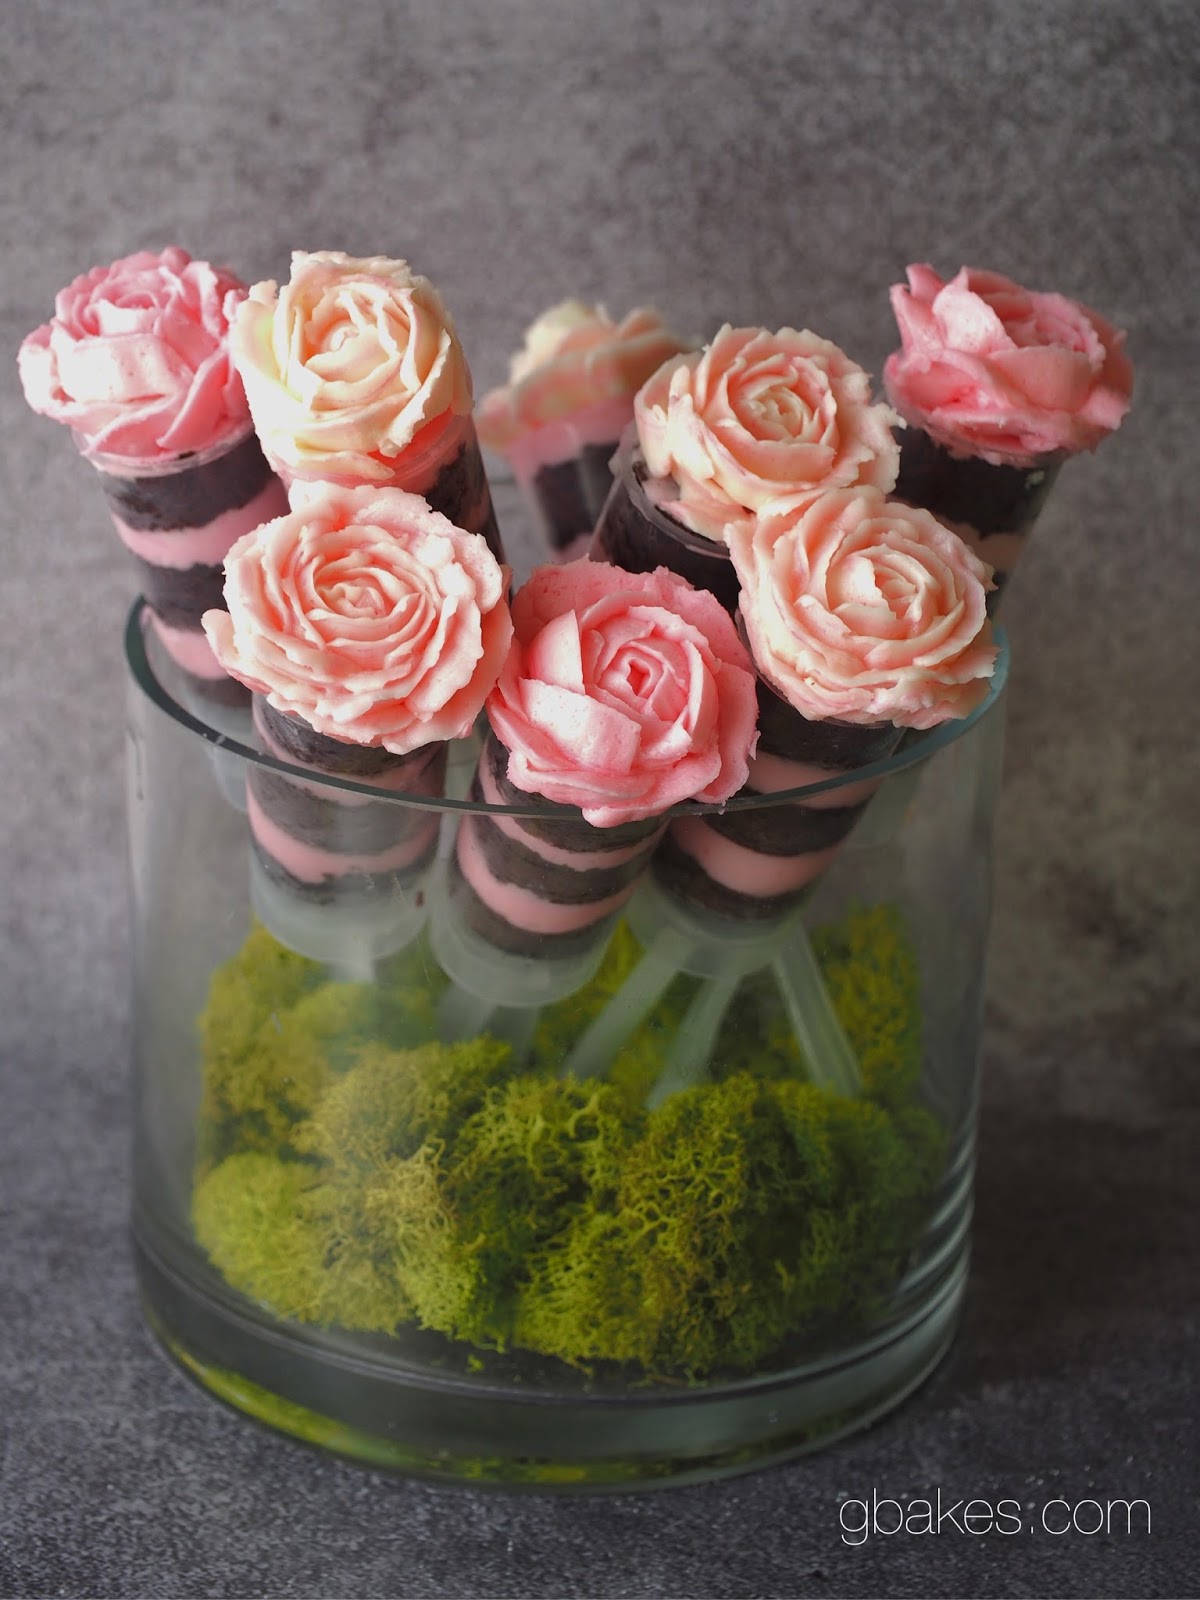
ROSE PUSH-POP CAKE

I've been piping buttercream roses for the past week. Yes, I had a project but now I can't stop. I won't stop. It's akin to the addictive nature of knitting, when the process hijacks your hands and the next thing you know you've got a kitchen full of scarf (or a field of buttercream roses). "A post! I'll write a post! And Ray can shoot a Cake Magic video! That's how I'll put these roses to use!"

After further thought, I realized perhaps simply piping a rose wasn't all that much fun unless there's cake invited to the piping party. I came up with the rose push-pop cake because who doesn't love a push-pop filled with cake...topped with a rose?

Even better, you can work in any combination of flavors you like. Not a fan of buttercream? Use curd as a filling. It's a push-pop, it'll stay put If you need push-pop containers, and who doesn't, you can get them at Amazon.
For the video demo, go HERE.
ROSE CAKE PUSH-POPS
For the cake (this is a riff off of my Crazy Cake)
2 cups King Arthur Flour unbleached cake flour1 1/2 cups granulated sugar1/2 cup high quality Dutched cocoa (I use Cacao Barry's Extra Brute)2 teaspoons baking soda1 teapoon fine sea salt3/4 cup cold coffee1/2 cup cold water3/4 cup canola oil1 teaspoon vanilla2 tablespoons distilled white vinegar
Preheat oven to 350ºF. Line a half sheet pan with parchment and spray with non-stick cooking spray. Set aside.
In a large bowl, sift the flour, sugar, cocoa, baking soda and salt. After sifting, whisk the ingredients together for 30 seconds to distribute the leavening.
Make 3 small wells in the dry ingredients. Add the vanilla in one, the vinegar in another, and the oil in the third. Pour the coffee and water over it all and immediately whisk the batter until well combined. Immediately pour into the prepared pan, tipping it back and forth to level the batter, and get that puppy in the oven.
Bake for 25-30 minutes or until the cake springs back when gently poked. Allow to cool completely before moving onto your cake popping.

For the italian meringue buttercream
1 cup sugar1/3 cup water1/4 teaspoon lemon juice5 egg whites, room temperaturepinch salt1 pound unsalted butter, room temperature (you may not need it all, most often I just use 12 ounces)1 teaspoon extract of your choice (I used raspberry)2-3 drops pink Americolor Gel Dye
In a heavy saucepan, combine the sugar, water and lemon juice. Stir over low heat until the sugar has melted. If there are sugar crystals on the side of the pan, use a damp pastry brush to encourage the crystals to join their melted friends. Attach a sugar thermometer, raise the heat to medium and cook the sugar mixture to 250ºF.
As you get to temperature, put your egg whites in the SPARKLING CLEAN bowl of a stand mixer fitted with the SUPER CLEAN whisk attachment. Start the mixer running and add the salt. Allow the egg whites to get nice and foamy and carefully pour the hot sugar mixture into the bowl with the mixer running. Aim just above the whisking whites but make sure not to hit the moving whisk otherwise hot sugar will go flying. Continue whisking on high until the bowl is cool to the touch and the meringue has stiff peaks. Add the butter a tablespoon at a time. At first the meringue will deflate. It might look like it's starting to separate or curdle. Once it does that, throw in another knob of butter and walk away. The buttercream will thicken and smooth out. Add the extract and dye and mix until combined.
For assembly, watch the video!
May 25, 2016
Chocolate Peanut Butter Cake with Toasted Marshmallow Frosting and a BIG ANNOUNCEMENT!

I'm delighted to announce that my new cake decorating video endeavor, Make Cake Magic, has launched! So now, when a cake or tart warrants special moving image treatment, I'll be posting a demo on the new site!

To celebrate, I made a chocolate cake filled with luscious peanut butter mousse. It's festooned with toasted marshmallow frosting. You can see how I made the frosting and how I coated the glorious confection at www.makecakemagic.com along with a host of other delightful cakes.
Check back often as I'm baking and Ray's shooting and editing furiously, so new demos will be up weekly and if there's anything you'd like to see demonstrated, give me a shout on Facebook.
CHOCOLATE-PEANUT BUTTER CAKE with Toasted Marshmallow Frosting
For the cake
3 cups sugar
3 eggs
3/4 cup neutral oil, such as Canola
1 cup piping hot coffee
3 ounces bittersweet chocolate, finely chopped (I use 60%)
1 1/2 cups all purpose flour
1 cup bleached cake flour
1 1/2 cups Dutched cocoa powder (I use Cacao Barry Extra Brute)
1 1/2 cups buttermilk
2 teaspoons baking powder
1 teaspoon baking soda
1 teaspoon salt
1 teaspoon vanilla
Preheat the oven to 325ºF. Line two 9" cake pans (best if the pans are 3" high because this is a lot of batter. Otherwise, 4 pans will be needed ) with parchment and line with a round of parchment. Spray with non-stick baking spray. Set aside.
In a large bowl, whisk together both flours, the cocoa powder, baking powder, baking soda and the salt. Whisk for at least 30 seconds. Set aside.
Combine the coffee, buttermilk and vanilla. Set aside.
In the bowl of a stand mixer fitted with the whisk attachment, combine the sugar and oil. Whisk until combined. Add the eggs and mix for 30 seconds until combined.
Add the 1/3 of the flour mixture and then 1/2 the buttermilk mixture, alternating between the two until both are added. Whisk for about 30 seconds or until the batter is smooth. Don't over mix.
Bake for 35-40 minutes or until a toothpick comes out with just a few moist crumbs attached. Turn the cakes out onto a cooling rack and allow to cool completely. Place in the freezer for 20 minutes and then slice evenly in half with a serrated knife for 4 layers total.
For the mousse
One 8 ounce package of Philadelphia cream cheese, room temperature
2 cups smooth peanut butter
1 1/2 cups confectioner's sugar
3/4 cup heavy cream
1 teaspoon vanilla
Combine all ingredients in the bowl of a stand mixer fitted with the whisk attachment. Whisk on low until the confectioner's sugar is somewhat distributed and then mix on high until the mousse is smooth and fluffy.
Pipe 1/3 of the mousse onto one round of the cake (about 12.5 ounces) and place second layer on top of the mousse. Continue, alternating between cake and mousse until you've added the last layer. Refrigerate the cake while you make the marshmallow frosting.

For the marshmallow frosting
(Go to www.makecakemagic.com to see a full demo on making this frosting)
1 1/2 cups granulated sugar
2 tablespoons corn syrup
1/2 cup water
7 egg whites
1/4 teaspoon salt
1/4 teaspoon cream of tartar
In a heavy saucepan, combine the granulated sugar, corn syrup and water. Stir over low heat until the sugar has completely melted. Attach a sugar thermometer, stop stirring and heat the sugar syrup to 234ºF.
As the sugar heats, add the egg whites to the clean bowl of a stand mixer fitted with a CLEAN whisk attachment. Once the syrup gets to about 220ºF, start whisking on high until foamy and then add the salt and cream of tartar. With the mixer still whisking on medium high, pour the HOT sugar syrup into the bowl, trying to hit just where the egg whites and the bowl meet but be careful not to hit the whisk otherwise the hot sugar will fling around the room and if that molten sugar hits you in the kisser, you won't be happy. Once all the sugar is added, whisk on high until the frosting is SUPER STIFF and the bowl is cool to the touch.
Cover the cake (you can watch a video!) and once you're happy with the results, toast the frosting with a kitchen torch. WARNING: I don't recommend putting this under the broiler, otherwise the mousse filling could melt. Good news is that this cake looks pretty spectacular if you don't brown the frosting at all.
Serve soon after frosting!
April 26, 2016
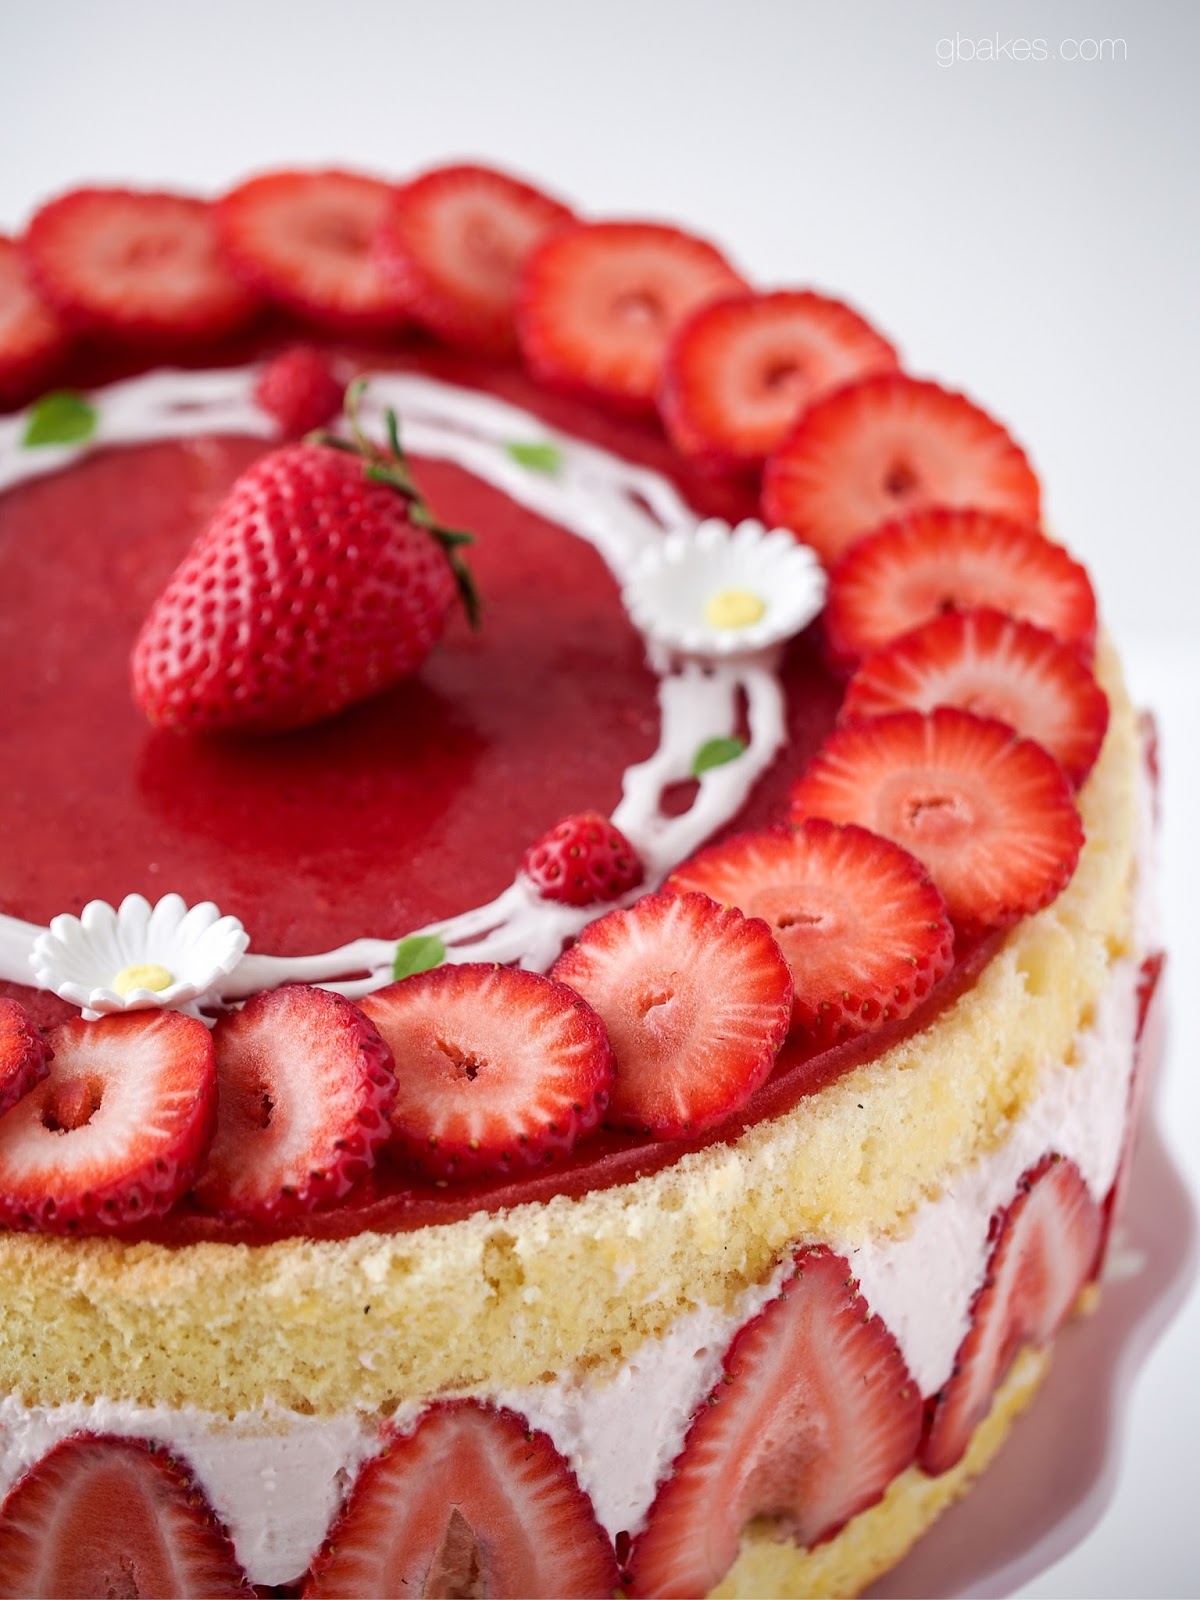
MOTHER'S DAY FRAISIER

It snowed today. In case you don't have access to a calendar, you should know that it's almost May. Just before it really got ugly, before the ducks and Mama started running around in a honking frenzy to warn me that the sky was falling, it was raining. Rain mixed with ice shards but still rain. I heard the mail truck pull up to the house and I ran out to save our kind mail woman a trip onto our slippery walkway.
"Vermont fertilizer," she said, gesturing to the icy deluge. "It's supposed to make the grass green."
As she pulled out, as if on cue, it started to snow. I looked up the hill to my garden. There was already a light dusting covering my asparagus patch. Fat chance those stalks will make an appearance any time soon with this schizophrenic weather. But the strawberries were another matter. I jogged up the hill to check on them and found that my alpine strawberries were looking perky as ever. Good thing too because with May and Mother's Day fast approaching, I depend on those puppies to supply me with a hit of spring, even when the rest of Vermont's flora and fauna refuse to acknowledge the season. And strawberries are what remind me most of my mother in May. The second she could get her magic baking hands on seasonal berries, she'd make a strawberry and cream sponge cake.
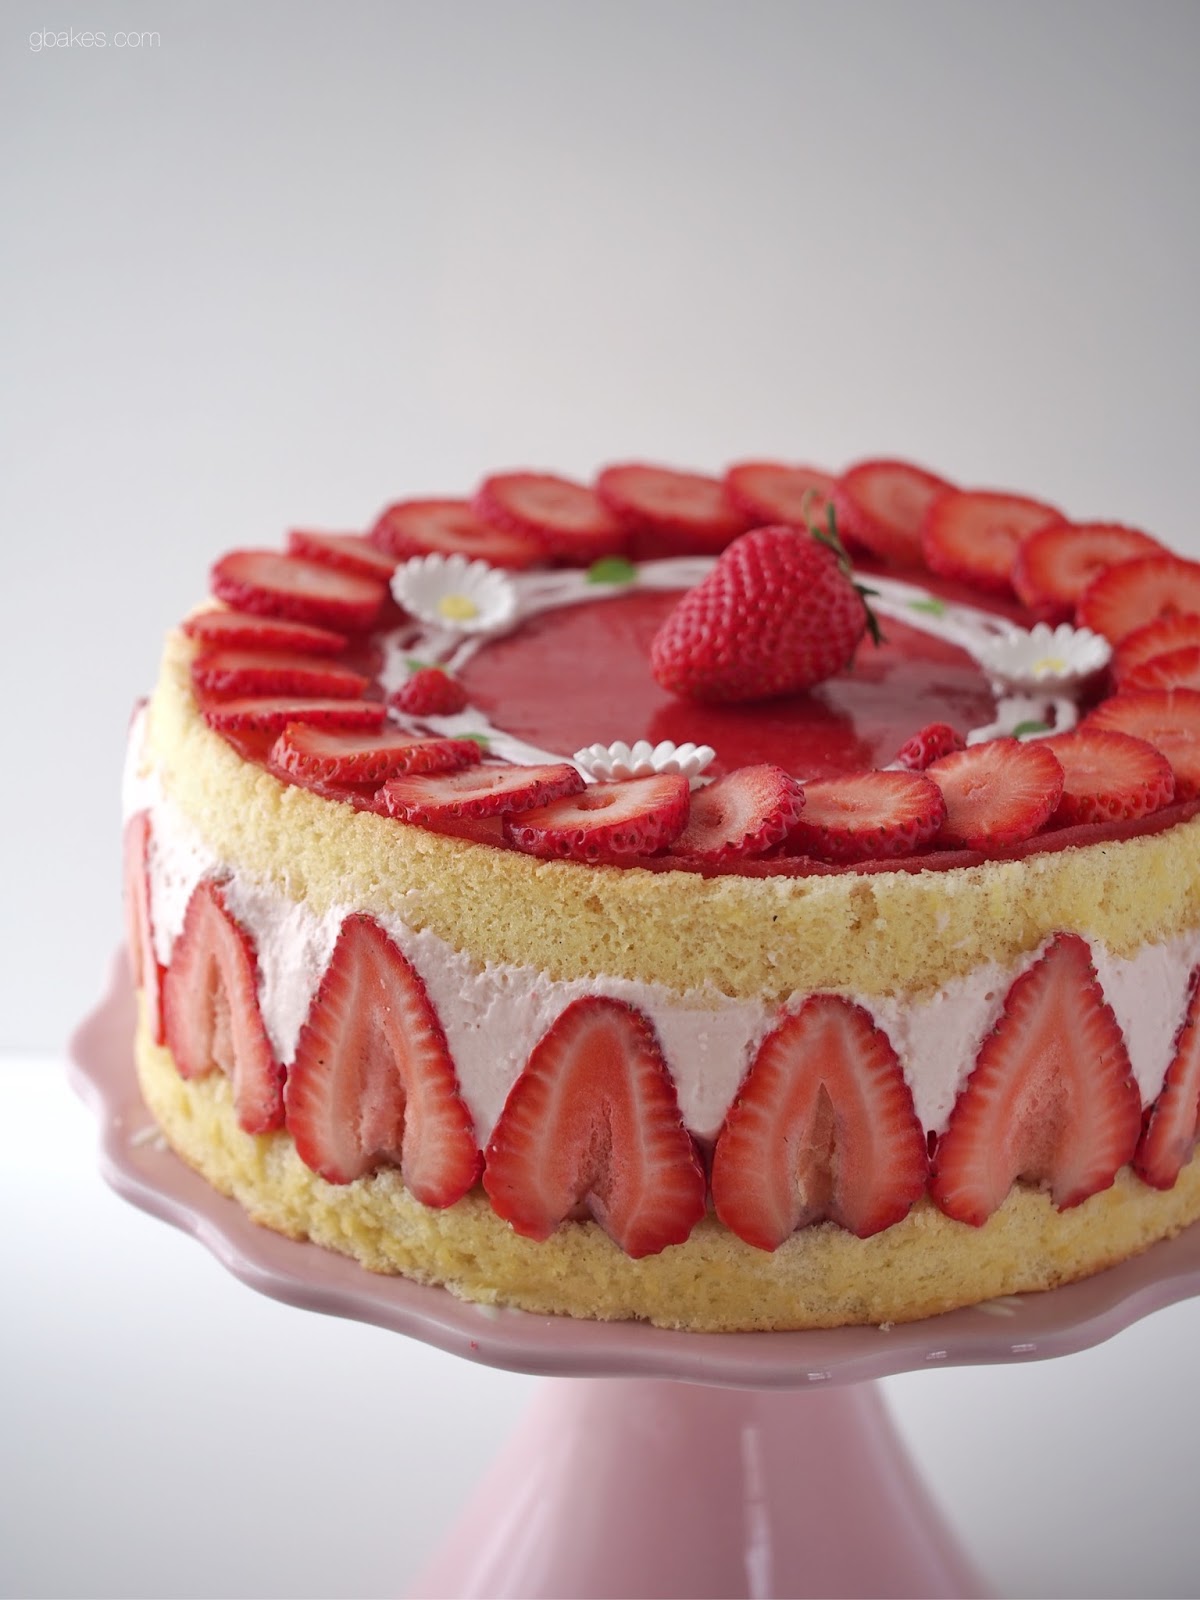
It's been 15 years since my mom passed and I still miss her. I still make her a strawberry-centric cake every spring around Mother's Day. This year it's a Fraisier, that French delight that's a glorious ode to all things strawberry (Fraise = strawberry a la Française). Traditionally, a Fraisier is a cake comprised of a ring of strawberries walling in vanilla mousse, all sandwiched by genoise. I went all-in on the strawberries, flavoring the mousse with berries. Mom would approve.
For a video demo of how to make this cake, visit my video demo site: www.makecakemagic.com
MOTHER'S DAY FRAISIER
For the genoise
3 tablespoons unsalted butter, melted
4 large eggs, room temperature
1/2 cup sugar
1/2 cup bleached cake flour (pre sift measure, spoon the flour into the cup and knock off extra with a flat edge of a knife)
1/2 cup cornstarch
1/2 teaspoon salt
1 teaspoon vanilla bean paste
1 teaspoon almond extract
Preheat oven to 350ºF. Line a 9" pan with a round of parchment and spray with baker's spray. Set aside.
In the bowl of a stand mixer, combine the sugar and eggs. Place the mixing bowl over a double boiler (simmering water in a saucepan) and whisk constantly until the sugar has melted and the mixture is warm to the touch.
Transfer the bowl to the mixer fitted with the whisk attachment, add the salt, vanilla bean paste and almond extract and whisk on high speed for 2 minutes. Turn the mixer to medium high (speed 8 on a 4 quart Kitchen Aid and medium speed 5-6 on larger, higher powered Kitchen Aids) and whisk for 5 minutes more.
While the egg mixture is whisking, first whisk together the flour and cornstarch and then sift the flour/cornstarch mixture.
Once the eggs have done their time in the mixer, make sure the butter is still fluid (if it's not, gently reheat it) and then add a large spoonful of the whipped eggs to the butter, whisking immediately to combine. Set aside.
Sift the flour in 2-3 additions over the remaining egg mixture and fold gently after each addition. Add the butter/egg mixture and fold until just combined. Immediately transfer the batter to the prepared pan and bake for 30-35 minutes. Don't open the oven early, the cake will fall. When finished, the cake will have risen just above the pan, will be golden brown and have slightly pulled from the sides of the pan. After 30 minutes, gently poke the cake to see if it springs back. If it sounds a bit crackly, bake for 5 minutes more.
Run a paring knife along the edge of the pan to release the cake and turn out to cool completely on a cooling rack. Once cool, place in the freezer (freezing for a bit makes it easier to slice the cake cleanly in half).

Clean the cake pan and line again with a parchment round on the bottom and with a strip lining the edge of the pan that rises about 2 inches above the top of the pan (it will be a paper ring within a ring). Set aside.
For the mousse
1 (8 ounce) package Philadelphia cream cheese, room temperature (very soft)
2 cups heavy cream
3 cups hulled and diced strawberries
1/2 cup granulated sugar
3/4 cup confectioner's sugar
1 packet gelatin
1/2 cup freshly squeezed lemon
1/2 cup water
In a bowl, combine the diced strawberries and the sugar. Stir to combine. Allow to sit about 20 minutes for the juices to start running. Transfer to a saucepan and stir over low heat until the strawberries are soft and the juices start to thicken to the point they coat the back of a spoon. Transfer to a blender or food processor and pulse until smooth. Run the puree through a fine sieve. You should have at least 1 1/4 cup puree once sieved. Take out 1/4 of the puree and set aside for the glaze.
Combine the lemon juice and water in a bowl and sprinkle the gelatin in an even layer over the top. Allow to sit for at least 5 minutes to bloom (the gelatin should look like wet sand). Once bloomed, melt the gelatin in the microwave in 30 second bursts at 30-40%. Swirl the bowl in between blasts and continue until the gelatin is completely melted. Combine the 1 cup strawberry puree and the gelatin mixture and stir to combine.
In a food processor combine the cream cheese, confectioner's sugar and puree and mix until smooth. Transfer to a large bowl. Whip the heavy cream to stiff peaks and fold into the cream cheese/puree mixture. Alternatively, use a stand mixer: in the bowl of a stand mixer fitted with paddle attachment, combine the cream cheese and the confectioner's sugar. Mix until smooth. Swap out the paddle attachment for the whisk attachment. Add the heavy cream and whisk on high until the mixture is thick and almost has stiff peaks. With the mixer running on low, slowly add the strawberry mixture. Once added, mix on high until combined.
NOTE: This mousse recipe is easily doubled and tripled.
To finish
About 24 large strawberries
1/4 cup water
1/4 cup sugar
1 packet gelatin
reserved 1/4 cup puree
Take the cake from the freezer and trim any brown pieces from the top and bottom of the cake. Using a long, sharp serrated knife, cut the genoise evenly in half. Place the one layer into the bottom of the prepared cake pan.
Hull and cut 10 similarly sized strawberries in half. Line the sides of the pan with the strawberries, cut side out and flat side down on the edge of the cake.

Gently pour the mousse into the middle of the cake pan and using a small offset spatula, gently push the mousse to the edge of the pan, being careful that the mousse doesn't seep out and cover the cut side of the strawberry. Place the second layer on top of the mousse very gently. Press VERY gently to adhere the cake to mousse. Place in the freezer for at least 2-3 hours (you can leave it overnight as well).
Once the cake has been in the freezer for at least 2 hours, combine and 1/4 cup water and 1/4 cup sugar in a sauce pan and stir over low heat until the sugar has melted. Take from the heat and stir in the puree and then sprinkle the gelatin in an even layer over the mixture. Allow to bloom for at least 5 minutes (the gelatin will look like wet sand) and then return to low heat, stirring constantly until the gelatin has completely melted. Allow to sit for a five minutes.
While the glaze is resting, gently turn out the cake from the cake pan (I place a flat plate or cake round on top of the cake and flip it and then immediately place my serving platter atop the cake and flip it right side up again). Pour the glaze evenly over the top of the cake, starting at the middle and gently pushing out towards the edge using a small off set spatula to help you along. I decorated the top of the cake with rings of strawberry along the edges (this is very useful when you haven't gotten the glaze to the very edge to keep it from dripping over) and then I piped a bit of firm royal icing just inside the strawberry ring and topped with some little pretties. Keep the cake in the fridge if not serving immediately. Alternatively, you can wrap the cake well BEFORE you glaze it and keep in the freezer for up to a month.
April 22, 2016
Happy Earth Day!
Happy Earth Day, sweet people!

I send you greetings from my little spot of green in Vermont, where making Cake Magic is my great joy and there's no better reason to make a cake than to celebrate our Big Blue Marble.

I also wanted to share a recipe for CHURROS, that crispy fried sweet dough miracle that make me thank goodness I'm alive on this spinning orb. You an get the recipe and watch my churro segment from this week on Today Show. Click HERE to get all the sweetness.

Happy weekend!
Gesine Bullock-Prado's Blog

- Gesine Bullock-Prado's profile
- 69 followers
Gesine Bullock-Prado isn't a Goodreads Author
(yet),
but they
do have a blog,
so here are some recent posts imported from
their feed.

