
Rachael Ray's Blog, page 47
October 4, 2013
How to Use Up Leftover Steak
I don’t know what your refrigerator is like. Maybe it has fresh food in it, and a clean smell, and a light that works, and crispy produce, and all the ingredients a person might need for the next five days of cooking. Mine is not like that. It is a repository of half-eaten things, forgotten sauces and mysterious stains. I am kind of afraid of it. But it is cold, they can’t say otherwise; and since I go out a lot, it tends to have a lot of leftovers.
Seeing as it is four amoebae short of being a biohazard, I try not to let leftovers sit in there for long. In fact, I’ve become something of a master at repurposing them. Because, no matter what your refrigerator is like, you don’t want anything in there too long.
Let’s start with steak.
Steak is a classic example of something you can’t leave behind, but can’t really use right away. Let’s say you go out to a steakhouse and get full after the first 3,000 calories. There’s almost always steak left over, but will you really feel like eating it the next day? Even if you’re not steaked out, it’s rarely very appealing. This was a question that plagued me for years. I didn’t want to eat it cold, which was gross. And no matter how I cooked it, the meat became overcooked, which of course defeats the whole purpose of steak. I beat this problem several ways, though, and here’s how.
1. Shabu Shabu
This isn’t really shabu shabu, a dish I view as depressing and unsatisfying that involves dipping raw meat in hot soup. I would never do that. It’s the worst thing I can think of. But by flashing thin slices of steak in hot sizzling butter, possibly with a little of its own trimmed fat thrown in for flavor, you can resuscitate the meat’s best qualities, and even give it some of that savory slickness which distinguishes steakhouse meat in the first place.
The key is to get the butter good and hot, and do little more than move the slices around in it for 30 seconds at most.
2. Crusty Steaklets
The other approach, a mirror to my shabu-shabu technique, is to cut the leftover steak into thick pieces about the size of a Baby Ruth. This time it will be vegetable oil and butter combined that will do the trick, because this baby has to sear hard and fast, before the middle can start cooking through. I find adding a little bit of soy sauce, salt and maybe a pinch of brown sugar can give you a tasty crust fast.
3. Cheesesteaks of the Gods
It may surprise you to learn that the original Philadelphia cheesesteaks, the ones that are remembered most fondly, were actually made from steak. (I grew up eating something called Steak-Ums, which tastes just like it sounds.)
If you slice the steak thin, and flash it as with the shabu-shabu technique, you can mix in some sautéed mushrooms and onions and peppers, and some sliced up cheese, and get it all mixed up together before the meat gets overcooked. I love this technique best of all, but you really have to do it just right. Cooking the peppers and onions first is key, because they flavor the oil and / or butter that you will cook the steak in.
4. Hot Carpaccio Bread. This is the simplest, and possibly the most elegant of all these solutions. If you have some crusty old Italian bread or a bialy, or better still some focaccia at your disposal, I would consider seasoning it (I use rosemary and salt), rubbing a little EVOO on it, giving it a hot crisp in the oven, and then laying slices of very thin cold steak on it. They warm without cooking and have a tendency to melt into the bread and to taste wonderful. A little arugula and some really good cherry tomatoes wouldn’t be out of place here, either.
Looking for steak recipes? Try these:
Sliced steak with pepper onion sauce
Rachael Ray’s steak & potato kebabs
Warm Greek salad with sliced steak
Sliced steak tacos with bloody Maria salsa


October 3, 2013
Announcing the Winners of the 2013 $100k Challenge
Each year, we team up with the ASPCA for the $100K Challenge to inspire animal shelters to go above and beyond to increase pet adoption, reunite lost pets with their families and save more animals’ lives. We’re very proud to share that over the course of this year’s three-month challenge, participants saved a total of 56,379 lives. That’s 12,050 more lives saved than last summer!
We’d like to thank everyone who participated in this year’s contest. We’re inspired by your hard work and creativity and moved to see you enacting real change!
Congratulations to The Animal Foundation of Las Vegas, Nevada, the 2013 Grand Prize winner. The Animal Foundation will take home $100,000 in grant funding for the greatest increase in lives saved. We’d also like to congratulate the following division leaders:
Division 1: Washington Animal Rescue League of Washington, D.C. with an increase of 326 lives saved over the prior year
Division 2: Texas Humane Heroes of Leander, Texas with an increase of 389 lives saved over the prior year
Division 3: HALO Animal Rescue of Phoenix, Arizona with an increase of 824 lives saved over the prior year
Division 4: Citizens for Animal Protection of Houston, Texas with an increase of 625 lives saved over the prior year

Last, but certainly not least, Canyon County Animal Shelter of Caldwell, Idaho will be awarded the $25,000 Community Engagement Award for doing the best job of engaging their community, the media and their supporters in saving more lives.
In total, $600,000 in grant funding will be awarded to shelter contestants in the competition for increases in animal lives saved, as well as a photo contest and general participation.
Images courtesy of ASPCA
October 2, 2013
10 Ways to Get Kids to Tolerate Their Vegetables
I started parenthood with a pretty high bar when it came to vegetables. My son was going to love them as much as I do. In as many varieties as I do. In as many ways as I do.
And he seemed on such a great path. Until he was about 3, he ate anything. What were all those parents of picky eaters whining about? Getting kids to love vegetables is easy.
And then, of course, reality set in. I don’t need to tell you the rest of the story. Chances are you live it every day.
So I’ve spent a lot of time struggling with how to get my kid to once again embrace vegetables. Some folks advocate hiding the vegetables, but I’m not a big fan of mixing pureed produce into brownies and mac and cheese.
I don’t like the message it sends. I don’t like teaching kids that vegetables — and therefore healthy foods — are something to be hidden, to be eaten only when deceived. I’d rather my kid reject broccoli on the plate than eat it pureed into a cookie.
There is a middle ground. But you have to give up the idea of kids loving their veggies. Someday, perhaps. For now, they just need to tolerate them. As I say to my son all too often, “You don’t have to like it. You just have to eat it.”
My trick? I call it partnering. As in, partnering vegetables with foods they like. This is different from hiding. The veg is there, full-frontal. But it is paired up with something they won’t just eat, but actually crave.
That’s what sets this apart from that old standby of trying to entice kids to eat baby carrots by letting them dip them in ranch dressing. Sure, kids like the dip, but few would list it among their favorite foods. It just isn’t enough of an enticement.
The foods you need to enlist in your fight are the ones they love. Particularly if you hope to get your kids to eat vegetables at lunch, when you aren’t there to model good behavior (or threaten).
So here are 10 lunch box-friendly ideas for partnering vegetables with foods your kids actually like.
1. Wrap it
A sandwich wrap is a fine place to stash foods they love. And hate. Greens or shredded carrots (don’t push your luck by doing both) are naturals here. Pair them with their favorite meat or cheese (or both) and a splash of a coveted condiment.
2. Chop it
As in, a chopped salad. I know, veg averse kids don’t generally care for salads. But think beyond traditional and find a way to work with the foods your kid loves. My little guy craves steak. So I made him a salad of lean (cold) bison steak, chopped mango, diced onion and a few finely chopped greens. I gave it a savory vinaigrette dressing and he didn’t mind the veggies.
3. Sushi it
This is a variation of the wrap, but kids love the novelty of it. I slather cream cheese or peanut sauce on a whole-wheat tortilla, then top it with greens, deli meat and cheese, then roll it into a tight log. Then just cut it into sushi-like bites. You also could use strips of red bell pepper instead of the greens.
4. Soup it
Not, vegetable soup. That’s asking for failure. But what about chili with chunks of butternut squash or chopped tomato? Or even chicken soup with celery or sweet potato? Easy dinners that make thermos-perfect leftovers.
5. Sauce it
Sad, but true — cheese sauce (with crumbled bacon, if you are so inclined) really does make everything more appealing. Nuke some leftover roasted or steamed veggies, pop them in a thermos, add cheese (or cheese sauce). You’re good.
6. Spud it
Baked potatoes don’t really count as a healthy veg, but they love being topped by them. Nuke a potato, then pop it piping hot in a thermos. Accompany with cheese, salsa and a chopped veg.
7. Quiche it
When you’re eating something as amazing as a cheesy (bacony?) quiche, you don’t care that there are onions or asparagus or mushrooms in it. And quiche is the world’s most perfect lunch food. It packs great hot or cold.
8. Noodle it
Whether hot or cold, pasta always helps the medicine go down. Toss chopped cooked (leftover) veggies with pasta. Then nuke it and toss with cheese in a thermos. Or do the same blend cold with vinaigrette or bottled peanut sauce.
9. Nacho it
Assemble a variety of nacho toppings — some meats, cheeses, sour cream, a packet of guacamole, and of course salsa and a chopped veg. Accompany with tortilla chips and let kids build their own nachos as lunch. Easy for you, too.
10. Sushi it, Take 2
This time, for real. Most grocers these days have sushi counters and can make to order. So grab a package of brown rice sushi with avocado and whatever veg your kid likes. Effortless for you. Delicious for the kid. Don’t forget the soy sauce.
Looking for more lunch tips? Try these:
8 Stay-fresh tips for apple-tastic lunches
3 Tips to help kids beat the clock at lunch
But Bobby gets to bring fast food for lunch! Why can’t I?
J.M. Hirsch is the national food editor for The Associated Press. He blogs about the trials and tribulations of his son’s lunches at LunchBoxBlues.com. His cookbook, Beating the Lunch Box Blues, is the first to be released by Rachael’s new publishing venture, Rachael Ray Books. Hirsch’s previous books include High Flavor, Low Labor: Reinventing Weeknight Cooking and Venturesome Vegan Cooking. He lives in New Hampshire with his son, wife, and too many cats.
October 1, 2013
Coconut Chia Pudding: A Yummy & Healthy Dessert
Pssst.
I want to let you in on a little secret.
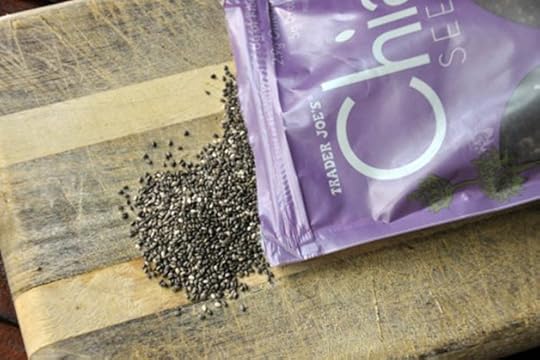
See those little grey seeds up there that look kinda like sesame seeds? They’re my new obsession.
What are they, you ask? I’ll give you a little OK, a BIG hint.
Chi-Chi-Chi-Chia!
Did you guess it yet? Oh, you guys are TOO good!
That’s right! They’re Chia Seeds and I. Cannot. Stop. Using. Them. They’ve sort of replaced my obsession with wheat germ and flax seeds, for the moment. I’ve been putting them in and on everything and anything since they started stocking them at my local Trader Joe’s. I have to admit that before trying them out a few weeks ago, I’d never had them before. My only experience with the word Chia came from the annoyingly addicting commercial that came on the scene in the 70s. Now you can’t get the song out of your head either, right? You’re welcome. : )
Anyway, when I stumbled upon them and read about all of their health benefits, I knew they were right up my alley. I love finding little (easy) ways to boost the nutritional value of what my family and I eat and Chia seeds fit the bill perfectly. And shockingly enough, they were an easy sell to my 4 year old. After labeling them as Chia “Sprinkles,” he happily eats them on anything I decide to sprinkle them on.
What the heck are chia seeds anyway?
Well I’m glad you asked. Chia seeds are an edible seed that comes from the desert plant Salvia hispanica, which is a member of the mint family that grows throughout southern Mexico. While you may be more familiar with them as sprouts growing on your novelty Chia pet planters, these tiny seeds are anything but novel.
Chia seeds are rich in omega-3 fatty acids and are a better source than flax. They’re also rich in antioxidants and can be stored for a long time without becoming rancid like so many other fatty acid-containing products. They can be eaten whole, which means you don’t have to grind them up like you do flax seeds and are a good source of fiber at about 6.9 grams per serving.
What can I do with them?
Since Chia seeds don’t have to be ground to be eaten, you can feel free to sprinkle them onto anything you’d like. Eaten naked, they really don’t have much of a flavor but they have a little bit of a crunch. When mixed into a liquid, they soak it up and become softer and more gelatinous in texture, which is quite enjoyable in beverages, yogurts and puddings. In fact, in mexico they mix it into different agua frescas and most commonly serve it in a lemonade that is just divine.
My favorite ways to use chia seeds:
Sprinkled over greek yogurt with a drizzle of honey.
Sprinkled over pancakes, waffles or french toast.
Mixed into smoothies or frozen inside popsicles.
Stirred into a beverage like lemonade — Chia Fresca! (popular in Mexico).
OR
In an awesome Chia Coconut Pudding (recipe below).
This recipe is a great dairy-free dessert. It’s sweet and creamy and feels decadent but is still very healthful. I feel good about giving this dessert to my kids because of the nutritional value of the chia seed and they simply love the taste. Win. Win!
Coconut Chia Pudding
2 servings
Ingredients:
2 cups unsweetened coconut milk
1/3 cup chia seeds
1/4 cup honey or agave nectar
1/4 teaspoon cinnamon
coconut flakes and berries for garnish
Directions:
In a small bowl or large jar, stir together the coconut milk, chia seeds and your choice of sweetener (sugar or agave nectar) and cinnamon. Chill in the refrigerator for at least 4 hours or until the chia seeds puff and expand.
Pudding may be stored in an airtight container in the refrigerator for up to 3 days.
Before serving, stir once and spoon into serving dishes. Garnish with coconut flakes and serve immediately.
Looking for more healthful treats? Try these:
Coconut Chia Pudding: A Decadent & Healthful Dessert
Pssst.
I want to let you in on a little secret.
See those little grey seeds up there that look kinda like sesame seeds? They’re my new obsession.
What are they, you ask? I’ll give you a little OK, a BIG hint.
Chi-Chi-Chi-Chia!
Did you guess it yet? Oh, you guys are TOO good!
That’s right! They’re Chia Seeds and I. Cannot. Stop. Using. Them. They’ve sort of replaced my obsession with wheat germ and flax seeds, for the moment. I’ve been putting them in and on everything and anything since they started stocking them at my local Trader Joe’s. I have to admit that before trying them out a few weeks ago, I’d never had them before. My only experience with the word Chia came from the annoyingly addicting commercial that came on the scene in the 70s. Now you can’t get the song out of your head either, right? You’re welcome. : )
Anyway, when I stumbled upon them and read about all of their health benefits, I knew they were right up my alley. I love finding little (easy) ways to boost the nutritional value of what my family and I eat and Chia seeds fit the bill perfectly. And shockingly enough, they were an easy sell to my 4 year old. After labeling them as Chia “Sprinkles,” he happily eats them on anything I decide to sprinkle them on.
What the heck are chia seeds anyway?
Well I’m glad you asked. Chia seeds are an edible seed that comes from the desert plant Salvia hispanica, which is a member of the mint family that grows throughout southern Mexico. While you may be more familiar with them as sprouts growing on your novelty Chia pet planters, these tiny seeds are anything but novel.
Chia seeds are rich in omega-3 fatty acids and are a better source than flax. They’re also rich in antioxidants and can be stored for a long time without becoming rancid like so many other fatty acid-containing products. They can be eaten whole, which means you don’t have to grind them up like you do flax seeds and are a good source of fiber at about 6.9 grams per serving.
What can I do with them?
Since Chia seeds don’t have to be ground to be eaten, you can feel free to sprinkle them onto anything you’d like. Eaten naked, they really don’t have much of a flavor but they have a little bit of a crunch. When mixed into a liquid, they soak it up and become softer and more gelatinous in texture, which is quite enjoyable in beverages, yogurts and puddings. In fact, in mexico they mix it into different agua frescas and most commonly serve it in a lemonade that is just divine.
My favorite ways to use chia seeds:
Sprinkled over greek yogurt with a drizzle of honey.
Sprinkled over pancakes, waffles or french toast.
Mixed into smoothies or frozen inside popsicles.
Stirred into a beverage like lemonade — Chia Fresca! (popular in Mexico).
OR
In an awesome Chia Coconut Pudding (recipe below).
This recipe is a great dairy-free dessert. It’s sweet and creamy and feels decadent but is still very healthful. I feel good about giving this dessert to my kids because of the nutritional value of the chia seed and they simply love the taste. Win. Win!
Coconut Chia Pudding
2 servings
Ingredients:
2 cups unsweetened coconut milk
1/3 cup chia seeds
1/4 cup honey or agave nectar
1/4 teaspoon cinnamon
coconut flakes and berries for garnish
Directions:
In a small bowl or large jar, stir together the coconut milk, chia seeds and your choice of sweetener (sugar or agave nectar) and cinnamon. Chill in the refrigerator for at least 4 hours or until the chia seeds puff and expand.
Pudding may be stored in an airtight container in the refrigerator for up to 3 days.
Before serving, stir once and spoon into serving dishes. Garnish with coconut flakes and serve immediately.
Looking for more healthful treats? Try these:
September 30, 2013
Pumpkin Cheesecake: The Perfect Fall Dessert
When you think of cheesecake, you might think it’s just for special occasions. Special occasions usually mean complicated recipes with multiple steps and ingredients. Not this cheesecake. It is a snap to whip up and easier than making a batch of brownies.
I made it the other day in honor of the beginning of fall and I think it might be the biggest fake-out dessert ever.
Not a fake-out as in buy a Sara Lee cheesecake, put it on a plate and call it your own (not that there’s anything wrong with that!); a fake-out because your guests will think you slaved all day over this simple to make cake. In reality it is all mixed in the food processor in under 15 minutes, including homemade gingersnap crust. If you have a springform pan, a food processor and plan ahead (you need to chill overnight), you are golden.
This is my kind of dessert. No adding eggs one at a time. There’s no fussy water bath in which to bake the cake — when water may accidentally slosh into the cake (a disaster. I’m speaking from personal experience.). And there’s just one bowl.
Oh, and you have to buy a bag of gingersnaps. And have leftovers. Twist your arm.
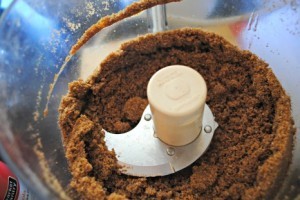
Then you grind up the cookies with some sugar and melted butter until it looks like wet sand.
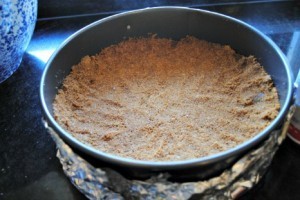
Then you press the crumbs in the pan and put in the freezer while you make the filling.
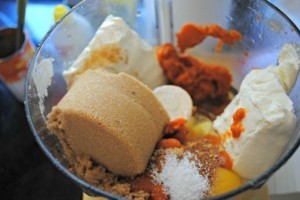
Now, as I’ve mentioned a few times already (you can tell I’m excited about this), you put the filling ingredients in the food processor bowl. It looks ugly now, but it turns into something special.
Pour the mixture onto the crust, and you are good to go.

After it’s baked, you spread a little sour cream vanilla mixture on top to cover any imperfections.

Bring it to Thanksgiving dinner, your next fall dinner party or make it for your family on a Tuesday like I did, and you will be a hero, impressing all with your technical baking ability.
PS: Your secret’s safe with me.
Quick and Easy Pumpkin Cheesecake
Serves 10-12
Ingredients
For the crust:
24 gingersnaps (about 6 ounces)
3 tablespoons sugar
1/4 cup melted butter
pinch of salt
For the filling:
2 8-ounce packages cream cheese, softened
1 15-ounce can pure pumpkin
5 eggs
1 cup packed brown sugar
1 1/2 teaspoons cinnamon
1 1/2 teaspoons vanilla
1/2 teaspoon ground ginger
1/2 teaspoon nutmeg
1/2 teaspoon kosher salt
For the topping:
16 ounces sour cream (I used 8 ounces nonfat Greek yogurt and 8 ounces sour cream)
1/4 cup sugar
1 teaspoon vanilla
pinch of salt
Directions:
Preheat the oven to 350 degrees F.
Make the crust: Grind gingersnaps and sugar in food processor to fine crumbs. Slowly add melted butter with machine running. Wrap aluminum foil around outside of a 9-inch diameter springform pan with 2 3/4″ sides. Press cookie crumb mixture over bottom and up about one inch of the sides. Freeze 15 minutes or while you make the filling.
Make the filling: Add the filling ingredients (cream cheese through salt) to the food processor bowl and blend until smooth. Pour filling over the crust and place in oven.
Make the topping: While the cake is baking, whisk together the topping ingredients and set aside.
Bake cake until edges of the cake begin to pull away from the sides of the pan and the cake begins to brown – about 70 minutes. The middle will still jiggle. Keep the oven on.
Immediately spread the topping over the hot cake (starting at the edges and working in) and put back in the oven for 12 minutes. Run a tip of a sharp knife around the edges of the cake pan sides to loosen and place the hot cake right in the refrigerator. Chill overnight. When ready to serve, take the cake out of the fridge for at least 15 minutes prior, remove cake pan sides and foil, and place on platter. Store leftover cake tightly covered in the refrigerator for up to 3 days.
Looking for more pumpkin recipes? Try these:
Chocolate chip pumpkin cookies
Plan B Mom is a mostly-stay-at-home mom of 3 who works from home but sees her main job as managing her family. When she is not taking care of her 13-year old and 11-year old girls, 9- year old son, yellow lab, and husband – she is baking, running, carpooling, or helping with homework. She tries to stay organized to keep life running smoothly – or at least catastrophes at bay. Follow her on Twitter at @PlanBMom.
September 29, 2013
8 Stay-Fresh Tips for Apple-Tastic Lunches
This time of year it’s hard to resist the lure of the apple orchard. Which is fine, except my son and I usually get carried away.
In short order we pick our way to enough pecks to keep ourselves stocked with pies, sauces, crisps and muffins until Christmas.
So I usually spend the better part of fall finding new and creative ways to use up our stockpile. And my son’s lunch box is a fine place to start.
Trouble is — as anyone who has ever packed an apple in a lunch knows — browning is a major issue. Slice an apple and within minutes it starts browning. And as we all know, all it takes is a little bit of brown to send a picky eater over the edge.
Sure, you could leave it whole. Except whole apples day after day are kind of dull. And if your kid is anything like mine — which is to say, he somehow “I don’t know!” beats the snot out of his lunch box to, from and during school — those whole apples end up bruised and mushed by lunch.
So what’s a lunch packer to do? I’ve got a few tricks for beating the apple packing blues. And truth is, I never send whole apples. Not just because they get mushed. But also because they take kids longer to eat than apples that have been cut up into more manageable pieces. Because I’m tired of the “I didn’t have time” excuses. Just like you.
Here are a few ideas to help you pack apples without suffering a brownout.
1. Add them to fruit salad
As long as there is something acidic in it, such as grapefruit or oranges, the apples won’t brown. And fruit salads don’t need to be complicated. Cut up an apple and toss it with canned pineapple (sugar-free) chunks. Done.
2. Do some acid
Same concept as the fruit salad, but even easier. Cut the apple into chunks (big or small) and toss with lemon juice, lime juice, orange juice, pineapple juice, whatever. Vinegar works, too, but kids may not like it. Drain, then pack. That’s it.
3. Salt ‘em!
Seriously. Salt water has the same anti-browning effect as acid. I cut my apple into chunks, then mix a teaspoon of salt with 1/2 cup or so of water in a bowl. Add the apples, toss, then drain. I love the taste of salted apples (my great grandmother used to prepare them for me that way — so delicious). So does my son. If you don’t, just rinse them before packing.
4. Slather them
Cut apples turn brown when exposed to air. So don’t let me be exposed. Slice an apple in half top to bottom. Use a melon baller to scoop out the core. Now smear peanut butter into the cavity and over the entire cut side of each half. You could stop here, but to make it even yummier, dunk the peanut butter sides into granola or breakfast cereal. Maybe even chocolate chips.
5. Get sauced!
It takes just minutes (all of it unattended) to turn apples into applesauce. And while you could plan ahead and make a big batch at night, it’s also easy to make a single serving. Just slice up an apple or two at breakfast, pop them in a saucepan or skillet, add a splash of water, a sprinkle of cinnamon and cover. Bring to a simmer. Done.
6. Brown ‘em!
File this under “if you can’t beat them, join them.” Slice the apple in half and scoop out the core. Melt a little butter in a skillet (use the same one you cooked your egg in — nobody will notice). Sprinkle in some brown sugar, then set the apples in cut side down. Turn the heat to low, then walk away. When the apples are tender and lightly browned, pop them in a thermos.
7. Bake ‘em!
If you have the time at dinner the night before, core a couple apples and sprinkle the insides with brown sugar, cinnamon and whatever else inspires you. Put them in a baking dish with a splash of juice, then bake at 400 F until browned and tender. Refrigerate and pack cold, or nuke briefly and pack hot in a wide thermos.
8. Salad them
Fresh apples are delicious chopped into a salad. But they’d brown if you added them straight up when packing in the morning. The acid in a vinaigrette will protect them, but you shouldn’t dress a salad with vinaigrette until ready to eat it (the same acid that will protect the apples will also wilt the greens). So instead, finely chop your apple and pop the pieces in a container with your vinaigrette. Assemble the rest of your salad, then toss with the apples-vinaigrette just before eating at lunch.
J.M. Hirsch is the national food editor for The Associated Press. He blogs about the trials and tribulations of his son’s lunches at LunchBoxBlues.com. His cookbook, Beating the Lunch Box Blues, is the first to be released by Rachael’s new publishing venture, Rachael Ray Books. Hirsch’s previous books include High Flavor, Low Labor: Reinventing Weeknight Cooking and Venturesome Vegan Cooking. He lives in New Hampshire with his son, wife, and too many cats.
September 28, 2013
6 Treats to Enjoy on National Coffee Day
Sunday, Sept. 29 is National Coffee Day and to celebrate, we thought we’d share some great recipes you can enjoy alongside your cup of joe.
1. Banana chocolate chip coffee cake muffins with streusel topping: Part coffee cake with the streusel topping, part dessert with the chocolate chips and warm cinnamon and ginger flavors, this recipe is a keeper.
2. Blueberry crumb cake: This budget-friendly cake is good for breakfast, a snack or even dessert.

3. Cinnamon chocolate swirl streusel coffee cake: Really, how can you go wrong with cinnamon chocolate swirl and streusel topping? And you probably have everything in your pantry to make it too!
4. Jumbo coffee cake muffins: This bakery-worthy treat includes a surprise layer of streusel in the middle of the muffin.
5. Cinnamon swirl coffee cake: Quick and easy, this coffee cake will be on the table in under an hour.
6. Hazlenut orange biscotti: Perfect for dunking into your coffee.

Looking for more tasty treats? Try these:
Image courtesy of umershabib, Flickr
September 27, 2013
8 New Ways to Use Lemons Around the House
When life gives you lemons, make lemonade. You know the expression, but did you know that you can use lemons for far more?
So on your mark, get set, squeeze! Here are 8 new ways to use this pint-sized tart fruit.
1. Maintain your cuticles and color
Soak your fingernails in a small bowl filled with a cup of warm water and the juice of half a lemon for five minutes. Next push back your cuticles and rub the peel back and forth on the nail. For extra zest (excuse the pun!) squish your nails in the pulp of the lemon prior to soaking. Rinse ‘n moisturize—easy squeezie (oops there I go again!)
2. Hair highlighter
Squeeze lemon juice on strands of your hair and either lay out in the sun to dry or leave on for about 30 minutes then blow dry your new blonde locks! I like putting the strands on a piece of tin foil and then squeezing the lemon on them to create my own homemade foils!
3. Deodorize disposal
Throw used lemon halves down your kitchen disposal to eliminate odors.
4. Sanitize cutting boards
Lemons are a natural sanitizer due to their low PH…who da thunk! To start, remove any crud or debris from the cutting board, then take half a lemon and rub the board. Let it sit for at least 20 minutes so it’s effective.
5. Clean microwave
This is a non-toxic way to clean our fave cooking tool since it leaves no chemical residue, just a fresh, clean scent. Cut a lemon in half and place it in a microwavable bowl filled with water. Place in microwave and zap for 3 minutes. Allow bowl to cool so you don’t burn yourself. Use a damp cloth to remove any debris loosened during the ‘cleansing’.
6. Bleach and brighten clothes
Mix an equal amount of lemon juice and baking soda and put it on mild stains. Let soak for 30 minutes then launder pronto. You can also put 2 teaspoons into a load with your detergent for a naturally fresh citrusy clean scent!
7. Prevent browning
Add a squirt of lemon on fresh avocados and guacamole, which will keep them from browning and make them taste yummier. Also add to potatoes and cauliflower when boiling to keep them from turning brown.
8. De-bugger
Got ants, roaches or fleas? Here’s what you can do to debug your home:
Take aim with lemon – bugs hate D-limonen, which is naturally found in these little yellow wonders. Put some in a spray bottle and squirt at their entryways, i.e. cracks between kitchen cabinets, holes in floors, door and window edges.
Wash floors with the juice of 4-6 lemons and ½ gallon of water. Test inconspicuous area.
And if you’ve got moths:
Place dried lemon peels in dressers, closet shelves and/or wrap some lemon peels in a mesh bag and hang in your closet.
Looking for more cleaning tips? Try these:
5 common back to school messes solved
10 new ways to use tennis balls and racquets
Lemon image courtesy of Daniella Segura, Flicker; Guacamole image Courtesy of lynch_m_j, Flickr
September 25, 2013
Pizza Night! 5 Quick and Easy Recipes
Thinking about ordering in a pizza? Think again! Making pizza is a quick, easy and fun activity that brings the whole family together.
Here are five flavorful recipes. For more quick and easy recipes, check out our Quick Meals section.
1. Wingless buffalo chicken pizza – A delicious combo of two of our favorite classics: buffalo wings and pizza! Need we say more?
2. Red onion kalamata and feta pizza – Add a Greek twist to your next pizza for a change of pace!

3. Lasagna bread pizza - A recreation of one of Rachael’s favorite childhood dishes; Serve this combo of bread pizza and lasagna, without pasta alongside salad.
4. Broccoli rabe pizza bread – Layer seasoned broccoli rabe and a three-cheese mix over a loaf of fresh ciabatta bread and bake for a mouth-watering pizza.
5. Zucchini pizza - Inspired by a pizza purchased by Rachael in Rome, this recipe is a must-try!
Bonus: Have some extra dough and a few extra minutes? Try these garlic knots.
More pizza recipes on RachaelRay.com:
Italian herb crusted cheese pizza
Rachael Ray's Blog

- Rachael Ray's profile
- 296 followers

