
Rachael Ray's Blog, page 45
October 21, 2013
Super-Sized Homemade Halloween Oreos
I love baking Halloween-themed desserts and these homemade chocolate sandwich cookies are reminiscent of Oreos, improving on a classic, if that’s even possible. A dark and dreamy chocolate cookie sandwiching a creamy vanilla filling – it’s a winner. You can tint the filling according to the holiday – red for Valentine’s Day, green for Christmas. You can even swap out the vanilla for peppermint extract for a Christmas Oreo. I’ll have to remember that come December.
Please note these cookies are bigger than traditional Oreos – closer to the jumbo soft Oreos than the traditional crisp cookies -but you can adjust to any size you like. Ok, let’s get started.
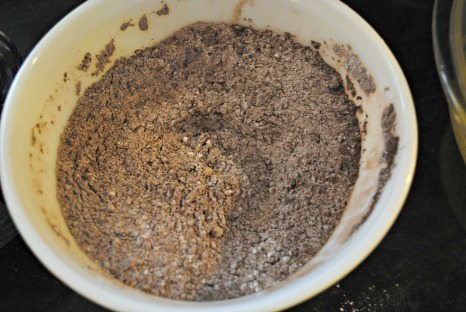
Whisk together your cocoa, flour, baking soda and salt like so.
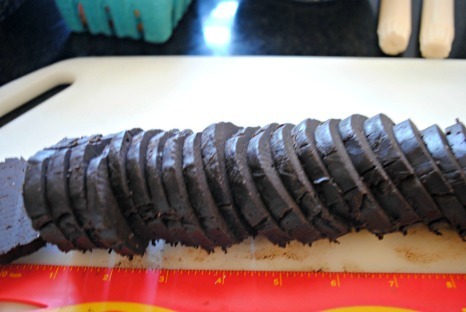
After your dough comes together, you chill it in the bowl in the fridge for a bit. Next you roll it into a cookie dough log – it looks like a giant tootsie roll – and into the freezer for a short bit.

After it’s chilled again, you slice the dough into even slices of deliciousness. I dare you not to eat a raw slice. And yes, that’s a ruler in the photo below. I use a ruler when I’m baking sometimes to make sure my measurements are on point. I am spacially challenged.
Onto the parchment-lined cookie sheets and while the cookies bake, get the filling together. Take note – the cookies aren’t perfect circles. It’s ok, they’re homemade and they should look like it.

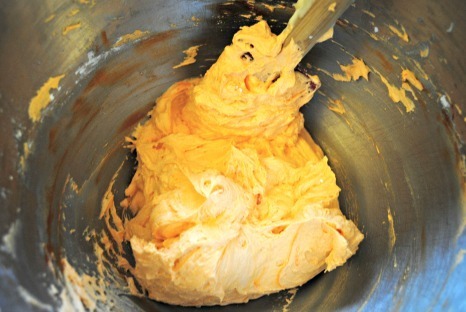
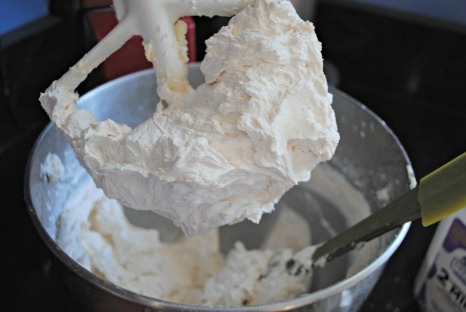
Here’s your thick and creamy buttercream filling.
Spread the filling on half of the cooled cookies – don’t be stingy. More is better.
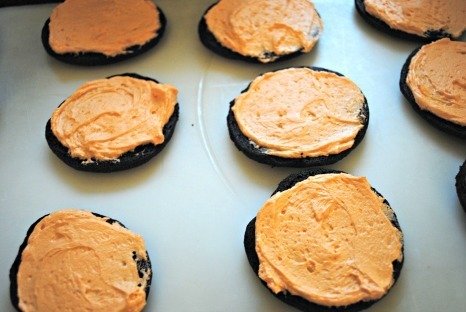
Sandwich with a second cookie and the Halloween Oreo is born. Heads up – these are actually better the next day (and the next!) as the cookies soften up and start to absorb some of the filling.

Super-sized Homemade Halloween Oreos
Makes 16-20, depending on size of cookies
Ingredients
For the cookies:
1 cup melted butter
3/4 cup sugar
1 teaspoon vanilla
1 cup melted chocolate chips
1 egg
1 1/2 cups flour
3/4 cup unsweetened cocoa powder
1 teaspoon kosher salt
1/2 teaspoon baking soda
For the filling:
1/2 cup butter, room temperature
1 2/3 cups confectioners sugar
1 teaspoon vanilla
1 tablespoon milk
pinch of kosher salt
Natural orange food coloring (Check your health food aisle, local health food store or head online to find it. I like India Tree brand, which is available on Amazon. If you want to skip this step, you can make the cookies with non-tinted filling – still delicious!)
Directions
In a medium bowl, whisk together the butter and sugar until well combined, about 2 minutes. Whisk in the vanilla and melted chocolate. Whisk in the egg and combine well. In a separate bowl, whisk together the flour, cocoa, salt and baking soda until combined. Add flour mixture to the chocolate mixture and stir until well combined. It will be the consistency of thick brownie batter. Cover and chill in the refrigerator 1/2-1 hour.
Transfer chilled dough to a sheet of wax paper and shape into a log about 2 inches in diameter and 11-12 inches long – or smaller in diameter if you want the cookies to be closer in size to traditional Oreos. Place log along the edge of wax paper and roll it into a smooth cylinder. Twist ends to secure and keep shape. Freeze 1/2 hour, checking twice to reshape if necessary.
Preheat oven to 325 degrees F and line two cookie sheets with parchment paper. Unwrap dough and cut into quarter inch slices (you’ll have 32-40) and place on baking sheets. Bake for 16-20 minutes or until cookies are firm to the touch. Let cool and prepare the filling.
With a mixer, beat the butter for a few minutes until smooth. Add sugar and vanilla and beat until smooth. Add milk and salt and beat until smooth. Add natural food coloring until you achieve desired tint. Place a tablespoon or so of filling on the bottom of each cookie and sandwich with a second cookie. Store tightly wrapped at room temperature for up to 3 days.
Looking for more Halloween treats? Try these:
Make your own peanut butter cups for Halloween
Halloween treats: Spook up your soup
Halloween treats: severed hand toast
Plan B Mom is a mostly-stay-at-home mom of 3 who works from home but sees her main job as managing her family. When she is not taking care of her 13-year old and 11-year old girls, 9- year old son, yellow lab, and husband – she is baking, running, carpooling, or helping with homework. She tries to stay organized to keep life running smoothly – or at least catastrophes at bay. Follow her on Twitter at @PlanBMom.


October 18, 2013
Your Weekly Meal Planning Guide
It’s that time again – happy meal planning day! Roll up your sleeves, grab your pencil and paper to make your shopping list, and let’s take care of your meals for the week. Fall is in the air so I am ready for some comfort food this week – goodbye grill and hello casseroles, soups and pasta bakes. Let’s get started.
Monday
Meatless Mondays are here to stay!

Lunch: Buffalo Corn Chowder - Make it on Sunday and enjoy during the week!
Dinner: Spinach Artichoke Stromboli - Your kids will be so thrilled with stromboli (i.e., stuffed pizza) on a Monday they won’t even notice the spinach. Use pizza dough from the grocery store. Serve with a crowd pleasing Caesar Salad and you’ve started the week off on the right foot.
Tuesday
Taco Tuesday means an easy enchilada bake for dinner.
Lunch: Tuna Pasta Salad is tasty and filling with canned tuna, white beans and red onion.
Dinner: Turkey Club Enchilada Casserole is a great make ahead meal you can throw together that day or even the night before.
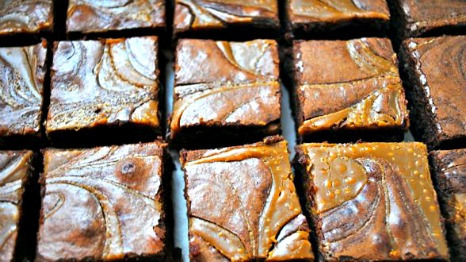
Dessert: Surprise your family with Peanut Butter Caramel Swirled Brownies.
Wednesday

Lunch: Tabbouleh Salad with Buffalo Club Sandwiches
Dinner: Bacon and Leek Mac ‘n Cheese or Rigatoni with Ricotta. Baked pastas never fail to please.
Thursday

How about a sammie night? Sandwiches don’t get enough respect at dinner time – a good quality bread grilled with fresh ingredients elevate the lowly sandwich.
Lunch: Deviled Egg Salad
Dinner: Italian Style Grilled Cheese and Spinach Sandwiches or Spanish Ham and Cheese Pannini
Snack: Cinnamon Sugar Popcorn
Friday
It’s pizza night! Pizza at home is way better than take out. Get the family involved and make a few kinds for variety.

Lunch: Greek Grilled Chicken and Vegetable Salad
Dinner: Thai Chicken Pizza and Potato Fontina Pizza
Dessert: Brownie Pie is the perfect ending to a family pizza dinner.
Saturday
Kick off the weekend with a unique frittata with a secret ingredient – Fritos add a delicious crunch.

Brunch: Frito Frittata
Dinner: White Chili with a Nacho Top is great to eat while watching a movie!
Sunday

Brunch: Oatmeal Peanut Butter Chocolate Chip Scones take about 20 minutes to bake and are basically foolproof. Serve with your favorite scrambled eggs.
Dinner: Chicken Cordon Bleu
Dessert: Old school Coconut Cream Pie
Looking for more easy peasy meal ideas? Check out our Quick & Easy section.
Lasagna Loaf: An Easy Weeknight Meal
Every once in a while I like to mix things up in the dinner department. OK. Who am I kidding? I’m constantly exploring in the kitchen. The kitchen has always been my place for relaxation and part of that relaxation means freeing myself up to explore and be creative. I know some people are afraid to change things up with recipes, but I say go for it. Have fun!
Recently I decided to make lasagna on a weeknight.
I know. Seems like a crazy idea for a busy mama like myself, but I decided to let go of the stressful and labor intensive lasagna making ways I’m used to and make it as simple as possible. I started off by using no-boil noodles. Some of you might be shrieking at the notion of no-boil pasta, but I assure you, they ROCK and it cuts preparation time in half making lasagna a totally doable weeknight meal. Love. This.
The other change I made was to bake it in an 8-inch-by-4-inch loaf pan. I did this partly because I didn’t want a huge pan of lasagna and partially because I thought it would be fun to make a loaf out of lasagna. The idea worked out beautifully if I do say so myself and is actually the perfect solution for those of you looking for a smaller scale lasagna recipe to feed 2-4 people. Make this tonight!
Lasagna Loaf
Serves 2-4
Ingredients:
1 cup part-skim ricotta cheese
2 tablespoons pesto, optional
1/3 cup parmigiano reggiano cheese, grated
1 cup mozzarella, shredded
1 3/4 cups tomato sauce,
6 no-boil lasagna noodles
Instructions:
1. Preheat the oven to 350 degrees.
2. In an 8-inch-by-4-inch loaf pan, spread 1/4 to 1/3 cup of the pasta sauce on the bottom. Top with one sheet of no-boil lasagna and then spread with 1/4 cup of the ricotta mixture. Pour on a few tablespoons of the pasta sauce, then top with a few tablespoons of parmigiano cheese and mozzarella. Repeat the layering, reserving a good 1/4 cup pasta sauce and cheese for the final top layer.
3. Press down slightly. Spread the remaining pasta sauce on top of the last noodle, sprinkle with remaining mozzarella cheese and the parmigiano cheese.
4. Cover with foil and bake the loaf about 25 minutes. Uncover and bake another 10 minutes making sure the noodles are fully cooked. Remove from the oven and let rest 5-10 minutes before slicing.
Looking for more Quick & Easy dinner ideas? Visit our Quick & Easy section.
Mini Vanilla Cupcakes With Buttercream Frosting
When it comes to cupcakes, or any dessert actually, do we really need more than 2-3 bites? I think not. I love all desserts mini – I cut brownies into squares and then in half in triangles. I love mini cookies that cook more quickly and let’s be honest, are cuter than giant cookies.
These mini cupcakes are really all you need for a cupcake fix, and they are the perfect size for kids’ birthdays and other celebrations. Plus, mini cupcakes bake in almost half the time. Don’t you hate it when you’re cleaning up after a party and you see a sad and abandoned half eaten cupcake? I know I do. Problem solved.
I know a lot of people turn to a boxed mix and/or canned frosting for cupcakes – I for one used to, until I realized how easy homemade cupcakes and frostings are to make. Added bonuses? They taste better and you most likely have all ingredients on hand – no special trip needed to the store for cake mix.
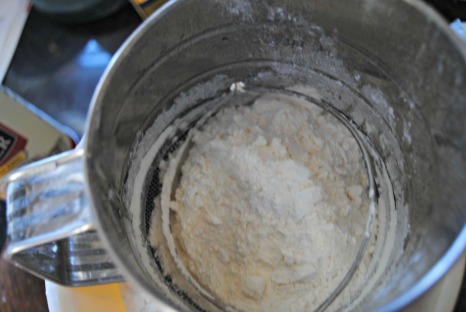
These vanilla cupcake and frosting recipes are my go-tos. The frosting is a classic buttercream recipe that is incredibly light and fluffy. The key to the cupcake is cake flour (or a substitution – see recipe below) and sifting your dry ingredients. I’ve tried recipes with regular flour and whisking, not sifting, and I’ve ended up with a dense cupcake, not a soft cupcake. I will take soft over dense any day, in cupcakes and beyond.
You start with the sifting – I have an old school hand crank sifter, but a strainer does the trick as well.
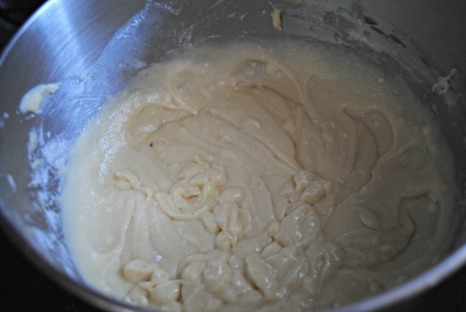
Next you cream your butter and sugar, add the vanilla and eggs, and add the flour and milk until you have a thick and creamy batter.
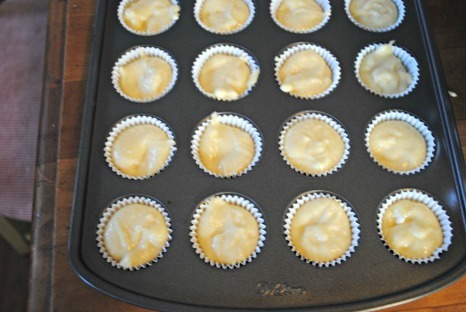
Divide evenly among 48 mini cupcake tins – thank goodness for liners. Buttering and flouring mini cupcakes is not fun.
Bake for 15-18 minutes. Let cool in the pan for 5 minutes then turn out on the cooling rack to completely cool.

Your buttercream frosting should be thick and creamy – yum.
Frost the completely cooled cupcakes. Sometimes I like to pipe, and sometimes I like to frost with an offset spatula. This day I piped. Enjoy!

Mini Vanilla Cupcakes with Buttercream Frosting
Makes 48 mini cupcakes
Ingredients
For the cupcakes
1 1/2 sticks butter, room temperature
2 cups cake flour (No cake flour? For a quick substitution, measure out 2 cups all purpose flour, remove 4 tablespoons of the flour, and add 4 tablespoons corn starch. Sift 3 times.)
1/2 tablespoon baking powder
1/4 teaspoon salt
1 1/2 cups sugar
1/2 tablespoon vanilla
3 eggs
3/4 cup milk
For the frosting
1 cup butter, softened
3-4 cups confectioners sugar
1/4 teaspoon kosher salt
1 tablespoon vanilla
up to 4 tablespoons milk
Directions
Make the cupcakes. Preheat oven to 350 degrees F. Line cupcake tins with paper liners. Sift together flour, baking powder and salt in a medium bowl and set aside. With an electric mixer beat the butter and sugar until pale and fluffy, 3-5 minutes. Add vanilla, then eggs, 1 at a time, beating well after each addition. Scrape down bowl as necessary. With mixer on low speed, add the flour mixture in 3 batches, alternating with the milk, starting and ending with the flour. Scrape down sides and bottom of bowl and beat until well combined. Transfer batter to prepared pan and bake for 15-18 minutes, until a cake tester comes out clean. Let cool.
Make the frosting. Beat the butter with an electric mixer for a few minutes until creamy. Add 3 cups powdered sugar and beat on low until the butter has absorbed the sugar. Increase the mixer to medium speed and add vanilla, salt and 2 tablespoons of milk. Beat on medium high speed for 3 minutes. If the frosting is too stiff, add more milk. If it’s too loose, add more sugar. Decorate cupcakes.
Looking for more cupcake recipes? Try these:
Chocolate peanut butter cupcakes
Plan B Mom is a mostly-stay-at-home mom of 3 who works from home but sees her main job as managing her family. When she is not taking care of her 13-year old and 11-year old girls, 9- year old son, yellow lab, and husband – she is baking, running, carpooling, or helping with homework. She tries to stay organized to keep life running smoothly – or at least catastrophes at bay. Follow her on Twitter at @PlanBMom.
October 17, 2013
Sweet Potatoes for Dessert? Yes, in Easy Sweet Potato Pudding
Sweet potatoes are delicious all year round, but when the fall weather makes it cool enough to turn on the oven, there’s nothing tastier than roasted sweet potatoes. All by themselves, with just a pinch of salt and some butter or olive oil, they are luscious. As the main ingredient in this pudding, their natural sweetness is set off by rich coconut milk and tangy orange juice.


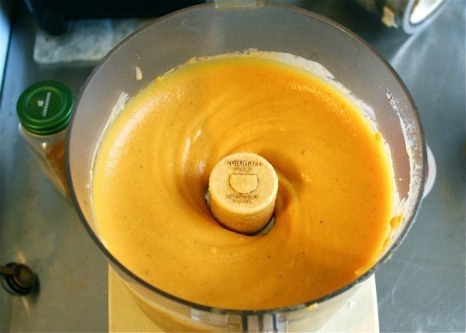
If you like easy desserts, that don’t involve flour or anything rising, then this one is for you. I’d like to call it a “no-bake dessert,” but technically the sweet potatoes are baked. After that, though, it’s just a matter of putting everything in a food processor and making it into a puree.
Sweet potatoes are a good ingredient to have on hand, not only because of their versatile flavor and texture—they can bulk out a stew, add heft to cakes and muffins, and make a colorful side dish—but also because they’re chock full of wholesome goodness. They’re high in iron, vitamin D, and that orange color means they’re rich in beta-carotene, too. They’re sweet, as their name implies, but their sugar is released slowly into the blood stream, so there’s no spike and crash, which over time can do real damage to the body.
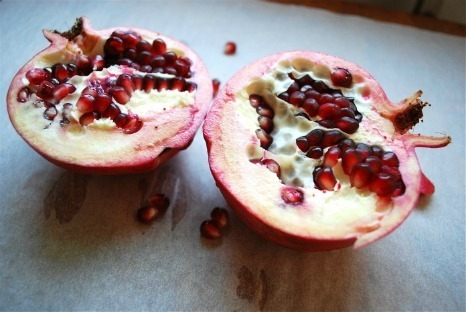
The healthy profile of this dessert gets a boost from vitamin C-rich orange juice, and from coconut milk, a rich source of iron and potassium. Pomegranates are in season now until February or March, so they make a perfectly tart and juicy topping that’s full of antioxidants. There’s a minimal amount of processed sugar in this dessert, but you can eliminate the sugar altogether and use a packet of the plant-based sugar substitute stevia, instead.
Make sure the pudding is chilled thoroughly before eating. If you have time to make this dessert the day before, it’s even better, as the flavors have a chance to deepen while it sits in the refrigerator overnight. The pudding will thicken as it chills.
Sweet Potato Pudding
Makes 2 1/2 cups of pudding
Ingredients:
1 large sweet potato, weighing about 1 pound
1 cup unsweetened coconut milk (from a 14-ounce can of coconut milk)
1/4 cup organic cane sugar, or to taste
Grated zest of 1 large orange
1/4 cup freshly squeezed orange juice
1 teaspoon cinnamon
1/2 teaspoon nutmeg
1/4 teaspoon sea salt
Seeds of 1 pomegranate
Directions:
Preheat the oven to 375°F, and lightly grease a baking dish.
Slice the sweet potato in half lengthwise, and place on the prepared baking dish cut side down. Cover and bake for 45 minutes, or until the flesh is fork tender. Cool to room temperature, and scoop out the flesh.
Place the sweet potato in the bowl of a food processor. Shake the can of coconut milk vigorously, then measure out 1 cup and add it to the food processor, along with the sugar, orange zest and juice, cinnamon, nutmeg, and sea salt. Puree until smooth. Taste and adjust the seasoning, adding more sugar and salt if desired.
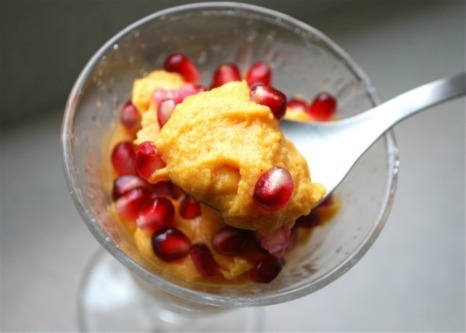
Place the pudding in an airtight container and chill thoroughly before serving. Portion into glasses or bowls, and top generously with pomegranate seeds before serving.
Looking for more healthful dishes? Try these:
Homemade peanut butter cups for Halloween
The best gluten-free apple cake for apple picking season
Louisa Shafia is the author of The New Persian Kitchen, a book of healthy Mediterranean and Silk Road-inspired recipes, and Lucid Food: Cooking for an Eco-Conscious Life, a collection of seasonal recipes and eco-friendly kitchen tips. See Louisa’s cooking videos and her schedule of upcoming events at lucidfood.com.
Waste Not: Ham & Cheese Rice Balls
A few posts ago, we discussed my issue with wasting food. In short, I hate it. Who doesn’t, right? We all want to use up what we have because it’s the right thing to do for the environment and for our wallets. In the last post I told you how to save your aging tomatoes by roasting them and this week I want to talk about rice—leftover rice to be specific.
We’ve all been guilty of over-estimating just how much rice we need. Even though the package clearly states just how much rice to boil for the amount of people being served, somehow, I always overdo it. It must be the Italian in me. Somehow, whenever I try and cook for 2-4 people it ends up more like a meal for 15. Whatever the case, there’s always a way to use up leftover rice and my favorite way is by making an Italian favorite—Rice Balls or Arnacini if you’re fancy!
This recipe is a ham and cheese version but the great thing about rice balls is that you can fancy them up with any meat, cheese, herb or veggie you like—just be sure to chop them small.
Spinach and Cheese Arancini
Makes 12
Prep Time: 15 minutes
Cook Time: 15 minutes
Ingredients:
Vegetable oil, for frying
3 large eggs, beaten
2 cups cooked and cooled short grain or risotto rice
1/2 cup parmesan cheese
1 1/2 cups seasoned bread crumbs
2 ounces mozzarella cheese, cut into 1/4 -inch dice
1/2 cup ham, chopped small
1/4 cup parsley, finely chopped
1/2 tsp salt
Directions:
1. Pour enough oil into a large heavy saucepan or dutch oven to reach 4-5 inches. Heat oil over medium heat. Tip: you can test to see if the oil is ready by dropping a small amount of breadcrumbs in. If it sizzles, the oil is ready.
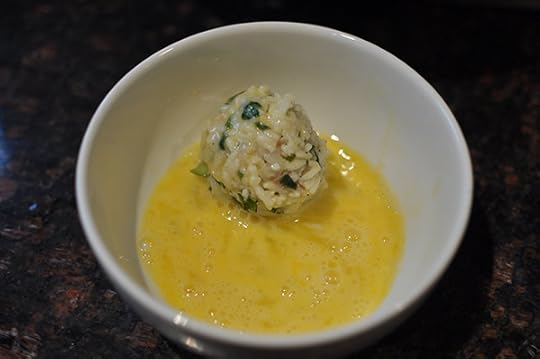
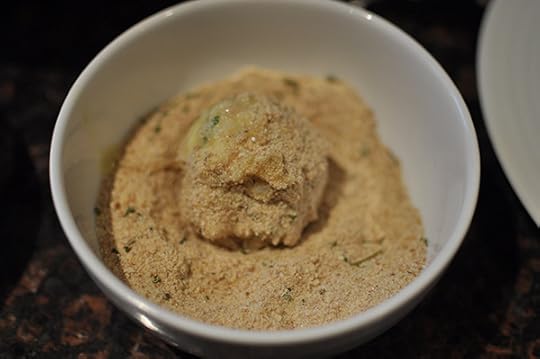
2. In a large bowl, combine 2 eggs, rice, cheese, 1/2 cup breadcrumbs and salt. Mix well with your hands. Place remaining egg and breadcrumbs into two separate shallow bowls for coating the rice balls. Using 1/4 cup rice mixture form into balls. Roll the balls into the beaten egg and then into the breadcrumbs to coat.
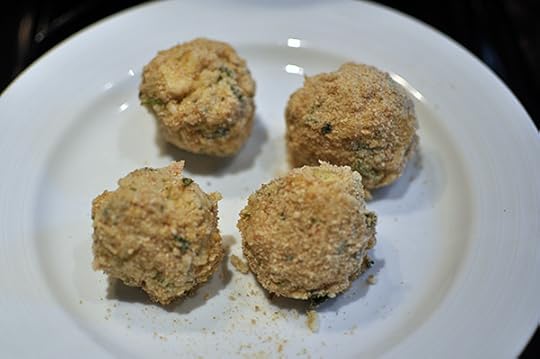
3. Working in batches, gently place the rice balls into the hot oil and cook until golden brown, about 4-5 minutes each. Remove rice balls using a slotted spoon and transfer to a plate lined with a paper towel to drain. Serve warm.
Looking for more rice recipes? Try these:
Chicken and rice pilaf skillet supper
Cheesy rice cake stuffed with herbs and greens
October 16, 2013
Duck Carnitas Tacos
Half the fun of discovering a new restaurant is sharing it with people you know will enjoy it. As Rachael Ray’s resident restaurant guru, here’s an inside look at what I report back to Rach about some of my favorite restaurant finds and food experiences!
From: Kappy
To: RR
Sent: Monday, October 14, 2013 11:25am
Subject: Duck Carnitas Tacos – Yeah, I Said That!
Hi RR –
What do Chef John Besh and Duck Carnitas have in common? Well, it’s a long story. But, long story short, I was honored to be chosen by Chef Besh as one of 11 people to receive an advanced copy of his new book, Cooking from the Heart. The deal was, I had to make a recipe and document it. I chose Duck Confit. While I’m a huge fan of this dish, I had never made it at home, or had even thought to make it at home. With this straightforward and delicious recipe, I was able to do so and hope others give it a try, too. Be sure to check out my complete write-up.
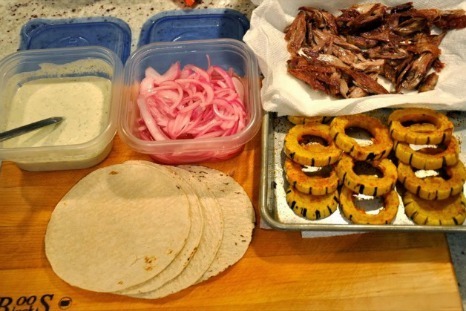
But what to do with leftover duck confit, you ask?! The possibilities are endless, but I chose to make Duck Carnitas Tacos with Goat Cheese-Green Chile Crema, Pickled Red Onions and Roasted Delicata Squash. (You may also make this recipe with leftover rotisserie chicken.)
Here are the recipes and my plan of attack:
1. Pickled Red Onions
Ingredients:
1 small red onion, thinly sliced
2-3 limes, juiced
A pinch of salt
Directions:
Put the sliced onions in a food storage container; add the lime juice and salt and cover. Give it a good shake and let stand for at least 30 minutes or overnight. Give the container a good shake every now and then to distribute the lime juice. These stay good for at least a couple weeks.
2. Goat Cheese-Green Chile Crema
Ingredients:
1/2 cup Mexican crema or sour cream
1/2 cup crumbled goat cheese
2 tablespoons canned chopped green chiles (more if you like spice)
Salt and pepper
Directions:
Mix all the ingredients together and let stand for 20-30 minutes for the flavors to come together.
3. Roasted Delicata Squash
You may use butternut squash or acorn squash, but be careful when slicing as their skin is tougher than delicata squash.
Ingredients:
1 small delicata squash, sliced into 1/4-1/2 inch rings, seeds removed
2 tablespoons extra virgin olive oil (EVOO) or cooking spray
Salt and pepper
A pinch of paprika (optional)
A pinch of ground coriander (optional)
Directions:
Pre-heat the oven to 400°F.
Place the squash rings in an even layer on a baking sheet. Drizzle with EVOO or spray with cooking spray and season with salt, pepper and paprika and coriander, if using. Flip over and do the same on the other side. Place in the oven and roast until golden brown and cooked through, about 20-25 minutes. Remove from the oven and cut each slice into half moons if you’d like – or just eat as is.
4. Duck Carnitas
Ingredients:
1-2 cups pulled duck, leftover from duck confit
2 tablespoons olive oil
Directions:
Place a medium to large size skillet over medium-high heat; add oil. When the oil is shimmering, add the pulled duck in an even layer and let cook until crisp, about 2-4 minutes. Turn the duck and let the other side get crisp, another couple minutes or so. Remove from pan and build tacos.
To assemble the tacos: To each his own, but I charred some white corn tortillas, placed some duck on them, and topped it off with pickled red onions, crema, and squash.
And that’s what’s on my plate!
~ Kappy, @OnKappysPlate
Andrew “Kappy” Kaplan loves food. A professionally trained chef, by day he runs Yum-o! Rachael Ray’s charity focused on kids and cooking, and keeps special projects running smoothly for her. By night he hops course to course, place to place, all across the country. He’s Rach’s own personal dining guide! You can also follow Kappy on Twitter to see what’s On Kappy’s Plate in real-time!
Cooking From the Heart: Duck Confit
Half the fun of discovering a new restaurant is sharing it with people you know will enjoy it. As Rachael Ray’s resident restaurant guru, here’s an inside look at what I report back to Rach about some of my favorite restaurant finds and food experiences!
From: Kappy
To: RR
Sent: Monday, October 14, 2013 11:25am
Subject: Chef John Besh’s New Book, Cooking from the Heart
Hi Rach –
While I normally share restaurant recommendations with you, I recently received an email from Chef John Besh in New Orleans asking if I would consider cooking from his new cookbook, Cooking from the Heart.
This was a no-brainer for me. I consider Chef John Besh to be one of the most talented and well-respected chefs in the country. As you know, he steers the ship of New Orleans restaurants that include Domenica, August, Borgne and more, not to mention his first foray outside The Big Easy, Lüke San Antonio, on the City’s famed River Walk. So to be able to be one of the first people to cook from his book? Well, I jumped at the opportunity to share this with you and your readers.
All about duck
The chapter that was assigned to me was called Lessons of the Hunt. And the recipe I chose was Duck Confit. It’s not that I don’t like duck, but I’m honestly not the biggest fan of duck breast. Duck confit, on the other hand – now, I can get down with that.
There are two duck dishes that distinctively stand out in my rolodex of food. One, the first meal I ate in Paris, from a small local restaurant called Le Bistro du Peintre. It was crispy, tender and flavorful – all things a good duck confit should be, in my opinion. And two, at Mario Baltali’s Lupa in New York City.
It was a Tuesday night and my fiancé, Katy, and I were out to dinner. I ordered the nightly special, which was a Crispy Duck Agrodulce. It blew my mind and I thoroughly enjoyed it. Just how much did I thoroughly enjoy it? Five minutes into eating it, Katy looked up at me and said, “You really like that, don’t you?” I said, “Um, yeah, how could you tell?” She responded, “Because you haven’t said a single word in five minutes!” She was right. The crispy skinned, Italian sweet-and-sour style preparation blew my mind to the point that I instantly decided I would not need to order duck anywhere else, because this did it for me.
Trying it in my own kitchen
Which brings me back to my excitement about cooking Chef John Besh’s Duck Confit recipe. I am a trained chef, so I was confident I could achieve the tender crispness of the duck I crave, but it wasn’t something I had thought to try in my own kitchen before. To John Besh’s credit, the recipe is written in such a way that a home cook can accomplish it, but I see a large part of being a trained chef and working for someone like Rachael Ray is making recipes as accessible as possible to all cooks. Taking it one step further, I enjoy teaching home cooks how to stretch a recipe into a second meal using any potential leftovers (look out for my upcoming post on how to use the leftovers to make duck carnitas tacos) or by making a double batch.
As the headnote of the recipe states, “Confit – Slow-Roasted Duck stored in its own fat –is an ancient way to preserve duck.” While it may sound confusing and time consuming, fear not, this is such a doable dish, you will want to make again, I promise.
Tips for success!
As you read through the recipe below, here is my list of tips to ensure a successful outcome:
1. Call your local butcher or a good-quality grocery store and ask for duck leg/thigh quarters. If you can’t find them, you can order them online from places like Maple Leaf Farms or D’Artagnan.
2. Many stores, including Whole Foods, sell containers of duck fat in their meat sections. The recipe says 4-6 cups – I opted for 6 to ensure the duck was completely covered.
3. Make sure that you have a baking dish with enough room to cook the duck in an even layer and that ALSO has enough room to have the duck fully submerged the next day. The first dish I put my duck in did not fit them all evenly, so I had to change dishes.
4. Always be careful when working with hot oil – after you melt down the duck fat, carefully ladle or pour it to cover the duck.
5. After you roast the duck for a couple hours, be sure to let it cool for a couple more hours before you cover it and refrigerate it.
6. When it cools overnight, the fat will solidify again, which is how the duck was preserved back in the day.
7. When you want to cook the duck, bring the dish to the counter and let it come close to room temperature for a good 20-30 minutes or so. Using your hands (the best tool in your kitchen), gently pry the duck out of the fat and peel off any big chunks that are adhering to the duck. Then go ahead and place the duck on a wire rack set over a baking sheet.
8. The recipe says to cook for 25-30 minutes. While this indeed works, in my quest for tender-crisp perfection, I left mine in for an extra 5-10 minutes to get some extra crispiness on the skin.
9. If using the duck for another recipe such as duck hash or duck tacos, let it cool, remove the skin, then pull the meat off the bones as you would pull chicken off the bones.
I know that “fat” is not always an attractive word, but you may not know that duck fat is a healthier animal fat alternative to butter or pork fat and compares favorably to olive oil in terms of polyunsaturated fats. In addition, duck fat is high in vitamin E and is 40% lower in saturated fats.
Rachael, I hope your readers have fun trying out John Besh’s recipe, because trying something new is what cooking anything is all about! I thoroughly enjoyed myself, as did the people that ate this dish. Thanks to Chef Besh for bringing an excellent Duck Confit recipe into the kitchens of home cooks! Readers, try out the recipe below and tell us how your recipe came out. Feel free to ask me any further questions in the comment section, below. And that’s what’s on my plate!
~ Kappy @OnKappysPlate
The recipe:
Duck Confit
Makes 6 legs
Confit—slow-roasted duck stored in its own fat—is an ancient way to preserve duck. I love serving these hot, crispy duck legs with anything from a hearty salad with a bracing vinaigrette, to luscious lentils, to sautéed apples or Sautéed Potatoes with Quince & Onions (page 94). I also use this confit to make rillettes (boneless confit emulsified with warm duck fat) that are then layered with thin slices of duck breast to create a terrine, essentially using every part of the bird in one dish (Terrine of Rare Duck Breast & Rillettes, page 18).
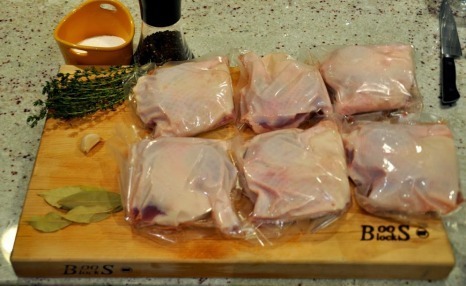
Ingredients:
6 duck legs and thighs
Salt
Freshly ground black pepper
1 clove garlic, thinly sliced
2 sprigs fresh thyme
6 bay leaves
4-6 cups duck fat
Directions:
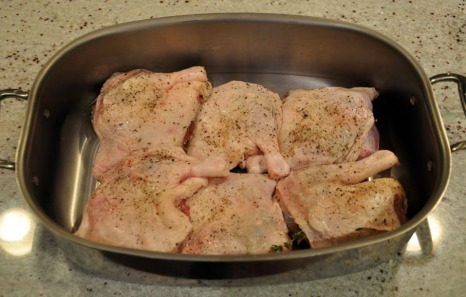
1. Liberally season the duck legs all over with salt and pepper. Tuck a slice of garlic, a small branch of thyme, and a bay leaf on the flesh-side of each leg and lay in a large baking dish. Cover with plastic wrap and refrigerate overnight.
2. Preheat the oven to 325°. Melt the duck fat in a medium saucepan over medium heat. Pour the melted fat over the duck legs in the baking dish so that they are completely submerged. Slow-roast in the oven until the legs are fork tender, about 2 hours. Let the duck cool in the fat. When the legs and fat are cool, cover and refrigerate overnight.
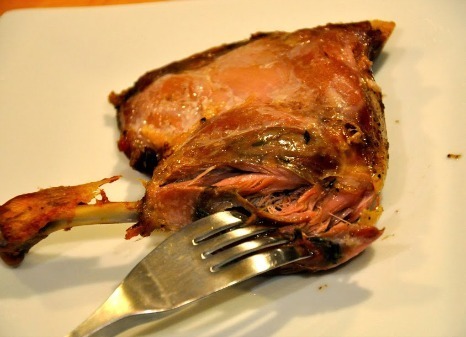
3. To serve the duck confit, preheat the oven to 375°. Remove the duck legs from the fat and place on a baking pan fitted with a wire rack. Bake until the skin is crispy and the legs are heated through, 25–30 minutes. Strain the remaining duck fat into a jar, refrigerate, and use for crispy fried potatoes.
—From Cooking from the Heart: My Favorite Lessons Learned Along the Way by John Besh/Andrews McMeel Publishing

Andrew “Kappy” Kaplan loves food. A professionally trained chef, by day he runs Yum-o!, Rachael Ray’s charity focused on kids and cooking, and keeps special projects running smoothly for her. By night he hops course to course, place to place, all across the country. He’s Rach’s own personal dining guide! You can also follow Kappy on Twitter to see what’s On Kappy’s Plate in real-time!
Dinner Deal: Rustic Beef & Tomato Stew
I wait all year for beef stew season. It means fall is coming, along with all of the other wonderfully cozy parts of autumn. It also means that feeding a few becomes just as simple as feeding a crowd with a dinner pot of stew.
The great thing about classic beef stew is how versatile it is: you can put just about anything in it. It’s one of those great “clean out the pantry” recipes. Speaking of which, the recipe below is easy and delicious on its own. But, if you happen to have these pantry items already kicking around on your shelf (meaning there’s no need to make a special trip to the store for them, they’re not essential) they make great add-ins to give your rustic stew a kick:
Frozen peas I always forget that I have these kicking around in the freezer. Stir in a 10-ounce bag at the very end of cooking for a bright green kick
Worcestershire It does the same for stew as it does for burgers. Just a few dashes will give your dish even more depth and heartiness
Red wine If you have a bottle of red wine open from a night or two before, add a few splashes to give the stew that “slow-cooked all day” satisfaction
Ground allspice or cloves I know it sounds a bit crazy but 1/2 teaspoon stirred into the pot will, similar to the Worcestershire, bring out the flavors of the meat and add depth and heartiness to the stew. Plus, like peas, I always seem to have a jar on the shelf that I forget is even there
Chopped fresh herbs If you already have them in the refrigerator, a garnish of chopped parsley or tarragon is great finisher that will add color and a bright contrast to your hearty meal
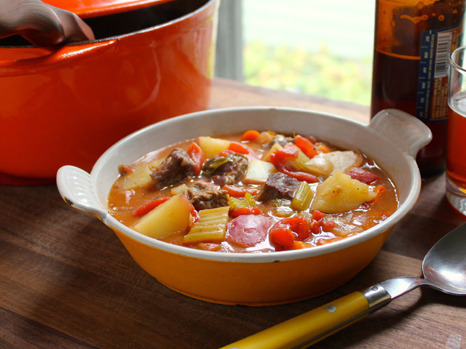
Rustic Beef & Tomato Stew
Makes 6 to 8 servings
2 tablespoons olive or canola oil
1 pound beef stew meat, cut into bite-sized pieces as needed
1 large onion, chopped
2 cloves garlic, finely chopped
2 carrots, chopped
2 stalks celery, chopped
6 tablespoons flour
1 tablespoon dried thyme
1 pound red-skin potatoes, cut into chunks
2 (14.5-ounce) cans beef broth or stock
1 (28-ounce) can diced tomatoes
Salt and ground black pepper
Place a large metal or cast iron pot over medium heat with the oil. Pat the beef dry and, working in batches as needed, sear it off in the pan until deep golden brown, 6 to 8 minutes per batch. Remove the meat from the pan as it finishes and reserve it on a plate.
Add the onion, garlic, carrots and celery to the pot and cook, stirring often, until the vegetables begin to soften, 3 to 4 minutes. Sprinkle the flour over the vegetables and cook for 1 minute. Add the dried thyme, potatoes, beef broth, tomatoes and reserved meat to the pot. Season with salt and pepper. Bring the liquid up to a boil and then reduce the heat to medium-low. Cover the pot with a tight-fitting lid and simmer the stew, stirring regularly, until the potatoes are tender and the meat can be easily shredded with a fork, about 90 minutes.
Adjust the seasoning as needed with salt and pepper. Serve the stew warm.
NOTE: Getting a deep golden brown sear on the beef is crucial to building flavor in the finished stew. Make sure that the meat is patted dry and hold off on seasoning it at the very beginning (you can do that later on). Salt will pull moisture out of the meat and get in the way of your beautiful golden brown searing efforts.
This dish only gets better with age. Save extra portions for next-day leftovers or an office-/school-ready lunch.
Looking for more quick & easy meals? Check out our Quick & Easy section!
Patrick W. Decker’s life revolves around food. Always has, probably always will. As a graduate of The Culinary Institute of America and past member of the culinary teams for Food Network stars Rachael Ray, Sandra Lee, Marc Forgione, Bobby Deen and Paula Deen, he now works as a food stylist and producer in NYC by day and a food writer and recipe developer at his home in New York’s Hudson Valley by night. You can see what he’s up to by following him on Instagram & Twitter at @patrickwdecker or visiting his website at patrickwdecker.com.
October 15, 2013
How to Use Up Leftover Chicken and Turkey
Over the years, I’ve had more leftover poultry cluttering up my refrigerator than anything else. (At least in terms of total volume; I still have ketchup packets that are older than my car.) The most common example is of course the tattered remains of roast chicken, but don’t count out leftover turkey, either. I could spend a week talking about how to get rid of it.
I actually like the leftovers more than the dish itself, if you can believe that. Of course, there’s always a challenge, whether you are cooking a turkey or chicken the first time or reheating it. The problem is that any bird is basically two different animals. The breast is of course lean, dry, and tasteless, unless cooked with exacting care, but also big and easy to slice. The dark meat, contrarily, is an intimidating mess of random bones and joints, and as fatty as the breast is dry. Between the two of them, they are hard to get rid of indeed.
Happily, a few basic techniques help you to use up every bit of the bird. They include:
Hybrid Vigor!
Here’s a very advanced technique for combining dark meat and white meat: chop it up. It’s not as easy as all that, obviously. The breast meat comes off easily enough, but the dark meat requires first separating out the flabby skin, and then entering the biological labyrinth that is the thigh.

I am not even kidding when I say that, after twenty years of writing about food – and meat in particular – I still don’t understand what is going on inside the thigh. I never know what side to eat it from, or how to separate it cleanly from the leg, or sometimes even which side is up. But I do know how to pull the meat from it, and from the leg as well. I try to take equal amounts of both meat, and mince them up either coarsely (for sandwiches like this one) or finely (for chicken salad) or very, very finely (to make a garlicky potted meat). For those who steer a middle course, this is the way to go.
Refire
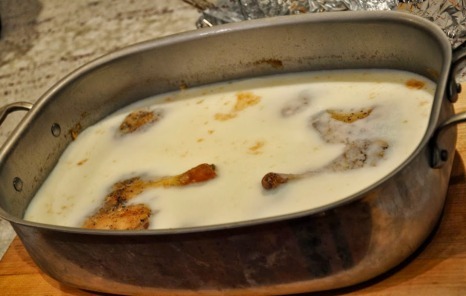
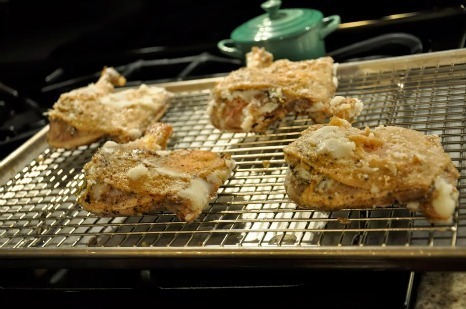
I don’t know about you, but I have rarely ever seen a bird whose underside was as crispy and brown as its top – for the simple reason that the top is where all the heat goes. This is unfortunate, as the bottom needs it a lot more than the top does. So I will frequently take a half-eaten chicken, strip the white meat off, and put it into a 350-degree oven upside down.
The white meat will get eaten later; even if it’s overcooked, mayonnaise covers a multitude of sins, which is one reason it’s always on chicken sandwiches. The dark meat and crusty skin, once it comes out of the oven and cools, makes a great low-carb snack, albeit a labor-intensive one (you still have to fight those bones!)
Buried treasure

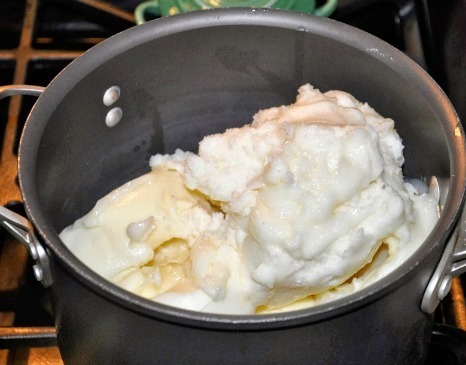
It generally gets thrown away, but the single most important part of a roasted chicken or turkey is neither the white meat, nor the dark meat, nor the delicious crusty vegetables that cooked beneath them, which need no help from anybody in getting eaten. No, it’s the weird, gelatinous stuff at the bottom of the pan. That, my friends, is aspic, and far and away the most flavorful thing in the whole pan.
I don’t waste an atom of this stuff. I will sometimes mix it up with mayonnaise or pesto or even olives, and shmear it on toasted crostini like these. Other times I just make sure to toss reheated chicken with it. It makes a great binding element with chicken salad, and I’ve also used it (along with some of the chicken fat that inevitably attaches to it) to flavor EVOO for roasted potatoes.
Fat and Bone
If you are going to throw anything out, it should be these two, right? Well, sure. But both are pretty easy to use up too. The fat turns white and solid in the fridge, so if you’re not too grossed out by it, it’s easy to spoon up and freeze away. (I add it to vegetable oil to make fried chicken, or to itself to make potato pancakes.)

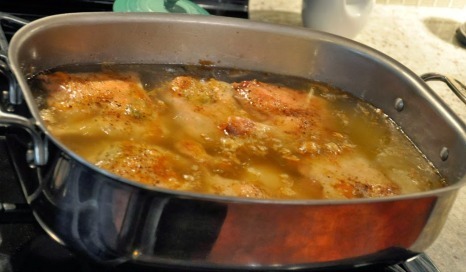
The bones have only one use: throw them in the pot with a carrot, an onion, and just enough water to cover it, and let it simmer for hours and hours. Then throw everything in the pot away, except the liquid, which will be ten times better than any chicken stock you’ll ever get in a store.
Looking for more quick & easy meals? Check out our Quick & Easy section!
Rachael Ray's Blog

- Rachael Ray's profile
- 296 followers

