
Rachael Ray's Blog, page 42
November 19, 2013
How to Tackle 6 Common Thanksgiving Messes
Ready for Thanksgiving? We’re counting down with great stories that will get you ready (and inspired!) to make it a beautiful holiday. And don’t miss our collection of 40+ no-fail recipes!
Thanksgiving is a wonderful day filled with family, football, food, and all the cleanup that remains after the feast is finished. No matter who you are, where you live, or how many guests you’ll have, there’s no getting around the hazards that a food-focused holiday brings.
Before we begin, here are some important reminders when dealing with any stain:
- Treat pronto.
- Read the care label on any fabric or surface.
- Pre-test an inconspicuous area first.
- Blot (never rub!)
- Do not put fabrics in the dryer until stain is completely out – heat will set it.
Now, let’s get down to some simple ways to tackle the most common messes:
Seeing Red…Wine!
That pinot noir may have been the perfect choice with your turkey, but it isn’t so great on your blouse. Accidents happen, though, and help is only one glass of white wine away! As soon as possible:
1. Blot any excess, then cover with Kosher salt (its coarse texture is more effective).
2. Leave it on for a few minutes before wiping off.
3. Pour either white wine, white vinegar, or baking soda on the stain, and let it sit for a few minutes. (Note: You can actually use the white wine or vinegar first, and then sprinkle baking soda on to remove any odor. Hydrogen peroxide will also work, but only use it on whites, because it’s a natural bleach.)
4. Launder per usual.
Courtesy of VeganBaking.net/Flickr
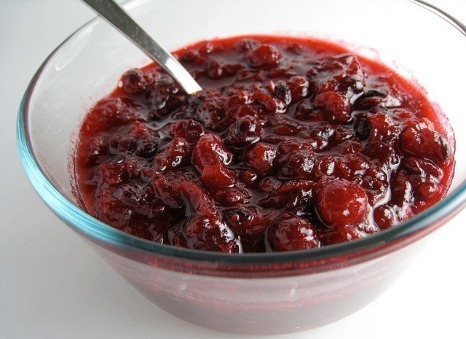
Berry Berry Bad
Everyone loves to load up on cranberry sauce, but as they do it, they leave drips on your tablecloth. Simply reach for your aerosol hairspray to deal with the mess!
1. If any remains, remove with a butter knife first.
2. Douse with aerosol hairspray (the alcohol is an effective cleanser).
3. Blot with clean cloth or paper towels.
4. Launder per usual.
A Sinking (Gravy) Boat
Turkey without gravy is like a peanut butter sandwich without jelly. But this Thanksgiving necessity is seriously messy. Here’s an easy way to combat stains before they set:
1. Scrape off excess gravy.
2. Cover with baby powder, which will absorb the oil.
3. Leave on for about 15-20 minutes.
4. Launder with an enzyme detergent such as OxiCLean or Tide Original which are easily found in your local supermarket, drug or retail superstores. Enzymes help break down the proteins, making it easier to lift them out.
Shards from the Chardonnay: Broken Glass
Glass fragments are hard to pick up with your dust pan or hand-held vacuum, and you don’t want to accidentally cut yourself by using your hands. One way to help ensure that you don’t miss those slivers is to use bread.
1. Take a fresh piece of bread, and press it down on the area where the glass broke.
2. Lift and repeat until all the glass is gone.

Courtesy of echiner1/Flickr
Wax On…Wax Off
Candle drips can be a real pain in the you-know-what when they get all over your tablecloth. Here’s a simple way to make them melt away:
1. Heat your iron on a warm setting.
2. Put a paper towel or thin, clean cloth on top of the hardened wax.
3. Place the iron on top of the towel or cloth. DO NOT MOVE IT AROUND unless you wish to spread the wax!
4. Hold the iron in place for 5-10 seconds.
5. Remove the iron and the cloth or paper.
6. Repeat until all the wax is gone – and consider using non-drip candles next time!
Bonus: Celebrating Thanksgivukkah? Here’s how to tidy the candle wax from your menorah:
1. Use a blow dryer with nozzle on and set on high.
2. Direct the hot air into the base where the candles are held, and hold for 20-30 seconds until the residue wax melts.
3. Use a cotton swab to scoop up melted residue.
To prevent wax build-up in the future, spray the candle holder (non-precious metals only!) with cooking spray before you put in the candles.
Ring Around (and on) the Table: Watermarks
Careless guest left their drink on your wood furniture? While you’re whipping up turkey salad leftovers, use a dollop of mayonnaise to get rid of the rings they left behind.
1. Apply a generous amount of mayo directly onto the mark.
2. Rub it in with a paper towel, and leave it overnight.
3. Wipe and buff with a clean microfiber cloth.
Note: If you have any ashes from your fireplace, add them to the mayo to help create a gentle scrub. Use a 1:1 ration of ashes to mayo. If your table has a lot of wax, add a bit more ash. Rub the mix in the direction of the wood grain. Baking soda can be used as an alternative to the ashes.
[Top image courtesy of Flickr/gromgull]


November 18, 2013
Grown-Up Candy Bars: Chocolate Caramel Shortbread Bites
Have you ever noticed how your favorite childhood foods don’t taste quite the same as an adult? I’m talking specifically about fast food, sugary cereals, and candy bars.
At least those were some of my favorites.
My once beloved Captain Crunch cereal now feels like a bowl of insta-cavities. Those tasty fast-food hamburgers now make me feel too tired and full. And at some point, Twix bars lost their appeal in comparison to the dark chocolate I’ve developed a taste for.
But this chocolate caramel shortbread bar is a candy bar for grown-ups. A buttery, not-too-sweet shortbread crust is topped with creamy caramel and finished with rich chocolate topping. You’ll never miss a Twix again.
Here’s how to make it:
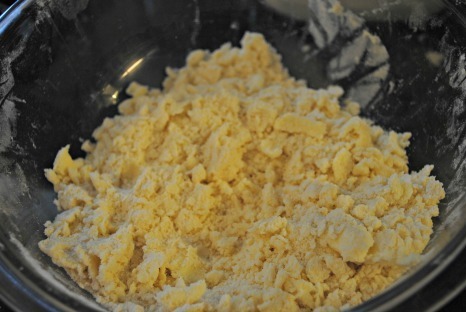
Start by mixing together the shortbread crust. The dough will be crumbly and not cohesive in any way. Don’t worry, that’s just the way it should be.
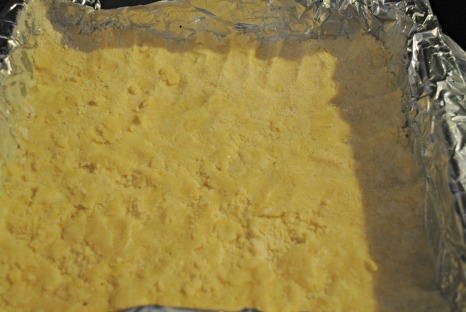
Once you pat the dough into the pan to bake, it all comes together.

Bake the shortbread until it’s a beautiful, light golden-buttery brown. I wouldn’t hesitate to cut this into bars and eat it with some coffee!

The caramel is made with a shortcut recipe that uses sweetened condensed milk. Just like the crust, it’s only four ingredients. No muss, no fuss.
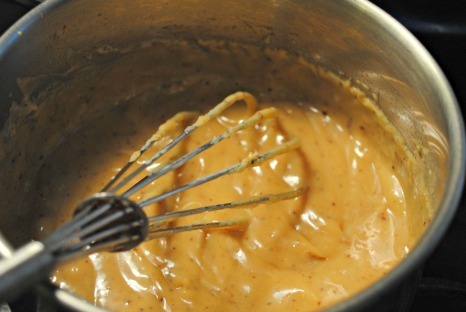
It’s foolproof and turns out thick and creamy. The hardest part is the constant whisking.
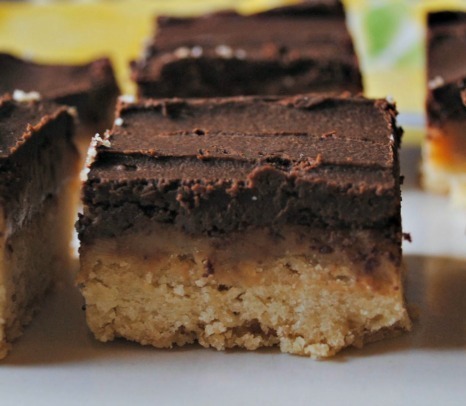
Finish with the chocolate topping, and you’re good to go. The bars are rich and delicious – and kind of nostalgic! Cut into small squares, and enjoy.
Chocolate Caramel Shortbread Bars
Makes 32 small squares or 16 large squares
Ingredients
For the shortbread crust:
1 1/2 cups flour
12 tbsp butter, softened
1/2 cup sugar
Pinch of kosher salt
For the caramel layer:
4 tbsp butter
1/4 cup brown sugar
14-oz. can sweetened condensed milk
Pinch of kosher salt
For the chocolate topping:
1 1/2 cups bittersweet, semisweet, or milk chocolate chips
2 tbsp butter
Directions
1. Preheat the oven to 325 degrees F. Line a 9-inch square baking pan with foil, leaving an overhang of foil over the sides so you can lift the baked bars out of the pan when finished. Spray the foil with non-stick cooking spray and dust with flour, tapping out excess. Set aside.
2. Make the shortbread crust. Add the flour, butter, sugar, and salt in a bowl and combine until the mixture is a crumbly texture. Pat into the prepared pan until the dough is compact and even, and bake for 30-40 minutes or until the crust is light golden brown. Set aside to cool.
3. While the crust is baking, make the caramel. Melt the butter and brown sugar in a heavy medium saucepan over medium-low heat. Add the condensed milk and salt and bring to a boil, whisking constantly, taking care to not scorch the bottom. Reduce the heat to low and simmer, stirring constantly, until the mixture is thick, creamy and a light caramel color (about 5 minutes). Pour the caramel over the shortbread layer and spread evenly.
4. Make the chocolate topping. Melt the chocolate chips and butter in the microwave, stirring and checking every 30 seconds so as to avoid scorching the chocolate. Pour the chocolate over the caramel layer and spread evenly.
5. Let cool (Note: You can refrigerate to speed up the process), and cut into squares when cooled. Store at room temperature.
November 15, 2013
Plan Out a Week of Meals in a Snap
Welcome to the Weekly Meal Planner! Whether you work all day and are out of steam when the dinner hour hits, or are fresh out of dinner ideas and in a cooking rut, we are here to make your life easier. We will include tips for picky eaters and easy food swaps if you don’t have an ingredient on hand. Have a great week!
Meatless Monday
Lunch: A salad and a soup in one? You bet. Get the best of both worlds with this Caesar Soup.
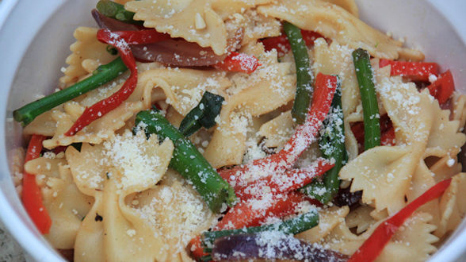
Dinner: Broccoli Rabe Farfalle is fresh and delicious. Be sure to use vegetable stock to keep it truly veggie if you’re doing a Meatless Monday. Tip: Broccoli can substitute for broccoli rabe, and skip the spice if your kids aren’t up to it!
Dessert: No one can say “no” to Peanut Butter Chocolate Rice Krispie Treats.
Tuesday
Lunch: Chicken Rice Soup with Greek Meatballs is a great meal to make over the weekend and enjoy all week long. Don’t want to make beef meatballs? Use ground turkey or chicken instead.
Dinner: The kids will love Turkey Breast in Blankets. Think upscale (and healthier) pigs in a blanket, and it couldn’t be easier with store-bought puff pastry.
Snack: Roasted Garlic, Feta and Walnut Spread with Toasted Flat Bread is perfect nosh.
Wednesday

Lunch: Pan Bagnat takes all the delicious ingredients of Nicoise Salad – tuna, hard boiled eggs, olives, and veggies – and tucks them in a baguette. Bonus: It’s even better if you make it ahead, wrap tightly, and refrigerate.
Dinner: Pasta Night! Enjoy Big Beef Meatballs with Bucatini for a crowd pleasing dinner. Freeze any leftover sauce to enjoy later.
Dessert: Lemon Squares are a great weekday dessert – and a perfect snack with a cup of coffee or tea the next day.
Thursday
Lunch: Spinach and Tuna Artichoke Melts come together in a flash. A versatile sandwich, you can swap out tuna for chopped turkey or chicken breast, and roasted red peppers or tomatoes for the artichoke hearts.
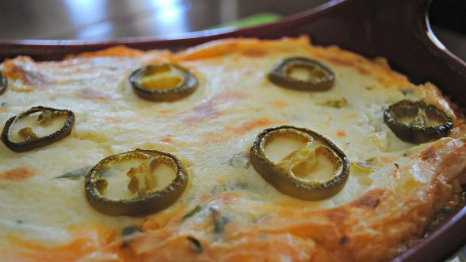
Dinner: Comfort food with a zing: Chili Shepherd’s Pie is the perfect dish for a chilly night. Omit the jalapenos if you have non-hot-loving family members.
Snack: Whip up a restaurant favorite at home with these Jalapeno Poppers.
Friday

Lunch: Nachos for lunch? Yes, you can with these healthy Fish Toastachos.
Dinner: Lasagna Joes are a fun Friday night dinner. What could be better than a lasagna you can pick up and eat?
Dessert: Who says cinnamon rolls are only for breakfast? They make a great dessert! These Mini Muffin Cinnamon Rolls – made with a tube of crescent rolls – are best hot from the oven.
Saturday

Brunch: It tastes like the holidays with these delicious Ginger Pancakes. Remember, you can always freeze leftover pancakes or make a double batch to reheat for breakfast on busy weekday mornings.
Dinner: Entertain friends without breaking the bank with Warm Pearled Barley and Mushroom Salad with Flank Steak.
Cocktail: Pickle Juice Bloody Mary is a BLD weekend drink – great for brunch, lunch, or dinner time!
Sunday

Brunch: Make a restaurant-caliber brunch at home with Smoky Huevos Rancheros.
Dinner: The whole family will love Chicken Cutlets Milanese with Butter Beans and Gnocchi. Rachael keeps it simple with canned beans and store-bought gnocchi.
Dessert: You definitely don’t need to be a baker to make this impressive Key Lime Ice Box Cake – use a pound cake from the supermarket! No key limes? No worries, regular limes will do the trick.
8 Healthy Foods to Beat Holiday Sugar Blues
Seasonal creep isn’t just a problem with holiday decorations seeping into store displays as early as September. Though that’s pretty annoying all on its own.
It also marks an ever longer period when the healthy eating habits we try so hard to impose on our kids get corroded by one celebratory sugar bomb after another.
Weeks of Halloween candy blur into days of giving thanks with ample pie which, in turn, meld into one candy cane-spiked holiday party after another.
Sure, we try to stem the tide. But truth is, I’ll only fight it so far. I’d prefer to focus on the battles I can win. For me, that means working to find balance.
Since I know October, November and December tend to pack in the sugar, I try to counter that by packing lunches for my son that are jammed with some good stuff.
One of the easiest – but least appreciated – ways of getting healthy foods into kids is whole grains. These days, there are plenty of whole-grain foods that don’t taste “whole grain.” There also are some whole-grain surprises you might not have considered.
So here are my top eight ideas for slipping whole grains into your kids’ lunches. And maybe even your own.
1. Popcorn: Seriously. Even when it’s coated in powdered “cheese” or caramel sauce, it’s still a whole grain. It’s also easy to pack, and kids consider it a treat. It also makes delicious “croutons” for salads and soups. These days, you even can get popcorn formed into tortilla-like chips.
2. White whole-wheat flour: You’ll find it in the baking aisle right next to the regular whole-wheat flour. But it’s a different variety of wheat. It has the same nutrition as the regular whole-wheat stuff, but a flavor and texture similar to all-purpose flour. Substitute it one-for-one in any recipe – pancakes, cookies, banana or pumpkin breads, even dumplings and biscuits.
3. Pretzels: Most grocers now have plenty of choices for whole-grain pretzels. Like popcorn, they are easy to pack, and kids consider them a great snack. They also are perfect for dunking in guacamole or hummus.
By J.M. Hirsch
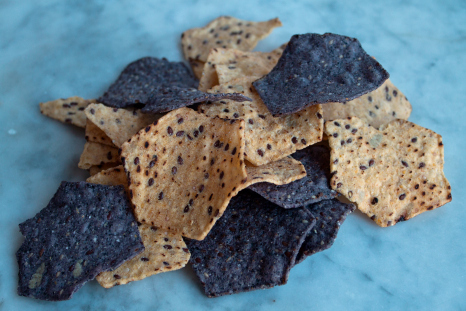
4. Tortilla chips: Speaking of dipping, have you checked out the tortilla chips aisle lately? Chips these days are jammed with seeds and whole grains. Accompany them with a packet of salsa and you get veggies as well as grains.
5. Wraps: Whether you prefer pita pockets, flour tortillas, naan or some other flatbread variation, just about all of them are available in whole-grain versions. It’s an easy way to wrap a kid’s favorite sandwich fixings in something healthy.
6. Rice: Brown rice is great for mixing into salads and soups. No time to boil some up (I’d do it at dinner and pack the leftovers)? Check out the heat-and-eat rice section at the grocer. There are tons of whole-grain packets that nuke in seconds and can be popped into a thermos.
7. Sushi: This is almost too easy. Even 7-Eleven sells sushi these days. Grab some brown rice sushi filled with avocado or cucumber (or more adventurous stuff if your kid is game). It’s an effortless, healthy lunch kids will get excited about.
8. Pasta: You no longer are allowed to complain that you don’t like the taste of whole-wheat pasta. Grocers have tons of varieties, including many designed to appeal to folks who don’t like whole grains. Find one your kids enjoy and stick with it. At dinner, boil up too much. The next morning, toss the leftovers with meat, veggies, and vinaigrette for an easy pasta salad. Or toss it with cheese and nuke it for mac and cheese (pack it in a thermos).
November 14, 2013
10 Handy Uses for Parchment Paper
I was introduced to parchment paper a few years ago, and now it’s a staple in my pantry. Heat-resistant (unlike wax paper) and virtually non-stick (unlike aluminum foil), it is the kitchen wonder paper. I order it in huge rolls from Amazon so I never run out.
If you want to give it a try, here are 10 uses for parchment paper to make your life easier in the kitchen:
1. Line cookie sheets and baking pans: This one goes without saying, but it can really be a lifesaver. I make cookies at least a few times each week, and I often had trouble with very thin cookies sticking to my cookie sheets. But not anymore! Even the thinnest, most delicate cookies come right off of parchment paper.
Bonus: No need to toss the sheet after each batch – I use the same sheet many times over. Plus, this reduces wear and tear on your cookie sheets.
Also, line cake pans, lasagna dishes, and baked pasta pans with parchment paper for non-stick results and easy clean up. Be sure to spray pans with non-stick cooking spray prior to inserting parchment paper so the paper stays in place. It also comes in handy when roasting anything, including meatballs, meatloaf, and chicken. I am behind any product that cuts down on dishes!

Courtesy of: Flickr/Veganbaking.net
2. Use in place of a bowl when sifting dry ingredients: When baking, sift ingredients like flour, baking powder and soda, salt, and spices over a piece of parchment, then lift and pour right into your bowl. Another dish eliminated and a potential mess easily contained.
3. Store your leftovers (and prevent sticking): Use parchment paper to divide leftovers like chicken breasts, pizza slices, and pancakes for non-stick food storage. The same method is also great for freezing foods like burgers, bacon, tortillas, and baked goods prior to placing them in a freezer bag.
4. Artfully wrap baked goods: Parchment paper makes the perfect wrapping paper for baked goods – and it looks chic and rustic. After wrapping, use tape to secure and finish with twine or ribbon.
Pro Tip: This method is perfect for wrapping the most appreciated holiday gifts ever: baked goods. Trust me, your kids’ teachers don’t want mugs. They want brownies.
5. Make dinner in a snap: One of the easiest and healthiest meals is parchment-wrapped fish or chicken. Place some veggies on the parchment paper first, top with your protein, drizzle with some olive oil, wrap tightly, and bake. Again, there aren’t any pots and pans to wash (easy cleanup is a theme here!). Check out Rachael’s Fish in a Sack (pictured above) and Chicken in a Sack and give it try for yourself.
Courtesy of: Flickr/alibree
6. Make disposable and crafty placemats: Having kids over for dinner? Cut placemat-sized squares from parchment paper and put place settings on top. Who cares how messy the kids are? Just toss when dinner is done.
7. Cut down on microwave messes: Instead of paper towels, cover dishes in the microwave with parchment paper to cut down on splatter. Your microwave will thank you.
8. Make a snack cone: Don’t you love when you go to a restaurant that serves fries in a cone? Make your own at home with parchment paper by simply rolling the paper into a cone and securing with tape. This works great for all sorts of munchies like popcorn and nuts, too.
9. Replace paper cupcake cups in a pinch: Isn’t it the worst when you’re making muffins or cupcakes and run out of liners? Skip rushing to the store, and use parchment paper instead. Cut 5-inch squares of parchment paper, spray each muffin cup, and press a paper square into each cup, taking care to press the paper firmly against the sides to avoid folds.
10. Use as a cookie cooling rack: If you’re baking multiple batches of cookies, chances are you don’t have enough cooling racks to accommodate all of your treats. Line your counter with parchment paper and transfer partially cooled cookies to free up your racks for those that are hot-from-the-oven.
November 13, 2013
7 Easy Thanksgiving Recipes for Beginners
Ready for Thanksgiving? We’re counting down with great stories that will get you ready (and inspired!) to make it a beautiful holiday. And don’t miss our collection of 40+ no-fail recipes!
Thanksgiving dinner has a bad rap. It’s lamented as a huge production, fraught with stress and too many details. When should you put the turkey in, again? Did Elizabeth mention she was bringing her new boyfriend? How did Nana say to keep the mashed potatoes warm without drying them out?
If you’re new in the kitchen, you might find yourself day-dreaming of bowing out of this year’s festivities, with promises that you’ll be better prepared in 2014.
But don’t give up just yet! Instead of offering to bring a bottle of sparkling cider and call it a day, take Thanksgiving head-on. With simple, delish recipes that aren’t difficult (But hey, your guests don’t need to know that, right?), even the newest cooks can feel confident about putting these dishes on the table.
Butternut Squash and Sage Crostini
Why it’s a great appetizer for beginners: This is a seasonally inspired app that guests assemble themselves. If you can slice bread and have approximately 10 minutes, then this crostini recipe is for you.
And don’t let the potential challenges of chopping a butternut squash scare you – pre-cut options abound at your local grocery store. Or, you can follow these simple instructions and do it yourself.
If you’re loving the idea of a crostini bar, check out this divine recipe for Mushroom Pate and Puttanesca Bruschetta.
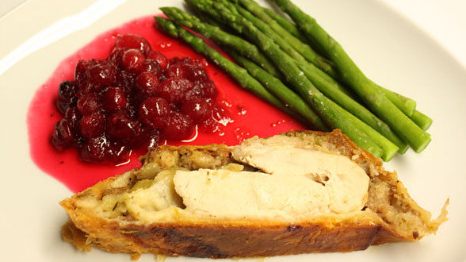
Roast Turkey Breast with Herb Butter
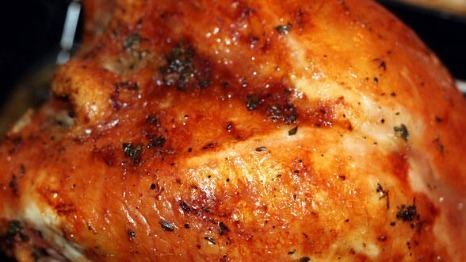
Photo via Lisbeth Axell
Why it’s a great turkey option for beginners: With only six ingredients, this recipe is as simple as it is delicious. Skip the big bird this year and go straight for savory, white meat that everyone will love.
It also roasts in less than an hour, meaning that impatient eaters (nothing wrong with that!) get to dig in sooner and stressed hosts have more flexibility to get it in the oven.
Why it’s a great gravy for beginners: Because gravy needs to thicken, some recipes require a few more ingredients or whisking stages to achieve the desired consistency.
This gravy has five ingredients and minimal steps, so you’ll have it whipped up without breaking a sweat. Be sure to keep an eye on it though (or designate a guest to be the babysitter), and give it a stir every now and then to prevent burning.
Corn Stuffing Muffins with Bacon

Photo via Lisbeth Axell
Why it’s a great stuffing for beginners: Let’s first answer this: Who doesn’t like muffins? They’re not only tasty, but fun to eat and simple to serve.
This recipe is a cinch because you simply enhance a corn muffin mix with spices and (everyone’s favorite!) bacon for extra pop. Toss ‘em in a basket with a little butter on the side, and you’re ready to go.
Why it’s a great cranberry sauce for beginners: While it may look difficult to make your own cranberry sauce and skip store-bought, the prep here isn’t complicated. Everything gets thrown into one pot for easy clean-up, the name is punchy, and the orange-cranberry combo here is perfectly paired.
Sour Cream and Onion Mashed Potatoes

Photo via Lisbeth Axell
Why it’s a great potato recipe for beginners: Sour cream and onion is a flavor combo that practically everyone goes crazy for.
This recipe is not only easy, but has a big payoff in a surprise flavor-twist for your guests. Four ingredients and about 25 minutes of prep and cooking time yield a mean pot o’ mashies that will go in a flash.
Pecan Pie with Chocolate-Cinnamon Whipped Cream
Why it’s a great dessert for beginners: Rachael always says that baking isn’t her speciality, and it doesn’t have to be yours either.
The secret to this tasty treat is grabbing some pies from the store and creating your own whip for a personal touch. An added bonus? You get to double-up on ingredients and use Grand Marnier (or the orange liqueur of your choice) again.
The last step? Watch your food magically disappear, relax, and grab a glass of wine. You’re a pro now!
Feeling bold? See our new Thanksgiving recipe collection, with family favorites and new twists on classic dishes that anyone can pull off!
(Top image via Flickr/suckamc)
November 12, 2013
Dinner Deal: Inside-Out Chicken Cordon Bleu
When I was a kid, Chicken Cordon Bleu was one of my favorite dinners. Gooey cheese and salty ham wrapped up with tender chicken – what’s not to love? Nowadays, I’m not sure my metabolism can support eating like I did then, which is why I’m all about this un-breaded version of the classic.
The beauty of this Inside-Out Chicken Cordon Bleu is in its bold, satisfying flavors. Put tangy Dijon mustard, sharp Swiss cheese, and rich roasted ham together and you’ll have a budget-friendly meal that you (and the kid in you) can truly savor.

Inside-Out Chicken Cordon Bleu with Dill-Carrot Rice
Makes 4 servings
For the rice:
1 tbsp olive oil
1 tbsp butter
2 medium carrots, chopped
1 cup long-grain white rice
1 1/4 cups chicken stock or water
Salt and ground black pepper
2 tbsp chopped fresh dill
For the chicken:
1 tbsp olive oil
8 slices good-quality ham
4 slices Gruyère or Swiss cheese
2 tbsp Dijon mustard
4 (4- to 6-ounce) boneless skinless chicken breasts
Salt and ground black pepper
1. Preheat an oven to 400 degrees F.
2. To prepare the rice, place a medium saucepan over medium heat with the olive oil and butter. Add the carrots and cook, stirring occasionally until starting to soften, 2 to 3 minutes. Add the rice, stock or water, and a pinch of salt and pepper to the pan. Bring the liquid up to a full boil, then reduce the heat to low, and place a tight-fitting lid on the pot. Steam the rice until it’s tender and all of the liquid has been absorbed, 15 minutes. Remove the pot from the heat, and let the rice sit for 5 minutes. Fluff the rice with a fork, add the dill, and keep warm.
3. While the rice is steaming, prepare the chicken. On a clean work surface, lay one piece of ham on top of another with a slight overlap, place a piece of cheese over the ham, and then spread a bit of mustard over the cheese. Season a chicken breast with salt and pepper, lay it over the cheese, and wrap the ham around the chicken to enclose it. Repeat with the remaining ingredients to make four portions.
4. Place a large oven-safe sauté pan over medium-high heat with the olive oil. Place the chicken in the pan, cheese-side down, and sear until deep golden brown, about 3 minutes. Flip the chicken over, and transfer the pan to the oven. Roast the chicken until fully cooked, 8 to 10 minutes.
5. Serve the chicken with the warm rice.
Love a good Dinner Deal? Try these:
Cider Braised Chicken with Peppery Escarole
Rustic Beef and Tomato Stew
One-Pot Broken Florentine Lasagna
—
Patrick W. Decker’s life revolves around food. Always has, probably always will. As a graduate of The Culinary Institute of America and past member of the culinary teams for Food Network stars like Rachael Ray, Sandra Lee, Marc Forgione, Bobby Deen and Paula Deen, he now works as a food writer in NYC by day and a recipe developer at his home in New York’s Hudson Valley by night. You can see what he’s up to by following him on Instagram & Twitter at @patrickwdecker or visiting his website at patrickwdecker.com.
November 10, 2013
13 Things to Do With Pumpkin Seeds
Pumpkins are everywhere this time of year, and we use them in everything from our favorite desserts to household decor, but did you know that you’re probably throwing out one of the best parts of this super-satisfying squash?
Pumpkin seeds, also known as pepitas, can be used in a variety of tasty ways. Here are 13 to get you started!
Roast ‘em
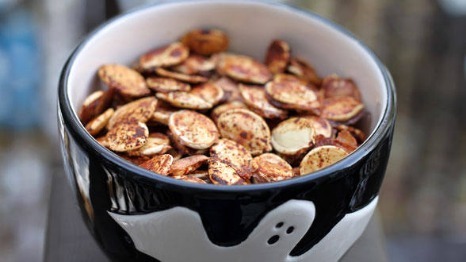
Roasted pepitas make for a great, healthy, and seasonal snack and can be prepared in under 30 minutes. Here are a few of Rachael’s roasted pumpkin seed recipes to try:
Make a spread
Pumpkin butter is a wonderful substitute for peanut butter, and it’s simple to make your own. Kids’ lunch expert J.M. Hirsch suggests:
“Get two 7-ounce packages of raw hulled pumpkin seeds (about 3 1/2 cups). Spread them on a rimmed baking sheet at bake at 325 F for 15 minutes, or until very lightly browned. Remove from the oven and let cool. Dump the seeds into a food processor. Process for several minutes, or until they form a dry sand-like mixture. Add 2 tablespoons olive oil and 1 teaspoon kosher salt. Puree until it forms a thick peanut butter-like mixture.”
Go south of the border
Rachael’s Mexican-style pesto, among others, can be made using pumpkin seeds. These recipes offer up wow-worthy taste and texture:
Pepita pesto pasta with roasted squash
Sweet corn soup with Mexican-style pesto
Mexican macaroni and grilled corn
Get saucy
Try pepitas in sauces to add depth to any dish. Check out:
Tell us about your favorite ways to use pumpkin seeds in the comments.
(Image courtesy of the_girl / flickr)
November 8, 2013
Your New Weekly Meal Plan
Welcome to the Weekly Meal Planner! Whether you work all day and are out of steam when the dinner hour hits, or are fresh out of dinner ideas and in a cooking rut, we are here to make your life easier.
We’ve gotten a few comments and questions about meal planning for picky eaters, and let me tell you, I have been there. Dinners in my house are all about making one meal work for everyone. If it’s a dish with some ingredients that might not appeal to my picky diners, I put together their dinner with components of the meal before the final product.
For example, to serve the chicken and rice pilaf dish for Wednesday night below, I would serve my finicky eaters the chicken without scallions and the rice pilaf without artichokes and pine nuts. The key here: You’re not making two separate meals, but you’ll introduce choosier members of your family to new dishes. Success!
I will continue to include some picky eater tips today and in the coming weeks. In the meantime, have a great week, and let me know what dishes you made in the comments below!
(Meatless) Monday

Lunch: Ratatouille-Stuffed Zucchini Pizza is a veggie delight with zucchini, eggplant, bell peppers, and tomatoes.
Dinner: Spaghetti with Cauliflower and Tuna is an inexpensive Meatless Monday dinner. Picky eaters? Omit the tuna and pepper for their meals and top with parmesan.
Dessert: Pumpkin Chocolate Chip Squares
Tuesday
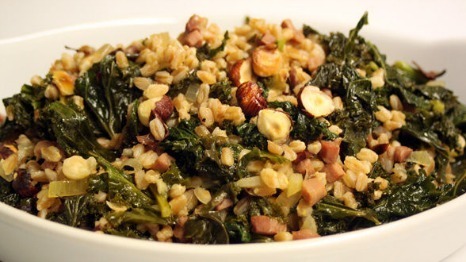
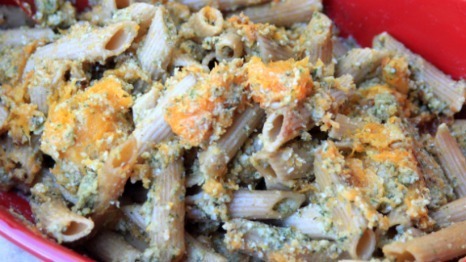
Lunch: Make Pearled Farro with Hazelnuts and Greens on Sunday to enjoy for a weekday lunch. No farro is the house? Swap in quinoa, rice, or even couscous.
Dinner: Vermont Chicken Pie is a shortcut comfort food with refrigerated biscuits filling in for homemade pie crust. Make it even easier with rotisserie chicken.
Snack: Splurge on decadent Ohio-Buffalo Nachos. They’re nachos with a twist – potato chips stand in for tortilla chips!
Wednesday

Lunch: Quick Chicken Soup with Pasta - freeze the leftovers in individual portions to thaw and enjoy later.
Dinner: It doesn’t have to be spring to enjoy Lemon and Rosemary Chicken with Spring Onions, Rice Pilaf with Artichokes and Pine Nuts - a complete and healthy meal.
Dessert: Oatmeal Chocolate Chip Bars are perfect for packed lunches all week long.
Thursday

Lunch: Chicken Salad with Yogurt-Ranch Dressing swaps out mayo with yogurt for a healthier chicken salad.
Dinner: It’s Sandwich Night! Get into the Thanksgiving spirit with this Turkey and Bacon Monte Cristo - a hot grilled turkey sandwich with bacon, cranberry sauce, cheese, and pickles. It comes together in under 15 minutes! Make a picky eater version with just turkey, bacon, and cheese.
Snack: Crispy Roasted Chickpeas are a healthy alternative to salty chips.
Friday

Lunch: Chicken Tender Salad will be a hit with adults and kids with only six ingredients, including baked corn chips that are crushed and tossed in the salad for added crunch.
Dinner: French Onion Soup-Topped French Bread Pizza and Salad with Dijon Vinaigrette is a fun and easy Friday night dinner. Omit the onion mixture for picky eaters and stick with cheese.
Dessert: TGIF! Have the kids help you make S’mores Cupcakes. They couldn’t be easier: store-bought cupcakes (or from a mix), canned frosting, and s’more toppings – mini marshmallows, chocolate chips, crushed graham crackers – come together for a fun dessert.
Saturday

Brunch: Cheddar-Whole Wheat Waffle BLT Sandwiches are hearty, sweet and savory.
Dinner: Grilled Pork Chops with Scallions, Garlic and Herbs
Cocktail: Celebrate the weekend with a special cocktail: Prosecco Cocktail with Berries.
Sunday

Brunch: Invite friends for that perfect mid-morning meal! This Rosemary Potato Frittata feeds a crowd.
Dinner: Grandpa’s Braised Beef is a fabulous Sunday supper that you can prepare in the afternoon, pop in the oven, and gather around the table later for a relaxed family meal. Picky eaters should dig into the beef, crusty bread and potatoes.
Dessert: Fudgy Brownies with Peanut Butter Frosting are a sweet ending to the weekend.
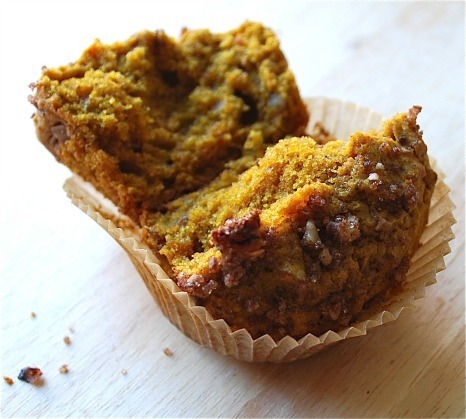
Perfect (and Gluten-Free!) Squash Muffins
What’s better in chilly weather than a delicious, warm, and wholesome treat? With eggs, nuts, winter squash, a small amount of sugar, and a gluten-free flour mix that contains chickpeas, these muffins pack protein and vitamins. Make them to accompany your morning brew or as part of a holiday brunch spread. Not a bad way to start the day!
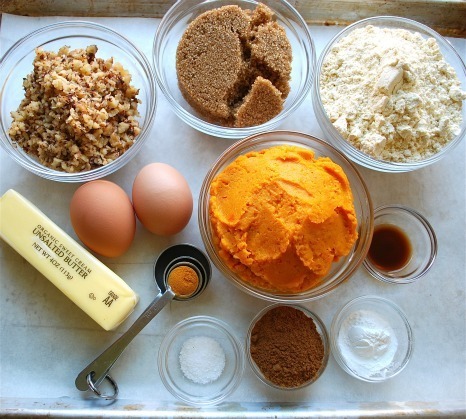
What makes these muffins special is the sweet, orange-gold squash that’s baked-in. You can use canned pumpkin, which works just fine, or you can roast your own squash or sweet potatoes and make a puree.
One advantage to roasting your own is the toasty, caramel smell it gives your kitchen. I used roasted kabocha squash, a winter squash variety with rich flesh, lots of flavor, and low water content. When your roasted squash is fork-tender, let it cool, then scoop out the flesh and puree it in the food processor (Tip: You can make it a day ahead and store in in the refrigerator until you’re ready to bake the muffins).

These muffins have a surprisingly delicate crumb, which you might not expect from a gluten-free pastry, and they’re rich and moist from the puree. I found that the muffins are good stored at room temperature for a couple of days. If you can’t eat them that quickly, freeze them, and when you’re ready to eat, defrost and pop a few in the oven or toaster oven to warm them up.

If you love pumpkin pie spice, this is a great chance to use it! The recipe calls for a tablespoon of pumpkin pie spice, but you can make your own using a combo of cinnamon, cloves, nutmeg, ginger, and allspice (see how below).
I also added turmeric to the recipe to boost the muffins’ golden color, but you can’t detect the taste. Turmeric, known for its use in Indian and Persian cuisine, is now recognized for all kinds of health benefits, so this is one more way to sneak it into your diet.
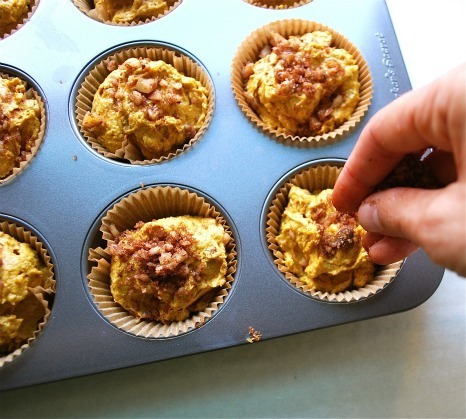
The muffins are finished with a simple crumb topping of ground walnuts, brown sugar, and cinnamon. If you want to avoid nuts, substitute ground pumpkin or sunflower seeds.
Perfect Squash Muffins
Makes 1 dozen muffins
Ingredients
1 cup Bob’s Red Mill Gluten-Free All Purpose Flour
1 tbsp pumpkin pie spice (or 1 tsp cinnamon, 1 tsp cloves, 1 tsp allspice, 1/2 teaspoon ginger, 1/4 tsp nutmeg)
1/4 tsp turmeric
1/2 tsp salt
2 tsp baking powder
1/2 cup unsalted butter, at room temperature
1 cup + 2 tablespoons brown sugar
1 cup pumpkin puree
2 eggs
2 tsp vanilla extract
1/2 cup + 3 tablespoons walnuts, coarsely ground
1 tsp cinnamon
Instructions
1. Preheat the oven to 350F, and line a muffin tin with paper muffin liners.
2. In a large bowl, whisk together the flour, pumpkin pie spice, turmeric, salt, and baking powder, and set aside.
3. In a stand mixer, cream the butter and sugar together until light and fluffy, about 3 to 4 minutes. Add the pumpkin puree, eggs, and vanilla, and mix to incorporate. Add the flour mixture in two batches, and mix just until it’s no longer visible. Fold in 1/2 cup of the walnuts.
4. Spoon the batter into the muffin tins. Mix together the remaining 3 tablespoons of walnuts, the two tablespoons of brown sugar, and the teaspoon of cinnamon, and sprinkle the mixture on top of the muffins.
5. Bake the muffins for 35 minutes, or until a toothpick inserted in the middle comes out clean.
Want more gluten-free goodness?
Gluten-Free Apple Cake
Gluten-Free Pancakes
Herbalicious Rice Meatballs (Gluten- and Lactose-Free)
—
Louisa Shafia is the author of The New Persian Kitchen, a book of healthy Mediterranean and Silk Road-inspired recipes, and Lucid Food: Cooking for an Eco-Conscious Life, a collection of seasonal recipes and eco-friendly kitchen tips. See Louisa’s cooking videos and her schedule of upcoming events at http://lucidfood.com/.
Rachael Ray's Blog

- Rachael Ray's profile
- 296 followers

