
Rachael Ray's Blog, page 38
December 19, 2013
Get Inspired: 21 Meal Ideas to Try This Week
Welcome to the Weekly Meal Planner! Whether you work all day and are out of steam when the dinner hour hits, or are fresh out of ideas and in a cooking rut, we are here to make your life easier. Note: We’ll include tips for picky eaters and easy food swaps if you don’t have an ingredient on-hand.
Happy Holidays! Christmas week has arrived! We’ve included some suggestions for holiday meals, as well as some easy post-holiday ideas. Let’s get started!
Meatless Monday

Lunch: No one will miss the meat with Spicy Roasted Carrot and Squash Mac ‘n Cheese.
Dinner: Make a big batch of ratatouille on Sunday and enjoy Ratatouille and Ricotta-Stuffed Peppers for dinner tonight.
Snack: Sweet Sesame Five-Spice Popcorn adds an explosion of flavor to this everyday snack.
Tuesday (Christmas Eve)
Lunch: Enjoy a surprisingly light veggie lunch before the holiday eating begins with Roasted Cauliflower Au Gratin.
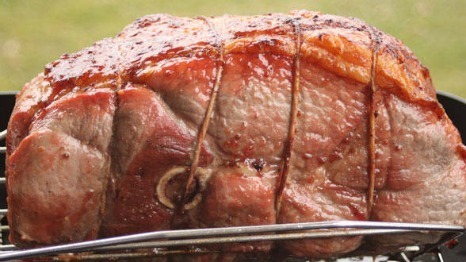
Dinner: Fresh Bone-In Ham with Maple Cherry Glaze makes an impressive centerpiece for your Christmas Eve table. Check out all of our suggestions for holiday meals here.
Dessert: Eggnog-Pannetone Bread Pudding is a special holiday dessert. Plus, the portioning is done for you since you bake it in a muffin pan. Don’t forget the whipped cream!
Wednesday (Christmas)

Brunch: Butternut and Apple Galette is an elegant meal that’s perfect for the holidays.
Dinner: Enjoy Rachael’s traditional Christmas dinner that feeds a crowd – Christmas Pasta! The secret ingredient to this festive sauce is allspice or cinnamon.
Snack: Cheese and Herb Puffs are the perfect Christmas hors d’oeuvres. Don’t be intimidated – they are surprisingly simple to make.
Thursday

Brunch: Kids will love this Rosemary Potato Frittata that features potatoes and cheese – yum! Leftovers are great re-heated or at room temp.
Dinner: Bacon, Bourbon and Black Pepper Bow Ties is a quick and easy post-holiday dinner. No bourbon in the house? Use wine or chicken stock.
Dessert: Fabulous Five-Minute Fudge Wreath is one of Rachael’s all-time most popular recipes. Make it early in the week with the kids and enjoy all week long.
Friday

Lunch: Chipotle Chicken Tortilla Salad is a healthy make-your-own takeout lunch.
Dinner: Take it easy tonight and serve upscale sammies with these flavorful Curried Lamb or Turkey Sandwiches on Naan Bread.
Dessert: Keep the holiday celebration going with festive Gingerbread. It’s delicious served warm with whipped cream or ice cream.
Entertaining Saturday

Brunch: Pecan Cinnamon and Nutmeg Pancakes aren’t any ordinary pancakes. Simply add spices to a store-bought mix and make a quick apple sauté for the topping.
Dinner: Fancy Fillet of Beef with Marsala Sauce, Roasted Garlic Mashed Potatoes, and Green Beans is the perfect dish for entertaining, most of which can be made in advance. Cheers!
Snack: Your guests won’t be able to resist Crab Arancini (Deviled Crab Balls).
Family Sunday
Brunch: French Toast Casserole is a crowd-pleaser. Make it Saturday night and bake the next morning.
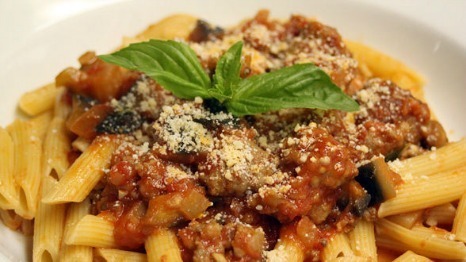
Dinner: Pasta night! Make the sauce early in the day and enjoy Sweet Sausage and Eggplant Penne for your Sunday supper.
Dessert: Pass the Christmas cookie platter (we know you’ll have plenty of leftovers!) which should definitely include these festive Thin Mint Chocolate Sandwich Cookies.


Red Velvet Thumbprints: A Twist on a Classic Holiday Cookie
The holidays mean many things to me. Family. Christmas carols. Decorations. Cookies.
Definitely cookies.
During the month of December, I spend many days baking my family’s favorite treats like frosted cut-out sugar cookies, pecan bars, and hello dollies. When I was little, my Aunt Missy taught me how to bake, and we would make mint thumbprint cookies every Christmas – a chocolate sugar cookie imprinted with mint chocolate.
My girls love red velvet cupcakes, so they were thrilled when I made these red velvet thumbprints, which combine their favorite cupcakes with my traditional thumbprint cookie.
These cookies are perfect for gifts or a holiday cookie tray. Like traditional red velvet, they aren’t too sweet, and the white chocolate filling is reminiscent of the classic cream cheese cupcake frosting.
Here’s how to make them:
The cookie dough is a stiff batter. Cream the butter and sugar, add the egg and food coloring, then the dry ingredients. As I mentioned, it will be stiff – very stiff. You might think it won’t come together but it will.
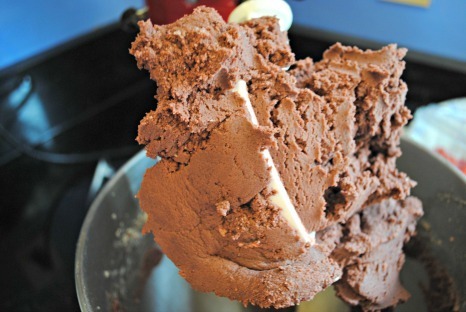
You will also notice that this dough is not bright red at all, but more of a reddish chocolate color. Red velvet doesn’t have to mean bright red. Classic red velvet means not-too-sweet and a mild chocolate flavor.
I use a natural food coloring (I like India Tree brand available on Amazon) but you could make these cookies without any food coloring with the same delicious results.
Next, shape the dough into one-inch balls. I have a mini ice cream scoop that is handy to make sure my cookies are the same size, and therefore, bake at the same rate.
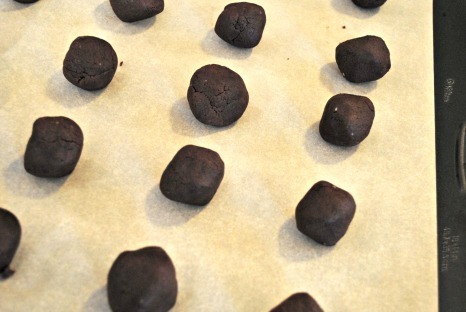
Before you put your cookies on the oven, press your thumb into the center of each to make an indentation. Do not press all the way to the bottom of the cookie, but make the indentation bigger than you think, because you want to have enough room to pour in the white chocolate filling.
Bake for about 12 minutes or until the cookies are set. Cool for two minutes, then use the end of a wooden spoon to remake the indentations. Again, make them bigger than you think you should.

Let the cookies cool completely, and then melt the white chocolate chips. White chocolate chips are more forgiving than semi-sweet chocolate chips when you melt them in the microwave, but you still need to check and stir often.
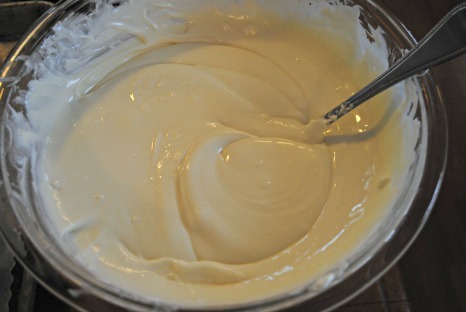
With a spoon or a zip-close bag with the corner snipped off, fill each thumbprint cookie with the melted chocolate. Let them stand until set.

Red Velvet Thumbprints
Ingredients
1 cup (2 sticks) butter, softened
1 cup sugar
1 egg
4 tsp. red food coloring (*Check your health food aisle, local health food store, or head online to find it. I like India Tree brand, which is available on Amazon. If you want to skip this step, you can make the cookies without any food coloring – still delicious!)
1 1/2 tsp. vanilla
2 cups flour
2/3 cup unsweetened cocoa
1/2 tsp. salt
2 cups white chocolate chips
Directions
1. Heat oven to 350 F. Line cookie sheets with parchment paper.
2. In a large bowl, beat butter and sugar with an electric mixer for about 2 minutes or until creamy. Add egg, food coloring, and vanilla and beat until well blended.
3. In a small bowl, whisk together the flour, cocoa, and salt. Add the dry ingredients to the wet ingredients, and beat until dough comes together - about one minute. The dough will be very stiff.
4. Shape the dough into one-inch balls and place on lined cookie sheets about 2 inches apart. Press your thumb in the center of each cookie to make an indentation. Do not press all the way to the bottom of each cookie.
5. Bake for 12 minutes or until set. Cool 2 minutes, then quickly remake the indentations with the end of a wooden spoon. Be sure to make decently sized indentations. Cool completely.
5. Melt the chocolate chips in the microwave until smooth, checking and stirring frequently to avoid scorching. Using a spoon or zip-close bag with the corner snipped off, fill each cookie with the melted chocolate and let stand until set. Store at room temperature.
Ready to bake more holiday cookies? Check out our picks for nine unique holiday cookies here!
How Red Cabbage Can Save Your Holiday Meal
It’s easy to get caught up in making comfort food over the holidays – which often leaves our guests crashed in food comas after the big meal is over.
Along with the meat, mashed potatoes, biscuits, and whatever various and sundry rich foods you’ll be making, you’re going to need a crisp, light side dish to balance the meal. I’m talking about salad, but it doesn’t have to be the traditional green kind.
That’s where the cabbage comes in.
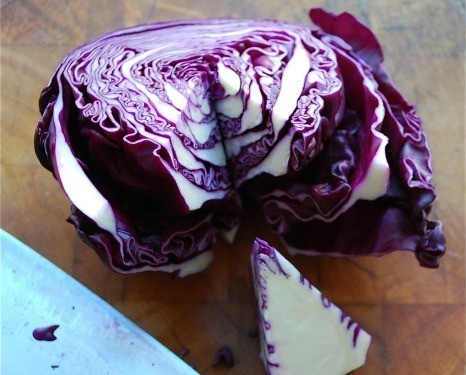
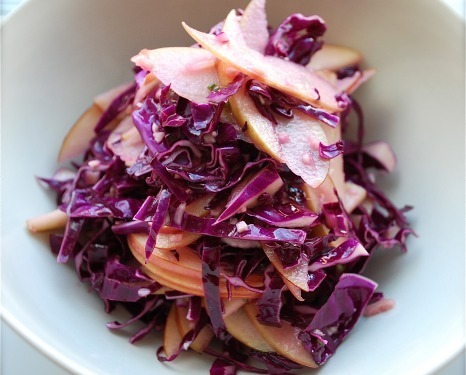
A simple red cabbage slaw is all you need to add that necessary element of freshness and zing. Red cabbage is abundant in winter, it sports a festive, purple color, and it’s cheap to boot.
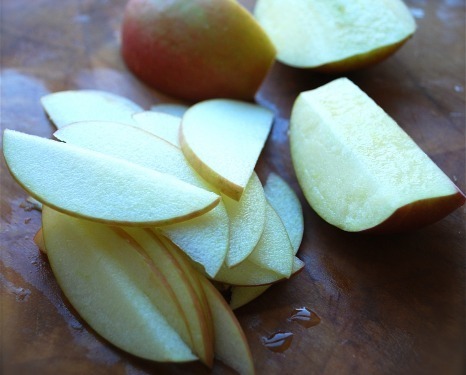
Pair the cabbage with crunchy apples, and you have a sweet-and-sour seasonal dish that will complement whatever you’re making for your big holiday dinner.
This recipe eschews the sour cream and mayo that you’ll often find in cole slaw and instead gets its flavor from tangy vinegar, sharp mustard, and a hit of nutty toasted sesame oil.
Sliced scallions and minced ginger also warm it up and give it a subtle Asian flavor profile.
You can keep this recipe super simple, as it’s written, or riff on it in any number of ways:
- Add toasted seeds or nuts like sesame, sunflower, hemp, almonds, or pecans.
- Add fresh or dried cranberries, raisins or currants, or shaved fennel.
- A small amount of minced anchovies will add an irresistible burst of umami (think Caesar salad dressing), while a garnish of toasted nori sea vegetable (the black wrapper that holds together your sushi) adds a bit of brine.
- A sprinkling of chili flakes, or green herbs like cilantro or parsley, work here too.
And the best part? You can get all the ingredients for the salad ready the day before, then toss it together just before serving.
Red Cabbage Slaw
Serves 4-6
Ingredients
1 small red cabbage, anywhere between 12 oz. – 1 lb.
2 crisp apples, like Fuji, Honeycrisp, or Granny Smith
1-inch chunk of fresh ginger, minced
2 scallions, very thinly sliced
1 tbsp. toasted sesame oil
2 tbsp. olive oil
3 tbsp. apple cider vinegar
1 tbsp. honey
2 tsp. Dijon mustard
Salt
(Don’t forget the extras and substitutions mentioned above for your own twist!)
Instructions
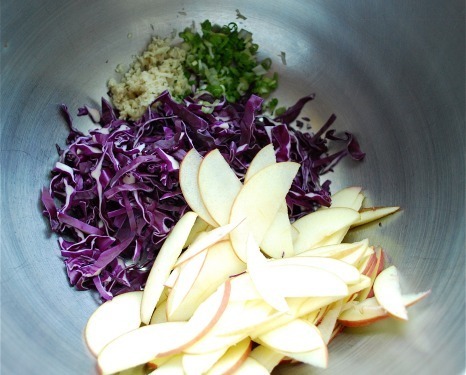
1. Halve the cabbage, and slice out the core. Thinly shred the cabbage, and place it in a large bowl.
2. Quarter the apples, and slice thinly. Add the apples to the cabbage along with the ginger and scallions.
3. Whisk together the oils, vinegar, honey, and mustard, and pour over the slaw. Toss to coat, and season with salt.
December 18, 2013
Double Peppermint Chocolate Cupcakes: Christmas on a Plate
I love the combination of peppermint and chocolate all year round, but even more so during the holidays.
A classic dessert my family serves at Christmas is peppermint ice cream with hot fudge sauce – it’s easy and delicious, yet somehow special, and even elegant.
I have a number of other peppermint-chocolate combo treats I love, including:
- Peppermint Bark: A great gift and classic winter time treat.
- Aunt Missy’s Mint Brownies: Brownies (from a mix!) with creamy mint buttercream frosting and a drizzle of chocolate.
- Mmmmint Brownies: Half candy, half brownie, these treats have a layer of creamy mint topped with a layer of chocolate ganache.
This year, I’m adding these double peppermint chocolate cupcakes to my “peppermint-chocolate greatest hits list.” A classic, rich chocolate cupcake is topped with a cream cheese-mint frosting and a sprinkling of crushed peppermint candies.
The star of this recipe is the frosting, so if you don’t have time to make homemade cupcakes, you can use a boxed mix and add a half teaspoon peppermint extract to the batter. No one will be the wiser!
Double Peppermint Chocolate Cupcakes

Makes 12 cupcakes
Ingredients
For the cupcakes:
3/4 cup unsweetened cocoa powder
1 1/2 cups flour
1 1/2 cups sugar
1/2 tbsp. baking soda
3/4 tsp. baking powder
1 tsp. salt
2 eggs
3/4 cup warm water
3/4 cup milk
1/3 cup canola oil
1/2 tsp. vanilla
1/2 tsp. peppermint extract
For the frosting:
1/2 cup butter, at room temperature
8 oz. cream cheese, softened
1 cup confectioner’s sugar
1 tbsp. heavy cream, plus more if needed
1/2 tsp. vanilla
1/2 tsp. peppermint extract
pinch of salt
Crushed candy canes or peppermint candies for decorating
Instructions
Make the cupcakes:
1. Preheat oven to 350 degrees F and line 12 cupcake cups with paper liners.
2. Whisk together cocoa, flour, sugar, baking soda and powder, and salt. Add eggs, water, milk, oil, vanilla and peppermint extract. Beat with an electric mixer at low speed until smooth, about 2-3 minutes.
3. Divide batter evenly among the 12 cupcake cups, and bake until a toothpick comes out clean – about 20-25 minutes.
4. Remove from oven and let cool completely prior to frosting.
Make the frosting:
1. Beat cream cheese and butter with an electric mixer until combined.
2. Add confectioner’s sugar and beat on low speed until combined.
3. Add heavy cream, vanilla, peppermint and salt and beat on medium high speed for 3-5 minutes, until light and fluffy. Add more cream if it’s too stiff, and add more sugar if it’s too thin.
4. Pipe frosting onto cooled cupcakes and top with crushed candies.
Want more cupcakes? Try these recipes:
Chocolate Peanut Butter Cupcakes
December 17, 2013
Eggnog in Your Kid’s Lunch Box? It’s the Season!
As quaint as the old holiday poem is, it’s been a long time since kids dreamed of sugar plums (or even knew what they were). Most kids today are all about the Christmas cookies, the candy canes, and the many treats they undoubtedly will get at their school parties.
My 9-year-old son yearns for all of those things, of course. But his dreams are filled not with sugar cookies or candies, but with rivers of eggnog. He would gladly replace all liquids consumed in December with a steady stream of eggnog.
Given the indulgent nature of the season, I try to roll with it. At least for a bit. But wow… Have you read the nutrition panel on that stuff? Never mind the fat… Take a look at the sugar!
Which is why when he recently asked me to include a bottle of it in his lunch, I put on the eggnog brakes.
But truth is, the sugaring up of eggnog is a relatively new thing. Traditional eggnogs were more boozy and creamy than sugary.
And that got me wondering whether I could create a simple eggnog at home that was just as delicious, but a little healthier. Or at least a little less sugary. Could I make a version that my son would love, but that I could consider more of a glorified smoothie than a glass of melted ice cream?
Turns out the answer is “yes.” But to make it work, you’ll need to embrace the idea of raw eggs.

It’s really not so radical. Real eggnog uses it. So do many cocktails and Italian pasta dishes. But since we’re dealing with kids, I wanted to keep it as safe as possible. That’s why I used pasteurized egg whites (the kind that come in the carton).
And this came with an added benefit: Using egg whites instead of whole eggs dramatically cuts the fat, but still gives the finished nog that rich, creamy body we want.
For natural sweetness and even more body, I added bananas, which are high in starch. Whole milk lends a rich creaminess without resorting to the heavy cream in traditional recipes.
Finally, spike it not with booze, but with cinnamon, nutmeg, and vanilla and rum extracts for a perfect seasonal treat.
And yes, it was delicious enough – and good enough for him – that I was willing to pack it in my son’s lunch. He thinks he’s getting eggnog. I think he’s having a smoothie. Everyone wins.
Lunch Box Eggnog
Start to finish: 5 minutes
Makes 2 servings
Ingredients
1 cup whole milk
1 banana
3 ice cubes
2 tbsp. pasteurized egg whites
2 tbsp. honey
1/2 tsp. rum extract
1/4 tsp. vanilla extract
1/8 tsp. cinnamon
Pinch nutmeg
Pinch salt
Instructions
1. In a blender, combine all ingredients and blend until completely smooth.
2. Pour into a drink bottle and keep chilled until ready to serve. If serving immediately, pour into a glass and top with a an additional pinch of cinnamon.
A Must-Try: Golden Lemon-Olive Chicken with Pine Nut Couscous
Rachael’s latest book, “Week in a Day,” helps you become a super meal-planner. Why not cook on one day, in order to have dinner ready for five? Buy your copy now!
If you’ve been bitten by the travel bug recently, but can’t quite hop on the next jet heading to an exotic location, we can help. Take yourself – or rather, your dinner table – to far off lands by switching up your normal dinner routine.
For instance, try the flavors of North African cuisine with this new recipe from the “World in a Day” week.
Rach writes: “Moroccan dishes (like this one) are filled with spices that are usually balanced with both citrus and something sweet, like dried fruit or honey. I combined those two ideas by using Meyer lemons, which are sweeter than traditional lemons.”
Bonus: No jet-lag!
Golden Lemon-Olive Chicken with Pine Nut Couscous
Serves 4
Ingredients
2 tbsp. EVOO
3 medium onions, peeled, each cut into 6 wedges, root end intact
4 fresh bay leaves
4 large cloves garlic, smashed
Salt and pepper
1 cup good-quality large green olives, pitted
5 tbsp. butter
4 Meyer lemons or organic lemons: 2 thinly sliced, 1 zested on a rasp-style grater and juiced, 1 juiced
A generous pinch of saffron threads
3 tbsp. flour
4 cups chicken stock, homemade or store-bought
1 1⁄2 tsp. ground turmeric
1 1⁄2 tsp. ground cumin
A pinch of ground cinnamon
1 1⁄2 to 2 pounds diced or shredded poached chicken
1⁄4 cup pine nuts
1 1⁄2 cups couscous
1⁄4 cup finely chopped fresh mint
1⁄4 cup finely chopped fresh flat-leaf parsley

Photo reprinted with permission from Atria Publishing. Photographer: Frances Janisch
Instructions
1. In a Dutch oven or deep skillet, heat the EVOO (2 turns of the pan) over medium-high heat. Add the onions, bay leaves, garlic, and salt and pepper. Stir for 3 to 4 minutes, then cover the pan and sweat the onions for 3 to 4 minutes more. Uncover the pan and stir in the olives.
2. Meanwhile, in a deep medium skillet, heat 1 tablespoon of the butter over medium to medium-high heat. Working in 2 batches, add the sliced lemons and gently brown. As they brown, add them to the onions and olives.
3. Add 3 tablespoons of the butter to the skillet and let it melt. Add the saffron and lemon zest and stir for 1 minute. Whisk in the flour and cook for a minute more. Whisk in 2 1⁄2 cups of the chicken stock, the turmeric, cumin, and cinnamon and let thicken for a couple of minutes. Stir in the lemon juice and reduce the heat to low.
4. Add the sauce to the onions, then add the chicken and gently stir to combine.
To make ahead:
Let cool and refrigerate.
To serve the night of:
1. Return the chicken to room temp before reheating gently over medium heat.
2. In a medium saucepan, melt the remaining 1 tablespoon butter over medium heat. Add the pine nuts and gently toast them to light golden brown.
3. Stir in the remaining 1 1⁄2 cups chicken stock and bring to a boil. Stir in the couscous, turn off the heat, cover, and let stand for 5 minutes.
4. Add the mint and parsley and fluff the couscous with a fork.
5. Spoon the couscous into a serving bowl. Transfer the chicken mixture to a serving bowl or platter, remove the bay leaves, and serve with the couscous.
Get your copy of “Week in a Day” for more great recipes!
[Top photo reprinted with permission from Atria Publishing. Photographer: Frances Janisch]
December 16, 2013
Dinner Deal: Pizzanini
This amazing Italian deli a few minutes from my house is known far-and-wide for its rock star panini. The secret? Aside from using great ingredients, they leave the bread on the grill, undisturbed, until it gets super crispy.
We’re talking 8 to 10 of the longest minutes of this starving lunch-goer’s life.
But it’s worth it – and it’s easy to do at home.
To save yourself the agony of a burned panini that’s still cold on the inside, set up your grill pan over medium heat (not high heat – slow and steady wins the race here), and don’t put any grease on it. Place your sandwich on the grill, weigh it down with a sheet pan and a heavy pot, and let the dry heat work its magic.
The difference between this crispy panini and a golden brown grilled cheese is the dry heat used to toast the bread. We butter the outside of a grilled cheese so that it will crisp up an otherwise soft piece of bread. To get a perfect panini, put crusty bread over dry heat to get an even crispier finished product.
Remember: With the power of this great secret comes great responsibility. Promise me, forevermore, that you’ll go forward and create delicious, crispy panini for as many of your friends and family as possible.
Pizzanini
Makes 4 servings
Ingredients
4 crusty rolls, split open
1/4 lb. thinly sliced pepperoni
1 lb. fresh mozzarella, thinly sliced
2 vine-ripe or Roma tomatoes
16 fresh basil leaves
Salt and ground black pepper

Instructions
1. Place a grill pan over medium heat. Do not put any oil or grease on the grill.
2. Assemble four sandwiches by stacking the bottoms of the rolls up with pepperoni, mozzarella slices, tomato slices, basil leaves, and some salt and pepper. Cap the sandwiches off with the tops of the rolls.
3. Place the sandwiches, rounded-side-down, on the grill. Place a baking sheet over the sandwiches and weigh the sheet down with a couple of heavy pots or cans – be sure to distribute the weight evenly so that the sandwiches press down evenly. Cook the sandwiches until grill-marked and toasted, 4 to 5 minutes.
4. Carefully remove the baking sheet. Flip the sandwiches and replace the baking sheet and weights. Cook the sandwiches until the other side is toasted and the cheese has melted, 4 to 5 minutes.
5. Serve the panini warm.
Christmas for Beginners
Getting ready for a beautiful holiday season? We’ll get you set up with our 30 favorite Christmas recipes, plus stories to help you feel inspired and organized. May your Christmas be merry and bright!
If you sit down with a group of friends and ask them what they’re doing for Christmas, I guarantee that you’ll hear completely different answers from each of them.
My large, loud Sicilian family meets up at least three different times between Christmas Eve and Christmas Day. We also go to the home of our family friends (who are Russian) and drink vodka. We drive for hours. We eat ravioli.
On the flip side, my friend spends Christmas quietly with her small family. They exchange gifts and play the piano and sing. They eat ham. They stay in one place. It is peaceful.
These experiences are all wonderful. They remind us that there’s no “right” way to celebrate a holiday, as long as you have the basics covered: People you love nearby, a warm place to gather, and good food on the table.
So, if you’re hosting the holiday for the first time and feel a little lost on what to serve, don’t fret. There’s no wrong answer! You take care of the friends and the location, and I hope these five, simple Christmas-friendly recipes help with the rest:
Appetizer: Shrimp Cocktail with Rach’s Quick Remoulade

Shrimp cocktail is a classic for fancy parties, but this recipe brings an unexpected twist with Southern flair. Plus, it’s ready in a flash!
Side: Scuderi Family Tradition – Christmas Star-Stuffed Artichokes
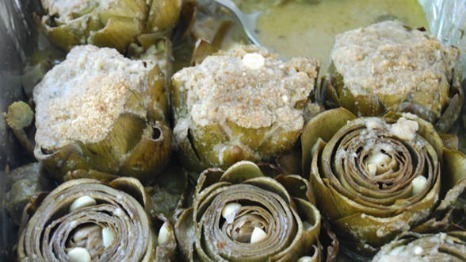
Stuffed artichokes always look impressive, but they’re much easier than they appear. All you need is a little time and some anchovies (trust me, they’re good!) to add some Italian flair to your festivities.
Main: Fennel-Stuffed Roast Chicken Dinner

The beauty of this preparation is you get big results for less effort: a meal and a side in one! These chickens also look beautiful on the table and are delicious with the seasonal flavors of fennel and thyme.
Drink: Gaspare’s Winter Punch

Rather than shaking up individual cocktails, punch is great for entertaining because you can put it out and let guests serve themselves. This punch‘s warm, winter flavors and bright fruits make it an instant crowd-pleaser.
Dessert: Fabulous Five-Minute Fudge Wreath

Who doesn’t love fudge over the holidays? Rich. Indulgent. Divine. This easy and delish fudge wreath is ready in a flash and looks impressive, to boot!
Brunch: Quick and Easy French Toast Casserole

Casseroles are perfect crowd-pleasers: They’re hearty and warm, and always filling. This casserole incorporates the flavors of French toast, without having to make individual slices for all your guests. Perfect!
[Top image via Flickr/ Roxanne Ready]
December 13, 2013
No-Bake Peanut Butter Fudge Pie
Pecan, pumpkin, and apple pies are all the standard classics during winter months. But this season, I decided to change things up with a no-bake peanut butter fudge pie.
No-bake pies have a number of perks:
#1: You can make them way in advance. This pie, and similar refrigerated pies like key lime and chocolate mousse, can be prepared and refrigerated up to four days prior to serving, and frozen for up to two weeks. You just need to thaw the frozen pie in the fridge overnight before serving.
#2: There are no baking issues to worry about, like the crust over-browning or a fruit filling bubbling over in the oven. Prepare the crust, whip up the filling, pour it in, and you’re done.
#3: No fussy pie crust! A cookie crumb pie crust requires no rolling or blind baking. Crush up some cookie crumbs, mix with some melted butter and a little sugar, pat it in the pie pan, and you’re off to the races.
Beyond being very easy to make, this pie is also rich and delicious. My kids (as a rule) don’t love pie and would take a brownie over a slice of apple pie any day.
They do, however, love this pie, which has a chocolate cookie crust topped with a layer of fudge and finished with a creamy peanut butter mousse.
Here’s how to make it – and make a pie lover out of anyone:
No-Bake Peanut Butter Fudge Pie
Makes one 9-inch pie
Ingredients
For the crust:
30 chocolate sandwich cookies
1 stick (8 tbsp.) butter, melted
1/4 cup sugar
For the chocolate ganache:
1 1/3 cups bittersweet or semisweet chocolate chips
2/3 cup whipping cream
2 tbsp. light corn syrup
1 tsp. vanilla
Pinch of kosher salt
For the peanut butter mousse:
1 cup creamy peanut butter (do not use natural-style)
1/2 cup confectioner’s sugar
1 tsp. vanilla
1 cup whipping cream, chilled
2 tbsp. sugar
Whipped cream for serving (optional)
Directions
1. Preheat oven to 350 F.
2. Make the crust: Grind cookies in a food processor until they are fine crumbs. Add melted butter and sugar, and combine until throughly mixed. Press into the bottom and up the sides of a 9-inch pie pan. Bake for 15 minutes or until set and fragrant.
3. Make the chocolate ganache: Combine chocolate chips, 2/3 cup whipping cream, corn syrup, vanilla, and salt in a heavy-bottomed sauce pan over low heat. Whisk constantly until smooth. Reserve 1/4 cup of ganache for decorating the pie if desired. Spread remaining ganache over bottom of crust, and transfer to freezer for about 30 minutes or until set.
4. Make the peanut butter mousse: Beat together the peanut butter, confectioner’s sugar, and vanilla until smooth. In a separate mixing bowl, beat the chilled whipping cream and sugar until very thick but not yet holding peaks. It should be the consistency of a thin yogurt. Add the cream to the peanut butter mixture in three additions and beat until combined. Spoon on top of the chilled crust, spread evenly, and decorate with reserved ganache.
4. Eat: Refrigerate for up to three days and serve cold, topped with whipped cream.
Looking for more pie recipes?
- Pecan Pie with Chocolate Whipped CreamCinnamon
- Apple Pie
- Sweet Potato Pie with Ginger
Chilaquiles: Your New Favorite Dinner
Rachael’s latest book, “Week in a Day,” helps you become a super meal-planner. Why not cook on one day, in order to have dinner ready for five? Buy your copy now!
We could really use a breather from a hectic week of work, couldn’t you? That’s why we love this new recipe from “Week in a Day.”
Shared in “It’s a Breeze” Week, which features “lazy meals that appeal to the lazy person who lives inside each and every one of us,” this dinner will swiftly become a go-to for busy cooks.
Don’t know what a chilaquile is? Rach writes: “Chilaquiles—in addition to being a fun word to say—are ripped up, toasted tortillas with toppings. Like a gigantic dinner nacho.”
Yum!
Tex-Mex Bacon and Eggs Chilaquiles
Serves 4
Ingredients:
12 corn or flour tortillas, cut into strips
Vegetable oil cooking spray
1 tbsp. vegetable oil
8 slices thick-cut smoky bacon, cut crosswise into 1⁄2-inch pieces
1 red onion, quartered and sliced
2 fresh red Fresno or jalapeño chiles, sliced
4 cloves garlic, chopped
1 (29 oz.) can black beans, rinsed and drained
1 tbsp. ground cumin
1 rounded tbsp. chili powder blend
Salt and pepper
1 cup dark beer (such as Negra Modelo), at room temperature
1 (14.5 oz.) can fire-roasted diced tomatoes
A small handful of fresh cilantro leaves, chopped
1 1⁄2 to 2 cups shredded hot pepper cheddar cheese or pepper jack cheese
4 eggs
1 avocado, diced
1 lime, cut into wedges
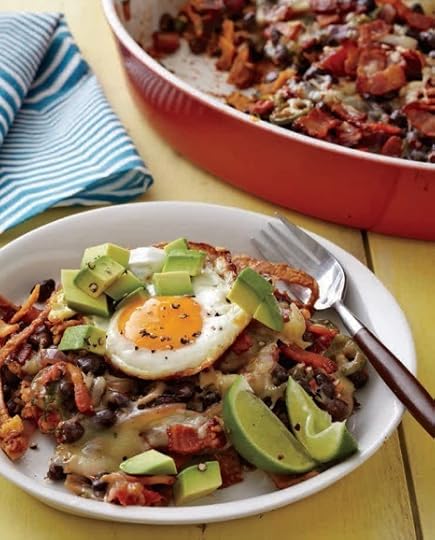
Photo reprinted with permission from Atria Publishing. Photographer: Frances Janisch
Instructions:
1. Preheat the oven to 425 F. Place a cooling rack over a baking sheet.
2. Place the tortilla strips on the cooling rack and coat with cooking spray. Bake until crisp, 12 to 15 minutes. Arrange in a 9 by 13-inch baking dish or a shallow 2- to 3-quart casserole. (Note: If making this dish to serve on Cook Day, leave the oven on. If making this for later in the week, you’ll bake the casserole on the night of.)
3. In a skillet, heat the oil over medium-high heat. Add the bacon and brown, then transfer to a plate with a slotted spoon.
4. To the drippings in the skillet, add the onion, chiles, and garlic and cook for a few minutes. Add the beans, cumin, chili powder, and salt and pepper. Stir in the beer and tomatoes and cook for 1 minute to thicken. Stir in the cilantro.
5. Adjust the seasonings, then pour over the tortillas. Scatter the bacon bits and cheese on top.
To make-ahead:
Let cool and refrigerate.
On the night of serving:
1. Return the casserole to room temp while you preheat the oven to 425 F.
2. Bake until bubbling and hot.
3. Meanwhile, cook the eggs sunny-side up or over easy – however your family members like their eggs.
4. Serve the hot chilaquiles topped with an egg and diced avocado, with a lime wedge for squeezing.
Get your copy of “Week in a Day” for more great recipes!
[Top photo reprinted with permission from Atria Publishing. Photographer: Frances Janisch]
Rachael Ray's Blog

- Rachael Ray's profile
- 296 followers

