
Rachael Ray's Blog, page 44
October 27, 2013
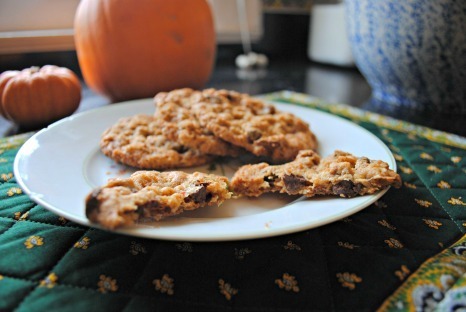
Halloween Cookies Make the Most of Your Leftover Candy
Halloween is this week and I don’t know about you, but I always over-buy Halloween candy.
After my kids have finished counting, sorting and trading their loot, and digging into my leftover stash, we always seem to have a big bowl of candy remaining. What’s left? Usually the candy no one wants.
These cookies are the perfect way to repurpose your chocolate Halloween candy and give it a whole new life (note: please only make these cookies with chocolate candy. I don’t think chopped Starburst or Smarties would work.). Oats and peanut butter give the cookies some heft to stand up to the chopped candy. Oh, and in case there isn’t enough chocolate with the Halloween candy, I included chocolate chips, too.
Full disclosure on this recipe – you’ll need to chill the dough for at least two hours, so plan accordingly. I hate it when I start on a new recipe and haven’t planned on chilling time. I think it should be the first line in any recipe. But I digress.
You start with the butter, peanut butter (any kind will do – crunchy, creamy, natural, whatever you have in your pantry) and sugars, and mix until creamy.

Then you add the eggs and vanilla, then dry ingredients, and mix it all together.

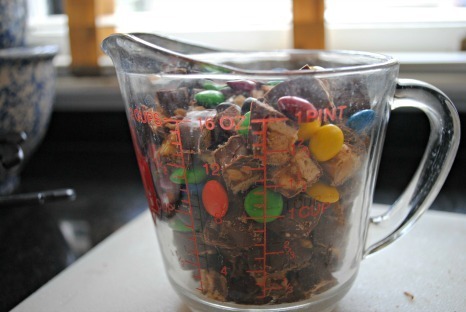
Collect your Halloween candy – you will need about 20 fun-sized pieces. I like M&Ms because no chopping is required.
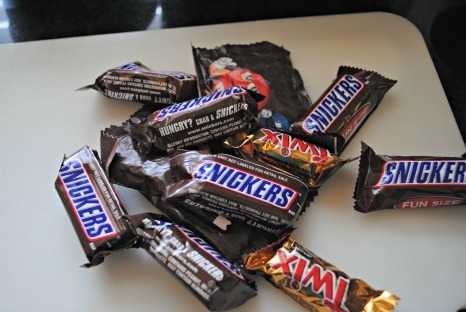
Next, you chop up the candy bars into roughly similar-sized pieces. Smaller is better.

Measure out two cups worth and hopefully you have a little extra for sampling.
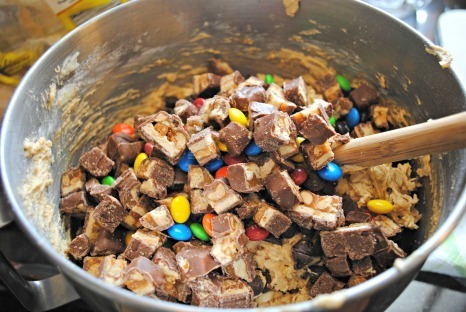
Stir the candy and chocolate chips into the dough. Try not to eat any. I dare you.
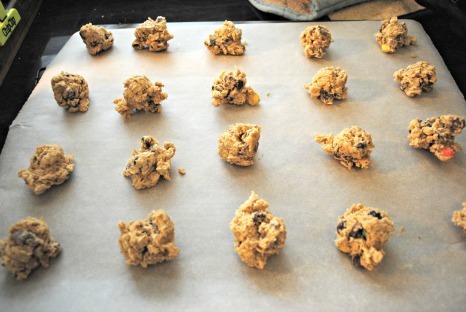
Next, chill the dough for at least two hours or overnight. Maybe go for a walk in preparation of all the cookies you are going to eat. When you are ready to bake, line your cookie sheets with parchment paper and drop cookies by rounded tablespoons about 2 inches apart. Bake until light golden brown.
This recipe makes about 70 cookies so feel free to cut recipe in half, or freeze, or give away to friends and neighbors.
Halloween Candy Cookies
Ingredients
3 cups oats
1 cup flour
1 teaspoon baking soda
1/2 teaspoon kosher salt
1 cup butter, softened
1 cup creamy or crunchy peanut butter
1 cup sugar
1 cup brown sugar, packed
2 eggs
2 teaspoons vanilla
1 cup chocolate chips
2 cups chopped (about 20 fun-size) Halloween candy (I used Snickers, Twix and M&Ms)
Directions
In a medium bowl, whisk together the oats, flour, baking soda and salt. In a large bowl, with an electric mixer beat together butter, peanut butter, sugar and brown sugar until well combined. Add eggs one at a time, and beat until well combined. Add vanilla and mix. With mixer on low speed, gradually add dry ingredients and mix until just combined. Stir in by hand chocolate chips and chopped candy. Chill dough for a minimum of two hours or overnight.
When ready to bake cookies, remove dough from the refrigerator. Preheat oven to 350 degrees F. Line two cookie sheets with parchment paper. Drop dough by rounded tablespoons about 2 inches apart onto prepared cookie sheets. Bake until cookies are light golden brown – about 15-17 minutes. Makes approximately 70 cookies.
Ready to bake more cookies? Check out these delish recipes:
Chocolate Chip Pumpkin Cookies
Chocolate Dipped Coconut Macaroons
Plan B Mom is a mostly-stay-at-home mom of 3 who works from home but sees her main job as managing her family. When she is not taking care of her 13-year old and 11-year old girls, 9- year old son, yellow lab, and husband – she is baking, running, carpooling, or helping with homework. She tries to stay organized to keep life running smoothly – or at least catastrophes at bay. Follow her on Twitter at @PlanBMom.


October 25, 2013
Your Weekly Family Meal Planner
Welcome to the Weekly Meal Planner! Halloween is this week, which means the week is probably just a tad hectic. Let’s keep it simple when it comes to dinners, with a special Halloween-themed meal on Thursday that you can make ahead to enjoy post-trick or treating, plus a snack to tide you over before you head out with the rest of the ghouls and goblins.
Monday

Lunch: Eggplant Parm Grilled Cheese and Tomato Soup. Enjoy a fantastic veggie lunch with an easy homemade creamy tomato soup and a deluxe grilled cheese sammie.
Dinner: Brown Macaroni with Four Cheeses and Cauliflower hits the spot for Meatless Monday – put this together on Sunday and bake on Monday for an easy make-ahead meal.
Tuesday
Lunch: Spring Chicken and Vegetable Soup is warm and satisfying, and the perfect remedy if you’re fighting a fall cold!
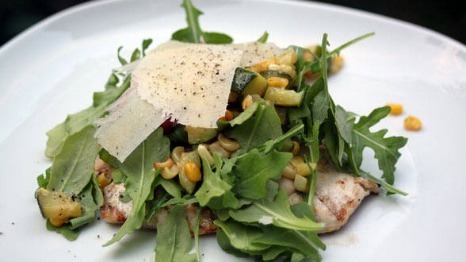
Dinner: Grilled Chicken Cutlets with Zucchini, Corn and Cherry Tomato Sauce. You can enjoy this nutritious, quick and easy summery meal all year round.
Dessert: S’more Bars Part Deux are a blast from the past treat – rice crispie treat meets s’more. Perfect to pack in everyone’s lunch the next day.
Wednesday

Lunch: Grilled Greens Wrapped in Speck with Eggs. Whip up this healthy lunch with romaine and ham for a healthy mid-week lunch.
Dinner: Teriyaki Chicken With Brown Whole-Grain Rice is a kid-pleasing homemade version of a takeout favorite.
Snack: Smoked Eggplant Hummus
Thursday
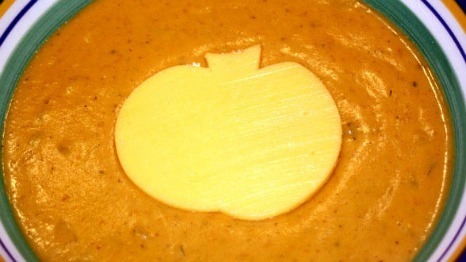
Lunch: Halloween Treats: Spook Up Your Soup! Start celebrating the holiday at lunch with this festive soup presentation.
Dinner: Devilish Sloppy Chicken Mini Sammies. Make the chicken filling earlier in the day and reheat when you are ready for dinner.

Snack: Salsa Cheddar Dip with Witches Hats. Enjoy this snack before you head out for trick or treating.
Friday
Lunch: Spinach Artichoke Ricotta Pie is an impressive and festive lunch. You can make it ahead and serve hot, room temperature or cold.
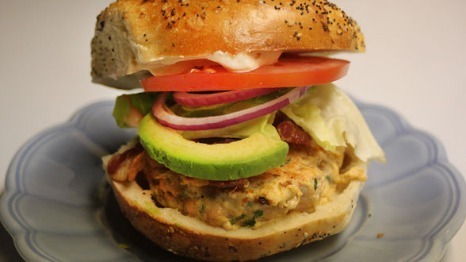
Dinner: BLAST Burgers Bacon Lettuce Avocado Salmon and Tomato burgers with a Sriracha aioli pack a punch.

Dessert: Mini Cookie Cups with Ice Cream are adorable and couldn’t be easier – you use a tube of refrigerated cookie dough!
Saturday

Brunch: Whip up Bacon and Eggs Rachael’s way – with the bacon in the eggs, not along side. Yum!
Dinner: Quick Coq au Vin is perfect for entertaining.
Dessert: Individual Pear Tarte Tatins are the perfect ending to a dinner party. Plus, puff pastry makes it easy but still impressive.
Sunday
Brunch: Make this surprisingly easy Crumb Cake with some fruit on the side for a sweet brunch.

Dinner: Spicy Ziti with Sausage is a warm and comforting Sunday supper.
Dessert: Chewy Brownies are fool proof – chewy and chocolatey!
Halloween Horror: Eyeball Pasta
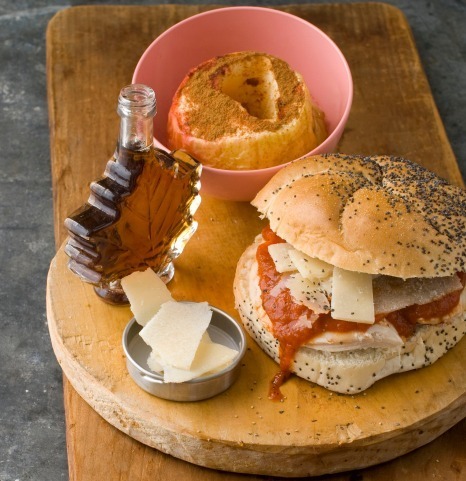
As a parent, I dread Halloween. The evening is filled with jarring looking candies that my kiddies scarf down like there’s no tomorrow. To top it off, it’s also my son’s birthday on the same day – now try saying NO!
I made a phone call to my friend and kidfresh founder Matt Cohen to release my Halloween angst. If anyone knows how to oomph-up meal appeal, it’s Matt – after all he has been making kiddie ’heat and eat dinners’ for years. His solution: Eyeballs and Pasta, A.K.A meatballs and pasta. His idea was not far off from Rachael’s original Worms and Eyeballs recipe, only these are a little more ‘googley-eyed’.
With a few little tricks, this wholesome meal transforms into freaky eyeballs. I did a dummy run to test them on the kids and what a hit! The best part, no fancy artistic skills are required. Just some cooked meatballs that are finished in the oven for a few seconds with small squares of cheese and sliced olives (think iris, pupils and the white part) and tada!
In fact, rally up the kids and have them turn the meatballs into eyeballs – it’s a fun group activity. I plan on making extra, after all, there’s no reason why the grown-ups can’t eat this too.
Recipe For Eyeball Pasta
Ingredients
Meatballs
1lb lean ground beef
½ carrot, grated
1 celery stick, grated
½ onion, finely chopped
¼ cup breadcrumbs
4 tablespoons of parmesan cheese
Salt and pepper to taste
Eyeball
5 Slices of cheese
Pitted olives, cut in to slices across the profile
Sauce
12-ounce jar of marinara sauce
½ a sweet potato, cooked and mashed
Served with
1 lb boiled pasta
Directions
1. Preheat oven to 350 degrees
2. Combine the meatball mixture and form 15 round balls. Sauté until cooked through on a frying pan
3. Cut cheese slices in to 4 squares. Lay a piece on one side of the meatball

4. Place on a sheetpan and in the oven for approximately 3 minutes until the cheese has lightly melted over
5. Remove from oven and stick the sliced olive on the center of the square

6. Heat the marinara sauce with the sweet potato and combine with boiled pasta. Lay the meatballs over the top
More Halloween treats and snacks:
Make your own peanut butter cups for Halloween
Halloween treats: Spook up your soup
Halloween treats: severed hand toast
Saira Malhotra, is of British–Indian descent and is a chef, food writer and cooking instructor based in New York City. She is a graduate of the International Culinary Center in New York City. Come visit her at her food blog: www.passportpantry.com where she shares approachable and international recipes
Images courtesy of Pat Kirkbride
October 24, 2013
7 Fresh Takes on Chicken for Lunch
Imagine a fourth grade boy. Give or take a bit, they tend to clock in around 60 pounds.
I know because I have one and he and his friends tend to trample through the house with alarming regularity.
That fourth grade boy is roughly the amount of chicken the average American eats per year. And just like that boy, it’s growing.
We’ve latched on to chicken as our go-to dinner because it’s cheap, healthy, easy to cook, and versatile — as in, it can be prepared in more ways and cuisines than I care to count.
That’s all great. Except when it comes to the leftovers.
As soon as extra chicken is destined for our (or our kid’s) lunch box, inspiration seems fleeting. We slap it on a sandwich with some cheese, or we chop it and douse it with mayo, then slap it on a sandwich.
Dull! So to help you get creative with your chicken habit, here are seven fresh ideas for making use of leftover bird.
1. Asian Chicken Salad Wrap
Set on having a chicken salad sandwich? Spike your mayo with hoisin and hot sauce, then toss in your chopped leftover chicken. Wrap it in a whole-wheat tortilla and accompany with cucumbers dressed with vinegar, salt and sugar.
For a side, toss purchased broccoli slaw with bottle peanut sauce.
2. Southwestern Chicken Salad

If you’re going to do a chicken salad, make it big and bold with hunks of tomato, avocado and — if you can handle it — some minced jalapenos. Some chopped marinated artichoke hearts would be a great addition.
Dress the whole thing with your favorite vinaigrette (the acid in it will keep the avocado from turning brown.
Want a side? Mix crumbled blue cheese with low-fat sour cream and a splash of hot sauce. Use it as a dip for veggies.
3. Chicken Parmesan Burger
You’ll need to double-fist a couple thermoses for this one, but it’s totally worth it.
Nuke some leftover chicken and toss it with some pasta sauce in a thermos.On the side, pack a burger bun (pop some Parmesan inside the bun). At lunch, just dump the toasty chicken on the bun. Done.
For thermos No. 2, you’ll want to core an apple, then nuke until tender. Put the apple in a second thermos, then sprinkle it with cinnamon and a hefty drizzle of maple syrup. A hot and healthy treat.
Wait! Wait! There’s more
4. Toss leftover chopped chicken with bottled barbecue sauce, then pack it warm in a thermos. At lunch, spoon it onto a roll for barbecue pulled chicken on a bun.
5. Got leftover pasta to go with your leftover chopped chicken? Toss them both with bottle peanut sauce for a quick and easy cold peanut noodle salad.
6. Chicken tacos! Pack wedges of whole-wheat tortillas along with containers of shredded cheese, guacamole, salsa and whatever else you like to dump on your tacos. Pack the chicken cold or in a thermos. Assemble and enjoy at lunch.
7. Chop up cold leftover chicken, then sprinkle it over a bowl of hummus. Season with dried oregano and paprika. Accompany with pita bread for scooping up.
Looking for more lunch ideas? Try these:
8 Stay-fresh tips for apple-tastic lunches
3 Tips to help kids beat the clock at lunch
But Bobby gets to bring fast food for lunch! Why can’t I?
J.M. Hirsch is the national food editor for The Associated Press. He blogs about the trials and tribulations of his son’s lunches at LunchBoxBlues.com. His cookbook, Beating the Lunch Box Blues, is the first to be released by Rachael’s new publishing venture, Rachael Ray Books. Hirsch’s previous books include High Flavor, Low Labor: Reinventing Weeknight Cooking and Venturesome Vegan Cooking. He lives in New Hampshire with his son, wife, and too many cats.
5 Creative Ways to Fix Sticky Situations Around the House
You know those little annoying stickers that ruin your manicure when you try to get them off? Or that jar of jam that no matter how hard you try to twist it off just stays stuck? Well, you don’t have to be annoyed or blue in the face any longer! Here are some simple ways to deal with these ‘sticky situations!’
1. Zippers: Write On!
Whether it’s boots, backpacks, pocketbooks, your wallet or jeans, after a while the zipper can lose its ‘zip’ and get stuck. What it needs is a ‘lil lubrication added to its ‘teeth.’ So grab that ChapStick, petroleum jelly or even a pencil (graphite is an amazing dry lubricant). Rub up and down several times, then clean any residue with a clean cloth!
2. Locks: Take Aim!

Key getting stuck in the lock? Take aim and give your lock a shot of cooking spray. Next, jiggle your keys in the lock a few times and your lock should be good to go! Btw: Cooking spray is also a terrific and quick nail polish dryer!!
3. Labels: Bring Out the Mayo!
I can’t tell you how many nails I’ve ruined trying to peel the price tag off my latest HomeGoods find or new wine glasses. But no longer, since I’ve discovered these mani-friendly alternatives you probably have in your kitchen cabinet:
Mayo: Coat the tag or label with mayonnaise and let it sit for a few minutes. Then use a clean rag to remove the tag. If there’s a little residue left, spritz it with some alcohol to cut the goo and leave the glass, or whatever you bought, sparkling clean.
Vinegar: You can also soak a cloth in white vinegar and let it sit on the label or use good ole baby oil, which will dissolve the residue! For labels on the bottom of glasses, I like to heat the vinegar for 20 seconds in my microwave and then place the stem of the glass in the bowl to remove it.
4. Jars: Anyone for Tennis?

I don’t know about you, but I get so frustrated when I’m trying to open a jar and it won’t budge. I try tapping it on the end of a counter, turning it ‘til I turn blue but it just won’t open.
Then I found a simple solution: Simply take an old tennis ball and cut it in half—carefully, please! I may be the accidental housewife but only as it relates to how I became one. Then slip it over the sealed lid, twist and turn. The rubber inside the tennis ball works as a wonderful grip! BTW if you have a pair of rubber gloves or rubber bands that will work, too!
5. Bubble Gum: Soft as Buttah!
Before you snip those locks and start pulling out your hair when your lil one comes home with some bubble gum in their hair, here’s a tasty solution: Peanut butter …the oilier, the better!
Put some on your toothbrush (yum) and brush the gum-ified area downward until it’s dissolved. Use a little at a time. Shampoo when finito. You and your lil one eating a spoonful or two is up to you!
Looking for more easy and affordable cleaning tips? Try these:
7 Unusual ways to turn kitchen trash into real savings
8 New ways to use lemons around the house
5 Common back to school messes solved
10 New ways to use tennis balls and racquets at home
Bubblegum image courtesy of MRHSFan; Tennis balls image courtesy of Horla Varlan; lock and key image courtesy of dewitt, Flickr.
October 23, 2013
Over-The-Top Homemade Chocolate Pizza is the Perfect Pizza Night Dessert
The next time you are having family make-your-own-pizza night, take the theme right into dessert with this over-the-top chocolate pizza.
Yes, chocolate pizza. It works.
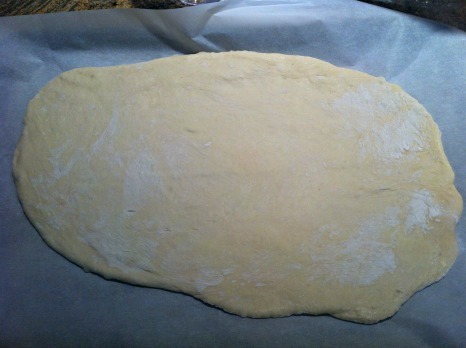
Homemade pizza dough is baked in the oven until it is crispy, then you spread the pizza with some Nutella, sprinkle with chocolate chips, nuts, coconut, whatever you heart desires, and finish it in the oven for a minute or so to heat the toppings through. Fresh dough from the grocery store or your local pizzeria is just fine if you don’t have time to make it yourself. If you’re game to make your own, Rachael’s pizza dough recipe is a good one to try.
This is a terrific hands-on recipe – my kids had a ball. They basically did the entire recipe themselves – start to finish – from rolling out the dough, to spreading the Nutella, to finishing with the toppings of their choice (i.e., a lot of chocolate!).
This recipe is just a starting point – you can definitely make it your own. Divide the dough into smaller individual pizzas so everyone gets their own masterpiece. You can get creative with your toppings. Dried cherries or cranberries would be delicious, mini marshmallows, broken up peanut butter cups – go wild. Use a lot of toppings, or just a few. You can’t go wrong here.
Chocolate pizza is best served immediately from the oven – not that you can expect to have any leftovers.
You start by rolling out your dough on a floured board. Try to get it as thin as you can. I never can seem to get mine thin enough.
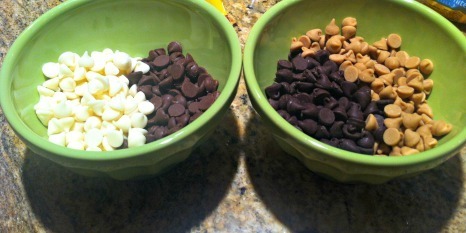
Then you bake the dough on a parchment lined cookie sheet for 15-20 minutes or until light golden brown. Everyone’s oven runs differently, so keep a close eye on your pizza. You can put out your toppings while you are waiting for the pizza to bake – we used peanut butter chips, milk chocolate chips, semi-sweet chocolate chips, white chocolate chips, and coconut.
My daughter was proud of her chocolate chip food styling.
As soon as you take the pizzas out of the oven, spread the Nutella. It should start to melt.

Then sprinkle your toppings and back into the oven for a minute or so.

Serve immediately and enjoy.

Chocolate Pizza
Ingredients
1 pound pizza dough
1/2 cup Nutella or chocolate hazelnut spread of your choice
1/4 cup (or more) each of white chocolate chips, peanut butter chips, milk chocolate chips, semisweet chocolate chips (or toppings of your choice)
1/4 cup (or more) shredded sweetened coconut (or replace with chopped toasted nuts, dried fruit, or other topping of your choice)
Directions
Preheat oven to 425 degrees F. Line two baking sheets with parchment paper. Divide dough in half and roll out into two pizzas on a floured board. Transfer pizzas to prepared cookie sheets and, using your fingers, poke small indentations all over the pizzas to avoid air bubbles. Bake pizzas for 15-20 minutes, or until crisp and light golden brown.When done, immediately remove pizzas from oven but leave oven on. Spread half of the Nutella on each pizza, sprinkle with the toppings, and put pizzas back in the oven for 1-2 minutes, until the chocolate chips just start to melt. Cut into squares and serve immediately.
Other Pizza Night recipes:
Wingless Buffalo Chicken Pizza
Plan B Mom is a mostly-stay-at-home mom of 3 who works from home but sees her main job as managing her family. When she is not taking care of her 13-year old and 11-year old girls, 9- year old son, yellow lab, and husband – she is baking, running, carpooling, or helping with homework. She tries to stay organized to keep life running smoothly – or at least catastrophes at bay. Follow her on Twitter at @PlanBMom.
October 22, 2013
“Week In A Day” Book Tour: See Rachael Ray in a City Near You
Rachael’s newest book “Week In A Day,” the companion to Rachael’s hit Food Network show is out in stores today and to promote it, Rachael will be hitting the road and visiting cities across the country.
Check out the list below to see Rachael in a city near you. We’ll continue to update this list as we have more details.
NEW YORK, NY
Thursday, October 24, 7:00 PM
Barnes & Noble
Union Square
33 East 17th Street
New York, NY
*with J.M. Hirsch, author “Beating The Lunch Box Blues”
Click here for more info
NEW JERSEY
Sunday, October 27, 12:00 PM
Wegmans
Manalapan
55 US Highway 9
Englishtown, NJ 07726
(732) 625-4100
Click here for more info
NEW YORK, NY
Monday, November 4, 7:00 PM
Hudson Union Society
Cornell Club
6 east 44th Street
New York, NY
Click here for more info
AUSTIN, TX
Monday, November 18, 6:00 PM
Book People
603 North Lamar
Austin, TX 78703
Click here for more info
AUSTIN, TX
Tuesday, November 19, 2:00 PM
Texas Conference for Women
Austin, TX
Click here for more info
PHILADELPHIA, PA
Saturday, December 7, 12:00 PM
Wegmans
One Village Drive
King of Prussia, PA 19406
PITTSBURGH, PA
Sunday, December 8, 11:00 AM
Market District
Robinson Market District
100 Settlers Ridge Center Drive
Pittsburgh, PA 15205
PITTSBURGH, PA
Monday, December 9, 12:00 PM
Market District
Bethel Park Market District
7000 Oxford Drive
Bethel Park, PA 15102
CHICAGO, IL
Thursday, December 12
Details to come
Learn more about “Week In A Day” here.
How to Use Up Leftover Potatoes
For my part, I always feel lucky when there are potatoes in the refrigerator. Sometimes they are leftovers: the four or five roasted ones left over from a roast, which somehow nobody got to; a half bowl of mashed, now two days in the refrigerator and beginning to crust over; two big reds, rolling around in the vegetable compartment, enough to take up space but not enough to cook; uneaten Idaho bakers, in whole or part. Whatever form they take, they are in my opinion the easiest to use, the most enjoyable, and the most satisfying kind of leftover.
Since there are so many forms of the loveable tuber, let’s go through them one by one.
Bakers
Bakers are the gift that keeps on giving. The insides are firm enough to eat straight up, but pliable enough that you can make things out of them. Nearly every steakhouse you have ever been to uses bakers for hash browns. They are starchy, so they hold together well; there is more potato to skin than any other potato; and they are obviously easy to cook. There’s an old insult used in kitchens, in fact: “he could screw up a baked potato.”

Use: The best gnocchi I’ve ever eaten were made by Marco Canora, using little but baked potatoes and flour. But as you can see from the video I made about them, they take a lot of time, space, and skill. Since I have none of those three things, I go for hash browns.
You can use any pan for these, but they’re best in a nonstick skillet or, failing that, an old, well-seasoned cast iron pan. Let the potato cool completely; a night in the refrigerator is best. Cut it up coarsely; salt well.
In a medium sized skilled, melt two tablespoons of butter, and slowly saute some coarsely cut peppers and onions. Move them around and allow them to soften. Cut the potatoes up coarsely and add them in, moving frequently so they are coated with butter. Smush the potatoes down with a spatula, set the heat on medium-low, and walk away. 20 minutes later you’ll be able to flip a big brown pancake.
Creamers
Little whole potatoes are too good to shape, smash, or otherwise mangle. Being a brute, I like to eat them cold with a little salt, the way you would eat an apple. My wife’s method is almost as simple minded: she pops them in the microwave for a couple of minutes, and presses them just hard enough to break the skin and puts a pat of butter on top.
Use: If I have time, I like to split them, crush them slightly, and then roast them in copious amounts of olive oil. You can flavor the oil with whatever you want – I like garlic and rosemary. But the main thing is to turn them often and cook them in a hot (450) oven. When they come out, let them cool a little and grate some parmesan on them. This method, more or less, has become wildly popular in New York restaurants, since it was introduced by superchef Michael White.
Mashed
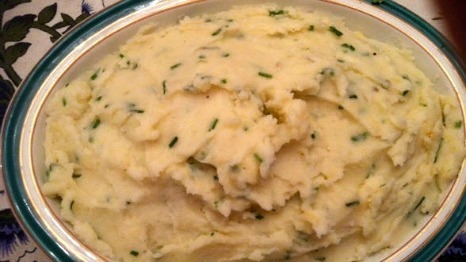
Leftover mashed potatoes are hard to get rid of. I won’t lie to you. There are a bunch of things you can do with them, like rolling them into little balls, breading them, and freezing them into makeshift tater tots. Rachael has a good one for crispy mashed potato pancakes. Other home cooks will use them for shepherd’s pie, or even mousakka. I can’t say than any of these satisfy my primal mashed-potato urges.
Use: Personally, I like to make a kind of creamy pudding with them, mixing in cream cheese or parmesan or even cheddar – really, whatever I happen to have in the house. You need some chopped scallions in there, just for a little color or texture, but there’s nothing more satisfying on a cold day. I actually like these better than fresh mashed potatoes.
Looking for more leftover recipes? Try these:
How to use up leftover chicken and turkey
Rachael Ray’s “Week In A Day” Book is Out Today
We’re excited to share that “Week In A Day,” the companion to Rachael’s hit Food Network show of the same name is available in stores today.
In the book, Rachael shares five seasons’ worth of recipes featured on the show, (more than 250 recipes!), offering her strategies for preparing a week’s worth of meals, for yourself or the whole family, in just one day so you can eat well every day of the week with minimal effort.
You and your family can enjoy up to a full year’s worth of delicious meals with Rachael’s practical tips and shopping lists that will take you through the weeks with as much ease and little work as possible.
Rachael even shows you how to fit all the groceries you need for three fabulous meals into a single bag with her special section, 1 Grocery Bag, 3 Meals. She also provides a list of her Foundation Recipes, recipes that make a big batch of an ingredient, such as poached chicken, that yields a variety of dishes throughout the week!
Learn more and pick up your copy here.

October 21, 2013
Dinner Deal: One-Pot Broken Florentine Lasagna
When I was working in the kitchen at Rachael’s show a few years ago, one of our favorite discoveries was the “broken lasagna.” Sure a wonderfully layered lasagna is a thing of beauty, but what if I want all that flavor and don’t have all the time to put it together? Bingo! Just break it up.
By stirring no-boil lasagna noodles into a prepared sauce and then baking it like a traditional lasagna, you can easily make a meal for a crowd with all the “wow” factor of a traditional lasagna (and a few spare minutes of “you time”).
Making use of some prepared frozen vegetables will make this meal both satisfying and budget-friendly. If you happen to have some around, feel free to stir in some cooked sweet Italian sausage. I mean, it can only help, right?
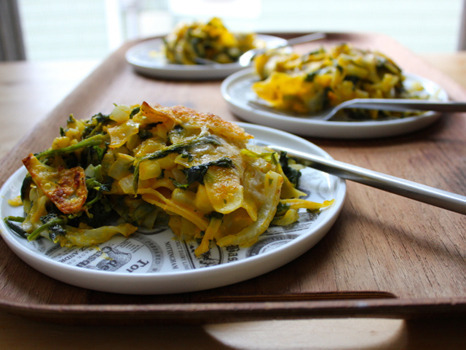
One-Pot Broken Florentine Lasagna
Makes 6 to 8 servings
Ingredients
2 tablespoons butter
2 tablespoons olive oil
1/2 bulb fennel, thinly sliced
1 large onion, chopped
Salt and ground black pepper
2 tablespoons flour
3 1/4 cups milk
2 cloves garlic, grated
1/2 teaspoon freshly grated nutmeg, optional
1 (12-ounce) box frozen cooked squash, defrosted
1 (10-ounce) box frozen chopped spinach, defrosted
1 (8- to 9-ounce) box no-boil lasagna noodles
1/2 cup grated cheese, such as Parmigiano-Reggiano, pecorino or locatelli
Directions
Preheat an oven to 375 degrees F.
Place a large oven-safe pot over medium heat with the butter and oil. Add the fennel, onion and some salt and pepper and cook, stirring occasionally, until the vegetables begin to soften, 4 to 5 minutes. Sprinkle the flour over the vegetables and cook for 1 minute. Add the milk and bring the liquid up to a bubble, stirring frequently. Simmer the sauce until thickened, about 2 minutes.
Remove the pot from the heat and stir in the garlic, nutmeg (if using), squash and spinach. Adjust the seasoning as needed with salt and pepper. Set aside.
Break each lasagna noodle into 4 to 6 pieces. Stir the noodles into the reserved sauce, tossing them well to evenly coat them. Cover the pot with an oven-safe lid or a piece of aluminum foil and bake for 30 minutes. Remove the lid or foil from the pot and sprinkle the cheese over the noodles. Return the pot to the oven and continue baking, uncovered, until the cheese is golden brown and the noodles are tender, 12 to 15 minutes.
Let the finished lasagna rest for 5 minutes before serving.
NOTE: If you have one available, a Dutch Oven is perfect for this recipe. The heaviness of the pot will retain the heat well during baking and, since this is a one-pot meal, will also give you a beautiful dish to serve from.
Looking for more budget meals? Try these:
Cider braised chicken with peppery escarole
Patrick W. Decker’s life revolves around food. Always has, probably always will. As a graduate of The Culinary Institute of America and past member of the culinary teams for Food Network stars like Rachael Ray, Sandra Lee, Marc Forgione, Bobby Deen and Paula Deen, he now works as a food stylist and producer in NYC by day and a food writer and recipe developer at his home in New York’s Hudson Valley by night. You can see what he’s up to by following him on Instagram & Twitter at @patrickwdecker or visiting his website at patrickwdecker.com.
Rachael Ray's Blog

- Rachael Ray's profile
- 296 followers

