
Rachael Ray's Blog, page 49
September 13, 2013
5 Common Back to School Messes Solved
Got stinky lunch boxes, ink stains on your kid’s nice new khaki shorts or bubble gum in their hair? Looks like we moms and dads have our own homework to do! Here’s an easy lesson on how to get rid of them that will save you time and money using items you likely already have in your home.
Stinky lunch boxes: Leftovers hidden in the lunch box side compartment? Pee-yew! First, wipe it out with some dish soap and water, then take out your white vinegar. Soak either a few pieces of bread or paper towels with this multi-tasking household staple and place them in your child’s lunch box overnight to absorb those yucky smells. Baking soda, another household multi-tasker and amazing odor absorber works too if you’re out of vinegar.
Bubble gum: You don’t need to turn your child’s long locks into a short bob! Reach for good ole olive oil. That and a fine tooth comb will break down the gum making it easy to remove. Apply a generous amount to the gummed area and work it in really well. Let it set for 20-30 minutes and feel free to make some dressing for a salad with your child during this time! Then comb through. Depending on how big the wad is, you may need to repeat. Wash hair and enjoy your salad and dressing! FYI: Baby oil and canola oil will also do the job.
Ink stains: Little Liam’s using his nice new khakis to remember his homework assignment? Well fear not, mom! Take aim with your fave styling tool: aerosol hairspray! Place a paper towel under the stain so it doesn’t bleed onto another part of the shorts, creating more work for momma. Saturate the stain with hairspray, which helps to break it up. Next, blot the stain but never rub or you’ll both spread and work the stain into the fabric, making it a more permanent design. And lastly, do not put it in the dryer until the stain is out or it will set it.
Grass stains: Our kids don’t think about sliding or crawling in the grass…and why should they! That’s where one of my favorite cocktail hour ingredients comes in: Vodka! Vodka is made of pure alcohol and has a solvent effect. Put some cheap vodka in a spray bottle and drench, blot, let sit for an hour or so and launder. You can also make yourself a yummy cocktail to celebrate! If you’d prefer to reach into your bathroom cabinet, rubbing alcohol will work too.
Cell phone rescue: Oops. Emma forgot that her cell phone was in her back pocket when she went to the girl’s room (when it should have been in her backpack and turned off during school!). While she has a time out, you can dry her phone out! First off, use a blow dryer on a cool setting to dry out the little openings and plug-in areas. Next, remove the battery and fill a bowl with enough dried rice to totally cover her phone and let it stay in there for at least 48 hours. Grab an old toothbrush and brush away any rice dust.
Have your own solution for back to school messes? We’d love to hear all about it in the comments.


September 9, 2013
3 New Ways to Spruce Up Your Seltzer
At New York City’s Chelsea Market, a really delicious change is happening on the menus of the restaurants that fill the ground floor – they’re making their own sodas. It’s not crazy difficult; it’s just a syrup base mixed with bubbly water. But since they’re making their own, delicious flavors like cherry-vanilla and Thai basil are trumping traditional cola.
You’ve probably got seltzer on-demand on your countertop, right? You can make a simple syrup, too, right? Then you, my friend, are on your way to making soda of your very own.
The three simple recipes below will walk you through how to make your own soda syrup. Generally speaking, 2 tablespoons of syrup stirred into 8 ounces of seltzer is a good ratio to follow. If you like things sweeter, just stir in a bit more. Keep these cooled syrups in an airtight container in the refrigerator for up to 1 week and, whether you’re at home or at the office, you’ll have on-demand soda that you can feel good about drinking at the ready, 24/7.
Of course, should these syrups find their way into a flute of champagne or delicious cocktail, that wouldn’t be the worst thing either. Just sayin’.

BLACKBERRY-VANILLA
In a small pot combine 1/2 cup sugar, 1/2 cup water, 2 cups blackberries, and 4 peels of lemon zest. Bring the mixture to a boil, reduce the heat to medium and simmer for 3 to 5 minutes until thickened. Remove from the heat, stir in 1 teaspoon vanilla extract and let cool. Strain the syrup (pressing the liquid out of the solids caught in the sieve), refrigerate, and use as desired. Makes about 2/3 cup.

STRAWBERRY-BASIL
In a small pot combine 1/2 cup sugar, 1/2 cup water, 2 cups of cleaned strawberries, and 20 torn leaves of basil. Bring the mixture to a boil, reduce the heat to medium and simmer for 3 to 5 minutes until thickened. Remove from the heat and let cool. Strain the syrup (pressing the liquid out of the solids caught in the sieve), refrigerate, and use as desired. Makes about 1 cup.

PINEAPPLE-JALAPENO
In a small pot combine 1/2 cup sugar, 1/2 cup water, 2 cups of crushed pineapple and 1 small sliced jalapeno. Bring the mixture to a boil, reduce the heat to medium and simmer for 3 to 5 minutes until thickened. Remove from the heat and let cool. Strain the syrup (pressing the liquid out of the solids caught in the sieve), refrigerate, and use as desired. Makes about 1 cup.
Patrick W. Decker’s life revolves around food. Always has, probably always will. As a graduate of The Culinary Institute of America and past member of the culinary teams for Food Network stars Rachael Ray, Sandra Lee, Marc Forgione, Bobby Deen and Paula Deen, he now works as a food stylist and producer in NYC by day and a food writer and recipe developer at his home in New York’s Hudson Valley by night. You can see what he’s up to by following him on Instagram at @patrickwdecker or visiting his website at patrickwdecker.com.
September 8, 2013
But Bobby Gets to Bring Fast Food for Lunch! Why Can’t I?
Settling in to a new school year can be exciting. Wrestling with the same old lunch duty dilemmas isn’t. And there’s the problem with back-to-school season.
Year after year, the drudgery of packing lunches for picky kids can wear down even the most creative and enthusiastic parent.
So to help us all get off to a good start, I asked readers for their biggest lunch packing gripes. And the responses overwhelmingly fell into two groups.
The first didn’t surprise me at all. You go to the trouble of packing a healthy lunch, but your kid whines that he’d rather eat the junk food his buddy brought.
But I wasn’t expecting the second one. And I was pretty stupid about that, because it’s one of the biggest challenges I face with my own son. You pack a great lunch, but your kid complains that lunch period is too short to eat the whole thing.
This week we’ll handle Problem No. 1: Coveting thy buddy’s lunch.
Let’s face it… the chocolate-covered deep-fried white bread hot mess your kid’s friend brought for lunch is way more appealing than the nutritious salad with whole-grain croutons that you packed.
This is the reason I always say, leave the green bean battles for dinner.
It’s hard enough to compete with the other kids’ lunches even when you pack foods your child loves. So don’t stack the deck against yourself by packing foods you know your kid is resistant to eating.
Sure, it would be great if all kids ate salads and steamed fish for lunch. But for most of us serving time as parents, that’s just a dream. Save that for dinner, when you’re there to beg, threaten and (sometimes) model good eating habits.
Which doesn’t mean you need to give in to requests for junk food lunches. In fact, as I said in a previous post, I really don’t think kids should get much say in what they bring for lunch. Parents are too busy as it is. We aren’t short order cooks, too.
But there is a middle ground. We all know which foods our kids enjoy. And we all know which of those foods are on the healthier end of the spectrum. Start there.
While I don’t give Parker much say in his lunches, I do try to pack foods I know he’ll get excited about. That’s a balancing act, of course. He’d be excited about all sorts of junk food. But we’re not going there. Packing foods I know he’ll love (bacon! pulled pork! steak carpaccio! sushi!) makes the other kids’ lunches less attractive.
So when your kids whine about wanting what all the other kids have, it’s time to have a chat. Start out with that line that all kids hate to hear… “Every family makes different choices. Our family doesn’t buy (insert whatever junk they are coveting) because (a gentle version of ‘it will rot your teeth and steal your soul’).”
After you’ve broken the bad news that you aren’t buying them any Despicable Monster Planes 2 Lunchtastics Lunch Kits, ask them what sorts of foods they would like in their lunches. Tell them that as long as it’s a healthy choice, you’ll find a way to work with their ideas. As guidance, consider telling the kids to think about their favorite dinners.
The next step is to find ways to make those foods appealing. This is another one of those tips you could follow out the window and down a path to insanity. I don’t believe in carving vegetables into cartoon characters just to make them appealing. Who has time for that?
But those grocery store lunch kits can teach us a thing or two about easy ways to make food appealing to kids. And you can steal those ideas.
Notice that those kits all feature small food. Fact is, kids love bite-sized foods. So go with it. Cut their sandwiches into quarters or strips or whatever. Get mini vegetables (baby carrots, cherry tomatoes, baby bell peppers, etc.).
Most of those kits also are big on DIY. They package a bunch of different foods and leave it to the kids to assemble at lunch. Crackers with a variety of pizza toppings, for example. Kids love getting hands on with their lunches, so let them.
Making them a ham and cheese sandwich? Substitute crackers for the bread, then pack the components separately and let the kids assemble it at lunch. Even a PB&J can be deconstructed this way (pack whole-grain pretzels with small containers of peanut butter and jam for dipping).
None of us should pretend that these tips will turn our kids into angels (but I’ll pay good money for any tip that does). But it should at least make lunch duty a little less onerous.
Next week, Problem No. 2: Who has time to eat lunch?
J.M. Hirsch is the national food editor for The Associated Press. He blogs about the trials and tribulations of his son’s lunches at LunchBoxBlues.com. His cookbook, Beating the Lunch Box Blues, is the first to be released by Rachael’s new publishing venture, Rachael Ray Books. Hirsch’s previous books include High Flavor, Low Labor: Reinventing Weeknight Cooking and Venturesome Vegan Cooking. He lives in New Hampshire with his son, wife, and too many cats.
Image courtesy of Matthew Mead
September 6, 2013
Inspired by Paradise: How to Make the Perfect Satay
This summer I was in Bali. Apart from the island being beyond paradise, one of the things I looked forward to most was meal times. With a cuisine that is heavy-handed with sour, sweet and fiery flavors, getting hooked is the only option!
Balinese food is based on Bumbu, a spice foundation for most of their dishes. Bumbu is the grinding of ingredients that capture the local personality, such as coconut, lemongrass, candlenut and lots of fresh chili. Held hostage by these addictive flavors, I needed to know how to replicate these dishes back home. I muscled my way in to the St. Regis’s Executive Sous Chef Agung Gede’s kitchen and vegetable garden to learn about the food he and fellow Balinese cook at home.

Agung and Me cooking. Photo courtesy of Made Wartawan
He took me through two of Bali’s staples: Satay and Sambal. What classics! Satays are skewered meats and have a presence at most meals whether you order them or not. Chef Agung showed me how to make seafood satay from flaky white fish and shrimp and its characteristic base of pounded lemongrass, lime leaves, turmeric and coconut milk. The skewers were then grilled off over hot coal (Chef Agung blessed me to go ahead and broil them in the oven or sauté on high heat). The satay was superbly moist with flavors of those pounded yummies marching sharply forward .
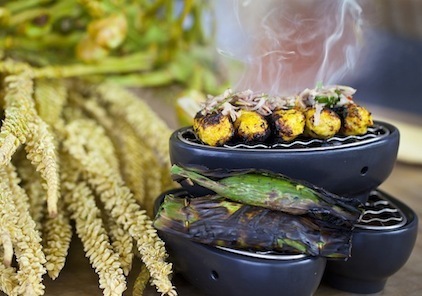
Satay and Seafood Sausage. Photo courtesy of Made Wartawan
Like any Balinese meal, no dish would be complete without Sambal. This dish will give your taste buds a work out as sliced onions and garlic are dressed in bruised- red chili-lime juice and other snappy ingredients. There is a little palm sugar in this dish (that can be substituted with light brown sugar) to provide momentary rescue from that fiery snap.

Sambal. Photo courtesy of Made Wartawan
Adapted From Chef Augung Gede’s Recipes
Ingredients
Base used for Sate ‘Bumbu’
5 ounces garlic, sliced
1 large shallot, sliced
3 ounces ginger, roughly chopped
4 ounces galangal, finely chopped
1/2 ounce turmeric, finely chopped
1 ounce candle nut, chopped (if unavailable, used macadamia)
1 red chili, finely chopped
2 teaspoons shrimp paste
2 teaspoons coriander seeds
1 teaspoon black peppercorns
315 ml cooking oil
1 teaspoon salt
Method
1. Process all ingredients except oil and salt in a blender with enough water to cover ingredients.
2. Heat oil in a wok or heavy pan, add all ingredients. Cook and stir frequently for 15 to 20 minutes until the marinade turns golden and the liquid evaporates. Cool before using.
Sate
Ingredients
1 pound fresh, light, white fish (snapper), ground (your seafood counter can do the grinding for you)
½ pound prawns, ground (your seafood counter can grinding for you)
4 ounces grated coconut
1 teaspoon garlic, finely chopped
1-tablespoon ginger finely chopped
1 red fresh chili, finely chopped
1 tsp. brown sugar or palm sugar (available at local Asian/ Thai grocery store)
2 tablespoons coconut milk
½ teaspoon of shrimp paste (available at local Asian/ Thai grocery store)
Method
1. Combine the shallots, garlic, ginger, chili, grated coconut, palm sugar, coconut milk, lime leaves, shrimp paste, lime juice and salt.
2. Then, add the minced seafood and base genep and mix well.
3. Form the mixture into a sausage link shape around a skewer and cook on a well-oiled pan until crisp and golden or in the oven at 375 degrees for about 12 minutes.

Bumbu mix, courtesy of Made Wadawan
Sambal
Ingredients
2 fresh red chilies, finely sliced
1 lime, Juice and some membranes
4 shallots, finely sliced
Salt
1 stalk lemongrass, finely chopped
1 teaspoon shrimp paste, pan roasted
½ teaspoon salt
Method
Combine all salad ingredients with the squeezed lime to bruise in the essential oils from the lime zest.
Saira Malhotra, is of British–Indian descent and is a chef, food writer and cooking instructor based in New York City. Raised in Hounslow, U.K, or rather ‘Little India’, where the air is aromatic with roasted spices, little did Saira know these moments would follow her from being a student in France and Italy to residing in NYC with her husband and kids and parlay themselves unexpectedly in to a culinary career. She is a graduate of the International Culinary Center in New York City. Come visit her at her food blog: www.passportpantry.com where she shares approachable and international recipes
How to Make the Perfect Satay
This summer I was in Bali. Apart from the island being beyond paradise, one of the things I looked forward to most was meal times. With a cuisine that is heavy-handed with sour, sweet and fiery flavors, getting hooked is the only option!
Balinese food is based on Bumbu, a spice foundation for most of their dishes. Bumbu is the grinding of ingredients that capture the local personality, such as coconut, lemongrass, candlenut and lots of fresh chili. Held hostage by these addictive flavors, I needed to know how to replicate these dishes back home. I muscled my way in to the St. Regis’s Executive Sous Chef Agung Gede’s kitchen and vegetable garden to learn about the food he and fellow Balinese cook at home.
Agung and Me cooking. Photo courtesy of Made Wartawan
He took me through two of Bali’s staples: Satay and Sambal. What classics! Satays are skewered meats and have a presence at most meals whether you order them or not. Chef Agung showed me how to make seafood satay from flaky white fish and shrimp and its characteristic base of pounded lemongrass, lime leaves, turmeric and coconut milk. The skewers were then grilled off over hot coal (Chef Agung blessed me to go ahead and broil them in the oven or sauté on high heat). The satay was superbly moist with flavors of those pounded yummies marching sharply forward .
Satay and Seafood Sausage. Photo courtesy of Made Wartawan
Like any Balinese meal, no dish would be complete without Sambal. This dish will give your taste buds a work out as sliced onions and garlic are dressed in bruised- red chili-lime juice and other snappy ingredients. There is a little palm sugar in this dish (that can be substituted with light brown sugar) to provide momentary rescue from that fiery snap.
Sambal. Photo courtesy of Made Wartawan
Adapted From Chef Augung Gede’s Recipes
Ingredients
Base used for Sate ‘Bumbu’
5 ounces garlic, sliced
1 large shallot, sliced
3 ounces ginger, roughly chopped
4 ounces galangal, finely chopped
1/2 ounce turmeric, finely chopped
1 ounce candle nut, chopped (if unavailable, used macadamia)
1 red chili, finely chopped
2 teaspoons shrimp paste
2 teaspoons coriander seeds
1 teaspoon black peppercorns
315 ml cooking oil
1 teaspoon salt
Method
1. Process all ingredients except oil and salt in a blender with enough water to cover ingredients.
2. Heat oil in a wok or heavy pan, add all ingredients. Cook and stir frequently for 15 to 20 minutes until the marinade turns golden and the liquid evaporates. Cool before using.
Sate
Ingredients
1 pound fresh, light, white fish (snapper), ground (your seafood counter can do the grinding for you)
½ pound prawns, ground (your seafood counter can grinding for you)
4 ounces grated coconut
1 teaspoon garlic, finely chopped
1-tablespoon ginger finely chopped
1 red fresh chili, finely chopped
1 tsp. brown sugar or palm sugar (available at local Asian/ Thai grocery store)
2 tablespoons coconut milk
½ teaspoon of shrimp paste (available at local Asian/ Thai grocery store)
Method
1. Combine the shallots, garlic, ginger, chili, grated coconut, palm sugar, coconut milk, lime leaves, shrimp paste, lime juice and salt.
2. Then, add the minced seafood and base genep and mix well.
3. Form the mixture into a sausage link shape around a skewer and cook on a well-oiled pan until crisp and golden or in the oven at 375 degrees for about 12 minutes.
Bumbu mix, courtesy of Made Wadawan
Sambal
Ingredients
2 fresh red chilies, finely sliced
1 lime, Juice and some membranes
4 shallots, finely sliced
Salt
1 stalk lemongrass, finely chopped
1 teaspoon shrimp paste, pan roasted
½ teaspoon salt
Method
Combine all salad ingredients with the squeezed lime to bruise in the essential oils from the lime zest.
Saira Malhotra, is of British–Indian descent and is a chef, food writer and cooking instructor based in New York City. Raised in Hounslow, U.K, or rather ‘Little India’, where the air is aromatic with roasted spices, little did Saira know these moments would follow her from being a student in France and Italy to residing in NYC with her husband and kids and parlay themselves unexpectedly in to a culinary career. She is a graduate of the International Culinary Center in New York City. Come visit her at her food blog: www.passportpantry.com where she shares approachable and international recipes
September 3, 2013
Cinnamon Chocolate Swirl Streusel Coffee Cake
When it comes to cooking, lately I’ve become the queen of substitutions. No basil? Parsley is fine. No sour cream? I’ll swap in some yogurt. No hot dog rolls? How about a hot dog sandwich?
Adding to that, my kids have become spoiled this summer and a cereal breakfast will not do – they’re accustomed to a hot breakfast. For example, this week we had french toast, pancakes, and eggs. But I’m out of bread and sick of pancakes, so this morning I made this coffee cake that is out of this world. I love a good coffee cake (a little too much!). The delicious aroma roused my kids out of bed (at 9am!) and they were not disappointed. Lots of unprompted “thank you mom”s from all.
Really, how can you go wrong with cinnamon chocolate swirl and streusel topping? And you probably have everything in your pantry to make it too!
Cinnamon Chocolate Swirl Streusel Coffee Cake (adapted from a recipe from “Joy the Baker Cookbook“)
Ingredients
For the streusel topping:
1 1/2 cups sugar
1/2 teaspoon kosher salt
2 cups flour
1 tablespoon ground cinnamon
1 stick softened butter
For the cinnamon chocolate swirl:
1 cup packed brown sugar
1 1/2 tablespoons ground cinnamon
4 teaspoons unsweetened cocoa powder
1/2 teaspoon kosher salt
For the cake:
1 1/2 sticks softened butter
1 1/2 cups sugar
1/3 cup packed brown sugar
2 teaspoons vanilla
3 eggs
3 3/4 cups flour
2 1/2 teaspoons baking powder
1 teaspoon kosher salt
3/4 cup Greek (non-fat or low fat) yogurt
1 1/4 cups milk
Directions
Preheat oven to 350 degrees F. Spray a 9 x 13 pan with cooking spray and coat with flour, or spray with Baker’s Joy.
Make the streusel topping: Whisk together sugar, salt, flour and cinnamon. Add the butter and mix with your hands until the mixture has the consistency of moist crumbs. Set aside.
Make the cinnamon chocolate swirl: whisk together the brown sugar, cinnamon, cocoa powder and salt. Set aside.
Make the cake: Beat together the butter and sugars for about 4 minutes or until light and fluffy using an electric mixer. Beat in vanilla. Add the eggs one at a time, beating well after each addition. In a small bowl whisk together the flour, baking powder and salt and set aside. In another small bowl whisk together the yogurt and milk and set aside. On low speed alternately add the dry ingredients and the wet ingredients, in two additions each (add half the dry, then half the wet, then the remainder of the dry and the remainder of the wet) mixing until just combined after each addition.
Spread half the batter in the prepared pan and top with the cinnamon chocolate swirl mixture. Top with the remaining batter and use an offset spatula to spread the batter. Use a butter knife to gently swirl the cinnamon chocolate mixture. Sprinkle the topping evenly over the cake and bake until it’s golden brown and a skewer comes out clean, 55-65 minutes.
Check out these other delicious coffee cake recipes:
Banana Chocolate Chip Muffins with Streusel Topping
Plan B Mom is a mostly-stay-at-home mom of 3 who works from home but sees her main job as managing her family. When she is not taking care of her 13-year old and 11-year old girls, 9- year old son, yellow lab, and husband – she is baking, running, carpooling, or helping with homework. She tries to stay organized to keep life running smoothly – or at least catastrophes at bay. Follow her on Twitter at @PlanBMom.
Super Special Breakfast: Cinnamon Chocolate Swirl Streusel Coffee Cake
When it comes to cooking, lately I’ve become the queen of substitutions. No basil? Parsley is fine. No sour cream? I’ll swap in some yogurt. No hot dog rolls? How about a hot dog sandwich?
Adding to that, my kids have become spoiled this summer and a cereal breakfast will not do – they’re accustomed to a hot breakfast. For example, this week we had french toast, pancakes, and eggs. But I’m out of bread and sick of pancakes, so this morning I made this coffee cake that is out of this world. I love a good coffee cake (a little too much!). The delicious aroma roused my kids out of bed (at 9am!) and they were not disappointed. Lots of unprompted “thank you mom”s from all.
Really, how can you go wrong with cinnamon chocolate swirl and streusel topping? And you probably have everything in your pantry to make it too!
Cinnamon Chocolate Swirl Streusel Coffee Cake (adapted from a recipe from “Joy the Baker Cookbook“)
Ingredients
For the streusel topping:
1 1/2 cups sugar
1/2 teaspoon kosher salt
2 cups flour
1 tablespoon ground cinnamon
1 stick softened butter
For the cinnamon chocolate swirl:
1 cup packed brown sugar
1 1/2 tablespoons ground cinnamon
4 teaspoons unsweetened cocoa powder
1/2 teaspoon kosher salt
For the cake:
1 1/2 sticks softened butter
1 1/2 cups sugar
1/3 cup packed brown sugar
2 teaspoons vanilla
3 eggs
3 3/4 cups flour
2 1/2 teaspoons baking powder
1 teaspoon kosher salt
3/4 cup Greek (non-fat or low fat) yogurt
1 1/4 cups milk
Directions
Preheat oven to 350 degrees F. Spray a 9 x 13 pan with cooking spray and coat with flour, or spray with Baker’s Joy.
Make the streusel topping: Whisk together sugar, salt, flour and cinnamon. Add the butter and mix with your hands until the mixture has the consistency of moist crumbs. Set aside.
Make the cinnamon chocolate swirl: whisk together the brown sugar, cinnamon, cocoa powder and salt. Set aside.
Make the cake: Beat together the butter and sugars for about 4 minutes or until light and fluffy using an electric mixer. Beat in vanilla. Add the eggs one at a time, beating well after each addition. In a small bowl whisk together the flour, baking powder and salt and set aside. In another small bowl whisk together the yogurt and milk and set aside. On low speed alternately add the dry ingredients and the wet ingredients, in two additions each (add half the dry, then half the wet, then the remainder of the dry and the remainder of the wet) mixing until just combined after each addition.
Spread half the batter in the prepared pan and top with the cinnamon chocolate swirl mixture. Top with the remaining batter and use an offset spatula to spread the batter. Use a butter knife to gently swirl the cinnamon chocolate mixture. Sprinkle the topping evenly over the cake and bake until it’s golden brown and a skewer comes out clean, 55-65 minutes.
Check out these other delicious coffee cake recipes:
Banana Chocolate Chip Muffins with Streusel Topping
Plan B Mom is a mostly-stay-at-home mom of 3 who works from home but sees her main job as managing her family. When she is not taking care of her 13-year old and 11-year old girls, 9- year old son, yellow lab, and husband – she is baking, running, carpooling, or helping with homework. She tries to stay organized to keep life running smoothly – or at least catastrophes at bay. Follow her on Twitter at @PlanBMom.
September 2, 2013
7 Essential Resources for Stress-Free School Lunches
School is back in session and our lunch expert J.M. Hirsch’s new book “Beating the Lunch Box Blues,” published by Rachael Ray Books is out on bookshelves today. To celebrate, we’re rounding up some of our favorite J.M. posts.
Here are seven essential resources for stress-free, quick, simple and affordable lunches.
1 - School is Coming… Time to Gear up - Everything you need to know about lunch boxes, thermoses, food containers and water bottles.
2 - Gearing up for School Lunch Duty - Tips and tricks for packing lunches so they stay fresh and safe.
3 - Strategic Leftovers? 8 Ways to Stay Sane While Packing Lunch - Some dinner leftovers can be repurposed better than others. Here are eight foods that will make that task much simpler.
4 - Lunch Packing Made Easy, One Grain of Rice at a Time - Rice makes for super-strategic leftovers that can become a very simple to make lunch.
5 - The Elvis (and 9 Other Lunch-Friendly Uses for Hot Dog Buns) - Here are 10 really creative and yummy ways to serve lunch on a hot dog bun.
6 - Drink Up! 9 Healthy Choices (Other Than Water) - Here are 9 picks for fun and delicious drink choices you can pack without guilt.
7 - 7 Lunch Duty Lessons I Learned the Hard Way - J.M. shares shares his lunch-time highs and lows.
Pick up your copy of “Beating the Lunch Box Blues” here.
Rachael Ray Books Presents Beating the Lunch Box Blues
We’ve got some exciting news to share. No stranger to cookbooks, Rachael is now publishing talented new authors under Rachael Ray Books, her own book imprint in partnership with Simon and Schuster. Her first book, “Beating the Lunch Box Blues,” by RachaelRay.com contributor and Associated Press Food Editor J.M. Hirsch is out in stores today.
Much like his blog, J.M.’s book offers healthy, fast, easy, affordable and delicious ways to tackle everyday school lunches. With over 200 photos and more than 500 tips and meals, this book is built to inspire and save you time and money.
Here are Rachael and J.M. discussing the book earlier this year:
You can order “Beating the Lunch Box Blues” here and check out J.M.’s blog on Rachaelray.com here.
Late Summer Salad: Tomato, Corn and Avocado
Summer is on its way out and while that makes me sad, I’m definitely enjoying the abundance of fresh produce available to me this time of year. When fruits and vegetables are at the peak of their ripeness I get super excited! I love combining raw, in-season veggies for simple salads to go alongside anything I have cooking up on the grill. In fact, when corn is super sweet, I almost always serve it raw, cut straight from the cob. it’s incredible sprinkled over any of your favorite salads.
This tomato, corn and avocado salad is my new obsession. It’s delicious on it’s own but even better served alongside your favorite protein. Think grilled fish, chicken or steak! The juicy tomatoes pair perfectly with the crunchy sweetness of raw corn which is tossed in a slightly tangy dressing and topped with the smooth butteriness of the avocado. This is definitely a salad you’ll want to make over and over again.
Tomato, Corn and Avocado Salad
Serves 4-6
Ingredients:
1/4 cup red wine vinegar
1/3 cup olive oil
1/2 teaspoon salt
1/2 teaspoon pepper
3 cups cherry tomatoes, cut in half
2 ears corn, raw, kernels removed
1/2 cup basil, torn
1 avocado, cut into 1/2-inch cubes
Instructions:
1. In a small bowl whisk together vinegar, oil, salt and pepper.
2. In a large bowl toss together tomatoes, corn and basil. Pour dressing over top and toss to coat. Top with avocado chunks and serve.
Rachael Ray's Blog

- Rachael Ray's profile
- 296 followers

