Rachael Ray's Blog, page 51
August 22, 2013
Jeweled Salad: Pairing Pears Perfectly
Shivani, who one can always count on to look after both your health and palate, made a most refreshing salad with pears. I am not talking of a garnish, or scant slivers poking through an abundance of leaves, but rather full on diced pairs. Towards the end of lunch, the scene became a little ‘survival of the fittest’ as guests and I wrestled for the last morsels. How could we not? On a hot day surrounded by sizzling meats, this provided for the perfect freshening-up of the mouth and spirit.
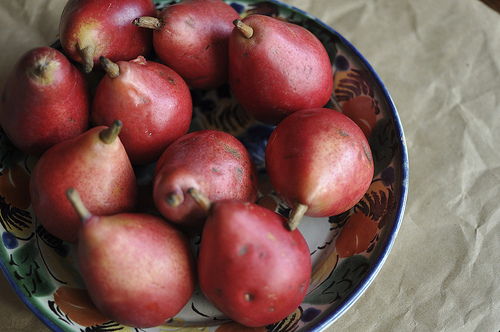
The pears were paired (pun intended) with juicy yellow tomatoes and a handful of arugula leaves thread through this jeweled heap. Just a few simple of ingredients with a huge pay off makes this a welcome addition to any BBQ.
Recipe for Jeweled Pear Salad:
Ingredients
2 cups red-skinned pears, cored and diced with skin on
1 cup of baby yellow tomatoes, halved
Handful of arugula
Sea salt for seasoning and finishing
1 tablespoon good quality Balsamic vinaigrette
Method
1) Combine all the salad ingredients. Adjust for seasoning
Saira Malhotra, is of British–Indian descent and is a chef, food writer and cooking instructor based in New York City. Raised in Hounslow, U.K, or rather ‘Little India’, where the air is aromatic with roasted spices, little did Saira know these moments would follow her from being a student in France and Italy to residing in NYC with her husband and kids and parlay themselves unexpectedly in to a culinary career. She is a graduate of the International Culinary Center in New York City. Come visit her at her food blog: www.passportpantry.com where she shares approachable and international recipes
August 20, 2013
Nobody eats lunch at lunchtime! 11 fast and easy snack ideas
At least that’s what it feels like when you talk to kids these days.
I blame our culture of constant snacking. And the trend of ever shorter lunch and recess periods in schools.
Because when I was in school, snack time was something that happened only in kindergarten. As of first grade, if you got hungry before or after lunch you were expected to suck it up.
And there was no such thing as not finishing your lunch during lunch period. Our lunch boxes were inspected before we could go to recess and we were returned to our tables to finish any lingering crumbs.
My son’s world? His school day is divided by two snack periods in addition to lunch.
I didn’t know how much things had changed. It took me a year to realize he was divvying up the lunches I packed for him into three mini meals.
The poor kid. I wasn’t exactly packing snack time-friendly stuff.
Under the delusion that his entire lunch was eaten in one sitting, I didn’t make it easy on him. Warm pastas and dressed salads, or meatball subs and yogurt parfaits aren’t exactly easy grab-and-go snack items.
Once I understood how things worked, I got much better at including items he could munch quickly and easily.
Truth is, I have it lucky. Children at my son’s school are allowed to access their lunch boxes to get their snacks. This means refrigerated items — such as a yogurt cup or cheese, meat and crackers — are fair game.
But plenty of schools make lunch boxes off limits until lunch. And the means dry or room temp snacks only.
So to help you handle school time snacking like a pro, here’s my list of 11 easy-to-pack, easy-to-eat snack items you can feel good about stashing in your kid’s lunch box.
Popcorn — Even when coated in powdered “cheese,” popcorn still is a whole grain.
Graham crackers — Good straight up, or slathered with peanut butter.
Dried fruit — When possible, aim for low- or no-sugar varieties. And don’t limit yourself to raisins and cranberries. These days you can get everything from mango and papaya to strawberries and dates.
Pretzels — You could do worse than regular pretzels. But you also can do better. Whole-grain and even gluten-free varieties are now common.
Granola — Skip the granola bars; most are jammed with fat and sugar. Instead, go for a healthy low-fat granola with lots of seeds and fruit to eat dry like chips. Just be sure to check the ingredients for nuts if that is a concern at your school.
Baby veggies — Some veggies travel well, even when not refrigerated. Baby carrots, mini bell peppers (left whole) and cherry tomatoes are ideal for popping in a snack container. A sprinkle of salt is nice.
Waffles — Making frozen waffles for breakfast? Toast an extra one. While it’s still hot, sprinkle it with cinnamon-sugar, then pop it in a snack container. Extra credit if you get whole-grain waffles.
Chips — Baked veggie chips and baked tortilla chips aren’t exactly nutritional powerhouses, but they are a respectable snack choice (and lots better than your average potato chip). And don’t forget kale chips.
Rice cakes — No, this isn’t an 80s flashback. They are back and better than before. Many are whole grain and come in tasty flavors.
Cured meats — Seriously. Pepperoni, salami and prosciutto are safe at room temperature. For carnivorous kids this is an easy snack that will fill them up.
Jerky — Another great meaty option. Almost all jerky is low-fat. It’s also naturally high in keep-them-feeling-full protein. And these days it’s available in tons of flavors and varieties, even vegan.
J.M. Hirsch is the national food editor for The Associated Press. He blogs about the trials and tribulations of his son’s lunches at LunchBoxBlues.com. His upcoming cookbook, Beating the Lunch Box Blues , will be the first to be released by Rachael’s new publishing venture, Rachael Ray Books. Hirsch’s previous books include High Flavor, Low Labor: Reinventing Weeknight Cooking and Venturesome Vegan Cooking. He lives in New Hampshire with his son, wife, and too many cats.
August 17, 2013
LUNCH BOX 101: Picking ‘n Packing Tips
Ah yes ‘tis back to school season which means our easy, breezy days of summer turn to crazy, hectic days of hysteria. And, that it’s time for us to pick out our young child’s lunchbox. Will it be Hello Kitty, Iron Man or there fave TV or animal adorning the front this year? Well, before we take them to the store there are some things you should keep in mind to insure their lunch stays fresh and their new lunchbox withstands the tossing, dropping and whatever else they do with it when playtime and the playground call.
Here are some simple tips from pickin to packin them that will help keep your child’s food fresh, and their lunchbox and mani in tact!
READ THE LABELS! MAKE SURE IT’S MADE OUTTA THE RIGHT STUFF The first thing is to only look at lunch boxes and bags that don’t contain the following:
LEAD: it’s toxic and can be easily ingested by your child simply touching it.
PVC: Another toxin that contains lead so again your child can touch it and ingest
BPA: This is a hormone disrupting toxin that has been found in water bottles when they’ve been washed in hot water or left in the heat.
·BEST BETS: Tin, cloth or nylon but again read labels and when in doubt throw it out as a consideration or call the manufacturer.
PUT IT TO THE TEST! Your kiddies are not going to treat their lunchbox with TLC so when selecting try as best you can to test and go for one with most of the following traits:
Separate sandwich shaped compartment
Easy to open and close
Pull tab on zipper
Won’t leak or spill
Easy to pack
Stain resistant
Spot washable and/or machine washable
Can label/print name
Stain resistant
Spot washable and/or machine washable
Insulated: retains hot and cold which leads me to….
CHILL, CHILL, CHILL
Insulation: that’s the biggest problem with lunchboxes since the majority of them won’t maintain a safe temperature of 40 degrees or cooler for two hours which is required to keep perishables from going south. And, though snack time may be an hour or so after our little ones arrive at school lunch is often 2-3 hours post arrival. for more then two hours. Here are a few packin tips ‘n tricks to help keep food fresh and my two Accidental Housewife lunchbox picks!
o FREEZE IT: You can use the traditional ice paks but the following will serve that purpose as well. Freeze the following overnite and by the time they enjoy them at school they’ll be defrosted and refreshing!
Single serve bottles of water
Juice paks
Sliced fruits
Yogurt
Whole fruits like apples, peaches and pears can also be a terrific ‘cooler’ so place them in the fridge overnite and put them in their box or tote!
MY ACCIDENTAL HOUSEWIFE SEALS OF APPROVAL
NEW SCHOOL WINNER!! BEST IN CLASS!!!
DABBAWALLA LUNCH TOTE from GROMMET.COM
My absolute fave since it meets all the safety and general requirements plus goes beyond: keeping food at safe temp for up to 4 hours as you’ll see below!
BTW Dabbawalla is what they call lunchtime food delivery men in India!
1. ECO -friendly: sponge material that’s biodegradable
2. Toxic free
3. No lead, BPA OR PVC
4. Keeps food safe temps up to 4 hours
5. Front load washing machine or hand wash
6. Pull strap/zipper/
7. Lots compartments
8. Natural insulating properties so it’s easy to keep food at safe temperatures for up to 4 hours with just a small ice pack.
NEW SCHOOL WINNER! Best in Chill!
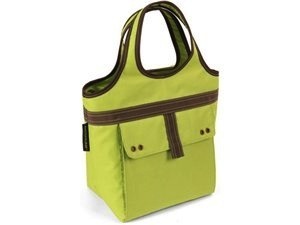
Our very own Rach not only knows how to make yummy lunch box treats but also how to keep food fresh and has created this colorful tote which will keep foods hot or cold for 6-7 hours! Love that moms…this is the one for total peace of mind for food safety! Plus it has:
• High-density thermal insulation with Therma-Flect radiant barrier
• Ultra Safe leak-proof lining with Microban
• Exterior front pocket
• Carry handles
OLD SCHOOL WINNER!!
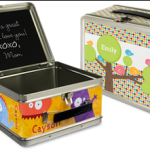
FRECKLEBOX OLD FASHION LUNCHBOX TINS
Their designs are great, they meet the safety requirements, easy to clean, sturdy, doesn’t leak, personalized, maintains chill for two hours or so (but need to include an insulator and my chill tips!!) And, they’re offering a special 20% discount promo on line!
August 16, 2013
3 Step Tandoori Chicken
Tandoori chicken is hugely popular; grown-ups and kiddies alike. There is a layer of attitude on the outside as it hits you with heavy-handed spice and flesh that crackles and chars. Yet the inside is juicy with a murmur of its sharp exterior flavors of cumin, coriander and ginger.
This recipe is a step-by step process to gob-smacking tandoori chicken. The best part: visits to your local specialty store are UNREQUIRED. Unlike most tandoori chicken dishes that use pre-made tandoori seasoning mixes, for this dish we will make our own. Something smoky is key here, so feel free to reach for smoked paprika or ground chipotle powder.
Now, for suggestions to gob-smacking Tandoori Chicken
Ideally it’s best to marinade the chicken for 3-4 hours. There is a tendency to over marinade chicken and some will allow chicken to sit in a rub or marinade for hours on end. The result is often a chicken that is tight and stringy and not very appealing.
Secondly, it is best to use chicken on the bone for maximum juiciness and not small, boneless pieces that shrivel like a prune on grill- contact.
Thirdly, marinating is a quick 2 step process. Open the chickens pours so it can fully absorb flavors by rubbing with salt, ginger and garlic. After an hour, add in the remaining handful of ingredients.
Lastly, when the chicken is ready to be cooked on a hot BBQ/ grill, make sure the surface is well oiled. Shake off the excess marinade as you place on to the rack to avoid excess burning and baste frequently.
*For additional tips on BBQ, reference Josh Ozersky
Recipe for 3 Step Tandoori Chicken
Ingredients
2lbs leg and thighs on the bone, skinless
Marinade
1 tbsp. ginger and garlic, grated
Salt
1 teaspoon coriander powder
¾ teaspoon smoked paprika or ground chipotle seasoning (available in the spice aisle)
1 tablepoon oil
1 tablespoon full fat yoghurt or sour cream
Lemon wedges, to serve
Method
1) Marinade chicken in salt, ginger and garlic. Allow to sit for 1 hour
2) Combine with remaining ingredients and set aside for 2 hours
3) Throw on to hot grill, rotating frequently and basting. Cook for approximately 15-20 minutes until juices run clear. Serve with lemon wedges
Saira Malhotra, is of British–Indian descent and is a chef, food writer and cooking instructor based in New York City. Raised in Hounslow, U.K, or rather ‘Little India’, where the air is aromatic with roasted spices, little did Saira know these moments would follow her from being a student in France and Italy to residing in NYC with her husband and kids and parlay themselves unexpectedly in to a culinary career. She is a graduate of the International Culinary Center in New York City. Come visit her at her food blog: www.passportpantry.com where she shares approachable and international recipes
August 15, 2013
The Thunder Shirt does the trick for calming an anxious dog
My friend has a wonderful, loyal dog - Beatrice - who is kind of a nervous Nellie. She literally guards my friend - her owner - and can be perceived as somewhat aggressive (when she is really anxious) to any non-family member who enters the house or approaches my friend. Beatrice is a barker and bark she does when she is guarding her territory. My friend has had a training expert come to her home on a regular basis and work with her and Beatrice and she has made great strides in training - and calming - her down. One interesting training tip she learned is that Beatrice not only needs regular exercise, but she needs to feel as if she is working, so when they walk, she should carry a pack (obviously a special dog pack, not a child’s back pack). One purchase that she swears by is this Thunder Shirt for dogs. It claims to “apply a gentle, constant pressure that has a dramatic calming effect for over 80% of dogs.”
Whatever it does, it works. We were having dinner recently and Beatrice was on edge so out came the Thunder Shirt and she definitely settled down. I imagine it’s like receiving a constant hug and I know I could use that some days. Plus it’s kind of jaunty and stylish. I think it would also be handy around the 4th of July, parties, and other chaotic events. The price is right - $39.95 at thundershirt.com.
Have you used a Thunder Shirt for your dog or cat? Share your stories here.
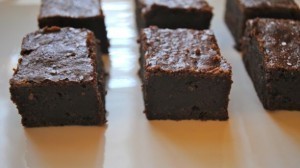
The sweet and salty brownie - a-mazing
Yes, I’m talking about brownies, again. I have been making these sweet and salty brownies from my favorite baking cookbook - Baked Explorations by Matt Lewis and Renee Poliafito - for a few years now and they are show stoppers. The recipes in this book don’t hold back when it comes to dark chocolate, butter, and cream, but the indulgence is worth it. Don’t be scared off by the salt - it makes the brownies (I am all about salt when I am baking to really bring out the sweetness, whether it’s chocolate or fruit).
Whenever I take these brownies to parties, I am inevitably asked for the recipe - it is somewhat involved, but worth the effort. The good news is that they hold up quite well for a few days in fridge so you can safely make them a day or two prior to serving - not that they last that long. My husband eats the caramel right out of the pan.
Sweet & Salty Brownie (adapted from a recipe from Baked Explorations by Matt Lewis and Renato Poliafito)
(click here for printable recipe)
Ingredients:
For the caramel filling:
1 cup sugar
2 tablespoons light corn syrup
1/2 cup heavy cream or half and half
1/4 cup water
1 teaspoon fleur de sel or sea salt
1/4 cup sour cream
For the brownie:
1 1/4 cup flour
1 teaspoon salt
2 tablespoons cocoa powder
11 ounces bittersweet chocolate chips (I use Ghiradelli)
2 sticks butter
1 1/2 cups sugar
1/2 cup packed brown sugar
5 eggs
2 teaspoons vanilla
For the top:
1 1/2 teaspoons fleur de sel or sea salt
1 teaspon coarse or granulated sugar
Directions:
Make the caramel:
In a medium saucepan, combine the sugar, corn syrup and water, stirring carefully to not splash the sides of the pan. Cook over high heat, without stirring, until the mixture is dark amber in color - it happens fast - 6-8 minutes, so keep a careful eye to prevent burning. Remove from heat and slowly add the cream or half and half and salt (it will bubble up and is very hot - be careful). Whisk in the sour cream until smooth (I have used Greek yogurt in a pinch) and set aside to cool.
Make the brownie:
Preheat oven to350 degrees F. Spray with cooking spray a 9 x 13 inch pan, line the bottom with parchment paper, and spray the parchment paper. In a medium bowl, whisk together the flour, salt and cocoa powder. Combine the chocolate chips and butter in a medium micorwave-safe bowl and melt in microwave, checking and stirring often to avoid scorching. When melted and smooth, immediately add both sugars and whisk until smooth. Add three of the eggs at once and whisk until just combined. Add the remainging eggs and whisk until just combined. Add vanilla and stir. Do not overbeat - this will make a cakey brownie. Add the flour mixture and fold with a rubber spatula until just combined.
Pour half the brownie mixture into the prepared pan and smooth so it covers the bottom of the pan. Drizzle about 3/4 cup of the caramel sauce (you will have a lot left over - enjoy with ice cream) over the brownie layer in a zig zag pattern, avoiding the edges of the pan to prevent the caramel from burning. Spread the caramel evenly over the brownie layer with an offset spatula. Scoop the rest of the brownie batter over the caramel layer and smooth gently with an offset spatula. It doesn’t have to be perfect - some caramel may peek through!
Bake the brownies for 30 minutes or until a few moist crumbs stick to a toothpick stuck in the middle. Remove brownies from the oven and sprinkle with the salt and sugar. Cool brownies completely before serving - I like them stored in fridge and served cold, but they are great room temp as well. These freeze well, wrapped individually in plastic wrap.
August 14, 2013
Beauty Flashback: Looks We Never Thought We’d See Again
There are plenty of beauty looks we’d rather leave in the past: Blue eyeshadow, perms, blue rinses. But in the world of beauty and fashion, everything comes back around again. We’ve been noticing plenty of looks back on the streets (and the catwalk) in the past few months, and we never thought we’d see them back again! Check out some of the most shocking below!
The Perm
While images of crazy poodle-hair perms may still haunt us, a textured wave today is a super chic look. A little less crazy, a little more defined, the perm is back in vogue.
Blue Eyeshadow
We all know never to pair blue eyeshadow with frosted pink lipstick (thanks to the 80’s!), but the past few fashion seasons have seen blue eyeshadow make a comeback! The trick is to use colored mascara or faint blue eye liner as opposed to covering your entire lid.
The Blue Rinse
It used to be that only your Grandma dyed her hair blue and violet, but coloring your locks has never been more popular. From Katy Perry to Kelly Osbourne, grandma hair color shades are making a comeback!
Happiness is a $14 Truffle
Truffles, I always assumed, were a luxury good reserved for the few and the lucky, gastrocrats and princes. These rare mushrooms fetch vast sums in the world’s top restaurants, and you are lucky to get a few small shavings if you pay top dollar at the best restaurant in town. They are fetishized and slavered over, like some kind of cross between black pearls, caviar, and cocaine. I like them - they are delicious and they smell great - but it never would have occurred to me to buy one.
But then I did. Today. And my dinner was easy, and cheap, and magnificent.
It rained today. I couldn’t grill. But! I had just gotten paid. One of those brief and unpredictable moments of bliss; you know how it is. And so I wandered out from the Rachael Ray.Com world headquarters, and over to Eataly, the Italian food superstore a few blocks away. Eataly has products you never even knew existed, thousands of them, and they are all expensive. But I thought I would get some stuff for dinner: some burrata. A good tomato. Some spaghetti. Little semi-dried tomatoes in a jar. A piece of cheese. Like that. But I also bought, on a whim, some little goat cheese ravioli. And I noticed, nearby, some black summer truffles, prices at something like 90 cents a gram. I don’t know how much a gram is, but I know how much 90 cents is. So I had them weigh the smallest one, and it cost 14 dollars. 14 dollars!
14 dollars won’t buy you a large Domino’s pizza. It won’t buy a bucket of Kentucky Fried Chicken. You can’t go to the movies for $14, not in New York, anyway. And here I was in possession of this ultimate luxury good for that sum. And I realized, all at once, that it wasn’t an ultimate luxury good, but just a mushroom, and than it would taste really good grated on top of some goat cheese ravioli, or fresh fettucini, or, really, anything. So I took my truffle and came home, and I made dinner for Danit. It might have been the easiest dinner I’ve ever made; certainly it was one of the happiest and most relaxing. I threw the ravoli in boiling water for three minutes, then tossed them in a bowl with some butter, and grated half the truffle over them. That’s it. It was exactly the same bowl of ultimate luxury pasta you get in a three-star temple of gastronomy, but you could eat it with your wife at the kitchen table with chopsticks. The key was the grate, grate, grate that truffle up. Because, 1, truffles are something you have to use a lot of; otherwise they lose their punch. They have to be used in profusion. They are mushrooms, you know? And half of this truffle, which produced a LOT of flavor and looked wonderful and smelled even better, literally cost me $7. I can’t get over it.
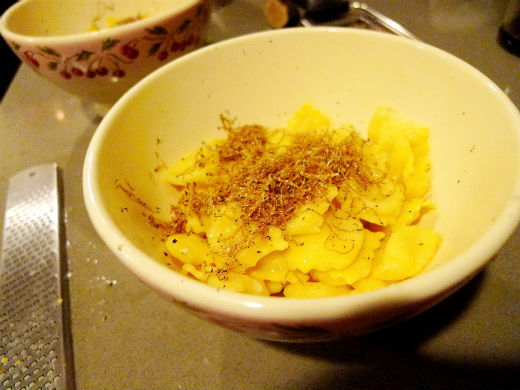
Cost: less than a pizza.
If you want to get on board with this, here are a few tips.
1. There are several places that sell truffles online, and a lot of specialty markets carry it too. It’s better to buy it a market if you can. You need to smell it. The smell is everything.
2. If you do buy a truffle, it should be whole, relatively fresh, and should come wrapped up in some tissue. It shouldn’t be in a bottle, or come in oil form, or as some kind of truffle spread. There are a million ways to rip you off when it comes to truffles. That truffle butter is good, but it uses the shittiest truffles and as little of them as they can get away with. The oil is even worse; it’s not even made from truffles; it’s an artificial chemical solution meant to taste like truffles. It’s a test-tube hamburger, a fraud, and it tastes weird to me.
3. There are a lot of diffent kinds of truffles and only a few of them are really good. The ones that you read about people paying 25 thousand dollars for are white Alba truffles from the Italian piedmont. Or not - nobody knows where they really come from. I think a lot of them are Serbian. They show up for about ten weeks, from late October to about Christmas. Then there are black truffles - perigord ones from France in winter, and Umbrian ones from Italy in summer. These were the ones I got, which is why I could afford them. There are some great black truffles coming out of Australia now too. Don’t get truffles from China or the Punjab. Trust me on this.
4. Never cook truffles. They are purely for putting on top of things. They lose their mojo minutes after being cut or grated, so wait until you are just about to eat before grating them. (It’s also more dramatic.)
5. Truffles, white or black, are best used on things that are rich and soft and delicate, like soft-scrambled eggs or creamed corn or fettucini alfredo. You don’t want to put them on things that taste good without them, like tomato sauce or steak or pizza. They need to be the star of the show. I didn’t even grate any parmigiano reggiano on my ravioli! And the reason is, that it’s all about the truffles.
6. Don’t hang on to them too long. They don’t keep. You need to use them, profusely, with an open heart and a heavy hand. If you start thinking too much about their value, they will have no value at all.
August 13, 2013
Gearing up for school lunch duty (Part 2)
Back-to-school season is barreling down upon us. And for kids who bring their lunches, shopping for supplies includes stocking up on the gear needed to pack safe and delicious lunches.
Last week, I covered the basics of getting the goods you’ll need. You can find the full details here, but the short version is: lunch box, food containers, thermoses and water bottles.
But stocking up on supplies was the easy part. Now you have to use them.
One of the most common questions I get over on my blog about the lunches I pack for my son — LunchBoxBlues.com — is how to pack lunches so they stay fresh (and safe).
So here’s my quick and easy class: Lunch Packing 101.
STAY COOL
We may still sometimes refer to it as “brown bagging,” but the reality is almost nobody uses brown bags to pack lunches anymore. They tear easily, are wasteful and — most importantly — aren’t insulated.
Safe lunch packing starts there — use an insulated lunch box. Even if you never pack items that need to be kept cold, an insulated bag better protects the food during transport (particularly when we’re talking about children, who aren’t known for being careful as they carry their lunches).
And even foods that don’t technically need to be kept cool still benefit from it. Even the humble PB&J. The bread stays fresher, the jam is less likely to ooze, etc.
Plus, being able to pack chilled items opens up way more possibilities when making lunch, particularly when it comes to using up leftovers (something that will only make your morning packing routine easier). My son often takes leftover steak, chicken or pork, none of which would be possible without an insulated bag.
ICE, ICE BABY
A small, reusable ice pack makes everything easier. When combined with an insulated lunch bag, an ice pack allows you to safely pack yogurts, meats, eggs, dips (such a hummus), and anything else that needs a chill.
I prefer rigid ice packs (the ones made from hard plastic) rather than soft (the ones that look like bags). The soft ice packs can freeze in odd, hard-to-pack shapes.
As with most lunch gear, it’s good to have two. This way when your kid forgets his at school or leaves it in the car, you still have one ready to go in the freezer.
Another benefit of the rigid ice packs is that they are easy to wash in the sink. For reasons I don’t quite understand, my 8-year-old seems incapable of eating lunch without getting food all over the ice pack.
Don’t feel like dealing with ice packs? One workaround is to pack a water bottle (it needs to fit inside the lunch box and it cannot be an insulted bottle) filled with equal parts ice and water. It will get the job done.
PRIMED AND READY
Thermoses are wonderful for packing both hot and cold ingredients. Think steaming hot chili or chicken soup, or a frosty fruit smoothie. But there are a few things you need to know about them.
A thermos works best when primed — that is, either heated or chilled before the food is added to it.
When packing hot foods, simply fill the thermos with hot water for about 5 minutes before you add the food. Then just dump out the water and add the lunch items.
When packing cold foods, just pop the empty thermos in the freezer for a few minutes before adding the food.
DO THE MATH
These days, quality thermoses are labeled to include a thermal rating. This indicates how long the thermos can safely keep foods hot or cold. This is important information for food safety.
To be safe, perishable foods need to be stored either below 40 F (for cold foods) or above 140 F (for hot). Once the food falls outside those ranges, it is safe to eat for another two hours.
So let’s say you have a thermos that is rated to keep foods hot or cold for 4 hours. You pack a hot chili in it at 7 a.m. It will be safe to eat until until 2 p.m. (the four hours the thermos is rated for, plus the two-hour grace period).
So when shopping for a thermos, first do the math. Figure out what time the lunch is going to be consumed. Then figure out what time you typically pack it. Now do the math. The difference between those times tells you how long your thermos needs to maintain the proper temperature.
SEPARATION ANXIETY
Another common question I get is how to pack hot sandwiches so that the warm (and usually moist) fillings don’t turn the bread to mush by lunch.
Easy! Pack the sandwich fillings separate from the bread and let Junior assemble it himself at lunch.
For example, I often pack barbecue pulled chicken sandwiches for my son (it’s a great way to use up leftover chicken). I heat up the chicken and pop that in a thermos. I pack a bun or other bread on the side and include a fork or spoon. At lunch, he makes the sandwich fresh for himself.
Another trick to keeping bread from getting soggy is to coat it with a bit of fat. So say you were packing a tomato and turkey breast sandwich, but didn’t want the juice of the tomato to moisten the bread. A smear of something fatty (mayonnaise or olive oil are ideal) on both pieces of bread will create a barrier to the moisture.
GOT QUESTIONS?
Got burning lunch packing questions? Post them in the comments here and I’ll answer them next week!
J.M. Hirsch is the national food editor for The Associated Press. He blogs about the trials and tribulations of his son’s lunches at LunchBoxBlues.com. His upcoming cookbook, Beating the Lunch Box Blues, will be the first to be released by Rachael’s new publishing venture, Rachael Ray Books. Hirsch’s previous books include High Flavor, Low Labor: Reinventing Weeknight Cooking and Venturesome Vegan Cooking. He lives in New Hampshire with his son, wife, and too many cats.
August 12, 2013
Pickle Time!
Every year I grow cucumbers in my garden and I think they are my favorite veggies to grow because no matter what, they grow in abundance. I try tomatoes, eggplant, cauliflower, berries, herbs and more every year and typically some things grow and others do not. I have been gardening now for years and I still have not mastered it. But those good ‘ole cukes are foolproof. They make me feel like I do something well! Here’s a tip if you decide to grow cukes-buy either a trellis or a few ladders so you can raise the cucumber vines off the ground. If you leave them on the ground, they will grow and snake, much like a squash plant, and the cukes could rot if kept so close to the ground, or eaten by bugs and worms.
Once you prop up your plants, you will see that you don’t need to have a green thumb to grow a bounty of cukes. Every day when I walk into the garden, there are literally 2-3 full grown cukes waiting to be picked, when the day before I may have barely seen them.
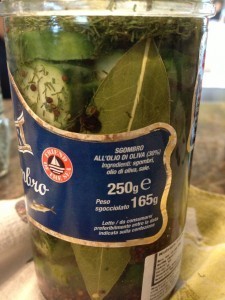
My son, the picky eater, eats them whole like they were doughnuts. Score. Today I decided to take half of my just picked bunch and make dill pickles. I love them and would rather make them myself than to buy them in the store. I got a little carried away and decided then to make bread and butter pickles and then to pickle jalapenos, also from the garden. All easy, all economical, and they all keep in the fridge for a long while.
I don’t do anything buy the book so this may not mirror a recipe you will find anywhere else - usually a recipe will tell you to mix the seeds and spices with the liquids first and then pour the mixture over the sliced cukes for even distribution but I didn’t do that. Just a warning.
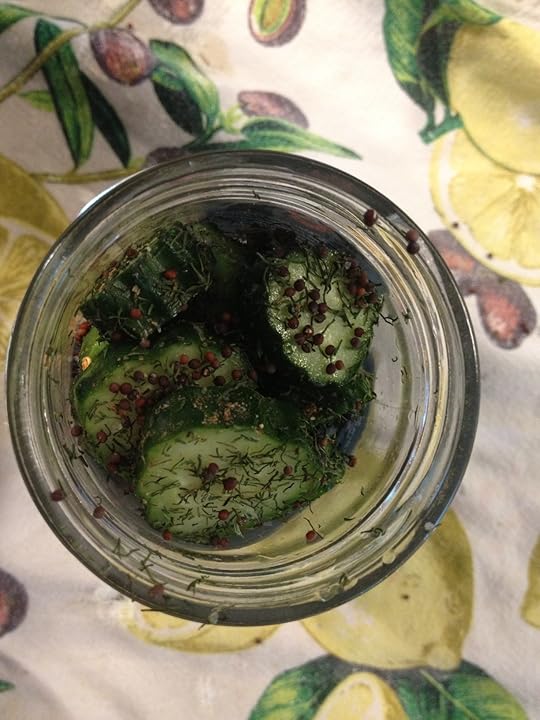
What I did do was to slice my cukes (you could make spears too) and shove them into a glass jar until it was jam packed. Once I saw how many I was going to use, I took them out and put them into a bowl and tossed them with kosher salt (about a tablespoon), whole black peppercorns, coriander powder (a pinch), two tablespoons minced fresh dill and whole mustard seeds. After evenly coating the slices, I put everything back in the jar and added sliced garlic and a bay leaf, then filled the jar with 1/2 white vinegar and 1/2 warm water. Put the lid on tightly, shook it up and tucked it into the fridge.
I was happy about my dills but wanted some bread and butter pickles too so I set about to make this recipe from Rachael Ray, but with a slightly different twist. In this case a sweetener is needed but I don’t like using sugar, so I opted for honey, which worked just great.
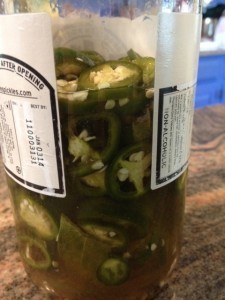
Last, I decided to pickle jalapenos. I love jalapenos on their own, but sometimes they are too strong for me so pickling them not only mellows them out slightly, but it keeps them for months in the fridge. I stole this recipe from Gweneth Paltrow’s new book, It’s All Good, and have found these to be a great flavor blast to anything from sandwiches to salads to tacos of course. I am addicted to these babies! Let’s see if I can remember what I did:
I sliced a bunch of jalapenos and stuck them in a glass jar, seeds and all. In a small pot, I boiled coriander seeds, black peppercorns, a tablespoon of salt, white wine vinegar and a little water and shut it off as soon as it boiled. I poured the liquid so it covered the peppers, then sealed it tight and stuck it in the fridge. She says to give it a week before eating but in the three times I have made this, I have never waited more than a day or two!
Rachael Ray's Blog
- Rachael Ray's profile
- 296 followers


